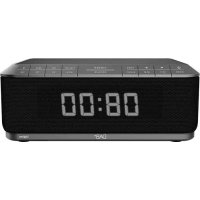
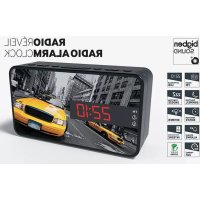
PS1AC - Alarm clock radio BIGBEN - Free user manual and instructions
Find the device manual for free PS1AC BIGBEN in PDF.

User questions about PS1AC BIGBEN
0 question about this device. Answer the ones you know or ask your own.
Ask a new question about this device
Download the instructions for your Alarm clock radio in PDF format for free! Find your manual PS1AC - BIGBEN and take your electronic device back in hand. On this page are published all the documents necessary for the use of your device. PS1AC by BIGBEN.
USER MANUAL PS1AC BIGBEN
RADIO-RéVEIL AVEC EFFETS LUMINEUX

MODE D'EMPLOI
LISEZ COMPLETÉMENT CE MODE D'EMPLOI AVANT D'UTILISER CET APPAREIL ET CONSERVEZ-LE POUR VOUS Y RÉFÉRER ULTÉRIÉTUREMENT
Table des matieres
Waterloo Office Park/Batiment H
Drive Richelle 161 bte 15 1410 Waterloo, Belgium
Bigben Interactive NEDERLAND b.v.
BELGIQUE, customerservice@bigben-interactive.be
NEDERLAND, customerservice@bigben-interactive.nl
ESPANA, sat@bigbeninteractive.es
ITALIA, support@bigbeninteractive.it
www/bigben.eu
PS1AC
DUAL ALARM CLOCK WITH LIGHT EFFECTS

OPERATING INSTRUCTIONS
PLEASE READ THIS USER MANUAL CAREFULLY BEFORE OPERATING THIS UNIT AND RETAIN FOR FUTURE REFERENCE
Contents
Getting Started 1
Safety and Notice 1
Care for your product 2
Care of the environment 2
General Description 3
Control List 3
Contents
3
Display
4
How to Use 4
6
Getting Started
- Remove the appliance from the box.
- Remove any packaging from the product.
- Place the packaging inside the box and either or dispose of safely.
Safety and Notice
Read and understand all instructions before you use this product. If damage is caused by failure to follow the instructions, the warranty does not apply.
Safety

Warning
- Never remove the casing of this apparatus.
- Never lubricate any part of this apparatus.
- Never place this apparatus on other electrical equipment.
- Keep this apparatus away from direct sunlight, naked Fames or heat.
- Never look into the laser beam inside this apparatus.
- Ensure that you always have easy access to the power cord, plug or adaptor to disconnect this apparatus from the power.
- Ensure minimum distances of 10 cm around the apparatus for sufficient ventilation.
- Ventilation should not be impeded by covering the ventilation openings with items, such as newspapers, table-cloths, curtains, etc.
- No open flame sources such as lighted candles should be placed on the apparatus.
- Attention should be drawn to the environmental aspects of battery disposal.
- The apparatus is intended for use in moderate climates.
1) Read these instructions.
2) Keep these instructions.
3) Heed all warnings.
4) Follow all instructions.
5) Do not use this apparatus near water.
6) Clean only with dry cloth.
7) Do not block any ventilation openings. Install in accordance with the manufacturer's instructions.
8) Do not install near any heat sources such as radiators, heat registers, stoves, or other apparatus (including amplifiers) that produce heat.
9) Protect the power cord from being walked on or pinched, particularly at plugs, convenience receptacles, and the Point where they exit from the apparatus.
10) Only use attachments/accessories specified by the manufacturer.
11) Use only with the cart, stand, tripod, bracket, or table specified by the manufacturer or sold with the apparatus. When a cart is used, use caution when moving the cart/apparatus combination to avoid injury from tip-over.
12) Unplug this apparatus during lightning storms or when unused for long periods of time.
13) Refer all servicing to qualified service personnel. Servicing is required when the apparatus has
been damaged in anyway, such as power-supply cord or plug is damaged, liquid has been spilled or objects have fallen into the apparatus, apparatus has been exposed to rain or moisture, does not operate normally, or has been dropped.
14) Apparatus shall not be exposed to dripping or splashing.
15) Do not place any sources of danger on the apparatus (e.g. liquid filled objects, lighted candles).
16) Where the MAINS plug (or AC/DC adaptor) or an appliance coupler is used as the disconnect device, the disconnect device shall remain readily operable.
17) Make sure there is enough free space around the product for ventilation.
18) Batteries (battery pack or batteries installed) shall not be exposed to excessive heat such as sunshine, fire or the like.
19) The rating label is placed on the bottom side of apparatus.
Care for your product
1) Always unplug the appliance when not in use and before cleaning.
2) Do not use this unit in wet or damp conditions.
3) Always disconnect the unit from the mains power supply before cleaning. Clean the appliance with a dry cloth. Do not use abrasives or harsh cleaners.
Care of the environment


EU and Turkey only
Your product is designed and manufactured with high quality materials and components, which can be recycled and reused.
When this crossed-out wheeled bin symbol is attached to a product it means that the product is covered by the European Directive 2002/96/EC. Please inform yourself about the local separate collection system for electrical and electronic products. Please act according to your local rules and do not dispose of your old products with your normal household waste. Correct disposal of your old product helps to prevent potential negative consequences for the environment and human health.
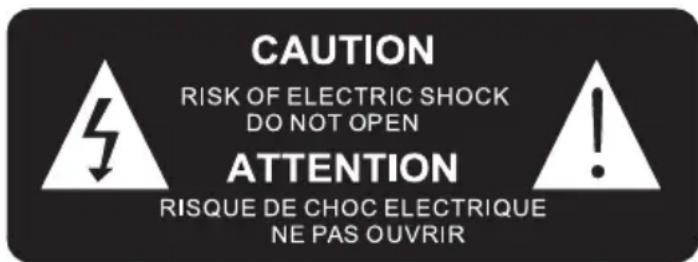
The lightning symbol inside an equilateral triangle warns the user of the presence inside the product of uninsulated hazardous electric voltages powerful enough to represent an electrocution risk.
Power

CAUTION
- Risk of product damager! Make sure that the power voltage corresponds to the voltage printed on the back label.
- Risk of electric shock! When you unplug the AC power cord always pull the plug from the socket. Never pull the cord
- Before connecting the AC power cord, ensure you have completed all other connections

Place the unit in the desired position and the AC Adaptor into the supply socket and switch on, if applicable.
Contents:
1 x Playstation inspired Alarm Clock
1 x AC Adaptor
1 x Instruction manual
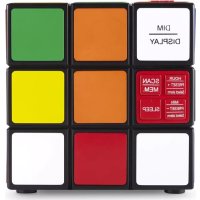
General Description
1) An LED Alarm clock with light feature
2) 2 × Alarms for daily, week day and weekend wake up
3) An SDR for an important Alarm event
4) NAP timer
5) Snooze feature
Control List
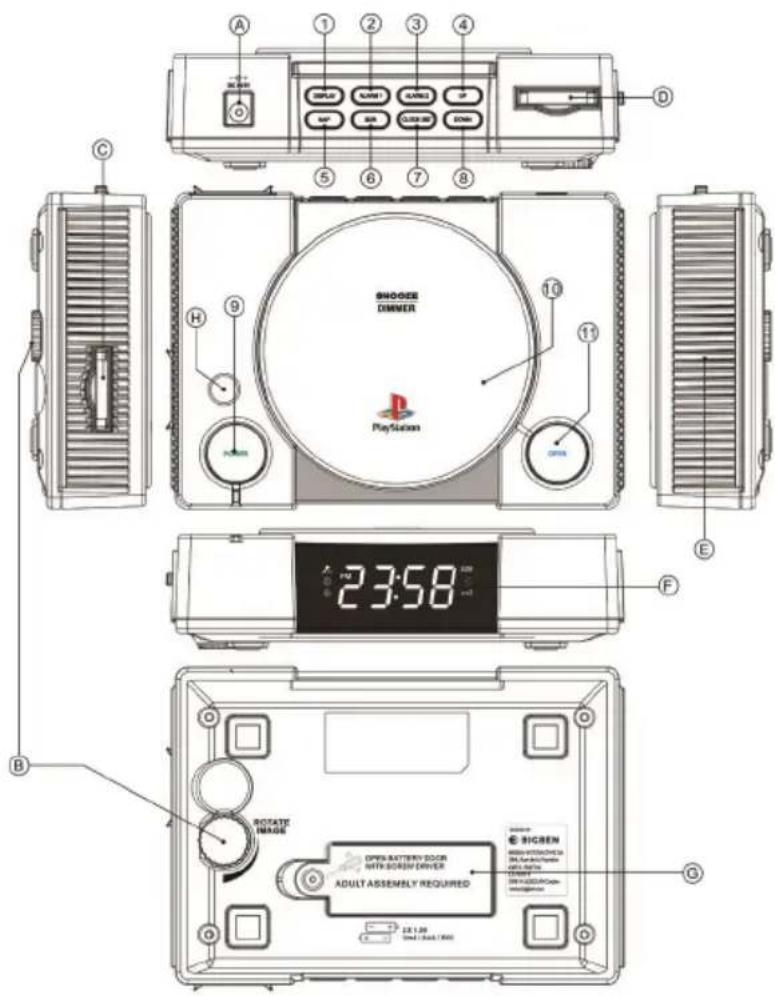
Control button
1) Display -- press to show the date, month and Year
2) Alarm 1-- setup Alarm 1
3) Alarm 2-- setup Alarm 2
4) Up—increase the value
5) NAP--NAP timer On/Off
6) SDR-- Special day reminder, per year
7)Clock Set—Setup Clock
8) Down—decrease the value
9) Power - Light On/Off
10) Snooze | Dimmer - press for Snooze when the alarm is active, and press to reduce the brightness of the time display (when the alarm is not active)
11) Open - Alarm Off
Other
A. DC input
B. Light effect rotation
C. Slide slot
D. Slide storage compartment
E. Speaker
F. LED clock display
G. Backup battery compartment
Display

| 1 Main Digit |
| 2 Special Date Remainder |
| 3 Nap |
| 4 Snoze |
| 5 Alarm 1 |
| 6 Alarm2 |
| 7 Light Effect |
| 8 PM indicator |
How to Use
1) Setting the Clock
1.1: Press the Clock Set' button and the display will show '24H' for a 24 hour time format. If you want a 12 hour time format then press theUp' or Down' button to select it. When you have chosen between 12 & 24 press theClock Set' button again and the first two digits, of the display, will flash. Press Up' orDown' to select the HOUR. Press Clock Set' again and the second two digits will flash. PressUp' or `Down' to select the minute(s).
Continue to press 'Up' or 'Down' to set the year, then press 'Up' or 'Down' to set the "day-month", When you have chosen, press the 'Clock Set' button again to store your selection.
2) Setting the Alarm
2.1: Press the 'Alarm 1' button. The display will go show 00:00 and the first two digits will flash. Press 'Up' or 'Down' to select the HOUR. Press the 'Alarm1' again and two digits will flash. Press 'Up' or 'Down' to select the minute(s). Press the 'Alarm1' button again to select alarm sound. The display will show 'S-1' and you will hear the alarm 'chime'. Press 'Up' and the display will show 'S-2' for you to hear the alarm 'chime'. Press 'Up' again and the display will show 'S-3' & you will hear the alarm 'chime'. Press 'Up' again until you have selected your desired 'chime' and press the 'Alarm1' button to store your selection.
2.1.2 When we set up the alarm, projection function will be off.
- Long press "Alarm 1", the display will show 00:00.
Press "UP / Down" to set the Hour. Press "Alarm 1" to confirm the Hour
Press "Up/ Down" to set the minutes. Press "Alarm 1" to confirm the minutes.
- Unit will go to sound output selection. Screen will show 3 music "S-1, S-2, S-3" for users to select.
Press "Alarm 1" to confirm the music. Screen will show the selected song.
Unit will go to sound level selection. Press "Up/Down" to adjust the alarm volume & "Alarm 1" to confirm.
- Unit will go to projection On/Off section. Press "Up/Down" to select the projection On(P O) or CLOSE(P C).
When "On" is selected, alarm will ring at the selected time together with projection.
When "CLOSE" is selected, alarm will ring at the selected time without projection.
- Unit will go to weekly schedule setting. Press "Up/Down" to select.
Display shows (1-7) alarm will ring every day from Monday to Sunday
Display shows (1-5) alarm will ring from Monday to Friday.
Display shows (5-7) alarm will ring weekend from Friday - Sunday only..
Display shows the single day (X), alarm will ring on the exact selected day weekly.
Press Alarm1 to finish the setting.
- Unit will return to normal clock status
To set Alarm 2, press "Alarm2" & repeat the above steps.
3) Set SDR (Special Date Remainder)
3.1: Setup SDR almost same as alarm setup
To set SDR, press and hold [SDR], "SDR" icon and firs digit flashing for MONTH value input,
press [Up] or [Down] to select the month and press [SDR] to confirm the desired month, then to set the DAY, digits will flash. Press [Up] or [Down] for you to select the desired day, Press [SDR] to confirm.
- The next step is to set the time, press the "SDR", first digit is flashing for Hour input, press [Up] or [Down] to select the desired hour then confirm it by pressing [SDR] again, next step to setup Minute., Please press [Up] or [Down] to input the desired minute then confirm it by pressing [SDR] again
- Press [SDR] for thrice or when confirmed hour value input, device entry output sound selection and display show "S 1", press [Up] or [down] to select as below:
To play each buzzer, display show S1, S2 or S3.
- press [SDR] confirm, next step to select the Sound level setup from V01 to V08 max), press [Up] or [Down] to change V02, V03......V08(max), and user can hear sound of selected output level, make it comfortable and confirm by pressing [SDR] again
- When sound level is confirmed, press [SDR] again go to projection ON(P O)/CLOSE(P C) selection, , press [up] or [down] then display show projection "ON" or "OFF",
ON: when SDR active, projection will active together
OFF: when SDR active, projection will not work together
Press [SDR] confirm and the icon SRow the display.
4) How to review the date
4.1: With the clock displayed, press the Display' button once and the year will appear;
4.2: Press "Display" 2nd time to show day and month;
4.3: Press "Display" 3rd time to show the date of week;
4.4: PressDisplay' 4th time to return to the main display;
5) Using NAP timer
5.1: Press and hold the NAP' button and the display will show theNAP' time ie: 60,45,30,15, OFF. When you reach your selected time then press and hold the `NAP' button to store your setting.
6) Using dimmer function
6.1: To reduce the brightness of the display press Snoopze / Dimmer'. There are 3 × levels to choose from which are selected by pressing theDimmer' button once each time. When you have selected your desired level leave the button and your setting will be stored.
7) Open
7.1: When the alarm activates press 'OPEN / Alarm Off' button to disable the alarm.
8) Snooze
8.1: When the alarm, or SDR timer, activates press the `Snoopze|Dimmer' button once and the alarm will be deactivated for 9 minutes.
9) Lighting operation
9.1: Press the `Power / Light On' button to activate the light effect. You can choose between 2 x light effects by changing the removable slide (see items C & D on the General Description section).
9.2: The images can be rotated by turning the 'Light effect rotation' wheel (item B).
10) Battery Back-Up
10.1: To maintain the time and alarm settings, (in the event of a power cut), insert 2 x AAA Alkaline batteries in to the battery compartment (see item G). Batteries should be fitted by, or under the supervision, of an adult.
Product specification
Power Source: 5V d.c., 500mA
Power consumption : 2 Watts
DECLARATION OF CONFORMITY
The undersigned, Bigben Interactive declares that the radio equipment of the PS1AC type complies with the 2014/53/EU directive.
To download the full statement, please visit our website: http://www/bigben-interactive.co.uk/support and the section "declaration of conformity".
Made in China
Manufactured by BIGBEN INTERACTIVE SA
396, Rue de la Voyette
CRT2-FRETIN
CS 90414
59814 LESQUIN Cedex - France
www/bigben.eu


REACH
- 两条既约曲线: x1 = -b - ^2 - 4ac2a x2 = -b + ^2 - 4ac2a .

Fabricant:BigbenInteractive FRANCE
396, Rue de la Voyette, C.R.T. 2, Fretin,
CS90414-59814 Lesquin Cedex, France
Waterloo Office Park / Batiment H
Drève Richelle 161 bte 15 1410 Waterloo, Belgium
Bigben Interactive NEDERLAND b.v.
BELGIQUE,customerservice@bigben-interactive.be
NEDERLAND, customerservice@bigben-interactive.nl
ESPANA, sat@bigbeninteractive.es
ITALIA, support@bigbeninteractive.it
www/bigben.eu
PS1AC
DESPERTADOR DE DOS ALARMAS CON EFFECTOS DE LUX

Waterloo Office Park/Batiment H
Drive Richelle 161 bte 15 1410 Waterloo, Belgium
Bigben Interactive NEDERLAND b.v.
BELGIQUE, customerservice@bigben-interactive.be
NEDERLAND, customerservice@bigben-interactive.nl
ESPANA, sat@bigbeninteractive.es
ITALIA, support@bigbeninteractive.it
www/bigben.eu
PS1AC
OROLOGIO CON DOPPIA SVEGLIA ED EFFETTI LUMINOSI

ISTRUZIONI D'USO
Waterloo Office Park / Batiment H
Dreve Richelle 161 bte 15 1410 Waterloo, Belgium
Bigben Interactive NEDERLAND b.v.
BELGIQUE, customerservice@bigben-interactive.be
NEDERLAND, customerservice@bigben-interactive.nl
ESPANA, sat@bigbeninteractive.es
ITALIA, support@bigbeninteractive.it
www/bigben.eu
PS1AC
RELÓGIO COM DUPLO DESPERTADOR E EFEITOS LUMINOSOS

Waterloo Office Park/Batiment H
Drive Richelle 161 bte 15 1410 Waterloo, Belgium
Bigben Interactive NEDERLAND b.v.
BELGIQUE, customerservice@bigben-interactive.be
NEDERLAND, customerservice@bigben-interactive.nl
ESPANA, sat@bigbeninteractive.es
ITALIA, support@bigbeninteractive.it
www/bigben.eu
PS1AC
WEKKER MET DUBBEL ALARM EN LICHTEFFECTEN

HANDLEIDING
GELIEVE DEZE GEBRUKSAANWIJZING GOED DOOR TE NEMEN VOOR U HET TOESTEL IN GEBRUK NEEMT EN BEWAAR HET ZODAT U HET LATER NOG KAN RAADPLEGEN.
Inhoud
Aandeslag1
Waterloo Office Park / Batiment H
Drive Richelle 161 bte 15 1410 Waterloo, Belgium
Bigben Interactive NEDERLAND b.v.
BELGIQUE, customerservice@bigben-interactive.be
NEDERLAND, customerservice@bigben-interactive.nl
ESPANA, sat@bigbeninteractive.es
ITALIA, support@bigbeninteractive.it
www/bigben.eu
PS1AC
BUDZIK Z PODWOJNYM ALARMEM I EFEKTAMI SWIETLNYMI

INSTRUKCJA OBSŁUGI
PRZED UZYCIEM URZADZENIA NALEZY UWAZNIE PRZECZYTAĆ
NINIEJSZA INSTRUKCJE OBSŁUGI. INSTRUKCJE NALEZY
ZACHOWAĆ NA PRZYSZŁOŚC.
Spistresci
Pierwsze kroki 1
Aby基础知识, do some basic concepts.
Aby基础知识, do some basic concepts.
Waterloo Office Park/Batiment H
Drive Richelle 161 bte 15 1410 Waterloo, Belgium
Bigben Interactive NEDERLAND b.v.
BELGIQUE, customerservice@bigben-interactive.be
NEDERLAND, customerservice@bigben-interactive.nl
ESPANA, sat@bigbeninteractive.es
ITALIA, support@bigbeninteractive.it
www/bigben.eu
PS1AC
ДВОИHBIE YACbI-БуДиЛьнК CO CBETOBblIMN 3ФФЕKTAMN

INHCTPYKUNIPO 3KCPJYATAUIN
Waterloo Office Park/Batiment H
Dreve Richelle 161 bte 15 1410 Waterloo, Belgium
Bigben Interactive NEDERLAND b.v.
BELGIQUE, customerservice@bigben-interactive.be
NEDERLAND, customerservice@bigben-interactive.nl
ESPANA, sat@bigbeninteractive.es
ITALIA, support@bigbeninteractive.it
www/bigben.eu