K 2 Battery Set - Pressure washer Kärcher - Free user manual and instructions
Find the device manual for free K 2 Battery Set Kärcher in PDF.
Download the instructions for your Pressure washer in PDF format for free! Find your manual K 2 Battery Set - Kärcher and take your electronic device back in hand. On this page are published all the documents necessary for the use of your device. K 2 Battery Set by Kärcher.
USER MANUAL K 2 Battery Set Kärcher
Register your product www.kaercher.com/welcome
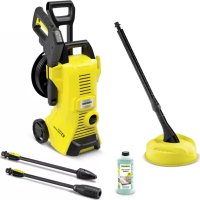
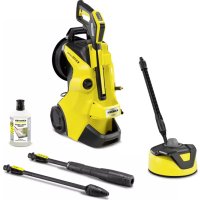
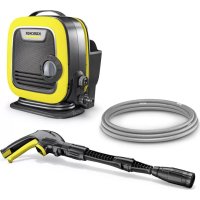
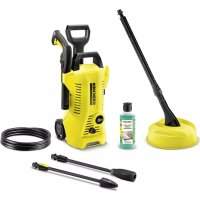
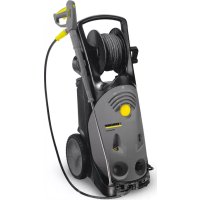
min min Gewicht (ohne Akku) 0,16 kg Technische Änderungen vorbehalten. EU-Konformitätserklärung Produkt: Hochdruckreiniger Typ: 1.117-200 1.117-2xx Einschlägige EU-Richtlinien 2006/42/EG (+2009/127/EG) 2014/30/EU 2011/65/EU 2000/14/EG Angewandte harmonisierte Normen EN 60335–1 EN 60335–1 – EN 60335-2-29 EN 60335–2–79 EN 60335–2–79 EN 62233: 2008 EN 62233: 2008 EN 55014–1:2017 EN 55014–1:2017 EN 55014–2: 2015 EN 55014–2: 2015 – EN 61000–3–2: 2014 – EN 61000–3–3: 2013 EN 50581 EN 50581 Angewandtes Konformitätsbewertungsverfahren 2000/14/EG: Anhang V Schallleistungspegel dB(A) Gemessen: 85 Garantiert: 88 Chairman of the Board of Management Director Regulatory Affairs & Certification 15DE– 5 Please read and comply with these original in- structions prior to the initial oper- ation of your appliance and store them for later use or subsequent owners. Apart from the notes contained herein the general safety provi- sions and rules for the preven- tion of accidents of the legislator must be observed. Warnings and notes that are at- tached on the appliance provide important notes for the safe op- eration. DANGER Pointer to immediate danger, which leads to severe injuries or death. 몇 WARNING Pointer to a possibly dangerous situation, which can lead to se- vere injuries or death. 몇 CAUTION Pointer to a possibly dangerous situation, which can lead to mi- nor injuries. ATTENTION Pointer to a possibly dangerous situation, which can lead to property damage. DANGER The user must use the appli- ance as intended. The person must consider the local condi- tions and must pay attention to other persons in the vicinity when working with the appli- ance. Check important compo- nents, such as high-pressure hose, hand spray gun and safety installations, for dam- age prior to every operation. Immediately replace dam- aged components. Do not op- erate appliance with dam- aged components. High-pressure jets can be dangerous if improperly used. The jet may not be directed at persons, animals, live electri- Contents Safety instructions... EN 5 Proper use ... EN 10 Environmental protection ... EN 10 Scope of delivery ... EN 10 Description of the Appliance ... EN 10 Assembly ... EN 10 Battery pack ... EN 11 Start up ... EN 11 Operation ... EN 12 Transport... EN 12 Storage ... EN 13 Cleaning and care... EN 13 Troubleshooting ... EN 13 Accessories and Spare Parts ... EN 14 Warranty ... EN 14 Technical specifications ... EN 15 EU Declaration of Conformity ... EN 15 Safety instructions Hazard levels Safe handling 16 EN– 6 cal equipment or at the appli- ance itself. The high-pressure jet must not be directed at other per- sons or the user him-/herself to clean clothing or footwear. Vehicle tyres/tyre valves are susceptible to damage from the high-pressure jet and may burst. The first indication for this is a discolouration of the tyre. Damaged vehicle tyres/ tyre valves are perilous. Keep a minimum jet distance of 30 cm during cleaning! 몇 WARNING Do not use the appliance when there are other persons around unless they are also wearing protective clothing. The appliance must not be operated by children or per- sons who have not been in- structed accordingly. This appliance is not intended for use by persons with limit- ed physical, sensory or men- tal capacities or lacking expe- rience and/or skills, unless such persons are accompa- nied and supervised by a per- son in charge of their safety or they have received precise instructions on the use of this appliance and have under- stood the resulting risks. Children must not play with this appliance. Supervise children to prevent them from playing with the appliance. 몇 CAUTION Create stability for the appli- ance prior to any work on or with the appliance to prevent accidents or damage. The water jet that is emitted from the high-pressure noz- zle results in a repulsion pow- er acting on the hand spray gun. Make sure that you have a firm footing and are also holding the hand spray gun and spray lance firmly. Never leave the appliance unattended as long as it is in operation. ATTENTION In case of extended breaks, switch off the appliance at the appliance switch. Do not operate the appliance at temperatures below 0 °C. 17EN– 7 DANGER The appliance may not be op- erated in explosive atmos- pheres. Never use the appliance to clean objects containing haz- ardous substances (e.g. as- bestos). Do not spray flammable liq- uids. Never draw in fluids contain- ing solvents or undiluted ac- ids and solvents! This in- cludes petrol, paint thinner and heating oil. The spray mist is highly inflammable, explosive and poisonous. Do not use acetone, undiluted acids and solvents, as they corrode the materials used on the appliance. Keep packaging films away from children, there is a risk of suffocation! 몇 WARNING According to applicable regu- lations, the appliance must never be used on the drinking water net without a system separator. Ensure that the connection of your building water installation on which the high-pressure cleaner is operated is equipped with a system separator pursuant to EN 12729 Type BA. Water that has flown through a system separator is no longer classified as drinking water. High-pressure hoses, fixtures and couplings are important for the safety of the appli- ance. Only use high-pressure hoses, fixtures and couplings recommended by the manu- facturer. When disconnecting the sup- ply or high pressure hose, hot water may leak from the con- nections after operation. 몇 CAUTION Mind the weight of the appli- ance when selecting the stor- age location and during trans- port (see technical data) to prevent accidents or injuries. 몇 WARNING This appliance was designed to be used with detergents which are supplied or recom- mended by the manufacturer. The use of other detergents or chemicals may compro- mise the safety of the appli- ance. The improper use of deter- gents can cause severe inju- ries or toxication. Store detergents away from the reach of children. Other risks Working with detergent 18 EN– 8 몇 CAUTION Safety installations serve the protection of the user and may not be modified or bypassed. The appliance switch prevents unintentional operation of the appliance. The lock locks the lever of the trigger gun and prevents the ac- cidental start of the device. If the lever on the trigger gun is released, the pressure switch turns off the pump, the high- pressure jet stops. If the lever is pulled the pump is turned on again. The device shuts off automati- cally after 2 minutes of dry run- ning so as to prevent damage to the high-pressure pump. 몇 CAUTION Wear protective clothing and safety goggles to protect against splash back contain- ing water or dirt. During the use of high-pres- sure cleaners aerosols can develop. Inhaling aerosols can cause health damage. – Depending on the applica- tion, completely shielded noz- zles (e.g. surface cleaner) that significantly reduce the emission of aqueous aero- sols can be used for high- pressure cleaning. – The use of such shielding is not possible with all applica- tions. – If the use of a completely shielded nozzle is not possi- ble, a respirator of the catego- ry FFP 2 or the like should be used, depending on the envi- ronment to be cleaned. Safety Devices Appliance switch Lock trigger gun Auto-stop function Dry running protection Personal protective equipment Symbols on the machine The high pressure jet must not be directed at persons, animals, live electrical equipment or at the appliance itself. Protect the appliance against frost. The appliance must not be directly connected to the public drinking water network. 19EN– 9 DANGER Check the plug-in power sup- ply, connection cable, battery adapter and battery pack for damage before every use. Damaged devices may no longer be used and must be replaced. Do not open the charger. The charger must be replaced if damaged or defect. Do not operate the charger in explosive environment. Never touch the mains plug and the socket with wet hands. Do not use the charger if dirty or wet. Do not charge battery (prima- ry cells); risk of explosion. 몇 CAUTION The mains voltage must match the voltage mentioned on the type plate of the charg- er. Use the charger only to charge approved battery packs. Only charge the battery pack using the original charger en- closed or with a charger ap- proved by KÄRCHER. ATTENTION Do no carry charger by the connection cable. Keep connection cable away from heat, sharp edges, oil and moving parts. Do not cover the plug-in pow- er supply. Avoid extension cables with multiple sockets and simulta- neous operation of several devices. Do not wind the connection cable around the or the bat- tery adapter to avoid damag- es. Be sure to read the safety in- structions enclosed with the battery pack and observe these during use! Charger safety instructions Symbols on the charger Protect the charger against moisture and store it dry. The device is only suitable for use in rooms; do not expose the device to rain. The charger has a built-in fuse of 1 ampere. The charger meets the requirements of protec- tive class II. Battery pack safety instructions 20 EN– 10 This high pressure cleaner is designed for domestic use only. – for cleaning machines, vehicles, buildings, tools, facades, terraces, gardening tools, etc. by means of a high-pressure water jet (if necessary, with ad- ditional cleaning agents). – with accessories, replacement parts and cleaning agents approved by KÄRCHER. Please observe the information accompanying the cleaning agents. Notes about the ingredients (REACH) You will find current information about the ingredients at: www.kaercher.com/REACH The scope of delivery of your appliance is illustrated on the packaging. Check the contents of the appliance for completeness when unpacking. In the event of missing accessories or any transport damage, please contact your dealer. These operating instructions describe the maximum equipment. Depending on the model, there are differ- ences in the scopes of delivery (see packaging). See fold-out page 3 for illustrations 1 Nameplate 2 High pressure connection 3 Appliance switch „0/OFF“ / „I/ON“ 4 Battery pack release 5 Battery compartment 6 Carrying handle 7 Storage for trigger gun 8 Storage for spray lance 9 Detergent suction hose (with sieve) 10 Coupling element for water connection 11 Water connection with integrated sieve 12 Trigger gun 13 High-pressure gun display
MIX / STANDARD / BOOST
14 Lock trigger gun 15 Button for detaching the high-pressure hose from the trigger gun 16 High pressure hose 17 Spray lance with Dirtblaster Working mode: BOOST For stubborn dirt (shorter battery run time) 18 Spray lance with high pressure nozzle Working mode: STANDARD For normal cleaning tasks (longer battery run time) Mount loose parts delivered with appliance prior to start- up. See fold-out page 4 for illustrations Illustration Attach the carrying handle. Illustration Screw the coupling element to the water connec- tion on the appliance. Proper use Environmental protection Old appliances contain valuable recyclable mate- rials that should be recycled properly. Batteries and accumulators contain substances that must not enter the environment. Please dispose of old devices and batteries or accumulators in an envi- ronmentally friendly way. Electrical and electronic devices often contain components which could potentially pose a dan- ger to human health and the environment if han- dled or disposed of incorrectly. However, these components are necessary for the proper opera- tion of the device. Devices marked with this sym- bol must not be disposed of with regular house- hold rubbish. The packaging material can be recycled. Please arrange for the environmentally appropriate dis- posal of the packaging. Cleaning operations which produce oily waste wa- ter, e.g. engine washes, underbody washes, may only be carried out using washing stations equipped with an oil separator. Work with detergents must only be performed on liquid-tight work surfaces with a connection to the sewer system. Do not let release detergent into waters or earth. Scope of delivery Description of the Appliance
- Optional 19 Standard charger Battery Power 36 V A Battery contacts B Battery adapter C Connection cable D Plug-in power supply 20 Battery pack Battery Power 36/50 A Battery pack display B Contacts C Nameplate D Intake ** Additionally required
Fabric-reinforced water hose with commercially available coupling. Minimum diameter, 1/2 inches (13 mm). Minimum length 7.5 m. 22 KÄRCHER suction hose SH 5 (order no. 2.643-100.0) Assembly 21EN– 11 A Battery Power 36/50 or Battery Power + 36/75 bat- tery pack and a charger from the KÄRCHER 36 V platform are required to operate the device. Note: The Battery Power 36/25 battery pack cannot be used. The battery pack is equipped with a display that pro- vides continuous information on the charging state, the progress of charging and the remaining battery life. In addition, any error messages occurring will also be shown. Depending on the device used, the display rotates when the battery pack is inserted. Note: New battery packs are only pre-charged and must be fully charged before first use. The display is activated during the first charging pro- cess. 몇 CAUTION Risk of injury, risk of damage due to exploding battery! Only charge the battery packs with the appropriate charger. Illustration Push the battery pack into the battery adapter of the charger. Plug the plug-in power supply into the socket. – The charging process begins automatically. – The display shows the remaining charging time of the battery pack in minutes during the charging pro- cess. – The charging process ends once the battery pack display reads 100%. Note: If the display does not show anything when the battery pack is in the charger, the battery capacity is ful- ly depleted or very low. As soon as the battery pack has been sufficiently charged, the display shows the re- maining charging time. If the display does not show anything even after a long period of time, the battery pack is defective and must be replaced. Remove the battery adapter from the battery pack after charging. Pull the plug-in power supply from the socket. Notes: – To ensure that the charge level indicator works cor- rectly, the battery pack must be discharged during initial use until the device is switched off. – New battery packs reach their full capacity after ap- prox. 5 charging and discharging cycles. – Charge battery packs that have not been used for a long time before use. – The performance of the battery pack is reduced at temperatures below 0 °C. – The capacity of the battery pack may be reduced if stored at temperatures over 20 °C. ATTENTION Do not the place the device and battery pack in direct sunlight. Park the appliance on an even surface. Illustration Connect the high pressure hose to the high pres- sure connection of the appliance. Illustration Push the high pressure hose into the trigger gun until it locks audibly. Note: Make sure the connection nipple is aligned correctly. Check the secure connection by pulling on the high pressure hose. 몇 CAUTION Risk of personal injury or damage! Ensure that the bat- tery pack properly snaps into place. Illustration Push the charged battery pack into the mounting on the device. For connection values, see type plate/technical data. Observe regulations of water supplier. ATTENTION Impurities in the water can damage the high-pressure pump and the accessories. For protection, the use of the KÄRCHER water filter (optional accessory, order no. 4.730-059) is recommended. ATTENTION Hose couplings made of metal with aquastop can dam- age the pump! Please use plastic couplings or KÄRCH- ER brass couplings. Attach the water supply hose to the coupling on the water connection. Connect the water supply hose to the water supply. Completely open the water tap. Battery pack Battery pack display Display Meaning Battery in storage Charging state of the battery pack while not in use. Battery in use Remaining battery life of the bat- tery pack while in use. Battery charging Remaining charging time of the battery pack during charging. Battery pack fully charged. Error display Battery pack temperature outside the permitted values or disabled due to short-circuit (see Help in case of malfunctions). Battery pack defective and disa- bled for safety. Do not use the battery pack anymore and dis- pose of it properly. Charging the battery pack Start up Inserting the battery pack Water supply Water supply from mains 22 EN– 12 This high-pressure cleaner is suitable for sucking up surface water, e.g. from water butts or ponds, with the KÄRCHER SH 5 suction hose (for maximum suction height see Technical data). Screw the suction hose into the water connection of the appliance and insert it into the water source (e.g. rainwater drum). Turn on the appliance “I/ON”. Unlock the lever of the trigger gun. Pull on the lever of the trigger gun; the device will switch on. Let the appliance work until the water exits at the hand spray gun without bubbles (max. 2 minutes). Release the lever of the trigger gun. Lock the lever of the trigger gun. Note: After 2 minutes of dry running, the device shuts off automatically. For information on restarting, see the "Troubleshooting" chapter. 몇 CAUTION Keep a distance of at least 30 cm when using the jet for cleaning painted surfaces to avoid damage. ATTENTION Car tyres, paint or sensitive surfaces such as wood should not be cleaned with the dirt blaster, as there is a risk of damage. Illustration Push the spray lance into the trigger gun and fasten it by a 90° rotation. Turn on the appliance “I/ON”. Unlock the lever of the trigger gun. Pull on the lever of the trigger gun; the device will switch on. The working mode is shown on the high-pressure gun display. Note: The battery pack takes a short while to activate; the device will start after 4 seconds at the most. Note: The battery pack display shows the remaining run time while the device is in operation. Note: Detergent can only be added when the device is operated in low pressure mode. DANGER When using detergents, the material data safety sheet issued by the detergent manufacturer must be adhered to, especially the instructions regarding personal pro- tective equipment. Pull detergent suction hose as far as is required out of the housing. Suspend end of detergent suction hose in a con- tainer filled with detergent. Detach spray lance from the trigger gun. Work only with the trigger gun. Working mode: MIX Note: This will mix the detergent with the water stream. Spray the detergent sparingly on the dry surface and allow it to react, but not to dry. Spray off loosened dirt with the high pressure jet. Release the lever of the trigger gun. Note: Release the lever of the trigger gun; the de- vice will switch off again. High pressure remains in the system. Lock the lever of the trigger gun. During longer breaks (more than 5 minutes), also turn the appliance off using the "0/OFF" switch. 몇 CAUTION Only separate the high-pressure hose from the trigger gun or the device when there is no pressure in the sys- tem. After operation with detergent: Run the machine for approximately 1 minute for a clear rinse. Release the lever of the trigger gun. Turn off the appliance "0/OFF". Turn off tap. Press the lever on the trigger gun to release any re- maining pressure in the system. Lock the lever of the trigger gun. Detach the appliance from the water supply. Remove the battery pack from the device after comple- tion of the work. Illustration Press the lock downwards. Pull the battery pack forwards. Recharge battery pack after work. Note: Also charge partly discharged battery packs after use. 몇 CAUTION Risk of personal injury or damage! Mind the weight of the appliance during transport. Lift appliance by the carrying handle and carry it.
Secure the appliance against shifting and tipping over. The lithium-ion battery is subject to the requirements of dangerous goods regulations and can be transported by the user in public traffic areas without any further restric- tions. When shipping by third parties (transport companies), special requirements for packaging and labelling must be observed. Only send the battery if the casing is undamaged. Tape off open contacts and pack the battery tightly and se- curely. It must not be able to move in the packaging. Please also observe the national regulations. Drawing in water from open reservoirs Deaerating the appliance Operation High pressure operation Operation with detergent Recommended cleaning method Interrupting operation Finish operation Removing the battery pack Transport When transporting by hand When transporting in vehicles Battery pack 23EN– 13 몇 CAUTION Risk of personal injury or damage! Consider the weight of the appliance when storing it. Park the machine on an even surface. Detach spray lance from the trigger gun. Engage the spray lance in its holder. Push the disconnect button on the trigger gun and pull the high-pressure hose out of the trigger gun. Place the trigger gun into the storage for the trigger gun. Push the casing of the quick coupling for the high pressure hose toward the rear and disconnect the high pressure hose from the appliance. Store the high-pressure hose on the device. Prior to extended storage periods, as during the winter, also observe the instructions in the Care section. ATTENTION Appliances and accessories that are not completely drained can be destroyed by frost. Completely drain ap- pliance and accessories and protect them against frost. To avoid damage: Completely drain all water from the appliance: Switch the appliance on with detached high pres- sure hose and detached water supply (max. 1 min- ute) and wait, until no more water exits at the high pressure connection. Turn off the appliance. Store the appliance and the entire accessories in a frost free room. ATTENTION Risk of damage! Store the battery packs in rooms with low humidity and below 20 °C only. This appliance must only be stored in interior rooms. The battery pack indicates its current charging state on the display, even without being connected to a charger. If the battery pack display goes out during storage, the battery capacity is fully depleted and the display has been switched off. Please recharge the battery as soon as possible. DANGER Short circuit hazard! Do not clean the device with a hose or high-pressure water jet. Switch the device off and remove the battery pack be- fore working on the device. ATTENTION Risk of damage! Do not use any abrasive or aggressive detergents for cleaning purposes. Clean the sieve in the water connection regularly. ATTENTION The sieve must not be damaged. Remove coupling from the water connection. Illustration Pull the sieve out using flat pliers. Clean the sieve under running water. Reinsert the sieve into the water connection. Regularly check the battery terminals and adapter for soiling and clean them as necessary. Recharge battery packs that are stored over a long- er period of time. DANGER Repair work and work on the electrical components may only be performed by an authorised customer service. You can rectify minor faults yourself with the help of the following overview. If in doubt, please consult the authorized customer ser- vice. Push the lever of the trigger gun, the device will switch on. The battery pack is not seated correctly in the bat- tery holder, insert the battery pack into the battery holder and let it click into place. Let the battery pack cool down when overheated. Charging state of the battery pack (see display) too low, charge the battery if necessary. Defect battery pack or charger, replace battery pack or charger with new accessory. – After 2 minutes of dry running. – When the battery pack is at risk of overheating. Restarting: Let the battery pack cool down if necessary. Turn off the appliance "0/OFF". Turn on the appliance “I/ON”. Appliance ventilation: Switch the appliance on with the high-pressure hose detached and operate (max. 2 minutes) until the water exits the high-pres- sure connection without bubbles. Switch off appli- ance and reconnect high-pressure hose. Check the water supply. Pull out the sieve in the water connection using flat- nose pliers and clean under running water. Clean high-pressure nozzle: Remove dirt and de- bris from the nozzle bore, using a needle and rinse through with water from the front. Check water flow quantity. Detach spray lance from the trigger gun. Work only with the trigger gun. Clean the detergent suction hose filter. Check the detergent suction hose for kinks. Dropwise leakage of the device is normal for tech- nical reasons. If the leakage increases contact the authorized customer service. Storage Storing the Appliance Frost protection Battery pack Cleaning and care Clean the sieve in the water connection Care Troubleshooting Appliance is not running The device switches off automatically Pressure does not build up in the appliance Strong pressure fluctuations No detergent infeed Appliance is leaking 24 EN– 14 Only use original accessories and spare parts, they en- sure the safe and trouble-free operation of the device. – Fast charger and battery pack with a larger capac- ity are available as special accessories. Note:The device can only be operated with 36 V battery packs and is not compatible with 18 V bat- tery packs. – Batteries / chargers that are not supplied in the scope of delivery or are additionally required are available as special accessories or can be pur- chased later. – Before using the quick charger and battery pack, please observe the operating instructions of the de- vice used and any safety instructions enclosed. – More information on the operating instructions for battery packs or on accessories and spare parts can be found at www.kaercher.com. The warranty terms published by the relevant sales company are applicable in each country. We will repair potential failures of your appliance within the warranty period free of charge, provided that such failure is caused by faulty material or defects in manufacturing. In the event of a warranty claim please contact your dealer or the nearest authorized Customer Service centre. Please submit the proof of purchase. Addresses can be found under: www.kaercher.com/dealersearch Display error messages Error during charging Display is on, indicator lamp in the charger is glowing solid green, but the battery pack is not charging Charger defective. Replace the charger. Display is off, battery pack not charging The battery pack may be completely discharged. Wait and see if the display shows the remaining charging time after some time. If not, the battery pack is defec- tive. Replace the battery pack. Display shows temperature symbol, battery pack not charging Battery pack temperature too low / too high. Put the battery pack in a moderate temperature environment. Wait until the battery pack temperature has normal- ized. The charging process then starts automatically. Error during operation The display shows the temperature symbol Battery pack temperature too low / too high. Put the battery pack in a moderate temperature environment. Wait until the battery pack temperature has normal- ized. In case of a short circuit, the battery pack is disabled for 30 seconds for further use. If the short-circuit oc- curs more frequently, the battery pack is permanently disabled. Connect the battery pack to the charger to unlock it. Display shows remaining run time 0, device switches off. The battery pack is discharged. Please recharge the battery pack. Storage error Display shows no remaining capacity The battery pack is discharged. Please recharge the battery pack. Display shows remaining capacity 70% even though the battery pack has been freshly charged. The battery pack is in automatic storage mode. This is activated if the battery has not been used for more than 21 days. This function protects the battery cells against rapid aging and increases their service life. Fully recharge the battery pack before next use. General fault Display screen shows broken battery symbol. Battery pack defective and disabled for safety. Do not use the battery pack anymore and dispose of it prop- erly. Accessories and Spare Parts Special accessories Information on battery pack and charger Warranty 25EN– 15 We hereby declare that the machine described below complies with the relevant basic safety and health re- quirements of the EU Directives, both in its basic design and construction as well as in the version put into circu- lation by us. This declaration shall cease to be valid if the machine is modified without our prior approval. The signatories act on behalf of and with the authority of the company management. Documentation supervisor: S. Reiser Alfred Kärcher SE & Co. KG Alfred-Kärcher-Straße 28-40 71364 Winnenden (Germany) Tel.: +49 7195 14-0 Fax: +49 7195 14-2212 Winnenden, 2018/10/01 Technical specifications Device Nominal battery voltage 36 V Power 1,1 kW Protection class IPX5 Operating time when battery is fully charged (max.) – Mix mode – Standard mode – Boost mode
Sound pressure level L
88 dB(A) Battery pack Battery Power 36/50 Battery type Li-Ion Nominal battery voltage 36 V Rated capacity (according to IEC/EN 61690) 4,8 Ah Rated capacity (according to specifications of cell manufacturer) 5,0 Ah Rating (in accordance with UN 3480) 172,8 Wh Max. charging current 7,5 A Operating temperature -20...40 °C Weight 1,5 kg Dimensions (L x W x H) 133 x 88 x 117
Standard charger Battery Power 36 V Nominal voltage 100...240 V Frequency 50-60 Hz Power consumption 0,3 A Protective class II Nominal battery voltage 36 V Max. charging current 0,5 A Charging time for empty battery Battery Power 36/50 – Charging time 80%, approx. – Charging time 100%, approx.