
WD 3 Battery Set - Vacuum Cleaner Kärcher - Free user manual and instructions
Find the device manual for free WD 3 Battery Set Kärcher in PDF.

User questions about WD 3 Battery Set Kärcher
0 question about this device. Answer the ones you know or ask your own.
Ask a new question about this device
Download the instructions for your Vacuum Cleaner in PDF format for free! Find your manual WD 3 Battery Set - Kärcher and take your electronic device back in hand. On this page are published all the documents necessary for the use of your device. WD 3 Battery Set by Kärcher.
USER MANUAL WD 3 Battery Set Kärcher
WD 3 Battery Premium
WD 3 Battery Premium Set
natural_image
Line drawing of a Karcher vacuum cleaner device with control panel and wheels (no text or symbols)
text_image
36V BATTERY POWER
text_image
KÄRCHER BATTERY UNIVERSEDeutsch 5
English 14
Français 23
Italiano 32
Nederlands 41
Español 50
Português 59
Dansk 68
Norsk 77
Svenska 86
Suomi 95
Ελληνικά 104
Türkçe 114
Русский 122
Magyar 133
Čeština 143
Slovenščina 152
Polski 161
Românește 170
Slovenčina 179
Hrvatski 188
Srpski 197
Български 206
Eesti 216
Latviešu 225
Lietuviškai 234
Українська 243
Қазақша 253
لعربيya 272
text_image
KARCHER 1 2 3 4 5 6 7 8 9 10 1112 13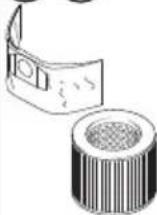 | 14 15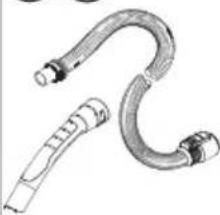 | 16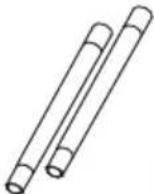 | 17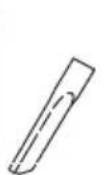 | 18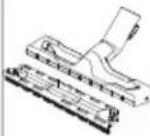 | 19 Akku Battery Power 36/25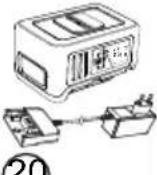 BC 36 V BC 36 V | |
| WD 3 Battery | ● | ● | ● | ● | ● | ○ |
| WD 3 Battery Premium | ● | ● | ● | ● | ● | ○ |
| WD 3 Battery Set | ● | ● | ● | ● | ● | ● |
| WD 3 Battery Premium Set | ● | ● | ● | ● | ● | ● |
text_image
A 1. 2. 1. 1.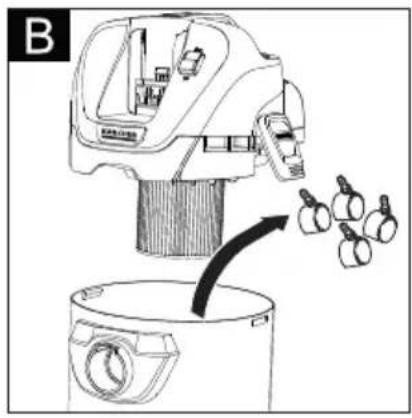
natural_image
Line drawing of a kitchen appliance with a lid and a side view showing garlic bulbs (no text or symbols)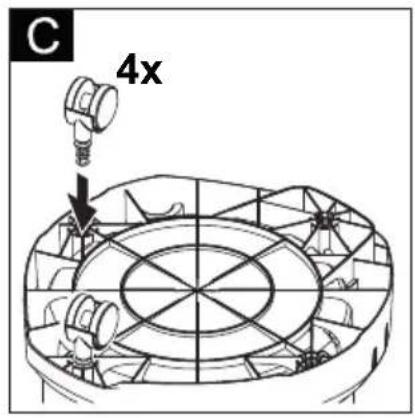
text_image
C 4x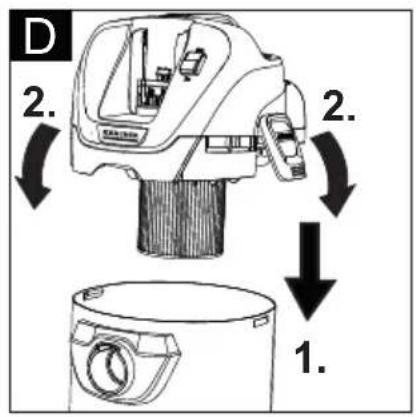
text_image
D 2. 2. 1.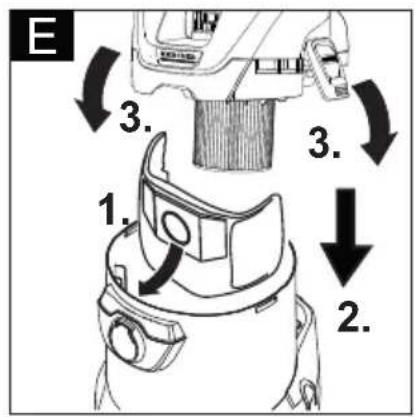
text_image
E 1. 2. 3. 3.
text_image
F 1. 2.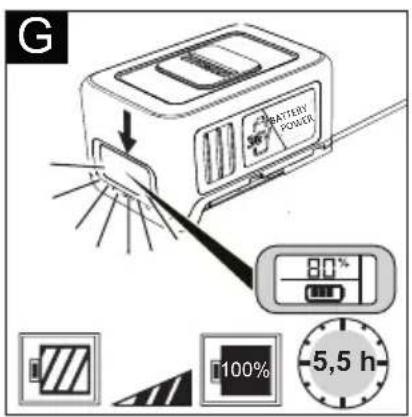
text_image
G BATTERY POWER 80% 100% -5,5 h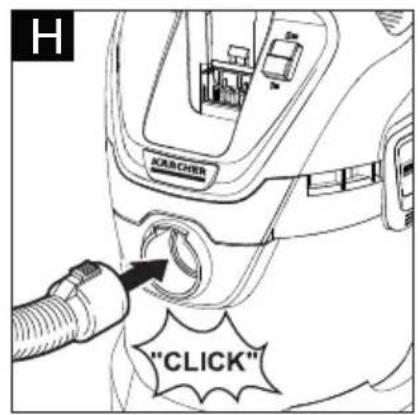
text_image
H ACRCHER "CLICK"
text_image
1. 1. "click" 2.
text_image
J 1. 2. 1.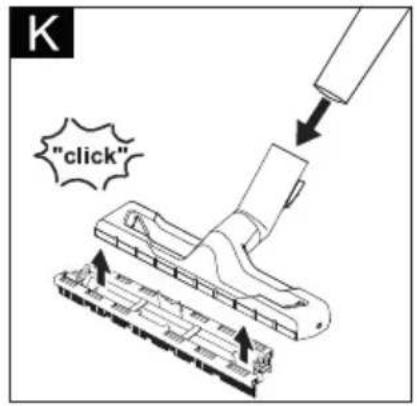
text_image
"click"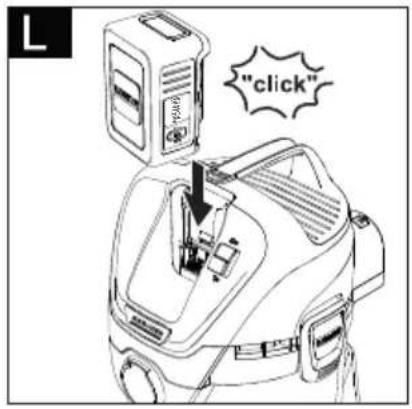
text_image
"click"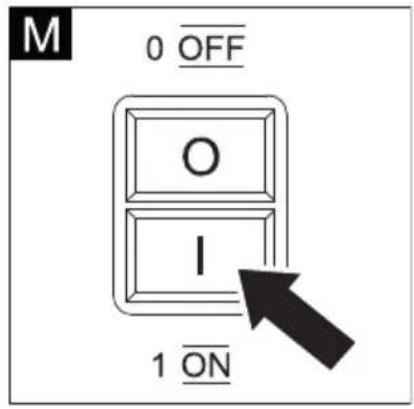
text_image
M 0 OFF O I 1 ON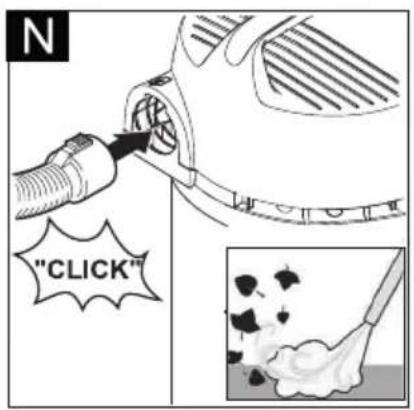
text_image
"CLICK"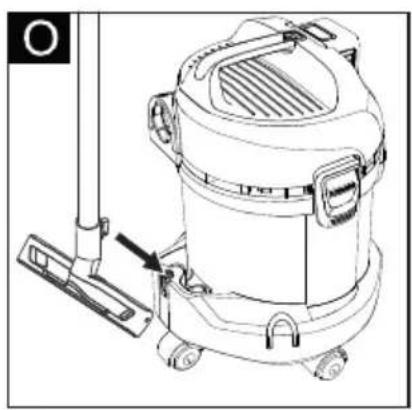
natural_image
Line drawing of a vacuum cleaner with attached mounting bracket and control panel (no text or symbols)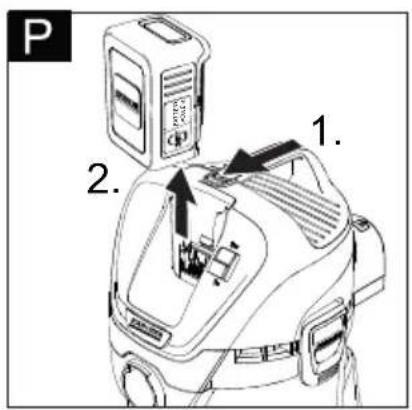
text_image
P 1. 2.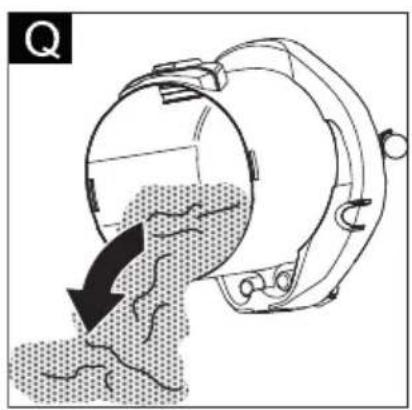
natural_image
Diagram of a mechanical device with a curved arrow indicating flow or movement, showing internal components and a dotted pattern (no text or symbols)
natural_image
Line drawing of a vacuum cleaner with attached tubing and wheels (no text or symbols)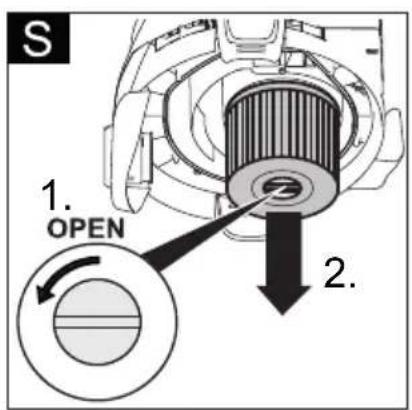
text_image
S 1. OPEN 2.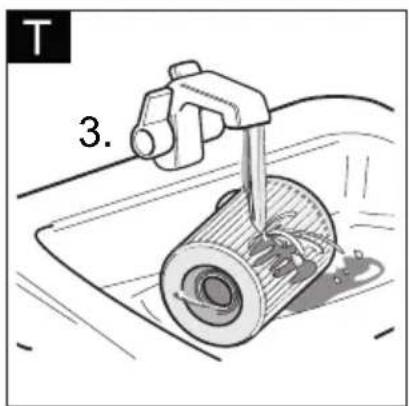
text_image
T 3.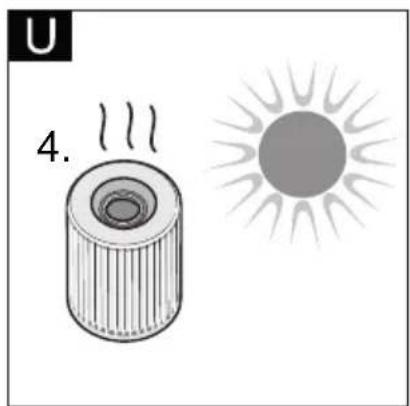
natural_image
Illustration of a cylindrical object emitting steam next to a sun (no text or symbols)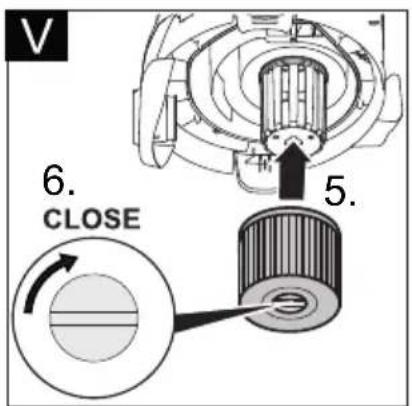
text_image
V 6. CLOSE 5.Inhaltsverzeichnis
text_image
Diagram of two electronic device modules with numbered labels pointing to different components.text_image
Diagram of a device with numbered components, showing a connector and terminal connectionstext_image
Simple diagram with a horizontal line, a vertical bar labeled '负' (negative), and a thermometer icon in the top-right corner.natural_image
Simple line drawing of a rectangle with a horizontal line and a small symbol inside (no text or labels)Information on battery pack and charger EN 8
Safety Devices EN 9
Operating elements EN 9
Charging process EN 9
Battery pack operation EN 9
Storage EN 10
Transport and storage EN 10
Care and maintenance EN 10
Troubleshooting EN 10
Description of the Appliance EN 11
Assembly EN 11
Charging the battery pack EN 11
Commissioning EN 11
General information on the operation EN 12
Operation EN 12
Transport EN 12
Care and maintenance EN 12
Troubleshooting EN 13
Technical specifications EN 13
Dear Customer,

Before using your appliance for the first time, read these original operating instructions, act in compliance with them, and keep them for later use or for subsequent owners.
General notes
Proper use
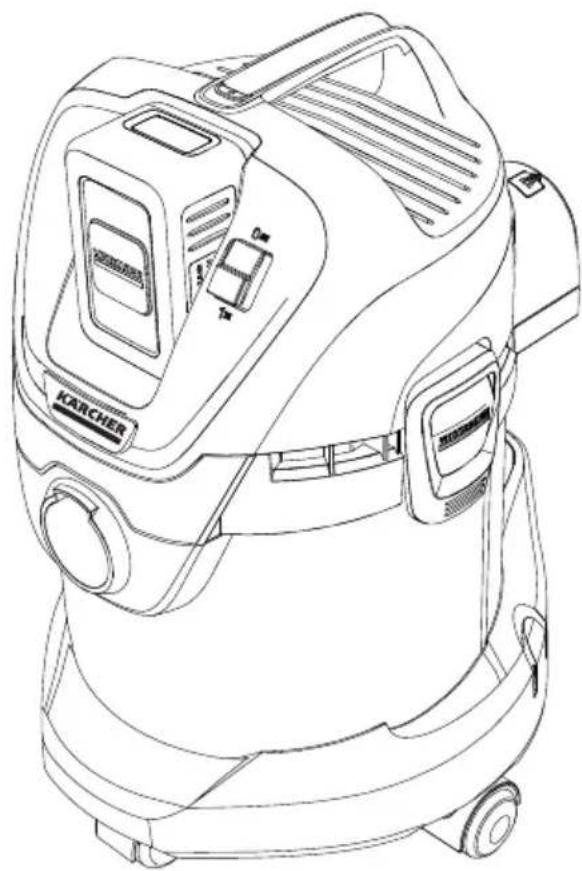
In accordance with the descriptions and the safety information in these operating instructions the appliance is intended for use as a multi-purpose vacuum cleaner.
This appliance has been designed for use in private households and is not intended for commercial use.
- Protect the unit from rain. Do not store outside.
- This device may not be used to suck in ash and soot.
The manufacturer is not responsible for any damages that may occur on account of improper use or wrong operations.
Environmental protection
Notes about the ingredients (REACH)
You will find current information about the ingredients at:
www.kaercher.com/REACH

The packaging material can be recycled. Please arrange for the environmentally appropriate disposal of the packaging.

Old appliances contain valuable recyclable materials that should be recycled properly. Batteries and accumulators contain substances that must not enter the environment. Please dispose of old devices and batteries or accumulators in an environmentally friendly way.
Electrical and electronic devices often contain components which could potentially pose a danger to human health and the environment if handled or disposed of incorrectly. However, these components are necessary for the proper operation of the device. Devices marked with this symbol must not be disposed of with regular household rubbish.
Notes about the ingredients (REACH)
You will find current information about the ingredients at:
www.kaercher.com/REACH
Warranty
The warranty terms published by the relevant sales company are applicable in each country. We will repair potential failures of your appliance within the warranty period free of charge, provided that such failure is caused by faulty material or defects in manufacturing. In the event of a warranty claim please contact your dealer or the nearest authorized Customer Service centre. Please submit the proof of purchase.
Customer Service
Our KÄRCHER branch will be pleased to help you further in the case of questions or faults.
Accessories and Spare Parts
Only use original accessories and spare parts, they ensure the safe and trouble-free operation of the device. For information about accessories and spare parts, please visit www.kaercher.com.
Scope of delivery
In the event of missing accessories or any transport damage, please contact your dealer.
Safety instructions
Danger or hazard levels
⚠️DANGER
Pointer to immediate danger, which leads to severe injuries or death.
⚠ WARNING
Pointer to a possibly dangerous situation, which can lead to severe injuries or death.
⚠CAUTION
Pointer to a possibly dangerous situation, which can lead to minor injuries.
ATTENTION
Pointer to a possibly dangerous situation, which can lead to property damage.
Safety Instructions for wet/dry vacuum cleaners
Safe handling
⚠️DANGER
■ The user must use the appliance as intended. The person must consider the local conditions and must pay attention to other persons in the vicinity when working with the appliance.
■ The appliance may not be operated in explosive atmospheres.
■ If the appliance is used in hazardous areas the corresponding safety provisions must be observed.
■ Do not use the appliance if it fell down, is visibly damaged or leaking.
■ Keep packaging films away from children, there is a risk of suffocation!
⚠ WARNING
This appliance is not intended for use by persons with limited physical, sensory or mental capacities or lacking experience and/or skills, unless such persons are accompanied and supervised by a per-
son in charge of their safety or they have received precise instructions on the use of this appliance and have understood the resulting risks.
■ Children may only use this appliance if they are over the age of 8 and supervised by a person in charge of their safety, or if they have received instructions on the use of this appliance and have understood the resulting risks.
■ Children must not play with this appliance.
■ Supervise children to prevent them from playing with the appliance.
■ Operate or store the appliance only in accordance with the description or illustration!
■ The appliance contains electrical components - do not clean under running water.
⚠CAUTION
■ Never leave the appliance unattended as long as it is in operation.
ATTENTION
■ Do not operate the appliance at temperatures below 0 °C.
■ Never vacuum without a filter, otherwise the appliance can get damaged.
■ Protect the appliance from extreme weather conditions, moisture and heat.
Other risks
⚠️DANGER
Risk of explosion!
■ The appliance may not be operated in explosive atmospheres.
■ Do not vacuum up explosive or combustible gases, fluids and dusts!
■ Do not vacuum up reactive metal dusts (e.g. aluminium, magnesium or zinc!
■ Do not vacuum up undiluted acids or brines!
■ Do not vacuum up burning or smouldering objects!
⚠ WARNING
Risk of injury!
■ Do not vacuum in the vicinity of the head when using the nozzle and suction pipe.
⚠CAUTION
In order to prevent accidents or injuries, mind the weight of the appliance during transport (see technical data).
Stability
⚠CAUTION
■ Create stability for the appliance prior to any work on or with the appliance to prevent accidents or damage.
Charger safety instructions
⚠️DANGER
■ Check the plug-in power supply, connection cable, battery adapter and battery pack for damage before every use. Damaged devices may no longer be used and must be replaced.
■ Do not open the charger. The charger must be replaced if damaged or defect.
■ Do not operate the charger in explosive environment.
■ Never touch the mains plug and the socket with wet hands.
■ Do not use the charger if dirty or wet.
■ Do not charge battery (primary cells); risk of explosion.
⚠CAUTION
■ The mains voltage must match the voltage mentioned on the type plate of the charger.
■ Use the charger only to charge approved battery packs.
■ Only charge the battery pack using the original charger enclosed or with a charger approved by KÄRCHER.
ATTENTION
■ Do no carry charger by the connection cable.
- Keep connection cable away from heat, sharp edges, oil and moving parts.
■ Do not cover the plug-in power supply.
■ Avoid extension cables with multiple sockets and simultaneous operation of several devices.
■ Do not wind the connection cable around the or the battery adapter to avoid damages.
Symbols on the charger
Protect the charger against moisture and store it dry. The device is only suitable for use in rooms; do not expose the device to rain.

The charger has a built-in fuse of 1 ampere.

The charger meets the requirements of protective class II.
Battery pack safety instructions
Be sure to read the safety instructions enclosed with the battery pack and observe these during use!
Information on battery pack and charger
△CAUTION
- Risk of injury, risk of damage due to exploding battery! Only charge the battery packs with the appropriate charger.
- Please check that the battery pack and charger match before use!
- Only charge undamaged battery packs.
- Modifications and changes that are not authorised by the manufacturer are prohibited for safety reasons.
– Any other use is prohibited. The user is liable for any hazards arising from improper use.
A battery pack and charger with 36 V nominal voltage is required for the initial startup. The "Set variants" already include a Li-ION battery pack with 36 V, 2.5 Ah (Battery Power 36/25) and a 36 V (Battery Power BC 36 V) standard charger in the scope of delivery.
■ The Battery Power battery packs (+) 36/25, 36/50 and 36/75 may only be used for the designated Kärcher 36 V Battery Power system devices.
■ Batteries / chargers that are not supplied in the scope of delivery or are additionally required are available as special accessories or can be purchased later.
■ Before using the battery packs in a KÄRCHER Battery Power battery platform, please observe the operating instructions of the device used and any safety instructions enclosed.
■ More information on the operating instructions for battery packs or on accessories and spare parts can be found at www.kaercher.com.
Battery packs 36 V Battery Power
| Description | Rechargeable battery type | Nominal voltage | Rated capacity (according to IEC/EN 61690) | Rated capacity (according to specifications of cell manufacturer) |
| _Li-O | V | A | h | |
| 36/25 36 2,4 | _Li-O | |||
| 36/50 36 4,8 | _Li-O |
Transport
■ The lithium-ion battery is subject to the requirements of dangerous goods regulations and can be transported by the user in public traffic areas without any further restrictions.
■ When shipping by third parties (transport companies), special requirements for packaging and labelling must be observed.
■ Only send the battery if the casing is undamaged. Tape off open contacts and pack the battery tightly and securely. It must not be able to move in the packaging.
■ Please also observe the national regulations.
Safety Devices
△CAUTION
■ Safety installations serve the protection of the user and may not be modified or bypassed.
Protective circuit
The installed protective circuit protects the battery pack against
■ Overheating
■ Full discharge
■ Overcharging
■ Short-circuit
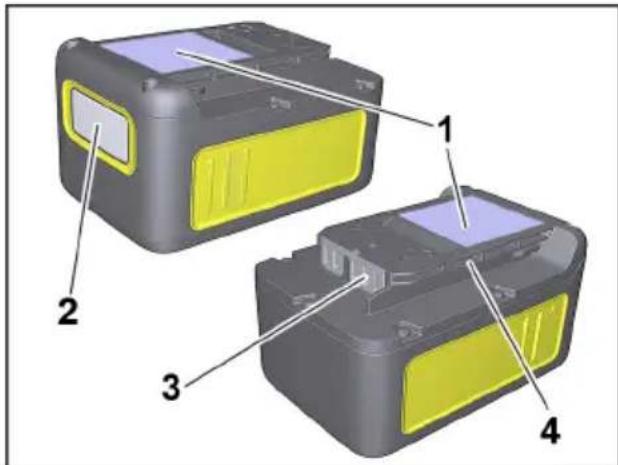
Operating elements
Battery pack
Figure dependent on types
text_image
Diagram of two electronic device modules with numbered labels pointing to different components.1 N a m e p l a t e
2 Display
3 C o n t a c t s
4 Intake
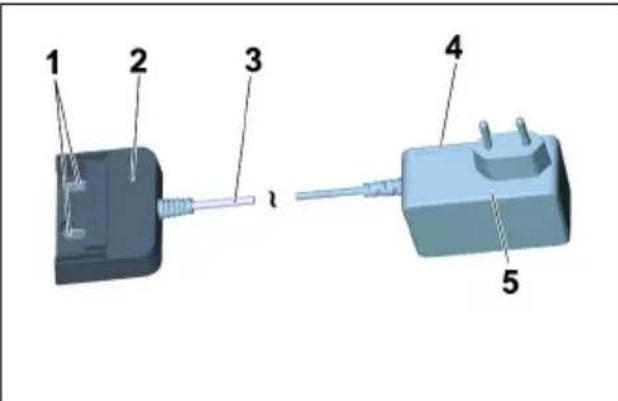
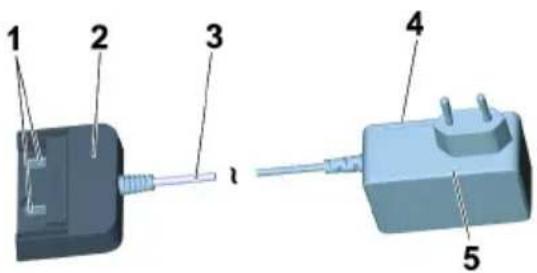
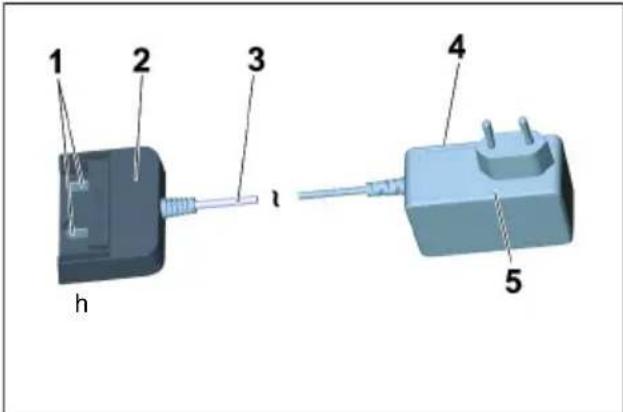
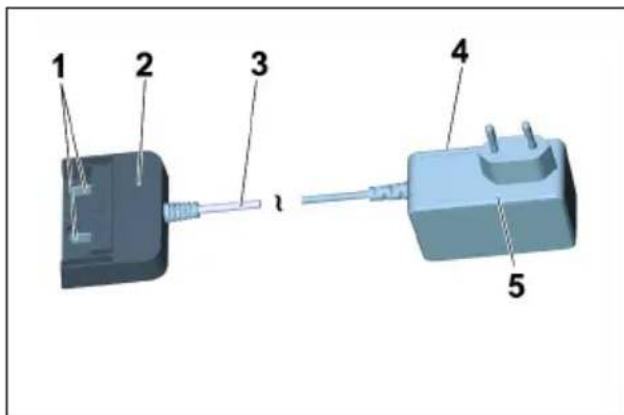
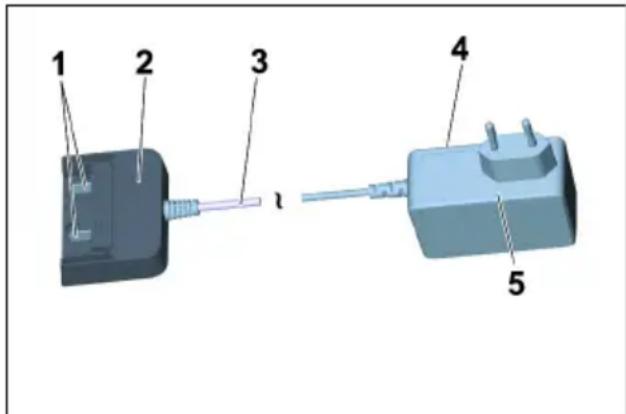
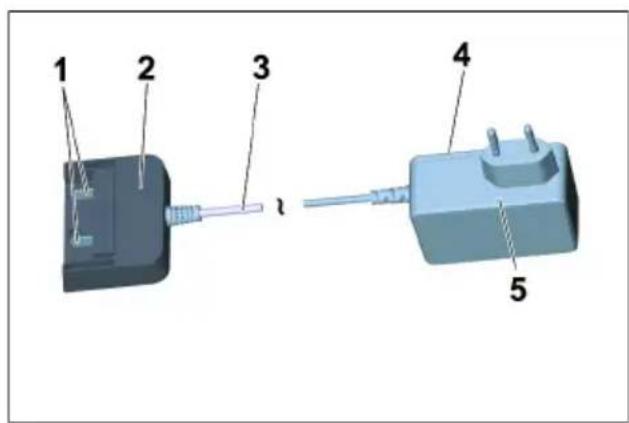
Standard charger
text_image
Diagram of a mechanical component with numbered parts labeled 1 to 51 Battery contacts
2 Battery adapter
3 Connection cable
4 N a m e p l a t e
5 Plug-in power supply
Charging process
△CAUTION
Risk of injury, risk of damage! Observe the operating instructions and safety instructions of the charger.
Note
New battery packs are only pre-charged and must be fully charged before first use.
The display is activated during the first charging process.
To ensure that the charge level indicator works correctly, the battery pack must be discharged during initial use until the device is switched off.
Illustration F
→ Plug the plug-in power supply into the socket.
→ Push the battery pack into the battery adapter of the charger.
→ The charging process begins automatically.
Illustration G
→ The remaining charging time is displayed on the battery pack display.
→ The charging time with a standard charger (Battery Power BC 36 V) for an empty battery pack (Battery Power 36/25) is approx. 5,5 hours.
→ When the battery pack is fully charged, the display shows 100%.
→ Remove the battery adapter from the battery pack after charging.
→ Pull the plug-in power supply from the socket.
Note
If the display does not show anything when the battery pack is in the charger, the battery capacity is fully depleted or very low. As soon as the battery pack has been sufficiently charged, the display shows the remaining charging time.
If the display does not show anything even after a long period of time, the battery pack is defective and must be replaced.
Note
New battery packs reach their full capacity after approx. 5 charging and discharging cycles.
Charge batteries that have not been used for a long time before use.
The performance of the battery pack is reduced at temperatures below 0^ C.
The capacity of the battery pack may be reduced if stored at temperatures over 20^ C.
Note
The charged battery pack can remain on the charger till it is to be used. There is no risk of over-charging.
In order to avoid unnecessary energy consumption, the charger should, however, be unplugged as soon as the battery pack has been fully charged.
Battery pack operation
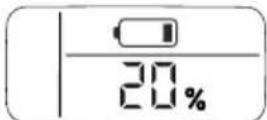
Display
■ The battery pack is equipped with a display that provides continuous information on the charging state, the progress of charging and the remaining battery life. In addition, any error messages occurring will also be shown.
■ The runtime adjustment is generated via capacity switching.
■ Depending on the device used, the display rotates when the battery pack is inserted.
Display Meaning
Battery in storage
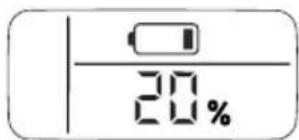
text_image
20%Charging state of the battery pack while not in use.
Battery in use
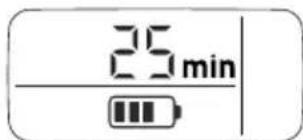
text_image
25 minRemaining battery life of the battery pack while in use.
Battery charging
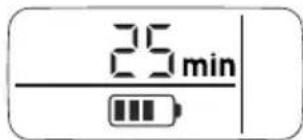
text_image
25 minRemaining charging time of the battery pack during charging.
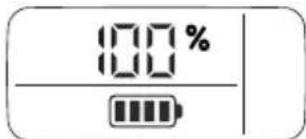
text_image
100%Battery pack fully charged.
Error display
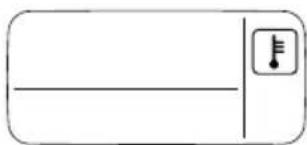
text_image
Simple diagram with a horizontal line, a vertical bar, and a thermometer icon in the top-right corner.Battery pack temperature outside the permitted values or disabled due to short-circuit (see Help in case of malfunctions).
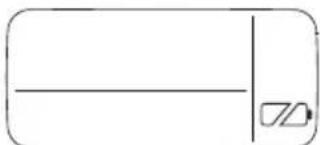
natural_image
Simple line drawing of a rectangle with a horizontal line and a small symbol inside (no text or labels)Battery pack defective and disabled for safety. Do not use the battery pack anymore and dispose of it properly.
Operation
△CAUTION
Risk of personal injury or damage! For operation, observe the operating instructions and safety instructions of the device used.
→ Insert the battery pack into the intake of the device.
△CAUTION
Risk of personal injury or damage! Ensure that the battery pack properly snaps into place.
Note
During use, the display shows the remaining operating time.
→ Remove the battery pack from the device after completion of the work.
→ Recharge battery pack after work.
Note
Also recharge partially discharged battery packs after use.
Storage
△CAUTION
Risk of personal injury or damage! Mind the weight of the appliance during transport.
ATTENTION
Risk of damage! Store the battery packs in rooms with low humidity and below 20 °C only.
This appliance must only be stored in interior rooms.
The battery pack indicates its current charging state on the display, even without being connected to a charger.
If the battery pack display goes out during storage, the battery capacity is fully depleted and the display has been switched off. Please recharge the battery as soon as possible.
Transport and storage
△CAUTION
Risk of personal injury or damage! Mind the weight of the appliance during transport.
Care and maintenance
→ Check charging contacts for soiling at regular intervals and clean them as necessary.
→ Recharge battery packs that are stored over a longer period of time.
Maintenance
The appliance is maintenance free.
Troubleshooting
Error during charging
| Display is off, battery pack not charging |
Charger defective. Replace the charger.
The battery pack may be completely discharged. Wait and see if the display shows the remaining charging time after some time. If not, the battery pack is defective. Replace the battery pack.
Charger defective. Replace the charger.
Observe the display. The battery temperature may not be within the normal range.
Battery pack temperature too low / too high. Put the battery pack in a moderate temperature environment. Wait until the battery pack temperature has normalized.
The charging process then starts automatically.
Battery pack temperature too low / too high. Put the battery pack in a moderate temperature environment. Wait until the battery pack temperature has normalized.
Display is on but the battery pack is not charging
Display shows temperature symbol, battery pack not charging
Error during operation
The display shows the temperature symbol
Error during operation
In case of a short circuit, the battery pack is disabled for 30 seconds for further use. If the short-circuit occurs more frequently, the battery pack is permanently disabled. Connect the battery pack to the charger to unlock it.
Display shows remaining run time 0, device switches off.
The battery pack is discharged. Please recharge the battery pack.
Storage error
Display shows no remaining capacity
The battery pack is discharged. Please recharge the battery pack.
Display shows remaining capacity 70% even though the battery pack has been freshly charged.
The battery pack is in automatic storage mode. This is activated if the battery has not been used for more than 21 days. This function protects the battery cells against rapid aging and increases their service life. Fully recharge the battery pack before next use.
General fault
Display screen shows broken battery symbol.
Battery pack defective and disabled for safety. Do not use the battery pack anymore and dispose of it properly.
Description of the Appliance
Illustrations on fold-out page!
■ These operating instructions describe the multi-purpose vacuum cleaners listed on the front cover.
■ The illustrations show the maximum equipment; depending on the model, there are differences in equipment and supplied accessories.
When unpacking the product, make sure that no accessories are missing and that none of the package contents have been damaged. If you detect any transport damages please contact your dealer.
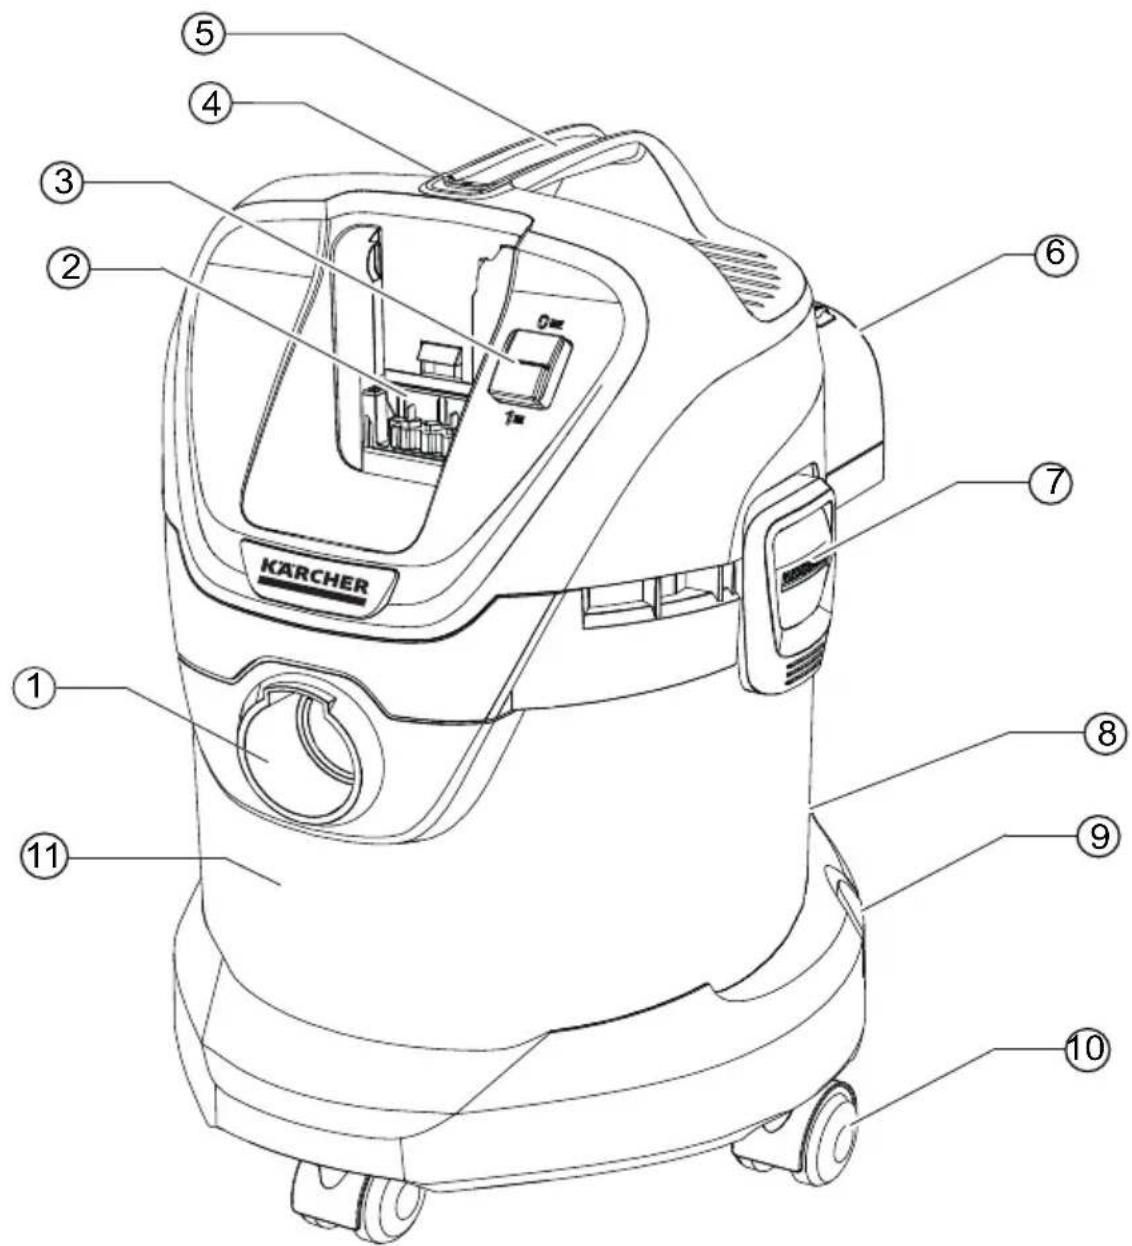
- included in the scope of delivery
○ possible accessories
1 Suction hose connection
2 Battery compartment
3 ON/OFF switch for appliance
4 Battery unlocking button
5 Handle
6 Blowing connection
7 Container closure
8 Parking position
9 Accessory mount
10 Steering roller
11 Container
12 Filter bag
13 Cartridge filter
14 Suction hose with connecting piece
15 Removable handle
16 Suction tubes 2 x 0.5 m
17 Crevice nozzle
18 Floor nozzle
(with insert)
19 Battery pack
Battery Power 36/25
20 Standard charger
Battery Power BC 36 V
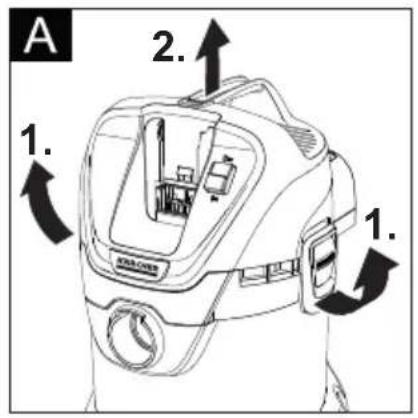
Assembly
Illustration A
→ To open, pull the container closures upwards and remove the device head on the carrying handle.
Illustration B
→ Remove the contents from the container.
Illustration C
→ Turn the container, press in the steering roller in the openings at the base of the container till the endpoint.
Illustration D
→ Put the appliance head onto the container and lock the container locks.
Illustration E
→ For vacuuming dry dirt an additional filter bag can be inserted if necessary.
Charging the battery pack
Illustration F
Illustration G
→ See chapters "Charging process" and "Battery pack operation".
Commissioning
Connect accessories
Illustration H
→ Push the suction hose into the connection on the appliance, it snaps in place. In order to disconnect it, push down with your thumb and pull the suction hose out.
Illustration I
→ Connect the handle with the suction hose until it snaps in place.
→ Put both suction tubes together and connect them with the handle.
Note: Accessories, such as suction brushes (optional) can be directly attached to the connecting piece and thus connected to the suction hose.
For convenient working even in tight spaces.
The removable handle can be attached between the accessories and the suction hose if necessary.
Recommendation: In order to vacuum the floor, attach the handle to the suction hose.
Illustration J
→ To remove the handle from the suction hose, press the button with your thumb and index and remove handle
Note: Due to removing the handle, accessories can be directly attached to the suction hose.
Illustration K
→ Connect the floor nozzle with the suction pipe.
Note: For vacuuming dry dirt or water off the floor - always work with the insert (brush strip and rubber lip) in the floor nozzle.
Inserting the battery pack
Illustration L
→ Push the battery pack from the top into the battery holder and lock it.
Turning on the Appliance
Illustration M
→ Position I: Vacuum and blowing function. Position 0: Appliance is switched off
General information on the operation
ATTENTION
The metal container can become statically charged when vacuuming large amounts of fine dust particles and then discharge upon contact.
ATTENTION
The batter holder area must be kept clean.
If there is too much dirt in this area, it is possible that the battery pack is not inserted/locked into place.
■ Similarly, it may be the case that battery pack can no longer be taken out of the device because the eject lever can no longer be moved.
Operation
ATTENTION
Always work with an inserted cartridge filter during wet as well as dry vacuum cleaning!
Dry vacuum cleaning
ATTENTION
Check the filter for damage prior to installation and replace as necessary.
Work with a dry cartridge filter only!
Illustration E
→ Recommendation: To vacuum fine dust, use the filter bag.
Information filter bag
- The filling level of the filter bag depends on the dirt that is sucked in.
- The filter bag needs to be replaced more frequently while sucking in fine dust, sand, etc.
- Clogged filter bags can burst - therefore make sure to replace the filter bag in a timely manner!
ATTENTION
Vacuum cold ashes only when using a pre-filter. For information about accessories and spare parts, please visit www.kaercher.com.
Wet vacuum cleaning
ATTENTION
Do not use a filter bag!
Illustration K
→ For vacuuming up moisture or liquids pay attention to the correct floor nozzle insert and connect the corresponding accessories.
Note: If the container is full, a float closes the suction opening, and the appliance works at a higher speed. Switch off the appliance immediately, and empty the container.
Blowing function
Cleaning hard to reach locations or, where vacuuming is not possible, like leaves from a gravel bed.
Illustration N
→ Connect the suction hose to the blower connection, this will activate the blower function.
Interrupting operation
→ Turn off the appliance.
Illustration
→ Hook the floor nozzle into the parking position.
Note: If it is necessary to remove the suction head when work is interrupted, the battery pack may become stuck. The battery pack is locked in tightly and cannot fall out.
Finish operation
→ Turn off the appliance.
Illustration P
→ Push the battery release button forwards and remove the battery pack from the device.
→ If necessary, recharge battery pack (see chapter "Charging battery pack").
Recommendation: Remove the battery pack from the device after completing the work.
Empty the container
Illustration Q
→ Remove the appliance head and empty the reservoir.
Storing the appliance
Illustration R
→ Store the accessories on the appliance and store the appliance in dry rooms.
Storing the battery pack
Note: Regardless of the vacuuming operations, the LC display uses little battery capacity, regardless of whether the battery pack is inside or outside the device.
→ See chapters "Charging process" and "Battery pack operation".
Transport
△CAUTION
Risk of personal injury or damage! Mind the weight of the appliance during transport.
When transporting by hand
→ Lift appliance by the carrying handle and carry it.
When transporting in vehicles
→ Secure the appliance against shifting and tipping over.
Care and maintenance
→ Clean the device and accessory parts made of plastic with a customary plastic cleaner.
→ If required, rinse the container and accessories with water properly and dry them before reuse.
Figure S V
→ Only clean the cartridge filter under running water; do not wipe or brush. Let it dry completely prior to installation.
→ Check charging contacts for soiling at regular intervals and clean them as necessary.
→ Check ventilation slits for soiling and clean them if necessary.
Maintenance
The appliance is maintenance free.
Troubleshooting
Appliance is not running
Illustration L
→ The battery pack is not seated correctly in the battery holder, insert the battery pack into the battery holder and let it click into place.
→ Charging state of the battery pack (see display) too low, charge the battery if necessary.
→ Defect battery pack or charger, replace battery pack or charger with new accessory.
The device switches off automatically
→ Device/battery pack is overheated, wait briefly to allow device/battery pack to cool down.
→ Container is full of water, which activated the float tank and empties the container.
Decreasing cleaning power
→ Accessories, suction hose or suction pipes are clogged.
Remove the clog with a suitable aid.
Illustration E
→ Filter bag is full, install new filter bag.
Figure S V
→ Cartridge filter is dirty, knock off dirt from cartridge filter and clean under running water if necessary.
→ Replace damaged cartridge filter.
Recommendation: Replace cartridge filter 1x per year.
Technical specifications
| Battery pack and quick charger in scope of delivery of:■ WD 3 Battery Set■ WD 3 Battery Premium Set(Battery pack Battery Power 36/25 / standard chargerBattery Power BC 36 V) | ||
| Device | ||
| Rated power W 300 | ||
| Operating time when battery fully charged (max.) | min 15 | |
| Protective class III | ||
| Type of protection IPX4 | ||
| Battery pack Battery Power 36/25 | ||
| Nominal voltage V 36 | ||
| Rated capacity(according to IEC/EN 61690) | Ah 2,4 | |
| Rated capacity(according to specifications of cell manufacturer) | Ah 2,5 | |
| Nominal width(in accordance with UN 3480) | Wh 86,4 | |
| Max. charging current A 4 | ||
| Battery type | Li-Ion | |
| Weight | kg | 0,9 |
| Dimensions (l x b x h) | mm | 133x88x72 |
| Standard charger Battery Power BC 36 V | ||
| Battery pack nominal voltage V 36 | ||
| Max. charging current A 0,5 | ||
| Battery type | Li-Ion | |
| Mains voltage | V | 100-240 |
| Frequency | Hz | 50-60 |
| Power input (max.) | A | 0,3 |
| Protective class | ☐ | II |
| Weight (without battery pack) | g | 205 |
Subject to technical modifications!
Table des matières
www.kaercher.com/REACH

www.kaercher.com/REACH
Garantie
Blocs-batteries 36 V Battery Power
text_image
Diagram of two labeled electronic devices with numbered components, showing front and rear views.1 Plaque signalétique
2 E c r a n
3 C o n t a c t s
4 Logement
text_image
Diagram of a mechanical component with numbered parts labeled 1 to 5Chargeur standard
text_image
Simple diagram with a horizontal line, a vertical bar, and a thermometer icon in the top-right corner.natural_image
Simple line drawing of a rectangle with a vertical line and a small symbol inside (no text or labels)www.kaercher.com/REACH

www.kaercher.com/REACH
Garanzia
text_image
Diagram of two labeled electronic devices with numbered components, showing front and rear views.text_image
Diagram of a mechanical component with numbered parts labeled 1 to 5text_image
Simple diagram with a horizontal line, a vertical bar, and a thermometer icon in the top-right corner.natural_image
Simple line drawing of a rectangle with a horizontal line and a small symbol inside (no text or labels)Bediening accupack NL 9
Opslag NL 10
Transport en opslag NL 10
Onderhoud NL 10
www.kaercher.com/REACH

Accupacks 36 V Battery Power
| Benaming | Accutype | Nominale spanning | Nominale capaciteit (conform IEC/EN 61690) | Nominale capaciteit (volgens informatie celfabrikant) |
| 4,8,5,0 | V | A | h | |
| 36/25 36 2 | ||||
| 36/50 36 4,8 5,0 |
Vervoer
text_image
Diagram of two electronic devices with numbered labels pointing to different componentstext_image
Diagram of a device with labeled components, showing two connected parts with numbered parts.1 Oplaadcontacten
2 Accu-adapter
3 Verbindingskabel
4 Typeplaatje
5 Stekkervoeding
Laadproces
⚠VOORZICHTIG
text_image
Simple diagram with a horizontal line, a vertical bar, and a thermometer icon in the top-right corner.natural_image
Simple line drawing of a rectangle with a horizontal line and a small symbol inside (no text or labels)19 Accupack Battery Power 36/25
20 Standaardoplaadapparaat Battery Power BC 36 V
Montage
Afbeelding A
www.kaercher.com/REACH

www.kaercher.com/REACH
Garantía
text_image
Diagram of a battery pack with numbered components labeled 1 to 4text_image
Diagram of a device with labeled components, showing two connected parts with numbered parts.Battery Power BC 36 V
Montaje
Imagen A
www.kaercher.com/REACH

www.kaercher.com/REACH
Garantia
text_image
Diagram of four labeled electronic components with yellow and gray sections, likely illustrating a battery or sensor assembly.1 Placa de tipo
2 Display
3 Contactos
4 Alojamento
A
Carregador standard
text_image
1 2 3 4 5 h1 Contactos de carregamento
text_image
Simple diagram with a horizontal line, a vertical bar, and a thermometer icon in the top-right corner.natural_image
Simple line drawing of a rectangle with a horizontal line and a small geometric symbol inside (no text or labels)text_image
Diagram of two electronic device modules with numbered labels pointing to different components.1 Typeskilt
2 Display
3 Kontakter
4 Holder
Standard ladeaggregat
text_image
Diagram of a device with labeled components, showing two connected parts with numbered parts.text_image
Simple diagram with a horizontal line, a vertical bar, and a musical note icon above it.natural_image
Simple line drawing of a rectangular shape with a horizontal line and a small symbol inside (no text or labels)20 Standardladeaggregat Battery Power BC 36 V
Montering
Figur A
www.kaercher.com/REACH

Materialet i emballasjen kan resirkuleres. Kvitt deg med emballasjen på miljøvennlig måte.

www.kaercher.com/REACH
Garanti
text_image
Diagram of two electronic device modules with numbered labels pointing to different components.1 Typeskilt
2 Display
3 K o n t a k t e r
4 H o l d e r
Standard-ladeapparat

text_image
Diagram of a device with labeled components, showing two connected parts with numbered parts.1 Ladekontakter
2 Batteriadapter
3 Tilkoblingskabel
4 Typeskilt
5 Strømadapter
Lading
⚠FORSIKTIG
text_image
Simple diagram with a rectangle, vertical line, and a small icon containing a thermometer symbol.natural_image
Simple line drawing of a rectangle with a horizontal line and a small geometric symbol inside (no text or labels)20 Standardlader Battery Power BC 36 V
Montering
Figur A
www.kaercher.com/REACH

www.kaercher.com/REACH
Garanti
text_image
Diagram of a battery pack with numbered components labeled 1 to 41 Typskylt
2 Display
3 Kontakter
4 H å l l a r e
Standardladdare

text_image
Diagram of a device with labeled components, showing two connected parts with numbered parts.text_image
Simple diagram with a horizontal line, a vertical bar, and a thermometer icon in the top-right corner.natural_image
Simple line drawing of a rectangle with a horizontal line and a small symbol inside (no text or labels)20 Standardladdare Battery Power BC 36 V
Montering
Bild A
www.kaercher.com/REACH

www.kaercher.com/REACH
Takuu
text_image
Diagram of two battery modules with numbered labels pointing to different componentstext_image
Diagram of a device with labeled components, showing a connector and terminal connectionstext_image
Simple diagram with a horizontal line, a vertical bar, and a thermometer icon in the top-right corner.natural_image
Simple line drawing of a rectangle with a horizontal line and a small symbol inside (no text or labels)www.kaercher.com/REACH

www.kaercher.com/REACH
Εγγύηση
text_image
Diagram of four labeled electronic components with yellow and black sections, likely illustrating a battery or sensor assembly.text_image
Diagram of a mechanical component with numbered parts labeled 1 to 5text_image
Simple diagram with a horizontal line, a vertical bar, and a thermometer icon in the top-right corner.natural_image
Simple line drawing of a rectangle with a horizontal line and a small symbol inside (no text or labels)www.kaercher.com/REACH

www.kaercher.com/REACH
Garanti
text_image
Diagram of two labeled electronic devices with numbered components, showing front and rear views.text_image
Diagram of a device with labeled components, showing a connector and terminal connectionsnatural_image
Simple line drawing of a rectangle with a horizontal line and a small symbol inside (no text or labels)www.kaercher.com/REACH

www.kaercher.com/REACH
Гарантия
| Обозначение | Тип аккумулятора | Номинальное напряжение | Номинальная емкость(согласно IEC/EN 61690) | Номинальная емкость(согласно данным производителяэлемента) |
| 4,4,5,6,7,8,9,10,11,12,13,14,15,16,17,18,19,20,21,22,23,24,25,26,27,28,29,30,31,32,33,34,35,36,37,38,39,40,41,42,43,44,45,46,47,48,49,50,51,52,53,54,55,56,57,58,59,60,61,62,63,64,65,66,67,68,69,70,71,72,73,74,75,76,77,78,79,80,81,82,83,84,85,86,87,88,89,90,91,92,93,94,95,96,97,98,99,100,101,102,103,104,105,106,107,108,109,110,111,112,113,114,115,116,117,118,119,120,121,122,123,124,125,126,127,128,129,130,131,132,133,134,135,136,137,138,139,140,141,142,143,144,145,146,147,148,149,150,151,152,153,154,155,156,157,158,159,160,161,162,163,164,165,166,167,168,169,170,171,172,173,174,175,176,177,178,179,180,181,182,183,184,185,186,187,188,189,190,191,192,193,194,195,196,197,198,199,200,201,202,203,204,205,206,207,208,209,210,211,212,213,214,215,216,217,218,219,220,221,222,223,224,225,226,227,228,229,230,231,232,233,234,235,236,237,238,239,240,241,242,243,244,245,246,247,248,249,250,251,252,253,254,255,256,257,258,259,260,261,262,263,264,265,266,267,268,269,270,271,272,273,274,275,276,277,278,279,280,281,282,283,284,285,286,287,288,289,290,291,292,293,294,295,296,297,298,299,300,301,302,303,304,305,306,307,308,309,310,311,312,313,314,315,316,317,318,319,320,321,322,323,324,325,326,327,328,329,330,331,332,333,334,335,336,337,338,339,340,341,342,343,344,345,346,347,348,349,350,351,352,353,354,355,356,357,358,359,360,361,362,363,364,365,366,367,368,369,370,371,372,373,374,375,376,377,378,379,380,381,382,383,384,385,386,387,388,389,390,391,392,393,394,395,396,397,398,399,400,401,402,403,404,405,406,407,408,409,410,411,412,413,414,415,416,417,418,419,420,421,422,423,424,425,426,427,428,429,430,431,432,433,434,435,436,437,438,439,440,441,442,443,444,445,446,447,448,449,450,451,452,453,454,455,456,457,458,459,460,461,462,463,464,465,466,467,468,469,470,471,472,473,474,475,476,477,478,479,480,481,482,483,484,485,486,487,488,489,490,491,492,493,494,495,496,497,498,499,500,501,502,503,504,505,506,507,508,509,510,511,512,513,514,515,516,517,518,519,520,521,522,523,524,525,526,527,528,529,530,531,532,533,534,535,536,537,538,539,540,541,542,543,544,545,546,547,548,549,550,551,552,553,554,555,556,557,558,559,560,561,562,563,564,565,566,567,568,569,570,571,572,573,574,575,576,577,578,579,580,581,582,583,584,585,586,587,588,589,590,591,592,593,594,595,596,597,598,599,600,601,602,603,604,605,606,607,608,609,610,611,612,613,614,615,616,617,618,619,620,621,622,623,624,625,626,627,628,629,630,631,632,633,634,635,636,637,638,639,640,641,642,643,644,645,646,647,648,649,650,651,652,653,654,655,656,657,658,659,660,661,662,663,664,665,666,667,668,669,670,671,672,673,674,675,676,677,678,679,680,681,682,683,684,685,686,687,688,689,690,691,692,693,694,695,696,697,698,699,700,701,702,703,704,705,706,707,708,709,710,711,712,713,714,715,716,717,718,719,720,721,722,723,724,725,726,727,728,729,730,731,732,733,734,735,736,737,738,739,740,741,742,743,744,745,746,747,748,749,750,751,752,753,754,755,756,757,758,759,760,761,762,763,764,765,766,767,768,769,770,771,772,773,774,775,776,777,778,779,780,781,782,783,784,785,786,787,788,789,790,791,792,793,794,795,796,797,798,799,800,801,802,803,804,805,806,807,808,809,810,811,812,813,814,815,816,817,818,819,820,821,822,823,824,825,826,827,828,829,830,831,832,833,834,835,836,837,838,839,840,841,842,843,844,845,846,847,848,849,850,851,852,853,854,855,856,857,858,859,860,861,862,863,864,865,866,867,868,869,870,871,872,873,874,875,876,877,878,879,880,881,882,883,884,885,886,887,888,889,890,891,892,893,894,895,896,897,898,899,900,901,902,903,904,905,906,907,908,909,910,911,912,913,914,915,916,917,918,919,920,921,922,923,924,925,926,927,928,929,930,931,932,933,934,935,936,937,938,939,940,941,942,943,944,945,946,947,948,949,950,951,952,953,954,955,956,957,958,959,960,961,962,963,964,965,966,967,968,969,970,971,972,973,974,975,976,977,978,979,980,981,982,983,984,985,986,987,988,989,990,991,992,993,994,995,996,997,998,999,100 | ||||
Транспортировка
text_image
Diagram of two labeled electronic devices with numbered components, showing front and rear views.text_image
Diagram of a mechanical component with numbered parts labeled 1 to 5text_image
Simple diagram with a horizontal line and a musical note icon, likely representing a button or label.natural_image
Simple line drawing of a rectangle with a horizontal line and a small symbol inside (no text or labels)www.kaercher.com/REACH

www.kaercher.com/REACH
Garancia
text_image
Diagram of two battery modules with labeled parts, showing front and rear views with numbered annotations.text_image
Diagram of a device with numbered components, showing a connector and cable connectiontext_image
Simple diagram with a horizontal line, a vertical bar, and a thermometer icon in the top-right corner.natural_image
Simple line drawing of a rectangle with a horizontal line and a small symbol inside (no text or labels)www.kaercher.com/REACH

www.kaercher.com/REACH
Záruka
text_image
Diagram of two electronic device modules with numbered labels pointing to different components.text_image
Diagram of a mechanical component with numbered parts labeled 1 to 5text_image
Simple diagram with a horizontal line, a vertical bar, and a thermometer icon in the top-right corner.natural_image
Simple line drawing of a rectangle with a horizontal line and a small symbol inside (no text or labels)www.kaercher.com/REACH

Embalažni materiali so primerni za recikliranje.
Embalažo zavrzite okolju prijazno.

www.kaercher.com/REACH
Garancija
text_image
Diagram of a battery pack with numbered components labeled 1 to 41 Tipska tablica
2 Prikazovalnik
3 S t i k i
4 D r ž a l o
text_image
Diagram of a device with labeled components, showing two connected parts with numbered parts.1 Polnilni kontakti
2 Akumulatorski adapter
3 Povezovalni kabel
4 Tipska tablica
5 Vtični adapter
Polnjenje
▲PREVIDNOST
text_image
Simple diagram with a horizontal line, a vertical bar, and a thermometer icon in the top-right corner.natural_image
Simple geometric diagram with a rectangle and a vertical line, no text or symbols present.www.kaercher.com/REACH

www.kaercher.com/REACH
Gwarancja
text_image
Diagram of two electronic device modules with numbered labels pointing to internal componentstext_image
Simple diagram with a horizontal line, a vertical bar, and a musical note icon in the top-right corner.natural_image
Simple line drawing of a rectangle with a horizontal line and a small geometric symbol inside (no text or labels)Mult stimate client,
www.kaercher.com/REACH

www.kaercher.com/REACH
Garantie
text_image
Diagram of a battery pack with numbered components labeled 1 to 4text_image
Diagram of a mechanical component with numbered parts labeled 1 to 5text_image
Simple diagram with a horizontal line, a vertical bar labeled 'F', and a thermometer icon in the top-right corner.natural_image
Simple line drawing of a rectangular shape with a horizontal line and a small symbol inside (no text or labels)www.kaercher.com/REACH

www.kaercher.com/REACH
Záruka
text_image
Diagram of two electronic devices with numbered labels pointing to internal componentstext_image
Diagram of a mechanical component with numbered parts labeled 1 to 5text_image
Simple diagram with a horizontal line, a vertical bar, and a thermometer icon in the top-right corner.natural_image
Simple line drawing of a rectangular shape with a horizontal line and a small symbol inside (no text or labels)www.kaercher.com/REACH

Materijali ambalaže se mogu reciklirati. Ambalažu odložite na otpad u skladu s propisima o očuvanju okoliša.

Stari uređaji sadrže vrijedne materijale koji se mogu reciklirati te bi ih stoga trebalo predati kao sekundarne sirovine. Primarne i punjive baterije sadrže tvari koje ne smiju dospjeti u okoliš. Stare uređaje kao i primarne odnosno punjive baterije odložite u otpad ekološki primjereno.
Električni i elektronički dijelovi često sadrže sastavne dijelove koji pri pogrešnom rukovanju ili pogrešnom zbrinjavanju mogu predstavljati potencijalnu opasnost za ljudsko zdravlje i okoliš. Ipak, ti sastavni dijelovi nužni su za propisani pogon uređaja. Uređaji označeni ovim simbolom ne smiju se odlagati u komunalni otpad.
Napomene o sastojcima (REACH)
Aktualne informacije o sastojcima možete pronaći na stranici:
www.kaercher.com/REACH
Jamstvo
text_image
Diagram of two electronic device modules with numbered labels pointing to different components.1 Natpisna pločica
2 Z a s l o n 3 K o n t a k t i 4 D r ž a č
Standardni punjač
text_image
Diagram of a device with labeled components, showing a connector and terminal block assemblywww.kaercher.com/REACH

Ambalaža se može ponovo preraditi. Ambalažu odložite u otpad ekološki primereno.

Stari uređaji sadrže vredne materijale sa sposobnošću recikliranja i treba ih dostaviti na ponovnu preradu. Primarne i punjive baterije sadrže materije koje ne smeju dospeti u životnu sreditu. Stare uređaje kao i baterije ili akumulatore odložite u otpad ekološki primereno. Električni i elektronski uređaji sadrže često sastavne delove koji, u slučaju nepravilnog rukovanja ili nepravilnog odlaganja u otpad, mogu da predstavljaju potencijalnu opasnost za zdravlje ljudi i okolinu. Ipak, ovi sastavni delovi su neophodni za pravilan rad uređaja. Uređaji koji su označeni ovim simbolom ne smeju da se odlazu u kućni otpad.
Napomene o sastojcima (REACH)
Aktuelne informacije o sastojcima možete pronaći na stranici:
www.kaercher.com/REACH
Garancija
U svakoj zemlji važe garantni uslovi koje je izdala naša nadležna distributivna organizacija. Eventualne smetnje na uređaju za vreme trajanja garancije uklanjamo besplatno, ukoliko je uzrok greška u materijalu ili proizvodnji. U slučaju koji podleže garanciji obratite se sa potvrdom o kupovini Vašem prodavcu ili najbližoj ovlašćenoj servisnoj službi.
Servisna služba
text_image
Diagram of two electronic device modules with numbered labels pointing to different components.1 Natpisna pločica
2 É k r a n
3 Kontakti
4 D r ž a č

text_image
Diagram of a mechanical component with numbered parts labeled 1 to 5Standardni punjač
1 Kontakti za punjenje
2 Adapter akumulatora
3 Spojni kabl
4 Natpisna pločica
5 Mrežni deo utikača
Postupak punjenja
△OPREZ
text_image
Simple diagram with a horizontal line, a vertical bar, and a thermometer icon in the top-right corner.Temperatura akumulatorskog pakovanja izvan dozvoljenih vrednosti ili blokada zbog kratkog spoja (vidi Pomoć kod smetnji).
natural_image
Simple line drawing of a rectangle with a horizontal line and a small symbol inside (no text or labels)Akumulatorsko pakovanje neispravno i blokirano zbog sigurnosti. Više ne koristiti akumulatorsko pakovanje i odložiti ga u otpad u skladu sa propisima.
Rad
△OPREZ
www.kaercher.com/REACH

www.kaercher.com/REACH
Гаранция
text_image
Diagram of two electronic device modules with numbered labels pointing to different components.text_image
Diagram of a mechanical component with numbered parts labeled 1 to 5text_image
Simple diagram with a horizontal line, a vertical bar, and a thermometer icon in the top-right corner.natural_image
Simple line drawing of a rectangle with a horizontal line and a small symbol inside (no text or labels)www.kaercher.com/REACH

www.kaercher.com/REACH
Garantii
text_image
Diagram of two electronic device modules with numbered labels pointing to different components.text_image
Diagram of a device with labeled components, showing two connected parts with numbered parts.20 Standardlaadija Battery Power BC 36 V
Paigaldamine
Joonis A
www.kaercher.com/REACH

www.kaercher.com/REACH
Garantijas nosacijumi
text_image
Diagram of two battery modules with numbered labels pointing to different componentstext_image
Diagram of a device with labeled components, showing two connected parts with numbered parts.text_image
Simple diagram with a horizontal line and a vertical bar containing a thermometer icon, likely representing a timer or function.natural_image
Simple line drawing of a rectangle with a horizontal line and a small symbol inside (no text or labels)www.kaercher.com/REACH

www.kaercher.com/REACH
Garantija
text_image
Diagram of two electronic device modules with numbered labels pointing to different components.text_image
Diagram of a device with labeled components, showing a connector and terminal block assemblytext_image
Simple diagram with a horizontal line, a vertical bar, and a thermometer icon in the top-right corner.natural_image
Simple line drawing of a rectangle with a horizontal line and a small symbol inside, no text or labels present.19 Akumuliatorius Battery Power 36/25
20 Standartinis jkroviklis Battery Power BC 36 V
Montavimas
Paveikslas A
www.kaercher.com/REACH

www.kaercher.com/REACH
Гарантія
text_image
Diagram of two labeled electronic components with numbered parts, showing internal structure and mounting points.text_image
Diagram of a device with labeled components, showing a connector and terminal connectionstext_image
Simple diagram with a rectangle, vertical line, and a thermometer icon in the top-right corner.natural_image
Simple line drawing of a rectangle with a horizontal line and a small geometric symbol inside (no text or labels)www.kaercher.com/REACH

www.kaercher.com/REACH
Кепілдеме
text_image
Diagram of two battery modules with numbered labels pointing to different componentstext_image
Diagram of a device with labeled components, showing a connector and cable connectiontext_image
Simple diagram with a horizontal line and a thermometer icon, likely indicating temperature measurement or status.natural_image
Simple line drawing of a rectangle with a horizontal line and a small symbol inside (no text or labels)text_image
Simple diagram with a horizontal line, a vertical bar, and a thermometer icon in the top-right corner.
natural_image
Simple line drawing of a rectangle with a horizontal line and a small symbol inside (no text or labels)عملية الشحن
تُويه Ⓓ
text_image
Diagram of two electronic device modules with numbered labels pointing to different components.2 شاشة العرض
3 الملامسات
4 وحدة الإدراج
جهاز_SHحن القياسي
text_image
Diagram of a device with labeled components: two connected devices and one with terminal pins.1 ملامسات الشحن
2 مهايى البطارية
3 كابل التوصيل
natural_image
Black thumbs-up icon on white background (no text or symbols)THANK YOU!
MERCI! DANKE! iGRACIAS!

Register your product and benefit from many advantages.
www.kaercher.com/welcome


Rate your product and tell us your opinion.
natural_image
Icon showing a gear and wrench inside a square frame (no text or symbols)www.kaercher.com/dealersearch
Alfred Kärcher SE & Co. KG
Alfred-Kärcher-Str. 28-40
71364 Winnenden (Germany)
Tel.: +49 7195 14-0
Fax: +49 7195 14-2212


