
FAN102477 - Fan Emerio - Free user manual and instructions
Find the device manual for free FAN102477 Emerio in PDF.
| Product type | Pedestal fan |
| Brand | Emerio |
| Model | FAN102477 |
| Power supply | 220-240 V ~ 50 Hz |
| Power consumption | 50 W |
| Standby power consumption | 0.462 W |
| Maximum air flow | 39.55 m³/min |
| Maximum air speed | 2.62 m/s |
| Noise level | 52.9 dB(A) |
| Service value | 1.13 (m³/min)/W |
| Number of speeds | 3 (low, medium, high) |
| Timer | Yes, from 0.5 to 7.5 hours |
| Operating modes | Normal, Nature, Sleep |
| Oscillation | Yes |
| Remote control | Yes (AAA batteries not included) |
| Height adjustment | Yes |
| Tilt | Yes |
| Protective grilles | Front and rear |
| Cleaning | Damp cloth, brush or vacuum cleaner for the grilles |
| Safety | Do not immerse, keep out of reach of children under 8 years |
Frequently Asked Questions - FAN102477 Emerio
User questions about FAN102477 Emerio
0 question about this device. Answer the ones you know or ask your own.
Ask a new question about this device
Download the instructions for your Fan in PDF format for free! Find your manual FAN102477 - Emerio and take your electronic device back in hand. On this page are published all the documents necessary for the use of your device. FAN102477 by Emerio.
USER MANUAL FAN102477 Emerio
natural_image
Black outdoor fan with four blades and a stand, no visible text or symbols on the fan or background.
CE
Inhalt – Съдържание – Sadržaj – Obsah – Indhold – Contenido – Sisukord – Sisältö – Contenu – Content – Sadržaj – Tartalom – Innihald – Contenuto – Turinys – Saturs – Inhoud – Innhold – Содержание – Sadržaj – Obsah – Vsebina – Innehåll – İçerik
Inhalt – German ...... - 2 -
Ръководство с инструкции – Bulgarian ...... - 7 -
Uputstvo – Bosnian ...... - 12 -
Návod k použití – Czech ...... - 17 -
Brugsanvisning – Danish...... - 22 -
Manual de Instrucciones – Spanish ...... - 27 -
Kasutusjuhend – Estonian ...... - 32 -
Käyttöopas – Finnish ...... - 37 -
Mode d'emploi – French ...... - 42 -
Instruction manual – English ...... - 47 -
Upute za rad – Croatian ...... - 52 -
Használati útmutató – Hungarian ...... - 57 -
Leiðbeiningarhandbók – Icelandic...... - 62 -
Manuale d'istruzioni – Italian.... - 67 -
Instrukciju vadovas – Lithuanian ...... - 72 -
Instrukciju rokasgrāmata – Latvian ...... - 77 -
Gebruiksaanwijzing – Dutch ...... - 82 -
Brukermanual – Norwegian ...... - 87 -
Инструкция по эксплуатации – Russian ...... - 92 -
Uputstvo – Serbian-Latin.... - 97 -
Návod na obsluhu – Slovakian.... - 102 -
Priročnik za uporabo – Slovenian ...... - 107 -
Bruksanvisning – Swedish ...... - 112 -
Kullanım talimatı – Turkish...... - 117 -

MONTAGEANLEITUNG
natural_image
Technical line drawing of a fan assembly with a cylindrical component and a circular fan blade (no text or symbols)3.
natural_image
Abstract line drawing of a fan-like shape with internal blades and a rotation arrow (no text or symbols)4.
natural_image
Diagram of a mechanical device with labeled parts and directional arrows (no text or symbols)5.
natural_image
Technical line drawing of a fan with internal blades and a separate cylindrical component (no text or symbols)3.
natural_image
Diagram of a fan-like mechanical component with internal blades and a rotation arrow (no text or symbols)4.

natural_image
Diagram of a mechanical device with circular components and directional arrows indicating motion (no text or symbols)5.

UPUTSTVO ZA SASTAVLIANJE
natural_image
Technical line drawing of a fan assembly with internal blades and housing (no text or symbols)3.

natural_image
Diagram of a mechanical component with rotating arrow indicating rotation (no text or symbols)4.
5.
UPUTSTVO ZA RAD
POKYNY K INSTALACI
natural_image
Line drawing of a fan with internal blades and a separate open fan (no text or symbols)3.
natural_image
Diagram of a mechanical fan or impeller with internal blades and a rotation arrow (no text or symbols)4.

natural_image
Diagram of a mechanical device with a central component and two circular components, showing internal structure (no text or symbols)5.
POKYNY PRO OBSLUHU
MONTERINGSVEJLEDNING
** Inden ibrugtagning skal produktet samles som beskrevet nedenstående.
- Samling af stativet
- Sæ t stativskaftet (15) ned i foden (16).
- Skru standerakslen fast til foden med låsemøtrikken (17).
- Den samlede montering
natural_image
Technical line drawing of a fan with internal blades and a separate view of the blade (no text or symbols)3.
natural_image
Diagram of a mechanical or fluidic component with concentric fan-like structures and a rotating arrow (no text or symbols)4.

natural_image
Diagram of a mechanical device with rotating components and a curved arrow indicating rotation (no text or symbols)5.
BRUGSANVISNING
INSTRUCCIONES DE MONTAJE
natural_image
Technical line drawing of a fan assembly with internal blades and a separate view of the blade (no text or symbols)3.

natural_image
Pure mechanical diagram of a fan or impeller with internal blades and a rotation arrow (no text or symbols)4.
natural_image
Diagram of a mechanical device with a circular component and two circular components, showing internal structure (no text or symbols)5.
KOOSTAMISJUHISED
natural_image
Technical line drawing of a fan assembly with internal blades and a separate view of the blade (no text or symbols)3.

natural_image
Diagram of a mechanical fan or impeller with internal blades and a rotation arrow (no text or symbols)4.

natural_image
Diagram of a mechanical device with labeled parts and directional arrows indicating motion (no text or symbols present)5.
KASUTUSJUHISED
KOKOAMISOHJEET
natural_image
Technical line drawing of a fan with internal blades and a cylindrical component, labeled '3.' (no text or symbols on the diagram itself)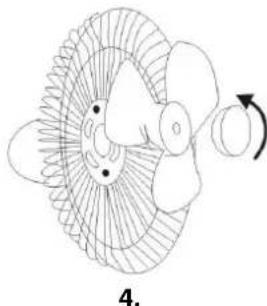
natural_image
Diagram of a mechanical fan or impeller with internal blades and a rotation arrow, labeled '4.' (no text or symbols on the diagram itself)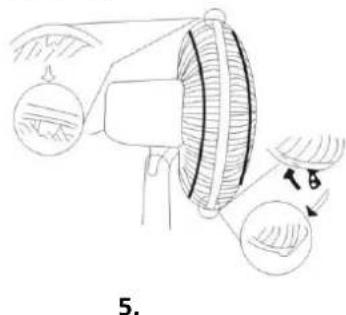
natural_image
Diagram of a mechanical device with labeled parts and directional arrows, no readable text or symbols present.KÄYTTÖ OHJEET
INSTRUCTIONS DE MONTAGE
natural_image
Line drawing of a fan with internal blades and a separate open bulb (no text or symbols)3.

natural_image
Diagram of a mechanical fan or impeller with internal blades and a rotation arrow (no text or labels)4.
natural_image
Diagram of a mechanical device with a circular component and a handle, showing no text or symbols.5.
INSTRUCTIONS D'UTILISATION
-
Oscillation (OSC)
-
Mode
- This appliance can be used by children aged from 8 years and above and persons with reduced physical, sensory or mental capabilities or lack of experience and knowledge if they have been given supervision or instruction concerning use of the appliance in a safe way and understand the hazards involved.
- Children shall not play with the appliance.
- Cleaning and user maintenance shall not be made by children without supervision.
- If the supply cord is damaged, it must be replaced by the manufacturer, its service agent or similarly qualified persons in order to avoid a hazard.
- This appliance is intended to be used in household and similar applications such as: staff kitchen areas in shops, offices and other working environments; farm houses; by clients in hotels, motels and other residential type environment; bed and breakfast type environments.
- Incorrect operation and improper handling can lead to faults on the device and injuries to the user.
- In the event of improper use or incorrect handling, no liability can be accepted for any damage that may occur.
- Before you put the plug into the socket, please check that the type of current and mains voltage correspond to the instructions on the nameplate on the underside of the appliance.
- Do not immerse the unit or mains plug in water or other liquids. There is danger to life due to electric shock! However, if this should occur, remove the mains plug immediately and then have the unit checked by an expert before using it again.
- Do not operate the device if the mains cable or the mains plug show signs of damage, if the device has fallen on the floor or has been otherwise damaged. In such cases take
the device to a specialist for checking and repair, if necessary.
- Never remove the mains plug from the socket by pulling on the mains cable, or with wet hands.
- Ensure that the mains cable does not hang over sharp edges or allow it to become trapped.
- Keep the appliance away from damp, and protect from splashes.
- Keep the appliance away from hot objects (e.g. hotplates) and open flames.
- Keep the appliance and its cord out of reach of children less than 8 years.
- The machine should not be operated by means of an external timer-switch or by means of a separate system with remote control.
- Use the appliance on a flat, dry and heat resistance surface.
- Never leave the device in unattended during use.
- Do not store or operate the appliance in the open air.
- Keep the appliance in a dry place, inaccessible to children (in its packaging).
- Never put fingers or any other objects through the fan guards when the fan is running.
- Never operate the product without the fan guards in place, as serious personal injury may result.
- The appliance must be assembled completely before use.
- Watch out for long hair! It can be caught in the fan owing to the air turbulence.
- Do not point the air flow to the people for a long time.
- Ensure that the fan is switched off from the supply mains before removing the guard.
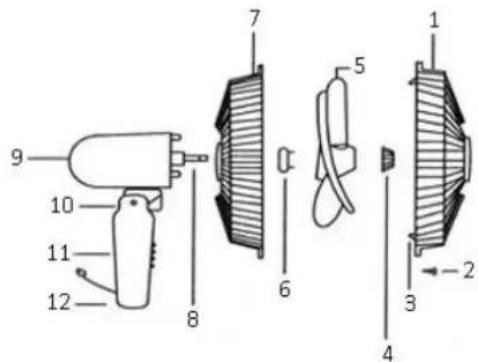
PARTS DESCRIPTION
- Front guard
- Guard clips screw
- Guard clips
- Blade fastening screw
- Blade
- Guard fastening screw
- Rear guard
- Motor shaft
- Rear shell
- Head clamping screw
- Switch box
- Fastening screw
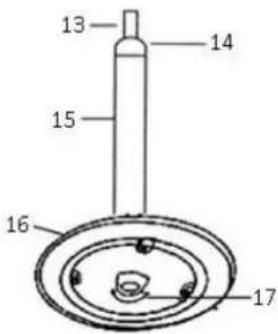
- Height adjustment pipe
- Fasten set
- Standing shaft
- Standing base
- Locking nut
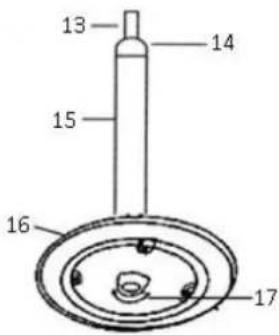
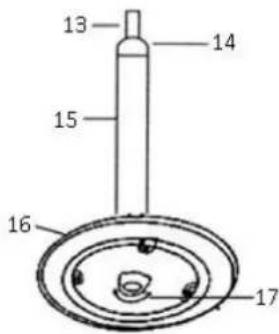
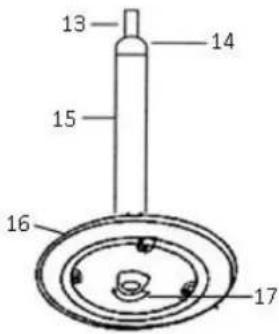
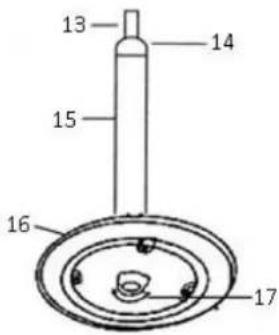
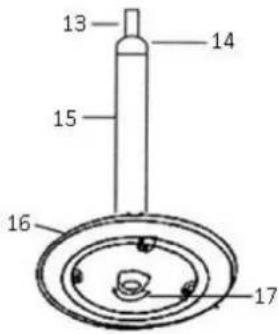
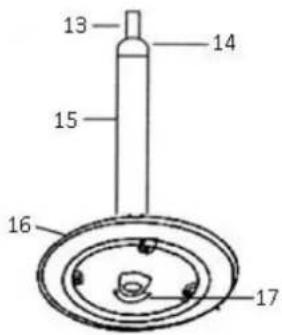
ASSEMBLING INSTRUCTIONS
** Please assemble correctly by the following orders when using.
-
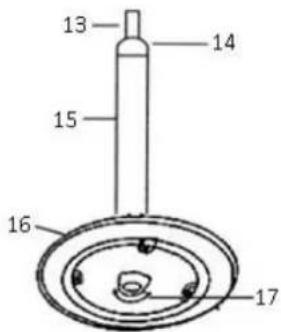
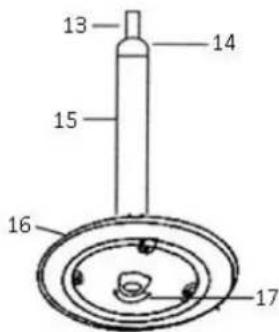
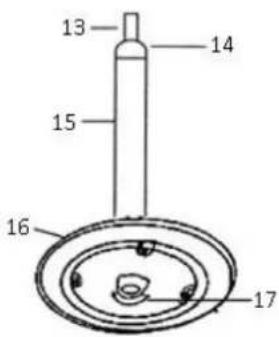
Assemble the stand
-
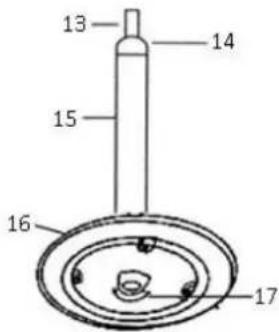
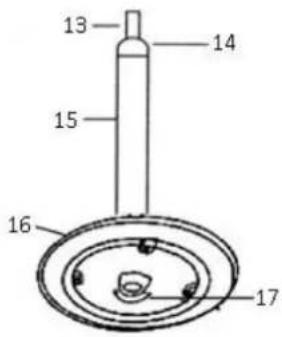
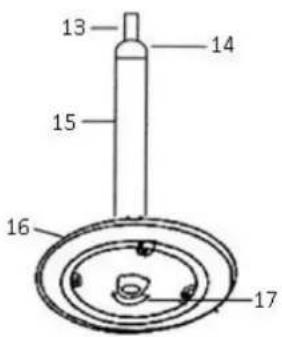
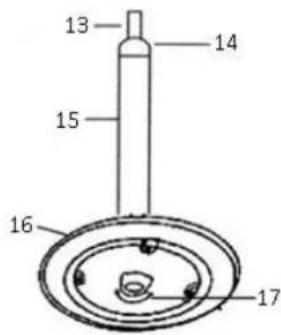
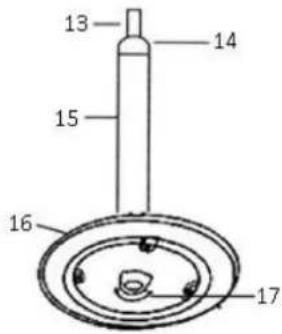
Put the standing shaft (15) on the standing base (16).
-
Screw the standing shaft on the standing base by using the locking nut (17).
-
The whole assembly
-
Pull the height adjustment pipe (13) out and tighten the fasten set (14).
-
Link the fan main body and the height adjustment pipe together by the fastening screw (12) and then fix them.
-
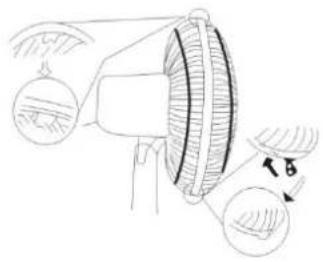
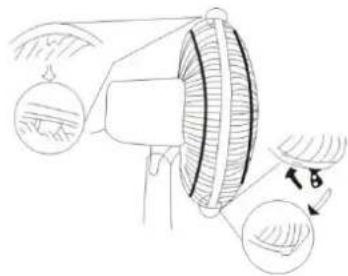
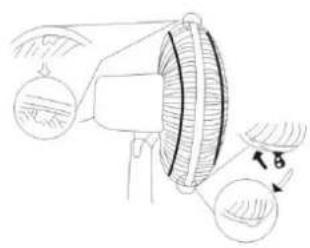
Rear grille assembly
-
Screw the guard fastening screw (6) out in anti-clockwise direction.
• Fix the rear guard (7) onto the two pillars of the motor front shell. -
Screw the guard fastening screw tightly in clockwise direction.
-
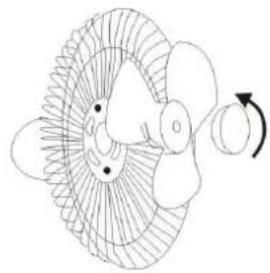
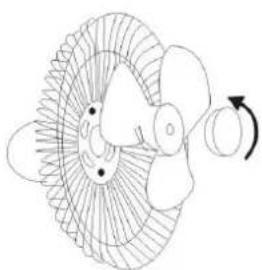
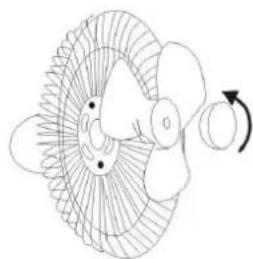
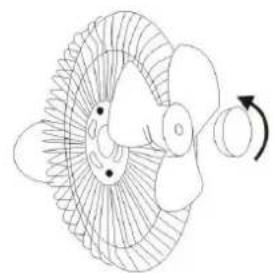
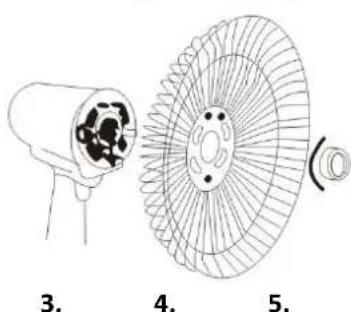
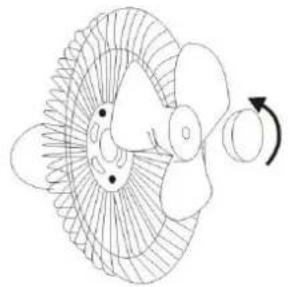
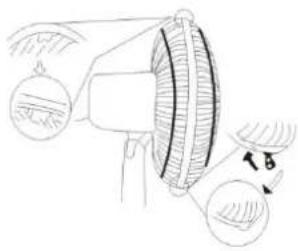
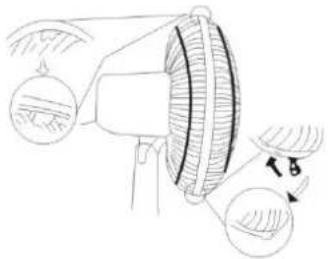
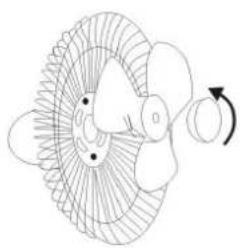
The assembly of fan blade
-
Insert fan blade onto shaft ensuring blade fits properly onto clip on shaft.
● Tighten blade screw onto shaft. Note: Blade screw should be tightened in anti-clockwise. -
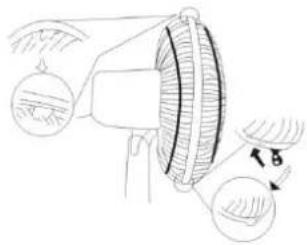
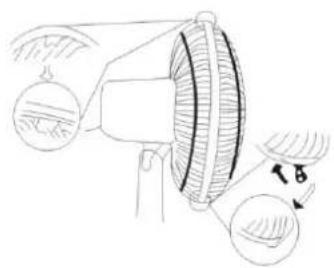
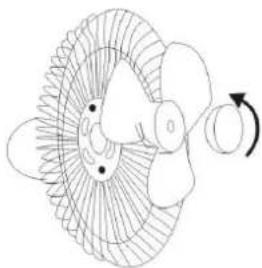
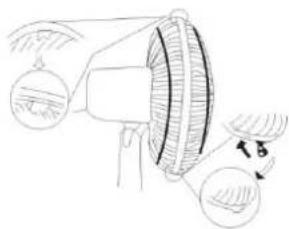
Front grille assembly
-
Put the hook of the front grille on the top of rear grille.
- Attach front grille to rear grille and then close clips and using the appropriate screw to secure grille together.
natural_image
Diagram of a fan with internal blades and a separate view showing internal structure (no text or symbols)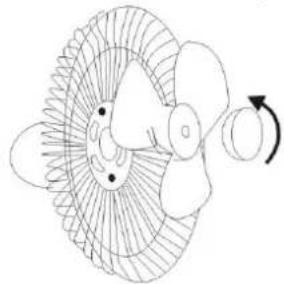
natural_image
Diagram of a mechanical fan or impeller with internal blades and a rotation arrow (no text or symbols)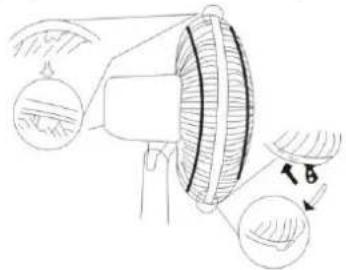
natural_image
Illustration of a hand holding a megaphone with a magnified inset showing the blade and handle (no text or symbols)OPERATING INSTRUCTIONS
Plug the power cord into a suitable socket. The indicator light of power is on and the appliance is under standby condition. Press the on/off switch and the fan begins to work with the following presetting:
Speed: low / Timer: off / Mode: normal (indicator lights of "NATURE" & "SLEEP" are off) / Oscillation: off
Please gently press the buttons on control panel to choose your desired functions.
-
Oscillation (OSC)
-
Mode
a. Nature
b. Sleep
- Timer
a. 0.5h
b. 1h
c. 2h
d. 4h
- Speed
-
On/off switch
-
Signal receiver against remote control

NOTE: The functions of the remote control buttons are the same as the functions of the buttons on the control panel.
- Oscillation: Press this button to control the oscillation function on and off. The indicator light of "OSC" will be on and off accordingly.
- Mode: Press this button to choose the mode functions "NATURE" or "SLEEP" and the corresponding indicator light will be on. NOTE: if you do not choose the mode, the fan will be working with the normal presetting speed.
a. Nature: when the indicator light of "NATURE" is on, the fan is under the mode of breeze blowing. You can press the "SPEED" button to choose speed L / M / H.
b. Sleep: when the indicator light of "SLEEP" is on, the fan will work inconsistently. The speed level (L / M / H) will be changed from high to low and keep working as low speed until the timer is off or you manually turn off the appliance.
(For example: If you choose speed H, the motor will work as speed H. After 30 minutes, it will automatically change to speed M. After 30 minutes again the motor will change to speed L and keep working as speed L unless you manually change the speed.)
- Timer: Press this button to set your desired working time from 0.5h → 1h → 1.5h → 2h → ... → 7.5h → off → 0.5h ... (repeating). After the timer is set, the unit will count down with related indicator light illuminate showing the remaining time (For example, if the timer is set with 1h, after 30 minutes the indicator light of 1h will be off and light of 0.5h will be on.). After the set time, all timer functions are disabled, the indicator light will be off and the unit will not be working anymore. The fan is under standby condition now.
- Speed: Press this button to choose your desired speed: Low / Medium / High. The related indicator light will be on accordingly.
- On/off switch: Press this button to turn on / off the fan under standby condition.
a. If the appliance is turned on at the first time, it will work with the following presetting: Speed: low / Timer: off / Mode: normal (indicator lights of "NATURE" & "SLEEP" are off) / Oscillation: off
b. If the appliance has already been used and you need it resume to work, press this button and the settings will be the same as the last time except for the function of timer and the sleep mode.
- Signal receiver against remote control: The remote control is directional and must be pointed towards the signal receiver on the control panel. The operating range can be up to 8 meters depending on the status of the batteries and the environment.
REMOTE CONTROL
This unit has a remote control. Please use two pieces of AAA size batteries (not supplied) for this remote control. Please insert the battery to the remote control tightly, based on the direction of the polarity. If it is not in use for a longer time, please take the battery out of the remote control. The functions of the remote control buttons are the same as the functions of the buttons on the control panel.
NOTE:
- Tilting Angles: By pushing the fan-guard, you can adjust the fan to the preferred elevation. Fix the angle with the head clamping screw (10).
- Height adjustment: Loose the fasten set (14) on the standing shaft (15). Carefully raise or lower the fan to the height desired and then firmly retighten the fasten set.
CLEANING
- Before servicing the fan and after each occasion of use, switch off the appliance and unplug the mains cable from the socket.
- Never immerse the appliance in water (danger of short-circuit). To clean the appliance, only wipe it down with a damp cloth and dry it carefully. Always take out the mains plug first.
- Take care that excessive dust does not build up in the air-intake and air-outlet grille, and clean it occasionally using a dry brush or vacuum cleaner.
TECHNICAL DATA
Operating voltage: 220-240V \~ 50Hz
Power consumption: 50W
| Eco design requirements | |
| Product information requirements | |
| Maximum fan flow rate (F) | 39.55 m^3/min |
| Fan power input (P) | 34.9 W |
| Service value (SV) | 1.13( m^3/min )/W |
| Measurement standard for service value | IEC 60879: 1986 (corr.1992) |
| Standby power consumption (PSB) | 0.462 W |
| Fan sound power level (LWA) | 52.9 dB(A) |
| Maximum air velocity (c) | 2.62 meters/sec |
| Contact details for obtaining more information | BAHAG AGGutenbergstr. 2168167 MannheimGermany |
Recycling
This marking indicates that this product should not be disposed with other household wastes throughout the 2012/19-EU. To prevent possible harm to the environment or human health from uncontrolled waste disposal, recycle it responsibly to promote the sustainable reuse of material resources. To return your used device, please use the return and collection systems or contact the
retailer where the product was purchased. They can take this product for environmental safe recycling.
SIGURNOSNE INFORMACIJE

UPUTE ZA SASTAVLJANJE

Ö SSZESZERELÉSI Ú TMUTATÓ
natural_image
Technical line drawing of a fan assembly showing internal blades and housing (no text or symbols)3.

natural_image
Simple line drawing of a fan-like shape with internal blades and a rotation arrow (no text or symbols)4.
natural_image
Diagram of a mechanical device with a bell and handle, showing internal components and directional arrows (no text or symbols)5.
HASZNÁLATI Ú TMUTATÓ
natural_image
Technical line drawing of a fan assembly showing internal components and external housing (no text or labels)3.
natural_image
Diagram of a fan or propeller with internal blades and a rotation arrow (no text or symbols)4.

natural_image
Diagram of a mechanical device with a circular component and directional arrows indicating motion (no text or symbols)5.
NOTKUNARLEIDBEININGAR
natural_image
Line drawing of a hand holding a megaphone next to a fan blade with a circular head (no text or symbols)3.

natural_image
Diagram of a mechanical fan or impeller with internal blades and a rotation arrow (no text or symbols)4.
natural_image
Diagram of a mechanical device with a circular component and two hands, showing internal components and directional arrows (no text or symbols)5.

SURINKIMO NURODYMAI
** Ventiliatoriø surinkite teisingai, vadovaudamiesi toliau nurodyta tvarka.
- Stovo surinkimas
natural_image
Technical line drawing of a fan with internal blades and a separate view showing internal structure (no text or symbols)3.
natural_image
Diagram of a mechanical fan or impeller with internal blades and a rotating arrow (no text or symbols)4.
natural_image
Diagram of a mechanical device with labeled parts and directional arrows (no text or symbols)5.
NAUDOJIMO NURODYMAI
MONTĀŽAS NORĀDĪJUMI
natural_image
Technical line drawing of a fan with internal blades and a separate view of the blade (no text or symbols)3.

natural_image
Diagram of a mechanical fan or impeller assembly with rotational arrow (no text or symbols)4.

natural_image
Diagram of a mechanical device with labeled parts and directional arrows (no text or symbols)5.
LIETOŠANAS INSTRUKCIJA
MONTAGEINSTRUCTIES

natural_image
Technical line drawing of a fan assembly showing internal components and a separate view (no text or symbols)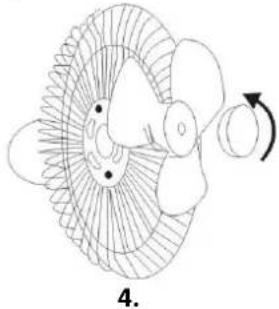
natural_image
Diagram of a fan-like structure with internal blades and a rotation arrow, labeled '4.' (no text or symbols on the diagram itself)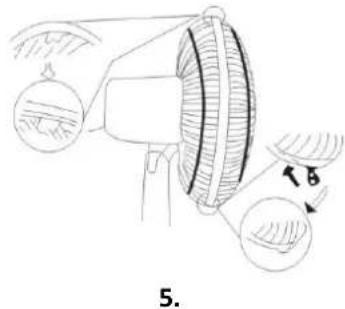
natural_image
Diagram of a mechanical device with labeled parts and directional arrows, no readable text or symbols present.
INSTRUKCIJE ZA SASTAVLJANJE
natural_image
Diagram showing four stages of a fan or fan assembly process, labeled 4 to 5, with no text or symbols present.UPUTSTVO ZA RAD
Ukopčajte napojni kabl u odgovarajuću utičnicu. Upaliće se svetlo indikatora napajanja, a uređaj će preći u stanje pripravnosti. Pritisnite prekidač za uključenje i isključenje, a ventilator će početi da radi prema sledećim fabričkim postavkama:
Brzina: sporo / Merač vremena: isključen / Režim: normalno (lampice indikatora „NATURE“ i „SLEEP“ su isključene) / Osciliranje: isključeno
Željenu funkciju birate laganim pritiskom na tastere na kontrolnoj tabli.
-
Oscillation (OSC) – Osciliranje
-
Mode – Režim
a. Nature – Prirodno b. Sleep – Spavanje
- Timer – Merač vremena
a. 0,5h
b. 1h
c. 2h
d. 4h
- Speed - Brzina
POKYNY NA MONTÁŽ
natural_image
Line drawing of a fan with internal blades and a separate open bulb (no text or symbols)3.
natural_image
Diagram of a mechanical or electrical component with curved internal structure and rotation arrow (no text or symbols)4.

natural_image
Diagram of a mechanical device with labeled parts and directional arrows (no text or symbols)5.
NÁVOD NA OBSLUHU
NAVODILA ZA MONTAŽO
NAVODILA ZA UPORABO
MONTERINGSANVISNINGAR
natural_image
Technical line drawing of a fan with internal blades and a handle, showing no text or symbols3.
natural_image
Diagram of a mechanical component with internal blades and a rotation arrow (no text or symbols)4.
natural_image
Diagram of a mechanical device with circular components and a belt, no text or symbols present5.
BRUKSANVISNING
MONTAJ TALİMATLARI
natural_image
Line drawing of a fan with internal blades and a hand holding a device (no text or symbols)3.

natural_image
Line drawing of a fan or propeller with blades and central hub, no text or symbols present4.

natural_image
Illustration of a mechanical device with a belt and adjustment arrows, no text or symbols present5.
KULLANMA TALİMATLARI

- MONTAGEANLEITUNG
- UPUTSTVO ZA SASTAVLIANJE
- UPUTSTVO ZA RAD
- POKYNY K INSTALACI
- POKYNY PRO OBSLUHU
- MONTERINGSVEJLEDNING
- BRUGSANVISNING
- INSTRUCCIONES DE MONTAJE
- KOOSTAMISJUHISED
- KASUTUSJUHISED
- KOKOAMISOHJEET
- KÄYTTÖ OHJEET
- INSTRUCTIONS DE MONTAGE
- INSTRUCTIONS D'UTILISATION
- PARTS DESCRIPTION
- ASSEMBLING INSTRUCTIONS
- OPERATING INSTRUCTIONS
- REMOTE CONTROL
- NOTE:
- CLEANING
- TECHNICAL DATA
- Recycling
- SIGURNOSNE INFORMACIJE
- UPUTE ZA SASTAVLJANJE
- Ö SSZESZERELÉSI Ú TMUTATÓ
- HASZNÁLATI Ú TMUTATÓ
- NOTKUNARLEIDBEININGAR
- SURINKIMO NURODYMAI
- NAUDOJIMO NURODYMAI
- MONTĀŽAS NORĀDĪJUMI
- LIETOŠANAS INSTRUKCIJA
- MONTAGEINSTRUCTIES
- INSTRUKCIJE ZA SASTAVLJANJE
- POKYNY NA MONTÁŽ
- NÁVOD NA OBSLUHU
- NAVODILA ZA MONTAŽO
- NAVODILA ZA UPORABO
- MONTERINGSANVISNINGAR
- BRUKSANVISNING
- MONTAJ TALİMATLARI
- KULLANMA TALİMATLARI
Brand : Emerio
Model : FAN102477
Category : Fan