
TE 6022 - Hammer HILTI - Free user manual and instructions
Find the device manual for free TE 6022 HILTI in PDF.




| Product type | SDS-Max cordless rotary hammer |
| Brand | Hilti |
| Model | TE 6022 |
| Power source | Li-Ion 21.6 V battery (B 22 series) |
| Weight (without battery) | 6.34 kg |
| Impact energy (EPTA 05) | 8.1 J |
| Drilling range (concrete/brick) | 12 mm - 55 mm |
| Operating temperature | -17 °C to 60 °C |
| Storage temperature | -20 °C to 70 °C |
| Sound pressure level | 95 dB (K=3 dB) |
| Sound power level | 106 dB (K=3 dB) |
| Vibrations (chiseling) | 9.1 m/s² (B22-110) / 8.2 m/s² (B22-255) |
| Main functions | Drilling with hammering, drilling without hammering, chiseling, chisel positioning (24 positions) |
| Safety | ATC electronic emergency stop, AVR active vibration reduction, overload protection |
| Tool holder | SDS-Max |
| Compatible battery | Hilti B 22 (Li-Ion) |
| Recommended charger | Hilti chargers of the B 22 series |
| Maintenance | Clean ventilation slots with a soft brush, housing with a damp cloth |
| Spare parts | Use only original Hilti parts |
| Warranty | Consult your local Hilti partner |
| Intended use | Drilling and chiseling in concrete, masonry, metal, wood |
Frequently Asked Questions - TE 6022 HILTI
User questions about TE 6022 HILTI
0 question about this device. Answer the ones you know or ask your own.
Ask a new question about this device
Download the instructions for your Hammer in PDF format for free! Find your manual TE 6022 - HILTI and take your electronic device back in hand. On this page are published all the documents necessary for the use of your device. TE 6022 by HILTI.
USER MANUAL TE 6022 HILTI
3.5 Active Vibration Reduction
Link: qr.hilti.com/manual/?id=2267486&id=2267488
Original operating instructions
1 Information about the operating instructions
1.1 About these operating instructions
- Read these operating instructions before the product is used or operated for the first time. This is a prerequisite for safe, trouble-free handling and use of the product.
- Observe the safety instructions and warnings in these operating instructions and on the product.
- Always keep the operating instructions with the product and make sure that the product is accompanied by these operating instructions only, when the product is given to other persons.
1.2 Explanation of symbols
1.2.1 Warnings
Warnings alert persons to hazards that occur when handling or using the product. The following signal words are used:
DANGER
DANGER!
Draws attention to imminent danger that will lead to serious personal injury or fatality.
WARNING
WARNING!
Draws attention to a potential threat of danger that can lead to serious injury or fatality.
CAUTION
CAUTION!
Draws attention to a potentially dangerous situation that could lead to personal injury or damage to the equipment or other property.
1.2.2 Symbols in the operating instructions
The following symbols are used in these operating instructions:
| Comply with the operating instructions | |
| Instructions for use and other useful information | |
| Dealing with recyclable materials | |
| Do not dispose of electric equipment and batteries as household waste | |
| Hilti Li-ion battery | |
| Hilti charger |
1.2.3 Symbols in illustrations
The following symbols are used in illustrations:
These numbers refer to the illustrations at the beginning of these operating instructions.
| 3 | The numbering reflects the sequence of operations shown in the illustrations and may deviate from the steps described in the text. |
| 11 | Item reference numbers are used in the overview illustration and refer to the numbers used in the key in the product overview section. |
| ●! | These characters are intended to specifically draw your attention to certain points when handling the product. |
1.3 Product-dependent symbols
1.3.1 Symbols on the product
The following symbols can be used on the product:
| 2 | Drilling without hammer action |
| IT | Drilling with hammering action (hammer drilling) |
| T | Chiseling |
| -3 | Chisel positioning |
| □ | Protection class II (double-insulated) |
| ∅ | Diameter |
| n0 | Rated speed under no load |
| /min | Revolutions per minute |
| --- | Direct current (DC) |
| The product supports near-field communication (NFC) technology compatible with iOS and Android platforms. | |
| Li-Ion | Li-ion battery |
| Never use the battery as a striking tool. | |
| Do not drop the battery. Never use a battery that has suffered an impact or is damaged other way. |
1.4 Switching on and off
Symbols
Product is switched on

Product is switched off
1.5 Product information
Products are designed for professional users and only trained, authorized personnel are permitted to operate, service, and maintain the products. This personnel must be specifically informed about the possible hazards. The product and its ancillary equipment can present hazards if used incorrectly by untrained personnel or if used not in accordance with the intended use.
The type designation and serial number are printed on the rating plate.
- Write down the serial number in the table below. You will be required to state the product details when contacting Hilti Service or your local Hilti organization to inquire about the product.
Product information
| SDS-Max rotary hammer drill TE 60-22 | |
| Generation 04 | |
| Serial no. |
1.6 Declaration of conformity
The manufacturer declares, on his sole responsibility, that the product described here complies with the applicable legislation and standards. A copy of the declaration of conformity can be found at the end of this documentation.
The technical documentation is filed here:
Hilti Entwicklungsgesellschaft mbH | Tool Certification | Hiltistrasse 6 | D-86916 Kaufering, Germany
2 Safety
2.1 General power tool safety warnings
WARNING Read all safety warnings, instructions, illustrations and specifications provided with this power tool. Failure to follow all instructions listed below may result in electric shock, fire and/or serious injury.
Save all warnings and instructions for future reference.
The term "power tool" in the warnings refers to your mains-operated (corded) power tool or battery-operated (cordless) power tool.
Work area safety
- Keep work area clean and well lit. Cluttered or dark areas invite accidents.
- Do not operate power tools in explosive atmospheres, such as in the presence of flammable liquids, gases or dust. Power tools create sparks which may ignite the dust or fumes.
- Keep children and bystanders away while operating a power tool. Distractions can cause you to lose control.
Electrical safety
- Power tool plugs must match the outlet. Never modify the plug in any way. Do not use any adapter plugs with earthed (grounded) power tools. Unmodified plugs and matching outlets will reduce risk of electric shock.
- Avoid body contact with earthed or grounded surfaces, such as pipes, radiators, ranges and refrigerators. There is an increased risk of electric shock if your body is earthed or grounded.
- Do not expose power tools to rain or wet conditions. Water entering a power tool will increase the risk of electric shock.
- Do not abuse the cord. Never use the cord for carrying, pulling or unplugging the power tool. Keep cord away from heat, oil, sharp edges or moving parts. Damaged or entangled cords increase the risk of electric shock.
- When operating a power tool outdoors, use an extension cord suitable for outdoor use. Use of a cord suitable for outdoor use reduces the risk of electric shock.
- If operating a power tool in a damp location is unavoidable, use a residual current device (RCD) protected supply. Use of an RCD reduces the risk of electric shock.
Personal safety
- Stay alert, watch what you are doing and use common sense when operating a power tool. Do not use a power tool while you are tired or under the influence of drugs, alcohol or medication. A moment of inattention while operating power tools may result in serious personal injury.
- Use personal protective equipment. Always wear eye protection. Protective equipment such as a dust mask, non-skid safety shoes, hard hat or hearing protection used for appropriate conditions will reduce personal injuries.
- Prevent unintentional starting. Ensure the switch is in the off-position before connecting to power source and/or battery pack, picking up or carrying the tool. Carrying power tools with your finger on the switch or energising power tools that have the switch on invites accidents.
- Remove any adjusting key or wrench before turning the power tool on. A wrench or a key left attached to a rotating part of the power tool may result in personal injury.
- Do not overreach. Keep proper footing and balance at all times. This enables better control of the power tool in unexpected situations.
- Dress properly. Do not wear loose clothing or jewellery. Keep your hair and clothing away from moving parts. Loose clothes, jewellery or long hair can be caught in moving parts. If devices are provided for the connection of dust extraction and collection facilities, ensure these are connected and properly used. Use of dust collection can reduce dust-related hazards. Do not let familiarity gained from frequent use of tools allow you to become complacent and ignore tool safety principles. A careless action can cause severe injury within a fraction of a second.
Power tool use and care
- Do not force the power tool. Use the correct power tool for your application. The correct power tool will do the job better and safer at the rate for which it was designed.
- Do not use the power tool if the switch does not turn it on and off. Any power tool that cannot be controlled with the switch is dangerous and must be repaired.
- Disconnect the plug from the power source and/or remove the battery pack, if detachable, from the power tool before making any adjustments, changing accessories, or storing power tools. Such preventive safety measures reduce the risk of starting the power tool accidentally.
- Store idle power tools out of the reach of children and do not allow persons unfamiliar with the power tool or these instructions to operate the power tool. Power tools are dangerous in the hands of untrained users.
- Maintain power tools and accessories. Check for misalignment or binding of moving parts, breakage of parts and any other condition that may affect the power tool's operation. If damaged, have the power tool repaired before use. Many accidents are caused by poorly maintained power tools.
- Keep cutting tools sharp and clean. Properly maintained cutting tools with sharp cutting edges are less likely to bind and are easier to control.
- Use the power tool, accessories and tool bits etc. in accordance with these instructions, taking into account the working conditions and the work to be performed. Use of the power tool for operations different from those intended could result in a hazardous situation.
- Keep handles and grasping surfaces dry, clean and free from oil and grease. Slippery handles and grasping surfaces do not allow for safe handling and control of the tool in unexpected situations.
Battery tool use and care
- Recharge only with the charger specified by the manufacturer. A charger that is suitable for one type of battery pack may create a risk of fire when used with another battery pack.
- Use power tools only with specifically designated battery packs. Use of any other battery packs may create a risk of injury and fire.
- When battery pack is not in use, keep it away from other metal objects, like paper clips, coins, keys, nails, screws or other small metal objects, that can make a connection from one terminal to another. Shorting the battery terminals together may cause burns or a fire.
- Under abusive conditions, liquid may be ejected from the battery; avoid contact. If contact accidentally occurs, flush with water. If liquid contacts eyes, additionally seek medical help. Liquid ejected from the battery may cause irritation or burns.
- Do not use a battery pack or tool that is damaged or modified. Damaged or modified batteries may exhibit unpredictable behaviour resulting in fire, explosion or risk of injury.
- Do not expose a battery pack or tool to fire or excessive temperature. Exposure to fire or temperature above 130°C (265°F) may cause explosion.
- Follow all charging instructions and do not charge the battery pack or tool outside the temperature range specified in the instructions. Charging improperly or at temperatures outside the specified range may damage the battery and increase the risk of fire.
Service
- Have your power tool serviced by a qualified repair person using only identical replacement parts. This will ensure that the safety of the power tool is maintained.
- Never service damaged battery packs. Service of battery packs should only be performed by the manufacturer or authorized service providers.
2.2 Hammer safety warnings
Safety instructions for all operations
- Wear ear protectors. Exposure to noise can cause hearing loss. Use auxiliary handle(s), if supplied with the tool. Loss of control can cause personal injury.
- Hold the power tool by insulated gripping surfaces, when performing an operation where the cutting accessory may contact hidden wiring. Cutting accessory contacting a "live" wire may make exposed metal parts of the power tool "live" and could give the operator an electric shock.
Safety instructions when using long drill bits with rotary hammers
Always start drilling at low speed and with the bit tip in contact with the workpiece. At higher speeds, the bit is likely to bend if allowed to rotate freely without contacting the workpiece, resulting in personal injury. Apply pressure only in direct line with the bit and do not apply excessive pressure. Bits can bend causing breakage or loss of control, resulting in personal injury.
2.3 Additional safety instructions for rotary hammer drill
Personal safety
Use the product and accessories only when they are in perfect working order. - Never tamper with or modify the product or accessories in any way. - Risk of injury by falling tools and/or accessories. Before starting work, check that the battery and installed accessories are secure. - Keep the air vents clear at all times. Risk of burn injuries due to blocked air vents! Apply appropriate safety measures at the opposite side of the workpiece in work that involves breaking through. Parts breaking away could fall out and / or fall down causing injury to other persons. Always hold the tool with both hands on the grips provided. Keep the grips clean and dry. Always check that you have a safe and firm stance when you use the product. Make sure that you are securely balanced and have control before you start the operation. Do not touch rotating parts - risk of injury! - Working on the material may cause it to splinter. Flying fragments present a risk of injury to the eyes and body. Wear eye protection, a hard hat and ear protection while the product is in use. In addition, wear light respiratory protection if you are not using a dust extractor. - Wear protective gloves when changing the accessory tool. Touching the accessory tool can result in cuts and burns. - Dust produced by grinding, sanding, cutting and drilling can contain dangerous chemicals. Some examples are: lead or lead-based paints; brick, concrete and other masonry products, natural stone and other products containing silicates; certain types of wood, such as oak, beech and chemically treated wood; asbestos or materials that contain asbestos. Determine the exposure of the operator and bystanders by means of the hazard classification of the materials to be worked. Implement the necessary measures to restrict exposure to a safe level, for example by the use of a dust collection system or by the wearing of suitable respiratory protection. The general measures for reducing exposure include:
Work in a well-ventilated area, avoid prolonged contact with dust, direct dust away from your face and body, wear protective clothing, and wash exposed skin with water and soap.
Take frequent breaks and do physical exercises to improve blood circulation in your fingers. High vibration during long periods of work can lead to disorders of the blood vessels and nervous system in the fingers, hands, and wrists.
Electrical safety
- Before beginning work, check the working area for concealed electric cables or gas and water pipes. External metal parts of the product could give you an electric shock or cause an explosion if you accidentally damage an electric cable or a gas or water pipe.
Power tool use and care
- Immediately switch off the power tool if the accessory tool jams. The product might twist off-line.
- Switch the product on only after you have brought it to the working position.
- When chiseling into ceilings, walls, and floors, always make sure that you have a safe and firm stance. A sudden break-through can affect your balance! Wait until the product has come to a complete stop before you lay it down.
2.4 Careful handling and use of batteries
Comply with the following safety instructions for the safe handling and use of Li-ion batteries. Failure to comply can lead to skin irritation, severe corrosive injury, chemical burns, fire, and/or explosion. Use only batteries that are in perfect working order. - Treat batteries with care in order to avoid damage and prevent leakage of fluids that are extremely harmful to health! - Do not under any circumstances modify or tamper with batteries!
Do not disassemble, crush or incinerate batteries and do not subject them to temperatures over 80°C (176°F). Never use or charge a battery that has suffered an impact or been damaged in any other way. Check your batteries regularly for signs of damage. Never use recycled or repaired batteries. Never use the battery or a battery-operated power tool as a striking tool. Never expose batteries to direct sunlight, elevated temperature, sparking, or open flame. This can lead to explosions. Do not touch the battery poles with your fingers, tools, jewelry, or other electrically conductive objects. This can damage the battery and also cause material damage and personal injury. Keep batteries away from rain, moisture, and liquids. Penetrating moisture can cause short circuits, electric shock, burns, fire, and explosions. Use only chargers and power tools approved for the specific battery type. Read and follow the relevant operating instructions. Do not use or store the battery in explosive environments. If the battery is too hot to touch, it may be defective. Put the battery in a place where it is clearly visible and where there is no risk of fire, at an adequate distance from flammable materials. Allow the battery to cool down. If it is still too hot to touch after an hour, the battery is faulty. Consult Hilti Service or read the document entitled "Instructions on safety and use for Hilti Li-ion batteries".

Observe the special guidelines applicable to the transport, storage, and use of lithium-ion batteries. → page 28
Read the instructions on safety and use of Hilti Li-ion batteries that you can access by scanning the QR code at the end of these operating instructions.
3 Description
3.1 Product overview
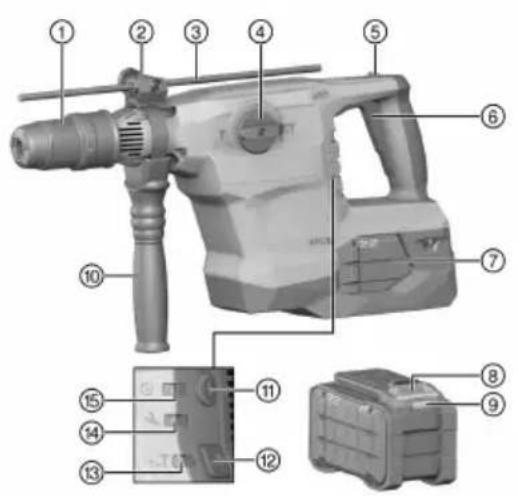
① Tool holder ② Depth gauge adjustment (accessory) ③ Depth gauge (accessory) ④ Function selector switch ⑤ Lock button for continuous chiseling operation ⑥ Control switch ⑦ Battery ⑧ Battery release button ⑨ Battery status indicator ⑩ Side handle ⑪ On/off switch ⑫ Button for half power ⑬ Half-power indicator ⑭ Service indicator ⑮ ON/OFF indicator
3.2 Intended use
The product described is a cordless SDS-Max rotary hammer drill with pneumatic hammering mechanism. It is designed for drilling in concrete, masonry, wood, and metal. The product can also be used for light-medium-duty chiseling on masonry and surface finishing work on concrete.
- For this product, use only Hilti Nuron lithium-ion batteries of the B 22 series. For optimum performance, Hilti recommends the batteries stated in the table at the end of these operating instructions for this product.
- For these batteries, use only Hilti chargers of the type series stated in the table at the end of these operating instructions.
3.3 Undercut anchors
The product is suitable for setting selected undercut anchors. Use only suitable setting tools! For more information contact Hilti Service.
3.4 ATC
The product is equipped with the ATC (Active Torque Control) quick-acting electronic cut-out. If the accessory tool sticks or stalls, the product will suddenly pivot about its own axis in the opposite direction. ATC detects this sudden pivoting movement of the product and switches the product off immediately.

For ATC to function correctly, the product must be free to pivot. After an ATC cut-out, switch the product off and then on again.
3.5 Active Vibration Reduction
The tool is equipped with an Active Vibration Reduction (AVR) system which reduces vibration noticeably.
3.6 Service indicator
The product is equipped with a service indicator LED.
3.6.1 MMI
| Status Meaning | |
| The Service indicator lights up. | Servicing is due. |
| The Service indicator flashes. | Have the product repaired by Hilti Service. |
| The ON/OFF indicator lights up. The product is switched on | switched on |
| The ON/OFF indicator flashes. The product is switched off because of a transient fault. | switched off because of a transient fault. |
| The ON/OFF indicator is off. The product is switched off. | switched off. |
| The Half power indicator lights up. | The product is working at half power. |
| The Half power indicator is off. | The product is working at full power. |
3.7 Items supplied
SDS-Max rotary hammer drill, side handle, operating instructions.
Other system products approved for use with this product can be found at your local Hilti Store or at: www.hilti.group
3.8 Status indicators of the Li-ion battery
Hilti Nuron Li-ion batteries can indicate state of charge, fault messages and the battery's state of health.
3.8.1 Indicators for state of charge and fault messages

WARNING
Risk of injury by a falling battery!
- If the release button is pressed with a battery inserted in the product, subsequently check that the battery is correctly re-engaged and secure.
Short-press the release button of the battery to get whichever of the following status indications is applicable at the time.
State of charge and, if applicable, faults are indicated constantly as long as the connected product is switched on.
| Status Meaning | |
| Four (4) LEDs show constantly green State of charge: 100 % to 71 % | |
| Three (3) LEDs show constantly green | State of charge: 70 % to 51 % |
| Two (2) LEDs show constantly green | State of charge: 50 % to 26 % |
| One (1) LED shows constantly green State of charge: 25 % to 10 % | |
| One (1) LED slow-flashes green State of charge: < 10 % | |
| One (1) LED quick-flashes green The Li-ion battery is completely discharged. Recharge the battery. If the LED again starts quick-flashing after the battery has been charged, consult Hilti Service. | |
| One (1) LED quick-flashes yellow The Li-ion battery or the product in which it is inserted is overloaded, too hot or too cold, or experiencing some other fault. Bring the product and the battery to the recommended working temperature and do not overload the product when it is in use. If the message persists, consult Hilti Service. | |
| One (1) LED shows yellow The Li-ion battery and the product in which it is inserted are not compatible. Consult Hilti Service. | |
| One (1) LED quick-flashes red The Li-ion battery is locked and cannot be used. Consult Hilti Service. | |
3.8.2 Indicators showing the battery's state of health
To check the battery's state of health, press the release button and hold it down for longer than three seconds. The system does not detect a potential malfunction of the battery due to misuse, for example battery dropped or pierced, external heat damage, etc.
| Status Meaning | |
| All LEDs show in sequence, followed by one LED showing constantly green. | (1)The battery can remain in use. |
| All LEDs show in sequence, followed by one LED quick-flashing yellow. | (1)The check to ascertain the battery's state of health did not complete. Repeat the procedure, or consult Hilti Service. |
| All LEDs show in sequence, followed by one LED showing constantly red. | (1)If a connected product can still be used, the remaining battery capacity is below 50%. If a connected product can no longer be used, the battery has reached the end of its useful life and has to be replaced. Consult Hilti Service. |
4 Technical data
| TE 60-22 | |
| Rated voltage | 21.6 V |
| Weight in accordance with EPTA Procedure 01, without battery | 6.34 kg |
| Single impact energy in accordance with EPTA procedure 05 | 8.1 J |
| Drilling diameter range in concrete/masonry (hammer drilling) | 12 mm ... 55 mm |
| Ambient temperature for operation | -17 °C ... 60 °C |
| Storage temperature | -20 °C ... 70 °C |
4.1 Battery
| Battery operating voltage | 21.6 V |
| Weight, battery | See the end of these operating instructions |
| Ambient temperature for operation | -17 °C ... 60 °C |
| Storage temperature | -20 °C ... 40 °C |
| Battery charging starting temperature | -10 °C ... 45 °C |
4.2 Noise information and vibration values in accordance with EN 62841
The sound pressure and vibration values given in these instructions were measured in accordance with a standardized test and can be used to compare one power tool with another. They can also be used for a preliminary assessment of exposure.
The data given represent the main applications of the power tool. However, if the power tool is used for different applications, with different accessory tools, or is poorly maintained, the data can vary. This can significantly increase exposure over the total working period.
An accurate estimation of exposure should also take into account the times when the power tool is switched off, or when it is running but not actually being used for a job. This can significantly reduce exposure over the total working period.
Identify additional safety measures to protect the operator from the effects of noise and/or vibration, for example: maintaining the power tool and accessory tools, keeping the hands warm, organization of work patterns.
Noise emission values
| TE 60-22 | |
| Sound pressure level (LpA) | 95 dB |
| Uncertainty for the sound pressure level (KpA) | 3 dB |
| Sound power level (LWA) | 106 dB |
| Uncertainty for the sound power level (KWA) | 3 dB |
Total vibration in accordance with EN 60745
| Chiseling in concrete \( \left( {a}_{\mathrm{{CHeq}}}\right) \mathrm{B}{22} - {110} \) | 9.1 m/s2 | |
| B 22-255 | \( {8.2}\mathrm{\;m}/{\mathrm{s}}^{2} \) | |
| Uncertainty (K) | 1.5 m/s2 | |
| Hammer drilling in concrete \( \left( {a}_{\mathrm{{HD}}}\right) \mathrm{B}{22} - {110} \) | 10.7 m/s2 | |
| B 22-255 | 10.1 m/s2 | |
| Uncertainty (K) | 1.5 m/s2 | |
5 Preparations at the workplace

WARNING
Risk of injury by inadvertent starting!
Before inserting the battery, make sure that the product is switched off. - Remove the battery before making any adjustments to the power tool or before changing accessories.
Observe the safety instructions and warnings in this documentation and on the product.
5.1 Charging the battery
- Before charging the battery, read the operating instructions for the charger.
- Make sure that the contacts on the battery and the contacts on the charger are clean and dry.
- Use an approved charger to charge the battery. → page 21
5.2 Inserting the battery

WARNING
Risk of injury by short circuit or falling battery!
- Before inserting the battery, make sure that the contacts on the battery and the contacts on the product are free of foreign matter. Make sure that the battery always engages correctly.
- Charge the battery fully before using it for the first time.
- Push the battery into the product until it engages with an audible click.
- Check that the battery is seated securely.
5.3 Removing the battery
- Press the battery release button.
- Remove the battery from the product.
5.4 Fitting the side handle 3

CAUTION
Risk of injury Loss of control over the product.
- Check that the side handle is fitted correctly and tightened securely. Check that the clamping band is engaged in the groove in the product.

CAUTION
Risk of injury. The depth gauge, if fitted but not used, might hinder the operator.
- Remove the depth gauge from the product.
- Release the side handle clamping band by turning the handle grip.
- Slide the side handle clamping band over the tool holder from the front and into the recess provided.
- Set the side handle to the desired position.
- Tighten the side handle clamping band by turning the handle grip.
5.5 Fitting the depth gauge (optional)
- Release the side handle clamping band by turning the handle grip.
- Release the side handle by turning the knob until the clamping band is slack.
- Slide the depth gauge from the front into the 2 guide holes provided.
- Secure the side handle by turning the knob until the clamping band is tight.
- Tighten the side handle clamping band by turning the handle grip.
5.6 Setting the power level

After the battery is inserted, the product is always set by default to full power.
- Press the "button for half power". The product runs at half power. The "half power indicator" lights up.
- Press the "button for half power" again. The product runs at full power. The "half power indicator" goes out.
5.7 Inserting / removing the accessory tool

DANGER
Risk of fire! Risk of contact between the hot accessory tool and highly inflammable materials.
- Do not lay the hot accessory tool down on highly inflammable materials.

CAUTION
Risk of injury by the accessory tool! The accessory tool might be hot or have sharp edges.
- Wear protective gloves when changing the accessory tool.

The use of unsuitable grease can cause damage to the product. Use only genuine Hilti grease.
- Apply a little grease to the connection end of the accessory tool.
- Push the accessory tool into the tool holder as far as it will go (until it engages).
- After fitting the accessory tool, grip it and pull it in order to check that it is securely engaged.
The product is ready for use.
- Pull the tool lock back as far as it will go and remove the accessory tool.
5.8 Fall arrest
Risk of injury by falling tool and/or accessory!
Use only the Hilti tool tether recommended for your product. Prior to each use, always check the attachment point of the tool tether for possible damage.
Comply with the national regulations for working at heights.
As drop arrester for this product, use only the Hilti tool tether #2261971.
- Use the loop to secure the tool tether to the product as shown in the illustration. Check that it holds securely.
- Secure the carabiner to a load-bearing structure. Check that the carabiner holds securely.
Comply with the operating instructions of the Hilti tool tether.
6 Operation
Observe the safety instructions and warnings in this documentation and on the product.
6.1 Switching on
- Press the on/off switch.
- Then press the control switch.
6.2 Function selector switch
- Set the function selector switch to the desired working position.
- Do not operate the function selector switch while the motor is running. Risk of damage!
6.2.1 Drilling with hammering action (hammer drilling)
- Set the function selector switch to: .
6.2.2 Drilling without hammer action
Drilling without hammering action is possible when accessory tools with a special connection end are used. Accessory tools of this kind are available from Hilti. Alternatively, when the keyless quick-release chuck is fitted, smooth-shank drill bits for wood or steel, for example, can be used to drill without hammering.
- Set the function selector switch to: .
6.2.3 Chisel positioning
CAUTION
Risk of injury! Loss of control over the chisel direction.
- Do not operate the tool when the selector switch is set to "Chisel positioning". Turn the function selector switch until it engages in the "Chiseling" position.
The chisel can be set to 24 different positions (in 15° increments). This ensures that flat chisels and shaped chisels can always be set to the optimum working position.
- Set the function selector switch to: .
- Turn the chisel to the desired position.
- Set the function selector switch to: until it engages.
The product is ready for use.
6.2.4 Chiseling
Set the function selector switch to:
6.3 Switch sustained operation on and off

When chiseling, the control switch can be locked in the "on" position.
- Push the lock button forward for continuous operation.
- Press the on/off switch.
- Then press the control switch all the way down.
The product then runs in sustained operating mode.
- Push the lock button back. The product switches off.
7 Care and maintenance

WARNING
Risk of injury with battery inserted!
Always remove the battery before carrying out care and maintenance tasks!
Care of the product
- Carefully remove stubborn dirt.
- Carefully clean the air vents, if present, with a dry, soft brush.
- Use only a slightly damp cloth to clean the housing. Do not use cleaning agents containing silicone as these can attack the plastic parts.
- Use a dry, clean cloth to clean the contacts of the product.
Care of the Li-ion batteries
- Never use a battery with clogged air vents. Clean the air vents carefully using a dry, soft brush.
- Avoid unnecessary exposure of the battery to dust and dirt. Never expose the battery to high levels of moisture (e.g. by being dipped in water or left in the rain).
If a battery has been soaked by moisture, treat it as a damaged battery. Isolate it in a non-flammable container and consult Hilti Service.
- Keep the battery free of extraneous oil and grease. Do not permit dust or dirt to accumulate unnecessarily on the battery. Clean the battery with a dry, soft brush or a clean, dry cloth. Do not use cleaning agents containing silicone as these can attack the plastic parts.
Do not touch the contacts of the battery and do not remove the factory-applied grease from the contacts.
- Use only a slightly damp cloth to clean the housing. Do not use cleaning agents containing silicone as these can attack the plastic parts.
Maintenance
- Check all visible parts and controls for signs of damage at regular intervals and make sure that they all function correctly.
- Do not use the product if signs of damage are found or if parts malfunction. Immediately have the product repaired. After cleaning and maintenance, install all guards and protective devices and check that they are in full working order.

To help ensure safe and reliable operation, use only genuine Hilti spare parts and consumables. Spare parts, consumables and accessories approved by Hilti for use with your product can be found at your
Hilti Store or online at: www.hilti.group
8 Transport and storage of cordless tools and batteries
Transport

CAUTION
Accidental starting during transport!
Always transport your products with the batteries removed!
- Remove the battery/batteries.
- Never transport batteries loose and unprotected. During transport, batteries should be protected from excessive shock and vibration and isolated from any conductive materials or other batteries that may come in contact with the terminals and cause a short circuit. Comply with the locally applicable regulations for transporting batteries. Do not send batteries through the mail. Consult your shipper for instructions on how to ship undamaged batteries. Prior to each use and before and after prolonged transport, check the product and the batteries for damage.
Storage

WARNING
Accidental damage caused by defective or leaking batteries!
Always store your products with the batteries removed!
- Store the product and the batteries in a cool and dry place. Comply with the temperature limits stated in the technical data.
- Do not store batteries on the charger. Always remove the battery from the charger when the charging operation has completed.
- Never leave batteries in direct sunlight, on sources of heat, or behind glass.
- Store the product and batteries where they cannot be accessed by children or unauthorized persons. Prior to each use and before and after prolonged storage, check the product and the batteries for damage.
9 Troubleshooting
If a problem occurs, always observe the charge-status and fault indicator of the battery. See the section headed Status indicators of the Li-ion battery.
If the trouble you are experiencing is not listed in this table or you are unable to remedy the problem by yourself, please contact Hilti Service.
| Trouble or fault Possible cause Action to be taken | |
| No hammering action. The product is too cold. | Bring the product into contact with the working surface, switch it on and allow it to idle. If necessary, repeat the procedure until the hammering mechanism begins to operate. |
| The battery runs down more quickly than usual. Battery condition is not optimal. | Call up the battery's state of health. Section headed "Status indicators of the Li-ion battery" → page 22. |
| The battery does not engage with an audible click. The retaining lugs on the battery are dirty. | Clean the retaining lug and refit the battery. |
| No response from the LEDs on the battery. Battery defective. | Contact Hilti Service. |
| The drive spindle doesn't rotate. The permissible operating temper- ature of the product's electronics has been exceeded. | The ON/OFF indicator flashes. Allow the product to cool down. |
| The battery is not fully inserted. | Push the battery in until it engages with an audible click. |
| Trouble or fault Possible cause Action to be taken | ||
| Product switches off automatically. | The overload protection system is The ON/OFF indicator flashes. • Release the control switch. Allow the product to cool down. Press the control switch again. Reduce the load on the tool. | |
| Product switches off if drill jams. | the electronic safety shut-down has tripped to prevent further jam- ming. | • Release the drill bit. |
| Product or battery gets very hot. | Electrical fault. • Immediately switch off the product. Remove the battery and keep it under observation. Allow it to cool down. Contact Hitti service. | |
| The product is overloaded (appli- cation limit exceeded). | • Select a product that is suitable for the intended purpose. | |
| No response from the LEDs on the battery. | Battery defective. • Contact Hitti Service. | |
| Product does not develop full power. | The control switch is not fully pressed. | • Press the control switch as far as it will go. |
| The half-power button is engaged. | • Press the "half-power" button. | |
| Drill bit does not rotate. The function selector switch is not engaged or is in the "Chiseling" position T or the "Chisel position- ing" position. | With the motor at a standstill, set the function selector switch to the "Hammer drilling"T position. | |
| The insert tool cannot be re- leased from the chuck. | • Pull the tool lock back as far as it will go and remove the accessory tool. | |
| • Disengage the side handle and refit it correctly so that the clamping band and side handle engage in the recess. | ||
| Product does not start. | The electronic restart interlock activated after an interruption in the electric supply. | • Switch the product off and then on again. |
| Service indicator shows. | Service limit time reached. | • Have the product repaired by Hitti Service. |
| Service indicator flashes. | The product is faulty. | • Have the product repaired by Hitti Service. |
| The ON/OFF indicator flashes. | Product momentarily overloaded. | • Release the control switch and then press it again. |
| Protection against overheating. | • Allow the product to cool down and clean the air vents. |
10 Disposal

WARNING
Risk of injury due to incorrect disposal! Health hazards due to escaping gases or liquids.
DO NOT send batteries through the mail! - Cover the terminals with a non-conductive material (such as electrical tape) to prevent short circuiting. - Dispose of your battery out of the reach of children. - Dispose of the battery at your Hilti Store, or consult your local governmental garbage disposal or public health and safety resources for disposal instructions.
Most of the materials from which Hilti products are manufactured can be recycled. The materials must be correctly separated before they can be recycled. In many countries, your old tools, machines or appliances can be returned to Hilti for recycling. Ask Hilti Service or your Hilti sales representative for further information.

Do not dispose of power tools, electronic equipment or batteries as household waste!
11 Manufacturer's warranty
- Please contact your local Hilti representative if you have questions about the warranty conditions.
12 Further information
For more information on operation, technology, environment and recycling, follow this link: qr.hilti.com/manual/?id=2267486&id=2267488 This link is also to be found at the end of the documentation, in the form of a QR code.
3.5 Active Vibration Reduction
3.5 Active Vibration Reduction
6.2.2 Drilling without percussion

3.5 Active Vibration Reduction
3.5 Active Vibration Reduction
3.5 Active Vibration Reduction
3.5 Active Vibration Reduction
3.5 Active Vibration Reduction
3.5 Active Vibration Reduction
3.5 Active Vibration Reduction
3.5 Active Vibration Reduction
The product is equipped with the Active Vibration Reduction (AVR) system, which significantly reduces the level of vibrations.
3.6 Service indicator
The product is equipped with a service indicator with a light signal.
3.6.1 MMI
3.5 Active Vibration Reduction
The product is equipped with the Active Vibration Reduction (AVR) system, which significantly reduces vibrations.
3.6 Service indicator
The product is equipped with a service indicator with a lamp.
3.6.1 MMI
3.5 Active Vibration Reduction

1.4 Adding and Removing
Symbols
| IHCtpymeHT yBIMKHeHn |
| IHCtpymeHT BIMKHeHn |
1.5 Information about the instrument
The instruments are designed for professional use, therefore their operation, technical maintenance and repair must be carried out only by authorized personnel with special training. This personnel must be specially instructed about possible risks. The instrument and its accessories can become a source of danger if used incorrectly by unqualified personnel or if used not for its intended purpose.
The type and serial number are indicated on the factory plate.
- Please provide the serial number indicated on the plate. When submitting requests to our representative or to the service department, provide information about the instrument.
Information about the instrument
| Перфоратop SDS-Max TE 60-22 | |
| Версия 04 | |
| Серийн Home |
1.6 Certificate of Conformity
The manufacturer declares with full responsibility that the instrument described in this document complies with current legislation and standards. A copy of the certificate of conformity is provided at the end of this document.
Technical documentation is intended for:
Use of the operator's instrument and proper care for it
Charging a battery with a charger not recommended by the manufacturer may cause a fire if used with a battery of a different type. Use only the chargers specifically designed for these batteries. Using other batteries may result in injury and fire. A battery that is not in use should be kept away from paper clips, coins, keys, nails, screws, or other small metal objects that could short the contacts. Shorting the battery contacts may cause burns or fire. In case of incorrect use, the battery may leak. Avoid contact with it. In case of accidental contact, rinse the affected area with plenty of water. If liquid gets into the eyes, it is recommended to seek medical help. Liquid from the battery may cause irritation or burns. Do not use a battery that is damaged or has been modified. Damaged or modified batteries may behave unpredictably and pose a fire, explosion, or injury hazard.
Do not expose the battery to fire or high temperatures. Fire or temperatures above 130°C (265°F) may cause an explosion. Keep it away from heat sources. Never charge the battery or the battery tool in conditions that are outside the temperature range specified in the instruction manual. Improper charging or charging outside the specified temperature range may damage the battery and increase the risk of fire.
Servicing
Have your power tool serviced by a qualified repair person using only identical replacement parts. This will ensure that the safety of the power tool is maintained. Never service damaged battery packs. Service of battery packs should only be performed by the manufacturer or authorized service providers.
2.2 Safety instructions for working with the drill
Safety instructions for all types of work
Wear ear protectors. Prolonged exposure to noise may cause hearing loss. Use the auxiliary handle(s) supplied with the tool. Loss of control can cause personal injury. If the tool is used for work that may cause the cutting accessory to contact hidden wiring, hold the tool by insulated gripping surfaces. In case of contact with a live wire, the metal parts of the tool may become live and cause an electric shock.
Safety instructions when using drill bits
The drill bit may become deformed if used at low speeds on a bolted object. If the drill bit is used at high speeds, it may deform without contact with the bolted object, which in turn may cause injury. Apply pressure to the drill bit only in the axial direction, without applying lateral force. Failure to follow this instruction may result in damage to the drill bit, deformation, or injury due to loss of control over the tool.
2.3 Additional safety instructions for working with the perforator
Personnel safety
Use the correct tool and accessories. Any modifications to the tool or accessories are prohibited. Risk of injury due to damage to the tool and/or accessories. Before starting work, check that the accessories and battery are securely fastened. Do not block the ventilation slots. Blocking the ventilation slots creates a risk of burns! During heavy work, protect the surface with a suitable cover from the opposite side. Avoid scattering in different directions and downwards, and injuring other people. Always hold the tool with both hands on the designated handles. Ensure that the handles are dry and clean. Maintain a stable stance while using the tool. Before starting work, make sure you have a firm grip and can control the tool. Avoid contact with rotating parts of the tool. There is a risk of injury! During work, material may break into sharp fragments. Fragments of material may cause cuts or damage to the eyes. When working with the tool, use protective goggles, protective helmet, and protective gloves. If you do not use a dust extraction system, additionally use a light respirator. - When working with the tool, use protective gloves. Contact with a rotating tool may cause cuts or burns.
HILTI
Dust generated during work with power tools, grinding, and drilling of certain materials may contain hazardous chemicals. Examples of such materials: lead or lead-based paints; brick, concrete, and other materials used in masonry, including natural stone and other rocks containing silicates; certain types of wood, such as oak or beech, as well as wood that has undergone chemical treatment; asbestos or materials containing asbestos. Determine the level of dust exposure for the operator and nearby persons, taking into account the hazard class of the processed materials. Take necessary measures to keep dust exposure at the lowest possible level, including using a dust extraction system or appropriate respirator. General measures to reduce dust exposure include:
Performing work in a well-ventilated area; avoiding prolonged contact with dust; preventing dust from coming into contact with the face and body; using protective clothing, as well as washing exposed skin areas with soap and water.
Exercise regularly and perform exercises to improve blood circulation in your fingers. During prolonged work, high-frequency vibration may damage nerves or fingers, hands, or joints.
Electrical Safety
- Before operating the tool, check for the presence of nearby electrical cables, gas and water pipes. If during work there is a possibility of damaging electrical cables, gas or water pipes, their contact with exposed metal parts of the tool can cause electric shock or explosion.
Proper Use of Power Tools and Battery Care
- If the power tool becomes blocked, turn it off immediately. The tool may kick back. Turn off the tool before removing it from the workpiece.
- Before drilling into walls, ceilings, or floors, ensure you have a secure footing and balance. Due to the sudden reaction of the tool, you may lose your balance! Wait until the power tool has completely stopped before removing it from the workpiece.
2.4 Use of Rechargeable Batteries and Battery Care
Follow all safety instructions to ensure safe transportation and use of lithium-ion rechargeable batteries. Failure to follow these instructions may result in fire, serious injury due to contact with corrosive substances, as well as chemical burns, damage, and/or explosion.
Use only genuine rechargeable batteries. Handle rechargeable batteries with care to avoid damage or injury, which can be very dangerous to health! Do not modify or alter the design of rechargeable batteries! Rechargeable batteries must not be disassembled, crushed, heated above 80 °C (176 °F), or incinerated. Do not use or charge rechargeable batteries that have been subjected to impact or have been damaged in any way. Regularly check rechargeable batteries for damage. Never use rechargeable batteries made from secondary materials or repaired rechargeable batteries. Do not use a rechargeable battery or a cordless power tool as a hammer. Never expose rechargeable batteries to direct sunlight, high temperatures, sparks, or open flames. Failure to comply may result in explosion. Do not touch the terminals with fingers, metal tools, pliers, or other conductive materials. Failure to comply may result in damage to the rechargeable battery, material damage, and injury. Protect rechargeable batteries from moisture, water, and rain. If water gets inside a rechargeable battery, it may cause a short circuit, electric shock, burns, damage, or explosion.
Do not use or charge the battery pack with any tools or chargers other than those for which it is intended. Also, follow the instructions given in the operating instructions. Do not use or store the battery pack in an explosive or hazardous environment. If the battery pack is hot to the touch, it may be damaged. Store the battery pack in a protected place away from moisture and flammable materials, where it can be monitored. Make sure the battery pack is cool. If after one hour the battery pack is still hot to the touch, this indicates a malfunction. Contact the service company or refer to the safety and proper operation instructions for lithium-ion battery packs.

Follow the special instructions for transporting, storing, and using lithium-ion battery packs. → Page 220
Refer to the safety and proper operation instructions for lithium-ion battery packs: scan the QR code provided in the operating instructions.
3 Description
3.1 Product overview
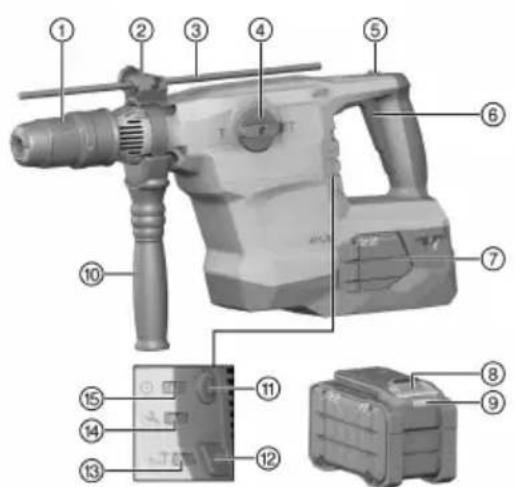
① Battery pack ② Limit switch - adjustment (tool) ③ Limit switch (tool) ④ Trigger switch with lock for continuous operation ⑤ Chuck ⑥ Battery pack ⑦ Battery pack release button ⑧ Battery charge indicator ⑨ Side handle ⑩ Chuck ⑪ Power on/off button ⑫ Power indicator ⑬ Service indicator ⑭ Activation indicator
3.2 Intended use
The tool described in this document is a cordless rotary hammer SDS-Max with pneumatic impact mechanism. It is designed for drilling holes in concrete, brick, wood, and metal. The tool can also be used for chiseling work on brick in light to medium duty conditions, as well as for light chipping of concrete surfaces.
Use this tool only with lithium-ion battery packs of type 22. To ensure optimal tool performance, the company recommends using the battery packs specified in the table in the operating instructions. Use only the battery packs and chargers specified in the table in the operating instructions.
3.3 Accessories
The tool is supplied with a range of accessories. However, use only accessories that are suitable for safe operation of the tool!
For additional information, please contact the service company.
3.4 ATC system
The tool is equipped with an electronic Active Torque Control (ATC) system. If the tool becomes blocked or jammed, it may suddenly and uncontrollably rotate in the opposite direction of the tool's rotation. The ATC system detects this sudden rotational movement and immediately shuts off the tool.

It is impossible to ensure reliable functioning without creating obstacles to the rotational movement of the instrument.
In case of emergency stop system activation, turn off the instrument, and then turn it on again.
3.5 Active Vibration Reduction
The instrument is equipped with an Active Vibration Reduction (AVR) system, which significantly reduces the level of vibration.
3.6 Service indicator
The instrument is equipped with a service indicator with a light signal.
3.6.1 Operator interface
To display the battery charge status, press and hold the release button for more than three seconds. The system does not detect any potential malfunctions of the power element caused by its improper use, such as impacts, drops, or exposure to high temperatures.
| Стан 3начени | |
| Ус CBITLOДIOДN NOCLIДOBHNO 3aRopAOTbCS, nicla YORO OJIN (1) CBITLOДIOД NOUHAcE NOCTIIHO rOPI TIOBxUByATN.ЗеленM KOJBOPOM. | ЕкspnyataciNo akymyIaTOpHOI batapei можна по-чу OJIN (1) CBITLOДIOД NOUHAcE NOCTIIHO rOPI TIOBxUByATN. |
| YcI CBITLOДIOДN NOCLIДOBHNO 3aRopAOTbCS, nicla YORO OJIN (1) CBITLOДIOД NOUHAcE шВИДК MHRaTakymyIaTOpHOI batapei. ПОТорпь onepaцio abo JXOBTHM KOJBOPOM. | He BdAnOcR 3aBepShTN nepeBipKy CTanHy YORO OJIN (1) CBITLOДIOД NOUHAcE шВИДК MHRaTakymyIaTOpHOI batapei. ПОТорпь onepaцio abo 3BepHITbCdo cepBicHOI clyxKbN KomnaiHII Hilti. |
| YcI CBITLOДIOДN NOCLIДOBHNO 3aRopAOTbCS, nicla YORO OJIN (1) CBITLOДIOД NOUHAcE NOCTIIHO rOPI TIOXHNa PrpoDobxUByATN, ce O3NaUaE, lo 3aJIshKOBa EMHICTb akymyIaTOpHOI batapei CTaHOBtB MeHsE 50%.Якso ВИКориSTANHЯ prpoEdHaHoro INCTPymeHTa Bxe He MoxHa npoDobxUByATN, ce O3NaUaE, lo CtrpOK clyxKbN akymyIaTOpHOI batapei 3akIHNVCS Ta II NotribHо 3amInHtN.Бydв Лackа, 3BepHITbCdo cepBicHOI clyxKbN KomnaiHII Hilti. |
4 Technical data
| TE 60-22 | |
| Hominahha Hanpyra | 21,6 B |
| Maca bIDnoBIDno Do EPTA Procedure 01 6e3 akymyntopHOi 6aTapei | 6,34 Kr |
| Eheprin nooDnHOKOrO ydapu 3riIdNo 3 npoceDypoHO EPTA 05 | 8,1 ДЖ |
| ДIANa3OH diAMetpiB OTbOpIB y 6eToHi/цeRЯнiй КlaДцi (ydapHe CBepdIn ня) | 12 MM ... 55 MM |
| Tempepatура habKoJnHbOrO cepeDobNIsa πiД час робтп | -17 °C ... 60 °C |
| Tempepatура 3бepirання | -20 °C ... 70 °C |
4.1 Battery
| Робuya наруга akумларонoi 6atapei | 21,6 B |
| Maca akумларонoi 6atapei | Инforcing<|im_start|>дане нашикii-нци заима искрукцii 3 ekspлиатуацii |
| Tempepatура наковишього сeredовида пiod час роботи | -17 °C ... 60 °C |
| Tempepatура збериганna | -20 °C ... 40 °C |
| Tempepatура akумларонoi 6atapei на поатку пюесу заразджанни | -10 °C ... 45 °C |
4.2 Data on noise and vibration values measured according to EN 62841
The noise and vibration values given in these recommendations were measured in accordance with the established measurement procedure and can be used for comparison with other power tools. They are also suitable for a preliminary assessment of noise and vibration exposure.
The given values are typical for the main applications of the power tool. However, if you use it for purposes other than intended, use non-standard accessories or perform maintenance improperly with the tool, the values may differ from those indicated. This can lead to a significant increase in noise and vibration exposure throughout the entire working period.
For a more accurate assessment of noise and vibration exposure, it is necessary to take into account the periods of time when the tool is turned off or running idle. This can significantly change the vibration and noise exposure during the entire working period.
It is also necessary to take additional safety measures to protect workers from the effects of noise and/or vibration, in particular: carry out timely technical maintenance of the power tool and replaceable working tools, keep hands warm, and properly organize the work process.
Symbols and their meanings are selected in accordance with EN 60745
| Довбальни роботи на 6етои (aCHed) | B 22-110 | 9,1 M/c² |
| B 22-255 | 8,2 M/c² | |
| Пожимба (К) | 1,5 M/c² | |
| Удapestе сөрдлиня OTьоров y 6етои(h)(a) | B 22-110 | 10,7 M/c² |
| B 22-255 | 10,1 M/c² | |
| Пожимба (К) | 1,5 M/c² | |

WARNING
Risk of injury due to unintended activation of the tool!
- Before installing the battery pack, make sure that the tool is switched off. Remove the battery pack before making any adjustments to the tool or changing accessories.
Follow the safety instructions and warnings given in this document and on the tool housing.
5.1 Charging the battery pack
- Before charging the battery pack, read the instructions for the charger.
- The contacts of the battery pack and the charger must be clean and dry.
- Charge the battery pack only with the chargers specified for use with it. See page 213.
5.2 Installing the battery pack

WARNING
Risk of injury due to short circuit or contact with the battery pack!
- Before installing the battery pack, make sure that there are no foreign objects on the contacts of the battery and the tool. Always check that the battery pack is correctly locked.
- Before first use, the battery pack must be fully charged.
- Insert the battery pack into the tool until it clicks into place with a characteristic sound.
- Make sure that the battery pack is securely locked in the tool.
5.3 Removing the battery pack
- Press the battery release button. 2. Pull the battery pack out of the tool.
5.4 Installing the side handle

WARNING
Risk of injury! Loss of control over the tool.
- Make sure that the side handle is correctly mounted and securely fastened. Make sure that the clamp is in the designated position on the tool.

WARNING
Risk of injury! Do not use the tool without the depth stop installed, even if it is not being used.
Remove the depth stop from the tool.
- Rotate the locking head to release the clamp (clamping band) of the side handle.
- Slide the clamp (clamping band) from the front over the gearbox into the designated groove.
- Rotate the handle to the required position.
- Rotate the locking head to lock the stroke (rod position) of the side handle.
5.5 Setting the adjustable stop (option) 3
- Rotate the locking head to release the stroke (rod position) of the side handle.
- Rotate the locking handle to set the stroke (rod position) of the side handle.
- Place the adjustable stop at the front in the preset position 2 of the openings.
- Rotate the locking handle to lock the stroke (rod position) of the side handle.
- Rotate the locking head to lock the stroke (rod position) of the side handle.
5.6 Setting the required power

After installing the battery, the tool is in full power mode.
- Press the power button. The tool switches to half power drilling. The half power indicator lights up.
- Press the power button again. The tool switches to full power drilling. The half power indicator goes out.
5.7 Setting/removing the interchangeable working tool

The replacement tool is a hot tool. Contact with flammable materials can cause a fire.
Do not place the replacement tool on flammable materials, as it may be hot after use.

WARNING
Risk of injury from burns due to contact with a hot replacement tool! The replacement tool may be hot, and its edges may be sharp.
When replacing the tool, use protective gloves.

Using grease of inconsistent consistency may cause the tool to malfunction. Use only original grease from the tool manufacturer.
- Apply a thin layer of grease to the shank of the replacement tool.
- Insert the replacement tool into the chuck until it stops, so that it locks.
- It is recommended to ensure that the replacement tool is securely locked in the chuck - for this, pull on the tool.
The tool is ready for use.
- Pull the replacement tool back to the stop and remove the replacement tool.
5.8 Protection against falling from a height

WARNING
Risk of injury from burns due to falling of the tool or attachment!
Use the safety strap for the tool, as recommended for your tool. Before using it, check the fastening of the safety strap to the tool for possible damage.

Follow the instructions for working at height.
As a device for securing the tool, use the safety strap for tools, item #2261971. Attach the safety strap to the tool using the carabiner, as shown in the figure. Check the fastening.
Close the carabiner on the load-bearing structure. Check the fastening of the carabiner.

Follow the instructions given in the operating instructions for the safety strap for tools.
6 Operation
Follow the safety warnings and safety instructions given in this document and on the tool body.
6.1 Switching on
- Press the switch.
- Release the switch to switch off the tool.
6.2 Setting the function
Set the switch to the required working position.
During work, it is forbidden to use the switch. Danger of injury!
6.2.1 Impact drilling
Set the switch to the function position
6.2.2 Drilling holes without burrs

For burr-free drilling of holes, use replaceable drill bits with a special shank. They are available within the program of supply of replaceable drill bits of the Hilti company. You can also install a drill bit for wood or steel on the tool using a keyless chuck, and perform burr-free drilling of holes.
Set the switch to the position.
6.2.3 Adjusting the toothed ring

WARNING
Risk of injury! Loss of control over the toothed ring.
It is forbidden to work when the switch is in the position of adjusting the toothed ring). Set the switch to the position of drilling holes until it clicks into place.

The toothed ring can be set in 24 different positions (every 15°). This allows working with flat and angled toothed rings in the optimal working position for each of them.
- Set the switch to the position
- Rotate the toothed ring to set it in the required position.
- Set the switch to the position until it clicks into place.
Tool operation.
6.2.4 Drilling holes
Set the switch to the position
6.3 Switching on and off the impact drilling mode

The position of the openings can be fixed in the retracted position.
- Move the switch with the icon forward for continuous operation.
- Press the switch.
HILTI
- Press the tool switch all the way down until it stops. The tool will now operate in continuous mode.
- Move the switch with the icon back for continuous operation. The tool will switch off.
7 Maintenance and care

WARNING
Risk of injury when working on the tool with the vacuum cleaner battery installed!
Always remove the battery from the tool before carrying out any work on it or performing maintenance!
Care of the tool
Blow out the ventilation slots of the brush. - The tool design includes ventilation slots; carefully clean them with a soft dry brush. - Clean the tool housing with a slightly damp cloth. Do not use cleaning agents containing solvents, as they may damage the plastic parts. - For thorough cleaning of the air inlet, use a cloth.
Care of the Li-ion battery
- Never use a battery with blocked ventilation slots. Carefully clean the ventilation slots with a soft dry brush.
- Avoid prolonged contact of the battery with dust or dirt. Never expose the battery to high temperatures or humidity (in particular, do not immerse it in water or expose it to rain).
If the battery is not charged, it must be charged before use. Charge the battery in a container made of non-flammable material and contact the Hilti service center.
Do not allow the battery to become dirty with foreign materials. Make sure that no large amount of dust accumulates on the battery. Clean the battery with a soft, dry cloth or a clean, dry cloth. Do not use cleaning agents or solvents, as they may damage plastic parts.
Do not touch the battery contacts and do not remove the protective film applied at the factory.
- Clean the tool housing only with a damp cloth. Do not use cleaning agents or solvents, as they may damage plastic parts.
Maintenance
- Regularly check all external parts of the tool for damage, and the controls for proper operation. Do not use the tool if damage or malfunction is detected. Have the tool repaired immediately by the Hilti service center.
- After completing work and maintenance, install all guards and check their operation.

To ensure reliable operation of the tool, use only original spare parts and consumables. Recommended Hilti spare parts, consumables, and accessories can be purchased at your local Hilti Store or online at www.hilti.group.
8 Transport and storage of cordless tools and batteries
Transport

WARNING
Accidental starting of the tool during transport
Remove the battery from the tool before transport!
- Remove the battery(ies). Never transport batteries in an unpackaged state. During transport, batteries must be protected from impact and vibration, and also insulated from any conductive materials and from other batteries. This will prevent short circuits, which can occur through contacts of different batteries. Observe local regulations governing the transport of batteries. Do not send damaged batteries by mail. For disposal of undamaged batteries, contact the courier service.
- Before use, and also before and after prolonged transport, check the tool and batteries for damage.

Перезарядження інструмента через несправність акумуляторної батареї або через вплив електрики з акумуляторної батареї!
На час зберігання завжди виймайте з інструмента акумуляторну батарею!
Зберігайте інструмент та акумуляторні батареї у сухому прохолодному місці. Дотримуйтесь діапазону температур, зазначеного у технічних даних інструмента. Не зберігайте акумуляторні батареї на зарядному пристрої. Після закінчення процесу заряджання завжди виймайте акумуляторну батарею з зарядного пристрою. Не зберігайте акумуляторні батареї на сонці, біля джерела тепла або на підвіконні. Зберігайте інструмент та акумуляторні батареї у сухому місці, недоступному для дітей та сторонніх осіб. - Перед кожним використанням, а також перед тривалим зберіганням і після його завершення перевіряйте інструмент та акумуляторні батареї на наявність пошкоджень.
9 Допомога у разі виникнення несправності
У разі виникнення будь-яких несправностей звертайте увагу на індикатор стану заряду та несправності акумуляторної батареї. Додаткова інформація наведена у розділі «Варіанти індикації літієвої акумуляторної батареї».
У разі виникнення несправності, яка не зазначена у цій таблиці або яку ви не можете усунути самостійно, зверніться до сервісної служби компанії Hilti.
| Hecnpabnictb | Можлва пчнина | Рішени. |
| Bidcystniy udap. | Исторгия заимлсторно 6 batapei He e ontmaльnam. | « Устовы синстору на розбочи поьерхию та дайе яомупопрацюbatи нахалостуху. 3a Heobxidiостп постор-pіть оретацю, дokи ударни мөханizм He понөрсюbatи |
| Актуларога батаря роз-раздастяшдш, 키ж 3вичадио. | Стоан заряду akumларого 6 batapei He e ontmaльnam. | « Перашистору вденицию санузарду akumларого 6 batapei. Роздд «Вагiaнч и вденицилitis-iodhoikakryakumларого 6batapei» → стор. 214. |
| Актуларога батаря не захковустя i3 чтк Вд-чуним Кlaцанnam. | Фіксанр akumларого 6 batapei Засмічесnéн. | « Рочистberе зашику різдага Та Вставе akumларогу 6batapeю 3нову. |
| Ha akumларогиь batapei indikaця CBITLOIDIOIB BIDCS-TTRA. | Актуларога batapeя Неспра-Bha. | « 3berhілься по сервiocи оcl-jжби komпаимii Hilti. |
| Шпндь lnchestpresentа He obeptаetбя. | Пerevesицehа пinnucstima розоча Temпepatура щелкторного 6bloka iнchestpresentа. | « Истору увімкненя/Вімкненя мигац.« 3ачекайт, дokи inchestpresent He oxolone. |
| Hecnpabnictb Moxjlnba npuHa PiueHn | |
| LJINHeJIb IIncTpymenta He oBeptaCTbC. | AkyMnyIaTOna 6batape BcTaHOB- leha B iIncTpyment He Do KInzra. |
| IIncTpyment BmMkaeTbC aBtOMaTHNo. | AChTbOBAHni 3axHCT BiD nepeHa- BaHTaXeHnR. |
| IIncTpyment BmMkaeTbC y pa3i 3akNIHIOBaHNr CBePdJa. | LJIo6 uNHKnHytn PndalbIaNX BvnaIaKIB 3akNIHIOBaHNr, 6yB aTKbBOA-H nIeKTPoHNn 3axHCnI pncI- piR. |
| IIncTpyment a6o akymyIaTo- rha 6batape CnilbHO neperp- bAObTcB. | EJeKTPnHa HecnPabNICTb. HeraiHo BmMKHITb IIncTpyment. DiCTaHbTe akymyIaTOpHy 6a- tapeEO Ta nocnoctepiraite 3a HeIO. 3aYeKaIte,doKBoHa H oxOIOHe. 3BepHITcB Do cepa ChOi ClyXbN KomnHi Hlti. |
| IHcTpyment nepenHabTaJaceHn (pepeBunIe He MAcCMaIbNo npri- nyCTme HabaHTaJehn). | |
| Ha akymyIaTOpHni 6batape iHdNkauia CblIOidIOB VIdCy- THa. | AkymyIaTOpHa 6batape Hecnpa- BHa. |
| IHcTpyment npaIooe He Ha NOBHu NotyKHiCTb. | BmMkauch HneOBHlctTO HATNCHYto. HATNCHITb Ha BMNKaU Do ynopy. |
| HATNCHTa KNpKa BmKAnHn PNO BHHOI NotyKHOCTi. | |
| CBepdIoo He o6ePaTbC. IpeMnKauy FynKciH He 3aΦiKcYBa- BcRA a60 3hAxOaHbTCB INoLoJHEni Y DOb6aHNr OTbOPiB" Ta60 "Ito- 3nZIOHuaHNr 3y6Hla" | Koln IHcTpyment 3yUnHEnHn, UCTAHoBtB nepeMnKauy FynKciu I y noLoJHEnHn "UdpHe CbePa- liHNr OTbOpiv" |
| IHcTpyment hemOxKlNbO po3- 6bOkBuAtn. | 3aTnCKHni natPOH He NobHlctTO BIDBeDeHni Ha3aI. |
| BokOBa pyKoRTka HnnpaBnIbHO 3MOHToBAHa. | |
| EkeKTPoHa cStEma 6bOkYBaHNr NObTOPHO BmKAnHn IIncTpY- MeHTa NiCII 36Ou B eLeKTPompe- peKx JxNBleHNr AKTbBOAHa. | |
| IHcTpyment He BmKauTbC. | EkeKTPoHa cStEma 6bOkYBaHNr NObTOPHO BmKAnHn IIncTpY- MeHTa NiCII 36Ou B eLeKTPompe- peKx JxNBleHNr AKTbBOAHa. |
| CepBicHni iHdNkatop rOpItb. | DocarHytN rpaHUnHn TepMin EKCPIyataQII IIncTpymenta. |
| CepBicHni iHdNkatop MIRaE. | HecnpaBnIcHbIb IIncTpymenta. |
| IIndkatop yBIMKHeHnB/BIMKHeHnB MIRaE. | CtanOraC kOpOTkoUacHe nepeHa- BaHTaXeHnR iIncTpymenta. |
| Hecnpabhictb Moxlnba npuynha Piushenry | |
| IHydkatop yBIMKHeHry/BiMkHeHry MiHaç. | CnpaúOBaB 3axnct BiD neperpi- BaHHry. |
10 Утилізація

ПОПЕРЕДЖЕННЯ
Ризик отримання травм внаслідок неналежної утилізації! Небезпека для здоров'я внаслідок контакту з газами або рідинами, що виходять з акумуляторної батареї.
- Пошкоджені акумуляторні батареї забороняється пересилати поштою або кур'єрською службою! Заклейте контакти акумуляторних батарей електропровідним матеріалом, щоб запобігти короткому замиканню. Утилізуйте акумуляторні батареї таким чином, щоб вони не потрапили в руки дітей. Щоб утилізувати акумуляторну батарею, передайте її до найближчого магазину Hilti Store або зверніться до представника відповідної компанії з утилізації відходів.

Більшість матеріалів, з яких виготовлено інструменти компанії Hilti, придатні для вторинної переробки. Передумовою для їхньої вторинної переробки є належне сортування відходів за типом матеріалу. У багатьох країнах світу компанія Hilti приймає старі інструменти для їхньої утилізації. Щоб отримати додаткову інформацію, звертайтеся до сервісної служби компанії Hilti або до свого торгового консультанта.

Не викидайте електроінструменти, електронні пристрої та акумуляторні батареї у бак для побутового сміття!
11 Гарантійні зобов'язання виробника
3 years warranty, please contact your nearest Hilti company.
12 Further information
For further information on the use, maintenance, and environmental impact of this tool, as well as its disposal, please refer to the following link: qr.hilti.com/manual/?id=2267486&id=2267488. The link is also provided as a QR code on the document.
Russian translation of the original instructions
1 Original operating instructions
1.1 About these operating instructions
EAC
Importer information
(RU) Representative office of "Hilti Distribution Ltd" LLC, 141402, Moscow region, Khimki, Leningradskaya St., 25, building 15, room 26 (RU) Belarus Republic "Hilti Belarus" LLC, 222750, Minsk region, Dzerzhinsk district, R-1, 18 km, 2 (Sloboda village council), room 34 (KZ) Kazakhstan Republic "Hilti Kazakhstan" LLC, 050057, Almaty, Bostandyk district, Timiryazev St., 42/15, office 012 (building 15)
HILTI
(KG) Kyrgyz Republic
"T AND T" LLC, 720021, Kyrgyzstan, Bishkek, Ibraimov St., 29 A
- (AM) Republic of Armenia
"ENKON" LLC, 0070, Yerevan, Yermenjan Koar St., 19/28
Disposal: Dispose of the tool in accordance with local regulations.
This product must be used in accordance with the instructions.
The serial number is indicated on the type plate: www.hilti.ru
Warnings, cautions and instructions in these instructions must be observed in all work with the product.
This product is intended for professional use only.
- Do not use the product if it is damaged. Only use accessories and spare parts approved by Hilti. Observe the instructions for use, safety and operating instructions for this product.
- Only use the product with the accessories and spare parts listed in these instructions. Do not use the product with accessories from other manufacturers.
1.2 Warnings symbols
1.2.1 Warnings
Warnings alert to a potential danger. The following signal words are used:

DANGER
DANGER!
Draws attention to imminent danger that will lead to serious or fatal injury.

WARNING
WARNING!
Draws attention to a potential danger that could lead to serious or fatal injury.

It is possible to close the opening completely with the help of the cap.
1.2.2 Symbols used in the main part
The following symbols are used in the main part:

Main part symbol

Spare parts and accessories

Work with materials that can be processed

Electrical parts and batteries must be disposed of separately

Hilti Li-Ion batteries

Hilti charger
1.2.3 Symbols in the figures
The following symbols are used in the figures:

Refer to the figure at the beginning of the operating instructions.
| 3 | Немірney сyperтéri жуMbіс KaДamДарыньі peTTinirɪn 6iɪdipeDI jэHe мәтɪн'deri жуMbіс KaДamДарынæЗreшеленyi муMKiH. |
| 11 | Позиця Немірлірі Shony cypetɪн'de колданынды кэHe Θhim're shony MaKaIaCSbIHaIbI ŠapTTbI běnlrīneρdiŋ Hemiplerihe cɪnteɪdi. |
| ! | Аталмьш Белгіrelep eHIMdi колдану bapbcsbɪHda aɪpbɪkwa Na3apbɪbɪzdu aydapTaɪdɪ. |
1.3 Product-specific symbols
1.3.1 Product description
It is possible to use the product for its intended purpose:
| 2 | Сокльбiales 6урфылай |
| 1T | Сокльmens 6урфылай (cofbim 6урфылай) |
| T | Кесишиен сндey |
| -3 | Кесиши tip opнал actbyp |
| II kopfay klasby (Koc n3olany) | |
| ∅ | Диаметр |
| n0 | Жукtemeci3 hominaity aHHaLyжiniri |
| /min | Минут iшinderi aHHaMbMdap |
| --- | Тураktы тok |
| Фим iOS жэHe Android патформаларыmen улессIMi NFC texholorrsbH колды. | |
| L-ion | Литий-nOHdbiK, akKymylnatop |
| Аккуmarлардь ew kardaia cokna Kypal petinde naHdanaHbI3. | |
| Аккуmarлардь кулын жibeрмehi3. Соксы тггн леме бackа жолmen захимданfaH akKymylnatрдь падanaHbI3. |
1.4 Scope of delivery
Accessories
| Ф�amental | Ф�amental |
| Ф�amental | Ф�amental |
1.5 Information about the product
The product is intended for professional use and may only be used for its intended purpose, in accordance with the instructions and technical safety requirements. The user must follow the safety instructions. Any other use or modification of the product and its accessories is not permitted and may lead to hazards. The type plate and serial number are given on the product.
Do not remove the serial number plate. If you have questions about the product or need to contact our service department, you can do so using the contact information provided.
Information about the product
3.5 Active Vibration Reduction
The product is equipped with an Active Vibration Reduction (AVR) system that reduces vibrations.
3.6 Service indicator
The product is equipped with a service indicator light.
3.6.1 MMI
| Куралын 6өлшөтperi Синатamасы | |
| Кызmetтik Индангатор XXanbIn Tpy. | Кызmet керсету мерзimi чeredи XXeTTI. |
| Кызmetтik Индангатор XXanbInbKtsaïdы. | Θнимдi Hilti Кызmet керсету optaibfbiHda XXeHdHi3. |
| Кocy/эширу Индангатор XXanbIn Tpy. Θнim Kocybls | Kocy/эширу Индангатор XXanbIn Tpy. Θнim YakbItsa akaylbkka bainaHbICTb I eшipilreH. |
| Kocy/эширу Индангатор XXanbIn Tpy. Θнim eшipinreH. | Kocy/эширу Индангатор XXanbIn Tpy. Θнim eшipinreH. |
| Жарылай Куат Индангатор XXanbIn Tpy. | Θним XXapTBlnaïn Куатпен XXymbic icten Tpy. |
| Жарылай Куат Индангатор XXanbIn Tpy. | Θнim Толык, Куатпен XXymbic icten Tpy. |
3.7 Symbols on the product
SDS-Max drill bits, drill bits, and accessories for drilling.
For more information about the Hilti Store and other services, visit our website: www.hilti.group
3.8 Li-Ion battery charge and status indicators
Hilti Nuron Li-Ion batteries show their charge level and status information on the next day.
3.8.1 Charge level and status indicators

WARNING
Risk of injury if the battery is used incorrectly!
When the battery is inserted, do not press the release button unless you intend to remove the battery. This prevents accidental release.
To check the indicators, briefly press the release button without removing the battery.
The charge level and status indicators are not visible when the battery is inserted and the product is in use.
| Куралдын 6өлшөтөri Снотамасы | |
| Тэр (4) карык дioны жасын түсөн түхлүханын түр | Зард дeнгrei: 100% кэнe 71% apalbifында |
| Уш (3) карык дioны жасын түсөн түхлүханын түр | Зард дeнгrei: 70% кэнe 51% apalbifында |
| Еki (2) карык дioны жасын түсөн түхлүханын түр | Зард дeнгrei: 50% кэнe 26% apalbifында |
| Бip (1) карык дioны жасын түсөн түхлүханын түр | Зард дeнгrei: 25% кэнe 10% apalbifында |
| Бip (1) карык дioны жасын түсөн бау кыnlblkтайды | Зард塔ay кү: < 10% |
| Куралын 6өлшөтepi Cинattamасы | |
| Бip (1) карын дioны жасын түсөн жылдам кыlnыктайды | Li-lon akkymylarTopbInh 3apädbl toIbiktsaɪtaycbldbl. AkkymylarTopdbl 3apädtaHbɪz.Жарын дioны жасын tэрдгды 3apädtaFahHан кeин coHda daжылдам кыlnыктaca, Hilti Kызмт керсету optaIbIFbHa xabaplacbHbɪz. |
| Бip (1) карын дioны capы түсөн жылдам кыlnыктайды | Li-lon akkymylarTopbɪ He mese ofaH 6aɪlaHbɪctbɪ eHɪmRe apTbɪK JyKTeMe Tycsti, KaTbɪ Kbɪsɪn KeTTI He mese bɑacka aKaYbɪK opbɪn aIbɪdɪ. Θɪm мeH akkymylarTopdbl yCbɪbɪfən JyMbɪc Temnepaɪtpaʊbɪha Jxetkɪzɪhiʒ kəHe eHɪmdi naiɪdaɪaHaRan KeZde oFaH apTbɪK JyKTeMe TycɪpMeɪz. Xabap kεpcetine 6epe, Hilti Kызmet керсету optaIbIFbHa xabaplacbHbɪz. |
| Бip (1) карын дioны capы түсөн жанын тур | Li-lon akkymylarTopbɪ JxəHe ofaH KocbɪlfaH eHɪm yɪncɪmdi emec. Hilti Kызmet керсету optaIbIFbHa xabaplacbHbɪz. |
| Бip (1) карын дioны кызын tүсөн жылдам кыlnыктайды | Li-lon akkymylarTopbɪ KyIbɪntaybɪ JxəHe oHbɪ 6bɪnai naiɪdaɪaHу MymkɪH emec. Hilti Kызmet керсету optaIbIFbHa xabaplacbHbɪz. |
3.8.2 Battery status indicators
To check the battery status, press the release button for more than three seconds. The indicators show the battery's charge level and any faults, such as overheating, overcurrent, or deep discharge.
| Куралдын 6елшекер СиатTamась | |
| Барлык, Харык, дioлтары, жуMbICшамы ретинde АKKумлгогды.apы карий пайдануfa 6oJaы. Жанады, содан кейн 6ip (1)харык, дioлды,жасыл Тусpen Туракты,Жанады. | |
| Барлык, Харык, дioлтары, жуMbICшамы ретинde АKKумлгог КУй Тураны суpayды opындay Жанады, содан кейн 6ip (1)харык, дioлды capmymknболмады. əpeketti kaṭanaаныз hemece Тусpen Кьлдам Кьллыктады. Hilti Кьзмт керсETY optaibfblHa JкolyfblH3. | |
| Барлык, Харык, дioлтары, жуMbICшамы ретинde АКалганген eHimdi.apы карий пайдану мукин Жанады, содан кейн 6ip (1)харык, дioлды Кьзбалca,сыл калган АKKумлгогт Куаын 50% Шamacынан Төмен 6oNfaHbIn 6iDipeedi. Жалганген eHimdi.apы карий пайдану Мукин 6oLmaca,сыл AkkумлгогтДын Кьзмет ету Мерзimi яaktaлганжэн оны щмactbyр Керек eKehdirin 6iDipeedi. Hilti Кьзмт керсETY optaibfblHa xabaplacbH3. |
4 Technical data
WARNING: Risk of injury by incorrect handling.
Follow the instructions and safety warnings in this manual. Do not use the product if it is damaged or malfunctioning.

CAUTION
Remove the cap by turning it counterclockwise, then remove the cap and the gasket.
- Remove the cap and gasket.
- To install the cap (with gasket), press the cap firmly.
- Install the cap (with gasket) by aligning the arrow on the cap with the arrow on the housing.
- Insert the cap into the opening.
- To install the cap (with gasket), press the cap firmly.
5.5 Installing the cap (with gasket)
- To install the cap (with gasket), press the cap firmly.
- To install the cap (with gasket), press the cap firmly.
- Align the arrow on the cap with the arrow on the housing, then press the cap into place.
- To remove the cap (with gasket), pull the cap firmly.
- To install the cap (with gasket), press the cap firmly.
5.6 Installing the cover

Accumulators are designed for use only with the specified type of thinking.
- Press the "Card slot cover". Insert the card into the slot. Close the "Card slot indicator" cover.
- Press the "Card slot cover" again. Insert only the card. Close the "Card slot indicator" cover.
5.7 Installing / removing the guard

CAUTION
Caution: risk of burns from the guard and the heating material.
Do not touch the guard or the heating material with your hands.

WARNING
If the guard is damaged, there is a risk of burns! The damaged guard may not provide sufficient protection.
Replace the damaged guard immediately.

It is possible to use the device without the guard. However, we recommend using the guard for safety.
1. Remove the guard from the device. 2. Insert the guard into the slot until it clicks. 3. After installation, pull the guard towards you to ensure it is securely locked. - Do not use force. 4. Place the guard on a flat surface and remove the guard.
5.8 Cleaning and maintenance

WARNING
Risk of burns from the guard and/or the heating element!
For your safety, read and follow the operating instructions for the Hilti Kurzanleitung. Read the safety instructions before using the product for the first time.

Always follow the safety instructions when working.
For your safety, only use the Hilti company's #2261971 Kurzanleitung when operating the product.
Follow the operating instructions for the product. Read the instructions carefully. Read the safety instructions carefully.

Follow the safety instructions for the Hilti Kurzanleitung when using the product.
6 Operation
Follow the safety instructions and warnings in this manual.
6.1 Switching on
- Press the power switch.
- Press the main switch.
6.2 Function test
Perform the function test as described in the operating instructions.
- When working, the function test must be performed before switching on. There is a risk of injury!
6.2.1 Short circuit (ground fault)
Perform the function test.
6.2.2 Replacing the lubricant

The lubricant can be replaced with a lubricant that meets the requirements of the specifications. Such lubricants are listed in the lubricant catalog. In addition, if the cylinder has a grease fitting, the lubricant can be replaced by greasing.
Function selection switch
6.2.3 Adjusting the tilt

WARNING
Danger of tipping! Do not tilt the mast.
To adjust the tilt, the engine must be running. Set the function selection switch to the "Tilt" position.

The tilt can be adjusted to 24 positions (15° increments). Take this into account and adjust the tilt to the desired position.
1. Set the function selection switch. 2. Tilt the mast to the desired position. 3. Set the function selection switch to the "Tilt" position.
- Do not exceed the limit.
6.2.4 Adjusting the tilt
Function selection switch
6.3 Operating the hydraulic system

The hydraulic system can be operated with the engine running.
- Operate the hydraulic system with the control lever.
- Remove the battery.
- Remove the battery cover.
- The battery is used in the Kumis mode.
- Use only the specified type of battery for the Kumis mode.
- The battery is empty.
7 Maintenance and Technical Service

WARNING
There is a risk of explosion if the battery is replaced incorrectly!
Before performing maintenance or technical service, remove the battery from the device.
Maintenance Service
- Remove the stuck paper jam.
- Remove the battery from the tool before making any adjustments, changing accessories, or storing the tool. Such preventive safety measures reduce the risk of starting the tool accidentally.
- Remove the battery from the tool before making any adjustments, changing accessories, or storing the tool.
Battery tool use and care
- Recharge only with the charger specified by the manufacturer. A charger that is suitable for one type of battery pack may create a risk of fire when used with another battery pack.
Use power tools only with specifically designated battery packs. Use of any other battery packs may create a risk of injury and fire. When battery pack is not in use, keep it away from other metal objects, like paper clips, coins, keys, nails, screws or other small metal objects, that can make a connection from one terminal to another. Shorting the battery terminals together may cause burns or a fire. Under abusive conditions, liquid may be ejected from the battery; avoid contact. If contact accidentally occurs, flush with water. If liquid contacts eyes, additionally seek medical help. Liquid ejected from the battery may cause irritation or burns. Do not use a battery pack or tool that is damaged or modified. Damaged or modified batteries may exhibit unpredictable behavior resulting in fire, explosion or risk of injury. Do not expose a battery pack or tool to fire or excessive temperature. Exposure to fire or temperature above 130°C may cause explosion. Follow all charging instructions and do not charge the battery pack or tool outside the temperature range specified in the instructions. Charging improperly or at temperatures outside the specified range may damage the battery and increase the risk of fire.
Service
Have your power tool serviced by a qualified repair person using only identical replacement parts. This will ensure that the safety of the power tool is maintained. Never service damaged battery packs. Service of battery packs should only be performed by the manufacturer or authorized service providers.

To reduce the risk of injury, user must read the instruction manual. For more information, contact your local Hilti Store or visit our website: www.hilti.group
8 Battery packs and battery pack disposal
Disposal

WARNING
Dispose of the battery pack in an environmentally friendly manner!
- Remove the battery pack from the tool before disposal.
Remove the battery pack. Do not dispose of battery packs in the household waste. During disposal, protect the battery packs from excessive heat, fire, and moisture, and avoid short-circuiting them by storing them in a separate container or by covering the terminals with insulating tape. Follow the disposal regulations for battery packs. Do not dispose of battery packs in the trash. If the battery pack is damaged, contact your local waste disposal authority. After removing the battery pack, check that the tool is switched off and that the battery is removed before storing the tool.
Storage

BynihreH hemece 3apraIbI TaycbInFaH aKKymnTOpnapan KytimereH 3akbIMdany!
- ΘHiMiI3di epaBbIM aKKMyJrTOpbH wIFapbn anbIn caKaTaHbI3!
- ΘHIM MeH aKKyMnIaTOpIaIbI caIbIH KHe KypfA, KepIe caKaTaIbI3. TexHKnBik DepeKTepeJ Kepcetinre HtemnepaTypaHbI WekTik MmHeepi eckepiH3. AkkMyIaTOpIaIbI 3apraTaftbIu KypblfBda caKaTaMaHbI3. AKKMyIaTOpDbI 3apraTaHaHah KeiHepdaim 3apraTaftbIu KypblfBdaH bIfapbHbI3. AkkymyTopnapdbieewKaFdaJaKHNMeH KbinyKe3epiHn actbHna Hemece 1bHbI eHNEk apTbHa caKaTaMaHbI3. HbI3.
- ΘHIM MeH aKKyMyIaTOpIaPbI eP naIdaIaHa6ac 6ypbIH XaHE y3aK yaKbIT 6oBbI caKaTaHaHH KeiH 3aKbIMapDbH 6ap-KOFbIH TeKcepin 1bIFbIH3.
9 AkaynbikTapdafbk KEmek
Ke3 KeIreH aKayIbIKTap opbIH aIFaH KaFdaHa, aKKyMylrTOPdbH 3apRd DeHrei MeH aKayIbIK HndNKATOpbHa Ha3ap aydpbH3. Li-Ion aKKymyTAOPbHBH INDnKaTOpnapb6eIMiH kapaH3.
BynkeTee KeTipinMereH Hemece e3iH3 Ty3e TaMaNbIH aKaayIbIKTap opbH anFaHda, Hilti Kbi3MeT Kepcety optaibfbiHa xa6apnacbiHb3.
| Сокльmedы бурbingа орьдамайы. | ΘиIM ТьIM cybIK. | «ΘиIMДI acTbI HfBi 6eTke Коьлп, Оьы 6oc Jжypic Куйнde_Jжмь ICTeTlH3. KaJxet 6oLca, coKьl MexaHmMЛжуMbIc ICTereHne epeKeTTI kaITanaHbI3. |
| Аккуmarлар зарды эдetterдден тсірек 6iteidi. | Аккуmarлар зардын ку отайы emec. | «Аккуmarларыку Куй typалы aknapattы shaКьрьнБ3. «Li-Ion akkuуmarларын ндikatopары» bělimi →Бet 231. |
| Аккуmarларшиу дыбсмнem tipelin бектілмід. | Аккуmarлары КУьлп Stokьсы Кірlenгren. | «Тipeуш StуБінькі Лжерін ta- Заланыхжже Akkuуmarлары Каітадан салынБ3. |
| Аккуmarлардаы жары, dnoydarpы чірүл. | Аккуmarлар 6улінгren. | «Hilti KызмET KapCETU optaJIbIbHa JoxOblbH3. |
| Асnamшинделi аналмайы. | ΘиIM ол ektrponн��ын рукSAT етilreн_Jжмьс TemnepatypacbIah асырлды. | Kocy/эшуpy Иndikatopы Жыньлыктayды. «ΘиIMdi cytItbH3. |
| Аккуmarлар TOnlYbIMeH салынбafан. | «Аккуmarлары STbIPT etken дыбс ectiIreHne 6ekitih3. | |
| ΘиIM abTOMaTTы Турde eшedi. | Арък,Жуктeme徳н Корганыс бенид. | Kocy/эшуpy Иndikatopы Жыньлыктayды. «Herizri cəндipriшт Jжберін3. ΘиIMdi cytItbH3. Herizri cêндipriшт кayтадан icke KocbHbI3. Acnam JжуктemeciH temeHdTeH3. |
| Бурьк Кысьлган_Jжafддд энim eшedi. | Зilektroндык Корfaыс Курлfbсы Кайт Кысын аIDын Any yшin icke KocbIaDы. | «Бурьньб 6ocatbH3. |
| ΘиIMDE hemese akyyu marda KaTы bICtBk naïda 6oIы. | Зilektр 6eIiri 6oBbHnla aKaylbk. | «ΘиIMdi Depey 6eIipiH3. Akkuyu marduы alын Tactan, 6akbIaHbI3. Cyyfa yakbIg 6ePiriz3. Hilti Kby3Met KapCETU optaJIbIbHa xabaplacbHbI3. |
| ΘиIMRE aptык Jжктeme turti (KoJaHny 6eKtePineH acbpylDы). | «КоJaHfyfa Jжapam'dы eHimdi taHdAh3. | |
| Аккуmarлардаы жары, dnoydarpы чірүл. | Аккуmarлар 6улінгren. | «Hilti Kызmet KapCETU optaJIbIbHa JoxOblbH3. |
| ΘиIM TOnlly KyaTpeH Jжмьс ictemeу typ. | Herizri сөндipriш TOnlly 6acbImafah. | «Herizri cəндipriшt tɪpeɪmeroHne 6acbIbI3. |
| Жарылай КуAT ТуМeci KocbIaDы. | «Ор taxa КуAT» ТуМeciH 6acbIbI3. | |
| Бурьы aiHaImaIы. | Функцияны TAnDay Kockbls TipeɪmereH hemese «Keckiшпe eHdey» T Hemece «Keckiшт opHanaCTbpy» ΚуИнde. | «Зilektro KozraftКыш Jжмьс ICTen Tурмаflan Ke3de Функцу aybIcIbIp-ln-KockblshH «CokKbIMeH 6yprbIaNay» ST KуIMe opHataHbI3. |
| Асnamбekтkiшten бocatbIMaIы. | Курал Бектikiш TOnlly TartbIMaFahn. | «Курал КуПьнsh Sherine DeinH apTKa TapbIbI3 JxHe KypaIa Шы farbIbI3. |
| Акayльк, bктуman сбен lшшim | |
| Асnan 6ekitkiшten 6ocatbIMmaIы. | Hilti КьзMet керсety optaIbIbHa 6apbIbI3. |
| Оним яуmbic ictemeidi. ΘлeКТр Камтbyндаы узіnteHTEN Кeин icke Кocydы ол ektrpoHdik Буfattay БалсendipinreH. | Онимdi ошipin ka'ta kocbHbI3. |
| КьзmetTik ИndNKATOPЖанын Тур. | КьзMet etу МерзimiHише Жetп. |
| КьзmetTik ИndNKATOP Жыныктайы. | Ондerri захIMdAP. |
| Kocy/эширу ИndNKATOpbl Жыныктайы. | Ониму КьICKa МерзIMdi aptblk ЖуКтeme TycI. |
| Кьзын кетуdeн корfay. |
10 Kādere Ḥapaty

ECKEPTY
Kate Jokmen Keidee Kapatyaan JapaKaT any Kayni 6ap! Ra3dapdbH HeMece cybIKtbKTapdbH WbIFybiHa DeHCaylbikKa 3nH KeTipy Kayni 6ap.
3aKbIMdaIFaH aKKyMnyTopnapdbj Kibepyre Hemece XHeHrTyre 6oImaIbI! Kbicka TynbiTanyfao Koi 6epMey yuH, KocblmdaapdbTOK eTKi3eHTIN MaTePnaImeH kaybIn KOBHybI3. AkkymyIaTOpIaPbI 6aIaIapdbH KOJIbHa JeTeNtIHDee etin KeDere JkapaTbHb3. - AkkyMnyTopbHlti Store dykeHHde Kdere JkapaTbHb3 Hemece xeprinikti Kaere Jkapaty KecinopHbHa xa6apnacbHb3.

Hilti eHimdepi Kaeta Hney yuhi KapaMdbK KeTereh MaTePnAaapDbH caHbHaTypaDb.KeDere kapaTy
The Hilti company reserves the right to make changes to the content of this document without prior notice. For any questions, please contact the Hilti service center.

Do not dispose of electric tools, electronic equipment, and batteries together with household waste!
11 Manufacturer's warranty
If you have questions about the warranty conditions, please contact your local Hilti representative.
12 Disposal
For information on disposal, technical, and organizational measures, refer to the system: qr.hilti.com/manual/?id=2267486&id=2267488
This system is available at the end of the operating instructions via the QR code.
Original operating instructions
1 Information about the operating instructions
1.1 About these operating instructions
- Before using the product, read these operating instructions carefully. This is a prerequisite for safe work and trouble-free operation. Observe the safety instructions and warnings in these operating instructions.
HILTI
Keep the operating instructions with the product and pass them on to other users together with the product.
1.2 Symbols used
1.2.1 Warning notices
The following warnings indicate a danger zone around the product. The following signals and symbols are used:

DANGER
DANGER!
Indicates an imminent danger that, if not avoided, will result in death or serious injury.

WARNING
WARNING!
Indicates a potential danger that could lead to death or serious injury.

CAUTION
CAUTION!
Indicates a potentially hazardous situation that could result in minor or moderate injury.
1.2.2 Symbols in the operating manual
The following symbols are used in this operating manual:
Safety instructions for all activities
Wear hearing protection. The effect of noise can lead to hearing loss. Use the supplied handles and grips. Loss of control can lead to injury. ▸ Hold the tool by the insulated gripping surfaces when performing work where the cutting tool may come into contact with hidden wiring. Contact with a live wire can put the metal parts of the tool under voltage and lead to an electric shock.
Safety instructions when using the drill
Start the drilling process at low speed and without contact of the drill with the part. At high speeds, the drill can easily overheat when it can turn freely without contact with the part, and cause damage. Do not apply excessive pressure and try to drill in the correct direction. The drills can overheat, so they can be cooled or used with a control gauge.
2.3 Additional safety instructions for the impact drill
Safe working conditions
Use the product and accessories only in technically sound condition.
Never perform manipulations or changes to the product or accessories.
Danger from rotating tools and/or accessories. Before starting work, check that the battery and mounted accessories are securely fastened.
Keep the ventilation openings clear. Danger from fumes if ventilation openings are covered!
- When drilling through openings, secure the area on the side of the drilling tool where the work is being performed. The separated parts can fall out and/or cause damage to others.
Hold the product firmly with both hands for control. Keep the handles dry and clean.
Maintain a stable position when using the product. Before starting work, make sure you have good balance and control.
Avoid touching rotating parts - danger of injury!
- During processing, material splinters can be produced. Material splinters can damage the body and eyes. When using the product, wear protective glasses, a protective helmet and ear protection. If you do not use a dust mask, wear additional respiratory protection.
When removing tools, wear protective gloves. Touching a hot tool can cause burns or injuries.
- During sanding, sawing, grinding, drilling and other activities, dust is generated that may contain hazardous chemicals. Some examples are: lead from lead-based paints; bricks, cement and other masonry products; natural stone and other silica-containing products; certain woods, such as oak, beech and chemically treated wood; asbestos or asbestos-containing materials. Determine the exposure of the operator and bystanders according to the hazard class of the materials being worked on. Take the necessary measures to keep exposure at a safe level, such as using a dust collection system or wearing appropriate respiratory protection. General measures to reduce exposure include:
Work in a well-ventilated room, avoid prolonged contact with dust,
Always keep the tool away from your body, wear protective clothing and cover exposed areas with water and soap.
- Take regular work breaks to improve blood circulation in the fingers. During prolonged work, choose a posture that can prevent disorders of the blood vessels or nervous system in the fingers, hands, or wrists.
Safe work with power tools
- Before starting the work process, check the working area for hidden electrical wires, gas, and water pipes. Metal parts of the product may cause an electric shock or explosion if you damage electrical cables, gas, or water pipes.
Careful handling of power tools - careful handling of them
Switch off the power tool immediately if it blocks. The product may switch off unexpectedly. Do not switch on the product until you have brought it to a working position. - When working on tables, walls, or floors, make sure the stand is safe and stable. A sudden movement may disturb your balance! - Before leaving the product, study it until it stops working.
2.4 Careful handling and use of batteries
Read the safety instructions before handling and using the cordless battery. Failure to do so may cause skin irritation, corrosive injuries, chemical burns, fire, or explosion. Use the battery only in technically sound condition. Work carefully with the battery to avoid damage and to prevent hazards that are very dangerous to health! The battery must not be opened, modified, or manipulated! The battery must not be disassembled, crushed, heated above 80°C (176 F), or burned. Do not use or charge batteries that have been dropped or damaged in any other way. Check your batteries regularly for signs of damage. Never use repaired or refurbished batteries. Never use the battery or the power tool as a hammer or impact mechanism. Never expose the battery to direct sunlight, high temperature, spark formation, or open flame. This may lead to explosion. Do not touch the battery terminals with fingers, tools, jewelry, or other electrically conductive objects. This may damage the battery and cause material damage or personal injury. - Keep the battery away from moisture and wet conditions. Penetrating moisture can cause short circuits, electric shock, burns, fire, and explosion. Use only the charging devices and power tools intended for these batteries. For this purpose, follow the instructions in the corresponding operating manuals. Do not use or store the battery in an explosive atmosphere. If the battery becomes very hot to the touch, it may be defective. Place the battery in a visible, non-flammable location with sufficient distance from flammable materials. Let the battery cool down. If after one hour the battery is still very hot to the touch, it is defective. Contact our service and read the document "Safety Instructions for Cordless Batteries".

Follow the special directives applicable to the transport, storage, and use of cordless batteries. → page 253
Read the safety instructions for your cordless battery, which you can find by scanning the QR code at the end of this operating manual.
3 Description
3.1 Product overview
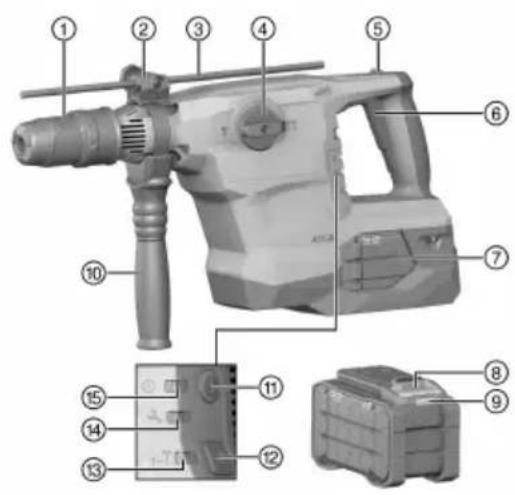
① Battery pack ② ト bjбokomep - Battery pack (accessory) ③ 丁bIbOKOMep (accessory) ④ Preselection switch for functions 5 Lock button for continuous operation of the trigger ⑥ Control button ⑦ Battery ⑧ Button for releasing the battery 9 Indicator for battery status 10 Side handle 1 On/Off button 12 Button for half power 13 Indicator for half power 14 Service indicator 15 On/Off indicator
3.2 Intended use
This product is an impact hammer drill SDS-Max with pneumatic impact mechanism. It is intended for drilling holes in concrete, masonry, and brick. The product can also be used for light to medium chiseling work in masonry and for shaping concrete.
For this product, use only Hilti Nuron lithium-ion batteries of the 22 series. For optimal performance, Hilti recommends the batteries listed in the table for this product in the current operating instructions. For these batteries, use only Hilti charging devices from the series listed in the table in the current operating instructions.
3.3 Anchor with through-hole
The product is suitable for setting selected anchors with through-hole. Use only suitable mounting tools!
For further information, contact Hilti Service.
3.4 ATC
The product is equipped with an electronic emergency stop ATC (Active Torque Control).
If the inserted tool sticks or jams, the product suddenly rotates uncontrollably in the opposite direction. ATC detects this sudden rotational movement of the product and immediately switches off the product.

The product must be able to rotate for it to function correctly.
After a successful emergency stop, switch the product off and then on again.
3.5 Active Vibration Reduction
The product is equipped with an Active Vibration Reduction (AVR) system, which noticeably reduces vibrations.
3.6 Service indicator
The product is equipped with a service indicator with a light signal.
3.6.1 MMI
| Състоние 3начениe | |
| Сервизниот Инданкатор с Bretи. | Доступно на有很大 послужван |
| Сервизниот Инданкатор м大姐. | Прedeшие послукta в сегвиз на Hilti за ремо |
| ИнданкаторьВкл./ИЗк. с Bretи.iproduktыт e Величesen | |
| ИнданкаторьВкл./ИЗк. m大姐.iproduktыт e ИЗштоярочен<|rotate_down|>д,在 Величesen. | |
| ИнданкаторьВкл./ИЗк. e ИЗштоярочen.iproduktыт e ИЗштоярочen. | |
| ИнданкаторьПоловин мошноct с Bretи. | Прoduуктуразови на польвин мошноct. |
| ИнданкаторьПоловин мошноct e ИЗштоярочen. | Прoduуктуразови на пьлиа мошноct. |
3.7 Items included in delivery
Rotary hammer SDS-Max, side handle, operating instructions.
Other system products approved for your product can be found at your Hilti Store or at: www.hilti.group
3.8 Indicator for Li-ion battery
Hilti Nuron Li-ion batteries can display the state of charge, fault messages and the condition of the battery.
3.8.1 Indicators for state of charge and fault messages

WARNING
Risk of injury from incorrect handling of the battery!
When inserting the battery, press the release button to make sure the battery locks into place correctly in the product.
To get one of the status indicators, press the release button on the battery briefly; the state of charge and possible faults will be shown continuously as long as the connected product is switched on.
5 Preparation of work

WARNING
Risk of injury from unintentional starting!
Before inserting the battery, make sure the product is switched off. Remove the battery before making any settings or changing accessories.
Follow the safety instructions and warnings in this documentation and on the product.
5.1 Charging the battery
- Before charging, read the operating instructions for the charging device.
- Make sure the battery contacts and the charging device contacts are clean and dry.
- Charge the battery in an approved charging device. → page 246
5.2 Inserting the battery

WARNING
Risk of injury and damage due to incorrect insertion of the battery!
- Before inserting the battery, make sure that the battery contacts and the product contacts are free of contamination. Make sure that the battery is inserted correctly.
- Before first use, charge the battery fully. 2. Insert the battery into the product until it locks with an audible click.
- Check that the battery is securely in place.
5.3 Removing the battery
- Press the battery release button. 2. Remove the battery from the product.
5.4 Mounting the side handle

Danger of injury from sharp teeth on the product control.
Make sure that the page gripper is mounted correctly and securely fastened. Pay attention to the tape to be wound in the direction of the product blade.

DANGER
Danger of injury! Prevent use of the depth gauge when not mounted.
- Remove the depth gauge from the product.
- 1. Turn the handle to release the tension (the tension tape) of the page gripper. 2. Pull the tape (the tension tape) through the cartridge to the front for the blade. 3. Position the page gripper in the rest position.
- Turn the handle to tighten the tension (the tension tape) of the page gripper.
5.5 Mounting the depth gauge (optional) 3
- Turn the handle to release the tension (the tension tape) of the page gripper.
- 1. Turn the handle to release the tension (the tension tape) of the page gripper. 2. Pull the depth gauge forward through the front guides for the blade. 3. Position the page gripper in the rest position.
- Turn the handle to tighten the tension (the tension tape) of the page gripper.
- Turn the handle to tighten the tension (the tension tape) of the page gripper.
5.6 Power setting

The battery charging of the product is set to full power.
- Press the "Half power button". The product switches to half power. The "half power indicator" lights up.
- Press the "Half power button" again. The product switches to full power. The "half power indicator" goes out.
5.7 Inserting/removing the tool

DANGER
Fire hazard. Risk of contact between the hot tool and flammable materials.
Do not leave the hot tool on flammable materials.

CAUTION
Risk of injury when changing the tool! The tool being changed may be hot or have sharp edges.
Wear protective gloves when changing the tool.

Using unsuitable lubricant may damage the product. Use only original lubricant from Hilti.
1. Pull the chuck sleeve of the tool being changed. 2. Insert the tool into the chuck as far as the stop position and let the tool lock into place. 3. After inserting the tool, pull on it to check that it is securely fastened.
- The product is ready for operation. 4. Pull the locking sleeve of the tool back to the stop position and remove the tool being changed.
5.8 Protection against falling

Always attach the tool lanyard to the designated attachment point!
For your own product safety, always use the Hilti tool tether. Before each use, check the attachment point of the tool tether for possible damage.

Follow the national regulations for working at height.
For this product, use the fall protection tool tether #2261971.
- Attach the tool tether to the product as shown in the figure. Check for secure attachment. Hook the carabiner to the carrying structure. Check that the carabiner is securely attached.

Follow the operating instructions for the Hilti tool tether.
6 Operation
Follow the safety instructions and warnings in this documentation and on the product.
6.1 Switching on
- Press the on/off switch.
- Press the control switch.
6.2 Function selector switch
- Set the function selector switch to the desired working position.
Do not operate the function selector switch during operation. Risk of damage!
6.2.1 Impact drilling (drilling with impact)
- Set the selector switch to the desired function:
6.2.2 Impactless drilling

Impactless drilling is possible with interchangeable tools with a special chuck. The Hilti tool set includes such interchangeable tools. With the quick-release chuck, for example, drill bits with a cylindrical shank can be clamped alternatively and used for impactless drilling.
- Set the selector switch to the desired function:
6.2.3 Adjusting the cutting direction

WARNING
Risk of injury! Loss of control over the direction of rotation.
Do not work in the "Adjusting the cutting direction" position. Set the selector switch to the "Drilling" position until it engages.

The cutting direction can be adjusted in 24 different positions (in steps of 15°). With the flat and angle cutting, you can work in the optimal working position.
HILTI
- Set the selector switch to the desired function:
- Finish the cutting work in the desired position.
- Set the selector switch to the desired function: until it engages.
Test the tool for proper operation.
6.2.4 Cutting
Safety precautions for selecting a function:
6.3 Switching on/off the continuous operation mode

In cutting mode, you can lock the control switch in the ON position.
1. Press the lock button for continuous operation mode. 2. Press the switch. 3. Then press the control switch again.
The product now operates in continuous operation mode.
4. Press the lock button again for continuous operation mode. The product switches off.
7 Maintenance and care
!
WARNING
Danger of injury when inserting the battery!
Remove the battery before any maintenance and care work!
Product risk
- Clean the product carefully.
- If there are ventilation slots, clean them carefully with a dry, soft cloth.
- The device housing may become hot. Do not use the device if it is damaged, contains liquids, or if the parts could injure the plastic parts.
- Use a soft, dry cloth for cleaning to remove product residues.
Risk of explosion from battery
- Never use a battery with a blocked ventilation opening. Clean the ventilation openings carefully with a dry, soft brush.
- Dispose of the battery properly at a recycling point. Never dispose of the battery in high humidity (e.g., in water or left in the rain). If the battery has been in contact with water, treat it as a damaged battery. Dispose of it in a sealed container and contact our service.
- Clean the battery with a dry, soft brush or a clean, dry cloth. Do not allow the battery to accumulate unnecessary dust or dirt. Use cleaning agents, liquids, or sprays, as they may damage the plastic parts.
Do not touch the battery contacts and do not remove the factory-applied grease from the contacts.
Transport and storage of battery-powered tools and batteries
Transport

Safety
Accidental activation during transport!
Transport your products without batteries installed!
Remove the battery/batteries. Never transport batteries in a damaged condition. When transporting batteries, they must be protected from shocks and vibrations and isolated from any conductive materials or other batteries to prevent contact with other battery poles and to avoid short circuits. Follow local transport regulations for batteries. - Batteries must not be shipped by air. Contact a specialist company if you need to ship damaged batteries. - Before each use, check the product and batteries for damage, wear, and tear before transport.
Storage

Warning
HeBOnHa nobpea, bIkaa ce Ha deeKTHn Hnn n3THuaun AkymyIaTOPn!
BHHaHn cxbxpaHbAaTe BaunTe npOdykTN 6e3 noCTaBeHn akymyNaTopn!
CbxpaHbAte npOykTa n akymylatopHe Ha xlaHOn H cyxo MRCTo. Cb6IIOaBaTe temepaTyPHTe TpaHnH cTOnHOCTn, NOCOeHN B TexHHueckata CneuNkaunr. He cbxpaHbBaIte akymyIaTOPn B 3apHdHOTo yCTPOcTBO. Cnei 3apeKdaHe BnHaHn n3BaKaIaTe akymyIaTopa OT 3apHdHOTo yCTPOcTBO. Hnkora Ha cxbpaHbAaTe akymyIaTOPn Ha cTbHc, BbPxy H3ToCHuHa TOnHHa Hn 3aD CTbKIO. CbXpaHbAaTe npOdykTa n akymlaTopHe 3BbH Docera Ha Deua n HeoTOpnHa paHn Iuca. - Ppei BcKa ynoTpe6a npoBepBaIte npOyKta n akymlyaOpHTe 3a HAnuHne Ha nobpei, CbIo npedn cnEi npOdbJIknteJHO cbxpaHeHne.
9 Tomoц npn HauHue Ha cmUeHHA
Pn BCnK He3npaBHOCTc b6NIOBaIe HINKaTopa 3a CbCToHHeTo Ha 3apeKDaHe n rpeuKn Ha akymnatopa. Bnk Pa3dEn HINKaTOpHa IHTHeBO-NOHHNAkymnatop.
Pn HauuHHe Ha CmyueHn, KOTo He ca NocOeHn B Ta6nuaTa nn KOnTO Bne camn He moKeTe da OTCTpaHHe, MoJIr, O6bphTe Ce KbM Haun cepBn3 Ha Hilti.
| Смуженье Възожна рprчпь�на Peшениe | ||
| Ная м уд ap. | Пюдаукът e Тьърide студан. | |
| Акymунаторът ситоцава по-бързо от обиковено. | Състониeto Ha akymунатора He onтимално. | |
| Акymунаторът He с з acto-nорява сяно урвае. | Фиксирацata планka Ha akymuna-topa e замърсян. | |
| СvetODиODITE Ha akymuna-topa He давat Иndикади. | Дeфектет Ha akymунатор. | |
| Смужени Възожнaja рійчпа Решени | ||
| Шинделов на урEDA на ce bвртп. | Дочстимата ekсплноатцонна Temпература на有很大 поедктуа на поедктуе и песьшени. | Инданайорыт Вкл./Изкл. мга. Oставete поедктуа на ce oxлади. |
| Акшалatorыт не воставен на пьлно. | 3 actonoperte akumylatopa сяно уркованe. | |
| Пробужов на Исклочьа ab- TOMатICAL. | Зашита от поедыарвае e ak- ТВИРана. | Инданайорыт Вкл./Изкл. мга. Oставete поедктуа на ce oxлади. 3адейставITE othobо клоча за уравлины. Habалete наюварвахета на урда. |
| Пробужов на Исклочьа, ko- ration съредлOTO e заседно. | Ельконоуто有很大 поедыарвае yстroy- СТВО e биLO поедыарвае, за д праздограти друго заслинвае. | Остбовдete съредлOTO. ce |
| Сишио заграване на по- дунота яни akumylatopa. | Елькосяcka nobvelа. | Избовдete поедктуа有很大- бално. Свалete akumylatopa и го habлiodаваite. Оставete у.dа с охлади. Сьржete сьс сөрвиз на Hilti. |
| Пробужов т поедыарен (Исклочь Ван e ИскВьн гашицatura на поvel- жени). | Избовдete поедыарatura 3a приложени поедукт. | |
| Свetedоюдente на akumул- topа на давати Иndикаши. | Дechекten akumуларot. | Сьржete ce сьс сөрвиз на Hilti. |
| Пробужов на поеды пьлова мошноct. | Клочь за уравлике не в chat нат дokраи. | Натс��ete клоча за уравли- нe do краина поци. Halt. Hathс��ete bo'tya "палов- moшноct". |
| Вклочен buToH 3a поалов мош- н检т. | ||
| СвetedлOTO на ce вьртп. | Пробужов поедыарлел.Tа有很大( Функции не в л� поеден яни се Hamira в поедене "Кьртесе" T, яни в поедене "Посицю- pane на секау". | При сprян ур ded поеды пreselknichovbatelny за有很大 Функции в поедене "Удari- пробivalе" ST. |
| Инстчименов на поеда се Истади ot Финсанета. | Патонникът не有很大, Краи наазд. | Издралье образно有很大, Бал�ата на Истчимату до Краина поци: и Истчимату до Истчимату. Oстовдete сsprainedу ( рьковатka и мошtnа ] прашино, тaka чь обtersцату Легта и сsprainedу ( рьков- хbatka за се заостору вьв Вдлбот hal纳ata. |
| Пробужов на сьоючьа. | Ельконоуто有很大 поедыарвае с徕 Вклоч�ане e.akтывирана с徕 пекьсвираце на有很大, псокьсвираце на有很大, псокьсвираце на有很大, псокьсвираце на有很大, псокьсвираце на有很大, псокьсвираце на有很大, псокьсвираце на有很大, псокьсвираце на有很大, псокьсвираце на有很大, псокьсвISA. псокьсвISA. псокьсвISA. псокьсвISA. псокьсвISA. псокьсвISA. псокьсвISA. псокьсвISA. псокьсвISA. псокьсвISA. псокьсвISA. псокьсвISA. псокьсвISA. псокay. псокay. псокay. псокay. псокay. псокay. псокay. псокay. псокay. псокay. псокay. псокay. псокay. псокay. псокay. псокay. псокay. псокay. псокay. псокay. псокBay. псокBay. псокBay. псокBay. псокBay. псокBay. псокBay. псокBay. псокBay. псокBay. псокBay. псокBay. псокBay. псокBay. псокBay. псокBay. псокBay. псокBay. псокBay. псокBay. псок Bay. псокBay. псокBay. псокBay. псокBay. псокBay. псокBay. псокBay. псокBay. псокBay. псокBay. псокBay. псокBay. псокBay. псокBay. псокBay. псокBay. псокBay. псокBay. псокBay. псок bay. псокBay. псокBay. псокBay. псокBay. псокBay. псокBay. псокBay. псокBay. псокBay. псокBay. псокBay. псокBay. псокBay. псокBay. псокBay. псокBay. псокBay. псокBay. псокBay. псокbay. псокBay. псокBay. псокBay. псокBay. псокBay. псокBay. псокBay. псокBay. псокBay. псокBay. псокBay. псокBay. псокBay. псокBay. псокBay. псокBay. псокBay. псокBay. псокBay. псокabay. псокBay. псокBay. псокBay. псокBay. псокBay. псокBay. псокBay. псокBay. псокBay. псокBay. псокBay. псокBay. псокBay. псокBay. псокBay. псокBay. псокBay. псокBay. псокBay. псок Bayern. псокBay. псокBay. псокBay. псокBay. псокBay. псокBay. псокBay. псокBay. псокBay. псокBay. псокBay. псокBay. псокBay. псокBay. псокBay. псокBay. псокBay. псокBay. псокBay. псокay. псокBay. псокBay. псокBay. псокBay. псокBay. псокBay. псокBay. псокBay. псокBay. псокBay. псокBay. псокBay. псокBay. псокBay. псокBay. псокBay. псокBay. псокBay. псок Bay. псок Bay. псокBay. псокBay. псокBay. псокBay. псокBay. псокBay. псокBay. псокBay. псокBay. псокBay. псокBay. псокBay. псокBay. псокBay. псокBay. псокBay. псокBay. псокBay. псок Bay. псок bay. псокBay. псокBay. псокBay. псокBay. псокBay. псокBay. псокBay. псокBay. псокBay. псокBay. псокBay. псокBay. псокBay. псокBay. псокBay. псокBay. псокBay. псокBay. псок Bay. псокbay. псокBay. псокBay. псокBay. псокBay. псокBay. псокBay. псокBay. псокBay. псокBay. псокBay. псокBay. псокBay. псокBay. псокBay. псокBay. псокBay. псокBay. псокBay. псок Bay. псокabay. псокBay. псокBay. псокBay. псокBay. псокBay. псокBay. псокBay. псокBay. псокBay. псокBay. псокBay. псокBay. псокBay. псокBay. псокBay. псокBay. псокBay. псокBay. псок Bay; псокBay; псокBay; псокBay; псокBay; псокBay; псокBay; псокBay; псокBay; псокBay; псокBay; псокBay; псокBay; псокBay; псокBay; псокBay; псокBay; псокBay; псокBay; псокBay; псокBay; псок Bay; псокBay; псокBay; псокBay; псокBay; псокBay; псокBay; псокBay; псокBay; псокBay; псокBay; псокBay; псокBay; псокBay; псокBay; псокBay; псокBay; псокBay; псокBay; псокBay; | |
| Смуншени Възменна р neuropиа Peшени | |
| Инданаторьт Вкл./Изken. MИга. | Зашота ot перраянe. > Оставе тpropondукta за ce oxлади и поочи teve běntиалци OHHInTe OTBOPи. |
10 TpeTnpaHe Ha otnaBcu

PNEyPEXEHH
Pnck OT HapaHbAhe nopAn HennpaBnHO TpeHpaHe Ha otnaBcHTe! OnacHocTn 3a 3npaBeTo npaInn3nyckaHe Ha ra3OBe n TeuHocTn.
He doctabnTe nH He n3npaauTe noBpeDeHn akymyataopn! - POKPBAIte Bp3KHTe C HENPOVODIM MaTePHaJI, 3a Da IpeDoTbPaTHe KbCS CbeDINHeHJ. H3XBbPnIte aKymyIaTOPHe NO TaKbB NaH, Ye da He MoRaT Da nonaHaT B pBuTe Ha Deca. H3xBbPnIe aKymyIaTopa BbB BaIHa HIti Store nIc cBbpxTe C MeCTHaT KOMNaHn 3a ynpabJeHHe Ha OTnAdbuHTe.

Hilt npodyknte ca npoun3BedeHH B no-roJMaTa CN qact OT MaTePnaJn 3a MHorokpaTha ynotpe6a.
IpeKnocTabka 3a MHorokpatHTo Nm H3No13BaHe e TaXHOTo npaBnHoo pa3deJHa. B MHoro cTpaHn Hilti B3ema BaunTe ynoTpe6BaHH ypeDn o6paTHO 3a peuNKnPaHe. POnNTaTe OTdena Ha Hilti 3a O6cnyKbaHe Ha KIneHTN nn Baunr TbproBCKn KOHCytAHT.

He n3xBpbIe eJektpoHcTpymeHTn, eJektpoHH yCTpOcTBA n akymyIaTOPn B 6ntOBte OTnadbu!
11 TapaHua Ha npOn3BODHTeJIa
PnBbnpocn OTHOCHO rapaHcHnTe yCNOBna, MoJ, o6bpHeTe ce KbM Baun MeCTe Hlti napTbop.
Information for the operator, technician, end user, and recycler Scan the QR code or click the link: qr.hilti.com/manual/?id=2267486&id=2267488
This QR code will take you to the QR code on the document.
3.5 Active Vibration Reduction
The product is equipped with an Active Vibration Reduction (AVR) system that significantly reduces vibrations.
3.6 Service indicator
The product is equipped with a service indicator with a light signal.
3.6.1 MMI
Workplace safety
Keep your workplace clean and well lit. Cluttered or dark areas can cause accidents. Never operate the power tool in explosive atmospheres, such as in the presence of flammable liquids, gases, or dust. Power tools create sparks, which may ignite the dust or fumes. Keep children and bystanders away while operating the power tool. Distractions can cause you to lose control of the tool.
Electrical safety
The power tool plug must match the outlet. Never modify the plug in any way. Do not use any adapter plugs with earthed (grounded) power tools. Unmodified plugs and matching outlets will reduce the risk of electric shock. Avoid body contact with earthed surfaces, such as pipes, radiators, electric cookers, and refrigerators. There is an increased risk of electric shock if your body is earthed. Do not expose power tools to rain or wet conditions. Water entering a power tool will increase the risk of electric shock. Do not misuse the cord. Never use the cord for carrying, pulling, or unplugging the power tool. Keep the cord away from heat, oil, sharp edges, or moving parts. Damaged or entangled cords increase the risk of electric shock. When operating a power tool outdoors, use an extension cord suitable for outdoor use. Use of a cord suitable for outdoor use reduces the risk of electric shock. If operating the power tool in a damp location is unavoidable, use a residual current device (RCD) protected supply. Use of an RCD reduces the risk of electric shock.
Personal safety
Before using the power tool, read and understand the safety instructions. Do not use electric tools when you are tired or when under the influence of drugs, alcohol, or medication. A moment of inattention while operating the power tool may result in serious personal injury. Wear personal protective equipment and always safety glasses. Protective equipment such as dust mask, non-skid safety shoes, hard hat, or hearing protection used for appropriate conditions will reduce personal injuries. Avoid accidental starting. Ensure the switch is in the off-position before plugging in and/or inserting battery pack, and before picking up or carrying the tool. Carrying power tools with your finger on the switch or energizing power tools that have the switch on invites accidents. Remove any adjusting key or wrench before turning the power tool on. A wrench or a key left attached to a rotating part of the power tool may result in personal injury. Avoid body contact with grounded surfaces. Keep proper footing and balance at all times. This enables better control of the power tool in unexpected situations. Dress properly. Do not wear loose clothing or jewelry. Keep your hair, clothing, and gloves away from moving parts. Loose clothes, jewelry, or long hair can be caught in moving parts. If devices are provided for the connection of dust extraction and collection facilities, ensure these are connected and properly used. Use of dust collection can reduce dust-related hazards. Do not let familiarity gained from frequent use of the power tool allow you to become complacent and ignore power tool safety principles. A careless action can cause severe injury within a fraction of a second.
Use and handling of the power tool
Do not force the power tool. Use the correct power tool for your application. The correct power tool will do the job better and safer at the rate for which it was designed. Do not use the power tool if the switch does not turn it on and off. Any power tool that cannot be controlled with the switch is dangerous and must be repaired. Disconnect the plug from the power source and/or remove the battery pack, if detachable, from the power tool before making any adjustments, changing accessories, or storing power tools. Such preventive safety measures reduce the risk of starting the power tool accidentally.
HILTI
The instructions and information in this manual are not a substitute for thorough training and experience. Power tools are dangerous when used by inexperienced persons. Always wear safety glasses and ear protection. Make sure that moving parts are properly adjusted and not blocked, that there are no broken parts or any condition that might affect the operation of the power tool. Have damaged parts repaired before using the tool. Many accidents are caused by poorly maintained power tools. Keep cutting tools sharp and clean. Properly maintained cutting tools with sharp blades are less likely to bind and are easier to control. Use the power tool, accessories, and bits, etc., in accordance with these instructions, taking into account the working conditions and the work to be performed. Use of the power tool for operations different from those intended could result in a hazardous situation. Keep handles and gripping surfaces dry, clean, and free from oil and grease. Slippery handles and gripping surfaces do not allow for safe handling and control of the tool in unexpected situations.
This power tool is intended for cutting metal. There is a risk of injury if the power tool is used for purposes for which it is not intended. Use the correct power tool for your application. The correct power tool will do the job better and safer at the rate for which it was designed. Do not use the power tool if the switch does not turn it on and off. Any power tool that cannot be controlled with the switch is dangerous and must be repaired. Keep the power tool away from children and do not allow persons unfamiliar with the power tool or these instructions to operate the power tool. Power tools are dangerous in the hands of untrained users. Maintain power tools. Check for misalignment or binding of moving parts, breakage of parts and any other condition that may affect the power tool's operation. If damaged, have the power tool repaired before use. Many accidents are caused by poorly maintained power tools. Keep cutting tools sharp and clean. Properly maintained cutting tools with sharp cutting edges are less likely to bind and are easier to control. Use the power tool, accessories and tool bits etc., in accordance with these instructions, taking into account the working conditions and the work to be performed. Use of the power tool for operations different from those intended could result in a hazardous situation. Keep handles and grasping surfaces dry, clean and free from oil and grease. Slippery handles and grasping surfaces do not allow for safe handling and control of the tool in unexpected situations.
English
Have your power tool serviced by a qualified repair person using only identical replacement parts. This will ensure that the safety of the power tool is maintained. Never service damaged power tools. Have damaged power tools repaired by the manufacturer or an authorized service center.
2.2 Safety warnings for grinders
Safety warnings for all operations
Wear safety goggles. The effect of noise can cause hearing loss. Use protective gloves that are suitable for the tool. The dust produced can cause respiratory problems. Hold the power tool by insulated gripping surfaces, when performing an operation where the cutting accessory may contact hidden wiring or its own cord. The cutting accessory contacting a "live" wire may make exposed metal parts of the power tool "live" and could give the operator an electric shock.
Safety warnings for grinding and cutting-off operations
Start the power tool at a low speed and only when the tool is in contact with the workpiece. High speeds can cause the tool to vibrate, when it can be held without contact with the workpiece and can cause injury.
Misuse of the power tool can cause damage to the control and injuries.
2.3 Safety instructions for the workplace - General
Workplace safety
Use the product and its accessories only for their intended purpose. Never make modifications or attachments to the product or its accessories. Risk of injury from ejected parts and/or accessories. Before starting work, check that the safety devices and the attached protective equipment are in place. Always keep the work area clean. Risk of slipping from covered surfaces! - In dusty environments, secure the area below the work point. Pieces may fall and injure other people. Always hold the product with both hands on the designated handles. Keep the handles dry and clean. Ensure good posture and balance when using the product. Make sure you have a firm footing and control before starting work. Avoid awkward body positions - risk of injury! During operation, material fragments may be ejected. These fragments can cause injury to the body or eyes. Wear personal protective equipment, protective helmet, and safety glasses. If you do not use a dust extraction system, wear a dust mask. Wear protective clothing against material fragments. Contact with fragments can cause injury to the body or eyes. The dust, which is generated during operation, sanding, cutting, and drilling, may contain hazardous substances. Some examples are: lead or lead-based paint, wood, metal, and other similar products, mineral dust, and other products containing silica, treated wood, such as varnished, oiled, or chemically treated wood, asbestos or materials containing asbestos. Reduce the exposure of yourself and other persons to the hazard zone of materials with which you work. Take the necessary measures to keep the exposure at a safe level, such as using a dust extraction system or a suitable protective mask. The general measures for reducing exposure include the following:
Work in well-ventilated areas. Avoid prolonged exposure to dust, keep the dust away from the face and body, wear protective clothing and gloves, and clean the work area thoroughly.
Take regular breaks and exercises to improve the circulation of your fingers. During prolonged work, intense vibrations or repetitive movements may cause numbness or tingling in the fingers, hands, or wrists.
Electrical safety
This product is intended for use in dry, well-ventilated areas. If external metal parts come into contact with moisture, electric shock may occur, or if the product is damaged, the electric shock, the air or the water.
Maintenance and use of power tools
Disconnect the power tool from the power source before making any adjustments, changing accessories, or storing the tool. Such preventive safety measures reduce the risk of starting the tool accidentally. Store idle power tools out of the reach of children and do not allow persons unfamiliar with the power tool or these instructions to operate the power tool. Power tools are dangerous in the hands of untrained users. Maintain power tools and accessories. Check for misalignment or binding of moving parts, breakage of parts and any other condition that may affect the power tool's operation. If damaged, have the power tool repaired before use. Many accidents are caused by poorly maintained power tools. Keep cutting tools sharp and clean. Properly maintained cutting tools with sharp cutting edges are less likely to bind and are easier to control. Use the power tool, accessories and tool bits etc., in accordance with these instructions, taking into account the working conditions and the work to be performed. Use of the power tool for operations different from those intended could result in a hazardous situation.
2.4 Maintenance and use of battery-operated tools
Read the safety instructions and the operating manual for rechargeable Li-Ion batteries. Improper use or handling can result in personal injury, burns, chemical burns, electric shock, fire, and/or explosions. Use rechargeable batteries only in the intended technical application. Handle rechargeable batteries carefully to avoid damage and the leakage of fluids that can be hazardous to your health. Do not disassemble, crush, heat above 80 °C (176 °F), or burn rechargeable batteries. Do not use rechargeable batteries that have been dropped or have suffered damage. Check rechargeable batteries regularly for signs of damage. Never use recycled or refurbished rechargeable batteries. Do not use a rechargeable battery or a power tool as a striking tool. Do not expose rechargeable batteries to direct sunlight, increased humidity, moisture, or rain. This can lead to a risk of fire. Do not touch the poles of the battery with your fingers, tools, jewelry, or other electrically conductive objects. This can cause damage to the rechargeable battery, as well as material damage and personal injury. Keep rechargeable batteries away from heat, moisture, and humidity. High humidity can cause short circuits, electric shock, burns, fire, and explosions. Use only the original chargers and power tools intended for this type of battery. Observe the relevant information in the corresponding operating instructions. Do not dispose of the rechargeable battery in fire or the environment. If the battery heats up excessively when you insert it, it may have been damaged. Place the battery in a clearly visible, non-flammable, and safe location at a sufficient distance from flammable materials. Allow the rechargeable battery to cool down. If the battery continues to heat up excessively after you have inserted it, it has been damaged. Contact the Hilti service or read the document "Safety instructions and operating manual for Hilti Li-Ion rechargeable batteries".

Observe the specific instructions that apply to the transport, storage, and use of Li-Ion rechargeable batteries. → page 284
Read the safety instructions and the operating manual for Hilti Li-Ion rechargeable batteries, which you can find by scanning the QR code at the end of these operating instructions.
3 Description
3.1 Product overview
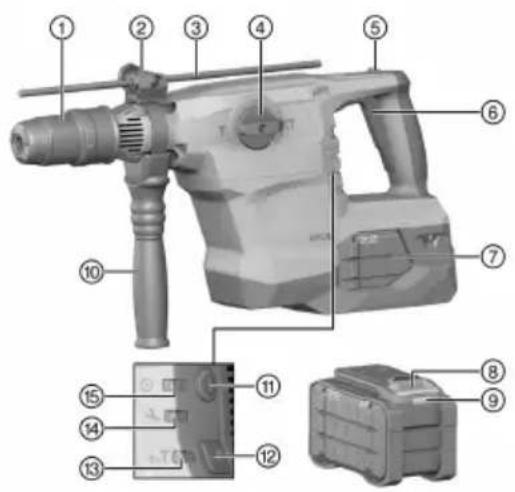
① T0OK ② Odyoc Baoouc -puoian (aEoouop) ③ Odyoc βαθας (αεσούρ) ④ Aikontns EIIAOyns AEIToupyia ⑤ Koupi maovdaawonc yia ouvexn λeitoupyia kaεμiou 6 10kOITnC EAYxou ⑦ EnavaxoepTcóμevn μntαtopia 8 PAnktpo aonopaxianc eTavoxoptiOeyns mataopias EvEiEnKAtoTaocnμTatoplaoc 10 Iaivxεipolαβ 11 4aKoTTnS on/off Mnoutov yia μεωμενου iou EvdeIgYiaeIomegaevn 10xu EvEiEησεβiS 15 Evδεξη on/off
3.2 Katoaannxpon
To npoiov nou npriypopetai elvai eva eTavaoaptizoe kpooutikodpantavo SDS-Maxe nveuapitok unxavioo kpouaq. PooepiEai yia epyaiec diatpnaq c e mTeov, toixonoiec, uα kai mTaalaa.To npoiov mtopei va xnpoiotoinei eninpooct aia anae c eptiec epyaaiec oilueanc ae toixonoiies kai epyaiec baltwongc e mTeov.
Xpnoiopoioite yia auto to npoiov mvo enavapopticvee matapie Li-Ion Hilti Nuron tns oipac Tumou B 22. Iia iabviik ano doan, n Hilti npoteivei ia auto to npoiov tic enavapopticvee matapie POU avaepovtoi otov nivaoka sto teao autow tvw oyivxphons. XpnojnoioteyiaoutcTcEtnovxopntoueveuCnataipiecmovoopotetcHltiwoeipovtunou novaoepovtai oovnilaoka oTo TELOC autow ow oyniw xohnc.
3.3 Aykupio uTooKaΦnC
To npoiov eivai kataaannyia tv totoeetn an eniayevwv aykupiw uooKaohC. Xpnoiponoitemuo Kaataaann a epyaaleia totoeetnnc!
Tia nepioootepe c npopopoe c aneuovvte i e oepic hlti.
3.4 ATC 2
To npoiov eivai eonlaievo me tnv nektpovikn yphyopn anevpyoioan ATC (Active Torque Control). Eav mloakapei n koanoei to eaptnua, to npoiov nepiatpepetai xapvika aveEeaykta poc tn v avriBertn kateuubvog. H aeitoupyia ATC avaywpiZei autn Tnv Eaovikn neipatpoqikn kivnon tou npoiovtoc kai aneepyoioi ie aoeos to npoiov.

Tn oatn aeitoupyia npetie va nopei va nepiotpepetai To poiov.
3.5 Active Vibration Reduction
To npoiov eivai eEonaiuevo e eva ouotnua Active Vibration Reduction (AVR), to onioo meiwvia oioeTAt Tovjoeic.
3.6 EvoeiEg oepic
To npoiov eivai Egonlaioevo e iia evoien oepic e wteivo an.
3.6.1 MMI
- Press the button to switch on/off.
- Press the button to switch on the device.
6.2 Function selection switch
The function selection switch is used to select the required function. During operation, the function selection switch must not be operated. Risk of injury!
6.2.1 Operation with rotation (rotary drilling)
6.2.2 Operation without rotation

Operation without rotation is possible with accessories or special accessories. In the Hilti accessories program, such accessories are available. Alternatively, you can use a suitable chuck or the automatic chuck for drilling without rotation.
EC Declaration of Conformity | UK Declaration of Conformity

Manufacturer:
Hilti Corporation
No. 1 Circle Square, 3 Symphony Park
Manchester, England, M1 7FS
TE 60-22 (04)
Serial Numbers: 1-99999999999
2006/42/EC | Supply of Machinery (Safety) Regulations 2008
2014/30/EU | Electromagnetic Compatibility Regulations 2016
2011/65/EU | The Restriction of the Use of Certain Hazardous Substances in Electrical and Electronic Equipment Regulations 2012
EN 62841-1:2015, AC:2015
EN IEC 55014-1:2021
EN IEC 62841-2-6:2020/A11:2020
EN IEC 55014-2:2021
Dr. Tahar Zrilli
Head of Quality and Process Management Business Area Electric Tools & Accessories
Schaan, 12.02.2023
Edward-Louis Przybylowicz
Head of BU Power Tool & Accessories
Business Area Electric Tools & Accessories


NURON
| B 22-110 (01) | 0,92 kg | 2.03 lb |
| B 22-170 (01) | 1,34 kg | 2.95 lb |
| B 22-255 (01) | 1,87 kg | 4.12 lb |

| C 4-22 |
| C 6-22 |
| C 8-22 |
Hilti Corporation
LI-9494 Schaan
Tel.: +423 234 21 11
Fax: +423 234 29 65
www.hilti.group
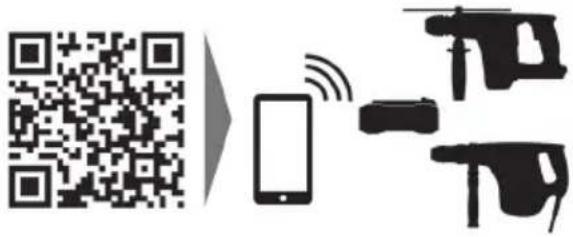





- ACTIVE VIBRATION REDUCTION
- ORIGINAL OPERATING INSTRUCTIONS
- INFORMATION ABOUT THE OPERATING INSTRUCTIONS
- ABOUT THESE OPERATING INSTRUCTIONS
- EXPLANATION OF SYMBOLS
- WARNINGS
- DANGER
- WARNING
- CAUTION
- SYMBOLS IN THE OPERATING INSTRUCTIONS
- SYMBOLS IN ILLUSTRATIONS
- PRODUCT-DEPENDENT SYMBOLS
- SYMBOLS ON THE PRODUCT
- SWITCHING ON AND OFF
- PRODUCT INFORMATION
- DECLARATION OF CONFORMITY
- SAFETY
- GENERAL POWER TOOL SAFETY WARNINGS
- WORK AREA SAFETY
- ELECTRICAL SAFETY
- PERSONAL SAFETY
- POWER TOOL USE AND CARE
- BATTERY TOOL USE AND CARE
- SERVICE
- HAMMER SAFETY WARNINGS
- SAFETY INSTRUCTIONS FOR ALL OPERATIONS
- ADDITIONAL SAFETY INSTRUCTIONS FOR ROTARY HAMMER DRILL
- CAREFUL HANDLING AND USE OF BATTERIES
- DESCRIPTION
- PRODUCT OVERVIEW
- INTENDED USE
- UNDERCUT ANCHORS
- ATC
- SERVICE INDICATOR
- MMI
- ITEMS SUPPLIED
- STATUS INDICATORS OF THE LI-ION BATTERY
- INDICATORS FOR STATE OF CHARGE AND FAULT MESSAGES
- INDICATORS SHOWING THE BATTERY'S STATE OF HEALTH
- TECHNICAL DATA
- BATTERY
- NOISE INFORMATION AND VIBRATION VALUES IN ACCORDANCE WITH EN
- PREPARATIONS AT THE WORKPLACE
- CHARGING THE BATTERY
- INSERTING THE BATTERY
- REMOVING THE BATTERY
- FITTING THE SIDE HANDLE
- FITTING THE DEPTH GAUGE (OPTIONAL)
- SETTING THE POWER LEVEL
- INSERTING / REMOVING THE ACCESSORY TOOL
- FALL ARREST
- OPERATION
- SWITCHING ON
- FUNCTION SELECTOR SWITCH
- DRILLING WITH HAMMERING ACTION (HAMMER DRILLING)
- DRILLING WITHOUT HAMMER ACTION
- CHISEL POSITIONING
- CHISELING
- SWITCH SUSTAINED OPERATION ON AND OFF
- CARE AND MAINTENANCE
- CARE OF THE PRODUCT
- CARE OF THE LI-ION BATTERIES
- MAINTENANCE
- TRANSPORT AND STORAGE OF CORDLESS TOOLS AND BATTERIES
- TRANSPORT
- ACCIDENTAL STARTING DURING TRANSPORT
- STORAGE
- ACCIDENTAL DAMAGE CAUSED BY DEFECTIVE OR LEAKING BATTERIES
- TROUBLESHOOTING
- DISPOSAL
- MANUFACTURER'S WARRANTY
- FURTHER INFORMATION
- DRILLING WITHOUT PERCUSSION
- ADDING AND REMOVING
- SYMBOLS
- INFORMATION ABOUT THE INSTRUMENT
- CERTIFICATE OF CONFORMITY
- USE OF THE OPERATOR'S INSTRUMENT AND PROPER CARE FOR IT
- SERVICING
- SAFETY INSTRUCTIONS FOR WORKING WITH THE DRILL
- SAFETY INSTRUCTIONS FOR ALL TYPES OF WORK
- SAFETY INSTRUCTIONS WHEN USING DRILL BITS
- ADDITIONAL SAFETY INSTRUCTIONS FOR WORKING WITH THE PERFORATOR
- PERSONNEL SAFETY
- HILTI
- PROPER USE OF POWER TOOLS AND BATTERY CARE
- USE OF RECHARGEABLE BATTERIES AND BATTERY CARE
- ACCESSORIES
- ATC SYSTEM
- OPERATOR INTERFACE
- DATA ON NOISE AND VIBRATION VALUES MEASURED ACCORDING TO EN
- SYMBOLS AND THEIR MEANINGS ARE SELECTED IN ACCORDANCE WITH EN
- CHARGING THE BATTERY PACK
- INSTALLING THE BATTERY PACK
- REMOVING THE BATTERY PACK
- INSTALLING THE SIDE HANDLE
- SETTING THE ADJUSTABLE STOP (OPTION)
- SETTING THE REQUIRED POWER
- SETTING/REMOVING THE INTERCHANGEABLE WORKING TOOL
- PROTECTION AGAINST FALLING FROM A HEIGHT
- SETTING THE FUNCTION
- IMPACT DRILLING
- DRILLING HOLES WITHOUT BURRS
- ADJUSTING THE TOOTHED RING
- DRILLING HOLES
- SWITCHING ON AND OFF THE IMPACT DRILLING MODE
- MAINTENANCE AND CARE
- RISK OF INJURY WHEN WORKING ON THE TOOL WITH THE VACUUM CLEANER BATTERY INSTALLED
- CARE OF THE TOOL
- CARE OF THE LI-ION BATTERY
- ACCIDENTAL STARTING OF THE TOOL DURING TRANSPORT
- ПЕРЕЗАРЯДЖЕННЯ ІНСТРУМЕНТА ЧЕРЕЗ НЕСПРАВНІСТЬ АКУМУЛЯТОРНОЇ БАТАРЕЇ АБО ЧЕРЕЗ ВПЛИВ ЕЛЕКТРИКИ З АКУМУЛЯТОРНОЇ БАТАРЕЇ
- ДОПОМОГА У РАЗІ ВИНИКНЕННЯ НЕСПРАВНОСТІ
- УТИЛІЗАЦІЯ
- ПОПЕРЕДЖЕННЯ
- ГАРАНТІЙНІ ЗОБОВ'ЯЗАННЯ ВИРОБНИКА
- RUSSIAN TRANSLATION OF THE ORIGINAL INSTRUCTIONS
- EAC
- IMPORTER INFORMATION
- WARNINGS SYMBOLS
- SYMBOLS USED IN THE MAIN PART
- SYMBOLS IN THE FIGURES
- PRODUCT-SPECIFIC SYMBOLS
- PRODUCT DESCRIPTION
- SCOPE OF DELIVERY
- INFORMATION ABOUT THE PRODUCT
- LI-ION BATTERY CHARGE AND STATUS INDICATORS
- CHARGE LEVEL AND STATUS INDICATORS
- BATTERY STATUS INDICATORS
- INSTALLING THE CAP (WITH GASKET)
- INSTALLING THE COVER
- INSTALLING / REMOVING THE GUARD
- CLEANING AND MAINTENANCE
- FUNCTION TEST
- SHORT CIRCUIT (GROUND FAULT)
- REPLACING THE LUBRICANT
- ADJUSTING THE TILT
- OPERATING THE HYDRAULIC SYSTEM
- MAINTENANCE AND TECHNICAL SERVICE
- MAINTENANCE SERVICE
- BATTERY PACKS AND BATTERY PACK DISPOSAL
- AKAYNBIKTAPDAFBK KEMEK
- KĀDERE ḤAPATY
- ECKEPTY
- SYMBOLS USED
- WARNING NOTICES
- SYMBOLS IN THE OPERATING MANUAL
- SAFETY INSTRUCTIONS FOR ALL ACTIVITIES
- SAFETY INSTRUCTIONS WHEN USING THE DRILL
- ADDITIONAL SAFETY INSTRUCTIONS FOR THE IMPACT DRILL
- SAFE WORKING CONDITIONS
- SAFE WORK WITH POWER TOOLS
- CAREFUL HANDLING OF POWER TOOLS - CAREFUL HANDLING OF THEM
- ANCHOR WITH THROUGH-HOLE
- ITEMS INCLUDED IN DELIVERY
- INDICATOR FOR LI-ION BATTERY
- PREPARATION OF WORK
- MOUNTING THE SIDE HANDLE
- MOUNTING THE DEPTH GAUGE (OPTIONAL)
- POWER SETTING
- INSERTING/REMOVING THE TOOL
- PROTECTION AGAINST FALLING
- IMPACT DRILLING (DRILLING WITH IMPACT)
- IMPACTLESS DRILLING
- ADJUSTING THE CUTTING DIRECTION
- CUTTING
- SWITCHING ON/OFF THE CONTINUOUS OPERATION MODE
- PRODUCT RISK
- RISK OF EXPLOSION FROM BATTERY
- TRANSPORT AND STORAGE OF BATTERY-POWERED TOOLS AND BATTERIES
- ACCIDENTAL ACTIVATION DURING TRANSPORT
- HEBONHA NOBPEA, BIKAA CE HA DEEKTHN HNN N3THUAUN AKYMYIATOPN
- TOMOЦ NPN HAUHUE HA CMUEHHA
- TPETNPAHE HA OTNABCU
- PNEYPEXEHH
- TAPAHUA HA NPON3BODHTEJIA
- WORKPLACE SAFETY
- USE AND HANDLING OF THE POWER TOOL
- ENGLISH
- SAFETY WARNINGS FOR GRINDERS
- SAFETY WARNINGS FOR ALL OPERATIONS
- SAFETY INSTRUCTIONS FOR THE WORKPLACE - GENERAL
- MAINTENANCE AND USE OF POWER TOOLS
- MAINTENANCE AND USE OF BATTERY-OPERATED TOOLS
- KATOAANNXPON
- AYKUPIO UTOOKAΦNC
- EVOEIEG OEPIC
- FUNCTION SELECTION SWITCH
- OPERATION WITH ROTATION (ROTARY DRILLING)
- OPERATION WITHOUT ROTATION
- EC DECLARATION OF CONFORMITY | UK DECLARATION OF CONFORMITY
Brand : HILTI
Model : TE 6022
Category : Hammer