
Babyside - Baby bed JANE - Free user manual and instructions
Find the device manual for free Babyside JANE in PDF.
| Product type | Baby bed (mini-crib co-sleeper) |
| Brand | Jane |
| Model | Babyside |
| Dimensions (approx.) | 90 x 50 cm (overall) |
| Weight (approx.) | 12 kg |
| Materials | Metal frame, washable textile cover |
| Main functions | Independent mini-crib, co-sleeping mode (attachment to parents' bed), adjustable height (6 positions) |
| Height adjustment | 6 positions, possible tilt (max 2 notches difference) |
| Co-sleeping mode | Side window with removable bar, straps for attachment to adult bed |
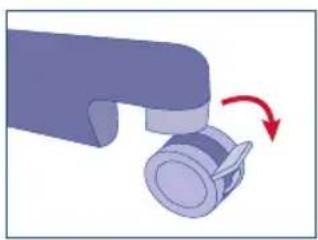
| Wheels and brakes | 4 wheels with locking brakes |
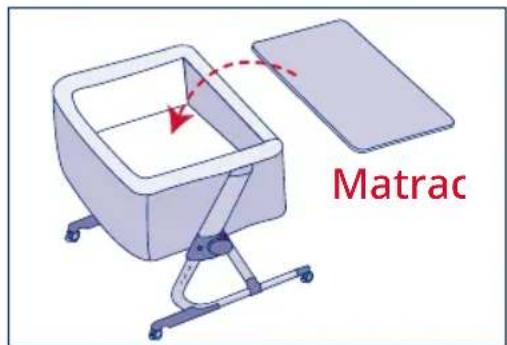
| Mattress included | Yes, specific mattress provided |
| Care of the cover | Hand wash, air dry at room temperature |
| Cleaning of parts | Metal parts: keep clean and dry; plastic parts: mild detergent and warm water |
| Safety | Do not use if child can sit/kneel/stand up; barrier always raised in solo mode; check attachments |
| Warranty | Warranty against manufacturing defects according to EU and national directives (invoice required) |
| Spare parts | Available from JANÉ S.A. |
| Repairability | Do not replace parts yourself; contact the manufacturer |
| Additional accessories | Attaching straps for co-sleeping mode provided |
| Recommended use | From birth until the child can sit, kneel, or stand up |
| Room temperature | Ideal between 18 and 22 °C |
Frequently Asked Questions - Babyside JANE
User questions about Babyside JANE
0 question about this device. Answer the ones you know or ask your own.
Ask a new question about this device
Download the instructions for your Baby bed in PDF format for free! Find your manual Babyside - JANE and take your electronic device back in hand. On this page are published all the documents necessary for the use of your device. Babyside by JANE.
USER MANUAL Babyside JANE
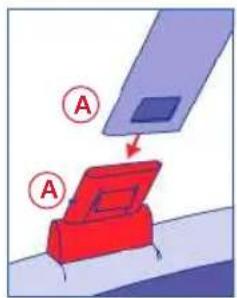
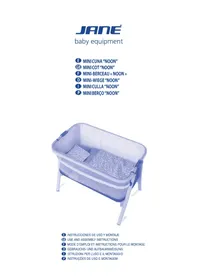
A1 Barra frontal extraile
A2 Cremalleras ventana
A3 Ventana bebé
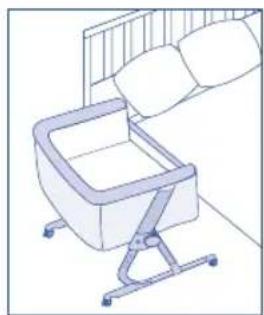
GB "BABYSIDE" MINI COT-COBED


IMPORTANT. KEEP FOR FUTURE REFERENCE. READ CAREFULLY
WARNING
-WARNING: Do not use this product without reading the instructions first.
-WARNING: Do not use this mini cot once the child can sit up, kneel or stand up unaided.
-WARNING: Placing additional items in this product may cause suffocation.
-WARNING: Do not place the product near other products that could cause a danger of suffocation or strangulation, for example: strings, curtains, cords, etc.
- The assembly parts should be firmly secured and checked to make sure that the fastening screws or connection points have not come loose, and the baby cannot get caught on them or get parts of his clothes tangled in them such as: dummy cords, hooks, collars or earrings causing a possible risk of strangulation.
- The co-sleeping mini cot should always be placed on a horizontal floor.
-Do not let children play unsupervised near the co-sleeping mini cot.
-When the child is in the mini cot unsupervised, make sure that the rail is always up, correctly fastened in place and that the zips are fully closed, and that the wheels are fully locked in place.
-DO NOT use the co-sleeping mini cot if any of the parts are broken, worn out or missing. Contact JANÉ S.A. to get replacement parts and extra instructions if necessary. DO NOT replace the parts yourself.
-Make sure that all the fastening devices are fully secure as well as the locking devices.
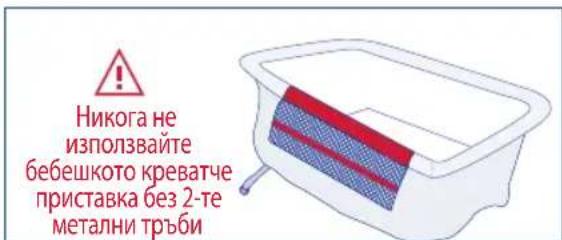
- Never use the cover without the metal structure.
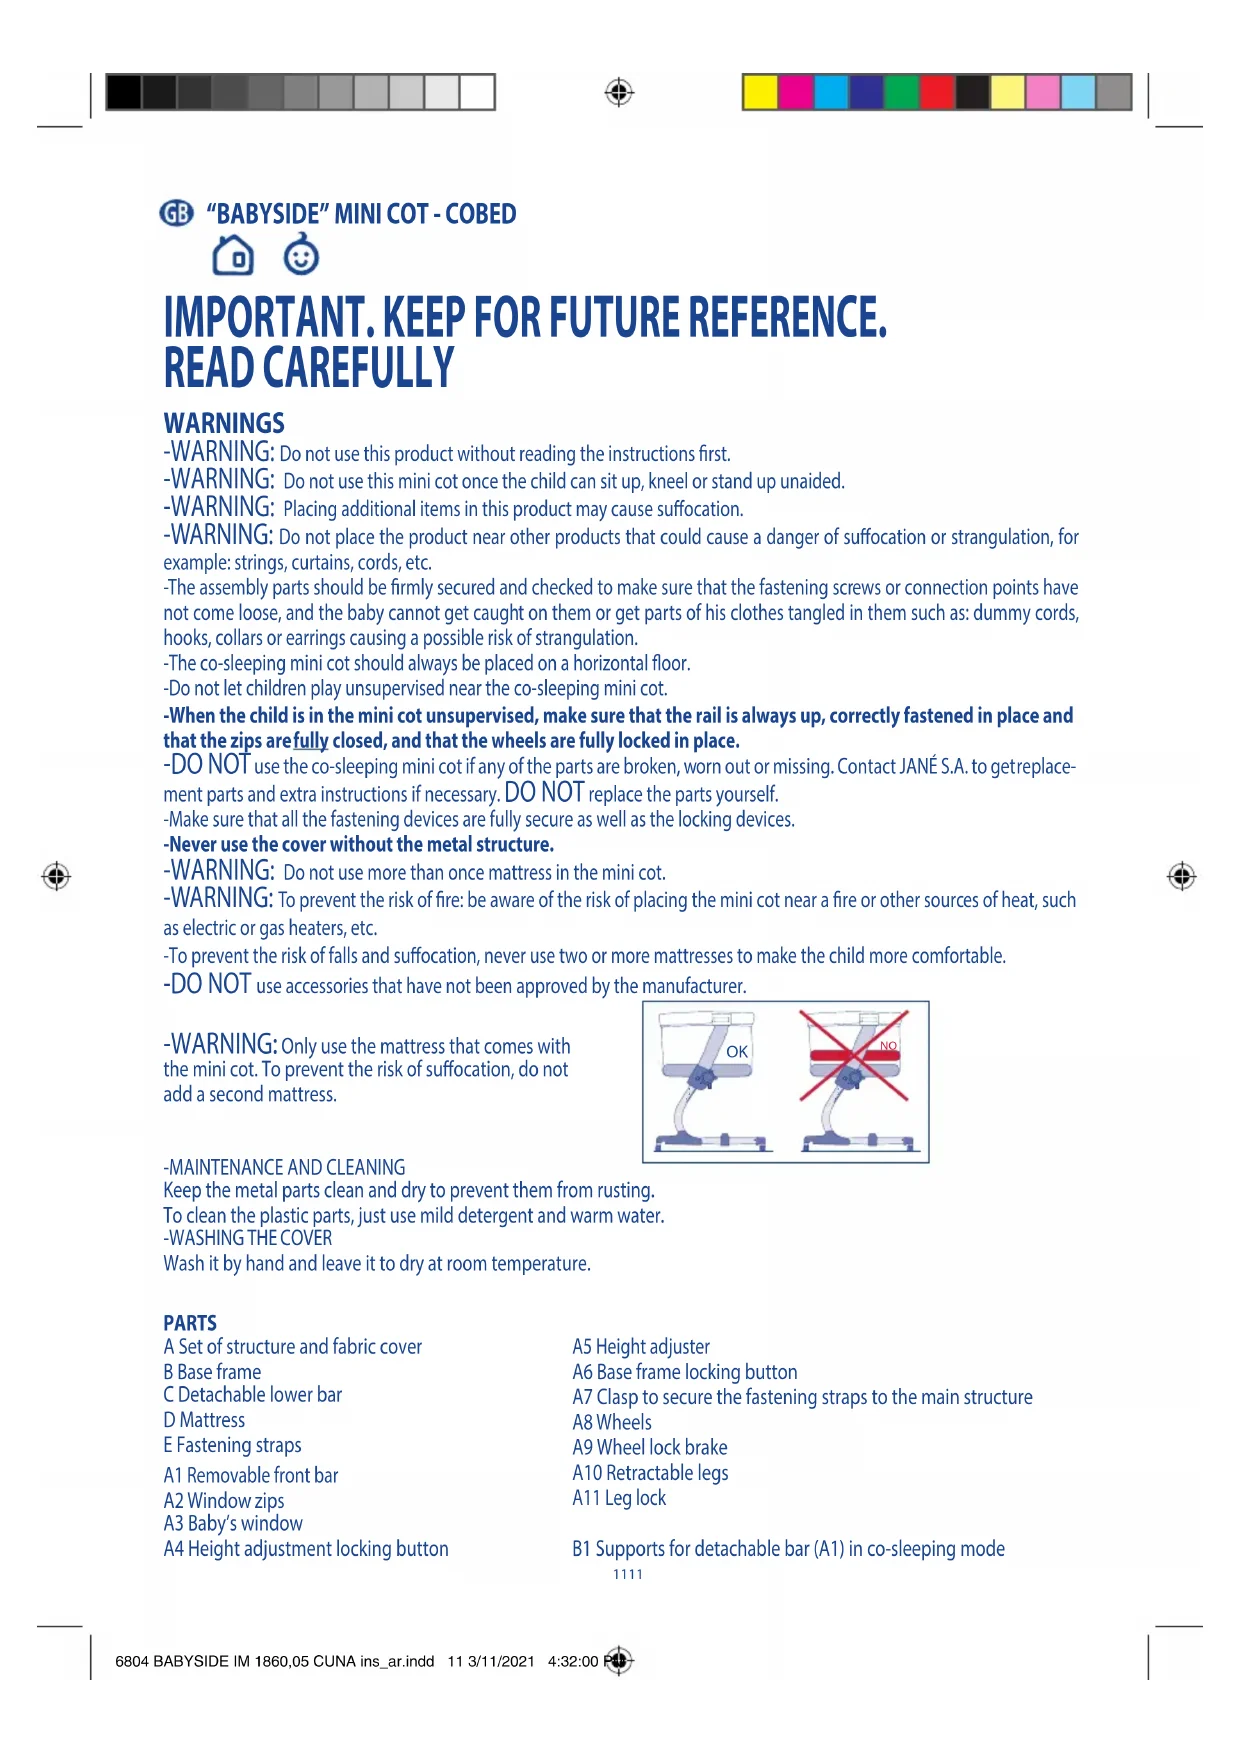
-WARNING: Do not use more than once mattress in the mini cot.
-WARNING: To prevent the risk of fire: be aware of the risk of placing the mini cot near a fire or other sources of heat, such as electric or gas heaters, etc.
-To prevent the risk of falls and suffocation, never use two or more mattresses to make the child more comfortable.
-DO NOT use accessories that have not been approved by the manufacturer.
-WARNING: Only use the mattress that comes with the mini cot. To prevent the risk of suffocation, do not add a second mattress.
-MAINTENANCE AND CLEANING
Keep the metal parts clean and dry to prevent them from rusting.
To clean the plastic parts, just use mild detergent and warm water.
-WASHING THE COVER
Wash it by hand and leave it to dry at room temperature.
PARTS
A Set of structure and fabric cover
B Base frame
C Detachable lower bar
D Mattress
E Fastening straps
A1 Removable front bar
A2 Window zips
A3 Baby's window
A4 Height adjustment locking button
A5 Height adjuster
A6 Base frame locking button
A7 Clasp to secure the fastening straps to the main structure
A8 Wheels
A9 Wheel lock brake
A10 Retractable legs
A11 Leg lock
B1 Supports for detachable bar (A1) in co-sleeping mode
INSTRUCTIONS
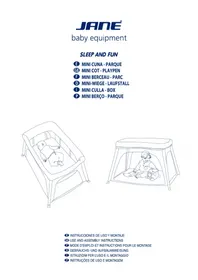
Assembling and dismantling the co-sleeping mini cot:
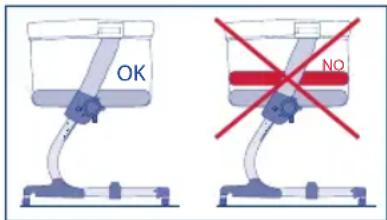
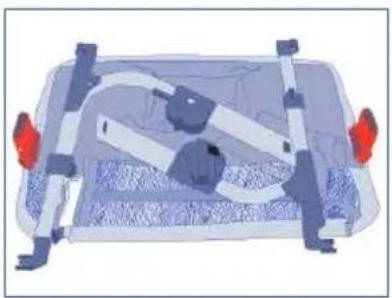
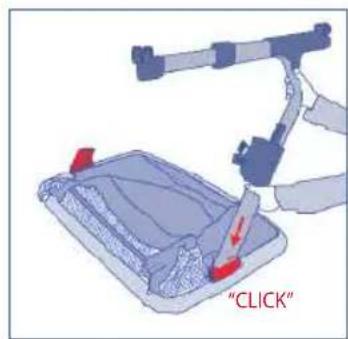
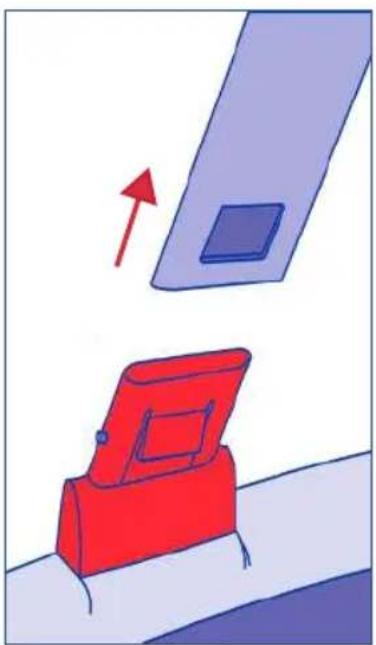
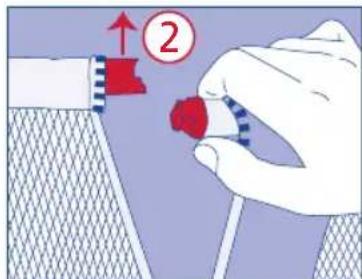
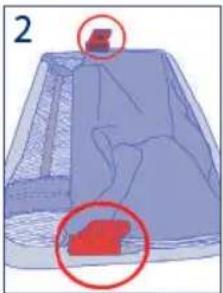
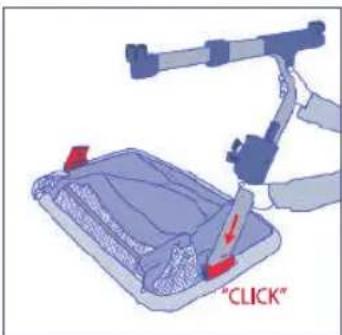
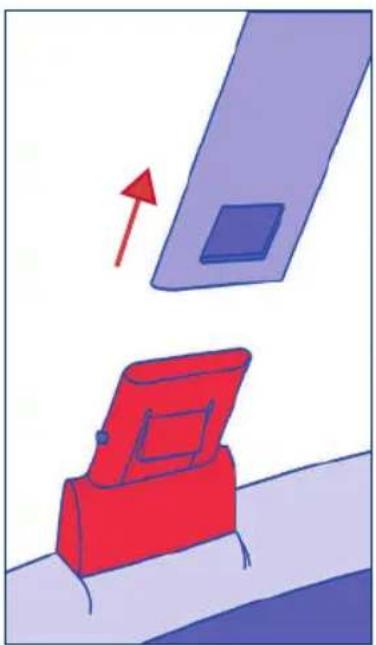
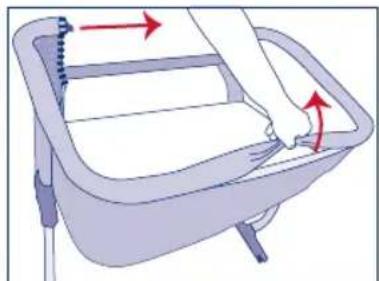
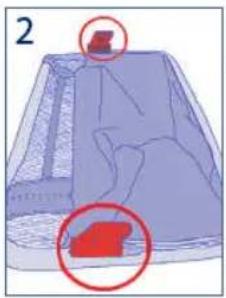
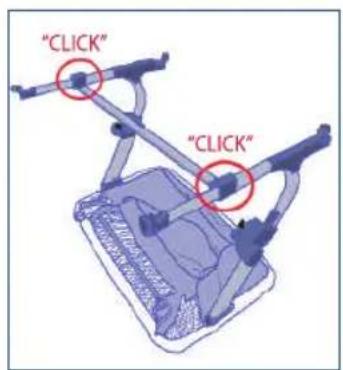
To assemble the cot place the upper frame with the upholstery on a clean table or on a bed as shown in diagram 2.
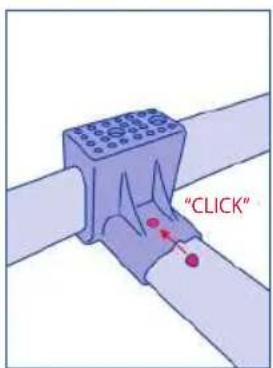
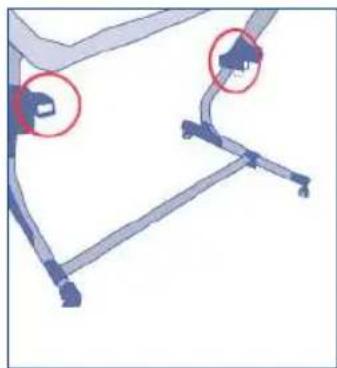
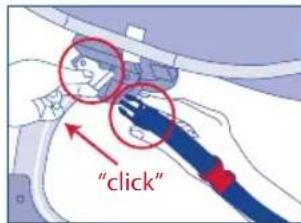
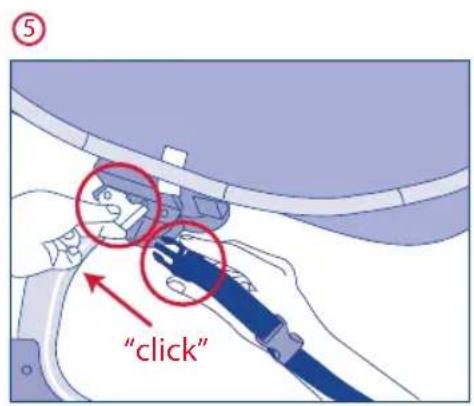
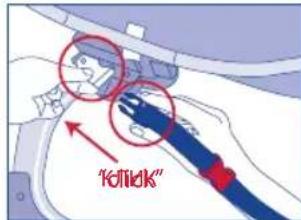
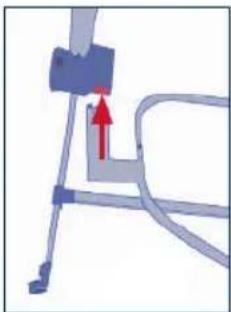
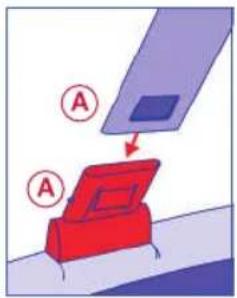
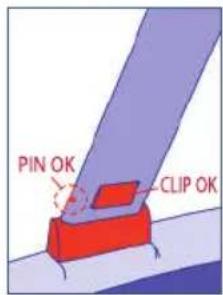
- Position each of the side legs always with the height numeration on the external side, and insert the end of each leg into the side support of the plastic until the metal pin pops out through the hole (it will click) and the plastic side legs are slotted into the holes.
- You should hear the safety clicks.
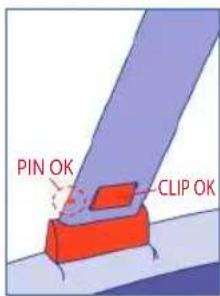
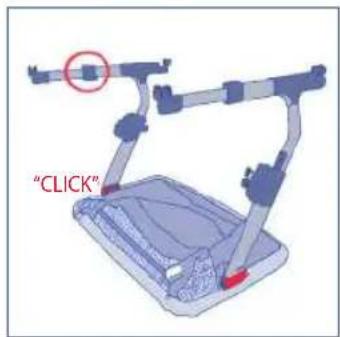
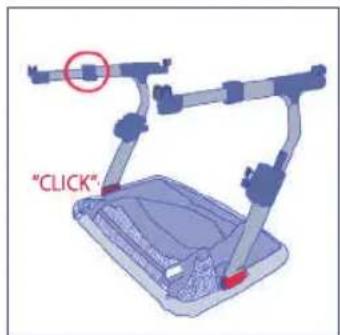
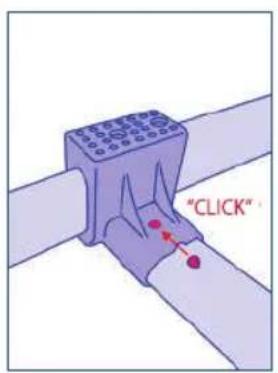
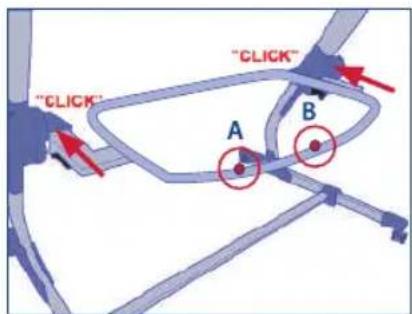
- Fit the long bar by inserting each end into the plastic slots until the metal pin pops out again. You should hear the safety clicks. Then place the structure with the wheels on the floor.
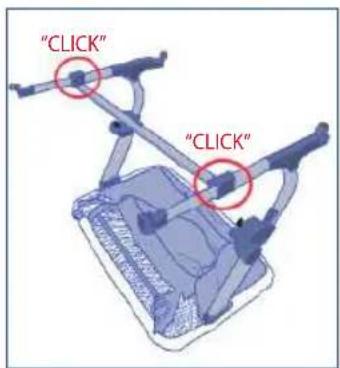
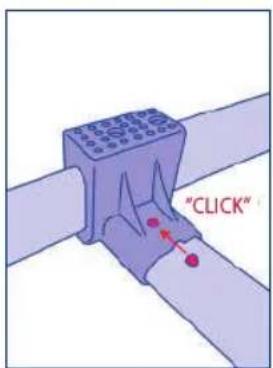
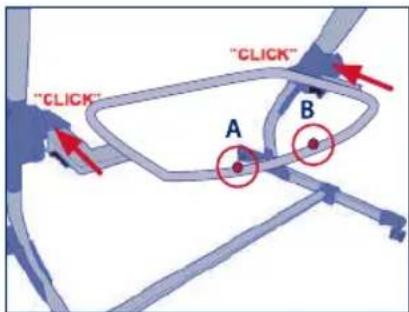
- Lastly, position the lower frame so that the side ends are aligned with the holes halfway up the sides of the mini cot, and then fully insert each end inwards with a gentle tap until you hear the safety clicks.

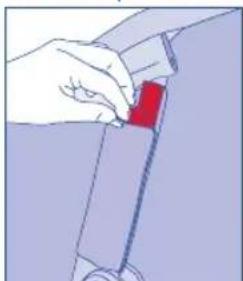
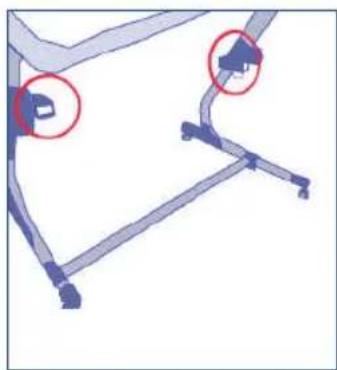
Check that the 2 plastic supports A and B face upwards
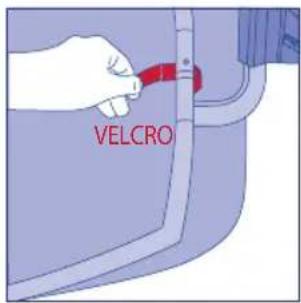
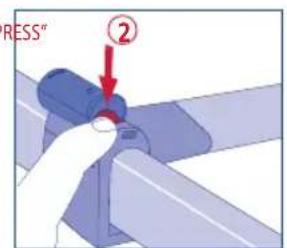
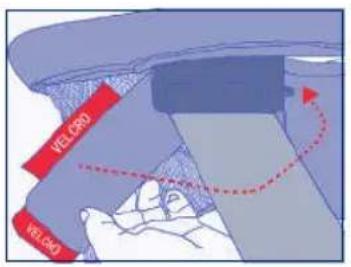
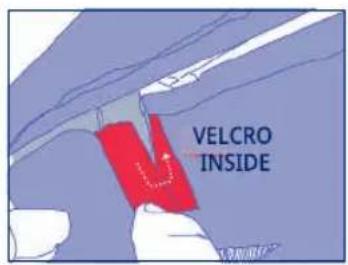
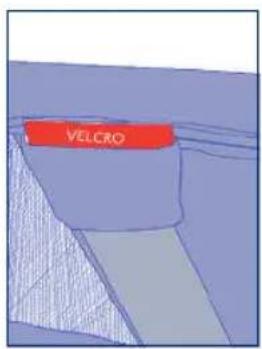
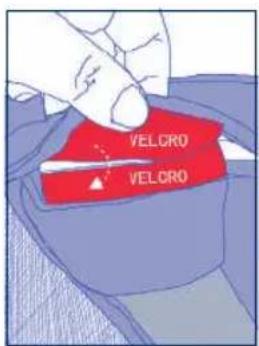
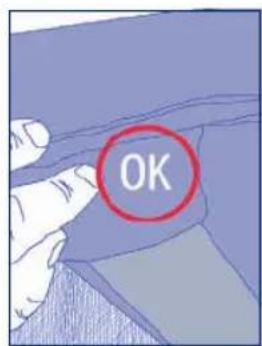
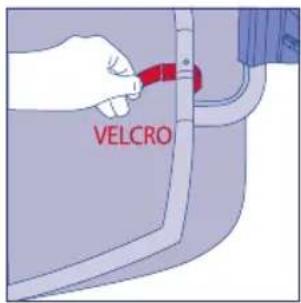
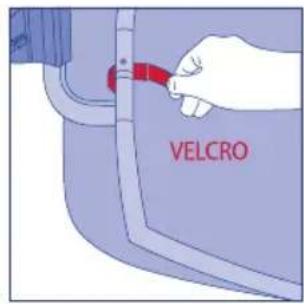
Take the side fabric band and cover the aluminium side support turning the band over to find the other Velcro part, from inside the mini cot press together to join the 2 Velcro parts. Fasten the upper Velcro with the Velcro found underneath the fabric.


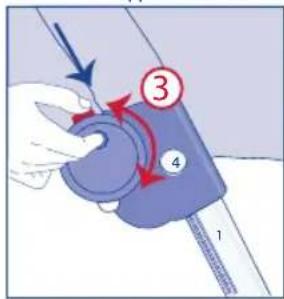
DESMANTLING THE MINICOT:
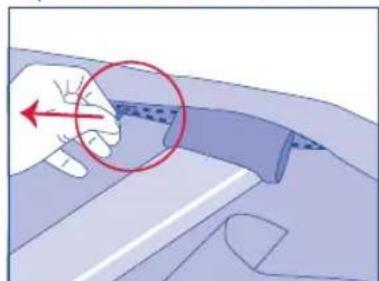
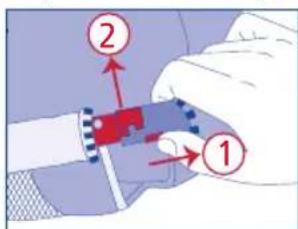
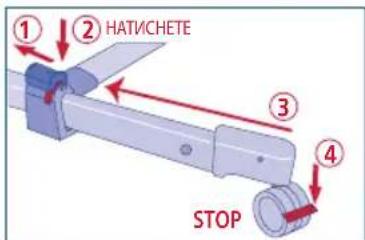
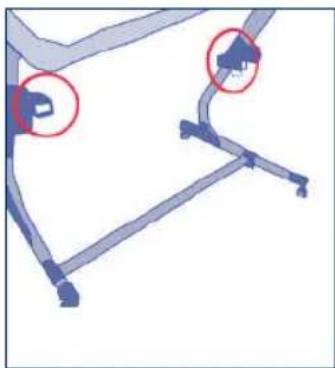
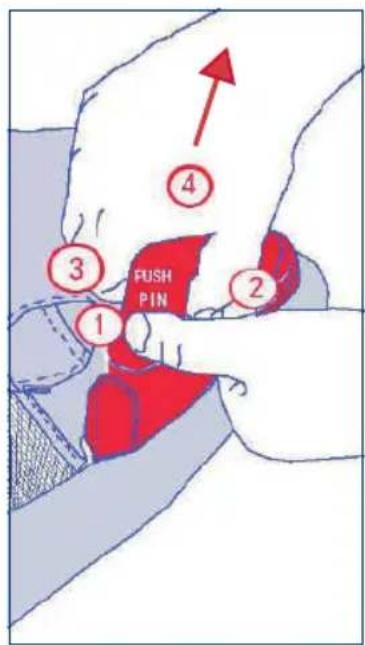
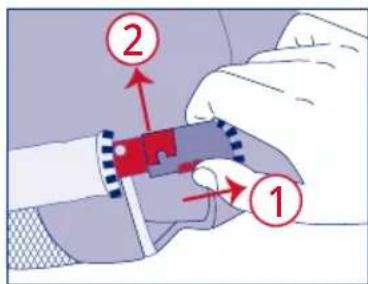
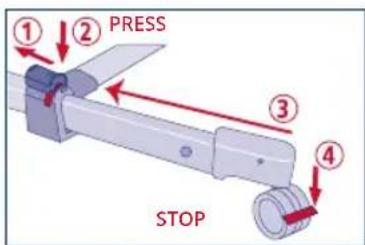
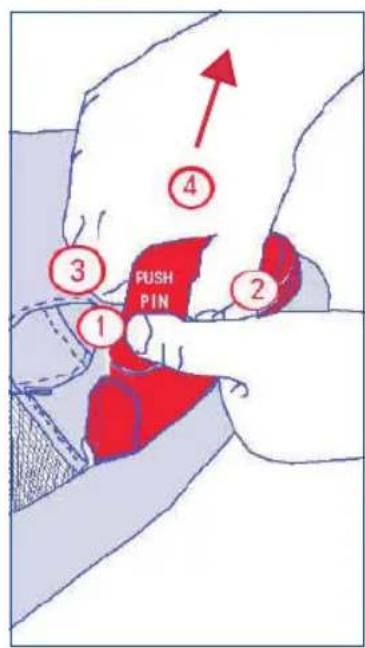
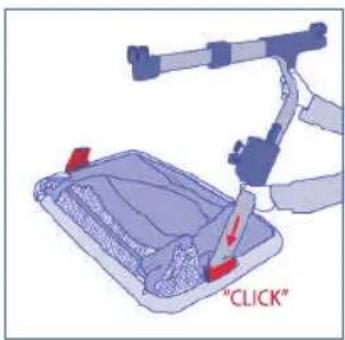
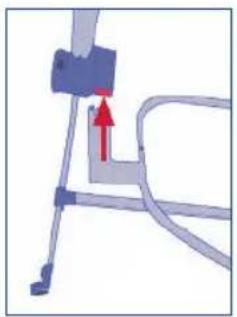
- To dismantle the mini cot follow the steps above in reverse until you have released the 3 blocks of each side by using one hand to press the metal pin (1) and the other hand to press the 2 plastic legs (2, 3) and then remove the leg (4).
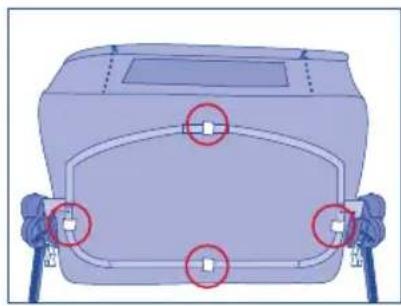
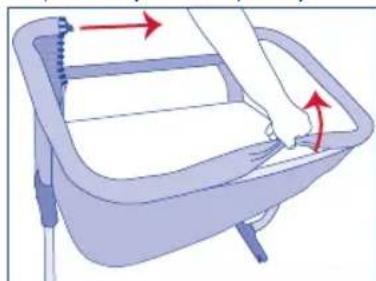
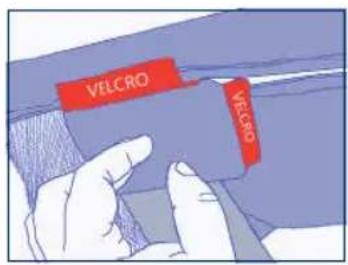
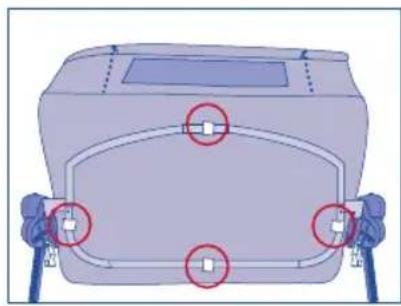
Once the base frame is assembled fit the upholstery by fastening the Velcro strips (4) found on the underneath of the upholstery (4) to the base frame tube.
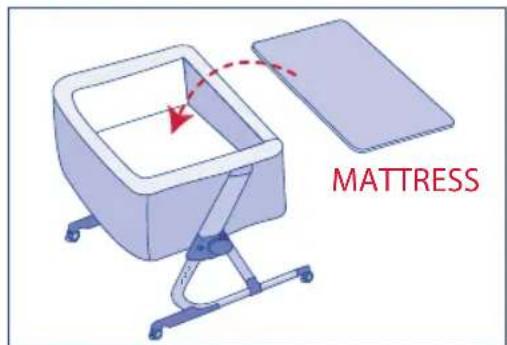
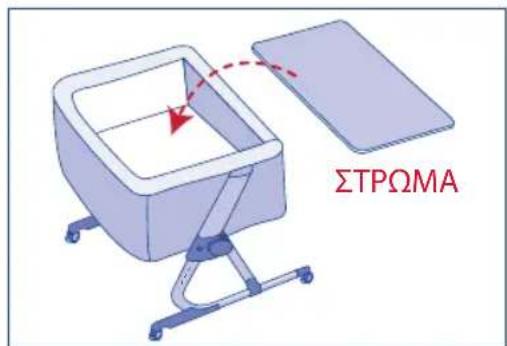
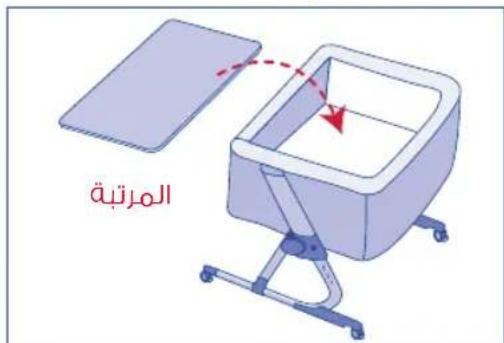
Place the mattress on the bottom of the mini cot.
Never use the mini cot without BABYSIDE mattress.
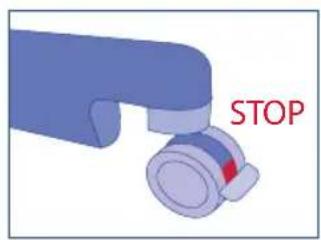
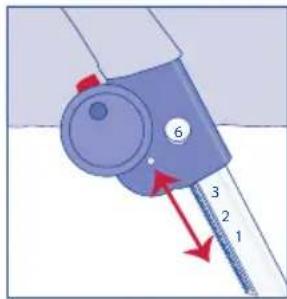
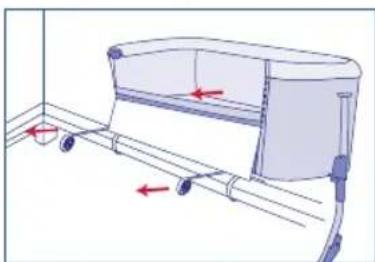
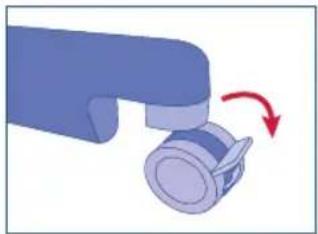
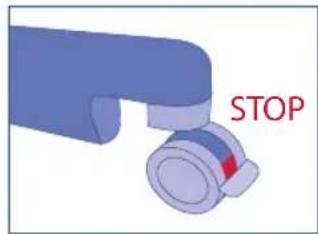
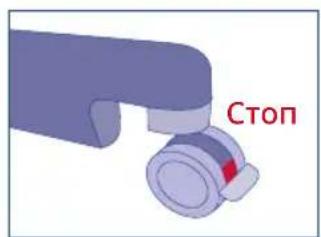
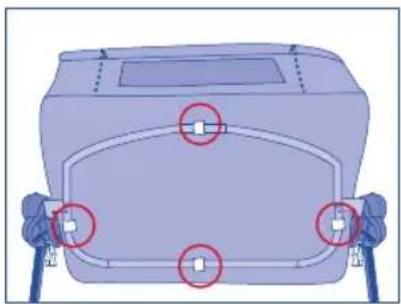
Lock all four wheels of the co-sleeping mini cot, lowering the levers to lock them so that the red mark is fully visible on the wheels.

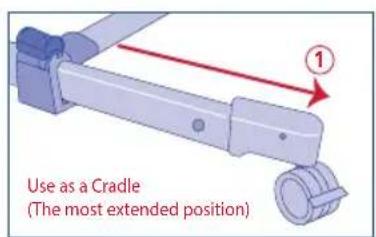
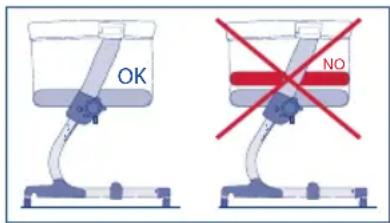
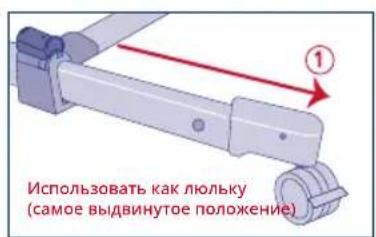
(*) IMPORTANT: For use as a Mini Cot-Cradle, check that the telescopic legs are ALWAYS unfolded and in the most extended position (1)
The mini cot is now ready for use.
To dismantle the co-sleeping mini cot, follow the same steps in reverse.
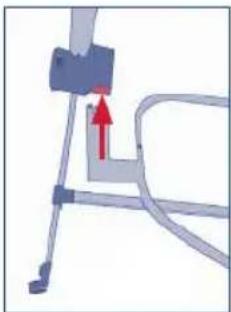
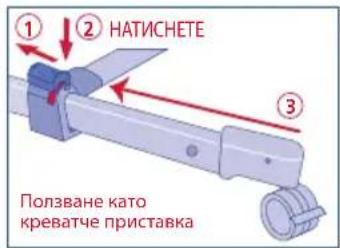
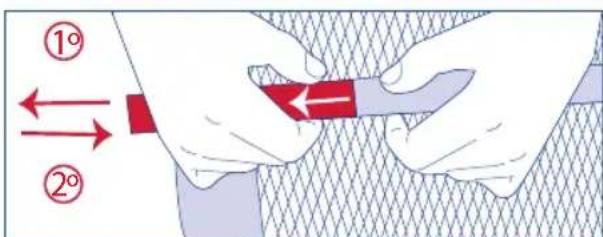
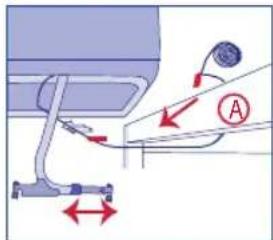
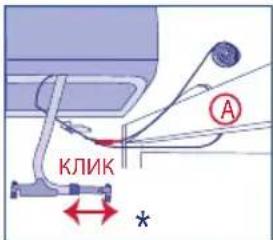
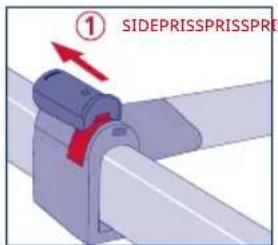
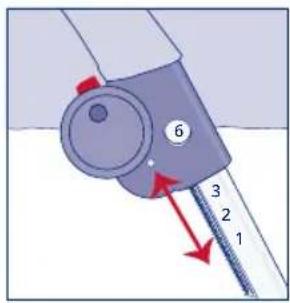
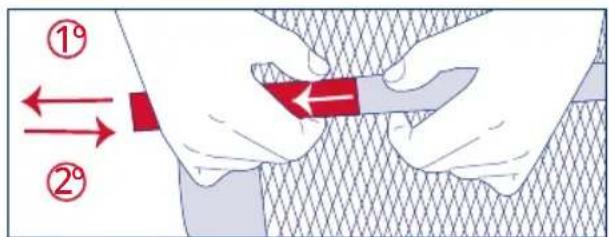
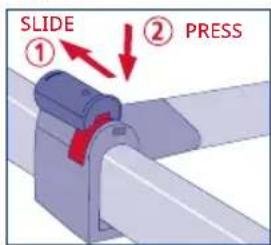
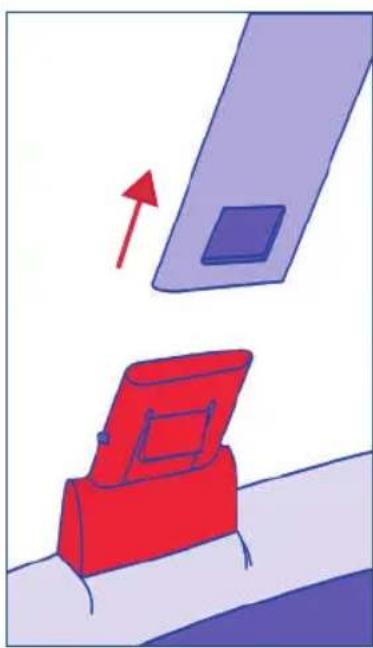
UNFOLDING AND FOLDING THE LEG (CO-SLEEPING MODE)
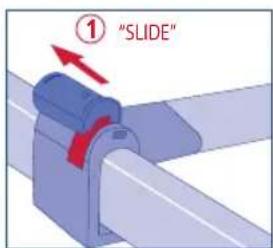
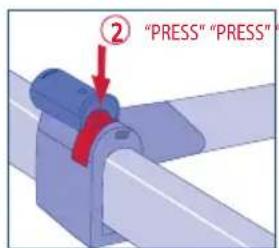
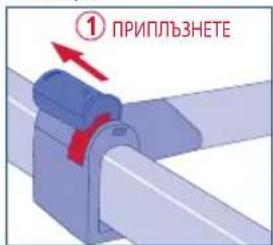
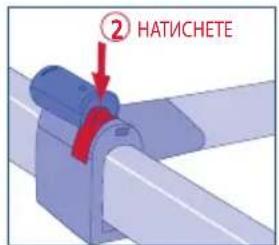
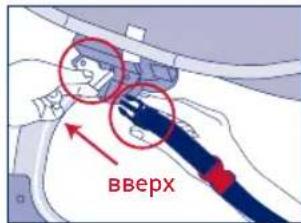
Use your thumb to slide the cover back and keep the button pressed down, push the leg inwards with your other hand to fit it to the bed. When you release it or separate it from the bed, it will automatically return to its original unfolded position where it will lock into place automatically.
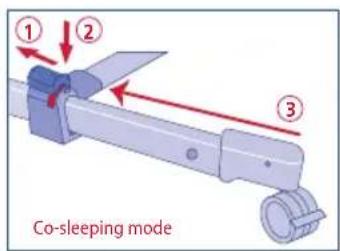
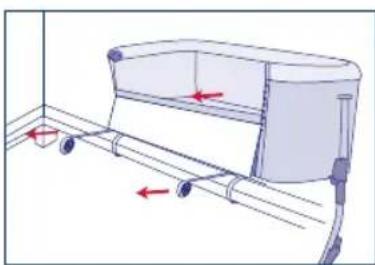
*Note: For quicker installation, it is advisable to place the mini cot near the adult bed and then bring it closer by tightening the straps.

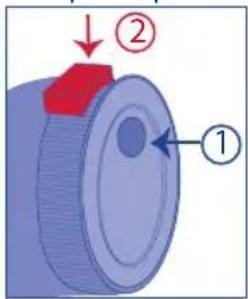
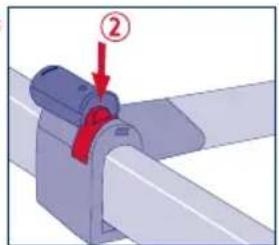
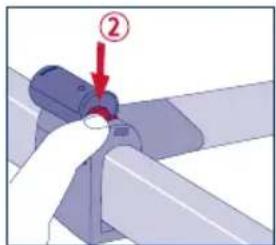
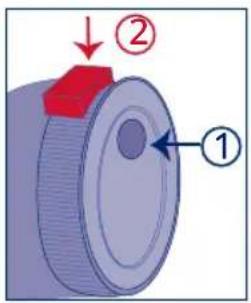
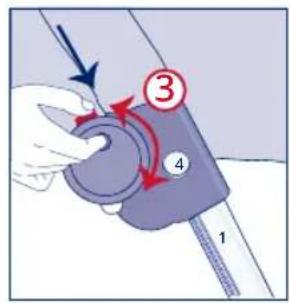
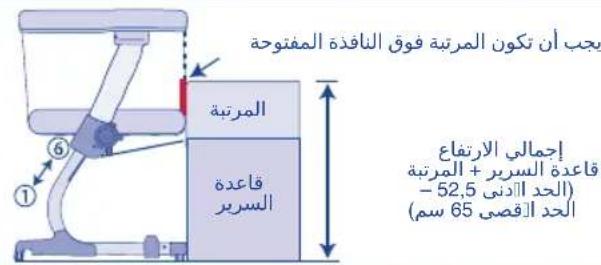
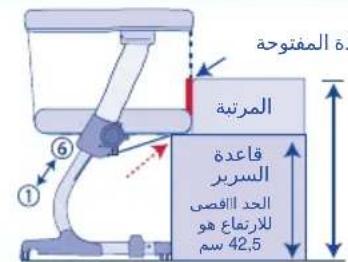
Adjusting the height of the mattress (6 heights)
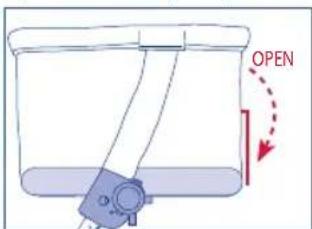
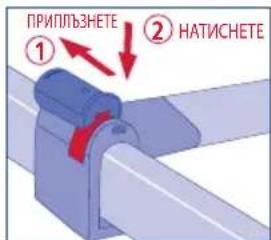
-To adjust the height of the mattress, release the safety locks on each side.
- Keep the round button (1) pressed, keep button (2) pressed down or to the centre and simultaneously turn the height adjuster 180^ clockwise or anti-clockwise to raise or lower the height of the mattress to the next locking position...
Each half circumference of the dial is equivalent to a height position.

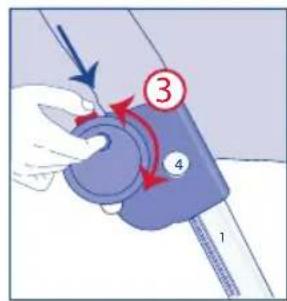

*Note: The mini cot can be tilted with a maximum difference of 2 positions between one side and the other. The baby's head should always be in the highest part of the cot.
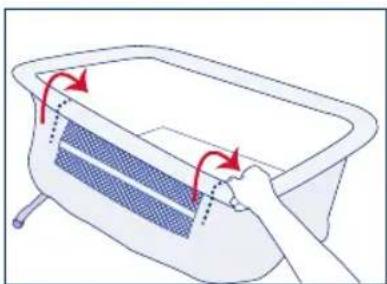
Removing the upholstery
a) Remove the mattress and unfasten the Velcro strips on the bottom of the upholstery attached to the base frame.
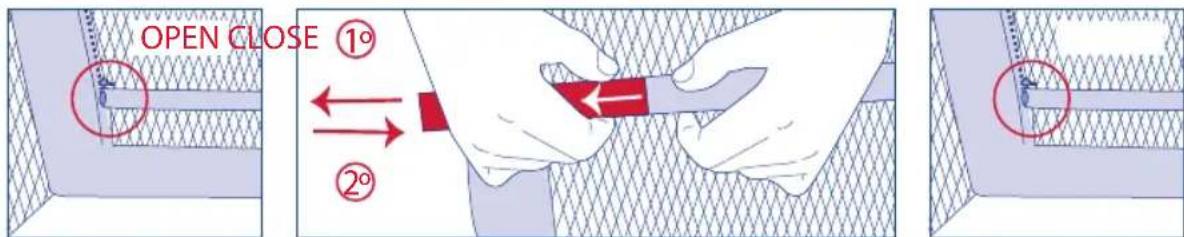
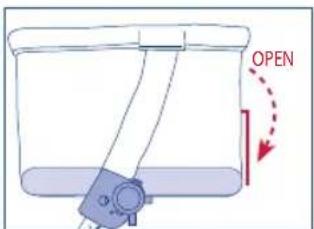
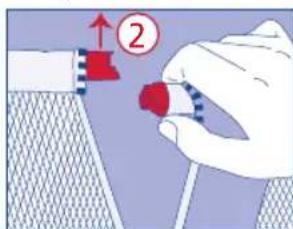
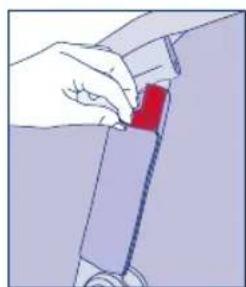
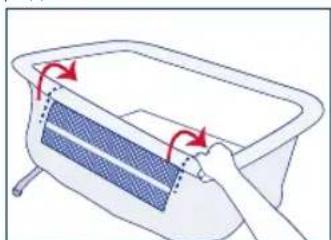
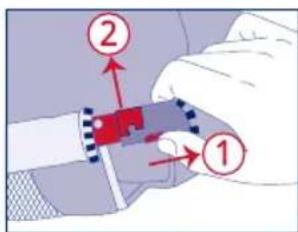
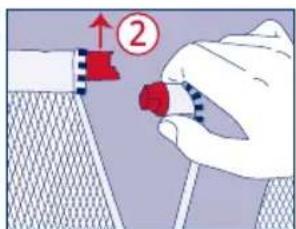
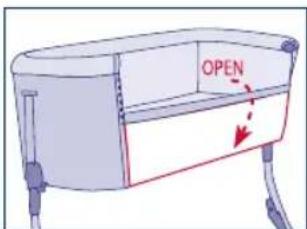
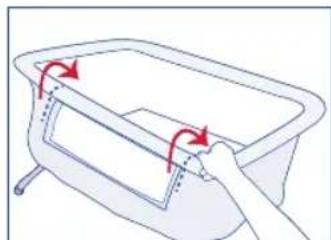
b) Open the 2 front zips found on each side of the window, slide the buttons on each end of the front bar outwards and remove the bar.
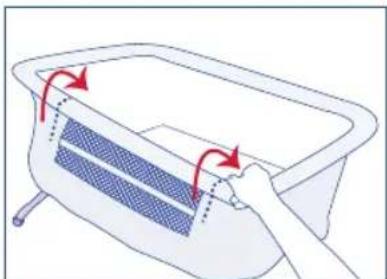

c) Unfasten the Velcro strips of the two side sleeves covering the vertical tubes.
d) Unfasten the zip found on the top frame of the mini cot and take the upholstery off completely.
e) With the cover separated from the structure, use your finger to open the small hole at the end of the metal bar.
f) Push the bar from the covered end and take it out through the hole until it is completely removed.
g) After washing, reinsert it fully through the hole and fasten it again with the Velcro.
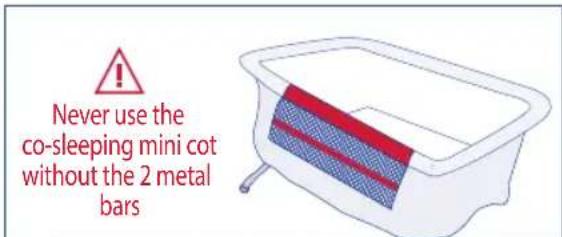
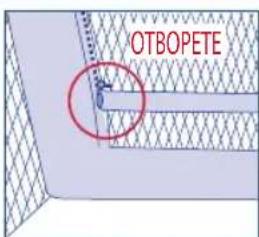
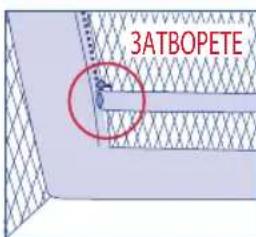
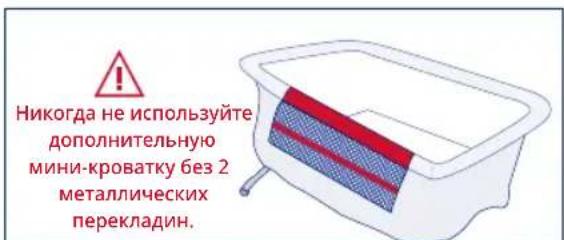
ATTENTION: NEVER USE THE BABYSIDE MINI COT WITHOUT THE METAL BAR FITTED IN THE WINDOW.
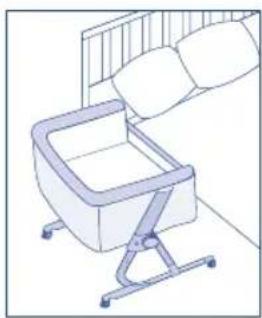
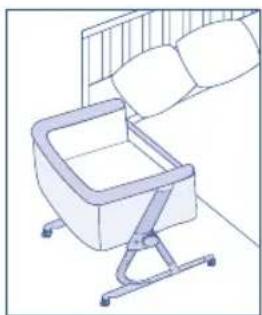
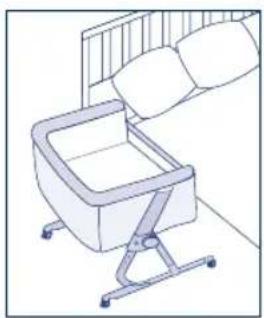
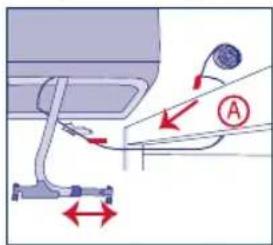
CO-SLEEPING MODE
To keep the baby closer during the night, the mini cot can be attached to the parents' bed using the fastening straps.
You can have direct contact with your baby through the side window.
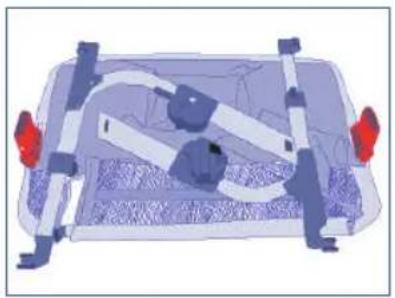
Assembly diagram
CO-SLEEPING-COMPATIBILITY TABLE
CO-SLEEPING MODE RECOMMENDATIONS AND WARNINGS
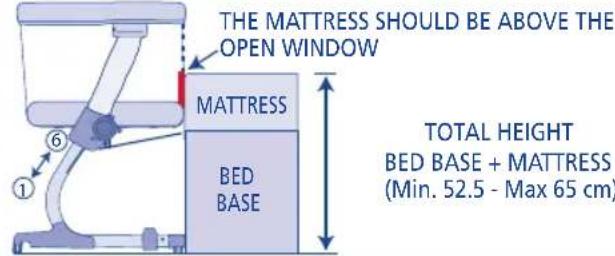
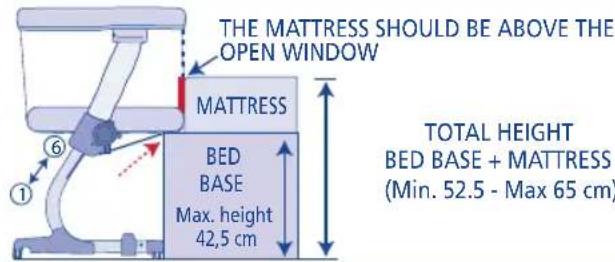
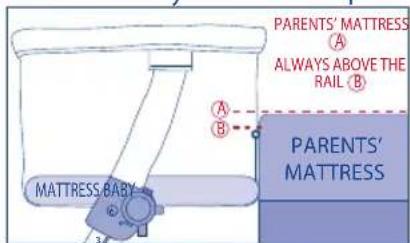
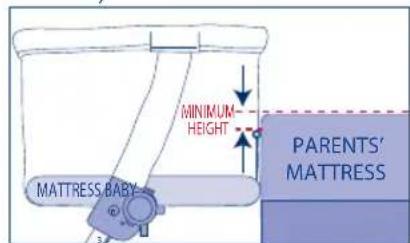
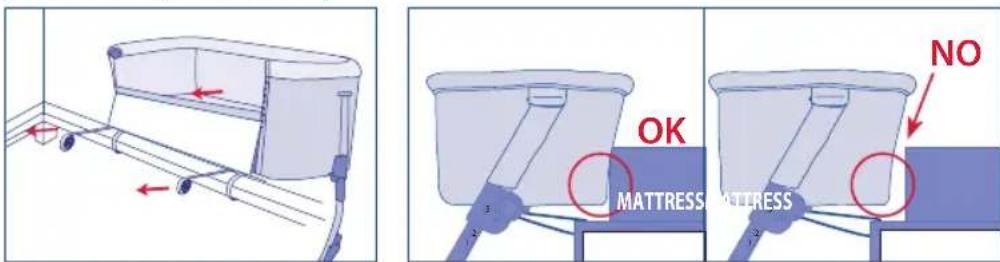
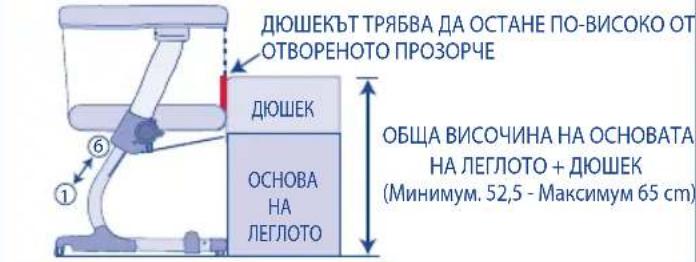
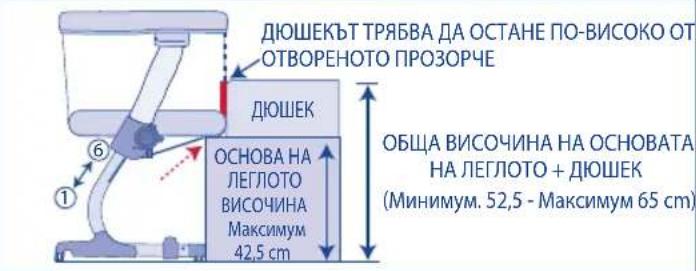
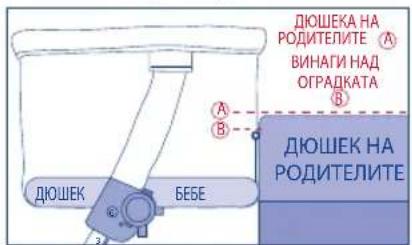
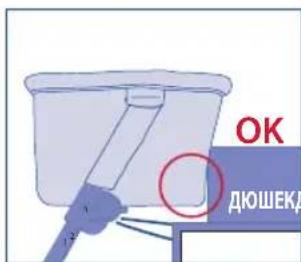
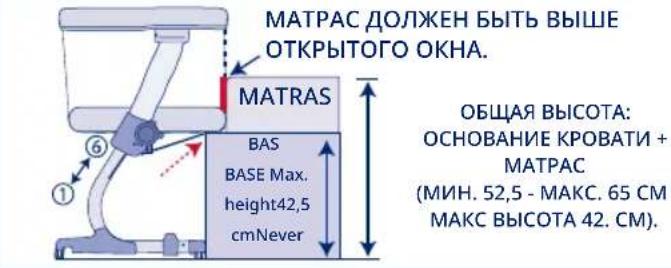
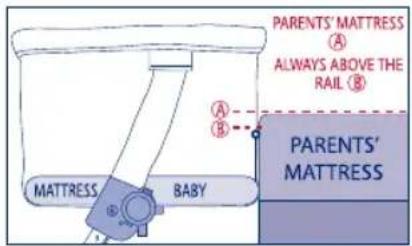
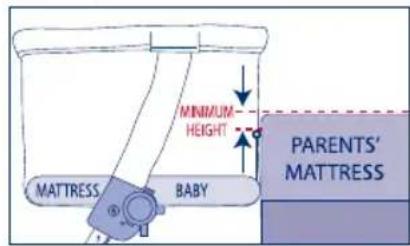
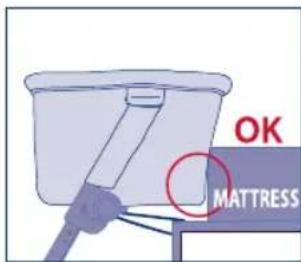
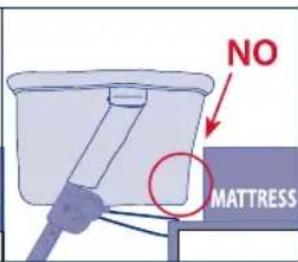
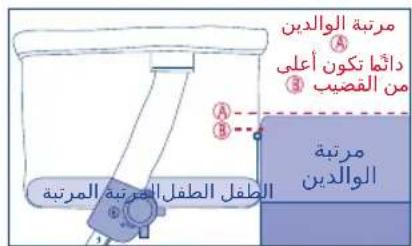
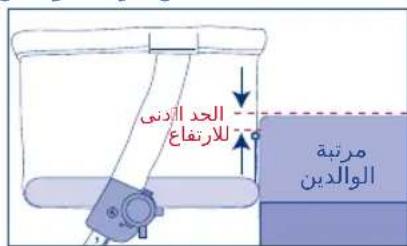
- The parents' mattress should always be above the top edge of the open window.
(The baby's mattress should always be below the parent's mattress).
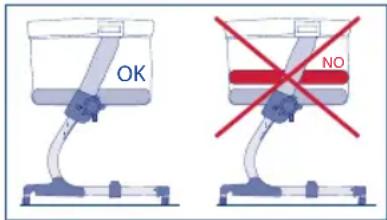
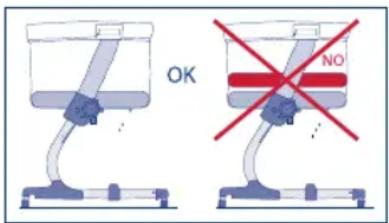
WARNING: Use the mini cot with the front bar lowered only in co-sleeping mode, attached securely to the adult bed.
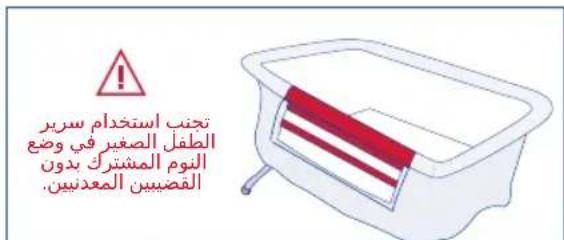
-WARNING: Do not attach the mini cot to the foot of the bed in co-sleeping mode.
-WARNING: The mini cot must not be used in co-sleeping mode with round beds and/or mattresses, inflatable mattresses or water beds.
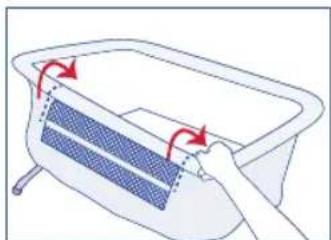
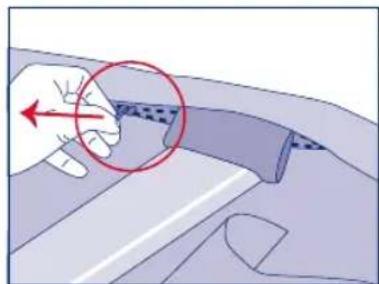
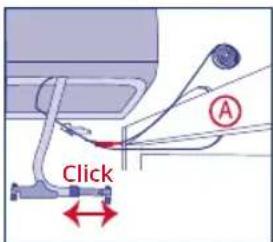
It is only possible to use this mode if the adult bed used complies with the assembly specifications listed below. 1) Fully open the 2 zips to the interior limit.
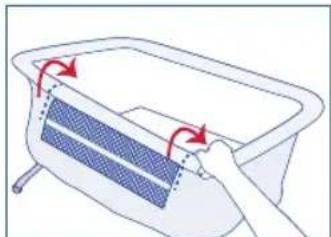
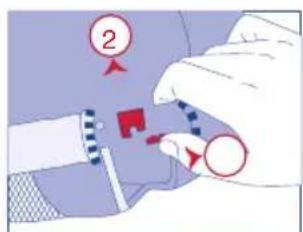
2) Unlock each end of the front bar to release it:
3) With one hand slide the button outwards and with the other hand separate the end of the bar upwards, repeat the operation on the opposite side to be able to open the window outwards.


4) Bring the mini cot closer to the parents' bed and adjust the height so that the mattress of the adult bed is above the top edge of the open window.
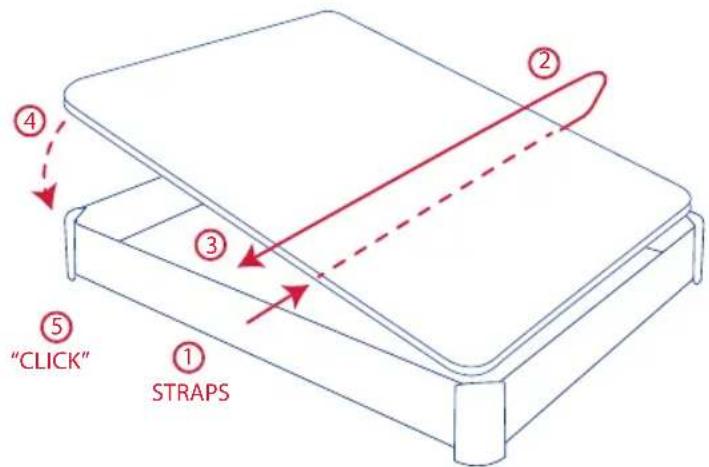
To attach the co-sleeping mini cot to the adult bed, used the two additional straps provided with the mini cot.
- Note: In co-sleeping mode the same height must always be selected for both legs.
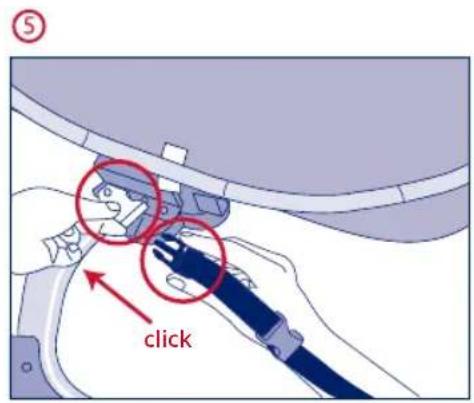
5) Fasten the black clasp of the additional strap to the clasp found on the lower part of the frame under the cover. The red clasps on the strap should be facing upwards.
6) Pass the free end of the strap underneath the structure of the adult bed (A) and wrap it round to fasten the free end of the red clasp with the red clasp positioned closest to the BABYSIDE mini cot.

DIVAN BEDS:
If the retractable legs of the mini cot touch the side of the structure of the bed that reaches the floor (divan bed...) the leg locking device will need to be released by pressing the point indicated with one finger and using the other hand to insert the leg to adjust it to the new length.
Press the unlocking point, conceal the leg and bring it into contact with the side of the bed until the mattress of the mini cot is touching the adult mattress.
Tighten the 2 fastening straps securely.
7) If the legs of the co-sleeping cot go underneath the adult bed, proceed as before and bring the mini cot closer until the mattress in the cot touches the mattress on the adult bed.
Tightening the 2 fastening straps securely.
WARNING:
-Check that the co-sleeping mini cot is securely attached to the adult bed, do this by pulling the mini cot away from the adult bed.
-To prevent suffocation, the co-sleeping mini cot must ALWAYS be correctly attached to the adult bed using the fastening system provided.
- Never use a different fastening system to the one supplied by Jané.
NOTE:
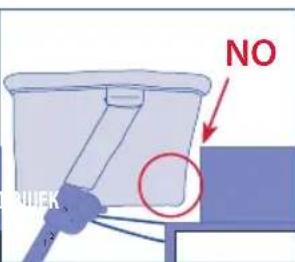
-There should never be any free space between the side bar of the window and the adult mattress.
-If there is any free space between the co-sleeping mini cot and the adult bed DO NOT use the product.
-Free spaces should not be filled with pillows, sheets, blankets or any other items.
8) Lock the wheels using the brakes fitted on them as explained in the 'Assembling and dismantling the co-sleeping mini cot' section.
FITTING TO A DIVAN BED
CO-SLEEPING COT WARNINGS
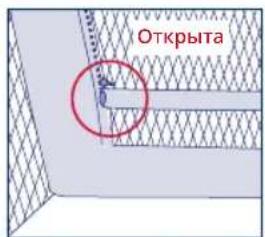
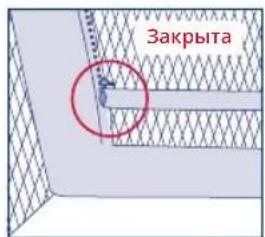
DANGER: WHEN THE MINI COT IS NOT ATTACHED TO THE ADULT BED, MAKE SURE THAT THE WINDOW IS ALWAYS
FULLY CLOSED, with the front bar correctly secured to the upper fastening points and with the zips fully closed.
-WARNING!: To prevent the risk of the baby's neck getting caught in the outer side of the window next to the adult bed, the height of the window bar must never be above the height of the adult mattress.
-WARNING!: To prevent the risk of strangulation, the system for fastening the co-sleeping cot to the adult bed must always be inaccessible, both inside and outside the cot.
-DO NOT use the product on a tilted surface.
- The fastening system used to attach the mini cot to the adult bed must be the one supplied by Jané, do not use any other fastening system.
-DO NOT use the mini cot in an inclined position when using it in co-sleeping mode.
-DO NOT use the mini cot - co-sleeping cot if any of the parts are broken, worn out or missing. Contact JANÉ S.A. to get replacement parts and extra instructions if necessary. DO NOT replace the parts yourself.
Consult your paediatrician about when to start using the cushion insert.
ROOM TEMPERATURE
WARNING
-Check the temperature of the room where the duvet is used to prevent hyperthermia.
- The ideal temperature for your baby's room is 18 - 22 °C.
- The minimum recommended age for using duvets is 9 months, there is a risk of suffocation in duvets are used with children under 4 months old.
- When it starts to get hot, take the duvet filling out and just use the cover as a blanket.
MAINTENANCE AND CLEANING
Keep the metal parts clean and dry to prevent them from rusting.
To clean the plastic parts, just use mild detergent and warm water.
GUARANTEE INFORMATION
This item is guaranteed against manufacturing defects as stipulated in the legal Directives and/or regulations in force on guarantees for consumer goods applicable to the European Union and those of the country in which it is marketed.
- It is essential to present the purchase invoice or receipt in order to process the guarantee through the seller of the item or, failing that, through the manufacturer.
- The guarantee excludes anomalies or faults caused by misuse, non-compliance with the safety regulations and instructions for use and maintenance provided, or due to wear and tear caused by normal use and regular handling of the item.
The label containing the serial number of your model must not be torn off under any circumstances as it contains information relevant to the guarantee.

FR MINI-BERCEAU CO-DODO "BABYSIDE"


IMPORTANT. CONSERVER POUR DE FUTURES CONSULTATIONS. LIRE ATTENTIVEMENT
AVERTISSEMENTS
MODALITA CO-SLEEPING
MINI BERCO CO-SLEEPING "BABYSIDE"


IMPORTANTE. CONSERVAR PARA FUTURAS CONSULTAS. LEIA ATENTAMENTE
AVISOS
A1 Barra frontal extraivel
A2 Fechos abertura
A3 Abertura bebé
ADVERTÉNCIAS CO-SLEEPING
-BHIMAHHE: He n3non3BaTe npodykTa, aKO He cTe npoyeni yka3aHnraTa.
-BHIMAHHE: Korato deTeTo 3aOnue He da cya, da 3aCTaba Ha KoIeHe nn Da ce n3npab8 be3 yxJa nOMOu, He ro cnaai Te noboeB TOBa KpeBaTHe.
-BHIMAHHE: NocTabraHTo Ha donbHNHTeHn eJeMeHTn Ha To3n npOdyKT MoKe Da IobEe Do 3aDyBaHe.
-BHIMAHHE: He noctabraye npodykta B 6bn3oCT do pyrug npodyktn, KOIO MOraT da cb3daat pck OT 3aNyuaBaHe nn Heocntn Ha Kcnlopond KaTo HanpImep:BxKeTa, nepTe, uHypoe n T.H.
-MoHTaxHNTe eIeHn Tp8Ba da 6bDaT BnHaN 3aKpeHn nPoBepHn, 3a da Ce npedOTbPaTn B3MOXHOCTTa BInTOBeTe nn CBpb3BaunTe eIeHn Da ce demOnHp aTnn Da ce pa3xla8T, KOTo 6n MOrNo da IObeDe Do 3aunPiBaHe Ha 6beTo nn Hn Ha actn OT dpexHn Me KaTo HanPmep: JeHTnTe Ha 6n6epoHa, ppuKaHn yctpoiCTBa, peMbUu N oBeu, Cb3DaBauKn B3MOXeH PnCK OT 3aDyuaBaHe.
-Be6eKoTO KpeBaTue npncTabKa TpA6Ba BnHaR Da e nocTaBeno Bbpxy Xopn3OHTaIen NOI.
- He no3BolnaIte Ha decaTa da unpaT 6e3 nA3Op B 6n3OCT do 6e6wKToTo KpeBaTupe npctabka.
-Korato deteto ceHAMIPA B KpeBaTuTeo 6e3 Hau3Op OT Bb3pacten, nperpaDATA BuHArn Tpr6Ba Da e BdnrHaT, da enpaBnHO 3akpeneha uINOBete da ca 3aTBOpeHn, a KOJenata da 6bDat HAnbHIO 6IokupAH.
-HE n3no13baIte 6e6ewkoTo KpeBaTne npncTabka, aKO hKoR OT cactnte My e CuyneHa, aKO e B looC bCTOHN He nnnncBa. CbpxKeTe ce JANE S.A., 3a da 6bJe 3ameHea CbOTBeTHata qact N da nOnyUHTe DOnbHnTeJIHN HnCTpyKcN, aKO TOBa e Heo6xOIMo. HE 3ameHnIte camn qactnte Ha npOdykTa.
-Провераяве ВИнг Ддл BCINKINпрспocobileня 3a MOHTINpHaHe ca npaBnH0 3aTeHATN, KaKTo N 6IOKnpaunTe MEXAHN3Mn.
-Hnkora He n3non3BaIte tanucepna Ta 6e3 MeTanHaTa CtpyKtypa.
-BHIMAHHE: He n3non3BaIte noBuee ot eJHO JIOwee B 6e6wKTo KpeBaTue.
-BHIMAHHE: 3a npedotBpaTBAHe Ha pNCKa OT NOxap: mMaTe npedBnD pNCKa OT TOBa KpeBaTuTeTo da Ce HAMIPA B 6bn30CT DO orbH nIIN dpYn N3TOUHn Cu TOnnHa, KaTO eNEKtpueckn Ra3OBn OTOnnTeHN ypeDu n T.H.
-3a npedotBpataBaHe Ha pnska OT nadaHn 3adyuabaHe, HNKORA He noCTabrTe eHOb Bbpxy Dpyro DBe mIITpn IIOweeta, 3a da CE yBCTBa DeTeTo No-yDo6Ho.
-He n3no3BaIte aKcecoapn, KOITo He ca Odo6peHn OT npOn3BODnteJ.
-BHUMAHHE: N3noI3BaIte eINHCTBHeO IIOweeTo, KOeTo ce doctabra 3aedHO C 6e6eKOTo KpeBaTue. 3a npedeotbpaTbaHe Ha onaChocTta OT 3aDyUwAbAne, He do6abIte BTOPO IIOwee.
PA3fbaHE IN CfbaHE HA KPAUYTO (KPEBATUE PNUCTABKA)
C naeca Ha eHaTc n pbKa npnIb3Hete Haaad Kanayeto n dpbxTe HATNCHT 6yToHa, a c npyra Tpa Ka n36yTaTKe Kpaka HABbTpE, 3a da ro 3akpenite 3a IerlnoTo. Korato ro otnyche Te nnro otdaJeHTe ot IerlnoTo, Kpaka ue Ce BbpHe ABTOMaTHUHO Do IIpbBOHaauHOTc n pa3rBHaTO nOLOXeHne N TaM ABTomTuHIO ue ce 6nokupa.

*3a6eexka: 3a no-6bp3o HCTaIpaHne npenopbUBaMe da cnoxnte 6e6eKOTO KpeBaTue 6n3o do Ierloto Ha Bb3pactHTNE i CNeI TOBa da rnpnbNKeTte, 3aTraRaN peMbInte.
Perynnpahe Ha BncounHaTa Ha DIOweeTo (6 ctenen)
-3a da perynipate BucuHaTa Ha IIOueTo, Tp6Ba Da ocbo6OHTe npedna3HnTe 6JoknpOBKn, HAMpaCn Ce ot DBeTe CTpaHn.
-Дрьхte HaTnCHa KpbIg 6yToH (1),дрьхte HaTnCHa 6yToHa (2) HAnOly Nm KbM cHTbpa N B CbSIO To BpeMe 3aBbpteTe peryaTopa Ha BnCOuHnHaTa 180° B NocOKa Ha YacOBnKOBaTa CTpeNkA Nm B NocOKa, OpaTHa Ha YacOBnKOBaTa CTpeNkA, 3a Da ce yBeNnU Nm HamaNn BnCOuHnHa Ta HIOseyeTo DO CneDbauTa CTeneH Ha 6IoknpaHe...
-Bcekn nolnykpbr 3abpbtaHe npomehn BncounHaTa C eHa cTeenH.
- 3a6eJekka: Pa3peWabacce 6e6eKOTKePBeaTc da ce HAKJaH, KaTo pa3nKaTa MeKdy eHata n Dpyrata cTpaHa He MoKe da npBnBaaba 2cteneH. IlaBaTa Ha dTeTo Tp6Ba da 6bde BnHaRn OTKbM NO-BnCOKaTa cTpaHa.
CbaJrHe Ha KaJIbKaKaTa
a) OTeTaPHeTe IOnueyeto n pa3deneTe JnENTnBeJIkpO B DoJIHaT a Yact Ha OCHOBaTa Ha KaJIbKkata, KOnTO ce 3aKpeBnBaT 3a DOnHata pAMKa.
6) Pa3Ko7aIte Dbata npedHn cHna, pa3noJoxeHn OT dBeTe CtpaHn Ha npO3OpyeTo, npuHb3HeTe HABbH 6byOnHte, HAMpaun Ce B DaT a KpaH na PpEHa Tpb6a n OOTcPaHete.


B) Pa3deneTe IeHTIe TIN BEnKPO Ha IBaTc CTpaHnHn KaJIbfoa, KOtTO NOKPnBaT BePTNkAJIHnTe Tp6n.
r) Pa3KoIpaIte cIINa, HAMPaUc Ce OT BbHUnHaTa CToHa Ha rOpHaTa pAmKa Ha KpeBaTuETo n 13BaJeTe n3zraNo KaIbΦkata.
I) Cnei KaTO CTe MaxHAnI N3cJIIO TANIepePraTa OT CTPyKTypaTa, OTBOpTe C npbCT MaIKnA OTBOP 3a N3BaXJaHe Ha MetaJIHaTa Tpb6a.
e) 136yTaIe TpBbAaT O cKpITn I Kpa I N 13DbPnAte OTkbM CTpaHata Ha OTbopa, DOKaTO I N3BaIte N3JNO.
K) CneI KaTo pNkInOHTe C npaHTo, BkapaTe r OTHOBIO n3ZrNo Ppe3 OTbopa I 3aTBOpTe DynKaTA, HATNCaIKN BEKPOTO.
BHIMAHNE: HIKOTA HE I3IIOJI3BAIITE B6EIIKOTO KPEBATYE BABYSIDE BE3 METAIHATA TpIbSA HA IIPO3OPUETO.
IIOIOXEHWE KPEBATUE PICTABKA
3a da mate no-6n3bK IOCTbn DO 6e6eto npes HOuTa, KpeBaTceto MoKe da 6bJe 3aKaueHo 3a IerIoto Ha poDnteJIte C NOMOHTa Ha 3akpenBaun peMbun.
Ppe3 ctpaHnHOTOpno3Opue ue IMate npK KOHTaKT C BaWTo 6e6e.
Cxema 3a MOHTnpaHe
KPEBATU INPUCTABKA - TABNJILCA 3A CbBMECTMIOCT
PENOPbKN IN PEPdynPEKDEHn3A IIOJ3BAHE KATO KPEBATy INPCTABKA
- IIOweKbT Ha pOunTeNITe BUNHArn TpR6Ba Da 6bJe NO-BuCOK OT ROPHNr KpaH Na OTBOpEHOT npo3OpYe. IIOweYeTo Ha 6be6To BUNHArn TpR6Ba Da OCTaHe No-HNCKO OT IIOweKa Ha pOunTeNITe).

-BINHMAHNE: IN3noN3BaIte 6e6eIKoTO KpeBaTue Cbc CbaIeHa npeHa Tp6a cMo KOrATo KpeBaTuTeO ce IN3noN3Ba KaTo IeIIO npucTabKa H e NdeAJIHO 3aKpeNeHO 3a IeIIO To Ha pOdITeJIte.
-BHIMAHHE:He cnaaTe KpeBaTuETo KaTo IerIIO npCTabKa B 3OHaTa Ha KpaKaTa Ha IerIIO To HA pOnTeJIte.
-BHIMAHHE:3a6paHEno e KpeBaTuETo Da Ce H3NoJ3Ba KaTo IerIIO npCTabKa B KOMbHaunC KpbTn IerNa m nn DIOseu, NaYBaEMn DIOweu, Nnn BOHN DIOweu.
KpeBaTuETo MoKe Da Ce H3NoJ3Ba KaTo KpeBaTue npCTabKa Camo aKO IerIOTO, KbM KOeTO ue 6bJe 3akpeNeHO, OTROBapr Ha BCNUKN IOOCUeHN NO-DONy H3NCKBaHnra 3a MOHTaxk.
1) Pa3konyaTe DOKpaI 2-Ta cUna, DOKaTO CTURHeTe Do BbTpewHnK paI.
2) O6IoknpaTe Dbata KpaHa IpeHnTa Tpb6a, 3a Da MoKeTe Da oCBO6OJNTe.
3) C eHa pKa npnInb3HeTe HaBbN 6yToHa, a c Dpyrata OCBO6oTe HArope eHNH KpaH Tpb6aTa. Cnei ToBa HAnpabete CbIOT OTO Dpyrna N Kpa, 3a Da MoKe da OTBOpHTe HaBbN Ipo3OpyeTo.

4) Do6nKte KpeBaTHeTo DO IeJIto Ha PoIeIte HnHaIaCte BnCOHnHaTa Taka, Ye IIOweKbT Ha IeJIto Ha PoIeIte Ta ocTaHe NaRrnpHkpa Ha OTBopeHTo npO3Opue.
IerIIO npictaBka ce 3akpenBa 3a IerIIO To Ha Bb3pactHnTe C NOMOHTa Ha Dbata DonbHnTeHN peMbKa, BKJIOUeH N B KOMJIIEKTA Ha KpeBaTuHTo.
*3a6eJekka:Korato KpeBaTuETo Ce non3Ba KaTo IerNo npUcTabKa, DaBata My KpaKa TpA6Ba Da ca eHaKBO BnCOKn.
5) BkapaTe uehHaTa KaTapaMa Ha IOnbHInTeJHHnpeMbK BaTapaMaTa, HAMpuA Ce Ha IOnHaTa paMka NtAnuepnra. UepBeHnTe KaTapaMa Ha peMbKa TpOBA da rIeDat Harope.
6)Ппекаши Свобони Краи На ремьк по рамka на Ha JERNTO HA Bb3paCTHnTe (A),O6XbaHete и 3akonuaite peMbKa CbC Cвобони Краи Ha YepBeHa T a KaTapaMa C chepBeHa T a KaTapaMa, KOrTo e Hau-0n3o Do KpeBaTuTe BABYSIDE.
ДИВАH-ЛЕТДА:
Ako pa3teratEnHnte Kpaka Ha 6e6eKOTO KpeBaTne OINpat B CTnraaTa DO 3emrTa CTpykTypa Ha rOJAMOTo Ierno (DnBaH-lerno), Tpr6Ba Da OCBO6OInTe 6LOKnpaunna MexaHN3bM Ha KpaKaTa KaTO HATNCHeTe C eDNH npbCT NOCOueHnryNKT n Cdpyata pbKa BkapaTe Kpaka HABbTpe, 3a Da QNKcnpaTe HOBATA My DblnxHa.
HaTnCHHe 6yToHa 3a De6nKpaHcPnTe KpaKa nO npTe Do paMkata Ha IerIoto TaKa, ye dIooeueTo Ha 6e6eKoTo KpeBaTuDe ca de Oonpe Do IouWeka Ha rOJAMOTo IerNo.
3aterheTe 3dpabo Dbata 3akpenbaun peMbKa Ha Ta3n no3nua.
7) Ako KpaKaTaHa KpeBaTuTe npCTabKa Bn3aT NOJIeNtOHa PoNTeJIte, IPOUeINpAte No CbunH NaHH, do6JIxKeTe 6e6eKoTo KpeBaTuTe Taka, Ye IIOuEeTeO Ha KpeBaTuTe Da ce DOnpe Do IIOWeKa Ha rONMOTO IeTIO. 3aterHeTe 3npaBO DbTa 3akpenBaUn peMbKa Ha Ta3n N03nur.
BHIMAHVE:
-Провете Ддд Кретауето-nпсг�а Кпрвннх ЗakpeneHo 3a nernoTo Ha podntenite.Може д ro HanpaBnTe KaTOdpbHnTe Kретауето-nпсг�аКИСОKa,OBpTaHa NaIerItoHa podntenite.
-3a npedotbpaTbaHe Ha onacnoCTTa OT 3aDywaBaHe nopadn 3aunBaHe Ha 6e6eTo, KpeBaTeTo-npntabKa Tpr6Ba BnHAn da 6bJe npabInHO 3akpeNeHO 3a JerIto Ha poduTeJIte NocpeCTBOM npinIOKeHa Ta CnCTema 3a 3akpenBaHe.
- Hikora He n3no3BaIte pa3InuHa oTIOCTaBeHata oT JANE cncTeMa 3a 3akpeBaeHe.
BHIMAHIVE:
-Hnkora He Tp6Ba Da octaba Hn MaiknT lyfT MeKdy CTpaHnHn KpaH npO3OpTeo n IIOweKa Ha poNTeIte. Ako MeKdy KpeBaTuETo-NpucTbKa NJeItoHa poNTeNtE octaba lyfT, HE n3noI3BaIte npOdykTa.
-0ctabaunte lyfoBe He Tp86Ba Da ce 3aBbNAc CB3rNaBHuC, YapuaOu OeJra Nn KaBBOTo n da 6nno Dpyro Heo.
8)Блokираиte колатca сnomoцla Ha BrpaedHte B TIX cnpauchn Taka, KaKTo e obacheHo B pa3den "MoHTnpaHe n demOHTupaHe Ha KpeBaTuTeO-npucTaBka".
-HE n3non3BaTne npodykTa Bbpxy HaKNOHeHa NOBbpxHOCT.
-Tp6BaJa n3nOJI3BaTe IOCTaBeHata OT JANE cncTeMa 3a 3akpenBaHe Ha KpeBaTuETo KbM IerNoTo, He n3nOJI3BaIe Dpyra CnCTema 3a 3akpenBaHe.
-HE n3non3BaTte 6e6eikoto KpeBaTue B haknoheHO noJoxHe, Korato e cNoXeHO KaTo Ipiuctabka.
-HE n3non3BaIte 6e6eIKOTO KpeBaTHe-NpuctabKa, aKO HAKO OT YactnTe My e CuyneHa, aKO e B NOIO CbCToHne mN IINCBa. CBpxKeTe ce c JANE S.A., 3a da 6bde 3ameHeHa CbotBETHa T acT N da NONYHTe DonbHInTeHN INHCTyKcN, aKO TOBa e Heo6xOIMo. HE 3ameHJIte camn YactnTe Ha npodykTa.
I3IIOJI3BAHE HA Bb3IJIABHIMJATA
Ponitatae BaunnaepnabtpaTOBaKORA Tp6Ba da 3anoHene da nIOJIbATE Bb3rAbHnuaTata.
TEMIIEPATyPA BCTA
BHIMAHHE:
-Провете Temпература встая, Кдeto Изпалыte IOprанчeto, за да се ИЗбгне петонлaine.
-ⅠeαJIHaTa TempepaTpaB cTЯTa 3a BaWteTo 6e6e mexkdy 18 n 22^
-Прелорьва симнмалнота Вьз pact 3а NOIЗве Наюрази e9 Meceua, ako ce nIIN3Ba npN Deua NO-MaIKN OT 4 Mecuca, cblseCTbva ONaCHOCT OT 3aDyUbaHe.
-Korato BpeMeTo Ce CTOnn, MaxHeTe IopraHueTo n 3nOJI3BaIte KaTo OJeAIO cAmo KaIbΦKaTa.
IODAPbXKAIIOYNCBAHE
PoiDbpxKaIte YnCTn n CbBcem CyXm MetaHInTe YaCTn, 3a Da He PpKdCAt.
3a nouchBahe Ha nlaactMacobite yactn 13noJ3BaIte cmo MEK Mneu npenapat N xlaKa Boda.
TAPAHIOHHA INHOPMALIN
To3n apTkyI mA rapaHUNCpeu npoBODCTBEHN DeefekTN, Taka KaKTO e npedBnDEHO B deNCTBAUHTe DpEKTBN HIN HopMaTNBn pa3npoe6bO tHOCHO rapaHUNTE 3a NotpeBNTENCK CTOKN, PnpIOXMM 3a EBPONEICK NcB03 n CneUphNn 3a DbpkBaTA, B KOrTo apTkyMNTe Ce npOdaBAT.
Tpa 3aBnKntno da ce npedctabn faktyp a nn Kacob6eKka,3a da e bainHa rapaHna nped npodaba Ha apTKyna nnn nped npoBDOHTen.
- TapaHHTA nKIOHOBA aHOMaIIN IIOBpei, npuHHeH OT HeNPaBnHa yNtpe6a, ot Hecna3BaHe Ha npedncaHnra 3a 6e3oNaCHOT HA INCTpykUInTe 3a npabunHa yNtpe6a HNDpBxKa, nO t N3HOCBaHE B pEyNTAT Ha HopMaHnata nepnoDnHa yNtpe6a Ha apTkyla.
-ETKKeTb, CbDpKaU, cepHnHn HOMep Ha Baunr MoeJI, B HnKaBb CnyaH He Tpy6Ba da ce OTkbCBA, TbN KATO CbDpXa BaxHa INHOpMaUN 3a rapaHnraTa.

HR KREVETIC ZA BEBU UZ KREVET „BABYSIDE"


VAŽNO: SACUVAJTE ZA BUDUCU UPORABU. PAŽLJIVO PROCITAJTE
UPOZORENJA
-UPOZORENJA: Nemoje upotreblavati ovaj proizvod akniste procitali upute.
-UPOZORENJA: Kad dijete moze sjediti, klecati il se moze samostalno uspraviti, dijete vise ne smije upotrebljavati ovaj krevetic.
-UPOZORENJA: Umetanje dodatnih dijelova u krevetic bi moglo prouzroci gujsanje.
-UPOZORENJA: Nemojte postavlji krevetic u blizini drugih predmeta koji bi mogli prouzroci opasnost od gusenja ili davljenja, kao sto su, primjerice: vrpce, zavjese, uzice, itd.
- Pričvrsni dijelovi uvijek moraju biti dobro zategnuti i potrebno in je redovito pregledavati kako bi se sprijecilo odvajanje ili ispadanje vijaka ili drugih pričvrsnih dizelova, koji bi mogli naškoditi bebi ili bi se mogli zaplesti u bebinu odjecu ili predmete kao što su vrpce za dude, kvačice, ogrlice i naušnice, a koji bi mogli predstavlji mogucu opasnost od guşenja.
-Kreveticza bebe za postavljanje uz krevet uvijek mora stajati na vodoravnoj podlozi.
-Nemojte dopustiti djeci da se igraju bez nadzora u blizini krevetica za bebe.
-Kad se dijete nalazi u kreveticu bez nadzora, povrinite se da je zaistna ogradica uvijek podignuta, ispavno pričvṛścena, da su patentni zatvarači potpuno zatvoreni, a kotačić potpuno blokirani.
-NO upotrebljavaje krevetic za bebe uz krevet ak je neki od njegovih dijelova ostecen, dotrajao il nedostaje. Obratite se na JANE S.A u slucaju da je potrebno zamjeniti dijelove ili pruziti dodatne upute. NO zamjenujte dijelove sami.
-Provjerite jesu li svi sustavi za postavljanje i mehanizmi za blokiranje uvijek ispravno zategnuti.
-Nemojte nikada upotrebljavati navlaku bez metalne konstrukcije.
-UPOZORENJA: Ne upotrebljavite više od jegnog madraca u kreveticu za bebe.
-UPOZORENJA: Za sprječavanje opasnosti od požara: imajte na umu da je opasno postaviti krevetić u blizini vatre ili drugi gih izvora topline, kao što su elektrčni aparati za grijanje ili plinske grijalice i sl.
-Kako biste sprijecili opasnost od ispadanja ili guosenja, nikada nemojte stavljati dva ili viise madraca jegan na drugi radi vece udobnosti dijeteta.
-Nemojte upotrebljavati dodatni pribor koji nije odobrio proizvodač.
-UPOZORENJE: Upotrebljavaje iskljucivo madrac koji dolazi u kompletu s kreveticem. Kako biste sprijecili opasnost od gu Senja, ne postavlajte drugi dodatni madrac.
-ODRZAVANJE I CISCENJE
Metalne dijelove odrzavajte cistima i suhima da ne bi zahrdali.
Za ciścenje plasticknih dijelova, koristite blago sredstvo za pranje i mlaku vodu.
-PRANJE NAVLAKE
Perite na ruke ili u perilici te ostavite susiti na sobnoj temperaturi.
SASTAVNI DIJELOVI
A A Sklop konstrukcije i tekstilne obloge
B Donji okvir
C Odvojiva donja prečka
D Madrac
Mn xnpoiponoite note to kivvo wpioc to otpwa tou BABYSIDE.
Aoapaiote tic teoepic podes tou kivou ouv-koiunong katébaovtac tou oxlouc tou ppevou wonou va eipavio ooknpo to kokkivo onuadi, evdeien otoi tpoxoi exouv makapiotei.

SLAPEN COT WAARSCHUWINGEN
IyOuNCTKNIIaTnKOBbIX DeTaJIe NcNOJIb3yITe MmRKe MoIOUe CpeCDTOI TeTIyIO BDOy.
-CTNPKA KpbiluH
BbIMOnTe erO BpyHyIO n OCTaBBte erO, yTo6bI BBiCOxHyTB npN KOMHaTHoN TeMnepaType.
ETAHIN
A-KomnneKT KOHCTpyKuIN TkaHeBOrO ueXna, A5-PeryIaTOp BbICOTbl
B-Ba3OBa pama, A6-KHonka 6nOKnOBKn HxHe npmbi
C-CbemHnHXnYnnAHaKa,A7-3actexkndnyKpePnEHHpeMHeK OCHOBHO KOHCTpyKcH.
D-Matpac,A8-Koneca
E-KpenkHbIe pemHn,A9-Topmo3 6JoknpOBKn Koneca
A1-CbemHna nepednnaHaKa,A10-BbIDBHXHbE HOKKN
A2-OKOHhIe MoHIn, A11-3amok JnHO
A3-DeTcKoe OKHO
A4-KhONka 6IoknpoBKN peYnlnpOBKn BlicToB, B1-Onopbln cbeMHO nnAhn (A1) B pexime coBmecTHoro cha.

NHCTPYKUIN
C6opka n pa36opka MHH- dTeCKo KpOBAtN.
- YTo6bI yctaHOBnTB KPOBaTky, yCTaHOBnTE BepxHIOHO paMy C o6NBKO H a pa6OuN CToJ IIN Ha KPOBaTb, KaK POKa3aHO Ha CXeMe 2.
- IomecTne KaKdyuHn 60KOBbIX HaKlaDOK BcERda C BbICwe Hymepaunei Ha BHeUHe CTopoHE n BCTaBnIe KOHeC KaxdoHoxKn B 60KOByO ONOpY n3 PAACTNkA, NOKa MTeAJIuueckn UTnΦT He BbIDeT Upe3 OTBepCTne (OH 6ydt UeJkTaB) n PAACTIKOBbIE 60KOBbIE HOXKn. BCTaBIAIOCTCR BOTBepCTnIa.
-BbldoJXhblyCblwaTbIeJN ppeOpaHnten.
- YCTAHOBNTe DIHHHYCMOJy, BCTaBnB KaxdIy KOHeC B IJIaCTIKOBbIe Inpoe3N Do Tex NOp, NOKa MTeJIINueckn UTNΦT CHOBa He BbICKOHT. Bbl DOJXHbI yCbIaTb UeJIcK 6eONacHOCTN. 3aTEM NOMEcTte KOHCTpyKUHO C KOJecAMn Ha NOI.

HakoHeu, paonnooxnte HxKHOpaMy TaK, yTo6bI 60KOBBe KOHcBbIpOBHnCb C OTBepCTnMn Ha noNpyTn no 6okam MNHN-KpOBAtKN, a 3aTeM BCTaBBTe KaKdbI KOHeU BHyTpB JeKIM NocTyKnBaHnEm, NOKa He YCbIiHTe npedoxpaHNTeNBHn UenK.

Y6eHITecb,HTo2
nlaCTNKOBBe onopBAnB
HaPpABHeBb BBepx.


Bo3bMnTe 60koByu TkAHb HnHakpoIte aHOMnHneByo 60koByu onopy, nepeBepHyB JeHTy, UTo6bHaHnTn DpyrO uAcTb Ha IINyUKe, n3HyTpN MHN-KpOBaTKn PnpXmTe BMeCTe, UTo6bCoedHHtB 2 IINyUKn. 3aKpeNITe BepxHIO LInyUky C NMOUbIoo IINyUKN, HaxOJaueCn PoD TKAHbO.


AeMOHTaX MHNH-KpoBaTKn:
-утбы разбравиMuHn-KpoBaTky,БИнOLHIneУka3aHHIe BbIe DeiCTBnB O6paTHOM nOpaJKe,пOKa Bbl He OCBO6OДITE 3 6LoKa c KaxdoI CTOpHbI,ОнHо pyKoH HaxIMaHa MeTaJIInueckn UTnΦT (1),a DpyroI pyKoHaxIMa Ha 2 ПlaCTNKOBIe HOxN (1,2),a 3aTeM CHImaeTe Hory (4).
Pocne c60pk 6a3oBOpaMbI yCTaHOBnTe o6NBky, npKpeINb IeHTb-llnyuKN (4), HaxOJaUncsra nOd o6uBko (4), K Tpy6e 6a3oBOpaMbI.
IIOLOXKITE MaTpac Ha DHO MUNH-KPOBATKN
HnKoIa He nCnoJIb3yIe MmH-KpOBAkTy 6e3 MaTpaca BABYSIDE.
3a6loKpyTe Bce YeTbIpe KOJIeCa MHH-KpOBaTKn IJI COBMeCTHO rO CHa, ONyCKa RbUarH, YTO6bI 3a6JIOKIpOBaTb INx TaK, YTO6bl KpaChA OMTKa 6blna NOLHOCTbO BNHa Ha KOJIeCax.
BAKHO:IJIINIOB3OBAHnB KaueCTBe MNHN-JIOBKn y6eNTecb,TO TeNEckOnuueckne HOXKN BCErDA pa3IOXHeHn HxOJaTcB H Hn6OJee BByDnHyTOM NOXKeHHN (1).
Tenepb MUNH-KpOBaTKa rTOBa K nCNoJIb3OBAHnHO.
YTo6bI pa3o6paTb DOnOJIHnTeJbHyIO MmHI-KpOaTky, BbINOJIHnTe Te Je DeIcTBnB O6paTHOM nopAke.
PaklaDbIbAHne ncklaDbIbAHne Hor (peXIM coBMeCTHoro cHa)
Bolbmm naIbceM cBnHbTe KpbIuKy Ha3aN, ydepknBaKHOKNy HaxaToN, pyroynpOToKNHTe Hory BHyTpB, YTO6bl npIKpeNTb ee K KPOBatN. Korda Bbl OTNyCTNe ero NnN OTdEnlTe OT KPOBatN, OH ABTomatueckn BepHeTc B INCXODHoe pa3NoXeHHoe NoLoXeHne, rde ABtomATueckn 3aΦNKcnpyETc Ha MecTe.

PnmeaHne. 60nee 6bCTpoy yctaHOBKn peKoMeHyTeTcpa3MeCTNtB MNHN-KpOBAkTy prdOM C KpOBAhDJI B3POCLOrO, a 3aTeM pnp6n3ntb ee, 3aTAYB peMHN.

PerylnpoBka BbICOTb MaTpaca (6 ypOBHei)
-TO6bI OTperpynnpoBaTb BlicOTy MaTpaca, OTnyCTnte fKCaTopbC KaXdoCTopoHbI.
- undepxnbTe KpyIyIO KHONky (1) HaxaToI, undepxnbTe KNONky (2) HaxaToI INB CEHTpe I ONDOBpeMeHHO NOBepHITpe peryIaTOp BbICOTb Ha 180 no yacoboi cTpeJIke npOTIB YACOBII CTpeIKN, YTO6bl NODHATb INI ONYCTNTb BBICOTy MaTPaca Do CLeDyUcero NONOKeHn 6JOKuPOBKn.
-KaXdA NOLOBHa OKpyxHocTn Unepe6NaTa COOTBeTCTBye T NOJIOKeHHIO NO BbICote.
*PnpmeaHne: MNH-KpOBAkTy MOxHO HaKIOHArb C MaKcIMaJIbHO pa3HnueB 2 NOJoxeHN MExdy odHOn CTOpOH N dpyro. Toloba pe6eHka Bcerda DOJIXHa HaxoITbcB CaMOI BbICOKO qACTN KpOBAtKn.
Chartne 06NBK
a) Chmnte MaTpac n pacTeHnTe InyuKn Ha HxHeu qacTu oBKn, npKpeIeHHO K 6a3OBo pame.
6) OTKpoIte 2 nepeHnne MoHnnc KKaJdoN CTOpOHbI OKHa, cDBrHbTe KHOJIKN Ha KaKdOM KOHcE nepeHHe nnAhnKn HApKy n ChmMnte nnAkHz.

B)OTcTeHnTE JINpyuKHa DByx 60KOBbIX pyKaBax,3aKpbBaHOuNX BepTnKaIbHbIe Tpy6Kn.
r) PacTeHHTe MoHnHO Ha BepxHei paMe MHN-KpObATK N NOJIHOCTbO CHMmTE 06NBky.
J)Korda Kpbuika Otdeneha O KOHCTpykun, naIbceM OTkoJe He6oJIWoOe OTBepCTne Ha KOHcMeTaJIInueckOn nlaHKn.
e) BbToIKNHtE NnAHHy 33aKpbITOrO KOHua N bBbTaUuTe ee uepe3 OTBepCTne, noka OHa nonHOctbH He CHIMETcA.
e) TnCtNk CBOHb NOHOCbIO BCTaBbTe eR O TBepTne N CHOBa 3akpenTe JInnyuKo.
BHIMAHNE: HIKOITDA HE INCIOJIb3yIte DETCKAR MHNH-DIOPOXKA BE3 METAJIINUeCKOII NOIOcBi, YCTAHOBJIEHHO B OKHE.
COBMECTHbIcOH
YTo6bMaBbIbBnB6JnxE BHOHoe Bpem, MHN-KpOBaTKy MOxHO npKpeNTb K KPOBaTN pOHTeNc c NOMOuBTO HOrAUXxCpEMHe.
BbIMoKeTeHaHpMyHO KOHTaKtIPOBaTb Cpe6eHKOM Uepe3 60KOBoE OKHO.
CXEMA CBOPKU
COBMECTbIIN COH-TA5JIuLA COBMECTMIOCTN:

PEKOMEHDAUINI INPDEUYIPEKDEHNA B PEXNME COBMECTHO CHA
-Matpac poDnteneBcerda donxhen 6bITb Bbiue BepxHero KpaotKpbItorO OKha.
(Matpacpe6eHkaBcERdaDolJxeh6bITbHNxKeMatpaca poNTTeJeI)
BHIMAHNE: INCNoJIb3yIte MHHN-KpOBArTkY COnyUeHHOpeaHHe NpeKJaINHO ToJIbKO B pexIme COBmecTHOrO CHa, HAdExHO npIKpeJIeHHyIO K KpOBArT DnB 3pocIoro.
-BHIMAHHE: He npikpeTne MHN-KpoBaTKy K n3HOxBJo KpoBaTu B peXmme COBMeCTHO rO CHa.
-BHIMAHHE! MHN-KpOBAkTy HeIb3nCIOJIb3OBaTb B pexime COBmecTHoro CHa C KpyJIbIMKpOBAtAMN / mMaTpacamN, HAdyBHbIMM MaTpacAMN, BOdHbIMN KpOBAtAMN.
IcnoB3oBaHne 3TOro peKIMa BO3MOXHO ToIbKO B Tom Cnyae, ecn IcNoB3yeMaK KPOBaTb DnB B3pOcIoro COOTBeCTByET CneuФkaUm C6OpKn, yKa3aHHbIM Hxke. 1) I) POnIOCTbO OTKpoIte 2 3acteKIN-MOIHN C BHyTpENHeI ppeJI
2)Pa36bokpyteKaKdbkoHeupeepnHoupeeknaHy,HTo6blocbo60ndtbe.
3) Ondno pykoCdbnHbTe KhoNky Hapxgy, a npyro pyko otdeInte KOHeu nHaKn BBepx, NOBtOpnte onepaunoc npTBONoJIOXHO CTopoHbI, yTo6bl MoKHO 6bl0 OTkpblb OKHO Hapxy.

10
4)ПоднecиTe MUNH-KpoBaTky 6JInxke K KpoBaTn poДnteIe N OTpErpyIpyIe BbICOTy TAK, YTO6bl MaTpac B3pocNoi KpoBaTn HaxOuINcR BbIe BepxHero KpaI OTKpbIToro OKHa.
HTo6bI npKpeNTb MHN-KpOaTKy DnI COBmecTHOro ChA K B3pocNoi KpOaTN, IcNoJIb3yIe DBa DoONIHTeNbHbIX peMHr, npNlaermbX K MHN-KpOaTke.
*PpmeaHne.BpeKMe COBmecTHoTc HcBaCerda DOnJXHa 6bItb BbIbpaHa OINHaKOBaB BaICota IJIra OBeHX Hor.
5)Пюдьтсвбоднь коheп peMH рOD кOHCTpyKUH B3рocIoN KpoBaTN (A)иOBepHnTe erO,чTObIЗakpeNTb cbo6dHbIKoHeC kpaCHO 3aTeJCKn C kpaCHO 3aTeJckO, paCNOJOKeHHoB 6JIxke BCero K MmHn-KpoBaTke BABYSiDE.
6)ПрдьтсвбогнькоheцpeMHнODKOHCTpyKUNBOBpOcHnKpoBaTN(A)ИOBepHnTeero,HTo6bI3aKpeNTb Cbo60dHbIKoHeczKpaCHOn 3aCTeKKN cKpaCHOn 3aCTeKKOn,pacnoJIOxehHO6JIxke BcERO K MmHN-KpoBaTKe BABYSIDE.
ДИВАН-KPOВАТN:
EcnBbDnKHbIe HOxK MHN-KpOaTKn KacaHTc Ta CTOpOB H KOHCTpyKm N KpOaTn, KOtopa JocTnaet nola (INBaH-KpOaTb ...), yCTpoiCTBO 6IoKnpoBKN HOxEK Heo6XoDMmo pa36IoKnpoBaTb, Haxab Ha Yka3aHHyTOuKy OdHM NaJIbCEm INcNoJIb3yJpyrIyO pyKy, YTO6bI BCTaBNTb HOxKy, YTO6bI OTpeYIpObaTb ee NO HOBo nnHe.
HaToKy pa36IOKpOBKN, 3aKpOte Hory n npXMMTE ee K Kpaio KpoBaTN, Noka MaTpac MmHn-KpoBaTKn He 6yET cOpNKACAe C MaTpaCOM nn B3POCNo.
HadexHo 3aTnHTe 2 KpeTExHbIX pemH.
7) Ecnn HoxkN DoonHInTeBHOI DeTCKO KPOBaTKn npoxoT NOD B3pocIo KPOBaTbHO, JeCTByTe, KaN paHBWe, IN Ondecnte MHN-KPOBaTKy 6bnke, noka MaTpac B dETCKO KPOBaTKe He KOCHcTa MaTpaca Ha B3pocIO KPOBaTN. HAdexHo 3aTRAHTe 2 KpeKexhix pemHra.
BHIMAHNE:
-86eHNTecb, YTO MNHN-KpOBaTKa Dnla CoBMeCTHO CHa HaJeXHo npKpePHeHa K KpOBAu DNRA B3POCbIX, Dnra 3TOrO OTOBUNbTE MHN-KpOBaTKy OT KpOBAu DNRA B3POCbIX.
-HTo6bI npEoTbpaTnB ydyu,coBMeCTHyIO MHN-KpOBAkCy BCEA HEO6xoDmIO npaBnJbHO npKpeNTb K KpOBAIT IIN B3Pocblx C NOMOuBIO pNlraeMoCNCTeMbI KpeJIneHn.
-HnkOrda He nCnObl3yIte cncTeMy KpePHeHna,OTnUHyO OToT,KOtopyOp npedoctabunaJane.
ПРИМЕЧАНО:
-HNKoHa He DoJHKHO 6bTb CBO6OHorO IpocTaHCTBa Mekdy BOKOB naHeIbHO OKHa mTpacOM IaB3pocIoro -EcnnecTb CBO6OHOe IpocTaHCTBO MeKdy MNHN-KpOBAtKO IIa COBMeCTHOrO CHa IN KpOBAtIO Ia B3pocIoro, HEICnOJIb3yIte 3Ty NIXKaMbI, IpocTbIHN, OeJra NII JIOBle Dpyrne npedMetbl
8) 3a6nokpyTe koleca c nOMoub ycTaHOBneHHbIX Ha HIX TOPMO3OB, kak onncaHO B pa3dene «C6opka n pa360pka MNHn-KPOBaTkn DnRA COBmecTHOrO CHA».
YCTAHOBKA KДИBAH-KPOBATN

IPEyIPEXDEHNA DIA COBMECTHOKOJIbIKN
PPEyIPEXDEHINIOCBMECHONKOLbIKN
ONACHO: KOTDA MNHN-DETCKA KPOBATb HE PNKPEPIEHA K B3POCLOMY KPOBATN, YBEENITECB, YTO OKHO BCEDAIPOJHO 3AKPbIto, PEPENHRA PEKEJIADINA HAPABINbHO PNKPEPIEHA K BEPXHM TOHKAM KPEPIEHNA, A MOHNI POJHOCTbIO 3AKPbITbl.
-BHIMAHIE! BO V36EXAHIE PNCKA 3AUEMJIENI WEN PEBEHKA 3A BHEUHIO CTOPOHY OKHA PRJOM C KPOBATBIO B3POCLOTO, BBICOTA OKOHNO IIAHKNI HIKOITDA HE DOJXHA BbITb BbICOTb MATPACA B3POCLOTO.
-BHIMAHNE !: BO I36EXAHNE PNCKA YUJSEHNA CNTEMA KPEJIENHRA DIOJINHEBHOI KPOBATK N B3POCLOI KPOBATN BCEDA DOJXHA BbITb HEOCTYINA, KAK BHUTN, TAK N CHAPYKN DETCKOHN KPOBATKN.
-HE IICNOJIb3yIte IN3DEJINIE HA HAKIOHHO NOBEPXHOCTN.
-CNCTEMA KPERIENHIN,NCIOJIb3yEMAR INJKPERIENHIMNIHN-KPOBATKN KPOBATINB3POCIOTO,DOJHXABITb TOI, KOTOPYIO NOCTABJIEET JANE,HE NCIOJIb3yNTEHNKAKYIO DpyyIO CNCTEMY KPERIENHIN.
-HE INCIOJIb3yIte MHHI-PACKJIaDyUkV B HAKIOHHom IIOLOXEHIN IPIN INCIOJIb3OBAHIN ERO B PEXKIMECOBMECTHO CHA.
-HE INCIOLB3YNE MHN-DETCKYO KPOBATKY, ECJIN KAKAR-JINBO N3CACTEINOMAHA, IN3HOUHEA INJN OTCYCTBYET.
-CBAXNTECb CJANE SA DnI PNOJYEHn 3ANACHbIX YACTEN N DONoHHTeJIbHbIX INHCTPYKUIN PNI HEOXBODMOCTN.
-HE 3AMEHJNTE DETAJI N CAMOCTORTJIbHO.
NcNoJIb3OBAHHe BCTABKn IJI NIOyUJKN
PpOKOHcyIbTyIpyntyTeCb CneIaItpOM O TOM, KOrDaHaunHaTb NcNoJIb3ObaTb NOpUkyBCTaBky
KOMHATHA TEMINEPATYABHIMAHVE
-Поверпг TeMнраТуВКOMHATE,ГдИССЛБ3yETcR OДЕДИ,ЧTOБы ПпсОТВраTиТБИМпЕТeРМИ.
-ⅠealbHaH TaMnepaTpy dIy Detcko KOMHaTb1 18-22:C.
-MHIMAbHbI peKOMeHdyembl Bo3pact IIN CNOJb3OBAHnnyXOBbIX OeJI COCTABJIET 9 MeCJIeB, pN INcIOJIb3OBAHNIpyXOBbIX OeJI C DeTbMn DO 4 Mecraue CBUeCTByET PNCYdUyB.
-Korda cTaHET KAPKO, BO3bMITE NyXBOE OeJeIO INpOcTo IcNoIb3yIte erKaK OeJeIO.
TEXHUNCHECKOE OBCJYKUBAHNEI YNCTKA
DepxTe MeTaannueckne DeTaan NcXmN, YTo6bl OH He pXaBeJI.
IyOuHCTKn PnAaCTNKOBbIX DeTaJIe NcPONb3yITe MArKoe MOHOUe CpeCDTBO N TeNpLyHO BOny.
INHOPMALIURO TAPAHTN:
-3TO n3dJIe IMeET rapaHTnHO Ha OTCyTCTBnE IpON3BOCTBeHHbIX DeΦeKToB, YTO ppeIcMOTpeHO B DeIeCTByIOxH DInpeKTUBaX / NII npABoBbIX HopMax O rapaHTnAX Ha IOTpe6nteBckne TOBaPbI, IpIMeHMbIX EBPoneckOM COHO3e IN DeIeCTByOuix B CtpaHE C6bItA.
-BaxHo npedocabntb cuet-phiKtypU nn TOBapHbI uek, UTO6bl OOpMnTb rapaHTNIO uepe3 npoabua ToBapa nIN, B npOTNBOM Cnyae, Uepe3 npOn3BOuNTeJIa.
- IapaHTn He pacnpoctpaHReTcHa aHOMaIN NIN NOIOMK, Bb3BaHHbIe HEnpaBnIbHbIM INCNOJIb3OBAHHeM, HecobIOpeHNEM npaBnI TexHnK 6e3oNaChOCTN IN HCTpyKuN NO EKCIyAtaUIN TEXHueCKomy OBCJyXNBaHIO, a TaXKe B CInyae IN3HOca n3-3a HopMaJIbHOrOpepnoDnueCKOrO INCNOJIb3OBaHn IN3DeJIIN.
-HakneKy C cepHbIM HOMepoB MaIeM MoIeI HeIb3O TpbBaTb HN pN KaKx OcToTeNbCTBax, TaK KaK Ha He CoepXkTcBaxHaHnOpMaIaIg IraPapHTNI.
J 100

iioaiee
.
:
Uglulooelloouguauoioy
oogogglgglgogglgogglgogglgogglgogglgogglgogglgogglgogglgogglgogglgogglgogglgogglgogglgogglg
.02c1u
guii i jiuuui uaiyue yuyue yuyue yuyue yuyue yuyue
Jl 1111111111111111111111111111111111
JUJIgJU
Lae Ie 100000000000000000000000000000000000000000000
aaiyaiyaiyaiyaiyaiyaiyaiyaiyaiyaiyaiyaiyaiyaiyaiyaiyaiyaiyaiyaiyaiyaiyaiyaiyaiyaiyaiyaiyaiyaiyaiyaiyaiyaiyaiyaiyaiyaiyaiyaiyaiyaiyaiyaiyaiyaiyaiyaiyaiyai
raa ccllglalu ractc lngjulllrgrllg jnll jnnn nnnn nn nnnn nnnn nnnn
Jaiil oog. llois egjoo uoi 05u jnll jall jw gaoqgall jall aoj roi Loic -
rui jui aiao cuiyolg.Lolai aiao ciuul uig
JilLggeo gI LJIgI Jgssoo oJoo joo Joo Joo Joo Joo Joo Joo Joo Joo Joo Joo Joo Joo Joo Joo Joo Joo Joo Joo Joo Joo
J 1
Joojoo
Jzssll Jsall uqul cshell roaui
jIJI JbJI JyJyO OaIg OJyOooJyJyOraOoJyJy
g 10000000000000000000000000000000000000000000000
.1jJlJIgUJooJyJUULJIO
jllllogg (A1) lallll lclle B1
wloell uocuall aogao A
0eLJIuBIB
C
aD
E
A1
A2
JohllosolA3
Eijlun JoojjA4
L
jillllgill gog yuall jubll uuclog
aagao gao la yuue jie aaiio uie (ogwll) yuoygalejulluyu
.2
(1) 20000000000000000000000000000000000000000000000
e 1000000000000000000000000000000000000000000000000000000
JbI JbI JbI JbI JbI JbI JbI JbI JbI JbI JbI JbI
glll lallll lglc hng jll c hnnll gollll llllll llll llll
a aagaae aae aee aee aee aee
2
UoJUUJIgUgGooUJ

JbIyauuauuuaa uauuauauuuuauuauuauuuuuuuuuuuuuuuuuuuuuuuuuuuuuuuuuuuuuuuuuuuuuuuuuuuuuuuuuuuuuuuuuuuuuuuuuuuuuuuuuuuuuuuuuuuuuuuuuuuuuuuuuuuuuuuuuuuuuuuuuuuuuuuuuuuuuuuuuuuuuuuuuuuuuuuuuuuuuuuuuuuuuuuuuuuuuuuuuuuuuuuUU

jllgill
SsJLlI slJcIO JALI slJ
JdJIgll JALI JyW JUoJ
JbJI abJrJpJzwiJ
Jo JbJI gO Jsw Jolglj LKoJ
.aaJI OJdJI JLS
wll
golll odo - jiloll qill
aagaaalololgaaal
eaiy1nla>
aill+1wlll25c0
-52.5 wlll 2all)
(aw65waa
Jgll g y aal l 1yagll
.0000000000000000000000000000000000000000000000000000000000
pSb alwogig jas Jjull ggi gag g wolll cawall jaag o jall Jeall jww poaii:
1.5.11
J 1000000000000000000000000000000000000000000000000000000000000
00 1000000000000000000000000000000000000000000000


- GB "BABYSIDE" MINI COT-COBED
- IMPORTANT. KEEP FOR FUTURE REFERENCE. READ CAREFULLY
- WARNING
- PARTS
- INSTRUCTIONS
- DESMANTLING THE MINICOT:
- UNFOLDING AND FOLDING THE LEG (CO-SLEEPING MODE)
- Adjusting the height of the mattress (6 heights)
- Removing the upholstery
- CO-SLEEPING MODE
- CO-SLEEPING-COMPATIBILITY TABLE
- CO-SLEEPING MODE RECOMMENDATIONS AND WARNINGS
- DIVAN BEDS:
- WARNING:
- NOTE:
- CO-SLEEPING COT WARNINGS
- ROOM TEMPERATURE
- MAINTENANCE AND CLEANING
- GUARANTEE INFORMATION
- FR MINI-BERCEAU CO-DODO "BABYSIDE"
- IMPORTANT. CONSERVER POUR DE FUTURES CONSULTATIONS. LIRE ATTENTIVEMENT
- AVERTISSEMENTS
- MODALITA CO-SLEEPING
- MINI BERCO CO-SLEEPING "BABYSIDE"
- IMPORTANTE. CONSERVAR PARA FUTURAS CONSULTAS. LEIA ATENTAMENTE
- AVISOS
- ADVERTÉNCIAS CO-SLEEPING
- PA3fbaHE IN CfbaHE HA KPAUYTO (KPEBATUE PNUCTABKA)
- Perynnpahe Ha BncounHaTa Ha DIOweeTo (6 ctenen)
- CbaJrHe Ha KaJIbKaKaTa
- IIOIOXEHWE KPEBATUE PICTABKA
- KPEBATU INPUCTABKA - TABNJILCA 3A CbBMECTMIOCT
- PENOPbKN IN PEPdynPEKDEHn3A IIOJ3BAHE KATO KPEBATy INPCTABKA
- ДИВАH-ЛЕТДА:
- BHIMAHVE:
- BHIMAHIVE:
- TEMIIEPATyPA BCTA
- BHIMAHHE:
- IODAPbXKAIIOYNCBAHE
- TAPAHIOHHA INHOPMALIN
- VAŽNO: SACUVAJTE ZA BUDUCU UPORABU. PAŽLJIVO PROCITAJTE
- UPOZORENJA
- -ODRZAVANJE I CISCENJE
- SASTAVNI DIJELOVI
- SLAPEN COT WAARSCHUWINGEN
- ETAHIN
- NHCTPYKUIN
- AeMOHTaX MHNH-KpoBaTKn:
- PaklaDbIbAHne ncklaDbIbAHne Hor (peXIM coBMeCTHoro cHa)
- PerylnpoBka BbICOTb MaTpaca (6 ypOBHei)
- Chartne 06NBK
- COBMECTHbIcOH
- COBMECTbIIN COH-TA5JIuLA COBMECTMIOCTN:
- PEKOMEHDAUINI INPDEUYIPEKDEHNA B PEXNME COBMECTHO CHA
- ДИВАН-KPOВАТN:
- BHIMAHNE:
- ПРИМЕЧАНО:
- YCTAHOBKA KДИBAH-KPOBATN
- IPEyIPEXDEHNA DIA COBMECTHOKOJIbIKN
- NcNoJIb3OBAHHe BCTABKn IJI NIOyUJKN
- KOMHATHA TEMINEPATYABHIMAHVE
- TEXHUNCHECKOE OBCJYKUBAHNEI YNCTKA
- INHOPMALIURO TAPAHTN:
- iioaiee
- .
- L
- 20000000000000000000000000000000000000000000000
- jllgill
- golll odo - jiloll qill
Brand : JANE
Model : Babyside
Category : Baby bed