
Micro Pro - Baby bed JANE - Free user manual and instructions
Find the device manual for free Micro Pro JANE in PDF.
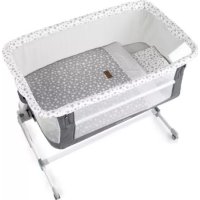
| Product type | Folding baby bassinet (baby bed) |
| Brand | JANE |
| Model | Micro Pro |
| Recommended age | From birth until child can sit up unaided (max 9 kg) |
| Maximum supported weight | 9 kg |
| Bassinet weight | Approximately 4-5 kg |
| Dimensions (unfolded) | Approximately 80 x 40 x 20 cm |
| Dimensions (folded) | Not specified |
| Materials | Plastic, textile, mosquito net |
| Carry handle | Central pivoting handle with lock |
| Canopy | Removable with mosquito net, foldable |
| Stroller attachment | ProFix adapter for JANE chassis (compatible with KENDO, KAWAI, CROSSLIGHT, NEWEL, MUUM Pro, MUUM, CROSSWALK) |
| Footmuff | Removable, with zipper |
| Folding system | Folding straps with attachment points |
| Usage | Firm, horizontal, flat, dry surface |
| Do not use | On a support, with missing parts, near a heat source |
| Do not add | Additional mattress |
| Care | Clean plastic parts with warm soapy water; hand wash fabric at 30°C max; air dry in shade |
| Warranty | Against manufacturing defects per EU directives; requires invoice; does not cover normal wear or misuse |
| Periodic inspection | Recommended at an official JANE workshop |
| Serial number | On label, do not remove |
Frequently Asked Questions - Micro Pro JANE
User questions about Micro Pro JANE
0 question about this device. Answer the ones you know or ask your own.
Ask a new question about this device
Download the instructions for your Baby bed in PDF format for free! Find your manual Micro Pro - JANE and take your electronic device back in hand. On this page are published all the documents necessary for the use of your device. Micro Pro by JANE.
USER MANUAL Micro Pro JANE
natural_image
3D rendered illustration of a baby car with a black seat and white trim, no text or symbols present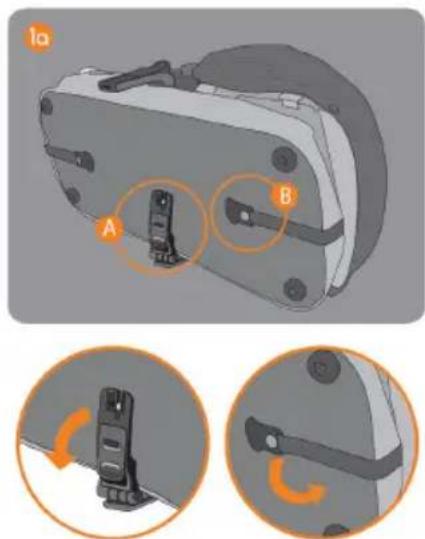
natural_image
Mechanical component diagram showing a clamping mechanism with labeled parts A and B, and two circular insets illustrating the motion of the clamping mechanism (no text or symbols present)MICRO-PRO

natural_image
Illustration of a hand using a tool to lift a car trunk, showing orange arrows indicating motion (no text or symbols)

natural_image
Illustration of a person adjusting a seatbelt device, showing hands and orange arrows indicating motion (no text or symbols)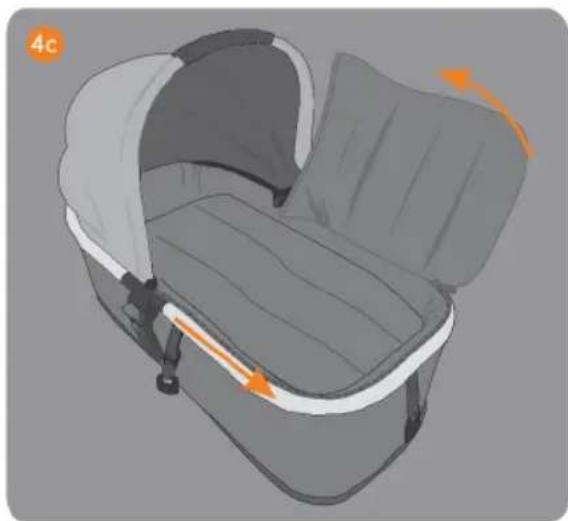
natural_image
3D illustration of a baby stroller with orange arrows indicating motion or movement (no text or symbols)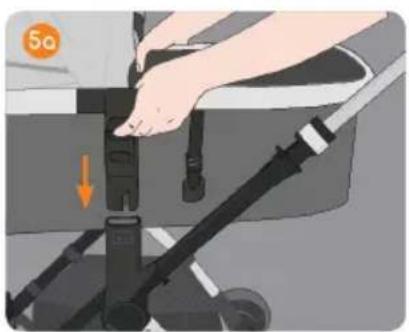
natural_image
Illustration of a person adjusting a seatbelt device with a hand adjusting the seat (no text or symbols visible)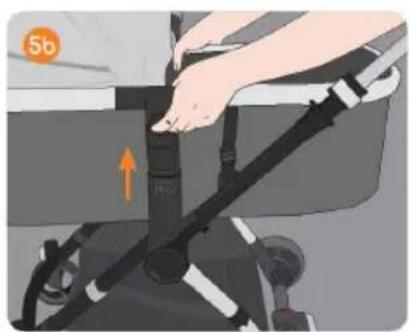
natural_image
Illustration of a person adjusting a black seatbelt device with an orange arrow indicating motion (no text or symbols)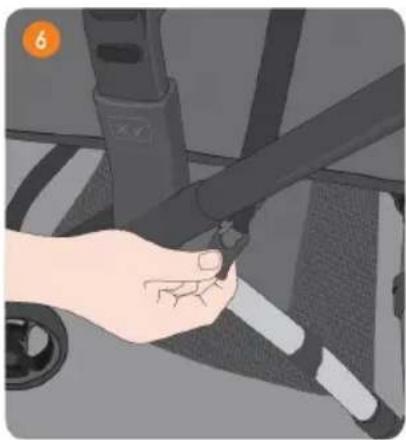
natural_image
Hand holding a bicycle seatbelt with a cable, no visible text or symbols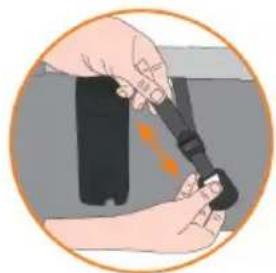
natural_image
Illustration of hands adjusting a black belt buckle, no text or symbols present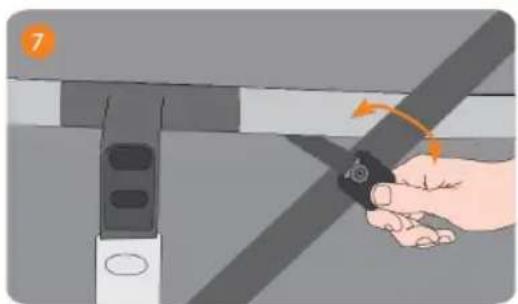
natural_image
Illustration of a hand holding a car tire with an orange arrow indicating motion (no text or symbols)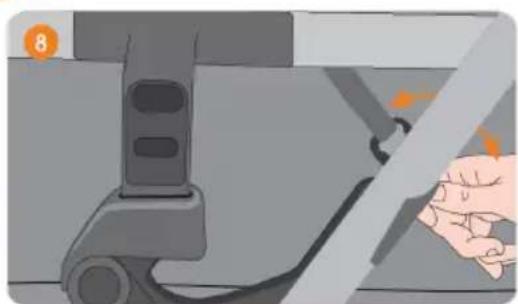
natural_image
Illustration of a car seatbelt mechanism with a hand pressing down on the side panel (no text or symbols visible)
INSTRUCCIONES
ÍNDICE
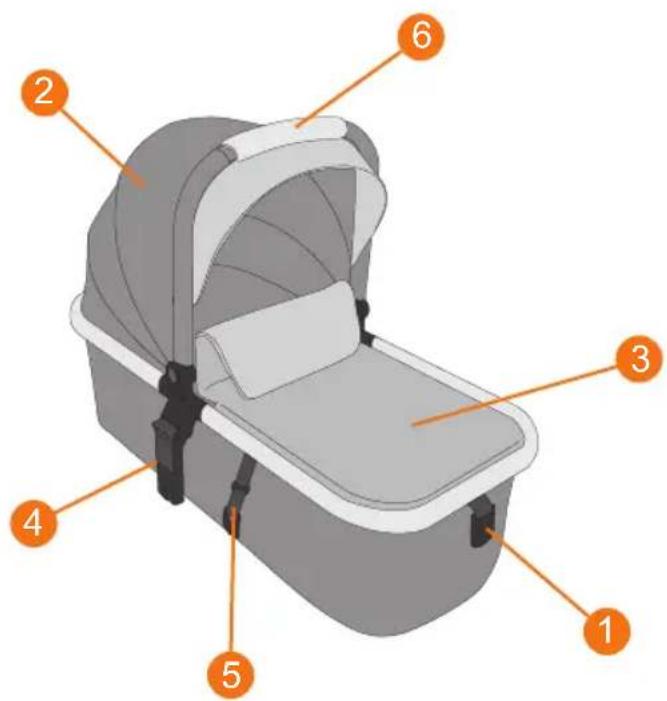
A. LISTA DE PIEZAS
1- CINTAS DE PLEGADO
2- CAPOTA
3- CUBREPIES
4- SISTEMA PROFIX
5- CINTA ANTI BALANCEO
6- ASA TRANSPORTE

A. PART LIST
1- FOLDING STRAPS
2- HOOD
3- FOOT COVER
4- PROFIX SYSTEM
5- ANTI-ROCKING STRAP
6- CARRY HANDLE

B. SAFETY WARNINGS AND INFORMATION
IMPORTANT: Read carefully and keep them for future reference.
WARNINGS:
- This product is only suitable for children who cannot yet sit up unaided.
- Do not leave the child unattended.
- Do not let other children play unattended near the carrycot.
- Do not use if any parts are missing, broken or torn.
- Never use this carrycot on a stand.
- Do not add an extra mattress.
- Only use on a firm, horizontal, level, dry surface.
ADDITIONAL INFORMATION:
- Only use original parts or parts that have been approved by JANÉ.
- Do not place the carrycot near open flames or other sources of heat.
- Inspect the handle and the base of the carrycot regularly to check for signs of damage or wear and tear.
- Make sure that the handle is in the correct position before lifting or carrying the carrycot.
- This carrycot is designed for children from birth up to 9 kg in weight.
- Check that the child's head in the carrycot is never lower than the body.
- This product is only suitable for children that cannot yet sit up unaided, turn over and who cannot push themselves up on their hands and knees.
- Do not add an extra mattress.
C. UNFOLDING
Place the MICRO-PRO folding carrycot on a flat surface 1 - 1a. Turn the ProFix connector outwards. A Unfasten the folding straps so that the side walls unfold completely. B
Make sure that the walls are fully unfolded!
D. FOLDING
Fold the hood. Close the foot cover. 2 - 2a Pull the folding straps and fasten them at the points found on the base of the carrycot. A Fold the ProFix adaptor inwards. B

WARNING: This step must never be done with the baby inside the carrycot. It is inevitable that sharp points and areas where body parts could get trapped emerge during these operations.
E. USING THE HANDLE AND THE HOOD
This carrycot is fitted with a central handle for carrying. The handle is also used as a support for the hood. The handle can be rotated to fold the hood. To rotate it, press the two buttons on the sides. When you release the buttons, the hood will be locked into the nearest position. 30.

If you are using it as a carry handle, make sure that the handle is in the upright position and is properly locked in place.
The hood can be folded, unfolded and removed.
To fit the hood place both flaps around the handle and close the zips. The skirt is attached to the carrycot by another zip. For greater ventilation and to be able to see the child, the hood has an extra section made of mosquito netting: you can access this section by undoing the zip between the first and second sections of the hood.
To remove the hood, follow the same steps in reverse.

WARNING: Do not place any weight on top of the hood.
F. FOOTMUFF
To settle your baby, undo the zip of the footmuff to the required level. 4c
To fully remove the footmuff, undo the zip completely.
G. ATTACHING THE CARRYCOT TO A JANÉ PUSHCHAIR
To attach the carrycot to a Jané chassis, position the carrycot so that the child's head is facing away from the handlebar.
Insert the Profix connectors into the slots found in the armrests of
the chassis, provided for this purpose; you should hear the safe connection click. 5a
CAUTION! Before use, make sure that all the safety locks are fastened.
To release the carrycot from the chassis, pull the locking buttons found on the connectors upwards and lift the carrycot off the pushchair by pulling it upwards.5b
To improve any possible rocking, when fitting it onto your pushchair, you can use the fastening system following the instructions. Adjust the strap to tighten it.
-KENDO, KAWAI, CROSSLIGHT, NEWEL, MUUM Pro 6 -MUUM 7 -CROSSWALK 8

NOTE: Unlock the system before removing the carrycot.
H. MAINTENANCE
Clean the plastic parts with soap and warm water, then dry all the parts thoroughly.
Hand wash and at a temperature not exceeding 30°C.
Air dry, in a shady place.
Prolonged exposure of the upholstery to sunlight may cause the fabric to fade.
MICRO-PRO has a guarantee with all the precise specifications for its correct maintenance, it is important to keep these in good condition.
For your safety as well as the correct maintenance of this product, it is important to have the product checked from time to time at any of our official workshops.
I. INFORMATION ABOUT THE GUARANTEE
- This item is guaranteed against manufacturing defects as stipulated in the legal Directives and/or regulations in force on guarantees for consumer goods applicable to the European Union and those of the country in which it is marketed.
- It is essential to present the purchase invoice or receipt in order to process the guarantee through the seller of the item or, failing that, through the manufacturer.
- The guarantee excludes anomalies or faults caused by misuse, non-compliance with the safety regulations and instructions for use and maintenance provided, or due to wear and tear caused by normal use and regular handling of the item.
- The label containing the serial number of your model must not be torn off under any circumstances as it contains information relevant to the guarantee.


NOTICE
INDEX
A. LISTE DES PIÈCES 24
B. INFORMATIONS ET AVERTISSEMENTS DE SÉCURITÉ 25
C. DÉPLIAGE 26
D. PLIAGE 26
E. UTILISATION DE LA POIGNÉE ET DE LA CAPOTE 26
F. COUVRE-PIEDS 26
G. FIXATION SUR UNE POUSSETTE JANÉ 26
H. ENTRETIEN 27
I. INFORMATIONS RELATIVES À LA GARANTIE 27
A. LISTE DES PIÈCES
1- SANGLES DE PLIAGE
2- CAPOTE
3- COUVRE-PIEDS
4- SYSTÈME PROFIX
5- SANGLE ANTI-BALANCEMENT
6- POIGNÉE DE TRANSPORT

B. INFORMATIONS ET AVERTISSEMENTS DE SÉCURITÉ
A. TEILELISTE
1- FALTGURTE
2- HAUBE
3- FUSSSACK
4- PROFIX-SYSTEM
5- ANTIWIPPGURT
6- TRAGEGRIFF

A. LISTA DEI COMPONENTI
1- CINGHIE DI CHIUSURA
2- CAPOTTINA
3- POGGIAPIEDI
4- SISTEMA PROFIX
5- CINGHIA ANTI DONDOLIO
6- MANIGLIA DI TRASPORTO

A. LISTA DE PEÇAS
1- FITAS DE DOBRAGEM
2- CAPOTA
3- COBRE-PÉS
4- SISTEMA PROFIX
5- FITA ANTI-BALANCEAMENTO
6- ASA DE TRANSPORTE

E. USO DA ASA E CAPOTA
A. LISTA CZEŚCI
1- PASY ŚCIĄGAJĄCE
2- DASZEK
3- POKROWIEC NA NOGI
4- SYSTEM PROFIX
5- PAS MOCUJACY
6- RĄCZKA DO TRANSPORTU

B. INFORMACJE DOTYCZĄCE BEZPIECZEŃSTWA I OSTRZEŻENIA
I. INFORMACJA GWARANCYJNA
A. SEZNAM DÍLŮ
1- UPEVŇOVACÍ PÁSKY
2- STRÍŠKA
3- NÁNOŽNÍK
4- SYSTÉM PROFIX
5- POJISTNÁ PÁSKA PPROTI HOUPÁNÍ
6- RUKOJEŤ PRO PŘENÁŠENÍ

B. INFORMACE A BEZPEČNOSTNÍ UPOZORNĚNÍ

- INSTRUCCIONES
- ÍNDICE
- LISTA DE PIEZAS
- PART LIST
- SAFETY WARNINGS AND INFORMATION
- WARNINGS:
- ADDITIONAL INFORMATION:
- UNFOLDING
- FOLDING
- USING THE HANDLE AND THE HOOD
- FOOTMUFF
- ATTACHING THE CARRYCOT TO A JANÉ PUSHCHAIR
- MAINTENANCE
- INFORMATION ABOUT THE GUARANTEE
- NOTICE
- INDEX
- LISTE DES PIÈCES
- INFORMATIONS ET AVERTISSEMENTS DE SÉCURITÉ
- TEILELISTE
- LISTA DEI COMPONENTI
- LISTA DE PEÇAS
- USO DA ASA E CAPOTA
- LISTA CZEŚCI
- INFORMACJE DOTYCZĄCE BEZPIECZEŃSTWA I OSTRZEŻENIA
- INFORMACJA GWARANCYJNA
- SEZNAM DÍLŮ
- INFORMACE A BEZPEČNOSTNÍ UPOZORNĚNÍ
Brand : JANE
Model : Micro Pro
Category : Baby bed