
RMCM30E - Multi-cooker Redmond - Free user manual and instructions
Find the device manual for free RMCM30E Redmond in PDF.
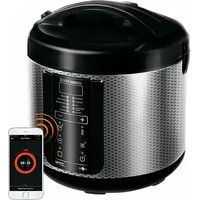
| Product type | Multi-cooker |
| Brand | Redmond |
| Model | RMCM30E |
| Power supply | 220-240 V ~ 50 Hz, 900 W |
| Container capacity | 6 liters |
| Interior coating | Non-stick |
| Display | Digital LED |
| Automatic programs | 10 programs: Rice/Cereals, Paella, Fry, Dessert, Yogurt/Dough, Bake/Bread, Braise, Dry Beans, Soup, Steam |
| Functions | Keep warm (24h max), Reheat, Delayed start (24h max) |
| Included accessories | Inner pot, Steamer container, Spatula, Spoon, Measuring cup, 100-recipe book, Maintenance booklet, Power cord |
| Safety | Overheat protection, mandatory grounding, automatic shutdown in case of error |
| Maintenance and cleaning | Clean after each use; removable inner pot and steam valve are dishwasher safe; wipe body with a damp cloth |
| Warranty | 2 years |
| Spare parts and repairability | Optional accessories available (tongs, yogurt jars, ham press, additional containers); repair by authorized center |
| General information | Weight and dimensions not specified; service life 5 years; made in China |
Frequently Asked Questions - RMCM30E Redmond
User questions about RMCM30E Redmond
0 question about this device. Answer the ones you know or ask your own.
Ask a new question about this device
Download the instructions for your Multi-cooker in PDF format for free! Find your manual RMCM30E - Redmond and take your electronic device back in hand. On this page are published all the documents necessary for the use of your device. RMCM30E by Redmond.
USER MANUAL RMCM30E Redmond
natural_image
Three rice cookers displayed side by side, one with digital display and control buttons, the other with a white lid (no visible text or symbols)User manual
A1
REDMOND
Carefully read all instructions before operating and save them for future reference. By carefully following these instructions you can considerably prolong the service life of your appliance.
IMPORTANT SAFEGUARDS
The manufacturer is not responsible for any failures arising from the use of this product in a manner inconsistent with the technical or safety standards.
- This appliance is intended to be used in household and similar applications such as: staff kitchen areas in shops, offices and other working environments; farm houses; by clients in hotels, motels and other residential type environments; bed and breakfast type environments.
- Before installing the appliance, check that the device voltage corresponds with the supply voltage in your home (refer to rating plate or technical data).
- While using the extension cord, make sure that its voltage is the same as specified on the device. Using different voltage may result in a
fire or other accident, causing appliance damage or short circuit.
- The appliance must be grounded. Connect only to a properly installed wall socket. Failure to do so may result in the risk of electrical shock. Use only grounded extension cords.
CAUTION! During use the appliance becomes hot! Care should be taken to avoid touching the housing, bowl, or any other metal parts while operating. Make sure your hands are protected before handling the device. To avoid possible burns, do not lean above the open appliance. - Always unplug the device after use, before cleaning or moving. Never handle plug with wet hands. Do not pull power cord to disconnect from outlet; instead, grasp plug and pull to disconnect.
- Keep the power cord away from hot surfaces (gas or electric ovens) or sharp edges. Do not let cord hang over edge of table or counter.
Remember: damaging the cord may lead to a failure that will not be covered by the war-
ranty. If the cable is damaged or requires replacing, contact an authorized service center only to avoid all risks.
- Never place the device on soft surfaces to keep ventilation slots clear of any obstruction.
- Do not operate the appliance outdoors, to prevent water or any foreign object or insect from getting into the device. Doing so may result in serious damage of the appliance.
- Always unplug the device and let it cool down before cleaning. Follow cleaning and general maintenance guidelines (p. 7) when cleaning the unit.

DO NOT immerse the device in water or wash it under running water!
- This appliance can be used by children aged from 8 years and above and persons with reduced physical, sensory or mental capabilities or lack of experience and knowledge if they have been given supervision or instruction concerning use of the appliance in a safe way and understand the hazards involved. Children
shall not play with the appliance. Keep the appliance and its cord out of reach of children aged less than 8 years. Cleaning and user maintenance shall not be made by children without supervision.
- Any kinds of modifications or adjustments to the product are not allowed. All the repairs should be carried out by an authorized service center. Failure to do so may result in device and property damage or injury.
REDMOND
TABLE OF CONTENTS
| I. PRIOR TO FIRST USE | 6 |
| II. OPERATION | 6 |
| III. ADDITIONAL FEATURES | 7 |
| IV. OPTIONAL ACCESSORIES | 7 |
| V. COOKING TIPS | 7 |
| VI. CLEANING AND GENERAL MAINTENANCE GUIDELINES | 9 |
| VII. BEFORE ADDRESSING A SERVICE CENTER | 9 |
| VIII. PRODUCT WARRANTY | 9 |
Technical Specifications
| Model: RMC M10 RMC M20 RMC M30 | ||
| Power 500 W 800 W 900 W | ||
| Voltage 330-240 V, 50 Hz | ||
| Bowl capacity ≥ L ≥ L ≤ L | ||
| Bowl coating Non-stick | ||
| Display LED, digital | ||
| System valve Removable | ||
Programs
| 1. RICE/GRAIN | 6. BAKE/BREAD |
| 2. PILAF | 7. STEW |
| 3. FRY | 8. BEANS |
| 4. OATMEAL/DESSERT | 9. SOUP |
| 5. YOGURT/DOUGH | 10. STEAM/BOIL |
Functions
| Keep Warm function | yes, up to 24 hours |
| Preset function | yes, up to 24 hours |
| Reheat function | yes, up to 24 hours |
Packaging Arrangement
| Multicooker with a removable bowl | 1 |
| Steaming container | 1 |
| Stirring paddle | 1 |
| Serving spoon | 1 |
| Cooking spoon | 2 |
| Measuring cup | 1 |
| User manual | 1 |
| "100 Recipes" | 1 |
| Service booklet | 1 |
| Power cord | 1 |
In accordance with the policy of continuous improvement, the manufacturer reserves the right to make any modifications to design, packaging arrangement, or technical specifications of the product without prior notice.
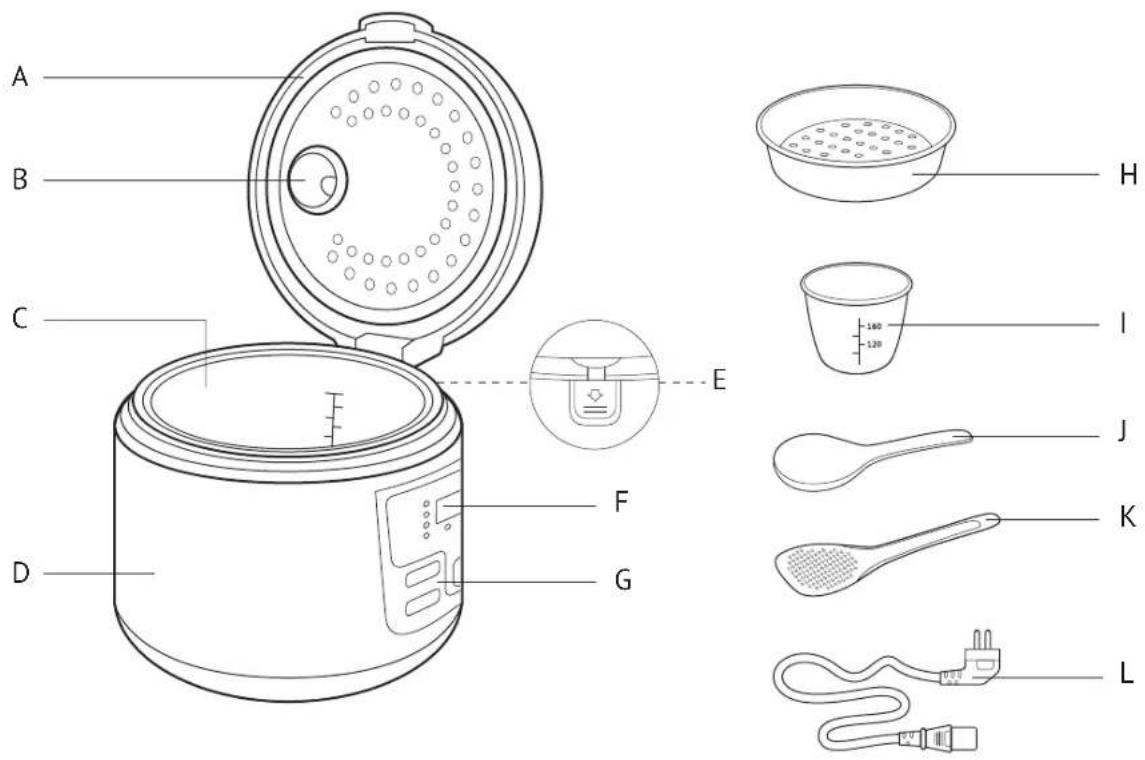
Device Assembly A1
A. Lid with a carrying handle
B. Removable steam valve
C. Bowl
D. The housing
E. Condensation collector
F. LED display
G. Control pane
H. Steaming container
- Measuring cup
1 Serving spoon
K. Stirring paddle
L Power cord
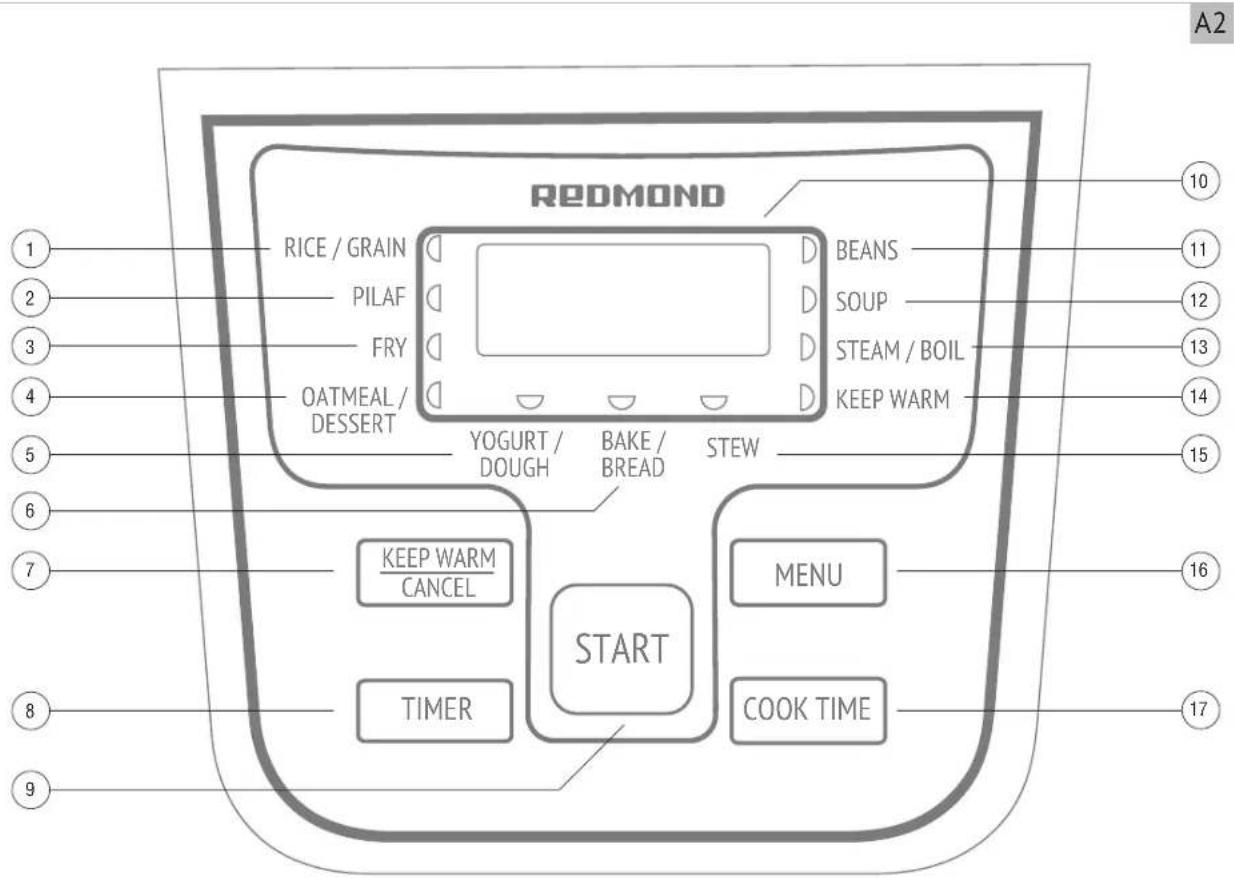
Control Panel A2
-
"RICE/GRAIN" program indicator
-
"PILAF" program indicator
-
"FRY" program indicator
-
"OATMEAL/DESSERT" program indicator
-
"YOGURT/DOUGH" program indicator
-
"BAKE/BREAD" program Indicate
-
"KEEP WARM / CANCEL" button interrupts cooking program, cancels
all settings, and disables/reactivates the Reheat function
-
"TIMER" button is used to enter the time setting mode in Preset function
-
"START" button starts the cooking program
-
Digital display
-
Digital display
-
"REANS" program indicator
-
BEANS program indicator 12. "SOUR" program indicator
-
"SOOP" program indicator
-
"STEAM(ROLL)" program indicator
-
STEAM/BOIL program indicator 14. "KEEP/WARM" function indicator
-
KEEP WARM function indicator
-
STEW program indicator
-
MENU button is used to select an automatic cooking program
-
"COOK TIME" button sets the cooking time
I. PRIOR TO FIRST USE
Carefully unpack the device, remove all packaging materials and stickers except the one with the unit's serial number.
The absence of the serial number will deprive you of your warranty benefits. Wipe all interior and exterior surfaces of the unit with a soft, damp cloth. Wash the bowl in warm soapy water. Rinse and dry thoroughly. Odor on first use of the appliance is normal. In such case, clean the device (p. 9).
CAUTION! Do not use the appliance in case of any malfunctions.
II. OPERATION
Before Use
Place the device on a flat, stable, and hard surface away from any objects or cabinets that could be damaged by steam, humidity, or high temperatures.
Before operating, make sure that the outer and inner parts of the multi-cooker have no dents, cracks or any other visible damages. There should not be any obstructions between the heating element and the bowl.
Setting the Cooking Time
Multicookers REDMOND RMC-M10/RMC-M20/RMC-M30 allow manually adjusting the cooking time, set by default for each program. Setting interval and range of cooking time settings depend on the program of cooking chosen. To adjust the time:
-
Press "MENU" button repeatedly to select the program. Default time for each program is displayed.
-
Use "COOK TIME" button to adjust the cooking time within the range of the program chosen. Press and release to advance one digit at a time or hold the button down to scroll through the digits until the desired time is selected. Once you reach the maximum setting the count starts from the beginning.
IMPORTANT Manuetly changing the cooking time, consider setting time range and setting Interval of a chosen program, given in the table of default settings (p. 9).
Preset Function
Preset function allows you to delay a program for a period of time up to 24 hours.
-
Press "MENU" button repeatedly to select the program.
-
Press "TIMER" button. Time indicator starts blinking.
-
Use "COOK TIME" button to set the hours. Press and release to advance one digit at a time or hold the button down to scroll through the digits. Once you reach the maximum setting the count starts from the beginning.
-
Use "MENU" button to set the minutes. Press and release to advance one digit at a time or hold the button down to scroll through the digits. Once you reach the maximum setting, the count starts from the beginning.
-
When the time is set, press "TIMER" button.
-
Use "KEEP WARM / CANCEL" button to cancel the settings or reset.
IMPORTANT! It is not recommended to use Preset function if dairy or perishable products are being used (eggs, fresh milk, meat, cheese, etc.). Preset function is not available in "FRY" program.
This is a non-volatile memory unit. In case of a short term power cut-off all settings will be saved.
Keep Warm Function
Keep Warm function is being activated automatically at the end of the cooking program. It allows maintaining the temperature of 70–75°C for a period of time up to 24 hours. Keep Warm countdown is displayed. Press "KEEP WARM / CANCEL" button to disable the function. "KEEP WARM" indicator goes off. Keep Warm function is not available in "JOGURT/DOUGH" program.
Reheat Function
o reheat a cold meal;
- Fill the bowl with ingredients and place it inside the device. Make
sure that the bowl and the heating element fit tightly.
-
Close the lid until it clicks into place and plug in the unit.
-
Press "KEEP WARM / CANCEL" button. Corresponding indicator lights up and reheating process starts. The meal will be warmed up to 70-75°C and the temperature will be maintained for up to 24 hours.
-
To cancel the function press "KEEP WARM / CANCEL". Function indicator goes off.
i IMPORTANT! The function may operate for a period of 24 hours, however, we recommend using it moderately, because a prolonged thermal exposure may affect flavor characteristics or dry out the meal.
Standard Operating Procedure for Automatic Programs
-
Measure the Ingredients according to the recipe and put them in the bowl. Make sure that all ingredients including liquid are below the scale mark indicating maximum capacity.
-
Place the bowl inside the device. The bowl and the heating element must fit tightly.
-
Close the lid until it clicks into place. Plug in the unit.
-
Press "MENU" button repeatedly to select the cooking program (corresponding indicator lights up).
-
Use "COOK TIME" button to adjust the time set by default for each program.
-
Set Preset function if needed. Preset function is not available in "FRY" program.
-
Press "START". Set program starts running and the countdown begins. "STEAM/BOIL" program countdown begins only when the water comes to a full boil
- When cooking time expires the device makes an audible sound. Depending on the program chosen or on your personal settings the device either enters the Keep Warm mode ("KEEP WARM / CANCEL" button indicator lights up), or switches off (button indicator goes off). Keep Warm function is not available in "YOGURT/DOUGH" program.
- To interrupt or to cancel the program or to disable the Keep Warm function press "KEEP WARM / CANCEL".
"RICE/GRAIN"
This program is recommended for cooking rice and other grains, hot cereals, and various children's meals. Default time for the program is 28 minutes. Manual time settings range from 5 minutes to 1 hour 30 minutes with 1 minute intervals.
"PILAF"
This program is recommended for cooking various types of rice pilafs. Default time for the program is 1 hour. Manual time settings range from 5 minutes to 2 hours with 5 minute intervals.
"FRY"
This program is recommended for frying meat, poultry, vegetables, and seafood. Default time for the program is 15 minutes. Manual time settings range from 5 minutes to 1 hour with 1 minute intervals.
Frying with an open lid is allowed. Preset function is not available in this program.
"OATMEAL/DESSERT"
This program is recommended for cooking various hot cereals using milk, making jams, jellies, and desserts. Default time for the program is 33 minutes. Manual time settings range from 5 minutes to 1 hour and 30 minutes with 1 minute intervals.
"OATMEAL/DESSERT" program is recommended for cooking various oat porridges using pasteurized low fat milk. To avoid boiling away, we recommend you do the following:
• rinse grain thoroughly before cooking;
• grease the sides of the bowl with butter;
• follow the proportions suggested in the recipe book, increase or reduce amount of ingredients proportionally;
• using whole milk dilute it by half with water.
"YOGURT/DOUGH"
This program is recommended for making homemade yogurts and for proofing dough. Default time for the program is 8 hours. Manual time settings range from 5 minutes to 12 hours with 5 minute intervals.
Keep Warm function is not available in this program.
"BAKE/BREAD"
This program is recommended for baking cakes, pies, puddings, and various kinds of bread. Default time for the program is 1 hour. Manual time settings range from 20 minutes to 4 hours with 5 minute intervals.
"STEW"
This program is recommended for stewing vegetables, meat, poultry, seafood, for making jellied meat and aspic. Default time for the program is 40 minutes. Manual time settings range from 20 minutes to 12 hours with 5 minute intervals.
"BEANS
This program is recommended for cooking beans. Default time for the program is 35 minutes. Manual time settings range from 5 minutes to 2 hours with 5 minute intervals.
"SOUP"
This program is recommended for cooking various soups and broths. Default time for the program is 1 hour. Manual time settings range from 15 minutes to 8 hours with 5 minute intervals.
"STEAM/BOIL"
This program is recommended for cooking vegetables, fish, meat, children's meals, and various side dishes by steaming or boiling. Default time for the program is 15 minutes. Manual time settings range from 5 minutes to 2 hours with 5 minute intervals.
To steam:
- Pour 500-600 ml of water in a bowl. Place the steaming container in.
- Measure Ingredients following the recipe provided, and put them into the container.
- Follow steps 2-9 of "Standard operating procedure for automatic programs".
III. ADDITIONAL FEATURES
- Bakes bread
• Makes fondu
• Makes cheese, cottage cheese - Bakes bread
• Makes fondu
• Makes cheese, cottage cheese
• Proofs dough
• Proofs dough • Pasteurizes liquids
IV. OPTIONAL ACCESSORIES
Additional accessories can be purchased separately. Information on the assortment, pricing, and compatible accessories is available through our authorized dealer in your country.
RAM-CL1 - bowl extraction tongs
Use tongs for convenient extraction of the bowl out of the device. The tongs may be used with multicookers from other manufacturers.
RAM-G1 - the set of 4 yogurt jars with date-dials on the covers
Use the set to prepare various yogurts. Each jar is provided with a date-dial, allowing you to control expiration dates. The set may be used with multicookers from other manufacturers.
RHP-M1 - ham maker for RMC-M20/RMC-M30
Designed for cooking ham, rolls and other delicacies of meat, poultry or fish with the addition of various spices. It may be used with multicookers from other manufacturers, in the oven or in a pan aerogrill with appropriate volume. PB-A700 - non-stick coated head for PMC-M10
Capacity: 3 L. The bowl features excellent non-stick and thermal conductivity properties. It is suitable for product storage and oven use (below 260°C).
Ceramic coated bowles by ANATO® (Korea): RB-C302 (3 L, for RMC-M10), RB-C502 (5 L, for RMC-M20), RB-C602 (6 L, for RMC-M30)
The ceramic bowl has excellent non-stick and thermal conductivity properties. It was especially designed for baking, frying and cooking hot cereals. Suitable for product storage and oven use.
RB-A503 - non-stick coated bowl by DAIKIN ^ (Japan), for RMC-M20
Capacity: 5 L. Non-stick coating of the bowl is scratch-resistant and features excellent thermal conductivity properties. It was especially designed for frying, baking, and cooking hot cereals. The bowl is suitable for product storage and oven use.
RB-S500 - steel bowl for RMC-M20
Capacity: 5 L. The bowl features excellent non-stick and thermal conductivity properties. Recommended for making various soups and jams. Suitable for blender and mixer use to prepare fruit and vegetable purees and cream soups.
RB-A600 - non-stick coated bowl for RMC-M30
Capacity: 6 L. The bowl features excellent non-stick and thermal conductivity properties. It is suitable for product storage and oven use (below 260°C).
V. COOKING TIPS
This chapter familiarizes you with the practical tips and solutions to some common problems you may experience when using the multicooker.
| THE DISH IS UNDERCOOKED | |
| Possible Causes Solving the Problem | |
| The lid of the device was either open or was not closed properly. | Try to avoid opening the lid while cooking.Close the lid until it clicks into place. Make sure that the rubber scaling ring, located on the inner side of the lid is not deformed or damaged in any way. |
REDMOND
| Cooking temperature was not observed because the food and the heating element did not fit slightly. | • These should not be any foreign objects between the lid and the limaxing of the device, remove it any.• Always make sure that the heating element is clean and fits slightly with the bowl before cooking. | |
| • Wrong ingredients or settings were chosen.• General proportions were not observed, the size of the ingredients was too large.• Wrong time settings.• Chosen recipe is not appropriate for the device. | • We recommend using recipes adjusted for the device. Choose proven recipes only.• Set the time and cooking program, choose ingredients, preparations, and the size of ingredients according to the recipe. | |
| Steaming: the amount of water in the bowl is too little to provide enough steam. | Use the amount of water recommended. If In doubt, check the water level while steaming. | |
| Frying: | Too much moisture inside the bowl. | • Frying ingredients add an amount of oil enough just to cover the bottom of the bowl.• Follow recommendations given in the recipe while deep frying. |
| Too much oil was added. | Do not close the lid of the device while frying unless specified in the recipe. Using frozen ingredients clust and drain before frying. | |
| Cooking: the water boiled away during preparation of foods with high acidity. | Certain products need to be processed before cooking, washed, browned, etc. Follow recommendations given in the recipe. | |
| Baking (dough did not bake through) | Too much dough in the towel. Use a smaller amount of dough. | |
| Praised dough has reached the inner lid and covered the steam valve. | • Take the baked product out of the unit, turn it over and place back. Bake until ready.• Next time use smaller amount of dough. | |
| Possible Causes Solving the Problem | |
| Wrong ingredients, wrong size of ingredients or time settings. | We recommend using the recipes adjusted for your model. Try choosing proven recipes only.Set the time and cooking program, choose ingredients, proportions, and this size of ingredients according to the recipe. |
| The dish remained in the unit with the "Keep Warm" on for too long after it's been cooked. | We recommend using the "Keep Warm" function moderately. If your device features the function of disabling the "Keep Warm" in advance, use it to avoid the problem. |
| LIQUID BOILS AWAY DURING COOKING | |
| Possible Causes Solving the Problem | |
| Milk rolls wavy. | Depending on the quality of milk used, it may bell away. To avoid this, we recommend using only ultra-justened milk with the fat content of 2.5% or less. Dilute milk with water if needed. |
| Ingredients were not properly processed (washed poorly, etc.)Wrong general, proportions or ingredients. | We recommend using the recipes adjusted for the device. Try choosing proven recipes only. Set the time and cooking program, cheese, Ingredients, proportions, and the size of Ingredients according to the recipe.Whole grains, meat, fish, and seafood need to be rinsed thoroughly before cooking. |
| THE DISH IS BURNT | |
| Possible Causes Solving the Problem | |
| The bowl was not properly washed after last use.Non-stick cooking is damaged. | Make sure that the bowl is clean and has no creating defects before cooking. |
| General amount of ingredients is smaller than recommended. Use proven recipes, adjusted for the device. | |
| Cooking time was too long. | Reduce the cooking time or follow recommendations given in the recipe adjusted for your mode. |
| Frying all was not added; the ingredients have not been stirred or turned out. | Frying products add amount of oil enough just to cover the bottom of the bowl. Still ingredients thoroughly while frying or turn over as required. |
| Stewing: not enough liquid. Add more liquids. Avoid opening the ice while stewing.Cooking: not enough liquid (proportions were not observed). Follow recommendation ratio of liquids to solids while cooking. | |
| Basting: the bowl was not dressed before baking. | Greeze the buttons and sides of the bowl with better air till before baking (do not pour oil orced). |
| INGREDIENTS LOOSE THEIR SHAPE WHEN COOKED | |
| Possible Causes Solving the Problem | |
| Ingredients have been over stirred. | Frying foods do not stir the ingredients more often than every 5-7 minutes. |
| Cooking time was too long. | Before cooking time or follow recommendations given in the recipe adjusted for the device. |
BAKED GOODS ARE OVERLY MOIST
| Possible Causes Solving the Problem | |
| Improper Ingredients causing excess moisture have been used (julcy fruits or vegetables, frozen berries, sour cream, etc.) | Use Ingredients according to the recipe. Try to avoid using Ingredients causing excess moisture or use them in smaller amounts. |
| Raised product has been left in the unit with the closed lid for too long. | We recommend taking baked product out of the unit right after the baking cycle finishes or leaving it on the Keep Warm for a short period of time only. |
BAKED GOODS DO NOT RISE
| Possible Causes Solving the Problem | |
| Lego and sugar were poorly whipped. | The proven recipes adjusted for the device. Cowsheng, measuring, and processing Ingredients follow recommendations given in the recipe. |
| The dough stayed for too long before being baked. | |
| The flour wasn't silted or the dough was poorly intoxicated. | |
| Wrong Ingredients. | |
| Wrong recipe. |
Certain REDMOND multicookers feature an overheat protection in "STEW" and "SOUP" programs. In case there is no liquid in the bowl, the device automatically interrupts the program and switches to "Keep Warm".
Table of Recommended Steaming Time for Various Products
| Product Weight, g/pcs Water, ml | Cooking time, minutes | ||||
| BMC-M10 | BMC-M20 | BMC-M30 | |||
| Pork / boaf fillet (cut into 1.5 cm cubes) | 300 | 100 | 35/45 | 35/40 | 30/30 |
| Mutton fillet (cut into 1.5 cm cubes) | 300 | 100 | 35 | 35 | 30 |
| Chicken fillet (cut into 1.5 cm cubes) | 300 | 100 | 35 | 30 | 30 |
| Meatballs / cutters | 180 (6 pcs) / 150 (3 pcs) | 500 | 30/40 | 30/40 | 1.5/30 |
| Fish fillet | 300 | 100 | 35 | 25 | 20 |
| Shrimps (cooked, peeled, frozen) | 300 | 100 | 30 | 20 | 20 |
| Potatoes (cut into 1.5 cm cubes) | 300 | 100 | 40 | 35 | 40 |
| Carrots (cut into 1.5 cm cubes) | 300 | 100 | 35 | 35 | 40 |
| Beef (cut into 1.5 cm cubes) | 300 | 100 | 50 | 50 | 1 hour 30 minutes |
| Vegetables (frozen) | 300 | 100 | 35 | 30 | 30 |
| Steamed eggs | 5 pcs | 100 | 25 | 25 | 30 |
Remember, that these are general recommendations only. In reality, cooking time may vary from the recommended one, depending on the quality of the products used and on your personal preferences.
Table of Default Settings
| Program Recommendations for use | Default cooling time | Time range / setting interval | Preset, hour | Keep warm | |
| RICE/RAIN | Cooking various kinds of grain and side dishes. | 28 min | 1 min - 15 hours / 1 min | - | + |
| PILAT | Cooking meat, fish, chicken, and vegetable piliat. | 1 hour | 3 min - 2 hours / 5 min | - | + |
| FRY | Frying meat, fish, vegetables, poultry, etc. | 12 min | 3 min - 1 hour / 1 min | --- | + |
| OATMEAL/DESSERT | Cooking various hot cereals using milk and making desserts. | 33 min 3 min - | 15 hours / 1 min + + | ||
| YOGURT/DOUGH | Making yogurt and proofing dough. | 8 hours | 3 min - 12 hours / 5 min | - | - |
| BAKL/BREAD | Beaking puddles, cakes, pies, yeast and pull pastry. | 1 hour | 20 min - 4 hours / 5 min | - | + |
| STEW | Stewing meat, fish, vegetables, making jellled meat. | 40 min | 20 min - 12 hours / 5 min | - | + |
| BEANS Cooking Legumes | 33 min 3 min - 2 hours / 5 min + + | ||||
| SOUP | Cooking soups and broots. | 1 hour | 15 min - 8 hours / 5 min | - | + |
| STEAM | Cooking meat, fish, vegetables, baby food by steaming or boiling. | 15 min 1 min | 2 hours / 5 min + + | ||
VI. CLEANING AND GENERAL MAINTENANCE GUIDELINES
Before you start cleaning the device, make sure that it is unplugged and has cooled down. Use soft cloth and mild soap to clean. We recommend cleaning the appliance after each use. Prior to first use or in order to remove the odor, boll half a lemon for 15 minutes using "STEAM/BOIL" program.

Do not use a sponge with a hard or abrasive surface; solvent and abrasive cleaning methods (gasoline, acetone) are not allowed. Do not immerse the device in water or wash it under running water.
Clean the housing as needed, following cleaning and general maintenance guidelines provided. We recommend cleaning inner aluminum lid after each use.
It is recommended to clean the bowl after each use. The bowl is dishwasher safe. By the end of cleaning, wipe the bowl dry.
The steam valve needs to be cleaned after each use. The steam valve can be taken off from the inner or outer side of the lid (depending on the model).
Gently, without effort pull the steam valve towards yourself in order to remove it from the outer side of the lid. Disassemble and rinse under running water. Let the valve dry, carry out the assembly in return sequence and install back into place.

Generally turn the steam valve counterclockwise. In order to remove it from the inner side of the lid, Rinse the valve under running water, let it dry and install back into place, by turning clockwise.
Clean the condensation collector, located on the housing of the device after each use. Gently press the lower part of the collector or hold it by its sides (depending on the model) and gently pull it towards yourself to remove. Pour the condensate out, wash the collector and install it back into place.

Condensation may sometimes accumulate in the special cavity around the bowl. Remove it with cloth or tissue.
VII. BEFORE ADDRESSING A SERVICE CENTER
| Error code | Error description | Error handling |
| C1-E4 | System error, system board or heating element malfunction; the lid was not closed properly. | Close the lid slightly. If this does not eliminate the error, address an authorized service center. |
| C5 | Automatic protection against overheating activated. | Do not operate the device without the bowl installed! Disconnected, the service and let it work down within 30-15 minutes. Add waste/bone and continue. If this does not eliminate the error, address an authorized service center. |
| Problem | Possible Cause | Solving the problem |
| The unit does not switch on. | Voltage supply failure. | Check the voltage supply. |
| The meal is taking too long to eat. | Voltage supply intervention. | Check the voltage supply. |
| The bowl is installed with a distortion. | Install the bowl property. | |
| There is a foreign object between the bowl and the heating element. | Remove the foreign object. | |
| The heating element is dirty. | Unplug the device and let it cook down. Clean the heating element. |
VIII. PRODUCT WARRANTY
We warrant this product to be free from defects for a period of 2 years from the date of purchase. If the appliance fails to operate properly within the warranty period and is found to be defective in material or workmanship, we will repair or replace it free or charge. This warranty comes into force only in case an original warranty service coupon with a serial article number and an accurate impress of the company of the seller proves the purchase date. This limited warranty does not cover damage caused by the failure to use this product for its normal purpose or in accordance with the instructions on the proper use and maintenance of the product or any kind of repair works. Do not try to disassemble the device and keep all package contents. This warranty does not cover normal wear of the device and its parts (liters, bulbs, ceramic and Telloon coating, rubber parts etc.).
Service life of the product, established by the manufacturer is 5 years from the date of purchase, provided that the unit is used and maintained in accordance with the user manual and applicable technical standards.

The packaging, user manual, and the device itself may not be treated as household waste. Instead, it shall be taken to the applicable collection point for the recycling of electrical and electronic equipment.
REDMOND
BU HET KOKEN KOOKT HET PRODUCT OVER
Programma "OATMEAL/DESSERT"
Programa "OATMEAL/DESSERT"
Programa "YOGURT/DOUGH"
Programa "STEAM/BOIL"
Program "OATMEAL/DESSERT"
Program "YOGURT/DOUGH"
Program "BAKE/BREAD"
Program "STEAM/BOIL"
VED KOGNING KOGES PRODUKTEN OVER
Programmet "OATMEAL/DESSERT"
Programmet "OATMEAL/DESSERT"
BAKET HAR INTE STIGIT UPP
Programul "OATMEAL/DESSERT"
\_STEAM/BOIL" program
"OATMEAL/DESSERT" program
"YOGURT/DOUGH" programi
"BAKE/BREAD" program
"STEAM/BOIL" program
16.2.1.2.3.4.5.6.7.8.9.10.11.12.13.14.15.16.17.18.19.20.21.22.23.24.25.26.27.28.29.30.31.32.33.34.35.36.37.38.39.40.41.42.43.44.45.46.47.48.49.50.51.52.53.54.55.56.57.58.59.60.61.62.63.64.65.66.67.68.69.70.71.72.73.74.75.76.77.78.79.80.81.82.83.84.85.86.87.88.89.90.91.92.93.94.95.96.97.98.99
- KEEP WARM / GANCEL (3)
24.18
S_n = 1
IV. لواحق إضافية
"KEEP WARM / CANCLI, 4
-
In the case of the first time, the number of cases is 208 and f is 272.
-
In addition, the net of income from the parent company (the parent company) is 100% of the total net income (1,657,205.41).
127
134
134
134 VIII
ويزکیهای فتی
| KMC-M10 RMC-M20 RMC-M30 | ||
| ### 500 ### 800 ### 900 | ||
| ### 50 ### 240.220 | ||
| ### 5 ### 6 | ||
| ### ### ### ### ### | ||
| ### ### ### ### ### | ||
| ### ### ### ### ### | ||
برنامه ها
1 (العربية) RICE/GRAIN
2 (PILAF
(العربية) FRB
(π) / (π) OATMEAL/DESSERT
(2) / (3) YOGURT DOUC
(6) CA) BAKE-BREAD
(2) 40° (1) 35° (2)
(10) SOUP
(1) / (2) STEAM/BOOD
دستورات
24
| "KEEP WARM/CANCEI" | .8 |
| "YOGURT/DOUGH" | .9 |
| "RENEAT/CANCEL" |
Produced by Redmond Industrial Group LLC, USA
1801 S Treasure Drive, 515, North bay Village, Florida 33141, USA
www.redmond-ig.com
Made in China
RMC-M10-20-30-E-UM-2R


- REDMOND
- IMPORTANT SAFEGUARDS
- Device Assembly A1
- Control Panel A2
- PRIOR TO FIRST USE
- OPERATION
- Before Use
- Setting the Cooking Time
- Preset Function
- Keep Warm Function
- Reheat Function
- Standard Operating Procedure for Automatic Programs
- "RICE/GRAIN"
- "PILAF"
- "FRY"
- "OATMEAL/DESSERT"
- "YOGURT/DOUGH"
- "BAKE/BREAD"
- "STEW"
- "BEANS
- "SOUP"
- "STEAM/BOIL"
- ADDITIONAL FEATURES
- OPTIONAL ACCESSORIES
- RAM-CL1 - bowl extraction tongs
- RAM-G1 - the set of 4 yogurt jars with date-dials on the covers
- RHP-M1 - ham maker for RMC-M20/RMC-M30
- Ceramic coated bowles by ANATO® (Korea): RB-C302 (3 L, for RMC-M10), RB-C502 (5 L, for RMC-M20), RB-C602 (6 L, for RMC-M30)
- RB-A503 - non-stick coated bowl by DAIKIN °ledR (Japan), for RMC-M20
- RB-S500 - steel bowl for RMC-M20
- RB-A600 - non-stick coated bowl for RMC-M30
- COOKING TIPS
- CLEANING AND GENERAL MAINTENANCE GUIDELINES
- BEFORE ADDRESSING A SERVICE CENTER
- PRODUCT WARRANTY
- Programma "OATMEAL/DESSERT"
- Programa "OATMEAL/DESSERT"
- Programa "YOGURT/DOUGH"
- Programa "STEAM/BOIL"
- Program "OATMEAL/DESSERT"
- Program "YOGURT/DOUGH"
- Program "BAKE/BREAD"
- Program "STEAM/BOIL"
- Programmet "OATMEAL/DESSERT"
- Programul "OATMEAL/DESSERT"
- \_STEAM/BOIL" program
- "OATMEAL/DESSERT" program
- "YOGURT/DOUGH" programi
- "BAKE/BREAD" program
- "STEAM/BOIL" program
- لواحق إضافية
Brand : Redmond
Model : RMCM30E
Category : Multi-cooker