
DTCTCS10WT - Detector NEDIS - Free user manual and instructions
Find the device manual for free DTCTCS10WT NEDIS in PDF.
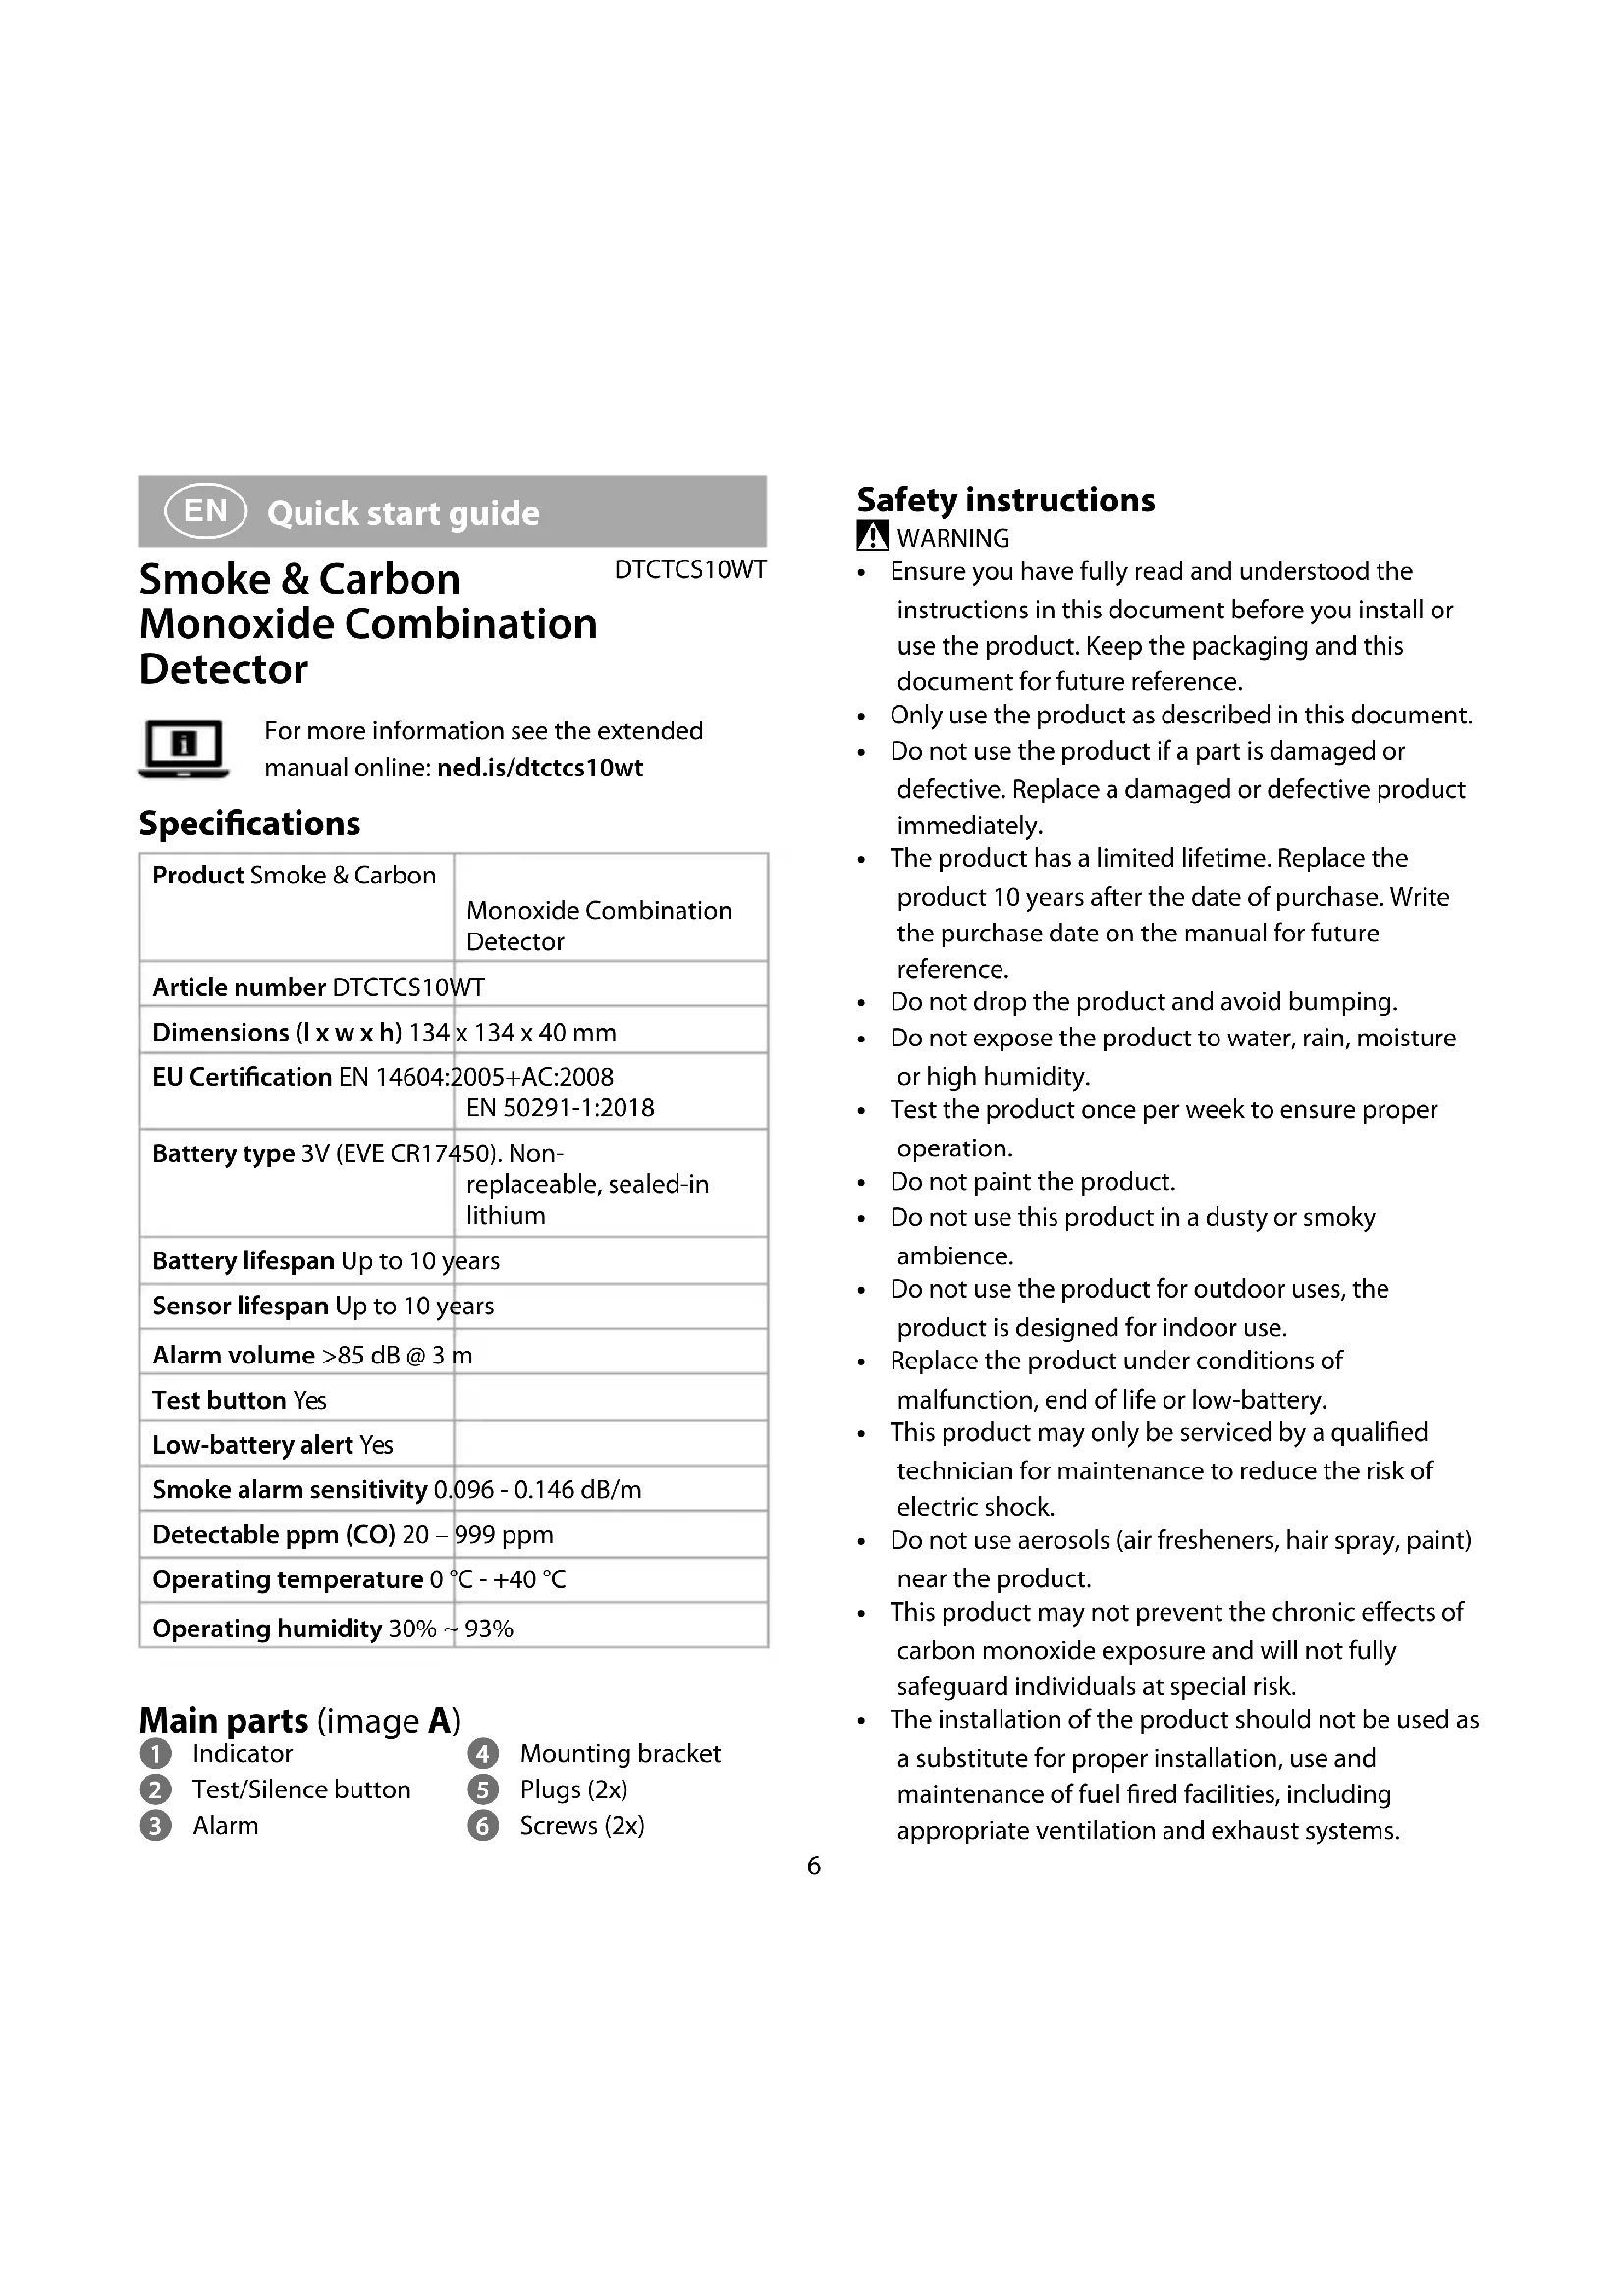
| Product Type | Combined smoke and carbon monoxide detector |
| Brand | Nedis |
| Model | DTCTCS10WT |
| Dimensions (L x W x H) | 134 x 134 x 40 mm |
| Power supply | Sealed non-replaceable 3 V lithium battery (EVE CR17450) |
| Battery life | Up to 10 years |
| Sensor life | Up to 10 years |
| Alarm volume | >85 dB at 3 m |
| Certification | EN 14604:2005+AC:2008, EN 50291-1:2018 |
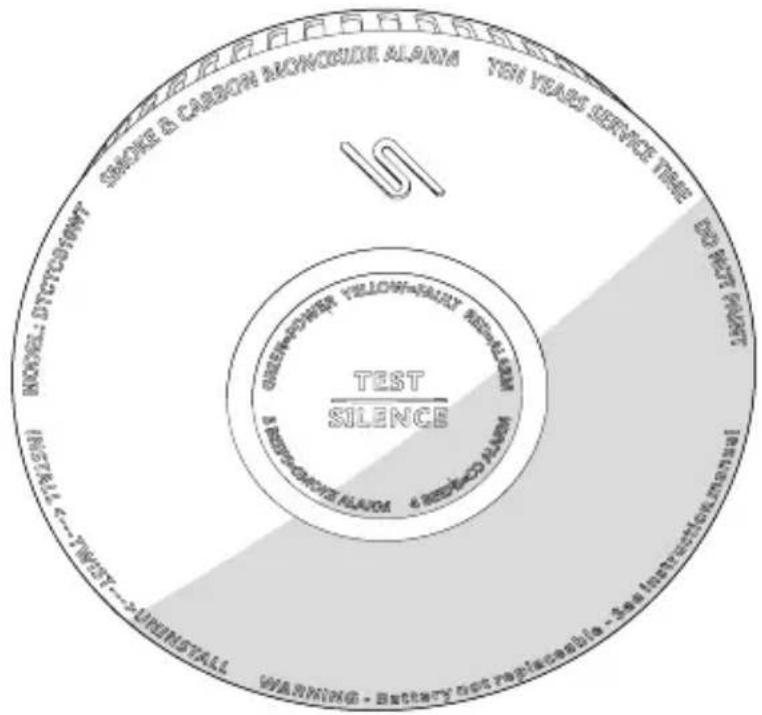
| Test/silence button | Yes |
| Low battery alert | Yes |
| Smoke alarm sensitivity | 0.096 - 0.146 dB/m |
| CO detection range | 20 - 999 ppm |
| Operating temperature | 0 °C to +40 °C |
| Operating humidity | 30 % ~ 93 % |
| Maintenance and cleaning | Clean with a soft dry cloth; vacuum once a month |
| Safety instructions | Do not paint; do not expose to water; install at least 3 m from CO sources |
| Spare parts and repairability | Non-replaceable battery; replace product after 10 years or if malfunction occurs |
| Warranty | Refer to the manual for details |
Frequently Asked Questions - DTCTCS10WT NEDIS
User questions about DTCTCS10WT NEDIS
0 question about this device. Answer the ones you know or ask your own.
Ask a new question about this device
Download the instructions for your Detector in PDF format for free! Find your manual DTCTCS10WT - NEDIS and take your electronic device back in hand. On this page are published all the documents necessary for the use of your device. DTCTCS10WT by NEDIS.
USER MANUAL DTCTCS10WT NEDIS
Smoke & Carbon Monoxide Combination Detector
With low-battery alert and test button
DTCTCS10WT

Quick start guide 6

Kurzanleitung 10

- Ensure you have fully read and understood the instructions in this document before you install or use the product. Keep the packaging and this document for future reference.
- Only use the product as described in this document.
- Do not use the product if a part is damaged or defective. Replace a damaged or defective product immediately.
- The product has a limited lifetime. Replace the product 10 years after the date of purchase. Write the purchase date on the manual for future reference.
- Do not drop the product and avoid bumping.
- Do not expose the product to water, rain, moisture or high humidity.
- Test the product once per week to ensure proper operation.
- Do not paint the product.
- Do not use this product in a dusty or smoky ambience.
- Do not use the product for outdoor uses, the product is designed for indoor use.
- Replace the product under conditions of malfunction, end of life or low-battery.
- This product may only be serviced by a qualified technician for maintenance to reduce the risk of electric shock.
- Do not use aerosols (air fresheners, hair spray, paint) near the product.
- This product may not prevent the chronic effects of carbon monoxide exposure and will not fully safeguard individuals at special risk.
-
The installation of the product should not be used as a substitute for proper installation, use and maintenance of fuel fired facilities, including appropriate ventilation and exhaust systems.
-
Do not remove the battery from the product.
- Do not dismantle, open or shred batteries.
- Do not expose batteries to heat or fire. Avoid storage in direct sunlight.
- Do not short-circuit a battery.
- Do not subject cells or batteries to mechanical shock.
- In the event of a battery leaking, do not allow the liquid to come in contact with the skin or eyes. If contact has been made, wash the affected area with copious amounts of water and seek medical advice.
- Keep cells and batteries clean and dry.
- Retain the original product literature for future reference.
- Battery usage by children should be supervised.
- Dispose of the cell or battery properly.
- Do not use any cell or battery that is not designed for use with the product.
- Seek medical advice immediately if a cell or a battery has been swallowed.
Angers of Carbon Monoxide
Exposure to Carbon Monoxide (CO) is very dangerous. CO is a colourless, odourless and tasteless gas that deprives oxygen from the area. This can be fatal. CO is generated by combustion of carbonaceous materials, mainly when not enough oxygen is available. This can occur for example by malfunctioning or misuse of appliances used for heating and cooking or by vehicle engines, blocked chimneys, fireplaces, boilers, stoves and any other fuel burning appliance within a confined area.
When exposed to CO, the following symptoms will occur:
| Concentration of CO in air. (ppm = parts per million) | Symptoms |
| 50ppm The maximum allowable concentration for healthy adults to be exposed to in a 8-hour period. | |
| 200ppm Within 2-3 hours of exposure: -slight headache -fatigue -dizziness -nausea | |
| 400ppm Within 1-2 hours of exposure: -frontal headaches WARNING: 3 hours of exposure will result in death. | |
| 800 – 999 ppm Within 45 minutes of exposure: -dizziness -nausea -convulsions -unconsciousness WARNING: 2-3 hours of exposure will result in death. | |
This product does not prevent the chronic effects of carbon monoxide exposure and will not fully safeguard individuals at special risk.
installation of the product should not be used as a substitute for proper installation, use and maintenance of fuel fired facilities, including appropriate ventilation and exhaust systems.
Activating the batteries
The batteries are activated when attached to the bracket for the first use.
product must be used with the matching bracket. The product does not work when used separately.
Choosing a location (image B & C)
For safe use it is recommended to install the product in areas with a source of combustion where CO and smoke will move upwards quickly.
The product can be installed in:
- Every sleeping area.
- Both ends of a hallway longer than 12 m .
- Every room where a furnace, a heat source and/or other burning devices are located.
- Every room where multiple people spend several consecutive hours.
- Install at least one product on each floor of a multi-level home.
In areas with a source of combustion:
On the ceiling:
- At least 3 m away from the CO-source.
- At least 30cm away from surrounding walls.
- At a central point in the room.
- Not in turbulent air (near windows, ceiling fans or air conditioners).
The product can also be installed on a sloped ceiling.
not install in the tip of a sloping ceiling as smoke-free air can collect in these areas.
In sleeping areas:
- Not in turbulent air (near windows, ceiling fans or air conditioners).
- Not behind objects (curtains or closets).
Other areas:
-
Not in turbulent air (near windows, ceiling fans or air conditioners).
-
Not behind objects (curtains or closets).
For optimal CO detection install the product at breathing height.
For optimal smoke detection install the product at a minimal height of 1.80m
Do not install the product:
- in dirty, greasy or dusty areas.
- in temperatures below 0^ .
- in temperatures above +40^ .
- in turbulent air (near ceiling fans, air conditioners or open windows).
within 3 meters of a high humidity source.
within 1.5 meters of kitchen appliances. - within 6m of a furnace or fuel burning heat sources.
behind objects like curtains or closets. - within 1m of fluorescent light.
Installing/Mounting the product (image D & E)
- Place 4 in the desired location.
Follow steps 2. - 6. for stone/concrete surfaces. Continue to step 5. for wood surfaces.
- Use 4 to mark the drill locations with a pencil (70mm in between the two holes).
- Drill two 05mm holes.
- Insert the plugs into the holes.
- Fasten the mounting bracket with the screws.
- Turn A3 clockwise to attach it to A4.
Do not overtighten the screws, this will deform the bracket.
Testing the product
The product must be tested once a week to ensure proper operation. Press and hold the test/silence button. A ① blinks red. Hold until the product emits three long beeps and four long beeps.
Silent mode
In silent mode, the product does not sound the alarm for 10 minutes. When smoke or CO is detected in silent mode, A① blinks red.
The silent mode must be activated manually.
- Press the test/silence button A 2 shortly to activate silent mode.
After 10 minutes, the product goes back into standby mode.
| LED light Sound alarm | ||
| Standby mode | A① blinks green every 40 seconds. | Off. |
| Hush mode | A① blinks yellow every 40 seconds. | Off. |
| Test | A① pulses red 3 times, followed by a 1.5 second pause. After this cycle, A① pulses red 4 times, followed by a 5 second pause. | 3 long beeps and 4 long beeps. |
| Low battery condition | A① blinks yellow every 40 seconds. | Beeps once every 40 seconds. |
| Malfunction | A① blinks yellow 2 times every 40 seconds. | Beeps 2 times every 40 seconds. |
| End-of-life | A① blinks yellow 3 times every 40 seconds. | 3 short beeps every 40 seconds. |
| Smoke alarm | A ➀ blinks red 3 times in a row, followed by a 1.5 second pause. | Beeps 3 times in a row, followed by a 1.5 second pause. |
| CO Alarm | A ➁ blinks red 4 times in a row, followed by a five second pause. | Beeps 4 times in a row, followed by a 5 second pause. |
Response time of the product in case of CO
| Concentration of CO in air. (ppm = parts per million) | Response time of the product |
| 30ppm 120 minutes | |
| 50ppm 60 – 90 minutes | |
| 100ppm 10 – 3 minutes | |
| 300ppm 3 minutes |
CO Alarm
When the alarm beeps four times in a row and the indicator blinks red:
- Immediately go outside.
- Call the local emergency services (Fire department).
- Do not go back into the building until the emergency services tell you it is safe.
Smoke alarm
When the alarm beeps three times in a row and the indicator blinks red:
- Identify the source of the smoke.
Troubleshooting
| Problem Possible solution | |
| The alarm does not respond when you press the test button. | Make sure the batteries are installed properly. |
| A①blinks and the alarm sounds every 40 seconds. | Battery is low. Replace the product immediately. |
| A①blinks twice and the alarm sounds every 40 seconds. | The product is malfunctioning. Contact Nedis. |
not use aggressive chemical cleaning agents such as ammonia, acid or acetone when cleaning the product.
- Clean the product regularly with a soft, clean, dry cloth. Avoid abrasives that can damage the surface.
Vacuum the product once a month to remove dust.
Declaration of Conformity
We, Nedis B.V. declare as manufacturer that the product DTCTCS10WT from our brand Nedis, produced in China, has been tested according to all relevant CE standards and regulations and that all tests have been passed successfully. This includes, but is not limited to the RED 2014/53/EU regulation.
The complete Declaration of Conformity (and the safety datasheet if applicable) can be found and downloaded via:
nedis.com/DTCTCS10WT#support
For additional information regarding the compliance, contact the customer service:
Web: www.nedis.com
Nedis B.V., de Tweeling 28
5215 MC 's-Hertogenbosch, the Netherlands

Kurzanleitung
(70xlaavαεσaσιςδύτριπεc).
- TpuinnoTe 出 0 5 mm tpuinec,
- Eiayte ta ouna otic tpunec.
- Στερεώσε το βραχίονα τοῦθέτησις με τις βίδες.
- TupioTe TO A 3 p o yia va to PPOOAPoOeTOA4.
MnV oipyye TneepoikacicBic, Kaohc auto tha npapaopwpoei to bpaxiova.
The Netherlands 08/21

- Smoke & Carbon Monoxide Combination Detector
- With low-battery alert and test button
- Angers of Carbon Monoxide
- Activating the batteries
- Choosing a location (image B & C)
- In areas with a source of combustion:
- On the ceiling:
- In sleeping areas:
- Other areas:
- Installing/Mounting the product (image D & E)
- Testing the product
- Silent mode
- CO Alarm
- Smoke alarm
- Declaration of Conformity
- Kurzanleitung
Brand : NEDIS
Model : DTCTCS10WT
Category : Detector