
KG241YU - Monitor ACER - Free user manual and instructions
Find the device manual for free KG241YU ACER in PDF.
| Product Type | LCD Monitor |
| Brand | Acer |
| Model | KG241YU |
| Screen Size | 23.8 inches (60 cm) |
| Maximum Resolution | 2560 x 1440 at 144 Hz (HDMI 2.0/DP) |
| Panel Technology | TN (Twisted Nematic) |
| Brightness | 350 cd/m² (typical) |
| Dynamic Contrast Ratio | 100,000,000:1 max (ACM) |
| Response Time | 1 ms (gray to gray) |
| Viewing Angle (horizontal/vertical) | 170° / 160° (CR=10) |
| Vertical Frequency | 40-144 Hz |
| Input Connectors | HDMI 1.4, HDMI 2.0, DP |
| Built-in Speakers | 2 x 2 W (optional) |
| Power Supply | 100-240 V, 50/60 Hz |
| Power Consumption (on) | 18 W (typical) |
| Power Consumption (standby) | 0.4 W (typical) |
| Power Consumption (off) | 0.35 W (typical) |
| Dimensions (W x H x D) | 541.9 x 423.7 x 215.5 mm |
| Net Weight | 4.3 kg |
| Tilt | -5° to +15° |
| Special Features | FreeSync, MPRT, ACM, Blue Light, Black Boost |
| Energy Efficiency Class | B |
| Care and Cleaning | Clean with a soft cloth and a solvent-free cleaning solution. Do not use ammonia or alcohol. Do not spray liquid directly onto the screen. |
| Safety Instructions | Do not expose to moisture or direct sunlight. Do not open the casing. Unplug if damaged. |
| Removable Stand | Yes (VESA compatible) |
Frequently Asked Questions - KG241YU ACER
User questions about KG241YU ACER
0 question about this device. Answer the ones you know or ask your own.
Ask a new question about this device
Download the instructions for your Monitor in PDF format for free! Find your manual KG241YU - ACER and take your electronic device back in hand. On this page are published all the documents necessary for the use of your device. KG241YU by ACER.
USER MANUAL KG241YU ACER
Important safety instructions
Please read the following instructions carefully.
-
To clean the LCD monitor screen: Be sure that your monitor is electrically rated to operate with the AC power available in your location.
-
Turn off the LCD monitor and unplug the power cord.
- Spray a non-solvent cleaning solution onto a rag and clean the screen gently.
- NEVER SPRAY OR POUR ANY LIQUID DIRECTLY ONTO THE SCREEN OR CASE.
- PLEASE DO NOT USE ANY AMMONIA OR ALCOHOL-BASED CLEANERS ON THE LCD DISPLAY SCREEN OR CASE.
-
Acer will not be liable for damage resulting from use of any ammonia or alcohol-based cleaners.
-
Do not place the LCD monitor near a window. Exposing the monitor to rain, moisture or sunlight can severely damage it.
- Do not apply pressure to the LCD screen. Excessive pressure may cause permanent damage to the display.
- Do not remove the cover or attempt to service this unit yourself. An authorized technician should perform servicing of any nature.
-
Store the LCD monitor in a room with a temperature of -20^ to 60^ C (-4^ to 140^ F). Storing the LCD monitor outside this range may result in permanent damage.
-
Immediately unplug your monitor and call an authorized technician if any of the following circumstances occur:
-
Monitor-to-PC signal cable is frayed or damaged.
- Liquid spills onto the LCD monitor or the monitor is exposed to rain.
The LCD monitor or case is damaged.
Attaching the monitor to the base
- Remove the monitor base from the packaging and place it on a stable and level workspace.
- Remove the monitor from the packaging.
-
Attach the monitor stand arm to the base.
-
Ensure that the base is locked onto the monitor stand arm. (for selected models)
- Secure the base to the monitor stand arm by turning the screw using the integrated tab or a suitable coin. (for selected models)
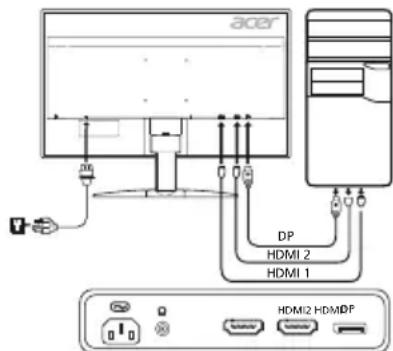
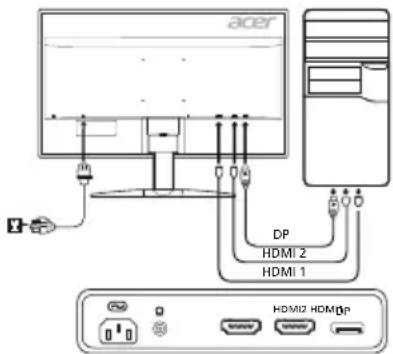
Connecting Your Monitor to a Computer
- Turn off your monitor and unplug your computer's power cord.
- 2-1 Connect DP Cable (Only DP-input model)
a. Make sure both the monitor and computer are powered-OFF.
b. Connect the DP cable to the computer.
2-2 Connect HDMI Cable (Only HDMI-input model)
a. Make sure both the monitor and computer are powered-OFF.
b. Connect the HDMI cable to the computer.
- Insert the monitor power cable into the power port at the back of the monitor.
- Plug the power cords of your computer and your monitor into a nearby electrical outlet.
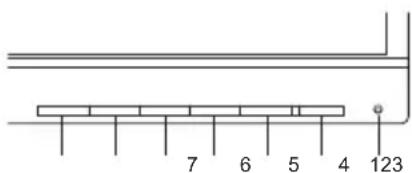
External Controls
| No.ItemDescription | ||
| 1, 2 | Power button/indicator | Turns the monitor on/off. Blue indicates power on. Amber indicates standby/ power saving mode. |
| 3 OSD functions | Press to view the OSD. Press again to enter a selection in the OSD. | |
| 4 Input button Press to toggle input sources. | ||
| 5 Volumet button | Press to activate the volume sliding scale. | |
| 6 MPRT press to activate the MPRT menu. | ||
| 7 Mode press to activate the Mode menu. | ||
Regulations and safety notices
FCC notice
This device has been tested and found to comply with the limits for a Class B digital device pursuant to Part 15 of the FCC rules. These limits are designed to provide reasonable protection against harmful interference in a residential installation. This device generates, uses, and can radiate radio frequency energy and, if not installed and used in accordance with the instructions, may cause harmful interference to radio communications.
However, there is no guarantee that interference will not occur in a particular installation. If this device does cause harmful interference to radio or television reception, which can be determined by turning the device off and on, the user is encouraged to try to correct the interference by one or more of the following measures:
Reorient or relocate the receiving antenna.
- Increase the separation between the device and receiver.
- Connect the device into an outlet on a circuit different from that to which the receiver is connected.
- Consult the dealer or an experienced radio/television technician for help.
CE declaration of Conformity
Hereby, Acer Inc., declares that this LCD monitor is in compliance with the essential requirements and other relevant provisions of EMC Directive 2014/30/EU, Low Voltage Directive 2014/35/EU, and RoHS Directive 2011/65/EU and Directive 2009/125/EC with regard to establishing a framework for the setting of ecodesign requirements for energy-related product.
Notice:
In order to prevent damage to the monitor, do not lift the monitor by its base.
Notice: Shielded cables
All connections to other computing devices must be made using shielded cables to maintain compliance with EMC regulations.
Notice:
Acer monitor is purported for video and visual display of information obtained from electronic devices.
Notice: Peripheral devices
Only peripherals (input/output devices, terminals, printers, etc.) certified to comply with the Class B limits may be attached to this equipment. Operation with non-certified peripherals is likely to result in interference to radio and TV reception.
Caution
Changes or modifications not expressly approved by the manufacturer could void the user authority, which is granted by the Federal Communications Commission, to operate this product.
Operation conditions
This device complies with Part 15 of the FCC Rules. Operation is subject to the following two conditions: (1) this device may not cause harmful interference, and (2) this device must accept any interference received, including interference that may cause undesired operation.
Notice: Canadian users
This Class B digital apparatus complies with Canadian ICES-003.
Disposal of Waste Equipment by Users in Private Household in the European Union
This symbol on the product or on its packaging indicates that this product must not be disposed of with your other household waste. Instead, it is your responsibility to dispose of your waste equipment by handing it over to a designated collection point for the recycling of waste electrical and electronic equipment. The separate collection and recycling of your waste equipment at the time of disposal will help to conserve natural resources and ensure that it is recycled in a manner that protects human health and the environment. For more information about where you can drop off your waste equipment for recycling, please contact your local city office, your household waste disposal service or the shop where you purchased the product.
SPECIFICATION
| LCD Panel | Driving System TFT Color LCD | |
| Size 23.8"W (60 cm) | ||
| Pixel Pitch 0.2058 mm (H) x 0.2058 mm (V) | ||
| Brightness | 350 cd/m² (Typical) | |
| Contrast 100000000:1 Max (ACM) | ||
| Viewable Angle 170° (H) 160° (V) (CR=10) | ||
| Response Time 1 ms (G to G) | ||
| Panel Type TN | ||
| H-Frequency | HDMI 1.4: 31 - 105 kHzHDMI 2.0: 31 - 222 kHzDP: 222 - 222 kHzDP: 222 - 222 kHz (FreeSync On) | |
| V-Frequency | HDMI 1.4: 56 - 76 HzHDMI 2.0: 56 - 144 HzDP: 40 - 144 HzHDMI 1.4: 40 - 70 Hz (FreeSync On)HDMI 2.0/DP: 40 - 144 Hz (FreeSync On) | |
| Display Colors 16.7 Million | ||
| Dot Clock | HDMI1.4: 280 MHzHDMI 2.0/DP: 600 MHz | |
| Maximum Resolution | HDMI 1.4: 2560 x 1440 @ 70 HzHDMI 2.0/DP: 2560 x 1440 @ 144 Hz | |
| Plug & Play VESA DDCCI/DDC2B | ||
| Energy Efficiency Class B | ||
| *Annual Energy Consumption 43 (kWh) (for HDMI-input Model) | ||
| Power Consumption | On Mode 18 W (Typical) | |
| Sleep Mode 0.4 W (Typical) | ||
| Off Mode 0.35 W (Typical) | ||
| Input Connector | HDMI 19 pin (Only HDMI-Input Model) (Optional)DP (Only DP-Input Model) (Optional) | |
| Input Video Signal | HDMI signal (Only HDMI-Input Model) (Optional)DP signal (Only DP-Input Model) (Optional) | |
| Speakers 2 W x 2 (Only Audio-Input Model) (Optional) | ||
| Maximum Screen Size | Horizontal: 526.9 mmVertical: 296.4 mm | |
| Power Source | 100-240 V, 50/60 Hz | |
| Environmental Considerations | Operating Temp: 5° to 35°CStorage Temp: -20° to 60°COperating Humidity: 20% to 80% | |
| Dimensions | 541.9 (W) x 423.7 (H) x 215.5 (D) mm | |
| Weight (N. W.) | 4.3 kg (net) | |
| Mechanism Specifications | Tilt: -5° to +15°Swivel: NoHeight adjustment: NoPivot: NoDetachable foot stand: Yes | |
| External Controls | Switch/Buttons | Power Button VolumeMPRTMPRTMode |
| MENU/ENTER Input Mode | ||
| Functions | Brightness OSD TimeoutTransparencyRefresh rate numInputAuto SourceDP FormatHot Key AssignmentWide ModeDDC/CLHDMI Black LevelQuick Start ModeDisplay InformationReset All SettingsSave Setting toExit | |
| Color TempColor TempWide ModeDCC/CLHDMI Black LevelQuick Start ModeDisplay InformationReset All SettingsSave Setting toExit | ||
| All specifications are subject to change without notice. | ||
Find manuals and other documents for your Acer product on the official Acer support website.
*Annual energy consumption is calculated using the typical power consumption 4 hours per day, 365 days per year.
Panduan Praktis Monitor LCD Acer (QSG)
m = 311 ;
。 1. FCC 1 # 1 # # # # # # # # # # # # # # # # # # # # # # # # # # # # # # # # # # # # # # # # # # # # # # # # # # # # # # # # # # # # # # # # # # # # # # # # # # # # # # # # # # # # # # # # # # # # # # # # # # # # # 2. FCC 1# 1# 1# 1# 1# 1# 1# 1# 1# 1# 1# 1# 1# 1# 1# 1# 1# 1# 1# 1# 1# 1# 1# 1# 1# 1# 1# 1# 1# 1# 1# 1# 1# 1#
BaxKn HnHCTpyKun 3a 6e3oNaCHOCT
MOn, npOteTe BnHMaTeNHO CneHNTE NHCtpKcH.
-
3a da nouchte ekaha ha LCD MOHITOPa: He 3a6paBraTe, ye BAaIaT MOHITOp e npedHa3Naueh 3a pa6oTa c npomeHINBOtOKOBO 3axpaHbAHe BbB BaIIaPeNoH.
-
3KIIIOHTe LCD MOHITOPa IN 3BaTe 3axpaHbauin Ka6en OT KOHTAKTa.
- HanpbckaIte nouCTBaU pa3TBOp 6e3 pa3TBOpNTeIN Bbpxy KbPna I NOuNCTeB NHIMaTeHNO ekpaHa.
HE INBCKAITE HNEIINBAITE TEUHOCT INPEKTHOBpX EKPAHA NIKOPNYCA.
HE N3IOJI3BAIte IOUHCTBAUIN IPEIAPATN HA AMOHRAHA INCINTHA OCHOBA 3A IOUHCTBAHE HA LCD EKPAHA INN KOPNYCA. -
Acer He Hocn OTROBOPHOCT 3a NOBpei, HAcTbNII B pe3yIITaH Ha N3NOJ3BaHETo Ha NoCHCTBaU INpeNaHa amOHrHa nn cInpTHA OCHOBA.
-
He nocTabaIe LCD MOHITOPa 6JIIN3O Do npo3opeu. I3naraHeTo Ha MOHITOPa Ha IbXd, Bnra Hn CnBHeBa CBETmHa MoKe cepno3HO da ro nobpei.
- He npinaraite HaTnCK Bbpxy LCD ekpaHa. IpeKomepHnT HaTnCK MoKe Da DoBoeDe Do TpaHNo YBpeXdaHe Ha DnCnIeA.
- He oTcpaHbAte KaNaka nHe ce ONITBaTe Da pemOHtnapeTo BA yCTpoiCTBO cAMn. YIbJIHOMOueH TexHnK Tp6Ba Da n3BbPbBa cepBn3HOto 06CnykBAhe OBCaKaBO eCTeTBO.
- CbxaHbAaTe LCD MOHTopa B cTae C TempeaTypa oT -20° Do 60°C (-4° Do 140°F). CbxaHHeHTo Ha LCD MOHTopa N3BbH To3n DnaIa3OH MoKe Da DoBeNe Do TpaHObEe
- He3a6abHNO 13BaTe 5e9ceNa OT KOHTAKTa HA Baunr MOHnTop n ce 6abeTe Ha ynbHOMoueh TexHk npu Bb3HnKbaHeTo Ha HRAOe OCTeHnTe 06TcTepTCTBa:
Ka6eBt 3a CnHAn OT MOHITopa KbM KOMNHOba e npoTpu TIN NOBpeDeH.
Pa3nBaHe Ha TeHocBbpxy LCD MOHTopa Nm MOHTOpbTe n3IOKeHa DbxkD.
LCDMOHITOpbTJINKOPNcBTcaNOBpeHeH.
3aKpenBaHe Ha MOHITopa KbM OCHOBaTa
1.ИЗbaTe OCHOBaTаHaMOHITopaOTOnaKOBKaTЯЯNoCTaBeTeBbpyxCTa6nHaNpaBHa pa60THaNOBbpxHOCT.
2. OTeTpaHete MOHITopa OTOnaKOBkata.
3. 3akpenete pAMOTO Ha CToiKaTa HA MOHITopa KbM OCHOBaTa.
- YBepete ce, ye ochoBaTa e 3aKJIoueHa Bbpxy pAMOTo Ha cToiKaTa Ha MOHITopa. (3a n36paHn MoDENI)
- 3aKpeTe OCHOBaT KaM paMOTo Ha cToiKaTa Ha MOHITopa KaTO 3aBbPTnTE BnHTa C NOMOuTa Ha BrpaDeHOTo e3Nue INIc NOxOJaMa MOHeTa. (3a n36paHn MoJeIN)
Cbbp3BaHe Ha MOHITopa KbM KOMNIOTBpa
1.ИЗКПЮЧЕТМОНТOPAиИЗВадеTe3axpaHbaцяKaбелHa KOMПOTbpaOT KOHTaTа.
2. 2-1 Cbpxte DP ka6ena (cAmo 3a moJe n cBxoD DP)
a. YBepeTe ce, Ye KaKTo MOHITOpbT, Taka N KOMNIOThbPbT ca N3KNIOUeHN.
b. Cbpxke TE DP ka6ena KbM KOMnHObpa.
2-2 CbpxTeHDMI ka6eJa (cAmo 3a moJe n CBxOHDMI)
a. YBepeTe ce, Ye KaKTo MOHITOpbT, Taka N KOMNHTbPbT ca N3KNIOUeHN.
b. CBpbxteHDMI ka6eJa KbM KOMNHTbpa.
- NocTaBeTe 3axpaHbAunKa6eJn Ha MOHTopa B 3axpaHbAunnopT OT 3aHaTa CtpaHa Ha MOHTopa.
- BkIIOUeTe 3axpaHbAunTe Ka6eHN Ha KOMNIOrBpa N MOHITopa B 6JIM3KIA eJIeKTPnueCKN KOHTAKT.
BbHn6yToH3aynpaBneHne
3a Da npedotbpaTne noBpeHa MoHITopa, He ro nobDnraTe OT OCHOBaMy.
Белека:Екранирази Кабел.
BcHKn Bp3kn KbM dpyHn 3uHcNtEHN yCtpoCTBa Tp86Ba Da ce n3BbPWBaT c NOMOHTa Ha ekpaHnpaHn Ka6eHn, 3a da OTrobaprHa pa3nopede 3a eNeKTPomarHHTha CbbMeCTmocT (EMC).
Белекka: Периферни усторства.
EINCTBHeNo nepnepn yctpoNCTBa (BXoHN/3XoHN yctpoNCTBa, TepMNHaH, npnHTepn nT.H.), KOTIO IMAT ceptnikat 3a CbOTBeTcTBne C orpaHHeHnTa 3a Knac B Morat da ce cbp3Bat KbM ToBa o6OpyDbaHe. Pa60tata c HecepTNPhiuPAH npePnepn yctpoCTBa MoKe Da DOBeDe Do CMUeHn Ha paDNIO IN TEeBN3NOHTo pnpMaHe.
BHMMaHHe
PpOMeHn MOnMnKauu, KOIT He ca n3pnuHo ODo6peHn OT npOn3BODnteI MoRat Da DOBeaT Do aHyIpHa He HbHOMoUraHa Notpe6nteJ, KoTe o Ce pdeocTabr O T FeepaHata KOMncnIO KOMyHKauuTe 3a pa6ota c To3n npOdykt.
UcnoBnaHa pa6Ota
ToBa yCTpoCTBO E B CBoTBeCTBnE C cact 15 ot npabInata Ha K K Pa6oTa e npedMeHa cneHnTe Dbe ycNoB: (1) ToBa yCTpoCTBO He Tp6Ba Da npuHHa BpeHN CmUeHn N (2) ToBa yCTpoCTBO Tp6Ba Da npHeMa BCnKn nOnyehn CmUeHn, BKNUHTeH0 CmUeHn, KOnto 6xHa MoTn Da npuHHa HxKeIaHa pa6Ota.
BeJexka: KaHaDcKn noTppe6nteJI
ToBa cHpOBo yctpoIcTBO OT Knac B OITRObAp Ha pa3nope6aTa ICES-003 Ha KaHaJa.
Olulised ohutusalased juhised
- nnuuuaauauauuCC: uuuuuuuuuuuuuuuuuuuuuuuuuuuuuuuuuuuuuuuuuuuuuuuuuuuuuuuuuuuuuuuuuuuuuuuuuuuuuuuuuuuuuuuuuuuuuuuuuuuuuuuuuuuuuuuuuuuuuuuuuuuuuuuuuuuuuuuuuuuuuuuuuuuuuuuuuuuuuuuuuuuuuuuuuuuuuUU
- JuaaLCD uanaanwaaan
·
- wuunwunwnnnaanannnnnnaaannnnnnaananaananaananaananaananaananaananaananaananaananaananaananaananaananaananaananaananaananaananaananaananaananaananaananaananaananaananaananaananaananaananaananaananaananaananaananaananaananaananaananaananaananaananaananaananaananaananaananaananaananaan
Acer 2uuiuunnnnne nnnnnnnnnnnnnnnnnnnnnnnnnnnnnnnnnnnnnnnnnnnnnnnnnnnnnnn
- aonnaaatnfa LCD 1nnnnnnn ndu anu uauanannn anananaananaananaananaan
- auiuunnnnnaa LCD uonnnnnnulalnuwunwauanrwn
- aunnnaaannnnnnaanennnnnnnnnnnnnnnnnnnnnnnnnnnnnnnnnnnnnnnnnnnnnnnnnnnnnnnnnnnnnnnnnnnnnnnnnnnnnnnnnnnnnnnnnnnnnnnnnn
- 1uauauuau LCD uuaaunnaunn -20° 60°C (-4° 140°F) nuaaunauauLCD nuaanau
- aanaanuwaanaannuuaaanaaunnaaennnnaaannnnnnaa:
Acer Inc., 2014/30/EU, Low Voltage Directive 2014/35/EU and RoHS Directive 2011/65/EU and Directive 2009/125/EC (to be amended) for the following sections:
y
aunnnnne nnnae Class B nnnnnnnn nn Canadian ICES-003
| vga LCD | 23.8"W (60 mm) | ||
| 23.8"W (60 mm) | |||
| 23.8"W (60 mm) | |||
| 23.8"W (60 mm) | |||
| 23.8"W (60 mm) | |||
| 23.8"W (60 mm) | |||
| 23.8"W (60 mm) | |||
| 23.8"W (60mm) | |||
| 23.8"W (60mm) | |||
| 23.8"W (60mm) | |||
| 23.8"W (60mm) | |||
| 23.8"W (60mm) | |||
| 23.8"W (60mm) | |||
| 23.8"W (60mm) | |||
| 23.1" (60mm) | |||
| 23.1" (60mm) | |||
| 23.1" (60mm) | |||
| 23.1" (60mm) | |||
| 23.1" (60mm) | |||
| 23.1" (60mm) | |||
| 23.1" (60mm) | |||
| H-Frequency | HDMI 1.4: 31 - 105 kHz HDMI 2.0: 31 - 222 kHz DP: 222 - 222 kHz DP: 222 - 222 kHz (uHa FreeSync) | ||
| HDMI 1.4: 56 - 76 Hz HDMI 2.0: 56 - 144 Hz DP: 40 - 144 Hz HDMI 1.4: 40 - 70 Hz (uHa FreeSync) HDMI 2.0/DP: 40 - 144 Hz (uHa FreeSync) | |||
| B | |||
| * H-2.7 AIN | |||
| Dot Clock | HDMI1.4: 280 MHz HDMI 2.0/DP: 600 MHz | ||
| H-2.7 AIN | HDMI 1.4: 2560 x 1440 @ 70 Hz HDMI 2.0/DP: 2560 x 1440 @ 144 Hz | ||
| Plug & Play VESA DDCCI/DDC2B | |||
| * H-2.7 AIN | B | ||
| * H-2.7 AIN | 43 (kWh) (H-2.7 AIN = HDMI) | ||
| H-2.7 AIN | HDMI 19 W (H-2.7 W) | ||
| H-2.7 AIN | 0.4 W (H-2.7 L) | ||
| H-2.7 AIN | 0.35 W (H-2.7 L) | ||
| H-2.7 AIN | HDMI 19 W (H-2.7 = HDMI = HDI) DP (H-2.7 = HDMI = DP) (H-2.7 = HDMI) | ||
| H-2.7 AIN | HDMI 19 W (H-2.7 = HDMI = HDI) DP (H-2.7 = HDMI = DP) (H-2.7 = HDMI) | ||
| H-2.7 AIN | 2 W x 2 (H-2.7 = HDMI = HDMI = HDMI = HDMI = HDMI = HDMI = HDMI = HDMI = HDMI = HDMI = HDMI = HDMI = HDMI = HDMI = HDMI = HDMI = HDMI = HDMI = HDMI = HDMI = HDMI = HDMI = HDMI = HDMI = HDMI = HDMI = HDMI = HDMI = HDMI = HDMI = HDMI = HDMI = HDMI = HDMI = HDMI = HDMI = HDMI = HDMI = HDMI = HDMI = HDMI = HDMI = HDMI = HDMI = HDMI = HDMI = HDMI = HDMI = HDMI = HDMI = H-2.7 = HDMI = HDMI = HDMI = HDMI = HDMI = HDMI = HDMI = HDMI = HDMI = HDMI = HDMI = HDMI = HDMI = HDMI = HDMI = HDMI = HDMI = HDMI = HDMI = HDMI = HDMI = HDMI = HDMI = HDMI = HDMI = HDMI = HDMI = HDMI = HDMI = HDMI = HDMI = HDMI = HDMI = HDMI = HDMI = HDMI = HDMI = HDMI = HDMI = HDMI = HDMI = HDMI = HDMI = HDMI = HDMI = HDMI = HDMI = H-2.5 = HDMI = HDMI = HDMI = HDMI = HDMI = HDMI = HDMI = HDMI = HDMI = HDMI = HDMI = HDMI = HDMI = HDMI = HDMI = HDMI = HDMI = HDMI = HDMI = HDMI = HDMI = HDMI = HDMI = HDMI = HDMI = HDMI = HDMI = HDMI = HDMI = HDMI = HDMI = HDMI = HDMI = HDMI = HDMI = HDMI = HDMI = HDMI = HDMI = HDMI = HDMI = HDMI = HDMI = HDMI = HDMI = HDMI = HDMI = HDMI = HDMI = HDD | ||
| H-2.7 AIN | H-2.7 AIN | ||
| H-2.7 AIN | H-2.7 AIN | ||
| H-2.7 AIN | H-2.7 AIN | ||
| H-2.7 AIN | H-2.7 AIN | ||
| H-2.7 AIN | H-2.7 AIN | ||
| H-2.7 AIN | H-2.7 AIN H-2.7 AIN | ||
| H-2.7 AIN | H-2.7 AIN H-2.7 AIN | ||
| H-2.7 AIN | H-2.7 AIN H-2.7 AIN | ||
| H-2.7 AIN | H-2.7 AIN H-2.7 AIN | ||
| H-2.2 AIN | H-2.2 AIN H-2.2 AIN | ||
| H-2.2 AIN | H-2.2 AIN H-2.2 AIN | ||
| H-2.2 AIN | H-2.2 AIN H-2.2 AIN | ||
| H-2.2 AIN | H-2.2 AIN H-2.2 AIN | ||
| H-2.2 AIN | L100 - 240V, 50/60 Hz | ||
| H-2.2 AIN | H-2.2 AIN H-2.2 AIN H-2.2 AIN H-2.2 AIN H-2.2 AIN H-2.2 AIN H-2.2 AIN H-2.2 AIN H-2.2 AIN H-2.2 AIN H-2.2 AIN H-2.2 AIN H-2.2 AIN H-2A H-2A H-2A H-2A H-2A H-2A H-2A H-2A H-2A H-2A H-2A H-2A H-2A H-2A H-2A H-2A H-2A H-2A H-2A H-2A H-2B H-2B H-2B H-2B H-2B H-2B H-2B H-2B H-2B H-2B H-2B H-2B H-2B H-2B H-2B H-2B H-2B H-2B H-2B H-2B H-2R H-2R H-2R H-2R H-2R H-2R H-2R H-2R H-2R H-2R H-2R H-2R H-2R H-2R H-2R H-2R H-2R H-2R H-2R H-2R H-2B H-2B H-2B H-2B H-2B H-2B H-2B H-2B H-2B H-2B H-2B H-2B H-2B H-2B H-2B H-2B H-2B H-2B H-2B H-2 B H-2 B H-2 B H-2 B H-2 B H-2 B H-2 B H-2 B H-2 B H-2 B H-2 B H-2 B H-2 B H-2 B H-2 B H-2 B H-2 B H-2 B H-2 B H-2 B H-2B H-2B H-2B H-2B H-2B H-2B H-2B H-2B H-2B H-2B H-2B H-2B H-2B H-2B H-2B H-2B H-2B H-2B H-2B H-2 H-2B H-2B H-2B H-2B H-2B H-2B H-2B H-2B H-2B H-2B H-2B H-2B H-2B H-2B H-2B H-2B H-2B H-2B H-2B H-2b H-2b H-2b H-2b H-2b H-2b H-2b H-2b H-2b H-2b H-2b H-2b H-2b H-2b H-2b H-2b H-2b H-2b H-2b H-2b H-2B H-2B H-2B H-2B H-2B H-2B H-2B H-2B H-2B H-2B H-2B H-2B H-2B H-2B H-2B H-2B H-2B H-2B H-2B H-2D H-2D H-2D H-2D H-2D H-2D H-2D H-2D H-2D H-2D H-2D H-2D H-2D H-2D H-2D H-2D H-2D H-2D H-2D H-2D H-2B H-2B H-2B H-2B H-2B H-2B H-2B H-2B H-2B H-2B H-2B H-2B H-2B H-2B H-2B H-2B H-2B H-2B H-2B H-2C H-2C H-2C H-2C H-2C H-2C H-2C H-2C H-2C H-2C H-2C H-2C H-2C H-2C H-2C H-2C H-2C H-2C H-2C H-2C H-2c H-2c H-2c H-2c H-2c H-2c H-2c H-2c H-2c H-2c H-2c H-2c H-2c H-2c H-2c H-2c H-2c H-2c H-2c H-2c H-2C H-2C H-2C H-2C H-2C H-2C H-2C H-2C H-2C H-2C H-2C H-2C H-2C H-2C H-2C H-2C H-2C H-2C H-2C H-2 C H-2C H-2C H-2C H-2C H-2C H-2C H-2C H-2C H-2C H-2C H-2C H-2C H-2C H-2C H-2C H-2C H-2C H-2C H-2C H-2B H-2B H-2B H-2B H-2B H-2B H-2B H-2B H-2B H-2B H-2B H-2B H-2B H-2B H-2B H-2B H-2B H-2B H-2B H-2c H-2c H-2c H-2c H-2c H-2c H-2c H-2c H-2c H-2c H-2c H-2c H-2c H-2c H-2c H-2c H-2c H-2c H-2c H-2b H-2b H-2b H-2b H-2b H-2b H-2b H-2b H-2b H-2b H-2b H-2b H-2b H-2b H-2b H-2b H-2b H-2b H-2b H-2c H-2c H-2c H-2c H-2c H-2c H-2c H-2c H-2c H-2c H-2c H-2c H-2c H-2c H-2c H-2c H-2c H-2c H-2c H-2d H-2d H-2d H-2d H-2d H-2d H-2d H-2d H-2d H-2d H-2d H-2d H-2d H-2d H-2d H-2d H-2d H-2d H-2d H-2d H-2c H-2c H-2c H-2c H-2c H-2c H-2c H-2c H-2c H-2c H-2c H-2c H-2c H-2c H-2c H-2c H-2c H-2c H-2c H-2e H-2e H-2e H-2e H-2e H-2e H-2e H-2e H-2e H-2e H-2e H-2e H-2e H-2e H-2e H-2e H-2e H-2e H-2e H-2e H-2c H-2c H-2c H-2c H-2c H-2c H-2c H-2c H-2c H-2c H-2c H-2c H-2c H-2c H-2c H-2c H-2c H-2c H-2c H-2f H-2f H-2f H-2f H-2f H-2f H-2f H-2f H-2f H-2f H-2f H-2f H-2f H-2f H-2f H-2f H-2f H-2f H-2f H-2f H-2c H-2c H-2c H-2c H-2c H-2c H-2c H-2c H-2c H-2c H-2c H-2c H-2c H-2c H-2c H-2c H-2c H-2c H-2c H-2r H-2r H-2r H-2r H-2r H-2r H-2r H-2r H-2r H-2r H-2r H-2r H-2r H-2r H-2r H-2r H-2r H-2r H-2r H-2r H-2c H-2c H-2c H-2c H-2c H-2c H-2c H-2c H-2c H-2c H-2c H-2c H-2c H-2c H-2c H-2c H-2c H-2c H-2c H-2g H-2g H-2g H-2g H-2g H-2g H-2g H-2g H-2g H-2g H-2g H-2g H-2g H-2g H-2g H-2g H-2g H-2g H-2g H-2g H-2c H-2c H-2c H-2c H-2c H-2c H-2c H-2c H-2c H-2c H-2c H-2c H-2c H-2c H-2c H-2c H-2c H-2c H-2c H-2a H-2a H-2a H-2a H-2a H-2a H-2a H-2a H-2a H-2a H-2a H-2a H-2a H-2a H-2a H-2a H-2a H-2a H-2a H-2a H-2b H-2b H-2b H-2b H-2b H-2b H-2b H-2b H-2b H-2b H-2b H-2b H-2b H-2b H-2b H-2b H-2b H-2b H-2b H-2h H-2h H-2h H-2h H-2h H-2h H-2h H-2h H-2h H-2h H-2h H-2h H-2h H-2h H-2h H-2h H-2h H-2h H-2h H-2h H-2b H-2b H-2b H-2b H-2b H-2b H-2b H-2b H-2b H-2b H-2b H-2b H-2b H-2b H-2b H-2b H-2b H-2b H-2b H-2r H-2r H-2r H-2r H-2r H-2r H-2r H-2r H-2r H-2r H-2r H-2r H-2r H-2r H-2r H-2r H-2r H-2r H-2r H-2R H-2R H-2R H-2R H-2R H-2R H-2R H-2R H-2R H-2R H-2R H-2R H-2R H-2R H-2R H-2R H-2R H-2R H-2R H-2r H-2r H-2r H-2r H-2r H-2r H-2r H-2r H-2r H-2r H-2r H-2r H-2r H-2r H-2r H-2r H-2r H-2r H-2r H-2t H-2t H-2t H-2t H-2t H-2t H-2t H-2t H-2t H-2t H-2t H-2t H-2t H-2t H-2t H-2t H-2t H-2t H-2t H-2t H-2r H-2r H-2r H-2r H-2r H-2r H-2r H-2r H-2r H-2r H-2r H-2r H-2r H-2r H-2r H-2r H-2r H-2r H-2r H-2s H-2s H-2s H-2s H-2s H-2s H-2s H-2s H-2s H-2s H-2s H-2s H-2s H-2s H-2s H-2s H-2s H-2s H-2s H-2s H-2S H-2S H-2S H-2S H-2S H-2S H-2S H-2S H-2S H-2S H-2S H-2S H-2S H-2S H-2S H-2S H-2S H-2S H-2S H-2S H-2s H-2s H-2s H-2s H-2s H-2s H-2s H-2s H-2s H-2s H-2s H-2s H-2s H-2s H-2s H-2s H-2s H-2s H-2s H-2c H-2c H-2c H-2c H-2c H-2c H-2c H-2c H-2c H-2c H-2c H-2c H-2c H-2c H-2c H-2c H-2c H-2c H-2c H-2s H-2s H-2s H-2s H-2s H-2s H-2s H-2s H-2s H-2s H-2s H-2s H-2s H-2s H-2s H-2s H-2s H-2s H-2s H-2r H-2r H-2r H-2r H-2r H-2r H-2r H-2r H-2r H-2r H-2r H-2r H-2r H-2r H-2r H-2r H-2r H-2r H-2r H-2l H-2l H-2l H-2l H-2l H-2l H-2l H-2l H-2l H-2l H-2l H-2l H-2l H-2l H-2l H-2l H-2l H-2l H-2l H-2l H-2r H-2r H-2r H-2r H-2r H-2r H-2r H-2r H-2r H-2r H-2r H-2r H-2r H-2r H-2r H-2r H-2r H-2r H-2r H-2 r H-2r H-2r H-2r H-2r H-2r H-2r H-2r H-2r H-2r H-2r H-2r H-2r H-2r H-2r H-2r H-2r H-2r H-2r H-2r H-2p H-2p H-2p H-2p H-2p H-2p H-2p H-2p H-2p H-2p H-2p H-2p H-2p H-2p H-2p H-2p H-2p H-2p H-2p H-2p H-2P H-2P H-2P H-2P H-2P H-2P H-2P H-2P H-2P H-2P H-2P H-2P H-2P H-2P H-2P H-2P H-2P H-2P H-2P H-2P H-2p H-2p H-2p H-2p H-2p H-2p H-2p H-2p H-2p H-2p H-2p H-2p H-2p H-2p H-2p H-2p H-2p H-2p H-2p H-2r H-2r H-2r H-2r H-2r H-2r H-2r H-2r H-2r H-2r H-2r H-2r H-2r H-2r H-2r H-2r H-2r H-2r H-2r H-2m H-2m H-2m H-2m H-2m H-2m H-2m H-2m H-2m H-2m H-2m H-2m H-2m H-2m H-2m H-2m H-2m H-2m H-2m H-2m H-2 m H-2m H-2m H-2m H-2m H-2m H-2m H-2m H-2m H-2m H-2m H-2m H-2m H-2m H-2m H-2m H-2m H-2m H-2m H-2m H-2r H-2r H-2r H-2r H-2r H-2r H-2r H-2r H-2r H-2r H-2r H-2r H-2r H-2r H-2r H-2r H-2r H-2r H-2r H-2rs H-2rs H-2rs H-2rs H-2rs H-2rs H-2rs H-2rs H-2rs H-2rs H-2rs H-2rs H-2rs H-2rs H-2rs H-2rs H-2rs H-2rs H-2rs H-2rs H-2r H-2r H-2r H-2r H-2r H-2r H-2r H-2r H-2r H-2r H-2r H-2r H-2r H-2r H-2r H-2r H-2r H-2r H-2r H-2rl H-2rl H-2rl H-2rl H-2rl H-2rl H-2rl H-2rl H-2rl H-2rl H-2rl H-2rl H-2rl H-2rl H-2rl H-2rl H-2rl H-2rl H-2rl H-2rl H-2r H-2r H-2r H-2r H-2r H-2r H-2r H-2r H-2r H-2r H-2r H-2r H-2r H-2r H-2r H-2r H-2r H-2r H-2r H-2rt H-2rt H-2rt H-2rt H-2rt H-2rt H-2rt H-2rt H-2rt H-2rt H-2rt H-2rt H-2rt H-2rt H-2rt H-2rt H-2rt H-2rt H-2rt H-2rt H-2r H-2r H-2r H-2r H-2r H-2r H-2r H-2r H-2r H-2r H-2r H-2r H-2r H-2r H-2r H-2r H-2r H-2r H-2r H-2rgb G- G- G- G- G- G- G- G- G- G- G- G- G- G- G- G- G- G- G- G- G- G- G- G- G- G- G- G- G- G- G- G- G- G- G- G- G- G- G- G- G- G- G- G- G- G- G- G- G- G- G - G- G- G- G- G- G- G- G- G- G- G- G- G- G- G- G- G- G- G- G- G- G- G- G- G- G- G- G- G- G- G- G- G- G- G- G- G- G- G- G- G- G- G- G- G- G- G- G- G- G G- G- G- G- G- G- G- G- G- G- G- G- G- G- G- G- G- G- G- G- G- G- G- G- G- G- G- G- G- G- G- G- G- G- G- G- G- G- G- G- G- G- G- G- G- G- G- G- G- G - G - G - G - G - G - G - G - G - G - G - G - G - G - G - G - G - G - G - G - G - G - G - G - G - G - G - G - G - G - G - G - G - G - G - G - G - G - G - G - G - G - G - G - G - G - G - G - G - G - G -G - G - G - G - G - G - G - G - G - G - G - G - G - G - G - G - G - G - G - G - G - G - G - G - G - G - G - G - G - G - G - G - G - G - G - G - G - G - G - G - G - G - G - G - G - G - G - G - G - G - G - G - G - G - G - G - G - G - G - G - G - G - G - G - G - G - G - G - G - G - G - G - G - G - G - G - G - G - G - G - G - G - G - G - G - G - G - G - G - G - G - G - G - G - G - G - G - G - G - G G - G - G - G - G - G - G - G - G - G - G - G - G - G - G - G - G - G - G - G - G - G - G - G - G - G - G - G - G - G - G - G - G - G - G - G - G - G - G - G - G - G - G - G - G - G - G - G - G - G- G - G - G - G - G - G - G - G - G - G - G - G - G - G - G - G - G - G - G - G - G - G - G - G - G - G - G - G - G - G - G - G - G - G - G - G - G - G - G - G - G - G - G - G - G - G - G - G - G -G -G - G - G - G - G - G - G - G - G - G - G - G - G - G - G - G - G - G - G - G - G - G - G - G - G - G - G - G - G - G - G - G - G - G - G - G - G - G - G - G - G - G - G - G - G - G - G - G - G -G - G - G - G - G - G - G - G - G - G - G - G - G - G - G - G - G - G - G - G - G - G - G - G - G - G - G - G - G - G - G - G - G - G - G - G - G - G - G - G - G - G - G - G - G - G - G - G - G - G -G G - G - G - G - G - G - G - G - G - G - G - G - G - G - G - G - G - G - G - G - G - G - G - G - G - G - G - G - G - G - G - G - G - G - G - G - G - G - G - G - G - G - G - G - G - G - G - G - G -G- G - G - G - G - G - G - G - G - G - G - G - G - G - G - G - G - G - G - G - G - G - G - G - G - G - G - G - G - G - G - G - G - G - G - G - G - G - G - G - G - G - G - G - G - G - G - G - G - G - G -G - G - G - G - G - G - G - G - G - G - G - G - G - G - G - G - G - G - G - G - G - G - G - G - G - G - G - G - G - G - G - G - G - G - G - G - G - G - G - G - G - G - G - G - G - G - G - G - G - G - G - G - G - G - G - G - G - G - G - G - G - G - G - G - G - G - G - G - G - G - G - G - G - G - G - G - G - G - G - G - G - G - G - G - G - G - G - G - G - G - G - G - G - G - G - G - G - G - G - F - F - F - F - F - F - F - F - F - F - F - F - F - F - F - F - F - F - F - F - F - F - F - F - F - F - F - F - F - F - F - F - F - F - F - F - F - F - F - F - F - F - F - F - F - F - F - F - F - F - G - G - G - G - G - G - G - G - G - G - G - G - G - G - G - G - G - G - G - G - G - G - G - G - G - G - G - G - G - G - G - G - G - G - G - G - G - G - G - G - G - G - G - G - G - G - G - G - G - C- C- C- C- C- C- C- C- C- C- C- C- C- C- C- C- C- C- C- C- C- C- C- C- C- C- C- C- C- C- C- C- C- C- C- C- C- C- C- C- C- C- C- C- C- C- C- C- C- C- C - C- C- C- C- C- C- C- C- C- C- C- C- C- C- C- C- C- C- C- C- C- C- C- C- C- C- C- C- C- C- C- C- C- C- C- C- C- C- C- C- C- C- C- C- C- C- C- C- C- c- c- c- c- c- c- c- c- c- c- c- c- c- c- c- c- c- c- c- c- c- c- c- c- c- c- c- c- c- c- c- c- c- c- c- c- c- c- c- c- c- c- c- c- c- c- c- c- c- c- C- C- C- C- C- C- C- C- C- C- C- C- C- C- C- C- C- C- C- C- C- C- C- C- C- C- C- C- C- C- C- C- C- C- C- C- C- C- C- C- C- C- C- C- C- C- C- C- C- c - c- c- c- c- c- c- c- c- c- c- c- c- c- c- c- c- c- c- c- c- c- c- c- c- c- c- c- c- c- c- c- c- c- c- c- c- c- c- c- c- c- c- c- c- c- c- c- c- c- c - c- c- c- c- c- c- c- c- c- c- c- c- c- c- c- c- c- c- c- c- c- c- c- c- c- c- c- c- c- c- c- c- c- c- c- c- c- c- c- c- c- c- c- c- c- c- c- c- C- C - C- C- C- C- C- C- C- C- C- C- C- C- C- C- C- C- C- C- C- C- C- C- C- C- C- C- C- C- C- C- C- C- C- C- C- C- C- C- C- C- C- C- C- C- C- C- C- c- c- c - c- c- c- c- c- c- c- c- c- c- c- c- c- c- c- c- c- c- c- c- c- c- c- c- c- c- c- c- c- c- c- c- c- c- c- c- c- c- c- c- c- c- c- c- c- c- C- C- C- C - C- C- C- C- C- C- C- C- C- C- C- C- C- C- C- C- C- C- C- C- C- C- C- C- C- C- C- C- C- C- C- C- C- C- C- C- C- C- C- C- C- C- C- C- C- c- c- c- c- c - c- c- c- c- c- c- c- c- c- c- c- c- c- c- c- c- c- c- c- c- c- c- c- c- c- c- c- c- c- c- c- c- c- c- c- c- c- c- c- c- c- c- c- c- C- C- C- C- C- C - C- C- C- C- C- C- C- C- C- C- C- C- C- C- C- C- C- C- C- C- C- C- C- C- C- C- C- C- C- C- C- C- C- C- C- C- C- C- C- C- C- C- C- c- c- c- c- c- c- c - c- c- c- c- c- c- c- c- c- c- c- c- c- c- c- c- c- c- c- c- c- c- c- c- c- c- c- c- c- c- c- c- c- c- c- c- c- c- c- c- c- c- C- C- C- C- C- C- C- C - C - C - C - C - C - C - C - C - C - C - C - C - C - C - C - C - C - C - C - C - C - C - C - C - C - C - C - C - C - C - C - C - C - C - C - C - C - C - C - C - C - C - C - C - C - C - C - C - C - C- C - C - C - C - C - C - C - C - C - C - C - C - C - C - C - C - C - C - C - C - C - C - C - C - C - C - C - C - C - C - C - C - C - C - C - C - C - C - C - C - C - C - C - C - C - C - C - C - C- C- C - C - C - C - C - C - C - C - C - C - C - C - C - C - C - C - C - C - C - C - C - C - C - C - C - C - C - C - C - C - C - C - C - C - C - C - C - C - C - C - C - C - C - C - C - C - C - C - C - C - C - C - C - C - C - C - C - C - C - C - C - C - C - C - C - C - C - C - C - C - C - C - C - C - C - C - C - C - C - C - C - C - C - C - C - C - C - C - C - C - C - C - C - C - C - C - C - C - c - c - c - c - c - c - c - c - c - c - c - c - c - c - c - c - c - c - c - c - c - c - c - c - c - c - c - c - c - c - c - c - c - c - c - c - c - c - c - c - c - c - c - c - c - c - c - c - c - c - C - C - C - C - C - C - C - C - C - C - C - C - C - C - C - C - C - C - C - C - C - C - C - C - C - C - C - C - C - C - C - C - C - C - C - C - C - C - C - C - C - C - C - C - C - C - C - C - C - G - G - G - G - G - G - G - G - G - G - G - G - G - G - G - G - G - G - G - G - G - G - G - G - G - G - G - G - G - G - G - G - G - G - G - G - G - G - G - G - G - G - G - G - G - G - G - G - G - g - g - g - g - g - g - g - g - g - g - g - g - g - g - g - g - g - g - g - g - g - g - g - g - g - g - g - g - g - g - g - g - g - g - g - g - g - g - g - g - g - g - g - g - g - g - g - g - g - g - G - G - G - G - G - G - G - G - G - G - G - G - G - G - G - G - G - G - G - G - G - G - G - G - G - G - G - G - G - G - G - G - G - G - G - G - G - G - G - G - G - G - G - G - G - G - G - G - G - . G - G - G - G - G - G - G - G - G - G - G - G - G - G - G - G - G - G - G - G - G - G - G - G - G - G - G - G - G - G - G - G - G - G - G - G - G - G - G - G - G - G - G - G - G - G - G - G - G - G - C - C - C - C - C - C - C - C - C - C - C - C - C - C - C - C - C - C - C - C - C - C - C - C - C - C - C - C - C - C - C - C - C - C - C - C - C - C - C - C - C - C - C - C - C - C - C - C - C - C - c - c - c - c - c - c - c - c - c - c - c - c - c - c - c - c - c - c - c - c - c - c - c - c - c - c - c - c - c - c - c - c - c - c - c - c - c - c - c - c - c - c - c - c - c - c - c - c - c - c - C - C - C - C - C - C - C - C - C - C - C - C - C - C - C - C - C - C - C - C - C - C - C - C - C - C - C - C - C - C - C - C - C - C - C - C - C - C - C - C - C - C - C - C - C - C - C - C - C - D - C - C - C - C - C - C - C - C - C - C - C - C - C - C - C - C - C - C - C - C - C - C - C - C - C - C - C - C - C - C - C - C - C - C - C - C - C - C - C - C - C - C - C - C - C - C - C - C - C - F - F - F - F - F - F - F - F - F - F - F - F - F - F - F - F - F - F - F - F - F - F - F - F - F - F - F - F - F - F - F - F - F - F - F - F - F - F - F - F - F - F - F - F - F - F - F - F - F - F - f - F - F - F - F - F - F - F - F - F - F - F - F - F - F - F - F - F - F - F - F - F - F - F - F - F - F - F - F - F - F - F - F - F - F - F - F - F - F - F - F - F - F - F - F - F - F - F - F - F - F - C - C - C - C - C - C - C - C - C - C - C - C - C - C - C - C - C - C - C - C - C - C - C - C - C - C - C - C - C - C - C - C - C - C - C - C - C - C - C - C - C - C - C - C - C - C - C - C - C - F - F - F - F - F - F - F - F - F - F - F - F - F - F - F - F - F - F - F - F - F - F - F - F - F - F - F - F - F - F - F - F - F - F - F - F - F - F - F - F - F - F - F - F - F - F - F - F - F - F - F - F - F - F - F - F - F - F - F - F - F - F - F - F - F - F - F - F - F - F - F - F - F - F - F - F - F - F - F - F - F - F - F - F - F - F - F - F - F - F - F - F - F - F - F - F - F - F - F - f - f - f - f - f - f - f - f - f - f - f - f - f - f - f - f - f - f - f - f - f - f - f - f - f - f - f - f - f - f - f - f - f - f - f - f - f - f - f - f - f - f - f - f - f - f - f - f - f - f - f - g - g - g - g - g - g - g - g - g - g - g - g - g - g - g - g - g - g - g - g - g - g - g - g - g - g - g - g - g - g - g - g - g - g - g - g - g - g - g - g - g - g - g - g - g - g - g - g - g - f - f - f - f - f - f - f - f - f - f - f - f - f - f - f - f - f - f - f - f - f - f - f - f - f - f - f - f - f - f - f - f - f - f - f - f - f - f - f - f - f - f - f - f - f - f - f - f - f - F - F - F - F - F - F - F - F - F - F - F - F - F - F - F - F - F - F - F - F - F - F - F - F - F - F - F - F - F - F - F - F - F - F - F - F - F - F - F - F - F - F - F - F - F - F - F - F - F - f - f - f - f - f - f - f - f - f - f - f - f - f - f - f - f - f - f - f - f - f - f - f - f - f - f - f - f - f - f - f - f - f - f - f - f - f - f - f - f - f - f - f - f - f - f - f - f - f - c- c- c- c- c- c- c- c- c- c- c- c- c- c- c- c- c- c- c- c- c- c- c- c- c- c- c- c- c- c- c- c- c- c- c- c- c- c- c- c- c- c- c- c- c- c- c- c- c- f- f - f - f - f - f - f - f - f - f - f - f - f - f - f - f - f - f - f - f - f - f - f - f - f - f - f - f - f - f - f - f - f - f - f - f - f - f - f - f - f - f - f - f - f - f - f - f - f - f - f- f - f - f - f - f - f - f - f - f - f - f - f - f - f - f - f - f - f - f - f - f - f - f - f - f - f - f - f - f - f - f - f - f - f - f - f - f - f - f - f - f - f - f - f - f - f - f - f - f- f- f - f - f - f - f - f - f - f - f - f - f - f - f - f - f - f - f - f - f - f - f - f - f - f - f - f - f - f - f - f - f - f - f - f - f - f - f - f - f - f - f - f - f - f - f - f - f - f - g- g- g- g- g- g- g- g- g- g- g- g- g- g- g- g- g- g- g- g- g- g- g- g- g- g- g- g- g- g- g- g- g- g- g- g- g- g- g- g- g- g- g- g- g- g- g- g- g- g- g g- g- g- g- g- g- g- g- g- g- g- g- g- g- g- g- g- g- g- g- g- g- g- g- g- g- g- g- g- g- g- g- g- g- g- g- g- g- g- g- g- g- g- g- g- g- g- g- g- g g- g- g- g- g- g- g- g- g- g- g- g- g- g- g- g- g- g- g- g- g- g- g- g- g- g- g- g- g- g- g- g- g- g- g- g- g- g- g- g- g- g- g- g- g- g- g- g- g- g | ||
Vodicza brzoPokretanje Acer LCD monitora (QSG)
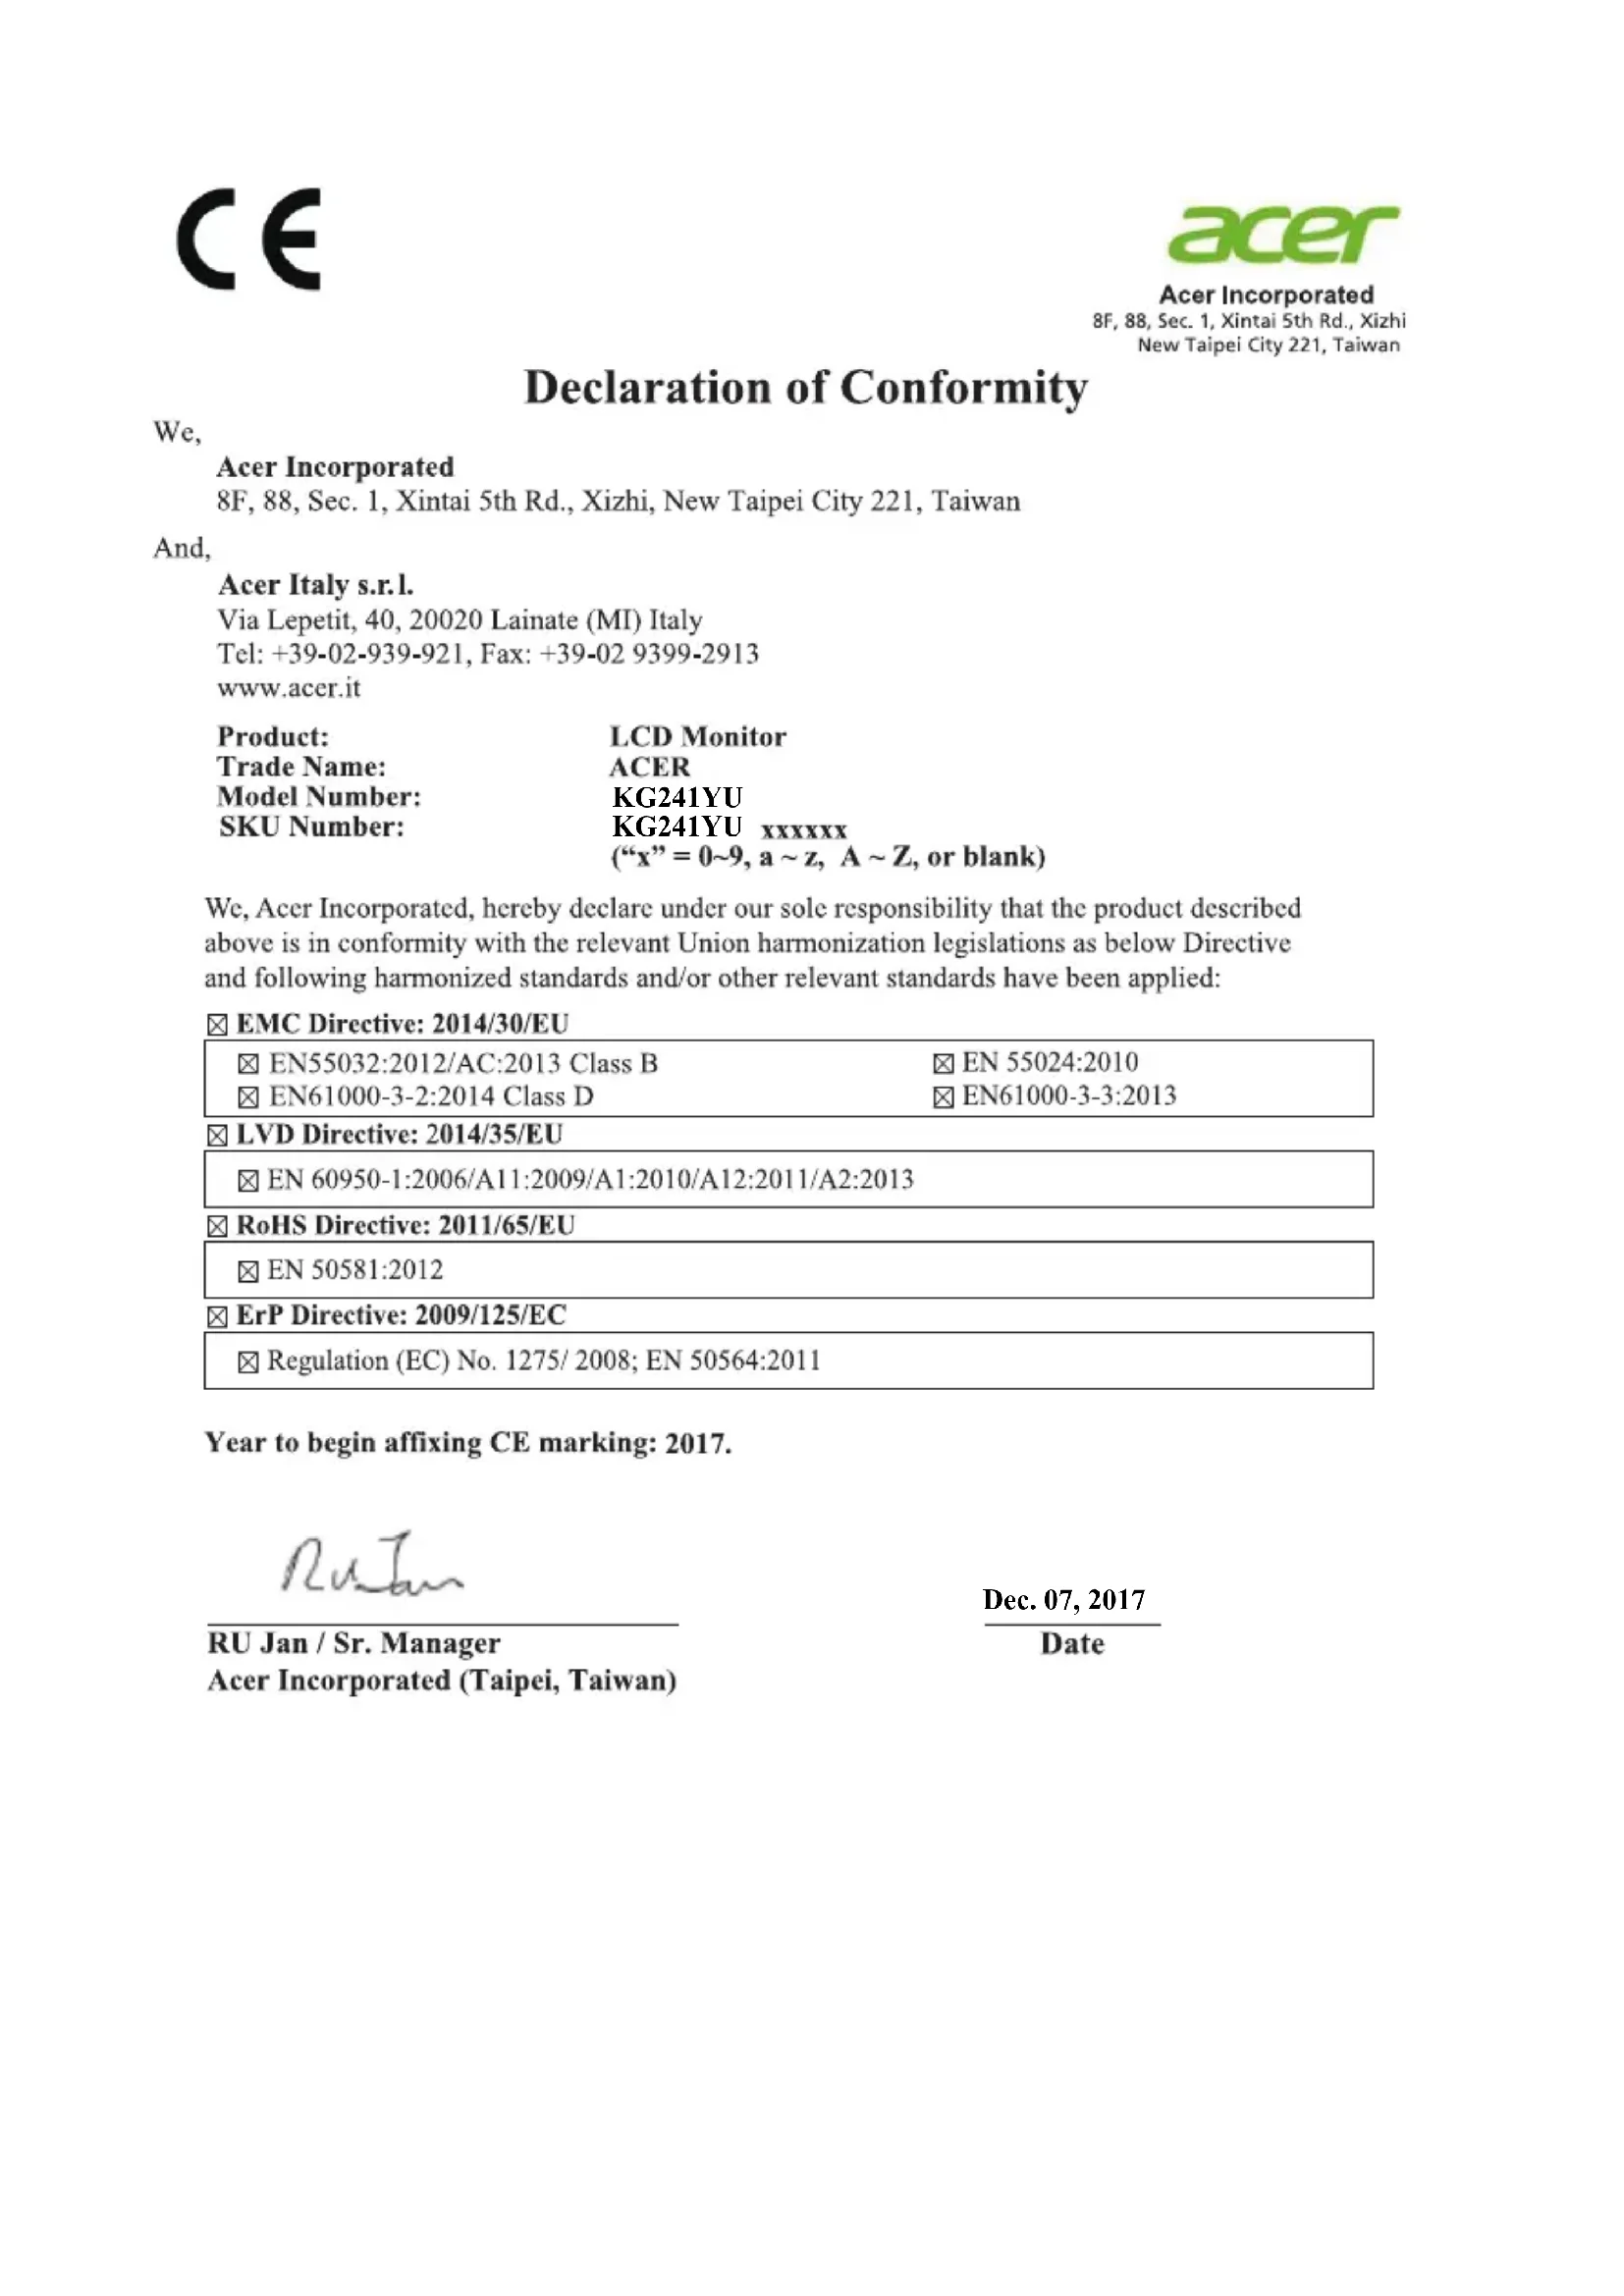
Declaration of Conformity
We,
Acer Incorporated
8F, 88, Sec. 1, Xintai 5th Rd., Xizhi, New Taipei City 221, Taiwan
And,
Acer Italy s.r.l.
Via Lepetit, 40, 20020 Lainate (MI) Italy
Tel: +39-02-939-921, Fax: +39-02 9399-2913
www.acer.it
Product:
LCD Monitor
Trade Name:
ACER
Model Number:
KG241YU
SKU Number:
KG241YUXXXXX
^ ^ = 0 9 a\~z,A\~Z,orblank)
We, Acer Incorporated, hereby declare under our sole responsibility that the product described above is in conformity with the relevant Union harmonization legislations as below Directive and following harmonized standards and/or other relevant standards have been applied:
EMC Directive: 2014/30/EU
EN55032:2012/AC:2013 Class B
EN55024:2010
EN61000-3-2:2014 Class D
EN61000-3-3:2013
LVD Directive: 2014/35/EU
EN60950-1:2006/A11:2009/A1:2010/A12:2011/A2:2013
RoHS Directive: 2011/65/EU
EN50581:2012
ErP Directive: 2009/125/EC
Regulation (EC) No. 1275/ 2008; EN 50564:2011
Year to begin affixing CE marking: 2017.
8F, 88, Sec. 1, Xintai 5th Rd., Xizhi, New Taipei City 221, Taiwan
Und
Acer Italy s.r.l.
Via Lepetit, 40, 20020 Lainate (MI) Italy
Tel: +39-02-939-921, Fax: +39-02 9399-2913
www.acer.it
Produkt:
Handelsbezeichnung:
Modellnummer:
Artikelnummer:
LCD-Monitor
ACER
KG241YU
KG241YU xxxxxx;
8F, 88, Sec. 1, Xintai 5th Rd., Xizhi, New Taipei City 221, Taiwan
Y,
Acer Italy s.r.l.
Via Lepetit, 40, 20020 Lainate (MI) Italy
Tel: +39-02-939-921, fax: +39-02 9399-2913
www.acer.it
Producto:
Monitor LCD
Nombre commercial:
ACER
Numero de modelos:
KG241YU
Acer Incorporated (Taipei, Taiwan)
Dec. 07, 2017
Fecha
8F, 88, Sec. 1, Xintai 5th Rd., Xizhi, New Taipei City 221, Taiwan
Et.
Acer Italy s.r.l.
Via Lepetit, 40, 20020 Lainate (MI) Italie
Tel: +39-02-939-921, Fax: +39-02 9399-2913
www.acer.it
Produit :
Nom commercial :
Numero de modulo:
Numéro SKU :
Moniteur LCD
ACER
KG241YU
KG241YU XXXXX;
(^ ^ ) = 0 9 a~z,A\~Z,ou blanc)
RU Jan / Sr. Manager
Acer Incorporated (Taipei, Taiwan)
8F, 88, Sec. 1, Xintai 5th Rd., Xizhi, New Taipei City 221, Taiwan
E,
Acer Italy s.r.l.
Via Lepetit, 40, 20020 Lainate (MI) Italy
Tel: +39-02-939-921, Fax: +39-02 9399-2913
www.acer.it
RU Jan / Senior Manager
Acer Incorporated (Taipei, Taiwan)
Dec.07,2017
Data
8F, 88, Sec. 1, Xintai 5th Rd., Xizhi, New Taipei City 221, Taiwan
En,
Acer Italy s.r.l.
Via Lepetit, 40, 20020 Lainate (MI) Italy
Tel: +39-02-939-921, fax: +39-02 9399-2913
www.acer.it
Product:
Handelsnaam:
Modelnummer:
SKU-nummer:
LCD-monitor
ACER
KG241YU
KG241YU XXXXX
(x = 0 9,a z,A Z, of leeg)
8F, 88, Sec. 1, Xintai 5th Rd., Xizhi, New Taipei City 221, Taiwan
E,
Acer Italy s.r.l.
Via Lepetit, 40, 20020 Lainate (MI) Italy
Tel: +39-02-939-921, Fax: +39-02 9399-2913
www.acer.it
Produco:
Monitor LCD
Regulatory Compliance


R43002
RoHS


UA.TR.060

一、股票交易异常波动的具体情况


NYCE
Barcode
acer
barcode
MC.TC511.003
Model No.: KG241YU
Part No.: MC.TC511.003

yochihh Ppy
