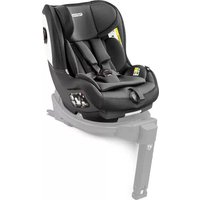
Primo Viaggio iPlus - Baby products PEG PEREGO - Free user manual and instructions
Find the device manual for free Primo Viaggio iPlus PEG PEREGO in PDF.
| Product type | Child car seat (carrycot) |
| Brand | PEG PEREGO |
| Model | Primo Viaggio iPlus |
| Standard | i-Size (UN/ECE Regulation No. 129) |
| Use | Rear-facing, in car and as a carrycot at home |
| Maximum child weight | 13 kg |
| Child height | 40 to 83 cm |
| Product weight (approx.) | approx. 4.5 kg |
| Fastening system | ISOFIX with i-Size Base or 3-point seat belt |
| Harness type | Integral 3-point with shoulder pads |
| Side protection | Adjustable Side Impact Protection (ASIP) with simultaneous headrest/harness adjustment |
| Number of headrest positions | 6 |
| Simultaneous headrest/harness adjustment | 5 positions (with Side Impact Protection system) |
| Handle positions | 4 positions (A, B, C, D) |
| Ganciomatic system | Yes (quick attach/release on base) |
| Tri Stage Cushion | Yes (3 independent cushions for small children, up to 9 kg) |
| Hood | Yes, with zipper for expansion |
| Absorbent materials | Expanded polystyrene (EPS) and expanded polypropylene (EPP) |
| Country of origin | Italy |
| Maintenance | Clean plastic parts with a damp cloth; cover washable according to label (no bleach, no tumble dryer) |
| Spare parts | Only original Peg-Perego parts, available from after-sales service |
Frequently Asked Questions - Primo Viaggio iPlus PEG PEREGO
User questions about Primo Viaggio iPlus PEG PEREGO
0 question about this device. Answer the ones you know or ask your own.
Ask a new question about this device
Download the instructions for your Baby products in PDF format for free! Find your manual Primo Viaggio iPlus - PEG PEREGO and take your electronic device back in hand. On this page are published all the documents necessary for the use of your device. Primo Viaggio iPlus by PEG PEREGO.
USER MANUAL Primo Viaggio iPlus PEG PEREGO
EN Instructions for use
FR Notice d'emploi
The Original Accessory Peg-Perego
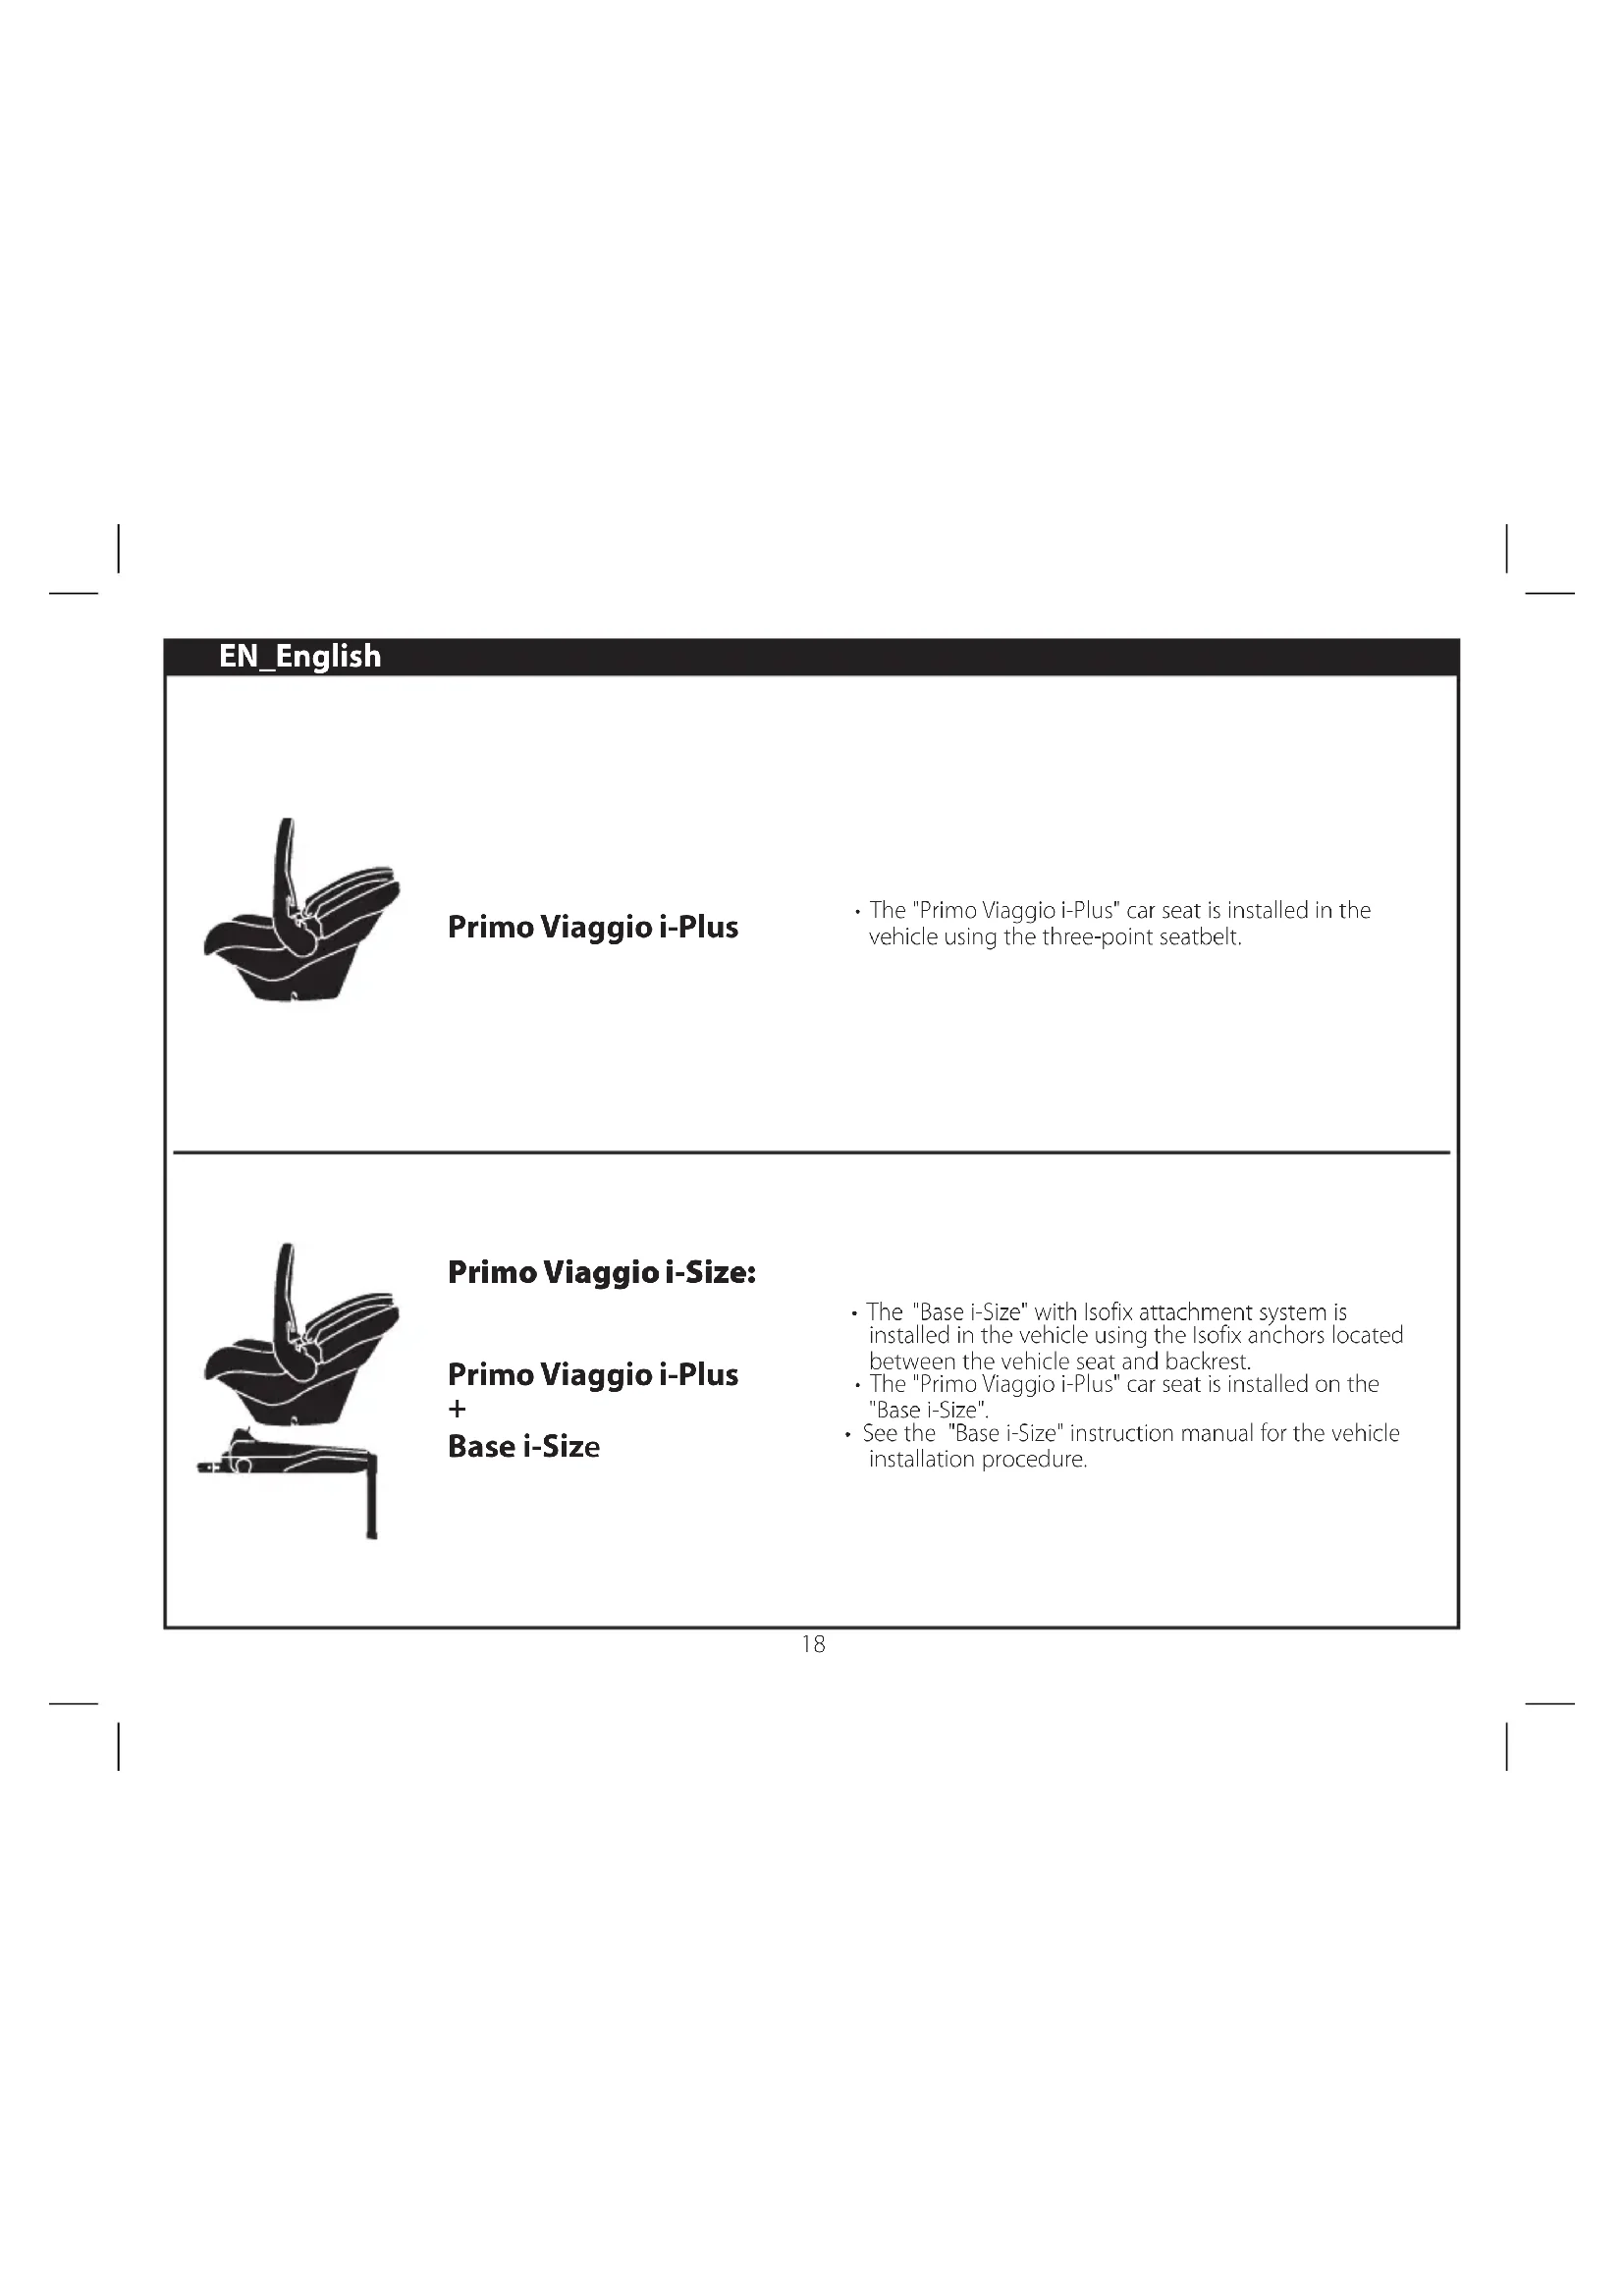
- The "Primo Viaggio i-Plus" car seat is installed in the vehicle using the three-point seatbelt.
Primo Viaggio i-Size:
- The "Base i-Size" with Isofix attachment system is installed in the vehicle using the Isofix anchors located between the vehicle seat and backrest.
- The "Primo Viaggio i-Plus" car seat is installed on the "Base i-Size".
- See the "Base i-Size" instruction manual for the vehicle installation procedure.
Thank you for choosing a Peg-Perego product.
Product characteristics
- Suitable for children between 40 and 83~cm with a maximum weight of 13~kg .
- This is an "i-Size" Child Restraint System. It is approved to Regulation No. 129, for us in "i-Size compatible" vehicle seating positions as indicated by vehicle manufacturers in the vehicle users' manual.
If in doubt, consult either the child restraint manufacturer, the vehicle users' manual or the retailer
- Do not fit this car seat onto passenger seats which have active airbags. Deactivate the airbag before fitting the car seat. Using this car seat on seats with active airbags may cause serious injury or death in the event of an accident.
- The use of the car seat for premature infants born at less than 37 weeks could cause respiration problems for the newborn. It is advisable to seek medical advice before leaving the hospital.
- The car seat can only be used in approved vehicles, fitted with static or inertia-reel three-point seatbelts, approved under regulation UN/ECE no. 16 or equivalent standards. It must not be used with two-point or lap seatbelts.
- When used with Base i-Size, this restraining system can be fitted to vehicles with positions that have been approved as ISOFIX positions (for more details, please refer to the user manual), depending on the child seat category and the structure.
- Consult the list of car models and seats equipped with ISOFIX anchor systems (see inside) that have been approved by the restraining system manufacturer.
Contact the restraining device manufacturer or retailer if you have doubts or require further information on the fitting of the Base i-Size in specific cars.
For more information, please contact the Peg-Perego Assistance Department at the address assistenza@pegperegoo.com
- This car seat comes with "Adjustable Side Impact Protection": improved protection against side impacts with the
"simultaneous system" for headrest-harness adjustment.
- This car seat is approved for installation in the car without the base or with the Base i-Size.
WARNING
- Read the instructions carefully before use and keep them in the holder provided for future reference. Failure to closely follow the car seat installation instructions will put your child at risk.
The assembly and installation operations must be conducted by adults.
Always use a car seat when in the car. Never remove the child from the car seat when the vehicle is in motion. - Never leave a child alone and unsupervised in a car, not even for a short time. The temperature inside the vehicle can change rapidly and become dangerous for the child inside.
- Install this car seat facing the direction opposite to the direction of travel.
- Install this car seat only on seats facing the direction of travel. If the vehicle has rotating or repositionable seats, position them facing the direction of travel.
- Do not fit this car seat onto passenger seats which have active airbags. Deactivate the airbag before fitting the car seat. Using this car seat on seats with active airbags may cause serious injury or death in the event of an accident.
- Check that the child car seat is not blocked by a moving part of the seat or a door.
- Scrupulously follow installation instructions; do not use installation methods other than those recommended because they could cause detachment of the car seat.
Always use the harness when using this car seat. - Adjust the height and tension of the shoulder straps ensuring that they are snug to the child's body without constricting him/her too much. Check that the harness is not twisted and that the child does not release it.
- To avoid the risk of falling, always use the car seat harness even for transport outside the vehicle.
- The car seat is not a substitute for a cot; if the child needs to sleep it is important to lie him/her down.
- Do not use the child car seat if it is broken or if there are
missing parts, or if it has been subjected to heavy impacts as a result of accidents, as it may have suffered structural damage which is not visible but is extremely hazardous.
- Do not use the car seat without its fabric cover; this must not be replaced with one not approved by the manufacturer since it is an integral part of the car seat and the safety system.
- Do not remove or replace the white polystyrene part under the seat, in the backrest and in the headrest, as it is essential for safety purposes.
- Do not leave the car seat in the vehicle when exposed to the sun. Some parts might heat up and be harmful to the delicate skin of the child -check before placing the child in the seat.
- Do not modify the product.
- Do not remove the adhesive and stitched labels since this might make the product non compliant with legal requirements.
- For any repairs, replacement parts and information about the product, contact the after-sales assistance service. Contact information is provided on the last page of this manual.
- Do not use accessories not approved by the manufacturer or by the competent authorities.
If using a second-hand product, make sure it is a recent model, comes with instructions, and is fully functional in all parts. An obsolete product may not conform to safety standards, due to natural ageing of materials and updating of regulations. If you have any doubts, contact the manufacturer's customer service centre. - Make sure there are no items of luggage or other unsecured items in the vehicle interior. They could injure the vehicle's occupants in the event of an accident.
- This product requires only minimal cleaning and maintenance. These operations must be performed by adults.
It is advisable to keep all the moving parts clean. - Clean plastic parts periodically with a damp cloth. Do not use solvents or similar substances.
-
Do not clean the polystyrene shock absorbing device with solvents or other similar products.
-
Brush fabric parts to remove dust. If you wash fabric parts, follow the washing instructions on the laundry label.
- Protect the product from atmospheric agents: humidity, rain or snow. Extended exposure to sunshine can cause colour changes in many materials.
- Store the product in a dry environment.
WARNING: FOR USE AS A RECLINED CRADLE.
- Do not use the reclined cradle once your child can sit unaided.
- This reclined cradle is not intended for prolonged periods of sleeping.
- It is dangerous to use this reclined cradle on an elevated surface, e.g. a table.
Components of the Product
Inspect the content of the package and contact Customer Care if any items are missing.
The child car seat includes:
a) Hood
b) Handlebar
c) Tri Stage Cushion
d) Headrest
e) Harness tension release button
f) Harness tension adjustment strap
g) 3-point safety harness with shoulder straps
h) Lever for release from base
i) Headrest height adjustment button
1) Instruction manual compartment.
m) Headrest covered with shock-absorbing expanded polypropylene foam
n) Shell covered with shock-absorbing expanded polystyrene foam (EPS)
The car seat is ready for use: no assembly required.
Instructions for use with base
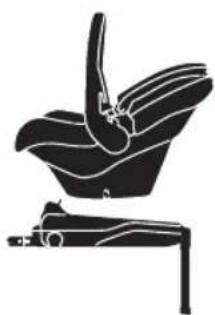
1 Primo Viaggio i-Plus features the Ganciomatic System for connection and release in the car with the Base i-Size.
To attach the Primo Viaggio i-Plus to the Base i-Size, align it with the connections and push it downwards until it clicks in
place (fig_a). Make sure that the red/green indicators on the back of the base are in the green position (fig_b).
2 Press the two buttons on the handlebar, turn them and position against the vehicle seat.
3 To release the Primo Viaggio i-Plus from the Base i-Size, put the handlebar in the carry position and pull the lever on the backrest upwards while simultaneously lifting the car seat.
4 The car seat handlebar has four fixed positions. To rotate it, press the two buttons on the handlebar and move this to the required angle. Ensure it clicks into position.
- Position A: the in-vehicle position;
- Position B: the position for transport by hand and for installation on a base, stroller or chassis;
- Position C: this is the resting position;
- Position D: stops the car seat from rocking.
Instructions for use without base
5 10MPORTANT! The car seat must be parallel to the ground. If necessary, use rolled-up towels or swimming pool float tubes under the car seat, in the folds of the vehicle's seats.
Fit the car seat with the child seated inside, remembering to secure the child with the harness. Fully lower the handlebar of the car seat (point 4 -position A).
6 Slide the lower part of the vehicle seatbelt into the two guides on the car seat handlebar (fig_a) and buckle it (fig_b), ensuring the seatbelt is taut, as shown in the figure.
Grasp the upper part of the vehicle seatbelt and pass it behind the car seat backrest(fig_c).
7 Insert the belt into the rear guide (fig_a). Tighten the vehicle seat belt(fiq_b). Installation is now complete.
8 To release the harness, press the red button on the crotch strap buckle (fig. a) and remove the straps. To engage the harness, place the two shoulder strap tongues in position and insert them into the buckle of the crotch strap until they click into place (fig. b).
9 To slacken the harness, insert a finger through the seat opening (1), keep the metal button pressed, and with the other hand pull on the straps (2).
10 To tighten the straps until they are snug to the child's body, pull the central adjustment strap towards you.
CAUTION: Do not over-tighten the straps, and ensure you leave minimum slack.
11 important! In winter, do not strap the child into the car seat wearing bulky, heavy clothing, and do not place blankets between the child's body and the harness. This could cause incorrect positioning of the safety harness, with serious consequences in the event of a collision. Use a blanket or an approved Peg-Perego accessory to protect your child from the weather.
12 The harness and the "Side Impact Protection" headrest can be adjusted simultaneously to 5 different heights so as to follow the growth of the child. To adjust height, open the door to access the opening in the back of the seat, press the button on the back of the height adjuster (arrow 1) while raising or lowering the seat to the desired position, making sure it is positioned correctly and clicked in place (arrow 2). Slacken the straps before adjusting the height of the harness and headrest.
13 The headrest may be set in 6 different positions.
14 The safety harness is at the right height when the slots in the backrest are at shoulder height or just below (green area), as shown in the figure.
Make sure the straps are not in the red area.
15 This car seat features the Tri Stage Cushion, a system composed of 3 separate cushions for even the smallest babies.
A: headrest reducer;
B: backrest reducer cushion;
C: reducer cushion for small seat. Do not use the Tri Stage Cushion with children weighing more than 9kg
16 The special shell shape is designed to rock your child. To rock the child gently, put the handlebar in the carry position, as shown (fig_a).
To prevent oscillation and stop rocking, lock the handlebar behind the backrest (fig_b).
17 The hood provides your child with shade and shelter. Unzip and lower the hood to cover a greater area.
IMPORTANT: The hood must not be used to lift the car seat because it might detach.
18 To remove the hood: unbutton the 5 buttons on the lower edge of the hood
19 Release the elastic bands behind the handlebar (1), lift it and release it upwards (2).
Removing the soft cover
20 To remove the "Tri Stage Cushion": unbutton the two buttons (fig_a) anchoring the headrest reducer to the backrest reducer cushion and pull it off (fig_b). Remove the headrest reducer from the car seat headrest by pulling out the two elastic bands at the back (fig_c).
21 Lastly, unfasten the straps and remove the seat reducer cushion by pulling it off the crotch strap.
22 Remove the shoulder pads (fig_a); open the compartment on the back of the car seat and pull the straps out the front (fig_b).
23 Release the four elastic bands on the cover from underneath the handlebar (fig_a), pull out the crotch strap (fig_b) and remove the entire cover.
24 Slide off the headrest cover from the bottom first and then, carefully, over the two sides;
BE CAREFUL NOT TO BREAK POLYSTYRENE (EPS-EPP) PARTS.
Remove the soft cover in sequence, as shown in the figure.
Maintenance of the padding
Brush the fabric parts to remove dust.
- When washing, closely follow the instructions stated on the label sewn into the cover.
- Do not use chlorine bleach.
- Do not iron.
- Do not dry clean.
Do not remove stains with solvents.
- Do not tumble dry.
How to cover the car seat
- Proceed to perform the operations shown in figures 20 through 24 in reverse order.
The Original Accessory Peg-Perego
Peg-Peregogo accessories are designed as a useful, practical means of simplifying the lives of parents. Discover all your product's accessories on www.pegperegogo.com
Serial numbers
25 Underneath the side of the car seat you will find the approval label and another label bearing the following information: product name, production date and serial number.
26 The date of production appears on the harness.
This information may be of use to customers in the event of problems with the product.
Product cleaning
- This product requires minimal maintenance. Cleaning and maintenance must only be carried out by adults.
It is advisable to keep all the moving parts clean. - Clean the plastic parts periodically with a damp cloth. Do not use solvents or similar substances.
- Brush the fabric parts to remove dust.
- Do not clean the polystyrene shock absorbing device with solvents or other similar products.
- Protect the product from atmospheric agents: humidity, rain or snow. Extended exposure to sunshine can cause colour changes in many materials.
- Store the product in a dry environment.
PEG-PEREGO S.p.A.
Peg-Perego SpA adopts a quality management system certified by TUV Italia Srl in accordance with the ISO 9001 standard. Peg Perego can make changes at any time to the model's described in this publication for technical or commercial reasons.
Peg-Pérego after-sales service
If any parts of the item get lost or damaged, only use genuine Peg-Perego spare parts. For any repairs, replacements, information on the products and sales of genuine spare parts and accessories, contact the Peg-Perego Assistance Service and state the serial number of the product, if present.
tel.0039/039/60.88.213
e-mail assistenza@pegperegofit
website www.pegperegocom
All intellectual property rights on the contents of this manual are property of PEG-PEREGO S.p.A. and are protected by the laws in force.
FR_Français
The Original Accessory Peg-Perego
The Original Accessory Peg-Perego
c) Tri Stage Cushion.
d) Reposacabezas.
The Original Accessory Peg-Perego
The Original Accessory Peg-Perego
The Original Accessory Peg-Perego
The Original Accessory Peg-Perego
The Original Accessory Peg-Perego
The Original Accessory Peg-Perego
The Original Accessory Peg-Perego
The Original Accessory Peg-Perego
The Original Accessory Peg-Perego
I P E D U N P E X K D E H N E
BHMataIbHO npOHTte HNCTpyKunn nepei 3KcnnyaTaeNe, IN xpaHnte IN B cneuaIbHO OTBeEHHom MecTe DnR IN NOCLJeUoero IcNoIb3OBaHn. HetaTeNbHOe Co6IoHeHne IHCTpyKUnn PO YCTaHOBKe ABtOMo6InbHoro KpeCna MOxET CTAb PnUHHO ONaCHOCn DnR BaWero pe6EHa.
Onepaunno c6opke n yctaHOBKe n3dennn DOnKhbI BbINOJIHrTb TOnbKO B3pOcNble.
Bcerda nCnOJb3yIne aBTOKpeCNO npn nepeBO3Ke pe6EHaBA B ATOMO6NHe.3aPpeuaTcB bHIMMaTb pe6EHa N3ABTOKpeCna B DnKyyIeMCA ABTOMO6NHe.
HnB Koem Cnyuae He octabnTe pe6eHka Ondoro 6e3 HAd3Opa B MaunHe, DaKe Ha KopoTkoe Bpemr. TemnepaTypa BHyTpmaunHb MoKet 6bICTpo MEHaTbcn CTaTb OnaChOn Dnpe6eHka BA bTOMo6nne. comHeHHo6bPaTnteck N pOn3BoDnTeNIO nn npodabuy 3TORo ABTOKpeCna.
YCTaHaBJIbBaIte ABToKpeCNo B HAnpaBHeHn, IPOTINBOJIOJXHom ObUHOMy HAnpaBNeHIO DBIXeHnA bTOMO6NHy.
YcTaHaBnBaIte aBTOKpeCNO TOnbKO Ha CnEhbpaIOIOXeHHbIE NO HApPaBHeHIO DnBXeHH. EcnB aTOMo6NInne HmEtOra NobopoTHbIE INn nepeCyTAHABnBaMaEBie CnDEHB, yCTaHOBtNE INx NOp HApPaBHeHIO DnBXeHH.
He yctahabnbaite 3to abtokpcno Ha naccaknpckne cndehBco BKNIOeHHbIM Noyukamn 63oNACHOCTn. BkiouaIte noykyke 63oNACHOCTn, npexJe Heym ctaHOBTb abtOKpcno. Icnonb3OBAHme 3TOrABtOKpcnaHa CnDEHBx CO BkIOUeHHbIM NoykaAMn 63oNACHOCTm MOET CTaT npuHON Cepe3HbIX TpAbM ININ CMEPTN B CNYae aBAPIN.
Y6eIITecb,HTOJeTcKoe aBtOKpeCnO He 6IoknyetcA DBNKyuIMMCACTAMN CNDehbN NIN DBepbIO.
Ckpynye3HO CoBIOdaIte IVHCTpyKuNN NO yCTaHOBKe; He pIMMeHrTe DpyRnE MToDbl yCTaHOBKn, NOMMPOpeMHeIOBaHbIX, NOCKoJIbKy 2TO MOKeT pINBeCTN KOTCOeHNHeHNO ABTOKpeCna.
- Pn 3KcNpyataun daHHoro ABTOKpeCna Bcerda NCNoB3ynte pemHn 6e3OnaCHOCTN.
Otperynpyte BbICOTy HATJKeHne pEmHe, y6eBnBWCb B TOM, TTO OHN npIneraOT K TeNy pe6EHaKa, HO He CNIWkoM Tyro. IpoBepbTe, He nepeKpyueH Nn peMeHb 63OnacHOCTCnDEhBa, IN He CMOxET Nn pe6EHO EOr OTCTeHTb.
BpeMeHb beoiaochTo nABTOMOIBIbHO KpeCJIaJaKe IJIpeBE03Kn BHe aBTOMOIBI.
- ABTomO6nHbHOe KpeCNo He 3aMeHReT KpoBaTky, ecn pe6eHKy HAO NOcNaTb, TO OueHb BaxHO VNOXHTb eO.
HeNCIOJIb3yIeTeIETCKOeABTOKpeCIOB TaKINxCnyaX:HO CLOMAHO,OTCYCTBYOT KOMNOHEHTbl,N3dJIENe NOBeprAOCb 3HaHTeNbHbIM yapHBm HarpY3KaM Bpe3yIbTaTe ABAPIN, NOKOJIbKy 3TO MOpEeNTnOBpEKeJDeHNo ERO CTpyKTypbl-HEuDUMOMy,HO Upe3BbIaHNo ONACHOMY.
HeNCIOJIb3yIte aBTOMO6INbHOe KpEcNO 63TKaHOI OOBIKN.ObuBky HeJIb3a 3aMeHHTb IpyrO,HeYTBepKJDeHHoI N3ROTOBHTENEM KpeCNa,TAK KA OHa ABnRETCRA HeOTBeMNEOM HACTBIO KpeCNa n ObceNeiBAe rto E63OnaCHOctB.
He ydaIyTe Hc MeHnTe 6enbIe noNtropoIOBle qactn NOc CnDeHbEM, B CnHKe Nn3 3aunTHbIX 6okOBnHax, nCKOJIbKy OHn BaXhbl dN oBeCneueHHn 6e3OnacHOCTn.
He octabJnTe aBTOMO6nHoe KpeCIO B aBTOMO6nne IIO
COHHUEM, TAK KAK HEKOTOpBIE DeTaN MOrY TnepepeTbCn INOBpeDITb HeKHyIO DetCKyIO KOxy. IpOBepeTe TemepaTypy KpeCIA JO TORO, KAK Bbl NOMECTIe B Hero pe6chKa.
He BHOCTe N3MeHEnB U3dJIue,
HeOTCOENHJTE NINKNE INPNIINBTE 3NTIKETKN. INX OTCYCTCBNE MOKET BbIBaTB HeCOOTBETCTBNE IN3dEINRA Tpe6OBAHNM CTAHDAPTA.
ДЯ ВьINONHHe pEMOHa, 3aMeHbI DeTaNEn N NONYeHnCnpabOK O6 n3dJIIN Bbl MoKTe O6paUaTbcN B CIny6BynocnepnoJaxHOro O6cnyKuBaHn. Ee peKbUNrBtbpNBedeHb Ha nocLneHHe CTpaHnue 3TOrO pyKOBOCDBa.
He nCnoB3yIte npHnAaNExKHOCTn, He OOnOpBeHHbIe N3ROTOBtEnEMnn KOMPeTeHTHbIMBnactAMN.
Bcnyae npno6peTeHnI 3dennr C pyk yOCTOBepbTecb,TO 3TO HeabHO BInyueHHaM OdeN, PpOaETC C INHCTpyKlHMN, N BCE ee KOMNOHEHTb NONHOCTbO OYHKIOHAJIbHbY. YCTapeBWee I3dne MeKet HE COOTBeTCTBOBaT CTahApTaM Be3OnaCHOCTH N3-3a CTapeHn MaTePnaIaOB N O6HOBJEHHo HOPMaTINBbIX Tpe6obAHnPi nHaNNm CoHHeHn ObpaTtEcB U cHTp KNIEHTCKOrO OcbNYXKBAHn PpOIM3BDiNTeR N3dennr.
- Y6eIntecb, yTO B cAnOHe aBtOMoHnI OTCyTCTByET 6aJHKnn He3aKpennHhIe NpeMTebl. B cNYae abapnn OHN MOrTy HHaHECTn TpaMbbl NaCCaXnIpam N BoNTeTIIO.
3TO H3JENHE HyKdAeTCA TOJIbKO B MHNMaJIbHOM yXOJe N OYNCTE, 3TN PPOUeDpybl DOnKHBcOcyIeCTBJIb B3PocNble.
- PeKOMeHnyETcN COePkaTb BCE IaBxKyuIeCn YaCTn BYNCTOTe.
- PepnoDnueckn Ounuaine nlaactNKOBbie qactN BlaXHOI TkaHbIO. He nCpNoB3yTe pactBopnti nn noo6hble BcIecTBA.
He nctte nonnctponoBOe yaponrnoaioee yctpoiCTBO pactBOpTeIaMm mnpDpyrnnm noOobHbIMnpOdykTAMN.
- NocHTTE TKAHeBbIe DeTAnu UTKoH, YTObbl ydaNtB nbInb. PnC TcIPKe TKAHeBbIX DeTaIe CoBIOaJaTe INHCTpyKcnn No CTIPKe H3TNKETke.
3auiuaiute H3dennoeOT BO3deICTBnA aTMoccepehBix OCAIOKOB:BNAHHOCTN,DOJKAHNCHERA.DINTEJIbHOe BO3deCTBne COJHeHbIy Lyuee MoKeT pNBecT K N3MEHEHIOUBETA MHORNX MATEPNAOB.
XpaHNTe N3dJIeNBE CyXOM MeCTe.
I P E D U N P E X D E H N E: I C N O J B 3 O B A H N E K P E C J A B K A Y E C T B E O T K I N D H O N J I O J B K N.
He nolb3yntc6 otKnndHoi IIOIbKO, KOrda BaW pe6eHOK yke moXeT cUdTeB 6e3 NoCTOpOHHeN NOMOuN.
JaHnHa OTKnHnHa IIOhBa He npEHa3NaeHa dHa B TeueHe IpOdoNkTeBbHx nepNoob BpeMeHn.
Onacho nCnONb3OBaTb 3Ty OTKnHyIO IIObnky Ha BO3BbIweHHoN NOBepxHOCTn, HApnpMep, Ha CTone.
KOMNOHEThbI n3dEInr
PaccmOTpnte coepxHMOE ynaKOBKn n npn OTCyTCTBn KaNX-N60 KOMHOHeTOB 6paTNTecb B CepBNCHyO cnyk6y.
B KOMnneKeT DeTCKOro aBtOKpeCna BXOyT:
a) Kaniooh
b)Pyka
c) Tri-Stage Cushion
d)ПДг罗Внк
e) KhoKa BbCBO6OxKeHnpeMHe 6e3OnaCHOCTN
f) Pemewok peryiniropobkn HaTaeHn peMHen 6e3oNaCHOCTN
g)3-ToueyHbpeMHN6e3OnaCHOCTn C NneYeBbIMN JAMKaM
h)PbHarDnOaTOcEHNHeHHN OTo 6a3bl
i) KHONka perynipOBKn BbICOTbI NOJROBHNKa
1)OTcEKdya pyKOBOCTBaNoIb3OBATeTnA
m) PnroOBHK c noKpbTHeM n3 ydaponorloauoero neHOPONIIeHa
n) Kopnyc c nokpbyTne m3 ydaponorlouaiooero neHONOINCTnpona (EPS)
ABTOKpeCNO rTOBO KNCIOJIb3OBAHnIO; c6OpKa He Tpe6yETcN.
Hnctpykunno nncnoj30BaHnOc 6a30
1 AToKpeCnO Primo Viaggio i-Plus oShaueHo CnCTeMoI Ganciomatic System nra KpennHn H ChrTn B aBtOMo6nE c 6a30n Base i-Size.
IJIa KpENIIeHnABTOKpeCna PrimoViaggioI-PlusHa63e Base I-Size COBmecTne ERO CKPENNEHnIMN HAKMNTE BHN3, NOKA ABTOKpeCNO He BCTaHET Ha MeCTO CO UENHKOM (PNC. a).Y6EINTECb, YTO KpaChbIE/3eneHbIE INHdNKATOpbl B 3aJHeu Actn Ba3bHaxoJrTaB 3eNEHom NOLOKeHn (Pnc.b).
2 Haxmte IBe KHOKN Ha pyKe n NOBepHnTe ee TaK, T06bl yIepeTb B CnDEHbe aBTOMOONJ.
3 UTo6bI OTcoeHNHT bAToKpeCNo Primo Viaggio i-Plus ot 6a3b Base i-Size, nobepHnTe pyky B noJooKeHne IJI NapeHoCKN HaxMNTe pBuAr Ha cnHKe BBepx, OHOBpEMEHNO NObIMAR ABToKpeCNo.
4Pyka ABTOKpeCnA IMeET qETbipe KcPOBaHHbIX NOLOXEHN. T06bl NOBepHyTbe ee, HAKMTe DBe KHONKa Ha pyHKe N yCTaHOBNTe ee noH HyKbIM Yrnom. Y6eINTecb, 1To OHa 3aueKHNacB B HxKHOM IIOXeHN.
NoIOXeHnA:NOIOXeHnB aBTOMaUNHe.
IonoXeHnB:noXeHnDnypyHOnTpaHCnpOpTIpOBKn n DnyyCTaHOBKnHaOCHOBaHH,HaKONRcKeNNHaWACCn.
IIOJXeHnC:3TOIOJNOJXeHnO npb.
- NonoXeHne D: npenrTCTByET KaaHnIO aBtOKpeCna.
HCTpykunno MCNoB30BaHmio 6e3 6a3bl
5 BAXHO! ABOKpeCNO CnEpyTcHaABNBAbT npaannelbHo 3emne. Pnp Heo6xOIMMOCTn NOIOXNTe ByrO nCnDEHbA BTOM0BnI NO ABOKpeCNO CBEPHyTbIe NONOTEHua Hn Hybl IINIaBAHnB B BacceHne.
YCTAHABINBAI BAOKPCN0 C NDAHIMB HEMPEEHKOM,HE 3a6bde3aKePENbpeBeka PemHAM. IIOHOCTbIO ONyCTTe pyky ABTOKpcNa (TOH4-PIIOJXeHHeA).
6IponyCTNE HNKHIO qACTb pemH 630NaCHOCTn ABTOMO6INB DBe HaPpABNIOpHe HA pyKe ABTKpeCna (pnc.a) n 3acterHNTe erO (pnc.b), y6eINBmCB TOM, yTO OH HAHTY, KAK IOKa3aHO Ha pcyHke. Bo3bMnTe BepxHIO qAChb pemH 630NaCHOCTn ABTOMO6INn npOnyCTNE erO 3a CnIHKO ABTKpeCna(pnc.c).
7 BCTaBbTe pemeHb 3aJHO HappaBnIOUyIO (pnc.a). 3aTnHTe pemeHb 6e3oNaChOcTH aBtOMoBnIA(pnc.b). Tenepb ABTOKpeCNO yCTaHOBNeHO n 3aKPeNJIeHO.
8Дпа pacTeRbAHЯ pemHeи HaxMITE Ha KpaChHy KOHONKY Ha npJxKke JAMKn, npoxOJaIe MExNy HORaMn, (pnc. a) n N3BJIeKeITpe pMHN.
TObb3acterypeMHyCTbHOBHTBbHcNDbYxPnueEBX peMHEn BHyKHO NOIOKeHMe N BCTaBtE IN B pRJKKy JAMKN, npoxoJIeMekdy HOrAMN,IO 3aUeIKBAHnHa MeCTe (pnc.b).
9 TRObOcIa6bTb peMHN, BCTaBte naJIeU B OTBePCTne
CnDHeBb(1),ydepXnBaHaxaToMMeTAnNueCKyIO KHOKNy,a DpyroynpKoNnotAHHTe peMHN(2).
10 To6bH HATyHTpeMHn IINI INOTHO npInerAHnK TEny pe6eHa,NotHHTeCHTpaHbHbI peryIpOBOHbIpeMeHb Ha c6ea.
BHIMAHHE! He 3aTARbauTe peMH CNuHKOM CnIbHO, 06a3aTeNbHO OCTaBbTe He6OJbWoe CBO6oHoe npoctpaHCTBO.
11 BAXHO! He CnEuyT PnCTeRnBaTb A BTOKpeCne peBHKa OBbEMHON TAnXeIOn OJExJe NIN NOMEuATb OeJIIO MEXy TEiOM peBcHka n PEMHMn. 3To MOKeT CTaTb pNHHOHN HENpaBnBHoro NONOKeHn PEMHe 6e3OnaCHOtN CepE3hIX NOCNECTBn B CnyAae abApnn.
IcnoIb3yIteOeIIO mIo OIO6peHHyIO Peg-Perego npHaJnHexHOCtB Jn 3aunTb peEHNKa OT HENORoBl.
12 Pemn n noTROBnK 3aunToIOT 60kOBoro yapa MOxHO odHOBpeMeHHo peryNtPOBaTb NO Bicote B 5 pa3nHbIX noIOXKeHNx B COOTBECTBn C POCTOM peBeHka. JnpeyNtPOBKn NO Bcote OTKpOte ABePb ABTOMOBn, YTO6bl NOJUHTb NOCTyn K OTBepCTnB CINHKe CnDEhB, N HaxMNTe KHONKy Ha 3aDHe N acTHn peYnTOpA BcOTb (CTpeLka 1), ODHOBpeMeHHo NOHMnAR NIOBO ONyCKa CnDEHbe B HxHNOE NOLOXKeHne, YOOCTOBepNBuNCb, YTO OHO npABnHbPOacNONOKeH No CO UenHKOM BCTANO HA MeCTO (CTpeLka 2). IpeKdYe peryNtPOBaTb BbcOTy pemHe N NOrIONOBHnKa, ocna6bTe pemHn.
13 POnrONoBnK MoXHO YoCTaHOBnTb B6 pa3nHbIX NOJoxeHn.
14 PemHn 6e3oNaChOCTn paCNoJoxHeHa npaBnBHO BbCote, cNn OTBepCTn Ha CnNHKe, B KOTOpBie BXODT peMHn, paCNoJoxHeHa yPOBHe NLeu peBcHkA NIN HEmHO RnKke (3eHeHaa), KaK NOKa3aHO Ha pncyHke.
YIOCTOBepbTecb,HTOppeMHHe HaxOJrTaB KpaCHOH 3OHe.
15 3To aBtOKpeCNo OcHauEHO COCTOaue N3 0TdEnbHbIX noDyweK CnCTeMoN Tri Stage Cushion, KOtopa Jenaet ero npriOnHbIM DaXe DnA camBx KpoIeuHbIX MaBliWei.
A:ymeHbWnteJIbNoJrOJIOBHHka;
B:NDyka-yMeHbWNTeNcHHK;
C:noyUka-ymHeHbWHTenbIraMaHeHkoRo CnDeHb. He nOJb3yIte cncTeMy Tri Stage Cushion dJeTei BECOM 6oJee 9Kr.
16 CneuaJIbHaJ opMa Kopnyca NOMOKeT yBaIOKaT BaUero
pe6eHa. JnHexKnHO yKaunBaHnnepeBedeTe pyky B NOIOKeHHe nepeHoCKn, KaK nOKa3aHO (pnc.a).
T06bI 36eKaTaB HAKIOHOB aBTOKpeCna nOCTaHOBnTb NOKaUNBaHne, 3aΦNKcnpyIte pyky 3a CnIHKO aBTOKpeCna (pnc. b).
17 KaIIIOHO CO3aET Heb n yIOT nMaJIbIa. PaCCTeRHTe MOHINIO ONYCTITE KaIIIOHO, YTO6bl 3akpbITb 6OJIbSyIO 06NaCTb ABTOKpeCna.
BAKHO!3anpeaetcnoHnMaTb aBtOKpeCNo 3a KaIOOH,TAK KA OH MOKeT OTCoeHNHTbcra.
18 YTo6b CHaTb KaIOoOH:OTCTeHnTe 5 KHOIOK NO HIXHemy Kpaio KaIOoHa
19 OtcterHnTe pe3nKn 3a pyKoN (1),noHnMnte KaIOuOH n CHmnte erO,NOTAHyB BBepx (2).
Charne markoN o6NBK
20ДЯСТЯСТЕМБI Tri Stage Cushion BbINONHITe TAKINE DeCTBIA:OTcTeHNTE DBe KHOKNi (PNC.a),KpenAùnne yEmhBHTENb NOrOBNHnKa K NOyUke yMeHbWNTeIa CnHNK, N BbTAnHTe ee (PNC.b). CHmNte yMeHbWNTenb NOrOBNHnKa C NOrOBNHnKa aBtOKpeCna, OCTeTHyB DBe pe3nHKn C 3aDHeN erO qactn (PNC.c).
21 HakoHeu,OTCTeHTHepe3HKnI CHMMTe NOyUKy-ymEhbWNTeB DnR CnDEHbN CHMMTe eeC peMHa Mekdy HOR.
22 CHIMTEIneueBbHeHaKlaaKn (pnc.a)OTKpoIneOTcKHa 3aHHeNIOBepXHOCTNaABTOKeCnA N BbITAHTepeMHN BIIpePd (pnc.b).
23 OCTeHTHNTe YETbIpe pe3INHK NOBKN IOJpyKoN (pnc.a), BbTAHNTe PEmHe, IPOXOAnuM MeJxHy HOr (pnc.b), IN CHIMNTe 06NBky NOJIHOCTbIO.
24 CHIMMTE OOBKY NOJROBHNKa CHaHa a 3aTeMaKKypaTHO C DByx CTOpOH.
COBJIOJDAIHTE OCTOPOKHOCTb, YTOBbI HE OBPEINb IETAJIN 3 NOJIUNCTUPOJIA (EPP-EPS).
IocneIOBaTeBHO CHMMTE MArKyIO O6N8Ky, KaK NOKa3aHo Ha pncyHKe.
Yxoa nOdkaKoN:
OuHuaTe TkaHeBbIe BCTaBKn OT bJIN
- PnCTnPKe TOUHO CNeIyIte INHCTpyKUIM Ha 3TNKeTKe, BUNTOB YEXON N3DEJIN.
HeOT6eINBaIteBxNOpKe;
HeIaBbTeyTIOROM
- He nCTIe CyXIM CnOCOBOM BXNMMCTKe;
He nCnONb3yNTe paCTBOpNTen bIaBBBeHnI NATEH;
He cyuINTe B cyuINKe dIa 6eJIbBa C BpaAIOUIMcB 6apa6aHOM.
HaedeBaHne 6mBKn Ha aBToKpeCNo
BbIOnHnTe DeiCTBn, NOKa3aHHbIe Ha pncyHKax c 20 no 24 B o6paTHOM nopAKe.
The Original Accessory Peg-Perego
PpHnHaJIeXHOCTn Peg-Perego pa3pa6oTaHbI KaK nOe3HbI e npakTNUHbI cpeCTBa Ira O6IeRyHeNr Xn3Hn poJITeNe. O3HaKOMbTeCb CO BCEMn npHaJIeXHOCTaMn K BaIeMy 3dennIO Ha Be6-caIte www.pegperego.com).
CepnHbIe Homepa
25HaHnKHeNIOBepxHOCTNa ABTOKpeCna pacnIOJKeHa cepTnOkaUONHaa Ta6NuaKa n eue OHa HAKneKa,Ha KOtopoYkA3aHa CNeIyUoiau INHOpMaUIN: Ha3BaHnE N3dJIi, data IPOUN3BOJCTBa N cepnHbHOMep.
26 Data npo3BODCTBa yka3aHa Ha peMHx. B cnyuae BO3HKnHOBeHn np06nem C n3dennm 3TN CbeHn moYr nOHaOnbTcRnOKynatEnm.
UncTka n3dennna
Baue n3eJnne HxJaTcB HeCNOxHOM yxoJe. Oepaunu NCTKN I yXOJa DOnKHb BbIINHHTb TOJIbKO B3POCLIbe.
- PekomeHnyetc coepkaTb B HCTOTE BCE DnKuueceyactn.
- NepoDnueckN OHHaIe PIIaCTMaCCOBIe DeTaN BlnAHHOITPnIKo, He NpIb3yIteCb paCTBOpHTeJAMN CXODHbIMNBeUeCTBaMn.
-NouchntteueKoTKaHbIeHaCTn,YTO6bIydaJIHTbNBJB.
He uCTnTe ynapoNOrnoaIoOee ycTpoiCTBO n3 NOINCTnPoJa paCTBOpNTeJIaMn IIn CXoHbIMC HIMN BeIeCTBaMn.
3aunntte n3deneo ot aTMOcOepehBix OCAkOB -BObl, CHera nn DoxJa. NocToHHaN npOdoJXnTeJbHa
NOBepKeHHOCTb COHHeHbIM LyaAM MOXe Bbl3BaTb LBEOTbI N3MeHEHn MHOrNX MaTePnaJIOB.
XpaHHTeN3dJIeMEB CyXOM MeCTe.
PEG-PEREGO S.p.A.
B Kompanhini Peg-Perego SpA Bhepeha cnCTema ynpablenen KaueCTBOM, cepTINPHUPOBaHHa TUV Italia Srl no CTandpTy ISO 9001. Kompanhini Peg-Perego IMeet npABo BHOCITb B IIO6OJ MOMeHT N3MeHeHnB MModEn, ONiCaHHbIe B HACTOJIEM IN3JaHnN, NO pInuHAm TexHnueCKOrO INI KOMMepueckOrO xapaKTepa
Cnyx6a o6cnyxuBaHnja Peg-Perego
B clyae yrepn nnn npn akceccyapOB, pnpmeHnTe TOnbKO fnpmeHHbe 3aNaChBe qactn npou3BOcTBA KOMnAHm Peg Perego.ДЯ BblnoJIeHnIpeMoHTa, ZameHb 3aNaChbix qacteN INoLyeHnI INFOpMaun O6 yCTpoNCTBe 0bpaauTecB CnykbynocneepodaJxHOro 6CnyKBaHn Peg Pego, coo6uNB, npn erO HAnu, cepnHbH Homep npdykTa:
Cpok cnjx6bl: 3 roda.
TapaHTnHbI cpoK:12 MecaueB
ren.:0039/039/60.88.213
Pima Vagic Fue, wate cook kufur j
nocaca emnlyk ererie aracabaglanir
Primo Viaggioi-Size:
The Original Accessory Peg-Perego
The Original Accessory Peg-Perego
Dodaci Perego osmišljeni su kako bi se na praktican način olakšãoživot roditeljima. Pogledajte sve dodatke iz asortimana proizvoda Per Perego na mreznom mestreu www.pegperego.com
Serijski brojevi
c) Tri Stage Cushion
The Original Accessory Peg-Perego
Pepoeae Bnmyyckny Bnndky BcytOCTbIy
CIOO
1.细度分析
h Pyca
CCTeMAIStageCushion
:N
]Knnnnae nne ene eae in 1
n n
103
IHCtpyKuJ3BukOpNCTaHH36a3010
M. APICD, PICO VIO A. GURUGULAM, C. HENRY, C. M. L. K. RAY, D. S. CHANDRA, J. B. DECONOY, F. GAOON, D. S. Chau
nngnnnne nnnnne Pnnnnn nn nnnnne
E
G
ACTHSHENTENYETHEHOYTOXHEI
2HaCHHdKnHbHyHcepHt1pOaayre
The Original Accessory Peg-Perego
Akcceyapn Peg-Perego 6ynn po3pobneH B JAKOCTI KOPNCHOI Ta npakTuHoi nIITPMK, IIO6 CnpocTNI KNTTA BaTKIB. IpeerHHTN BcI Akcceyapn dnn BaWOro npodykTy Peg-Perego Ha www.pegperego.it
CepiHi Homep
25 Ha HnKHi nOBepxHbAToKpIcna po3TaObaHa cePTnΦiKauiHa Ta6NtKa Ta IHwa eTKeTKa,Ha Kai 3a3HaYeHO Taky IHOpMauiC:
Ha3Ba Bnpo6y, DaTa BnroTOBnEHn Ta cepiHn Homep.
26 Data BuroTOBNEHHa HpeMeHx 6e3NeKn.
LHaHOpMaia cTane y HaroDi KopnctyBauebi y pasi BuHnKHeHHI npo6nem 3 Bnpo6om.
UHsEHH Ta DOrn
Bupi6 Bumaraic MinimabHoro ocbnyroByBaHHa. uuueHH Ta o6cnyroByBaHH Bnpo6y MaOTb BIKOHByATnca TINbKn DOpocnmu.
- PeKOMeHIOBaHO TpIMaTn B UcCTOTi BCI pyXOMI uactuHn.
- PepioDnH0 OuyuIte INaCTNKOBI Detani BONORIO TKaHHoIO, He BNKOpNCTOByIte PO3HHNKIB YN IHINX noi6Hnx peOBOH.
KopntyTeCnIITKOIO DnBnDaJIeHHNnIy 3TKaHINHHnx
He ncttb npncptpi nornnHaHH ydp4 3 nonicnpony po3HHKAMn nn Hmnn noi6HmpeoBnAmn.
3axuatae Bnpi6 BiBnNBy atmocepnHex akTopiB, BOIN,douy Ta CHIy,TPNBaIe nepe6byBaHH Ha COHcIMoKe npNBecTNO 3MIHN KONbOpy 6araTbOx MaTepiAnIB.
36epiraTe Bnpi6 y cyxomy MiCi.
PEG-PEREGO S.p.A.
B Kompanhini Peg-Perego SpA BHepeha cnctema ynpablenn KaueCTbOM, PegPerego B 6ydb-akni cac Moke BVocnt 3MiHn do Modenb, Bka3aHnx B daHi IHCTpykui, 3TexhiHnx abo KomepuiHnx npuHH.
PEG-PEREGO CEPBIC
KIOy npD6aHOro BAMn TOBapy Peg-Perego noikOuINncb 30430000000000000000000000000000000000000000000000000000000000000000000000000000000000000000000000000000
ten. +38 (050) 32-69-131, (050) 32-65-682, (044) 574-95-41
φακc: +380 44 574-95-42
eJektpoHha noWta info@amigotoys.com
603 cepbichoo Cnyx6o1o Peg-Perego B Itanii tel. 0039/039/60.88.213
The Original Accessory Peg-Perego
Ta aEoaup Peg-Perego exouv enivon@w c npio kai npaktik ooneta wote va dieukoluvouv tn 0wn twyovew. Avakalue ola Ta aEoouap Tou npoiovtoc PegPerego oTo www.pegperego.com.
Aipouc oεipac
25 Tnv nlaivn nEupa, kaw ano to kaioqa, uapyei n Etiketa Eykioc kai n Etiketa me tic akoloudec n npopopiec ovoa npoiovtoc, nepounvia napaywnkai apiOuc oipac.
26 NaW oTg CwV avaypapetai nepounvia npaywync Ta 0toxieia auta eiva xpojma otov katavaawtn oE nepintwn nou to npoiov napovsiacei npoBnmuata
Kaθápiσμa to npoióvtoC
To pioov oac xpeiaetai exayiotn ouvtnpno. O epyaiec kaBapiaoukai ouvtnpnonc npenei va ekteauovtai movov ano Evnlikec.
Σμβouεouμε va διαπρείτε kaθαρά σλa ta μερη που KIVOUVTai.
- Pepiodiká Kaθapiéte Ta nlaotíka hépne Éva Uypo Niavi, μη xροιμοιeite δiautíka n àλa πapóuia npoióvta.
BouptoiTe ta upaouativa hepn yia va anoakpuve Te n oKovn.
Mny kaapieTe n diatae anoppoPOnnc npooKpuOeWv ano noluatupevio me diautika n alaa napoia npoiovta.
Ppoataeute npoiov ano atmuogpaipikouc napayovtec, Bpoxn, vepo n xiovi. H auvexnc ekthetaon otov nia yia nou Kaipooa va npokaleoei aalayec oto xpua noawuukwv
ΦuáéTe to npoióv Εnpó χwpo.
PEG-PEREGO S.p.A.
H Peg-Perego SpA eivai ma etaipieia me Suottna Diaxepionc Piotntac mtonoinuevo ano tvu TUV Italia Srl, ouqwva me to npotuno ISO 9001. H Peg-Perego 8a uiopei va enipei ava naa otiyun troponoinaeic ota movtea nov nepiyapovtai atny napouoa dnmuoeuvn, yia loyouc texviiknc n emnpiknc quanc.
Yπnpεσia unooπηριξηc Peg-Pérego
Eav tuyov yaoov n kataotpapov uepn tou ovoTeau, xpoioioiote movov wnoia avtaaakktia Peg-Perego. Ta evdoeyoeec eTNIKEUEc avtikataoTaEcN npopopiec oxetik a Ee TPOIOvTA, wanon WNOIOW AVTAALAKTIKW KAI eOouap, EIKIOUWNEte Me TNV YINPEIA YINOTNIPOIEC Peg Perego avapepovac, OE ppiTTwn Tou utapxei, Tov oeiPiKO apIoo Tou pioiovtoc.
tnλ.0039/039/60.88.213
LcLcElyu"Base i-Size"pLsWJU
aJJI J
aIy aIy aIy aIy aIy aIy aIy aIy aIy aIy aIy aIy aIy aIy aIy aIy aIy aIy aIy aIy aIy aIy aIy aIy aIy aIy aIy aIy aIy aIy aIy aIy aIy aIy aII y Ia Ia Ia Ia Ia Ia Ia Ia Ia Ia Ia Ia Ia Ia Ia Ia Ia Ia Ia Ia Ia Ia Ia Ia Ia Ia Ia Ia Ia Ia Ia Ia Ia Ia Ia Ia Ia Ia Ia Ia Ia Ia Ia Ia Ia Ia Ia Ia Ia Ia Iaa 10000000000000000000000000000000000000000000000000000000000000000000000000000000000000000000000000000
Peg-Perego Lioo joo
a_3 + a_4 + a_5 = 6
"alal jg g Arg 2. y Lo golgcbj yll Jabla bll qil
pss
1i0."i-Size"egj no JlalbUaL pllai go I aJyLL Jabll aao
aalglll alIyall aal Lwog .19, aalll Laag oao
Jlgoa Sall aeall sll Jn o cagogo loS "i-Size"go
dally plasuW8
aIgloLgogosLsclao hlaLg lalalBaae aae
Jablao Cuaia Jauagolgolalwblayda aie
JlwgogooLs,clao Ic lao ayllw aaao plssuW! aylw
Coiagl all golgolgolgolgolgolgolgolgolgolgolgolgolgolgolgolgolgolgolgolgolgolgolgolgolgolgolgolgolgolgolgolgolgolgolgolgolgolgolgolgolgolgolgolgolgolgolgolgolgolgolgL 11
Gglalge Gglal Gglal Gglal Gglal Gglal Gglal Gglal Gglal Gglal Gglal Gglal Gglal Gglal Gglal Gglal Gglal Gglal Gglal Gglal Gglal Gglal Gglal Gglal Gglal Gglal Gglal Gglal Gglal Gglal Gglal Gglal Gglal Gglal GglalGglal Gglal Gglal Gglal Gglal Gglal Gglal Gglal Gglal Gglal Gglal Gglal Gglal Gglal Gglal Gglal Gglal Gglal Gglal Gglal Gglal Gglal Gglal Gglal Gglal Gglal Gglal Gglal Gglal Gglal Gglal Gglal Gglal Goglaleo 11
Jzlll iio PkXl plbi ci kBase i-Size go aoloai wic
Jzlll jzai Jzai Jzai Jzai Jzai Jzai Jzai Jzai Jzai Jzai Jzai Jzai Jzai Jzai Jzai Jzai Jzai Jzai Jzai Jzai Jzai Jzai Jzai Jzai Jzai Jzai Jzai Jzai Jzai Jzai Jzai Jzai Jzai Jzai JZ
a5pjo go Iolai 10Lc: p> (g
aclll 10
jJJJ JIJI JIJI JIJI
Laeel Jd 1
aal jolao (EPP) yLg yJy Jyogj y Jy
aasllal (EPS) 11 Jguiuugulj oogc oolcs (n
cucuulac gJ Lclx yg plsswU jol yL uunl Jabll 20
oocg o pssw81 cale
aJ. Ganciomatic Lgj Primo Viaggio i-Plus 1 Base i-Size
Lluo golgo jSo Base i-Size Primo Giaggioi-Plus.. JIo Sla aJisilai ababu clogg Jauaiaeog Cuii JsiIgai oall joi aalj fio oaggl 1y
b < c 值得归”
Jolao 1000000000000000000000000000000
LioJ 1i0g g i0g jilalgsg pcl
L
Tri Stage Cushion (c)
Ji d
S OBC = S COD + S BOC - S BOC
40
logwJlai
1111 1111 1111 1111 1111 1111 1111 11
(1) 128114 a3g (1) 11111111111111111111111
L
JUa (a Jk) 1234567890123456789012345678901234567890123456789012345678901234567890123456789012345678901234567890123456789
gaw gaii siw aiae ai oLuguJ uJ iinno j
1000 10000000000000000000000000000000000
(C)
JLALI pRnny aal alolwglalgaoa
Lalalalalalalalalalalalalalalalalalalalalal
(b-1)
11111111111 10000000000000000000000000000000000
JolSLJIaJIJIJIJIJIJIJIJIJIJIJIJIJIJIJIJIJIJIJIJIJIJIJIJIJIJIJIJIJIJIJIJIJIJIJIJIJIJIJIJIJIJIJIJIJIJIJIJIJIJIJIJIJIJIJIJIJIJIJIJIJIJIJIJIJIJIJIJIJIJIJIJIJIJIJIJIJIJIJIJIJIJIJIJIJIJIJIJIJIJIJIJIJIJIJIJIJIJIJIJIJ
a0a2g1LalwIg3aLz0L00uWJ1auewauoL aWLaJI clpa
The Original Accessory Peg-Perego
g 1 Lc g aLi gS: Peg-Perego 1g wS
Peg- jaii i aai 1jgW521 gao
www.pegperegco.com jgjLgjI Lc Perego
C. _L f(x) d^2 x = _L f(x) d x
(a)
- S ACD = S COD + S BDO - S CDO
J 1
a0 > a1 > ·s > an < a1 < ·s < a_n
jLgLg 10
(b-|c|) a,b,b,c
(1) aalaaeae 1
(1)a#
Jg 1
S,S,11
JgogJLp,1a,1aJai Jalal ggo aSll eLaJc
Ela281 pab1 jol 1jll lc biaolg aall lll piae gaaa e aea
joo.1000000000000000000000000000000000000000000
LoljFliuJfLiaI (1 pGw) aababal oos Jx no
a.o.3x1 In 10.12.a.
aLio 1
12
gao gao LoS (gaii aaii) Jaiw gai Sll liaiy jgiall sio
J
aaiiie
alaiw wsiLwrg Jo gSo pLiBi.Tri Stage Cushion, jso JiaJalalJeao 10
jLjLjLjLjLjLj
juii jiu
yglal aolb yoe bLug
iJ1 J11 Lw g pia w 8 jaua Jwgl aolos oLwg
5 4 j0s91 gjg Jlcb
Jai Jai Jai Jai Jai Jai Jai Jai Jai Jai Jai Jai
(a J5)JgogosLsJia:gi gog
(b)
aiaaglalwglalldlaalaoos
1 1
L
Lol Logell Jolgulgolgul oJalalao
Lulwlll aegg Cuiy
L
i 1
ii
aogoo
aiicjg aaii
aaii
Paaai 8. allio jolae bao: lgg a.s wlll slj>81 aaii
aLio oio gai jilg
aagglgallalglalwglolaoai oacgial slalai
olio aIwJgJgJgJgJgJgJgJgJgJgJgJgJgJgJgJgJgJgJgJgJgJgJgJgJgJgJgJgJgJgJgJgJgJgJgJgJgJgJgJgJgJgJgJgJgJgJgJgJgJgJ
.1g!Lio oioio g!
jglgJlgl JIOgJolgoa
Lolal 100
Lg jIcog aiiLLb
PEG-PEREGOS.p.A
TUV Italia 1200000000000000000000000000000000000000000000000000000000
g g Peg Perego 1 ISOL Lsrg
a13g1 2
Peg-Perego 5
jellgbabpsiwilglgai gai jaaal
JgJgJgJgJgJgJgPeg Pergo
y j 1j y 1j 1j 1j 1j 1j 1j 1j 1j 1j 1j 1j 1j 1j
Peg Peregao
1
·s + AA + r + 1 - QA - rQ^2
(c)
Tri Stage Cushion (c
J0wLg4s(jd
jgo 10000000000000000000000000000000000000000000
180
aLw gla auiLi alai3- g
A 1
jwol8a.sjEla juaiaos (i
Jalllgiiu aipjoo gaoaio Joo 1
j 1 j 1 j 1 j 1 j 1 j 1 j 1 j 1 j 1 j 1 j 1 j 1 j 1 j 1 j 1 j 1 j 1 j 1 j 1 j 1 j 1 j 1 j 1 j 1 j 1 j 1 j 1 j 1 j 1 j 1 j 1 j 1 j 1 j 1 j
(EPS) jj j j Lw j 2000
aai alwog Js Cao: A Cao
LcWls. 5g g g g g g B
:
C
13jLwgoaegio!gaiiaojgjglSi:Dcuag
Lg 1
5
i 1
wJ 15, uLi jg jy20 aLai Lng Js1, gjg
sagc gagg jgaaa
s 1
1
gclcwl 1jai jiai jao aia gaoa gls c
g jgjLgJgJgJgJgJgJg
LJgoooOuclUbIusLcIabjagai
J 1
10
Lai Lai Lai Lai Lai Lai Lai Lai Lai Lai Lai Lai Lai Lai Lai Lai Lai Lai Lai Lai Lai Lai Lai Lai Lai Lai Lai Lai Lai Lai Lai Lai Lai Lai Lai Lai Lai Lai Lai Lai Lai Lai Lai Lai Lai Lai Lai Lai Lai Lai Lai
Jao 4 Jao Jao Jao Jao Jao Jao Jao Jao Jao
j 1 j
g 100
g
yLwOoJlWgjooL0sJyRyL
JLWgjw gJyW ay Cw JLe J. aLW
All of the intellectual property rights for the contents of this instruction manual belong to PEG-PEREGO S.p.A. and are protected by the laws in force.
PRIMO VIAGGIO i-Plus
Peg-Pérgo