FCL80121 - LED Lighting PARKSIDE - Free user manual and instructions
Find the device manual for free FCL80121 PARKSIDE in PDF.

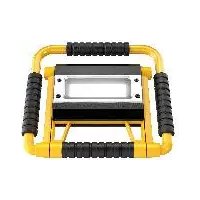
| Product type | LED construction spotlight 2 x 50 W |
| Brand | Parkside |
| Model | FCL80121 |
| Operating voltage | 220-240 V~ 50 Hz |
| Total power | 2 x 50 W |
| Total luminous flux | 2 x 4500 lm (maximum) |
| Color temperature | 6500 K (cold white light) |
| Color rendering index (Ra) | > 80 |
| Beam angle | 105° |
| Protection rating | IP54 (spotlights and socket) |
| Dimensions of one spotlight (L x H x D) | approx. 18.2 x 14.6 x 5.4 cm |
| Tripod height (including spotlights) | 115 to 165 cm |
| Power cable length | 5 m |
| Total weight | 6 kg |
| Number of spotlights | 2 (independent) |
| Brightness adjustment | 100 % / 50 % (per spotlight) |
| Integrated socket | 220-240 V~, max. load 3580 W, IP54 |
| Usage | Indoor and outdoor |
| Warranty | 3 years |
| Delivery contents | 2 spotlights, 1 tripod, 1 handle, 1 mounting bracket, screws, manual |
Frequently Asked Questions - FCL80121 PARKSIDE
User questions about FCL80121 PARKSIDE
0 question about this device. Answer the ones you know or ask your own.
Ask a new question about this device
Download the instructions for your LED Lighting in PDF format for free! Find your manual FCL80121 - PARKSIDE and take your electronic device back in hand. On this page are published all the documents necessary for the use of your device. FCL80121 by PARKSIDE.
USER MANUAL FCL80121 PARKSIDE
natural_image
Two white outdoor lighting fixtures mounted on a black metal frame, no visible text or symbols.LED-ARBEITSSTRAHLER 2 X 50 W / 2 X 50 W LED WORK LIGHT / PROJECTEUR DE CHANTIER LED 2 X 50 W
DE AT CH
LED PRACOVNY REFLEKTOR 2 X 50 W
2 X 50 W LED WORK LIGHT
Assembly, operating and safety instructions
NL BE
LED-WERKSCHIJNWERPER 2 X 50 W
PRACOVNÍ LED REFLEKTOR 2 X 50 W
Before reading, unfold both pages containing illustrations and familiarise yourself with all functions of the device.
FR BE
GB / IE Assembly, operating and safety instructions Page 13
text_image
Technical diagram of two lighting equipment setups with numbered components and labeled parts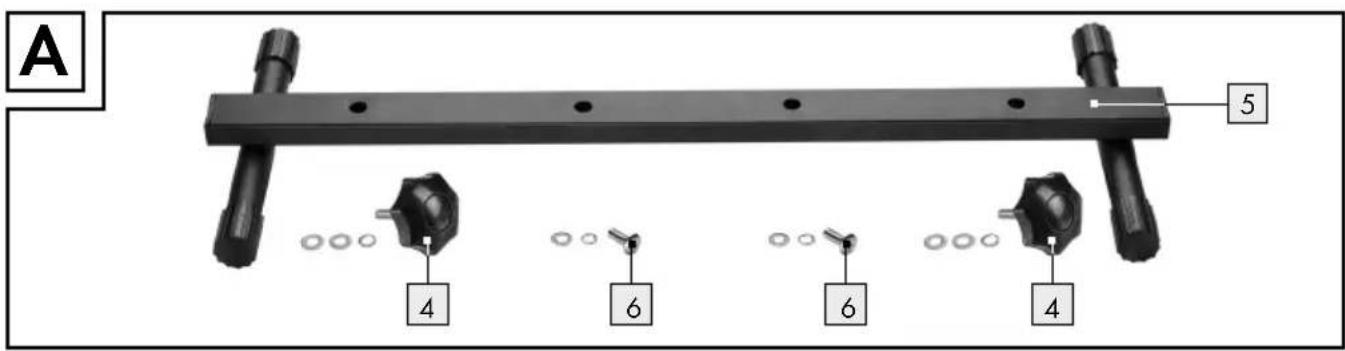
text_image
A 5 4 6 6 4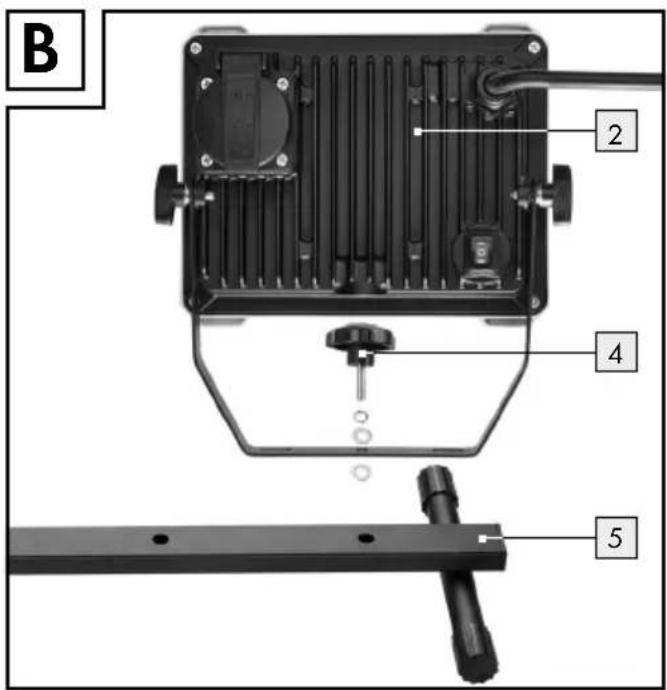
text_image
B 2 4 5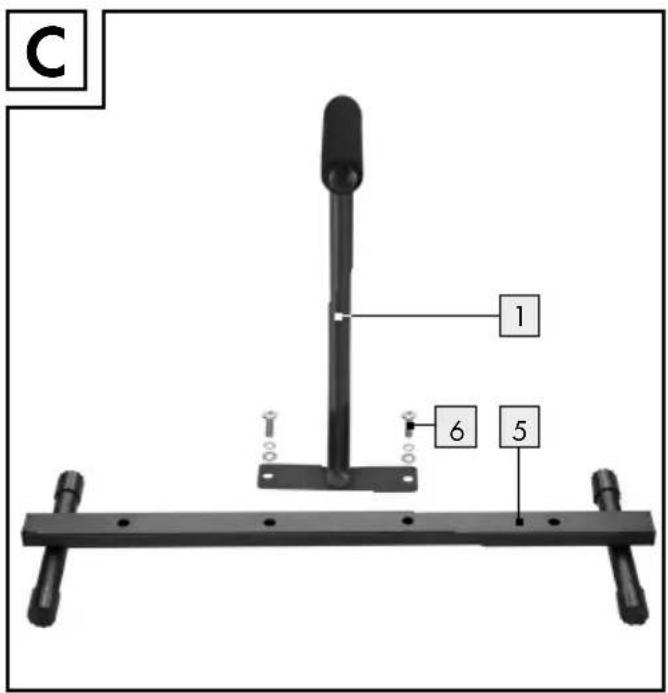
text_image
C 1 6 5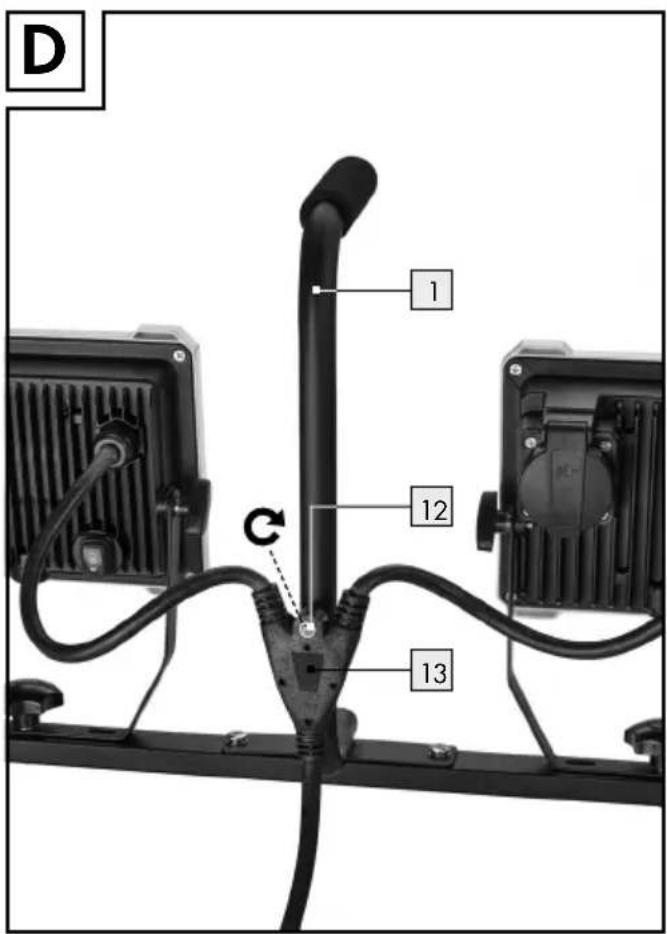
text_image
D 1 12 C 13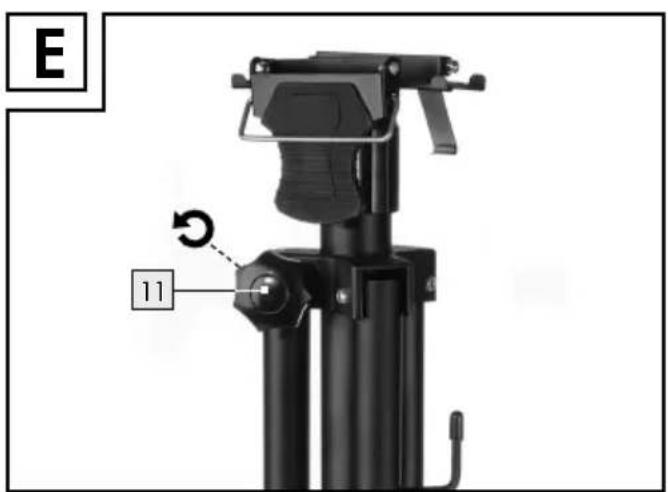
text_image
E 11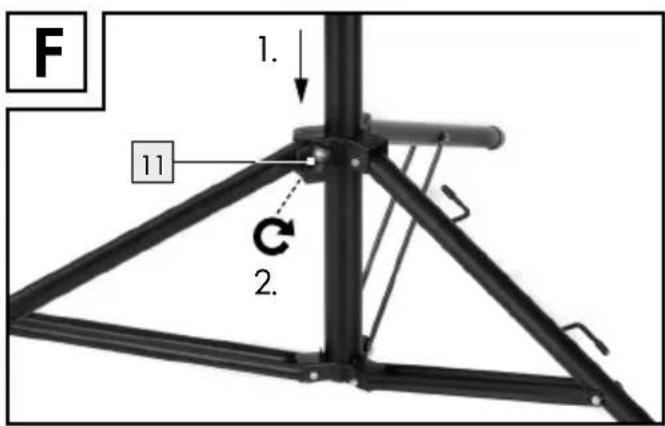
text_image
F 1. 11 C 2.Intended use....Page 14
Scope of delivery....Page 15
Parts description Page 15
Technical data......Page 15
Safety notes......Page 15
Installation......Page 16
Assembling the spotlights and handle piece on the mounting bracket ......Page 16
Setting up the tripod....Page 17
Setting the tripod height......Page 17
Assembling the work light on the tripod Page 17
Disassembling the work light....Page 17
Operation Page 17
Using the light....Page 17
Using the socket Page 17
Maintenance and cleaning......Page 18
Disposal Page 18
Warranty and service......Page 18
Warranty Page 18
Service address......Page 18
| List of pictograms used | |||
 | Read the instructions! Warning! Danger of |  c shock! c shock! | |
 | Volt |  | The built-in LED modules have adjustable brightness (100%/50%). |
 | Alternating current/voltage |  | Beam angle: 105° |
 | Hertz (frequency) |  | A shattered protective covering must always be replaced. |
 | Watts (effective power) Plug protection typ |  ash-proof ash-proof | |
 | Protection class I |  | Product protection type: dust-proof and splash-proof |
 | Observe the warnings and safety information! |  | Dispose of the packaging and device in an environmentally friendly manner! |
 | Danger to life and risk of accidents for infants and children! |  | The illuminant in this light must be replaced by the manufacturer or by an authorised service technician or a similarly qualified person. |
 | Lights for harsh operating conditions Only |  x4 plugs in the socket. x4 plugs in the socket. | |
 | LED operating life TÜV SÜD/GS certified |  | |
 | Switching cycles Packaging from responsib |  FSC* C159239 FSC* C159239 | |
2 x 50 W LED work light
- Introduction

We congratulate you on the purchase of your new product. You have chosen a high quality product. The instructions for
use are part of the product. They contain important information concerning safety, use and disposal.
Before using the product, please familiarise yourself with all of the safety information and instructions for use. Only use the product as described and for the
specified applications. If you pass the product on to anyone else, please ensure that you also pass on all the documentation with it.
Intendeduse
This lamp is suitable for indoor and outdoor use. This product is only intended for private household use. Any other use or product modification is prohibited and will result in damage. The manufacturer does not assume any liability for damage arising from improper use. The product is not intended for commercial use.

Lights for harsh operating conditions
- Scope of delivery
Always check that all the parts are present and that the product is in perfect condition immediately after unpacking.
1 handle piece
2 spotlights
2 clamping nuts with 3 washers each (mounting bracket) (pre-installed)
1 mounting bracket
2 screws with 2 washers (mounting bracket) (pre-installed)
1 tripod
1 clamping nut (tripod) (pre-installed)
1 screw (handle) (pre-installed)
1 set of assembly instructions and instructions for use
Partsdescription
1 Handle piece
2 Spotlight
3 Wing bolt
4 Clamping nut (mounting bracket)
5 Mounting bracket
6 Screw (mounting bracket)
7 Clamp
8 Height adjuster
9 Tripod
10 Cable winder
11 Clamping nut (tripod)
12 Screw (handle)
13 Mains cable bracket
14 Socket
15 Mains cable
16 ON/OFF switch
●Technicaldata
Model number: FCL-80121
Operating voltage: 220-240V\~50Hz
Total output: 2 x 50 W
IP rating: IP54
Dimensions per
floodlight:a pprox. 18.2 cm x 14.6 cm x 5.4 cm (L x H x D)
Height of tripod
including spotlight: 115-165 cm
Cable length: 5 m
Light colour: 6500K
Total luminous flux: 2 × 4500 lm, Ra > 80
Adjustable beam angle: 105°
Luminous flux at
120° angle: approx. 2 x 4000 lm
Weight: 6 kg
Projected area: approx. 7 m x 7 m
Socket:
Operating voltage: 220–240V\~50Hz
Nominal load: max. 3580 W
IP rating: IP54

Safety notes


WARNING! DANGER TO LIFE AND RISK OF ACCIDENTS FOR INFANTS AND CHILDREN!
This product may be used by children aged 8 years and up, as well as by persons with reduced physical, sensory or mental capacities or lacking experience and knowledge, so long as they are supervised or instructed in the safe use of the product and understand the associated risks. Do not allow children to play with the product. Cleaning and user maintenance must not be performed by children without supervision.
Do not leave the lamp or packaging material lying unattended. Plastic films / bags, plasticparts, etc. are dangerous for children to play with.
The maximum installation height must not exceed 5 metres.

AVOID THE RISK OF FATAL INJURY FROM ELECTRIC SHOCK
We assume no liability for property damage or personal injury caused by improper handling or failure to observe the safety notices!
- Never use the lamp if any defects have been identified. Check the light and the mains cable 15 with the plug for any damage before connecting it to the mains.
■ Never open any of the electrical equipment or insert objects into these. Such interferences pose a risk of fatal injury from electric shock.
■ Only touch the insulated part of the mains plug when connecting or disconnecting it from the mains supply!
To avoid hazards, if the flexible lead on this light is damaged it must be replaced by the manufacturer, their service representatives or an equivalent professional!
Before use, verify that the available mains voltage matches the required operating voltage of the lamp (220-240 V\~, 50 Hz).
■ Under no circumstances should you allow liquids or steam to enter the socket on the back! This can cause it to short circuit and pose a risk of death or serious injury.
■ Only use IPX4 plugs in the socket.
- When using the built-in socket, the IP protection is reduced to IP44 if a corresponding IP44 model plug is used.
- Disconnect the product from the mains supply whenever you want to use it in a different location.
■ Never carry the product by the mains cable.
- Only use the handle piece to adjust the lamp, not to carry it.
- Do not connect the product in series.

PREVENT FIRE AND INJURY HAZARDS
⚠️CAUTION! RISK OF BURNS DUE TO
HOT SURFACES! To prevent burns, ensure that the lamp has been switched off and has cooled down before touching it. Illuminants become very hot.
- Do not cover the lamp with objects. Excessive heat build-up can result in fire.
■ Never leave the lamp unattended during operation. Excessive heat build-up can result in fire.
■ The LED lamp is not dimmable.
Do not look directly into the light source (light bulb, LED etc.). Do not look into the light source (light bulb, LED, etc.) with an optical instrument (e.g. magnifying glass).
A shattered protective covering must always be replaced.
●Installation
WARNING! DANGER OF ELECTRIC
SHOCK! Only insert the mains plug into the mains socket after it has been assembled. Otherwise there is a risk of electric shock!
Note: You can use the light as a handheld or floor spotlight or with the tripod 9 if necessary.
- Assembling the spotlights and handle piece on the mounting bracket
☐ First, unscrew the pre-installed fixing material (screws 6, clamping nuts 4 and the washers pertaining to them) from the mounting bracket 5 (see Fig. A, ensure that the washers are in the correct order).
☐ Screw both spotlights 2 with the clamping nut 4 and the washers to the mounting bracket 5 (see Fig. B, ensure that the washers are in the correct order).
☐ Screw the handle piece 1 with the screws 6 and the washers to the mounting bracket 5 (see Fig. C, ensure that the washers are in the correct order).
☐ Loosen the screw 12 on the reverse side of the handle piece 1 and attach the mains cable bracket 13 to the handle piece 1 (see Fig. D).
Note: You can use the light in this form as a floor spotlight.
- Setting up the tripod
☐ Loosen the clamping nut 11 by turning it anticlockwise (see Fig. E).
☐ Catch the tripod element where the legs are connected at the same height as the clamping nut 11 and press it downwards so that the legs unfold.
☐ When the tripod element cannot be pushed down any further, and the legs have fully folded out, re-tighten by turning the clamping nut ^11 clockwise (see Fig. F).
- Setting the tripod height (see Fig. G)
☐ Loosen the height adjuster 8 by turning it anticlockwise.
☐ Set the tripod 9 at the desired height by pulling the rod elements upwards or pushing them downwards.
☐ Tighten the height adjuster 8 by turning it clockwise to fix the tripod 9 at the desired height.
- Assembling the work light on the tripod
Note: To assemble the work light on the tripod 9 you must firstly assemble the spotlights 2 and the handle piece 1 on the mounting bracket 5. Proceed as described in the chapter "Assembling the spotlights and handle piece on the mounting bracket".
Place the mounting bracket 5 (with spotlights 2 and handle piece 1) on the open clamp 7. The handle piece 1 must be orientated in the direction of the retaining plates on the clamp 7, as otherwise, it cannot be fixed. Also ensure that you place the holes on the underside of the mounting bracket 5 on the pins of the clamp 7 (see Fig. HI and HII).
☐ Close the retaining plate of the clamp 7 (see Fig. HIII).
☐ Flip the clip of the clamp upwards, so that it catches in the retaining plate (see Fig. HIV).
☐ Press the locking handle of the clamp 7 downwards to fix the mounting bracket 5 (see Fig. HV).
• Disassembling the work light
WARNING! DANGER OF ELECTRIC
SHOCK!Remove the mains plug from the mains socket before disassembly.
⚠️CAUTION! RISK OF BURNS DUE TO
HOT SURFACES! Allow the light to cool down fully before disassembling it.
☐ To disassemble the individual elements, proceed in the reverse order as described in the respective chapters.
Operation
• Using the light (see Fig. I)
□ Completely unwind the mains cable 15.
□ Connect the mains plug to the mains socket.
☐ You can switch the light of any of the spotlights 2 on and off by press the ON / OFF switch 16 on the back.
Position I: 50 % light, 2250 Lumen (both spotlights together 4500 Lumen)
Position II: 100% light, 4500 Lumen (both spotlights together 9000 Lumen)
Position 0: Off
☐ Loosen the wing bolt 3 to tilt the spotlight 2 into the desired position. Re-tighten the wing bolt 3 to fix the spotlight 2 in the desired position.
- Using the socket
Before using the socket 14 ensure that the maximum nominal load of 3580 W is NOT exceeded by the connect device.
The socket 14 on the back of the spotlight is always active when the mains plug of the product is in the wall socket.
☐ To use the socket 14 on the back of the spotlight, flip the socket cover up and connect the desired device.
● Maintenance and cleaning
WARNING! DANGER OF ELECTRIC
SHOCK! Before cleaning the light, remove the mains plug from the mains socket and wind the mains cable 15 on the cable winder 10.
WARNING! DANGER OF ELECTRIC
SHOCK! To ensure electrical safety, never clean the light with aggressive detergents or immerse it in water.
⚠️ CAUTION! RISK OF BURNS DUE TO HOT SURFACES! Allow the spotlights 2 to cool down completely.
- Do not use solvents, petrol, etc. These would damage the light.
■ Only use a dry, lint-free cloth for cleaning.
■ Use a slightly moist cloth to remove any stubborn dirt.
●Disposal
The packaging is made entirely of recyclable materials, which you may dispose of at local recycling facilities.

Observe the marking of the packaging materials for waste separation, which are marked with abbreviations (a) and numbers (b) with following meaning: 1–7: plastics / 20–22: paper and fibre-board/80–98: composite materials.

The product and packaging materials are recyclable, dispose of it separately for better waste treatment. The Triman logo is valid in France only.

Contact your local refuse disposal authority for more details of how to dispose of your worn-out product.

To help protect the environment, please dispose of the product properly when it has reached the end of its useful life and not in the household waste. Information
on collection points and their opening hours can be obtained from your local authority.
● Warranty and service
Warranty
The product has been manufactured to strict quality guidelines and meticulously examined before delivery. In the event of product defects you have legal rights against the retailer of this product. Your legal rights are not limited in any way by our warranty detailed below.
The warranty for this product is 3 years from the date of purchase. The warranty period begins on the date of purchase. Please keep the original sales receipt in a safe location. This document is required as your proof of purchase.
Should this product show any fault in materials or manufacture within 3 years from the date of purchase, we will repair or replace it – at our choice – free of charge to you. This warranty becomes void if the product has been damaged, or used or maintained improperly.
The warranty applies to defects in material or manufacture. This warranty does not cover product parts subject to normal wear, thus possibly considered consumables (e.g. batteries) or for damage to fragile parts, e.g. switches, rechargeable batteries or glass parts.
- Service address
Please have your receipt and the item number (IAN 366993_2010) ready as your proof of purchase when enquiring about your product.
CE
$$ (L \times A I \times P) $$
natural_image
Mechanical assembly diagram showing a black frame with two metal clips and a central shaft, no text or symbols present.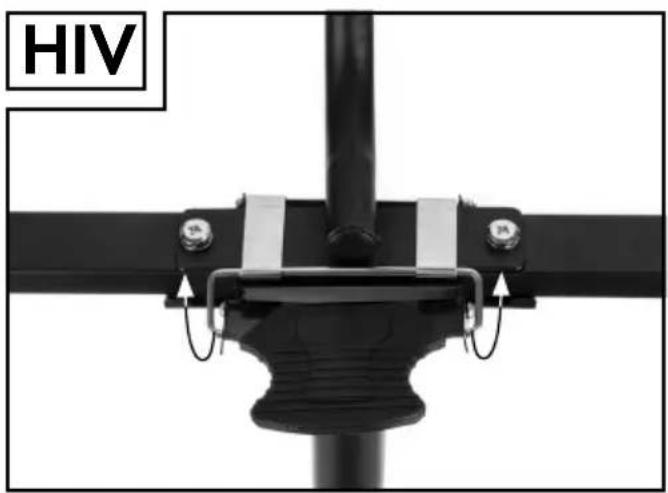
text_image
HIV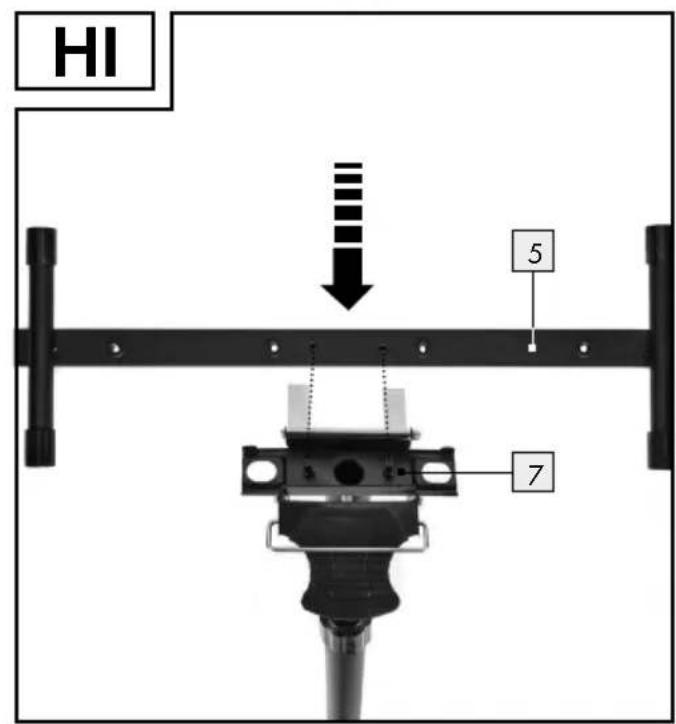
text_image
HI 5 7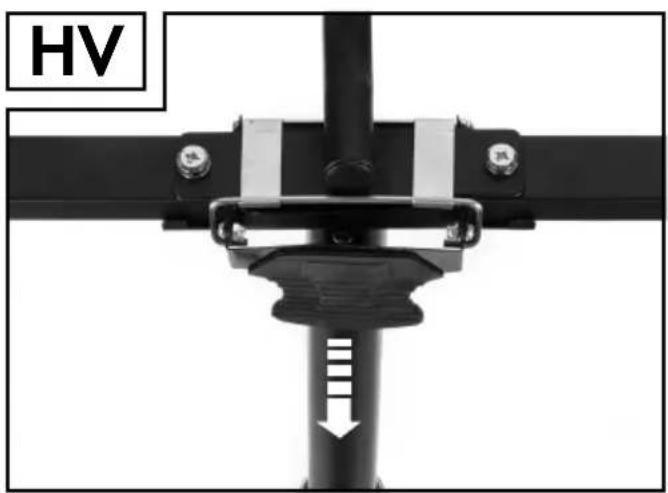
text_image
HV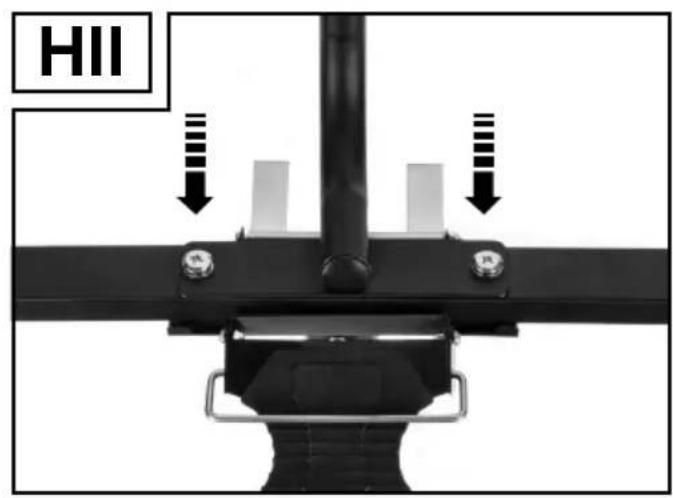
text_image
HII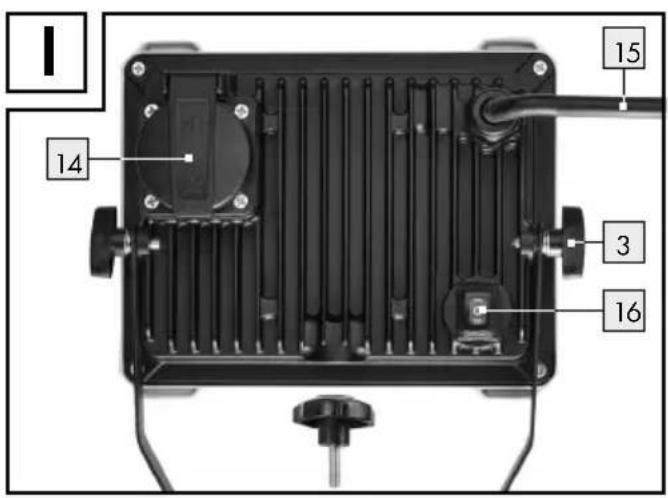
text_image
1 14 15 3 16Tristar Europe B.V.
Jules Verneweg 87
5015 BH Tilburg
THE NETHERLANDS