NightMatic 5000 - Motion detector STEINEL - Free user manual and instructions
Find the device manual for free NightMatic 5000 STEINEL in PDF.

| Product Type | Twilight Motion Detector |
| Brand | Steinel |
| Model | NightMatic 5000 |
| Dimensions (L × W × H) | 95 × 95 × 41.5 mm |
| Power Supply | 220-240 V, 50/60 Hz |
| Max. incandescent/halogen lamp power | 2000 W |
| Max. LED power (< 2 W) | 100 W |
| Max. LED power (2-8 W) | 300 W |
| Max. LED power (> 8 W) | 600 W |
| Detection Angle | Diffuse |
| Detection Technology | Photodiode |
| Twilight Threshold Setting | 2 to 1000 lx + Teach mode |
| Forced On Function | Switchable (4 h) via mains switch |
| Night Economy Mode | Yes, adjustable from 0 to approx. 7 h |
| Protection Rating | IP54 |
| Temperature Range | -20 °C to +50 °C |
| Max. Connection Cross-section | 2.5 mm² |
| Max. Capacitive Load | 176 μF |
| Optional Accessories | Remote controls RC5, RC8, Smart Remote |
| Manufacturer Warranty | 5 years |
| Installation Location | Indoor and outdoor, wall or ceiling |
| Available Colors | Black (ref. 648015) or white (ref. 035174) for angle bracket |
| Maintenance and Cleaning | Clean with a soft, dry cloth; do not use abrasive products |
| Spare Parts and Repairability | Contact Steinel customer service or a qualified electrician |
Frequently Asked Questions - NightMatic 5000 STEINEL
User questions about NightMatic 5000 STEINEL
0 question about this device. Answer the ones you know or ask your own.
Ask a new question about this device
Download the instructions for your Motion detector in PDF format for free! Find your manual NightMatic 5000 - STEINEL and take your electronic device back in hand. On this page are published all the documents necessary for the use of your device. NightMatic 5000 by STEINEL.
USER MANUAL NightMatic 5000 STEINEL
IE Socket Tool Company Ltd
Unit 714 Northwest Business Park
Kishane Drive Babysooin-Dubin 15
Tel:0035318809120-inicssockettoole
FR STEINEL FRANCE SAS
ACTICENTRE - ORT 2
Pug dos Famaos-Bat, M-Lot 3
TR-59813 Lesquin Cedex
Tel:+333/20 30-34.00info@steneharce.com
NL Van Spijk B.V.
Postbus 2-5688 HP OIRSCHOT
De Scheper 402-6688 HF ORSCHOT
Te+31498571810
nbayarsikl:www.arspkn
BE YSA Belgium
Hapeo 29. BE-240 Geel
Te:132/14/256050
info@vsacgjum.be -www.vsacgjum.be
LU Minusines S.A.
- rue de Hoogensraa, LU 1322 Luxembourge
Tel:1003524958581-www.minusnes.com
ES SAET-94 S.L
C Tropedola, n° 10 - Pol. Ind. Castalibesal Sud
ES-08765 Casselbibel Barcelona
Tel:+34/39772849-sae948seel84.com
IT STEINEL Italia S.r.l.
Lango Dnepani 2 IT 2012 Milan
Te:1397296457251
http://www.stonetel.com/
PT F.Fonseca S.A.
Fus Joao Francisco do Casal 87,89 Esquira
3800266AverP
Tel-3512341309909
fforsocac@fonsocca.com·www.forsocca.com
SE KARL H STROM AB
Vorstansgen 4:SE55302 Jockcinc
Tel:1302105212021.hongc@xspen.net
TR SAOS Teknoloi Elektrik Sanayi ve Ticaret Limited Sirketi
Hali Rirat Pasa mahalosi Yuzorhavz Soek
PERPA Tcarg Medez A Bick Kat 5 No 313- SsI / STANUL
T+02122200820
Jerism@socsteknol.com.tr: www.socsteknol.com.tr
CZ NECO SK, A.S.
Bjzseu11:SK-01901/
日:+421/4214455710
DEGDECSK:www.deqck
Please read carefully and keep in a safe place.
-Undercopyright
Reproduction either in whole or in part only with our consent.
- Subject to change in the interest of technical progress.
Symbols

Hazard warning!

Reference to other information in the document.
2. General safety precautions

Disconnect the power supply before attempting any work on the sensor.
- During installation, the electric power cable to be connected must not be live. Therefore, switch off the power first and use a voltage tester to make sure the wiring is off-circuit.
- Installing the sensor involves work on the mains power supply. This work must therefore be carried out professionally in accordance with national wiring regulations and electrical operating conditions. (DE: VDE 0100, AT: ÖVE-EN 1, CH: SEV 1000)
3. NightMatic 5000-3 COM1
Proper use
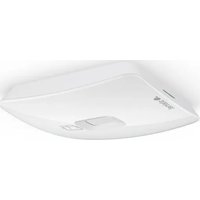
- The NightMatic 5000-3 COM1 is suitable for ceiling and wall mounting indoors and outdoors.
The NightMatic 5000-3 COM1 photo-cell controller measures ambient brightness and automatically switches the light ON at dusk and automatically switches it OFF again in line with various setting options. The NightMatic 5000-3 COM1 comes with new diffuse light measurement. This detects the level of light in its entire surrounding, taking better measurements than conventional light sensors.
Optionally, all function settings can be made via the RC5, RC8 remote controls as well as the Smart Remote. ( "8. Accessories")
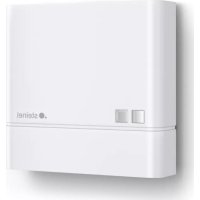
Package contents (Fig. 3.1)
Product components (Fig. 3.2)
A Load module, power supply lead
B Designer trim
C Sensor module
Product dimensions (Fig. 3.3)
4. Electrical installation
The mounting location should be selected so that daylight is able to fall onto the light sensor. An optional corner wall mount (product no. 648015 black or 035174 white) is available for mounting the NightMatic 5000-3 COM1.
The supply lead consist of three wires:
L = phase conductor (usually black, brown or grey)
N = neutral conductor (usually blue)
PE = protective-earth conductor (green/yellow)
= switched phase conductor (usually black, brown or grey)
Note on manual override function:
A power switch for switching ON and OFF can be installed in the mains supply lead.
This is a prerequisite for the manual override function ( "6. Funktion")
If the rubber seal is damaged, the cable entry openings must be sealed with an M16 or M20 (at least IP54) double seal cable gland.
For mounting on the wall, a condensation water drainage hole (Ø 5 mm drill bit) is marked next to the rubber seal. This must be opened if necessary. (Fig. 5.2)
Connection examples (Fig. 4.1)
Light without neutral conductor
(2) Light with neutral conductor
③ Connection by means of two-circuit single-interruption switch for manual and automatic operation
④ Connection via two-way switch for manual override and automatic operation Setting I: Automatic operation
Setting II: Manual operation, light permanently ON
Note: The system cannot be switched OFF, it is only possible to select operation via setting I or II.
a) Load, lighting max. 2000 W (refer to Technical specifications)
b) Sensor connection terminals
c) Indoor switch
d) Indoor two-circuit single-interruption switch, manual, automatic
e) Indoor two-way switch, automatic, light permanently ON
Connecting several sensors in parallel (not illustrated)
In this case, it is important not to exceed a sensor's maximum connected rating. In addition, all units must be connected to the same phase.
Note: The cable between two sensors must be no more than 50 m in length.
5. Mounting
- Check all components for damage.
- Do not use the product if it is damaged.
- Choose an appropriate site to install the product. Make sure that no lamp is shining light directly on the sensor.
Installation procedure (Fig. 5.1 + 5.2)
- Switch OFF power supply.
- Detach designer trim from sensor module.
- Disconnect sensor module from the load module.
- Connect to mains power supply. (Fig. 5.3)
- Insert fastening screw and mount load module.
- Fit sensor and load module together and screw into place.
- Switch ON power supply.
- Set functions. ( "6. Function / operation")
- Fit designer trim.
6. Function / operation
Factory settings
Twilight level:
1000 lux
Night economy mode:
OFF
Setting for morning hours: light ON in the morning
Remote controls RC5, RC8 or Smart Remote can be used for resetting to the factory settings.
Twilight setting (Fig. 6.1)
On actuating the control dial, the sensor is in programming mode.
This means:
The light connected always goes out.
-The sensor function is deactivated.
The settings may be altered as often as you wish. The last setting will remain stored in the memory in the event of power failure.
Important: while setting the light sensor, do not cover it or shade it with your own shadow
Teach mode
The control must be set to at the level of light at which you want the sensor to respond to movement from now on. Ambient brightness is calibrated for 10 seconds. The load is deactivated during this period.
Dazzle guard:
This product is equipped with an integrated dazzle guard. A drastic change in ambient brightness does not immediately switch OFF the sensor. The change in ambient brightness must last for longer than 1 second.
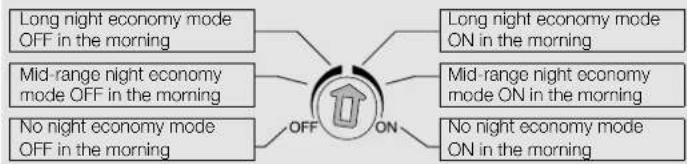
Night economy mode setting
The load connected can be switched OFF automatically at night to save even more electricity. The night economy mode always ends in the early hours of the morning between approx. 4 and 5 a.m. The economy time can be infinitely adjusted at the control inside the unit from 0 to approx. 7 hours. The control is divided into two sections. If the control is set to the left-hand scale side, the load will be switched OFF between 4 and 5 a.m. after the night economy time elapses. If the control is set to the right-hand scale side, the load will be switched OFF after the night economy time elapses and ON again when it gets dark. Wherever possible, avoid setting the control to the middle position. The electronic system does not have a clock. All times are computed by the microprocessor on the basis of light levels at twilight. Seasonal changes in light levels are identified automatically and taken into account.
Important:
Setting for morning hours
Control dial set to OFF means light stays OFF in the morning.
Control dial set to ON means light switches ON at dawn and OFF when it is light enough.
Manual override function (Fig. 6.2)
If a power switch is installed in the supply lead, the following functions are available in addition to simply switching ON and OFF:
Important: The switch should be actuated in rapid succession (in the 0.5-1 s range).
Manual override
1) Activate manual override:
Switch ON and OFF twice. The sensor is set to stay ON for 4 hours (red LED lights up behind the lens). Then it returns automatically to sensor mode (red LED 'OFF').
2) Deactivate manual override:
Switch ON and OFF once. Sensor goes out or switches to sensor mode.
LED function
-Normal mode: LED stays OFF
Remote control: LED flashes approx. 10 times per second
-Permanently ON/OFF: LED ON
Note: After putting the unit into operation and defining the twilight setting for the first time, the light stays ON all through the first night until the morning so that it can determine light levels at dusk and dawn.
7. Disposal
Electrical and electronic equipment, accessories and packaging must be recycled in an environmentally compatible manner.

Do not dispose of electrical and electronic equipment as domestic waste.
EU countries only:
Under the current European Directive on Waste Electrical and Electronic Equipment and its implementation in national law, electrical and electronic equipment no longer suitable for use must be collected separately and recycled in an environmentally compatible manner.
8. Accessories (optional)
User remote control RC5 EAN 4007841 592806
Additional functions, RC5
Light ON/OFF 4 h
-Userreset
- 100 h burn in, 4 h light ON press for ≥ 5 s
Service remote control RC8 EAN 4007841 559410
Additional functions, RC8
-Twilightsetting
Night-timeoperation
Daylightoperation
-Teach-IN
-Reset
Smart Remote EAN 4007841 009151
Control via smartphone or tablet
- Replaces remote controls RC5 and RC8
Download the appropriate app and connect via Bluetooth
Identify the sensors and read parameters
Additional functions. Smart Remote
Light-level setting:teach,2-1000 lux
-Burn in: 100 h
Initial state: behaviour after applying the light ON/OFF supply voltage
-Eco mode: OFF, ON in the morning, OFF in the morning
-Eco mode duration: 2 h - 10 h
Detailed descriptions are provided in the operating instructions for the particular remote control.
9. Manufacturer's warranty
As purchaser, you are entitled to your statutory rights against the vendor. If these rights exist in your country, they are neither curtailed nor restricted by our Warranty Declaration. We guarantee that your STEINEL Professional sensor product will remain in perfect condition and proper working order for a period of 5 years. We guarantee that this product is free from material-, manufacturing- and design flaws. In addition, we guarantee that all electronic components and cables function in the proper manner and that all materials used and their surfaces are without defects.
Making Claims
If you wish to make a claim, please send your product complete and carriage paid with the original receipt of purchase, which must show the date of purchase and product designation, either to your retailer or contact us at STEINEL (UK) Limited, 25 Manasty Road, Axis Park, Orton Southgate, Peterborough, PE2 6UP, for a returns number. For this reason, we recommend that you keep your receipt of purchase in a safe place until the warranty period expires. STEINEL shall assume no liability for the costs or risks involved in returning a product.
For information on making claims under the terms of the warranty, please go to www.steinel-professional.de/garantie
If you have a warranty claim or would like to ask any question regarding your product, you are welcome to call us at any time on our Service Hotline 01733 366700.

Dimensions (× × ) 95x95x41.5mm
- Technical specifications
| Output Incandescent / halogen lamp load 2000 W | |
| Fluorescent lamps, electronic ballast 1500 W | |
| Fluorescent lamps, uncorrected 1000 VA | |
| Fluorescent lamps, series-corrected 400 VA | |
| Fluorescent lamps, parallel-corrected 400 VA | |
| Low-voltage halogen lamps 2000 VA | |
| LED < 2 W 100 W | |
| 2 W < LED < 8 W 300 W | |
| LED > 8 W 600 W | |
| Capacitive load 176 μF | |
| Mains power supply | 220 - 240 V, 50 / 60 Hz max. 2.5 mm² |
| Angle of coverage | diffuse |
| Sensor technology | Photo diode |
| Twilight setting | 2-1000 lux + teach mode |
| Manual override (permanent light) | selectable (4 h) |
| IP rating | IP54 |
| Temperature range | -20°C to +50°C |
11. Troubleshooting
Malfunction Cause Remedy
| NightMatic 5000-3 COM1 without power | ■ Fuse has tripped, not switched ON, break in wiring | ■ Activate, change fuse, turn ON power switch, check wiring with voltage tester |
| ■ Short circuit | ■ Check connections | |
| Light does not switch ON | ■ Load faulty | ■ Change load |
| ■ No power supply | ■ see "NightMatic 5000-3 COM1 without power" | |
| ■ Surroundings still too bright | ■ Wait until ambient light reaches ON brightness; if necessary, define new switch-on value (using button) | |
| Light does not switch OFF | ■ Surroundings not yet bright enough | ■ Wait until it is light enough; if necessary, define a new light ON brightness (in the evening) |
| Light does not switch ON in the morning | ■ Function not properly activated | ■ Set function as described in "Setting for morning hours" |
| Light switches ON or OFF at unusual times | ■ Change from summer to winter time or vice versa | ■ Switching times are geared towards light levels. Change setting if necessary |
| ■ Switching times incorrect | ■ Re-define switch-ON light level (switching times will be re-computed) | |
| ■ Sensor near Wi-Fi or other wireless communication source | ■ Install at least 2 m away from the wireless communication source | |
| LED flashes once every 15 s | ■ Load connected is too high | ■ Reduce load or use contactor |
FR
1. A propos de ce document
Mode Teach (apprentissage)
Verblindingsbeveiliging:
Permanent lys (ill. 6.2)
Pouian via tic npwvec wpc: Ooc to npwi ENTO
EpiKTH n enavadopda ae publiaec epyoataclou pao TnAekovtpa RC5, RC8 n Smart Remote.
Pouan euaonlaic (Ek.6.1)
PntwTAC topuBuiOn o aioBnIpaac npvae ie Aetoupyia npoypaiaio
AUTOONUVAVEI:
-0 ouwdeedepeoc aqumnpac aBnei baoika navta.
-H Aeroupyia rou aiothnpa anevyponoiirai.
O Pubjiae, uopouov va TporotoinBouv dote Belaete auJupwua pe tic ETBIJIc cac. H Teueutai ta n anoekuetai ot mun jne aaoaiaea evan diakontic sktoou.
Poooh: Mny kauuTTETe Tov aoHTnpa foToc katn pueon ouTe va ToV OKOTEMACETe pe Tov idIO OAC.
Aetoupyia ekpaθηαnc (Teach-Modus)
Eoov Eikpatouv Etnupntc ouvehke, ootoc, kata tic onoe Ba npene va evpyonoiitai eavovtka aaoentpac, opuqnihc npene va nepaed otg ccon
Fia 10 8epeoAenra yiveta n eptponnc tnc pntc fowentotnac npdaovtoc. Tautoxpova anevpyonoeitrto ofoio.
Ppotaia avraklaonc: Auro to npoiov diaBetevouqutuueyn ppoataia avraklaonc. O aiohntnpac, sev ojne uedea ae nepintwn iaynpnc petaoanc pfewotntac. H petoanf pwhemotntac npenei va siapkeoei nepoooteo an 1 deutepeoentto.
Pouion oikovoiiknc aeitoupyia vixtac
O ouwdebeioeoc katawawtncmuopei va anevepyoioeita n wxta autoujata npoc ernpooetn oikovojua peuajotac.HIKOVOKHJ AEIOVPOyA VUXTAC TEAEWVEI NATVA TIC npwTEc npwvcwpezeta4:00kai5.00nwa.Oxpvoc oikovoknic Ateuoypuic uonoeva puoheiote aiaepaBHTA TOO EWC nepitno7 6pce tco eauotki KTOC OUKEUNC. Ipoc to akono auto o pueutni cieiv axipiaevoc ae doo topec. Eav o pueutniic bioketai otny apatepn IaeupaTNC KAIJAKAC, TOTE O katovawtnc atyeu oivayntc taN TNI TNPUEAUONTOXPOVQIKNC AIEOTUPLAC WXTAC met4:00kai5.00nwa.Eav o pueutniC bioketai otny deeaIaeupaTNC KAIJAKAC, TOTE O katovawtnc eeyvouo iaytaui naIeTNTN TNPUEAUONTOXPOVQIKNC AIEOTUPLAC WXTAC kai otavutapexiaokotoc. Ta TpNETI VA anoPouyetye 000 eviva epktro tvnv keptikheon Tou puuoutnTo Naektpovko ouattnja dev nepiaabale poal. OAc o tiuec xpvou utolovcovta anto to ikpoeneepyaatt Oauuupua me tic uunukkeakluokofwotc. Etioxiakeckaaayec twv ouwnkiv duotoc auadavovta unouh autoujata.
Ppoox: P0uion ia tic npwivc wpc
Pueurntc, anen ON Ouaive oT to fuc napaeve opnoTo npou. Pueurntc, anen ON onuvaive oT to fuc avaei To npoi kata to oupuota Ka apnve ploic pfioia opketa.

IpOoBETcE, Aetoupyiec Smart Remote
-PuOpon suoioNoic: Teach, 2 - 1000 Lux
-Burn in: 100 h ENTO2
Kaataaon apxkooinc: ouneepopap aetn v epapoyntao tpoobocic Phc ENTOEKO
-Ecomode: EKTOs, Ppwi ENTOs, Ppwi EKTOs
-Ecomodeδαρεα:2h-10h
AenTnepeic nepiypapc; otic oynie c xepipou TOU ekctote TnEkoVtpa.
9. Eyyunon kataokevaotn
Oc ayopaotnicmuopeite va kavete xpanu wovvupw evwntkiv bikawpatuw evan vto nwnn. Epoaovt ta dkaiajuaata auta iuxuvn otxupaac, dev uvtqvovtai oue npapoiokovtar ano t dnk jac dnwn ywnanc. cac napexoupe 5 etn eywnan ouyauyn oyn akyowkn kainnv kavovnik aeupuyia tv npoiovtoc STEINEL Professional-Sensorik. Napexoupe tyv ywnan oto to npoiov svnapouokce Iaattuata uukou, kataokaun nyxdeianpapouxeywn anetupoynkic kaVomTACdAWuWn eKtpovkiwdpooatoxelwakawbiu, otnc emioncEaaieucnpaatuw dawuTw xnpqpononBevtwuikw kaiuwkuiw uwt emipaveiwoutw.
PpOBoAaEwoewv
Eav balevaiautwae Tnapova oxetkae to npoiou ayopadate, npakaoue otoc to atooteleae e anon katoaon kai aaleuac paie nvy auveki antoeien ayopac, no tola npetie va avapepei tv npouyaayopac kai tvnyaiaou npolvotoc, oovt avinipownoacn 0n 0nty etapeia pac
ANTINPO2NOI-EI2A1QRE1E1ATHN EAAADAAAnvync&Yiot oE/
Aipotopavoc 8 A8na 10554. zac ouvtooue loiov onuc diaoaeEte npoeKtka Tnv anoeiayopac EwC Tnv npaleueon Tc diapkeiaevynong.Ta ta Eo6a KaTouk Kivouvou, pTeapopac Ota nlaia Etnpodnc Tou npoiovtoc n STEINEL Sevaauapeu kua Euvnu
Tnnpoepiec oxetka m npnoa aegwoc ae nepinwn sywnnc aneovBte atn diaekwakn nnww.steinel-professional.de/garantie
Eav vojkeTe onnpoketai wa nepinwn enywnong n sav exete onoiadnote antopia oxetika pe to nooovac, mpoite va paac triaepwneve ava raoa otun ypaun THAEQONA YIIOSTPHIEH & SEPBIZ IIA,THN EAAADA / 2103212021 / 2103218558 / Da: 2103218630.

- Tevika δεδομενα
-Surekli ACIK/KAPALI:LED surekli yanar