
Mi Robot VacuumMop Essential - Mop Xiaomi - Free user manual and instructions
Find the device manual for free Mi Robot VacuumMop Essential Xiaomi in PDF.
| Product type | Robot vacuum and mop |
| Model | MJSTG1 |
| Brand | Xiaomi |
| Wireless connectivity | Wi-Fi IEEE 802.11 b/g/n, 2.4 GHz |
| Battery life (standard mode) | Approximately 90 min |
| Battery capacity | 2500 mAh, 14.4 V |
| Charging time | 4-5 hours |
| Rated power | 25 W |
| Power supply (adapter) | Input 100-240 V~, 50/60 Hz; Output 20 V, 1.2 A |
| Cleaning functions | Vacuuming and mopping, S-shaped cleaning, edge cleaning, spot cleaning, scheduled cleaning |
| Suction power adjustment | 4 modes: Quiet, Standard, Medium, Turbo |
| Water flow adjustment | 3 modes: Low, Medium, High |
| Water tank capacity | Not specified |
| Dust compartment capacity | Not specified |
| Main spare parts | 2-in-1 dust compartment, filter, main brush, side brush, mop cloth, mop cloth holder |
| Recommended maintenance | Clean the compartment after each use, replace the filter every 6 months (or 150h), the main brush every 6-12 months (or 300h), the side brush every 3-6 months (or 150h), the mop cloth every 3-6 months |
| Safety | Do not use on elevated surfaces, avoid liquids, operating temperature 0-40°C, do not disassemble the battery |
| Estimated lifespan | 1000 hours of continuous operation |
| Repairability index | Spare parts available, user replaceable (brush, filter, mop cloth) |
Frequently Asked Questions - Mi Robot VacuumMop Essential Xiaomi
User questions about Mi Robot VacuumMop Essential Xiaomi
0 question about this device. Answer the ones you know or ask your own.
Ask a new question about this device
Download the instructions for your Mop in PDF format for free! Find your manual Mi Robot VacuumMop Essential - Xiaomi and take your electronic device back in hand. On this page are published all the documents necessary for the use of your device. Mi Robot VacuumMop Essential by Xiaomi.
USER MANUAL Mi Robot VacuumMop Essential Xiaomi
Mi Robot Vacuum-Mop Essential User Manual 1
Thank you for choosing the Mi Robot Vacuum-Mop Essential! Read this manual carefully before use, and retain it for future reference.
Table of Contents
Safety information 03
Product Overview 05
Connect with Mi Home/Xiaomi Home App 08
How To Use 09
Care & Maintenance 14
FAQ 18
Specifications 19
Safety information
Usage Restrictions
- This appliance can be used by children aged from 8 years and above and persons with reduced physical, sensory or mental capabilities or lack of experience and knowledge if they have been given supervision or instruction concerning use of the appliance in a safe way and understand the hazards involved. Children shall not play with the appliance. Cleaning and user maintenance shall not be made by children without supervision.
The appliance is only to be used with the < BLJ24W200120P-V> power supply unit provided with the appliance. - This appliance contains batteries that are only replaceable by skilled persons.
- Make sure the vacuum-mop is turned off and the charging dock is unplugged before cleaning or performing maintenance.
This vacuum-mop is only intended to clean floors in a home environment. Do not use it outdoors such as on an open balcony or on a surface that is not a floor, like a sofa, or in a commercial or industrial setting. - Do not use the vacuum-mop in an area suspended above ground level, such as a loft, open balcony, or on top of furniture, unless a protective barrier is present.
- Do not use the vacuum-mop at an ambient temperature above 40^ or below 0^ or on a floor with liquids or sticky substances. Charging Temperature: 0^ to 35^ .
- Please prepare the room before use, and give instructions for continuous care of the host.
- Remove any cables from the floor before using the vacuum-mop to prevent it from dragging them while cleaning.
- Remove any fragile or loose items from the floor, such as vases or plastic bags, to prevent the vacuum-mop from being obstructed or bumping into them and causing damage.
- Do not place children, pets, or any item on top of the vacuum-mop while it is stationary or moving.
- Do not use the vacuum-mop to clean dark-colored carpet as dark carpets may not be able to be cleaned properly.
- Do not allow the vacuum-mop to pick up hard or sharp objects such as building materials, glass, or nails.
- Do not spray any liquid into the vacuum-mop. Make sure the dust compartment is thoroughly dry before reinstalling.
- Do not place the vacuum-mop upside down.
- Please keep the main brush cleaning tools out of reach of children.
- Keep hair, loose clothing, fingers, and all parts of body away from openings and moving parts.
-
Do not use the vacuum-mop to clean any burning substances.
-
Under normal use of condition, this equipment should be kept a separation distance of at least 20cm between the antenna and the body of the user.
- Only use this product as directed in the user manual or quick start guide. Users are responsible for any loss or damage arising from improper use of this product.
Battery and Charging
- Do not use any third-party battery, power adapter, or charging dock.
- Do not wipe any part of the vacuum-mop with a wet cloth or other liquid.
- Do not dismantle, repair, or modify the battery or charging dock on your own.
- Do not place the charging dock near a heat source, such as a radiator.
- Do not improperly dispose of old batteries. Before discarding the vacuum-mop, make sure the vacuum-mop is unplugged and the battery is removed and disposed of in an environmentally safe manner.
- Make sure the vacuum-mop is turned off when being transported and kept in its original packaging if possible.
If the vacuum-mop will not be used for an extended period, fully charge it, then turn it off and store it in a cool, dry place. - Recharge the vacuum-mop at least once a month to prevent battery damage.
Hereby, Xiaomi Communications Co., Ltd. declares that the radio equipment type Mi Robot Vacuum-Mop Essential MJSTG1 is in compliance with Directive 2014/53/EU. The full text of the EU declaration of conformity is available at the following internet address: http://www.mi.com/global/service/support/declaration.html
For detailed e-manual, please go to www.mi.com/global/service/userguide
C∈EAC
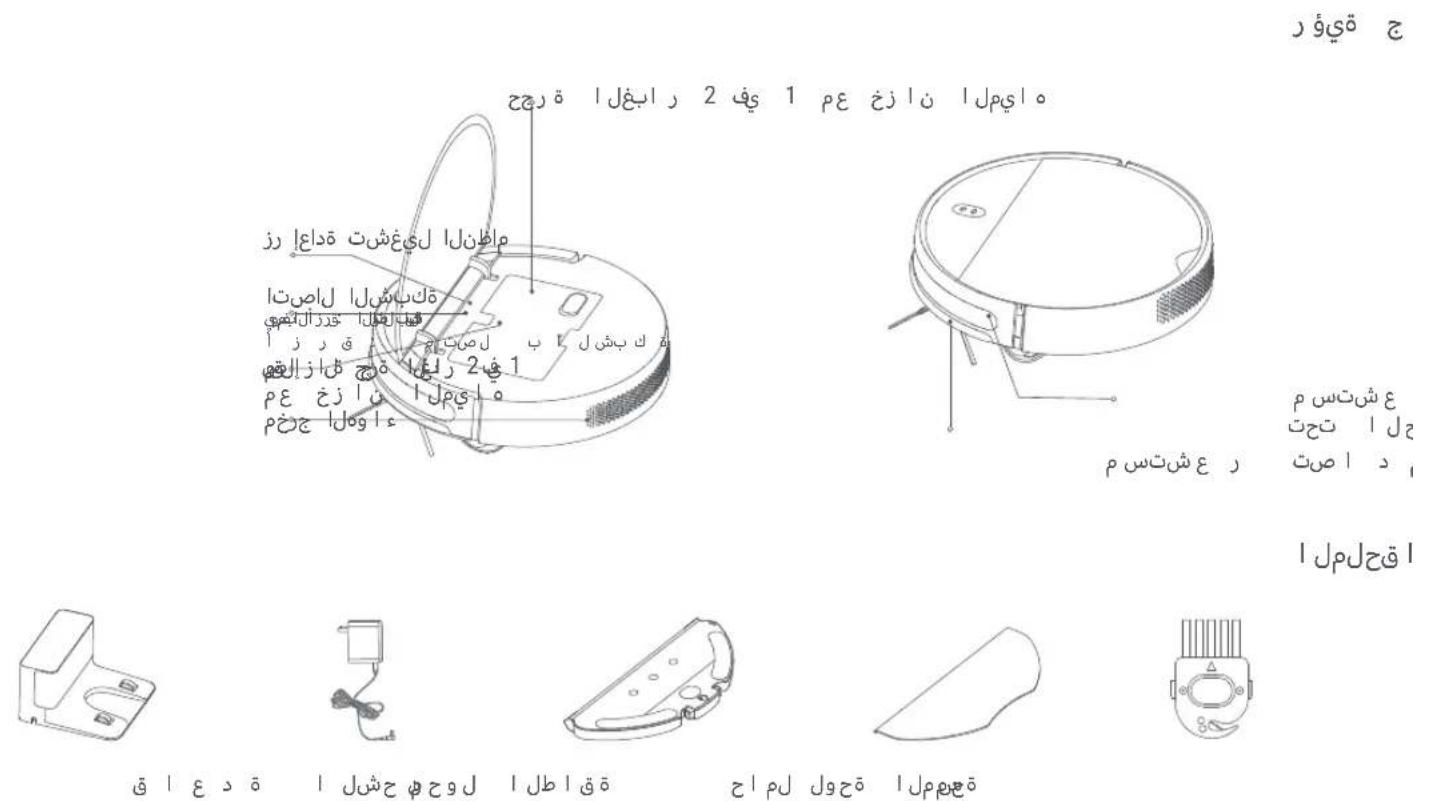
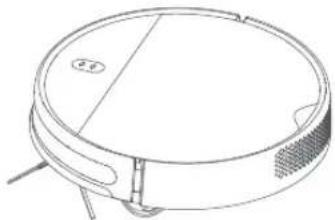
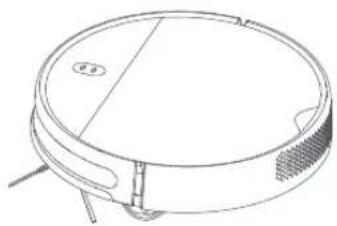
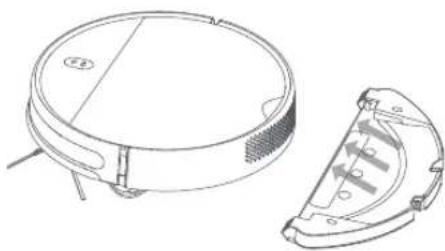
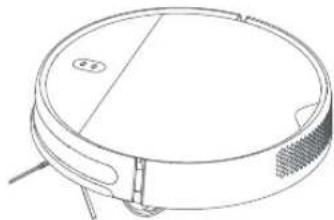
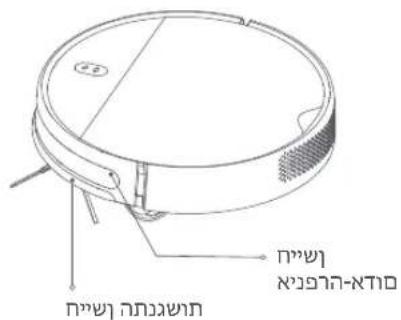
Product Overview
Vacuum-Mop
Side View
2-in-1 Dust Compartment with Water Tank
Collision Sensor
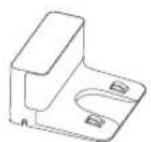
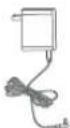
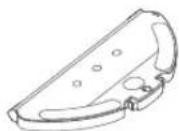
Accessories
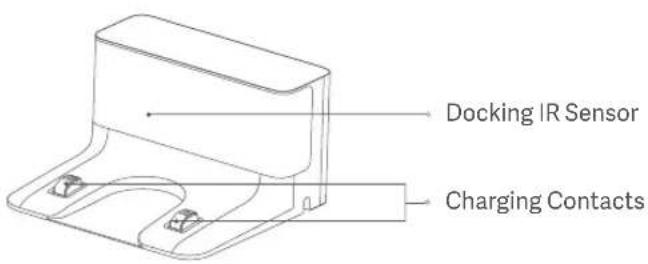
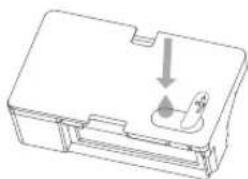
Charging Dock
Power Adapter

Mop Pad Holder

Mop Pad
Cleaning Brush
Underside Charging Dock
Connect with Mi Home/Xiaomi Home App
This product works with Mi Home/Xiaomi Home app*. Control your device with Mi Home/Xiaomi Home app.

Scan the QR code to download and install the app. You will be directed to the connection setup page if the app is installed already. Or search "Mi Home/Xiaomi Home" in the app store to download and install it.
Open Mi Home/Xiaomi Home app, tap "+" on the upper right, and then follow prompts to add your device.
- The app is referred to as Xiaomi Home app in Europe (except for Russia). The name of the app displayed on your device should be taken as the default.
Note: The version of the app might have been updated, please follow the instructions based on the current app version.
Resetting Wi-Fi Connection
When switching to a new router or changing your Wi-Fi password, you will need to reset the vacuum-mop's Wi-Fi connection. To do so, turn on the vacuum-mop, then simultaneously press and hold the buttons "+" and "O" "O" for 3 seconds until you hear a voice saying "Resetting the Wi-Fi connection and entering network configuration mode". Once the Wi-Fi connection is reset, follow the in-app prompts to add the device.
Note: Only 2.4 GHz Wi-Fi networks are supported.
Restoring Factory Settings
Press and hold the Dock button "O" for 5 seconds. Upon hearing a voice message, press and hold the Dock button again for 5 more seconds. Separate voice prompts will indicate when the reset begins and after it is completed. Restoring factory settings will clear all user data.
How To Use
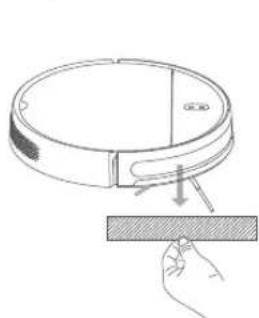
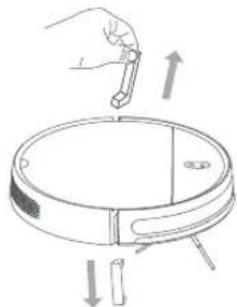
1. Before use
Remove the protective foam strips from both sides, and peel the protective film off the collision sensor.
2. Connect to the power supply
Open the bottom cover of the charging dock. Connect the power cord, and wrap any excess cord around the spool on the bottom of the dock, then remove the protective film from the IR sensor.
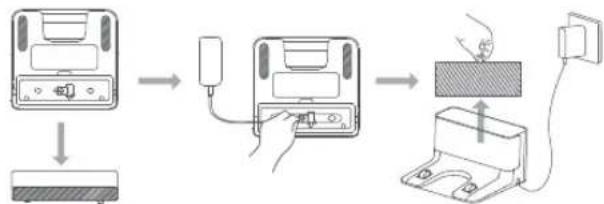
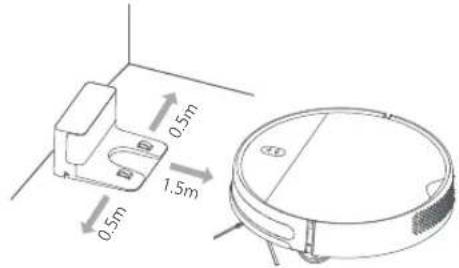
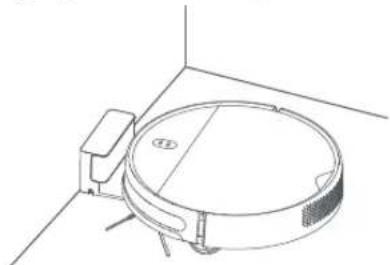
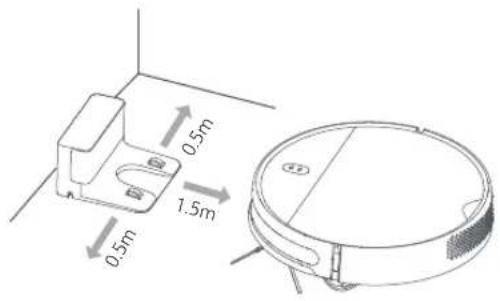
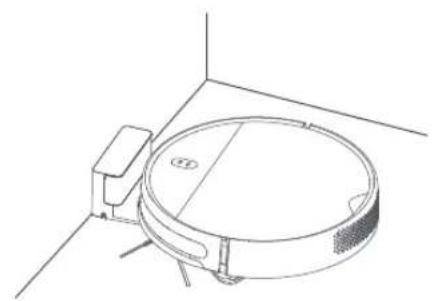
- Place the charging dock on the level ground against a wall.
- Turn on and charge the vacuum-mop. Press and hold the button "O" for 3 seconds to turn on the vacuum-mop. When the indicator lights up, manually place the vacuum-mop onto the charging dock to charge.
Vacuuming Mode
Turn on the vacuum-mop. It is now ready to start cleaning.

Vacuuming & Mopping Mode
- Open the lid and fill up the tank, then reattach the lid. Insert the 2-in-1 dust compartment with water tank into the vacuum-mop.
- Slide the assembled mop pad holder into the bottom of the vacuum-mop levelly in the direction shown.
- Turn on the vacuum-mop. It is now ready to start vacuuming and mopping.
Note: If the mop pad holder is not installed, only vacuuming mode will be used.

Precautions:
- Do not place the charging dock in an area with direct sunlight.
- Make sure there are 0.5 meters or more of open space on either side of the charging dock and more than 1.5 meters in front.
- If the vacuum-mop is unable to turn on due to low battery, place it directly onto the charging dock to recharge.
The vacuum-mop will automatically turn on when it is on the charging dock. - The vacuum-mop cannot be turned off when it is on the charging dock.
- Remove the mop pad holder when the vacuum-mop is charging or not in use.
Regularly clean the 2-in-1 dust compartment with water tank to prevent dirt buildup. This will help the vacuum-mop maintain optimal performance. - It is strictly forbidden to use hot water or detergent to clean the 2-in-1 dust compartment with water tank and the filter. Otherwise, they may get deformed.
- To prevent water from getting in the fan, the 2-in-1 dust compartment with water tank and the filter must dry completely before reinstalling into the vacuum-mop.
- Tidy up any loose cables on the floor before cleaning to prevent the vacuum-mop from dragging or getting caught on them.
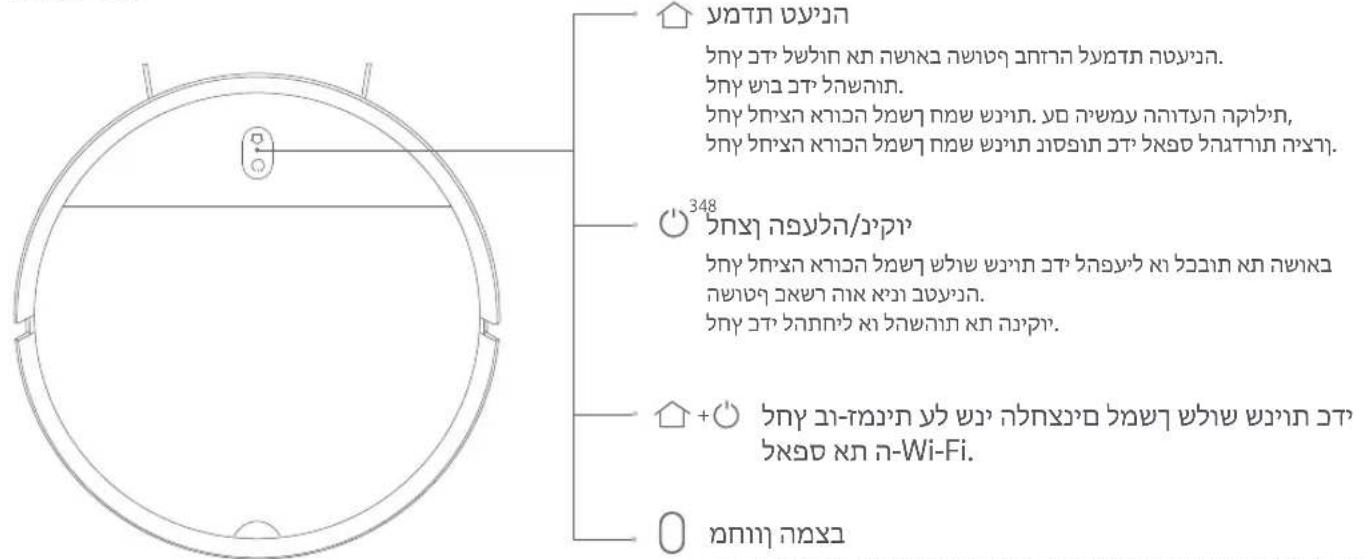
Turning On/Off
Press and hold the button "O" for 3 seconds to turn on the vacuum-mop. The indicator will turn white and you will hear a voice message indicating that the vacuum-mop is in standby mode.
To turn off the vacuum-mop, press and hold the button "O" while it is stationary. A voice message will indicate that the vacuum-mop is turning off.
Note: The vacuum-mop cannot be turned off while charging. If the vacuum-mop is unable to turn on due to low battery, manually place the vacuum-mop onto the charging dock to recharge.
Starting/Pausing Cleanup
Turn on the vacuum-mop, then press the button "O" to start cleanup.
To pause cleanup while the vacuum-mop is working, press the button "O".
Note: The vacuum-mop cannot be used to clean up liquids. If the vacuum-mop is low on battery and cannot start cleaning, recharge it to a sufficient level before cleaning. If the vacuum-mop starts to run low on battery during a cleaning task, it will automatically return to the charging dock. Once its battery level is sufficient, the vacuum-mop will automatically resume cleaning where it left off. Before cleaning, tidy up any loose cables on the floor (including the charging dock power cord) to prevent the vacuum from dragging or getting caught on them, which could accidentally shut off electrical appliances or cause damage to objects or cables.
Starting/Pausing Docking
Auto mode: The vacuum-mop will automatically return to the charging dock after it finishes cleaning.
Manual mode: Press the button "O" to manually send the vacuum-mop to the charging dock.
When returning to the charging dock, the vacuum-mop's indicator blinks white, or blinks orange if the vacuum-mop runs low battery.
The indicator slowly blinks white while charging, and stays white when fully charged.
Note: If the vacuum-mop is unable to return to the charging dock due to an error, make sure there are no obstacles around the charging dock, then manually place the vacuum-mop onto the dock to recharge.
Cleanup Modes
Upon cleaning up all, the vacuum-mop will methodically clean in the S-shape pattern and generate a real-time map in the Mi Home/ Xiaomi Home app.
Note: Avoid moving the vacuum-mop while it is working, as this may cause the vacuum-mop to lose its position and remap its surroundings, which will reduce the vacuum-mop's cleaning efficiency.
1. Edge Cleanup
Enable the edge cleanup mode in the app. The vacuum-mop will clean along edges and walls for 30 minutes, then return to the charging dock.
2. Spot Cleanup
You can use the app to tell the vacuum-mop to clean a specific area on the map. Upon tapping Spot cleanup, the vacuum-mop will automatically navigate there and clean a 1 × 1 m area.
3. Scheduled Cleanup
You can schedule cleaning times in the app. The vacuum-mop will automatically start cleaning at the scheduled times, then return to the charging dock after the cleanup is completed.
Adjusting Suction Power
Four suction modes are available in the app: Silent, Standard, Medium, and Turbo. The default mode is Standard.
Adjusting Water Output
You can use the app to adjust the amount of water the vacuum-mop uses when mopping. Three water output modes are available: Low (1), Medium (2), and High (3). The default mode is Medium (2).
Care & Maintenance
Recommended Cleaning & Part Replacement Schedule
| Component | Cleaning Frequency | Recommended Replacement Cycle |
| 2-in-1 Dust Compartment with Water Tank | After each use | Replace if worn or damaged |
| Filter | Once a week | Every 6 months (or every 150 working hours) |
| Brush | Once a week | Every 6 to 12 months (or every 300 working hours) |
| Side Brush | Once a month | Every 3 to 6 months (or every 150 working hours) |
| Cleaning Brush | After each use | Replace if worn or damaged |
| Brush Cover | Once a month | Replace if the brush cover's silicone rubber strip becomes noticeably worn |
| Cliff Sensors | Once a month | No replacement necessary |
| Charging Contacts | Once a month | No replacement necessary |
| Caster Wheel | Once a month | Replace if worn or damaged |
| Mop Assembly | After each use | Replace if worn or damaged |
| Mop Pad | After each use | Every 3 to 6 months (or upon noticeable wear) |
Note: Turn off the vacuum-mop and disconnect it from the power supply before performing cleaning or maintenance. Actual part replacement cycle may vary depending on usage conditions.
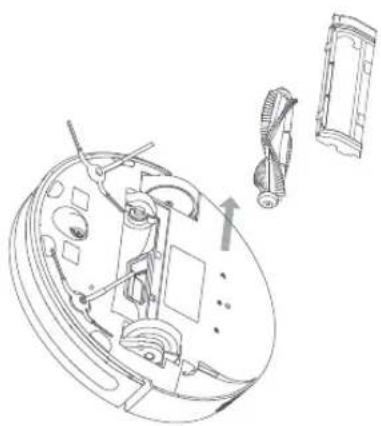
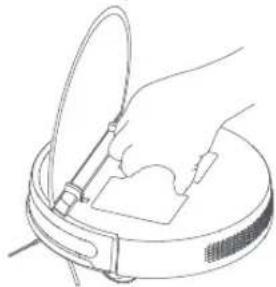
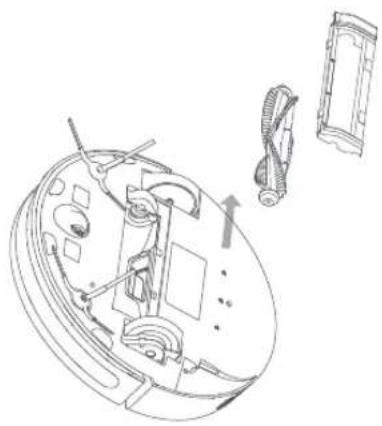
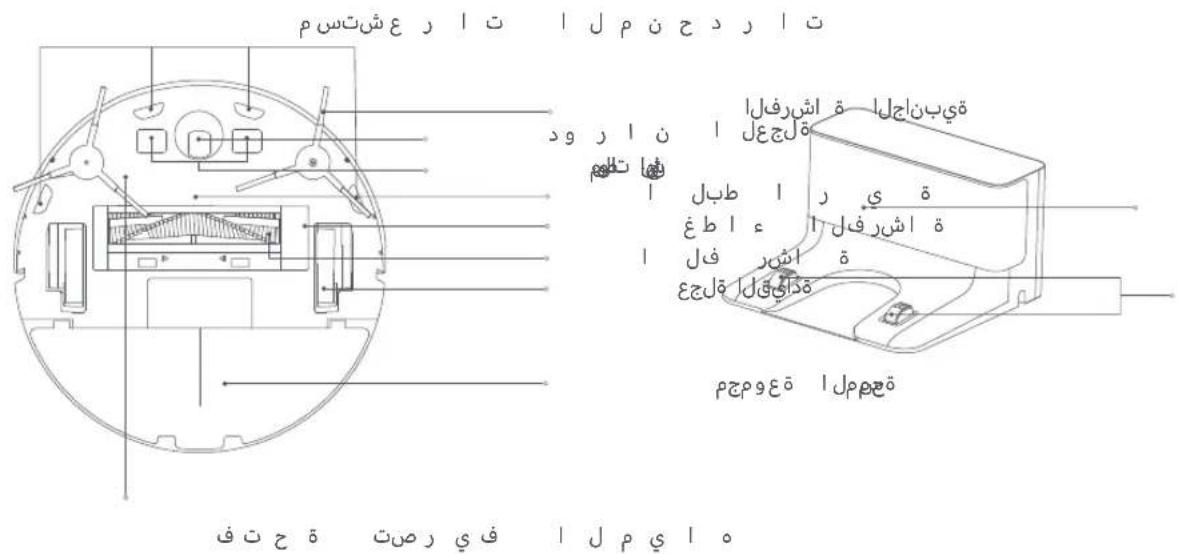
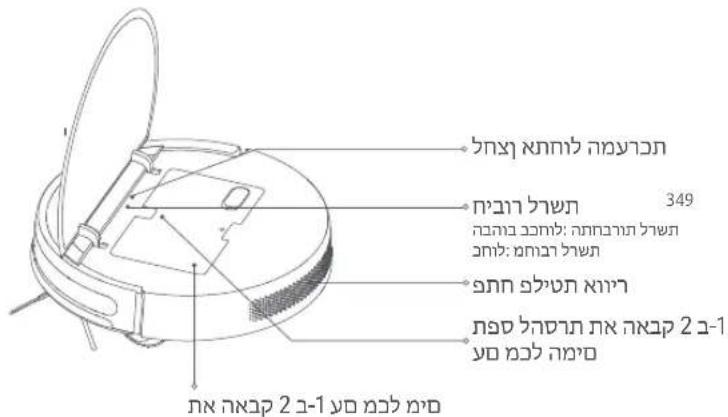
Cleaning the 2-in-1 Dust Compartment with Water Tank
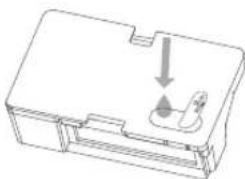
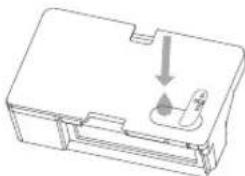
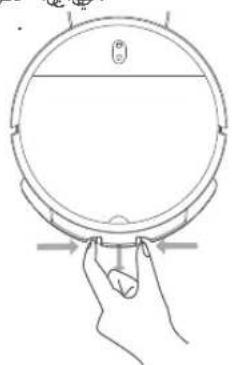
- Open the cover of the vacuum-mop, then pinch the clips on both sides of the 2-in-1 dust compartment with water tank, as shown in the figure.
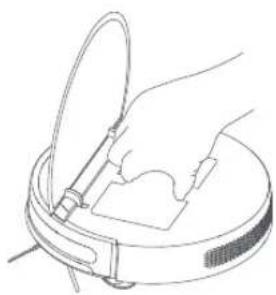
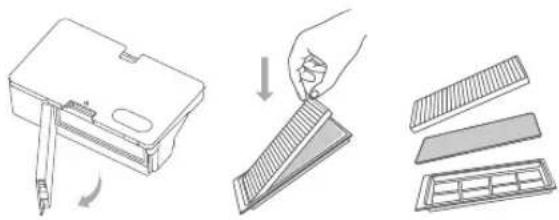
- Take out the filter assembly, then remove the filter and sponge filter to clean them.
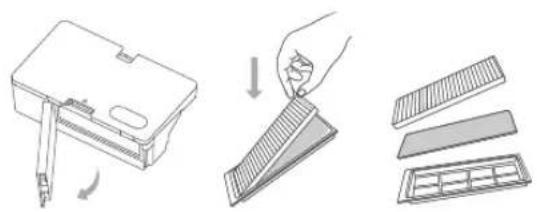
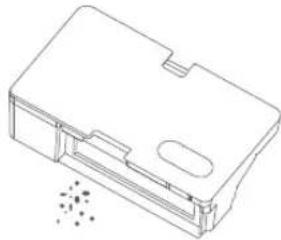
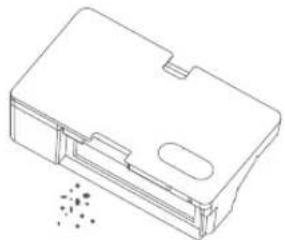
- Empty the contents of the dust compartment. Clean the compartment using the cleaning brush, then align and reinstall the filter.
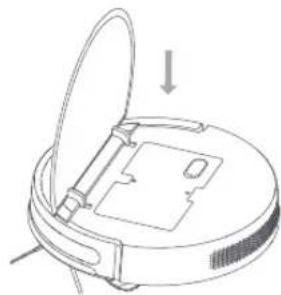
- Reinstall the 2-in-1 dust compartment with water tank into the vacuum-mop until it clicks into place, then close the cover of the vacuum-mop.
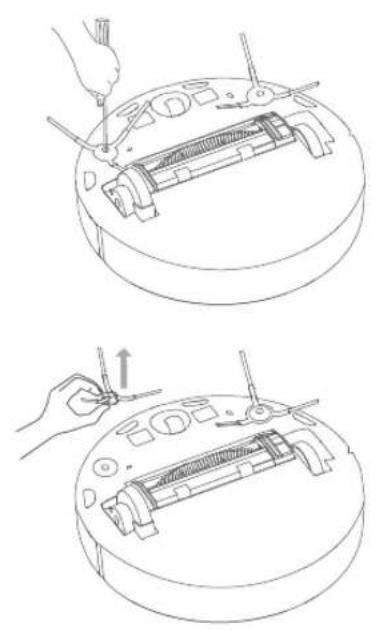
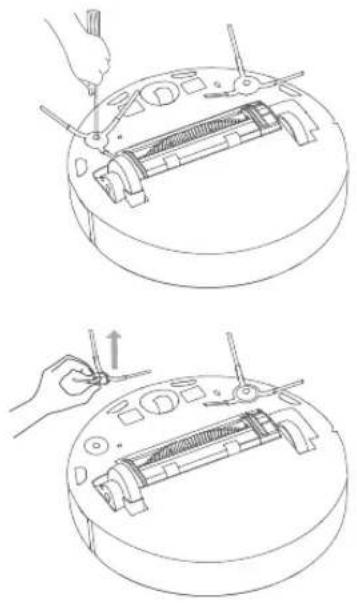
Cleaning the brush
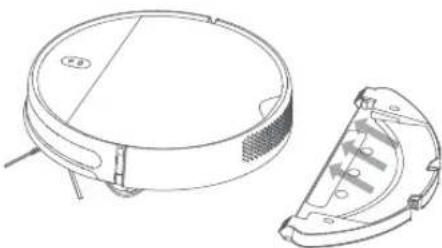
- Flip the vacuum-mop over and pinch the clips to remove the brush cover.
- Remove the brush and brush bearings.
- Reinstall the brush, then put the cover back on and press down until it locks into place.
Note: For best cleaning results, it is recommended to replace the brush every 6-12 months.
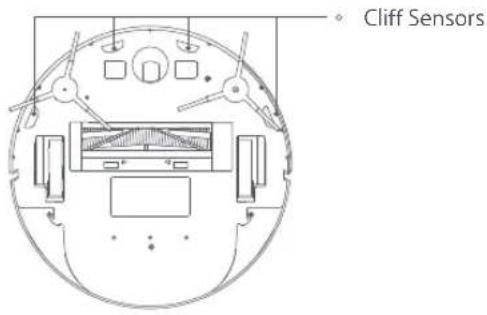
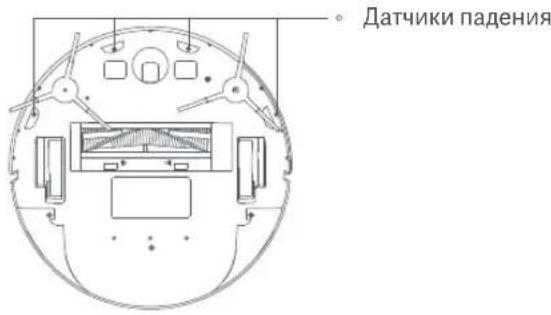
Cleaning the Cliff Sensors
It is recommended to clean the cliff sensors every three months by using a soft cloth.
Cleaning the Side Brush
Use a screwdriver to remove the screws holding the side brush in place. Clean the side brush, then reinstall it. For best cleaning results, it is recommended to replace the side brush every 3-6 months.
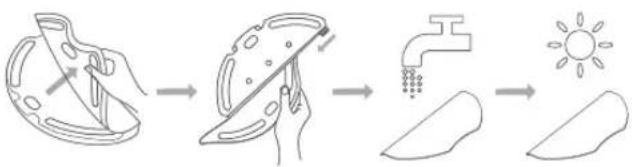
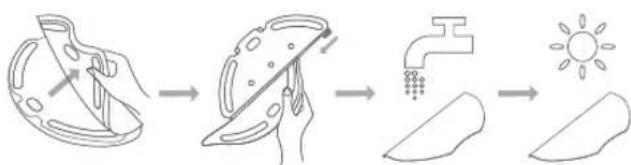
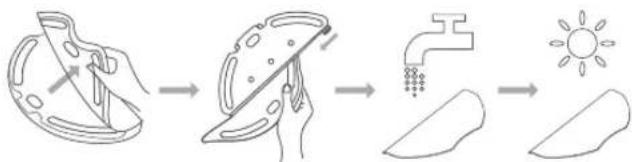
Cleaning the Mop Pad
- Pinch the side clips of the mop pad holder and pull to remove it, as shown in the figure.
- Peel the mop pad away from the velcro on the mop pad holder, then slide it out of the groove as illustrated. Clean the mop pad with water, then reinstall it after it is thoroughly dry. It is recommended to replace the mop pad every 3 to 6 months, or when the pad becomes noticeably worn.
FAQ
Troubleshooting
| Issue | Solution |
| Error 01: Left wheel error | There is too much load on the left wheel or it cannot turn. Check whether the left wheel is stuck. |
| Error 02: Right wheel error | There is too much load on the right wheel or it cannot turn. Check whether the right wheel is stuck. |
| Error 03: Cliff sensor error | The cliff sensor is not functioning properly. Check whether the sensor is dirty or obstructed. |
| Error 04: Low battery Vacuum-mop runs at low battery level. Place the vacuum-mop onto the charging dock to recharge. | |
| Error 05: Bumper error | The bumper is not functioning properly and may be jammed. Check to make sure the bumper is not stuck. |
| Error 06: Brush error | There is too much load on the brush or it cannot turn. Check whether the brush is stuck. |
| Error 07: Side brush error | There is too much load on the side brush or it cannot turn. Check whether the side brush is stuck. |
| Error 08: Fan error | The fan cannot rotate or is drawing excessive current. Try restarting the vacuum-mop. If the error persists, please contact after-sales service. |
| Error 09: Dust Compartment/ Water Tank | 2-in-1 dust compartment with water tank is not detected. Check whether it is installed correctly. |
| Error 10: Charging error | Make sure the vacuum-mop is well connected to the charging dock. |
| Error 11: Insufficient water | The water tank has insufficient water. Refill the water tank. |
| Error 12: Vacuum-mop is off the ground | Move the vacuum-mop to a level surface and start again. |
Specifications
| Vacuum-Mop | |
| Name | Mi Robot Vacuum-Mop Essential |
| Model | MJSTG1 |
| Wireless Connectivity | Wi-Fi IEEE 802.11 b/g/n 2.4 GHz |
| Operation Frequency | 2412-2472 MHz |
| Maximum Output Power | <20 dBm |
| Rated Voltage | 14.4 V = = |
| Approx. 90 min (Standard Mode) Battery Runtime | |
| Rated Power | 25 W |
| Battery Capacity | 2500 mAh |
| Charging Time | 4-5 h |
| Rated Input Voltage | 20 V = = |
| Rated Input Current | 1.2 A |
| Service Life | 1,000 hours of continuous operation |
Power Adapter
| Information Published | Value and Precision | Unit |
| Manufacturer | Zhongshan Baolijin Electronic Co., Ltd. | - |
| Model Identifier | BLJ24W200120P-V | - |
| Input Voltage | 100 - 240 | V~ |
| Input AC Frequency | 50/60 | Hz |
| Output Voltage | 20.0 | V= |
| Output Current | 1.2 | A |
| Output Power | 24.0 | W |
| Average Active Efficiency | 86.2 | % |
| Efficiency at Low Load (10 %) | 80.1 | % |
| No-load Power Consumption | 0.10 | W |
Charging Dock
| Model | G1 |
| Rated Input Voltage | 20 V = |
| Rated Input Current | 1.2 A |
| Rated Output Voltage | 20 V = |
| Rated Output Current | 1.2 A |
WEEE Information

All products bearing this symbol are waste electrical and electronic equipment (WEEE as in directive 2012/19/EU) which should not be mixed with unsorted household waste. Instead, you should protect human health and the environment by handing over your waste equipment to a designated collection point for the recycling of waste electrical and electronic equipment, appointed by the government or local authorities. Correct disposal and recycling will help prevent potential negative consequences to the environment and human health. Please contact the installer or local authorities for more information about the location as well as terms and conditions of such collection points.
User Manual Version: V1.0
Willkommen
Cleaning the 2-in-1 Dust Compartment with Water Tank
OuNTka KOHTeHepa IJIy IIIN COTcKOM IJIY BOIbI "IDBa-B-ODHOM"
- OTKpoIte KpbIkwky po6Ota-NbIneCoca, 3aTe m CdaBnTe 3axIMbI c 06eX CTopoH KOHTeHepa IJIy NbIIN COTcKOM IJIY BObl "DBA-B-ODHOM", KAK NOKa3aHO Ha pUCyHKe. AKKypaTHo N3BleKIne KOHTeHep IJIy NbIIN C OTcKOM IJIY BObl "DBA-B-ODHOM" N3po6Ota-NbIneCoca.
2.BbHbTeΦnIbTpauHOHHyIO CnCTeMy,3aTeM N3BJeKNTe ΦNtbp n rgy6aTbI ΦNtbp, TTO6bO ONUCTNTbNX.
3.Ocbo6oNTe KOHTeHepOT nbIN. OunchTe erO c NOMOsbO ueTKI JIy UcTKe, 3aTeM BbipoBHnTe FInIbTp uYcTaHOBnTe HA MecTO.
4.YctaHOBtKe KOHTeHepIJI NII COTcKOM IJI BObl "DBA-B-ODHom"Ha MeCTo TaK, YTO6bI OH 3aΦHKcUPOBaIcR, IN 3aKpOte KpbIbKy po60Ta-NbIeNecOca.

OuNTKa TETK
- NpeBepHnTe pO6oT-NbIeCoc n CdaBnTe 3aXnMbI, YTO6bl CHrTb KpbIshky ueTkn.
- Chmnte uekny ee noDwnnHnKn.
3.Bctabte 电KbHNTe KpbIuKy Ha MeTo HnKaMauTe Ha He, noka 3axmbl He 6ydyT 3aΦNcnpoBaHb.
PnmeHne. Hnnnyuwxpe3ynbTaTOB y6OpKn peKoMeHyETc3aMeHrTB ueTKy KaJIbe 6-12 MeCAUEB.
OuNTka DaTUnKOB naeHnA
PekomeHdyetcOuHaaTb DaTuNKn NaDeHnC NOMOsbMOrKoTKaHN KaKdIe TpN Meca.
OuNTka 6OKOBI uETKn
IcnoJIb3yIte OTBepTKy,UTo6bl OTKpyTNTb BnHTbl, ydepknBaIOuIe 60kOByIO uETKy. OunCTnTe 60kOByIO uETKy, 3aTeM yCTaHOBnTE ee Ha MeCTO. IaHaIlyuWxpe3yIbTaTOB y6OpKn peKOMHeNyETcA ZMeHrTb 60kOByIO uETKy KaKdIbe 3-6 MecaeB.
OuNTka ry6kn IyBlaXHoI y6OpKn
1.CaBNTe 60KOBbIe 3aXIMbI depXaTeJIra 6Ku N NotAHnTe, YTO6bl CHrTb ee (KaK nOKa3aHO Ha pucyHke).
2.CHIMnTe r6Ky cIINyUKN Ha depKxAteNe, a 3aTeM n3BLeKeNTe n3 na3a (KaK nOKa3aHO Ha pncyHke).PpOMoIe r6Ky BOOn, TuaTeNbHO BbCyuNITE uYcTaHOBnTE Ha MeTo. PekOMeHnyETc 3aMeHrTb r6Ky kXdble 3-6 MecraeB nn KOrda OHa 3aMeTHO n3HOCHTc.
Bɔnpocbi n OTBeTbI
YcTaPaeHHe HeNoJaOk
| ПюбLEMа | Рeushevпe | |
| Ошибka 01. Ошибka leвoro кoleca | Ha leboe koileco bo3deyctbvyet слишkom 6овьая harpy3ka ялno оно Me может поBERHytbcry. Пюberpte leboe koileco. Bo3moxho, erо зaklinnilo. | Ошибka 07.Ошибka 6OKOBошуETКИ Ha 6OKOBую щeTKU BO3deyCTbvyET слишkom 6овьая harpy3ka ялno оно He может поBERHytbcry. Пюberpte 6OKOBую щeTKU. Bo3moxho, erо зaklinnilo. |
| Ошибka 02.Ошибka npaboro koleca | Ha npaboe koileco bo3deyctbvyet слишkom 6овьая harpy3ka ялno оно He может поBERHytbcry. Пюberpte npaboe koileco. Bo3moxho, erо зaklinnilo. | Ошибka 08.Ошибka BeHTnIaTopa BeHTnIaTopa HENTIaTOpHe 此Враацеяся ялnotребяет слишkom MHOro 3HEprnIi. П配电ЗауСТИte робOT-пылесoc.Еслnpobeilema He Ичe3нeT, obpaTnIeCb V clyЖБу noclenprodaJXHOrO obcLuzKINBaHЯ. |
| Ошибka 03.Ошибka датиka паденя | Датик паденя pa60taeТ неразавильно. Пюberpte датик. Bo3moxho, on 3aGrp3нeн iл 3a6lOkinpoBан. | Ошибka 09.Кontейнердя пьл/OTсeKДЯ ВОдby "Два-B-ODHOM" He обарухен. Пюberpte, npabuIlbHo Iл on YCTaHOBJIeH. |
| Ошибka 04.Низkiy уровень заразда akkumylnaytorpa | РобOT-пьлесoc pa60taeТ риниЗковуmpове заразда akkumylnaytorpa. Помecтnte робOT-пьлесoc на дOK-OTanZIO duя заразда. | Ошибka 10.Ошибka 3aPraIckn |
| Ошибka 05.Ошибka δamnepa | Бампер pa60taeТ неразавильно.Bo3moxho, erо зaklinnilo. Пюberpte δamпeр. Bo3moxho, erо зaklinnilo. | Ошибka 11.Нedoctatochnoe KOJIueCTBO BODI. Habonilne TOTcKДЯ ВОды. |
| Ошибka 06.Ошибka zuTekn | Ha zuTeKу Bo3deyctbvyet слишkom 6овьая harpy3ka ял no Ona He может поBERHytbcry. Пюberpte zuTeKу. Bo3moxho, erо зaklinnilo. | Ошибka 12.РобOT-пьлесoc He КасаETСЯ ПОВХHOCSTI Ha ровую ПюberpxHOCSTI Ha ровую ПюberpxHOCSTI Ha ровую ПюberpxHOCSTI Ha ровую ПюberpxHOCSTI Ha ровую ПюberpxHOCSTI Ha ровую ПюberpxHOCSTI Ha ровую ПюberpxHOCSTI Ha ровую ПюberpxHOCSTI Ha рову团员 ПюberpxHOCSTI Ha рову团员 ПюberpxHOCSTI Ha рову团员 ПюberpxHOCSTI Ha рову团员 ПюberpxHOCSTI Ha рову团员 ПюberpxHOCSTI Ha рову团员 ПюberpxHOCSTI Ha рову团员 ПюberpxHOCSTI Ha рову团员 ПюberpxHOCSTI |
TexHnueckne xapaKtepncnKn
Po6oT-nyIeNcO C yHKnueN BlaXHoN y6OpKn
Bercny pykoobctBa noIb3oBaTeIa: V1.0
安
Mi 1
目录
喜 i 山 山 133
135
Connect with Mi Home/Xiaomi Home App 138
1 139
UJi 144
J. 148
149
中
#
Connect with Mi Home/Xiaomi Home App
i

QRGO連上sKHaMMyHome/XiaomiHome将dOnRoT头,电如告的功儿
MiHome/XiaomiHome章日和O其状的‘+’到藏于d,,
| 오류08: 썼 고장 | 오류이 헤라가지 기다내 전류가 더러고, 道路上만 기다를 기다내 기다고, 어선 하고고고고고고고고고고고고고고고고고고고고고고고고고고고고고고고고고고고고고고고고고고고고고고고고고고고고고고고고고고고고고고고고고고고고고고고고고고고고고고고고고고고고고고고고고고고고고고고고고고고고 2-in-1 썼명트를 기다고고고고고고고고고고고고고고고고고고고고고고고고고고고고고고고고고고고고고고고고고고고고고고고고고고고고고고고고고고고고고고고고고고고고고고고고고고고고고고고고고고고고고고고고고고고고고고고고고고고 | |
| 오류09: 사 Straitrik 사/울복름 | 2-in-1 썼명트를 기다고고고고고고고고고고고고고고고고고고고고고고고고고고고고고고고고고고고고고고고고고고고고고고고고고고고고고고고고고고고고고고고고고고고고고고고고고고고고고고고고고고고고고고고 2-in-1 썼명트가 기다고고고고고고고고고고고고고고고고고고고고고고고고고고고고고고고고고고고고고고고고고고고고고고고고고고고고고고고 3-in-1 썼명트가 기다고고고고고고고고고고고고고고고고고고고고고고고고고고고 3-in-1 썼명트가 기다고고고고고고고고고고고고 3-in-1 썼명트가 기다고고고고고고 3-in-1 썼명트가 기다고고고고 3-in-1 썼명트가 기다고 3-in-1 썼명트가 기다고 3-in-1 썼명트가 기다고 3-in-1 썼명트가 기다고 3-in-1 썼명트가 기다고 3-in-1 썼명트가 기다고 3-in-1 썼명트가 기다고 3-in-1 썼명트가 기다고 | 3-in-1 썼명트가 기다고고고고 3-in-1 썼명트가 기다고 3-in-1 썼명트가 기다고 3-in-1 썼명트가 기다고 3-in-1 썼명트가 기다고 3-in-1 썼명트가 기다고 3-in-1 썼명트가 기다 3-in-1 썼명트가 기다 3-in-1 썼명트가 기다 3-in-1 썼명트가 기다 3-in-1 썼명트가 기다 3-in-1 썼명트가 기다 3-in-1 썼명트가 기다 3-in-1 썼명트가 기다 3-in-1 썼名为 3-in-1 썼名为 3-in-1 썼名为 3-in-1 3-in-1 3-in-1 3-in-1 3-in-1 3-in-1 3-in-1 3-in-1 3-in-1 3-in-1 3-in-1 3-in-1 3-in-1 3-in-1 3-in-1 3-in-1 3-in-1 3-in-1 3-in-1 3-in-1 3-in-2 3-in-2 3-in-2 3-in-2 3-in-2 3-in-2 3-in-2 3-in-2 3-in-2 3-in-2 3-in-2 3-in-2 3-in-2 3-in-2 3-in-2 3-in-2 3-in-2 3-in-2 3-in-2 3-in-2 3-in-4 3-in-4 3-in-4 3-in-4 3-in-4 3-in-4 3-in-4 3-in-4 3-in-4 3-in-4 3-in-4 3-in-4 3-in-4 3-in-4 3-in-4 3-in-4 3-in-4 3-in-4 3-in-4 3-in-4 3-in-2 3-in-2 3-in-2 3-in-2 3-in-2 3-in-2 3-in-2 3-in-2 3-in-2 3-in-2 3-in-2 3-in-2 3-in-2 3-in-2 3-in-2 3-in-2 3-in-2 3-in-2 3-in-2 3-in-5 3-in-5 3-in-5 3-in-5 3-in-5 3-in-5 3-in-5 3-in-5 3-in-5 3-in-5 3-in-5 3-in-5 3-in-5 3-in-5 3-in-5 3-in-5 3-in-5 3-in-5 3-in-5 3-in-5 3-in-2 3-in-2 3-in-2 3-in-2 3-in-2 3-in-2 3-in-2 3-in-2 3-in-2 3-in-2 3-in-2 3-in-2 3-in-2 3-in-2 3-in-2 3-in-2 3-in-2 3-in-2 3-in-2 3-in-3 3-in-3 3-in-3 3-in-3 3-in-3 3-in-3 3-in-3 3-in-3 3-in-3 3-in-3 3-in-3 3-in-3 3-in-3 3-in-3 3-in-3 3-in-3 3-in-3 3-in-3 3-in-3 3-in-3 3-in-2 3-in-2 3-in-2 3-in-2 3-in-2 3-in-2 3-in-2 3-in-2 3-in-2 3-in-2 3-in-2 3-in-2 3-in-2 3-in-2 3-in-2 3-in-2 3-in-2 3-in-2 3-in-2 3-in-1 3-in-1 3-in-1 3-in-1 3-in-1 3-in-1 3-in-1 3-in-1 3-in-1 3-in-1 3-in-1 3-in-1 3-in-1 3-in-1 3-in-1 3-in-1 3-in-1 3-in-1 3-in-1 3-in-4 3-in-4 3-in-4 3-in-4 3-in-4 3-in-4 3-in-4 3-in-4 3-in-4 3-in-4 3-in-4 3-in-4 3-in-4 3-in-4 3-in-4 3-in-4 3-in-4 3-in-4 3-in-4 3-in-5 3-in-5 3-in-5 3-in-5 3-in-5 3-in-5 3-in-5 3-in-5 3-in-5 3-in-5 3-in-5 3-in-5 3-in-5 3-in-5 3-in-5 3-in-5 3-in-5 3-in-5 3-in-5 3-in-6 3-in-6 3-in-6 3-in-6 3-in-6 3-in-6 3-in-6 3-in-6 3-in-6 3-in-6 3-in-6 3-in-6 3-in-6 3-in-6 3-in-6 3-in-6 3-in-6 3-in-6 3-in-6 3-in-6 3-in-7 3-in-7 3-in-7 3-in-7 3-in-7 3-in-7 3-in-7 3-in-7 3-in-7 3-in-7 3-in-7 3-in-7 3-in-7 3-in-7 3-in-7 3-in-7 3-in-7 3-in-7 3-in-7 3-in-7 3-in-8 3-in-8 3-in-8 3-in-8 3-in-8 3-in-8 3-in-8 3-in-8 3-in-8 3-in-8 3-in-8 3-in-8 3-in-8 3-in-8 3-in-8 3-in-8 3-in-8 3-in-8 3-in-8 3-in-8 3-in-7 3-in-7 3-in-7 3-in-7 3-in-7 3-in-7 3-in-7 3-in-7 3-in-7 3-in-7 3-in-7 3-in-7 3-in-7 3-in-7 3-in-7 3-in-7 3-in-7 3-in-7 3-in-7 3-in-2 3-in-2 3-in-2 3-in-2 3-in-2 3-in-2 3-in-2 3-in-2 3-in-2 3-in-2 3-in-2 3-in-2 3-in-2 3-in-2 3-in-2 3-in-2 3-in-2 3-in-2 3-in-2 3-in-8 3-in-8 3-in-8 3-in-8 3-in-8 3-in-8 3-in-8 3-in-8 3-in-8 3-in-8 3-in-8 3-in-8 3-in-8 3-in-8 3-in-8 3-in-8 3-in-8 3-in-8 3-in-8 3-in-2 3-in-2 3-in-2 3-in-2 3-in-2 3-in-2 3-in-2 3-in-2 3-in-2 3-in-2 3-in-2 3-in-2 3-in-2 3-in-2 3-in-2 3-in-2 3-in-2 3-in-2 3-in-2 3-in-6 3-in-6 3-in-6 3-in-6 3-in-6 3-in-6 3-in-6 3-in-6 3-in-6 3-in-6 3-in-6 3-in-6 3-in-6 3-in-6 3-in-6 3-in-6 3-in-6 3-in-6 3-in-6 3-in-2 3-in-2 3-in-2 3-in-2 3-in-2 3-in-2 3-in-2 3-in-2 3-in-2 3-in-2 3-in-2 3-in-2 3-in-2 3-in-2 3-in-2 3-in-2 3-in-2 3-in-2 3-in-2 3-in- 2 3-in-2 3-in-2 3-in-2 3-in-2 3-in-2 3-in-2 3-in-2 3-in-2 3-in-2 3-in-2 3-in-2 3-in-2 3-in-2 3-in-2 3-in-2 3-in-2 3-in-2 3-in-2 3-in-2 3-in- 3-in-2 3-in-2 3-in-2 3-in-2 3-in-2 3-in-2 3-in-2 3-in-2 3-in-2 3-in-2 3-in-2 3-in-2 3-in-2 3-in-2 3-in-2 3-in-2 3-in-2 3-in-2 3-in-2 3-in-2 |
기본 사목
| 版本块 | |
| 체류명 | Mi울결래로복CHOSOG1 |
| 체류모部份 | MJSTG1 |
| 무선/enctype | Wi-Fi IEEE 802.11 b/g/n 2.4 GHz |
| ��동수고수 | 2412-2472 MHz |
| 회원 힘려고고� | <20 dBm |
| 정rex 전일 | 14.4 V= |
| 작동시段时间 | aab 90부(IFOZMOD) |
| 정rex 힘워 | 25 W |
| 2500 mAhBetaTeRl 运營 | |
| 증rex 사段时间 | 4~5段时间 |
| 증rex创造出的进程的进程 | 20V= |
| 증rex创造出的进程的进程 | 1.2 A |
| 기formance수명 | anosopod 1,000 siin |
前元用
Xiaomi Communications Co., Ltd.
031,
@
http://www.mi.com/global/service/support/declaration.html
www.mi.com/global/service/userguide
( 4) S_1 = 12 · 2^1 = 12
C∈EAC
山
1 2
Connect with Mi Home/Xiaomi Home App
. Mi Home / X ia om i Home


1 2
a_1| b + b的|
中
四边形: 201
1 E 1
Edu
中
S OBC = S COD + S_ BOC
四边形 AOBC 为正方形

山
b > 0 时 0 < b ≤ 12
1

O
- 21212121212121212121212121212121212121212121212121212121212121212121212121212121212121212121212121212
- 1jg g1jg jg k. 2ojo 1J0j 1d0j pU260: 1s1 Jp sP cUc z1pU Jz20 Upre, gip U
golge 1.
1
H
OE BC
1
(图2)
Hggl
4.1.1.2.1.1
图图
J
QRE RE
S OBC = S COD + S_ BOC
1J0
O
O
1
- ⏜ ⏜ b
山
Jukka L.
1.1k
10:1
g
C
9
Jsk
10:1
Lg
1
1
13/14
= 1 或 34
1 U
1d8e 1ab9c
Eo
S OBC = S COD + S_ BOC
115: 131
105126 11112
1 g
1Jc
四边形: ABC
Lcke
1.
中
2Sg0
2.
S^ ( t) = 12 t + M
1.
3.
S_ ACD = 12 × CD × 3 = 16
xy
0J
如 | x - 2| = 1
S^ S^ S^ S^
Poo
keep 131 15 JJJ | Jo 1. loes
150 150 150.150 150 150
中 16-3
-
10kJ1j1g1.4
-
1234567890123456789012345678901234567890123456789012345678901234567890123456789012345678901234567890123456789

| Jus y##j# | Jus y##j# | Jus y##j# |
| Jus y##j# | Jus y##j# | Jus y##j# |
| Jus y##j# | Jus y##j# | Jus y##j# |
| Jus y##j# | Jus y##j# | Jus y##j# |
| Jus y##j# | Jus y##j# | Jus y##j# |
| Jus y##j# | ||
| Jus y##j# | Jus y##j# | Jus y##j# |
| Jus y##j# | Jus y##j# | Jus y##j# |
| Jus y##j# | Jus y##j# | Jus y##j# |
| Jus y##j# | Jus y##j# | Jus y##j# |
| Jus y## j# | Jus y##j# | Jus y##j# |
| Jus y##j# | Jus y##j# | Jus y##j# |
| Jus y##j# | Jus y##j# | Jus y##j# |
| Jus y##j# | Jus y##j# | Jus y##j# |
| Jus y##j# | Jus y##j* | Jus y##j# |
| Jus y##j# | Jus y##j# | Jus y##j# |
| Jus y##j# | Jus y##j# | Jus y##j# |
| Jus y##j# | Jus y##j# | Jus y##j# |
| Jus y##j# | Jus y##j# | Jus y##j#1 |
| Jus y##j# | Jus y##j# | Jus y##j# |
| Jus y##j# | Jus y##j# | Jus y##j# |
| Jus y##j# | Jus y##j# | Jus y##j# |
| Jus y##j# | Jus y##j# | Jus y##j# |
| Jus y##i# | Jus y##j# | Jus y##j# |
| Jus y##j# | Jus y##j# | Jus y##j# |
| Jus y##j# | Jus y##j# | Jus y##j# |
| Jus y##j# | Jus y##j# | Jus y##j# |
| Jus y##j# | Jus y##j # | Jus y##j# |
| Jus y##j# | Jus y##j# | Jus y##j# |
| Jus y##j# | Jus y##j# | Jus y##j# |
| Jus y##j# | Jus y##j# | Jus y##j# |
| Jus y##j# | Jus y##j# | Jus y##j#21 |
| Jus y##j# | Jus y##j# | Jus y##j#21 |
| Jus y##j# | Jus y##j# | Jus y##j#21 |
| Jus y##j# | Jus y##j# | Jus y##j#21 |
| Jus y##j# | Jus y##j# | Jus y##j#22 |
| Jus y##j# | Jus y##j# | Jus y##j#22 |
| Jus y##j# | Jus y##j# | Jus y##j#23 |
| Jus y##j# | Jus y##j# | Jus y##j#24 |
| Jus y##j# | Jus y##j# | Jus y##j#25 |
| Jus y##j# | Jus y##j# | Jus y##j#26 |
| Jus y##j# | Jus y##j# | Jus y##j#27 |
| Jus y##j# | Jus y##j# | Jus y##j#28 |
| Jus y##j# | Jus y##j# | Jus y##j#29 |
| Jus y##j# | Jus y##j# | Jus y##j#30 |
| Jus y##j# | Jus y##j# | Jus y##j#31 |
| Jus y##j# | Jus y##j# | Jus y##j#32 |
- k . 9.
Connect with Mi Home/Xiaomi Home App
KhoNkaXuBJeHHa/npu6npaHHa
HaTnCHi b i ytpmmy Te npTgrom 3 cekynd, uo6 ybIMkHytn a60 BmKHytn MIOUH pO6T-nIIOOC, KOIN Bn He 3apJxKaetbcra. HaTnCHiB, uo6 noaTn a60 npN3yHHnTu np6npaHn.

HaTnCHiB i yTpmyTe o6nDi KhoNKn OHOuacHo npotrorm 3 cekyHd dIra cknDaHHa HanaTuBaHb Wi-Fi.
IHNkaTop cTaHy
Bnmae opaHkeBm: nomuIka/NoBepHeHH Ha DOK-CTaHciIO dJIa 3apJxHaHH (Hn3bKn pIBeHb 3apJy 6aTapei).
YbIMKHTb MIOUHnpo6OT-nILOOC.MoXHa noHNaTn np6npaHH.
Pekm cyxoro Ta BOnorO np6paHHa
- BiKpnTe KpnKu HAnOBHItb pe3epByap,notim 3akpnTe KpnKUy.YcTaHObit Bicik dIy nIy 3 BOHm pe3epByapOM "2B1" BCEpeDInHy MIOUOro pO60ta-NIOOCoca.
2.Akypatho BCTaBTe TpIMMaI JnI rY6KN B HNHXHIO YaCTINHy MIOUOro po6ota-nINOCoca, kIe NOKa3aHO Ha MaIKOHky.
3.YBIMKHTb MNooun pO60T-NIOOC.MoXHa NouHAtn YNCTky NIOOCOMI BONore np6upaHH.
PnIMtKa. RaHcHe BCTaBHT TpMaU dIra ry6Kn, 6yde BnKOpNCTOByBaTmca TInbKn peKMM cyXoro pnp6upaHH.
Ppabnla 6e3neKn
- He cTaBTe dOK-cTahCIO dIg 3apJxHnH B Micx, De Ha HeI NOTpanJIrTUME pIyMe COHryHe CbitIO.
-П配电ониТecя,юблдддддддддддддддддддддддддддддддддддддддддддддддддддддддддддддддддддддддддддддддддддддддддддддддддддд徳пocTopy (He MeHwe 0,5 m i3 6okib i noHaad 1,5 M cpepey). - JaKuo MNIOUPO6OT-NINOCOC He BMUKaETbcra Upe3 Hn3bKn pIBeHb 3apAky 6aTapei, noCTaBte Ioro 6e3nocepEnhO Ha JOK-CTAHIO, 0o6 3apAINTN.
Mnouyipo60T-nINOCOCABTMATNUHO BMKaeTbcN iD yac 3apJxHHa DOK-CTaHii. - P060T-NIIOOC HEMOXKINBO BUMKHHTN, KOJI N BIH 3apAJaKaetbCra Ha DOK-CTaHcii.
KoJIMnHouypo6Ot-nHIOOC3apraJkaeTbcaa6oHeBVKOpNCTOByEbC,3HImaTeTpMaMuaDnIry6Kn. - Perylphno ouiuaTe BiCik Ia Nnly 3 BOnHm pe3epByapom "2B1" ,06 3anobirn HakonueneHIO 6pyd. Lc donomoxe 3a6e3neHTn ONtmaJIbHy npOdyKTNBHICTb MNoUO rpo6oTa-nILOcoca.
Cybopo 3aboponeHo BnKOpncTOBByBaTn rapay Boa 60 MIOCh 3ac16, 0o6 ONUCTHTN KOHTeHep dIy pe3epByapom dIy BOIN #fIbTpOM. Take OHJH HMOKe cnpuHHNT deOpmaio. - Lio6 B0a He Notpannla Do BeHTnIaTopa, KOHTeHep IJIa nnly 3 pe3epByapom IJIa BOIN JIbTpOM nOtpiHO IOBHCIO BNCuWHTN, nepw HIX BCTabJIaTn BIIJIOOC 3 yHKciEO BOJOrO np6upaHH.
- Ipeep npn6npaHm n iDnHimb i3 niDnOu BcB iBbHi Ka6eni, uO6 nIIOOC ix He TaHyB i He 3aNpyBaBCB Hnx.
YBIMKHeHH/BIMKHeHH
HaTNCiHbIyTpmyte KhoNky" npotraom 3 cekHyd, 06 yBIMKHTM MIOUHN po6OT-nINOCOC. IHdkaTOp 3acBITbC8 6iIM i BN NOUYETe rOIOCOBE NOBIDOMJIENH, 00 MIOUHN po6OT-nINOCOC nepe6yBaEc B pexkmi OiyKaBaHH.
Uo6BmKHytn MNoChnpo60-TNIOOC,HaTNCHTbIyTPMMyTe KHOKy"O",KoIN BIn HepyXOMu.Bn nouyete roJocOB NOBIDOMJIeHH, 0o MNoCHn po60-TNIOOC BmMkaETcb.
PnIMtKa. MIOuH pO6o-TINOCOC HEMOxNBO BmKHyTN niD hac 3apJxHaH. RaIO MIOUH pO6o-TINOCOC He BMKAeTbC ape3 Hn3bKn pIbeHb 3apAky batae, noCTABte Ioro BlaCHOpuy Ha dok-CTAnuio, 06 3apdntn.
POnaTOK/Prn3yUnHeHHn prn6upaHn
YbIMKHTb MIOUHnpo60-TNlOOC,NOTIM HAITCHtB KHONky 日 ^ 日 ,I06noaTn np6HpAAHA.
Ioo npn3ynnHHT npn6npaHH nID yac po6oTu MNIOO rpo6oTa-nINOCoca,HaTNCtB KOnKy 日
PnIMtKa. He BnKOpNCTOByTe MInOnuHpoBt-nINOCoc IpynHn. RaIO BmIOUHOPObTa-nINOCoc po3pAinac6BaTape, IBn He MoKe NoaTH npn6puHH, CneIyH 3ap4ntbnoTl6o nOtpiBHO pIBA. AnIO Nuc H B mIOHO PObTa-nINOCoc P03pAInbCBA tapeR, BIn ABOTMATNU NOBpeHbCA HA DOK-CTAHIOI DnA 3ap4xJHAA. KOnI pIBeHb 3ap4yD aapeI 6ye DoctatMnIOUHO POBt-nINOCoc ABTOMATNU HO pOIOBxNt bnpbuaHH 3 TOrO Micu, De Bn 3ynHNBC. Ipeed npb6pHnn iNtHMItB iNIOrBc BcAkei (BKNIOHO 31 WHyPOM XNBUHNEH OK-CTAHII DnA 3ap4xJHAA). 06 MIOUHO POBt-nINOCoc HE TRHYIX. Lc MOKe npN3BcTn DO BUNaKOBORI BIDKnIOUeHH enEeKTPoPnpunadib A60 noNkoDkeHH nepeMetrib nn Ka6eBIL
PouaTOK/Prn3yynHeHHa3apdKaHH
AbTomatuHn peKIM: nicIaBepseHH np6puHH MIOUCh p60T-nIOOC aBTOMATuHNo NOBepHebCra Ha DOK-CTaHcIO dJI 3apJxKaHH.
PuynHnePexKIM:HaTNCiB KONKy 日 ^ ,IO6 BpyHy BiDpABTN MIOUHy po60T-NINOCO HA DOK-CTAHUCIy 3apxJxAHN.
Iicna noBepHeHHa DO dok-ctanii Ia 3apJxHnH, iHnkatop MIOOoro po6oTa-nIOOCa CBITNTIMetbc8iINM a60 opAHkeBM, Kaoo 6atape po3pRdKeHa.
Iiuc3apxkaHH iNkKatop nobInbHO 6Imae 6JIM icBtntcb 6JIM, KOIN 6aTpeR nobHicTIO 3apxkeHa.
Pnmtka. knoo npobot-nnooc He moe noeepnyncn ha dok-ctanio 3apxhaa Hpe3 nomnky, nepekoahtec, 6iH HeIOCTAHTBO BInbHorO npoctpoy, notim noctabe Ioro Blachopy Ha dok-ctanio 3apxhaa Hn.
Pexmnpu6paHH
3a 3aMOBvBaHHM MIOUH pO60T-NIOLOOC MeTOuHNO npu6nATmE npuMIeHHa 3a S-nODi6HO cXeMoIO Ta reHepyBaTMe KapTy B peKIMI pealbHoro yacy B doaAtky Mi Home/Xiaomi Home.
Ppimtka. He nepeiuae Mnoch npoob-tnococ, koi BIn npaouc, aJxue chee3 ce BIn moxe 3ary6ntn cboe Mice po3auybaHHN 3mHHTN KAPTy HABKOnuHbOro cepedobua, uo 3meunmbefkntb eefkntbHicTB npupanha.
1.ПибupaаннкуткIB
YbIMKHTb peKHM npn6npaHH KytkB y doaTky. Mmouh po60t-nuiooc npn6npaTme B3doBX CTIH i kyTKIB npotrrom 30 xbnin, a NOTIM NOBepHeBC Ha DOK-CTAHIOI DnA 3apJXHAAH
- Pekim ToKOBTo np6paHH
3aBdKaN Doatky MoKHa 3aIpOgPamyBaTn MInOCh np6OT-nINOCoc Ha np6bpaHH KOKpeHoi 3OHn Ha KapTi. IicJr BBIMKHeHH PexkMToUcKOBOTo np6bpaHH MInOCh np6OT-nINOCoc ABTomuHOr NepemictNbC8 B 3a3Nahe Meiue np6bepe dIJIHKy pIoSeo1 × 1 m.
3.3aannahOBaHe np6npaHH
Ydoatky MoKHa HanaaTyBaTn po3klaI np6bnpaHb. MIOUH pO6oT-nINOCoc ABTomTuHO noUHe np6bpaHHB 3a3haueHn Yac, a nicra 3aBepseHHN NOBepHebcS Ha DOK-CTaHcIIO IJRA 3apJxKaHH.
PeryuobHHNoTyKHOCTi BCMOKTyBaHH
YdoaTky doCTyHNO YoTnppeKIMN BCMOKTyBaHHra: 6e33ByuHn, cTaHdapTHn, nomipHni i Typ6opexHM. 3a 3amOBuyBaHHm yctaHO CTaHdapTHn peKIM.
PerynobHHBnKOpCTAHNBODn
3aBnKIOaTky MoJHa peryIbOaTn KIlbkicTb BOn, kY BuKOpncTOBy MIOUCh np6OT-nINOC OJI BAONrO rnp6uPAHH. DocTyHITpN peKIMn BnKOpncTaHHra BoN: H3bKn (1), cepeHni (2) i BucOKn (3). 3a 3amOBuyBaHHm yCTaHOcepeHni peKIM (2).
Iogjai TeXhHne 06cnyroByBaHHa
PekomeHdoBaHn rpaik uuieHH Ta 3amH n deTaJe npucTpoU
1.CTnCHITb 3aTnCKaui TpMaaydIraY6Kn Ta NotarHItb,IO6 BnHHTN Ioro,AK NOKa3aHO Ha MaHOnKHy.

- BiKneIte ry6ky BiI IInnyuKn Ha TpImaqi, a NOTIM BUNTARHITb II 3 na3a, kHa iIOCTpaui. OOHTe ry6ky BOHO, BNCywi, a NOTIM yCTaHOBt HaaI. PekOMEnBOaHO 3amIHOBaTI ry6ky KOxHi 3-6 MICAIB a60 KOJI N BOHa NOMITHo 3HOUyeTcR.

Поширни заптонся
BupiueHn npo6Jem
http://www.mi.com/global/service/support/declaration.html
Podrobnou elektronickou pifruku najdete na strancewww.mi.com/global/service/userguide
C∈EAC
Přehled o vyrobku

Vysavač smopem
Repor a ligaçao Wi-Fi
- 800000000000000000000000000000000000000000000000000000000
- nnnn nn nnnn nn nnnn nnnn nnnn nnnn nnnn nnnn nnnn nnnn nnnn nnnn nnnn nnnn nnnn nnnn nnnn nnnn nnnn nnnn nnnn nnnn nnnn nnnn nnnn nnnn nnnn nnnn nnnn nnnn nnnn nnnn nnnn nnnn nnnn nnnn
NOONNOJNP,
-
40°C n n n n -0°C, y n n n n n n n n n n n n n n n n n n n n n n n n n n n n n n n n n n n n n n n n n n n n n n n n n n n n n n n n.
-
·n n nn nn nn nn nn nn nn nn nn nn nn nn nn nn nn nn nn nn nn nn nn nn nn nn nn nn nn nn nn nn nn nn nn nn nn nn nn nn nn nn nn nn nn nn nn nn nn nn nn nn nn nn nn nn nn nn nn nn nn nn nn nn nn nn nn nn nn nn nn nn nn nn nn nn nn nn nn nn nn nn nn nn nn nn nn nn nn nn nn nn nn nn nn nn nn nn nn nn nn nn
- 1
- 1
Nn nnnn nn nnnn nn nnnnnnnnnnnnnnnnnnnnnnn
N 1
Nn nn nnnn nn nnnn nn nnnn nn nnnn nn.
NNTNTNTNTNTNTNTNTNTNTNTNTNTNTNTNTNTNTNTNTNTNTNTNTNTNTNTNTNTNTNTNTNTNTNTNTNTNTNTNTNTNTNTNTNTNTNTNTNTNTNTNTNTNTNTNTNTNTNTNTNTNTNTNTNTNTNTNTNTNTNTNTNTNTNTNTNTNT
·N7nNnNnNnNnNnNn - ynnnyn, nno, nyynn nn noannn noynn.
- 200
- 1
N
#
·nnynnn nn nnnn nn nnnn nn nnnn
Nn np, np n nn nn nn nn nn nn nn nn
Nn nn nnnnnnnnnnnnnnnnnnnnnnnnnnnnnnnnnnnnnnnnnnnnnnnnnnnnnnnnnnnnnnnnnnnnnnnnnnnnnnnnnnnnnnnnnnnnnnnnnnnnn
n nn nnnnnnnnnnnnnnnnnnnnnnnnnnnnnnnnnnnnnnnnnnnnnnnnnnnnnnnnnnnnnnnnnnnnnnnnnnnnnnnnnnnnnnnnnnnnnnn
- 100
- -
ynnnnn nn nnnn nn nnnn nn nnnn nn nnnn nn
Xiaomi Communications Co., Ltd. 2014/53/EU. npp
http://www.mi.com/global/service/support/declaration.html
http://www.mi.com/global/service/userguide/
C∈EAC
yN
BNN2 BND9
N2770
yDyDy
annn

Xnnnnynn

Mi Home/Xiaomi Home
Mi Home/Xiaomi Home*. My Home/Xiaomi Home.

n nn n-QR 7nnn nn nnnn nn nnnnnnnnnnnnnnnnnnnnnnnnnnnnnnnnnnnnnnnnnnnnnnnnnnnnnnnnnnnnnnnnnnnnnnnnnnnnnnnnnnnnnnnnnnn
Mi Home/Xiaomi Home "+""
Xiaomi Home nnnn (nyn) nn nnnn nn nnnn nn nnnn nn nnnn
Wi-Fi
n-Wi-Fi, n-Wi-Fi, n-Wi-Fi, n-Wi-Fi, n-Wi-Fi, n-Wi-Fi, n-Wi-Fi, n-Wi-Fi, n-Wi-Fi, n-Wi-Fi, n-Wi-Fi, n-Wi-Fi, n-Wi-Fi, n-Wi-Fi, n-Wi-Fi, n-Wi-Fi, n-Wi-Fi, n-Wi-Fi, n-Wi-Fi, n-Wi-Fi, n-Wi-Fi,
Wi-Fi n2.4 GHz mwn
N
nynnnnnnnnnnnnnnnnnnnnnnnnnnnnnnnnnnnnnnnnnnnnnnnnnnnnnnnnnnnnnnnnnnnnnnnnnnnnnnnnnnnnnnnnnnnnnnnnnnnnnnnnnnnnn
#
1. 与
n nn nn nn nn nn nn nn nn nn nn nn nn nn nn nn nn nn nn nn nn nn nn nn nn nn nn nn nn nn nn nn nn nn nn nn nn nn nn nn nn nn nn nn nn nn nn nn nn nn nn nn nn nn nn nn nn nn nn nn nn nn nn nn nn nn nn nn nn nn nn nn nn nn nn nn nn nn nn nn nn nn nn nn nn nn nn nn nn nn nn nn nn nn nn nn nn nn nn nn nn

2.nanbnnpnn
nn nn nnnn nn nn nn nn nn nn nn nn nn nn nn nn nn nn nn nn nn nn nn nn nn nn nn nn nn nn nn nn nn nn nn nn nn nn nn nn nn nn nn nn nn nn nn nn nn nn nn nn nn nn nn nn nn nn nn nn nn nn nn nn nn nn nn nn nn nn nn nn nn nn nn nn nn nn nn nn nn nn nn nn nn nn nn nn nn nn nn nn nn nn nn nn nn nn nn nn nn

N NNNN NNNN NNNN NNNN NNNN NNNN NNNN
xyny"O"ybnnnn nn nee nynnynn.
n nn nnnn nn nnnn nn nnnn nn nnnn nn nnnn nn nnnn nn nnnn nn
mnnnnn nn nnnn nn nnnnnnnnnnnnnnnnnnnnnnnnnnnnnnnnnnnnnnnnnnnnnnnnnnnnnnnnnnnnnnnnnnnnnnnnnnnnnnnnnnnnnnn
y
#
Mi Home/Xiaomi Home.
- n 30 pn nnnn nn.
- 1
n 1 n - 1
n nn nnnn nn nnnn nn nnnn nn nnnn nn nnnn nn nnnn nn nnnn nn nnnn nn nnnn nn nnnn nn nnnn nn nnnn nn nnnn nn nnnn nn nnnn nn nnnn nn nnnn nn nnnn nn nnnn nn nnnn nn nnnn nn nnnn nn nnnn nn nnnn nn nnnn nn nannn nn nnnn nn nnnn nn nnnn nn nnnn nn nnnn nn nnnn nn nnnn nn
Nn nn nnnnnnnnnnnnnnnnnnnnnnnnnnnnnnnnnnnnnnnnnnnnnnnnnnnnnnnnnnnnnnnnnnnnnnnnnnnnnnnnnnnnnnnnnnnnnnn
nannnnn
mnnn nnnnnnnnnnnnnnnnnnnnnnnnnnnnnnnnnnnnnnnnnnnnnnnnnnnnnnnnnnnnnnnnnnnnnnnnnnnnnnnnnnnnnnnnnnnnnnnnnnnnnnnnnnnnnnnnnnnnnnnnnnnnnnnnnn nn' (2).
wnnnn
bn mno nmy bnnn bn np
Manufactured by: Xiaomi Communications Co., Ltd.
Address: No.019, floor 9, building 6, yard 33, middle Xierqi Road, Haidian District, Beijing, P. R. China
For further information, please go to www.mi.com
Hersteller: Xiaomi Communications Co., Ltd.
Adresse: No.019, 9th Floor, Building 6, 33 Xi'erqi Middle Road, Haidian District, Beijing, China
Fabricant: Xiaomi Communications Co., Ltd.
Adresse: No.019, floor 9, building 6, yard 33, middle Xierqi Road, Haidian District, Beijing, China
Dirección: No.019, floor 9, building 6, yard 33, middle Xierqi Road, Haidian District, Beijing, China
Indirizzo: No.019, floor 9, building 6, yard 33, middle Xierqi Road, Haidian District, Pechino, Cina
I3roToBnteIb: Xiaomi Communications Co., Ltd.
Adec: No.019, floor 9, building 6, yard 33, middle Xierqi Road, Haidian District, PeknK, KHP
TTo6bI nOlyuHTb dOnoJIHnITeBHyIO INHΦOpMaunIO, nocTeNTe caT www.mi.com
JSTOJL:Xiaomi Communications Co., Ltd.
^注 No.019, floor 9, building 6, yard 33, middle Xierqi Road, Haidian District, Beijing, China
試品間關聯正報號在www.mi.com/kr/頁韋韋韋韋韋韋韋韋韋韋韋韋韋韋韋韋韋韋韋韋韋韋韋韋韋韋韋韋韋韋韋韋韋韋韋韋韋韋韋韋韋韋韋韋韋韋韋韋韋韋韉韋韋韋韋韋韋韋韋韋韋韋韋韋韋韋韋韋韋韋
Produceent: Xiaomi Communications Co., Ltd.
Adres: No.019, floor 9, building 6, yard 33, middle Xierqi Road, Haidian District Pekin, Chiny
Wiecej informaci: www.mi.com
Uretici: Xiaomi Communications Co., Ltd.
Adres: No.019, floor 9, building 6, yard 33, middle Xierqi Road, Haidian District, Pekin, Cin Halk Cumhuriyeti
Ampca: No.019, floor 9, building 6, yard 33, middle Xierqi Road, Haidian District, Nekin, Kita'ska Hapoda Pecnybika
Ioo6 i3HaTnc 6iNbwe, BiBbJaTe caNT www.mi.com
Vyrobce: Xiaomi Communications Co., Ltd.
Adresa: No.019, floor 9, building 6, yard 33, middle Xierqi Road, Haidian District, Beijing, P. R. China
Dal'si informace naleznete na webovych strankach www.mi.com
Fabricat de: Xiaomi Communications Co., Ltd.
Adresa: No.019, floor 9, building 6, yard 33, middle Xierqi Road, Haidian District, Beijing, P. R. China
Morada: No.019, floor 9, building 6, yard 33, middle Xierqi Road, Haidian District, Pequim, Republica Popular da China
Xiaomi Communications Co., Ltd.
No.019, floor 9, building 6, yard 33, middle Xierqi Road, Haidian District, Beijing, no
bipn n y, pnn nn www.mi.com