
CareStyle Compact IS 2058 BK - Iron BRAUN - Free user manual and instructions
Find the device manual for free CareStyle Compact IS 2058 BK BRAUN in PDF.
| Brand | Braun |
| Model | CareStyle Compact IS 2058 BK |
| Product type | Steam generator iron |
| Power supply | 220-240 V, 50-60 Hz |
| Power | Approximately 2400 W |
| Water tank capacity | Approximately 1.2 L |
| Ironing modes | iCare, eco, turbo |
| Vertical steam function | Yes (iCare mode) |
| Double steam trigger | Yes (turbo mode) |
| Soleplate | Rounded 3D soleplate for optimal glide |
| Auto shut-off | Yes, after 10 minutes of inactivity |
| Anti-calc system | Anti-calc filter cartridge (replaceable) |
| Cartridge change indicator | Illuminated anti-calc indicator |
| Locking system | Yes, for transport and storage |
| Integrated iron rest | Yes, on the base |
| Care and cleaning | Clean the soleplate with a damp cloth; do not use chemicals |
| Safety | Hot surfaces, do not immerse, keep out of reach of children under 8 years |
| Spare parts available | CareStyle anti-calc filter cartridges |
| Repairability | Contact an authorized Braun after-sales service |
| Country of origin | Not specified |
Frequently Asked Questions - CareStyle Compact IS 2058 BK BRAUN
User questions about CareStyle Compact IS 2058 BK BRAUN
0 question about this device. Answer the ones you know or ask your own.
Ask a new question about this device
Download the instructions for your Iron in PDF format for free! Find your manual CareStyle Compact IS 2058 BK - BRAUN and take your electronic device back in hand. On this page are published all the documents necessary for the use of your device. CareStyle Compact IS 2058 BK by BRAUN.
USER MANUAL CareStyle Compact IS 2058 BK BRAUN
Register your product www.braunhousehold.com/register
Steam generator iron
Deutsch 6
English 11
Francais 17
Espanol 23
Portugues 28
Italiano 33
Nederlands 39
Dansk 44
Norsk 49
Svenska 54
Suomi 59
Polski 63
Český 69
Slovenský 74
Magyar 79
Hrvatski 84
Slovenski 90
Türkce 95
Romana (RO/MD) 100
Eaynikα 105
Ka3ak 110
Pycckn 116
ykpaiHcbka 123
131
Copyright 2018. All rights reserved
De'Longhi Braun Household GmbH
Carl-Ulrich-StraBe 4
63263 Neu-Isenburg/Germany
5712812201/01.19-IS 2044,IS 2043 INT
DE/UK/FR/ES/PT/IT/NL/DK/NO/SE/FI/PL/CZ/SK/HU/HR/
SI/TR/RO/MD/GR/KZ/RU/UA/Arab
A

B
C
D
E
F
G
Deutsch
Our products are engineered to meet the highest standards of quality, functionality and design. We hope you thoroughly enjoy the new Braun appliance.
Before use
Please read instructions carefully and completely before using the appliance.
Caution
Caution: Hot surfaces! Electric stng stations combine high temes and hot steam that could do burns.
- This appliance can be used by children aged from 8 years and above and persons with reduced physical, sensory or mental capabilities or lack of experience and knowledge if they have been given supervision or instruction concerning use of the appliance in a safe way and understand the hazards involved.
Children shall not play with the appliance.
- Cleaning and user maintenance shall not be made by children without supervision.
- During operation and cool-down the appliance and its mains cord shall be kept out of reach of children under 8 years.
- If the supply cord is damaged, it must be replaced by the manufacturer, its service agent or similarly qualified persons in order to avoid a hazard.
- Always unplug the station/iron before filling with water.
- The appliance must be used and rested on a stable surface.
- During ironing pauses, place the iron upright on its heel rest or on the iron rest. Ensure that the heel rest is placed on a stable surface.
- The iron must not be left unattended while it is connected to the supply mains.
- The appliance must not to be used if it has dropped, if there are visible signs of damage or if it is leaking. Regularly check the cords for damages.
- Never immerse the unit in water or other liquids.
- This appliance is designed for household use only and for processing normal household quantities.
- Please clean all parts before first use or as required, following the instructions in the Care and Cleaning section.
- The cords should never come in contact with hot objects, the soleplate, water and sharp edges.
- Before plugging into a socket, check whether your voltage corresponds with the voltage printed on the bottom of the appliance and that you are using an earthed socket.
- When using an extension cord watch out that it is in good condition, has a plug with an earth connection and corresponds with the power rating of the appliance (16A).
- The soleplate and the iron rest can reach very high temperatures that could lead to burns. Do not touch them.
- Choking hazard. The appliance might contain small parts. Some of those small parts might be required to get disassembled during cleaning and maintenance operations. Handle with care and keep small parts out of reach of children.
-
Important: Keep all packaging (plastic bags, polystyrene foam) away from children.
-
Caution: Due to the high power of this steam iron please make sure that your mains supply is sufficient. Please contact your local electric power company to make sure that the so called mains impedance is not higher than 0.372 Ohm.
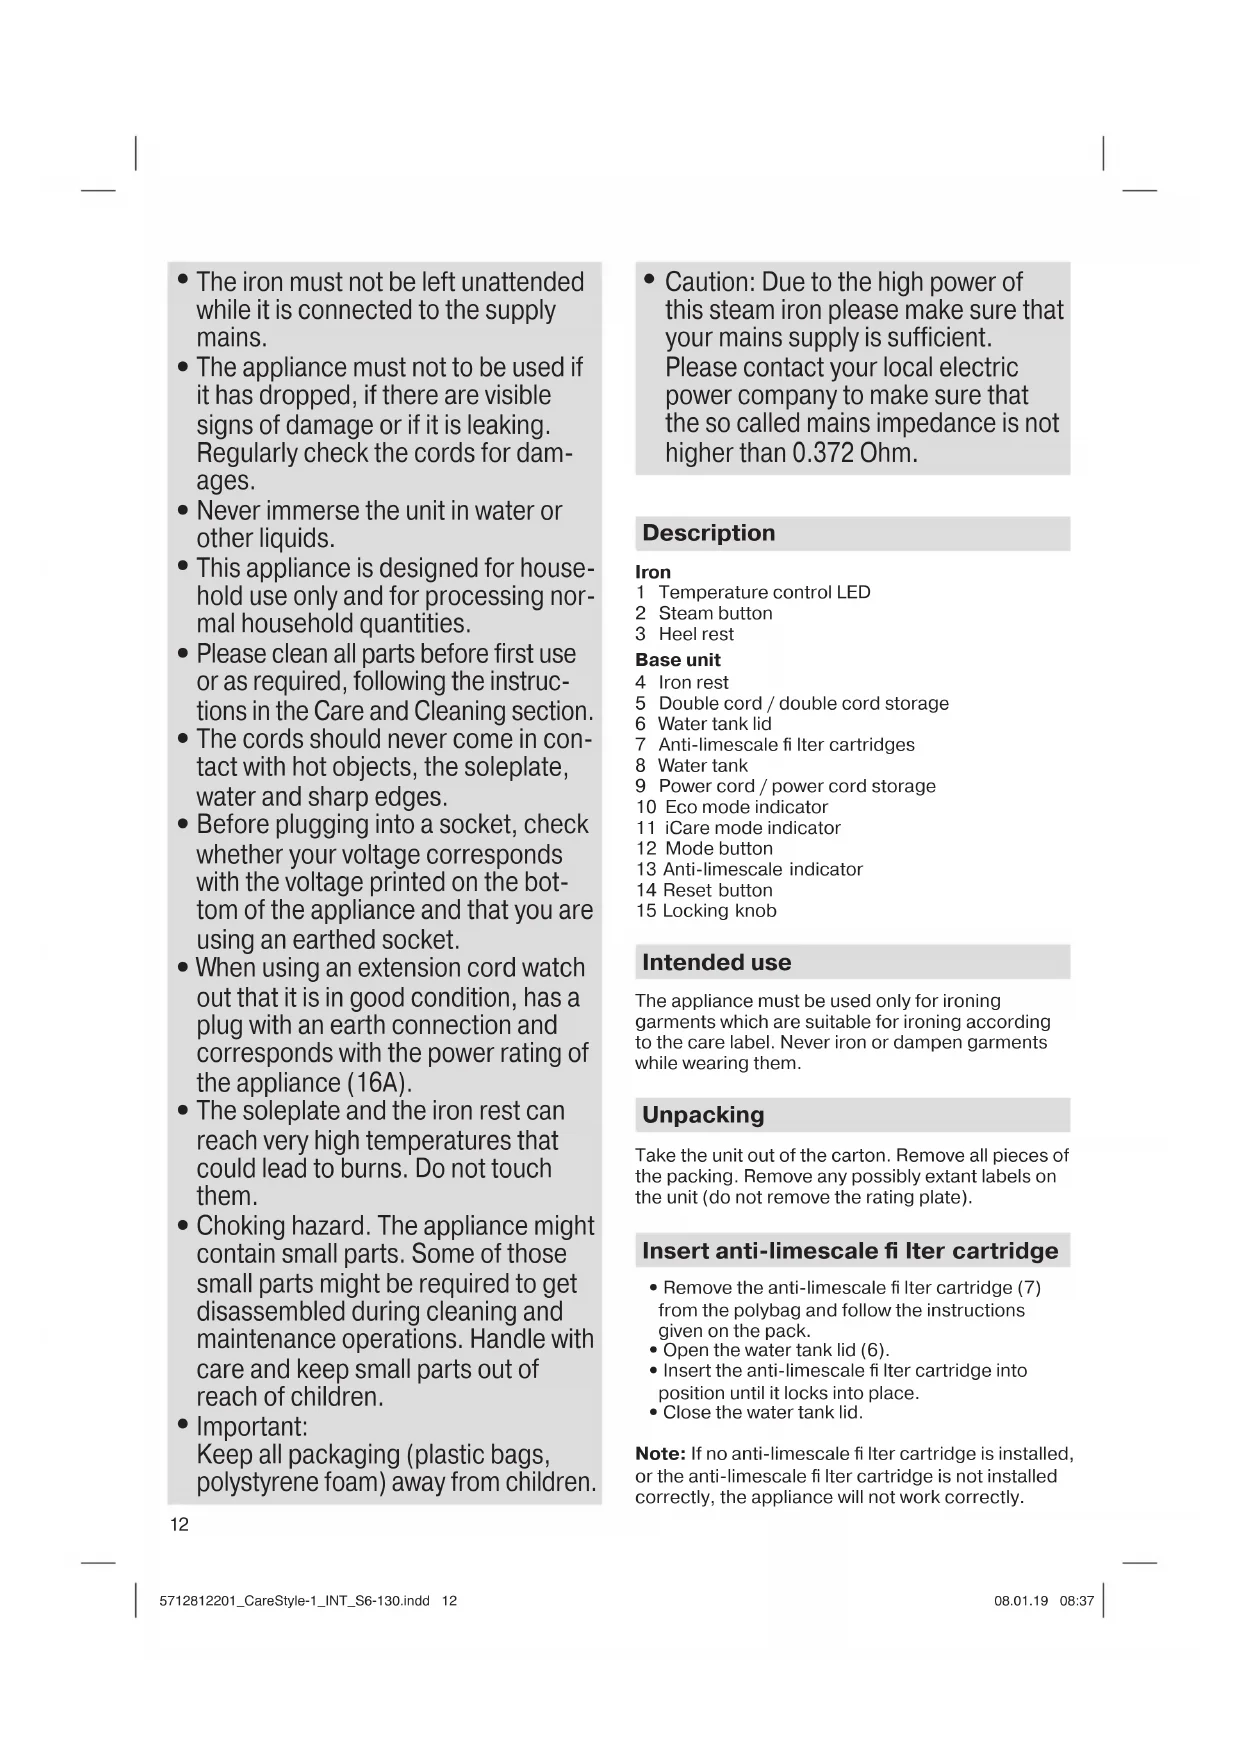
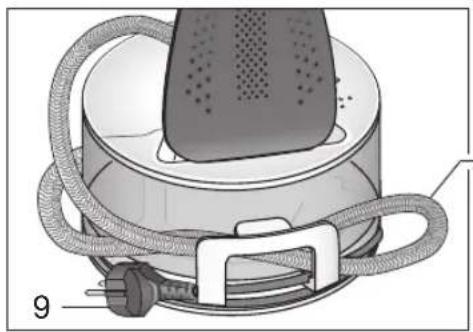
Description
Iron
1 Temperature control LED
2 Steam button
3 Heel rest
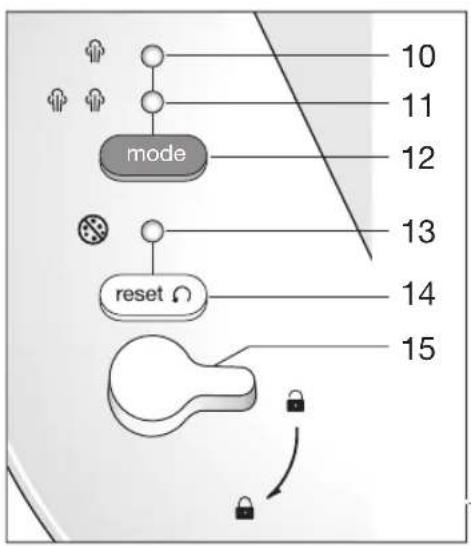
Base unit
4 Iron rest
5 Double cord / double cord storage
6 Water tank lid
7 Anti-limescale filter cartridges
8 Water tank
9 Power cord / power cord storage
10 Eco mode indicator
11 iCare mode indicator
12 Mode button
13 Anti-limescale indicator
14 Reset button
15 Locking knob
Intended use
The appliance must be used only for ironing garments which are suitable for ironing according to the care label. Never iron or dampen garments while wearing them.
Unpacking
Take the unit out of the carton. Remove all pieces of the packing. Remove any possibly extant labels on the unit (do not remove the rating plate).
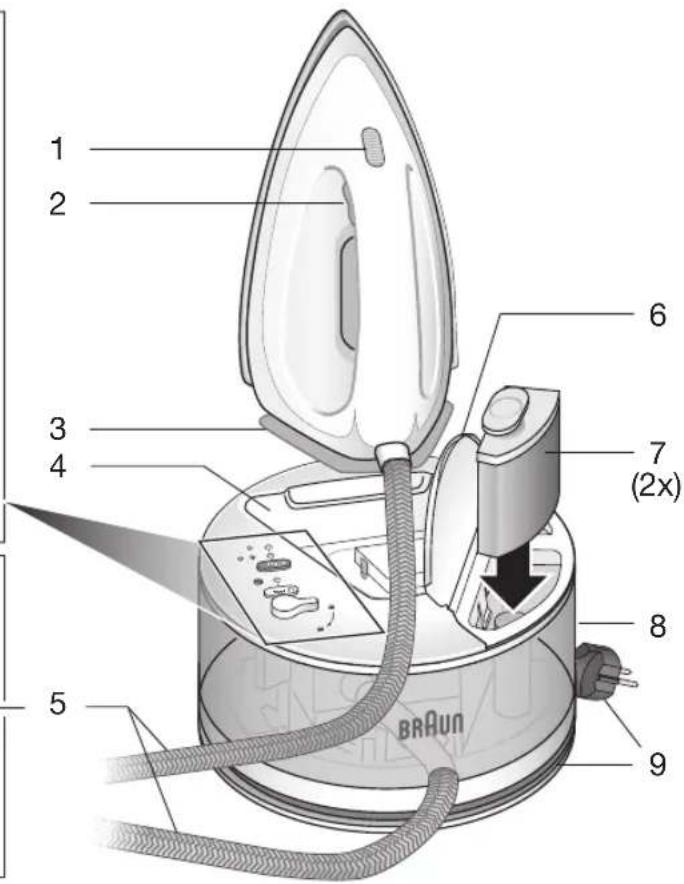
Insert anti-limescale fi Iter cartridge
- Remove the anti-limescale filter cartridge (7) from the polybag and follow the instructions given on the pack.
- Open the water tank lid (6).
- Insert the anti-limescale filter cartridge into position until it locks into place.
- Close the water tank lid.
Note: If no anti-limescale filter cartridge is installed, or the anti-limescale filter cartridge is not installed correctly, the appliance will not work correctly.
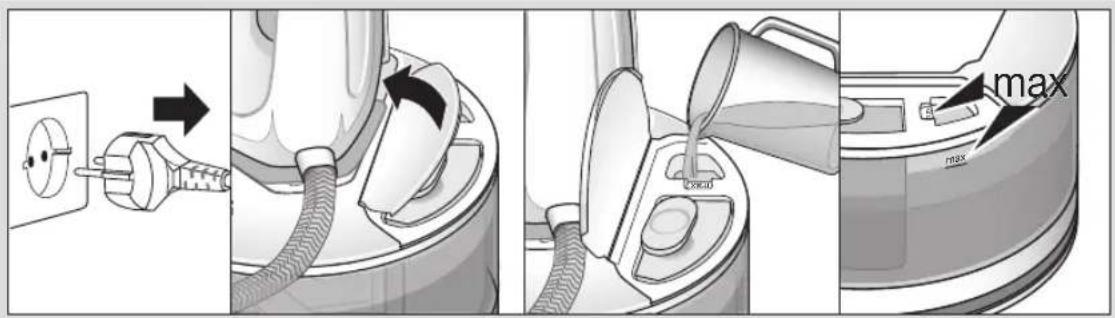
(A) Filling the water tank
- Make sure that the iron is unplugged.
- Open the tank lid (6) and fill the water tank with tap water, taking care not to exceed the «max» level. If you have extremely hard water, we recommend that you use a mixture of 50% tap water and 50% demineralised water. Do not add any additives (e.g. perfumes and other chemical materials). Do not use condensation water from a tumble dryer.
- Place the appliance on a stable, level surface.
Before first use
When you use the appliance for the first time, press the steam button (2) for about 60 seconds and hold the iron horizontally to pull the steam through to the soleplate.
When steam is ready for the first time we recommend to iron for a few minutes over a rag to avoid manufacturing residues can dirty your garments.
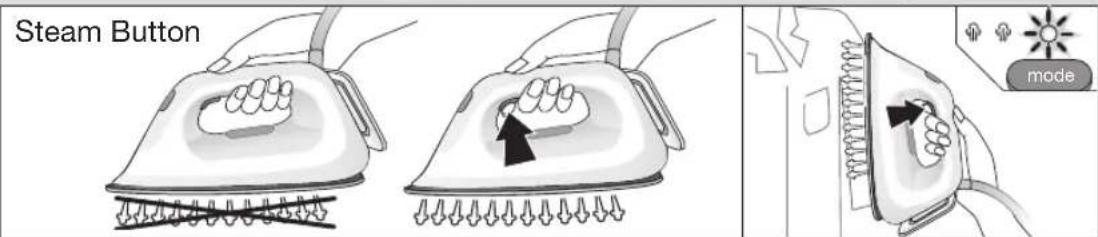
(B) Start into operation
Before start ironing follow the garment care label instructions carefully. Fabrics with this symbol are not ironable.
- Place the iron on the iron rest (4), unwind completely the power cord and plug in.
- The iron will start to heat up and the temperature control LED (1) on the iron will flash. Once the iron is ready the temperature control LED is permanently on.
- For ironing with steam, press the steam button (2) below the iron handle. Steam will come out from the holes in the soleplate.
- For dry ironing, iron without pressing the steam button. Please note that after 10 minutes of dry ironing, the iron switches to the auto-off mode.
For best results
Always iron black and dark garments inside out to avoid getting a sheen on the fabrics from the iron.
- When ironing a shirt, start with the more difficult parts like collar, cuff links and sleeves. Then iron the bigger parts like front and back, so you can prevent wrinkling the bigger parts when you are ironing the other parts.
- When you iron a collar, start on its underside and work from the outside (the pointy end) inwards. Turn over and repeat. Fold down the collar and press the edge for a more crisp finish.
- When ironing garments with imprints, applications or even more sensitive fabric parts
(i.e. embroidery), turn them inside out and, if necessary, lay a cotton cloth between the iron and the fabric. This way you avoid damage and get the volume of fabric designs that are not to be ironed flat.
- In order to prevent new creases while ironing with steam make sure that the garment shows no residual moisture before going on ironing other parts of it.
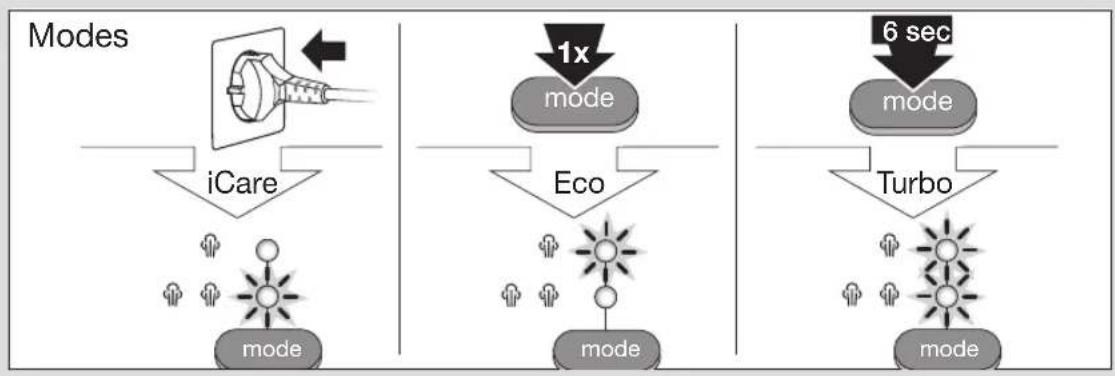
(C) Settings
iCare
The iCare mode is automatically chosen when the appliance is plugged in. The iCare mode indicator (11) is on.
This mode is suggested for garments like wool, polyester and cotton/linen.
eco
The eco mode is suggested for most delicate garments like synthetics, silk and blended fabrics for which you need less steam. This mode allows less power consumption.
To select the eco mode, press the mode button (12). The eco mode indicator (10) turns on.
P turbo
The turbo mode is suggested for garments that need more powerful steam, like thick cotton/linen and jeans.
To select the turbo mode, hold down the mode button (12) until the eco mode indicator (10) and the iCare mode indicator (11) turn on.
Double trigger (turbo mode only)
Use the double trigger function to remove stubborn creases.
Press the steam button (2) twice quickly. There will be a continuous steam emission for a few seconds. Press the steam button once again during steam emission to stop the function.
To repeat the steam boost wait about 12 seconds before pressing again the steam button.
Vertical steam (iCare mode only)
The iron can also be used for steaming hanging clothes for a quick refreshment. However, this function does not replace ironing.
Ensure the iCare mode is selected and hold the iron in a vertical position, tilted slightly forwards.
Press repeatedly the steam button (2) while moving the iron from top to the bottom. Then place the iron on the iron rest.
Steam is very hot: never iron or dampen garment while wearing them.
3D soleplate
The unique round shape of the 3D soleplate ensures best gliding results on difficult parts (e.g. buttons, pockets etc.)
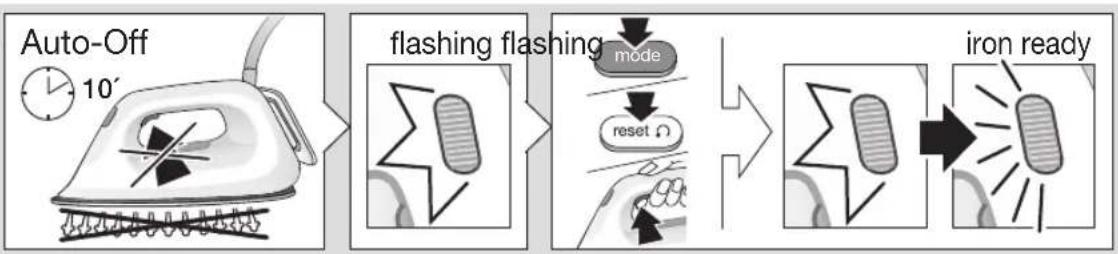
(D) Auto-off
This function is activated if after 10 minutes there has been no steam emission.
- When the appliance is in the auto-off mode the temperature control LED (1) is flashing in a faster interval.
To turn the iron on again press the reset button (14), the mode button (12) or the steam button (2). - Before start ironing again wait until the temperature control LED is permanently on.
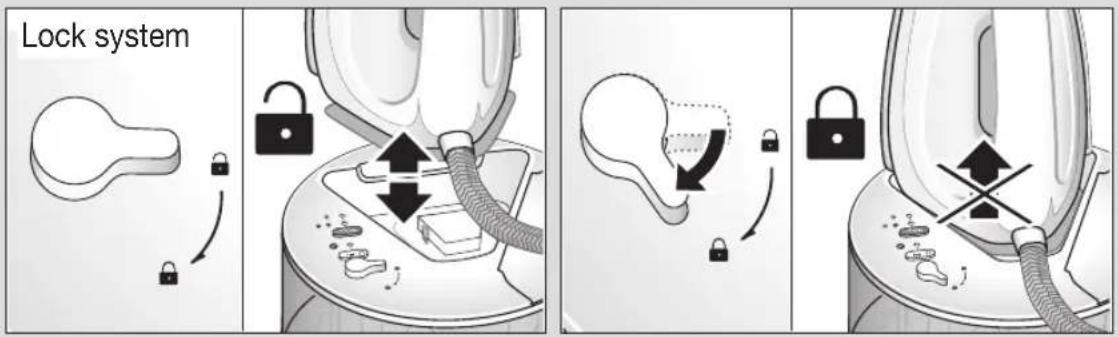
(E) Lock system / storage
The appliance is equipped with a lock system for convenient transportation and easy storage. It is possible to lift and carry the appliance on the handle of the locked iron.
NOTE: Before transportation make sure the iron is properly locked and has cooled down completely. In case you do not use the appliance for a longer time (more than 1 month), empty the water tank before storage.
- Place the iron on its heel rest (3) into the iron rest (4) on the base unit.
To lock the iron turn the locking knob (15) to
To unlock the iron turn the locking knob to. The iron will be released.
Unplug and let the appliance cool down (the soleplate is hot) before winding the cords for storage.
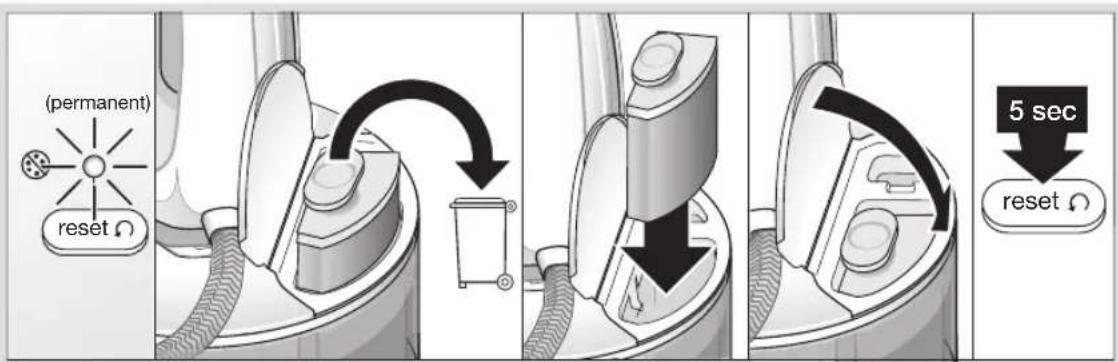
(F) Anti-limescale fi Iter cartridge replacement
To maintain optimum performance of your appliance it is important to exchange regularly the anti-limescale filter cartridge or use demineralised water.
When the anti-limescale filter cartridge requires changing, the anti-limescale indicator (13) turns on. a. Unplug the appliance.
b. Remove the old anti-limescale filter cartridge (7) by lifting it out of the water tank (8) and dispose it.
c. Follow the instructions given on the foil and insert the new anti-limescale filter cartridge into position until it locks into place.
d. Close the tank lid, plug in and press the reset button (14) for 5 seconds until the LED turns off. 14
NOTE: After the replacement of the anti-limescale filter cartridge press the steam button (2) for about 60 seconds and hold the iron horizontally to pull the steam through to the soleplate.
In case of using demineralised water, you need to leave the filter cartridge in the compartment and press the reset button (14) for 5 seconds each time the anti-limescale indicator turns permanently on until the LED turns off.
We recommend using the CareStyle anti-limescale filter cartridge (can be purchased in stores, through www.braunhousehold.com or by calling Customer Service).
Do not use any chemicals, additives or descaler to rinse the water tank.
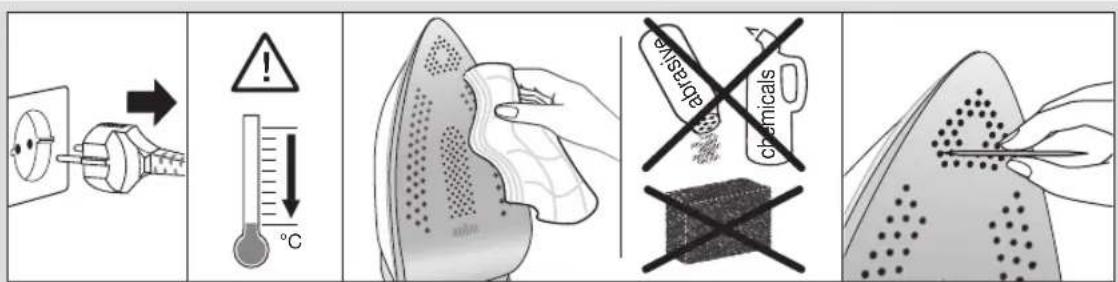
(G) Care and cleaning
Before cleaning, always make sure that the appliance is unplugged and has cooled down completely.
To clean the soleplate it is suggested to use a damp cloth.
- Never use chemicals, vinegar or scouring pads (eg. sponges with coarse nylon fabrics etc).
Please do not dispose of the product in the household waste at the end of its useful life. Disposal can take place at a Braun Service Centre or at appropriate collection points provided in your country.

For UK Only
Guarantee Information
All Braun Household products carry a minimum guarantee period of two years. The rights and benefits under this guarantee are additional to your statutory rights which are not affected.
Please keep your receipt as this will form the basis of your guarantee.
In the unlikely event of a breakdown you have access to professional help from our team simply by calling: 02392 392333
For service in the Republic of Ireland please call: 012475471
Braun Household undertakes within the specified period to repair or replace any part of the appliance, free of charge (with the exception of any glass or porcelain-ware incorporated in the product) found to be defective provided that;
We are promptly informed of the defect.
The product is used and maintained in accordance with the User Instructions.
- The appliance has not been altered in any way or subjected to misuse or repair by a person other than an authorised service agent for Braun Household.
- No rights are given under this guarantee to a person acquiring the appliance second hand or for commercial or communal use.
- Any repaired or replaced appliance will be guaranteed on these terms for the unexpired portion of the guarantee.
The need for repair has not been caused by insufficient aftercare or cleaning: or damage caused by the chemical or electrochemical effects of water.
Troubleshooting guide
| PROBLEM CAUSE REMEDY | ||
| The appliance does not produce any steam. | There is not enough water in the water tank. | Unplug the appliance; check if the anti-limescale fi liter cartridge has been well prepared and is placed properly; fi II water up to max. level; close the lid of the water tank; plug in and wait until the temperature control LED is permanently on; press the steam button until steam comes out of the soleplate. In case above procedure does not solve the problem take the following steps: press RESET + steam buttons together until steam comes out. Once steam comes out, release the buttons. |
| The steam button has not been pressed. | ||
| A new anti-limescale fi liter cartridge has just been installed. | ||
| The anti-limescale fi liter cartridge is not placed properly. | ||
| The anti-limescale indicator is on and less or no steam comes out of the iron when pressing the steam button. | The anti-limescale fi liter cartridge needs to be replaced. | Replace the anti-limescale fi liter cartridge and press the reset button for 5 seconds until the LED turns off. You can also use demineralised water. In that case, you need to leave the anti-limescale fi liter cartridge in the compartment and press the reset button for 5 seconds each time the the antilimescale indicator turns on. |
| The appliance emits a loud noise associated with vibrations (subtle pumping sound is normal). | A new anti-limescale fi liter cartridge has just been installed. | Continue to press the steam button until the loud noise stops and steam comes out of the soleplate. |
| The water tank is empty. | Refi ll the water tank and press the steam button until the loud noise stops and steam comes out of the soleplate. | |
| The anti-limescale fi liter cartridge is not in place. | Place the anti-limescale fi liter cartridge in the compartment. | |
| The anti-limescale fi liter cartridge is damaged or shows cracks. | Inspect the anti-limescale fi liter cartridge thoroughly. If you see any sign of damage or cracks, replace the anti-limescale fi liter cartridge with a new one. | |
| The fi rst time the appliance is turned on, you notice smoke / smell. | Some parts have been treated with sealer/lubricant which evaporates the fi rst time the iron heats up. | This is normal and will stop when you have used the iron a few times. If the smoke/smell is still present after turning off the appliance, contact an authorised Braun Customer Service. |
| There is too much steam coming out of the iron. | Mode turbo is on. | Activate the iCare or eco mode by pressing the mode button. |
| Water (dirty) droplets and impurities come out of the soleplate. | After the anti-limescale fi liter cartridge replacement, remaining water may drip out of the sole-plate. | Take the iron out of the base and position it horizontally on a thick towel or cloth. Press the steam button and the reset button at the same time until the Temperature Control LED on the iron starts flashing. Release the 2 buttons and wipe the soleplate dry with a cloth. Watch out - the soleplate is hot. |
| All LEDs are fl ashing. System error. | Unplug the system, plug in again. If the problem is still present turn the appliance off immediately and contact an authorised Braun Customer Service. |
Français
1 TemnepaTpaHb6akblaywaMbI
2 By TyuMeci
3 Tipeyi
Ytikti6eketi
4 YtIK KOIFbIu
5Xyncbim/XynCbIMCAKtafbil
6 Cy caytBtHbH, KaKaNaFbl
7 KaKa KaCbI cy3ri KapTpIaJpeI
8 Cy KyraTbIH Caybit
9 KyaT CbIMbl / KyaT CbIMbiH CaKtaFblU
10 YHemDipeXIM INHdNKaTOpbl
11 iCare pexmhiH nHnkaTopbI
12 Pekum Tymecci
13 KaKa Kapcbi HnNkKatop
14 Kaɪta petTey Tɪmeci
15 Kybnbntray tetiri
KoIdaHbIy MaKcaTbI
Byn acnan Kytin yctay 3aTtAcbbHa caikec Ytiktey XapaaTbH KIM-KeUeKTI Faha Ytiktey yuH naDanaHbIyFa Tnic. Knin xypren KIMDi eWkaan Hytiktey Hemece BylayFa 6oImaMdbI.
OpaybHaWy
KypbIbIbIbI KopanTah anbln 乌fbHbI3.
OpayblTbH 6apblk 6eIKTePi anbln TaTaHaB3.
KypblFbJa KaIFaH XancaPmaJap 6oLca, anbln TaTaHaB3 (3ayblTBk 3at6eJIriHi amMaHbI3).
KaKa KaPcbI cy3ri KapTpndxin caNy
KaKka Kapcbl cy3ri KaptpnJxH (7) noJIaTIneH KaIbIKTaH aJIbIHbI Da, opayblITafbl HcKayIapblOpIHdaHbI3.
CyKyTbIHbIDbIcTBHKaKnafBih(6)aWbHb3.
KaKa KaKbCy3i KapTpIxOpHbHa cbpt erin 6ekireHeKeipri3iH3.
Cy KyraTbH bIdbCTbH KaKaNafbH xaabHb3.
ECKEPTNE:ErepKaKaKapcCy3ri KapTpndxip OPhaTbIMaca Hemece KaKa KapcCy3ri KapTpndxi Dpybc OPhaTbIMafH 601ca,acnAn Dpybc KymbicIcTeMei.
(A) Cy KyraTbH bIdbicKa cy KyoIO
YTikTih 3eKtp po3etkacbHaH cybipbIn KaImaHaBt TEKcepH3.
Cy KyTbIH CaybTTbIH KaKNaFBH (6) aUbIH3 da, cy KyTbIH CAYbITKa "max" DeHreINHea cBipMaJ Ky6bp CybIHAN KybIHbI3. Erep cy TbIM KepMeK 601ca, 50% Ky6bp cy MeH 50% cy3iReH Ta3a cybl apanaactbIPbn naDnAHydb yCbIHAmbl. EwkaHdAn yCTemEnepdi (MbICJIb, NICcy HemeC backa XmMnJIbIK 3aTTap) KOCyFa 6OImaNbl. Kip KeNTipeTIH MaUNHaJa XUnHaFAn Cybl KOJaHbHaB3.
KypbIbIbHbI Ka3bl,TypaKbI XepeKoBhlbI3.
112
Bipinwi peT konlaHap andbHda
Acnantb aHaPet naiJaHaHKe3e,6y Tymecin (2) WamameH 60 ckyHd 6acbHb3 da, YtIKTH TaabHbHAn 6y WbIFAp yWIn YtIKTe KeIbey YCTan TpyBbHb3.
Bipinpi pet 6y daBH 6onFaHda, KmIMdi YtIKTIH 3aybTTaH KaBn KOiFaH KaNDbIKTapbl 6bINFaMaC ywiH 6ipHeWe MNHT 6ip WSybepeKti YtIKteyDi YcbIHAmbl3.
(B) Icke Kocy
Ytikteyre kipicnc 6ypbH KNIMdi Kytin yctay 6oynihwa Hcayapdb3eHH KOBN OKHBn3.
Aderen TaH6acb6ap MaTanapnbyYtIKteyRe 60JMaJnbl.
- YtikTiYtIK KOiFbIuKa (4) KOiBHi3, Kyat CbIMbHbIHOpaybiTOnbIK Xa3bHb3 Da, PO3eTKaF CyfBiHbI3.
Ytik Kbl3a BactaIbI XaHe TEMnepaTpaHbI 6akblay Tymeci (1) kblibkTaIbI. Ytik DaIbIH 6oIfAHa, TemepaTpaHbI backapaTBH KapbIK DNOJ WAM TpyaKbTI TypDe XaHaDbI. - Bymeh ytktey yin Hytkih tyKacbHbH actbHaBfby Tymecih (2) 6acbH3. By ytKa TaabaHdaftb TeciktpdeH bfaDbI.
Kypfak Ytiktey yuH 6y tymecin 6acnactah YtIKTeH3. Kypfak Ytiktey 6actaHaHH KeiH 10 MNHT apaIbIbIHDA Kypblfbl «ABTOwY KyiHe ayBCaTbTIbH ECKepiH3.
Hətnxkei tamaa 60ny yuih
Kapa Hemece kyHript TcyTki KIMdi Ytik XbIbIpaTbIN xi6epmec yuIH OApDb iUki XaFbHaH YtIKTeHi3.
-KeiIeHiYtIKTeReH Ke3Je apKaUaH XaFacbl, KaeHHKaiBIPMacblXeHe XeHi CnRAKTb KNUBH 6eJIikTepeHbAcTaHbI.CoHaH KeiH aJbMe H apTb CnRAKTb YJIkeHIpeK 6eJIikTePIH YtIKTeHi3, COHa baca6eJIikTePiYtIKTeReH Ke3e YJIkeHIpeK 6eJIikTePiMbKbImMaJDbI.
Xa facbH yTikTeReH Ke3De OHbIH actbHaH 6actaHbI da, cbiptbHaH (yUbIHah) iWine KapaJ XaNFActbPbHbI3. AyapbICTpbHbI3 da, KaTanaHbI3. XaFaHbI KaBpIn 6yKTEHi3 De, KaTbIN TpybI yWIn XnERiH IN YCTHeH yTikTeHi3.
- BacIFaH cypTepi, jANCbIpMaIapbl Hemece OaHa Ha3ik 6eIKTepei (MbCaIb, KeCTe) 6ap KIM-KeWeKTI yTKTeReH Ke3de OApDbH iHi CBtBHa ayDapbHbI3 Da, KaXeT BoJcA, MaTaHbH YCTHeH MaKTa MaTaeCehI3. CoHa MaTaHbH 6yInHyIe XoJ BePMeNci3 XHe yTKTeJmeyre Tnic 6eIKTePiH KeJIeMH CaKaTcbI3.
-БуMuH yTikTeR eKe3e KeHa KbIpTbIcTapDbH naJa bOnybHa Jc0n 6epMey YuH OHbH BaKa bEJIkTePiYyIKTeYdi KaNFaCTbIpaPdAn 6pybH KNIMde bUfAkanMaFaHbH TeKcepH3.
(C) NapameTpnep

iCare
Acnantbpo3etkafKaJaNFAfAHKe3e iCare pexmimi ABTOMaTTbType TaHJaIaIb.iCare pexmiH INHdkaTopb1(11)XaHaIbI.
By np pexkim kyn, noinctep kHe MaKta/3bIfbip CnKtbl MaTadaH TiriInreH KIM-KeWeKTi YTIkTey yUHH Cyblhbla.

eco
3ko pexnmi cInTeTnka, x6eK xe He apanac MaepnAndapAn TiriInre H3iK 3aTTapDbI YtIKteyRe K0laJIb. ByI peXIM KyATbI a3bIpaK XymcayFa MymKiHdk6epei.
3ko pexmiH TaHday yuih pexmmHIn TYmecin (12) 6acbHb3.3ko pexmiH INHnKATOpbl (10) KaHaDbI.


turbo
Typ6o pexim MaKaTa/3bIbIp KHe DxHNC CnKtbl
Kywi 6ybl KaKet eTeTIN MaTePnAndapDaH
XacanFaH 3aTTapDbYtIKTeY yWIn YcBnHJaDbl.
Typ6o peximTi TaHday yWIn pexIMHi TymMeCIn
(12) 3ko pexim INHdkaTopbl (10) Mei iCare pexmi
INHdkaTopbl (11) XaHFaHwa 6acbl YCTan TypbHb3.
Koc Tytkbii (Tek Typ6o peXmme)
Koc tyTbIw cyHKUcBcIH KaTbI KbiptbCTaIFAH
Xepnepdi YrIKTeY yuHn naDanaHbIH3.
By TYMecin (2) eki pet Xblam 6acbl3.
Bipheue cekyH y3dikci 6 by sbfapblnabli.
dyHKUraHbToKtAty ywiH 6by sbfapy 6apbcihda
by TYMEcin TaFb6ip pe8acbl3.
KapkbiHb6 by 6epyki KaTanay yuH 6y Tymecin KaTada6bacap aIbHa waamameh 12cekyH, Kytih3.
TiriHeH 6y uBfApy (TeK iCare pexmHne)
Ytki coHdaiak iyni typran kim-Kewekti byay yuHn de konlahyra bola. AnaJa 6yI yHKunr YtikteyinOpbHaXypmeNi.
iCare pexKMIH TaHaIFaHbHa Ke3 XeTki3in, YtIKaJIFA KApA CcN KcAaTbIN, TIK KaJIbNTa YCTaHB3. YtIKTI KOFapBdaH ToMeH KapA XbJXbIta OTbIPbIN, 6y TYmecIH (12) KaTakaTa BacbHb3. CoaH KeiH YtIKTI YtIK KOfFbUka KoYbHb3.
By eTe bICTbIK: KInn JxypReH KImDi EwKaWAn Ytikteyre Hemece CyayFa 60JMaJbI.
Yw enwemdi (3D) yrik ta6aHbI
3D Ta6aHbHbH DeHReNeK NiWiMi YtKTeYre KnbH aMakTapDbI (TyMeNep, KaTanap XHe T.6.) KaMTy MymKiHdIrH YcbHaDbI.
(D) ABTO-ewy
Erep 10 MmHyTTaH KeiH 6y WbIKnaca, OcbI FyHKUJ IcKe KocblJaBl.
Ytik abTo oUy peXIMInHe TpyFaHda, TemnepaTpaHbI bAcKapy IaMbI (1) XblIaMbIpaK XnIiIKNeH XblIbIbIKTan TypaDbI.
YtikTi KaTadaH icke Kocy yuH bICbipy TyMeciH (14), pexm TyMeciH (12) Hemece 6y TyMeciH (2) 6acbHb3.
KaTadaH yTikTeyRe kipicnc 6ypbH TEMnepaTypaHbI backapy WAmbl TypaKTbI Tpyde KaHaHaWkTiHi3.
(E) Bekity xyueci / caKayfKaOIO
TacbmaIay bHfaiNb epi caKtayfa OHaB 0onybl ywiH acn an 6ekitkiXymeH XapaKaTaNFaH. AcnantbI 6ekitirre HytikTH TYTKacbHaH YCTan KeTepyre HeMece aIbIn KypyRe 6oImaNbl.
ECIH3DE BOJcBH: TacbMaJdaydaH 6ypbH yTtH, dpybc 6ekitilreHine XeHe 6deH cyfAhaHa Ke3 XeKtiH3. Acnantb Y3ak YaKbIT 6oBb1 (1 aHa actam) naDanaHbAaTBH XaFdaHa, caKTayf KaopDaH 6ypbH cy caytbH 6ocTaHbI3.
- YtikTi ytic 6eketihderi ytic TaHbIbIHbIH, (4) ytic KOfblWBbIH, (4) iuHe caJIbIH3.
Ytikti 6ekity yuih Kynbntay Tetirin (15) KaannbHa 6ypaHb3.
YtIKTHKynbIH aftbyuH KynbIITay teir. KaIIbHa 6ypaHb3.YtIK 6ocatbnadbl.
TOKtaH cybIbIHbI3 Da, CbIMdbI caTay yuIN opaydaH 6ypbH acnacybifaHwa kyTHi3 (YTKTH Ta6aHbI bICTbIK 60laDb).
(F) KaKa kaKapcbl cy3ri KapTpndxin aybIcTbIpy
AcnantbH,6apbHwaXaKcbI XyMbIC icTeyiH KaMTamac3 ety yuiH KAKKa Kapcbl cy3ri KaptpuXHHemayibCTbIPBIn OTbpydbHHeMeCe Cy3iReH Ta3a CynbnaJdaJahHydbH MaHb3bl 3Op.
KaKKa Kapcbi cy3ri KaptpnDxih aybictbipy KaKet 6oIHaH Ke3de, KaKKa Kapcbi INHdNkAtop (3) KaHaDbI.
a. AcnantbI əJIeKTp po3eTKacbHaH cybIPbHb3.
b. KaKa Kapcbl cy3rHiH ecki KaptpnJxH (7) cy CaytBtHbH (8) iWHeH KETepin WbIFapbIn, KOkICKa TaCTaHbI3.
c. XykaTbIpaBeepireHHyckaynapbI opbIHan, KaKa KapcBi cy3riHH KaHa KapTpNkIH opHbHa cbIp etin 6ekireHwe caJIbIbI3.
d. CaybTTbH KaKaNaFbH Xa6bHb3, TOKKa KOCbHb3Ia, bCbpy TyMeciH (14) XapbIK DNOD IaAM ceHreHwe 5ceKyHd 6acbHb3.
ECKEPTNE: KaKa Kapcbl cy3rHin ecki
kapTpnuXHH aybCTbIPFaHHaH KeHH by TYMeCIN
(2) WAMAMEN 60 cekyHd bacbHb3 Da, yTikTH
TaBaHbHaH by bIFapy yuHn YtIKTe KeJIbEy YcTan
TypbHb3.
Cy3iReH Ta3a cy naIdaIaNbIaTbIH XaFdaIa, KaKKa Kapcbl INHnIKaTOp TypaKTb TYpde XaHFaH caBbIH Cy3ri KapTpndXH YrcbIHDa KaNdbipIn, XapbIK DIOJ WAM CHeHRe HWe BcBpy TymecIH (14) 5 cekyHd bacy Kaxet.
Bi3 CareStyle KaKa KapcBi cy3ri KapTpNdiH naDanaHydbI yCbIHAmbI3 (dyKeHepDeH, www. braunhousehold.com caTbI apKbIJbI HeMece TyTbIHyUbInapFa Kbi3Met KepCeTy OpTaIbIFbIHa KOHbIPay COfBn CaTbIN aNyFa 6oJaN).
Cy caybTBH xyy yuH XUMNIAbIK 3aTTapbl, YCTeMeIepi HEmec KeK Ta3apTKblTbI KOJaHa6aHbI3.
(G) Kytin yctay xhe ta3aJaiy
Ta3aIap aIbIHda KypblfbiHbIH KyaT Ke3iHeh axbipatblfahbHa XeHE 6deH cybifaHbHa Ke3 xeTKi3iH3.
YTik Ta6aHbIH Ta3aIay yuH DbIMKbl uy6epeKti naJdanaHaHraDypbic.
XIMNIAIbIK 3aTTapDbI, cipke cyBH Hemece Kblpfbll XeKeHi (MbIC., KaTbI HeINoH MaTaCbI 6ap XeKe T.C.c) naDalaHyra 60MaJdbI.
ΘHIM KOJaHaBbCTaH WbIKKaHda 6aca y KOKbcIbMeH 6ipre TaTamaHb3. EIni3deri Braun KbI3MET Kepcety opTaIbIFbHa HemeTeNicti XnHay opTaIbIKTapbHa eTK3yIH3re 6oJaNbl.

bifapbifFaH Xblbl
WbIFapbINFaH XbIBH 6eJIrJeyuIH 6yIbIM TaKaTaWacBHaFb5-CAHbIK WbIFapuybKOdbIH KapaHb3. WbIFapuybKOdbHB6ipHsi CaHb WbIFapFAH XbINDbH COFBcCaHBn 6iJipei.KeJIci 2 caHdAp WbIFapbIJFaH XbINDbH KYHTi36eJik anTa caHBn 6iJipei.An CoFB2 caHdAp 1992 XbINaH 6actan ABTomaTbI Typde ecentreReh 6acbin WbIFapy Mep3imH 6iJipei.
MbicaJIb:30421-ByIbIM 2013 KbJIbIHbIH 4 anTacbiHda WbIFapblFaH.
EAC
YcnoBna peann3aun:
IpaBnla pean3aun TObapa He yCTaHOBneHb I3rTOBNTelem,
Pon3BODnteIb:
De'Longhi Braun Household GmbH,
Carl-Ulrich-Strasse 4,
63263 Neu Isenburg, Germany
PykoBoDcTbO no yCTpaHeHnIO HeNCpPaBHOCTe
IiIroTOBka do nepworo BnKOpNCtAHN
KaIO BV BIKOPNCTOByTe npnlaD Bnepwe, HATNCHTb KONky noaChi napu (2) iYtpmMyIte npotrrom npn6n3Ho 60 cekyHd, TpmaOHy npackyB ropn3oHTaJIbHOMy nIoJxehHi, Uo6 BoDa BnWLa Hepe3 NiDoWBy npackn.
Pn nepwomy BnKOpncTaHnI nappekomeHDOBaHO npOTrOM DeKiNbKOx XBnHn IpacyBaTu Chepe3 KlaanTtKtKaHnH, 063aNo6irn 3a6pydHeHHIO BnPo6HnHm OcaHOM.
TkaHHnHa knx E CmB0J He niJaRaOTb npacyBaHHIO.
PocTaBTe npacky Ha niDCTaBky (4), NOBHiCTo p03MOTaIte UHyp XnBHeHH Ta yBIMKHiTb NOrO B p03eTKy.
- Ipnacka noyHe HarpibatncI cBtJIOiOHN iHnKATOp KOHTPOIO TEMNepaTyprn (1)Ha npacu 6yde 6nMaTn. Jk TjIbKn nPpacka Harpietbcr, CbitIOiOHN iHnKATOp KOHTPOIO TEMNepaTyprn NOHc CBITNTNCb IOCTiHO.
Длп npacyBaHHnapoIOHaTnCHiB KhoNky noaqui napu (2),Io 3HaxOДиTBcR HxKYe pyKn npackn. Napa noUHe BnxOДиTN 3ycix OTbOpIB B niDowBi npackn.
-Дясухо npacybaHH He HaTnckaTe KHONky noaqi napi.3BepHbYbaryHa Te,IO uepe3 10xbuHH cyxoro npacybaHH npacka nepexoNTb B pexm aBTOMaTHO RBMKHeHHr.
ДлгнкрашиpeультатIB
3abxnpacyte yopHn i TemHn oJg i3 3BOPOTbOro 60ky, uo6 3ano6iTn noRbi 6ncky Bi npackHa TkaHHi.
- Ppi npacybaHHi copouKN nouHaHTe 3 haH6InbUcklaadnHex YactNH, TAKNX KK Komip, MaHKeTNI pykaba. Notim npacyte 6InbIi YactHH, Taki JNpeedi CnIHKA, Uo6 3anobirn NORBi CKJaDOK Ha 6InbIX XactHHax iJd Yac npacyBaHHI HxuaCTINH.
- Ppi npacybaHHi KOMipy NOUHaHTe 3 Noro 3BOPOTbHO 6Oky, nepeCyBaIteCb BID KpaIO (roCTporo KINc)do ueHTpy. NpeerOpHITb Bnpi6 i NobTOpIb Te X came. CKlaIITb KOMip i BIDnpacyte NOrO KpaI DIA OTPMaHHe eFeKTy «XpyCTKORO» KOMipy.
- Ppi npacybaHHi OJry 3 npHTamn, anJIkaizmna 60 biIbIeJIkATNIMu cactHAMn (HaPnKlaI, i3 BnWNBKOIO) BnBepHITb Ioro i, 3a Heo6xIDHOCTi, nOKlaIb6abOBHny TKAHNHy Mx npackoTa OJrrom. TaKIM YINHOM BN yHNIKHete NOIKOJKeHHa OJry Ta HAdacte 06'Emy TIm NOrO qactHAM, kI He MOXHa npacyBatn HAnpMy.
- Ⅲo63anobirnoBIBIOHBOXCKlaDOK, nepekoHaTeCb y BiCDyTHOCTI 3aIIuKOBoi BOJOrn Ha OJ3i, nepu HIX nepeHTN Do npacyBaHHn HactynHx NOrO qACTnH.
(C) HanaWryBaHHa
iCare
PexIM «iCare» BCTaHOBIOEbCABTOMaTHNO nicra yBIMKHeHHn npackn B po3eTKy. INdkaTop pexIMy «iCare» (11) 6ynde cBITNTncr. Lc HalaTuBaHHpeKOMeHDoBaHO dIra BOHN, nonieCTepy i babOBHn/JIboHy.
eco
PexIM 一 e C 一 peKOMeHIOBaHO nT aKIN Hn6iJbW
JeikatnTKaHH,AK CHTeTnHi,IOBKOBI TKAHHn abo TKaHHn 3MiHaHOro Tnny. Lepexm D03BOJRAc cNOXBaNt MeHwe eNEKTPOeHeprii. Uo6 BCTaHOBnTI peXIM «ECO», HATNCHTb KHOKNBy Bn6opy pexmy (12). 3arOpNTbc iHnKatop pexmy «eco» (10).

turbo
PekIM Tpy6o peKOMHeOBAHO JTKAHIN, 10
notpe6yIOb 6JIbwe napu, HapnKJaT, TOBCTa
6abOBHa/BoH i DxNHCObaTkAHNa.
UoB BCTaHOBHT peKIM Tpy6o, HATNCHTiYyTPMMyTe KHONky BNbOpy pexIMy (12),DOKn He
yBIMKHyTBcra IInkKaTopnppeKIMy "eco" (10) ta
iCare"(11).
IpaCKy TAKOX MOXHa BnKOpNCOTByBaTn IJIa WbNdkoro BiNnapIOBaHHr OJry, IIO BNCITb. UyHKjOJHak He 3amHIO npacyBaHHr.
IpekeohaiTeC,IO BCTaHOBHeHO peXIM «iCare», I TpImaIte npacky B BepTnKaJIbHOMy NOJIOXeHHI, TPOxHaxnINBwII II Bnepe,I.
Ipepeiuyte npacky 3ropn DOHn3y, npn ubomy nepioDnHNo HATNCKaTe Ha KhoNkY noaHi napn (2). Notim BCTaHOBt npacky Ha niDCTabky.
Iapa i3 npack nyke rapya: HIKOJI He npacyiTe Ta He BiDnapoiTe OJr, AKN OJrHHeNn Ha Bac.
3D niðowba
Yhikalha 3D nioBa kpyIoi φopMn 3a6e3neye HauKpaui peyIbTaTN KOB3aHHB CklaHnx DIIHKAX (HaNPKlA, ryn3NK, KUWeHi i T. d.)
(D)Функця abTomatMuHOrOBuMnKaHHa
Lz yHKjia akTnByeTbC8y BnnaKy BiDcyTHOCTi noaqi nap npotrom 10 xBnH.
KoI npacka nepe6yBaE b pexkmi aBTOMaTHHOrO BIMKHeHHra, CBIITIOIOHNi iHnkaTOp KOHTpONIO TEMNepaTyprn (1) 6nmae Wbndse.
- 3HOBy yBIMKHyTN npacky, HATNCHTb KHONky cKnDaHHa (14), KHONky Bn6Opy pexmmy (12) abo KhoNky noaHi nap (2).
- Ppeid noatkom npacybaHHcIid 3auekatn, DOKN CBITIOIOHN IHINKATOP KOHTPOJIO TEMNEPATpyNOHHe NOCTIHOCBITNTNC.
(E) CnCTema 6JIOkyBaHHa/36epiraHHa
Ppnilad OcHauheHO CnCTeMOIo Fikcaui DnA 3pyHoro nepemiuueHHi npocToro 36epirAHn. 3a6loKOBaHy npacky moXHa nHimatu Ta nepehoCOnTu 3a pyKy.
INPMITKA: NpeepnepeMiueHHm npackn nepekoHaiTecb y TOMy, lo BOHa k CIId 3a6Iokobaha i NobHicTHo BnCTnRJa. Y BNpaKy, Rkso BV He BnKOpNCOTBye Te npJuaI npOTraOM TpBaIoro Yacy (6iNbwe 1 Micra), npeed 36epiraHHm 3JInTe BOy 3 pe3epByapa dNBAOn.
BctaHObIb npacky Ha n'RTky (3) y niDCTabu (4) Haa3OBOMy bloui.
- 3aΦikCyBaTn npacky, NOBepHITb KONKy 6NOKyBaHHA (15) B noJIOXeHHA.
ДяТOrO,Uo6po36NoKyBaTn npacky, BCTaHOBITb KHOITKy 6NoKyBaHHB NIOJOxEHHn. npacka po36NoKvETbcr.
IepHixckpyyBaTu shHyprn Ina 36epirAHN BmKHiTb npacky 3 po3etkn i daTe iN OxOnohTy (niOwBa rapya).
Sally aolled LED aolcls jzj 00 10
jJyJyJyJyJyJyE
aalalalalalalalalalalalal
Jxu Jao juo Jia5o ao paocui y. (y)
gugog 10b 2w 1d jolll
plucuul UgU
60 2 (2) jj j j j j j j j j
aalalal algll Jx jao jolw wol oololololol
a a a a a a a a a a a a a a a a a a a a a
yui yu wgl yagla jia 100
joljoljol jolall jolll paaai
.
gall goll gl pluullgl algl 1s
a aalg aaley gaae eogagall cslly eel
gglgglgglgglplglllgl
.5511 1
a 100
iololulwus liogjgljglaal
2j30
aai 398 aai 110
16) jgauiaai aaii aai iaaa gao gao aao
Jyduuol a jdy uusulal yjuyd jy
y y 1 y j k
.
o0eol 1j0yll 1s joo 000000000000
daiwaliyaiiuiuulua
Jglio 1 Jue yjxall ojo Sll ddo b0g jyoo Iao Lolo
Jlab