HyperX CloudX - Helmet KINGSTON - Free user manual and instructions
Find the device manual for free HyperX CloudX KINGSTON in PDF.
User questions about HyperX CloudX KINGSTON
0 question about this device. Answer the ones you know or ask your own.
Ask a new question about this device
Download the instructions for your Helmet in PDF format for free! Find your manual HyperX CloudX - KINGSTON and take your electronic device back in hand. On this page are published all the documents necessary for the use of your device. HyperX CloudX by KINGSTON.
USER MANUAL HyperX CloudX KINGSTON
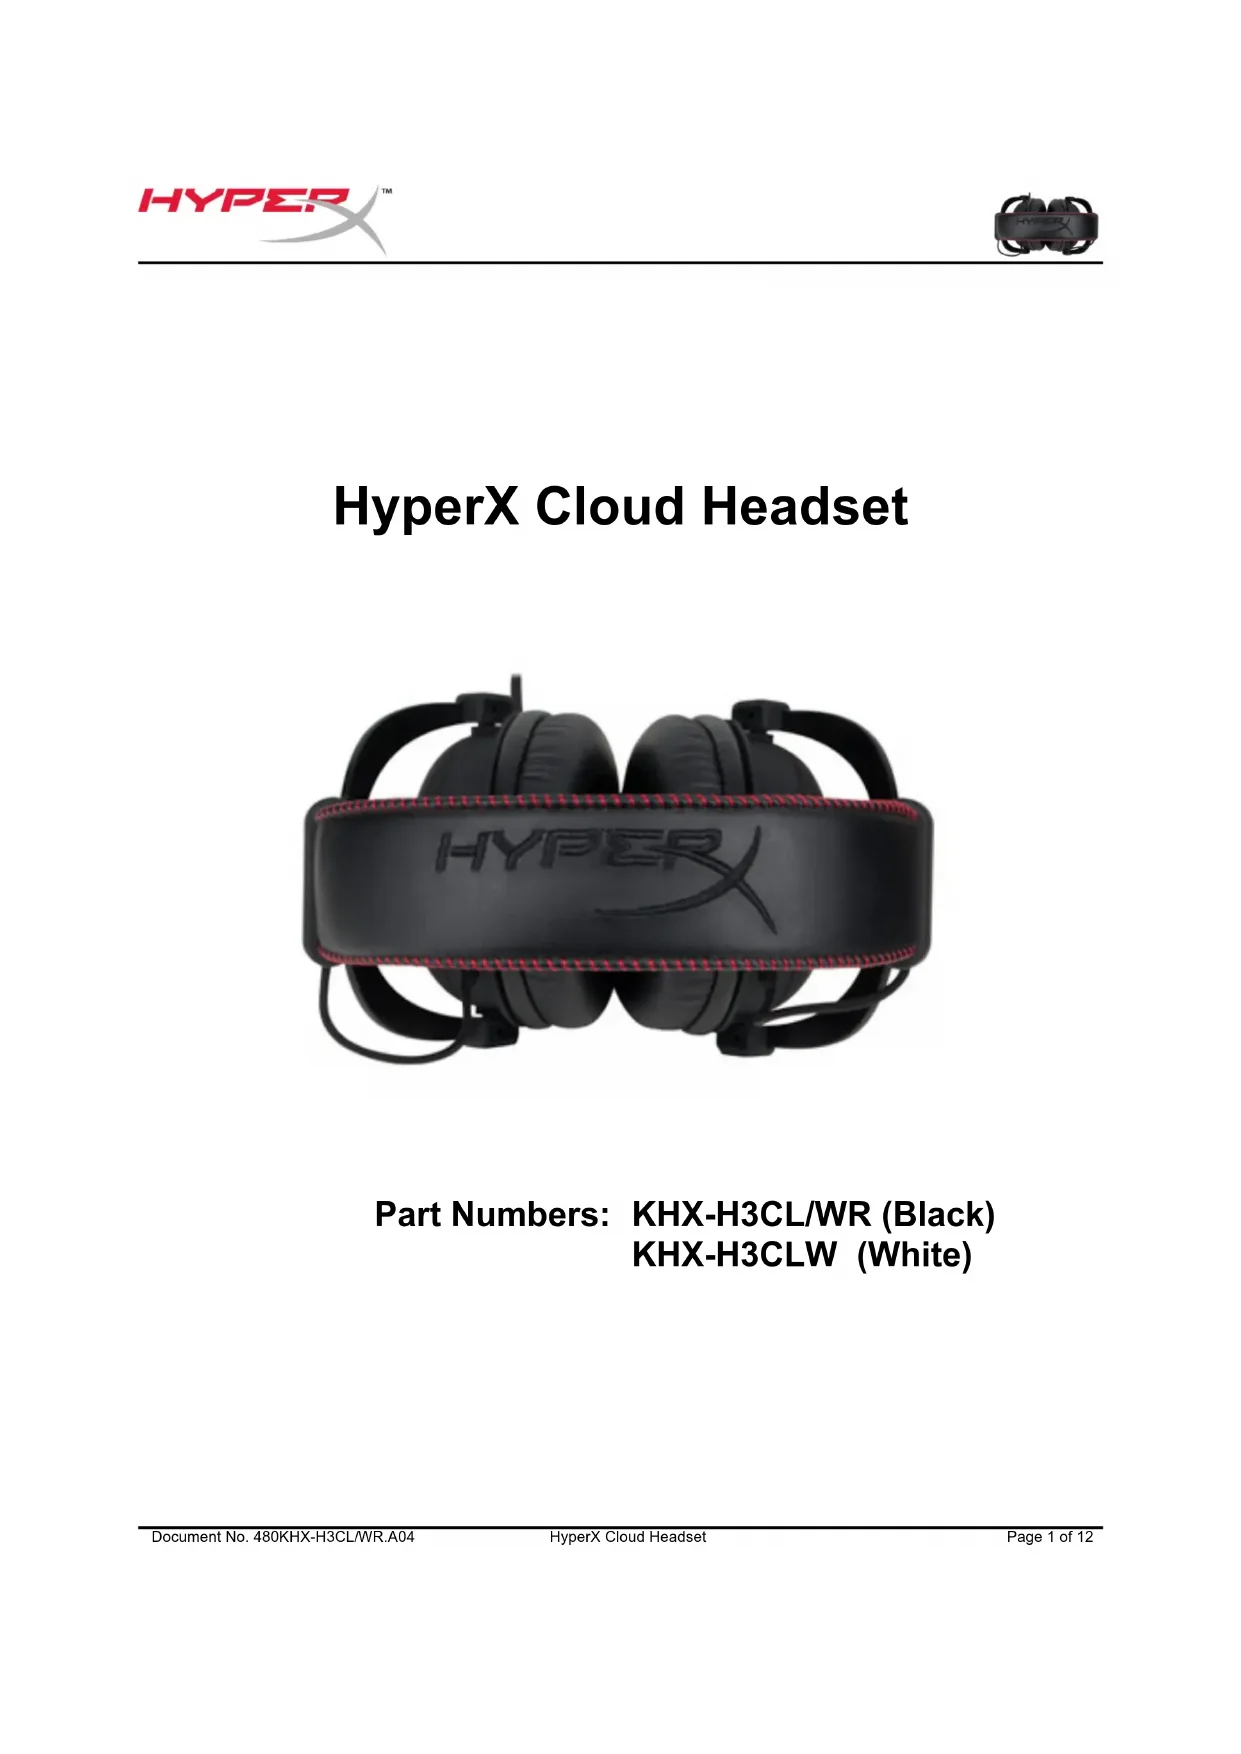
HyperX Cloud Headset
Find the language and latest documentation for your HyperX Cloud Headset here.
HyperX Cloud Headset Installation Guide
For instructions in English
Para instrucciones en español
Für Anleitungen in Deutsch
Pour des instructions en français
...... Per le istruzioni in italiano
Por as instruções em português
Instrukcje w języku polskim
Для инструкции на русском
C Turkce talimatlar icin
Japanese
Thai
......Українська
Vietnamese
Simplifi ed Chinese ..... 中文说明
Traditional Chinese .... 中文說明
HyperX Cloud Headset

natural_image
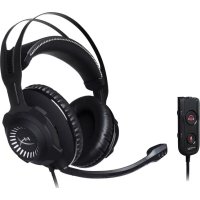
Black HyperX headset with red strap, no visible text or symbols on the device itselfPart Numbers: KHX-H3CL/WR (Black) KHX-H3CLW (White)
Introduction
Optimized for pro-gaming, HyperX Cloud Headset is a high-quality communicating device that delivers superior sound, style and comfort. It uses an adjustable, soft-padded leatherette headband and features a closed-cup design for enhanced bass reproduction and minimal sound leakage. The HyperX Cloud Headset is HiFi capable and delivers a durable design for the most rugged gaming environments and is compatible with tablets and smartphones for mobile use.
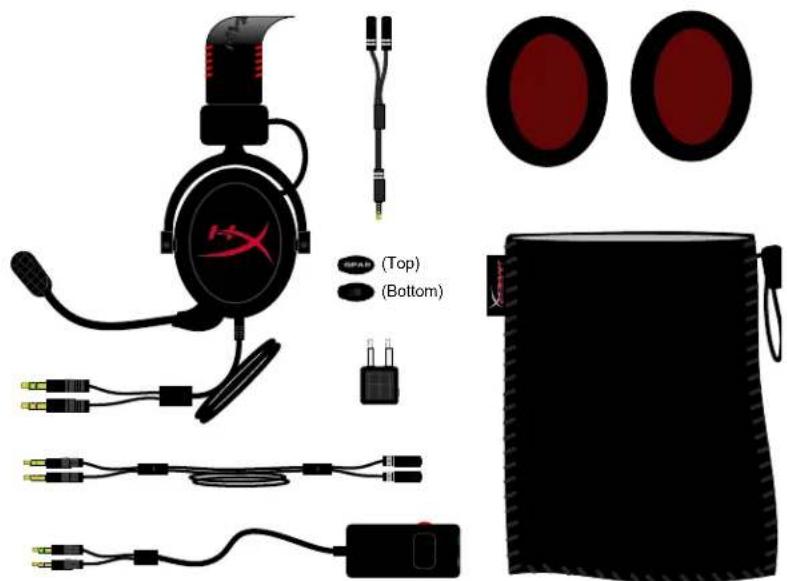
What's Included:
•1 HyperX Cloud Headset
•1 Detachable Microphone (attached to headset in figure 1.1)
- 1 Microphone plug
- 1 spare set of velour ear cushions
• 1 control box with 100cm cable (cable has 3.5mm audio jacks)
•1 extension cable (200cm)
•1 headset splitter cable (10cm)
•1 Airplane headphone adapter
- 1 Mesh bag
natural_image
Product line drawing of a hockey headset and rear camera with labeled components (no text or symbols on main parts)Figure 1.1 – Package Contents
Features:
• Hi-fi capable 53mm drivers for supreme audio quality
• 15-25 KHz frequency response (earphones)
- Detachable microphone (quick and easy to plug/unplug for music-only purposes)
•Solid aluminum construction for durability and stability
• Super-soft padded leatherette headband and leatherette padding on cups
- Closed cup design for enhanced bass-reproduction and sound leakage
Technical Specifications:
•Transducer type: Dynamic 53mm
- Operating principle: Closed
• Frequency response: 15Hz-25KHz (earphones)
•Nominal impedance: 60 ohm per system
•Nominal SPL: 98+/-3dB
•T.H.D: < 2%
•Power handling capacity: 150mW
•Sound coupling to the ear: Circumaural
•Ambient noise attenuation: approx.20 dBA
•Headband pressure: 5 N
•Weight with microphone and cable: 350g
• Cable length and type: 1m + 2m extension + 10cm iPhone
• Connection: Mini stereo jack plug (3.5MM)
- Microphone Transducer type: Condenser (back electret)
- Operating principle: Pressure gradient
•Polar Pattern: Cardioid
•Power supply: AB powering
•Supply voltage: 2V
•Current consumption: Max 0.5 mA
• Nominal impedance: ≤2.2 k ohm +/- 30%
- Open circuit voltage at f = 1kHz20mV/Pa
• Frequency response: 100 - 12,000 Hz (microphone)
•T.H.D: 2% at f = 1 kHz
• Max. SPL: 105dB SPL (THD ≤ 1.0% at 1KHz)
•Microphone output: -39+/-3dB
- Dimensions: 6*5mm
•Length mic boom: 150MM(include gooseneck)
• Capsule diameter: 6mm
Overview
text_image
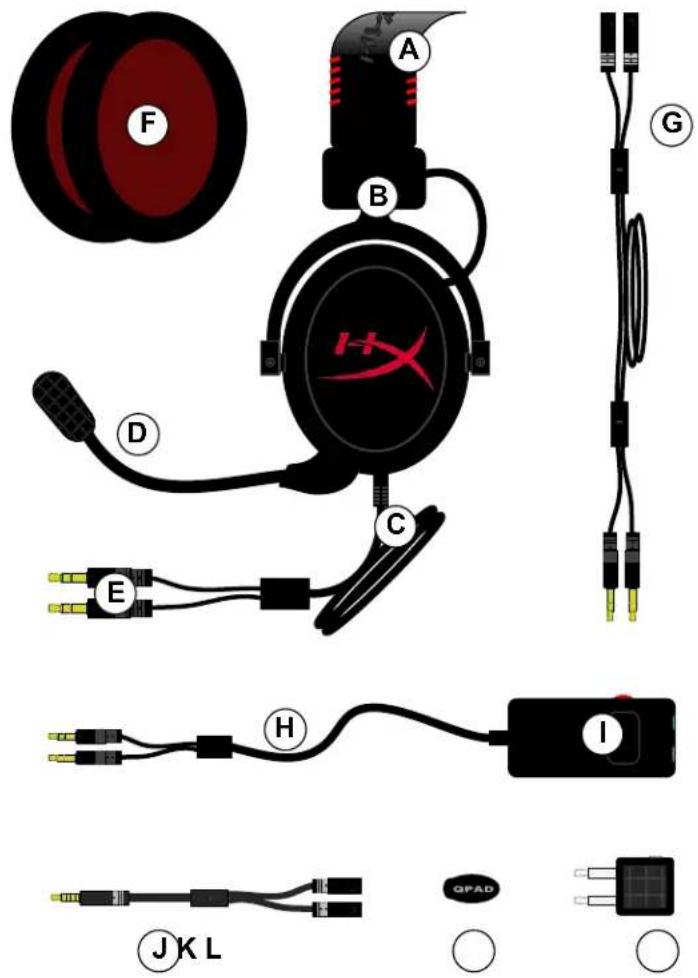
A B C D E F G H I JK L QPADA. Leatherette headband w/ HyperX logo
B. Aluminum arm to adjust headband
C. Attached cable (1 meter in length) w/ 3.5mm input jacks (letter E)
D. Detachable microphone with adjustable arm and condenser
E. 3.5mm audio input jacks attached to the 1 meter headset cable
F. Extra set of ear cushions
G. 2-meter extension cable
H. Control box cable w/ 3.5mm audio jacks and control box (letter I)
I. Control box w/ multi-function button and volume control. The multi-function button can be used for:
a. Answering or hanging up a phone call from a mobile device
b. Pausing a song when listening to music on a mobile device
J. Headset splitter cable w/ 3.5mm audio jack
K. Microphone plug (attached to headset by default) where microphone (letter D) connects to HyperX headset
L. Airplane adapter w/ 3.5mm audio jacks and input converter jack
Usage (Correct vs Incorrect)
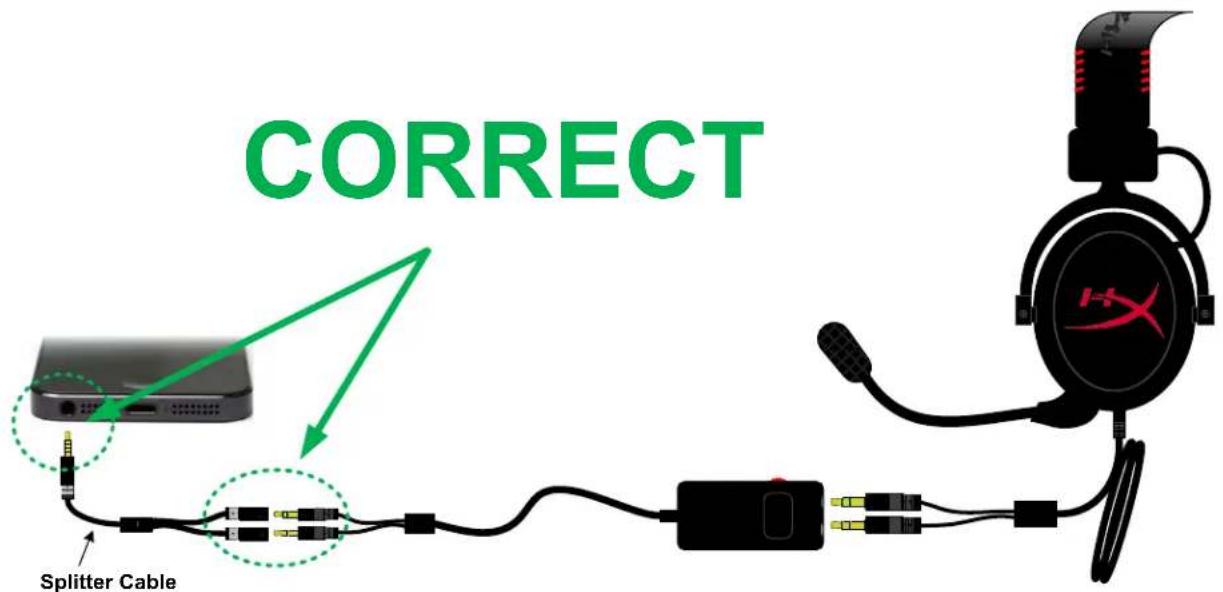
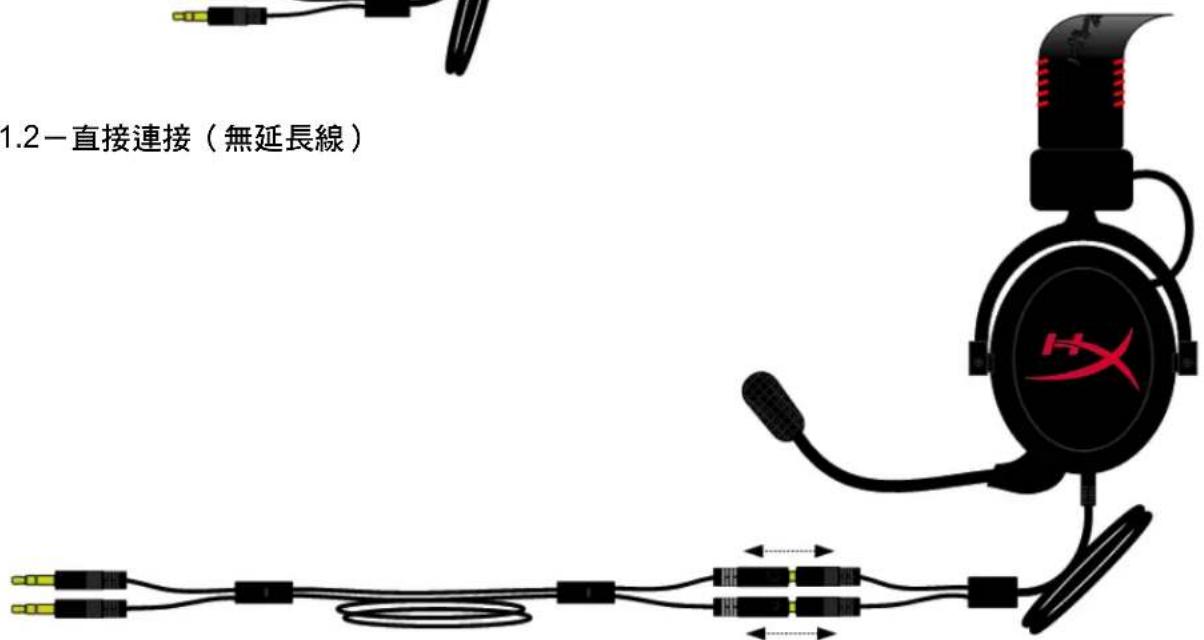
When connecting your HyperX Cloud headset to a device that has a single 3.5mm audio jack, you MUST use the splitter cable (or "Y" cable) to ensure that each jack is connected properly and securely plugged in. Do NOT ignore or leave any audio jacks unplugged as depicted below in the "INCORRECT" configuration.
text_image
CORRECT Splitter Cable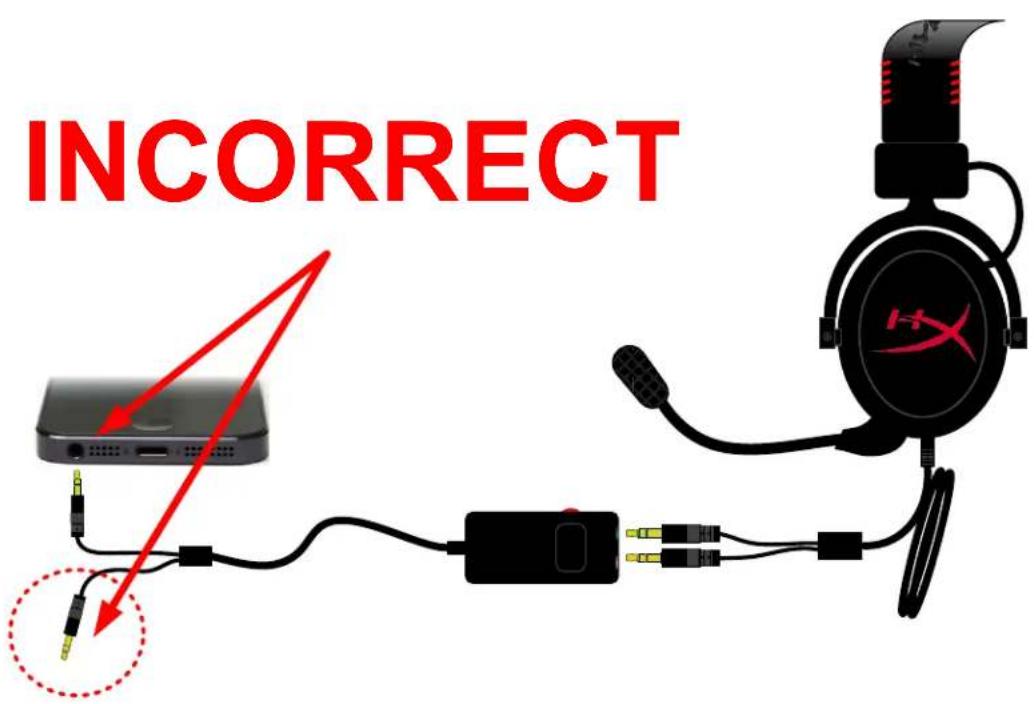
text_image
INCORRECTUsage (Direct Connect)
Connect your headset directly to your computer (or other device) that has both a headset jack and a microphone jack. The headset jack, which has green stripes, plugs into the port signified by a green input or earphones symbol , and the microphone jack, which has pink stripes, plugs into the port signified by a pink input or a microphone symbol ⚠ . (Optional: The included extension cable (letter G on Page 4) may also be used to add length to the existing headset cable, as seen in Figure 1.3.)
natural_image
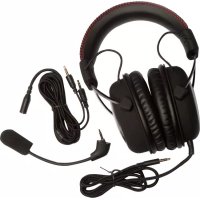
Black and red HX headset with earbuds and connector (no text or symbols visible)
text_image
Figure 1.2 – Direct Connect (without extension cable)Figure 1.3 - Direct Connect (with 2-meter extension cable)
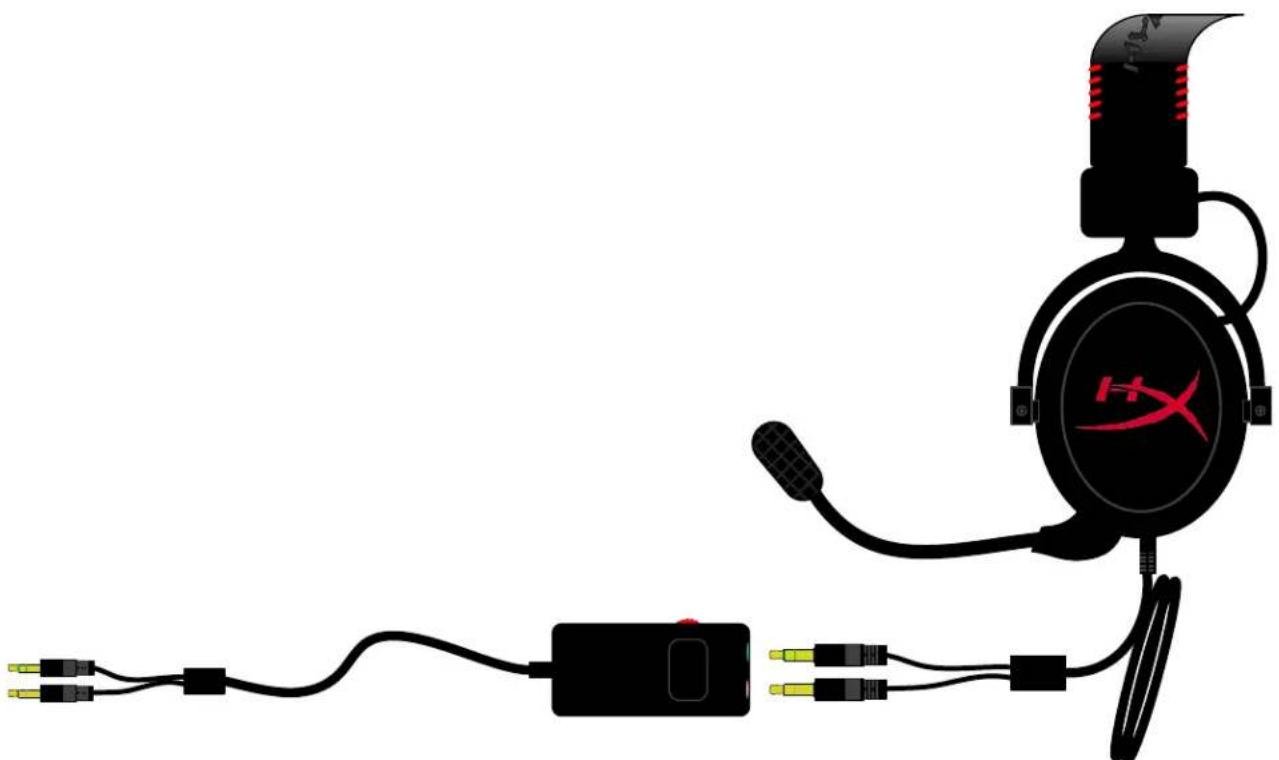
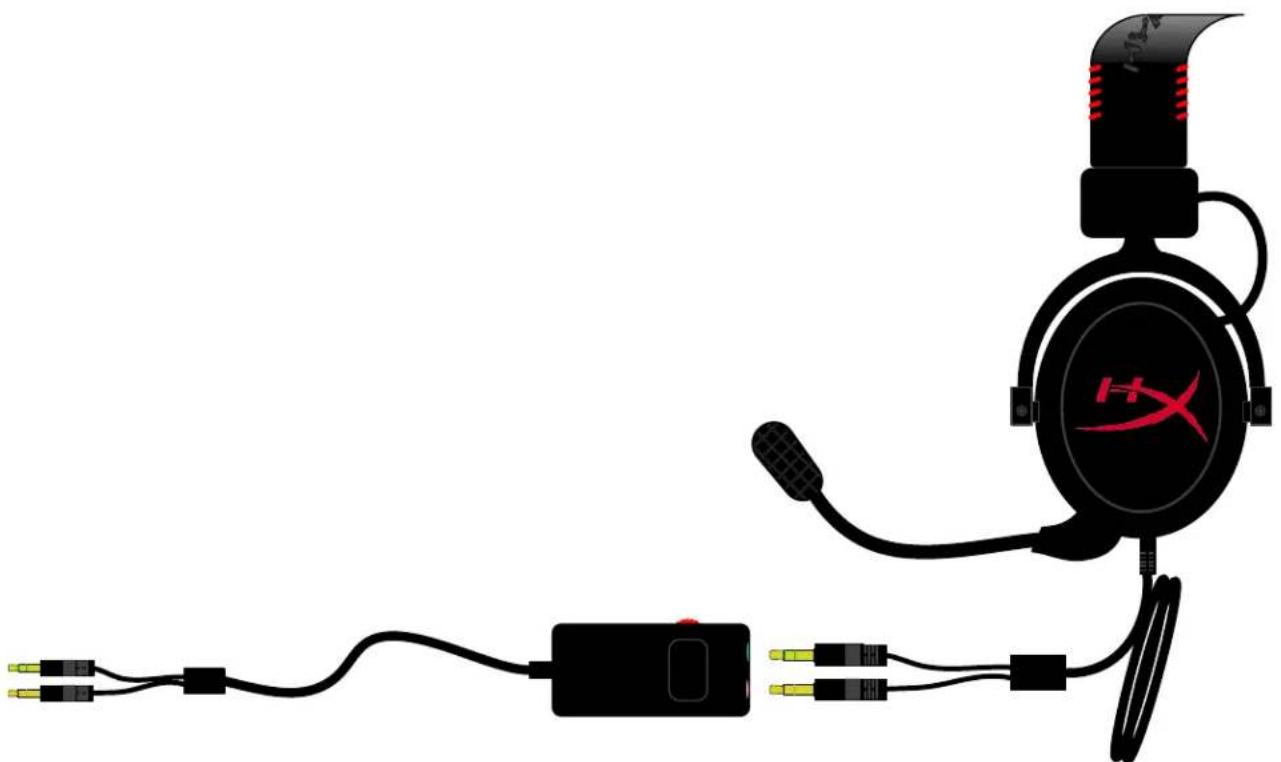
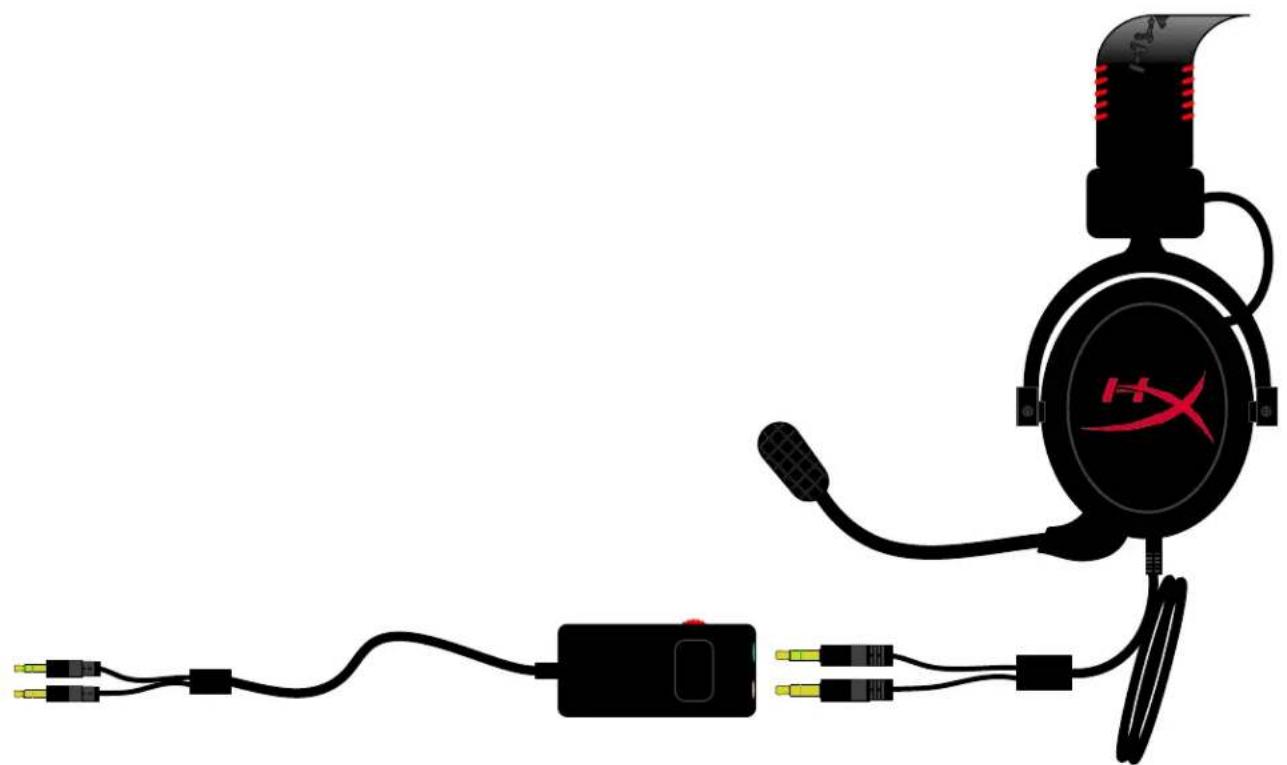
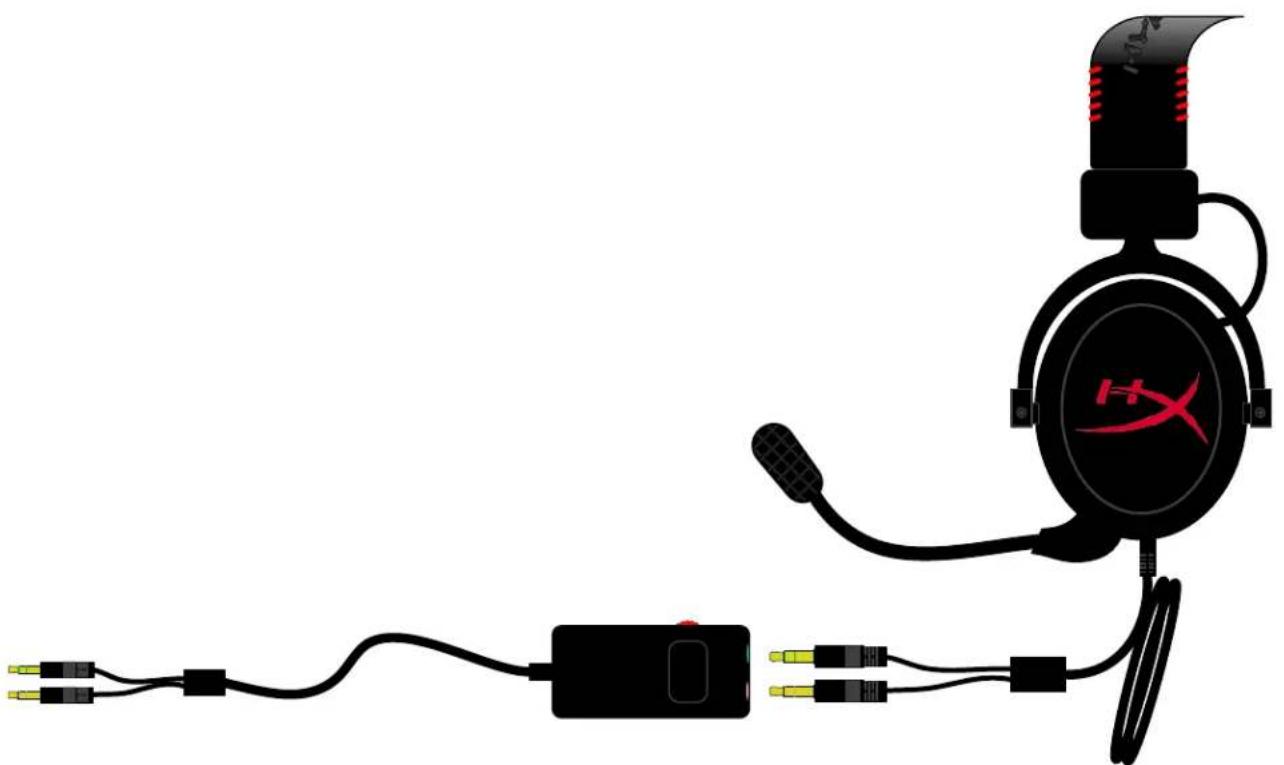
Usage (with Control Box)
Connect your headset to the control box that has both a headset jack and a microphone jack on it. The headset jack (green stripes) plugs into the green input port on the control box and the microphone jack (pink stripes) plugs into the pink input port on the control box. The control box cable then connects to your computer (or other output device w/ dual microphone and headset jacks) using the 3.5mm audio jacks on the end of the cable.
(Optional: The included extension cable (letter G on Page 4) may also be used to add length to the existing headset cable and control box.)

natural_image
Pure electrical circuit lines without any symbolsFigure 1.4 – Extension Cable (Optional)
natural_image
Illustration of a black H36 head with earplifier connected to a power adapter and cable (no text or symbols)Figure 1.5 – Using Control Box
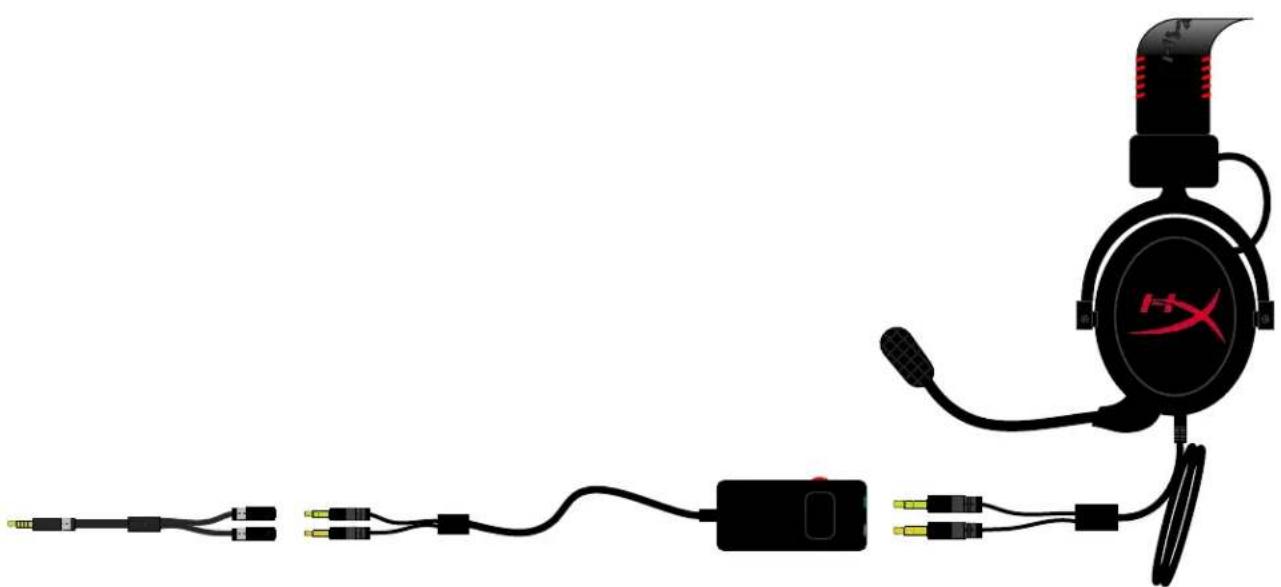
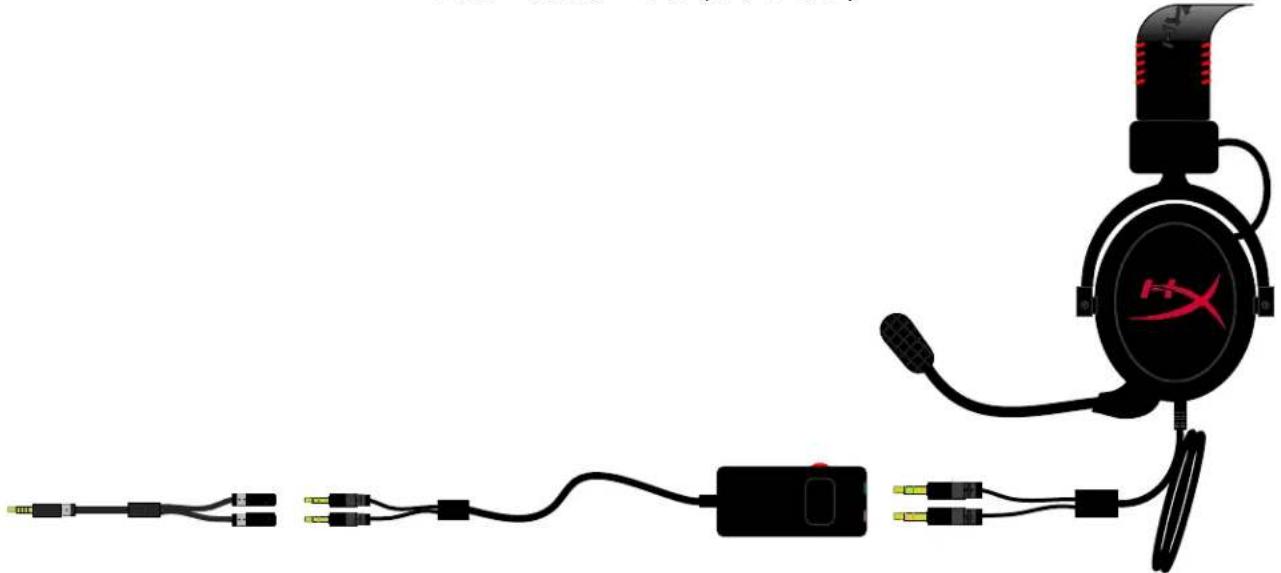
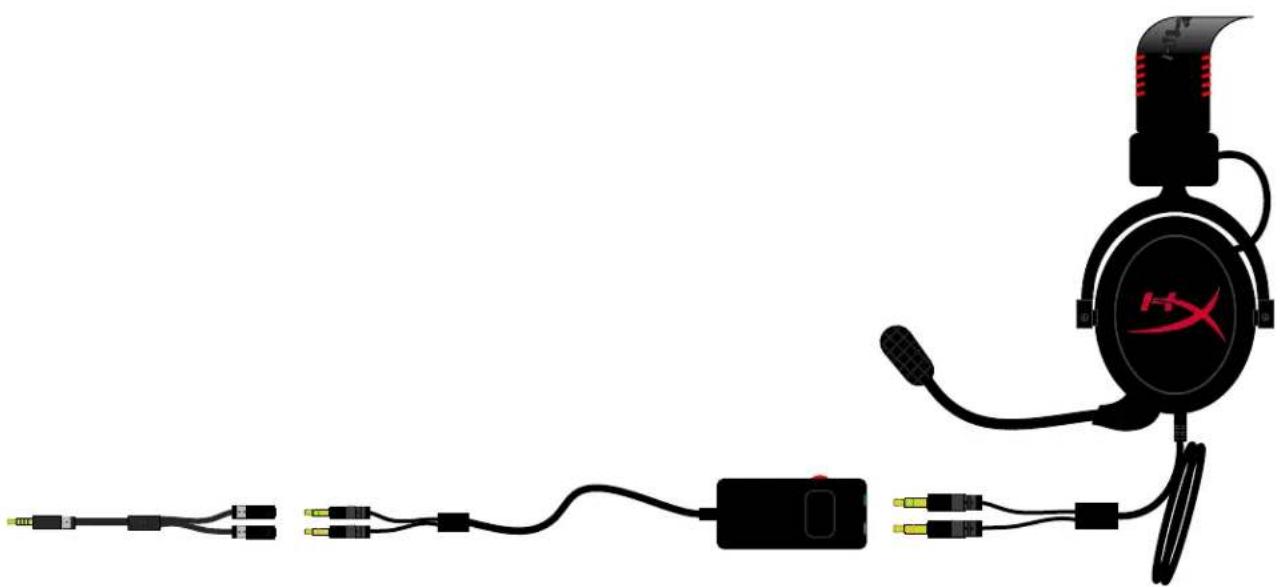
Usage (with Control Box and Headset Splitter Cable)
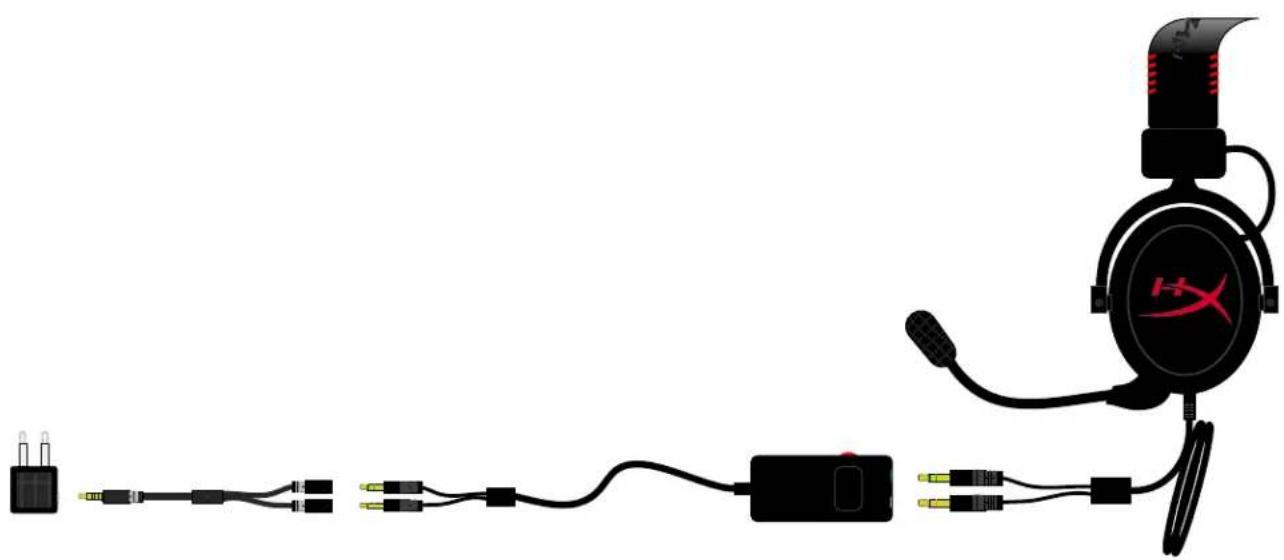
If you are connecting the headset to a laptop or mobile device (phone or tablet) that has a single audio jack, generally marked with an earphones or headset symbol 🔒
Connect the control box to the headset splitter cable (letter J on page 4.) This will convert the separate microphone and earphones jacks into a single 3.5mm audio jack as seen in Figure 1.8.

natural_image
Pure electrical connector diagram without any text, numbers, or symbolsFigure 1.6 - Headset Splitter Cable
(Optional: The included extension cable (letter G on Page 4) may also be used to add length to the existing headset cable and control box.)

natural_image
Pure electrical circuit lines without any symbolsFigure 1.7 - Extension Cable (Optional)
natural_image
Illustration of a headset connected to a power connector and cable, with no visible text or symbols.Figure 1.8 – Using Headset Splitter Cable
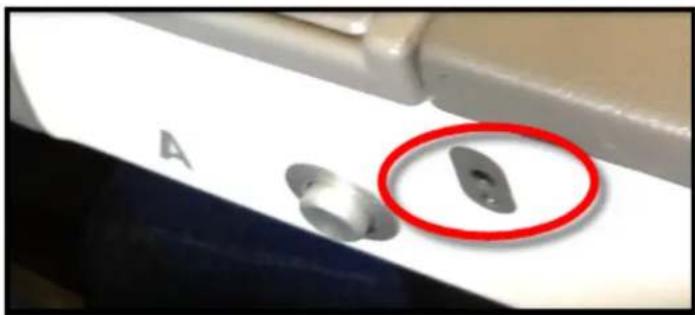
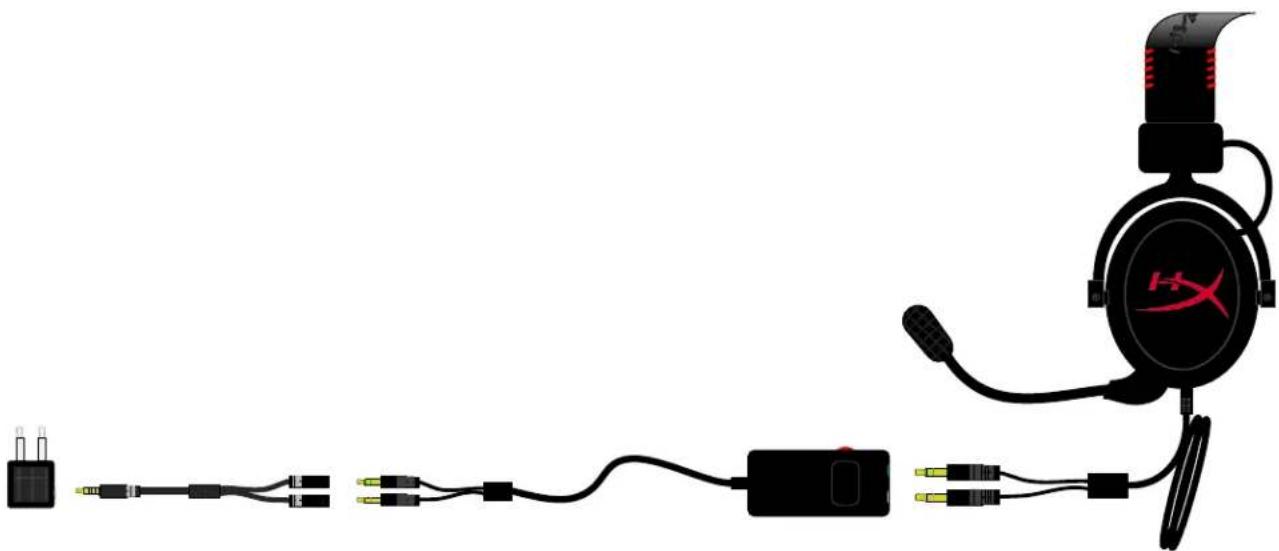
Usage (with Airplane Adapter)
If you are connecting the headset to an airplane jack (generally found on the armrest of a seat) as seen in Figure 1.9, connect the headset splitter cable to the airplane adapter (letter L on page 4) that came with your headset and plug the airplane adapter into the audio jack found on the armrest of your seat.
natural_image
Close-up of a white surface with metallic buttons and a red circle highlighting a small gray object (no text or symbols visible)Figure 1.9 – Input Jacks on an Airplane Seat (Armrest)
(Optional: The included extension cable (letter G on Page 4) may also be used to add length to the existing headset cable and control box.)

natural_image
Pure electrical circuit lines without any symbolsFigure 1.10 - Extension Cable (Optional)
natural_image
Diagram of a headset connected to various cable and connector components (no text or symbols visible)Figure 1.11 - Using Airplane Jack
Usage (PlayStation® 4)
For optimal use with PlayStation ^ 4 (PS4 ^ ), connect your HyperX Cloud headset to the PS4 game controller and follow these steps:
- Turn on your PS4 ^® game console.
- Navigate to the Settings Menu and select it.
- Highlight the 'Devices' menu option and select it.
- Scroll down to 'Audio Devices' and select it.
- Choose 'Output to Headphones' and select 'All Audio.'
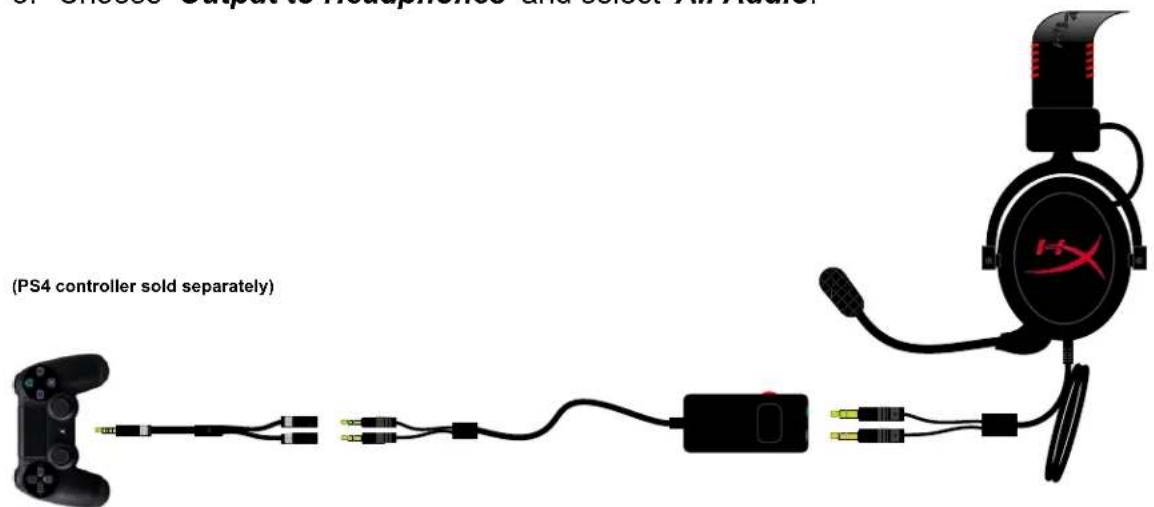
text_image
(PS4 controller sold separately)Figure 1.12a - Using with PS4®
If the PS4 user chooses to connect the headset to the PS4 game controller without using the volume control box (as seen here in Figure 1.12b), then the volume / audio level is controlled from within the game(s) being played.
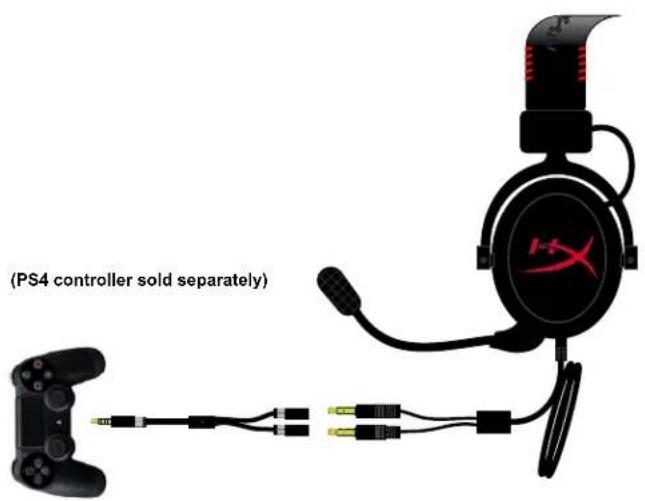
text_image
(PS4 controller sold separately)Figure 1.12b - Using with PS4®
Usage (Xbox ^® One)
To use the HyperX Cloud headset with Xbox ^® One, you will need the Xbox One adapter (sold separately) that plugs into the Xbox One controller (pictured below.) Because this adapter has built-in volume controls, you can remove the control box that came with your HyperX Cloud headset and connect directly to the "Y" cable as seen below in Figure 1.13.
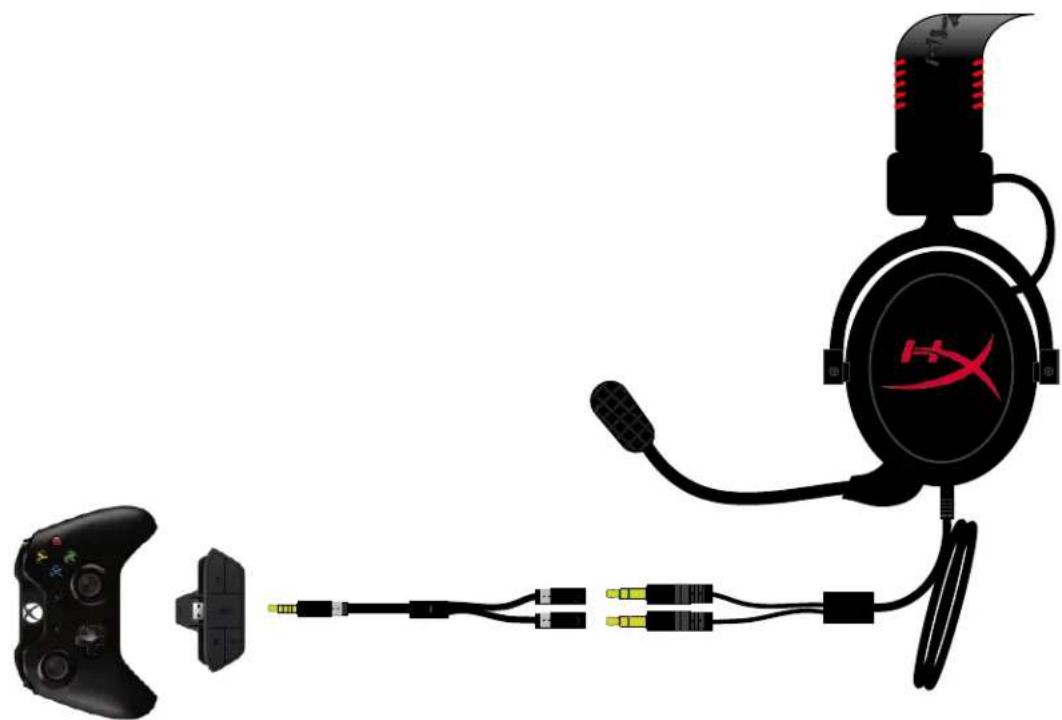
natural_image
Diagram of a game headset connected to a game controller and cable, showing wiring and connector (no text or symbols present)(Xbox controller and adapter sold separately)
Figure 1.13 - Using with Xbox® One
Usage with Mobile Device (Phone or Tablet)
To use the HyperX Cloud headset with a mobile device, simply plug the "Y" cable into the 3.5mm audio jack as seen below in Figure 1.14. (NOTE: Location of the audio jack may vary based on model and/or brand of mobile device you are using.) Volume of the conversation and/or music you are listening to can be adjusted using the red wheel located on the left side of the control box.
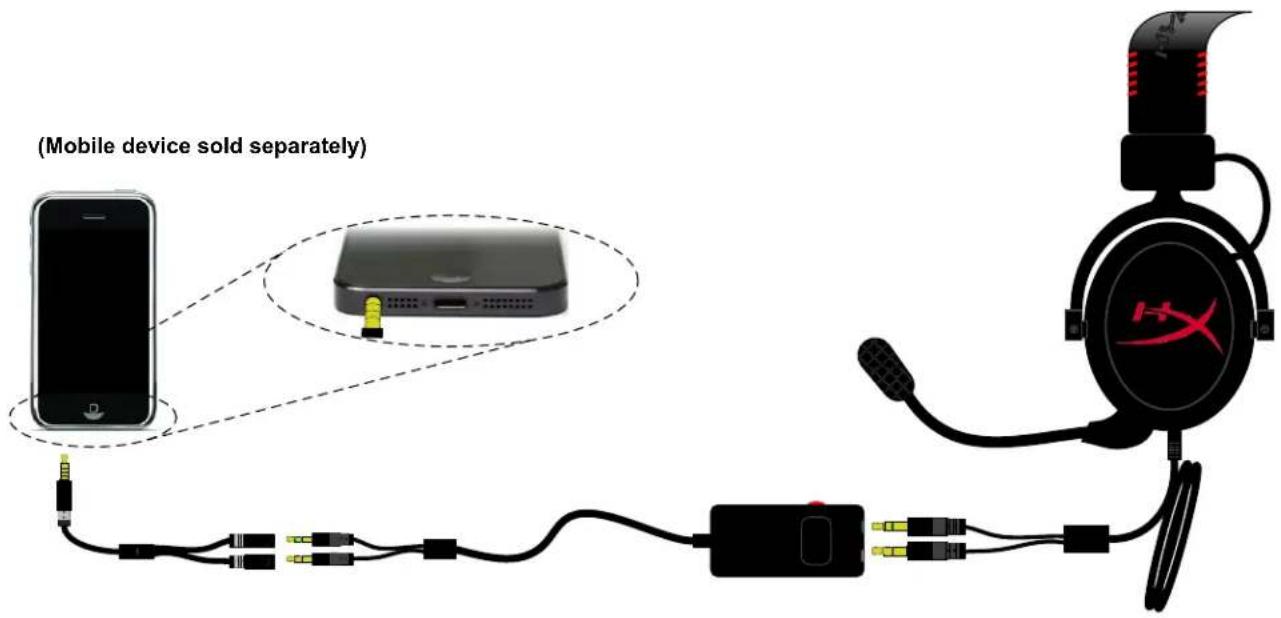
text_image
(Mobile device sold separately)Figure 1.14 - Using with mobile device (phone or tablet)
Auriculares HyperX Cloud

natural_image
Black HyperX headset with red strap, no visible text or symbols on the device itselftext_image
A B C D E F G H I J K L QPADtext_image
CORRECTO Cable divisor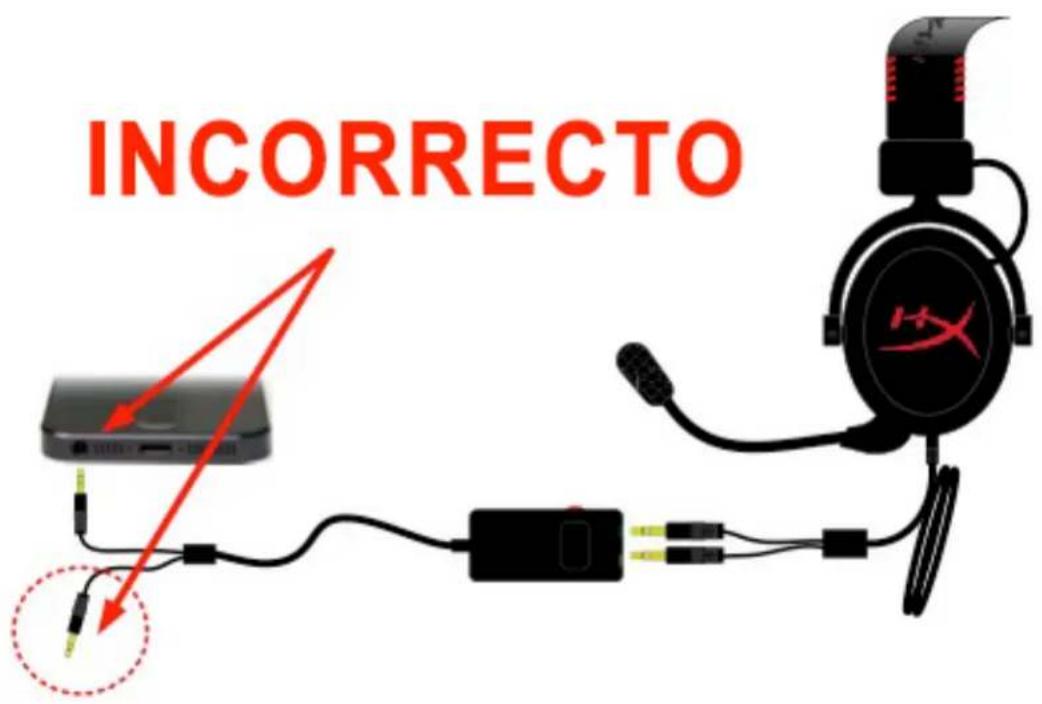
text_image
INCORRECTOnatural_image
Black and red H99 headset with earplugs and connector cables (no visible text or symbols)
natural_image
Pure electrical circuit lines without any symbolsnatural_image
Illustration of a black H36 head with earphones connected to a power adapter and cable (no text or symbols)natural_image
Pure electrical connector diagram showing two leads and a central connector (no text or symbols)Figura 1.6 – Cable divisor de auriculares
natural_image
Pure electrical circuit lines without any symbolsnatural_image
Illustration of a headset connected to a power adapter and cable, showing wiring and connector (no text or symbols)natural_image
Close-up of a white surface with metallic components and a red circle highlighting a small gray object (no text or symbols visible)natural_image
Black HYPER X-branded headphones with red dotted band (no text or symbols on the devices)text_image
A B C D E F G H I JK L QPADnatural_image
Black and red H99 headset with earbuds and connector, shown without any text or symbols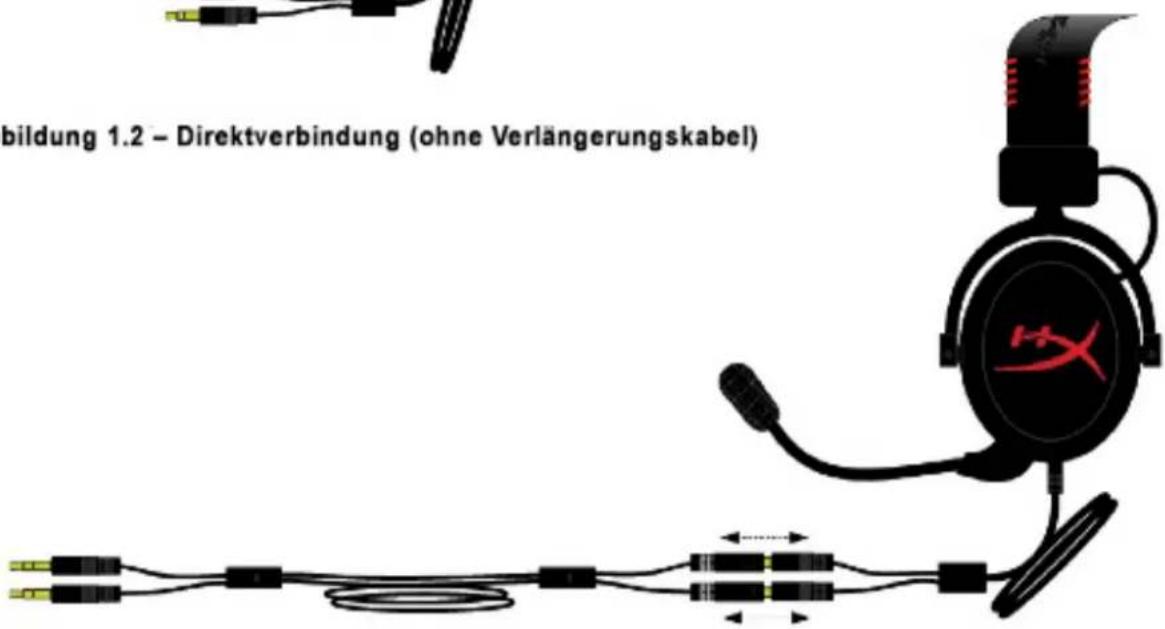
natural_image
Pure electrical circuit lines without any symbolsnatural_image
Illustration of a black H36 head with earphones connected to a power adapter and cable (no text or symbols)natural_image
Pure electrical connector diagram showing two black cables with a yellow terminal, no text or symbols presentnatural_image
Pure electrical circuit lines without any symbolsnatural_image
Diagram of a headset connected to a power adapter and cable, showing wiring and connector (no text or symbols)natural_image
Close-up of a white surface with metallic buttons and a red circle highlighting a small gray object (no text or symbols visible)natural_image
Pure electrical circuit lines without any symbolsnatural_image
Diagram of a headset connected to various cable and connector components (no text or symbols visible)natural_image
Black HyperX headband with red dotted band and logo (no text or symbols on the headset itself)natural_image
Product line drawing of a hockey headset and rear gear assembly (no text or symbols)Figure 1.1 - Contenu
Fonctionnalités :
text_image
A B C D E F G H I JK L QPADnatural_image
Black and red headset with earbuds and connector, no visible text or symbols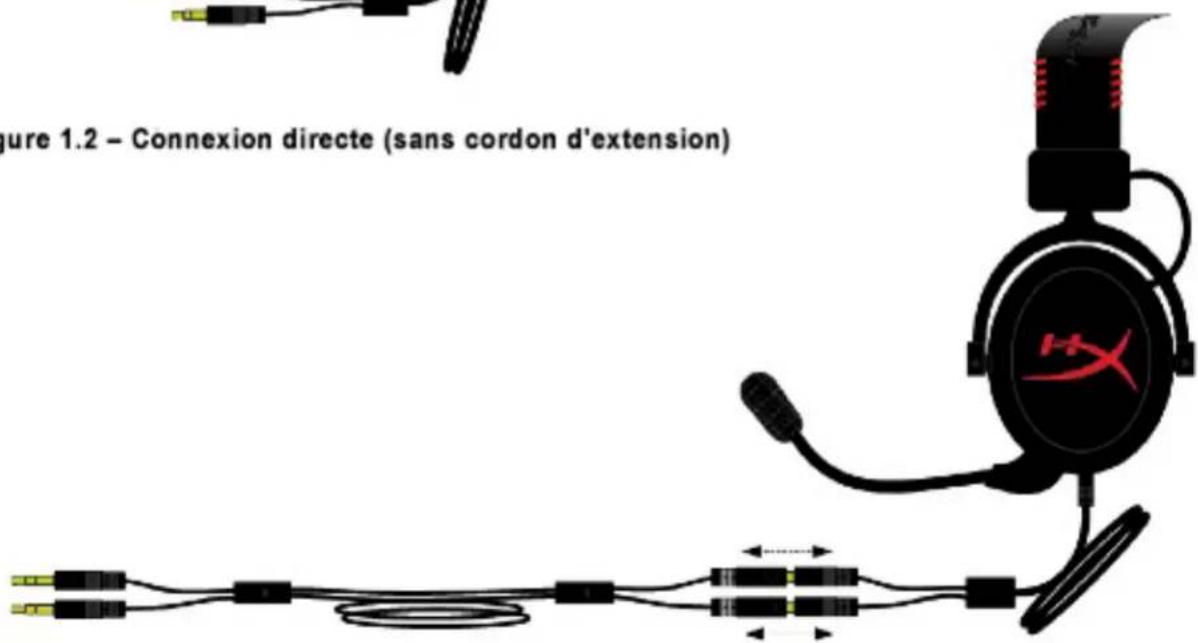
text_image
Figure 1.2 – Connexion directe (sans cordon d'extension)natural_image
Pure electrical circuit lines without any symbolsnatural_image
Illustration of a black H2O head with red logo connected to a black headset and cable, showing wiring (no text or symbols)natural_image
Pure electrical connector diagram showing two leads and a cable (no text or symbols)Figure 1.6 – Cordon convertisseur audio
natural_image
Pure electrical circuit lines without any symbolsnatural_image
Illustration of a headset connected to a battery and cable, showing wiring and connector (no text or symbols)natural_image
Close-up of a white surface with two metallic objects and a red circle highlighting a small dark object (no text or symbols visible)natural_image
Pure electrical circuit lines without any symbolsnatural_image
Diagram of a headset connected to various cable and connector components (no text or symbols visible)natural_image
Black HyperX headset with red strap, no visible text or symbols on the device itselfnatural_image
Product line drawing of a hockey headset and accessories including headphones, earphones, and a branded bag (no text or symbols)text_image
A B C D E F G H I JK L QPADnatural_image
Black and red H3K headset with ear connector and cable, no visible text or symbols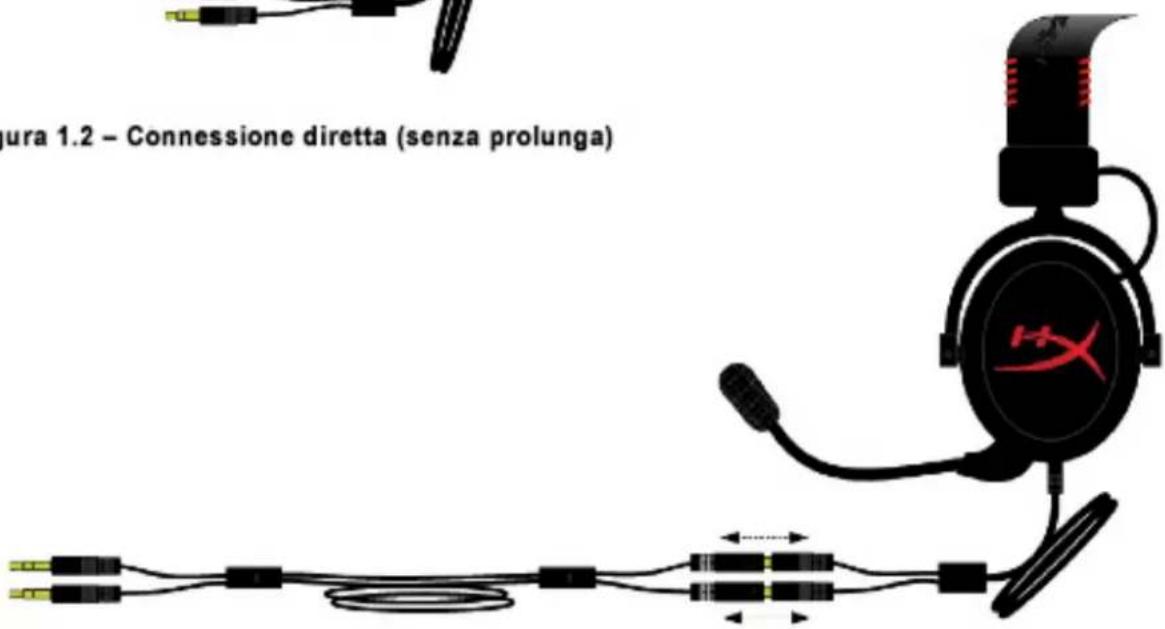
natural_image
Pure electrical circuit lines without any symbolsnatural_image
Illustration of a black headlamp with red logo connected to a power adapter and cable (no text or symbols)natural_image
Pure electrical connector diagram showing two black cables with gold connectors (no text or symbols)natural_image
Pure electrical circuit lines without any symbolsnatural_image
Illustration of a headset connected to a power adapter and cable, with no visible text or symbolsnatural_image
Close-up of a white surface with metallic components and a red circle highlighting a small gray object (no text or symbols visible)natural_image
Pure electrical circuit lines without any symbolsnatural_image
Diagram of a headset connected to various cable and connector components (no text or symbols)natural_image
Black HYPER VR headset with red strap, no visible text or symbols on the device itselftext_image
A B C D E F G H I JK L QPADtext_image
CORRETO Cabo splitter INCORRETOnatural_image
Black and red headset with a stylus logo, shown with cable connectors (no text or symbols visible)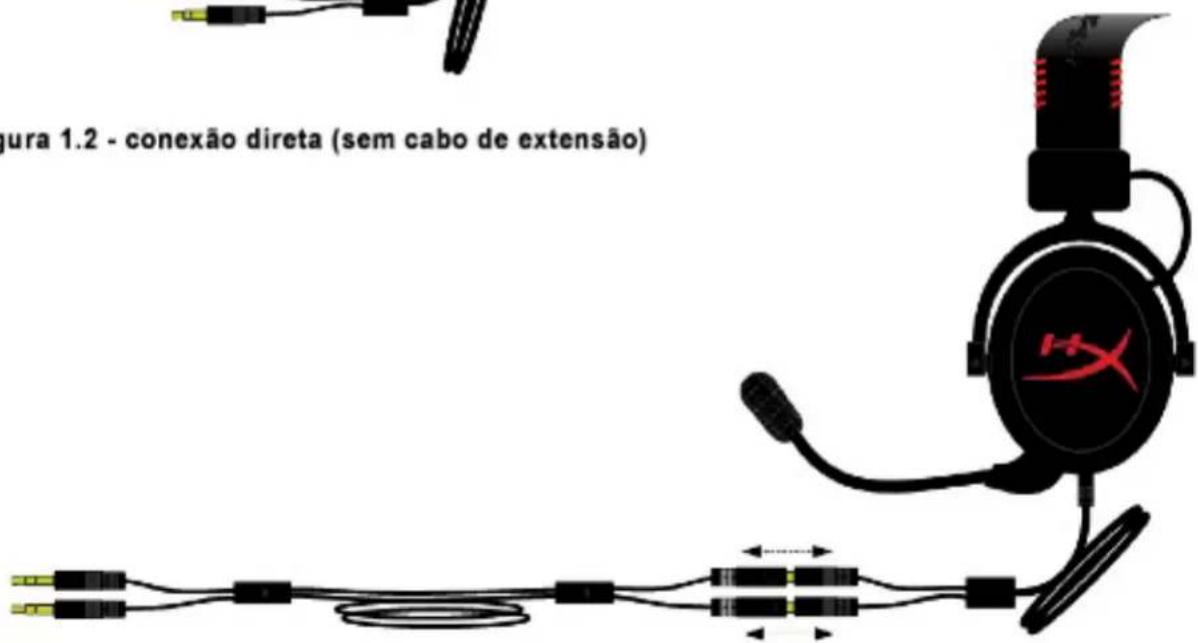
natural_image
Pure electrical circuit lines without any symbolsnatural_image
Illustration of a black H36 head with earphones connected to a power adapter and cable (no text or symbols)natural_image
Pure electrical connector diagram showing a multi-pin cable with terminal connectors (no text or symbols)natural_image
Pure electrical circuit lines without any symbolsnatural_image
Illustration of a headset connected to a power adapter and cable, with no visible text or symbolsnatural_image
Close-up of a white surface with two metallic objects and a red circle highlighting a small dark object (no text or symbols visible)natural_image
Pure electrical circuit lines without any symbolsnatural_image
Diagram of a headset connected to various cable and connector components (no text or symbols)natural_image
Black HyperX headset with red strap, no visible text or symbols on the device itselfnatural_image
Product display of a smart earless device with headphones, earplands, and accessories (no visible text or symbols)text_image
A B C D E F G H I JK L QPADnatural_image
Black and red HX headset with earbuds and connector, shown without any text or symbols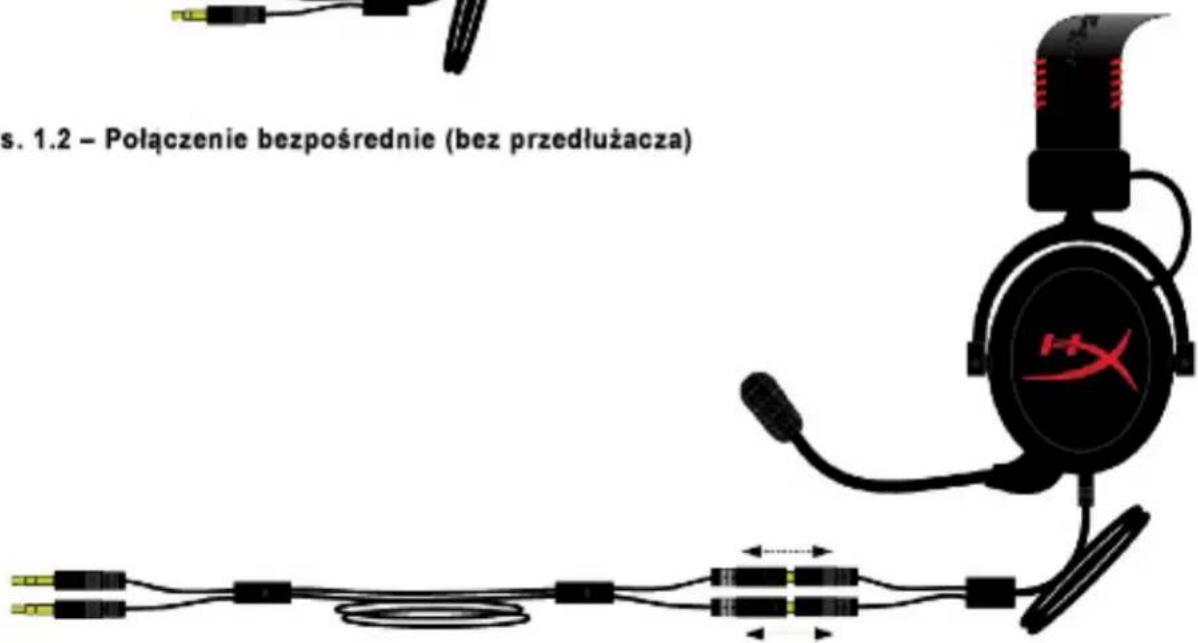
natural_image
Pure electrical circuit lines without any symbolsnatural_image
Illustration of a black H36 head with earphones connected to a power adapter and cable (no text or symbols)natural_image
Pure electrical connector diagram showing two black cables with gold connectors and a yellow terminal (no text or symbols)natural_image
Pure electrical circuit lines without any symbolsnatural_image
Illustration of a HX head with connected audio and cable components (no text or symbols)natural_image
Close-up of a white surface with metallic components and a red circle highlighting a small gray object (no text or symbols visible)natural_image
Black HyperX headband with red dotted band, no visible text or symbols on the device itselfnatural_image
Product line drawing of a hockey headset and rear gear assembly (no text or symbols)text_image
A B C D E F G H I JK L QPADnatural_image
Black and red headset with earbuds and connector, no visible text or symbols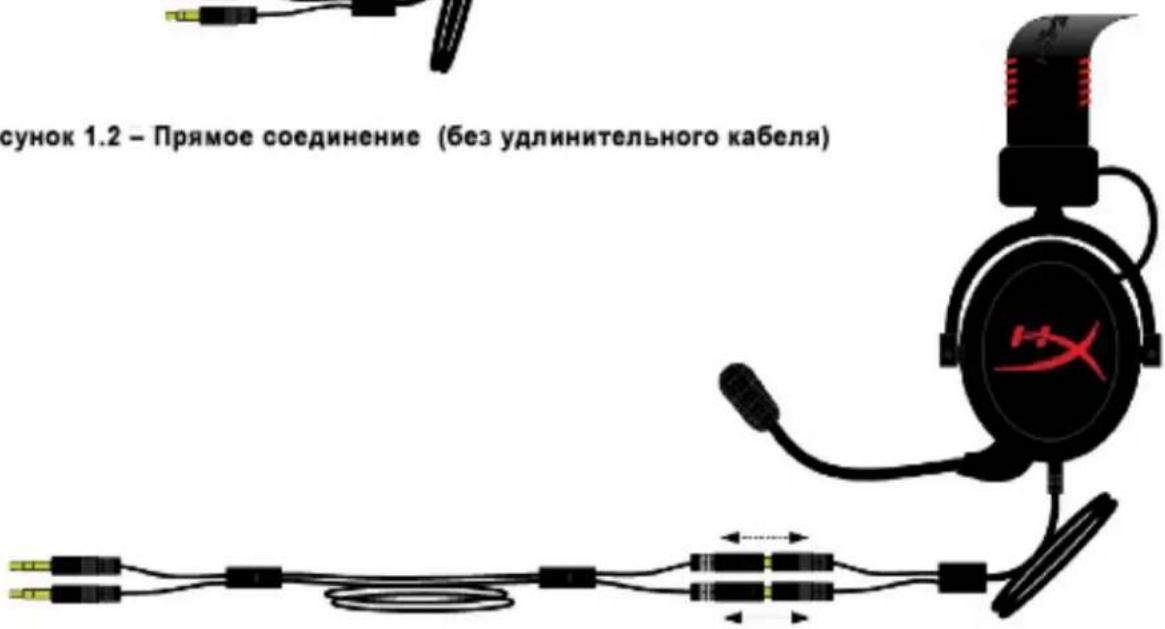
natural_image
Pure electrical circuit lines without any symbolsnatural_image
Illustration of a black H36 head with earphones connected to a power adapter and cable (no text or symbols)natural_image
Pure electrical connector diagram showing two black cables with a yellow terminal, no text or symbols presentnatural_image
Pure electrical circuit lines without any symbolsnatural_image
Illustration of a headset connected to a power connector and cable, showing wiring and connectors (no text or symbols)natural_image
Close-up of a white surface with two metallic objects and a red circle highlighting a small gray object (no text or symbols visible)natural_image
Pure electrical circuit lines without any symbolsnatural_image
Diagram of a headset connected to various cable and connector components (no text or symbols visible)natural_image
Black HyperX headband with red dotted band, no visible text or symbols on the device itselfParça Numaraları: KHX-H3CL/WR (Siyah) KHX-H3CLW (Beyaz)
Giriş
natural_image
Product line showing various audio equipment including headphones, earphones, and a portable device with red-lit highlights (no text or symbols visible)text_image
A B C D E F G H I JK L QPADnatural_image
Black and red headset with microphone and connector, no visible text or symbols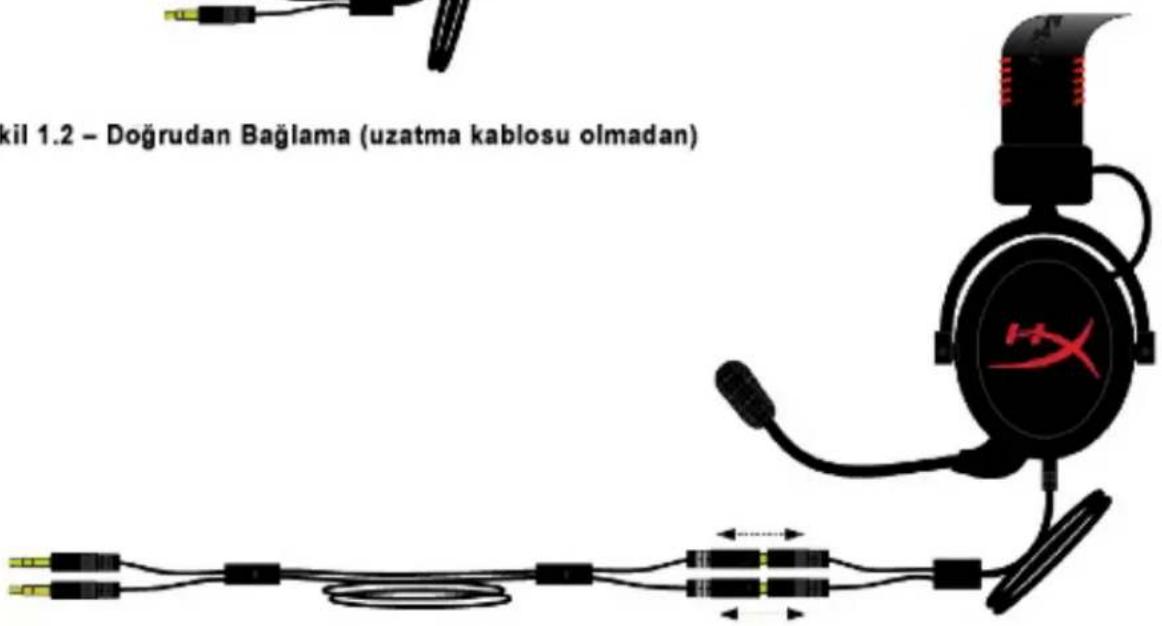
natural_image
Pure electrical circuit lines without any symbolsnatural_image
Illustration of a black H36 head with earphones connected to a power adapter and cable (no text or symbols)natural_image
Pure electrical connector diagram showing two black cables connected by a yellow cable (no text or symbols)natural_image
Pure electrical circuit lines without any symbolsnatural_image
Illustration of a headset connected to two USB cables, one with a microphone and cable, the other with a battery (no text or symbols present)natural_image
Close-up of a white surface with two metallic clips and a red circle highlighting a small gray object (no text or symbols visible)natural_image
Pure electrical circuit lines without any symbolsnatural_image
Diagram of a headset connected to various cable and connector components (no text or symbols visible)natural_image
Black HYPER headphones with red textured strap, no visible text or symbols on the device itselftext_image
Product diagram of a hockey headset with labeled parts including headsets, connectors, and a bag with red circular highlights.図 1.1 - パッケージの内容
特長:
•T.H.D : 2% at f = 1 kHz
text_image
A B C D E F G H I JK L GPADnatural_image
Black and red HX99 headset with earbuds and connector (no text or symbols visible)natural_image
Pure electrical circuit lines without any symbols図1.4-延長ケーブル(オプション)
natural_image
Illustration of a black H36 head with earphones connected to a power adapter and cable (no text or symbols)図1.5-コントロールボックスの使用
natural_image
Pure electrical connector diagram showing two black cables connected by a yellow cable (no text or symbols)natural_image
Pure electrical circuit lines without any symbols図1.7-延長ケーブル(オプション)
natural_image
Illustration of a HX head with connected audio and cable components (no text or symbols)natural_image
Close-up of a white surface with two small metallic clips and a red circle highlighting a small gray object (no text or symbols visible)natural_image
Pure electrical circuit lines without any symbolsnatural_image
Diagram of a headset connected to various cable and connector components (no text or symbols)図1.11-航空機内ジャックの使用
natural_image
Black HYPER VR headset with red strap, no visible text or symbols on the device itselftext_image
A B C D E F G H I J K L QPADnatural_image
Black and red HX3 headset with earbuds and connector (no text or symbols visible)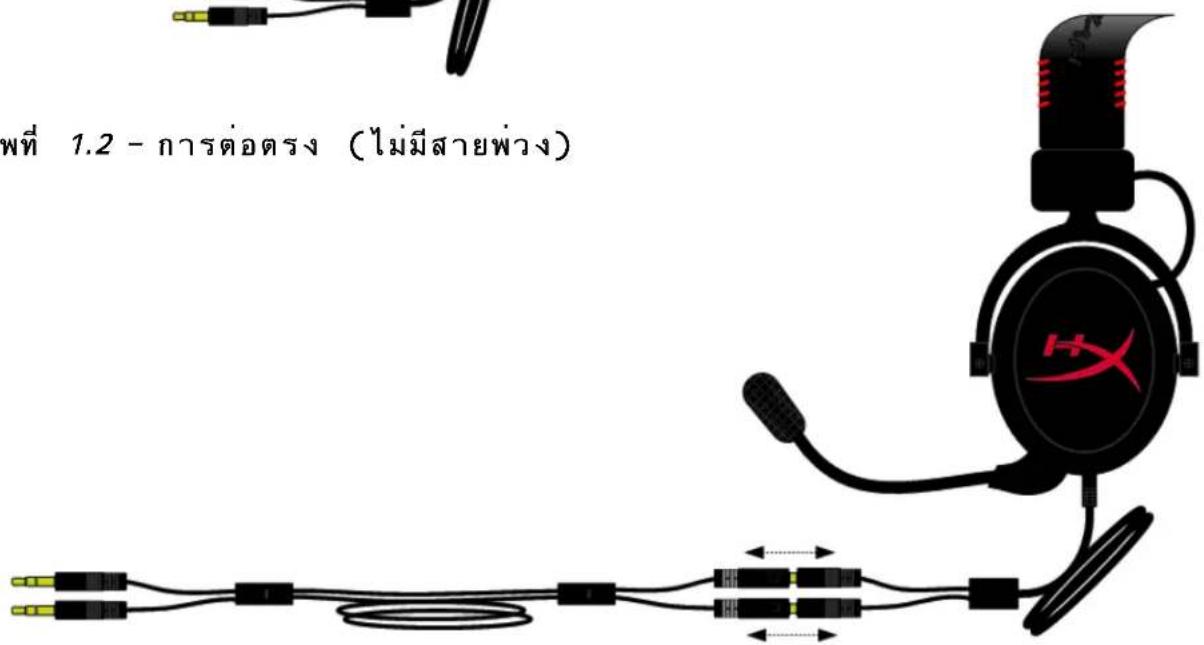
natural_image
Pure electrical circuit lines without any symbolsnatural_image
Illustration of a black headlamp connected to a power adapter and cable, with no visible text or symbols.natural_image
Pure electrical connector diagram showing two black cables connected by a yellow cable (no text or symbols)natural_image
Pure electrical circuit lines without any symbolsnatural_image
Illustration of a black H3X headset connected to two USB cable connectors (no text or symbols)natural_image
Close-up of a white surface with metallic clips and a red circle highlighting a small dark object (no text or symbols visible)natural_image
Pure electrical circuit lines without any symbolsnatural_image
Diagram of a headset connected to various cable and connector components (no text or symbols)natural_image
Illustration of a game headset connected to a game controller and cable, showing wiring and connector (no text or symbols)natural_image
Black HYPER VR headset with red dotted band, no visible text or symbols on the device itselfnatural_image
Product line drawing of a black headset with earphones, connectors, and accessories (no text or symbols)natural_image
Black and red HX36 headset with earbuds and connector (no text or symbols visible)
natural_image
Pure electrical circuit lines without any symbolsnatural_image
Illustration of a headset connected to a power adapter and cable, with no visible text or symbols.natural_image
Pure electrical connector diagram showing two black cables with gold leads and terminal connectors (no text or symbols)natural_image
Pure electrical circuit lines without any symbolsnatural_image
Illustration of a black Sony Headset connected to a power adapter and cable, with no visible text or symbols.natural_image
Close-up of a white surface with two small metallic clips and a red circle highlighting a small gray object (no text or symbols visible)natural_image
Pure electrical circuit lines without any symbolsnatural_image
Diagram of a headset connected to various cable and connector components (no text or symbols visible)natural_image
Diagram showing a game controller connected to a headset via cable and connector (no text or symbols)natural_image
Product line diagram showing a game controller connected to a Sony Max headset via cable and connector (no text or symbols)natural_image
Diagram of a game headset connected to a game controller and cable, showing components like headsets and connectors (no text or symbols present)text_image
Diagram showing connections between a smartphone, a network device, and an HTC head with H-X logonatural_image
Black HYPER VR headset with red strap, no visible text or symbols on the device itselfnatural_image
Product line drawing of a headset and charging device with labeled components (no readable text or symbols)text_image
A B C D E F G H I J K L QPADnatural_image
Black and red HX36 headset with earbuds and connector (no text or symbols visible)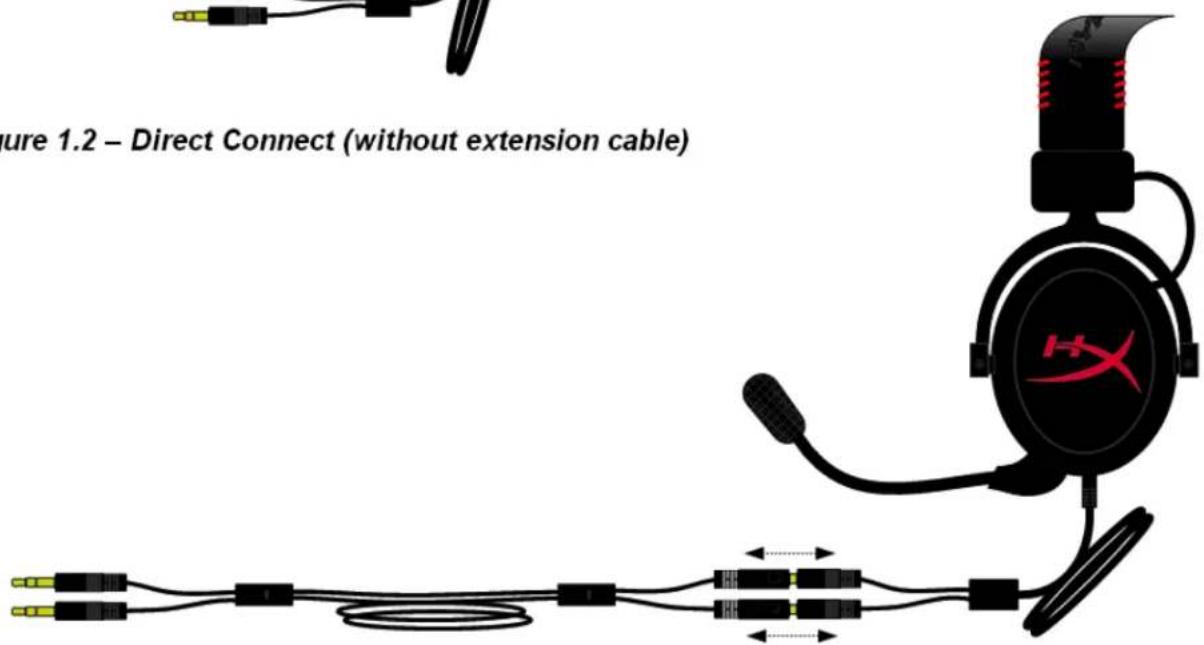
text_image
Figure 1.2 – Direct Connect (without extension cable)Figure 1.3 - Direct Connect (with 2-meter extension cable)
natural_image
Pure electrical circuit lines without any symbolsnatural_image
Illustration of a black H36 head with earphones connected to a power adapter and cable (no text or symbols)natural_image
Pure electrical connector diagram showing two black cables with gold connectors (no text or symbols)natural_image
Pure electrical circuit lines without any symbolsnatural_image
Illustration of a black HX head with audio jack connected to a power adapter and cable, showing wiring (no text or symbols)natural_image
Close-up of a white surface with metallic oval shapes and a red circle highlighting a small dark object (no text or symbols visible)natural_image
Pure electrical circuit lines without any symbolsnatural_image
Diagram of a headset connected to various cable and connector components (no text or symbols visible)natural_image
Black and red HYPER headphones with a red strap, no visible text or symbols on the devices themselves.text_image
Product catalog image showing headset, earplugs, and accessories with Chinese labels图1.1-包装内容
特性:
text_image
A B C D E F G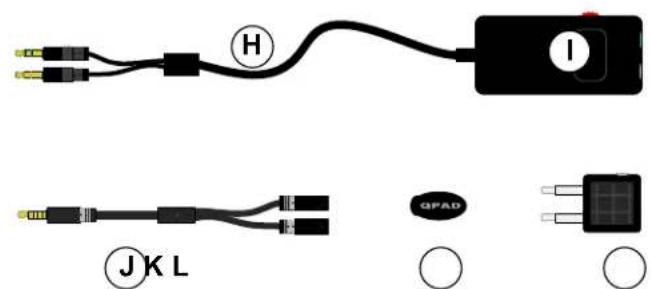
text_image
H I JK L GPADnatural_image
Black and red HX36 headset with earbuds and connector (no text or symbols visible)natural_image
Pure electrical circuit lines without any symbols图1.4-延长线(可选)
natural_image
Illustration of a black H36 head with red logo connected to a black headset and cable, showing wiring (no text or symbols)图1.5-使用控制盒
使用(带控制盒与耳机分配器线)
natural_image
Pure electrical connector diagram showing two black cables connected by a yellow cable (no text or symbols)图1.6-耳机分配器线
natural_image
Pure electrical circuit lines without any symbols图1.7-延长线(可选)

natural_image
Illustration of a HX head with connected audio and ear components (no text or symbols)图1.8-使用耳机分配器线
使用(带飞机适配器)
natural_image
Close-up of a white surface with metallic components and a red circle highlighting a small gray object (no text or symbols visible)图1.9-飞机座椅(扶手)上的输入插孔
natural_image
Pure electrical circuit lines without any symbols图1.10-延长线(可选)
natural_image
Diagram of a headset connected to various cable and connector components (no text or symbols)图1.11-使用飞机插孔
natural_image
Black HyperX headband with red dotted band and logo (no text or symbols on the headset itself)text_image
F A B G D C E H I JK L GPADnatural_image
Black and red HX36 headset with earbuds and connector (no text or symbols visible)圖 1.2-直接連接(無延長線)
natural_image
Pure electrical circuit lines without any symbols圖 1.4 - 延長線 (選用)
natural_image
Illustration of a black H36 head with red logo connected to a power adapter and cable (no text or symbols)圖1.5-使用控制器
natural_image
Pure electrical circuit lines without any symbols圖 1.7 – 延長線 (選用)
natural_image
Illustration of a black H2X headset connected to a power connector and cable, with no visible text or symbols.圖 1.8 – 使用耳機分接線
使用方式(搭配飛機專用轉接頭)
natural_image
Close-up of a white surface with two small metallic objects and a red circle highlighting a dark object (no text or symbols visible)natural_image
Pure electrical circuit lines without any symbols圖 1.10 – 延長線 (選用)

natural_image
Diagram of a headset connected to a power adapter and cable, showing wiring and connector (no text or symbols)圖 1.11 – 使用飛機專用轉接頭