MP 210 LUX - Manicure/Pedicure Device BEURER - Free user manual and instructions
Find the device manual for free MP 210 LUX BEURER in PDF.
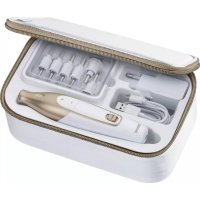
| Product type | 3-in-1 manicure/pedicure station with drill, suction and UV/LED lamp |
| Brand | Beurer |
| Model | MP 210 LUX |
| Base dimensions | 19 x 19 x 6.5 cm |
| Storage drawer dimensions | 10 x 5.5 x 2.5 cm |
| Weight | Approx. 1,333 g |
| Power supply | 100-240 V~, 50-60 Hz, 50 W |
| UV/LED lamp wavelength | 365-405 nm |
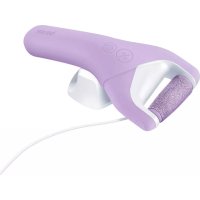
| Main functions | Nail drill with 10 professional attachments, integrated suction, UV/LED drying with timer (30/60/90 s), auto shut-off after 30 min, adjustable speed, reversible rotation direction |
| Package contents | 1 station, 1 nail drill, 10 attachments, 1 brush, 1 power cord, 2 spare filters, 1 instruction manual |
| Care and cleaning | Clean the base with a slightly damp cloth; attachments can be cleaned with an alcohol-dampened cloth; do not immerse; replace filters every 6 months |
| Safety | Use only on human nails; do not use in water; auto shut-off in case of excessive pressure; do not look directly at UV light; not recommended for pregnant women |
| Spare parts and repairability | Professional attachments (ref. 110163), spare filters (ref. 110168); repairs only by customer service or an authorized technician |
| Warranty | See the supplied warranty card |
Frequently Asked Questions - MP 210 LUX BEURER
User questions about MP 210 LUX BEURER
0 question about this device. Answer the ones you know or ask your own.
Ask a new question about this device
Download the instructions for your Manicure/Pedicure Device in PDF format for free! Find your manual MP 210 LUX - BEURER and take your electronic device back in hand. On this page are published all the documents necessary for the use of your device. MP 210 LUX by BEURER.
USER MANUAL MP 210 LUX BEURER
natural_image
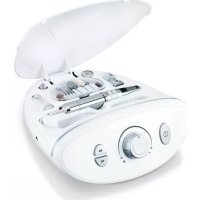
Exterior view of a beurer air purifier with visible fan grille and control panel (no text or symbols on device body)DE Maniküre-/Pedikürestation 3-in-1 Gebrauchsanweisung ....4
EN 3-in-1 manicure/pedicure station Instructions for use....16
natural_image
Illustration of an open book with a geometric envelope and horizontal lines, no text or symbols present.EN Fold out page 3 before reading the instructions for use.
16 UV/LED Lampe Symbol
17 Nagelfräß-Symbol
natural_image
Pure diagram of a mechanical component with an arrow indicating direction (no text or symbols)natural_image
Exterior view of a modern office building (no signage)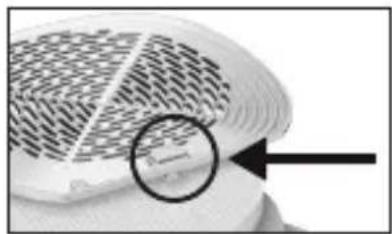
natural_image
Close-up of a patterned fabric with a magnified circular detail showing a small mark (no text or symbols)https://www.beurer.com/conformity
13. GARANTIE
Read these instructions for use carefully. Follow the warnings and safety notes. Keep these instructions for use for future reference. Make the instructions for use accessible to other users. If the product is passed on, provide the instructions for use to the next user as well.
CONTENTS
- Included in delivery 18
- Signs and symbols....18
- Intended purpose....19
- Warnings and safety notes....19
- Device description....20
- Initial use 21
- Usage 21
7.1 Initial steps for cutting nails 21
7.2 Extraction function....22
7.3 Cleaning the filter 22
7.4 Drying/curing your nails 22
7.5 Storage drawer.... 23
7.6 Overview of attachments....23 - Cleaning and maintenance....24
8.1 Cleaning 24 - Accessories and/or replacement parts 24
- What if there are problems? 24
- Disposal....25
- Technical specifications 25
- Guarantee....25
WARNING
- Use the device exclusively on human nails for curing UV or LED nail gels.
- The device must only be used for the purpose for which it was designed and in the manner specified in these instructions for use. Any form of improper use can be dangerous.
- The device is only intended for domestic/private use, not for commercial use.
- This device may be used by children over the age of 8 years and by people with reduced physical, sensory or mental capabilities or a lack of experience or knowledge, provided that they are supervised or have been instructed on how to use the device safely, and are fully aware of the risks of using the device.
- Children must not play with the device.
- Cleaning and user maintenance must not be performed by children unless supervised.
- Do not use the device if it shows signs of damage or does not function properly. In these cases, contact Customer Services.
- Repairs must only be carried out by Customer Services or authorised retailers.
- If the mains connection cable of this device is damaged, it must be disposed of. If it cannot be removed, the device must be disposed of.
- Under no circumstances should you open or repair the device yourself. If you do so, it may no longer function correctly. Failure to comply will invalidate the guarantee.
1. INCLUDED IN DELIVERY
Check that the exterior of the cardboard delivery packaging is intact and make sure that all contents are included in the delivery. Before use, ensure that there is no visible damage to the device and accessories and/or replacement parts and that all packaging material has been removed. If you have any doubts, do not use the device and contact your retailer or the specified Customer Service address.
• 1 manicure/pedicure station
- 1 nail cutter
- 10 attachments
- 1 brush
- 1 Mains cable
- 2 replacement filter
• 1 copy of these instructions for use
2. SIGNS AND SYMBOLS
The following symbols are used on the device, in these instructions for use, on the packaging and on the type plate for the device:
WARNING
Indicates a potentially impending danger. If it is not avoided, there is a risk of death or serious injury.
NOTICE
Indicates a potentially harmful situation. If it is not avoided, the device or something in its vicinity may be damaged.

Product information
Note on important information

Read the instructions
The electronic device must not be disposed of with household waste

Manufacturer

Protection class II device

For indoor use only
Marking to identify the packaging material.
A = material code, B = material number:
1-7 = plastics, 20-22 = paper and cardboard
Importer

CE labelling
This product satisfies the requirements of the applicable European and national directives.

Conformity assessed marking for the United Kingdom

Alternating current

The products demonstrably meet the requirements of the Technical Regulations of the EAEU

Separate the product and packaging elements and dispose of them in accordance with local regulations.

Caution, hot surface
3. INTENDED PURPOSE
Use the device exclusively to treat hands (manicure) and feet (pedicure).
The device is only intended for the purpose described in these instructions for use. The manufacturer is not liable for damage resulting from improper or careless use. The device is suitable for private use, and not for medical or commercial purposes.
4. WARNINGS AND SAFETY NOTES
WARNING
- Check the results regularly during the treatment. It is particularly important for diabetics to do so as they have a lower sensitivity to pain and could injure themselves more easily. The 10 professional attachments supplied with the MP 210 LUX are in principle suitable for diabetics. However, please use with particular care and do not use at high speed. If you have any doubts, consult your doctor.
- This device may only be used for the purpose for which it is designed and in the manner specified in the instructions for use. Any form of improper use can be dangerous.
- The device may heat up faster during prolonged, intensive use, for example when removing calluses on the feet. Allow the device to cool down for a relatively long time between individual applications to prevent skin burns. For your own safety, continuously check the heat generated by the device. This applies in particular to persons that are not as sensitive to heat as others.
- Keep the device and mains cable away from water!
-
Before use, ensure that the device and accessories show no visible damage. If you have any doubts, do not use the device and contact your retailer or the specified Customer Service address.
-
Please check the device frequently for signs of any wear and tear or damage. If there are signs indicating the above or if this device was used improperly, it must be returned to the manufacturer or retailer before further use.
- In the event of defects and operational faults, switch off the device immediately.
- Repairs must only be carried out by Customer Services or authorised retailers. Never attempt to repair the device yourself! Failure to comply will invalidate the guarantee.
- Only use the device with the supplied accessories.
- Always monitor the device when it is in operation.
- Store the device out of the reach of children. The device is not suitable for children.
- Never use the device under a blanket, pillow or cushion, etc.
- Do not use the device for periods longer than 30 minutes without a pause. After this period, have a break of at least 30 minutes to prevent the motor from overheating.
- Do not use the device while bathing or showering. Do not store the device in areas where it may fall into the bathtub or wash basin.
- Immediately disconnect the mains plug if the device has fallen into water
- Never pull the mains plug out of the socket using the mains cable or with wet hands.
- Do not use the device if it is visibly damaged, is not working properly or if the mains cable is damaged.
- For hygiene reasons, the attachments may be used by one person only.
- Wear appropriate protective equipment (FFP2 mask, protective gloves and protective glasses) when using on acrylic, gel or artificial nails.
- Never look directly at the UV/LED light.
- Do not use the device during pregnancy.
• Overexposure to UV radiation may cause sunburn to the skin. Too frequent expo-
sure to UV radiation will age the skin and increases the risk of skin cancer.
- Excessive exposure to UV radiation can cause damage to the skin and eyes. Please seek medical assistance if you notice any changes to your skin.
- If you are aware of any allergy to UV/LED radiation, consult your doctor before using the device.
- Keep sensitive areas of skin such as scars and tattoos away from radiation.
- Never place any objects on the device. Do not cover the device while it is in operation.
NOTICE
- Protect the device from impacts, humidity, dust, chemicals, marked temperature fluctuations and direct sunlight.
- Always hold the storage drawer 7 firmly when storing or carrying the device. Otherwise the storage drawer 7 could easily slide out when storing or carrying the device.
Repairs
WARNING
- Do not open the device. Do not attempt to repair the device yourself. This could result in serious injury. Failure to comply will invalidate the guarantee.
- Never operate the device during maintenance work.
- For repairs, please contact Customer Services or an authorised retailer.
5. DEVICE DESCRIPTION
The associated drawings are shown on page 3.
1 Base station
2 Mains cable connection
3 Hand-held device connection
4 UV/LED lamp
5 Brush
6 Hand-held device
7 Storage drawer
8 Attachment box
9 Filter cover
Buttons and display
10 ON/OFF button: To switch the device on/off
11 Extraction button: To extract the nail dust
12 UV/LED light button: For efficient nail drying
13 Speed indicator: Displays the speed of the nail cutter
14 Timer display: Displays the timer of the UV/LED lamp (30, 60, 90 seconds)
15 Extraction symbol
16 UV/LED lamp symbol
17 Nail cutter symbol
18 Button to reduce speed (-)
19 Button to increase speed (+)
20 Nail cutter/change direction button: Press and hold to change the direction of rotation (clockwise/anti-clockwise rotation); press briefly to switch the nail cutter on and off.
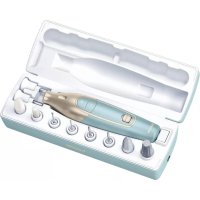
Attachments
21 Sandpaper attachments (single-use)
22 Holder for sapphire wheels
23 Fine-grain sapphire wheel
24 Coarse-grain sapphire wheel
25 Sapphire cone, fine
26 Sapphire cone, coarse
27 Felt cone
28 Flame-shape cutter
29 Nail cutter
30 Attachment for using the sandpaper attachments
31 Carbide nail cutter
32 Carbide nail cutter
6. INITIAL USE

WARNING
Danger of suffocation! Keep packaging material away from children.
- Check to ensure that the package contains all the parts that should be included in delivery. If any parts are missing or damaged, contact Customer Services.
- Place the device on a firm, level and dry surface.
- Remove all packaging material.
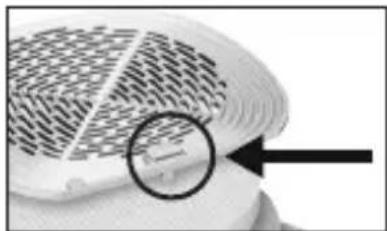
Adding the attachment
- Turn the safety lock to the open position and carefully push the selected professional attachment onto the hand-held device, up to the stop.
- To lock the attachment in place, carefully turn the sealing ring to the closed position
- If you are using one of the two sapphire wheels (23 or 24) on the hand-held device 6, additionally attach the holder for the sapphire wheels 22 to the tip of the hand-held device 6 from above.
- Connect the cable of the hand-held device 6 to the hand-held device connection 3 on the base station 1.
- Connect the mains cable with the mains cable connection 2 on the base station 1
- Insert the mains plug into the socket.
7. USAGE

WARNING
Check the results during the treatment. This applies in particular for diabetics as they have less sensitive hands and feet. Stop treatment as soon as it becomes unpleasant.
NOTICE
Ensure the axle can always rotate freely. The axle must not be permanently blocked, as otherwise the device will become too hot and suffer damage.

When filing, always move from the outside of the nail towards the tip! Please observe that professional attachments show reduced performance on soaked or wet skin. For this reason, we recommend that you do not soak the skin in water before treatment.

Automatic switch-off after 30 minutes
7.1 Initial steps for cutting nails
- Press the ON/OFF button 10 to start treatment. "00" appears on the display when switching on the device. The individual functions can then be switched on.

If the safety lock is not turned to the closed position, the device cannot be switched on.
-
To switch on the nail cutter, press the nail cutter/change direction button 20.
-
Use the +/- buttons 18 19 to select your desired speed level on the hand-held device. Your current speed level setting is shown by the speed indicator 13.
- To change the direction of rotation of the drive axle, press and hold the change direction button 20. The display shows the current direction of rotation setting.
- Do not press too hard and always carefully move the attachments towards the area to be treated. Move the device over the area to be treated and apply slight pressure while slowly moving the device in circles.

If a large amount of pressure is placed on the rotating attachment, the device automatically switches off. Press the ON/OFF button 10 again to switch the device back on.
- Apply moisturiser to the treated areas after each use.
- Press the change direction button 20 again briefly to switch off the device.
7.2 Extraction function
You also have the option of activating an extraction function whilst cutting your nails. The extraction function ensures clean working and prevents nail dust from being swirled up.
- To activate the extraction function whilst cutting your nails, press the extraction button 11. The extraction symbol 15 lights up on the display.
- Press the extraction button 11 again to select one of the two extraction levels:
- “LO” = low extraction power
- "HI" = high extraction power
- To deactivate the extraction function, press the extraction button 11 again. The extraction symbol 15 goes out on the display.

Clean the built-in filter by tapping it lightly each time after using the device. We recommend replacing the built-in filter every 6 months. Use the brush 5 to brush the nail dust from the device and from your hands into the filter.
7.3 Cleaning the filter
We recommend cleaning the filter each time after using the device. To clean the filter, proceed as follows:
- Press the lower button on the filter cover 9. The filter cover opens.
- Remove the white filter from the plastic holder.
- Insert a new filter into the plastic holder.
- Place the filter and plastic holder on the base station 1.
- Place the filter cover 9 back on the base station 1 and press the lower button on the filter cover 9 to close it securely.
natural_image
Close-up of a white fan or fan with a patterned grille and a magnified inset showing a small object (no text or symbols visible)
natural_image
Exterior view of a modern kitchen appliance with a mesh fan and control panel (no visible text or symbols)7.4 Drying/curing your nails
The integrated UV/LED nail dryer 4 provides efficient nail drying for long-lasting results. The UV/LED nail dryer is suitable for all UV-cured varnishes and gels, thereby guaranteeing optimum results regardless of which varnish or gel brand is used.

Never switch on the UV/LED light if the storage drawer 7 is still inside the device.
- Insert your hand/foot with the nails treated with UV/LED nail gel into the opening of the device (with the nails facing upwards).
- Press the ON/OFF button 10 to start treatment. The display lights up.
- Use the UV/LED light button 12 to select your desired curing time (30, 60 or 90 seconds). The programmed curing time is shown on the display.

Set the application duration according to the recommended curing time of the UV/LED nail gel manufacturer.
- The UV/LED light switches off automatically after the programmed curing time has been reached. Alternatively, you can also switch off the UV/LED light by pressing and holding the UV/LED light button 12.
7.5 Storage drawer
The storage drawer 7 provides a practical place to store all the items.
NOTICE
Always hold the storage drawer 7 firmly when storing or carrying the device. Otherwise the storage drawer 7 could easily slide out when storing or carrying the device.
7.6 Overview of attachments
WARNING
Take special care when using professional attachments. Improper use, particularly at high speeds, may cause injuries.
21 Sandpaper attachment (single-use)
Suitable for removing dry or hard skin or calluses on the sole of the foot and heel, and treating the nails. The special feature of the single-use sandpaper attachments is that they can be removed and disposed of after a single use. A total of 7 single-use attachments are included in delivery. To maintain natural skin protection, do not remove the entire callus.
22 Holder for sapphire wheels
For attaching the sapphire wheels (23 or 24) onto the hand-held device 6.
23 Fine-grain sapphire wheel
Suitable for filing and treating nails, fine-grain sapphire wheel. The special feature of this sapphire wheel is that the internal sanding disc rotates whereas the external housing does not. This makes it possible to file nails precisely without the risk of burning the skin with the quickly rotating wheel.
24 Coarse-grain sapphire wheel
Suitable for filing and treating nails, coarse-grain sapphire wheel. This attachment makes it possible to shorten even thick nails by filing them. However, also take care during use as it quickly removes large areas of the nail.
25 Sapphire cone, fine
Suitable for removing dry or hard skin or calluses on the sole of the foot and heel, and treating the nails. To maintain natural skin protection, do not remove the entire callus.
26 Sapphire cone, coarse
Suitable for quickly removing thick hard skin and large calluses from the sole of the foot and heel. This attachment is intended for application on large areas. To maintain natural skin protection, do not remove the entire callus.
27 Felt cone
Suitable for smoothing and buffing the tips of nails after filing and for cleaning the surface of nails. Always use circular movements to buff the nails and never let the felt cone rest in one position as the friction can create a considerable amount of heat.
28 Flame-shape cutter
Suitable for removing ingrown nails. For this purpose, carefully position the flame-shape cutter on the area to be treated and remove the necessary nail parts.
29 Nail cutter
The nail cutter is a precision tool. Exercise care when using this attachment, as careless use can quickly result in injury. This attachment can be used to expose ingrown nails and cut off dead nail parts. Operate the nail cutter at a low speed.
30 Attachment for using the sandpaper attachments
Suitable for fitting sandpaper attachments.
31 32 Carbide nail cutter
Suitable for removing gel or acrylic nail applications and for filing and shaping artificial nails. Not suitable for natural nails.
8. CLEANING AND MAINTENANCE
8.1 Cleaning
WARNING
Before beginning cleaning, always pull the mains plug out of the socket!
- Clean the base station and the hand-held device with a slightly damp cloth. If they are very dirty, you can also moisten the cloth with a mild soapy solution.
- For hygiene reasons, you may use alcohol and a cloth or brush to clean the attachments if required. Allow the attachments to dry carefully afterwards.
- Do not use any chemical or abrasive cleaning agents.
- Ensure that no water enters the device. If this should happen, reuse the device only when it has fully dried out.
- Never submerge the base station or mains cable in water or any other fluids.
9. ACCESSORIESAND/OR REPLACEMENT PARTS
To purchase accessories and/or replacement parts, visit www.beurer.com or contact the corresponding service address (as per the service address list) for your country. Accessories and/or replacement parts are also available from retailers.
| Designation Item | number and/or order number |
| 10 professional attachments | 110163 |
| Replacement filter | 110168 |
10. WHAT IF THERE ARE PROBLEMS?
| Problem | Possible cause | Solution |
| Hand-held device will not switch on. | Mains plug not plugged in. | Plug the mains plug into the socket. |
| No voltage at mains socket. | Check your fusebox. | |
| Hand-held device not connected to base station. | Connect the hand-held device to the base station. | |
| UV/LED nail gel does not cure. | Set application duration too short. | Set a longer application duration on the nail dryer. Set the application duration according to the recommended curing time of the UV/LED nail gel manufacturer. |
| Filter cover cannot be closed | The lower button on the filter cover is not pressed. | Press the lower button on the filter cover to close the filter cover. |
11. DISPOSAL
For environmental reasons, do not dispose of the device in household waste at the end of its service life. Dispose of the device at a suitable
local collection or recycling point in your country. Observe the local regulations for material disposal. Dispose of the device in accordance with EC Directive Waste Electrical and Electronic Equipment (WEEE). If you have any questions, please contact the local authorities responsible for waste disposal. You can obtain the location of collection points for old devices from the local or municipal authorities, local waste disposal companies or your retailer, for example.

12. TECHNICAL SPECIFICATIONS
| Mains operation: | 100–240 V~,50–60 Hz, 50 W |
| Dimensions of base station | 19 x 19 x 6.5 cm |
| Dimensions of storage drawer | 10 x 5.5 x 2.5 cm |
| Weight Approx. 1333 g | |
| Light source wavelength range | 365–405 nm |
EU declaration of conformity:
https://www.beurer.com/conformity
13. GUARANTEE
Further information on the guarantee and guarantee conditions can be found in the guarantee leaflet supplied.
FRANÇAIS

Attention, surface chaude
3. UTILISATION CONFORME AUX RECOMMANDATIONS
natural_image
Pure electrical circuit lines without any symbols7. UTILISATION
AVERTISSEMENT
natural_image
Exterior view of a modern kitchen appliance with a mesh fan and control panel (no visible text or symbols)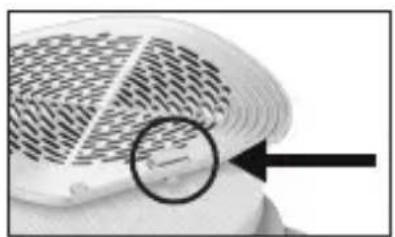
natural_image
Close-up of a patterned surface with a magnified circular detail and arrow pointing to a small object (no text or symbols visible)https://www.beurer.com/conformity
13. GARANTIE
natural_image
Pure electrical circuit lines without any symbols
natural_image
Close-up of a patterned surface with a magnified circular detail highlighting a small feature (no text or symbols)natural_image
Exterior view of a modern kitchen appliance with a mesh fan and control panel (no visible text or symbols)https://www.beurer.com/conformity
13. GARANTÍA
natural_image
Pure mechanical component diagram without any text, numbers, or symbolsnatural_image
Exterior view of a modern kitchen appliance with a mesh fan and control panel (no visible text or symbols)natural_image
Close-up of a textured surface with a magnified circular detail and arrow pointing to a small object (no text or symbols visible)23 Disco in zaffiro, a grana fine
25 Lima in zaffiro, a grana fine
26 Lima in zaffiro, a grana grossa
9. ACCESSORI E/O RICAMBI
https://www.beurer.com/conformity
13. GARANZIA
natural_image
Pure electrical circuit lines without any symbolsnatural_image
Close-up of a textured surface with a magnified circular detail highlighting a small feature (no text or symbols)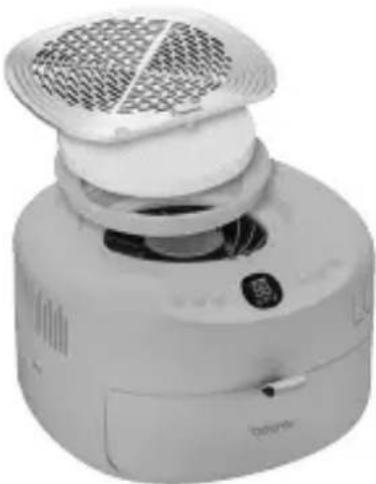
natural_image
Exterior view of a modern office building (no signage)https://www.beurer.com/conformity
13. GARANTI
natural_image
Pure electrical circuit lines without any symbolsnatural_image
Close-up of a textured surface with a magnified circular detail and arrow pointing to a small object (no text or symbols visible)
natural_image
Exterior view of a modern kitchen appliance with a white filter and control panel (no visible text or symbols)https://www.beurer.com/conformity
13. ГАРАНТИЯ
16 Symbol lampy UV/LED
17 Symbol frezu do paznokci
natural_image
Pure diagram of a mechanical component with an arrow indicating direction (no text or symbols)natural_image
Exterior view of a modern kitchen appliance with a white fan and control panel (no visible text or symbols)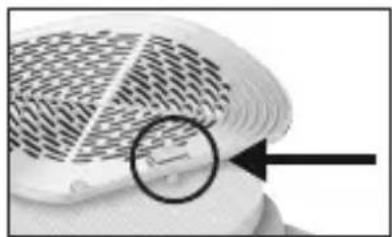
natural_image
Close-up of a textured surface with a magnified circular detail and arrow pointing to a small object (no text or symbols visible)https://www.beurer.com/conformity
13. GWARANCJA
4. WAARSCHUWINGEN EN VEILIGHEIDSRICHTLIJNEN
WAARSCHUWING
5. BESCHRIJVING VAN HET APPARAAT
natural_image
Pure mechanical component diagram without any text, numbers, or symbolsnatural_image
Exterior view of a modern electric air purifier with a mesh grille and control panel (no visible text or symbols)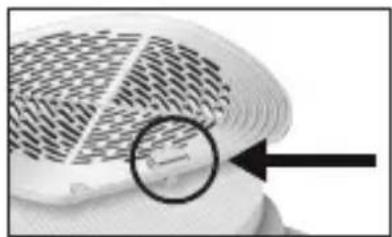
natural_image
Close-up of a patterned fabric or material surface with a magnified circular detail highlighting a small feature (no text or symbols visible)7.4 Nagels drogen/uitharden
https://www.beurer.com/conformity
13. GARANTIE
natural_image
Pure mechanical component diagram without any text, numbers, or symbolsnatural_image
Close-up of a white fan or plastic fan with a circular arrow pointing to a small object on the side (no text or symbols visible)
natural_image
Exterior view of a white portable air conditioner unit with ventilation grille and control panel (no visible text or symbols)https://www.beurer.com/conformity
13. GARANTI
natural_image
Pure electrical circuit lines without any symbolsnatural_image
Close-up of a patterned surface with a magnified circular detail highlighting a small feature (no text or symbols)7.4 Torka/härdanaglarna
https://www.beurer.com/conformity
13. GARANTI
natural_image
Pure electrical circuit lines without any symbols7. BRUK
ADVARSEL
natural_image
Close-up of a textured surface with a magnified circular detail highlighting a small rectangular feature (no text or symbols)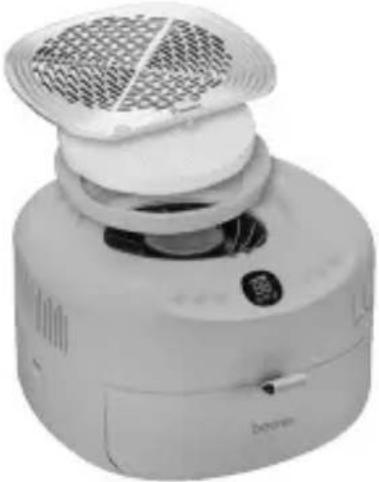
natural_image
Exterior view of a portable air conditioner unit with a mesh grille and control panel (no visible text or symbols)https://www.beurer.com/conformity
13. GARANTI
natural_image
Pure electrical circuit lines without any symbolsnatural_image
Close-up of a textured surface with a magnified circular detail highlighting a small feature (no text or symbols visible)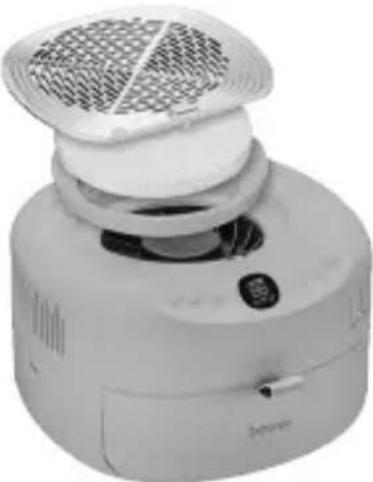
natural_image
Exterior view of a modern kitchen appliance with a mesh fan and control panel (no visible text or symbols)https://www.beurer.com/conformity
13. TAKUU
UK: BEURER UK Ltd., Suite 16, Stonecross Place, Stonecross Lane North,
WA3 2SH, Lowton, United Kingdom