
DKE4220X - Microwave DE DIETRICH - Free user manual and instructions
Find the device manual for free DKE4220X DE DIETRICH in PDF.
| Product type | Built-in microwave |
| Brand | De Dietrich |
| Model | DKE4220X |
| Dimensions (H x W x D) | Approximately 385 x 595 x 455 mm |
| Weight | Approximately 18 kg |
| Power supply | 220-240 V ~, 16 A |
| Microwave power (max) | 1000 W |
| Power levels | 100 W, 300 W, 500 W, 700 W, 1000 W |
| Installation type | Built-in, minimum height 850 mm from floor |
| Capacity | Approximately 25 liters |
| Materials | Stainless steel, glass (door) |
| Automatic functions | Defrost (prepared meals, bread, meat/poultry), cook fish, frozen vegetables, fresh vegetables |
| Timer | Yes, up to 99 minutes |
| Child safety lock | Yes |
| Delayed start | Yes |
| Keep warm after cooking | No |
| Grill / Convection | No |
| Turntable | Yes, glass |
| Included accessories | Turntable, roller support, drive |
| Cleaning | Regular cleaning with a damp soapy sponge; lemon water/vinegar for the interior |
| Maintenance | Replace the lamp by a qualified professional |
| Energy class | Not specified (estimated B) |
Frequently Asked Questions - DKE4220X DE DIETRICH
User questions about DKE4220X DE DIETRICH
0 question about this device. Answer the ones you know or ask your own.
Ask a new question about this device
Download the instructions for your Microwave in PDF format for free! Find your manual DKE4220X - DE DIETRICH and take your electronic device back in hand. On this page are published all the documents necessary for the use of your device. DKE4220X by DE DIETRICH.
USER MANUAL DKE4220X DE DIETRICH
RELATIONS CONSOMMATEURS FRANCE
You have just purchased a De Dietrich product. This choice reflects your high standards and taste for the French way of life.
Resulting from over 300 years' know-how, the De Dietrich creations embody the fusion between design, authenticity and technology at the service of culinary arts. Our appliances are manufactured using noble materials and offer an irreproachable quality of finish.
We are certain this high-quality product will enable cooking enthusiasts to express all their talents.
The De Dietrich Customer Service Department is at your disposal for all your questions and suggestions to always better meet your expectations.
We are honoured to be your new partner in the kitchen and thank you for your trust.

BvCer. 601.825
With its factories based in France, in Orleans and Vendôme, De Dietrich cultivates a constant search for excellence, perpetuating exceptional know-how in the design of perfectly finished products.
Many of our electrical appliances are certified by the "Origine France Garantie" label, an acknowledgement which certifies they are manufactured in France.
This label both ensures the quality and durability of our appliances, as well as their traceability, thus offering a clear and objective indication of their provenance.
www.de-dietrich.com
De Dietrich
CREATEURD'EMOTIONS DEPUIS 1684
IMPORTANT SAFETY ADVICE AND PRECAUTIONS 4-6
1 INSTALLATION 7-8
Choice of location and fitting. 7
Electrical connection 8
2 ENVIRONMENT 9
Caring for the environment 9
3 PRESENTATION OF YOUR APPLIANCE 10-11
Description of the oven 10
Accessories (depending on the model) 11
4 FIRST USE AND SETTINGS. 12-16
Cooking mode 12
Settings menu (depending on model) 13
Setting the time, changing the time and timer. 14
Starting a cooking programme 15
Immediate microwave cooking 15
Immediate cooking with automatic functions 15
Delayed start cooking and setting the child safety lock 16
5 CARE 17
Cleaning the inner and outer surfaces 17
6 ANOMALIES AND SOLUTIONS 18
7 COOKING TIPS 19
IMPORTANT SAFETY INSTRUCTIONS - READ CAREFULLY AND KEEP FOR FUTURE USE.
This user guide is available for download on the brand's website.
Once you receive the appliance, unpack it or have it unpacked immediately. Give it an overall inspection. Make a note of any reservations on the delivery slip and keep a copy.
manufacturer, its after-sales service department or by a similarly qualified person in order to avoid danger.

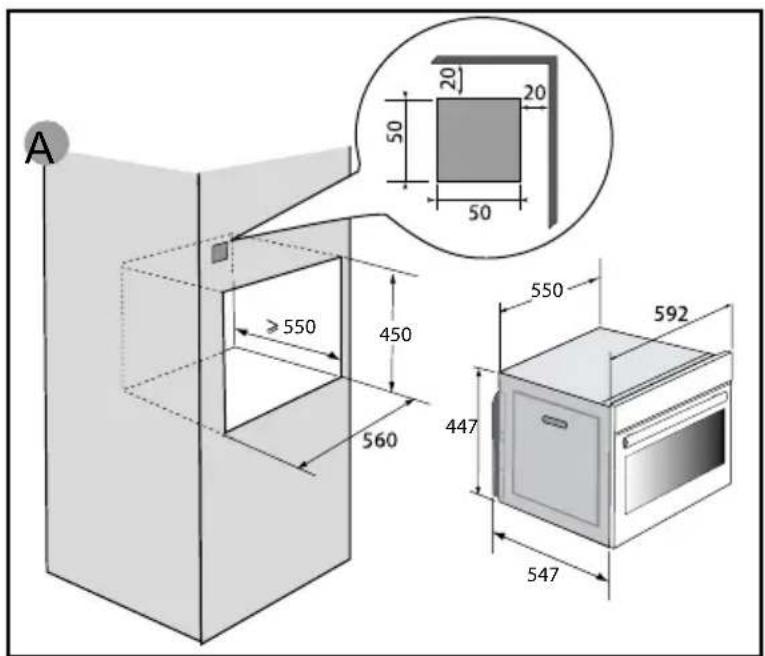
This appliance must be used more than 850mm up off ground.
The appliance must not be installed behind a decorative door to prevent overheating.
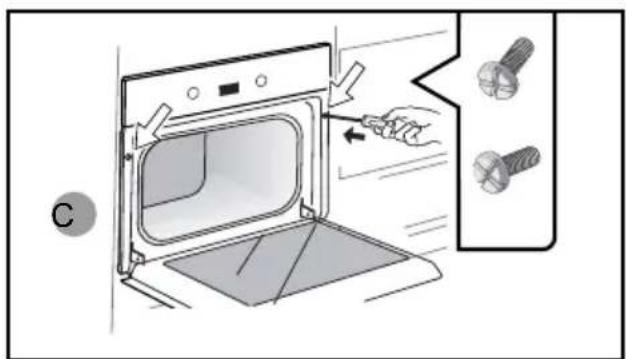
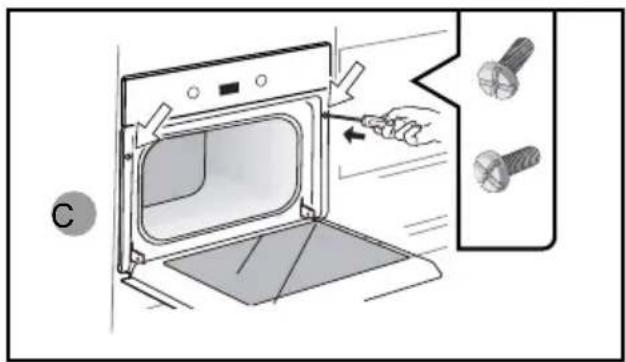
Centre the oven in the cabinet so as to ensure a minimum gap of 10mm between the appliance and the surrounding unit. The material of the unit supporting the appliance must be heat-resistant (or covered with a heat-resistant material). For greater stability, attach the oven to the unit with 2 screws through the holes provided on the side panels.

It must be possible to
disconnect the appliance from the power supply by fitting a switch on the fixed wiring system in accordance with installation rules.
If the power cable is damaged, it should be replaced by the

WARNING:
It is dangerous for anyone other than a qualified person to perform maintenance or repairs that requires the removal of the cover providing protection against exposure to microwave power.
This appliance is designed to cook with the door closed.
-
This appliance is designed to be used for domestic and similar applications such as kitchen areas for the staff of shops, offices and other professional premises; farms; use by clients of hotels, motels and other residential type establishments; guest house type environments.
-
This appliance may be used by children aged 8 years and older, and by persons with impaired physical, sensory or mental capacities, or without experience or knowledge, if they are supervised or have received prior instructions on how to use the appliance safely and have understood the risks involved.
IMPORTANT SAFETY ADVICE AND PRECAUTIONS
- Children must not play with the appliance. The appliance should not be cleaned or maintained by unsupervised children.
- Children should be supervised to prevent them from playing with the appliance.

WARNING:
The appliance and its accessible parts become hot during use. Be careful not to touch the heating elements inside the oven. Children under 8 years of age should not be allowed near the appliance, unless they are constantly supervised.

WARNING:
If the appliance is being used in combination mode, it is recommended that children only use the oven under adult supervision due to the temperatures generated.
- Only use utensils suitable for use in microwave ovens. Metal food and beverage containers cannot be used for microwave cooking.
The microwave oven is intended for heating food and drinks. Drying food products or linen or heating heat pads, slippers, sponges, damp clothes
or similar could cause injury, combustion or fire.

WARNING:
Liquids and other foods should not be heated in tightly closed containers as they may explode.
- When heating food items in plastic or paper containers, monitor the microwave's contents due to the risk of combustion.
- If smoke appears, stop or unplug the oven and keep the door closed to smother any flames.
Heating beverages in the microwave oven can cause the sudden and/or delayed splattering of boiling liquid, so care must be taken when handling their containers.
The contents of baby bottles and baby food jars must be stirred or shaken and the temperature must be checked before consumption, so as to prevent burns. - It is not recommended to heat eggs in their shells or whole hard-boiled eggs in a microwave oven, as they may explode, even after cooking has ended. — It is recommended to clean the oven regularly and to remove any food residue.
If the appliance is not cleaned regularly, its surface could
IMPORTANT SAFETY ADVICE AND PRECAUTIONS
become damaged, permanently affecting the appliance's lifespan and possibly causing a safety hazard.

WARNING:
If the door or door seal is damaged, the oven must not be operated until it has been repaired by an authorised person.
- Do not use abrasive cleaners or hard metal scrapers to clean the oven's glass door; they could scratch the surface and cause the glass to.
- Do not use steam cleaning devices.
- Only allow children to use the oven without supervision if adequate instructions have been given so that the child is able to use the oven safely and understands the dangers of incorrect use.
1 INSTALLATION
CHOICE OF LOCATION AND FITTING
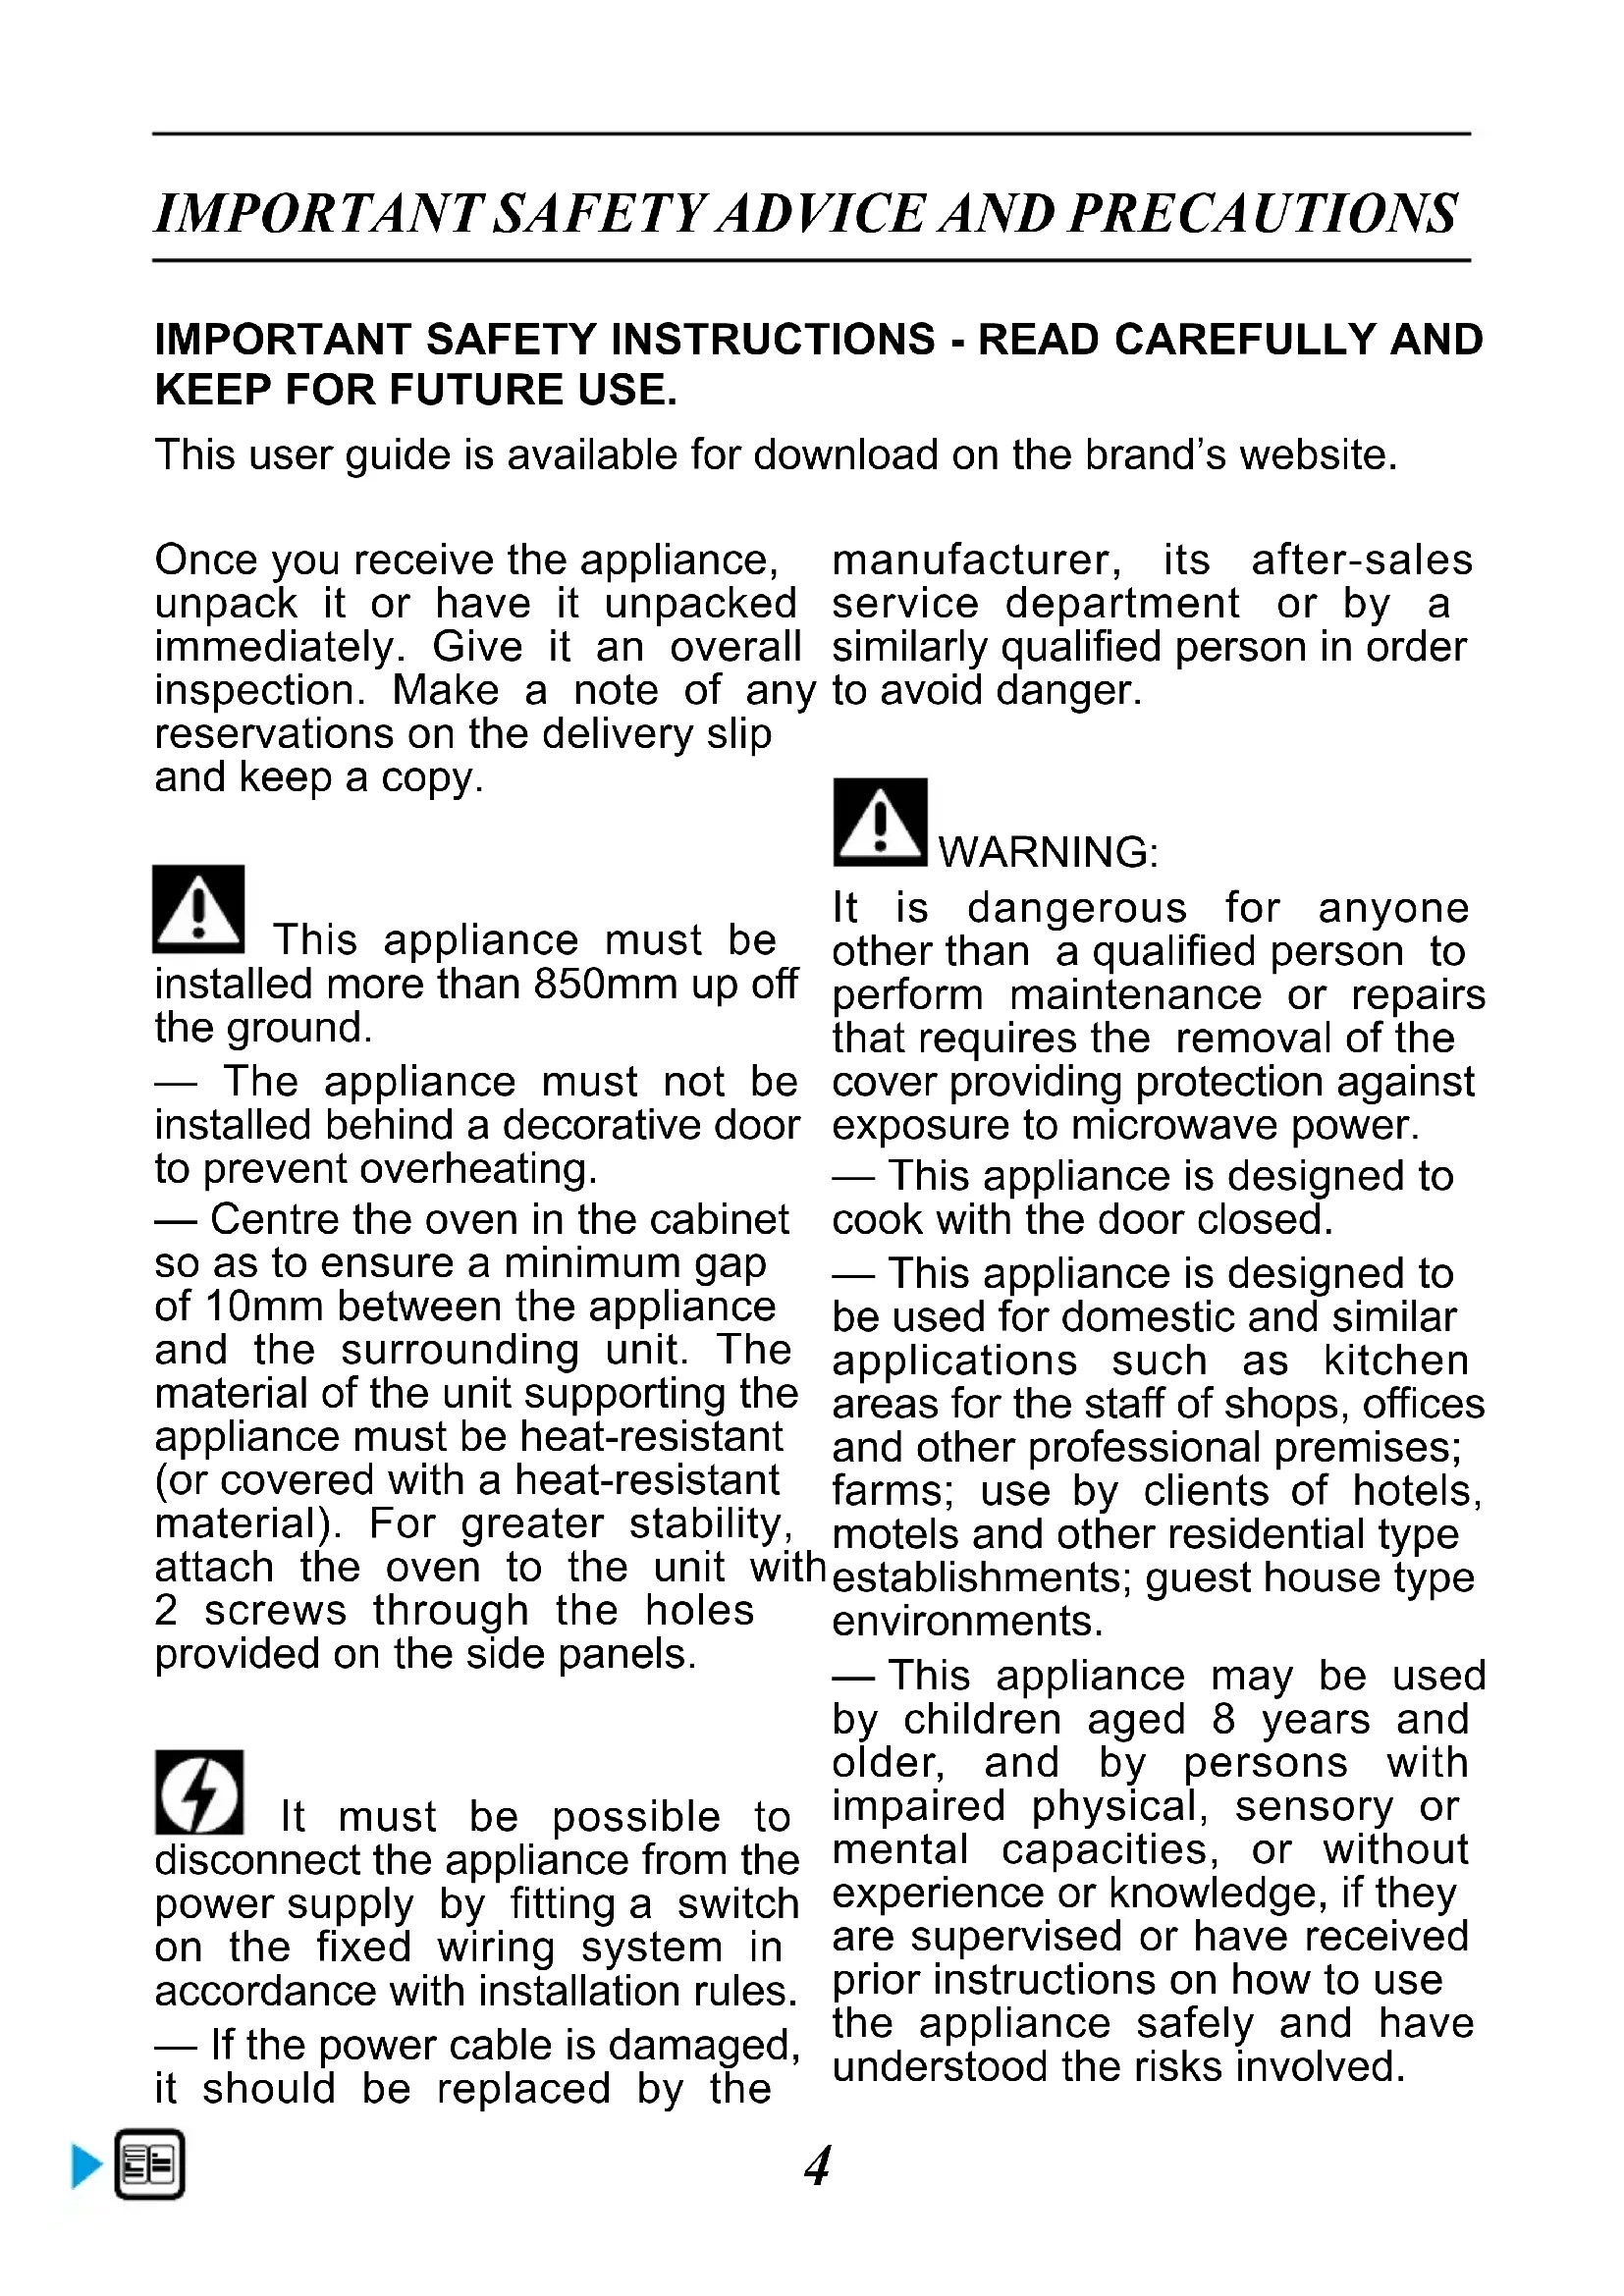
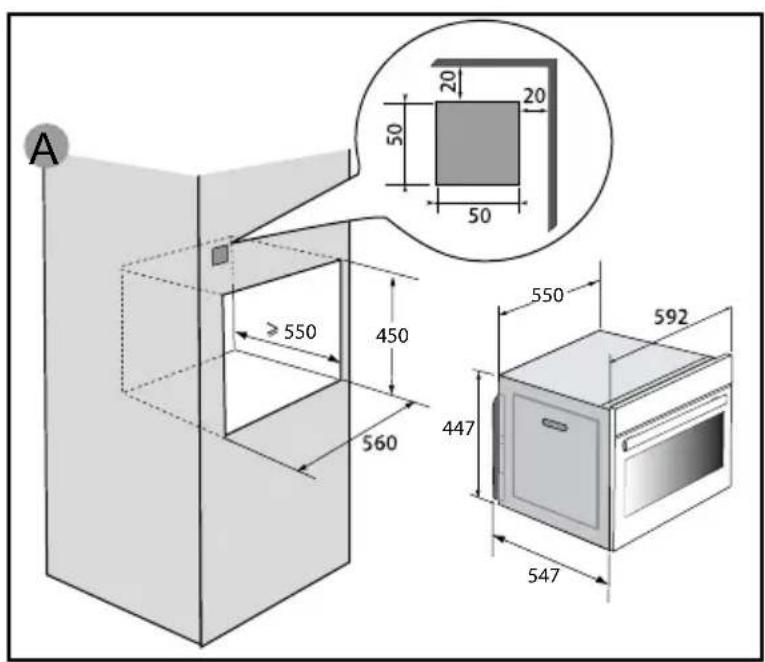
This appliance must be installed more than 850~mm up off the ground. This appliance may be installed in a cabinet column, as indicated on the installation diagram (fig. A).
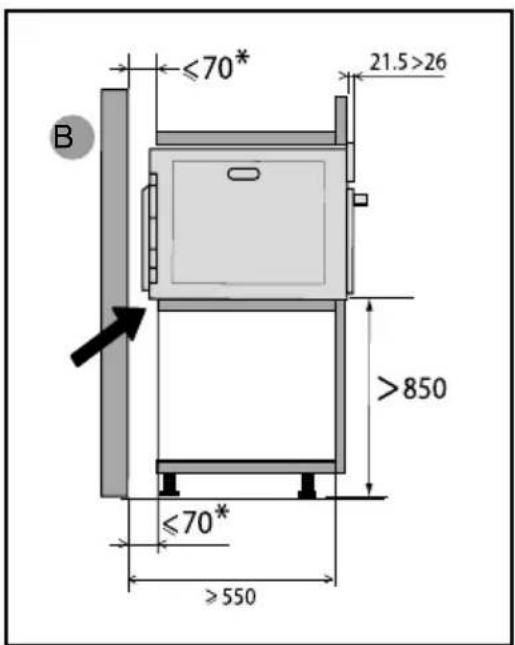
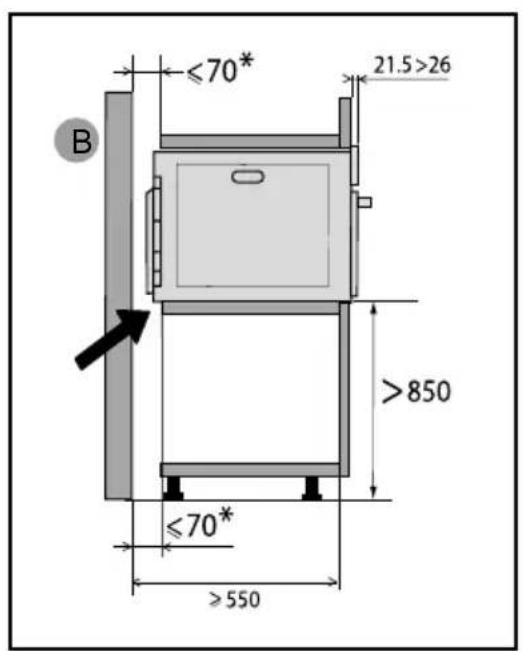
Caution: if the back of the cabinet is open, the space between the wall and the surface on which the oven rests must be no more than 70~mm^* (fig. B).
Do not use your appliance immediately (wait for about 1 to 2 hours) after transferring it from a cold place to a warm place, as condensation may cause a malfunction.
Centre the oven in the cabinet so as to ensure a minimum gap of 10mm between the appliance and the surrounding unit. The material of the cabinet must be heat-resistant
(or have a heat-resistant coating).
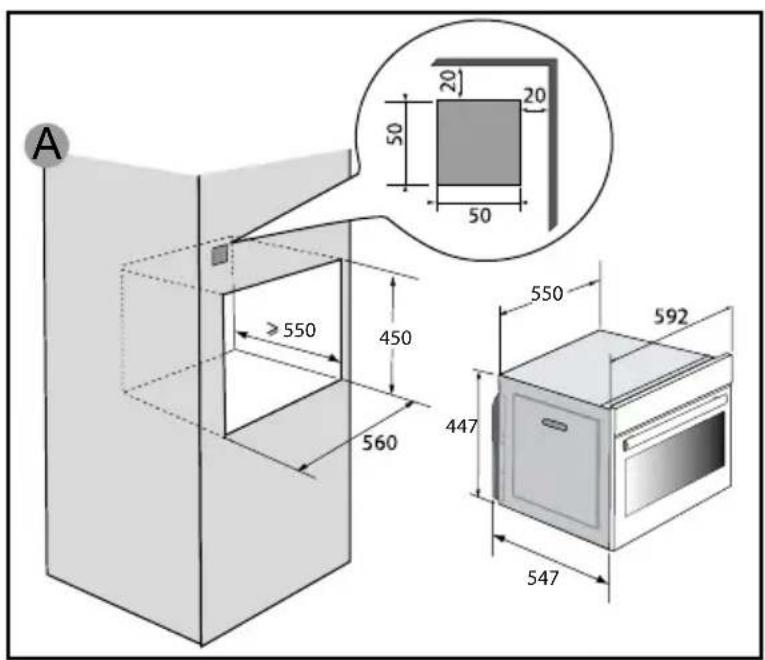
Drill a 2 mm diameter hole in the cabinet panel to avoid splitting the wood.
For greater stability, attach the oven to the unit with 2 screws through the holes provided on the side panels (fig. C).

ELECTRICAL CONNECTIONS
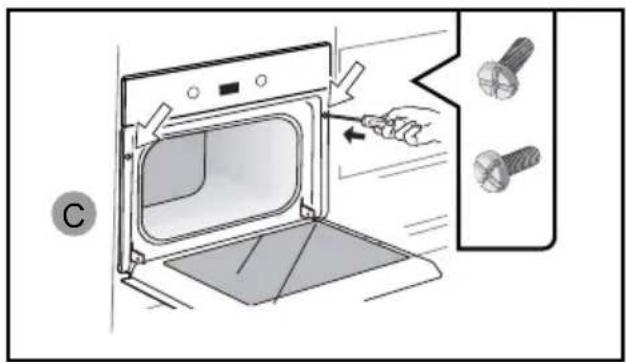
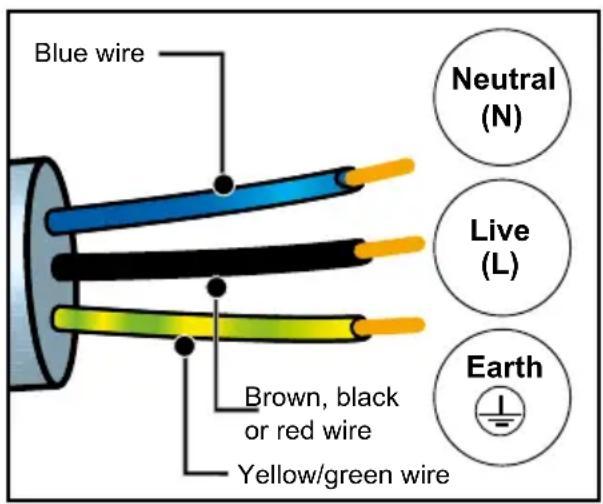
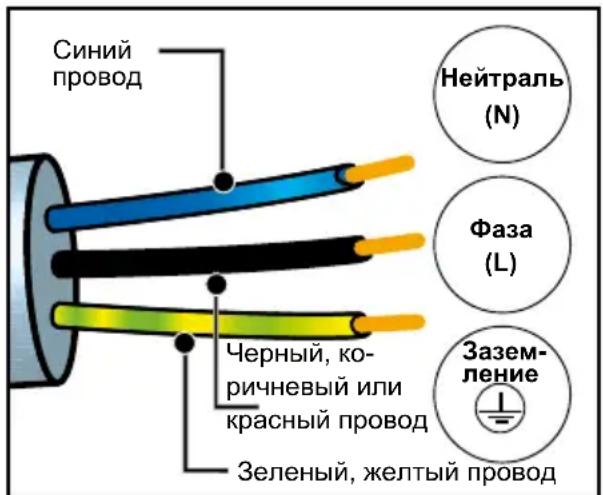
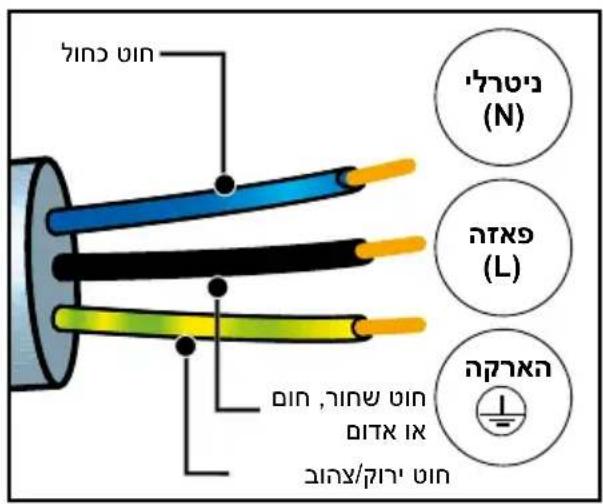
The appliance must be recess-fitted correctly to ensure electrical safety. The electrical connection should be completed before the appliance is placed in the cabinet. The oven is supplied with a standardised power cable with 3 conductors of 1.5mm^2 (1 live + 1 neutral + earth) which must be connected to a 220-240V single-phase grid via an IEC 60083 standard power socket or via an all-pole cut-off device in compliance with the installation rules.
Check that:
- the electrical installation has sufficient voltage (220-240 Volts~ 16 Amps). If the electrical installation of your home requires a modification to connect the appliance, call a qualified electrician.
During maintenance, the appliance must be disconnected from the mains, the fuses must be switched off or removed.

Important:
This appliance should be installed by a qualified technician / installer.

Important:
The safety wire (green-yellow) is connected to the appliance's terminal 12 and must be connected to the installation's earth.
If the oven malfunctions in any way, unplug the appliance or remove the fuse for the oven's connection line.

Important:
We cannot be held responsible for any accident or incident resulting from non-existent, defective or incorrect earthing or non-compliant connection.
2 ENVIRONMENT
CARING FOR THE ENVIRONMENT
The packaging material of this appliance is recyclable. Please recycle it and help protect the environment by depositing it in municipal containers provided for this purpose.
Your appliance also contains many recyclable materials. It is therefore marked with this logo to indicate that used appliances should not be mixed with other waste.
Recycling of appliances organised by your manufacturer is carried out under the best possible conditions, in accordance with the European directive in force on waste electronic and electrical equipment. Contact your local authority or retailer for information on used appliance collection points close to your home.
We thank you for your help in protecting the environment.
3 PRESENTATION OF YOUR APPLIANCE
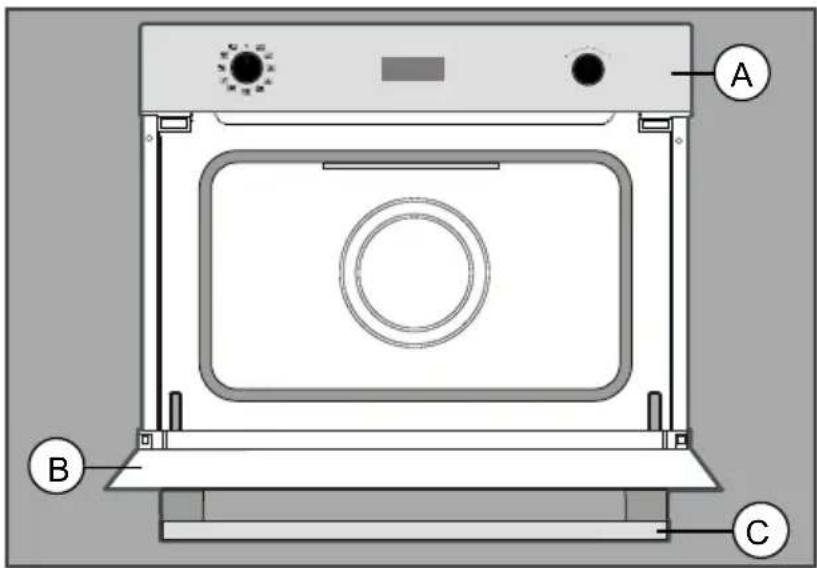
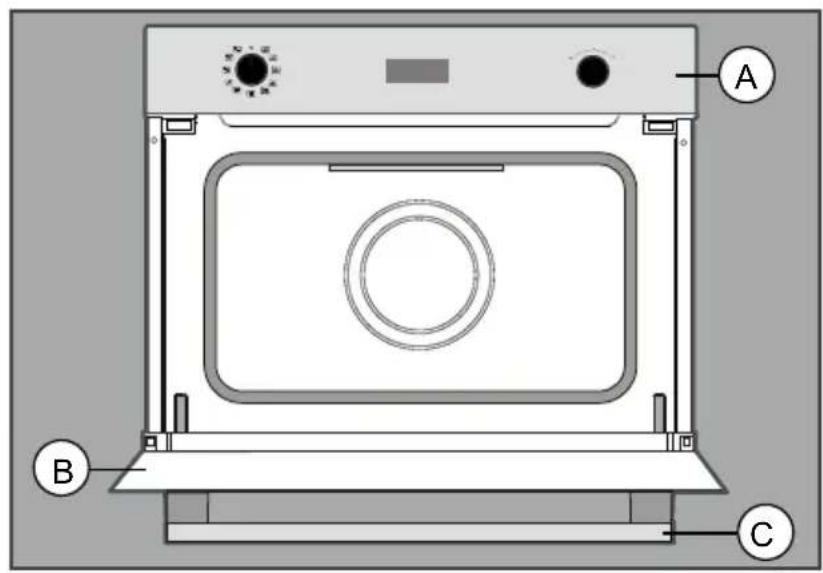
Description of the oven
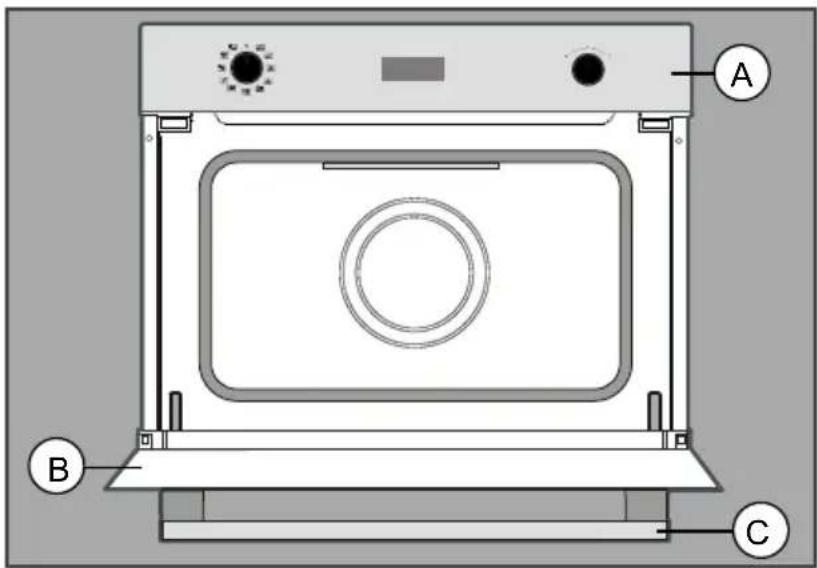
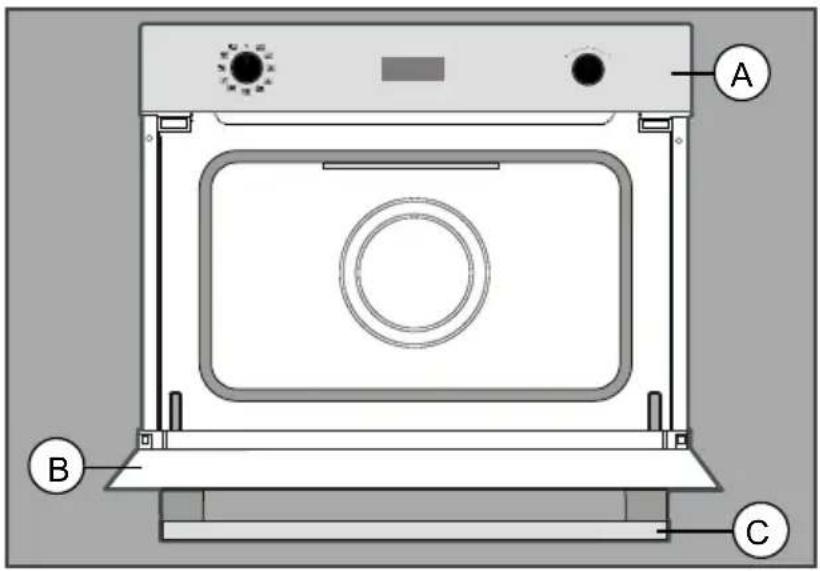
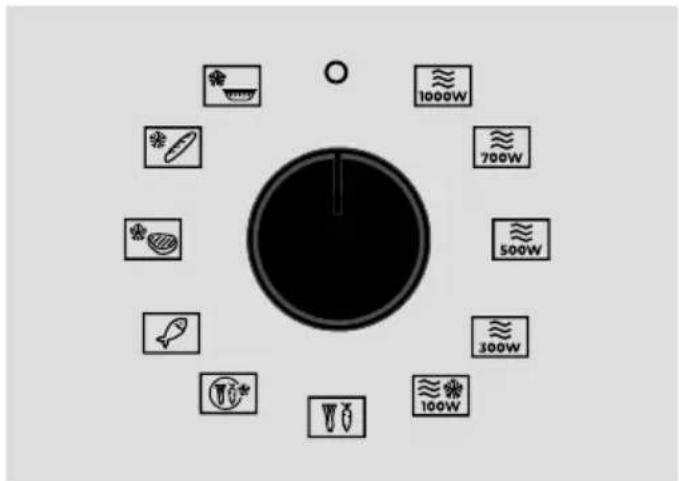
A Control panel
B Door
C Handle
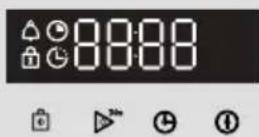
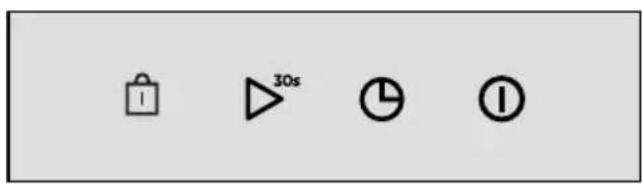
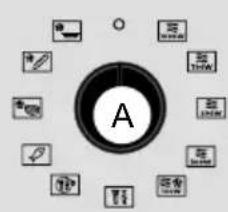
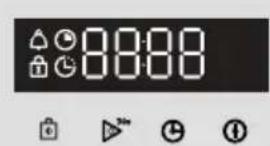
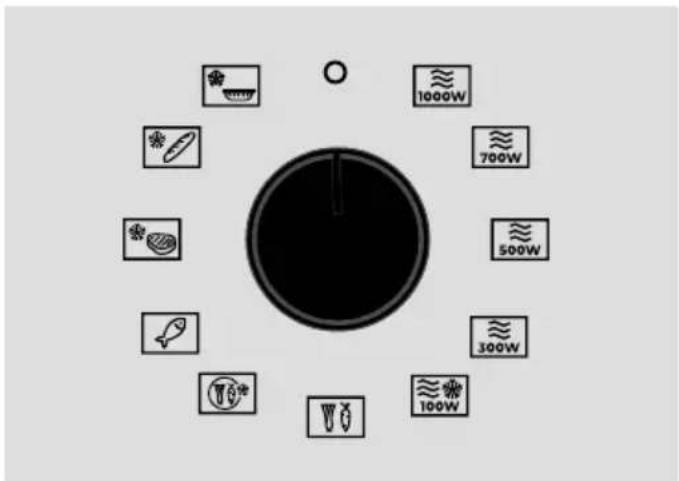
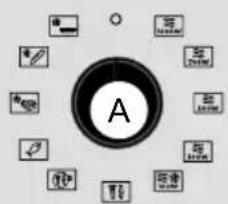
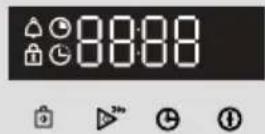
Control panel
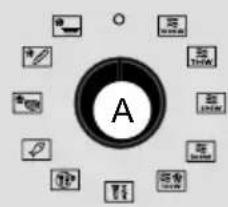


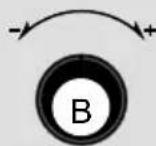
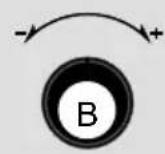
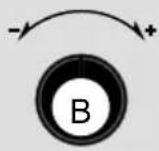
d) Cooking mode selection knob

- and - setting knob


= Cooking time
G=End of cooking
Keypad lock
Timer
Weight
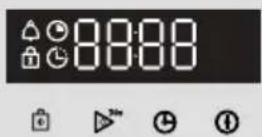
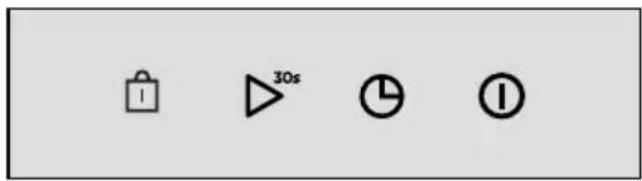
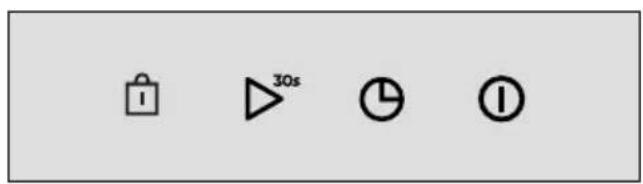
A Keypad lock
B Adds 30 seconds to the cooking time
C Sets the time, duration and delay
Cooking start
3 PRESENTATION OF YOUR APPLIANCE
ACCESSIONS
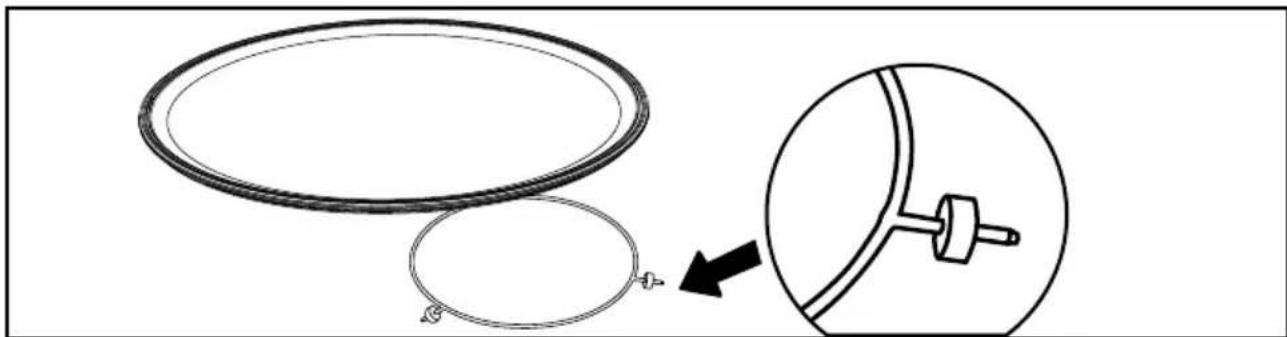
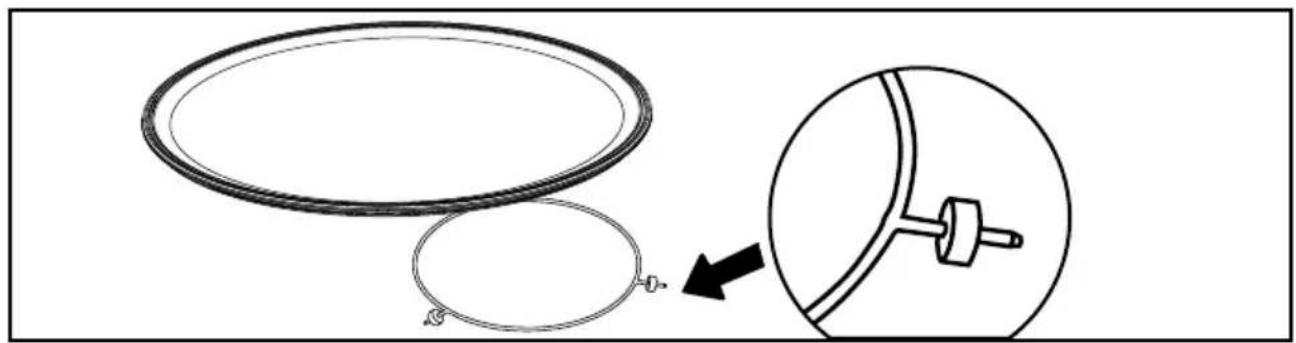
Turntable
The turntable ensures equal cooking of food throughout with no need to intervene. Rotates in both directions. If it does not turn, check that all the elements are in their proper places.

It can be used as a cooking dish. To remove it, grab it by using the access areas in the cavity.
The turntable allows the glass plate to turn.
If you remove the turntable, avoid getting water in the motor shaft hole.
Do not forget to put the turntable, the roller frame and the glass turntable plate back in.

IMPORTANT:
Do not attempt to manually turn the glass plate as this may damage the drive system. If it does not turn properly, check that there is nothing underneath the plate stopping it from turning.
COOKING MODES
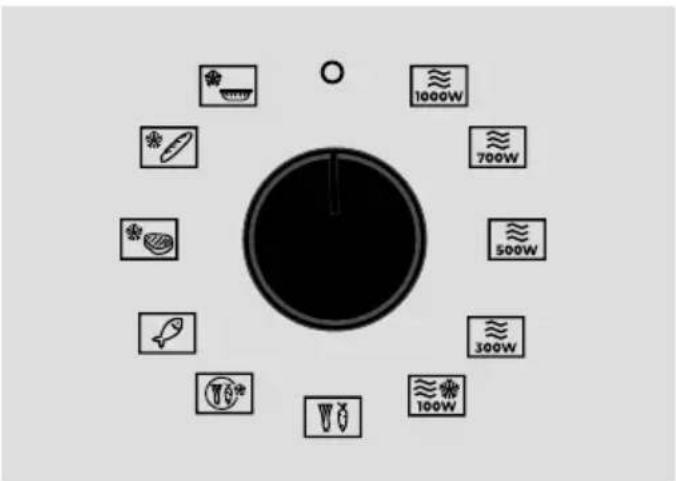
Automatic Functions:
The automatic functions select the cooking parameters for you based on the food being prepared and its weight.
Select a pre-programmed food item from the list below:
Defrost prepared dishes*.
Defrost bread*.
Defrost meat and poultry*.
Cook fish.
Cook frozen vegetables.
Cook fresh vegetables
- The delayed start cannot be used with these positions.
NB: Following a cooking time of more than 3 min at more than 300W, the fan, lamp and turntable remain active.
The fan helps evacuate any steam built up in the cavity to avoid damaging your appliance's electronic components. The glass plate will keep turning as long as the door is left closed.
During this mode, the microwave function is stopped, there is therefore no risk for your food.
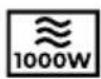
Microwave Functions
Turn the function selector to the desired position:
1000 W - 700 W - 500 W - 300 W - 100 W

Quickly heat water-based drinks and dishes containing a large amount of liquid.
Cook food containing lots of water (soups, sauces, tomatoes, etc.).

Cook fresh or frozen vegetables.

Melt chocolate. When cooking fish and shellfish.
Reheat on two levels. When cooking dried vegetables over low heat.
Reheat or cook delicate egg-based foods.

Cook dairy products or jams at low heat.

Manual defrost. To soften butter or ice cream.
SETTINGSMENU
You can adjust different settings on your oven (when it is not cooking), to do so:
Press and hold the key until "MENU" displays. Press again to scroll through the different settings.
Activate or deactivate the different settings with the + and - knob.
| 5b on | KEY SOUNDS - BEEPS: Position ON, sounds active. Position OFF, no sounds. |
| 5d of F | DEMO MODE. Switch on / off the “DEMO” mode; demonstration mode used for show. Switch it off to make your oven work. |
| 55 on | DISPLAY STANDBY MODE ON position: the display switches off after 90s. OFF position: the brightness diminishes after 90s. |
To exit the "MENU", press again for a few seconds.
4 FIRST USE AND SETTINGS
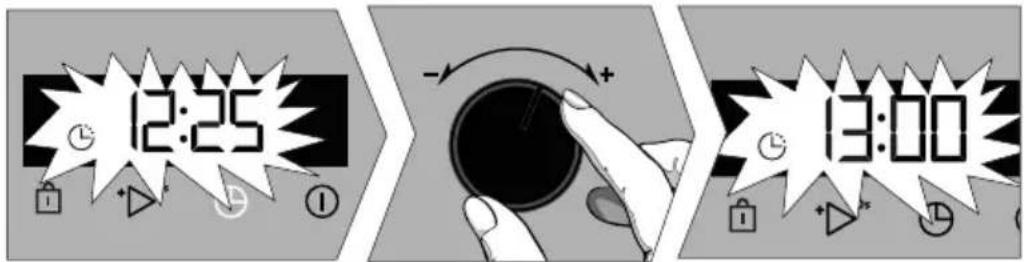
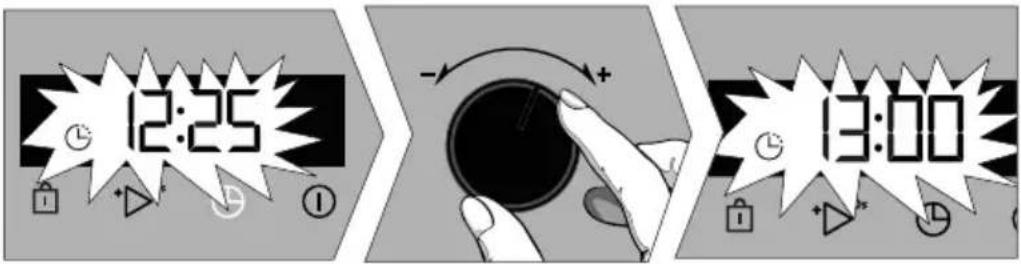
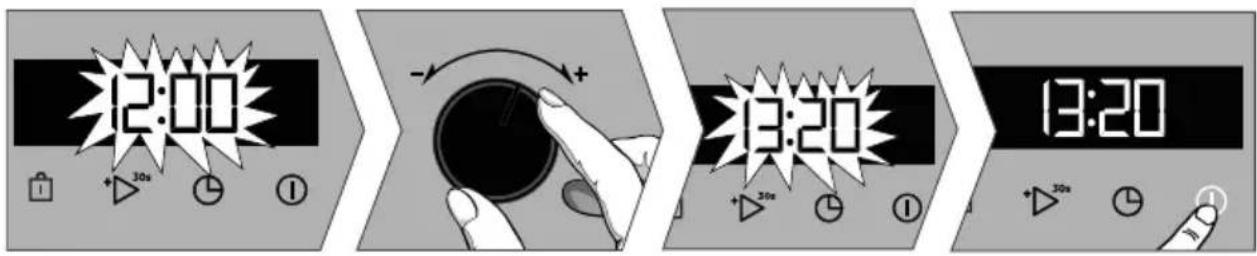
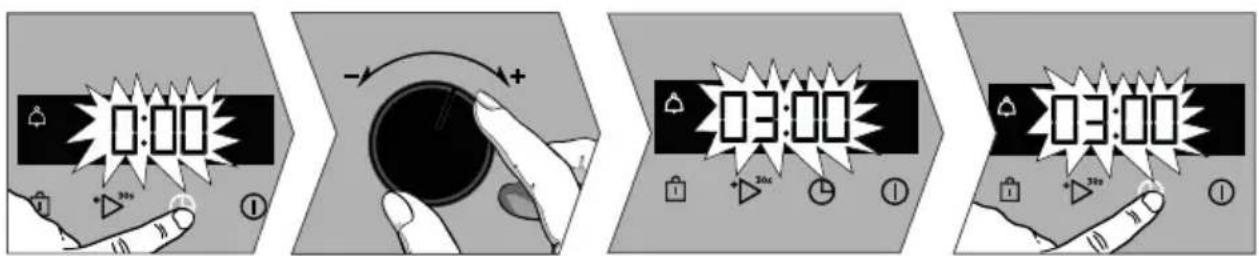
Setting the clock
When switching on, the display flashes at 12:00.
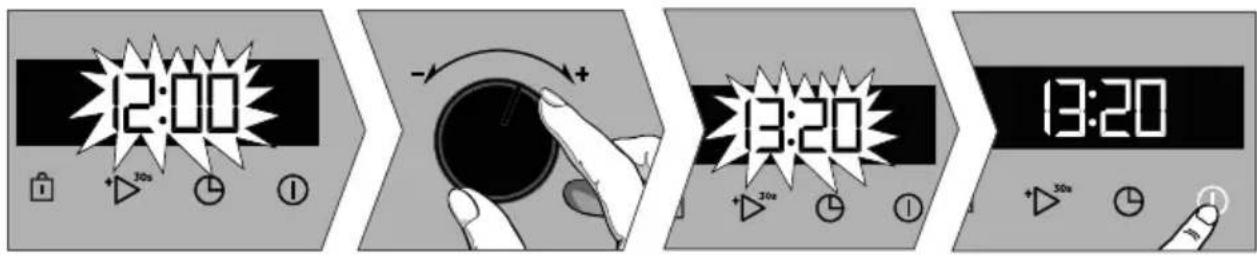
Set the time with the + and - knob. Confirm with .
The time will also flash if there is a power cut. Reset it as above.
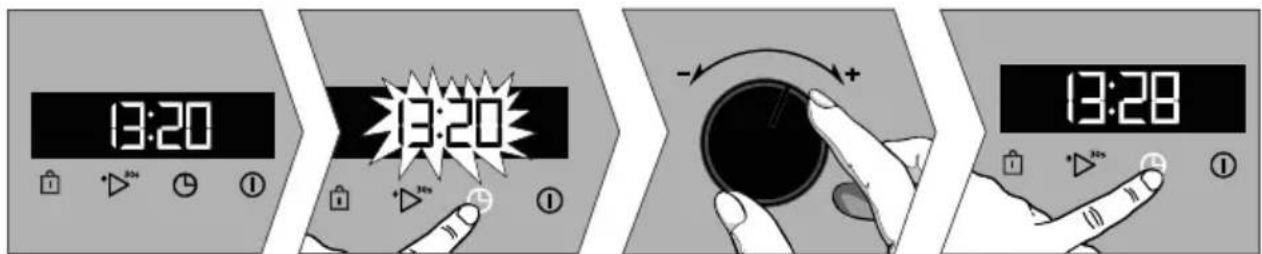
Changing the time
The function selector must be in position 0.
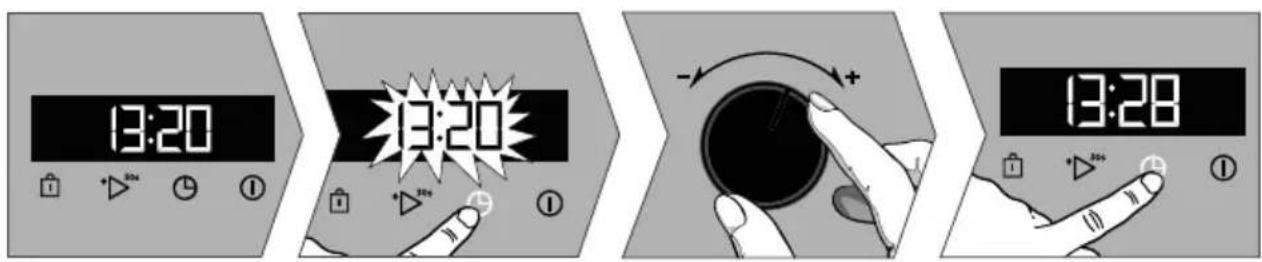
Press the key twice Confirm with
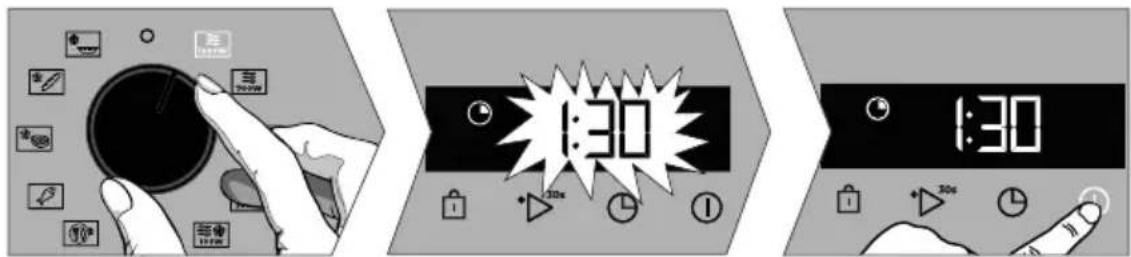
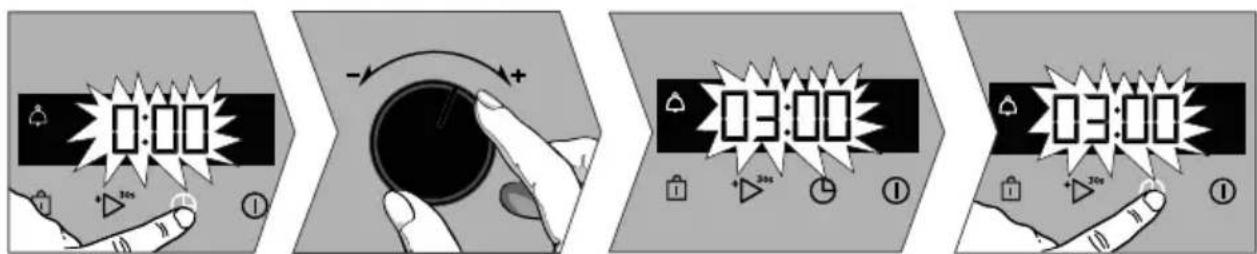
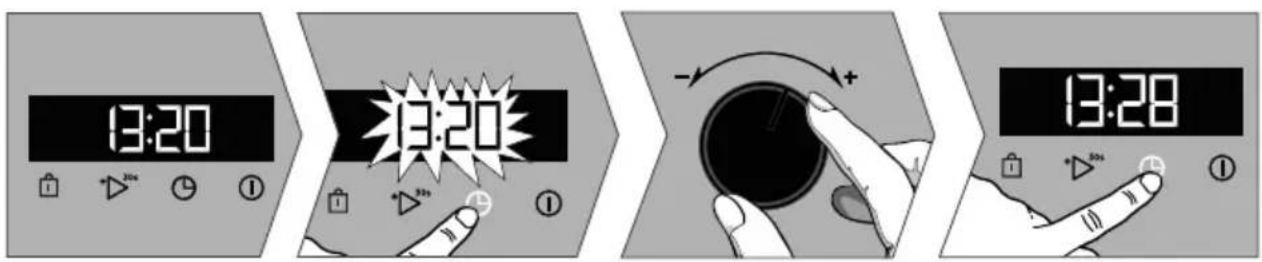
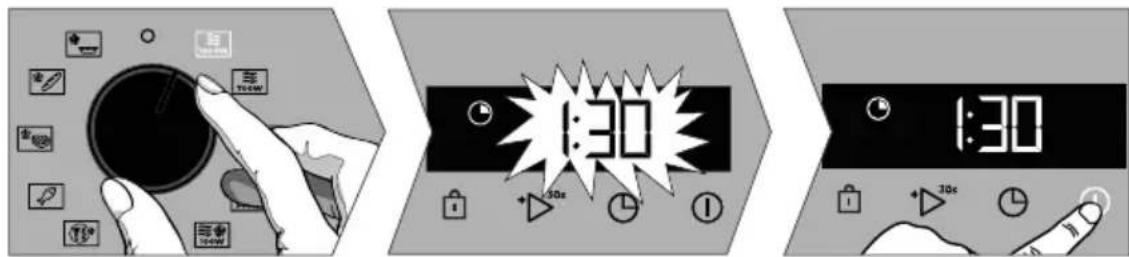
Timer
This function can only be used when the oven is off.
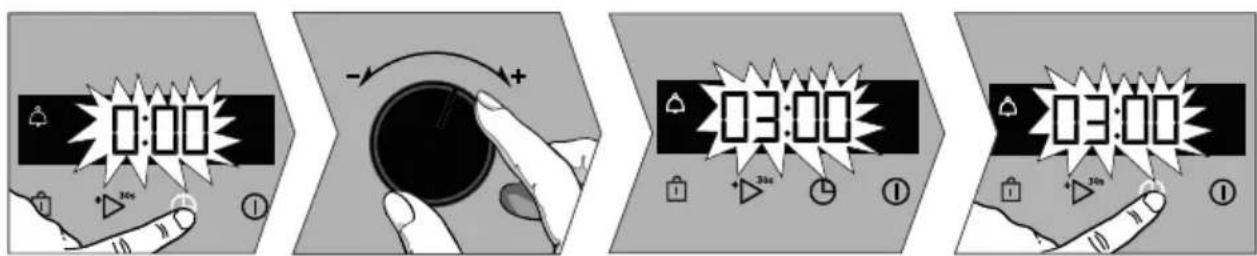
Press the key, the symbol appears. The minute minder flashes.
Set the timer with the + and - knob.
Press to confirm. The timer will then start.
Once the time has lapsed, there is a sound signal. To stop it, press any key. The time appears in the display again.
NB: You can modify or cancel the timer at any time. To cancel, return to the timer's menu and set to 00:00.
If you do not confirm, it will be saved automatically after a few seconds.
START A COOKING PROGRAMME
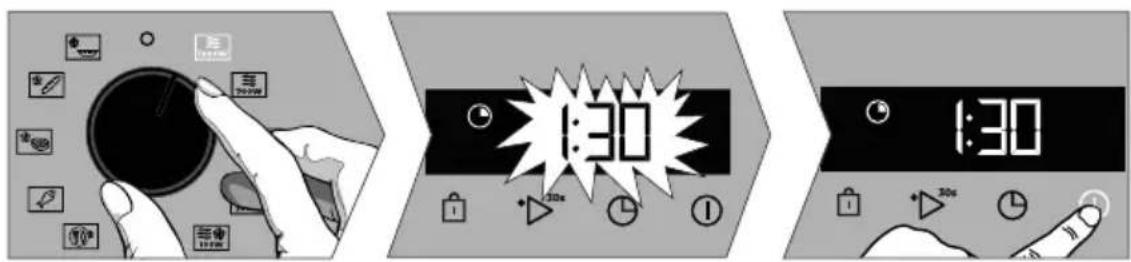
Immediate Microwave Cooking
The timer must only display the time. It should not be flashing. Open the door.
Set the dish inside the appliance and close the door. 5 microwave power levels are available: 100W (defrost) - 300W - 500W - 700W - 1000 Watts.

-
Turn the function selector to choose the required power. The display flashes and a cooking time displays according to the power level. You can modify the cooking time with the + and - selector.
-
Confirm with ① ; cooking starts and the countdown is displayed.
You can modify the cooking time with the + and - selector.
Immediate Cooking with Automatic Functions
The automatic functions select the cooking parameters for you based on the food being prepared and its weight.
-
Turn the function selector to the desired automatic function.
-
Enter the weight of the dish with the + and - selector (by 50g increments).
confirm by pressing ① .The oven starts.

4 FIRST USE AND SETTINGS
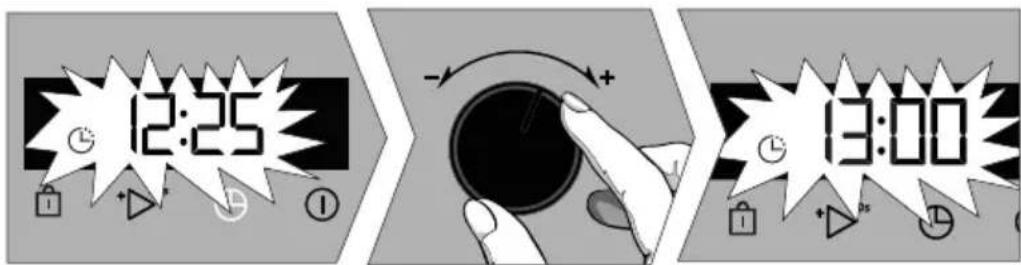
Delayed start
Select the desired cooking time and press ① ; the cooking end time flashes.
- Turn the + and - selector to set the cooking end time.
The cooking end time is automatically saved after a few seconds, or you can confirm it by pressing the key. The cooking end time display stops flashing.

IMPORTANT:
The delayed start cannot be used with the automatic defrost functions.
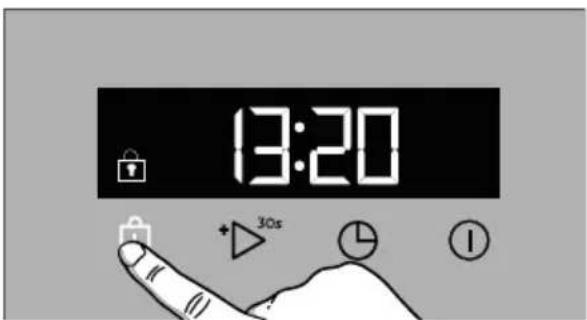
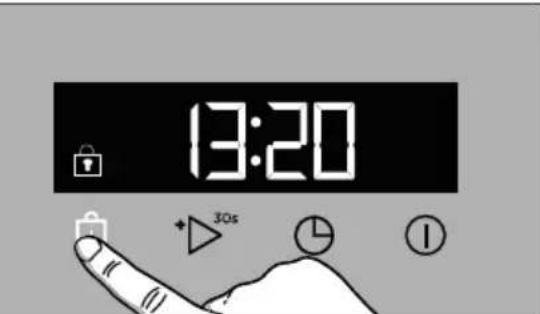
Locking the Controls - Child Safety Lock
Press the key until the symbol is displayed. To unlock, press the key until the symbol disappears.

CLEANING THE OUTER SURFACES
We recommend you clean the oven regularly and remove any deposits of food inside and outside of the appliance. Use a damp sponge and a little soap. If the appliance is not cleaned regularly, its surface could become damaged, permanently affecting the appliance's lifespan and possibly causing a safety hazard.
The use of abrasive products, alcohol or thinners is not recommended as they are likely to damage the appliance.
CLEANING THE INNER SURFACES
If the door or door seal is damaged, the oven should not be used until it has been repaired by a qualified person.
If the oven smells bad or is dirty, boil a cup of water with lemon juice for 2 minutes and clean the walls with a small amount of washing up liquid.
The turntable can be removed for easy cleaning. To remove it, grab it by using the access areas designed for this. If you remove the turntable, avoid getting water in the motor shaft hole. Do not forget to put the turntable, the roller frame and the glass turntable plate back in.
REPLACING THE LIGHT BULB
Contact the After Sales Service for any work on the light bulb, or a qualified professional accredited to work on the brand.
TROUBLESHOOTING AND SOLUTIONS
The appliance does not start.
Check that it is plugged in properly.
Check that the oven door is properly closed.
-The appliance is noisy.
The turntable does not rotate properly.
Clean the wheels and the rolling area under the turntable.
- You notice steam on the glass.
Wipe off the condensation using a cloth.
- Food is not heated during a microwave programme.
Make sure the utensils are suitable for microwave ovens and the power level is appropriate.
- There are sparks coming from the appliance.
Clean the appliance properly: remove any grease, food deposits, etc.
Remove any metal items from the walls of the oven.
- The oven is not heating
Check that the oven is correctly connected and that your installation's fuse is not out of service. Make sure the oven is not set to "DEMO" mode (see settings menu).
Functional suitability tests in accordance with IEC/EN/NF EN 60705 standards:
The International Electrotechnical Commission, SC.59K, has established a standard for comparative performance tests conducted on various micro-wave ovens.
We recommend the following for this appliance:
| Test Load | Time | time | Power selector | Containers / Tips |
| Egg cream (12.3.1) | 1000 g 16- | 18 min 500W Pyrex 227 | On the turntable plate | |
| Sponge cake (12.3. | 475 g 6 - 7 | minutes 700W Pyrex 827 | On the turntable plate | |
| Meat loaf (12.3.3) | 900 g 14 min 700W Pyrex 838 | Cover with cling film. On the turntable plate | ||
| Defrost meat (13.3) | 500 g 11-12 min 200W On a flat plate | On the turntable plate | ||
| Defrost raspberries (B.2.1) | 250 g 6-7 min 200W On a flat plate | On the turntable plate | ||

VAŽENA ZAKAZNICE, VAŽENY ZAKAZNIKU
A A E I A K A I H M A N T I K E I P O Y A E I
3 IAPOYIAGH THE YSEYHSEA
Napouoi an tou ooupyou
A Nivakac xεipioou
B Πóρτα
F Aαβn

Iivakac xepioou

Iepioptpeofoevoc diaokottnc
ETIIAOYnC LEIToupyiw
muyeipepaTOC

NaTne duo opecTo TnKtpo EIIeBaiwote μe To nnKtpo
XpovodiaikóTTnC
Autn n I oupyia va xnpoiooiOe i movov otav o oupvoC pioKetai EKToc I oupyia.

Pntote to nKtpo Kai 0a eupavio Te to ouuBoo. O xpovodiaakottnc avaoosnvei.
PuθμioTe Tov xpovoiaokottn μe Tov πεpiotpeφoEv oiaokottn + kai-.
Pntote To nnktpo yia eipiebaiwn kai θa ekvnoi n avtioptpO npn.
Molc teiaowei OxpoVoc, aKouyetai eva nyntiko onua. Ia va otapatnoi, TatnoT
onioobntne nnktpo. H wpa eupavicietai vava otnv oovn.
\SHMEI H: MTopeite va aAaXeTe n va akupwoTe OToiabntote OtiymuTov TpoypaaMTOU XpovobiaKoTTn. Ia akupwO, ETIOTpeVT OE TO evou Tou XpovobiaKoTTn kai putheta Te oTnv evEiN 00:00.
Eav yivei ETIIEBaiowon, n Eyypaqn TpaymuToIOeIa autouata oLiya deutepoAeTTa.
- AiaTIOSTWVETe OTI TO TzaiI IOaMI WVEI.
KouTIOTE Touc UopatmuOUs Eva Tavi.
ULKOPINNAN PUHDISTUS
SISÄPINNAN PUHDISTUS
Oh rapaHTnpyET He TOnbKO KaueCTBO I DOJIROBeYHOCtB HaIINx np6OpOB, Ho I INX OTCJExKIBaEMOCTb, To eCTb YKa3bIBAe TOUHOE N YeTKOE MeCTo INx pONCXOXKeHnI.
www.de-dietrich.com
De Dietrich
CREATEURD'EMOTIONS DEPUIS 1684
BAJHbIe NHCTPYKcIIN PO TEXHnke B3OpACHOCTN I PPeIOCTEPEXKeHnra. 4-6
1 YCTAHOBKA 7-8
BbI6op MeCTa n yCTaHOBka 7
3neKtpnueckoe noKnIOUeHne 8
2 OKPYKAIOUIA CPEIa 9
Oxpana okpykaioe ipebl. 9
3 ONICAHNE BAUJERO PUNBOPA 10-11
OnncanHe duyxObero 10
PpHaIeKHOCTn (B 3aBcIMOcTn OT MoJeN). 11
4 BkJIIOUeHne HAcTPOIKA 12-16
Pexim npiroToBJIeHnI nn 12
MeHIO HAcTpoEk (B COOTBeTCTBmC MoJeIbIO) 13
YcTaHOBka BpeMeHn, n3MeHeHne BpeMeHn TaMepa 14
Hauano npiroToBneHn 15
БыICTpbI peKIM npriROTOBHeHc MmKpOBoHOBbIM n3JeueHnem 15
БыICTpbI aBToMaTuYeCKn peXIM npriroTOBHeHna 15
IpiroToBneHnE c 3aepKko CTapTa n 6IoKnpOBka CnCTeMbI ynpabNeHnC 3aunTOJ deTei. 16
5 yXoI 17
OuInCTka BHyTpEHHeN IN BHeUHHeN NOBepXHOCTN 17
6 HENCINPABHOCTN IN CNOCObI INX YCTPAHEHNA 18
7 PEKOMEHDAUINI NO PIPNTOBLEHNIO NIIu 19
BE3OIIACHOCTb I BAJHbIE MEPbI IIPEdo-CTOPOJXHOCTN
BAXHbIE INHCTPYKcIIN IO TEXHnke B3OpAChOCTN: BHIMATEJIbHO IPOuTHTE N COXPAHNTE JIЯ NCIOJIb3OBAHnRA B DAJIbHEJWeM.
3Tu INHCTpyKcIIO MOXHO cKaaTaB Ha Be6-caTe KOMNaHn.
B MOMENT NOJUyeHnЯ np6bopa cpa3y Je pacnakyIte ero nIIN nonpocnte 3TO cdeJaTb KOrO-Jn6o dpyrOro. IpOBepbTe BHeuHn BvD. Pn Heo6xOdmocTn OOnuHTe HeoCTaTKn Ha KBNTaHcNn O doCTaBKe n COxpaHnTe oDNH 3K3emIIp.

3TOT np6opdoJxKeH
yctaHaBnBaTbCra Ha BbICote He MeHee 850 MM OT nOJa.
BE3OIIACHOCTb I BAJHbIE MEPbI IIPEdo-CTOPOJXHOCTN
cnyxheNble NOMEeHn;epMbI;
IINoJIb3OBaHn NOCeTtTeJMy
ROCTHnU,OTeJeN IN Dpynx
yUpeXdEHN JnIOrO Ha3NaueHnA,
BTOCTHnUHbIX HOMepax.
— 3TOT np6op moKet nCNOJb3OBaTbCЯ DeTbMn OT 8IeT n CTapWe, JIOdBm C OrpaHnueHHbIMN Qn3nueCKmN, CEHCOPHBIMN N yMCTBHeHHbIMN BO3MOxHOCTaMn, a TaKKe JIOdbMn C HexBaTKoIOnbTa I 3HaHnI NOk KOHTpOJeM OTBeTCTBeHHOrO 3a INX Be3OpacHOCTb INuca NocJe PPOXOXDeHnI PpeDvapnteJIbHoro INHcTpyKtaxa No 6e3OpacHomy NCNoJb3OBaHnIO np6opa I NOlyuHnI HΦopMauzn O pnckax, KOTOpbIM OHN IOdBepraIoTcR.
- DeTAM 3aPpeSeHo nIrpatb c npnbopom. He cIeJyET pa3peWATb DeTAM 6e3 npNCMOtpa OcyuEcTBnTb OunchKy u TexO6cnyKnBaHne.
— Cπeπte 3a Tem, yTo6bI DeTn He nΓpaIIc npnbopom.

ПЕДОCTEPEЖЕНЕ.
Прибори erо части,нанхаяшпесьВOTКрытOMdoCTуne,MOryTcNьнОHarpeBaTbCSBOВРЕma Pa6Otbl.БydTe BHNMaTeЛьнblIи HeПриТразИВaNTecbKHarpeBaTeJIbHbIM3ЛeMeHTam,KOTOpblE HaxODЯТСВHHTnДуXOBOrO shkaФa.DetmMlaDWe8NETMOrT HaxOДNTbCSBO3JIe DuyXOBOrO shkaФa TOLbKOПОД NOCTOЯHHbIM Na6JIIODeHNeBМЗрСыIX.

ПЕДОCTEPEЖЕНЕ.
Ecnn np6op pa6otaet B KOM6HnHPOBaHHOM peXnme, peKOMeHnyetcra, YTO6bI DeTn NCNoJIb3OBaJI Npey ToJbKO NOI npncMOTpOM B3PocJIbIX, BBnDy BBICOKNX TemnepaTyp.
—Пользуйтесь только посудов,приюнов дя ИспolyбовашиВ МИКРОВOLHOBОСеDE.ДЯ ПигOTOBЛЕNHЯВ MИКРОВOLHOBOM ржиме Hepa3peшаETСЯ ИСПОЛБ3OBaTbMeТаллчeckyю посудУ ДЯПRODAyKTOB ПNTAHNY IЖИКOSTeI.-МИКРОВOLHOBАЯпчБпретнаЗнayehaДЯ pa3Oг佩ваняпpoDAyKTOB ПNTAHNYI HanITKOB.ВыICUWBAHnePPODAyKTOB ПNTAHNYI NII BeSeI HArpeBaHNe CORPEBAHOxN ODoYWeK, TanoueK, rY6OK, BlaJXHOrO 6BJBЯ I DpyrNX POnO6HbIX PpeDMetOB мОжET NOВLEch 3a co6oB pNCKNoJIyEHNr TpABM, BO3RopAHNY IIN NOJkapa.

ПЕДОCTEPEЖЕНЕ.
Kndkoctn nIIN dpyrne npOdyktbI He cIeNyET HArpeBaTb B RepeMtuHNO 3aKpbITbIX COcydax BO n36eJxHne ONaCHOCTHB3PbIBa. —Pi np a30rpeBaHnnpOdykTOB NITAHN B PIACTNKOBbIX IIN 6ymaxhblx NaKeTAX, CJeDInTe 3a TeM, YTO6bl He npOn3oJIo BO3rOpahHe BVneH.
BE3OIIACHOCTb I BAJHbIE MEPbI IIPEdo-CTOPOJXHOCTN
BHHMaHHe:ecn Me6eJb He HMeet 3aDHeN cTeHKn, pacCToHne MExdY cTeHOI NOBepxHOCTbHO, Ha KOTOpOy UcTaHOBJIeHa Neyb, DOJXHO 6bITb He 60Jee 70 MM* (pnc. B).
Iocne nepehoca neun n3 xoloda B TeNnO He nCnoB3yNe Te ee cpa3y Je (noDoxnTe np6n3ntelbHo 1-2 yaca), NockoJbky KOHdeHcauia MoKeT npNBecTN K HapuWeHHo pa60Tbl.
PacnoJoxnTe neyb B Me6eIIN NO ceHTpy TaK, YTO6bl MeKdy neybIO n COceDNHM
IpeMeTOM Me6eN OCTaBAnc3a3Op He MeHee 10 MM. MaTePnA1 Me6eN, B KOTOpYOB BCTpaNBaETcM NkPoBOJHOBOI dYXOBON uKaΦ, DoJxKeH 6bITb yCTOuHBbIM K BO3DeIcTBnIO BblCOKo TEmpePaTypbI (IIIN Me6eN bOJxHa 6bITb NOKpIta TaKIM MaTePnA1OM).
PpocBepnTe OTBepCTne 2 MM B CteHKe Me6eJI N Bo n36exKaHne NOBHeNr TpeuINB DepeBe.
Дя obecneueHЯ 6OJIbIeW yCTOuHBOCTN 3akpeNTe neyB Me6eN, BKpyTNB Dba BnHTa B OTBepCTN, ppeDyCMOTpeHHbIe JЯ ATnx ueN (pnc. C).
3JIeKTPnueCKNE COeINHeHnA
Дя obecneeyня 3neKtpnuecko
6e3onacnoctn Heo6xOIMO npabnlbHo
yctahOBHT np6op. 3neKtpnueeckoe
IOdkIIOUeHne Heo6xOIMO BblONHHTb
do TOrO, KaK np6op 6yDet BCtpoEH
B Me6enb. DuxOBoi shkaΦ OCHaSeH
CTAHdApTHbIM Ka6eJem NITAHNc
TpeM npOBODnHKam CeuHEm 1,5 MM²
(1 Φa3a + 1 HeiTpalb + 3a3emHeHne),
KOTOpbIe DOJIKNbI 6bITb IOdkIIOUeHb K CETN220~240 B c nOMoubIcTaHdapTHOH pO3eTKNIEC 60083 Jn6o BceNoIOHcHOro npepbIbATEJIaB C COOTBeTCTBNc PpaBUNAMY UCTaHOBKn.
PpOBepeTe, yTo6bl:
- yctaHOBOUHЯ MOUHOCb 6bIa DoCTaTOHoi (220-240 BoIbT ~ 16 amnep). Ecnn dIra NODKluOeHn npu6opatpe6yETc BHeCTn n3MeHEnn B 3JIeKTpocetb BaIeO DOMa, o6paITecb K KBaJIINΦNUPOBAHHomy 3JIeKTpyk.
Bo BpemyBbIOnHeHnpa6oT no 06cnyKuBaHHO 6OpUdoBaHne DOJXHO 6bITb OTKJIIOyeHOOT CETN 3JIeKTpUpeCKOrO nHTaHn, PnaBKe IpeDOxpaHNTeHn Heo6xOIMO OTKJIIOUYHTb INN IN3BLeYb.

BHHMaHHe!
YcTaHOBka 6OpUpoBaHnI DoJXHa BbInOJIHrTbcra TOnbKO CneuNaIINCTaMn I KBaJIncnIupoBaHHbIMN TexHNKaMn.

BHHMaHHe!
IpoBOD 3a3emJHn (3eJIeHbIN-JeNTbI) NOcOeDInHeN K KJIeEMMe 3a3EmJHn np6op a NdoJXeH 6bITb NOKIOUeH K 3a3emJeHnO yCTaHOBKn. Pn OsbapxKeHN HeNCpabHOCTn DyXOBORo WkaΦa OTKlIOHTe erO OT CETN NIN CHIMTE COOTBeTCTBYIOuN INaBKNIpeDOxpaHnteB C JINHN NOKIOUeHn DyXOBORo WkaΦa.

BhimaHne!
Haawa kompanna He Hecet OTBETCTBeHHocTn 3a HecuactHbIe CnyuaH NIN NOLOMKN 3-3a OTCyTCTByUoZero, HEnCnpaBHoro NIN HEnpaBnJbHoro 3a3eMJIeHnN INn HECOTBcTCTByUoZeRo NOkJIIOUeHn.
2 OKpyKAIOIIA CPEIa
OXPAHA OKPYXAOUeN CPeIbI
MaTePnAJIbI yNaKOBKn npN6opa npNROHbI dIa BTOpUHOn nepepa6oTKn. I03a6ObTbTeCb 6bOkpyKaHOUs cpeDe: yuactByuTe B nepepa6oTKe, Bbl6paCbIBaYyNAKOBky B COOTBeTCTByIOUne rOpODCKNe KOHTeINHepbI.
PpN6Op TAKKe COCTOuT n3 pa3JIuHbIX MaTePnaJIOB, npnroHbIX dIa BTOpuHoi nepepa6OTKn. Ha Hero HAnecen IOROTIN, yKa3bIBaIOUsiN Ha To, UTo 6bIBWne B yNoTppe6JeHmnpN6Opbl He cIeNyET
CMeUINBaTb C npOuHM OTXoJamN.
Takm o6pa3om, ytnn3aun npnbopa 6ydet npo3BOINTbcB N0NJHom COOTBeCTBnC Tpe6oBaHnMn N3ROTOBnteN I DeiCTByUoSeE BponeckO DNpeKtNBbl 06 ytnn3aun 3neKtpueckoro n 3neKtpoHHoro 6opydoBaHn.
O6paaItecB 6nKaiuM3pNIO nIN K DnCTpn6bIoTOpy, yTO6bl y3HaTb 6nKauiNe K BaIeMy domy ToCkN C6opa np6bopoB dJn IN x yTNn3aun.
Pyuka Bbl6opa peXIMOB npnroTOBNeHn

Puyka HacrpoiKn + n -

O=Прдпгштельнocь ппготовеня
G=OKOHuaHne npnroTOBJIeHna
BnokpoBka KHOPOK
Taimep
9 = Bec
A BnoknpOBka KHOIOK
B Do6aBbTe 30 cekyHd K npnroTOBJIeHHIO
Hactpoika BpeMeHN,ДПИTeJIbHOCTN ⅠOTLOXKeHHORO
D CTapTa dIy npIroTOBneHnA
.3 OIIHCAHNE BAIIIETO IIPNBOPA
ПРИНадлесхноctи
Bpaaoueec6JIOdo
Bpaaiooeeoc 6nIO oecneuBaet paBHomepHoe npiroTOBHeHne npOyKta 6e3 BbINOHNHeNr DOONHHTeNbHbIX DeICTBn.
Bpaaetc B 2 HanpaBneHnX. Ecnn OHO He Bpaaetc, npoBepbTe, TTo6bl BCE 3JIemEnI npaBnIbHO cTOnnn.

Ero moxho nCnoJb3ObaTb kak 6nIO do npiroTOBneHna. Ira n3BneueHna 6nOda BbIaHTe erO, nCNoJb3yra 30HbI DoCTyna, npeducmOTpeHHbIe Byrny6neHnn.
Hecyun 3IeMeHT n03BOJraT CTeKJIHHOMy 6JIOy Bpaaatbcra.
Ecn He cyu n 3nemnt nBneueH, He onyckaTe nonadHn BODbB OTBepCTne OCN Dnrgatela.
He 3abBaIte BepHyTb Ha MeCTO HeCyUH 3JIeMeHT, POJIKOByU ONOPY I CTeKJIaHHoe BpaauoUeecr 6JIIO.

BAKHO!
He BpaaTe 6IIO Bo BpyHyO BO n36exHne NOBpeXeHn CnCTeMbI npNBOda. B cnyae nnoxoro BpaueHn y6eINTecb B OTCyTCTBn INHOPOdHBIX ppeMeTOB no6IIOOM.
4 BKJIIOYEHHE HACTPOJKA
PEXIMblPNIIGOTOBJEHNA

ABTomatnueckne yHKcnn
A B T O M A T N U C E C K N E Φ y H K C N N B b i 6 n p a H T 3a B a c N o d x o D A S U N e nap a M e T p b I P n r o T O B J E H N B 3 a B u C H M O C T N O T P n r o T O B N L E M O R O n p o D y k T a n e r O M a C c b l.
BbIbePte npedBapnteJbHo 3anporpamMnpoBaHHbI npOyKT n3 cneDyUoero nepeuHa:
Pa3MopaxKBaHne roTOBbIX 6JIoD*.
Pa3MopaxKBaHne xIe6a*.
Pa3MopaxnBaHne Mca n NTuBi*.
PpuroToBJeHne pbl6bl.
PpuroToBJIeHne 3amOpOxeHHbIX OBOUeJ.
PnuroToBJIeHne CBexnx OBOUeJ
- Θι pεχκμβI He ΠΟ3ΒΟλΙΟΤ BbɪŋΟJIHHTb OTNoXeHHbI CTapT.
PpimmeaHne. Pocne npnroTOBHeHn B TeueHne 6oJee 3 MInHyT npn MoUHcTn 300 Bt BeHTnlaCn,JaMnOuKa n BpaAuaOuEecr 6bIoo ocTaIoTc aKTHNBbIMN.
Bentnlaun no3BoJaret ydaHntb nap, KOTOpBIMOR CKONITbcB DuyxOBOM shkafty, YTO6bl He nobpeDnTb 3JeKTPoHHbIe KOMNoHEtbl BaWero n3dennr. CTeKnHHOe 6IIO do 6ydet npOdoJIkTaB BpaaTaBcR Do Tex nop, NOKa DBepca 3akpbita.
B 3TOM pexnme cyHKunr MmKpOBoH OTKJIouyeHa, NO3TOMy Het HnKaKOro PnCKa DnBaUnx npOdyKTOB.
Функцma MKNPOBOJIH
YCTAHOBNTe nepeKIOUaTeJIb B HxHoe NOJoxKeHHe:
1000 Bt, 700 Bt, 500 Bt, 300 Bt, 100 Bt

PnpuroBHeHne npOdyKTOB nHTaHn, coepkaux 6oNbwoe KOJIuYeCTBO BObI (cynbl, coycbl, NOMIDOpbl T. d.)

PnroTOBJIeHHe CBexNX nn 3aMOpOKeHHbIX OBOUeI.

PnabHeHne WOKoJa. PnroToBJIeHne pb6bl paKoo6pa3HbIX.
Pa3orpB Ha 2 ypoBnX. PnproToBneHne cyxnx OBOuEe Ha MaJOM OrHe.
Pa3orpeB nnn npuroTOBJeHne Hekhblx npOdykTob Ha 6a3e RnC.

PnroTOBJIeHHe Ha MaIOM OrHe MOIOUHbIX npOdyKTOB, BapeHbJ.

Pa3MOpO3Ka B pyHOM peXnMe.
PactOnITb MacNo, neI.
MEHIO HACTPOEK
Bbl moxete BblbnpaTb pa3hble npaMeTpbl dny BaWei neu (He B peXnme npiroTOBneHn),dny 3toro:
YdepxBaTe KHOKy Do nOBHeHnHaDnCn MEHO.CHOBa HaxMnte Ha KHOpy
DNpnepeXoDa OT ODoHn HAcTpoKn K dpuroi.
BkIIOaIte nII N BbIKIOuaIte pa3JIINHbIe npaMeTpbl c NOMOu bO pyuKn + n -.
HauJIO PnIroTOBJIeHnIa
БьICTpbI pexIM npiroTOBJeHnC MKNpOBOJHOBBbIM N3JnyeHHeM
Ha dncnnee doJnxHo oTo6paXaTbcra ToIbko BpeM. Noka3aHna Ha dncnnee He doJxHbI MnRaTb. OTKpoTe DBepu.
Pa3mecntte npodykt nHTaHnB neu, 3akpoTe DBepy. B BaIeM paCnpjKeHn 5 MoUHOCTe IpaAun MKNPOBOH: 100 Bt (pa3MopaxNBaHne), 300 Bt, 500 Bt, 700 Bt, 1000 Bt.
-Повернite поеклочаел b Функци Дя Вьбopa кени мошноctи.Диспел Начот MИгат, оTOбра3ntcдЛNTeЛьвOCt b пи�OTOBленя B 3aBnCmOCTN OT Мошноctи.Бbl можete n3MeHHT bДЛNTeЛьвOCt b пи�OTOBленя C nOMOьbIO пөрклочаел + n -.
- PoiTBePdIte c nOMOuBIO KHOJKN ①, npouecc npiroTOBHeHn 3anyueH, OTo6paKaTeC o6paTHbI OTCuET BpemeHn.
Bb moKeTe n3MeHnTb dIInTeJbHOCTb npiroTOBJIeHnC NOMOu bIO nepeKIOUaTeTg+ n-
БыICTpbi aBTOMaTHueckn peXm npHroTOBneHna
A B T O M A T N U C E C K N E Φ y h k c n N B b i 6 n p a I O T 3 a B a c n o d x o d y s u n e nap a m e T p b l n p n r o T O B n e H N R B 3 a B N C N M O C T N O T p n r o T O B n J E M O R O n p o D y k T a n e r o M a C c b l.
-
YcTaHOBIne nepeKJIouaTeIb Функин Ha aBTOMaTnueckyIO ФункиNIO NO BaWemy BbIbOpy.
-
YcTaHOBnTe BEc npOdyKta c NOMOu bIO KHONoK + n - (c 50 r).
IodTBePdnte CBoB BbI6Op, Haxab ①. DuxOBoN uKaΦ NaunHaet pa6OtaTb.

4 BKJIIOYEHNH HACTPOJKA
PnroToBJIeHne c OTIOXKeHHbIM CTapTOM
BbI6epnte cnooc npiroTOBJIeHn, 3aTeM HaxMITE KHOJky O, HauHET MIRaTb CIMBOJ OKOHuaHn npiroTOBJIeHn.
C nOMOUIbHpyuKN+u-yCTaHOBNTe BpeMg OKOHuaHN npnroTOBneHn.
Yepe3 HeCKoJIbKO CeKHyI BpeMg OKOHuaHnnpuROBHeHn6yJeT 3aΦHKcnpOBaHO aBTOMaTuueckn, B INHom Cnyuae nOITBepDInTe BblOp, Haxab KHOkky O. INdikatop OKOHuaHn npuROBHeHn ppeKaaaet MmraTb.

BAKHOI
ABTomatnueckne yHKun pa3MopaxnBaHna npOyKTOB He N03BOJrT BbINONHHTb OTIOXeHHbI CTapT.
6 HENCIIPABHOCTH IN CIOCOBBI INYCTPAHEHIA
HENCPABHOCTN IN CNOCObI INX YCTPAHEHNA
- Duxoboi shkaΦ He 3anyckaetc.
PpOBepeI npaBnIbHocTb POKJIoueHnBaSeI neu.
IpoBepbTe, yTo6bl DBePca BaWei neu 6bIna xopoOio 3akpbIta.
- Duxoboi kkaΦ n3daeT wym.
- Duxoboi shkaΦ He HarpeBaetc.
IpoBepbTe,TO dyXoBOJ uKaΦ npaBnIbHo NOdKJIouyeH nIpeOxpaHnteIb BaWero npi6opa B pa6ooyem COCTOAHm. IpoBepbTe, He HAcTpoEHn dyXoBOJ uKaΦ Ha peXIM DEMO (cM. MeHIO HAcTpoEk).
7 PEKOMEHDAIINIO IIPNIGOTOBJEHNIOIIIIN
TecbI pa6oey npirodnoctn B COOTBeTCTBn C HopMaMn CEI/EN/NF EN 60705:
MexdynapoHna 3neKtpoxnuecka KOMnccn, SC.59K, yTbePnla cTaHapr, OTHocuNcK CpaBHnTeIbHbIM TecTam TexHko-3KcnpyaTuOHHbIX NOKa3aTeJeB, BbINOJIHeHHbIM dIpa3NIuHbIX MKNpOBONHObIX neeu.
Mbl pekomehnyem cneyuouee B OTHoWeHn daHHoro np60pa:
VAL AV PLACERING OCH INBYGGNAD
Denna apparat ska installeras minst 850~mm fran golvet. Den kan installeras pa hojden, enligt vad som anges pa installationsritningen (Fig.A).
BAJKINBI INPABUNA TEXHIK N 8E3NEKN 3ANOBIXHI 3AXOIN .4-6
- YCTAHOBJIEHN.. 7-8
Bn6ip Micya IJpa po3aUyBaHHra Ta B6yDoByBaHHra 7
Пд'еднняdo eNeKtpomepexi 8
2.HABKOLINHCECEPEIOBUNe 9
3axnCT HABKOJIINHbOro cepeIOBua 9
3.ОПИС ПИСТЮIO 10-11
Onnc duxoboioafo 10
Akecyapn (aenxno Bid moeni) 11 - YBEDEHHB EKCPIYATAUIO TA HAJAHTYBAHHN 12-16
PexnM npiroToyBaHnHa 12
MeHou HanaTsyBaHb (3anexHo BiD MoDeni) 13
YcTaHOBJIeHHaCv, 3MiHeHHaCv Ta TaMep. 14
IouaTOK npuroTuBaHHra 15
HeraiHe npiroToyBaHHa HBu 15
HeraiHe npiroToyBaHHB aBtOMaTHOHy peKmI 15
Bidknaedn 3anyck npirotyBaHHra Ta 6nokyBaHHa KhoNOK dIra 3axncty dTei. 16
5.Догл.. 17
OuHHeHH BHyTpIiHbOiT Ta 3OBHiHbOIO nobepxhi. 17 - HECPABHOCTI TA IX YCYHEHHRA 18
- IOPAIN ⅢOIO PNIIGOTYBAHNA 19
BAKJIINBI IINPABUNA TEXHIKN 6E3NEKN - YBAJHO IPOUHTAITE N 3BEPEXITb IJIЯ NOДАЛьшОВ O BNKOPNUCTAHNЯ.
Lcien noci6nK KopncTyBaay MoxHa 3aBaHTaxNTn 3 Be6caTyr KomnaHII.
Otpimabwn npncpti, odpa3y X po3naKyIte Ioro BlaacHopya6o X nonpocitb po3naKyBaTn Ioro. NpeBipTe Ioro 3OBHIshni BnIgIaD. 3annsi TbcYci 3actepexeHnB HaKaIadHi, 3po6Itb II konio i 36epexiTb.
— Y pa3i NOsKoJKeHnKa6eIIO XnBJIeHnY, 06 yHnKHyTn He6e3neKn, I0rO 3amIny IOBnHeN 3dIINCHIOBaTN BnPO6HnK, Cnyk6a nCnJaPOnaJxHO rO 06cNoyROyBaHnA6o OcO6n 3 BiDnOBiDHO KBaIicIkaIeI.

Cen npncptpi Heo6xidno
BCTaHOBJIIOBaTn Ha BnCOTi 6IbIe 850 MM Bi nIaIOnr.
3a6oHbOHTn npntpi 3a DeKopaTbHMn DBepTaMn, OckiNbKu Ze MoKe npn3BecTu Do neperpiBy.
BiduHTpyTe Duxoby waoBy B Mici BCTaHOBHeHn TaK, 0o6 BiDcTaHb BiD cyciHbooi waoN CTaHOBnla 0oHaIMeHne 10 MM. B6yOBoHi Me6nIOBHHI 6yTN BnroTOBJIeHI 3 TepMOCTIKOROMatepiay (a6o NOKpNTI TepMOCTIKM MaTePiaIOM).ДЯ 6iNbwoi CTiKocTi npKpinitb PnCtpiJ Do wa0n 3a DOnomoroHO DBOX TBnHTiB Ype3 OTBOpn Ha 6iHuNX CTiKaX.

Ma€ 6yTn 3Mora BIDKJIIOHTN
nprncptpi BID eIeKtpomepejx 3a DOnOMOHO BmNKaHa, y6ydoBaHOro y φiKcoBaHn Ka6eJenpoBid BiNObiDnO Do npabn MOHTaJy.

3ACTEPEXEHHЯ.
Uo6 yHnKHyTn He6e3neKn, 0epaui 3 texHicHo ro 06cnyroBvBaHHa 60peMoHTy, aKi nepeD6aauTob 3HraTTa KpnsKn, 0o 3axuace BID BnIBy MikpoxBnIbOBoi eHepri, NOBHeH BVKOHyBaTu TjIbKn KBaIqikOBaHn CneuaJIcT.
—Leynpicti npn3naeHOnI npirotoybaHHia 3aunHeHmN DBePcTaMn.
— Léen npincptiin npn3naheNo dIy BnKOpncTaHnB nO6yTOBnx i aHaIorigHnX yMObax, k-OT KxOHnI KyToUKN IJI npceHny B mara3nHax, ophiacx Ta iHnX npopeciHnx npmiiEHHx; fepmepcbki roCnoapCTBa; KJIeHTaMn B rOteJAX, MOTeJAX Ta iHnX JNTIOBnX npmiiEHHx; B npmiiEHHx TIny rOCTboBnX KIMHaT.
LIM npncptpoem MoKyTb KOpNCTyBaTnCra DITn He MOJOnIe 8 pOKiB i Oco6n 3 φi3NuHmN, CEHCOPHmN Ta PO3ymOBmN Baamn a6o 6e3 Heo6xIDHorO
DocBiy 3HaHb, 3a yMOBn
IIO BOH Npe6yBaIOTB NiD
BIDNOBIDHM HaTJOM, IX 6yNo
NONepeHNBO IPOIHCTpyKTOBAHO
UOo 6e3neuHOr BOKOpNCTaHH
PnCTpoIO Ta BOH p03yMIOTb
NOB'3aHI 3 cIM Pn3NK.
-ДiTЯМ 3a6bOPOHeH rpaTnC4 3 npIcTpoEМ.ДiTЯMdo3BOJeH0 6paTn yUaTb B OChuSeHHi ITexHiCyHOMy ObcnyroBvBaHHi npIcTpoTOiNbKn NiD HaraJdOM dopocnX.
Heo6xio CnikkyBaTu 3a Tm, o6 dITn He rpaIncs 3 npncTroem.

3ACTEPEXEHH
Пд час роботи писчим i为其о Досяжни detaji HarpiBaHTbCS. He TopkaIteся HarpiBaIbHnx elementiv ycepeDHHi dYxOBOi waФи.ДITEB BIKOM Do 8 pOKIB 3a6obopoHeNo ПIDnyckatn Do пристою Be3 HargЯу 6aTbKIB.

3ACTEPEKEHH
Якшо писстрипрацюев КOMбIHOBaHOMy peхимi,чepe3 BnCOky TemnepatypуpekOMeHNIOBaHO Do3BOJnTINДITЯМ KOpNCTyBaTnCЯ писстpoemTilbkn NiI HaIGNJDOM DOpocnX.
BnKOpncToByTe JnIe NocyD, np3HaueHn DJIa BnKOpncTaHHB MIKPOXBnIbOBNX
peax. 3a6oponeho BnKOpNCTOByBaTN MeTaeBi KOHTeHepn dIJI iXi N HanoIB dIa
IprnroTyBaHHB MikpoXBnIbOBNX neuax.
MikpoxBnIbOBy nIpy np3NaueHo dIy po3irpiBaHnX xapOBX npOdyKTiB i HanoiB.CuSiHHx xapOBX npOdyKTiB a6o bIin3Hn, a TakoJ HarpIBaHHraPioK, KaIcIB, r60K, BOnoroI bIin3Hn iHux noi6hNx npedmetiB MoKe npN3BeCTn Do TpaBMvBaHHa, 3aImaHHa 6o IooKexi.

3ACTEPEXEHHY
PidHn iHwi xapObi npOdyKtN 3a6OpOHeNo HarpiBaTn B repMeTuH0 3aKpNTux KOHTeHepax, OCKiNbKn BOHN MOxTyB Bu6yXHyTN.
—Пд час розirpiВанняixiВпл actNKOBnx abo panepobnxKoHTeHepax He BiDxOdbTeBiI neyi, Ockilbkn icHyec pN3nK3aImaHHra.
— Y pa3i NOBn DmMy 3ynnHITb a6o BiKIOUHTb BiD Mepexi niu TpMaIte DBepzraTa 3aunHeHMn, 06 3aracntn MOxJIVe NOLym'
HarpiBaHHa HanoB y MikpoxBnIbOBI neyi MoKe CnpuHHT paTobN i TpNBaII BnKD OKPOny, TOMy 6yDbTe oBepeXHi, bepuN Do pyK KOHTeHepn.
- Ymict dntaunx pnaeok i 6aHocik3 dntaum XapuyBaHHam neped BxNBaHHam Heo6xidno nepemiatn a6o 36OBtata Ta nepeBipTu TEmnepatpy, 06 yHnKHyTN OnikiB.
He pekomeHdoBaHo
po3irpiBAtn B mikpoxBnIbOBIi
neui yuB shkapanyni a6o
KpyTO 3BapeHi yu, OckilbKn
BOHN MOKyTB BNoByxHyTu HaBiTb
nicra 3aKiHueHH npriOTyBaHHra.
— PekomeHDoBaHO perynapHO
ChNTtuPi i BnDaJIaTn 3aJIuShKn
IXi.
-Якwo npictpiHnePiIDTPmMyBaTn B uNcTOTi,CTaHNoRo NOBepxHi MoKe NOripuNTncr,HEMNHyCe cKOpOuyUoyu TepMInClyXbN PnIcTpPoU, 0o MoKePpN3BeCTn Do He6e3NeuHOICHTyaui.

3ACTEPEXEHH
Y pa3 noшкоженя DBepcaT a60 ix yuizbHeHHa 3a6OpOHeHO KopnCTyBaTnCn iuyo, NOKn II He 6yde BiDpeMOHTOBaHo. Pemont NOBIneH BnKohyBaTu KBaJIiΦiKOBaHn CneuaJIcT.
3a6bOpOHeHO BnKOpNCToBvBaTn abpa3nBHi YnCTnIbHi 3ac06n a6o TBepdi MetaJIeBi cKe6Kn dJa OuyIeHHr CKJHnx DBePcT dYxOBoi IaΦN, OckIbKn BOHm MOxTy b NopRpaTn NOBepXHTo Ta npu3BeCTn Do po3TpickyBaHnckJa.
He BnKOpNCToBvIte npOoUncHnK.
—ДiTиMOxUyTb KOpNCTyBaTnCra niuH0 6e3 HargJy TInbKn
nicra TOrO, k BOHn OTPMaOTb BiINOBiDiHi iNCTpyKcii 0oDo 6e3neuHoro KopnctyBaHHn Niuyu yCbIDomJrTb He6e3neky HnpaBnIbHO BnKOpNCtAHn.
BnBIP MlCzI JIaP03TaUyBAHHN IyBUDyBAHHN
Ley npicpii Heo6xio BCTaHOBIOBaTH Ha BncoTI 6Ibwe 850 MM Bi nIgOrn. Noro MOxHa BCTaHOBIOBaTH B IaΦi-NeHaji, k POKa3aHo Ha CXem MoHTaKy (pnc.A).
YBara! Ka 3aHn cTInKa Me6nib 6yde BiKpToH, BiCTaHb MIX CTiHKoH nIOBepxHeU, Ha kY CNpaETbcN iU, He NOBHHa nepeBn7yBatn 70 MM* (Pnc. B).
He BnKOpNCTOBuYTe npncTpiOdpa3y (3aueKaIte np6Iu3Ho 1-2 roDHH) nicJnepeHecenHryo 3 xOJODHO rnpMiuEHHB TePJIe, OCKJIbKn KOHDeHCAT MOKe npu3BeCTn Do HecnPabHocTi.
BiduHTpyTe nuy Micci BCTaHOBHeHnTaK, 06 BiDcTaHb BiCyciHboI WaΦn CTAHOBnla 0oHaMehwe10 MM. Y6yIDobHi Me6JI NOBHHI 6yTINBuroBHeHi 3 TepMOCTiIKOrMaTepiany (a6o NOKpNTi TepMOCTiIKM MaTePiaNOM).
PpocBepdniitb OTBip 2 MM B ctiHcimMe6nib, uo6 yHnKHyTN po3KOJIIOBaHHMaCnBy DepeBnHn.
Дя 6иьwoi ctiikocti npinkpiitb npictpi Ido wao n 3a donomoroIO DBOX rBnHTIB uepe3 OTBOp (pnc.C).


ПID'ЕДHAHHЯ DO EJEKTPOMEPEXI
Heo6xio npabnIbHO B6yBAtn npncpti y Me6ni, 0o6 3a6e3neuHTn eNeKtpo6e3neky. Iid'EDHaHHa Do eJeKtpomepexi Heo6xio HO BIKOHATn DO BCTaHOBJIeHHa npncTpoIO B Me6ni. DyxOBy waCy OChauEHO cTaHApTHm Ka6eIem KINBLeHHa 3 TpbOM npOBiDnKamn nepetnHom 1,5 MM2 (1Φa3a + 1 NeITpaJb + 3emna), kI Heo6xioHO nID'EDHaTn Do MepeXi 220-240 B uepe3 po3eTKy cTaHapTy IEC 60083 a6o BceNoIcHn Po3MkaU BiNobiDHO do npabn MOHTaxy.
IpeBipTe:
- yctaHOBka Maé DoCTaTHIO NOTyXHicTb (220-240 B, ~ 16 A).Якso Дяпдключehня zuboro npnctpoIo Do eNeKtpoPBOdKn B 6ydIbNi, yЯкиВи MeuKaTe, Heo6xIDHO BheCTN NeBHi 3MiHn, 3BepHiTbcrdo KBaIiΦikOBaHoro eNeKtpika.
Iid yac texhichoro 06cnyrobyBaHHn npnstpi Mae 6ytu BiKluoyeno BiEneKtpomepexi, a 3anobixHnKNBumKHeHO a6o BnHrTo.


ybara!
MOnTax npnctpoo NOBHHI BnKOHyBaTu TiIbKn KBaIipikobahi Cnei- anictu 3i BCTaHOBJeHH Ta TexHikn.

ybara!
3axnH npoBip (3eJeHO-KOBtN) nID'cHaHO Do KIeMM pncTpoU, i Noro He-06xIDHO 3'cHaTHi 3a3emnIOBaayem.
y pa3i BnHnKHeHH 6yDb-8knx HeCnpaBHOCTe DyxOBoI waΦn BiD'EdHaHTe npncTpii Bd MepeXi abo BnMItb 3anobixhNk Ha BiIDNoBIDHi JInHii NiD'EDHaHHra waΦn.

ybara!
Kompania He Hece BiINOBiJaIbHocTi 3a 6yNb-RAKi HeuacHi BnnaKn a6o iHNDeHTN, CnpuynHei BiDCyTHicTIO 3a-3eMJIeHHra, Ioro HecnpaBHicTIO a6o HEPaBnIbHM BVKOHHaHHaM, a TaKox 3a 6yNb-Ke He npaBnIbHe NiKDJIoueHHa.
2. HABKOLIIHCE CEPEIOBIIIE
3AXNCT HABKOLINHbOTo CEPeIOBnA
YnakOBky cIbO npICtpoIO BnroTOBneHO 3 MaTepiJIIB, zo nIaIraHOt b nepepo6ci. Taki MaTepiAn cIiD BiDaTn Ha nepepo6Ky dIy 3axNCTy HABKOINHbOro cepeoBnua, nomcTbUx iX y cNeizaiNbHi MyHicnPabHi KOHTeHepn.
Ppncptpi k Takn TaKoK MicTb YNCJIeHHI MaTePiAn, npndatHi DJI BTOpHHOi nepepo6Kn. Tomy Ioro No3HaueHo cIM IOROTINOM, kN Bka3ye Ha Te, 0o BVKOpncTaHI pncctpoi He
MOxHa BnKnDaTn pa30m 3 iHsMMN BiXoDAMN.
Ipepeo6ka npncTroob, opraHizobana Bnpo6nKOM, 6yde 3diinChIOBaTnCBA NaKpaux yMObax BiNObiDHO Do YHHOeBPOneCbKOi DnpeKTNBu Odo BiXoDiB eJeKtpnHoro N eJeKTPoHOrO 0bnadHaHHa. 3B'JxItbc3 MicceBOU BnaIo a6o po3dpi6Hm npodabcem, zo6 Di3HaTnCs, De npuy i3 BaAMM 6ydnKOM po3TaioBaHO nyHKTI 360py BnKOpNCtAHnx npncTroOB.
Дякемо 3a Baшу ДОпOMORY B 3axNCTi HabkoNiшьOrO cepeNoBnUca.
3.ОПИС ПИСТРОВ
OncdyxoboIwaФn

PanaHb KepyBaHHa

Pyuka Дя Вибopy peжимьnpirotoybaHHa

PуkaHaIaStTyBaHHЯ + 1

Tpmbanictb npurotybaHHa
G=KHeueb npnroTyBaHHa
BIOKByBaHHKHOHOK
Taimep
9 = Maca
A BnokyBaHHKHOHOK
B IodabAHn 30 ckyHd do yacy npiroToyBaHH
HanaTByBaHHa cacy, TpNbAIOCTi Ta BiKnaDeHoro 3anycky
D 3anyck npnroTyBaHHa
3. OIIHC IIPIHCTPOIO
AKCECYAPN
Повороте 6людо
IobopOTHe 6JIIO Do03BOJnE pIBHomipHO roTyBaTn iKy 6e3 BtpuHaHHa.
BoHO o6epTaEcBcra OndaKOBm YINHom y DBOX HaprMaKax. JaKIO BOHO He o6epTaEcBcra, BnEBHtbcra, 0o Bci eJeMeHTn npabunbHO BCTaHOBNeHo.
Ioro MoXHa BnKOpNCTOBByBaTn YK NocyD dNpNroTyBaHHa. 5o6 iCtAtn 6nIOo, Bi3bMitb Ioro, CkOpNCtABwncb nepeDbayehmN dNp cBOrO 3OHAmN doCTuNy BCEpeDiHi duXOBoi wa.
PnBID Oo3BOJAE CKNJHOMy 6JIIOy o6ePTaTncr.
Y pa3i 3HRTy npBODy yHnKaIe nOTpanJIHHa BOIN B OTBOpN Bici DnryHa.
He 3a6yIbTe BCTaHOBuTn Ha Micue npNBiD, NiDcTabKy Ha KOJIiUaTkax i cKJrHe NOBOPoTHe 6JIIO.

BAJKJINBO!
He hamaraTeCra NOBepTaTc KJIaHE NOBOPoTHe 6JIIO Do BpyHy. Ye moKe npNBecTn DO NOsKOJxHRe CnCTeMn PpNBOy. Y pa3i NoraHoro ObeptaHHa BnEBHITbcr, 0o Ni d NobopOTHM 6IIOOM HemaC CTOpOHHix PpeDMtIB.
4. YBEJEHHB EKCIIJYATAIIO TA HAJAHTYBAHH
PEKIM PUNIOTYBAHNA
ABTomatnHi peXkIMN
AByOMaTuHi peKmM O6npaTb JIy Bac BiIDNoBiDiHni napametpn npnroTyBaHHa 3aJIeXHo BiD XapUOBOrO pOdykTy, kN HEO6XiHO npnroTyBaTN, Ta NOro BarN.
Bunbepih nonepedno 3anporpaMoBaHn npodykt 3i cncky HxKHe.
Po3MopoQyBaHHra rTOBOoi cTpaBN*.
Po3MopoxyBaHHxI6a*.
Po3MOPOxyBaHHa M'acTa TnCiJ*.
PnroTyBaHn np6n.
PnroTyBaHHa 3amOpOKeHNx OBOyIb.
PnroTyBaHHcBixnx Oboyib.
*Дяци nx no3nii BiDknaDeHn 3anyck HEMOxNIBn.
ПРИМITKA. Пия npriroTuBaHЯ,як Трпвало DoBwe Tpbox XBnlnH i Ha notyxhocti 6iNbwe 300 Bt, BeHTnlaizir, Iamna, a TakoX nobopoTHe 6liJDo npoDobKyuHb TpaucuBaTn.
Bentnlaici Do3BoJc BndaHnT n npy, kka Morna HakonuHTnc BcepeHHI dYXOBoi waH, 06 3anobirn NowkoJxehHIO eJeKTPoHNHX KOMnoHENTIB npucrpo. CkJhaNe NOBOPOTHe 6JIIO pOdoBxBaTMe OBeptatncs, kUo DBePcTa 3aHnWATMMyTbCz 3aKpNTmN.
IpoTAROM zboro pexnmy yHKciIO HBU BmKHeHO, TOMy HeMaE XoDHorO pn3NkY dIg Baunx npOdyKTiB.
MikpoxBnIbObi pexm (HB4)
P03TOnJIIOBaHHa WOKOJaY.
IpiroToyBaHHpaKoNoi6Hnx.
IiirpiB Ha DBox pIBHx.
PiurotyBaHHa 6o6OBux Ha
MaIOMy BOrHi.
IidirpiB a6o npiroToyBaHHa M'kNX npOdyKTIB XapUyBaHHa OCHOBi RcUb.

PnroTyBaHHa MaIOMy BORHi MOIOuHnx npOdyKTIB, BapeHna.

PyuHepo3MopoxyBaHHa. Po3M'KWeHHBepuKOBOrMaCna, MOp03nBa.
MEHIO HAJAHTYBAHb
Bn moxete 3miHOBaTu pi3Hi napameTpN dYXOBoI uafu (He niD yac npuroTyBaHHa). IJIy Cboro Heo6XiIDHO BnKoHaTu HabeDeHi HIXUe Dii.
HaTnCHiB Ta yTpmyIte HaTnCHyToIO KhONky 念 IOKn He BiO6pa3ntbcra CNoBO MENU (MEHIO). 3HOBy HATnCHiB KhONky 念 Ioo6 nepeeTN do pi3Hnx HanaWtYBaNb.
AknByTe a6o de3aKnByTe pi3Hi npamEtprn 3a donomoroOp yuKn «+» i «-».
| 5b on | 3BYKN: СИГHAЛN Кнорok Положеня ON (YBIMKH.) — 3BYKN yBIMKHeNo Положеня OFF (ВIMKH.) — 3BYKN BIMKHeNo |
| 5d of | ДЕMOHCTPAÇIиHи PEXКМ Актулы te abo DeэаKTиВуITE рекIM DEMO, Deemonctpaçiйний рекIM, який ВИКорисТовуEcTьсЯ дlya пеэntaцii в магаши. ДeэаKTиВуITE яого, соб духова shaфа перашILA в робочи рекIM. |
| 55 on | PEXКIM OчIKYBAHня ДИСПLEЯ Положеня ON (YBIMKH.) — noracаня диспley черз 90 сekунд. Положеня OFF (ВIMKH.) — знжени яскравостi диспley черз 90 сekунд. |
Iio6 BnHTn 3 MEHIO, 3HOBy HATNCiTb Ta yTpmyTe HAtncHyTOIO npOTAROM DeKINbKOx CekyHd KhoNky.
4. YBEDEHHB EKCIIJYATAIIO TA HAJAHTYBAHH
YcTaHOBJIeHHa cacy
PicnpiEHaHHaDxKepeJXuBHeHHaDnCnnei6yIeMuroTiN«12:00

BidpernyHte yac 3a donomoroO pyuK 四 + 四 i 四 - 四 .PiTBePbTe 3a donomoroO KhoNk Y pa3i BiKIOueHH eIeKtpoeHepri I rOINHHK taKx 6yJe MroTiN. BnKOHaTe HanaSTyBaHH, HabeDeHe BNse.
3MiHeHHa cacy
Pyky Mae 6yTN o6OB'3KOBO BCTaHOBJeHO B NOJoxKeHHI O.
HaTnCHiB DaBa pa3n KhoNky
PiTBePbTe 3a DonomoroH KhoNKn
Taumep
LIOyHKU MOXHa BnKOpNCToBbTu NIIe ToDi, KOIN NIV BnMKHeHO.
HaTnCHiTb KhoNky, BiO6pa3ntbCra 3Haoyok TaMep 3amHroTNTb.
HanaTyuTe TaImep 3a DonomoroIO pyuKn «+» i «-».
HaTnCHiB KhoNky DnI niTBePdxKeHHa, 3anyCTntbCra 3BOpOThi BIDNIK.
Iicra 3akHcHnB BCTaHOBJeHO TpBaJocTi npOlyHae 3ByKOBn CnHan. Oo6 noro BMkHyTn, HATNCiTB 6yDb-ky KhONky. Ha dinCnnei 3HOby BiO6pa3ntbcs qac.
ПРИMITКА. В можete 3миHTи abo BiДmIHn nporpamy TaMepa B 6yd-якIMOMeHT. ДЯ BiДmIHи NOBepHITbcr B MeHIO TaMepa Ta BCTaHOBITb 00:00.
Ubnke npnroTybaHn HbU
Ha dincnnei mae BiDobpaKataNc Inwe yac. BIn He Mae MroTITn. BiKpnTe DBepuTa. Nomicitb npodykT y npncpti, 3akpnTe DBepuTa. lChye n'aytB notyXHocTe HBU: 100 Br (po3MopOxyBaHHa), 300 Br, 500 Br, 700 Br, 1000 Br.
- ьбрг Heo6xHy noTyXHicTb, nobepHtB nepemkauch pexmib. Dncnne 6yde mroitu, BiO6pa3ntbcra TpnbAnicTb npiroToYBaHHaJ3aJexHo BID notyKHOcti. BmOKeTe 3miHTn TpnbAnicTb npiroToYBaHHa 3a DonomoroIO nepemkau «+» i «—».
-Пдтвердьte 3a ДОнOMою KHONK.ПОчЕТбяпriгOTуВаннЯ, BiOобрахаТIMeTься BiДrik TrPUBaNoCTi.
Bm mokeTe 3miHnT npBaJIcTB npriToyBaHHa 3a donomoroIO nepemkaa + i -
HeraHe npnroToyBaHHa B aBTOMaTHUHomy peXnMI
A B T O M A T N U H I p e x i m n o b i p a t b d r a B a c B i d n o b i d h i nap a m e t p n p niroT y b a n h n 3a JexnhoB iD xapoyoro npodykTy, kni Heo6x iDnO npiroT y b a n, Ta no r o B a n.
BidknaedeHn 3anyck npiroToBaHHa

Bn6epiTb Heo6xidHn peKIM npiroTyBaHHa, notim HATNCHTb KHOKNy. Yac 3aBepWeHHn npiroTyBaHHa 6ynde MuroTiN.
BidperynioTe yac 3aBepweHn npiroTyBaHHa 3a DOnomoroO pyKn «+» i «-».
Yac 3aBepueHn npuroTyBaHH 36epiraTbcra ABTomTuHNo uepe3 deKilbKa ceKyHd, iHaKwe nTBePbTe 3a DonomoroH KhoNKn O. Yac 3aBepueHn npuroTyBaHH 6iJbWe He MInOTNb.

BAJKJINBO!
Для abTomatnHnx peXmib po3MopoxyBaHHЯ BiKnaJeHn 3aynck HeMOxJnBn.
Блокуваим Кнорok Дли зхисту дiteн
HaTnCHiB Ta yTpmyTe HaTnCHyToIO KhONKy 1 Do nOBu 3HaUka .IJa
po36nOKyBaHHa HATnCHiB Ta yTpmyTe HaTnCHyTOIO
KhONKy , DOKN 3HaUOK e 3HnKHe.
OuHJEH3OBHIshhboI NOBEPXHI
Mn pekomendyemopereynapno ounilaTn duyxoby wafty Ta npnbpatn 6yd-ka 3anuKni iKi 3OBHi Ta BCEpeHNI npncptpo. BnkopncTOByte BOIory MmIbHy r6ky. RaKo npncptpi He niDtpmMyBatn B uNCTOTi, cTah Ioro nobepxhi MoKe nOriipwnTcA, HEmNHye CKOPOuyuOn Ioro cTpOK cnJx6n, 0o MoKe npn3BecTN Do He6e3neuHOi cnTuayui.
He pekomeHdyEcBcB BnKOpncTObyBaTu a6pa3nBHi peuOBHH, cnpT a6o po3uHHNK. BOH MoKyTb NOsKOHTn npicTpii.
OuHsEHnBHyTPIHbOIOBEPXHI
y pa3i nowkoJxHnA DBepuT a6o ix yuJIbHeHHa 3a6OpOHeHO KOpNCtYBaTncra dUxOBOU WApO, NOKn II He 6yde BiDpeMOHTOBaHO KBaIipIKOBaHm CneuiAnicTOM.
Y pa3i HaraBHOCTI 3anaxy a6o 3a6pydHeHb 3akn'ayiTb BODy 3 NIMOHHM COKOM a6o OcTOM y ChaUsi npOTAROM DBOX XBUNH Ta OunchTe CTINK, CKOpNCtABWncb HeBeJIkoIO KInbKiCtTO pIDHH dJRA MMTTЯ NOcydy.
Ioo6 cnpocntn npoec ouuueHH, NOBOPOTHe 6IIOO BuroTOBneHO 3HIMHM. Ioo6 Ioro DiCTaTn, Bi3bMitb Noro B nepeD6aueHx Dnla CboRo 30hax DoCTyny BCEpeDNHi DuxOBoi ShaΦn. Y pa3i 3HRTT npNBODy yHnKaIte NotpanJIHHN BODN B OTBOpN BICI DBnryHa. He 3abYbTe BCTaHOBtN Ha Micce npNBID, NiCDTaBky Ha KOniuaTkax i NobOPOTHe 6IIOo.
3AMIHA JAMNoCKN
Дляnpоведеньбудь-якnxMaHinnylaцi i3 lamnoIO 3BepHITbCЯdo clyx6n nicЯnpodaxHoro obcIyroByBaHHa6o KBaJIΦIKOBaHO rO CneuiJicTa KOMnaHii.
6. HECIIIPABHOCTI TA IX YCYHEHHA
HECπPABHOCTI TA IX YCYHEHЯ
PnucTpi He BMnKaetbcra.
YneBnItbcra, 0 npncptpii nHaHO do eNeKtpomepeXi HaJeXHm YNHOM.
YneBHitbcra, 0o DBePcraTa DyXOBoi
waΦn Do6pe 3aunHeHo.
IobopOthe 6nIO He oBeptaetbC HaeKHM YHOM.
OuncbTe KOniuaTka Ta o6epTaIbHn MexaHi3M NiD NOBOPOTHM 6JIIOOM.
- Bn nomitui KOHdeHcat Ha ckni.
BntpiTb KOHdEHCAT 3a DOnOMOrOIO raHcyipKn.
- PpOdyKT xapUyBaHnHe po3irpiBcB peXmI HBq.
YneBHITbcra, 0nocynd nixoDntb dIBAHKOpNCTaHHB MikpoxBnIbOBI neyi Ta BCTaHOBNeHO BiIDNOBIDHn PiBeHb NOTyxHoCTi.
-Ппсстриickрть.
Dobpe ouncbTe npucptpi: BndaJIb Jnnp, 3aIIuKn iKi TOnO.
Pn6epitb 6ydb-kaI metaneBi enemeHTN BiD CTiHOK dYXOBoi waΦn.
- DyxoBa wapa He HarpiBaCTbca.
YneBHTbcra, 00 dyxoby wadpyiD'edHaHO Do Dkepea KnBHeHHa a3anobixhNK npncptpoE cnpabHm.
YneBHITbcra, 0o dyxoba wapapauoe He B demOHCTpauiHomy pexnmi
DEMO (nVB. MeHIO HaJaTaYBaHb).
7. IOPAIIIIOIO IIPIIIGOTYBAHHJ
TecTyBaHnI npndaTHocTi B pi3Hnx pexImax IEC/EN/ NF EN 60705.
MixnapoHa eJeKtpoxHicHa Komicia, SC.59K, BCTaHOBnla BmOrn 0do TecTyBaHH npIBHJIbHnx XapaKTepnCTNK Ha pi3Hnx MIKPOXBnboBnX neayx.
HnKye HabeJeHO peKomeHdauiI dny zuoro npncTroIO.
| Тecтуваня № | Ванта-Жени | Пробл.чac | Вибipnotужностi | Коонтейнера та поади |
| Яший крем(12.3.1) | 1000 r 16- | 18 xB. 500 Bt pyrex | 227 | Ha noворOT humу 6liюdi |
| СавоиславскийБiocквIT (12.3. | 475 r 6-7 | KB. 700 Bt pyrex | 827 | Ha noворOT humу 6liюdi |
| M'яснибатон(12.3.3) | 900 r 14 xB. 700 Bt pyrex | 38 | Hakrintихарочью плівкою. Ha noворOT humу 6liюdi | |
| Розморож汞ванneyМ'ясан(13.3) | 500 r 11- | 2 xB. 200 Bt Ha | плосkiий tarinzi | Ha noворOT humу 6liюdi |
| Розморож汞ванneyмалини(B.2.1) | 250 r 6-7 | KB. 200 Bt Ha плосkiий tarinzi | Ha noворOT humу 6liюdi |
n nn nnnnnnnnnnnnnnnnnnnnnnnnnnnnnnnnnnnnnnnnnnnnnnnnnnnnnnnnnnnnnnnnnnnnnnnnnnnnnnnnnnnnnnnnnnnnnnnnnnnnnnnnnnnnnnnnnnnnnnnnnnnnnnn
n nn nnnnnnnnnnnnnnnnnnnnnnnnnnnnnnnnnnnnnnnnnnnnnnnnnnnnnnnnnnnnnnnnnnnnnnnnnnnnnnnnnnnnnnnnnnnnnnnnnnnnnnnnnnnnnnnnnnnnnnnnnnnnnnn
nnn nn nnn nn nnn nnn nnn
XIN, YUNN 700000000000000000000000000000000000000000000000000000000000000000000000000000
X X'X'Y, Y'W'N'Y D Y .TIN 19X N'X'W'N. W .17W '70N N'X ,N'TA N TiyN ,N'AX ,N'NON DIYN .DxX X"NN NNIY N'

in
noin nTn Tn 7pion nni n ix nnnn yy nynn nn nnnn nn nnnn nn nnnn nn
nTwunuuy Tyn nwn 1
D'N D'YN Tyn nynn — nynnn nn n 19 ,D'NI IINI O'TWN ,nINn D'NIY ;O'77n O'7wn ;O'NN NITy IIN ,IINn O'NIX WnW IINN O'NIY IOI O'ON .
n n n n n n n n n n n n n n n n n n n n n n n n n n n n n n n n n n n n n n n n n n n n n n n n n n n n n n n n n n n n n n n n n n n n n n n n n n n
.

n 850 yu w
7 nyn nn n 7 -
nnnnnnn n7 ,nnnn
n 10 n97 w nn nn
wnx 7 .inon nn
IX) Dn Tny nn n y u IONX
, n n nn . (n nn nn
nyn nn nn nn nn 2
.
77 77777777777777777777777777777777
Tn n Tyn nn - 1, no IIN INIIN .NINNI 10, 190, n7y ,nDnN Dn7 7y dN Nx Dxinn Dn .nTTINnn ,nv
y nuy d77 yox7 1x -
n77 d77 yox7 1x - .ywn
.ynun x77 ywn nn pnn
Dxy T171 Dny nyny 1
.ynon Dny
:

:

nX Jnn nn nnnn nn nnnn nn nnnn nn nnnn nn nnnn nn nnnn nn nnnn nn nnnn nn nnnn nn nnnn nn nnnn nn nnnn nn nnnn nn nnnn nn nnnn nn nnnn nn nnnn nn nnnn nn nnnn nn nnnn nn nnnn nn nnnn nn nnnn nn nnnn nn nnnn nn nnnnn nn nnnn nn nnnn nn nnnn nn nnnn nn nnnn nn nnnn nn nnnn nn nnnn nn nnnn nn nnnn nn nnnn nn nnnn nn nnnn nn nnnn nn nnnn nn nnnn nn nnnn nn
n nn nnnn nn - nn nn nn nn nn nn nn nn nn nn nn nn nn nn nn nn nn nn nn nn nn nn nn nn nn nn nn nn nn nn nn nn nn nn nn nn nn nn nn nn nn nn nn nn nn nn nn nn nn nn nn nn nn nn nn nn nn nn nn nn nn nn nn nn nn nn nn nn nn nn nn nn nn nn nn nn nn nn nn nn nn nn nn nn nn nn nn nn nn nn nn nn nn nn nn nn nn nn nn nn
n 1097 u,uy yin nx - nunn nix n7 ix nn ny6 iouyio 7T nx xun
y y n nn nynnnn - 7ninnn nn nnnn nnnn nnnn nnnn nnnn nnnn nnnn nnnn nnnn nnnn nnnn nnnn nnnn nnnn nnnn nnnn nnnn nnnn nnnn nnnn nnnn nnnn nnnn nnnn nnnn nnnn nnnn nnnn nnnn nnnn nnnn nn
W DNN IN N N N N N N N N N N N N N N N N N N N N N N N N N N N N N N N N N N N N N N N N N N N N N N N N N N N N N N N N N N
nniin nn nnnn 1X - nnnn nnnn nnnn nnnn nnnn nnnn nnnn nnnn nnnn nnnn nnnn nnnn nnnn nnnn nnnn nnnn nnnn nnnn nnnn nnnn nnnn nnnn nnnn nnnn nnnn nnnn nnnn nnnn nnnn nnnn nnnn nnnn nnnn nnnn nn
1
ynnn nn nnnn nn nnnn nn nnnn nn nnnn nn nnnn nn nnnn nn nnnn nn nnnn nn nnnn nn nnnn nn nnnn nn nnnn nn nnnn nn nnnn nn nnnn nn nnnn nn nnnn nn nnnn nn nnnn nn nnnn nn nnnn nn nnnn nn nnnn nn nnnn nn nnnn nn
(nnnn nn
2 2n nnnn
n nn nnnnnnnnnnnnnnnnnnnnnnnnnnnnnnnnnnnnnnnnnnnnnnnnnnnnnnnnnnnnnnnnnnnnnnnnnnnnnnnnnnnnnnnnnnnnnnnnnnnnnnnnnnnnnnnnnnn
.(C
n"850 ynuu nn nnnn 1
96 1111 1111 (A uun) npnnn nn
ninnnnnnnnnnnnnnnnnnnnnnnnnnnnnnnnnnnnnnnnnnnnnnnnnnnnnnnnnnnnnnnnnnnnnnnnnnnnnnnn
(Bu) *70 77
ynu nn) ywnn 1
,nn nnnn nn (nu

yun n
ywnn nn nnnn y
ynwnn nn nnnn nnnn +1ph+1N) 2n"n 1.5 7n 3 ny
nynnn nn nnnn (ny
ynwn nn nn nn nn nn nn nn nn nn nn nn nn nn nn nn nn nn nn nn nn nn nn nn nn nn nn nn nn nn nn nn nn nn nn nn nn nn nn nn nn nn nn nn nn nn nn nn nn nn nn nn nn nn nn nn nn nn nn nn nn nn nn nn nn nn nn nn nn nn nn nn nn nn nn nn nn nn nn nn nn nn nn nn nn nn nn nn nn nn nn nn nn nn nn nn nn
.
:NTT
-220)wnn nn nnnn nn nnnn nn nnnn nn nn nn nn nn nn nn nn nn nn nn nn nn nn nn nn nn nn nn nn nn nn nn nn nn nn nn nn nn nn nn nn nn nn nn nn nn nn nn nn nn nn nn nn nn nn nn nn nn nn nn nn nn nn nn nn nn nn nn nn nn nn nn nn nn nn nn nn nn nn nn nn nn nn nn nn nn nn nn nn nn nn nn nn nn nn nn nn nn nn
.7noin 7nun
wnn nn nnnn nn nn
wnnn nn

:
yixn xix 17 ynynn npnn .DNOIN D'XDOU

nnn (nx n) npnn nnn nn nnn nnn nnn nnn nnn nnn nnn nnn nnn nnn nnn nnn nnn nnn nnn nnn nnn nnn nnn nnn nnn nnn nnn nnn nnn nnn nnn nnn nnn nnn nnn nnn nnn nnn nnn nnn nnn nnn nnn nnn nnn
:

IN INN NNNN NNNN NNNN INN INN NNNN NNNN NNNN NNNN NNNN NNNN
nion 2.
nnon nix y nwn
ynnn nn nnnnnnnnnnnnnnnnnnnnnnnnnnnnnnnnnnnnnnnnnnnnnnnnnnnnnnnnnnnnnnnnnnnnnnnnnnnnnnnnnnnnnnnnnnnnnnnnnnnnnnnnnnnnnnnnnnnnnnnnnnnnnnnnnnnnnnnnnnnnnnnnnnn
n nn nnnnnnnnnnnnnnnnnnnnnnnnnnnnnnnnnnnnnnnnnnnnnnnnnnnnnnnnnnnnnnnnnnnnnnnnnnnnnnnnnnnnnnnnnnnnnnnnnnnnnnnnnnnnnnnnnnnnnnnnnnnnnnnnnnnnnnnnnnnnnnnnn
n nn nnnnnnnnnnnnnnnnnnnnnnnnnnnnnnnnnnnnnnnnnnnnnnnnnnnnnnnnnnnnnnnnnnnnnnnnnnnnnnnnnnnnnnnnnnnnnnnnnnnnnnnnnnnnnnnnnnnnn
n nn nnnnnnnnnnnnnnnnnnnnnnnnnnnnnnnnnnnnnnnnnnnnnnnnnnnnnnnnnnnnnnnnnnnnnnnnnnnnnnnnnnnnnnnnnnnnnnnnnnnnnnnnnnnnnnnnnnnnnnnnnnnnnnnnnnnnnnnnnnnnnnnnnnn
Jywnn Jaxn 3.
TI'9 NVIY

n77

T

B
n nnnnnnnnnnnnnnnnnnnnnnnnnnnnnnnnnnnnnnnnnnnnnnnnnnnnnnnnnnnnnnnnnnnnnnnnnnnnnnnnnnnnnnnnnnnnnnnnnnnnnnnnnnnnnnnnnnnnn

n

30 nooi

nunun,nuu

nnn

ywn 0
Wn 10
n7y
7n"0
7wn 9=
Jywnn nn 3.
D
nnonnn
n nn nnnnnnnnnnnnnnnnnnnnnnnnnnnnnnnnnnnnnnnnnnnnnnnnnnnnnnnnnnnnnnnnnnnnnnnnnnnnnnnnnnnnnnnnnnnnnnnnnnnnnnnnnnnnnnnnn
n nn nnn nnn nnn nnn nnn nnn nnn nnn nnn nnn nnn nnn nnn nnn nnn nnn nnn nnn nnn nnn nnn nnn nnn nnn nnn nnn nnn nnn nnn nnn nnn nnn nnn nnn nnn nnn nnn nnn
n nn nnnnnnnnnnnnnnnnnnnnnnnnnnnnnnnnnnnnnnnnnnnnnnnnnnnnnnnnnnnnnnnnnnnnnnnnnnnnnnnnnnnnnnnnnnnnnnnnnnnnnnnnnnnnnnnnnnn
:

103n .nnnn nnnn nn nnnn nnnn nnnn nnnn nnnn nnnn nnnn nnnn nnnn nnnn nnnn nnnn nnnn nnnn nnnn nnnn nnnn nnnn nnnn nnnn nnnn nnnn nnnn nnnn nnnn nnnn nnnn nnnn nnnn nnnn nnnn nnnn nnnn nnnn
nTnI nIyN nyon 4.
711 19X
yinniyin19
ynnn nn nnnnnnnnnnnnnnnnnnnnnnnnnnnnnnnnnnnnnnnnnnnnnnnnnnnnnnnnnnnnnnnnnnnnnnnnnnnnnnnnnnnnnnnnnnnnnnnnnnnnnnnnnnn
W 100 - W 300 - W 500 - W 700 - W 1000
yni n nn ynnn nn
n nn nn nn nn nn nn nn nn nn nn nn nn nn nn nn nn nn nn nn nn nn nn nn nn nn nn nn nn nn nn nn nn nn nn nn nn nn nn nn nn nn nn nn nn nn nn nn nn nn nn nn nn nn nn nn nn nn nn nn nn nn nn nn nn nn nn nn nn nn nn nn nn nn nn nn nn nn nn nn nn nn nn nn nn nn nn nn nn nn nn nn nn nn nn nn nn nn nn nn nn
DIN17 IN D'U N

.11111111111111111111111111111

y nnnn 2- nn n.
y Dn nn n nn n nn n nn n nn nn nn nn nn nn nn nn nn nn nn nn nn nn nn nn nn nn nn nn nn nn nn nn nn nn nn nn nn nn nn nn nn nn nn nn nn nn nn nn nn nn nn nn nn nn nn nn nn nn nn nn nn nn nn nn nn nn nn nn nn nn nn nn nn nn nn nn nn nn nn nn nn nn nn nn nn nn nn nn nn nn nn nn nn nn nn nn nn nn nn nn nn nn nn nn nn nn nn nn
n nn nnnn nn nnnn nn nn

nTn nn nnn

NUNIOIN NIX
Xn nn nnnn nn nn nn nn nn nn nn nn nn nn nn nn nn nn nn nn nn nn nn nn nn nn nn nn nn nn nn nn nn nn nn nn nn nn nn nn nn nn nn nn nn nn nn nn nn nn nn nn nn nn nn nn nn nn nn nn nn nn nn nn nn nn nn nn nn nn nn nn nn nn nn nn nn nn nn nn nn nn nn nn nn nn nn nn nn nn nn nn nn nn nn nn nn nn nn nn nn nn nn nn gn nnnn nnnn nnnn nnnn nnnn nnnn nnnn nnnn nnnn nnnn nnnn nnnn nnnn nnnn nnnn nnnn nnnn nnnn nnnn nnnn nnnn nnnn nnnn nnnn nnnn nnnn nnnn nnnn nnnn nnnn nnnn nnnn nnnn nnnn
:
*PIN 7N IN N
*on7nwn
*y
.
DIN197N17H1U
n
nnnnnnnnnnnnnnnnnnnnnnnnnnnnnnnnnnnnnnnnnnnnnnnnnnnnnnnnnnnnnnnnnnnnnnnnnnnnnnnnnnnnnnnnnnnnn
yni nT 3-n nyh ywnn nnx:nnn nnnonnnn nn,nnn,300W-
n nn nnnnnnnnnnnnnnnnnnnnnnnnnnnnnnnnnnnnnnnnnnnnnnnnnnnnnnnnnnnnnnnnnnnnnnnnnnnnnnnnnnnnnnnnnnnnnnnnnnnnnnnnn
n77n by
n nn nnnn nnnn nnnn nnnn nnnn nnnn nnnn nnnn nnnn nnnn nnnn nnnn nnnn nnnn nnnn nnnn nnnn nnnn nnnn nnnn nnnn nnnn nnnn nnnn nnnn nnnn nnnn nnnn nnnn nnnn nnnn nnnn nnnn nnnn nn
nTnI nXn 4.
NNTAN 09N
y 17, (n) x n y n nn n n n n n n n n n n n n n n n n n n n n n n n n n n n n n n n n n n n n n n n.
| :ɒʌŋʌŋʌŋʌŋʌŋʌŋʌŋʌŋʌŋʌŋʌŋʌŋʌŋʌŋʌŋʌŋʌŋʌŋʌŋʌŋʌŋʌŋʌŋʌŋʌŋʌŋʌŋʌŋʌŋʌŋʌŋʌŋʌŋʌŋʌŋʌŋʌŋʌŋʌŋʌŋʌŋʌŋʌŋʌŋʌŋʌŋʌŋʌŋʌŋʌŋʌη | 5b on |
| :(ɒʌŋʌŋ) DEMO xyn wn'wν wν wν ;"DEMO" xyn / ɒʌŋʌŋʌŋʌŋʌŋʌŋʌŋʌŋʌŋʌŋʌŋʌŋʌŋʌŋʌŋʌŋʌŋʌŋʌŋʌŋʌŋʌŋʌŋʌŋʌŋʌŋʌŋʌŋʌŋʌŋʌŋʌŋʌŋʌŋʌŋʌŋʌŋʌŋʌŋʌŋʌŋʌŋʌŋʌŋʌŋʌŋʌŋʌŋʌŋæ | 5d of |
| xyn wν wν wν wν wν wν wν wν wν wν wν wν wν wν wν wν wν wν wν wν wν wν wν wν wν wν wν wν wν wν wν wν wν wν wν wν wν wν wν wν wν wν wν wν wν wν wν wν wν wν w\n | 55 on |
y nnnn nn"nnn"nn
nTnI nXn 4.
yuyi
12:00 00000000000000000000
WnDyNux."-ix"+"nTnDyNwnNxHID
.111n INX Nx Iy .nannnn nnwn nwn npn
ywn
.0n nnnn nn nnnn n
wnynynn
Uwn nn
yin nn nynn nn nn nn nn
nnnn nn yin no 7y
"-"IX"+nTnDynnn
nnn nn n 7 7 7
n nn nnnnnnnnnnnnnnnnnnnnnnnnnnnnnnnnnnnnnnnnnnnnnnnnnnnnnnnnnnnnnnnnnnnnnnnnnnnnnnnnnnnnnnnnnnnnnnnnnnnnnnnnnnnnnnnnnnnnnnnnnnnnnnnnnnnnn
00:00-1111
JONNNNININNNTTNN
nTnI nXn 4.
nnnn
hian n
- (nwn) 100W: nwn nwn nwn 5. nwn nwn nwn nwn nwn nwn nwn nwn nwn nwn nwn nwn nwn nwn nwn nwn nwn nwn nwn nwn nwn nwn nwn nwn nwn nwn nwn nwn nwn nwn nwn nwn nwn nwn nwn nwn nwn nwn nwn nwn nwn nwn nwn nwn nwn nwn nwn nwn nwn nwn nww
n nn nnnnnnnnnnnnnnnnnnnnnnnnnnnnnnnnnnnnnnnnnnnnnnnnnnnnnnnnnnnnnnnnnnnnnnnnnnnnnnnnnnnnnnnnnnnnnnnnnnnnnnnnnnnnnnnnnnnnnnnnnnnnnnnnnnnnn
nunix nix719 Tnn 1
xnnn nn nnnn nn nnnn nn nn nn nn nn nn nn nn
177
.10 50 nnnn

nTnI nXn 4.
nwnnnnny
nannnnn nno nnu , 1 nn nnnn nn nn nnn
yio 10nyu nn yann "--"+-"nTnydy
OIOIIN. 0y7n DYNX, x7 OX, n7T 90ON NNX 1NIOIN 1NIN
n nn nnnnnnnnnnnnnnnnnnnnnnnnnnnnnnnnnnnnnnnnnnnnnnnnnnnnnnnnnnnnnnnnnnnnnnnnnnnnnnnnnnnnnnnnnnnnnnnnnnnnnnnnnnnnn
:

nwnnnnnnnnnnnnnnnnnnnnnnnnnnnnnnnnnnnnnnn
ninnn
x7,ynn nn7. noynin ty pn ynx?
xnn nn nyny npny
y n nn nn nn nn nn nn nn nn nn nn nn nn nn nn nn nn nn nn nn nn nn nn nn nn nn nn nn nn nn nn nn nn nn nn nn nn nn nn nn nn nn nn nn nn nn nn nn nn nn nn nn nn nn nn nn nn nn nn nn nn nn nn nn nn nn nn nn nn nn nn nn nn nn nn nn nn nn nn nn nn nn nn nn nn nn nn nn nn nn nn nn nn nn nn nn nn nn nn nn nn
n nn n97nn

- RELATIONS CONSOMMATEURS FRANCE
- IMPORTANT SAFETY ADVICE AND PRECAUTIONS 4-6
- INSTALLATION 7-8
- ENVIRONMENT 9
- PRESENTATION OF YOUR APPLIANCE 10-11
- FIRST USE AND SETTINGS. 12-16
- CARE 17
- ANOMALIES AND SOLUTIONS 18
- COOKING TIPS 19
- IMPORTANT SAFETY INSTRUCTIONS - READ CAREFULLY AND KEEP FOR FUTURE USE.
- WARNING:
- IMPORTANT SAFETY ADVICE AND PRECAUTIONS
- INSTALLATION
- CHOICE OF LOCATION AND FITTING
- ELECTRICAL CONNECTIONS
- Important:
- ENVIRONMENT
- CARING FOR THE ENVIRONMENT
- PRESENTATION OF YOUR APPLIANCE
- ACCESSIONS
- Turntable
- COOKING MODES
- Automatic Functions:
- Microwave Functions
- SETTINGSMENU
- FIRST USE AND SETTINGS
- Setting the clock
- Changing the time
- Timer
- START A COOKING PROGRAMME
- Immediate Microwave Cooking
- Immediate Cooking with Automatic Functions
- Delayed start
- Locking the Controls - Child Safety Lock
- CLEANING THE OUTER SURFACES
- CLEANING THE INNER SURFACES
- REPLACING THE LIGHT BULB
- TROUBLESHOOTING AND SOLUTIONS
- The appliance does not start.
- -The appliance is noisy.
- - You notice steam on the glass.
- - Food is not heated during a microwave programme.
- - There are sparks coming from the appliance.
- - The oven is not heating
- Functional suitability tests in accordance with IEC/EN/NF EN 60705 standards:
- VAŽENA ZAKAZNICE, VAŽENY ZAKAZNIKU
- A A E I A K A I H M A N T I K E I P O Y A E I
- IAPOYIAGH THE YSEYHSEA
- XpovodiaikóTTnC
- - AiaTIOSTWVETe OTI TO TzaiI IOaMI WVEI.
- ULKOPINNAN PUHDISTUS
- SISÄPINNAN PUHDISTUS
- BE3OIIACHOCTb I BAJHbIE MEPbI IIPEdo-CTOPOJXHOCTN
- ПЕДОCTEPEЖЕНЕ.
- 3JIeKTPnueCKNE COeINHeHnA
- BHHMaHHe!
- BhimaHne!
- OKpyKAIOIIA CPEIa
- OXPAHA OKPYXAOUeN CPeIbI
- .3 OIIHCAHNE BAIIIETO IIPNBOPA
- ПРИНадлесхноctи
- Bpaaoueec6JIOdo
- BAKHO!
- BKJIIOYEHHE HACTPOJKA
- PEXIMblPNIIGOTOBJEHNA
- ABTomatnueckne yHKcnn
- Функцma MKNPOBOJIH
- MEHIO HACTPOEK
- HauJIO PnIroTOBJIeHnIa
- БьICTpbI pexIM npiroTOBJeHnC MKNpOBOJHOBBbIM N3JnyeHHeM
- БыICTpbi aBTOMaTHueckn peXm npHroTOBneHna
- BKJIIOYEHNH HACTPOJKA
- PnroToBJIeHne c OTIOXKeHHbIM CTapTOM
- BAKHOI
- HENCIIPABHOCTH IN CIOCOBBI INYCTPAHEHIA
- HENCPABHOCTN IN CNOCObI INX YCTPAHEHNA
- PEKOMEHDAIINIO IIPNIGOTOBJEHNIOIIIIN
- VAL AV PLACERING OCH INBYGGNAD
- BAJKINBI INPABUNA TEXHIK N 8E3NEKN 3ANOBIXHI 3AXOIN .4-6
- BAKJIINBI IINPABUNA TEXHIKN 6E3NEKN - YBAJHO IPOUHTAITE N 3BEPEXITb IJIЯ NOДАЛьшОВ O BNKOPNUCTAHNЯ.
- 3ACTEPEXEHH
- 3ACTEPEKEHH
- 3ACTEPEXEHHY
- BnBIP MlCzI JIaP03TaUyBAHHN IyBUDyBAHHN
- ПID'ЕДHAHHЯ DO EJEKTPOMEPEXI
- ybara!
- HABKOLIIHCE CEPEIOBIIIE
- 3AXNCT HABKOLINHbOTo CEPeIOBnA
- 3.ОПИС ПИСТРОВ
- OIIHC IIPIHCTPOIO
- AKCECYAPN
- Повороте 6людо
- BAJKJINBO!
- YBEJEHHB EKCIIJYATAIIO TA HAJAHTYBAHH
- PEKIM PUNIOTYBAHNA
- ABTomatnHi peXkIMN
- MikpoxBnIbObi pexm (HB4)
- MEHIO HAJAHTYBAHb
- YBEDEHHB EKCIIJYATAIIO TA HAJAHTYBAHH
- YcTaHOBJIeHHa cacy
- 3MiHeHHa cacy
- Taumep
- Ubnke npnroTybaHn HbU
- HeraHe npnroToyBaHHa B aBTOMaTHUHomy peXnMI
- BidknaedeHn 3anyck npiroToBaHHa
- Блокуваим Кнорok Дли зхисту дiteн
- OuHJEH3OBHIshhboI NOBEPXHI
- OuHsEHnBHyTPIHbOIOBEPXHI
- 3AMIHA JAMNoCKN
- HECIIIPABHOCTI TA IX YCYHEHHA
- HECπPABHOCTI TA IX YCYHEHЯ
- PnucTpi He BMnKaetbcra.
- - Bn nomitui KOHdeHcat Ha ckni.
- - PpOdyKT xapUyBaHnHe po3irpiBcB peXmI HBq.
- -Ппсстриickрть.
- - DyxoBa wapa He HarpiBaCTbca.
- IOPAIIIIOIO IIPIIIGOTYBAHHJ
- 1
- yun n
- nion 2.
- nnon nix y nwn
- Jywnn Jaxn 3.
- Jywnn nn 3.
- nnonnn
- nTnI nIyN nyon 4.
- yinniyin19
- nTnI nXn 4.
- n nn n97nn
Brand : DE DIETRICH
Model : DKE4220X
Category : Microwave