
274224 - Slush machine Arktic - Free user manual and instructions
Find the device manual for free 274224 Arktic in PDF.
| Product type | Double bowl slush machine |
| Brand | Arktic |
| Model | 274224 |
| Usage | Commercial (restaurants, cafeterias, bars) |
| Operating modes | Granita, Juice, Stop |
| Number of bowls | 2 |
| Refrigerant | R290 (flammable) |
| Protection class | I (grounded) |
| Control panel | Digital display, hardness adjustment (levels 1-7), juice temperature adjustment (1-7°C) |
| Lighting | Replaceable LED bulb |
| Spare parts included | Auger gaskets, sealing rings, tap gaskets, lubricant |
| Maintenance | Manual disassembly and cleaning of bowls, lubrication of seals |
| Safety | Do not immerse, do not leave unattended, ventilation space min 20 cm |
| Power supply | Electrical connection, voltage in accordance with label |
Frequently Asked Questions - 274224 Arktic
User questions about 274224 Arktic
0 question about this device. Answer the ones you know or ask your own.
Ask a new question about this device
Download the instructions for your Slush machine in PDF format for free! Find your manual 274224 - Arktic and take your electronic device back in hand. On this page are published all the documents necessary for the use of your device. 274224 by Arktic.
USER MANUAL 274224 Arktic
STROJ NA VÝROBU BŘEČKY
CZ
ZAVAROS GÉP
HU
ГРАНИТОР
UA
SLUSH MASIN
EE
SALDĒTO DZĒRIENU APARĀTS
LV
GRANITOS APARATAS
LT
GB: Read user manual and keep this with the appliance.
GB: For indoor use only.
natural_image
Simple line drawing of a wine glass with a fork (no text or symbols)

GB: NOTE: This manual is translated from original English manual using AI and machine translations.
2
3
4
natural_image
Line drawing of a bucket being stirred with a tool, no text or symbols present5
7
8
natural_image
Line drawing of a mechanical device with a hand pressing a button, showing no text or symbols.9
natural_image
Diagram of a hand operating a mechanical device with a mesh chamber and a warning symbol (no text or labels present)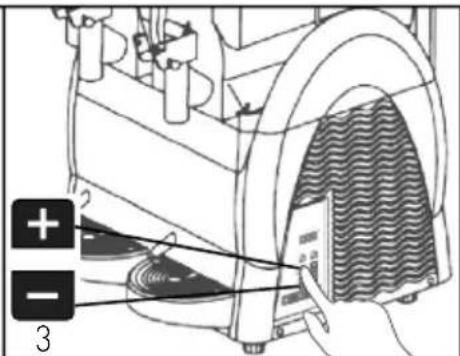
natural_image
Diagram of a mechanical device with a hand holding a card and a water droplet, no text or symbols present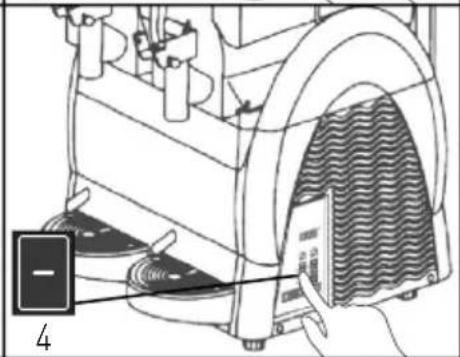
natural_image
Technical illustration of a mechanical device with a component inserted into a housing (no text or symbols visible)10

natural_image
Diagram of a kitchen appliance with a hand holding a tray, showing internal components and a warning symbol (no text or labels present)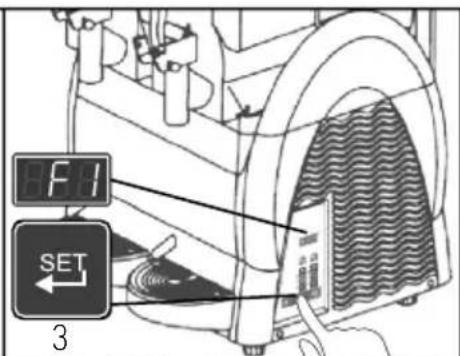
11 1
natural_image
Technical line drawing of a mechanical device with no visible text or symbols
natural_image
Technical line drawing of a mechanical assembly with gears and a directional arrow (no text or symbols)13 1
natural_image
Line drawing of a bucket with a tool, a handle, and a small box above it (no text or symbols)15 1
natural_image
Technical line drawing of a mechanical device with no visible text or symbols17 1
192
natural_image
Technical line drawing of a mechanical component with labeled section A (no text or symbols beyond label)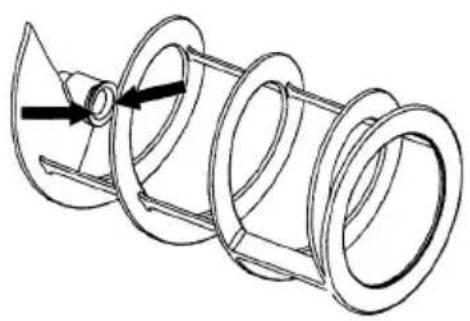
natural_image
Technical line drawing of a mechanical component with no visible text or symbols21 2
natural_image
Technical line drawing of a mechanical assembly with labeled component B (no text or symbols beyond label)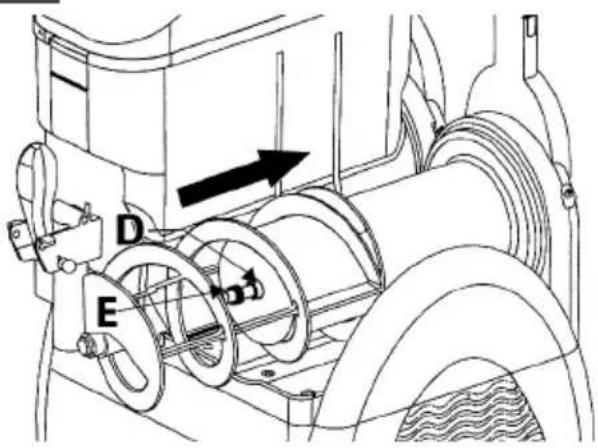
232

25 2

natural_image
Technical line drawing of a device with two circular components and an inset showing a circular component (no text or symbols)27 2
natural_image
Line drawing of a rectangular basin with two side handles and an arrow indicating direction (no text or symbols)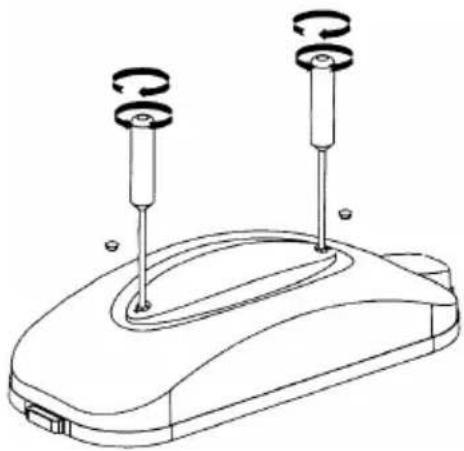
natural_image
Line drawing of a device with two cylindrical sensors and two circular ports, no text or symbols present29 3
31 3
natural_image
Technical line drawing of a heat exchanger or cooling unit with cooling fins and cooling fans (no text or symbols)
natural_image
Diagram of a hand using a tool to adjust or remove a heat exchanger component (no text or symbols visible)GB: Technical specifications / DE: Technische Angaben / NL: Technische gegevens / PL: Dane techniczne / FR: Données techniques / IT: Parametri di base / RO: Parametrii de bază / GR: Baoukéç paráµetpoi / HR: Tehnički podaci / CZ: Technická specifikace / HU: Műszaki adatok / UA: Texníční характеристики / EE: Tehnilised andmed / LV: Tehniskās specifikacijas / LT: Techninės specifikacijos / PT: Especificações técnicas / ES: Especificaciones técnicas / SK: Technické špecifikácie / DK: Tekniske specifikationer / FI: Tekniset tiedot / NO: Tekniske spesifikasjoner / SI: Tehnične specifikacije / SE: Tekniska specifikationer / BG: Texнически спецификации / RU: Texнические данные
| A 274224 v.02_s.01 274255 v.02_s.01 | |
| B 220-240V~ 50Hz / 220-240 B ~ 50 Гц | |
| C 710W / Вт 380W / Вт | |
| D | I |
| E IPX0 | |
| F 20°C - 32°C | |
| G -10°C --2°C | |
| H R290 / 125g R290 / 60g | |
| I | N |
| J < 70 dB | |
| K 2 | 1 |
| L | 12 |
| M | N: 470 mm/мм x O: 520 mm/мм x P: 810 mm/мм |
| N | 50 kg / кг |

A: GB:Item no. / DE:Art.-Nr. / NL:Artikelnr. / PL:Nr pozycji / FR:N° d'article / IT:N. articolo / RO:Nr. articolului/ GR:Ap. εἰδους / HR:Broj stavke / CZ:Položka č. / HU:Cikkszám / UA:Homer elementa / EE:Artikli nr / LV:Vienums Nr. / LT:Prekės Nr. / PT:Item n.o / ES:N.o de artículo / SK:Č. položky / DK:Varenr. / FI:Kohteen nro / NO:Varenr. / SI:Št. izdelka / SE:Art.nr / BG: Homer na element / RU:Homer позиции
B: GB: Rated voltage and frequency / DE: Nennspannung und Frequenz / NL: Nominale spanning en frequentie / PL: Znamionowe napięcie i częstotliwość / FR: Tension et fréquence nominales / IT: Tensione e frequenza nominali / RO: Tensiune nominală și frecvență / GR: Ovojaotikn táon kai ouxvònta / HR: Nazivni napon i frekvencija / CZ: Jmenovité napětí a frekvence / HU: Névleges feszültség és frekvencia / UA: Номінальна напруга та частота / EE: Nimipinge ja -sagedus / LV: Nominālais spriegums un frekvence / LT: Vardine jtampa ir dažnis / PT: Tensão e frequência nominais / ES: Tensión y frecuencia nominales / SK: Menovité napätie a frekvencia / DK: Nominel spænding og frekvens / FI: Nimellisjännite ja -taajuus / NO: Nominell spenning og frekvens / SI: Nazivna napetost in frekvenca / SE: Märkspänning och frekvens / BG: Номинално напрежение и честота / RU: Номинальное напряжение и частота
C: GB: Rated input power / DE: Nenneingangsleistung / NL: Nominaal ingangsvermogen / PL: Znamionowa moc wejściowa / FR: Puissance d'entrée nominale / IT: Potenza nominale in ingresso / RO: Putere nominală de intrare / GR: Ovojaotikn ioxus eisobou / HR: Nazivna ulazna snaga / CZ: Jmenovitý vstupní výkon / HU: Névleges bemeneti teljesítmény / UA: Номинальна вхідна потужність / EE: Nimisisendvõimsus / LV: Nominālā ieejas jauda / LT: Vardine jejimo galia / PT: Potência de entrada nominal / ES: Potencia de entrada nominal / SK: Menovitý vstupný výkon / DK: Nominel indgangseffekt / FI: Nimellistuloteho / NO: Nominell inngangseffekt / SI: Nazivna vhodna moč / SE: Märkineffekt / BG: Номинална входяща мощност / RU: Номинальная входная мощность
D: GB: Protection class (Class) / DE: Schutzklasse (Klasse) / NL: Beschermingsklasse (klasse) / PL: Klasa ochrony (klasa) / FR: Classe de protection (classe) / IT: Classe di protezione (classe) / RO: Clasă de protectie (clasă) / GR: Kláon prostaociaç (katnyopia) / HR: Klasa zaštite (klasa) / CZ: Trída ochrany (trída) / HU: Védelmi osztály (osztály) / UA: Kлас захисту (klac) / EE: Kaitseklass (klass) / LV: Aizsardzības klase (klase) / LT: Apsaugos klasė (klasė) / PT: Classe de proteção (classe) / ES: Clase de protección (clase) / SK: Trieda ochrany (trieda) / DK: Beskyttelsesklasse (klasse) / FI: Suojausluokka (luokka) / NO: Beskyttelsesklasse (klasse) / SI: Razred zaščite (razred) / SE: Skyddsklass (klass) / BG: Kлас на защита (Klac) / RU: Klacc защиты (klacc)
E: GB: Waterproof protection rating / DE: Wasserdichtigkeitsschutzklasse / NL: Beschermingsgraad tegen water / PL: Klasa wodoodporności / FR: Indice de protection étanche / IT: Grado di protezione impermeabile / RO: Clasificare protecție impermeabilă / GR: Baθμος αδιάβροχης προστασίας / HR: Vodootporna zaštita / CZ: Odolnost proti vodě / HU: Vízálló védelmi besorolás / UA: Рейтинг водонепроникності / EE: Veekindluse kaitseaste / LV: Üdensnecaurlaidības klase / LT: Apsaugos nuo vandens klasė / PT: Classificação de proteção à prova de água / ES: Grado de impermeabilidad / SK: Stupeň ochrany proti vode / DK: Vandtæt beskyttelsesklassificering / FI: Vedenpitävä suojausluokitus / NO: Vanntett beskyttelsesklassifisering / SI: Stopnja zaščite pred vodorom vode / SE: Vattentät skyddsklassning / BG: Klas na водоустойчивост / RU: Рейтинг водонепроницаемости
F: GB:Operating ambient temperature / DE:Betriebsumgebungstemperatur / NL:Bedrijfstemperatuur / PL: Temperatura otoczeniapodczas pracy / FR:Température ambiante defonctionnement / IT:Temperatura ambiente diesercizio / RO:Temperatura ambientă defuncționare / GR:Θερμοκρασία περιβάλλοντοςλειτουργίας / HR:Radna temperatura okoline / CZ:Provozní okolní teplota/ HU:Üzemi környezeti hőmérséklet / UA:Робоча температура навколишнього середовища / EE:töökeskkonna temperatuur / LV: Darba vides temperatūra / LT:darbinė aplinkos temperatūra / PT:Temperatura ambiente defuncionamento / ES:Temperatura ambiente defuncionamiento / SK:Prevádzková okolitá teplota / DK:Driftstemperatur / FI:Ympäristön käyttölämpötila / NO:Omgivelsestemperaturunder drift / SI:Temperaturadelovnega okolja / SE: Omgivningstemperatur viddrift / BG:Pаботна температура на околната среда / RU:рабочая температура окружающей среды
G: GB: Temperature settings / DE: Temperatur-Einstellungen / NL: Temperatuur instellingen / PL: Ustawienia temperatury / FR: Réglages de température / IT: Impostazioni della temperatura / RO: Setări de temperatură / GR: Puθμίσεις θερμοκρασίας / HR: Postavke temperature / CZ: Nastavení teploty / HU: Hőmérséklet-beállítások / UA: Налаштування температури / EE: Temperatuurisätted / LV: Temperatūras iestatījumi / LT: Temperatūros nuostatos / PT: Definições de temperatura / ES: Ajustes de temperatura / SK: Nastavenie teploty / DK: Temperaturindstillinger / FI: Lämpötila-asetukset / NO: Temperaturinnstillinger / SI: Nastavitve temperature / SE: Temperaturinställningar / BG: Настройки на температурата / RU: Настройки температуры
H: GB:Refrigerant used and injection quantity / DE:Verwendetes Kältemittel und Injektionsmenge / NL:Gebruikte koelmiddel en injectiehoeveelheid / PL:Używany czynnik chłodniczy i ilość wstrzyknięcia / FR:Réfrigérant utilisé et quantité d'injection / IT:Refrigerante utilizzato e quantità di iniezione / RO:Agent frigorific utilizat și cantitate de injecție / GR:Xpnolμοποιημένο ψυκτικό μέσο και ποσότητα ένεσης / HR:Upotrijebljeno rashladno sredstvo i količina ubrizgavanja / CZ:Použité chladivo a množství injekce / HU: Felhasznált hűtőközeg és injekció mennyisége / UA:Використаний холодоагент і кількість ін'єкцій / EE:Kasutatud külmik ja süstekogus / LV:Izmantotais aukstumaçents un injekcijas daudzums / LT:Panaudotas freonas ir injekcijos kiekis / PT:Refrigerante utilizado e quantidade de injeção / ES:Refrigerante utilizado y cantidad de inyección / SK:Použité chladiace médium a množstvo injekcie / DK:Brugt kølemiddel og injektionsmængde / FI:Käytetty kylmäaine ja injektiomäärä / NO:Kjølemiddel brukt og injeksjonsmengde / SI:Uporabljeno hladilno sredstvo in količina injiciranja / SE:Använd köldmedium och injektionsmängd / BG:Използвано хладилно вещество и количество за инжектиране / RU:Использованный хладагент и количество впрыскиваемого материала
I: GB:Climate class / DE:Klimaklasse / NL:Klimaatklasse / PL:Klasa klimatyczna / FR:Classe climat / IT:Classe climatica / RO:Clasa climei / GR:Klumatikn katnyopia / HR:Stematski sat / CZ:Klimatická třída / HU:Klímaosztály / UA:Klas klímaty / EE:Kliendiklass / LV:Klimata klase / LT:Lékimo klasé / PT:Classe climática / ES:Clase climática / SK:Klimatická trieda / DK:Klima af klasse / FI:Ilmastoluokka / NO:Klimaklasse / SI:Podnebni razred / SE:Klimatklass / BG:Klimatologichen klas / RU:Klass klimata
J: GB: Noise level / DE: Rauschpegel / NL: Geluidsniveau / PL: Poziom hałasu / FR: Niveau sonore / IT: Livello di rumore / RO: Nivel zgomot / GR: Eninęðo őorůBou / HR: Razina buke / CZ: Hluková úroveň / HU: Zajszint / UA: Pívень шуму / EE: Müratase / LV: Trokšna līmenis / LT: Triukšmo lygis / PT: Nível de ruído / ES: Nivel de ruido / SK: Úroveň hluku / DK: Stojniveau / FI: Äänen taso / NO: Støynivå / SI: Raven hrupa / SE: Ljudnivå / BG: Ниво на шум / RU: Уровень шума
K: GB:Number of bowl / DE: Anzahl der Schüsseln / NL:Aantal kommen / PL:Liczba misek / FR:Nombre de bols / IT:Numero di ciotole / RO:Număr de boluri / GR:Aptθμός μπολ / HR:Broj zdjele / CZ:Počet mís / HU:Edény száma / UA:Kількість чаши / EE:Kausi number / LV:Błodas skaits / LT:Dubens skaičius / PT:Número de taças / ES:Número de tazones / SK:Počet misiek / DK:Antal skåle / FI:Kulhon määrä / NO:Antall skåler / SI:Število skled / SE:Antal skålar / BG:Брой купички / RU:Количество чаш
L: GB: Capacity of each bowl (Liter) / DE: Fassungsvermögen jeder Schüssel (Liter) / NL: Capaciteit van elke kom (liter) / PL: Pojemność każdej miski (litr) / FR: Capacité de chaque bol (litre) / IT: Capacità di ogni ciotola (litro) / RO: Capacitatea fiecărui bol (litru) / GR: Хпрпикотпа кабе μπολ (Литро) / HR: Kapacitet svake zdjele (litara) / CZ: Kapacita každé misy (litr) / HU: Az egyes tálak kapacitása (liter) / UA: Емність кожної чаши (литер) / EE: Iga kausi maht (liiter) / LV: Katra trauka ietilpība (litrs) / LT: Kiekvieno dubenio (kepenų) talpa / PT: Capacidade de cada taça (litro) / ES: Capacidad de cada recipiente (litro) / SK: Kapacita každej misy (litrová) / DK: Hver skåls kapacitet (liter) / FI: Kummankin kulhon tilavuus (litra) / NO: Kapasitet for hver skål (liter) / SI: Zmogljivost vsake posode (liter) / SE: Kapacitet för varje skål (liter) / BG: Вместимост на всяка купа (литра) / RU: Емкость каждой чаши (литр)
M: GB:Dimensions / DE:Abmessungen / NL:Afmetingen / PL:Wymiary / FR:Dimensions / IT:Dimensioni / RO:Dimensiuni / GR:Διαστάσεις / HR:Dimenzije / CZ:Rozměry / HU:Méretek / UA:Розміри / EE:Mõõtmed / LV:Izmēri / LT:Matmenys / PT:Dimensões / ES:Dimensiones / SK:Rozmery / DK:Mål / FI:Mitat / NO:Mål / SI: Mere / SE:Mått / BG: Размери / RU:Размеры
N: GB:Net weight (Bowl empty) / DE:Nettogewicht (Schale leer) / NL:Nettogewicht (Bowl leeg) / PL:Waga netto (Bowl pusty) / FR:Poids net (bol vide) / IT:Peso netto (Bowl vuoto) / RO:Greutate netă (Bowl gol) / GR:Kαθαρό Βάρος (Κενό κουβὰ) / HR:Neto težina (Bočica je prazna) / CZ:Čistá hmotnost (prázdná mísa) / HU:Nettó tömeg (tartály üres) / UA:Bara нетто (порожня кришка) / EE:Netokaal (tühjalt) / LV:Neto svars (tukšs trauks) / LT:Grynasis svoris (mašina tuščia) / PT:Peso líquido (Couve vazia) / ES:Peso neto (tazón vacío) / SK:Čistá hmotnost (gulôčka je prázdna) / DK:Nettovægt (skål tom) / FI: Nettopaino (kulho tyhjä) / NO:Nettovekt (tom tank) / SI:Neto teža (prazna krogla) / SE:Nettovikt (skål tom) / BG: Нетно tegло (купata е празна) / RU:Вес нетто (пустой кишечник)
GB: Remark: Technical specification is subjected to change without prior notification.
DE: Anmerkung: Die technische Spezifikation kann ohne vorherige Ankündigung geändert werden.
NL: Opmerking: De technische specificatie zijn onderworpen aan wijzigingen zonder voorafgaande kennisgeving.
PL: Uwaga: Specyfikacja techniczna może zostać zmieniona bez powiadomienia.
FR: Remarque: La spécification technique peut être modifiée sans notification préalable.
IT: Osservazione: Le specifiche tecniche sono soggette a modifiche senza preavviso.
RO: Observatie: Specificația tehnica se poate modifica fără notificare prealabilă.
GR: Σημείωση: Οι τεχνικές προδιαγραφές μπορούν να αλλάξουν χωρίς προειδοποίηση.
HR: Napomena: Tehničke specifikacije podložne su promjenama bez prethodne obavijesti.
CZ: Poznámka: Technická specifikace se může změnit bez předchozího upozornění.
HU: Megjegyzés: A műszaki adatok előzetes értesítés nélkül változhatnak.
UA: Зауваження: Технічні характеристики можуть змінюватися без попереднього повідомлення.
EE: Märkus: Tehnilisi andmeid võidakse muuta ilma eelneva teavitamiseta.
LV: Piezīme: Tehniskās specifikācijas var tikt mainītas bez iepriekšēja brīdinājuma.
LT: Pastaba: Techninė specifikacija gali būti keičiama be išankstinio įspejimo.
PT: Observação: As especificações técnicas estão sujeitas a alterações sem notificação prévia.
ES: Observación: Las especificaciones técnicas están sujetas a cambios sin previo aviso.
SK: Poznámka: Technické špecifikácie podliehajú zmenám bez predchádzajúceho oznámenia.
DK: Bemærkning: Tekniske specifikationer kan ændres uden forudgående varsel.
FI: Huomautus: Teknisiä tietoja voidaan muuttaa ilman ennakkoilmoitusta.
NO: Merknad: Teknisk spesifikasjon kan endres uten forhåndsvarsel.
SI: Opomba: Tehnične specifikacije se lahko spremenijo brez predhodnega obvestila.
SE: Anmärkning: Tekniska specifikationer kan ändras utan föregående meddelande.
BG: Забележка: Техническите спецификации подлежат на промяна без предварително уведомление.
RU: Примечание. Технические характеристики могут быть изменены без предварительного уведомления.
Dear Customer,
Thank you for purchasing this Arktic appliance. Read this user manual carefully, paying particular attention to the safety regulations outlined below, before installing and using this appliance for the first time.
Safety instructions
- Only use the appliance for the intended purpose it was designed for, as described in this manual.
- The manufacturer is not liable for any damage caused by incorrect operation and improper use.
- DANGER! RISK OF ELECTRIC SHOCK! Do not attempt to repair the appliance by yourself. Do not immerse the electrical parts of the appliance in water or other liquids. Never hold the appliance under running water.
- NEVER USE A DAMAGED APPLIANCE! Check the electrical connections and cord regularly for any damage. When damaged, disconnect the appliance from the power supply. Any repairs should only be carried out by a supplier or qualified person to avoid danger or injury.
- WARNING! When positioning the appliance, route the power cable safely if necessary to avoid unintentional pulling, being damaged, coming into contact with the heating surface, or causing a tripping hazard.
- WARNING! As long as the plug is in the socket the appliance is connected to the power supply.
- WARNING! ALWAYS switch off the appliance before disconnecting from the power supply, cleaning, maintenance or storage.
- Only connect the appliance to an electrical outlet with the voltage and frequency mentioned on the appliance label.
- Do not touch the plug/electrical connections with wet or damp hands.
- Keep the appliance and electrical plug/connections away from water and other liquids. If the appliance falls into water, remove the power supply connections immediately. Do not use the appliance until it has been checked by a certified technician. Failure to follow these instructions will cause life threatening risks.
- Connect the power supply into an easily accessible electrical outlet so you can disconnect the appliance immediately in case of emergency.
- Make sure the cord does not come in contact with sharp or hot objects and keep it away from open fire. Never pull the power cord to unplug it from the socket, always pull the plug instead.
- Never carry the appliance by its cord.
- Never try to open the housing of the appliance yourself.
- Do not insert objects into the housing of the appliance.
- Never leave the appliance unattended during use.
- This appliance should be operated by trained personnel in kitchen of the restaurant, canteens or bar staff, etc.
- This appliance should not be operated by persons with reduced physical, sensory or mental capabilities, or persons that have a lack of experience and knowledge.
- This appliance should, under any circumstances, not be used by children.
- Keep the appliance and its electrical connections out of reach of children.
- Never use accessories or any extra devices other than those supplied with the appliance or recommended by the manufacturer. Failure to do so could pose a safety risk to the user and could damage the appliance. Only use original parts and accessories.
- Do not operate this appliance by means of an external timer or remote-control system.
- Do not place the appliance on a heating object (gasoline, electric, charcoal cooker, etc.).
- Do not cover the appliance in operation.
- Do not place any objects on top of the appliance.
- Do not use the appliance near any open flames, explosive or flammable materials. Always operate the appliance on a horizontal, stable, clean, heat-resistant and dry surface.
- The appliance is not suitable for installation in an area where a water jet could be used.
- Leave a space of at least 20 cm around the appliance for ventilation during use.
- WARNING! Keep all ventilation openings on the appliance free from obstruction.
Special safety instructions
• CAUTION! RISK OF FIRE! The refrigerant
used is R290 It is a flammable refrigerant which is environmentally friendly. Although it is flammable, it does not damage the ozone layer and does not increase the greenhouse effect. The use of this
coolant has, however, led to a slight increase in the noise level of the appliance. In addition to the noise of the compressor, you might be able to hear the coolant flowing around the system. This is unavoidable, and does not have any adverse effect on the performance of the appliance. Care must be taken during the transportation and setting up of the appliance that no parts of the cooling system are damaged. Leaking coolant can damage the eyes.
• This appliance is intended for commercial use.
- Do not operate the appliance without load to prevent overheating.
- DANGEROUS! RISK OF INJURY! There are moving parts inside the bowl, which may cause injury. Switch off the machine and disconnect it from the power supply before doing any operations.
- CAUTION! ALWAYS switch the machine off and disconnect the power supply before touching any motoring parts.
If the supply cord is damaged, it must be replaced by the manufacturer, its service agent or similarly qualified persons in order to avoid a hazard.
- ATTENTION! Do not fill the load over MAX level.
- CAUTION! RISK OF BURNS! Refrigerant liquid sprayed on the skin can cause critical burns. Keep eyes and skin protected. If refrigerant burns occur, rinse immediately with cold water. In case burns are severe, apply ice and contact medical treatment immediately.
- WARNING! Provide sufficient ventilation in the surrounding structure when building-in. Never block the air flow suction and air outlet in order to keep air circulation.
- Do not place any dangerous products, such as fuel, alcohol, paint, aerosol cans with a flammable propellant, flammable or explosive substances, etc. inside or near the appliance.
Intended use
- This appliance is intended to be used for commercial applications, for example in kitchens of restaurants, canteens, hospital and in commercial enterprises such as bakeries, butcheries, etc., but not for continuous mass production of food.
- This appliance is designed for dispensing cold beverages. Any other use may lead to damage of the appliance or personal injury.
- Operating the appliance for any other purpose shall be deemed a misuse of the device. The user shall be solely liable for improper use of the device.
Grounding installation
This appliance is classified as protection class I and must be connected to a protective ground. Grounding reduces the risk of electric shock by providing an escape wire for the electric current.
This appliance is fitted with a power cord with grounding plug or electrical connections with grounding wire. The connections must be properly installed and grounded.
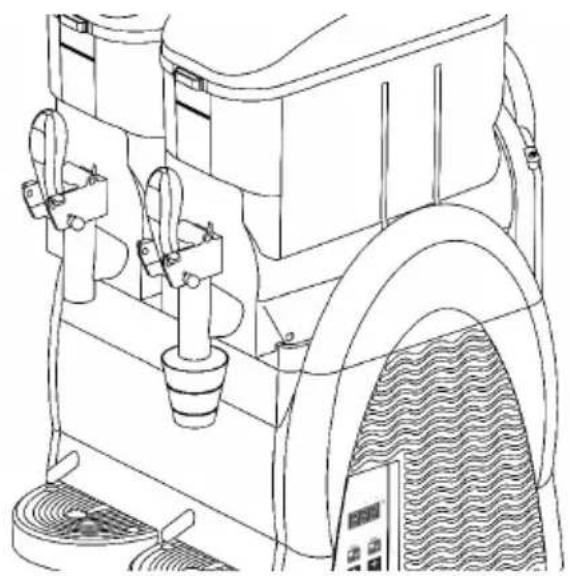
Main parts of the product
(Fig.1 on page 3)
- Bowl lid cover
- Bowl
- Control panel
- Detachable Drip tray
- Grid
- Float (overflow indicator)
- Dispenser taps
- Handles
- Feet
Spare parts
A. Auger seal hat cover x3
B. Bowl seal ring x1
C. Dispenser tap seal ring x10
D. Auger shaft white washer x3
E. Auger shaft black washer x3
F. Tube of lubricant x1
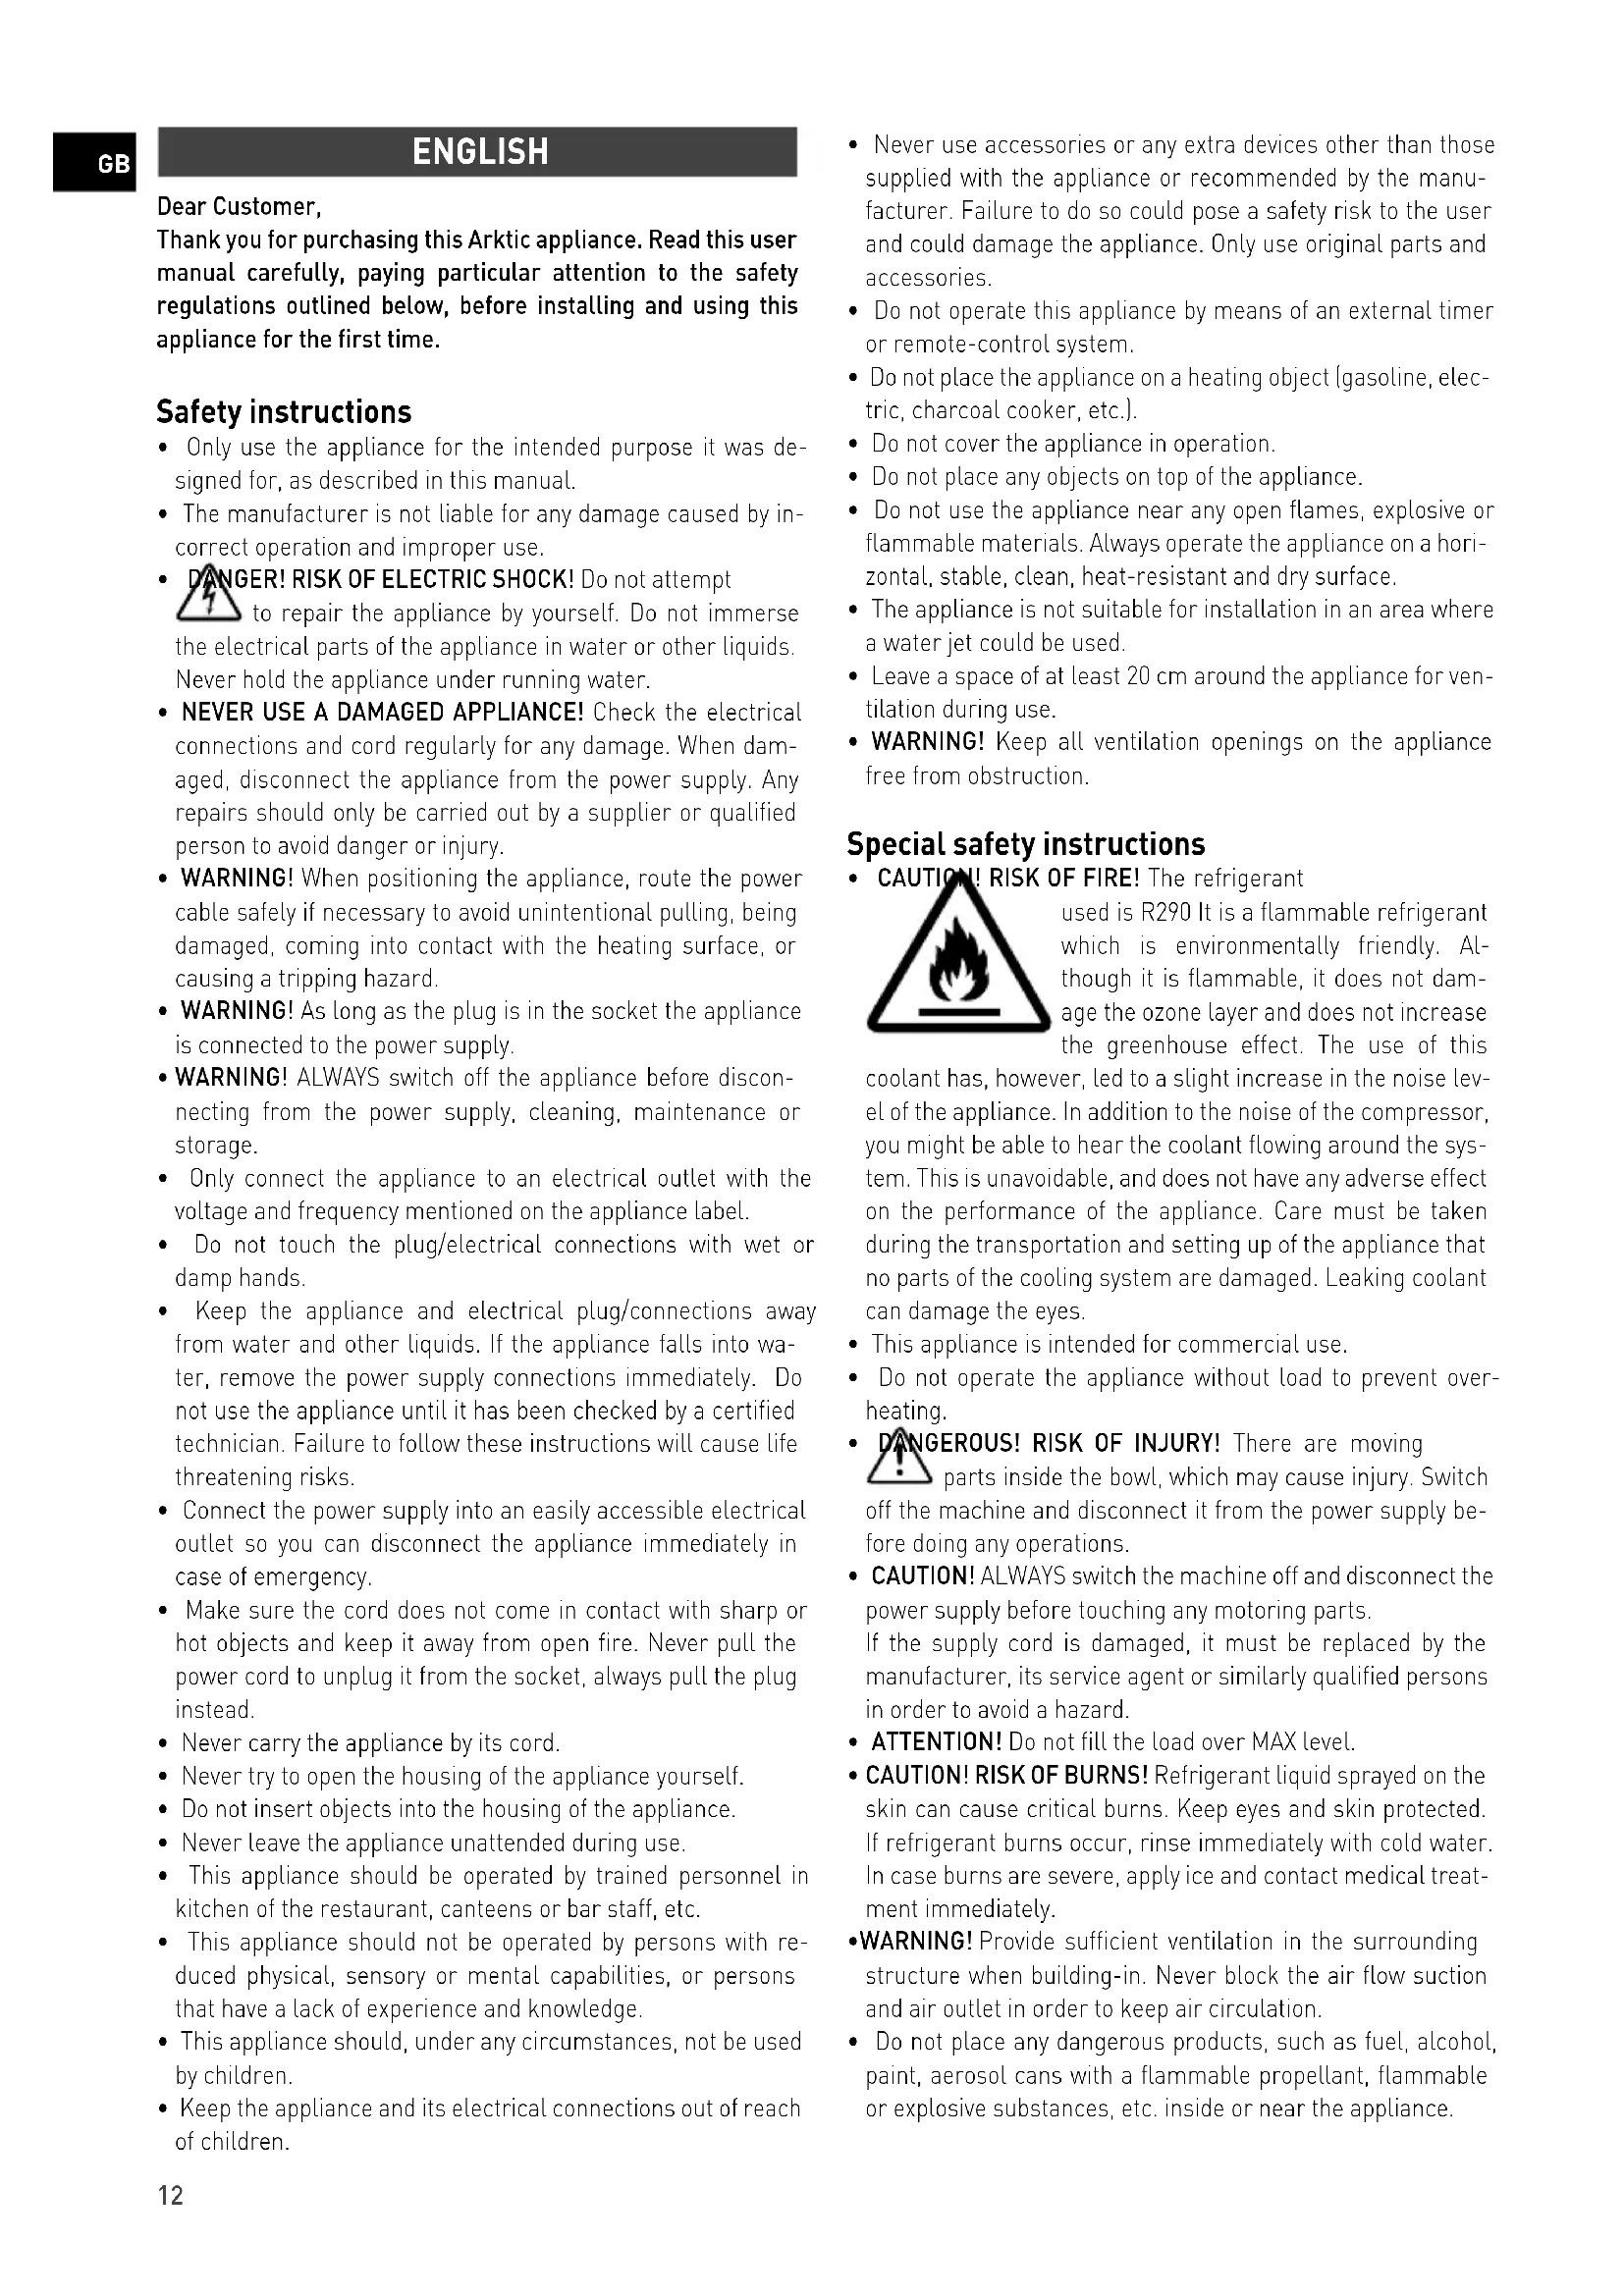
Control panel
(Fig.2 on page 3)
- Bowl indicator light
- Display
- Mode selection button for desired bowl
- Right panel
- Increase hardness + / Temperature
- Display of hardness / Temperature
- Decrease hardness - /Temperature
- Left panel
- Granita mode indicator
- Juice mode indicator
- OFF mode indicator
- Power switch
- Parameter setting button
(See == > Parameter Setting of the Machine) - Illumination light button
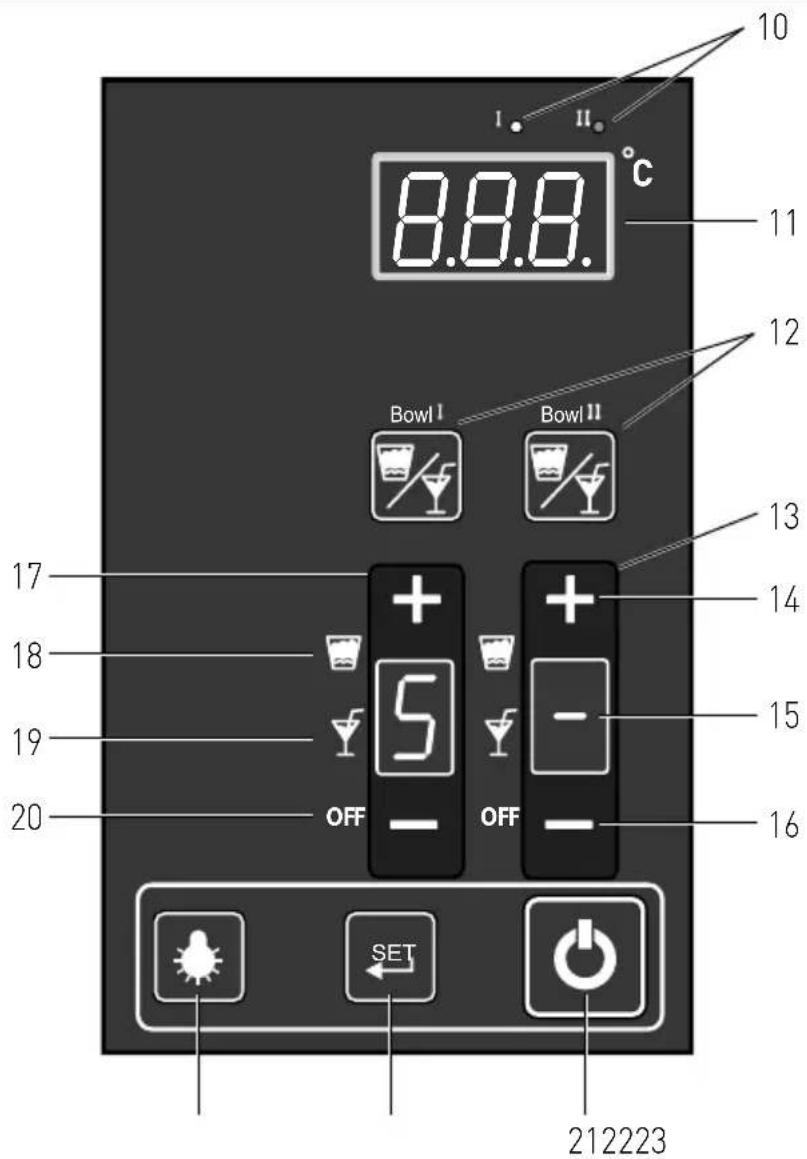
Circuit diagram
(Fig.3 on page 4)
T. Switch power
M1: Compressor
FA: Compressor overload
KA: Compressor relay
C: Start capacitor
NTC1\NTC2: Sensor of drink of 1\2
NTC3\NTC4: Sensor of suction of 1\2
WX: Temperature display
MI\MII : DC Gear Motor of 1\2
LEDI \LEDII : LED Lights of 1\2
Preparation before use
- Remove all protective packaging and wrapping.
- Check that the device is in good condition and with all accessories. In case of incomplete or damaged delivery, please contact the supplier immediately. In this case, do not use the device.
- Clean the accessories and the appliance before use (See ==> Cleaning & Maintenance).
• Make sure the appliance is completely dry. - Place the appliance on a horizontal, stable and heat resistant surface that is safe against water splashes.
- Keep the packaging if you intend to store your appliance in the future.
- Keep the user manual for future reference.
NOTE! Due to manufacturing residues, the appliance may emit a light odor during the first few uses. This is normal and does not indicate any defect or hazard. Make sure the appliance is well ventilated.
Operating instructions
a) Preparation of the food ingredient:
(Fig.4 on page 4)
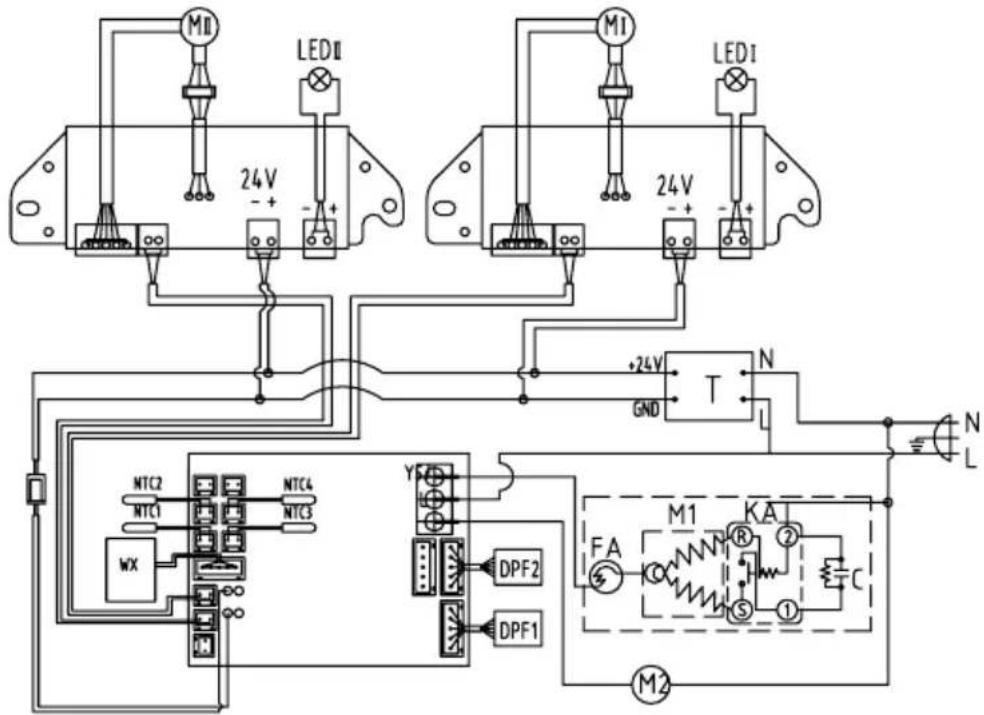
- Dilute and mix the CONCENTRATE with WATER in a suitable container, following the manufacturer's recipes. THE MIXTURE OBTAINED MUST HAVE A MINIUM SUGAR CONTENT OF 13°BRIX. A lower concentration may damage the augers and/or gearmotors.
- WARNING! The temperature of the food ingredient should never exceed 25°C.
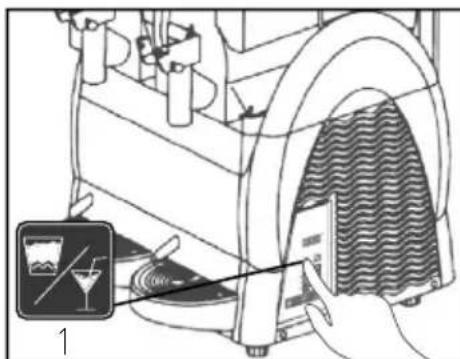
- WARNING! Never use only with water.
b) Putting food ingredient into the machine:
- WARNING! Food ingredient should be poured into the bowl (2) only when the machine is OFF and unplugged from the electrical power supply.
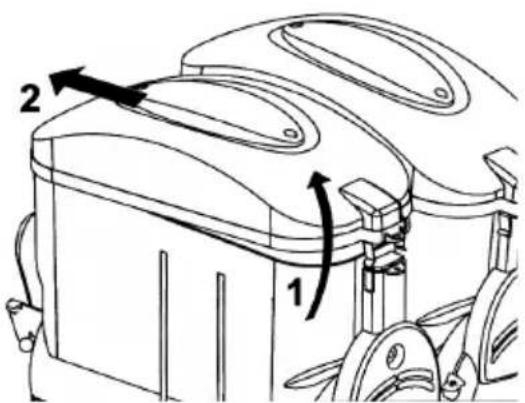
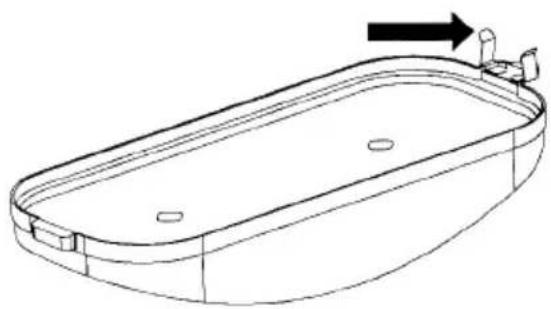
- To remove the bowl lid (1) of the bowl (2), follow these instructions (Fig.5 on page 4):
1) Lift the rear part of the lid;
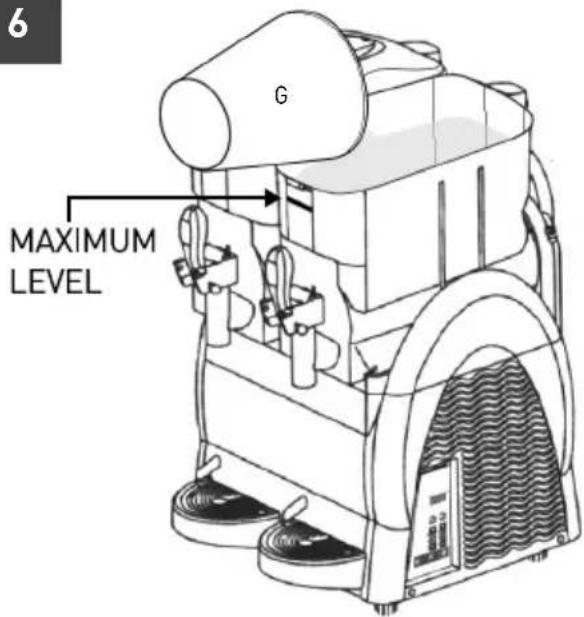
2) Extract the bowl lid (1) from the retainer placed at the front side. - Pour the food ingredient (G) into the bowl (2) with care and not beyond the "MAXIMUM LEVEL". (Fig.6 on page 4), (Do not pour hot liquid to avoid hazard.)
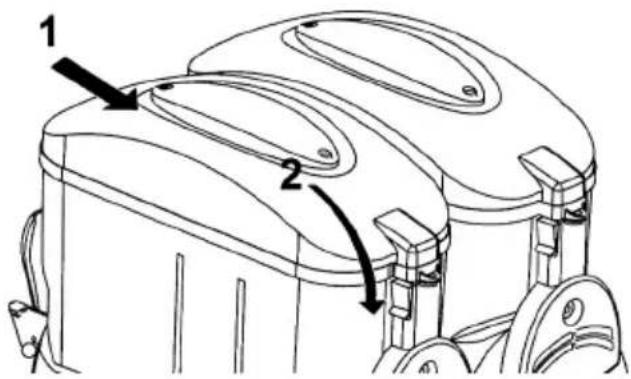
- After pouring/refilling the food ingredient into the bowl [2], close the bowl lid [1] on top of the bowl [2]. (Fig.7 on page 4)
WARNINGS!
-
Never switch on the machine if the bowl lid is missing. Before removing the bowl lid, switch off the machine and unplug it.
-
There are some moving parts inside the bowl, which may cause injuries, switch off the machine and unplug it before carrying out any operation.
c) Start operating the machine:
(Control panel : Fig.2 on page 3)
Each bowl is controlled independently.
- First, connect the power plug to a suitable electrical power outlet.
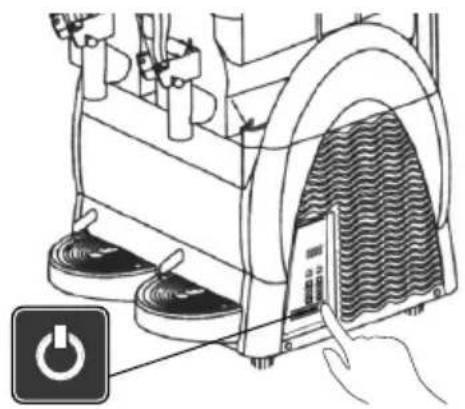
- Next, press (21) to switch ON the machine. Press and hold (21) for 3 seconds to switch to STANDBY mode of the machine when not use. (Fig.8 on page 5).
- Then, press the corresponding bowl button(12).
And press consecutively to select the working mode here are 3 working modes: Granita (18), juice (19) or OFF (20). It will be displayed in sequence and the corresponding icon will be lighted.
I). To serve with Granita
(Fig.9 on page 5)
- Press the corresponding bowl button(12).
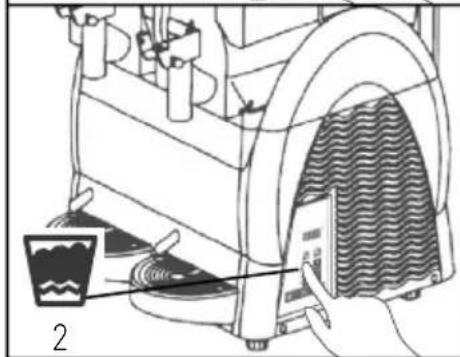
- Next, press consecutively to select Granita mode(18) will be lighted.
- Then, press "+" or "-" consecutively to adjust the hardness. The level in between from 1 (Soft with much water content) to 7 (Hard with less water content).
II). To serve with cold drinks
(Fig.10 on page 5)
- Press the corresponding bowl button(12) until (19) lights up.
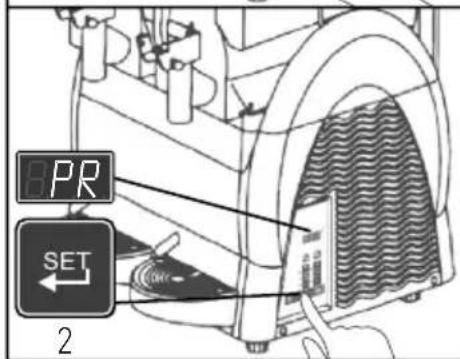
- Enter to juice temperature setting mode by long pressing(22) until "PR" is blinking on the display.
- Press (22) again to select bowl 1(F1) or 2(F2) until "F1" or "F2" is shown on the temperature display.
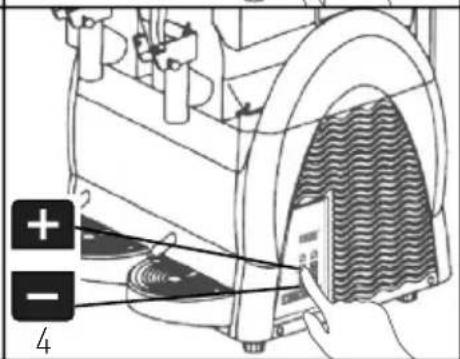
- Press left panel (17) to adjust the temperature from 1^ 7^ . The temperature will be set successfully. After flashing 15 times without any operation, the display will return to normal.
NOTICE:
- Current temperature is showing on display as normal.
- Press (14) and (16) at the same time for restoring to default temperature( 2^ C).
- Display shows "PR" / "F1" / "F2": Juice temperature setting mode / bowl 1 / bowl 2. The mode will become invalid after flashing 15 times without any operation and display will switch back to normal.
- Only left panel (17) can be operated (for both bowl 1 and 2) within juice temperature setting model.
III). To stop working
- Press the corresponding bowl button (12).
- Next, press consecutively until OFF mode, (20) will be lighted. Then, it would stop stirring and refrigerating.
d) To simply clean the corresponding bowl:
- Press and hold the corresponding bowl button[12] for about 6 seconds.
- The corresponding bowl valve will be fully open for cleaning about 3 minutes. During this mode, the control display will show "°C".
ATTENTION! Under this mode, the electronic expansion valve of the corresponding bowl will open. But the auger still stirring for cleaning. Please fill with warm and clean water into the bowl not exceeding the "MAXIMUM LEVEL". Do not put your hand inside.
Switch OFF the machine and unplug it for thorough cleaning or sanitization to the machine.
e) Dispensing granita
(Fig.11 on page 6)
• To dispense the food product, pull the tap lever.
NOTE: Regularly check the temperature of the beverages in the bowl (2). Keep on the machine running when there is any food inside the bowl.
If the machine is not continuously operated, it is necessary to dispose of the small amount from the tap area first before serving for the customer.
Parameter Setting of the Machine
WARNING! It is highly not recommended to change
these settings below as the machine is already adjusted to the optimal settings by the factory default. Change the setting only if it is necessary.
How to set
Press and hold (22) for about 6 seconds. The "PA" is shown on the display.
Press "+" or "-" to enter the value "15" (This is the code for entering into the setting mode).
Then, press (22) consecively to select the parameter (display will show consecively) that you want to change. The parameters are list below:
| Display Description | Setting range | Factory default | |
| F1 | Temperature of Bowl I under juice mode | 1°C ~ 7°C | 2°C |
| F2 | Temperature of Bowl II under juice mode | 1°C ~ 7°C | 2°C |
| F3 | Not applicable | ||
| C1 | Protection when the temperature is low | -13°C ~ -3°C | -5°C |
| C3 | Liquid temperature during first stage | 5°C ~ 10°C | 10°C |
| C4 | Liquid temperature during second stage | 3°C ~ 8°C | 5°C |
| A1 | Sensor probe temperature for bowl I | -5°C ~ 5°C | 0°C |
| A2 | Sensor probe temperature for bowl II | -5°C ~ 5°C | 0°C |
| A3 | Not applicable | ||
| E1 | Temperature difference under juice mode | 1°C ~ 5°C | 2°C |
| E2 | Time delay of compressor | 2 ~ 8 min | 2 min |
Cleaning & maintenance
- ATTENTION! Always disconnect the appliance from the power supply and cool down before storage, cleaning & maintenance.
- Do not use water jet or steam cleaner for cleaning and do not push the appliance under the water as the parts will get wet and electric shock might be resulted.
- If the appliance is not kept in a good state of cleanliness, this can adversely affect the life of the appliance and result in a dangerous situation.
- Food residues should be regularly cleaned and removed from the appliance. If the appliance is not cleaned properly, it will reduce its lifespan and may result in a dangerous condition during use.
Cleaning
- Clean the cooled exterior surface with a cloth or sponge slightly dampened with a mild soap solution.
- For reasons of hygiene, the appliance should be cleaned before and after use.
- Avoid water contacting the electrical components.
- Clean the inside of container with a non-abrasive detergent and rinse with clean water.
- Never immerse the appliance in water or other liquids.
- No parts are dishwasher safe.
| Parts How to clean Remark | ||
| All accessories such as racks, rack holders, etc. | Soak in warm, soapy water for about 10 to 20 minutes.Rinse under running water thoroughly. | Dry all parts well at last. |
| External glass surfaces | Wipe clean with a soft cloth and a little neutral detergent.Make sure no water or moisture enters inside the of the appliance. | |
| Interior glass surfaces | Remove any food deposits.Wipe clean with a soft cloth and a little mild detergent.Make sure no water or moisture enters inside the of the appliance. | |
| Glass door | ||
a) Emptying the bowls
- Before a bowl may be cleaned, it must be emptied all the food ingredient inside the bowl first.
b) Disassembly the dispensing tap:
- Ensure all the beverage are emptied inside the bowl.
- Disassembly the tap before removing the bowl.
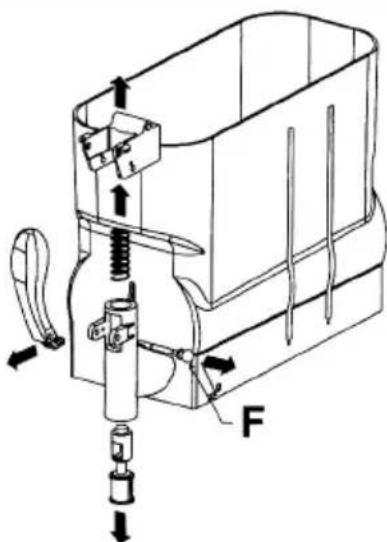
- Remove the pin (F) to release all the other parts. (Fig.13 on page 6)
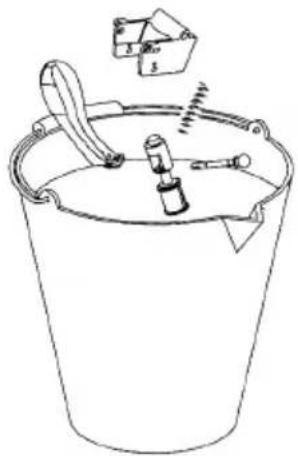
- Use clean and warm water to wash the parts. (Fig.14 on page 6)
c) Remove the bowl and the lid:
-
To remove the bowl lid (1) of the bowl (2) first, follow these instructions & see Fig.15 on page 6.
1) Lift the rear part of the lid;
2) Extract the bowl lid (1) from the retainer placed at the front side. -
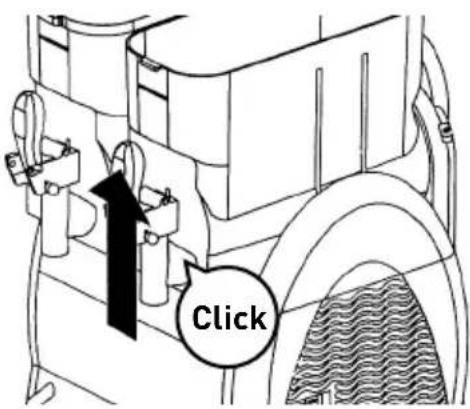
Then, raise the front part of the bowl to release it.
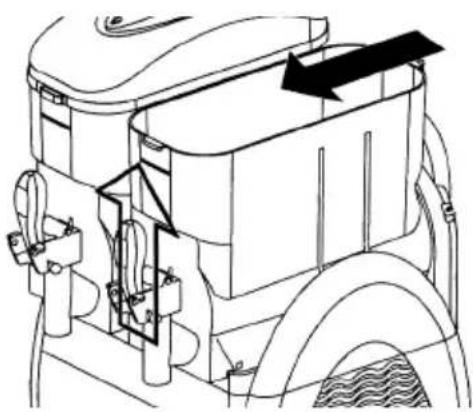
- Next, remove the bowl from its position by pushing slightly at the rear side. The bowl is detached now. (Fig.16 on page 6)
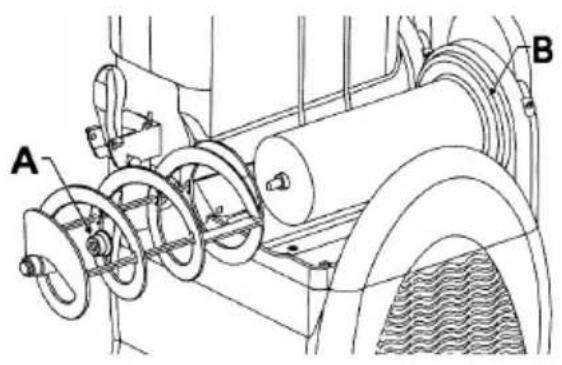
- Finally, take out the auger and remove the seal hat cover (A) and bowl seal ring (B). Replace if worn or for every 12 months. (Fig.17 on page 7)
d) Remove the bowl and the lid:
ATTENTION! All of the previously disassembled and removed components must be thoroughly washed and sanitized. We strongly recommend daily cleaning and sanitizing this machine in order to maintain high degree of food quality.
• To carry out this procedure correctly, proceed as follows:
- Fill a container with detergent and hot water with a temperature of 50 \~ 60°C;
- Wash the disassembled components thoroughly with the detergent solution.
- Rinse with hot water.
- Dip the disassembly components into the solution and soaked for about 30 minutes.
- Then, wash the components again with clean water.
- Place different components on a dry, clean surface and dry all parts well.
- Assembly the machine as described in below part e).
- Before starting operating the machine again, carry out the rinsing cycle with clean water. (See below part f.)
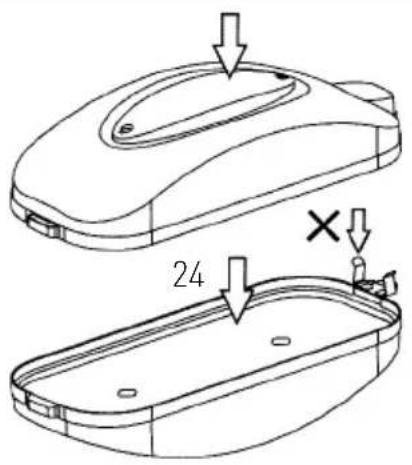
WARNING! Do not immerse the bowl lids with lighting bulb in any type of liquid. Before cleaning, please make sure the lighting bulb are removed from the machine as described as below (Fig.29 on page 8).
To clean the lighted bowl lid as below:
- Using a clean, damp cloth to wipe clean the bottom part of the bowl lid & the outer surface.
- Using a sponge dipped in the washing solution, sanitize the bottom part [24] of the bowl lid, take care not to touch the hinge part (X) for about 10 minutes (Fig.18 on page 7).
- Rinse twice or more, with a clean sponge soaked in warm fresh water.
- Dry it with a dry clean cloth.
- Put back the bowl lid only after the bowl has been cleaned and sanitised.
e) Reassembly the washed components
ATTENTION! All of the washed components must be carefully re-assembled. Some components must be adequately lubricated by the supplied lubricants in order to ensure that they work efficiently.
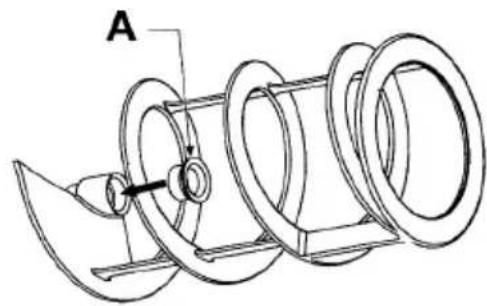
- Always check for the integrity of the seal (A), should it be worn, replace it with a new one (supplied).
- Replace the auger seal hat cover (A) for at least every 12 months.
- Insert the auger seal hat cover (A) as below. (Fig.19 on page 7).
- Lubricate the inside area of the auger seal hat cover (A) as shown in Fig.20 on page 7 with the lubricant (Supplied).
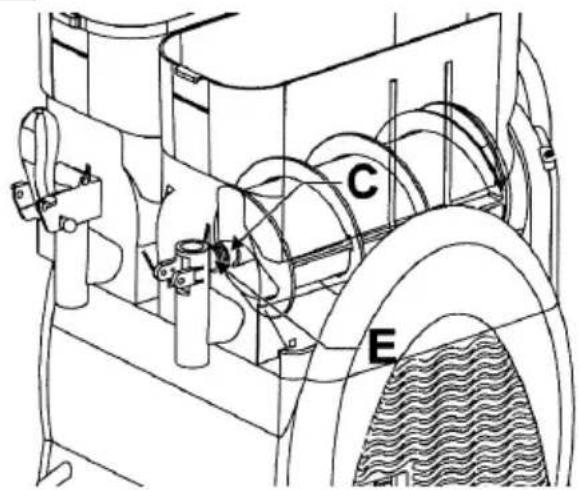
- Then, insert the bowl seal ring (B) and lubricate with the supplied lubricant around it as below. (Fig.21 on page 7)
-
Next, insert the auger with the white washer (D) and black washer (E) for the shaft. Rotate the auger to engage it. (Fig.22 on page 7)
-
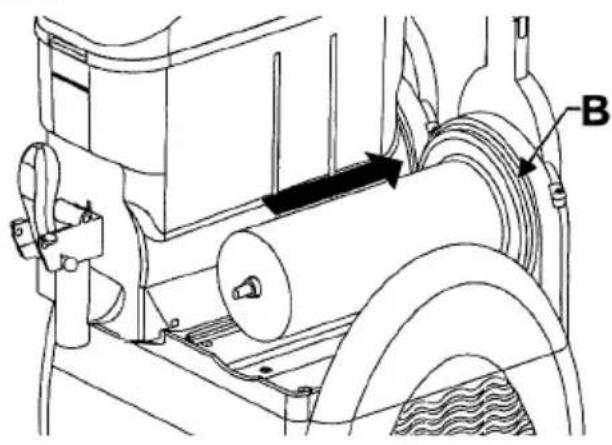
After that, set back the bowl in place, slightly raise head of the auger so that it align with the position (E) of the bowl. (Fig.23 on page 7)
- Press the bowl slightly downward until it engages with the correct position and there will be a "click" sound. (Fig.24 on page 7)
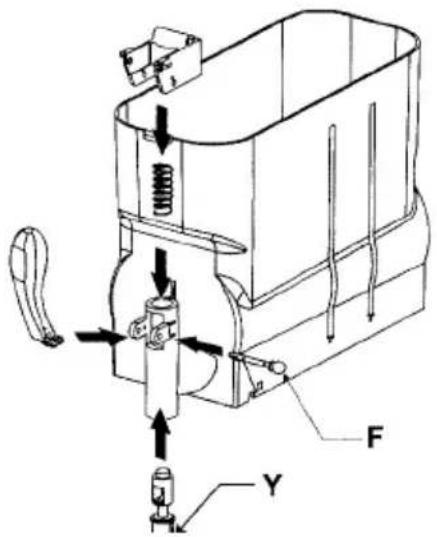
Follow below instructions to re-assembly the tap (7):
- Using the supplied lubricant, lubricate the cap (Y) adequately and re-assembly the components.
- Fit the pin (F) while keep the tap lever steady. (Fig.25 on page 8)
- Replace the tap seal ring (C) if worn or leakage.
f) Rinsing the machine
ATTENTION! Before starting up the machine after cleaning, you must carry out the rinsing cycle.
Procedures as below:
- Pour out the clean water into bowl;
- Let the machine to run for at least 5 minutes in the "agitation"
- Switch off the machine and empty the bowl by opening the tap.
g) Cleaning the drip tray
ATTENTION! The drip tray should be emptied and cleaned every time the red float installed in the grid rises into view. It should be cleaned daily.
- Lift the tray with the grid on top of it and pull it out. (Fig.26 on page 8)
- Wash the tray and the grid separately with the lukewarm water.
- Dry both parts well and place back the grid on top of the tray.
- Position the drainage hose in the opening provided.
- Fit back the tray in place and press down to secure it with the machine.
h) Lighting lid
ATTENTION! During the cleaning process, take care not to bend, break or damage the „contacts“ [Fig.27 on page 8]. Any damage might cause a bad functioning of the lighting lid.
- Clean the lid contacts using a damp cloth and dry well. Always switch OFF the machine.
- Do not immersed in water for cleaning.
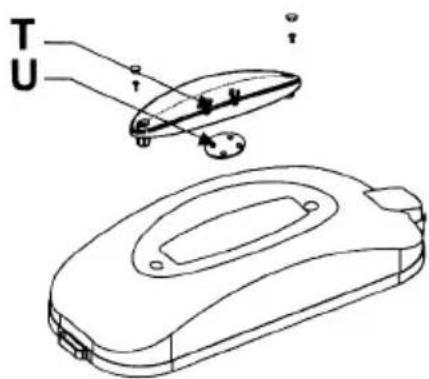
i) Bulb replacement
- The bulb should be replaced only when the machine is switched OFF and the power cord is unplugged.
- Next, remove the protection caps. Then, using a proper screwdriver (not supplied) to loosen the screws in order to remove the cover (Fig.28 on page 8).
- Remove the bulb (U) from the socket (T) (Fig.29 on page 8). And replace it with a new bulb (not supplied).
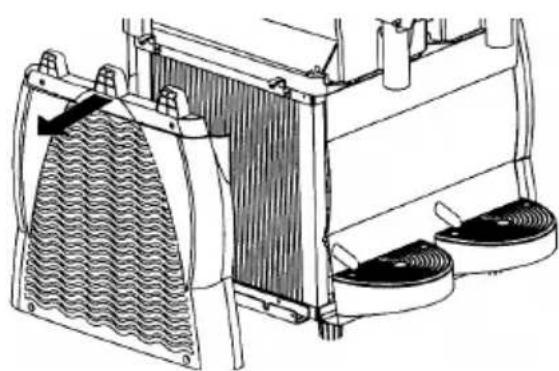
j) Cleaning the condenser
- ATTENTION! The condenser can only be cleaned solely by a specialized technician, who must organize all of the operational sequences and with suitable tool/equipment.
- The condenser should be cleaned regularly (at least once per every 6 months) to keep good machine performance.
-
To access the condenser, the safety guards need to be removed.
-
WARNING! Removing safety guards will expose some sharp surfaces of the machine.
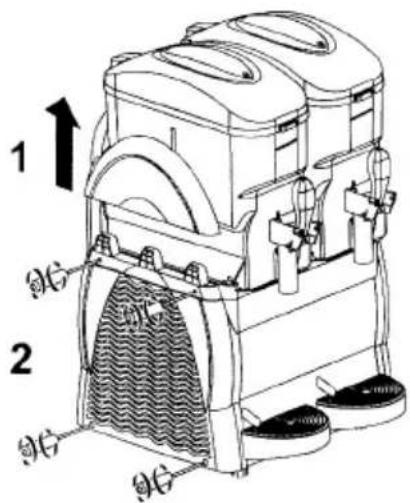
- To remove the safety guard panel, proceed as below: (Fig.30 on page 8)
1) Lift and completely remove the upper part of the side guard;
2) Loosen the 4 screws securing the guard in place.
3) After removing the 4 screws, take off the safety guard. (Fig.31 on page 8)
4) Use a dry brush (not supplied) to remove the dust that has built up over time with use. [Fig.32 on page 8]
5) After having thoroughly cleaned the condenser, re-assembly the safety guard.
k) Periodic maintenance
This machine must be periodically checked (for at least every 6 months) by a specialized technician. This periodic check serves to ensure that all the components installed and the machine itself are at a high level of safety.
Any worn components must be replaced by an original spare part. It is forbidden to use this machine when even only one of its components is faulty or worn. User are prohibited to perform periodic maintenance.
Maintenance
- Check the operation of the appliance regularly to prevent serious accidents.
- If you see that the appliance is not working properly or that there is a problem, stop using it, switch it off and contact the supplier.
- All maintenance, installation and repair work must be carried out by specialised and authorised technicians, or recommended by the manufacturer.
Transportation and Storage
- Before storage, always make sure that the appliance has been disconnected from the power supply and completely cooled down.
- Store the appliance in a cool, clean and dry place.
- Never place heavy objects on the appliance as this could damage it.
- Do not move the appliance while it is under operation. Disconnect the appliance from power supply when moving and hold it at the bottom.
Troubleshooting
If the appliance does not function properly, please check the below table for the solution. If you are still unable to solve the problem, please contact the supplier/service provider.
| Problems Possible cause | Possible solution | |
| The machine has no operation after plug into the electrical socket | The power cord and plug do not connect firmly and correctly | Check again the connection. And make sure all the connections are firmly connected. |
| Dispenser tap leakage | The tap is not fitted correctly | Check again the connection. And make sure all the connections are firmly connected. |
| The tap piston is not lubricated | Lubricate the tap piston | |
| The tap piston is defective | Contact the supplier. | |
| Food leakage from the back of the bowl | The bowl is not fitted correctly. | Check again the position and reas-sembly the bowl. |
| The bowl seal ring is not lubricated. | Lubricate the bowl seal ring. | |
| The bowl seal ring is defective. | Replace with a new bowl seal ring. | |
| The auger does not turn | The auger is blocked by the ice in the bowl. | Allow the ice to be melted first. |
| The machine does not make granita | The work mode is not under “Granita mode” | Select “Granita mode” |
| The condenser is dirty. | Clean the condens-er regularly. | |
| Ventilation is not sufficient | Allow sufficient ventilation | |
| The machine nearby to the heat source. | Put the machine away from the heat source | |
| The auger is noisy during operation | The front seal (A) fitted incorrectly. | Check again and put the front seal (A) correctly. |
| The front seal (A) is not lubricated | Lubricate the front seal (A). | |
| The consistency is too thick | Change the con-sistency. | |
| Granita has black stains | The bowl is dirty. | Switch off & unplug the machine. Clean the bowl thoroughly. |
| The auger seal ring is dirty. | Clean again the seal ring. | |
| The dispenser tap doesn’t release properly | Tap is blocked by the ice | Switch off the machine to let the ice melt. |
Warranty
Any defect affecting the functionality of the appliance which becomes apparent within one year after purchase will be repaired by free repair or replacement provided the appliance has been used and maintained in accordance with the instructions and has not been abused or misused in any way. Your statutory rights are not affected. If the appliance is claimed under warranty, state where and when it was purchased and include proof of purchase (e.g. receipt).
In line with our policy of continuous product development we reserve the right to change the product, packaging and documentation specifications without notice.
Discarding & Environment
When decommissioning the appliance, the product must not be disposed of with other household waste. Instead, it is your responsibility to dispose to your waste equipment by handing it over to a designated collection point. Failure to follow this rule may be penalized in accordance with applicable regulations on waste disposal. The separate collection and recycling of your waste equipment at the time of disposal will help conserve natural resources and ensure that it is recycled in a manner that protects human health and the environment.
For more information about where you can drop off your waste for recycling, please contact your local waste collection company. The manufacturers and importers do not take responsibility for recycling, treatment and ecological disposal, either directly or through a public system.
DEUTSCH
Ohutusalased erijuhised
HENDI Romania S.R.L.
Str. Sânzienei FN, DE 305
507075, Ghimbav, Braşov, Romania
Tel: +40 268 320330
Email: office@hendi.ro
HENDI Horeca SL
Polígono Campollano, Calle B, 120
GB: Changes, printing and typesetting errors reserved.
39100 Bolzano (BZ), Italy
Tel: +39 800 727 438
Email: office.italy@hendi.eu
HENDI HK Ltd.
1202, 12/F Exchange Tower
33 Wang Chiu Road, Kowloon Bay, Hong Kong
Tel: +852 2154 2618
Email: info-hk@hendi.eu
Find HENDI on internet:
www.hendi.com
www.facebook.com/HendiToolsforChefs
https://www.linkedin.com/company/hendi-tools-for-chefs/
www.youtube.com/HendiEquipment


- Dear Customer,
- Safety instructions
- Special safety instructions
- Intended use
- Grounding installation
- Main parts of the product
- (Fig.1 on page 3)
- Spare parts
- Control panel
- (Fig.2 on page 3)
- Circuit diagram
- (Fig.3 on page 4)
- Preparation before use
- Operating instructions
- a) Preparation of the food ingredient:
- (Fig.4 on page 4)
- b) Putting food ingredient into the machine:
- WARNINGS!
- c) Start operating the machine:
- (Control panel : Fig.2 on page 3)
- I). To serve with Granita
- (Fig.9 on page 5)
- II). To serve with cold drinks
- (Fig.10 on page 5)
- NOTICE:
- III). To stop working
- d) To simply clean the corresponding bowl:
- e) Dispensing granita
- (Fig.11 on page 6)
- Parameter Setting of the Machine
- How to set
- Cleaning & maintenance
- Cleaning
- a) Emptying the bowls
- b) Disassembly the dispensing tap:
- c) Remove the bowl and the lid:
- d) Remove the bowl and the lid:
- To clean the lighted bowl lid as below:
- e) Reassembly the washed components
- f) Rinsing the machine
- g) Cleaning the drip tray
- h) Lighting lid
- i) Bulb replacement
- j) Cleaning the condenser
- k) Periodic maintenance
- Maintenance
- Transportation and Storage
- Troubleshooting
- Warranty
- Discarding & Environment
- DEUTSCH
- Ohutusalased erijuhised
- HENDI Romania S.R.L.
- HENDI Horeca SL
- HENDI HK Ltd.
- Find HENDI on internet:
Brand : Arktic
Model : 274224
Category : Slush machine