
Serie 4 WNA13400IT - Washing machine BOSCH - Free user manual and instructions
Find the device manual for free Serie 4 WNA13400IT BOSCH in PDF.

| Product type | Washer-dryer |
| Brand | Bosch |
| Model | Serie 4 WNA13400IT |
| Washing capacity | 9 kg |
| Drying capacity | 6 kg |
| Max spin speed | 1400 rpm |
| Dimensions (H x W x D) | 84.5 x 60 x 64.2 cm |
| Net weight | 80 kg |
| Power supply | 220-240 V ~ 50 Hz |
| Energy class | A |
| Noise level (washing/spinning/drying) | 52 / 74 / 62 dB(A) |
| Annual water consumption | 10 500 L |
| Main functions | Speed Perfect, Eco, Cotton, Synthetics, Delicates, Cold wash, Delay start, Timed drying |
| Safety | Child lock, automatic stop, foam detection, Anti-leak system |
| Maintenance and cleaning | Filter cleaning, detergent drawer cleaning, door seal cleaning |
| Spare parts and repairability | Door seal, hinge, front panel, base cover, belt, heating element |
| General information | User manual downloadable at notice-facile.com |
Frequently Asked Questions - Serie 4 WNA13400IT BOSCH
User questions about Serie 4 WNA13400IT BOSCH
0 question about this device. Answer the ones you know or ask your own.
Ask a new question about this device
Download the instructions for your Washing machine in PDF format for free! Find your manual Serie 4 WNA13400IT - BOSCH and take your electronic device back in hand. On this page are published all the documents necessary for the use of your device. Serie 4 WNA13400IT by BOSCH.
USER MANUAL Serie 4 WNA13400IT BOSCH
CIMBOHTE3aONACHOCTCa CIMBOHNUH N3o6paXeHNA, KOHTO DaBaT INDINKAUHA 3a BnDa ONACHOCT.
BTo3n DOKyMeHCTe H3N013BaT CNEdHInTe CMBOIN 3a OnaCHOCT:
4.1 CMRAHa Ha Kanaka Ha OCHOBaTa
M3nCKBaHe:
YpeBbTe H3KnIOueHOT 3axpaHBAHeTo.
YpeBt E n3KIOHcH OT BODOCHA6dITENHATA MpeXa.
4.1.1 CbanaHe Ha kanaka Ha ochobata
1.ИЗБаDETe МарКуЧа 3a ИЗTOUBAHe.
2.CbaneTe KaNAka 3a N3TOUBAHe.
3.CaaneTe Kanaka Ha OCHOBaTa.

- OtkaHTe Mapkyua.
5.CBANE BHTOBETE.
6.Ocbo6oJeTe KpeKHeHnEneMeHT. - CbaTe KaNaka Ha OchoBaTa.
4.1.2 MoHTnpaHe Ha kanaka Ha oCHOBaTa
MoHTupaTBeB o6paTeH peI.

PemOH
4.2 CmHa Ha npedHnaHn
N3nCKBaHe:
YpeIbTe n3KIOueHOT 3aXpaHbHaHeTo.
YpeBt E n3KIOUeH OT BOOChA6DnTeNHaT MpeXa.
YekmeKeTo 3a nepinHn npenapaTe cBaIeHO.
ΦacadHnT nHaEn e CBaneH.
BpataTa e cBaneha.
YnnbTHHeHnETo Ha BpaTaTa e CBAJeHO.
KanakbT Ha OCHOBATA e CBAJEH.→7
4.2.1 CbajHe Ha npedHn paHn
BHIMATEHNO
Octpn pb6oBe Ha Kopnyca!
HapaHbAHnO Tnp3BaHe
Hocete npedna3n pbkauu.
1.

BHIMATEHNO
Pnck ot nadaun yactn nopadn pa3xa6eHn BnHTOBe!
HapaHbAHe npaDn nadaun hactn.
3akpenete KOMnoHeHTa, Taka Ye da He naHe.

BHIMAHHE!
Pnck OT naaun qactn nopadn pa3xa6eHN BHTOBe!
NobpdaHa npyTu cactn Ha ypeDa NIN B DOMa H KIneHTA, HAp. 1DhTOO.
3akpenete KOMnoHeHTa, Taka Ye da He naHe.
OTCTpaHETe BnHTOBeB CnEHNpE1(1-2-3-4).
2.Canete npednnaHn.
4.2.2 MoHTnpaHe Ha nppeHnnaHn
MoHTnpaTBeB6paTeHpeI.
PeMoHT
4.3 CmHa Ha BpaTaTa
M3nCKBaHe:
YpeBbTe H3KnIOueHOT 3axpaHBAHeTo.
YpeBtE n3KNIOueH OT BOOCHa6nTENHa Mpeka.
4.3.1 N3BaxKaHe Ha BpTaTa
1.CBaneTe DbTa BnHTa(1).
2.OcbobodeTe KpeenexHnTe enemeHTn C nnoCKa oTBepKa (2).
4.3.2 MoThnPaHe Ha BpTaTAt
MOHTnpaTBeBbpaTeHpeI.

PemOH
4.4 CmHa Ha yynbTheHneTo Ha BpaTaTa

BHIMATEJIHO
Octpn p6bOBe h kopnycA HaparabHnAn OTO npra38aHe
Hocete npedna3n pbkabu.
BHIMATEJIHO
Pnck OT nadaun yactn nopadnpa3xna6eHN BnHTOBe!
HapaHbAHe npaui nadaun yactn.
3akpenete KOMnoHEHTa, Taka Ye da He naHe.
BHIMAHHE!
Pnck OT nadaaun yactn nopadn pa3xa6eHN BnHTOBe!
NopeHa npyn TaCn Ha ypeHa nn B doma Ha knneHtA, Hap. bHo
TO.
3akpenete KOMNOHEHTa, Taka ye da He nanHe.
N3nCKBaHe:
YpeBt E n3KIOueH OT 3aXpaHbHaTeO.
YpeIbTe n3KIOUeH OT BOOCHa6DITeHATA MpeKa
YekMeJKeTo 3a nepuHnna npenapaTe cBaaneHo.
BpaTatae cBaneha
KanakbHa OCHOBatae CBAJEH.→7
4.4.1 CbAJaHe Ha ynIbTHeHHeTo Ha BpTaTa
1.

BHNMATEJHO
Pnck OT naaun yactn nopadn pa3xna6eHN BHTOBe!
HapahBaHe npaPi naaun qactn.
3akpeneteKOMnoHEnTa,Taka Ye da He naHe.

BHUMAHVEI
Pnck ot nadaaun yactn nopadnpa3xna6ehn BuHTOBe!
NoBpeHa npTuHn Ha ypeHa nN B DoMa Ha KneHTa, HAp.
SHOTO.
3akpenete KOMNOHHTa. TaKa Ye Da He NaHHe.
OTCTpaHETe BHTOBeB CnEDHmpeD(1-2-3-4).
- Pa3xna6ete BnHTOBeTe O3aHa ypeJa.
3.CbaneTe rophma pa60TeH nnot.
4.Ocbo6oTeKpEnexhHte enemHTnHa fpaacnnaen OTrope nOTJrCHATA cTPAHA.
5.CBaIeTeΦacdHnnaHen.
6.CBaJIeTe IbpKauHa OcbetIeHHeTo Ha 6apa6aHa OTrope. - Pa3xna6ete BnHTOBeTe Ha Kopnyca Ha do3aTopa.
8.

BHIMAHUEI
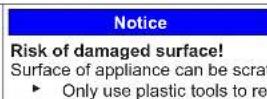
Pnck OT noBpeDeHa noBbpxHocT!
NoBpIxOCTa Ha ypeDa MoKe Ze ce HApDcKa, aKo I3nON3BaTe HennPabNINHCTpyEmTe.
N3NON3BaTe cAmO nJaCTMaCOBn HHCTpyMeHTn 3a NODMaHa
HaobTgaaun npbcteH.
Cbaene oobraa npbcteh ot ynbltheHneTo c nnaactmacOB uHcTpyMeHT.
9.Ocbo6oTeynnbTHHeHToHaBpaTaTaO npedHnaHen.
10.Ocbo6oTe KOHEKTopa Ha Ka6eHa ot KIOHuaIkaTa Ha BpaTaTa.

PemOH
- Cbane Te npednna nanei.
12.OcbooTe BCnK CbeHNHTeHN enMeHTn 3a MapkyH.
13.ИЗБАДЕТУУПЛТСЕННОHAВРАТА.
4.4.2 MoHTnpaHe Ha yynbTHHeHnETo Ha BpaTaTa
MoHTnpaTBe BoPaTeH peI.
MoHTnpaIteB06paTeHpeI.
Poranéni padajícimi dily.
Zajistetejednotlivesoucasti predpadem.
POZOR!
Nebezpeci padajicich dilu kvuli uvolenynm sroubum!
Poškozeni jin'ych cásti spotbrebe nebo prvku domacnosti zakaznika, napr. podlachy.
4.2 Udskifting at frontpanel
Preindstilling:
Sorg for at sikre componenten mod at falde ned.
1 Concerning this document. 58
1.1 Important information 58
1.1.1 Purpose 58
1.2 Explanation of symbols 58
1.2.1 Danger levels.. 58
1.2.2 Hazard symbols 58
1.2.3 Structure of the warnings.. 59
1.2.4 General symbols 59
Safety 60
2.1 General Safety instructions 60
2.1.1 All domestic appliances 60
Tools and aids 61
Repair 62
4.1 Replacing base cover 62
4.1.1 Removing base cover 62
4.1.2 Installing base cover 62
4.2 Replacing front panel 63
4.2.1 Removing front panel 63
4.2.2 Installing front panel 63
4.4 Replacing door seal.. 65
Concerning this document
1.1 Important information
1.1.1 Purpose
These repair hints support consumer to repair appliances by himself according to the applicable eco-design regulation (as of 03/2021).
They contain information how to exchange defined spare parts including warnings and risks.
In case of questions, please contact our customer service. We will only be liable for damages if the repair hints have been followed properly.
1.2 Explanation of symbols
1.2.1 Danger levels
The warning levels consist of a symbol and a signal word. The signal word indicates the severity of the danger.
Table 1: Danger levels
| Warning level Meaning | |
| Danger | Non-observation of the warning message will result in death or serious injuries. |
| Warning | Non-observation of the warning message could result in death or serious injuries. |
| Caution | Non-observation of the warning message could result in minor injuries. |
| Notice | Non-observation of the warning message could result in damage to property. |
1.2.2 Hazard symbols
Hazard symbols are symbolic representations which give an indication of the kind of danger.
The following hazard symbols are used in this document:
| Hazard symbol Meaning | |
| ! | General warning message |
| Danger from electrical voltage | |
| Risk of explosion | |
| Danger of cuts | |
| Danger of crushing |
Concerning this document
| Hazard symbol Meaning | |
| Danger from hot surfaces | |
| Danger from strong magnetic field | |
| Danger from non-ionizing radiation |
Table 2: Hazard symbols
1.2.3 Structure of the warnings
Warnings in this document have a standardised appearance and a standardised structure.

Danger
Type and source of danger!
Possible consequences of ignoring the danger / warning.
Measures and prohibitions for preventing the danger.
The following example shows a warning that warns against electric shock due to live parts. The measure for avoiding the danger is mentioned.
Danger
Risk of electric shock due to live parts!
Death by electrocution
- Disconnect appliances from electrical supply at least 60 seconds before disconnecting repairs.
1.2.4 General symbols
The following general symbols are used in this document:
| Gen. symbol Meaning | |
| 1 | Identification of a special tip (text and/or graphic) |
| i | Identification of a simple tip (only text) |
| Identification of a link to a video tutorial |
| Gen. symbol Meaning | |
| Identification of required tools | |
| Identification of required preconditions | |
| Identification of a condition (if ..., then ...) | |
| Identification of a result | |
| [Start]Identification of a key or button | |
| [00123456] Identification of a material number | |
| Status Identification of displayed text / window(in the appliance's display) | |
Table 3: General symbols
Safety
2.1 General Safety instructions
2.1.1 All domestic appliances
Risk of electric shock due to live parts!
Errors by repairs involving electrical components can lead to electrical shock!
- Disconnect the appliance from the mains for at least 60 seconds before starting work.
After the repair have a safety test according VDE 0701 or country-specific regulations performed.
Risk of injury from sharp edges!
Wear protective gloves.
Risk of crushing during repair, maintenance, troubleshooting and service due to heavy and moving components
Wear protective shoes.
- Secure heavy components from falling down.
- Do not stick body parts into moving components.
Risk to the appliance's safety / function!
Only use original spare parts.
Risk of damage to electrostatically sensitive components (ESDs)!
- Do not touch the modules, including connections and conductor paths.

Tools and aids
| Designation Details Images | ||
| Auxiliary tool [15000155] | Tool for loosening out of plastic parts | |
| Screwdriver Torx T20 with bore hole [00340764] | 100 mm, for screws with safety pin | |
| Torque spanner [15000441] | Torque spanner 20 - 100 Nm | |
| Slot screwdriver [00340854] | Blade 3.5 mm x 0.6 mm x 100 mm, Protective Insulation 1000 V AC | |
| Slot screwdriver [00340855] | Blade 5.5 mm x 1.0 mm x 125 mm, Protective Insulation 1000 V AC | |
| Needle-nose pliers, angled pattern [00341269] | Length 200 mm | |
| Side-cutting pliers [00342182] | Length: 200 mm | |
| Designation Details Images | ||
| Combination wrench [00340811] | Wrench size 10°mm, M6 | |
| Combination wrench [00340814] | Wrench size 13°mm, M8 | |
| Combination wrench [00340817] | Wrench size 17 mm, M10 | |
| Combination wrench [15000459] | Wrench size 16°mm, M10 | |

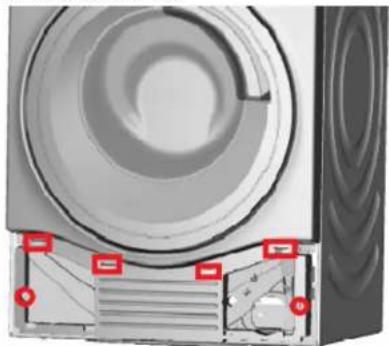
Repair
4.1 Replacing base cover
Prerequisite:
Appliance is disconnected from power supply.
Appliance is disconnected from water supply.
4.1.1 Removing base cover
- Remove drain hose.
- Remove drain cover.
- Remove base cover.
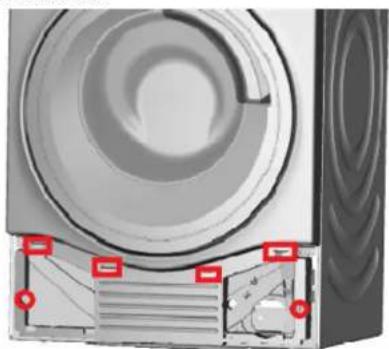
- Clip out hose.
- Remove screws.
- Release catch element.
- Remove base cover.
4.1.2 Installing base cover
Install in reverse order.

Repair
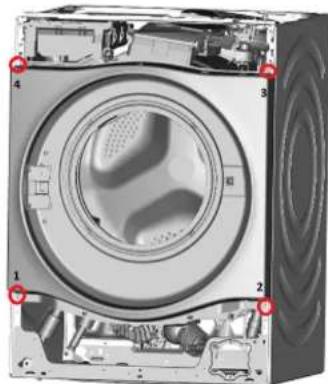
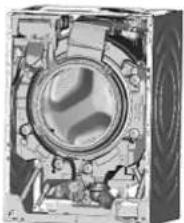
4.2 Replacing front panel
Prerequisite:
Appliance is disconnected from power supply.
Appliance is disconnected from water supply.
Detergent drawer has been removed.
Fascia panel has been removed.
Door has been removed.
Door seal has been removed.
Base cover has been removed. Page 62
4.2.1 Removing front panel
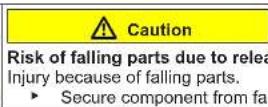
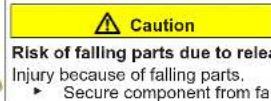
Caution
Sharp housing edges!
Cut injuries
Wear protective gloves.

1.
Caution
Risk of falling parts due to released screws!
Injury because of falling parts
Secure component from falling down.

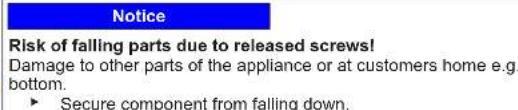
Notice
Risk of falling parts due to released screws!
Damage to other parts of the appliance or at customers home e.g.
bottom.
Secure component from falling down.
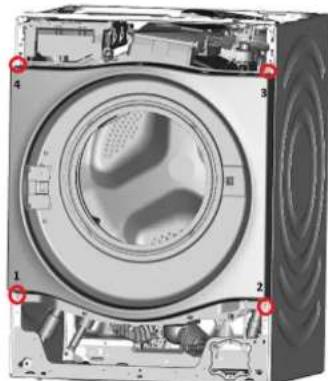
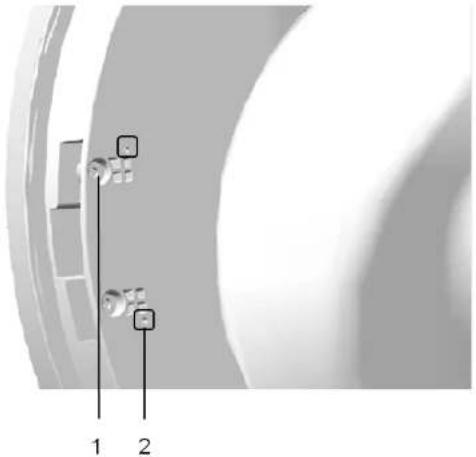
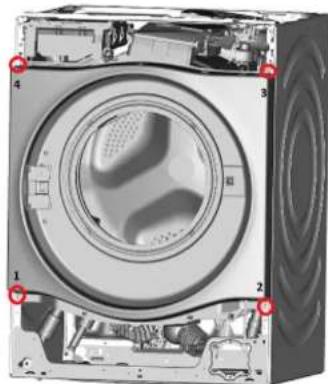
Remove screws from in following order (1-2-3-4).

- Remove front panel.
4.2.2 Installing front panel
Install in reverse order.

Repair
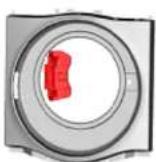
4.3 Replacing door
Prerequisite:
Appliance is disconnected from power supply.
Appliance is disconnected from water supply.
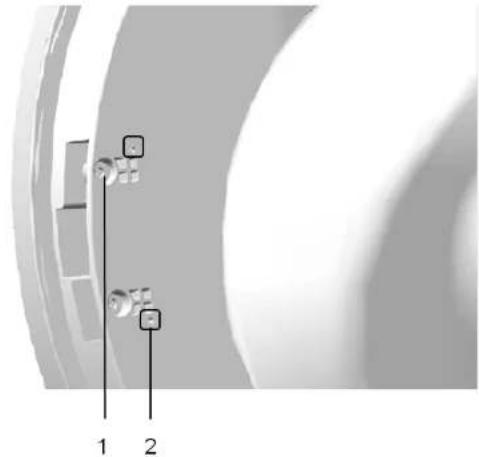
4.3.1 Removing door
- Remove two screws (1).
- Release catch elements with slotted screwdriver (2).
Install in reverse order.

Repair
4.4 Replacing door seal

Sharp housing edges!
Cut injuries
Wear protective gloves.

Prerequisite:
Appliance is disconnected from power supply.
Appliance is disconnected from water supply.
Detergent drawer has been removed.
Door has been removed.
Base cover removed. Page 62
4.4.1 Removing door seal
1.


Remove screws from in following order (1-2-3-4).
- Release screws at back of appliance.
- Remove worktop.
- Release catch elements of fascia panel at top and on right side.
- Remove fascia panel.
- Remove drum light holder at top.
- Release screws of dispenser housing.
8.

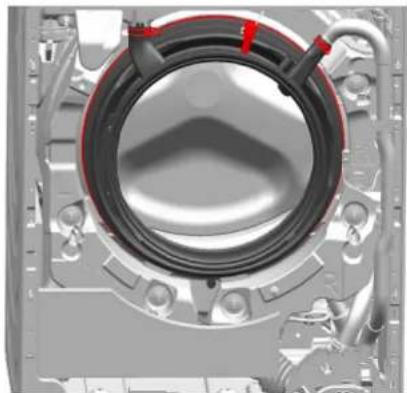
Remove tension ring from gasket with a plastic tool
- Release door seal from front panel.
- Release cable connector from door lock.
- Remove front panel.

Repair
- Release all hose connections.
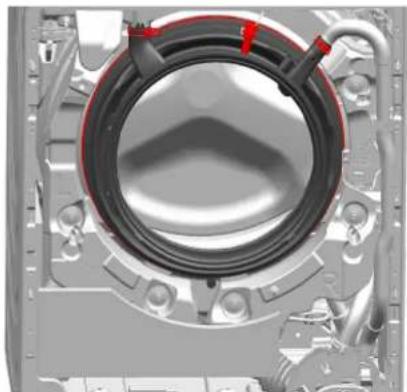
- Remove door seal.
Install in reverse order.

Repair
Appliance is disconnected from power supply.
Appliance is disconnected from water supply.
Detergent drawer has been removed.
Door has been removed.
Door seal has been removed.
Base cover removed. Page 62
Front panel has been removed.
- Remove two screws.
- Remove door hinge.
Install in reverse order.
Remonditeave - Kuivatiga pesumasin
1 Selle dokumendiga seoses 69
1.1 Tahtis teave 69
1.1.1 Eesmark 69
1.2 Sumbolite selgitus 69
1.2.1 Ohutaseemed 69
1.2.2 Ohusumbolid 69
1.2.3 Hoiatuste struktuur 70
1.2.4 Üldised sumbolid 70
Ohutus. 71
2.1 Üldised ohutusjuhised 71
2.1.1 Koki kodumasinad 71
Tabel 1: Ohutasedmed
1.2.2 Ohusumbolid
m = 311
Mny avyicete TIOJovdc,ouMTpeiaqavopevwTov ouvdoewk KaT ovayuyuTw TAKETW.

EpyaIeia Kai BonOnmuata
- Apaipate ToV oWAnVa aTnOToPdavYiAnG.
- Apaepote To kaaumu aonotpaayion
3.Apaipote to kalaumua bao
- Kóptyteovéukαμπtioσωλnva.
- Apaipote Tis biDc
- AITAOAIAIATE TOOIXEIOUyKpTaOnG
7.ApaipéTeToKaλuμaβαoNc
4.1.2 TOnoBéTnO KaUμaToC βaOns
Eykaataotne tynvctetn eip

EMIOKEUN
4.2 Avikataoan mppotivou nivaka
Pouu6ean:
H oukeun eivai aioouvdeevn aTTO IV npox Tpopo0o0iac.
H oukeun eivai aonouvoeyn aoTny rapoX vepou.
Exi aipieeTo ouptapitoppuavikou.
ExicapieeEi n eTwn.
H TnpTa EeI aepieEeI.
ExiaapaeBTo steyavotoinTKoTnptac.
To kαλυμα βασns éxεi αραipεθει.→117
- Remova o painei frontal.