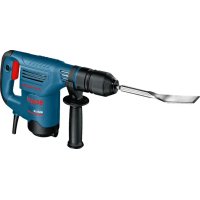
GSH 11 EAR Professional - Hammer BOSCH - Free user manual and instructions
Find the device manual for free GSH 11 EAR Professional BOSCH in PDF.
| Brand | Bosch |
| Model | GSH 11 EAR Professional |
| Category | Demolition hammer |
| Product type | Electric breaker hammer |
| Weight | 10.1 kg (according to EPTA 01:2014) |
| Rated power input | 1850 W |
| Impact rate | 900 to 1890 min⁻¹ |
| Individual impact force | 11 J (according to EPTA 05/2009) |
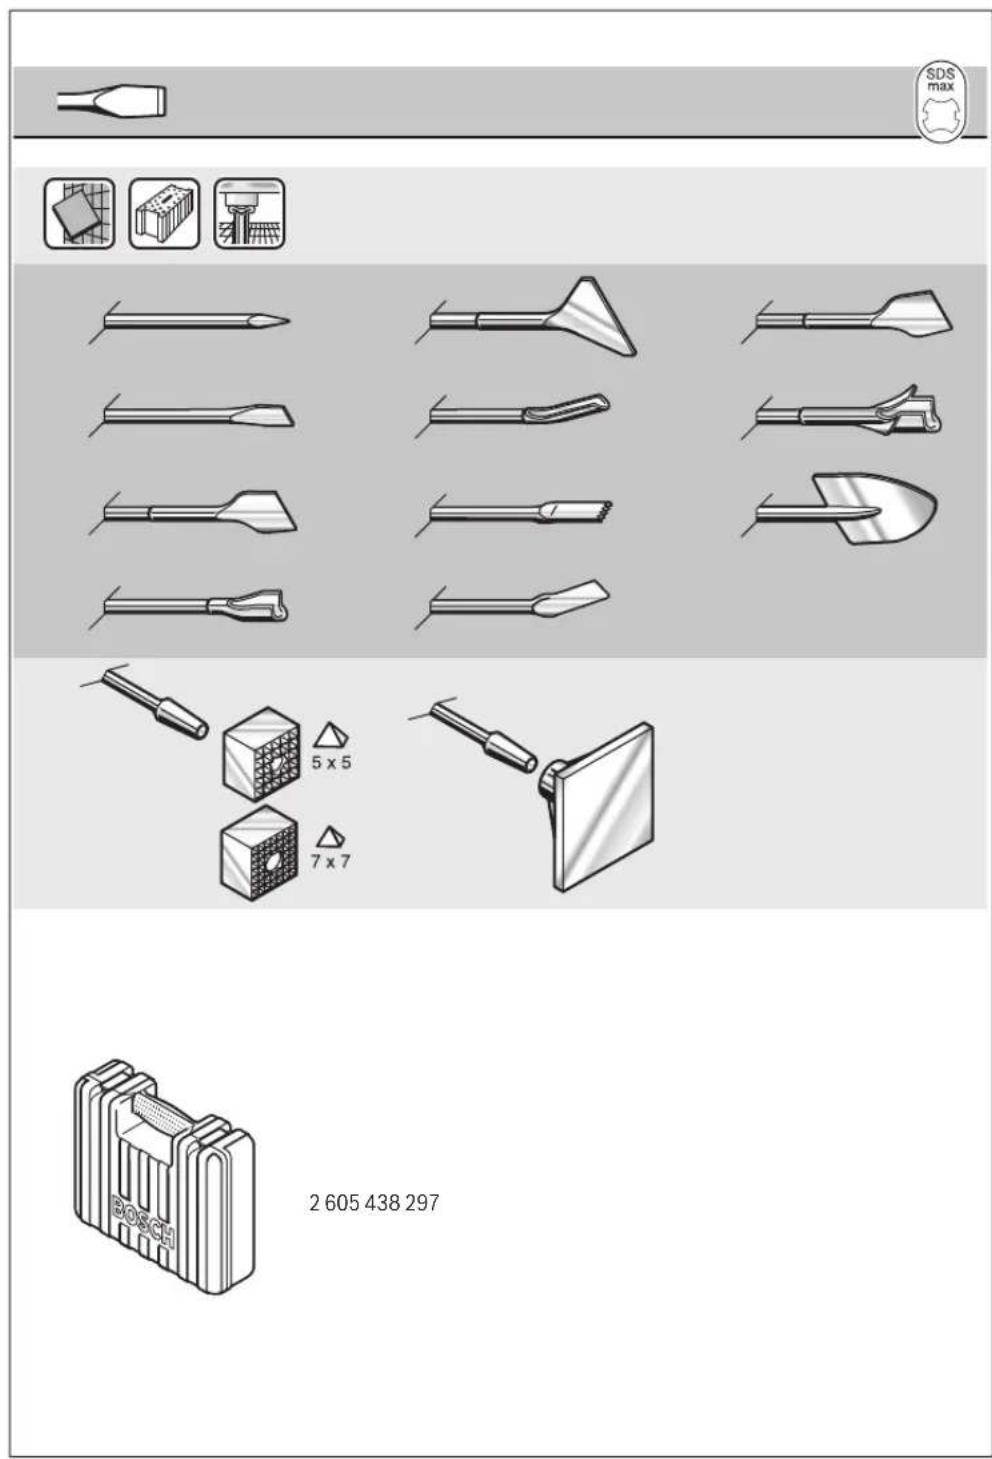
| Tool holder | SDS-max |
| Chisel positions (Vario-Lock) | 12 positions |
| Lubrication | Permanent central lubrication |
| Protection class | II (double insulation) |
| Rated voltage | 230 V (compatible with 220 V) |
| Sound pressure level | 89 dB(A) |
| Sound power level | 100 dB(A) |
| Vibrations (chiseling) | 18.5 m/s² (uncertainty K=2.4 m/s²) |
| Main functions | Chiseling, driving, compacting |
| Electronic adjustment | Constant-Electronic and frequency adjustment wheel |
| Maintenance | Regular cleaning of ventilation slots and replacement of dust protection cap |
| Safety | Wear hearing protection; use the additional handle; automatic shut-off in case of brush wear (service indicator) |
| Spare parts and repairability | Available via Bosch after-sales service; repair by an authorized professional |
| General information | User manual available in multiple languages; warranty according to Bosch conditions |
Frequently Asked Questions - GSH 11 EAR Professional BOSCH
User questions about GSH 11 EAR Professional BOSCH
0 question about this device. Answer the ones you know or ask your own.
Ask a new question about this device
Download the instructions for your Hammer in PDF format for free! Find your manual GSH 11 EAR Professional - BOSCH and take your electronic device back in hand. On this page are published all the documents necessary for the use of your device. GSH 11 EAR Professional by BOSCH.
USER MANUAL GSH 11 EAR Professional BOSCH
OU BIUCIL-66-009.hoep Page 1 Monday, September 12, 2016 1:00 PM
WEU WEU
Robert Bosch Power Tools GmbH
705.38 Stuttgart
GERMANY
www.bosch-pt.com
160992A2BD(2016.09)T/68

160992A2BD
GSH 11 E Professional

BOSCH
de Originalbetriebsanlertung
en Original instructions
fr Notice originale
es Manual original
pt Manual original
it strzionl original
nl Oorspronkeiye gebruksaarnz ping
da Originalbrugsaansing
sv Bruksanevising original
no Original driftsinstruks
1 Akuperiset objec
HpTaTnnaabqWvXpnans
tr Original isletmetallmat
ar
fa 1

2
Deutsch. 6
English Page 10
Francais Page 14
Espanol. Pagina 18
Portugues. Pagina 22
Italiano.. 26
Nederlands.. 31
Dansk .Side 35
Svenska Sida 38
Norsk. Side 41
Suomi. 45
EAAyniká 48
Türkce Sayfa 52
a_1 = 4
16 × 16
C∈

3
1609 92A 2BD| (12.9.16) Bosch Power Tools
4

5
B
C
6 | Deutsch
Deutsch
Sicherheitshinweise
General Power Tool SafetyWarnings
WARNING Read all safety warnings and all instruc-tions. Failure to follow the warnings and
instructions may result in electric shock, fire and/or serious injury.
Save all warnings and instructions for future reference.
The term "power tool" in the warnings refers to your mains-operated (corded) power tool or battery-operated (cordless) power tool.
Work area safety
- Keep work area clean and well lit. Cluttered or dark areas invite accidents.
Do not operate power tools in explosive atmospheres, such as in the presence of flammable liquids, gases or dust. Power tools create sparks which may ignite the dust or fumes. - Keep children and bystanders away while operating a power tool. Distractions can cause you to lose control.
Electrical safety
Power tool plugs must match the outlet. Never modify the plug in any way. Do not use any adapter plugs with earthed (grounded) power tools. Unmodified plugs and matching outlets will reduce risk of electric shock.
- Avoid body contact with earthed or grounded surfaces, such as pipes, radiators, ranges and refrigerators.
There is an increased risk of electric shock if your body is earthed or grounded.
- Do not expose power tools to rain or wet conditions. Water entering a power tool will increase the risk of electric shock.
Do not abuse the cord. Never use the cord for carrying, pulling or unplugging the power tool. Keep cord away from heat, oil, sharp edges and moving parts. Damaged or entangled cords increase the risk of electric shock.
When operating a power tool outdoors, use an extension cord suitable for outdoor use. Use of a cord suitable for outdoor use reduces the risk of electric shock.
If operating a power tool in a damp location is unavoidable, use a residual current device (RCD) protected supply. Use of an RCD reduces the risk of electric shock.
Personal safety
Stay alert, watch what you are doing and use common sense when operating a power tool. Do not use a power tool while you are tired or under the influence of drugs, alcohol or medication. A moment of inattention while operating power tools may result in serious personal injury.
Use personal protective equipment. Always wear eye protection. Protective equipment such as dust mask, non-skid safety shoes, hard hat, or hearing protection used for appropriate conditions will reduce personal injuries.
Prevent unintentional starting. Ensure the switch is in the off-position before connecting to power source and/or battery pack, picking up or carrying the tool.
Carrying power tools with your finger on the switch or energising power tools that have the switch on invites accidents.
Remove any adjusting key or wrench before turning the power tool on. A wrench or a key left attached to a rotating part of the power tool may result in personal injury.
Do not overreach. Keep proper footing and balance at all times. This enables better control of the power tool in unexpected situations.
Dress properly. Do not wear loose clothing or jewellery. Keep your hair, clothing and gloves away from moving parts. Loose clothes, jewellery or long hair can be caught in moving parts.
If devices are provided for the connection of dust extraction and collection facilities, ensure these are connected and properly used. Use of dust collection can reduce dust-related hazards.
Power tool use and care
Do not force the power tool. Use the correct power tool for your application. The correct power tool will do the job better and safer at the rate for which it was designed.
Do not use the power tool if the switch does not turn it on and off. Any power tool that cannot be controlled with the switch is dangerous and must be repaired.
- Disconnect the plug from the power source and/or the battery pack from the power tool before making any adjustments, changing accessories, or storing power tools. Such preventive safety measures reduce the risk of starting the power tool accidentally.
- Store idle power tools out of the reach of children and do not allow persons unfamiliar with the power tool or these instructions to operate the power tool. Power tools are dangerous in the hands of untrained users.

- Maintain power tools. Check for misalignment or binding of moving parts, breakage of parts and any other condition that may affect the power tool's operation. If damaged, have the power tool repaired before use. Many accidents are caused by poorly maintained power tools.
- Keep cutting tools sharp and clean. Properly maintained cutting tools with sharp cutting edges are less likely to bind and are easier to control.
Use the power tool, accessories and tool bits etc. in accordance with these instructions, taking into account the working conditions and the work to be performed. Use of the power tool for operations different from those intended could result in a hazardous situation.
Service
Have your power tool serviced by a qualified repair person using only identical replacement parts. This will ensure that the safety of the power tool is maintained.
Hammer SafetyWarnings
Wear ear protectors. Exposure to noise can cause hearing loss.
Use auxiliary handle(s), if supplied with the tool. Loss of control can cause personal injury.
Hold power tool by insulated gripping surfaces, when performing an operation where the cutting accessory may contact hidden wiring or its own cord. Cutting accessory contacting a "live" wire may make exposed metal parts of the power tool "live" and could give the operator an electric shock.
Use suitable detectors to determine if utility lines are hidden in the work area or call the local utility company for assistance. Contact with electric lines can lead to fire and electric shock. Damaging a gas line can lead to explosion. Penetrating a water line causes property damage or may cause an electric shock.
- When working with the machine, always hold it firmly with both hands and provide for a secure stance. The power tool is guided more secure with both hands.
- Secure the workpiece. A workpiece clamped with clamping devices or in a vice is held more secure than by hand.
Always wait until the machine has come to a complete stop before placing it down. The tool insert can jam and lead to loss of control over the power tool.
- Products sold in GB only: Your product is fitted with a BS 1363/A approved electric plug with internal fuse (ASTA approved to BS 1362). If the plug is not suitable for your socket outlets, it should be cut off and an appropriate plug fitted in its place by an authorised customer service agent. The replacement plug should have the same fuse rating as the original plug. The severed plug must be disposed of to avoid a possible shock hazard and should never be inserted into a mains socket elsewhere.
Products sold in AUS and NZ only: Use a residual current device (RCD) with a rated residual current of 30mA or less.
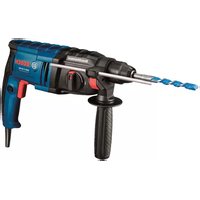
Product Description and Specifications

Read all safety warnings and all instructions. Failure to follow the warnings and instructions may result in electric shock, fire and/or serious injury.
While reading the operating instructions, unfold the graphics page for the machine and leave it open.
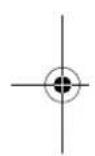
Intended Use
The machine is intended for chiselling work in concrete, brick, masonry and asphalt as well as for driving in and compacting, when using the respective accessories.
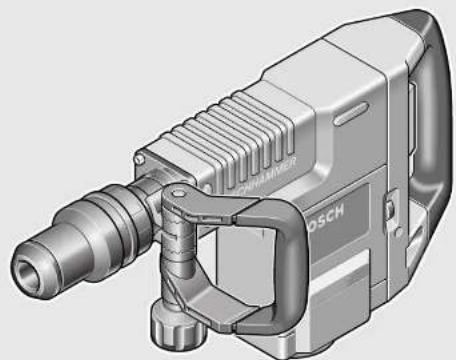
Product Features
The numbering of the product features refers to the illustration of the machine on the graphics page.
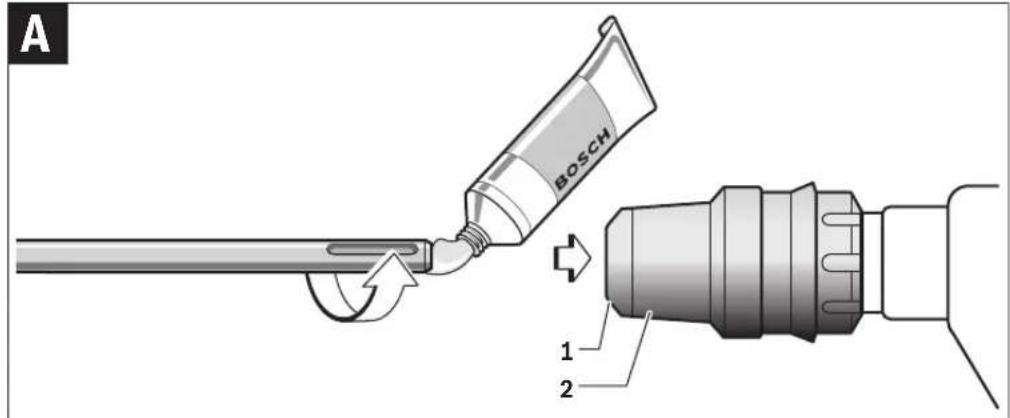
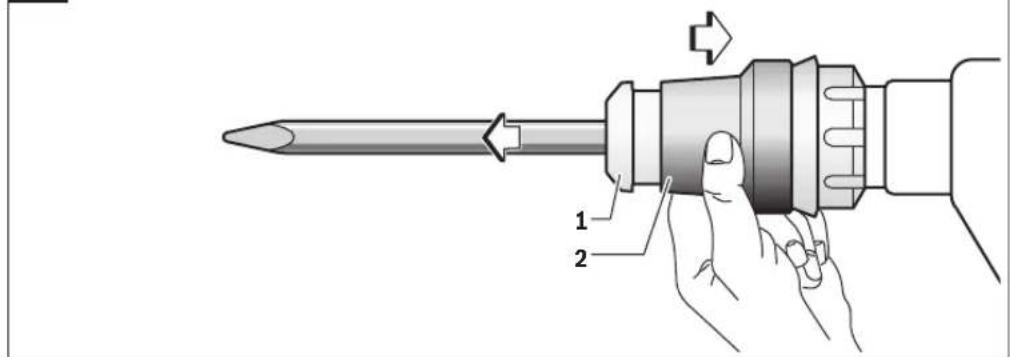
1 Dust protection cap
2 Locking sleeve
3 Chisel adjustment ring (Vario-Lock)
4 On/Off switch
5 Thumbwheel for preselection of impact rate
6 Service indicator
7 Auxiliary handle (insulated gripping surface)
8 Knurled nut for auxiliary handle
9 Handle (insulated gripping surface)
Accessories shown or described are not part of the standard delivery scope of the product. A complete overview of accessories can be found in our accessories program.
Technical Data
| Demolition Hammer GSH 11 E | |
| Article number | 06113167.. |
| Rated power input | W 1 |
| Impact rate min | -1 900-1890 |
| Impact energy per stroke accord-ing to EPTA-Procedure 05/2009 | J 16.8 |
| Chisel positions | 12 |
| Tool holder | SDS-max |
| Lubrication | Central permanent lubrication |
| Weight according to EPTA-Procedure 01:2014 | kg 10.1 |
| Protection class | ☐ /IT |
| The values given are valid for a nominal voltage [U] of 230 V. For differ-ent voltages and models for specific countries, these values can vary. | |
Noise/Vibration Information
Sound emission values determined according to EN 60745-2-6.
Typically the A-weighted noise levels of the product are: Sound pressure level 89 dB(A); sound power level 100 dB(A). Uncertainty K = 3 dB.
Wear hearing protection!

12 | English
Vibration total values a_h (triax vector sum) and uncertainty K determined according to EN 60745-2-6: Chiselling: a_h = 18.5m / s,K = 2.4m / s^2
The vibration level given in this information sheet has been measured in accordance with a standardised test given in EN 60745 and may be used to compare one tool with another. It may be used for a preliminary assessment of exposure. The declared vibration emission level represents the main applications of the tool. However if the tool is used for different applications, with different accessories or insertion tools or is poorly maintained, the vibration emission may differ. This may significantly increase the exposure level over the total working period.
An estimation of the level of exposure to vibration should also take into account the times when the tool is switched off or when it is running but not actually doing the job. This may significantly reduce the exposure level over the total working period. Identify additional safety measures to protect the operator from the effects of vibration such as: maintain the tool and the accessories, keep the hands warm, organisation of work patterns.
Assembly
Auxiliary Handle
Operate your machine only with the auxiliary handle 7.
The auxiliary handle 7 can be set to any position for a secure and low-fatigue working posture.
- Loosen the knurled nut 8, rotate the auxiliary handle 7 around the axis of the machine to the required position and tighten the knurled nut 8 again.
The auxiliary handle 7 can be mounted to a different position. For this, completely unscrew the knurled nut 8 and then pull out the hexagon bolt upward. Pull off the auxiliary handle 7 to the side and turn around the remaining clamping element by 180^ . Mount the auxiliary handle 7 in reverse order.
Changing the Tool
Before any work on the machine itself, pull the mains plug.
With the SDS-max tool holder, simpler and easier tool changing is possible without additional aids.
The dust protection cap 1 largely prevents the penetration of dust into the tool holder during operation. When inserting the tool, pay attention that the dust protection cap 1 is not damaged.
A damaged dust protection cap should be changed immediately. We recommend having this carried out by an after-sales service.
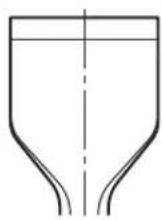
Inserting (see figure A)
- Clean and lightly grease the shank end of the tool.
- Insert the tool in a twisting manner into the tool holder until it latches itself.
- Check the latching by pulling the tool.
Removing (see figure B)
- Push back the locking sleeve 2 and remove the tool.
Dust/Chip Extraction
Dust from materials such as lead-containing coatings, some wood types, minerals and metal can be harmful to one's health. Touching or breathing in the dust can cause allergic reactions and/or lead to respiratory infections of the user or bystanders.
Certain dust, such as oak or beech dust, is considered carcinogenic, especially in connection with wood-treatment additives (chromate, wood preservative). Materials containing asbestos may only be worked by specialists.
- Provide for good ventilation of the working place.
- It is recommended to wear a P2 filter-class respirator.
Observe the relevant regulations in your country for the materials to be worked.
Operation
Starting Operation
Observe correct mains voltage! The voltage of the power source must agree with the voltage specified on the nameplate of the machine. Power tools marked with 230V can also be operated with 220V .
Switching On and Off
- To start the machine, push the On/Off switch 4 to the right.
- To switch off the machine, push the On/Off switch 4 to the left.
For low temperatures, the machine reaches the full impact rate only after a certain time.
This start-up time can be shortened by striking the chisel in the machine against the floor one time.
To save energy, only switch the power tool on when using it.
Setting the Impact Rate
The electronic control enables stepless speed preselection in accordance with the material to be worked.
The constant electronic control keeps the preselected impact rate nearly constant between no-load and load conditions.
- Select the impact rate with the thumbwheel 5 according to the material.
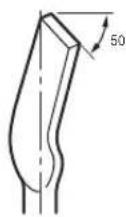
Changing the Chiselling Position (Vario-Lock)
The chisel can be locked in 12 positions. In this manner, the optimum working position can be set for each application.
- Insert the chisel into the tool holder.
- Push the chisel adjustment ring 3 forward and turn the chisel to the required position with the chisel adjustment ring 3.
- Release the chisel adjustment ring 3 and turn the chisel until it latches.
Working Advice
Before any work on the machine itself, pull the mains plug.

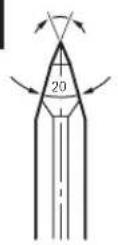
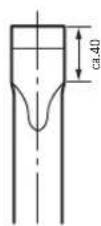
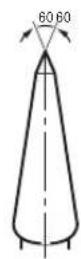
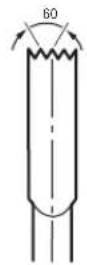
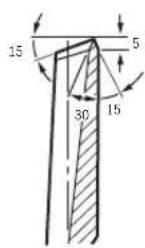
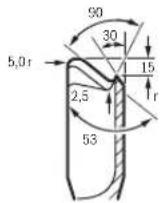
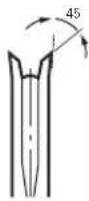
Sharpening Chisels (see figure C)
Good results are only achieved with sharp chisels; therefore, sharpen the chiselling tools in good time. This ensures a long service life of the tools and good working performance.
Re-sharpening
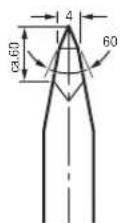
Sharpen chiselling tools using grinding wheels (e.g. ceramic bonded corundum wheel) with a steady supply of water. Reference values are shown in the figure. Take care that no annealing coloration appears on the cutting edges; this impairs the hardness of the chiselling tools.
For forging, heat the chisel to between 850 and 1050^ (bright red to yellow).
For hardening, heat the chisel to approx. 900^ and quench in oil. Then anneal in an oven for approx. one hour at 320^ (annealing colour = light blue).
Maintenance and Service
Maintenance and Cleaning
Before any work on the machine itself, pull the mains plug.
For safe and proper working, always keep the machine and ventilation slots clean.
A damaged dust protection cap should be changed immediately. We recommend having this carried out by an after-sales service.
If the replacement of the supply cord is necessary, this has to be done by Bosch or an authorized Bosch service agent in order to avoid a safety hazard.
Service Indicator 6
When the carbon brushes are worn out, the machine switches itself off. This is indicated approx. 8 hours beforehand by the lighting or blinking of the service indicator 6. The machine must then be sent to an after-sales service agent. Addresses are listed in the Section "After-sales Service and Application Service".
After-sales Service and Application Service
Our after-sales service responds to your questions concerning maintenance and repair of your product as well as spare parts. Exploded views and information on spare parts can also be found under:
www.bosch-pt.com
Bosch's application service team will gladly answer questions concerning our products and their accessories.
In all correspondence and spare parts orders, please always include the 10-digit article number given on the nameplate of the product.
Great Britain
Robert Bosch Ltd. (B.S.C.)
P.O.Box 98
Broadwater Park
North Orbital Road
Denham
Uxbridge
UB95HJ
At www.bosch-pt.co.uk you can order spare parts or arrange
the collection of a product in need of servicing or repair.
Tel. Service: (0344) 7360109
E-Mail: boschservicecentre@bosch.com
Ireland
Origo Ltd.
Unit 23 Magna Drive
Magna Business Park
City West
Dublin 24
Tel. Service: (01) 4666700
Fax: (01) 4666888
Australia, New Zealand and Pacific Islands
Robert Bosch Australia Pty. Ltd.
PowerTools
Locked Bag 66
Clayton South VIC 3169
Customer Contact Center
Inside Australia:
Phone: (01300) 307044
Fax: (01300) 307045
Inside New Zealand:
Phone: (0800) 543353
Fax: (0800) 428570
Outside AU and NZ:
Phone: +61 3 95415555
www.bosch.com.au
Republic of South Africa
Customer service
Hotline: (011) 6519600
Gauteng - BSC Service Centre
35 Roper Street, New Centre
Johannesburg
Tel.: (011) 4939375
Fax: (011) 4930126
E-Mail: bsctools@icon.co.za
KZN - BSC Service Centre
Unit E, Almar Centre
143 Crompton Street
Pinetown
Tel.: (031) 7012120
Fax: (031) 7012446
E-Mail: bsc.dur@za.bosch.com
Western Cape - BSC Service Centre
Democracy Way, Prosperity Park
Milnerton
Tel.: (021) 5512577
Fax: (021) 5513223
E-Mail: bsc@zsd.co.za
Bosch Headquarters
Midrand, Gauteng
Tel.: (011) 6519600
Fax: (011) 6519880
E-Mail: rbsa-hq.pts@za.bosch.com

14 | Francais
Disposal
The machine, accessories and packaging should be sorted for environmental-friendly recycling.
Do not dispose of power tools into household waste!
Only for EC countries:
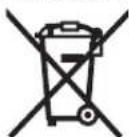
According to the European Directive 2012/19/EU for Waste Electrical and Electronic Equipment and its implementation into national right, power tools that are no longer usable must be collected separately and disposed of in an environmentally correct manner.
Subject to change without notice.
Français
Sousreservedemodifications.

Espanol
Bosch Service Center
Telegrafvej 3
2750 Ballerup
Pá www.bosch-pt.dk kander online bestilles reservedele erer oprettes en reparations ordre.
TIf. Service Center: 44898855
Fax: 44898755
E-Mail: vaerktoej@dk.bosch.com
Bortskaffelse
Bosch Service Center
Telegrafvej 3
2750 Ballerup
Danmark
Tel.: (08) 7501820 (inom Sverige)
Fax: (011) 187691
Avfallshantering
Moyo yia xwpec Tnc EE:
Umpova me Tm Koivotnki Ondya
2012/19/EE oxetika me tic nalaiec nkepti kacai nektpovike ouakeuckac kain meta-
opopa tnc oyniac autnc o evoiko dioka dev
elva nevou unoxpewntko ta axpnota nkepti ka epyaia va auyyovtai exomega ia va
avakukawbouv me pto npoi pukio npoc to nepi
baaov.
Tnpoue to dikaiwa aalayov.
Türkce
Güvenlik Talimatu
Elektrikli El Aletleri icin Genel Uyar Talimatu

UYARI
jg jll jla joa aagll uoe
juljla do sa jso uo oouu
1 1 1 1 1 1 1 1 1 1 1 1 1 1 1 1 1 1 1 1 1 1 1 1 1 1 1 1 1 1 1 1 1
6doJ1
aagwui sic gaii iabj aaiygl 0dai Iabi Jn oIgai ciel8 lqia jI juai yall Jw! qaiy.6aiial wgo gao gol oJgai jaiul jiljll ao jsao aiylgsl Jnglal s "psswol oegguog jiljla do
pIaW2I oJgwo g jUjll do
aiuog auii suiyaiui 1uji jil aia jio yoo ooi jil jie jil gbi jay la iag qall gai jai gbi jci loglaal lcg 6aaal
www.bosch-pt.com
asu oaiw 0jgua aeg jgws ggs no uqsw
aigg liiio n c aiw yogaa y sclw u ig
gao agll aag jwll cilall g3 waill pjy
juc gba cullg i jwaiwl a jluw! sic qall
laal jgol gbiay laiaal jll d gill y
jall gabng aialll
U
ggl
yagaao pjJall aaj.53j
20300 1J
+212(0)522400409/+212(0)522400615:
service@outipro.ma:gJsJxJy
jJ
Jiuwwu
julal aclial aaiol
jIJJ-06000 aL
+213(0)982400992:
+213(0)34201569:JUSSLJI
sav@siestal-dz.com:jgJ\\JL _d

58|
JUSSU JUSSU UUGU Uc bla - P2 uall aaiu uaiill auag liq suiu - slgall aunll pssu ge auuul pksll cji - Lqiluee gjol
山
山
aaiyjaiyajgssal aasuul aaii 4
aia jgsall ologaaall gaii gao
auijgssll jaiy jn jqal jlb
laibg220 -bglg230
LbIg J
J 1
.14 Labxg
山 1
JUWU L4 Lb
lo sic alolSll gjll jg jaiygl 0eall jogg .aioo oijg 21 aanaio ojjall cajg S 0sc gdd yagail ojiall oam maai jdlisay .oJy dalsg oja ayjgl 0dally asal l Jao, qdoaui lo sic baoa ayjgl 0dall Jaa .adll jq
[gl] Ssc bdo
gj 1a a j g jS kai
aaiiaaaa aaiiaaa
sall gbl ssc uu du uuc gjg kui kaiy Lus uug uug uuuu uug uuauu 0alll aac alc abwgl gbl ssc buol
(Vario-Lock)
11 11 11 11 11 11 11 11 11 11 11 11 11 11 11 11 11 11 11 11 11 11 11 11 11 11 11 11 11 11 11 11 11 11 000000000000000000000000000000000000000000000000000000000000000000000
UJUJUOjUJIg3UoJgagogaaJU 1
J
山auiuSII aaiu uuo uuaI 1
(Cgjglgjj) caii d
oall cail sccabawg o y gil w jogill ssos .wlll ggl g cail lssdow gai i 120 .jw g uig soal agb aoloo eoln
Wl 5le
JU 1JU JU UUUUUUUUUUUUUUUUUUUUUUUUUUUUUUUUUUUUUUUUUUUUUUUUUUUUUUUUUUUUUUUUUUUUUUUUUUUUUUUUUUUUUUUUUUUUUUUUUUUUUUUUUUUUUUUUUUUUUUUUUUUUUUUUUUUUUUUUUUUUUUUUUUUUUUUUUUUUUUUUUUUUUUUUUuuuuuuuuuuuuuuuuuuuuuuuuuuuuuuuuuuuuuuuuuuuuuuuuuuuuuuuuuuuuuuuuuuuuuuuuuuuuuuuuuuuuuuuuuuuuuuuuuuuuuuuuuuuuuuuuuuuuuuuuuuuuuuuuuuuuuuuuuuuuuuuuuuuuuuuuuuuuuuuuuuuuuuuuuuuuuuuuuuuuuuuuuuuuuuuuuuuuuuuu uu
-2019
sucj.oglag aaybi gbalssiey lglbla
auiu uulua oull glalglal gdlgall
JUU UUUUUGUUGU
Jssg gglg auiuSll saa
b9mu clls lglj,clall l mua,g
sall saiu
LlaLo 1j jlll jll lalac
JUgSJI JSLJ g aasal adjglgblgbl
a aollo 1 aaljssd jy
i d i 10
aalagagusallajssalljlljrgsllgai
Jauuagao
Jgglg gblg ailljll jll Jac8 jaoa jgl
gjU yggj dic jolgl wJl alallosclawlg
.
60|
Jaa
abwlgjLg g aai to 11 wlg bay jS auiy S o siiu W .Jau ay uilg Sll dall y C uoi ng Si lo sic g l uio ng Si lo sic abll oui i p .ag ggl gl ggl gl Jgsslll
Ig Sg D auiy kll oaii pi aai wic oalg
. aIg cIJI bIaI sJlg pALI aLgll sIc sJl 1 JUJI JIggl liAs, JALI aLgll sIc JIJ IJ ggl gJgJgJgJgJgJgJgJgJgJgJgJgJgJgJgJgJgJgJgJgJgJgJgJgJgJgJgJgJgJgJgJgJgJgJgJgJgJgJgJgJgJgJgJgJgJgJgJgJgJgJ
JgS no Su. gao jue kui buiu uaiu 1
JlI lIy Iaog aIabag aIyrgsll O
U. Iaog gl aeg pals ygl g ylg
auaygssll oall Jus Lg aiaal G
Qg Uoie ayrgsll aswbl jgal lug n gl
Olgall og dgsy dyg .yessill
6dall jg bgl g buall scc gjl
g dalgaii glalgl gdoas g .aegk
.2g yjgl joln jgd j
bng lal cq .aaubu all glog i
ge aobull no ll d aaww .ails dljlgl
.aaogio ae algall faojls kuy jlae
g aafaaall jz J.aaowu yj
illaaglg yaulg jwll glc bala. jll
yaii kaii sd .asiall jgal jacse Lc
.asiaiall jxylb glall ywlgl aadalld
5tio uall gao gao hao jy jla j
pwl kaiy laoai wai ayig aaggo lagl no
jbaall no oicbai baiu oljagno
auijglll paiwlg alao jnns
cllaaiil poaii .jglal jaaay baj 2
Jsuji ci .dai aauoaiaiy juiqsl 6sll
(iaaiall ayjgll oedll abwgl lol j5g j50
.9gdl151
Lac uai juiuuiuuiuuiuuiuuiuuiuuiuuiuuiuuiuuiuuiuuiuuiuuiuuiuuiuuiuuiuuiuuiuuiuuiuuiuuiuuiuuiuuiuuiuuiuuiuuiuuiuuiuuiuuiuuiuuiuuiuuiuuiuuiuuiuuiuuiuuiuuiuuiuuiuui uai uai uai uai uai uai uai uai uai uai uai uai uai uai uai uai uai uai uai uai uai uai uai uai uai uai uai uai uai uai uai uai uai uai uai uai uai uai uai uai uai uai uai uai uai uai uai uai uai uai uauuuuuuuuuuuuuuuuuuuuuuuuuuuuuuuuuuuuuuuuuuuuuuuuuuuuuuuuuuuuuuuuuuuuuuuuuuuuuuuuuuuuuuuuuuuuuuuuuuuuuuuuuuuuuuuuuuuuuuuuuuuuuuuuuuuuuuuuuuuuuuuuuuuuuuuuuuuuuuu uu
Jl
aJgSJJ sssA oIc aJdU bdo
aalgag aalgl aalall gag jol 4
aalalgl qbi sic lalgl u!
ailllloall lgl gao c alalgl aai
.2g2g2g2g2g2g2g2g2g2g2g2g2g2g2g2g2g2g2g2g2g2g2g2g2g2g2g2g2g2g2g2g2g2g2g2g2g2g2g2g2g2g2g2g2g2g2g2g2g2g2
LaiuUclalg auiu Uaiai kaiia
yosannll "ayjrgsJ osll" albaa ay
asull algoall ayjrgsJ sall,ayxill buoall
ssall lag (ayjrgsJ asswll uksl abwlg) ayjrgsJ
.(ayjrgsJ asswll uksl ng) ayogjall ayjrgsJ
J 1
gall. uks o 1nag adu jle bla 4
gsd 0o 1slll lssog jswl kso g
jol jao bao g auiy jll sall Jaiu 2
guljall gulgwl daggu lJlg jaii
Jsw ayu yjll sall Jiauw alal oE
.ogjg oecjll juiu g uu
Lc palaJU pa mucg UabI Lai Lc bla 4
Saoj 9. auiyEul osa Jauu loic So
Gull sic jglll lc oobull
1
Lggi jI gai yj s cagai Lggi Jgai gao aogai .sGge jgngn D. pail (wglj uu oia) jao 1aas w ay uaiyuyu yu yu yu yu yu yu yu yu yu yu yu yu yu yu yu yu yu yu yu yu yu yu yu yu yu yu yu yu yu yu yu yu yu yu yu yu yu yu yu yu yu yu yu yu yu yu yu yu yu yu
6 jw g w j
JyjI JyJyOoJyOoJyOoJyOoJyOoJyOoJyOoJyOoJyOoJyOoJyOoJyOoJyOoJyOoJyOoJyOoJyOoJyOoJyOoJyOoJyOoJyOoJyOoJyOoJyOoJyOoo
yogg ju lo
jJ LwUgW d WgJ J UuOo Sd jS g
Lalao g Su Olae g uogwU
Lalao oju UcIbI g uglai .sUgA
guiu josuol uu J duilgfo I Uaiao g Su
:La
www.bosch-pt.com
JLs Lg WgWgJg JgJgJgJgJgJgJgJgJgJgJgJgJgJgJgJgJgJgJgJgJgJgJgJgJgJgJgJgJgJgJgJgJgJgJgJgJgJgJgJgJgJgJgJgJgJgJgJgJgJgJg
olssjS jL0sjl
J 11 Jg 11 11 11 11 11 11 11 11 11 11 11 11 11 11 11 11 11
Henk Becker
Executive Vice President
Engineering and Manufacturing
Helmut Heinzelmann
Head of Product Certification

i. V. h = ml
Robert Bosch Power Tools GmbH, 70538 Stuttgart, GERMANY
Stuttgart, 01.01.2017