
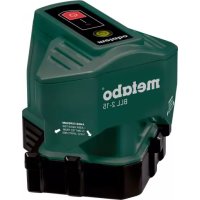
MLL 320 - Laser level METABO - Free user manual and instructions
Find the device manual for free MLL 320 METABO in PDF.

| Product type | Multi-line construction laser level with self-leveling |
| Brand | Metabo |
| Model | MLL 320 |
| Laser | Red diode, class 2, < 1 mW, wavelength 635 nm |
| Batteries | 4 x 1.5 V alkaline, AA / LR6 size |
| Battery life | Approximately 10 hours (alkaline batteries) |
| Self-leveling range | ± 4° |
| Accuracy - Horizontal line | ± 0.3 mm/m |
| Accuracy - Line tilt | ± 0.2 mm/m |
| Accuracy - 90° angle | ± 0.3 mm/m |
| Accuracy - Vertical cross point | ± 0.3 mm/m |
| Accuracy - Downward plumb beam | ± 0.3 mm/m |
| Operating temperature | -10 °C to +50 °C |
| Storage temperature | -25 °C to +70 °C |
| Tripod thread | 5/8" |
| Main functions | Horizontal and vertical lines, plumb points, marking mode, height adjustment, precision adjustment |
| Safety | Class 2 laser, do not look directly into the beam, avoid shocks and humidity |
| Maintenance | Check calibration before each use, clean with a soft dry cloth |
| Warning | Do not use in explosive or aggressive environments |
Frequently Asked Questions - MLL 320 METABO
User questions about MLL 320 METABO
0 question about this device. Answer the ones you know or ask your own.
Ask a new question about this device
Download the instructions for your Laser level in PDF format for free! Find your manual MLL 320 - METABO and take your electronic device back in hand. On this page are published all the documents necessary for the use of your device. MLL 320 by METABO.
USER MANUAL MLL 320 METABO
natural_image
3D rendering of a mechanical device with black and white components (no visible text or symbols)
natural_image
Simple line drawing of an open book with an 'i' symbol on the cover (no text or numbers present)10 m 3,0 mm 20 m 6,0 mm
Batteriewechsel
Operating instructions
The MLL 3-20 is an easy to operate self-levelling multi-line laser, designed for use on construction sites. The laser unit is self-levelling within the range of ±4^ . The fine adjustment allows precise 90^ angles to be projected. The laser lines are pulsed which makes it possible to work over greater distances using a special line receiver.
Read the operating instructions together with the illustrated portion. Follow the general instructions on the handling, care and maintenance of the unit. Observe the safety instructions on laser beams.
Do not use in potentially explosive or aggressive environments! Do not dispose of batteries and unit in household waste! Falling and strong vibrations of the unit may lead to malfunctioning!

Unit elements
- Exit aperture 360^ laser line
- Exit aperture vertical laser lines
- Exit aperture plumb line laser
- Feet with bearing surfaces
- 5/8" tripod socket
- Green LED: Operating function Yellow LED: Display battery capacity
- Button for selecting laser functions
- ON / OFF button for marking laser
- Laser housing
- Housing frame
- Fine adjustment
- Magnet
- Eyelets for attaching tensioning belt
- Clamping lever for height adjustment
- ON / OFF sliding switch with transport lock
- Battery compartment cover
Before initial commissioning:
The warning notice in your language must be clearly affixed on the laser instrument at the position indicated. The appropriate stickers are enclosed.
LASER RADIATION DO NOT STARE INTO BEAM LASER CLASS 2
This sticker with the warning notice written in the usual language must be affi xed here in place of the English text!
Batteries must be inserted -> changing batteries
en
Main applications:
Operating modes
The MLL 3-20 can be used in 2 operating modes.
- as self-levelling line laser + plumb line laser
- as laser unit for marking applications without the levelling function
Operating mode with self-levelling
A laser line can be selected in this mode.
Commissioning
Turn the laser housing to the working position Fig. (B1). Use the sliding switch (15) to switch on the laser unit Fig. (B2).
Horizontal and vertical laser lines and the plumb line points appear after switching on. The LED lights up green Fig. (B2). The MLL 3-20 is in self-levelling mode and levels itself automatically.
Setting the type of line:
→Fig. (B3) The vertical and horizontal laser lines
with the plumb line point and the cross laser line can be set after each other by pressing the selector switch (7).
The laser lines flash if the laser unit is at too steep an angle.
Laser flashes → Fig. (B4) -> The unit is inclined too much
- is outside the self-levelling range
- the laser cannot level itself automatically
Operating mode without levelling function
→ Fig. (B5) In the marking mode the MLL 3-20 is only switched on with the switch (8). Horizontal, vertical laser lines, plumb point and the LED flash quickly.
The MLL 3-20 is not in self-levelling mode and can only be used in this mode for marking and alignment!
Plumbline operating mode
The foot can be extended in order to improve the visibility of the lower plumb line point Fig. (B6). The MLL 3-20 is positioned and switched on (switch (15)).
The foot can also be spread out Fig. (B7). The laser down beam is aligned as required to the object or a mark Fig. (B8). Mark the position of the up laser beam on the ceiling. The laser lines are always switched on at the same time as the plumb line laser points.
Always ensure that the centre of the laser line is marked!
Additional functions
Function: Height adjustment → Fig. (B6)
Use the clamping lever (14) to adjust the height of the laser housing.
Function: Fine adjustment → Fig. (B9)
Use the fine adjustment (11) to rotate the laser casing to an exceptionally high degree of precision, which allows the vertical laser lines to be precisely aligned.
Checking the calibration
The MLL 3-20 crossed line and plumb line laser is designed for use on the construction sites and left our factory perfectly adjusted. As with any precision instrument, however, its calibration must be regularly checked.
The unit should be checked before starting any new tasks, particularly when the unit has been exposed to strong vibrations.
Vertical check
Checking the 2 vertical laser lines - Fig. (C1)
- Create a reference line e.g. with a plumb line.
- Set up and align the MLL 3-20 at distance Y in front of this reference line.
- Compare the laser line with the reference line.
- Do not allow the laser line to deviate from the reference line by more than 1 mm over a distance of 2 m!
- Perform this check for both vertical laser lines.
Checking the plumb-line function Fig. (C2)
- Align the MLL 3-20 precisely with one floor marking using the plumb dot.
- The projected laser line cross appears on the ceiling.
- Turn the MLL 3-20 around 180° and align it once again with the floor marking using the plumb-line dot.
- The projected laser line cross appears on the ceiling.
The difference measured between the markings is twice the actual discrepancy. With a ceiling height of 5 m, the difference should be no more than 3 mm.

Horizontal check
Checking the level of the horizontal laser line → Fig. (C3)
2 parallel walls at a distance S of at least 5 m apart are needed to carry out the horizontal check.
- Position the MLL 3-20 as close as possible in front of wall A on a horizontal surface.
- The MLL 3-20 is aligned with wall A using an exit aperture for the vertical laser line.
- Switch on the laser unit ( sliding switch (15)).
- Once automatic levelling has ended, mark the laser line cross projected onto wall A. Marking 1.
- Turn the MLL 3-20 by 180° and align with wall B using the same exit aperture for the vertical laser line. The height adjustment must not be changed.
- Once automatic levelling has ended, mark the laser line cross projected onto wall B. Marking 2.
- Now reposition the laser unit so that it is directly in front of wall B. The MLL 3-20 is aligned with wall B using the same exit aperture for the vertical laser line.
- Move the laser line cross by turning and adjusting the height until it precisely coincides with point 2.
- Turn the MLL 3-20 by 180° and align with wall Am using the same exit aperture for the vertical laser line. The height adjustment must not be changed.
- Move the laser line cross by turning until it precisely coincides with point 1.
- Once automatic levelling has ended, mark the laser line cross projected onto wall A. Marking 3.
- Measure the vertical distance between points 1 and 3.
Perform this check for both vertical laser lines!
Clearance S to the wall:
maximum permissible clearance:
05 m 3.0 mm
10 m 6.0 mm
15 m 9.0 mm
Angle check
Checking the 90^ angle → Fig. (C4)
- Mark point A on the floor at a distance of 10 m in a sufficiently large corner of the room.
- Align the MLL 3-20 with point A using the plumb-line dot.
- Align the MLL 3-20 with one wall using a laser line.
- Precisely mark point B on the floor at the halfway point.
- Precisely mark point C on the wall or floor.
- Shift the MLL 3-20 and align with point B using the plumb-line dot.
- Align the MLL 3-20 with point C again using the laser line.
- Precisely mark point D on the other wall or on the floor using the 90^ laser line.
Note:
The distance from A to B, B to C and B to D should be the same to guarantee accuracy.
- Turn the MLL 3-20 by 90^ and align laser line 1 with point D.
- Mark position E on the perpendicular 2nd laser line as close as possible to point A.
- Measure the distance between points A - E.
Room length Maximum permissible
or clearance clearance
between points
A and C
between points
A and E
10 m
20 m
3.0 mm
6.0 mm
Replacing the batteries
Slide the battery cover (16) in the direction of the arrow and insert new batteries in accordance with the symbols in the battery compartment
→ Fig. (A2). Suitable rechargeable batteries can also be used.
Technical Specifications
Laser type: Red diode laser, pulsed line laser, wavelength 635 nm
Output Power: < 1 mW, laser class 2 according to IEC 60825-1:2007
Self-levelling range: approx. ± 4^
Levelling accuracy*:
Laser line horizontal: ± 0.3 mm/m centre of laser line
Inclination of the laser line: ± 0.2 mm/m laser line
Accuracy 90°: ± 0.3 mm/m
Cross point vertical: ± 0.3 mm/m
Down beam: ± 0.3 mm/m
Batteries: 4 x 1.5 V alkaline, size mignon, AA, LR6
Operating life: approx. 10 hours (alkaline)
Operating temperature
range: -10 °C to +50 °C
Storage temperature
range: -25 °C to +70 °C
Subject to technical modifications.
* When operated within specified temperature range
Metabo Measuring Tools requiring Service
Contact your local Metabo representative if you have Metabo measurement devices requiring service.
See www.metabo.com for addresses.
Mode d'emploi
05 m 3,0 mm 10 m 6,0 mm 15 m
9,0 mm
Contrôle de l'angle
3,0 mm 6,0 mm 9,0 mm

Hoekcontrole
05 m 3,0 mm
10 m 6,0 mm
15 m 9,0 mm

Controllo angolare
05 m 3,0 mm 10 m 6,0 mm 15 m
9,0 mm

Control angular
05 m 3,0 mm 10 m 6,0 mm 15 m 9,0 mm

'Ελεγχος γωνιών
10 m 3,0 mm 20 m 6,0 mm
Αλλαγή μπαταριών
05 m 3,0 mm
10 m 6,0 mm
15 m 9,0 mm
A szög ellenőrzése

- Batteriewechsel
- Operating instructions
- Unit elements
- Before initial commissioning:
- LASER RADIATION DO NOT STARE INTO BEAM LASER CLASS 2
- en
- Main applications:
- Operating modes
- Operating mode with self-levelling
- Commissioning
- Setting the type of line:
- Operating mode without levelling function
- Plumbline operating mode
- Additional functions
- Checking the calibration
- Vertical check
- Horizontal check
- Checking the level of the horizontal laser line → Fig. (C3)
- Angle check
- Checking the 90° angle → Fig. (C4)
- Note:
- Replacing the batteries
- Technical Specifications
- Metabo Measuring Tools requiring Service
- Mode d'emploi
- Contrôle de l'angle
- Hoekcontrole
- Controllo angolare
- Control angular
- 'Ελεγχος γωνιών
- Αλλαγή μπαταριών
- A szög ellenőrzése
Brand : METABO
Model : MLL 320
Category : Laser level