
PL 5-30 - Laser level METABO - Free user manual and instructions
Find the device manual for free PL 5-30 METABO in PDF.

| Product type | Self-leveling 5-point laser |
| Brand | Metabo |
| Model | PL 5-30 |
| Power supply | 3 AA (LR6) alkaline batteries 1.5 V |
| Battery life | Approx. 20 hours (alkaline) |
| Laser type | Red diode, wavelength 635 nm |
| Laser class | 2 (power < 1 mW, IEC 60825-1:2007) |
| Self-leveling range | ±4.5° (horizontal) |
| Horizontal accuracy | ±0.3 mm/m |
| 90° angle accuracy | ±0.2 mm/m |
| Upward beam accuracy | ±0.3 mm/m |
| Downward beam accuracy | ±0.4 mm/m |
| Operating temperature range | -10 °C to +45 °C |
| Storage temperature range | -20 °C to +60 °C |
| Main functions | 5 laser points (horizontal, vertical, plumb), 90° angle measurement, telescopic stand, magnets, wall mount, 1/4" thread for tripod |
| Maintenance and cleaning | Clean with a dry cloth, avoid solvents |
| Safety | Do not stare into the laser beam, follow safety instructions |
| Spare parts and repairability | Contact Metabo representative for repair, addresses at www.metabo.com |
Frequently Asked Questions - PL 5-30 METABO
User questions about PL 5-30 METABO
0 question about this device. Answer the ones you know or ask your own.
Ask a new question about this device
Download the instructions for your Laser level in PDF format for free! Find your manual PL 5-30 - METABO and take your electronic device back in hand. On this page are published all the documents necessary for the use of your device. PL 5-30 by METABO.
USER MANUAL PL 5-30 METABO
natural_image
3D rendered mechanical component with black and white sections, no visible text or symbols
natural_image
Simple line icon of an open book with a lowercase 'i' on the cover (no text or symbols beyond the icon)| S gemessener Wert | |
| 5 m | 3,0 mm |
| 10 m | 6,0 mm |
| 15 m | 9,0 mm |
| 20 m | 12,0 mm |
Technische Daten
Operating instructions


The Metabo PL 5-30 is a simple to operate 5 point laser for use horizontal and vertical levelling and also for use in a plumb line function. This laser can measure 90° angles with great precision. It is self-levelling in the range ± 4,5° and enables levels to be determined quickly and accurately. Read the User Manual along with the illustrated portion. Follow the general instructions on the handling, care and maintenance of the instrument. Observe the safety instructions on laser beams.
A
Main components
(1) ON / OFF switch (for protecting during transport)
(2) LED green : Operating mode ON or READY
(3 a/b/c) Exit aperture : horizontal at 90° angle to each other
(4 a/b) Exit apertures: for plumb line laser
(5) Sliding cover -> horizontal exit aperture
(6) Foot - extendable
(7) Release lever
(8) Battery compartment cover
(9) Protective cover
(10) 1/4" threaded connector for tripod
(11) Magnets
(12) Wall bracket
A
Before initial start-up :
The warning notice in your language must be clearly affixed on the laser instrument at the position indicated. The appropriate stickers are enclosed.
This sticker with the warning notice written in the usual language must be affi xed here in place of the English text!

Batteries must be inserted -> changing batteries
Commissioning
The instrument is switched on with the on/off switch (1). The side exit aperture (3a) is uncovered at the same time for a horizontal laser beam. By moving the sliding cover (5) the exit aperture (3b) is uncovered for a further horizontal laser beam.
Place the laser on a level surface. The laser must be within its ±4,5^ self-levelling range for it to align automatically.
Positioning the laser and transferring points Plumb line function:
Release the release lever (7), extend the foot (6) and lock into position. The PL 5-30 is positioned and switched on -> switch (1).
The down laser beam is aligned on the object or mark as required. Mark the position of the perpendicular laser beam on the ceiling. Please note that the centre of laser dot is marked!
Plumbing a Wall
Release the release lever (7), extend the foot (6) and lock into position. Position the laser in such a way that the foot (6) is on the front edge of the floor profile.
Switch on the instrument. -> switch (1). Illuminated green LED (2) -> laser in operation.
Align the upper end of the partition wall until the perpendicular laser beam meets the upper edge of the top track.
Operating status display and error messages via the LED
Illuminated green LED -> laser in operation
Illuminated red LED -> battery voltage very low
laser beam flashing-> -> The unit is inclined too much + is outside the self-levelling range + the laser cannot level itself automatically
Replacing the batteries
Slide the battery cover (4) in the direction of the arrow and insert new batteries in accordance with the symbols in the battery compartment. Suitable batteries can also be used.
Checking the calibration
The PL 5-30 5 point laser is designed for use on construction sites and left our factory perfectly adjusted.. As with any precision instrument, however, its calibration must be regularly checked. The unit should be checked before starting any new tasks, particularly when the unit has been exposed to strong vibrations.
en
Checking plumblining

- Switch the unit on
- Place the laser so that its down beam is over a reference mark on the floor.
- Locate the position of the up beam on the ceiling and make a mark.
- Rotate the laser 180^ and realign the down beam over the reference mark on the floor.
- Locate the position of the up beam on the ceiling and make a mark.
- Measure the difference D between the two marks on the ceiling, which will be twice the actual error.
The difference may not be greater than: 3 mm in 5 m (1/8" in 16'5").

Checking Level 90° Calibration between horizontal and right angle

- Find a room at least 10 m (35 ft) long.
Mark a point (A) on the floor at one end of the room. - Set up the laser so that its down beam is over point A.
Make sure the level beam points toward the far end of the room. - Mark a point (B) on the floor at the center of the room using a target to transfer the level beam location to the floor.
- Mark a point (C) on the far wall or transfer the level beam location to the floor.
- Move the PL 5-30 to point B and align the level beam to point C again.
- Mark the location of the square beam (D) on the floor.
Tip:
To ensure accuracy, the distances from A to B, B to C, and B to D should be equal.

- Turn the PL 5-30 90° so that the level beam aligns with point D.
- Mark the location of the square beam (E) on the floor as close as possible to point A.
- Measure the distance between points A and E.
Room length or distance between points A and C
The 90^ angle between the level beam and square beam is out of calibration if the distance between points A and E is:
10 m
2,0 mm
20 m
4,0 mm
32'10"
5/64“
65'8"
5/32 "
Horizontal checking
Two parallel wall surfaces at least 5m /16'5" apart are required for the horizontal check.
- Place the PL 5-30 on a smooth surface or on a tripod as close as possible to wall A and with the front side pointing towards the wall
- Switch the unit on.
- Mark the centre of the visible laser dot on wall A (point 1).
- Turn the complete unit 180^ without altering the height of the laser.
- Mark the centre of the visible laser dot on wall B (point 2).
- Now move the unit directly in front of wall B.
- Set the unit's height so that the laser dot's height matches that of point 2.
- Without changing the height of the laser, rotate it 180^ to place the beam near the mark on the first wall (step 3 / point 1).
Measure the vertical distance between point 1 and point 3. The difference must not be greater than :
| S Measured Value | S Measured Value | ||
| 5 m | 3,0 mm | 20 ft | 1 / 8“ |
| 10 m | 6,0 mm | 40 ft | 9 / 32“ |
| 15 m | 9,0 mm | 60 ft | 7 / 16“ |
| 20 m | 12,0 mm | 80 ft | 9 / 16“ |
Technical data
Laser type: Red diode laser, wavelength 635 nm
Output : < 1 mW, Laser Class 2
to IEC 60825-1:2007
This product complies with 21CFR parts
Self-levelling range*: (horizontal)
$$ \text { Approx. } \pm 4, 5 ^ {\circ} $$
Levelling accuracy :
Laser line horizontal*: L1 = ±0,3 mm/m middle of the laser line
$$ L 1 = \pm 3 / 1 6 ^ {\prime \prime} \text { over } 5 0 \mathrm{ft} $$
90° angle laser beam:* L2 = ± 0,2 mm/m laserlinie
$$ L 2 = \pm 1 / 8 ^ {\prime \prime} \text { over } 5 0 \mathrm{ft} $$
Up Beam Accuracy: L3 = ±0,3 mm / m / ± 3/16" over 50 ft
Down Beam Accuracy: L_4 = ± 0.4 mm / m / ± 1/4 “ over 50 ft
Batteries : 3 x 1,5 V Mignoncells Alkaline, Size AA, LR6
Operating life : Approx. 20 hours (Alkaline)
Operating temperature range: -10 °C to +50 °C / -14°F to +122°F
Storage temperature range: -20 °C to +60 °C / -4°F to +140°F
Subject to technical modifications.
* When operated within specified temperature range
en
Metabo Measuring Tools requiring Service
Contact your local Metabo representative if you have Metabo measurement devices requiring service. See www.metabo.com for addresses.
Mode d'emploi
| S Valore misurato | |
| 5 m | 3,0 mm |
| 10 m | 6,0 mm |
| 15 m | 9,0 mm |
| 20 m | 12,0 mm |
Dati tecnici
| S | v | a | l | o | r |
| 5 m | 3,0 mm | ||||
| 10 m | 6,0 mm | ||||
| 15 m | 9,0 mm | ||||
| 20 m | 12,0 mm |
Dados técnicos
| S | U | p | p | m | ä |
| 5 m | 3,0 mm | ||||
| 10 m | 6,0 mm | ||||
| 15 m | 9,0 mm | ||||
| 20 m | 12,0 mm |
Tekniset tiedot
| S | m | i | t | a | t |
| 5 m | 3,0 mm | ||||
| 10 m | 6,0 mm | ||||
| 15 m | 9,0 mm | ||||
| 20 m | 12,0 mm |
Tekniset tiedot
Lasertyppi:
| S | m | å | l | t | v |
| 5 m | 3,0 mm | ||||
| 10 m | 6,0 mm | ||||
| 15 m | 9,0 mm | ||||
| 20 m | 12,0 mm |
| S | m | å | l | t | v |
| 5 m | 3,0 mm | ||||
| 10 m | 6,0 mm | ||||
| 15 m | 9,0 mm | ||||
| 20 m | 12,0 mm |
Tekniske data
Lasertype:
other
| Position | Distance (mm) | | :--- | :--- | | 10 m | 2,0 | | 20 m | 4,0 |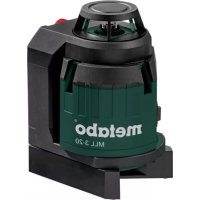

- Technische Daten
- Operating instructions
- A
- Main components
- Before initial start-up :
- Commissioning
- Positioning the laser and transferring points Plumb line function:
- Plumbing a Wall
- Operating status display and error messages via the LED
- Replacing the batteries
- Checking the calibration
- en
- Checking plumblining
- Checking Level 90° Calibration between horizontal and right angle
- Tip:
- Horizontal checking
- Technical data
- Metabo Measuring Tools requiring Service
- Mode d'emploi
- Dati tecnici
- Dados técnicos
- Tekniset tiedot
- Tekniske data
Brand : METABO
Model : PL 5-30
Category : Laser level