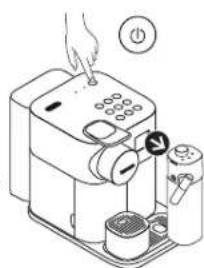
Icona Capitals CTOC4003 - Toaster DELONGHI - Free user manual and instructions
Find the device manual for free Icona Capitals CTOC4003 DELONGHI in PDF.
| Product type | Espresso coffee machine with Nespresso Original system |
| Brand | De'Longhi |
| Model | Icona Capitals CTOC4003 / Gran Lattissima |
| Power supply | 220-240 V, 50-60 Hz |
| Pump | 19 bar pressure |
| Water tank capacity | Approximately 1 L |
| Coffee type | Nespresso Original capsules (Ristretto, Espresso, Lungo) |
| Milk-based drinks | Cappuccino, Latte Macchiato, Caffè Latte, Flat White |
| Milk system | Removable Rapid Cappuccino system, dishwasher safe |
| Programming | Programmable coffee volume from 25 to 150 ml; programmable milk volume up to 400 ml |
| Automatic shut-off | After 9 minutes of inactivity (adjustable) |
| Alert functions | Descaling alarm, cleaning alarm |
| Maintenance | Daily cleaning of the milk system; descaling cycle recommended |
| Safety | Cut-off, hot surface indicator, child lock (not specified) |
| Warranty | 2 years (parts and labor) |
Frequently Asked Questions - Icona Capitals CTOC4003 DELONGHI
User questions about Icona Capitals CTOC4003 DELONGHI
0 question about this device. Answer the ones you know or ask your own.
Ask a new question about this device
Download the instructions for your Toaster in PDF format for free! Find your manual Icona Capitals CTOC4003 - DELONGHI and take your electronic device back in hand. On this page are published all the documents necessary for the use of your device. Icona Capitals CTOC4003 by DELONGHI.
USER MANUAL Icona Capitals CTOC4003 DELONGHI
Get online assistance by visiting: www.nespresso.com/machine-assistance
Safety Precautions 6
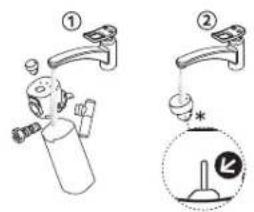
Assembling/Disassembling of Rapid Cappuccino System/Montage/Demontage du systeme Rapid Cappuccino 19
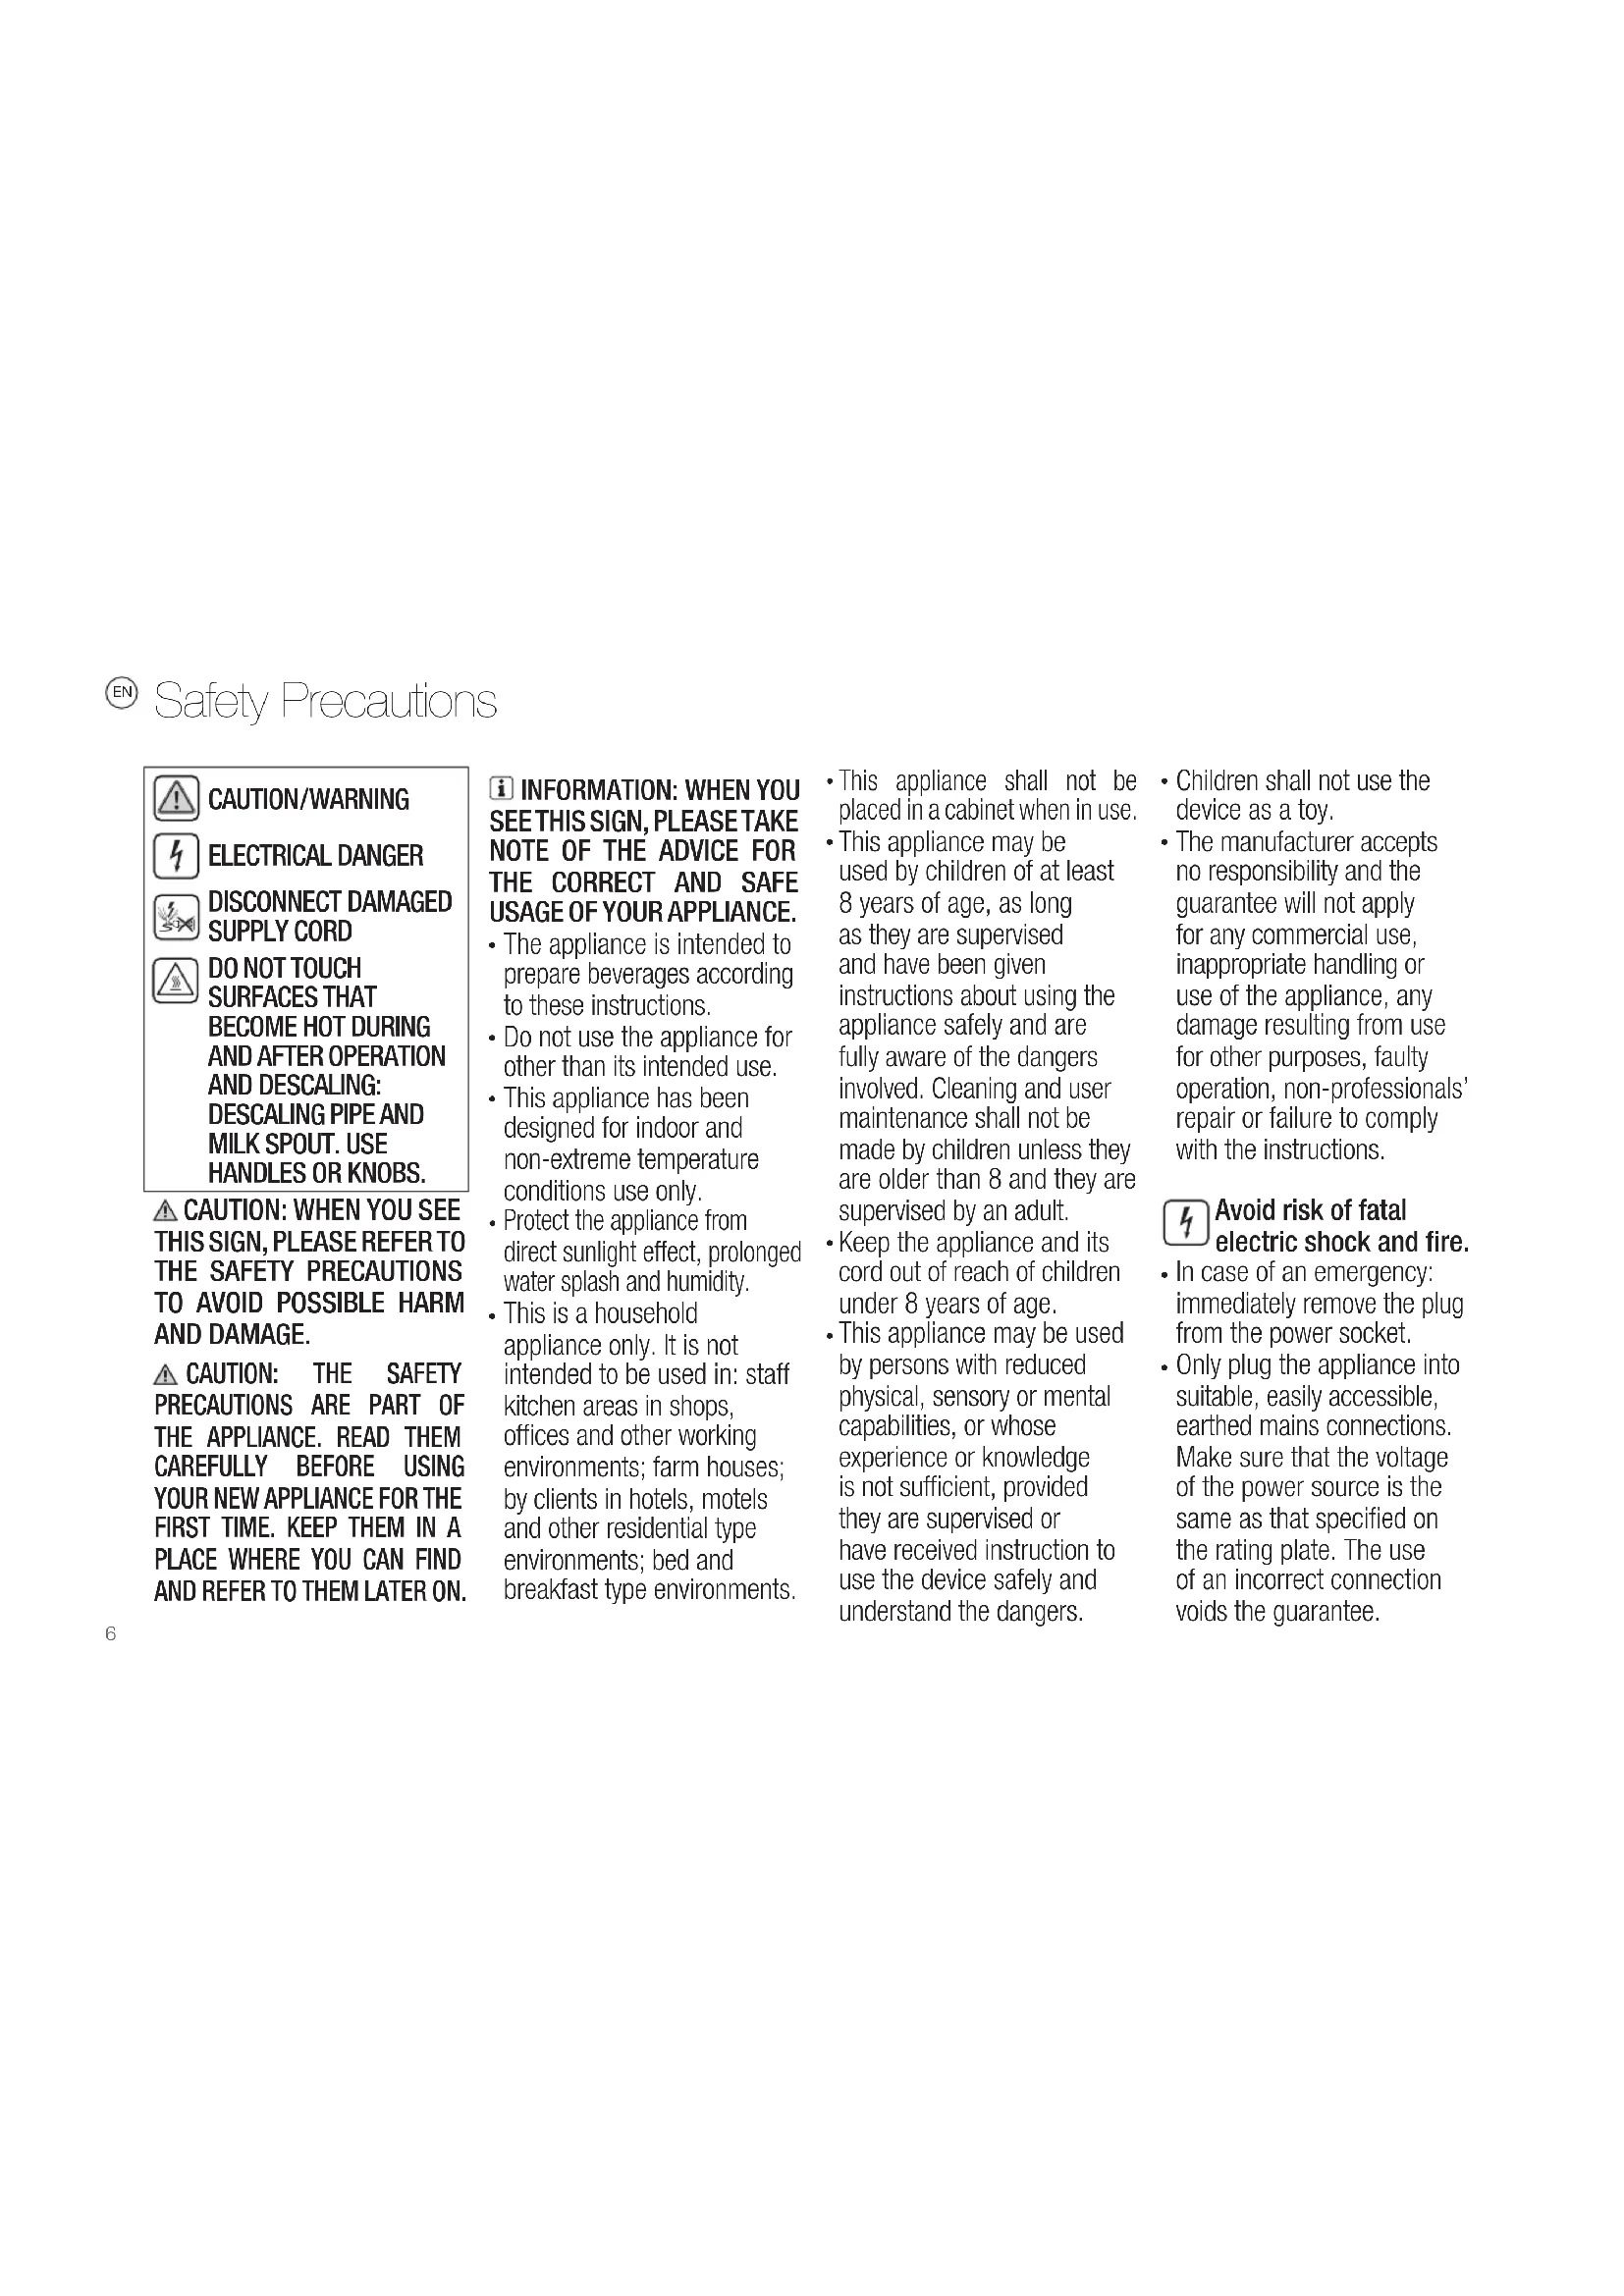
DO NOT TOUCH SURFACES THAT BECOME HOT DURING AND AFTER OPERATION AND DESCALING: DESCALING PIPE AND MILK SPOUT. USE HANDLES OR KNOBS.
CAUTION: WHEN YOU SEE THIS SIGN, PLEASE REFERTO THE SAFETY PRECAUTIONS TO AVOID POSSIBLE HARM AND DAMAGE.
CAUTION: THE SAFETY PRECAUTIONS ARE PART OF THE APPLIANCE. READ THEM CAREFULLY BEFORE USING YOUR NEW APPLIANCE FOR THE FIRST TIME. KEEP THEM IN A PLACE WHERE YOU CAN FIND AND REFER TO THEM LATER ON.
iINFORMATION:WHEN YOU SEE THIS SIGN,PLEASETAKE NOTE OF THE ADVICE FOR THE CORRECT AND SAFE USAGE OF YOUR APPLIANCE.
- The appliance is intended to prepare beverages according to these instructions.
- Do not use the appliance for other than its intended use.
- This appliance has been designed for indoor and non-extreme temperature conditions use only.
- Protect the appliance from direct sunlight effect, prolonged water splash and humidity.
-
This is a household appliance only. It is not intended to be used in: staff kitchen areas in shops, offices and other working environments; farm houses; by clients in hotels, motels and other residential type environments; bed and breakfast type environments.
-
This appliance shall not be placed in a cabinet when in use.
- This appliance may be used by children of at least 8 years of age, as long as they are supervised and have been given instructions about using the appliance safely and are fully aware of the dangers involved. Cleaning and user maintenance shall not be made by children unless they are older than 8 and they are supervised by an adult.
- Keep the appliance and its cord out of reach of children under 8 years of age.
- This appliance may be used by persons with reduced physical, sensory or mental capabilities, or whose experience or knowledge is not sufficient, provided they are supervised or have received instruction to use the device safely and understand the dangers.
Children shall not use the device as a toy.
- The manufacturer accepts no responsibility and the guarantee will not apply for any commercial use, inappropriate handling or use of the appliance, any damage resulting from use for other purposes, faulty operation, non-professionals' repair or failure to comply with the instructions.
Avoid risk of fatal electric shock and fire.
- In case of an emergency: immediately remove the plug from the power socket.
- Only plug the appliance into suitable, easily accessible, earthed mains connections. Make sure that the voltage of the power source is the same as that specified on the rating plate. The use of an incorrect connection voids the guarantee.
In case of plug incompatibility with the socket, use an adaptor ensuring the ground continuity between the machine and the network.
The appliance must only be connected after installation.
- Do not pull the cord over sharp edges, clamp it or allow it to hang down.
- Keep the cord away from heat and damp.
- If the supply cord or the plug are damaged, they must be replaced by the manufacturer, its service agent or similarly qualified persons, in order to avoid all risks.
- Do not operate any appliance with a damaged cord or plug or after the appliance malfunctions, or has been damaged in any manner. Return appliance to the nearest authorized service
facility for examination, repair or adjustment.
If an extension cord is required, use only an earthed cord with a conductor cross-section of at least 1.5mm^3 or matching input power.
- To avoid hazardous damage, never place the appliance on or beside hot surfaces such as radiators, stoves, ovens, gas burners, open flame, or similar.
Always place it on a horizontal, stable and even surface. The surface must be resistant to heat and fluids, like water, coffee, descaler or similar liquids.
- Disconnect the appliance from the mains when not in use for a long period. Disconnect by pulling out the plug and not by pulling the cord itself or the cord may become damaged.
- Unplug from outlet when not in use and before cleaning. Allow to cool before putting
on or taking off parts, and before cleaning the appliance.
Always attach plug to appliance first, then plug cord into the wall outlet. To disconnect, stop any preparation, turn any control to "off", then remove plug from wall outlet.
- Never touch the cord and the plug with wet hands.
- To protect against fire, electric shock and injury to persons, do not immerse cord, or plugs, in water or other liquid.
- Never immerse the appliance or part of it in water or other liquid
- Never put the appliance or part of it in a dishwasher, except the Rapid Cappuccino System.
Electricity and water together is dangerous and can lead to fatal electrical shocks.
- Do not open the appliance. Hazardous voltage inside!
- Do not put anything into any openings. Doing so may cause fire or electrical shock!
- The use of accessory attachments not recommended by the appliance manufacturer may result in fire, electric shock or injury to persons.
Avoid possible harm when operating the appliance.
- Never leave the appliance unattended during operation.
- Do not use the appliance if it is damaged, has been dropped or not operating perfectly. Immediately remove the plug from the power socket. Contact
Nespresso or Nespresso authorized representative for examination, repair or adjustment.
A damaged appliance can cause electrical shocks, burns and fire.
- Always completely close the lever and never lift it during operation. Scalding may occur.
- Do not put fingers under
coffee outlet, risk of scalding.
- The surface of the heating element remains hot after use and the outside of the appliance may retain the heat for several minutes depending on use.
- Do not put fingers into capsule compartment or the capsule shaft. Danger of injury!
- Do not touch surfaces that become hot during and after operation and descending: descending pipe and milk spout. Use handles or knobs.
- If coffee volumes higher than 150ml are programmed: let the machine cool down for 5 minutes before making the next coffee. Risk of overheating!
Water could flow around a capsule when not perforated by the blades and damage the appliance. - Never use an already used, damaged or deformed capsule.
- If a capsule is blocked in the
capsule compartment, turn the machine off and unplug it before any operation. Call Nespresso or Nespresso authorized representative
Always fill the water tank with cold, fresh drinking water.
- Empty water tank if the appliance will not be used for an extended time (holidays, etc.).
- Replace water in water tank when the appliance is not operated for a weekend or a similar period of time.
- Do not use the appliance without the drip tray and drip grid to avoid spilling any liquid on surrounding surfaces.
The machine is not intended for use with raw milk.
- Do not use any strong cleaning agent or solvent cleaner. Use a damp cloth and mild cleaning agent to clean the surface of the appliance.
- To clean machine, use only clean cleaning tools.
- When unpacking the
machine, remove the plastic film and dispose.
- This appliance is designed for Nespresso coffee capsules available exclusively through Nespresso or your Nespresso authorized representative.
- All Nespresso appliances pass stringent controls. Reliability tests under practical conditions are performed on randomly selected units. This can show traces of any previous use.
- Nespresso reserves the right to change instructions without prior notice.
Dscaling
- Nespresso descaling agent, when used correctly, helps ensure the proper functioning of your machine over its lifetime and that your coffee experience is as perfect as the first day.
- Descale according to user
manual recommendations,or consult the descending information by visiting the Nespresso website www. nespresso.com/machinemaintenance
CAUTION: the descending solution can be harmful. Avoid contact with eyes, skin and surfaces. The use of any unsuitable descending agent may lead to machine component damage or an insufficient descending process. For any additional questions you may have regarding descending, please contact Nespresso.
SAVE THESE
INSTRUCTIONS
Pass them on to any
subsequent user.
This instruction manual is
also available as a PDF at
nespresso.com
"Welcome to Nespresso folder" Pochette "Bienvenue chez Nespresso"
THE CLASSIC ESPRESSO EXPERIENCE With the Nespresso Original system, you're invited to enjoy the essence of an
espresso, with or without milk. Inspired by the Italian coffee tradition, it's a timeless experience at the touch of a button. The Nespresso Original machines and capsules offer an array of aromas to fit all coffee tastes. Espresso or lungo, black or in a recipe, always layered with a soft crema or an indulgent foam. This is only made possible thanks to the 19-bar pressure in every machine. It extracts the optimal flavours from each capsule, to reveal them in your cup. Nespresso Original, classic in its own way.
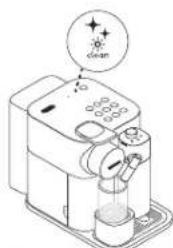
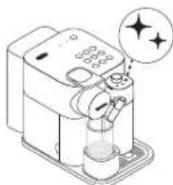
17 "DESCALING" :descending alert refer to section "Descending" de detartrage, section "Detartrage"
18 "CLEAN" milk system cleaning alert refer to section "Preparing Milk-based beverages" "Clean" de nettoyage système lait, voir section "Preparation de boissons à base de lait"
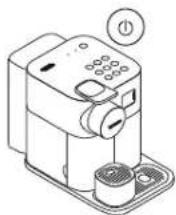
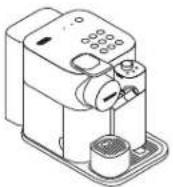
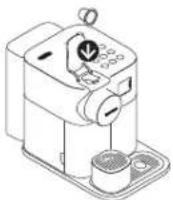
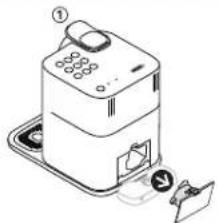
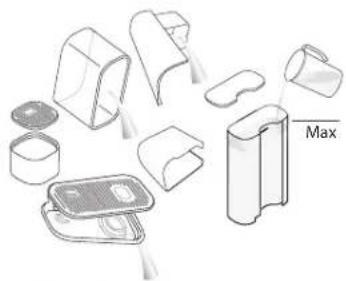
Water tank (1.0 L)
Réserveur d'eau (1.0L).
Lever
Levier
Capsule
compartment Compartment a capsules
Steam connector door Volet du
Steam connector Connecteurvapeur
Coffee outlet Sortie du café
7 Drop collector housing Logement bac a goutes
Used capsule container Bac a capsules usages
Drip tray Bacch eonputan
10 Small cup grid Grille petite tasse
11 Small cup support Support pour petite tasse
12 Cup grid Gnilie tasse
13 Drop collector Bae collecteur de gouttes
15 Descaling pipe storage
Logement tube de détartrage
15 Descalining pipe Tube de detartrage
16 Descaling pipe cover Couverde tube de detartrage
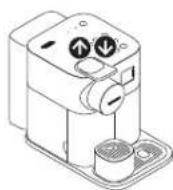
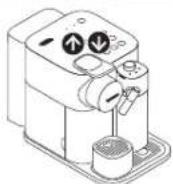
Tactile beverage buttons
Touches tactiles boissons
19 On-Standby but (standby mode consumption: 0 Bouton Marche (consummation veille:0.22 Wh)
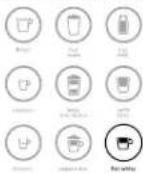
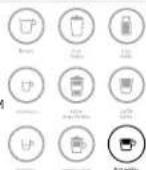
Lungo 110 ml Lungo 110 ml
21Espresso 40 ml
Espresso 40 ml
22 Ristretto 25 ml Ristretto 25 ml
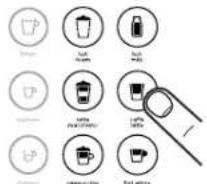
Cappuccino Cappuccino
Flat white Flat white
25 Caffé latte Caffé latte
Hot milk Lait chaud
27 Latte macchiato Latte macchiato
28 Hot foam Mousse chaude
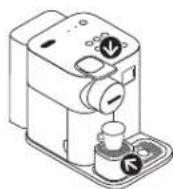
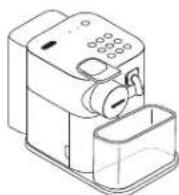
Rapid Cappuccino System (R.C.S.) Systeme Rapid Cappuccino (R.C.S.)
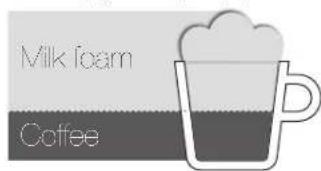
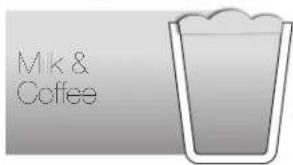
A cappuccino is characterized by a milky coffee topped with a thick layer of milk froth on the top.
Recommended proportions:
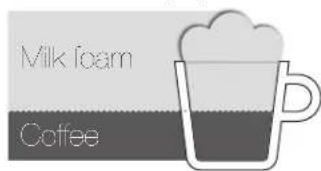
Quantity: 100 ml milk foam
40 ml coffee
Choice of coffee:
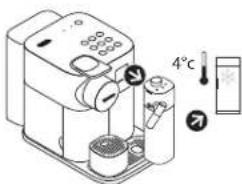
The milk froth quality and aspect could be affected by the type, freshness and temperature of the milk (ideally stored at 4^ )
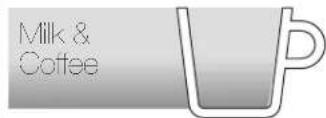
CAFFE LATTE:
A caffe latte is a coffee to which a generous amount of hot slightly frothed milk is added.
Recommended proportions:
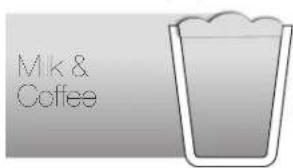
Quantity: 110 ml coffee
140 ml milk
60 ml milk foam
Choice of coffee:
Lungo capsule
Choice of cup:
A recipe glass
Tips:
The thin layer of milk froth on top should be about 1cm. It is usually brownish, tented with coffee colour.
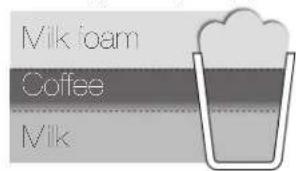
LATTE MACCHIATO:
A latte macchiato is a recipe in which coffee is poured into a glass full of frothed milk. It is characterised by the 3 "milk-coffee-froth" layers.
Recommended proportions:
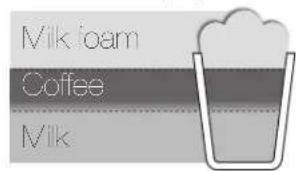
Quantity: 140 ml milk
140 ml milk foam
40 ml coffee
Choice of coffee:
The milk froth quality and aspect could be affected by the type, freshness and temperature of the milk (ideally stored at 4^ )
EN
FLAT WHITE:
A flat white is an espresso coffee to which a generous amount of hot slightly frothed milk is added.
Recommended proportions:
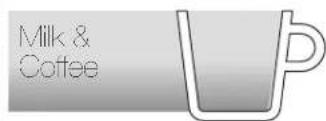
Quantity: 40 ml coffee
100 ml milk
Choice of coffee:
The layer of milk froth on top should be thin of about half centimeter. It is usually brownish, teinted with coffee colour and more liquid and shiny with very tiny bubbles.
NOTE: to turn off the machine, press the On-Standby button (standby mode consumption: 0.22 Wh).
IMPORTANT : pour etéindre la machine appuyez sur la touche Marche / Veille (consommation en mode veille: 0.22 Wh
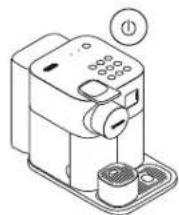
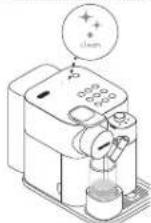
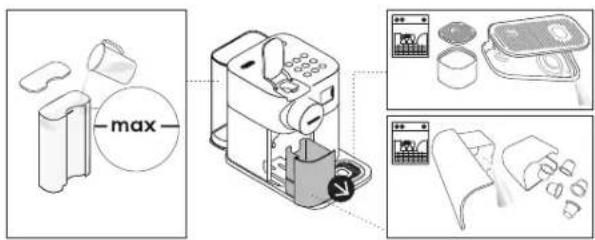
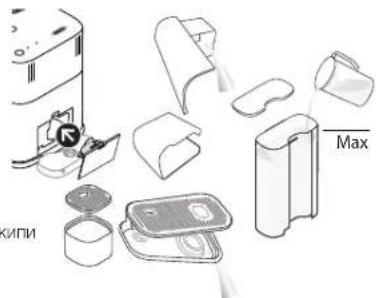
When unpacking the machine, remove the plastic film, water tank, drip tray, and capsule container. Adjust the cable length and store the excess in the cable guide under the machine.
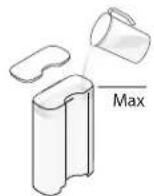
Rinse the water tank before filling with fresh potable water up to maximum level. Plug machine into pans.
Switch the machine on by pressing the on-standing button-Blinking lights (coffee buttons): heating-up (25 s)-Steady lights: ready
Allumez la machine en appuyant sur la touche Marche / Veille - Voyants clignotants (touches cafe) :chauffage (25 s) - Voyants fixes : machine prete
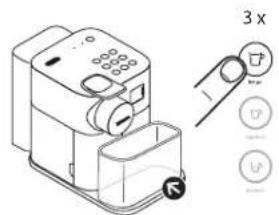
Rinsing: place a container (not provided with the machine) under coffee outlet and press the button. Repeat three times.
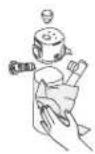
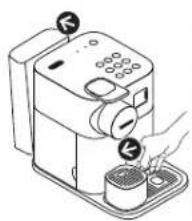
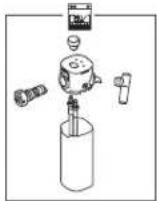
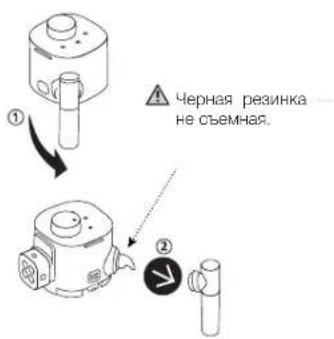
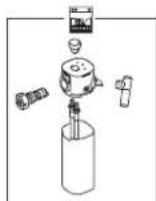
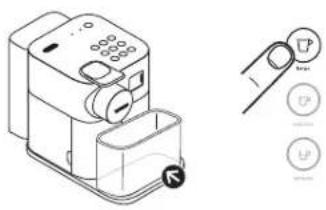
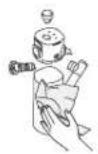
Remove the milk container by pressing the buttons on the sides of the milk jug. Unplug the aspiration tube.
CAUTION: When assembling the R.C.S., insert well the aspiration tube until it cannot move.
Position the milk spout vertically to disassemble and to reassemble. Pour demonter et remonter la buse a la place-la verticalement.

CAUTION: the milk should not be kept for more than 2 days in the refrigerator. In the case the milk container is kept outside refrigerator for longer than 30min disassemble the Rapid Cappuccino System and clean all components (refer to dishwashing or hand washing recommendations).

1 Do not use any strong cleaning agent or solvent cleaner. Use a clean damp cloth and mild cleaning agent to clean the surface of the machine. Do not put any machine components in dishwasher, except the Rapid Cappuccino System components, drip tray and used capsule container. Always check if the component is dishwasher safe before putting it in dishwasher (see page 14)
ne nettoy z jai o a u s t i e t r t t t t t t t t t t t t t t t t t t t t t t t t t t t t t t t t t t t t t t t t t t t t t t t t t t 0
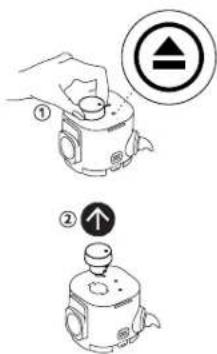
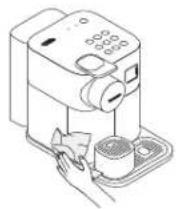
Lift and close the lever to eject the capsule into the used capsule container
Remove drip tray. Used capsule container, cup support and drop collector. Empty and rinse. Remove water tank. Empty, rinse it before filling with fresh potable water.
Place a container under coffee outlet and press the button to rinse.
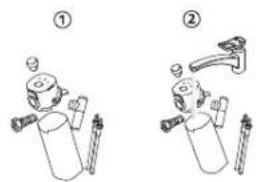
Disassemble the Rapid Cappuccino System. Refer to section "Assembling / Disassembling of Rapid Cappuccino System". Rinse away carefully any milk residue with hot potable water (40^ / 104^) . Remove all the visible dirt with a sponge.
Soak all components in with hot potable water (40^ / 104^) together with mild/soft detergent for at least 30 minutes and rinse thoroughly with hot potable water (40^ / 104^) . Do not use odor mild/soft detergents.
Clean the interior of the milk tank, the milk spout connector, and the milk knob with mild/soft detergent and rinse with hot potable water (40C/104F).
- Ensure air inlet is clean. This will ensure perfect foam.
Do not use abrasive material that might damage the surface of the equipment.
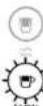
Dry all parts with a fresh and clean towel, cloth or paper and reassemble. If the Rapid Cappuccino System was very dirty, proceed with two rinsing of the system by turning the milk froth regulator knob to (Clean) position. Milk system rinsing process starts and hot water combined with steam flows through the milk spout.
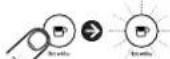
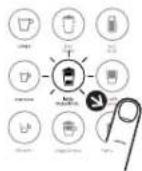
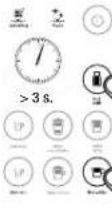
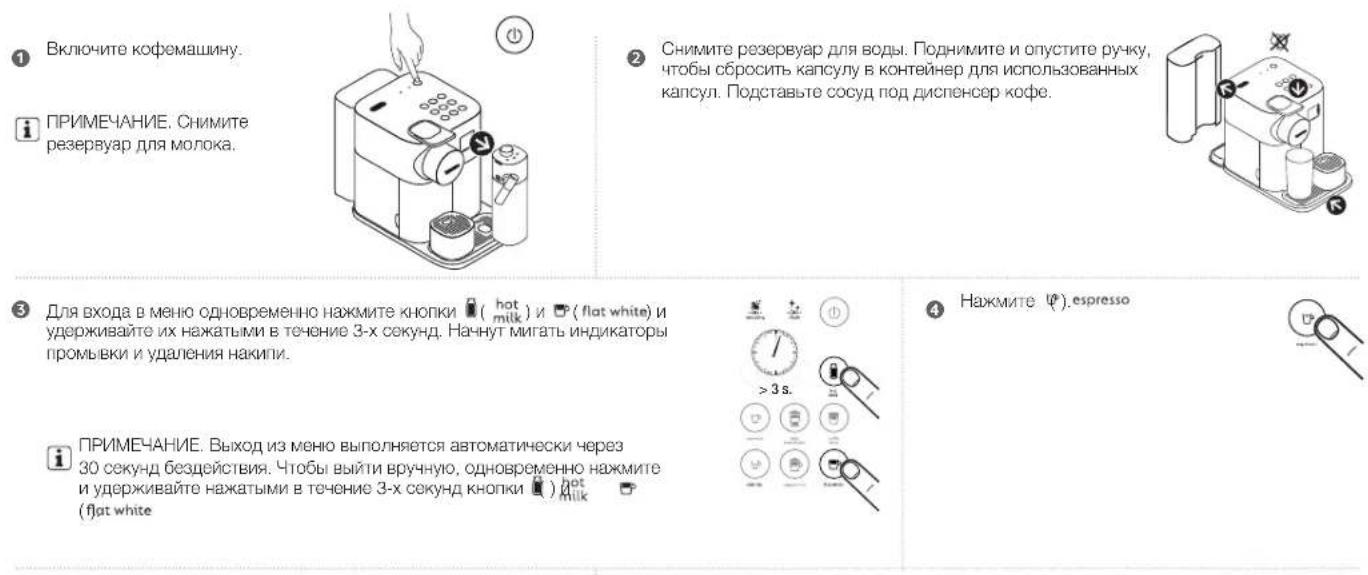
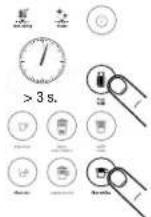
Touch and hold the button relative to the drink you want to programme for at least 3 s, to enter the programming mode. Brewing starts and button blinks fast.
Press (flat white): it binks.
Appuyez sur: formwhiteclignote
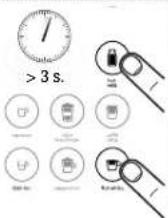
Press simultaneously hot (milk) and (fiat white) buttons for 3 seconds to enter Menu mode: descending and clean alert start blinking.
NOTE: the Menu mode exits automatically after 30 seconds if no actions are performed or can be exited manually by pressing simultaneously
Press (flat white) button: it blinks 3 times rapidly to confirm restoring the quantity to factory setting.
CAUTION: refer to safety precautions.
Lift and close the lever to eject any capsules in the used capsule container.
Empty the drip tray, used capsule container, cup support, and drop collector. Fill the water tank with 100 ml of Nespresso descaling agent. Add water up to the Descaling mark on the water tank (~500 ml).
Take the descending pipe situated at the back of the machine and plug the descending pipe into steam connector of machine. Replace water tank.
The machine enters the descending mode. The descending alert blinks orange during the entire descending process. The flat white button illuminates white.
Place a container with a minimum 1 litre capacity under both the coffee outlet and under the descending pipe nozzle.
Press the (flat white) button. Descaling product flows alternately through the coffee outlet, descending pipe and drip tray. When the descending cycle is finished (water tank runs empty, the flat white button shines.
Empty the drip tray, used capsule container, cup support, and drop collector, rinse out and fill the water tank with fresh potable water up to level MAX.
Press the (flat white) button again. The rinsing cycle continues through the coffee outlet, descending pipe and drip tray until the water tank turns empty.
Once the rinsing process is finished, the machine switches off. Remove descaling pipe with handles or knobs, and store it. Empty drip tray and used capsules container. Fill water tank with fresh potable water.
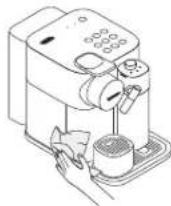
Clean the machine using a damp cloth. You have now finished descaling the machine.
WARNING: Descalging pipe becomes hot during operation.
Use handles or knobs to avoid possible burns.
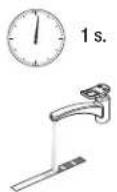
Take water hardness sticker placed on the first page of the user manual and place it under water for 1 second.
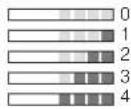
The number of red squares indicates the water hardness level.
The number of red squares indicates which button you should press (see table below). Now, within 30 seconds, you can set the desired value by pressing the corresponding button. They blink 3 times rapidly to confirm new value. The menu exits automatically and machine returns to ready mode.
NOTE: the Menu mode exits automatically after 30 seconds if no actions are performed. It can be exit manually by pressing simultaneously ( ) button for White seconds.
Emptying the system before a period of non-use, for frost protection or before a repair
Remove the water tank. Lift and close the lever to eject any remaining capsule. Place a container under the coffee outlet.
Press simultaneously hot (hot) and (flat white) buttons for 3 seconds to enter Menu mode: descending and clean alert start blinking.
NOTE: the Menu mode exits automatically after 30 seconds if no actions are performed. It can be exit manually by pressing simultaneously ( ) but this for 8 seconds.
Press the (espresso) button for confirmation. Once pressed, the emptying starts. All buttons blink alternately: emptying mode in progress. When the process is finished, the machine switches off automatically.
NOTE: appliance will be blocked for approximately 10 minutes after emptying.
Press simultaneously (hot) and (flat white) buttons for 3 seconds to enter Menu mode: descending and clean alert start blinking.
NOTE: the Menu mode exits automatically after 30 seconds if no actions are performed. It can be exit manually by pressing simultaneously ( ) button seconds.
Now, within 30 seconds, you can change the automatic power off and set the desired value by pressing the corresponding button. See table for more details.
They blink 3 times rapidly to confirm new value. The menu exists automatically and machine returns to ready mode.
As we may not have foreseen all uses of your appliance, should you need any additional information, in case of problems or simply to seek advice, call Nespresso or your Nespresso authorized representative.
Contact details for your nearest Nespresso or your Nespresso authorized representative can be found in the «Welcome to Nespresso» folder in your machine box or at nespresso.com
De'Longhi warrants this product against defects in materials and workmanship for a period of two years from the date of purchase. During this period, De'Longhi will either repair or replace, at its discretion, any defective product at no charge to the owner. Replacement products or repaired parts will be guaranteed for only the unexpired portion of the original warranty or six months, whichever is greater. This limited warranty does not apply to any defect resulting from accident, misuse, improper maintenance, or normal wear and tear. Except to the extent allowed by applicable law, the terms of this limited warranty do not exclude, restrict or modify, and are in addition to, the mandatory statutory rights applicable to the sale of the product to you. If you believe your product is defective, contact Nespresso for instructions on where to send or bring it for repair.
Please visit our website at www.nespresso.com for contact details.
Your appliance contains valuable materials that can be recovered or recycled. Separation of the remaining waste materials into different types facilitates the recycling of valuable raw materials. Leave the appliance at a collection point. You can obtain information on disposal from your local authorities.

www.nespresso.com/machine-assistance
www.nespresso.com/machine-assistance
Contenuo
nespresso.com/descaling
Utilize as pegas ou botoes.
www.nespresso.com/machine-assistance
Inhoud
περιεχόμενα
Schakel de machine in.
Everyday, no one can
www.nespresso.com/machine-assistance
Obsah Obsah
Technique specifikace / Technique specifikaciae 126
Obsah/Obsah126
System Rapid Cappuccino (RCS) System Rapid Cappuccino (R.C.S.)
29 Knoflik regulatör pemy Gomolk regulatörata peny
50 Viko nadobky na mielko
Veko nadobny na mielko
31 Ulozeni RCS Ulozenie systemu R.C.S.
Koncowa systemu RCS Kanektor systemu R.C.S.
53 Tlačitko na uvoñeni vika
Tlačidí na uvojenie veka
Koncowa pro vypust mleka
Konektor gre vypust mleka
Vypust mléka Vypust mléka
36 Saci trubicka na mleko Hadicka na privod mileka
57 Nadoba na mieko
Nadoba na mieko
58 Polohna "Odstraneni knofiku" Polohna "Odstranenie gombika"
59 Poloha "Pena" Poloha , Pena"
40 Polha "Cisten" Polha "Cisterie"
Napoje smlekem
KAPUCINO:
Kapucino je kava s mlekemPokryta silnou vrstyou mlecné peny.
Doporucene pomery:

Mnozstvi: 100 ml mlecné peny 40 ml kavy
Vyber kavy:
Kapsle pro ristretto nebo espreso
Vyber salku:
Salek na kapucino
Tipy:
Kvalita a vzhled mlecné peny mohou byt ovliveny druhem, cerstvosti a teplotou mleka (idealne uchovavaneho pri teplote 4^
CAFFÉ LATTE:
PnIroTOBNEHnE MoIOHbIX HAnITKOB 196
EeKeHbYxO198
PyHnA npMbIbKa CnCTembl Rapid Cappuccino 199
IporpammmpoBaHne o6bema 200
BoctaHOJIeHHe 3aOcknX Hactpoek o6bema 200
3aBODCKHe HacTpoKn 201
YdaneHn Hn 202
Hactpoika ypoBHa XeCTKocTn BODbl 204
Onopoxhenne cntemb npoctoem, n3aunb ot 3amep3ann nepe npoeenme pmohta 205
HamaHeHnHaCTpoek ABOBbIKIOeHH 206
YcTpaHHe HncnpaBHOCTe 207
O6paTnTeCb B Nespresso 209
OrpaHHeHHra paHTn 209
ytnnnaia n oxpana okpykaioe cpdb 209
MepbI npedoctopoxkHOCTN


BHIMAHME/
PENJYNPKJEHME

ONACHO!
3JIeKTPPOOBOPUIOBAHME

OTKJIOHNTE
IOBPEXDEHHbI LHYP
TNTAHN

HE TIPVKACAMTECb
KIOBEPXHOCTM
KOTOPBEMOYT
HATPEBATbCBO BPEM
PABOTI WIMB INPOUECE
OCHNTKI KOFEMALLINHBI
OT HAKIMIN: TPYEKA DIA
YDAJEHNAHAKINVI
HOCIKIPOJDAUYMOJOKA
IIOJIb3yUtePyuKIN
PERYJNATOPbI.
ABHUMAHNE!
DAHHbIE MEPbl
ПЕДОCTОPOЖHOCTN
Y B J I Y O T C Y
HEOTbEMJIEMOJ YACTbIO
IIOCTABKII IPII5OPA.
BHIMATEJIbHO I3yHITE
IX IEPED IEPBbIM
IICIOJIb3OBAHnEM
IPNUEOPA. XPAHNTE
3TV NHΦOPMALIIO
BJIIEKOKOIOCTUYHOM MECTE.
iHHOPMAU:
3TOT 3HAK yKA3bIBAET
HA PEKOMEHJALIIN
PON KOPPEKTHOJ
EN BEE30PACHOIN
3KCNJLYATALUNIPNEOPA.
Koepemaunna
PepiHa3HaHeHa DJIa
PnTTOBJIeHn HAnNTKOB
B COOTBETCTBIM C DaHHbIM pyKOBOCTBOM.
3anpeaaetcnsnojb30BaT np6op He nO Ha3NaeHnIO.
- Hactoian npio6op
PnepHa3HaueH Dnla
3KcPnyaTaunTOJbKO B
3aKpbTOMIOMEeHm
HOPMaIbHbIX
TemnepaTyPhbIX YcNoBnax.
- He donyuckai Te nonadnna
Ha npnBop nprrmbix
COJIHeUHbIX JIyHei,
ДИNTeJIbHOrO Bo3dEiNCTBnIa
OpbI3 BGbI IN BJIaXHOCTN.
- Hactoian npibop
PpeHa3HaueH TOJIbKO JINDAOMaHIeHO INCIOJIb3OBAHH
Oh He npedHa3NaeH
INIOJIb3OBAHNA
NepcoHAnOMMaRa3INHOB
B30HE KUxHn, BOΦuCax
nDpynxpa0oynx
NOMEUHIX,TOCTIMN
OTeJIeM,MOTeJIeN I npOuHx
BUNOBTOCTINHNUHBIX
PpeDnprnTm.
3aPpeuaeTc3aKpbIbAtb
PnBop B WkaDy BO Bpemr
NCIOJB30BAHNA
ДанныnpиборMoryT
NCN0lb3OBaTb(NO
PnICMOTPOM B3POCJIbIX)
TeTN,IOCTTUNNE8NET
NCTapse,ecn OHN
IpnOHCTpyKtIpObaHbI
OTHOCHTeJIbHO 6e3OJaCHOrO
NCIOJIb3OBAHIMNOC03HaHT
OnachOCTb HnPaBnJIbHOI
3KcnpnyatauIN.K
yXoY3a npn6opom n
EROOBCJyKIMBAHNO He
DonyyckaiOTcI DeTmMnaIaWe
8 JeT. TeTn CTapSe BocbMn
JIETMOYTIOJb30BAtbCRA
PnibOpOMToIbKOIO
PnIcMOTpOM B3pOcJIbIX.
XpaHnTe npBOp n erO shHyp
B MECTe, HeIOCTYINHOM IJIa
TeMJaIe 8 JET.
-Даньи npi6op M
NCIOJIb3OBaTbCJIIMUaM
C O T P A H N U E H H B I M
H3UHECKKIMN,CEHCOPHBIMN
JNJYMCTBEHHbIM
CIOOCHOCTAMNUN
JILUAMCOTCYTCTBNIEM
ONbTaI3HaHm,ecn
OHINPOINHCTpyKTNPOBaHbI
OTHOCITJIbHO 6e3OIIaCHOrO
NCIOJIb3OBAHnI NOC03HaIOT
Onachocb HenpaBnIbHON 3KcNlyaTaUIN.
-ДETRAMZAPPEUHNOIRpaTB C YCTPOIYCTBOM.
ПОНЗВОДNTIEL He HecET OTBETCTBEHHOCTN,I DeINCTBVE rapaHTIN He paacnpocTpaHЯETcB Cclyae NOBpeKJdeH,BO3HNKUHX B pe3YJIbTaTE KOMMEpueCKOro INCNoJIb3OBaHnI np6Oba,HEnpaBnIBHOrO INCNoJIb3OBaHnI np6Oba IINI NCNoJIb3OBaHnI np6Oba He No Ha3HaueHIO,a TaKKe HEnpoPeCCNOHaJIbHOrO pEmONTa NII HECoJIbIOdEHnI HACTOJaEi INHCTpyKlUN.
I36eAITE pncOB, CB3aHHbIX C nopaxHeHnEM 3JKeKTPnueCKnM TOKOM IN BO3rOpahnEM.
Плп BO3нКНOBЕнОпаCHOCTи HemeДLEHNOИЗВLEKITE BUNKy UHypa
IITaHmN I3 pO3ETKn.
BkIIOuAte np60p TOIbKO B IOJXoJMyU NJIeKoIOcTOyHyo 3JIeKToPueCKyO pO3eTKy C 3a3EmJeHem. Y6eNTecb, 7TO HApRjKeHne B cETN COOTBeTCTByET HApRjKeHIO np60pa, yKa3aHHOMy Ha nacnOpTHo TabInuKe. Pn HePpABINbHom IODKIIIOUeHm np60pa K cETn rapaHTn aHHynpyetc.
- ECN TIN BUNIKI OTNIUaETCOT TINa PO3eTKI, MOXHONCIOJIb3OBA Tb NEPEXOJHCKoKTAKTOM 3a3emJIeHnI.
PnBOp MOxHO NOKJIOUaTb K CETN TOJBKO IOCJIe YCTAHOBKn.
He npotraBaIte uHyp B HENOCpeCTBeHHoB 6JIN3OCTN OT OCTpbIX yrIOB. 3akpenITE erO TaK, YTO6bI OH He CBNCaJI BHIN3.
- He donyckaite harpebaHn
UHypa NIN NonaanHa HrO BlaIgN.
Bcnyae noBpeKdHnna Hypa NIN BILIKo 6paTNTecb K npO3BOJNTeIO, CepBCHOMy aHTy NIN DpyIM KBaINΦUpOBaHHbIM JIuCaM IIN IX 3aMeHbl.
3anpeuaeTc
3KcnnyaTnpoBaTb npBop
C NOBpexDeHHbIM UHypom
nIN BnIKoI, a TaKke B
Clyuae HeNCnPabHocTn
nIN KAKOro-JIO
NOBpexDeHn. BepHnte
npBOp B 6JnxKaUshn
ABTOPN3OBaHHbI
CEPBCHbI CEHTP JnA
OCMOTpa, pEmOHTa nIN
HaCTPOkN.
- EcnI IJIa IIOKIIHcEHn Tpe6yETcYdINHITeJIb, INCIOJIb3yIte TOJIbKO 3a3EmJIeHHbYdINIHNITeJIb C NIOUaIbKO NOpeuHOrO CEHENI PPOBOHNIKOB
He Mehee 1,5 MM²
JINU YDINHINTEJIb,
COOTBETCTBYIOLIM BXOHOH
MOUHOCTN.
Bo n36eKanHe IOBpeXdHnHE CTaBbTe npibop Ha ropyHe IOBepxHOCTn INN B6IN3n TaKOBbIX, HApnpMep, Ha paIaNATOpbl, PJIITbl, Ra3OBbIE ropeJIKn, B6IN3N OTKpbIToro ORHn np.
Bcerda CTabte npmbop Ha pOBHbIE ROpN3OHTaJIbHbIE yCTOuHBbIE NOBepxHOCTn. IOBepxHOCTb DOJXHa 6bITb CTOKoK HArpeBaHIO N XIKKOCTM, TAKIM KAK BOda, KOFe, CpeIcTBO OT HAKINI IN Dp.
- OTKIIOUaJIte npINbOp OT CETN B Clyuae IINTEJbHOrO 6e3JeIcTBn. PpN OTKIOUChENI npINbOpa OT CETN, IN3BJIeKa BNIky IN3 PO3ETKn, He TAnHTe 3a npOBoD BO IN36eKaHne erO NOBpeXdEHn.
- OTeOeINHInTe np6Op OT cTeI3NeKTPoNITaHnI nepeq uCTKO, nIeEOn OH He IcNoJIb3yETc. JaTe np6Opoy octbTb, npexJe yEm UCTaHaBnBaTb Ha Hero DeTaII INI CHIMAtb IX, a TaKepeq uCTKO.
-ObraTeIbHO Chauana NODKIOUaJIe TShyP NTaHnK PnIBOpy,a 3aTEM-B po3ETKy.HTo6bl n3BJeCy shHyp NTaHnN i3 po3ETKn, CHaJaN aOCTaHOBnTE npiroTOBLeHHe, yCTaHOBnTE BCE perJyTAToPbI B noLoXKeHne OFF (BbIKn.) n N3BLeKeITe BNkky ShHypa n3 po3ETKn.
3aPpeaaetcnpkacaTbcMOKpbIMpykamKUnHpyINBUNKE NITAHNA.
-Bo n36eKanHe noXapa, nopaKeHnI 3JIeKTPuYeCKIM TOKOM n TpaBMIpOBAHnI He norgyKaIte IHyp IIN BUNKy B BodY nIIN JIObYIO dpyrJyO KJNDKOCTb.
3anpeucaetcnopykaTb npibopnIINeroactNB BOyNIIJIIO6yIO DpyryIO KNDKOCTB.
3aippeuaetcMbItb npibopnnIero yactn,3a ncklouehem CNTEmbl Rapid Cappuccino,B nocydomoeuHOn MaunHe.
B3aIMoJcIeCTBVe BObI N TOKa ONaCHO N MOKET npVBecTI K JIeTaJIbHOMy ICXOdy BCJeCTBVe NOPaXeHnE 3JIeKTPnueCKM TOKOM.
3aippeaaetc BckpbBatb np6op.Bhytpn onachoe HanpjkHe!
He BCTaBnIte NOCTOpOHnIe npEdMeTb I OTBepCTnI pN6Opa. 3TO MOKET nPnBeCTn K nopaxKeHIO 3JekTpncECKIM TOKOM NJIu BO3rOpaHnIO!
IcnoJIb3OBAHHe IOnIOJIHITeJIbHbIX npHnAdJnxKHOCTei, He peKOMeHNoBaHHbIX
PON3BOIDTEJIEM,MOKET PnVBECTN K NOXkapy, NOPaXKeHIO 3JIeKTPuYeCKIM TOKOM INIIT PpaBMIpOBaHIO IIODeI.
I36eaiTe BO3MOXhBIX TpaBM npu NcPONb3OBaHIM npibopa.
He octablannte npnbop 6e3 npncmOTpa BO Bpemra paobTbI.
He nCnoJb3yIte np6Op, ecn OH nobpeKdH, HnpabInbHo pa6OtaeT nn NocTe TOR, KaK OH yanHa noi. HemeJeHOn OTcoEHHnte np6Op OT cTeN 3JIeKTPoNTaHn. Obpatntecb B Nespresso nn KynOJIHOMOeHHOMy npedCTaBtEnIO Nespresso Ira OcEHKn, pEmOHTa nn peRyIINPOBKn.
3KcnnyataunnIOBpeKeHHO rnp6opa MoKeT npNBecTN K nopaxKeHHO 3JIeKTPnueckIM
TOKOM, OKOGRAM IV B03rpaHIO.
BcerdaIO KOHua ONyckaIte pyuKy HNkoRda He NOHMaiTe ee BO Bpemra pa60tbl. 3TO MOKET npINBeCTN K OwInapnBaHIO.
He noctabnne naibcnpndncncep Koe BO n36eKaHne OwnapnBaHn.
- NOBepxHocTb
HaRpeBaTeIbHOrO 3JIeMeHTa
OCTaETCra TOpRAeN IOcJIe
ICNoIb3OBAHnA, a BHeUHnA
NOBepxHocTb npi6Opa
MOKeT COXpaHrTb TeIIO
B TeUeHnE HeCKoJIbKnx
MnHyT, B 3aBNCIMOCTN
OT IPOIoJLKnITeIbHOCTn
3KcPnyTaTuIN.
He nomeuai Te naIbU BOTcK DnKancyI. 3TO MOxET PnBecTn K TpaBMam!
He npikacaiTecb K NOBepxHOCTM,
KOTOpbIE MOryT HArpeBaTbcra BO BpempaObIuINB IPOUcEe OChCTKn KOfemaunHbI OT HaknPi: Tpy6ka dny ydaJeHnHaKnPi N Hocnk NoaM MoIoka. NcNoJIb3yIte pyuKNI IN peryJrTOpbI.
- EcIn 3aIporpaMMNPOBaHHbI o6bEm KoFe 60JIbIe 150 mI, daIte KoFemaHHe OCTbITb He MeHee 5 MNHyT nepei nprirotOBLeHnem CJeDyUoSei qAShKn KoFe. Pnck neperpeBa cnCTembl!
Boda moKet npoteb BOKpyr KaNCyIb, He npOTKHyToI Je3BnA MIn, INOBpeNtB np6Op.
HaCToTeJIbHO HepeKOMeHnyETcNcNoJIb3OBAtBOTpa6oTaHHie,IOBpeXdEHhIE NINDeΦopMnPoBaHHbIe KaNCyJIbl.
Bcnyae 3actpebaHnKaNCyIb I BOTCEKe DnKaNCyI BblKIOUHTeKOΦeMaunHy NOTcoEINHTe ee OTcETN, PpexKe YemPpeiPnHMaTbKaKHe-JIn6o DeICTBn.Obpatntecb B Nespressonn KOpuHaJIbHomNy npedctabNTeIoo Nespresso
3aOpHnItepe3epByap DnBBOBtTOJIbKO UCTOJ
NITbEBOI BOIOI.
- Ecnn nIaanpyetcnaIteNbHoe Bpemn HeNCIOJIb3OBAb KoPemaunHy (HaNPmep, BO BpemnOTnycka nT. d.), BblneTe BODy n3 pe3epByapa.
3aMeHnTe BovyB pe3epByape Ha CBexkyo, ecIn npio6op He nCIOJIb3OBAJcR B TeueHne HECKOJIbKINx INHeI.
He nCnoJb3yIte npio6op 6e3 noDIOHa n peWetKn, YTO6bI He DoIpyCTnTb nonaHaHn XnIKoCTe Ha OKpyXaUcne NOBepxHOCTN.
MaHnHa He paccuTanaHa ha pa6oTy c Henaactepn3OBaHHbIM
MOJIOKOM.
He nCnoJIb3yIte arpeccnBhbie NCTaIe CpeIcTBa IIN paCTbOpITeJIN. TIOBepxHOCTb KoFemaHbI HeO6XoIMO OCHUaTb TKaHbK,CMOueHHoB B MmKOM YnCTAIZem CpeIcTBe.
-Дя OчNTKI KoFemaUNHbI INCNoJIb3yIte TOnIbKO YIcTbIE INHCTpymENTbl.
IocJe N3BJeHnKoFemaunHbN3 yNaKOBKnCHIMITE C Hee IJIeHky UytINm3npyTe ee.
JaHHa KoFemaunHa pa3pa6oTaHa CneuaJbHo Jn KaCyJ Nespresso, KOTOpbie MoXHO npNoBpectn
Nespresso yu ynoHOMOeHHoro npctabntera Nespresso.
Bce npnbopb Nespresso npoxoJrT cTporn KOHTpOB KaueCTBa. IJIpaON3BOJbHO BbipaHHbIX npnbopOB npobOJaTcNcblTaHnHa HaJeXHoCTb BpeJbHbIX ycIOBnX 3KcnIpyaTuIN. IOnToMy Ha HeKOToPbIX MaunHax MOy OCTaTbcra CJeDbI pPeDyUeRO NCNOJb3OBAHn.
Nespresso OCTaBnIeT 3a co6o npaBO Ha BHeceHne n3MeHEnB pyKOBODCTBO 6e3 npEbnapntelbHoro yBeDOMJIeHnI.
YdaneHne Hakinn
CpeIcTBoIpyydaJIeHnHaKINN Nespresso,PIu erO npaBnIbHOMNCNOLb3OBaHnN,
rapaHTnpyETbe30Tk3HyIO pa6Oy KoFemaunHbI BTeueHne BcEro Cpoka CnyXbI NHeN3MeHNO npEBOxCoNDhBkyc KoFe.
OuHuaTe KoFemaunHy OT HAKINB COOTBETCTBUN CpeKOMHaIaIIMN, PnIBeHeHHbIMN B pyKOBOCTBe NOJIb3OBaTeJIa KoFemaunHbI Nn Ha caIte Nespresso: www. nespresso.com/machinemaintenance
BHIMAHNE!XNIOKCTb IYDAJIENI
HAKINMOKETbItb
ONACHA.N3BETYNE
IIOADAHJXIKKOCTN
BTLA3A,HAKOXYI
JIIOBIE NOBEPXHOCTN.
NCPOJIb3OBAHIE
HEIODXOJLIETO
CPECDTBA JIA
UYDAJEHNI HAKIN
MOKETIPNBECTN K
IOBPEKDEHNIQDETAJIEN
KOΦEMALIINHbI NJINHE9ΦEKTINBHOMY
YDALEHNIHO HAKINI. IPNI BO3HNIKHOBEHNI
IOnOJIHnTEJIbHbIX BOITPOCOB IO
YDALEHNIHO HAKINI
O5PATNTECb B NESPRESSO.
COXPAHNTE DAHHOE PYKOBOJCTBO
IpepaTe pyKOBOCTBO CJeYIOSeMy IOJIb3OBATEJIIO. IaHHoe pKOBODCTBO
docTyHOBΦopMaTe PDF hcaite nespresso.com
CoedepeKIMoe ynaKOBKn
Kofoemaunna
PykoBOOCTBO NJIb3OBATEIa

Ha6op kancyn
4 BykntT DOpno NoXanOBaTB

5 Nespresso
1HnDkAtpKcctKocInB0dy(BHytpnykoBOCTBaNoIb30BaTeJ)
Gran Lattissima/
KJIACCHNECKM BKYC 3CPIPECCO
HacnepntecpncOaHbI apomATcONPCCo CMOKOC mN 63C CNTTEMOS Nespresso Original He NOHOBACTHOE BPEMeHN BOIOUeHE NtAIBRHCKX TpaHINI pNOTOBENHKOe, OCTyCNHOBCEOO OHM HAXATEM XHCNOH.
KoPemauHbN KcanyBn Nespresso Original -3TO ueaR rama Apomatob KoFe H na60B BvC. Ocnpecco mnn lyHro, YepHb nn peueyTpyHb. BCeRa C uAnko N3 MFKK nI cTOnKoK pKemOBn IooKn. Bc 3TO 5nAorap daBleHno 19 6ap B KaqdoMaunHe. POn DaJIeHNEM apOMAT N3BNEKaETCR N3 KAcYbI,HTo6bI packpblch B 4aWke KoFe.
Nespresso Original - 3TO KnaCnKa B yHnKaIbHOM BONIOueHM.
BHIMAHHE! 3TOT 3HAK YKA3bIBAET HA HEOBXODIMOCTb CO6JIIODEHnRA YKA3AHHBIX B PYKOBODTBE IOpIb3OBATEJME MEP IPEIOCTOPOXHOCTN BO N3BEXKAHNE BO3MOXHBIX TPABM INIOBPEKDEHIN.
MHOPMALJRA.3T0T3Hak ykaSbBaet H peKOMeHaLIMIIO KOppeKTHO 6eOtonaCHOE KcTIyataUIMKOPOMAHMBI.
0630p

063op MaUINHbI
A KofemalunHa 6e3 CNTEmbl
6 Rapid Cappuccino
1 Peeppeyap nB0d1(1,0n)
Pyka
OTcK nI Kancyn
4 Dcepua KaIyHHaTopa
KanyuHaTOp
6 DmncncepKoep
Kopnyc kannecbopnka
KoTHHeHepJINIICNTOB30BaHHbIXKANCyI
9 Pndon
10 PeWetka nna TaueeK
11 Ncctabka nna Hauueek
12 PoWetka nHaWeK
13 Kanne6bopnK
14OTcKnXpAeHnTpykKnIyDaeHnHaKn
15 Tpy6ka ydaJIeHIMHaKIM
KpbuKa Tpy6n Dya ydaenHn HAKINN
YBeIDOMJIeHnIa
17 DESCALING Heo6xOmy yanaTb HAKINb,cm.pa3en "yanaHHe HAKIN"
18 CLEAN #pe6yetcnpmbikc,cm,pa3d#n
KhoNknoDauHnAHTKOB
19 KhoNka BKNIOUeyHnna (IOTpe6BHeMa MOUHOCTb E peKIMe OxJDAHn0,22Br)
20 110m
21 Scnpecco 40 MN
2PcTpeTTO 25M
23 KanyuHIO
24 Kode monokom
25 Kope naTte
26TopHeeMOJOKO
7 NATTE MAKVATO
28 Topnna nha
97 PeepByap nna Monoka
38 PnOJXeHHeN 一 _ 日 peryIyIITop
910noxehne“Peha
10 NpOJKeHHe PpOmbIbKa

MolouhbieHaNTKIN

KANYUHHO:
KanyuHNO xapakTeep3yETc
MOLOUHbIM BkycOM KoPe C
TOONHHROM N3 TOJCTORO CNoR
MOLOUHOH PeHbI.
PekomehnyeMbIe nponopnIM:
KoIyueCTBO:
100MIMMOOCHIOHb40MKOe
BbI6op KoΦe:
Kanycyana pncptpTo nn 3cnpecco
BbIbOp yaIkn:
UaškaДЯпКануЧИно
Cobetbl:
Ha KaeeCTBO IN BND MOOnHNO
Nehb MoKcET BnAeTb TIN, CBExKeCTb N Tempepatya
MOLOKa (PEKOMEnyEma
TemepaTypa coctabJeT 4 ^ C)
KOΦEJIATTE:
KoPe JatTe -3To KoPe c 60JIbIIMM KOJIuHcTBM Oropaero n CnErKa B36ntoro MOJOKa.
PekomeHdyemIe nponopuM:
KoJInueCTBO:
110 mI KOpe
140 MIMMOJOKA
60MIMONOCHNOHbI
BbI6op kOe:
Kancyla Lyhro
BbIbOp yaIkn:
PeuTpyhB CTaKaH
Cobetbl:
ToIuHa CIOB B3bntoro MOJOKa DOJXHa COCTABnTb OKoNo 1 cm.ObHNO NMeET KOpUHeBaTbI QBET,6NIXeK UBeTy KoPe.
JIATTE MAKIATO:
JaTte MaKaHato -3To peCenTpya, npN KOtOpO KoPe HAnBaETcra B CTaKaH, NOHbIMoJOKa. XapaKTEPHeIe CepTb - 3CnOa MoJOUHO-KoPeHIO NeHbI.
PekomehnyeMbIe nponopuim:
KoJIINHcETBO:
140 Mm MoJoka
140 Mm MONOHOH NHeB 40Mn Kcpe
Bb6op Ko6e:
Kancypa pucptpTO 3cnpecco
Bb6op qawkn:
PeueTpyHbI CTaKaH
CoBeTb:
HaKaueCTBO IN BNDMOJIOHON
NEHbIMOKeT BINrTaTN,
CBeKcTeB N TEMpePaTypa
MOJOKa (PEKOMEHyEmar
TEMepaTypo coCTabnre4 ^ C
KOΦE C MOJIOKOM:
KoPe C MOJOKOM 3TO 3cnpceco C60JIbUIMM KOINHECTBOM TOpAero N CJERKA B36NTORO MOnoka.
PekomeHnyeMbIe nponopunn
KoJInueCTBO:
40 mI koe
100 Mm MoJoka
Bb6op Ko6e:
Kancyana 3cnpecco nnnpctpeTTO
Bb6op qaikn
Haika KaIyHnO
Cobetbl:
ToIyHc CIOB B3bnto MOIoka DOJHKa COCTABTb OKOIO NOOBINbI caHTIMetpa. PHeKa ObIHyN IMeET KOpUHeBaTb ICBt, 6nKxK CByTeY KoPe, 6oee XmKar N bIeCTaA, C OHbMeKNMnIy3bIpKaAMn.
IepBoe nCNoJb3OBaHne IJI NcNoJb3OBaHne NOcJe dIInTeJb- HOrO npocToT
BHIMAHNE!B INEPBYIO OUEPEbO3HAKOMbTECb C MEPAMN INPEIOCTOPOXHOCTN BO 135EXKAHE PUCKA IOPAXEHHJ 3JEKTPnueCKHM TOKOM NIN BO3TOPAHNIA.
I PIPMEUHHE. YTOBb BIKIOHTB KOFEMAUHHY, HAXMITE KHOKBYKIOOHeH (NOTpeBnEma MOHOCCTB B pexmoe OxuaHa 0,22 BTH).
BHIMAHHE!IpeepBknoeHemKoepemaunHBbpoaTekyy6nTEcb,HTOB HeipncyTCTayETKoTAKT38cEMHIN.
Pacnakobbba KofemaunHy,CHMMTE IaTMcKOyIOIINHky N BbHbTepe3eByap DnBOBdNPODnHO KOHTHeOpDnKANCyI.
O Tpynypnye HnHcy cetBcFO UHpya,pa3MeCTIN HUcNOL3yEmIO HnHByOTCEKeIpy XPAHENHUYpONo KOPDEMAHNOH.
PpOMOIepeepByapDnBBOH HANIOHNITE EORCHTOI NITBEBOI BOOJDOMAKCMAMJIHOHOYPOBHNOJIKHOHTe KcETH.
BKnIOHHTe KOpMaunHy KHONK BKNIOHCHN INIIEPOXOaBpEKMM OKnDAHNN. NINKAtopbMIRATOT (KHONK NOAHN KOpE):pa30rpeB (25c).NINKAtopbRopT: KOPeMAUHA RTOBA.
POMbBA: NOCTaBte cocyD (HE BXOJNT B KOMNTEKT NOCTABK)NOI DACIECEP KoNE HAKMTTE KHONKY (YHBOBPTOPNE OPEAPUKO TPO p3a.
Bce KOFMaUNHb npoxoT KOMNKeKCHyno npOBepky cpaay noocne npOABQCTBA. IIOaTomy BO3MOXHO NOBHeHE HeobJbTOKOINcHCTBa 1ACTNU Koepn pnpOMBaHHN KOFMaUNHb nepeI npBbIM NcNOBtOBaHNMe.Pa3CpHte CNTemy Rapid Cappuccino nONOIe BCE 6 HAcTeB B NoCyDmOeHHO MAuHHe Ha BEpxHnNoKHe.Ecmy bACet HnocDyMoEHO MAuHnHb, oBpaITeB K pa3dJePy-Hra npOMBkacCTMByRapid Cappuccino, Pocne cbopkiu yctahOBKn R.C.S.Ha MaunHy, 3anyCTTE FyHKnIO TPOMbKA) nped npriOTOBnEHm MOOnHOrO HanNTka (CM. CTpanHa201).
Cm. paanen «C6pka-pa36pka CmTeMbi Rapid Cappuccino» Ha ctpaanu 195.
RrPnroTOBJIeHne KoOe
I IINMEYAHME. BO BPEMRA3OTPEBA KOFEMALIMHbIOXHO HAKATB JIO6yIO N3 KHOITOK PINTOTOBHEHRSKOFE. IOJDAKA KOFE HAHTCR ABTOMATINHECKNIPOCJIPE PA3OTPEBA.
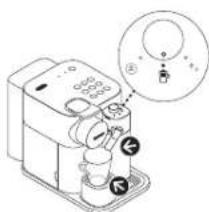
10nHocTbNO nDnHMmTe pyKy N BCTaBtE KAncyny.
Onyctte pyuKu nOoCTaBtE uauKy noD DnneHce Koepe.
Hakmte KHOJIKI),Rttnnnn espresso (HeproBneHne Kope 38eepntc AROTOMTHeckn.
110ml ⑦
40ml ① ③
25 ml
4T06bOCTAHOBHTb NOaHky KOpE paHbue HNPODOKHTb ee, HAXMMTE KHOKKy eue pa3. NoHHMMte NOryCTMe pyKcy, T06bO bocpNkBanKcNvB KOHTeHep DnNCNOB3OBaHHbIX KANCY.
C6opka-pa36opka cnCTembl Rapid Cappuccino

1 CHMNTe pe3epByap nIa MOIOKA C NMOUHBO KHONOK Ha 6CKOBbIX CTOPOHAX KOHTEINHepa. OTcoEINHTe Tpy6ky IaNoDAH MOnIOKA.
BHIMAHHE!PnC6pKe R.C.S. npabHbHO BCTABTe TpyKy DnI NOAHNMOJOKA,HTO6bl OHA He DBNTANBC.
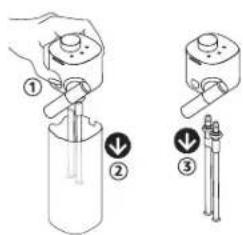
PoeBnHTe HOCNIOaH NMOIOKA BPTKNAIbHO IINr ERO OTOOeHNHeHHN INPcNOcDHNHOH
34NoBepHtE dmKcatop CNTembl Rapid Cappuccino do noaBneHHA 3haka OTKpbItb3AMOK" 1 CHMMTE ee.
IOBepHnTe peryIaTOp MOJcHOn NHeBbNIOJooMe HCHb peryIaTOp NCHIMTE erO.
RrPnroTOBJIeHHe MOJOhbIX HAnNTKOB
I JINPIMTOBNEHIN MDAHNOHMOHOH NHEBOHOIO HNOB3OBAbKOPOBBe 063KIPHHOE INN NOyOB3XHPENHO MOKOKN XONODHBHKA (TMEHPaTyPA DnKHa CoCTABnTB OKoN 4°C).MOHNA CNTEMA KOEMAUHHe npehnaHaeHa IIN NOCNIb3OBAHn pactTeHOrO MOKA.
HAnIOJIHInTepe3epByapIINMOJOKHe npeJeTMe MONO:co6HnOaITeOTmETKyMAX.3akpoiTepe3epByapIINMOJOKA

10nHOCTbIO NOHNMMHTe pyKy u BCTABBte kANCyIy. ONCYTNE PyKy. 3AkPoiTe peepaypnnMOJka NIOOcEaHInTE cnCTemy Rapid Cappuccino KoFemauHHpe. PasorpeB KoFemaunHb npocxOJIKOKO 15 ckyHd (HINDKATOPBI MRAKT).

Pamectte Haikny Ia KaynyHIO nCTaKaH IaIATTE MAKINTO NOI INCEHcEPO KOe. OTepyNpyTe NOLOKHeHO HOCKA NOAHHMOLOKA NO UENTpy HAIKN.NoBepHTte peryTrop MOONHOH NHBI B NOLOKHe HIOHa).
4 HaKMITE KHOIky, COOTBETCTBYKUyIO BbOpaHHOMY MOLOHOMY HANITKY. IOnoTHHTeJIbHyIO INOPCMALIO O KaKJDM N3 MOTOHbIX HANITKOB CM. HA CTpaHnla 196.
I PnroTOBHeHMe HAHHTcR Heep3 HeCKOJIbKO C8KyH, n 3aBepUIMTCr ABToMaTHHeCKN.

BHIMAHHE! HEB3RA NCIOLB3OBATb MOIOKO, KOTOPOE XPAHNIOCB BXIOJINHBHKE BOJEE 2-X INE. ECIN PE3EPBYAP IAN MOJOKA HAXOJNLCB HBE XOJIIOJIbHNA KOJIbJE 30 MHNUT, OTCOEDNHITE CNTTEMY Rapid Cappuccino INPOMOITE BCE EKOMTOHEHTBI (CM. PEKOMEHDAUIN IO ABTOMATNUECKO IN PUYHOIN POMMbIKE).
P No OKOHaHHn pnpTOBAnHm HnDnKATop (npOMBbKa)ropNT OPAHKBEBMb UEBOTM,yKa3bbBaHa Heo6xOIMMOCTb npOMBkCNCTeMbRapid Cappuccino.
6 PnOCTABbTE COCyI NOI DmCHeHcpe KoePe.
PnOBEPNHTE peryTAPoMOnHOH NEnBb I
NNoONKeHMe (POMBiBA).HaHTeTCr
PnOUEC nPoMbIKN MOJIOHOH CmCTEMbl,
B XOJe KOTOPOrIO H3OCMkA NOdAHN
MOJOKa BSyET bXIOuNTb TOpRNaH BOJa C
napOM.PnOUEC nPOMbIKN npeKpATNTCR
ABOTOMATHECKN.
PnDnHmMTEI ONyCTMEpyKy,YTO6bCpOcMTB KANCJYB KOHTHeHepIINNCIOJIb30BaHHbIX KANCJY.
No 3abepeHHm Ipocceca npomblk INHikatop HEOOxDAMOCN TPOMblk BbIKIOaETcB.BepHTe peryIaTBP Nnonokhen
Pn Hnnnn MOnoka B CnCTeMepRapid Cappuccino: OToCoaHInHe CnCTeMy Rapid Cappuccino oT KoPeMaunHbI n Cp3y Xe NmecHTte ee B xOIOJIMHbIK. 3akpoJIeDpuy kayTHATOPa.
EcmB R.C.S HET MOJOKA,IM60 ERO
HIOOCTATOHO JINI HOONEOYIOUX
npIROTOBENHN,IMNO pOLOU2 2DHTo
NEEPDJOINBOOMMOJOKAOTCCOENHITE
R.C.S INPOMOHTE BCE ee KOMPOHEHtB B
NOCYDOMOEHQN MAJIHHe HA BEPXEHNIOLKE
EcInyBAC HET NocYDMOEHQN MAJIHNbI,
OBaPITIEcK PAK3Dey "PyHnA pOMBkA
CNCTEMBr Rapid Cappuccino.
PVPMEHAHNE.CM.PA3DEI《CB50PKA-PA360PKACHTEMBI RAPID CAPPUCCINO
EKeHHeBHyIyXoI
He HcnoBbmye arpeccnBHy qHCTRAHm CpeCTBa mN pactBOpATEI. NOEpxHOCTb KOpemaunHb Hoo6xOIMMO OHHaTb YACTOYTKAHIO,CMOHHO B MRTKOM 1MCTAHEcm cpeCTBE. He MoHTe dtaan HcoFemauHb B NocyDmoEOHm MaUNHe, 3a NCKIOHcHEM KOMIOHEHOB CCHTEMb Rapid Cappuccino,NODOHa N KOHTeHepa Dn IncNoB3oBAHbHX KANCyn. Pepe NOMeueHEm KOMIOHETBa B NocyDmoEOHyMaUNHy y6eITTeCB TOM, YTO STO pa3peuHc (CM."Overview", ctp. 3)
1 PnHMMITE nOnyCTNEpyky, cyb6cpcNTbKANCyB KOHTHEHep DnI NcNtB30BaHbIX KANCyI. CHMMITE NOIOHO, KOHTHEHep DnI NcNtB30BaHbIX KANCYI, NOCTABK DY PAaek NKanIEc5OBpHKN. OnopXHnTE HxN npOMe. CHMMITE pe3epByap dnn Bdo. ONOpXHnTE nnpOMe erpepeTem, KaK 3aMThCBexyo NITbeByo Body.
IOCTABBeIpyCOnCocSyNDnDmNcHecP Kcpe HAXMNTeKHOKNy
PpOPTPIE DnCHePNKoPe HNOBepXHOCTbKOeMAUHbH CTOTN BNAKHO TKAHbO.
PyuHa npomblbKa cnCTembl Rapid Cappuccino

PekomehnyetcNcnoB30BaTb NocyDnOcEHyMaHINHy.Ho ECnnY BAC HET TAKOH Bo3MOxHOCTN.To BCE KOMNOHeHTb CnCTeMBi Rapid Cappuccino MOxHO npOMbTBn BpyHyo. DAnHyIO npOeDpy Heo6xOIMBO BInOINHTb NocNE KAKDOI NOB3OBAHNA.
Pa36epnte cmtmy Rapid Cappuccino. O3nakombTebc pa3denOM «C6pka- paa36opka cmtmy Rapid Cappuccino. TuaTeBHO CMOTI OCTaKMOJOKA rOPOHINITBEBOB BOO(40°C). YdaIHTE BCE BUNIMBLE 3aRpa3HeHHRA6KOJ.
3amOHTBE BcKOMNHOHTB BROPHEH NITBeBOI BOe (40^) BmCTE C MKTMMOKUHM cpeCTBOM MMIMMm HA 30 MNHY, 3ATOM TuaTeJIbHO IPOMOJEHX ROPHEH NITBeBOI BOOJ (40^) .He nIOIbSyIe MOUme cpeCTBa CnIbHoI OTdyuKOI.
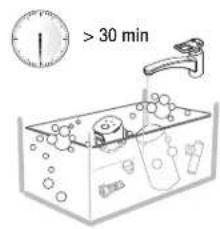
Pnptpyte BHTpeHHIO NOBepxHocTbepeepyapa DnRA MOKOKA,ФNKCaTOp HOCNKAnoaHMOKOKA INPERYNSTOP NOaHMOKOMARKMMOUUMCpeCTBOMNOLOCHHTeRPOHNIITBEBOBD(40°C)。Y6eINTcB,HTOBCDxyo3abopNHK NCT.3To 06ecneHTIeALHyIO neHY.He nCOnbEyIte abpaBnBHe MATEpMaJIbKOtOpBe MOrT NOpeDHTb NOBepxHocTbycTPOINCTBa
4IpoTPTHEHACYXBCE HACTNHCTbIM
NIOCTEHJEM,OTPESKOMTKAHNI
6yMaHHoANCpETKOHNCHOBACOePBTE.
B Cnhyae CNHORO 3aqrpeHNEHcIcTeMBiRapid Cappuccino BbNOONHTe Daa LkNA
IPOMBHKCNCTMEB,IOEPHyB peryjTOp
MOHOH NIOHBI B NOJOKHEV (Ipombyka).HaHHTcPOUeCC IpOMbIKM
MOHOH CNCTMEB,B XOJe KOTOPORIO
HOCKA NOJaMNOLOKA bEDT BxOJNDTb
ROPHA BOa c napm.
Ecn noce nckna npmbk B cncteme Rapid Cappuccino octanb 3arpaheHn, M peKomeHyem npno6pctn Hobyo ciCTemy. o6paTMBncB cepnchbl
RrPpamMnObaHne oBema
I IINMUEAHHE. O3HAKOMBTECB C HHPOMALMEIO MAKUMAJHBHX MHHMAJIbHbIX O5bEMAX BPA3DEJECYKA3AHMEM 3ABOJCKNX HACTPOEK.
10TcboBnBpeKMMI nporpaMMPOBAHn,HAKMTe yuepkBaHBeThe Me HeMee 3-X CekHyD KHOKNHYANTKA,KOTOpbTIpeSyETc 3anporpaMMPOBaTB.HAHETcBapKa KOPe,KHOTKa HAHET 6bCTPO MMRATb.
OTNYCTTE KHOHKY, KORDA JEAJIaEMbMbObEM 6yET DOCTMHT. ECHB PELENT BXoDIT DpyIe NHEPDEHINb, CHOBA HAKMMTE KHOHKYuYdpeKpEe EE HAKATOn Do DOCTKHeHJXeHMAEOrO OBObEMa 3aTEM OTNYCTTE. Nocne NOdaHnNcNEHrero HHPdeHNTa (CM.TabMbHu Ta ctp.201) KHOKNaMHET 3 p3a, NOdTBeKJaHOBb OBem HAnNTKa. BbSpaHHb OBem HANNTKa aTOMaTHeCKa3anOMHaTeCn4 CnEduKuHXnpnAroTOBHeHn.
BocstahOBJIeHne 3aOJcKnx HacTpoEk Osbema
BKKIOHTKOKDMALLH

PIMMEAHHE.CHMMITEpe3epByap DIA MOJOKA.

1IINBIXOJBA MEHO OIOHOBPEMEHHO HAXKMITE KHOKNI (not milk) HAIJIHXJBAIIE XIX HAKATMBI HEMTEHE-3-CKHYD HAHTYMMFATN INIKAICATOPBIPOMBIKN YUDAENHIHAKINI.
IPVMEAHHE.BbIXOJN3 MEHIO BbIIOJIHRETCR ABTOMATMECKN YEPE3 30 CEKHYD, E63JECTBIVA. TAKKE N3 MEHO MOXHO BbITN, OJHOBPMEHIO HAKAB UYEPKBAIB HAKATBMI BTEHEHNE 3-X CEKYHD KHONIK)hit(). flat white
HAXMMTE KHOITKY);flot white OHAI HAIHT MIRATb.


HAKMITE KONKY)roHaBCTPO MHTET 3 paa, noTBePckdABBOCTAHOBILHEObEMAIO 3a0oCIX HACPTPOK
3aBoDcKne HaCTpoiKn

BHIMAHHE! ECJIN 3APPOI PAMMIOBAHHbI OsbEM KOPE IPEBblAET 150 MJI,DAITE KOΦEMALUHNE OCTbITb HE MEHEE 5 MINHT IPEED IPIIOTOBIEHnEM CJIeDyIOLUeYALUKN KOΦE. PNCK IPEEPBECA CNTTEMbl!
PeueNTbI (CTaHapTHbIe 0bbembl) /
| Р ecent | Ингеляnteblу по- слесователноctь разыtmаминь | Оьем (MЛ) |
| lungo | Кофe 110 | |
| espresso | Кофe 40 | |
| ristrotto | Кофe 25 |
4 Bo3bMTE Tpy6ky dny ydaneHn HAKIN, pACIOJIOXeHHyHO HA 3aDHeN MaHEI KQePEMaUHbI, N BCTABTe EE B KanyuHaTOp. YCTANOBITE peepbyap dny BOBt Ha MeCTo.

KoPdemaHnHa npcknoaetcB pexmYdaJIeHn HAKIN. NIDNkATOp ydaJIeHnHAKIN MMaET OPAHKeBbIM LEBOTM HAnpotXeHN BcERO npouEcca.KHOJKAHAHTKAA KoeC MoNOKOM CEBNTTCB EJIbIMLEBOTM.
(RO)
0nDCTabBTE COcY OobEMOM He MeHee 1 NnOa DnCNEHCEP KoeE HOCIK Tpy6Kn IydaNHeHNAHAKIN.
Hakmte KhoNky (flat white). CpeCTBO nIy daneHn HAKINI NOpEPEMENHO npoxoJNT Hepe3 nCnEHEcP KoPe, TpyKny dYdAeHNHe HAKININ NODIOH. No 3abepeHn UKNa YdaENHn HAKINN (N3 p3eepbpa crnBaetcB Oda) 3aropaeTc KHONKa BbOpa "KoPe c MoJOKOM"

OnopokHNTE KOHTeHnep DnI NCIOJIbTOBAHbIX KANCYI N NOIDOH,NOCTABKy DNIAWIEK IN KAITIOC6OOPHN, TUIATJIbHO ONIOCHNTE IN HANOINHE PE3cPbAYp DII BODbl CBXKeIN NTJBeBOI BOOJ DO MAKCMMAHbCHO yPOBHI.
CHOBAHAKMMTEKHONKY HACHOHCTKN PNOONKTCA,INBDAPOINETpeepdncnHcpeKoPe, TpybcknyIydaHANHAKNNNNODPNOKa pe3epbyap IINBOBHe6ydtTcyt.


No 3aBepueHm npoecca npombIK MauHHa BblIOHcTc. CHMMTE TpyOy dnnI yaneHn HAKIN, DEpXacb 3a pyKHN INI peryTOBPI, n NOMCTITE ee Ha xpaHHe. ONOpoxHnTE NOdoH N KOHTeHep Dn I mCNoIb3OBaHbIX KANCn. HanOnHtE pe3epByap nIra BoN CBexKn NITbEOB BOO:
PpOPTPOTE MaUNHy BnAXHOI TKAHBO. YdaJIeHMe HAKINN 3aBepueHo.
IPEUYIPEXJHEIE Tpy6ka nla ydanenHn HArpeBaETcBO BpempaOToB.BoN36ekAnHe OKOIOB NIOJIb3yIe pyKmnnpeYJITOpbl.

HactpoJa ypoBna JkeCTKocTn BoDbl
OnyCTNE HINKATOP XECTKCTN BOBpaacnoJKeHHbHa NEBOH CTpAHue HnCTpyKuHN NO OKnJnyAaUN, BBOY HA 1 cekHy.
UPOBHeH XECTKCTN BOJI COCTBTCTBYET KOJIVHECTBy KPACHBX KDApATNIKOB.
BknoHte KcpeMaunHy.
I NPMHEAHHE CHIMITEpe3epbpyap 101 MOJOKA.
4 BxOBA MEHO OHOBPOHNO HAKMITE KHONK () flat white N yepkmairenx HaxatbIMN B TceHne 3-x cekynd. HauhyT MnAtb INHkKatOpB I POMbIKN N ydaehna HAKNN
HakMTe KHONKy (coppuccino).

KoJIHcCTBO KpaCHbIX KBaAPATIKOB yKa3bBaET Ha TO, KAKYIO KHOTKY CnEDyET HAXKaTb (CM. TaBNIUY HNKe). B TeeyHNE 30 cekHy MOXHO 3aTaTb Tpe6yEmoe 3HAeHNe HxKATBM COOTBETBYOUEN KHONIK. NIMKATOpB b6IcTO pMnTH 3paa. 4TO6BI IOITBePmITb HOOE 3HAeHne. BbxOJ N3 MCHIO BINOTNHETCR ABOTMATHOCKn, MAUIMBA OBCBpaAaETCB PEXIM FOTBOHOCTN K NCNOJIb3COBAHIO.
IPVIMEYAHHE.BbXoN3 MeHO BbINONHRETCABTOMATNECKHep30 C6eHyDbe3JeCTBn. 406blBbTN BPyHIO,ODHOBPcEMHO HAKMNTU yNDKBAHTHE HAKATbMI BTECHME3-X C6eHyD KHONIK (m)Hot . flat white
| уравень жостков Вор di | Конь | fH | dH | CaCO3 |
| hot foam | <5 | <3 | <50 Mr/n | |
| latte macchiato | >7 | >4 | >70 Mr/n | |
| cappuccino | >13 | >7 | >130 Mr/n | |
| hot milk | >25 | >14 | >250 Mr/n | |
| caffè latte | >38 | >21 | >380 Mr/n |
OnopoxHeHne cncTeMbI nepei npocToeM, IJIa 3aunTbI OT 3a-Mep3aHnI nn nepei npoBeHnem peMOHTa
Hakmtte KhoNky 100000BepxDHeHn. Iocne HAKATIN HAHTETOIOPOXHEHn.Bce HAKATOPBI MAMOT OHOpePeI:IdTIOPOCCOIOPOXHEHn 3aBcPUEHMI POUCCCA KODEMAAHn BbIKKQAeTcABOTMAITHECN.
I PIPMEAHHE, NOCJE ONOPOXKHEHRA KOPEMAUHA BbIKHOHAETCR IPIPMEPHO YEPE3 10 MHyT.
BHIMMAHIEI PIPXPAHEHMMALINHB I XOJIOJDHOM NOMEELIEHINBO3MOKHO SAMEP3AHME IN KAK CJEINTCTBNE, TIOBPEKDEHME BOJRAHOKOHTYPA, YTO PPMBEDT KIPOTEKAM.
U N3MeHeHne HAcTpoEaBTOBbIKJIOueHnA
AHHH KcpeMaunna Ochaueta 3epkntmbno CnctemOn 3heproocbepehna, a ToKae ykuue ATOBbIKoueHn (0 B), KOtOpaa nO3bONrT 3KOHOMT bneKtpo3HeprnIO. B COOTBETCTBN C 3aBOckm Hactpomam npbop BbIKNoaetcpe9 MHyT Be3deIeCTBn.
Bknquyte kopemaullny.
I PUMMEAHHE CHIMMTEpeepyap 1MOJOKA.

2I BxOaB M HeIO COnHOBpeMeHHIO HAKKMTE KHONK (hot () yNcKHeAeTe MX HAKATbIMN B TeEHHE 3-XekyH,HaHyT MAto HINKAToPbI POMBIKN I ydaeneHn HAKNN.
IIPVMEUAHNE.BxOIN3MeHO BbNOHRETCABTOMATNHECKN HEPB330CEKHyD6E3DECTBn.HTo5BbBbTN BPyHyIO.OHOBPOMEHHO HAKMITEuYNEPRKMBaTeHAKATbIMB TBeHeHMe 3-X CEkyHKn KOHN (J)ot white
HAXMMTE (r)streto

B TceHHe 30 CCKHyIO MOXHO IMAHmHTI IapAMETpbl ABOBkiKIOHcHn H3aDAtb TpeSyEme 3HAeHHe C NOMOJIbCOOTBETCTBYOUJeu KNOHKn CM, NOpOBoHCTN B TaBNIJE. VHdkaTOpbl B6tPO MmHyr 3 paa, YTObI NOTpBepNTb HOBOE 3HueHHe. BxOJ IN MEHO BInONHReTCB AOBMATUHECKM, MAuINHa BOBpaAuaCTCR B pckHM IOTOBHCTN KNCIOJIbBOBAHnC.
ABTOBbIKIOHHeHH
ristretto
9 MHHVT
espresso
→30MHHYT
lungo
84coB
YcTpaHHeHHeNcnpaBHOCTeI

| He roрат Иndикаторы. | -Проблема розук, влку, наразраиме иPreposхаимь. Ппр ВОЗнКИБЕМпproбам obразайсяВ Nespressо. |
| Het podачи КODE, Het podачи BODI. | -Рezерberгдя Ддь Вдьпс.Наллгпспгпспгпспгпспгпспгпспгпспгпспгпспгпспгпспгпспгпспгпспгпспгпспгпспгпспгпспгпспгпспгпспгпспгпспгпспгпс? -Очирпгпспгпспгпспгпспгпспгпспгпспгпспгпспгпспгпспгпспгпспгпспгпспгпспгпспгпспгпспгпспгпспгпспгпспгпспгпc |
| Kode bityeKaatr Chahb McdInHNo. | -Сокорьгпгпспгпспгпспгпспгпспгпспгпспгпспгпспg. -Очирпгпспгпспгпспg. -Сокорьгпгпспгпспg. -Очирпгпспg. -Сокорьгпg. -Очирпg. -Сокорьg. -Очирпg. -Сокорьg. -Очирпg. -Сокорьg. -Очирпg. -Сокорьg. -Очирпg. -Сокорьg. -Очирпg. -Сокорьg. -Очирпg. -Сокорьg. -Очирпg. -Сокорьg. |
| Het podачи KODE, Ид.TOLko BOДA (при Составлий сankул). | -Пп ВОЗнКИБЕМпproбем OTТррьгпспгпспь. -Очирпгпспg. -Сокорьгпg. -Очирпg. -Сокорьg. -Очирпg. -Сокорьg. -Очирпg. -Сокорьg. -Очирпg. -Сокорьg. -Очирпg. -Сокорьg. -Очирпg. -Очирпg. -Очирпg. -Очирпg. -Очирпg. -Очирпg. -Очирпg. -Очирпg. -Очирпg. -Очирпg. -Очирпg. -Очирпg. -Очирпg. -Очирпg. -Очирпg -Очирпg. -Очирпg. -Очирпg. -Очирпg. -Очирпg. -Очирпg. -Очирпg. -Очирпg. -Очирпg. -Очирпg. -Очирпg. -Очирпg. -Очирпg. -Очирпg. -Сокорьгпg. -Очирпg. -Очирпg. -Очирпg. -Очирпg. -Очирпg. -Очирпg. -Очирпg. -Очирпg. -Очирпg. -Очирпg. -Очирпg. -Очирпg. -Очирпg. -Очирп g. -Очирпg. -Очирпg. -Очирпg. -Очирпg. -Очирпg. -Очирпg. -Очирпg. -Очирпg. -Очирпg. -Очирпg. -Очирпg. -Очирпg. -Очирпg. -Очирпg. -Oчирпg. -Очирпg. -Очирпg. -Очирпg. -Очирпg. -Очирпg. -Очирпg. -Очирпg. -Очирпg. -Очирпg. -Очирпg. -Очирпg. -Очирпg. -Очирпg. -ОчIRC. -Очирпg. -Очирпg. -Очирпg. -Очирпg. -Очирпg. -Очирпg. -Очирпg. -Очирпg. -Очирпg. -Очирпg. -Очирпg. -Очирпg. -Очирпg. -Очирпg. - -Очирпg. -Очирпg. -Очирпg. -Очирпg. -Очирпg. -Очирпg. -Очирпg. -Очирпg. -Очирпg. -Очирпg. -Очирпg. -Очирпg. -Очирпg. -Очирпg. -Oчирпg. -Очирпg. -Очирпg. -Очирпg. -Очирпg. -Очирпg. -Очирпg. -Очирпg. -Очирпg. -Очирпg. -Очирпg. -Очирпg. -Очирпg. -Очирпg. -Оч㗅. -Оч㗅. -Оч㗅. -Оч㗅. -Оч㗅. -Оч㗅. -Оч㗅. -Оч㗅. -Оч㗅. -Оч㗅. -Оч㗅. -Оч㗅. -Оч㗅. -Оч㗅. -Оч㗅. - -Оч㗅. -Оч㗅. -Оч㗅. -Оч㗅. -Оч㗅. -Оч㗅. -Оч㗅. -Оч㗅. -Оч㗅. -Оч㗅. -Оч㗅. -Оч㗅. -Оч㗅. -Оч㗅. -ONpchE. -Оч㗅. -Оч㗅. -Оч㗅. -Оч㗅. -Оч㗅. -Оч㗅. -Оч㗅. -Оч㗅. -Оч㗅. -Оч㗅. -Оч㗅. -Оч㗅. -Оч㗅. -Оч㗅. -Oч㗅. -Оч㗅. -Оч㗅. -Оч㗅. -Оч㗅. -Оч㗅. -Оч㗅. -Оч㗅. -Оч㗅. -Оч㗅. -Оч㗅. -Оч㗅. -Оч㗅. -Оч㗅. -Оч旳. -Оч旳. -Оч旳. -Оч旳. -Оч旳. -Оч旳. -Оч旳. -Оч旳. -Оч旳. -Оч旳. -Оч旳. -Оч旳. -Оч旳. -Оч旳. -Оч旳. -Оч旳. -Оч旳. -Ов! -Ов旳. -Ов旳. -Ов旳. -Ов旳. -Ов旳. -Ов旳. -Ов旳. -Ов旳. -Ов旳. -Ов旳. -Ов旳. -Ов旳. -Ов旳. -Ов旳. -Ов旳. -Ов旳. -Ов旳. -Ов㗅. -Оч㗅. -Оч㗅. -Оч㗅. -Оч㗅. -Оч㗅. -Оч㗅. -Оч㗅. -Оч㗅. -Оч㗅. -Оч㗅. -Оч㗅. -Оч㗅. -Оч㗅. -Оч㓄. -Оч㓄. -Оч㓄. -Оч㓄. -Оч㓄. -Оч㓄. -Оч㓄. -Оч㓄. -Оч㓄. -Оч㓄. -Оч㓄. -Оч㓄. -Оч㓄. -Оч㓄. -Оч㓄. - -Оч㓄. -Оч㓄. -Оч㓄. -Оч㓄. -Оч㓄. -Оч㓄. -Оч㓄. -Оч㓄. -Оч㓄. -Оч㓄. -Оч㓄. -Оч㓄. -Оч㓄. -Оч㓄. -OKy. -OKy. -OKy. -OKy. -OKy. -OKy. -OKy. -OKy. -OKy. -OKy. -OKy. -OKy. -OKy. -OKy. -OKy. -OKy. -OKy. -OKy. -OKy. -OKy. -OKy. -OKy. -OKy. -OKy. -OKy. -OKx. -OKx. -OKx. -OKx. -OKx. -OKx. -OKx. -OKx. -OKx. -OKx. -OKx. -OKx. -OKx. -OKx. -OKx. -OKx. -OKx. -OKx. -OKx. -OKx. -OKx. -OKx. -OKx. -OKx. -OKx. -OKX. -OKx. -OKx. -OKx. -OKx. -OKx. -OKx. -OKx. -OKx. -OKx. -OKx. -OKx. -OKx. -OKx. -OKx. -OKx. -OKx. -OKx. -OKx. -OKx. -OKx. -OKx. -OKx. -OKx. -OKx. -OKх. -OKx. -OKx. -OKx. -OKx. -OKx. -OKx. -OKx. -OKx. -OKx. -OKx. -OKx. -OKx. -OKx. -OKx. -OKx. -OKx. -OKx. -OKx. -OKx. -OKx. -OKx. -OKx. -OKx. -OKx. -OK x. -OKx. -OKx. -OKx. -OKx. -OKx. -OKx. -OKx. -OKx. -OKx. -OKx. -OKx. -OKx. -OKx. -OKx. -OKx. -OKx. -OKx. -OKx. -OKx. -OKx. -OKx. -OKx. -OKx. -OKx. -OK× -OKx. -OKx. -OKx. -OKx. -OKx. -OKx. -OKx. -OKx. -OKx. -OKx. -OKx. -OKx. -OKx. -OKx. -OKx. -OKx. -OKx. -OKx. -OKx. -OKx. -OKx. -OKx. -OKx. -OKx. -OKx -OKx -OKx -OKx -OKx -OKx -OKx -OKx -OKx -OKx -OKx -OKx -OKx -OKx -OKx -OKx -OKx -OKx -OKx -OKx -OKx -OKx -OKx -OKx -OKx -OKx. -OKx -OKx -OKx -OKx -OKx -OKx -OKx -OKx -OKx -OKx -OKx -OKx -OKx -OKx -OKx -OKx -OKx -OKx -OKx -OKx -OKx -OKx -OKx -OKx. -OKx. -OKx -OKx -OKx -OKx -OKx -OKx -OKx -OKx -OKx -OKx -OKx -OKx -OKx -OKx -OKx -OKx -OKx -OKx -OKx -OKx -OKx -OKx -OKx |
| KaucesTBo MOLONHoi NeHki He COOTBETCTBYET CTAHdApTaM. | - Heo6xOДIMо ИСПONSБОВТь КОРБе OБЕЗКIPENHоМИ ПОЛУБЕЗКIPENHоМОЛОКОИ XОЛОПБИKHа (Темпeратура ДолЖи соctавлгы okono 4℃). - PeryIaTOp MOLONHoi NeHki B NOLOXEHmIII ПepeBaDITe erо B NOLOXEHme - ПрмьБaIte CStcTeMy nOcLae KAKDOrO prinotOBeHry MOLONHOrO HANHtka (Cm. pasden «PyHnA прмьБaKc CStcTeMlRapid Cappuccino®). - ОснTite МaUHny OT hAnHm, CM. pasden «YdANeHne HAKINN». - He IcPONbIyIe paHoe SAmOPoxeHHo MOLOKO. - Y6eJITeBc, UTo BO3dIXOZaBOPHik He 3aPra3HnEh. CM. pasden «PyHnA trpOMbIbKa CStcTeMlB Rapid Cappuccino®. - Y6eJITeBc, UTo Bce KMONHEnTH b CStcTeMlRapid Cappuccino yctahOBeHnI npabInbNo. |
| HeB03MOxHNO BoIITN B MeHIO. | - Y6eJITeBc, UTo PseEBpyar dЯ MOLOKA ChrT. - Y6eJITeBc, UTo BcI ONUOBpOMeHNo HAKJIIM KHOJIKN hot milk n flat white n UdepkvBani Nx HAKaTbMI B TeHcHne 3-x cckuH. - Y6eJITeBc, UTo Tpy6kДЯ UdaJIeHry HAKINN ChrTA. |
| He ydaetC rCHrTB peSEpByap dЯ MOLOKA. | - ДЯ pa3BeHdINHЯ DeTaleHЯ HAKMITE KHOJIKN Ha Bokobix CTopOHax PeSEpByap dЯ MOLOKA. - OshakombTeB c paskelom «C6opka-pasboKpa CStcTeMlB Rapid Cappuccino®. |
| Буклоченie KoФeMaUHnHbI. | - HAKMITE KHOJky BkIQUeHnIA (NotpebIeMЯ MOUHcTb B pexkime oksiadinna: 0,22 BTu. |
| PeSEpByap dЯ MOLOKA yCTaHOBnH, Ho KHOJIKN pRiPoTOBnHnEMI MOLONHbX HAPITKOB HE AKTIbHbI. | - PeryIaTOp MOLONHoi NeHbI HaxODITcB NOLOXeHmI (npOMbIbKa). ПepeBaDITe erо B NOLOXeHne (пeHa). |
Osbpatntecb B Nespresso

HeB03MOXHO npDyCMOTpeb BCE CnTuYAM, KOToPbe MOrTy B03HKNHyTB pNIN cNpIb3oBAHN pN6Opa, N03TOMy, ECIM BAM Tpe6yeTcI DOnONHITeBHAR nHfOpMaH, ECIM BO3HKnJI pNo6Iema, INI NPOCTO HyKcn COBET, ObaaJteCb B Nespresso INI K yIOnHomOeyHOMy npEcdTabTeIO Nespresso B CBOEM peINOHE.
KoTakThIe DaHHe 6nKaJHero cPnca Nespsso nn 6nKaJHero ynoHOMOeHHoro npdctABTeRNE Nespsso MOKHO HAIIN B 6poUIOpe "Dobpno IooKaiOBaBbN Nespsso, nocTaJIeMoB Kopo6ke C KoFemauuHIO, Hn HA caTne Nespsso.com.
OrpaHnueHHa rapaHTnA
De'Longhi rapaHTpyET oCTyCTBNE deFeKTOB MaTePnAnOB n CbOpKn B TeHHe N DeBykNET cDatb npIO6peTHeN h3dEINBA. B TEHHe 3TO rEPmoDA De'Longhi
ob3yETcBe 6ecnIaTHo OTpEMOnTPOBaBt bnn 3aMeHHTb (no CBOeY yCMOTpeHMO)
JIIOOBo DEFKeTHO 3aDEIe. TaPAHTHa BAOTPEmTOBAPBOAHBHe Nn 3aMeHHeHbE
B IPOUcECE PEmOHTA DetaNN COCTABNIET WeCTb MEcHueB INn DO KCHua
DcIeTBTHN PeBBOHAHLbHO rApaHTHNO HPOepNoA, B 3aBNCIMOCn OT TORO,
TOHACTyPi PAeH. DaHHa ORpaHHeHHo RApaHTHa HE pAcnpoctpaHETcER
HA JIOBLE HECNPABHOCTN, BO3HNKHe M Be p3yIbTate HeC4ChbX CUYaeB,
HEPaBnblHOH 3KcNpyatauIn, O6cLyKbNAHn INn OBbHOrO N3HocA. B pAMKaX,
DpyCTMbIX DeIcTByHUMMM 3aKoHMn, yCIOBn DaHHo IOrpaMHHeHHr rapAHm H NCKHOAOT, HE OrpAHMHBAOT, HE N3MeHJrO6Ba3aTeNbHbX 3aKOHbX npab B OTHOUHEHNPiOBpEHTeHHo Bamn IN3dJIeN, a NIIuI JOnONHrO1x. B Cnyae YbepeHHOCTn B DEpEHTHOINPnpOpBa o6paTl8eB Nespresso 3a IHCTpyKUHMn IO OTPABeK PnpOpBa DnIPOBoEHn pEmoHa. KOtAKHyIO MHPopMaHIO CM. Ha caTe www.nespresso.com.
YTNIN3aunn n oxpana OKpykaHoueCpebl
Pn6bop copepxnteHHbIe MATEpmaJIbI, KOTOpbeMOTy BocCTaHOBHeHIMnnepepaOtaHbI. PaaJIbJIbHI c6bp MycOPaYnpouaETnepepaOCTky eHHbIXcbpeBaMATEpnaOB.OTppBaTe pnp6B yNHT npMeA.HfOpMaJIO 06ytININ3AMMOXHOJNOHYHTOT MECHbIX cprAHOB BAACTN.


GRAN LATTISSIMA