
SRD 600 B1 - Shaver SILVERCREST - Free user manual and instructions
Find the device manual for free SRD 600 B1 SILVERCREST in PDF.

| Product type | Electric shaver with rotating heads |
| Brand and model | SilverCrest SRD 600 B1 |
| Power supply (mains adapter) | Model PTB-050100EU, input 100-240 V~, 50/60 Hz, output 5.0 V =, 1.0 A, 5.0 W |
| Power supply (device) | 5.0 V =, 1.0 A |
| Battery | Lithium-ion 3.7 V, capacity 700 mAh |
| Charging time | Approximately 60 minutes |
| Battery life | Approximately 60 minutes (with fully charged battery) |
| Protection rating (adapter) | IPX4 (protection against water splashes) |
| Protection rating (shaver) | IPX6 (protection against powerful water jets) |
| Usage | Cordless (on battery) or with cord (mains) |
| Shaving | Dry shaving only |
| Integrated trimmer | Retractable trimmer for long hairs/equalizing |
| Travel lock | Switch lock (long press 3 seconds) |
| Head cleaning | Dry cleaning (brush) or under running water (shaving unit only) |
| Deep cleaning | Disassembly of heads for complete cleaning |
| Package contents | Shaver, mains adapter, protective cap, brush, pouch |
| Warranty | 3 years for France and Belgium |
| Spare parts | Shaving unit (including shaving heads) available via after-sales service |
| Adaptation period | 2 to 3 weeks for the skin |
| After-sales service | Kompernass Handels GmbH, phone 0800 919270, email kompernass@lidl.fr |
Frequently Asked Questions - SRD 600 B1 SILVERCREST
User questions about SRD 600 B1 SILVERCREST
0 question about this device. Answer the ones you know or ask your own.
Ask a new question about this device
Download the instructions for your Shaver in PDF format for free! Find your manual SRD 600 B1 - SILVERCREST and take your electronic device back in hand. On this page are published all the documents necessary for the use of your device. SRD 600 B1 by SILVERCREST.
USER MANUAL SRD 600 B1 SILVERCREST
Operating instructions
FR BE
ROTEREND SCHEERAPPARAAT
Gebruiksaanwijizing
PL
ROTACYJNA MASZYNKA
DO GOLENIA
Instrukcja obstugi
ES
AFEITADORA ROTATORIA
GB/IE Operating instructions Page 1
Package contents and transport inspection . . . . . . 2
Description of the appliance 3
Technical data 4
Safety guidelines 6
Charging the battery 11
Fitting/removing the protective cap 12
Cordless shaving 12
Shaving with mains voltage 13
Trimmer/long hair trimmer 14
Cleaning and care 14
Cleaning with the brush 15
Cleaning under running water 15
Thorough cleaning 16
Travellock 19
Storage 19
Disposal 20
Kompernass Handels GmbH warranty . . . . . . . . 2 1
Service 24
Importer 24
Ordering spare parts 25
Introduction
Congratulations on the purchase of your new appliance.
You have selected a high-quality product.

The operating instructions are part of this product. They contain important information on safety, usage and disposal.
Before using the product, familiarise yourself with all handling and safety guidelines. Use the product only as described and for the range of applications specified. Please also pass these operating instructions on to any future owner(s).
Intended use
This appliance is intended exclusively for shaving and trimming human hair.
This appliance is intended solely for use in private households.
Do not use it for commercial applications.
All other uses are deemed to be improper and may result in property damage or even in personal injury.
Package contents and transport inspection
Remove all parts of the appliance and the operating instructions from the carton.
Remove all packaging materials and any films and labels.
The package contents include the following components (see fold-out page for illustrations):
- Rotary shaver
- Mains adapter
- Protective cap
Brush
Case - Operating instructions
NOTE
- Check the package for completeness and for signs of visible damage.
If the delivery is incomplete or damage has occurred as a result of defective packaging or during transport, contact the service hotline (see section "Service").
Description of the appliance
Figure A (front fold-out page):
1 Protective cap
Cutting unit
3 Grip recesses
4 Long hair trimmer
Catch for the long hair trimmer
On/Off switch
Blue control lamp
Red charge indicator light
symbol (travel lock)
10 Mains connection
Figure B (rear fold-out page):
11 Mains adapter
12 Connector
13 Brush
14 Case
Technical data
| Mains adapter | |
| Manufacturer | ZHEJIANG PAITER ELECTRIC CO., LTD Hongxiang Road 33#, Hi-tech Industrial Zone, Ouhai Area, Wenzhou, Zhejiang, 325006 P. R. China Commercial register number: 91330304724535131X |
| Importer: KOMPERNASS HANDELS GMBH, BURGSTRASSE 21, 44867 BOCHUM, GERMANY Register court: AG Bochum Register number: HRB 4598 | |
| Model PTB-050100EU | |
| Input voltage | 100-240 V ~ (AC) |
| Input AC frequency 50/60 Hz | |
| Output voltage 5.0 V | (DC) |
| Output current 1.0 A | |
| Output power 5.0 W | |
| Average operating efficiency 75.8 % | |
| No-load power consumption 0.07 W | |
| Input current 0.2 A | |
| Barrel plug polarity | |
| Protection class | II / (double insulation) |
| Efficiency class | 6① |
| Protection type | IPX4 (Protection against water splashes from any direction) |
| Nominal ambient temperature (ta) | 40 °C |
| Appliance | |
| Input voltage 5.0 V (DC) | --- |
| Input current 1.0 A | |
| Protection type | IPX6 (Protection against a strong water jet or temporary submersion) |
| Barrel plug polarity | --- |
| Rechargeable battery | |
| Capacity 700 mAh | |
| Rechargeable battery | 3.7 V = (DC) (1 x 3.7 V Lithium-ion rechargeable battery) |
| Battery charging time approx. 60 minutes | |
| Running time with full charge approx. 60 minutes | |
NOTE
No user action is required to switch the product between 50 and 60Hz . The product switches automatically to either 50 or 60Hz .
The product is equipped with or supplied with a lithium-ion battery.
Safety guidelines

DANGER! RISK OF ELECTRIC SHOCK!
Prior to use, check the appliance for visible external damage. Never operate an appliance that is damaged. There is a risk of electrocution.
- Stop using the appliance if there is any damage to the mains adapter, mains cable, the housing or any other components.
To avoid potential risks, if the appliance power cable is damaged, it must be replaced by the manufacturer, its customer service or by a qualified technician.

DANGER! RISK OF ELECTRIC SHOCK!
Pull the mains adapter from the mains power socket
-if a defect occurs,
- before cleaning the appliance,
- after every use.
Always pull on the mains adapter itself; never pull on the power cable.
- Never submerge the appliance or the mains adapter or cable in water or other liquids.
If the appliance falls into water, pull the mains adapter out of the power socket before you reach into the water.
- Never touch the appliance, mains adapter or its cable with wet hands.
- Check the mains adapter, mains cable and appliance regularly for possible mechanical defects.

DANGER! RISK OF ELECTRIC SHOCK!
- Ensure that the power cable does not get jammed in cupboard doors and that it is never laid on hot surfaces. If this occurs, the cable insulation may be damaged.
- Ensure that the power cable does not get jammed in cupboard doors and that it is never laid on hot surfaces. If this occurs, the cable insulation may be damaged.
The installation of a residual current circuit breaker with a rated tripping current of no more than 30 ~mA offers further protection from electric shocks. Have the installation carried out only by a qualified electrician.
CAUTION! Keep the appliance dry.
WARNING! RISK OF INJURY!
This appliance may be used by children aged 8 years and above and by persons with limited physical, sensory or mental capabilities or lack of experience and knowledge, provided that they are under supervision or have been told how to use the appliance safely and are aware of the potential risks.
Children must not use the appliance as a plaything.
- Cleaning and user maintenance tasks may not be carried out by children unless they are supervised.
- All repairs must be carried out by authorised specialist companies or by the Customer Service department. Improper repairs can pose significant risks to the user. It will also invalidate any warranty claims.
- Do not use the appliance with a defective cutting unit or long hair trimmer because these may have sharp edges. There is a risk of personal injury!
WARNING! RISK OF INJURY!
-
Defective components must always be replaced with original replacement parts. Compliance with safety requirements can only be guaranteed if original replacement parts are used.
-
Only plug the power plug into an easily accessible power socket so that you can pull it out of the power socket quickly in an emergency.
CAUTION! PROPERTY DAMAGE!
Use the appliance only indoors.
Never operate the appliance unsupervised, and only in accordance with the information on the nameplate.
- Do not use the mains adapter for a different product and do not attempt to charge this appliance with a different mains adapter. Use only the mains adapter supplied with this appliance (Model PTB-050100EU).
CAUTION! PROPERTY DAMAGE!
The batteries in this appliance cannot be replaced.
- Remove the cutting unit from the handset for cleaning under running water.
Charging the battery
The battery should be charged for at least 60 minutes before first use.
NOTE
- Ensure that the appliance is switched off before charging the battery.
1) Plug the connector ⑫ into the mains connection ⑩ on the shaver.
2) Plug the mains adapter ⑪ into a mains socket that complies with the appliance specifications. While the battery is charging, the red charge indicator light ⑧ flashes.
When the battery is fully charged, the blue control lamp lights up. Disconnect the product from the mains supply.
Once the battery is fully charged, you can use the appliance for around 60 minutes without connecting it to the power supply.
If the red indicator light 3 flashes, the battery charge level is too low. Recharge the battery in that case.
Fitting/removing the protective cap
When you are not using the shaver, protect the shaving head by putting on the protective cap 1.
Remove the protective cap 1 by pulling it downwards off the cutting unit 2 (see Fig. 1).
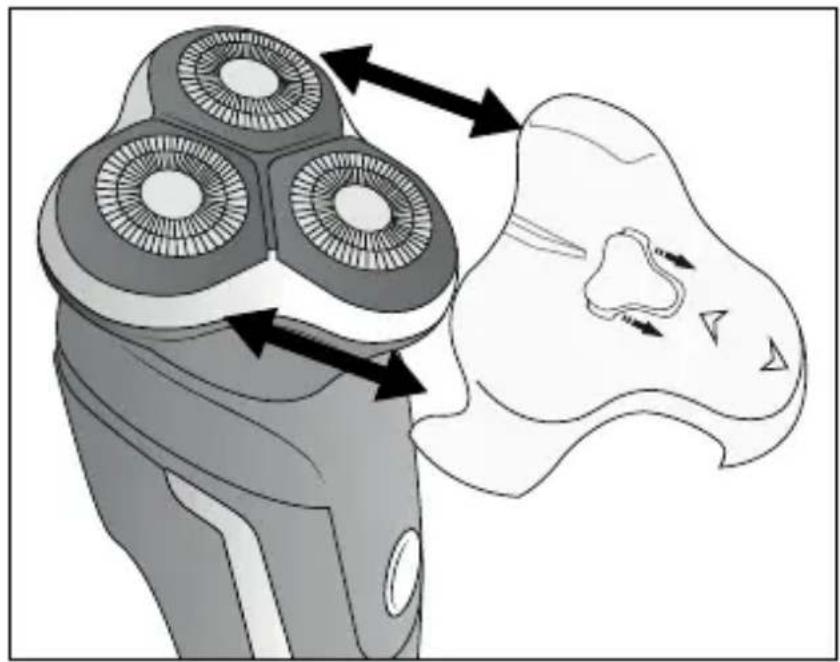
Fig. 1
Cordless shaving
CAUTION! MATERIAL DAMAGE!
This appliance is not suitable for wet shaving!
This shaver can be used without the power cable. In this case, you must charge the appliance before first use (see section "Charging the battery").
1) Ensure the cutting unit 2 is attached and locked in place.
2) Remove the protective cap 1.
3) Press the On/Off switch ⑥ to switch on the appliance. The blue control lamp ⑦ lights up.
NOTE
The best results are achieved if used on dry skin.
It can take 2 to 3 weeks until the skin is accustomed to the dry shaving system.
4) Move the shaving heads with straight and circular motions over the skin.
5) After you have covered all the areas you want to shave, use the On/Off switch ① ⑥ again to turn off the appliance. The blue control lamp ⑦ goes out.
6) Clean the shaver after every use with the supplied brush ⑬. For a more thorough cleaning, read the section "Cleaning and care".
Shaving with mains voltage
CAUTION! MATERIAL DAMAGE!
This appliance is not suitable for wet shaving!
If you want to use the shaver without previously charging it, you can also use it directly with mains voltage:
1) Plug the connector ⑫ into the mains connection ⑩ on the shaver.
2) Plug the mains adapter ⑩ into a mains socket that complies with the appliance specifications. While the battery is charging, the red charge indicator light ⑧ flashes.
You can then use the shaver as described in the section "Cordless shaving".
Trimmer/long hair trimmer
To shape your beard, form sideburns or shave eyebrows, use the long hair trimmer 4.
1) To do this, push the catch ⑤ towards the long hair trimmer ④. The long hair trimmer ④ flips out.
2) Press the On/Off switch ① ⑥. The shaver starts the cutting unit ② and the long hair trimmer ④, the blue control lamp ⑦ lights up.
3) Once you have finished trimming, press the On/Off switch again to turn off the appliance. The blue control lamp goes out.
4) Clean the long hair trimmer ④ with the supplied brush 13 . For a more thorough cleaning, read the section "Cleaning and care".
Cleaning and care

DANGER - ELECTRIC SHOCK!
Before cleaning the device, disconnect the mains adapte from the mains power socket! There is a risk of electric shock!
CAUTION! MATERIAL DAMAGE!
- Do not use abrasive, chemical or caustic cleaning agents to clean this appliance. This will irreparably damage the appliance.
Cleaning with the brush
Cutting unit
Clean the 3 shaving heads of the cutting unit ② after every shave using the brush 13 .
1) Take hold of the cutting unit ② with three fingers in the grip recesses ③ and pull it off.
2) Tap the cutting unit 2 on a flat surface or blow off the hair cuttings.
3) Use the brush 13 to remove any remaining hair cuttings.
4) Replace the cutting unit ② flush on the appliance. Ensure that it snaps into place and is seated firmly.
Long hair trimmer
Clean the long hair trimmer 4 after every use with the supplied brush 13.
Oil the long hair trimmer 4 around every 6 months with a drop of sewing machine oil.
Cleaning under running water
1) Take hold of the cutting unit 2 with three fingers in the grip recesses 3 and pull it off.
2) Hold the cutting unit ② under the running water so that the water flows through the shaving heads from the inside to the outside.
CAUTION! MATERIAL DAMAGE!
- Hold only the cutting unit ② under running water! The shaver handset can be damaged irreparably if it is held under running water.
3) Allow the cutting unit 2 to dry.
4) Replace the cutting unit ② flush on the appliance. Ensure that it snaps into place and is seated firmly.
Thorough cleaning
To clean the appliance thoroughly, disassemble the three cutting heads:
1) Take hold of the cutting unit 2 with three fingers in the grip recesses 3 and pull it off (see Fig. 2).

Fig. 2
2) Press the two protruding tabs together and release the black retainers from the catches (see Fig. 3). You can now remove the cutting heads and the blades.
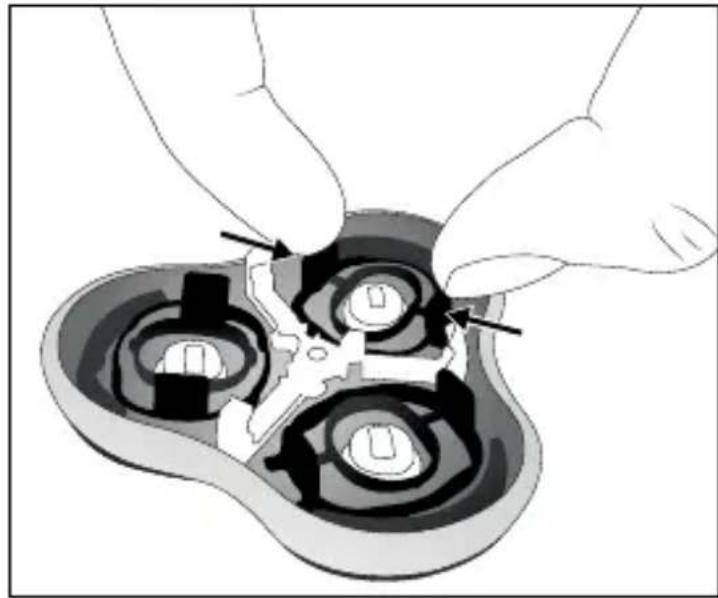
Fig. 3
3) Clean all parts under running water and then allow them to dry fully.
4) Reassemble the cutting unit ②. Use the following illustrations for guidance (see Fig. 4).

Fig. 4
- Place the three shaving heads in the recesses of the cutting unit ② . Ensure that the notches on the edge of the shaving heads rest on the catches in the opening.
- Place the round blades into the shaving heads with the blade tips to the front.
- Press the two tabs of the retainers together and place them back into the catches of the cutting unit ② and release the tabs. The cutting unit ② is now reassembled.
5) Remove loose hairs from the shaver with the brush 13.
6) Replace the cutting unit 2 on the shaver. Ensure that it snaps into place and is seated firmly.
Clean the housing with a moist cloth.
NOTE
If...
... the shaving result is noticeably poorer, ...
- ... you have to the shave the same spot repeatedly to achieve a good result, ...
... the shave takes much longer than usual, ...
... there is visible damage to the shaving heads, ...
... the shaving heads/the cutting unit 2 must be replaced.
You can order the cutting unit 2, incl. shaving heads from our customer service (see section "Ordering spare parts").
To replace the cutting unit 2 proceed as follows:
1) Take hold of the cutting unit ② with three fingers in the grip recesses ③ and pull it off.
2) Fit the new cutting unit ② onto the shaver. Ensure that it snaps into place and is seated firmly.
Travel lock
This appliance is fitted with a travel lock. You can lock the On/Off switch to prevent accidental starting:
Press and hold the On/Off switch ① ⑥ for around 3 seconds, until the symbol ⑨ lights up blue. The On/Off switch ⑩ ⑥ is now locked.
To unlock the appliance, press and hold the On/Off switch ① ⑥ for around 3 seconds, until the symbol ⑨ lights up blue five times.
NOTE
If you attempt to switch the appliance on while the travel lock is activated, the symbol lights up blue once. The appliance will not start.
Storage
CAUTION! MATERIAL DAMAGE!
- Never store the shaver in the case 14 while the appliance is charging. Risk of overheating!
Always replace the protective cap 1 onto the cutting unit 2 when you are not using the appliance.
Store the cleaned and dried appliance and its accessories in the supplied case 14.
Store the everything in a clean, dust-free and dry place.
Disposal
Never dispose of the device in the normal domestic waste. This product is subject to the provisions of European Directive 2012/19/EU.
Dispose of the device via an approved waste disposal company or your municipal waste disposal facility. Please observe applicable regulations. Please contact your waste disposal facility if you are in any doubt.
Do not dispose of the mains adapter in your normal domestic waste. The mains adapter is subject to the provisions of European Directive 2012/19/EU WEEE (Waste Electrical and Electronic Equipment).
Dispose of the mains adapter at an approved disposal centre or your community waste facility. Please comply with all applicable regulations. Please contact your waste disposal facility if you are in any doubt.

Your local community or municipal authorities can provide information on how to dispose of the worn-out product.

The product is recyclable, subject to extended producer responsibility and is collected separately.
NOTE
- The integrated rechargeable battery in this appliance cannot be removed for disposal. When disposing of the appliance, indicate that the appliance contains batteries.
The packaging is made of environmentally friendly materials which you can dispose of at your local recycling centre.
Dispose of the packaging in an environmentally friendly manner.
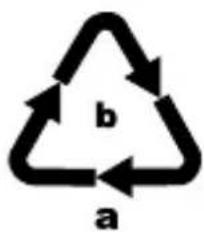
Note the labelling on the packaging and separate the packaging material components for disposal if necessary. The packaging material is labelled with abbreviations (a) and numbers (b) with the following
meanings:
1-7:plastics,
20-22: paper and cardboard,
80-98: composites.
This appliance has a 3-year warranty valid from the date of purchase. If this product has any faults, you, the buyer, have certain statutory rights. Your statutory rights are not restricted in any way by the warranty described below.
Warranty conditions
The warranty period starts on the date of purchase. Please keep your receipt in a safe place. This will be required as proof of purchase.
If any material or manufacturing fault occurs within three years of the date of purchase of the product, we will either repair or replace the product for you or refund the purchase price (at our discretion). This warranty service requires that you present the defective appliance and the proof of purchase (receipt) within the three-year warranty period, along with a brief written description of the fault and of when it occurred.
If the defect is covered by the warranty, your product will either be repaired or replaced by us. The repair or replacement of a product does not signify the beginning of a new warranty period.
Warranty period and statutory claims for defects
The warranty period is not prolonged by repairs effected under the warranty. This also applies to replaced and repaired components. Any damage and defects present at the time of purchase must be reported immediately after unpacking. Repairs carried out after expiry of the warranty period shall be subject to a fee.
Scope of the warranty
This appliance has been manufactured in accordance with strict quality guidelines and inspected meticulously prior to delivery. The warranty covers material faults or production faults. The warranty does not extend to product parts subject to normal wear and tear or to fragile parts which could be considered as consumable parts such as switches, batteries or parts made of glass. The warranty does not apply if the product has been damaged, improperly used or improperly maintained. The directions in the operating instructions for the product regarding proper use of the product are to be strictly followed. Uses and actions that are discouraged in the operating instructions or which are warned against must be avoided.
This product is intended solely for private use and not for commercial purposes. The warranty shall be deemed void in cases of misuse or improper handling, use of force and modifications / repairs which have not been carried out by one of our authorised Service centres.
Warranty claim procedure
To ensure quick processing of your case, please observe the following instructions:
Please have the till receipt and the item number (IAN) 377187_2110 available as proof of purchase.
■ You will find the item number on the type plate on the product, an engraving on the product, on the front page of the operating instructions (below left) or on the sticker on the rear or bottom of the product.
If functional or other defects occur, please contact the service department listed either by telephone or by e-mail.
■ You can return a defective product to us free of charge to the service address that will be provided to you. Ensure that you enclose the proof of purchase (till receipt) and information about what the defect is and when it occurred.
You can download these instructions along with many other manuals, product videos and installation software at www.lidl-service.com.
This QR code will take you directly to the Lidl service page (www.lidl-service.com) where you can open your operating instructions by entering the item number (IAN) 377187_2110.
Service
Service Great Britain
Tel.: 0800 404 7657
E-Mail: kompernass@lidl.co.uk

Servicelreland
Tel.: 1800 101010
E-Mail: kompernass@lidl.ie
IAN 377187_2110
Importer
Please note that the following address is not the service address. Please use the service address provided in the operating instructions.
KOMPERNASS HANDELS GMBH
BURGSTRASSE 21
44867 BOCHUM
GERMANY
www.kompernass.com
Ordering spare parts
You can order replacement parts for this product on the Internet at www.kompernass.com.

Scan this QR code with your smartphone or tablet.
You can use this QR code to go directly to our website www.kompernass.com to view and order the available replacement parts.
NOTE
If you have problems with your online order, you can contact our service centre by phone or e-mail (see section "Service").
- Please always quote the article number (e.g. 123456_7890) when ordering. You can find it on the title page of these operating instructions.
- Please note that online ordering of replacement parts is not possible for all countries.
Inhaltsverzeichnis
KOMPERNASS HANDELS GMBH
BURGSTRASSE 21
44867 BOCHUM
DEUTSCHLAND
www.kompernass.com
Chere cliente, cher client,
Chere cliente, cher client,
KOMPERNASS HANDELS GMBH
BURGSTRASSE 21
44867 BOCHUM
ALLEMAGNE
www.kompernass.com
Commander des pieces de rechange
Yououpouvezcommandercomfortablementdespiecede rechange pourceproduitturInternetaI'adressewww.kompernass.com.
WAARSCHUWING! LICHAMELIJK GEVAAR!
WAARSCHUWING! LICHAMELIJK GEVAAR!
KOMPERNASS HANDELS GMBH
BURGSTRASSE 21
44867 BOCHUM
DUITSLAND
www.kompernass.com
KOMPERNASS HANDELS GMBH
BURGSTRASSE 21
44867 BOCHUM
NÉMECKO
www.kompernass.com
KOMPERNASS HANDELS GMBH
BURGSTRASSE 21
44867 BOCHUM
NIEMCY
www.kompernass.com
KOMPERNASS HANDELS GMBH
BURGSTRASSE 21
44867 BOCHUM
NEMECKO
www.kompernass.com
KOMPERNASS HANDELS GMBH
BURGSTRASSE 21
44867 BOCHUM
ALEMANIA
www.kompernass.com
Pedido de recambios
Bestilling of reservedele 237
Indledning
KOMPERNASS HANDELS GMBH
BURGSTRASSE 21
44867 BOCHUM
TYSKLAND
www.kompernass.com
Bestilling af reservedele
KOMPERNASS HANDELS GMBH
BURGSTRASSE 21
44867 BOCHUM
GERMANIA
www.kompernass.com
KOMPERNASS HANDELS GMBH
BURGSTRASSE 21
44867 BOCHUM
NÉMETORSZÁG
www.kompernass.com
KOMPERNASS HANDELS GMBH
BURGSTRASSE 21
44867 BOCHUM
NEMCIJA
www.kompernass.com
Pooblaščeni serviser
SI ServisSlovenija
Tel.: 018889273
E-Mail: kompernass@lidl.si
IAN 377187_2110
Garancijski list
KOMPERNASS HANDELS GMBH
BURGSTRASSE 21
44867 BOCHUM
GERMANY
www.kompernass.com