
SRD 600 A1 - Razor SILVERCREST - Free user manual and instructions
Find the device manual for free SRD 600 A1 SILVERCREST in PDF.


| Product Type | Electric Shaver |
| Dimensions | Approx. 6.5 x 2.5 x 2.0 inches (165 x 63 x 50 mm) |
| Weight | Approx. 200 g (0.44 lbs) |
| Power Supply | Rechargeable lithium-ion battery, 100-240V, 50/60Hz |
| Charging Time | 1 hour for full charge |
| Battery Life | 45 minutes after full charge |
| Main Features | Wet & dry shaving, pop-up precision trimmer, 3D floating shaving heads |
| Cleaning & Maintenance | Rinse under running water; use cleaning brush; replace cutting head every 12 months |
| Safety | IPX7 waterproof, automatic shut-off after 5 minutes |
| Spare Parts | Replacement foil and cutter block, cleaning brush, travel pouch |
| General Information | Brand: SilverCrest; Model: SRD 600 A1; Warranty: 2 years |
Frequently Asked Questions - SRD 600 A1 SILVERCREST
User questions about SRD 600 A1 SILVERCREST
0 question about this device. Answer the ones you know or ask your own.
Ask a new question about this device
Download the instructions for your Razor in PDF format for free! Find your manual SRD 600 A1 - SILVERCREST and take your electronic device back in hand. On this page are published all the documents necessary for the use of your device. SRD 600 A1 by SILVERCREST.
USER MANUAL SRD 600 A1 SILVERCREST
ROTARY SHAVER SRD 600 A1
TARGA GMBH
DE-59494 Sone
CHIMANY
Last Information Update - Hμ/via niuromiaic ovipuoroc
05/2017-Ident-No.: SBD 400 A1 062017-1
CH IE NI CY
Operating instructions and safety instructions
OR CY
English....2
Ελληνικά 21
Deutsch 42
Table of contents
- Intended use....3
- Package contents ....4
- Technical data....5
3.1. Shaver....5
3.2. Mains adapter .... 5 - Safety instructions ....6
- Copyright 11
- Before initial use....11
6.1. Charging the battery .... 11 - Initial use....12
7.1. Mains operation 12
7.2. Battery mode....12
7.3. Using the cutter 13
7.4. Travel safety lock 13 - Cleaning/maintenance 14
8.1. Cleaning....14
8.1.1. Cleaning after each use 14
8.1.2. Thorough cleaning process 15
8.2. Maintenance....15 - Storing the device when not in use 18
- Environmental and waste disposal information.... 18
- Marks of conformity 19
- Notes on guarantee and service.... 19
Congratulations!
By purchasing the SilverCrest SRD 600 A1 rotary shaver, hereinafter referred to as shaver, you have opted for a high-quality product.
Familiarise yourself with the shaver before using it for the first time and read these operating instructions carefully. Observe the safety instructions and only use the shaver in the manner described in these operating instructions and for the indicated fields of application.
Keep these operating instructions in a safe place. Hand over all documents in the event that you pass on the shaver to a third party.
1. Intended use
The shaver only be used for private purposes and is not for industrial or commercial use. In addition, the shaver must not be used outside of closed rooms. This shaver meets the requirements of all relevant standards related to CE conformity. Compliance with these standards is no longer guaranteed if a change is made to the shaver without the authorisation of the manufacturer. The manufacturer shall not be liable for any damages or faults arising as a result.
Please observe the national regulations and/or laws of the country in which the device is used.
2. Package contents
- Shaver
- Protective cover
- Mains adapter
- Cleaning brush
- Travel bag
• These operating instructions
These operating instructions also have a cover that can be unfolded. The inside of the cover provides a schematic of the shaver and a number legend. The numbers identify the following parts/functions:
1 Cutter system
2 Unlock button
3 On/off button
4 Charging indicator
5 Travel safety lock
6 Replace shaver heads
7 Cleaning
8 Cutter
9 Charge connection
3. Technical data
3.1. Shaver
| Input voltage 5 V | |
| Input current 1 A | |
| Battery Li-Ion (Li-Fe), 3.2 V, 600 mAh | |
| Charging time approx. 60 minutes | |
| Protection class IPX 6 | |
| Operating temperature, atmospheric humidity | 0°C to +35°C; max. 75% relative humidity |
| Storage temperature, atmospheric humidity -10°C to +45°C; max. 85% relative humidity | |
| Dimensions (W x H x D) approx. 16 x 5.4 x 6.4 cm | |
| Weight approx. 155 g | |
3.2. Mains adapter
| Manufacturer KUANTEN | |
| Model KT05W050100BSD | |
| Input voltage 100 - 240 V | ~ , 50 Hz/60 Hz |
| Output voltage 5 V | — |
| Input current 0.2 A | |
| Output current 1 A | |
| Protection class II / | ☐ |
The specifications and design are subject to change without notice.
4. Safety instructions
Before using the shaver for the first time, read the following instructions carefully and observe all warnings, even if you are familiar with using electronic devices. Keep these operating instructions in a safe place for future reference. If you give the shaver away or sell it, please ensure that you also pass on these operating instructions. They are part of the product.

DANGER! This icon, together with the word 'Danger', indicates an impending dangerous situation that, if not prevented, can lead to serious injuries or even death.

WARNING! This icon, with the word 'Warning', indicates important information for the safe operation of the device and user safety.

The mains adapter is only suitable for use in indoor rooms.
This icon indicates that you can clean the shaver under running water.
DANGER! Disconnect the shaver from the mains adapter first. There is a risk of electric shock!

A short circuit-proof isolation transformer is built into the mains adapter of the shaver.
The mains adapter features a micro USB connector.

Efficiency class 5
This mains adapter is a switching power supply.

This icon indicates that further information on the topic is available.

DANGER! This shaver can be used by children aged eight and over, as well as by people with reduced physical, sensory or mental abilities or who lack experience and knowledge, provided they are supervised or have been instructed in the safe use of the shaver and understand the resulting dangers. Children must not play with the shaver.
Cleaning and user maintenance must not be carried out by children unless they are supervised. Small parts can be lethal if swallowed. Also keep the packaging film away from children. There is a risk of suffocation.

DANGER! Ensure the mains adapter is kept dry.
The mains adapter is not waterproof and must never be used in the bath or shower. Furthermore, the mains adapter must never be fully immersed in water. There is a risk of electric shock!

DANGER! If the shaver falls into water, you must first remove the mains adapter from the power socket, otherwise there is a risk of electric shock!

DANGER! If you notice any smoke, unusual noises or smells, switch off the shaver immediately and remove the mains adapter from the power socket. If this happens, you must stop using the shaver until it has been checked by a specialist. Do not inhale smoke possibly caused by a burning device. If you have inhaled smoke, consult a physician. Inhaling smoke can be harmful to your health.

DANGER! Inspect the shaver, cable and mains adapter for damage prior to use. In order to avoid hazards, the shaver must not be used if damaged.

DANGER! In order to avoid hazards, the shaver must not become damaged.

DANGER! Make sure there are no naked flames (for example, burning candles) placed on or near the shaver. There is a risk of fire!

DANGER! Never touch the mains adapter or cable with wet hands, as this poses a risk of short circuit or electric shock.

DANGER! Disconnect the mains adapter from the mains in the following cases:
- If a fault occurs.
- Prior to cleaning or maintenance.
- In the case of extended periods not in use.
- Following use.
- If damage is found.
- Prior to a storm/or risk of thunder and lightning.

DANGER! Always take hold of the mains adapter directly and do not pull on the cable itself.

DANGER! The power socket used must always be easily accessible so that the mains adapter can be quickly removed from it in an emergency.

DANGER! Always arrange the cable in such a way that it is not jammed or damaged.

DANGER! Risk of injury! Only allow an authorised service department to carry out repairs.

DANGER! Do not use the shaver if the cutting system is damaged. There is a risk of injury!

DANGER! Only original spare parts may be used in order to ensure safe operation.

WARNING! The shaver must not be exposed to direct sources of heat (for example, heaters), direct sunlight or strong artificial light. Also make sure that the shaver is not exposed to excessive shocks and vibrations. Furthermore, no foreign bodies should penetrate into the device. This could damage the shaver.

WARNING! The shaver must not be exposed to excessive temperature fluctuations, as otherwise condensation can occur and lead to electrical short circuits.

WARNING! Only use the mains adapter provided in order to prevent damage to the shaver.
5. Copyright
All contents of these operating instructions are subject to copyright law and are provided to the user solely as a source of information. Any form of copying or reproduction of data and information without the express written permission of the author is prohibited. This also concerns commercial use of the content and data. The text and illustrations correspond to the technical standards at the time of printing.
6. Before initial use
Remove the shaver and all the accessories from the packaging.
Check the shaver for signs of damage. If the shaver is damaged, it must not be put into operation.
The shaver can be operated using batteries or as a mains-powered device.
6.1. Charging the battery
Proceed as follows to charge the battery:
- Connect the plug of the mains adapter to the charge connection [9] on the bottom of the shaver.
- Insert the mains adapter into an easily accessible power socket. The charging indicator [4] will indicate the charge level of the battery during the charging process. The charge level is shown as a percentage from 0 to 100 in increments of 10.
- Disconnect the mains adapter from the power socket and the shaver once the charging indicator [4] reaches "100". The battery is now fully charged.
7. Initial use

WARNING! Use the shaver solely for dry shaving.

The shaver can be operated using batteries or as a mains-powered device.
7.1. Mains operation
Proceed as follows to use the shaver in mains operation:
- Connect the plug of the mains adapter to the charge connection [9] on the bottom of the shaver.
- Insert the mains adapter into an easily accessible power socket.
- Use the shaver as described in the next chapter.
- Following use, disconnect the mains adapter from the power socket and the shaver.
7.2. Battery mode
Proceed as follows to use the shaver in battery mode:
- Remove the protective cover.
- Press the on/off button [3] in order to switch on the shaver.
- The charging indicator [4] is shown during operation. If the battery drops to 10%, the charging indicator [4] starts to flash.
- Use gentle pressure and circular motions to guide the shaver across your skin. Always hold the shaver at a right angle to your skin. You can also tense your skin with your free hand in order to tilt the hair on your beard.

Please note that shaving may result in a slight reddening or irritation of the skin. This is entirely normal, as skin needs to adapt to this kind of shaving. It may take two to three weeks for skin to adapt to this kind of shaving.
- Switch the shaver off following shaving by pressing the on/off button [3].
- Clean the shaver as described in the section "8.1. Cleaning".
12 - English
7.3. Using the cutter
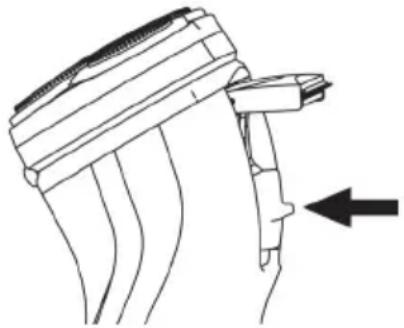
You can trim longer beard hair or sideburns using the cutter [8]. To use the cutter [8], proceed as follows:
- Unfold the cutter [8] by pressing the tab of the cutter [8] and pushing this upwards.
- Press the on/off button [3] in order to switch on the shaver.
- Switch the shaver off following use by pressing the on/off button [3].
- Clean the cutter [8] with the cleaning brush.
- Fold in the cutter [8] by pressing the tab of the cutter [8] and pushing this downwards.
7.4. Travel safety lock
Switch on the travel safety lock [5] in order to prevent accidental switch-on of the shaver. Proceed as follows:
- Press the on/off button [3] until the symbol for the travel safety lock [5] flashes.
- If the on/off button [3] is now pressed, the symbol for the travel safety lock [5] now flashes a few times. The shaver will however not switch on.
Switch the travel safety lock [5] off as follows:
- Press the on/off button [3] until the shaver switches on. The symbol for the travel safety lock [5] flashes a few times during this time and then goes out.
- The shaver can now be switched on and off with the on/off button [3].
8. Cleaning/maintenance
8.1. Cleaning

DANGER! Disconnect the shaver from the mains prior to cleaning, otherwise there is a risk of electric shock!

DANGER! Switch off the shaver prior to cleaning in order to avoid hazards.

DANGER! Never immerse the shaver in water or any other liquid.

WARNING! Do not use any compressed air, scouring pads or aggressive detergents to clean the shaver.
We recommend cleaning the shaver following each use in order to ensure optimum shaving results.
Clean the housing of the shaver with a soft, damp cloth.
8.1.1. Cleaning after each use
Cleaning the cutter system
- Remove the protective cover.
- Clean the shaver heads of the cutter [1] with the cleaning brush provided.
- Press the unlock button [2] in order to open the cutter system. CAUTION! The cutter system [1] cannot be removed.
- Clean the inside of the cutter [1] and the collection chamber with the cleaning brush provided.
- Fold in the cutter system [1] until you hear it click into place.
- Place the protective cover [1] back on the cutter system. Ensure that the wide tab of the protective cover is aligned above the unlock button [2].
Cleaning the cutter
- Unfold the cutter [8] by pressing the tab of the cutter [8] and pushing this upwards.
- Then clean the cutter [8] with the cleaning brush provided.
- Apply a drop of sewing machine oil to the cutter [8] around every six months.
- Fold in the cutter [8] by pressing the tab of the cutter [8] and pushing this downwards.
8.1.2. Thorough cleaning process
Thorough cleaning must be performed following approx. 30 minutes of operation. If the Cleaning symbol [7] lights up, it is time for thorough cleaning to be performed. Proceed as follows to change the ear cushions:
- Remove the protective cover.
- Press the unlock button [2] in order to open the cutter system. CAUTION! The cutter system [1] cannot be removed.
- Clean the inside of the cutter system [1] and the collection chamber under running water.
- Wait until the cutter system [1] and the collection chamber are dry.
- Fold in the cutter system [1] until you hear it click into place.
- Place the protective cover [1] back on the cutter system. Ensure that the wide tab of the protective cover is aligned above the unlock button [2].
8.2. Maintenance
The shaver heads must be replaced after approx. 75 hours of operation. If the Replace shaver heads [6] symbol lights up, it is time for them to be replaced.

The shaver heads are subject to wear and are not covered by the warranty. New shaver heads can be ordered online from the following website: shop.targa.de

DANGER! Disconnect the shaver from the mains prior to maintenance work, otherwise there is a risk of electric shock!

DANGER! Switch off the shaver prior to maintenance work in order to avoid hazards.
Proceed as follows to replace the shaver heads:
- Remove the protective cover.
- Press the unlock button [2] in order to open the cutter system. CAUTION! The cutter system [1] cannot be removed.
- Carefully turn the lock in the direction of the arrow until the retainer for the shaver heads is released.
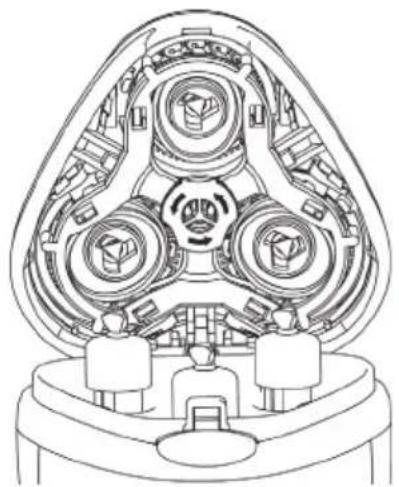
- Remove the retainer for the shaver heads and place it somewhere easily accessible.
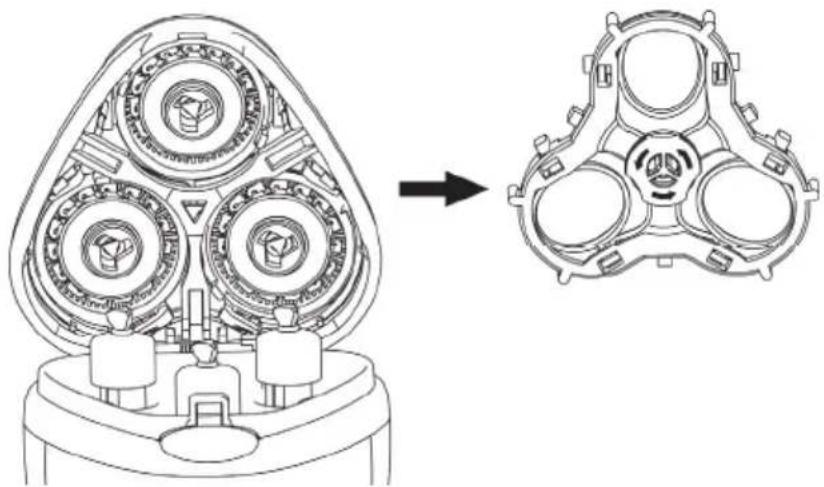
- Remove the shaver heads. A shaver head comprises a hairpocket and a clipping blade.

- Re-insert the new shaver heads into the shaver unit. Please make sure that the recess in the shaver head is positioned in the slot in the shaver unit.
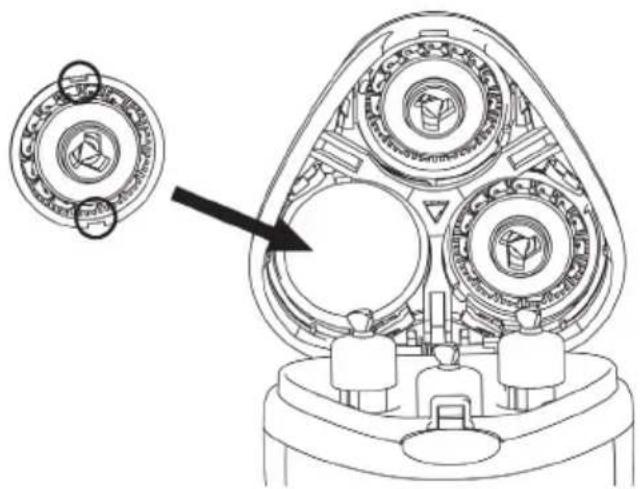
- Re-insert the retainer for the shaver heads into the shaver unit.
- Carefully turn the lock against the direction of the arrow until the retainer for the shaver heads is secured in place.
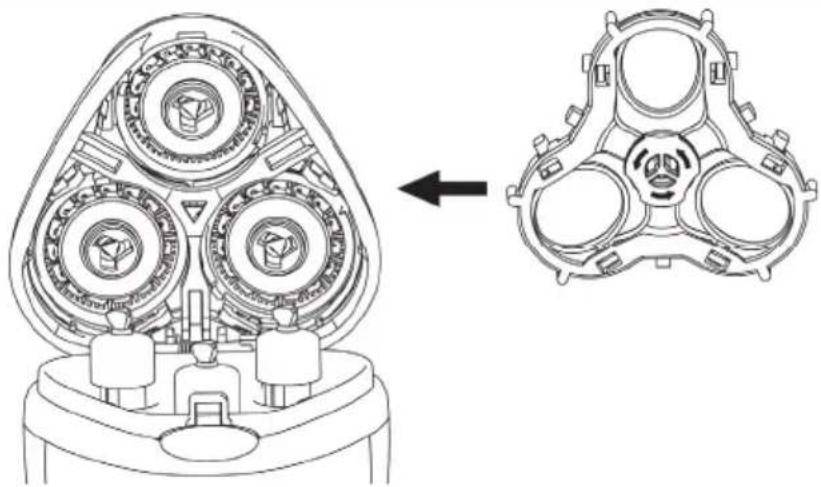
- Fold in the cutter system [1] until you hear it click into place.
- Place the protective cover [1] back on the cutter system. Ensure that the wide tab of the protective cover is aligned above the unlock button [2].
9. Storing the device when not in use
If the shaver is not going to be used for a long period of time, clean as described in the section "8.1. Cleaning". Place the protective cover on the cutter system [1] in order to protect against damage. Ensure that the wide tab of the protective cover is aligned above the unlock button [2]. To help maintain the battery performance, you should charge it at regular intervals. Keep the shaver and its accessories in a clean, cool, dry place, such as the travel bag.
10. Environmental and waste disposal information
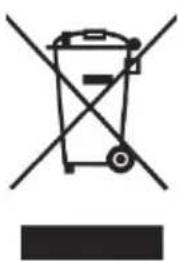
Devices marked with this symbol are subject to the European Directive 2012/19/EU. Electrical and electronic equipment must not be put in the household waste, but must be disposed of via designated public disposal centres. By properly disposing of the old device, you can avoid environmental damage and hazards to health. Further information regarding disposal of the old device can be obtained from your local authority or the shop where you purchased the device.
The integrated battery cannot be removed for disposal.

The battery used in this device does not belong in normal domestic waste and must be disposed of in the appropriate way. Contact your local collection point. Point out during disposal that the device contains a battery.
Make sure the packaging is disposed of in an environmentally friendly manner. Cardboard packaging can be put out for waste-paper collection or taken to public collection points for recycling. The plastic packaging used for your device is collected by your local waste management company and disposed of in an environmentally-friendly manner.
11. Marks of conformity

This device conforms to the fundamental requirements and other relevant regulations of the EMC Directive 2014/30/EU, the Directive on Low Voltage Equipment 2014/35/EU and the RoHS Directive 2011/65/EU.
You can download the full EU declaration of conformity at the following link: www.targa.de/downloads/conformity/285966.pdf
12. Notes on guarantee and service
Warranty of TARGA GmbH
This device is sold with three years warranty from the date of purchase. Please keep the original receipt in a safe place as proof of purchase. Before using your product for the first time, please read the enclosed documentation. Should any problems arise which cannot be solved in this way, please call our hotline. Please have the article number and, if available, the serial number to hand for all enquiries. If it is not possible to solve the problem on the phone, our hotline support staff will initiate further servicing procedures depending on the fault. Within the warranty period the product will be repaired or replaced free of charge as we deem appropriate. No new warranty period commences if the product is repaired or replaced. Consumables such as batteries, rechargeable batteries and lamps are not covered by the warranty.
Your statutory rights towards the seller are not affected or restricted by this warranty.

Service

Phone: 020 - 70 49 04 03
E-Mail: service.GB@targa-online.com

Phone: 01-4370121
E-Mail: service.IE@targa-online.com

Phone: 027 78 11 03
E-Mail: service.MT@targa-online.com

Phone: 02 - 20 09 025
E-Mail: service.CY@targa-online.com
IAN: 285966

Manufacturer
TARGA
GmbH
Coesterweg 45
DE-59494 Soest
GERMANY
Περιεχόμενα
7.4. Reisesicherung



- ROTARY SHAVER SRD 600 A1
- TABLE OF CONTENTS
- CONGRATULATIONS
- INTENDED USE
- PACKAGE CONTENTS
- TECHNICAL DATA
- SHAVER
- MAINS ADAPTER
- SAFETY INSTRUCTIONS
- COPYRIGHT
- BEFORE INITIAL USE
- CHARGING THE BATTERY
- INITIAL USE
- MAINS OPERATION
- BATTERY MODE
- ENGLISH
- USING THE CUTTER
- TRAVEL SAFETY LOCK
- CLEANING/MAINTENANCE
- CLEANING
- CLEANING AFTER EACH USE
- CLEANING THE CUTTER SYSTEM
- CLEANING THE CUTTER
- THOROUGH CLEANING PROCESS
- MAINTENANCE
- STORING THE DEVICE WHEN NOT IN USE
- ENVIRONMENTAL AND WASTE DISPOSAL INFORMATION
- THE INTEGRATED BATTERY CANNOT BE REMOVED FOR DISPOSAL
- MARKS OF CONFORMITY
- NOTES ON GUARANTEE AND SERVICE
- WARRANTY OF TARGA GMBH
- SERVICE
- IAN: 285966
- MANUFACTURER
- ΠΕΡΙΕΧΌΜΕΝΑ
- REISESICHERUNG
Brand : SILVERCREST
Model : SRD 600 A1
Category : Razor