DesignMax DM6SE - Speakers BOSE - Free user manual and instructions
Find the device manual for free DesignMax DM6SE BOSE in PDF.
| Product Type | In-ceiling loudspeaker for fixed installation |
| Brand | Bose |
| Model | DesignMax DM6SE |
| Height | 340 mm |
| Width | 222 mm |
| Depth | 229 mm |
| Net weight (speaker with grille and bracket) | 6.40 kg |
| Gross weight (pair of speakers) | 14.74 kg |
| Electrical power | 70 V / 100 V or 8 Ω |
| Power (70 V) | 2.5 W, 5 W, 10 W, 20 W, 40 W, 80 W |
| Power (100 V) | 5 W, 10 W, 20 W, 40 W, 80 W |
| Impedance | 8 Ω (for direct use) |
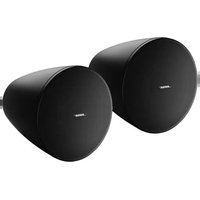
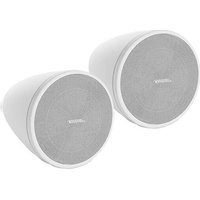
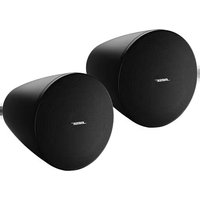
| Main features | Professional fixed installation, outdoor use (damp), adjustable orientation (0°, 15°, 30°, 45°), rotatable logo, removable grille, weather-resistant input protective cover |
| Care and cleaning | Clean only with a dry cloth; do not use soap, detergent, alcohol or chemical products |
| Safety | Installation by professional technician only; do not repair yourself; use a secondary safety cable if required; do not install near heat sources |
| Spare parts and accessories | Mounting bracket included; options: tilt bracket (Surface-Mount Pan and Tilt Bracket), CMBS2 ceiling bracket (indoor), pole mount |
| Repairability | Maintenance by authorized centers only; no user repair |
| General information | Limited warranty; compliant with UL 1480A, IEC 60268-5 standards; outdoor use (damp environment); class 1, 2 or 3 wiring |
| Recommended wire gauge | 18 AWG (0.8 mm²) to 14 AWG (2.1 mm²) |
| Logo color | Rotatable to align with speaker orientation |
Frequently Asked Questions - DesignMax DM6SE BOSE
User questions about DesignMax DM6SE BOSE
0 question about this device. Answer the ones you know or ask your own.
Ask a new question about this device
Download the instructions for your Speakers in PDF format for free! Find your manual DesignMax DM6SE - BOSE and take your electronic device back in hand. On this page are published all the documents necessary for the use of your device. DesignMax DM6SE by BOSE.
USER MANUAL DesignMax DM6SE BOSE
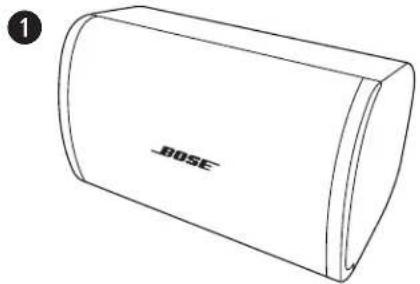
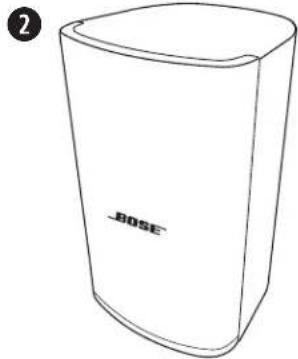
Surface-mount Loudspeaker
Installation Guide. 2
Guia de instalacion 9
Please read and keep all safety and use instructions.
This product is intended for installation by professional installers only! This document is intended to provide professional installers with basic installation and safety guidelines for this product in typical fixed-installation systems. Please read this document and all safety warnings before attempting installation.
Do not attempt to service this product yourself. Refer all servicing to authorized service centers, installers, technicians, dealers or distributors. To contact Bose Professional or to find a dealer or distributor near you, visit BoseProfessional.com.
- Read these instructions.
- Keep these instructions.
- Heed all warnings.
- Follow all instructions.
- Do not block any ventilation openings. Install in accordance with the manufacturer's instructions.
- Do not install near any heat sources such as radiators, heat registers, stoves, or other apparatus (including amplifiers) that produces heat.
- Only use attachments/accessories specified by the manufacturer.

WARNING/CAUTIONS


This product contains magnetic material. Consult your physician on whether this might affect your implantable medical device.
- It is the responsibility of the installer to use a support system which has sufficient wind load strength to comply with the applicable codes and standards.
- All Bose Professional products must be installed in accordance with local, state, federal and industry regulations. It is the installer's responsibility to ensure installation of the loudspeakers and mounting system is performed in accordance with all applicable codes, including local building codes and regulations. Consult the local authority having jurisdiction before installing this product.
- This product is not intended for installation or use in indoor water facility areas (including, without limitation, indoor pools, indoor water parks, hot tub rooms, saunas, steam rooms and indoor skating rinks).
- Unsafe mounting or overhead suspension of any heavy load can result in serious injury or death, and property damage. It is the installer's responsibility to evaluate the reliability of any mounting method used for their application. Only professional installers with the knowledge of proper hardware and safe mounting techniques should attempt to install any loudspeaker overhead.
- Do not mount on surfaces that are not sturdy, or that have hazards concealed behind them, such as electrical wiring or plumbing. If you are not sure about installing the bracket, contact a qualified professional installer. Ensure the bracket is installed according to local building codes.
- Use only the hardware and accessories included or specified by Bose Professional for use with DesignMax DM6SE loudspeakers. Hardware for securing the loudspeaker to the mounting surface is not supplied. For information on compatible accessories, see the product's technical data sheet at BoseProfessional.com.
- Keep the product away from fire and heat sources. Do not place naked flame sources, such as lighted candles, on or near the product.
- Do not make unauthorized alterations to this product.
- The DesignMax DM6SE wall-mounting bracket is only for use with model DM6SE.
- Do not expose loudspeaker or mounting components to any chemical substances that are not specified by Bose Professional, including but not limited to lubricants, cleaning agents, contact sprays, or other hydrocarbon-based solvents. Exposure to such substances can lead to degradation of the plastic material, resulting in cracking and creating a falling hazard.
- Clean speakers using only a dry cloth. Do not expose loudspeaker to soap, detergent, mineral oil, alcohol or other cleaning agents or chemicals.
Product Ratings:
Input Voltage: 70V/100V
Impedance: 8 Ω, 100 W
Current or Power: (70V): 2.5W, 5W, 10W, 20W, 40W, 80W; (100V): 5W, 10W, 20W, 40W, 80W
Regulatory Information
This product conforms to all applicable EU directive requirements. The complete declaration of conformity can be found at: www.Bose.com/compliance.

This product conforms to all applicable Electromagnetic Compatibility Regulations 2016 and all other applicable UK regulations. The complete declaration of conformity can be found at: www.Bose.com/compliance
This symbol means the product must not be discarded as household waste, and should be delivered to an appropriate collection facility for recycling. Proper disposal and recycling helps protect natural resources, human health and the environment. For more information on disposal and recycling of this product, contact your local municipality, disposal service, or the shop where you bought this product.
China Restriction of Hazardous Substances Table
| Names and Contents of Toxic or Hazardous Substances or Elements | ||||||
| Toxic or Hazardous Substances and Elements | ||||||
| Part Name | Lead (Pb) | Mercury (Hg) | Cadmium (Cd) | Hexavalent (CR(VI)) | Polybrominated Biphenyl (PBB) | Polybrominated diphenylenether (PBDE) |
| PCBs X O O O | O O | |||||
| Metal Parts X O | O O O O | |||||
| Plastic Parts O | O O O O | O | ||||
| Speakers X O O | O O O | |||||
| Cables | X O O O O O | |||||
| This table is prepared in accordance with the provisions of SJ/T 11364. O: Indicates that this toxic or hazardous substance contained in all of the homogeneous materials for this part is below the limit requirement of GB/T 26572. X: Indicates that this toxic or hazardous substance contained in at least one of the homogeneous materials used for this part is above the limit requirement of GB/T 26572. | 15 | |||||
Taiwan Restriction of Hazardous Substances Table
| Equipment name: DesignMax DM6SE, Type designation: 829682 | ||||||
| Restricted substances and its chemical symbols | ||||||
| Unit | Lead (Pb) | Mercury (Hg) | Cadmium (Cd) | Hexavalent chromium (Cr+6) | Polybrominated biphenyls (PBB) | Polybrominated diphenyl ethers (PBDE) |
| PCBs | - | ○ | ○ | ○ | ○ | ○ |
| Metal Parts | - | ○ | ○ | ○ | ○ | ○ |
| Plastic Parts | ○ | ○ | ○ | ○ | ○ | ○ |
| Speakers | - | ○ | ○ | ○ | ○ | ○ |
| Cables | - | ○ | ○ | ○ | ○ | ○ |
| Note 1: "o" indicates that the percentage content of the restricted substance does not exceed the percentage of reference value of presence. Note 2: The "-" indicates that the restricted substance corresponds to the exemption. | ||||||
Date of Manufacture: The eighth digit in the serial number indicates the year of manufacture; "7" is 2007 or 2017.
EU Importer: Transom Post Netherlands B.V., Keizersgracht 391A, 1016 EJ, Amsterdam | UK Importer: Transom Post Netherlands UK, Squires House 205a High Street, West Wickham, BR4 0PH | Japan Importer: Transom Post International Japan KK Co., Ltd. PMO Tamachi IV Shiba5-29-19, Minato-ku, Tokyo | Australia Importer: Transom Post Australia Pty. Ltd., Level 14, 60 Margaret Street, Sydney, NSW 2000 | China Importer: Transom Post (Shanghai) Audio Co. Ltd Room 2209, Building 1, 175 Longyao Road, Xuhui District, Shanghai | Mexico Importer: POST INTL MEXICO, S. DE R.L. DE C.V. Insurgentes Sur No. 1079, 1st floor, Colonia Noche Buena, Benito Juarez, C.P. 03270, Mexico City | UAE Importer: 102 A, Sama Tower Sheikh Zayed Road, Dubai UAE
Bose is a trademark of Bose Corporation.
DesignMax is a trademark of Transom Post OpCo LLC.
Bose Professional, 117 South St, Hopkinton, MA 01748 USA
©2024 Transom Post OpCo LLC. No part of this work may be reproduced, modified, distributed or otherwise used without prior written permission.
Warranty Information
This product is covered by a limited warranty.
For warranty details, visit BoseProfessional.com/Warranty.
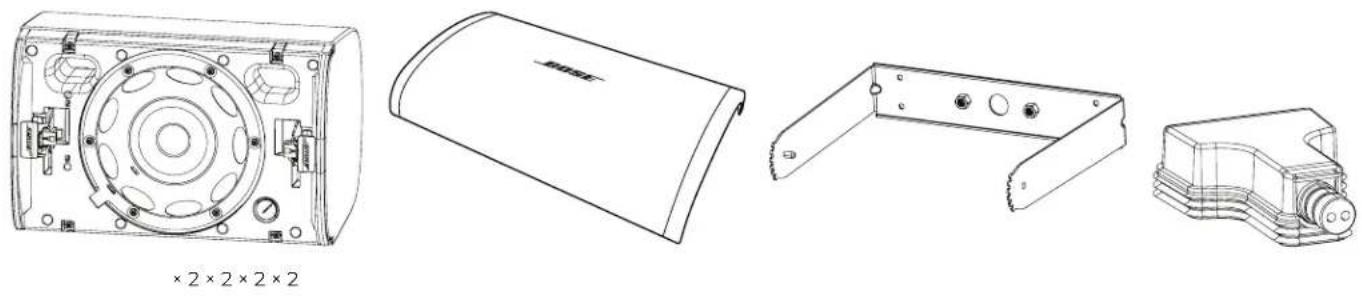
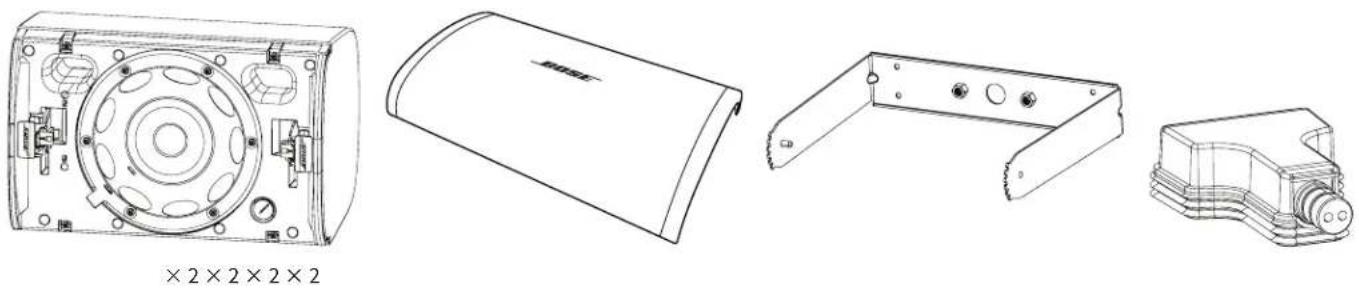
Package Contents
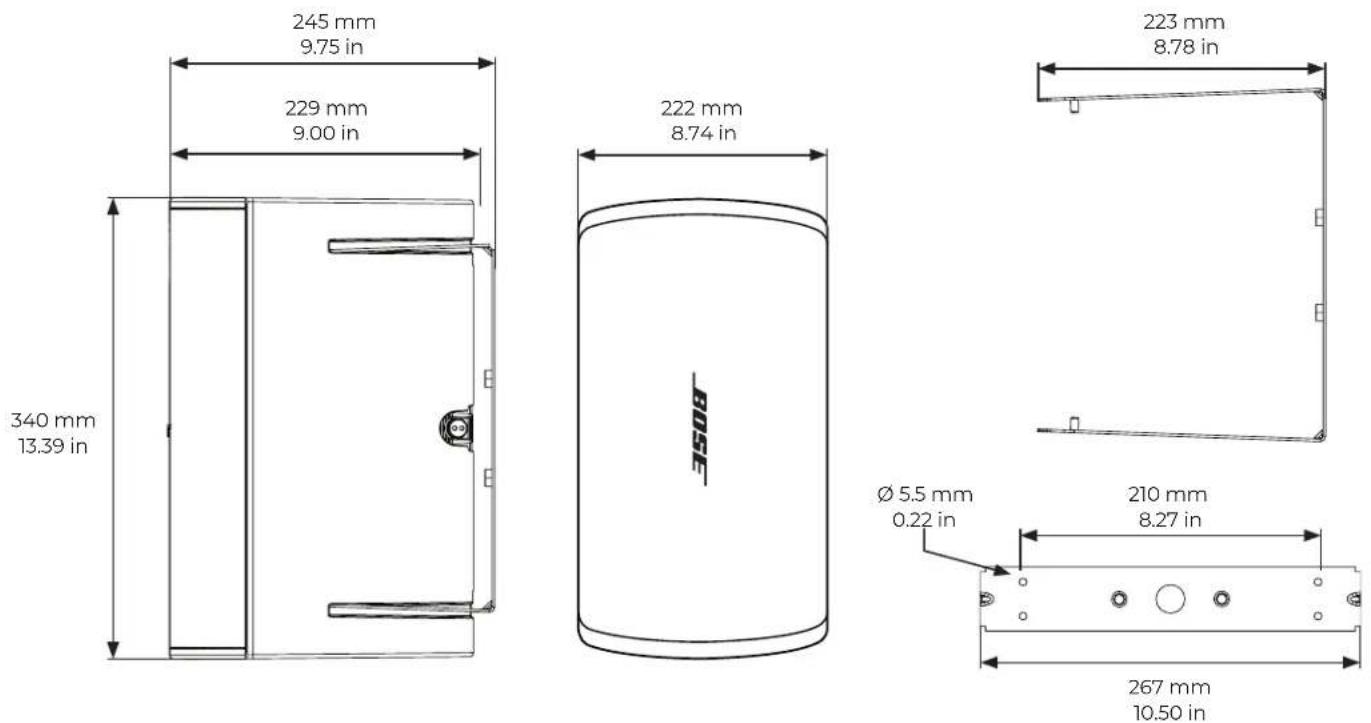
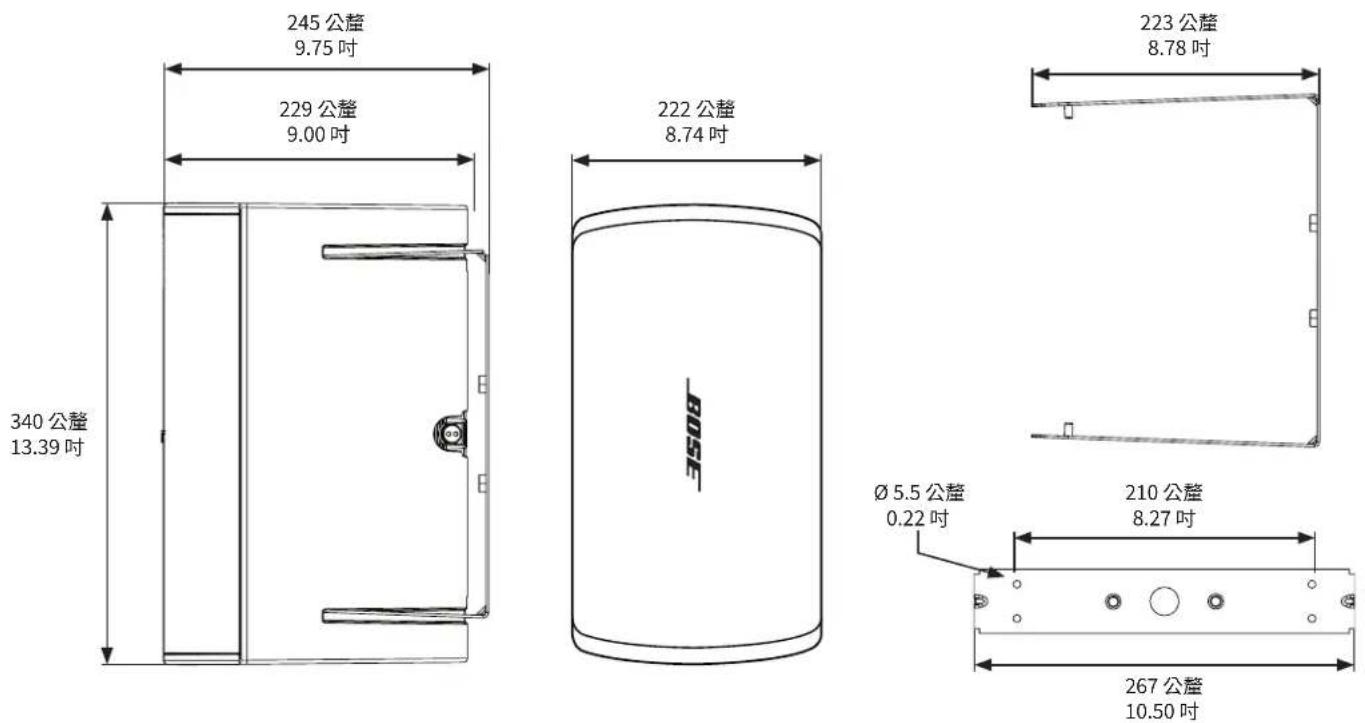
Product Dimensions
Technical Specifications
For additional specifications, see the DesignMax DM6SE technical data sheet at BoseProfessional.com.
| Physical | |
| Product Dimensions Height: 340 mm (13.39 in) | |
| Width: 222 mm (8.74 in) | |
| Depth: 229 mm (9.00 in) | |
| Net Weight, Loudspeaker with grille and bracket (single) | 6.40 kg (14.1 lb) |
| Shipping Weight (pair) 14.74 kg (32.5 lb) | |
Important Installation Information

Before installing the loudspeaker, review Important Safety Instructions on page 2.
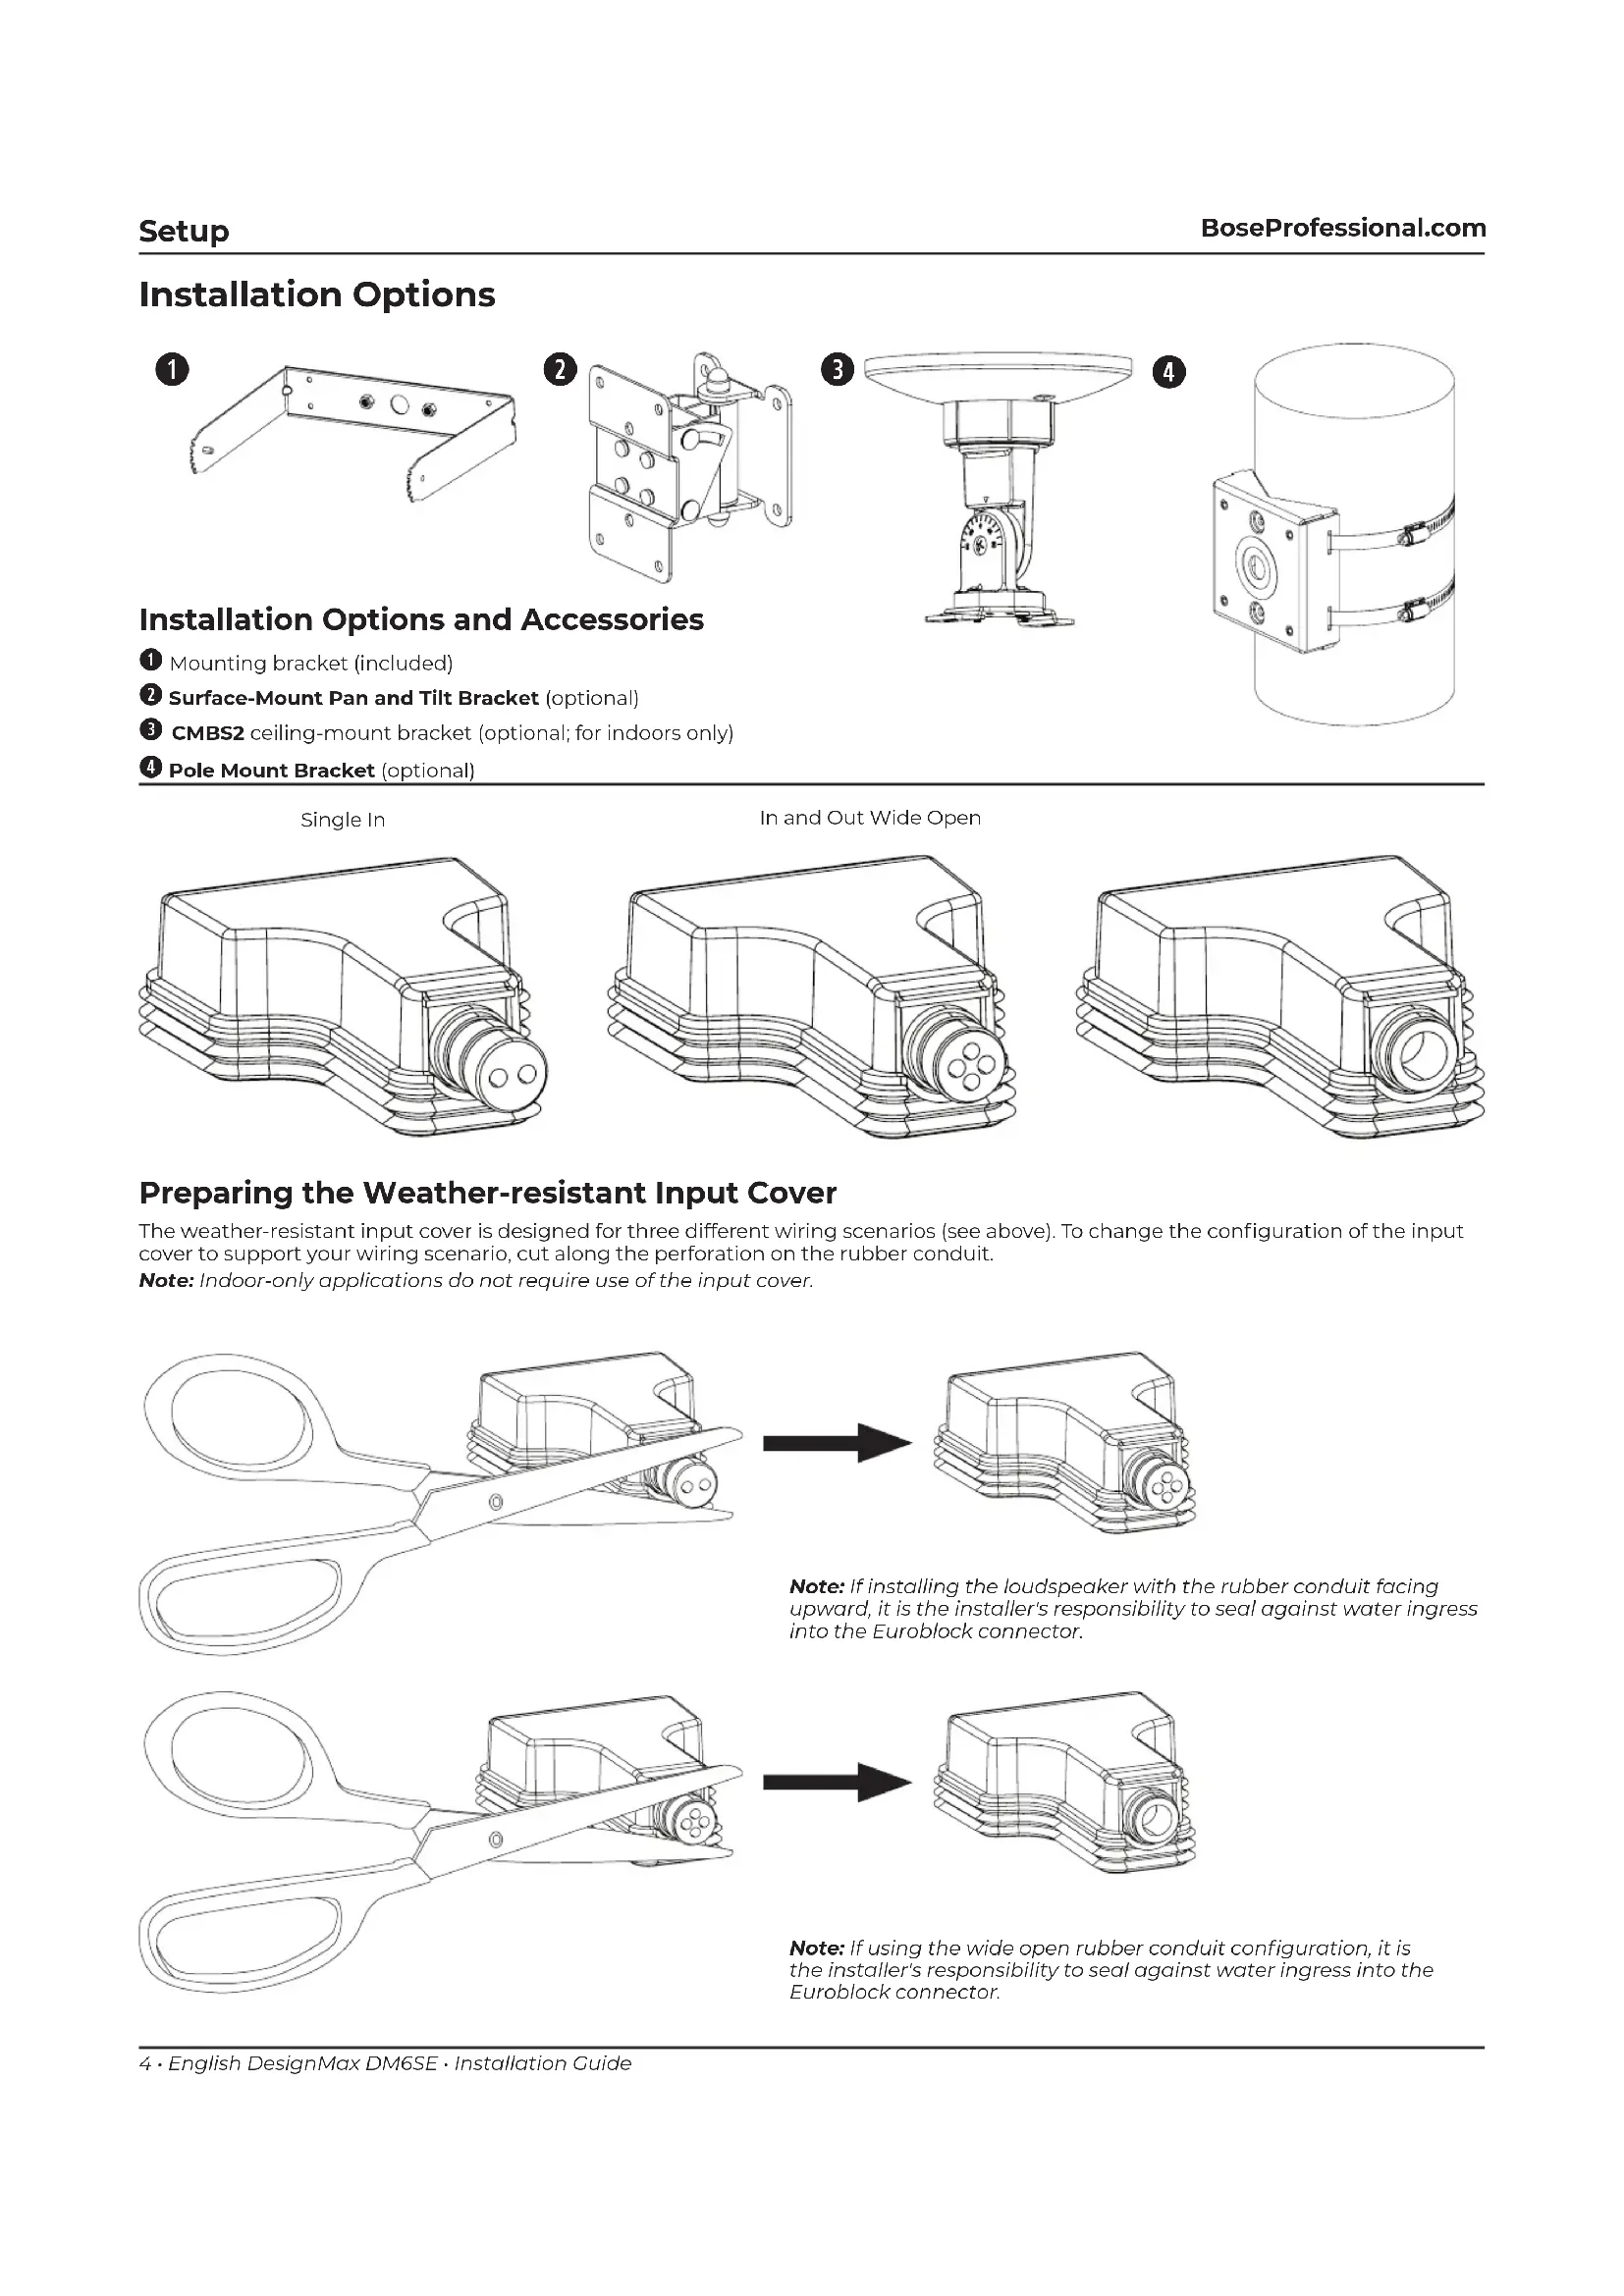
Installation Options
Installation Options and Accessories
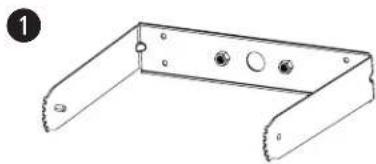
Mounting bracket (included)
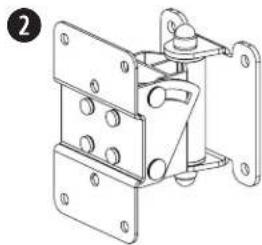
Surface-Mount Pan and Tilt Bracket (optional)
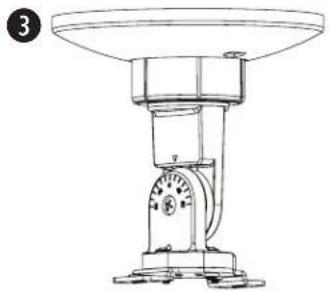
CMBS2 ceiling-mount bracket (optional; for indoors only)
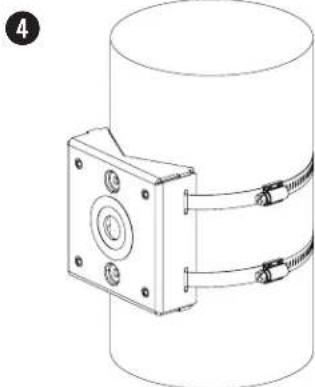
Pole Mount Bracket (optional)

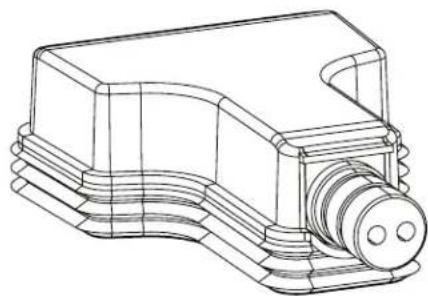
Single In
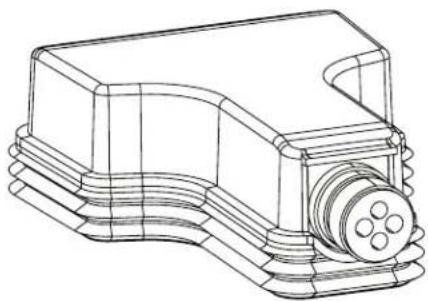
In and Out Wide Open
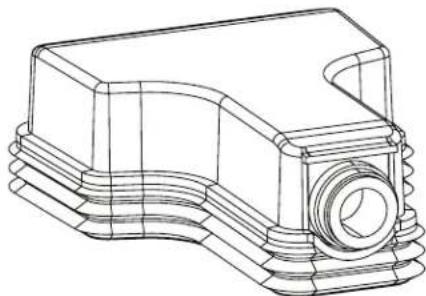
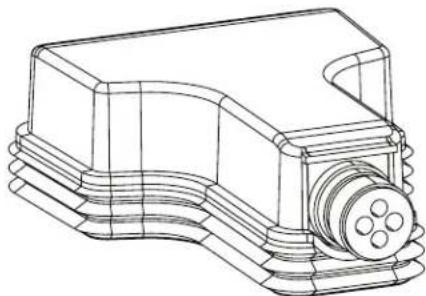
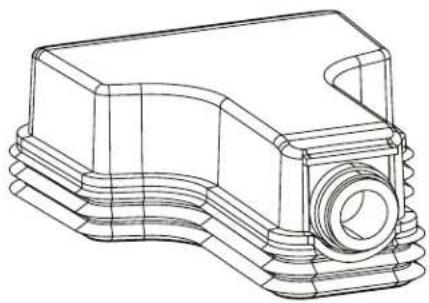
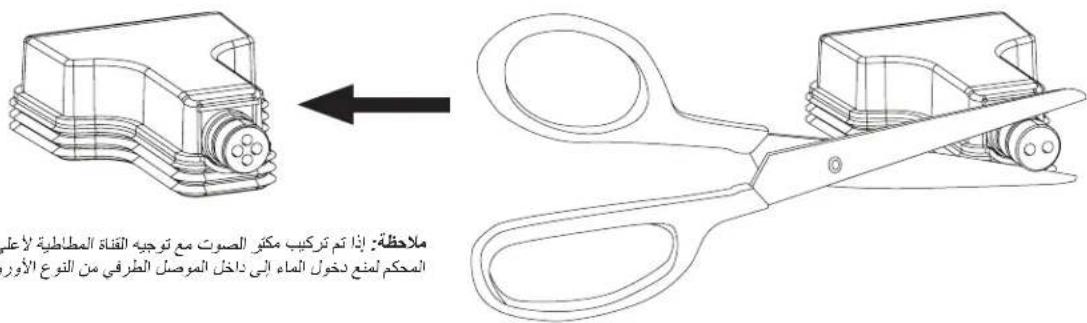
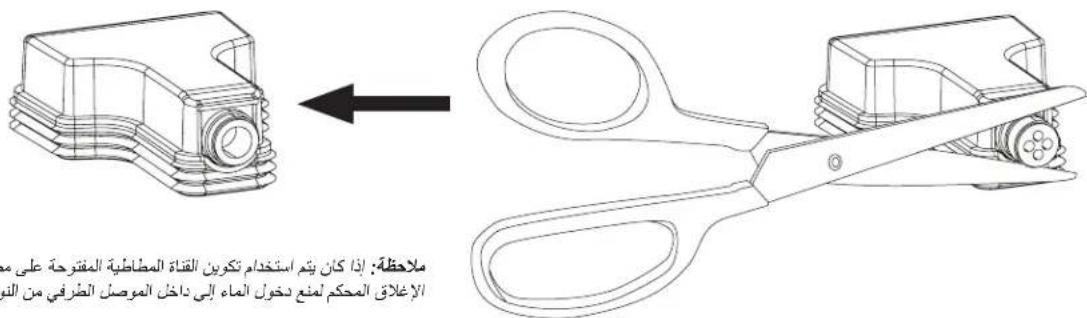
Preparing the Weather-resistant Input Cover
The weather-resistant input cover is designed for three different wiring scenarios (see above). To change the configuration of the input cover to support your wiring scenario, cut along the perforation on the rubber conduit.
Note: Indoor-only applications do not require use of the input cover.

Note: If installing the loudspeaker with the rubber conduit facing upward, it is the installer's responsibility to seal against water ingress into the Euroblock connector.
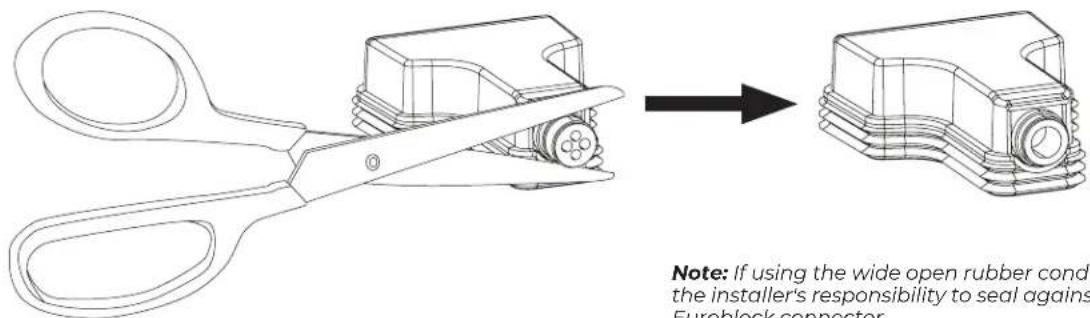
Note: If using the wide open rubber conduit configuration, it is the installer's responsibility to seal against water ingress into the Euroblock connector.
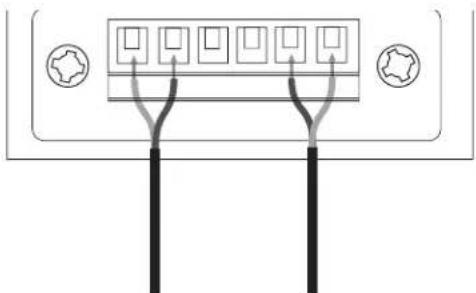
Wiring the Loudspeaker
Wire Gauge
The DesignMax DM6SE loudspeaker is designed to work with 18 AWG (0.8 mm²) to 14 AWG (2.1 mm²) size wire only.
Connection Diagrams
Expose six millimeters (1 / 4 inch) of bare wire to attach to the terminals.
Note: The loudspeaker is not rated for use with a rigid conduit. The loudspeaker is suitable for a flexible conduit or wiring connection only.
70V/100V
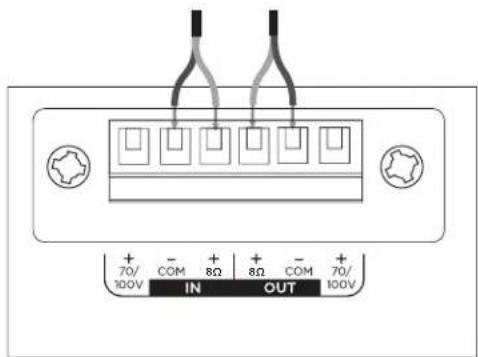
8Ω
Loudspeaker Settings
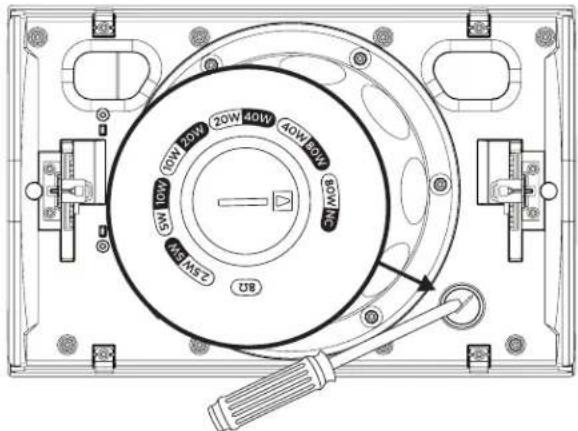
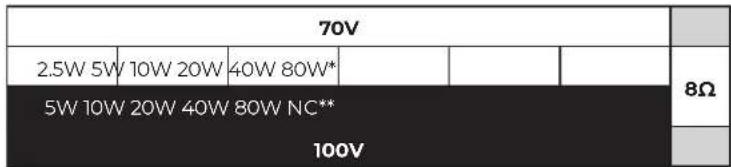
* NC: No Connection (do not use) Factory default
Transformer Tap Setting
Set tap by turning. Use a flat head screwdriver.
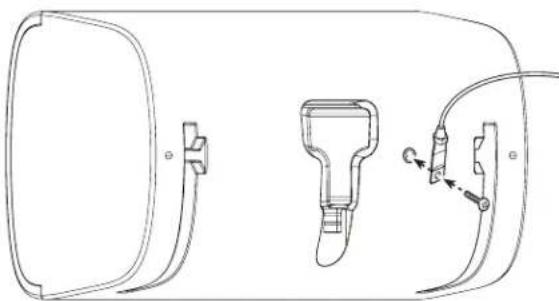
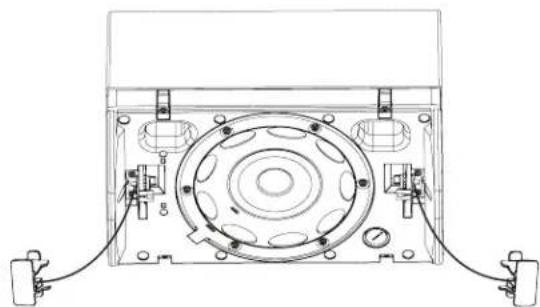
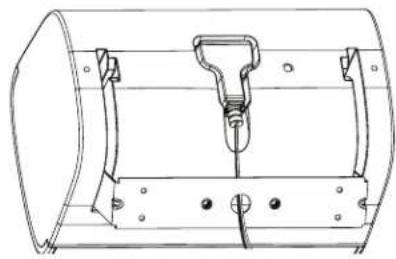
Using a Safety Cable
Some regional construction codes require the use of a secondary method of securing loudspeakers to support structures to provide additional safety. Choose a mounting position, method, and hardware consistent with local building codes and regulations.
A safety cable can be attached to the loudspeaker using the threaded insert on the back of the enclosure.
The insert is sized for an M8 screw (not included) with a depth of 15 millimeters (0.59 inches).
Loudspeaker Orientation
Choose the loudspeaker orientation best suited for your installation.
Horizontal
Vertical
Note: Installation in close proximity to cooking surfaces where the loudspeaker may be directly exposed to cooking oils, such as in commercial cooking environments, may decrease the performance or functionality of the loudspeaker.
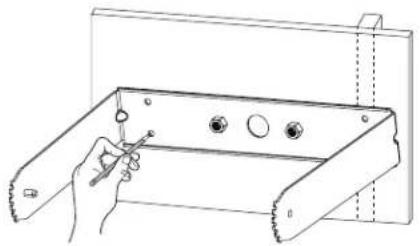
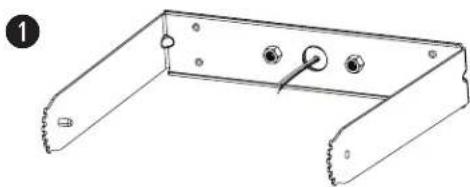
Installing the Bracket
Note: When choosing an installation location, at least two of the mounting bracket's attachment points must be secured to a support structure. Attachment points not secured to a support structure must be secured using appropriate hardware for the installation. Choose fasteners that are consistent with all local building codes and requirements.
Note: Choose appropriate fasteners to support the weight of the loudspeaker (6.40 kg [14.1 lb]).
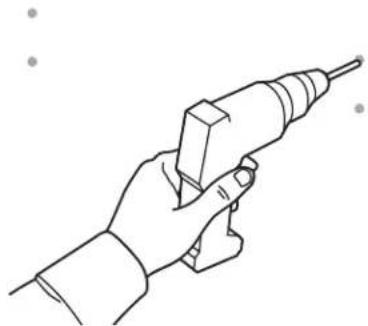
- Mark the drill holes.
- Drill four holes (sized for appropriate fasteners) into the wall.
- Secure the bracket to the wall with four screws (not included). Note: Use M5 or #10 sized screws.
1 2 3

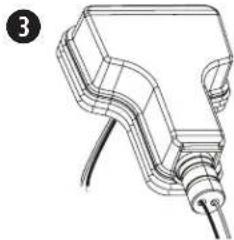
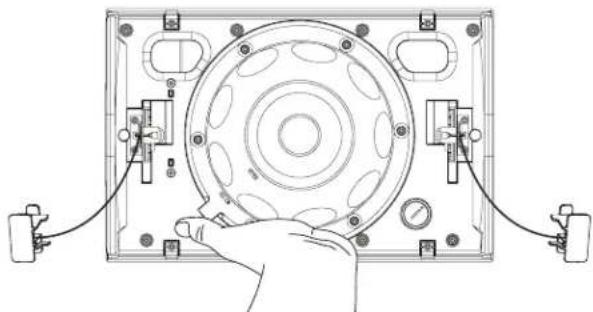
Wiring the Connector
- Feed the wires through the center hole of the bracket.
- Remove the connector from the loudspeaker.
- For outdoor installations, insert the wires through the bottom of the input cover. See Preparing the Weather-resistant Input Cover on page 4.
- Wire the connector. For wiring information, see Wiring the Loudspeaker on page 5.
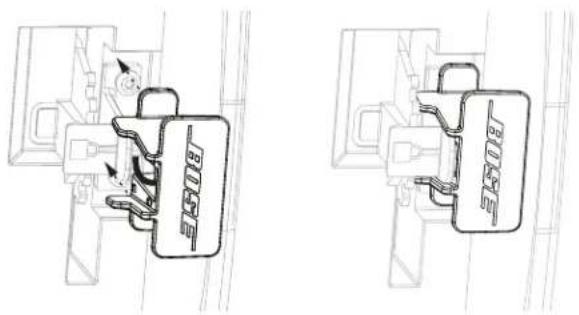
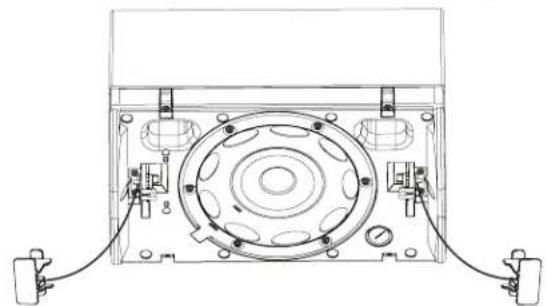
Important Mounting Information
Bracket lock tabs: Used to secure the loudspeaker angle.
Grille release tabs: Used to secure the grille to the loudspeaker.
Lock blockers: Used to secure the loudspeaker to the mounting bracket.
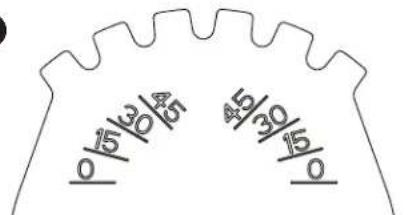
Angle labels (on bracket): Identify your desired angle position.
4
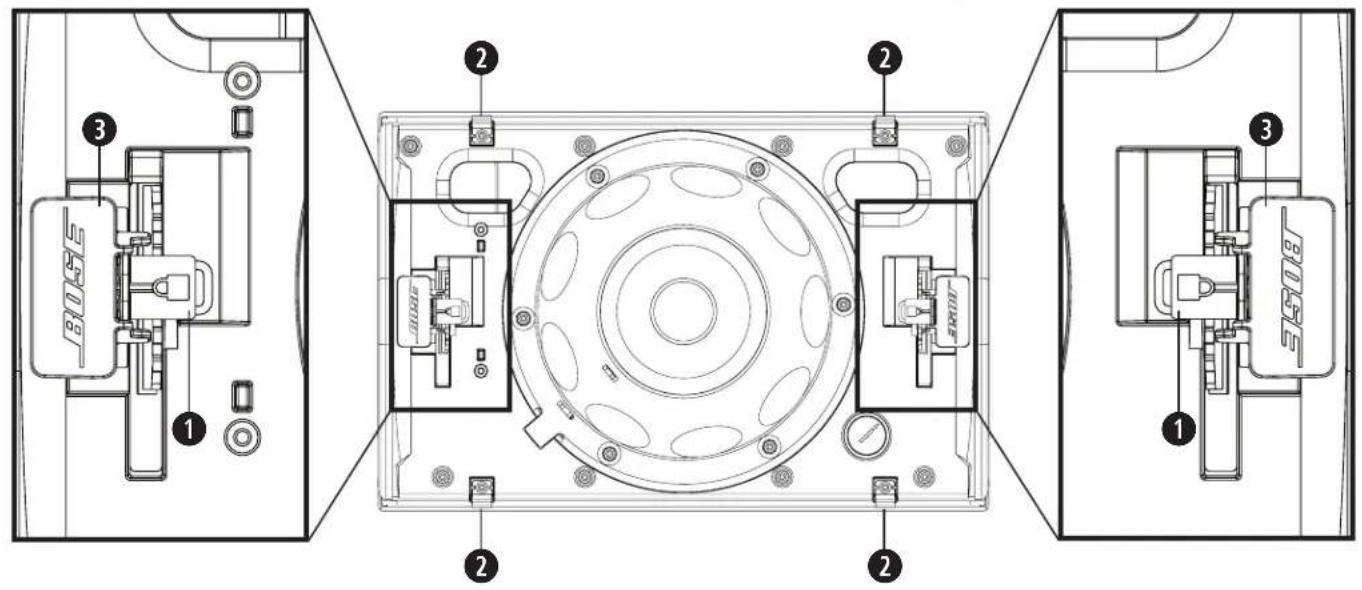
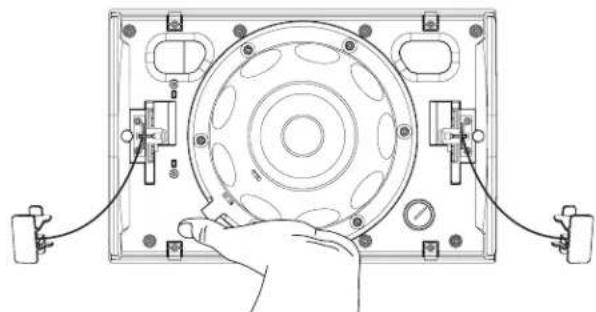
Installing the Loudspeaker

WARNING: Failure to follow the steps below could lead to an unsafe mounting condition, which could create a falling hazard.
- Remove the lock blockers from the lock tabs. Make sure not to pull the lock blocker tethers out of the loudspeaker.
- Attach the loudspeaker to the bracket, unlock lock tabs to adjust the loudspeaker to 45^ , and lock the tabs into place.
- Attach the wired connector to the loudspeaker.
- For outdoor installations, place the weather-resistant input cover over the connector and press it firmly against the loudspeaker to create a tight seal. See Preparing the Weather-resistant Input Cover on page 4.

- Unlock the tabs and adjust the loudspeaker to your desired angle. Make sure to support the weight of the loudspeaker while you adjust the loudspeaker angle. Note: The angle of the loudspeaker can be adjusted to 0^ , 15^ , 30^ , or 45^ .
- Lock the tabs into place.
- Press the lock blockers onto the lock tabs until the blockers snap securely around the tabs, maintaining the desired loudspeaker angle.
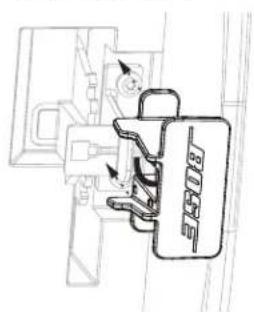
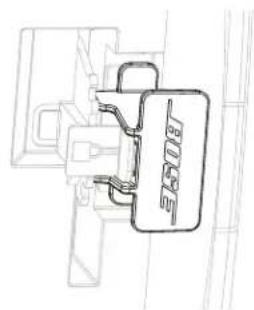
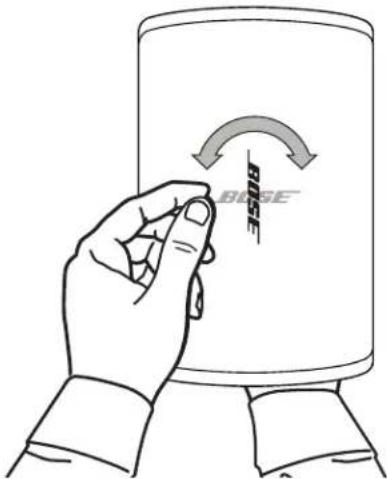
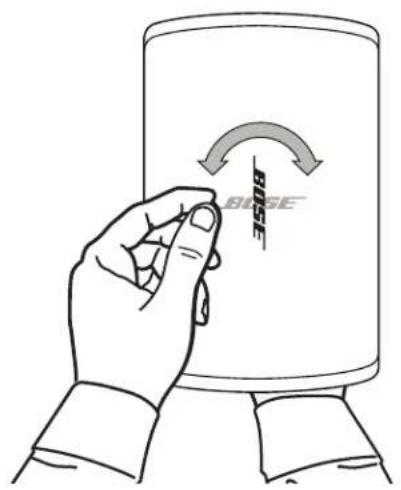
Adjusting the Logo
You can rotate the Bose logo to align with your loudspeaker orientation. With one hand, press the button on the back of the grille. Rotate the logo with the other hand. The logo can be rotated clockwise or counterclockwise.
Note: Do not pinch the button inward unless you intend to remove the logo.
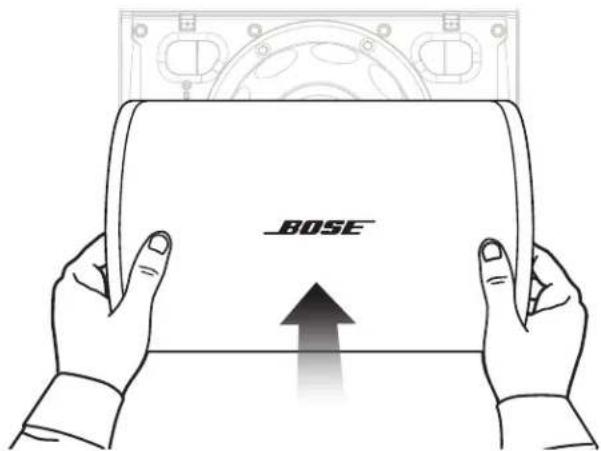
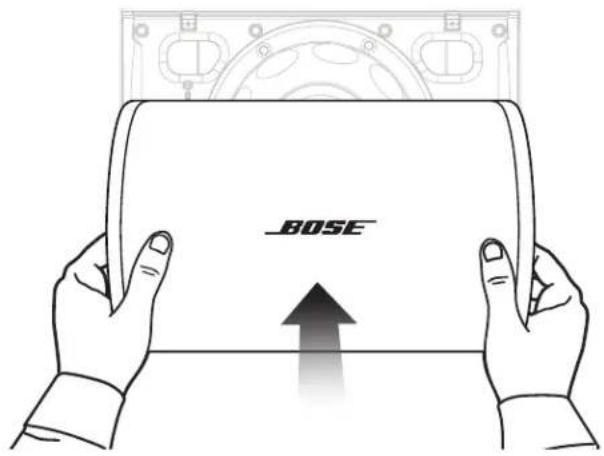
Attaching the Grille
Place the grille over the front of the loudspeaker and push it firmly until it snaps into place.
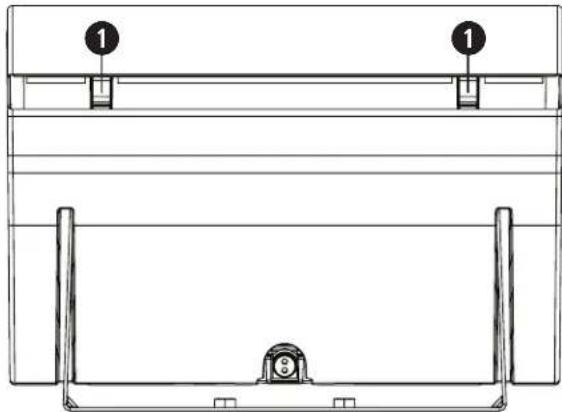
Removing the Grille
There are two small openings on either side of the grille (1). Along the side of the loudspeaker with the bracket slots, insert a small, flat tool into the grille openings to disengage the release tabs. Pull the grille away from the loudspeaker.
Safety and Regulatory Compliance
The DesignMax DM6SE loudspeaker has passed testing and complies with the following specifications and uses:
Listed to ANSI/UL 1480A-2016, Speakers for Commercial & Safety Professional Use
General-Purpose Use - UL Category UEAY, File Number S36835
The DesignMax DM6SE is suitable for use outdoors in wet locations
Suitable for installation using Class 1, Class 2, Class 3 wiring methods in accordance with NFPA 70, National Electrical Code, 2017
Article 640
The DesignMax DM6SE loudspeaker has been designed to the requirements defined in the following European regulatory specification for combination systems:
Tested to IEC60268-5, 2007
ANSI/UL 1480A-2016, Speakers for Commercial & Safety Professional Use
General-Purpose Use - UL Category UEAY, File Number S36835
Australsk importar: Transom Post Australia Pty. Ltd., Level 14, 60 Margaret Street, Sydney, NSW 2000 | Importar for Kina: Transom Post (Shanghai) Audio Co. Ltd Room 2209, Building 1, 175 Longyao Road, Xuhui District, Shanghai | Importar for Mexico: POST INTL MEXICO, S. DE R.L. DE C.V. Insurgentes Sur No. 1079, 1st floor
Colonia Noche Buena, Benito Juarez, C.P. 03270, Mexico City | Importor for De forente arabiske emirater: 102 A, Sama Tower Sheikh Zayed Road, Dubai UAE Bose er et varemerke for Bose Corporation.
DesignMax er et varemerke for Transom Post OpCo LLC.
Bose Professional, 117 South St, Hopkinton, MA 01748 USA
| Importer — Australia: Transom Post Australia Pty. Ltd., Level 14, 60 Margaret Street, Sydney, NSW 2000 | Importer — Chiny: Transom Post (Shanghai) Audio Co. Ltd Room 2209, Building 1, 175 Longyao Road, Xuhui District, Shanghai | Importer — Meksyk: POST INTL MEXICO, S. DE R.L. DE C.V. Insurgentes Sur No. 1079, 1st floor, Colonia Noche Buena, Benito Juarez, C.P.03270, Meksyk | Importer — ZEA: 102A, Sama Tower Sheikh Zayed Road, Dubaj, ZEA
National Electric Code, 2017, art. 640
欧盟進口商:Transom Post Netherlands B.V., Keizersgracht 391A, 1016 EJ, Amsterdam | 英國進口商:Transom Post Netherlands UK, Squires House 205a High Street, West Wickham, BR4 0PH | 日本進口商:Transom Post International Japan KK Co., Ltd. PMO Tamachi IV Shiba5-29-19, Minato-ku, Tokyo | 澳洲進口商:Transom Post Australia Pty. Ltd., Level 14, 60 Margaret Street, Sydney, NSW 2000 | 中國進口商:Transom Post (Shanghai) Audio Co. Ltd Room 2209, Building 1, 175 Longyao Road, Xuhui District, Shanghai | 墨西哥進口商:POST INTL MEXICO, S. DE R.L. DE C.V. Insurgentes Sur No. 1079, 1st floor, Colonia Noche Buena, Benito Juarez, C.P. 03270, Mexico City | 阿拉伯聯合大公國進口商: 102 A, Sama Tower Sheikh Zayed Road, Dubai UAE
(100V):5W·10W·20W·40W·80W
包装内容物
產品尺寸
技術規格
This product conforms to all applicable EU directive requirements. The complete declaration of conformity can be found at: www.Bose.com/compliance.
This symbol means the product must not be discarded as household waste, and should be delivered to an appropriate collection facility for recycling. Proper disposal and recycling helps protect natural resources, human health and the environment. For more information on disposal and recycling of this product, contact your local municipality, disposal service, or the shop where you bought this product.
ANSI/UL1480A-2016Speakers for Commercial & Safety Professional Use
一般用途向の使用-UL Category UEAY、File Number S36835
Transom Post Netherlands B.V., Keizersgracht 391A, 1016: J. Amsterdam Transom Post Netherlands UK, Squires House 205a High Street, West Wickham, BR4 0PH Transom Post International Japan KK Co., Ltd. PMO Tamachi IV: Transom Post Australia | Shiba5-29-19, Minato-ku Pty. Ltd., Level 14, 60 Margaret Street, Sydney, NSW 2000 Transom Post (Shanghai) Audio Co. Ltd Room 2209, Building 1, 175 Longyao Road, Xuhui District MEXICO, S. DE R.L. DE C.V. Insurgentes Sur No. 1079, 1st floor, Colonia Noche Buena, Benito Juarez, C.P. 03270 Bose Corporation DesignMax Bose Professional, 117 South St, Hopkinton, MA 01748 USA
Jaaalll Jaaaiae
1
Bose Professional.com
1
2
3
4
5
a
a jai 1 aiei ciae i aiei jai jai jai jai jai jai jai jai jai jai jai jai jai jai jai jai jai jai jai jai jai jai jai jai jai jai jai jai jai jai jai jai jai jai jai jai jai jai jai jai jai jai jai jai jai jai jai jai jai jai jali jali jali jali jali jali jali jali jali jali jali
jie gill (yall chuaan ellg) jyll ylae
7
.

1 1

y
Bose Professional
y 1 y
jaiy jaiy jaiy jaiy jaiy jaiy jaiy jaiy jaiy jaiy jaiy jaiy jaiy jaiy jaiy jaiy jaiy jaiy jaiy jaiy jaiy jaiy jaiy jaiy jaiy jaiy jaiy jaiy jaiy jaiy jaiy jaiy jaiy jaiy jali y
中
S ADB = S COD + S_ BDO
Surface-Mount Pan and (y)
Tilt Bracket
()CMBS2
Pole Mount Bracket (4)
j 1
中
aabllagjglgall jlae b
y
y
1 2
J 3
.81 8
.4
.82

5
45 30 15 0
6 1
gall jka 15
aie aie aeae eae

45 45
gall y gll jay 3
jall gll gll gll gll gll gll gll gll gll gll gll gll gll gll gll gll gll gll gll gll gll gll gll gll gll gll gll gll gll gll gll gll gll gll gll gll gll gll gll gll gll gll gll gll gll gll gll gll gll gll gell
y jai
Aa
Jaa
a jai y g aal jil g bauai, gaaal jkaal g aai lal Bose jaiy gai kaj
aai jai jaii ay iay jaii ayiy ayiy ayiy ayiy ayiy ayiy ayiy ayiy ayiy ayiy ayiy ayiy ayiy ayiy ayiy ayiy ayiy ayiy ayiy ayiy ayiy ayiy ayiy ayiy ayiy ayiy ayiy ayiy ayiy ayiy ayiy ayiy ayiy ayiy ayiy ayiy ayiy ayiy ayiy ayiy ayiy ayiy ayiy ayiy ayiy ayiy ayiy ayiy ayiy ayiy ayll
aill cai aai jy jie 1) jall jalil qn no uq uge jia jia d

aaiiil J1y 10
DesignMax DM6SE j
AaI aI aI aI aI aI aI aI aI aI aI aI aI aI aI aI aI aI aI aI aI aI aI aI aI aI aI aI aI aI aI aI aI aI aI aI aI aI aI aI aI aI aI aI aI aI aI aI aI aI aI
S36835 1UL UUEAY - aale j
DesignMax DM6SE