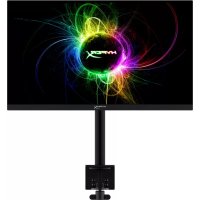
Armada 25 - Monitor HYPERX - Free user manual and instructions
Find the device manual for free Armada 25 HYPERX in PDF.
| Brand | HyperX |
| Model | Armada 25 |
| Product type | Gaming monitor with articulated arm |
| Screen size | 24.5 inches (62.2 cm) |
| Screen type | IPS, matte panel |
| Native resolution | 1920 x 1080 (Full HD) |
| Max refresh rate | 240 Hz |
| Response time | 1 ms (GtG with OD) |
| Brightness | 400 nits |
| Contrast ratio | 1000:1 |
| Viewing angle | 178° horizontal and vertical |
| Color gamut | sRGB 99% |
| Video inputs | 1x DisplayPort 1.4, 2x HDMI 2.0 |
| Power supply | 100-240 V AC, 50/60 Hz |
| Typical power consumption | 22 W |
| VESA compatibility | 75x75 mm and 100x100 mm |
| Monitor weight (alone) | 2.9 kg |
| Monitor dimensions (W x H x D) | 55.74 x 33.02 x 6.12 cm |
| Arm reach | 31.2 ± 0.5 cm |
| Tilt | -25° to +60° |
| Swivel/Pivot | Swivel ±90°, pivot ±90°, arm ±180° |
| Maintenance | Clean with antistatic cloth and 50% water / 50% isopropyl alcohol solution |
Frequently Asked Questions - Armada 25 HYPERX
User questions about Armada 25 HYPERX
0 question about this device. Answer the ones you know or ask your own.
Ask a new question about this device
Download the instructions for your Monitor in PDF format for free! Find your manual Armada 25 - HYPERX and take your electronic device back in hand. On this page are published all the documents necessary for the use of your device. Armada 25 by HYPERX.
USER MANUAL Armada 25 HYPERX
HyperX Armada 25 FHD Gaming Monitor
Find the language and latest documentation for your HyperX Armada 25 FHD Gaming Monitor here.
HyperX Armada 25 FHD Gaming Monitor Installation Guide
For instructions in English
Para instrucciones en Espanol
+ .Fur Anleitungen in Deutsch
Pour des instructions en Francais
Per le istruzioni in Italiano
... Por as instruções em Português
Instrukcje w jezyku Polskim
Дяинструкши Ha Pycckom
C. Turkce talimatlar icin
日本語マニアル用
..
..
* DExem hong dan bang tieng Viet
Simplified Chinese....简体中文说明书
Traditional Chinese....繁體中文說明
Arabic.
HyperX Armada 25 FHD Gaming Monitor
N22234-001
TABLE OF CONTENTS
Getting Started 5
Important safety information 5
Getting to know your monitor. 6
Components. 6
Locating the serial number and product number 8
Setting up the monitor 9
Using the C clamp. 9
Using the grommet mount. 9
Attaching the neck and mounting arm. 11
Adjusting the tension. 14
Connecting and routing the cables. 15
Adjusting the monitor. 16
Turning on the monitor 17
HyperX watermark and image retention policy 18
Mounting multiple monitors 18
Monitor mounting configurations 21
Using the monitor 22
Downloading software 22
Using the OSD menu 22
Display mode status. 23
Using Auto-Sleep mode 23
Troubleshooting 24
Solving common issues 24
HyperX Armada 25 FHD Gaming Monitor 24
Button lockouts 25
Questions or Setup Issues? 25
Maintaining the monitor 26
Maintenance guidelines 26
Cleaning the monitor 26
Shipping the monitor 27
Technical specifications 27
HyperX Armada 25 FHD Gaming Monitor 27
Preset display resolutions 29
Copyright 2022 HP Development Company, L.P.
HyperX and the HyperX logo are registered trademarks or trademarks of HP Development Co. in the U.S. and/or other countries. All registered trademarks and trademarks are property of their respective owners.
The information contained herein is subject to change without notice. The only warranties for HP products and services are set forth in the express warranty statements accompanying such products and services. Nothing herein should be construed as constituting an additional warranty. HP shall not be liable for technical or editorial errors or omissions contained herein.
Product notice
This guide describes features that are common to most models. Some features may not be available on your product.
First Edition: June 2022
Document part number: N22234-001
Getting Started
Important safety information
A power cord is included with the monitor. If you use another cord, use only a power source and connection appropriate for this monitor. For information about the correct power cord set to use with the monitor, see the Product Notices provided on the web at http://www.hp.com/go/regulatory.
WARNING! To reduce the risk of electric shock or damage to the equipment:
- Plug the power cord into an AC outlet that is easily accessible at all times.
- If the power cord has a three-pin attachment plug, plug the cord into a grounded (earthed) three-pin outlet.
- Disconnect power from the computer by unplugging the power cord from the AC outlet. When unplugging the power cord from the AC outlet, grasp the cord by the plug.
For your safety, do not place anything on power cords or cables. Take care to route all cords and cables connected to the monitor so that they cannot be stepped on, pulled, grabbed, or tripped over. To reduce the risk of serious injury, read the Safety & Comfort Guide available on the web at https://hyperx.gg/ergo. It describes proper workstation setup and proper posture, health, and work habits for computer users. The Safety & Comfort Guide also provides important electrical and mechanical safety information.
IMPORTANT: For the protection of the monitor and the computer, connect all power cords for the computer and its peripheral devices (such as a monitor, printer, scanner) to a surge protection device such as a power strip or uninterruptible power supply (UPS). Not all power strips provide surge protection; the power strip must be specifically labeled as having this capability. Use a power strip whose manufacturer offers a damage replacement policy so that you can replace the equipment if surge protection fails.
Use the appropriate and correctly sized furniture designed to properly support your monitor.
WARNING! Monitors that are inappropriately situated on dressers, bookcases, shelves, desks, speakers, chests, or carts could fall over and cause personal injury.
WARNING! Stability hazard: The device might fall, causing serious personal injury or death. To prevent injury, securely attach the monitor to the floor or wall in accordance with the installation instructions.
WARNING! This equipment is not suitable for use in locations where children are likely to be present.
NOTE: This product is suitable for entertainment purposes. Consider placing the monitor in a controlled luminous environment to avoid interference from surrounding light and bright surfaces that might cause disturbing reflections from the screen.
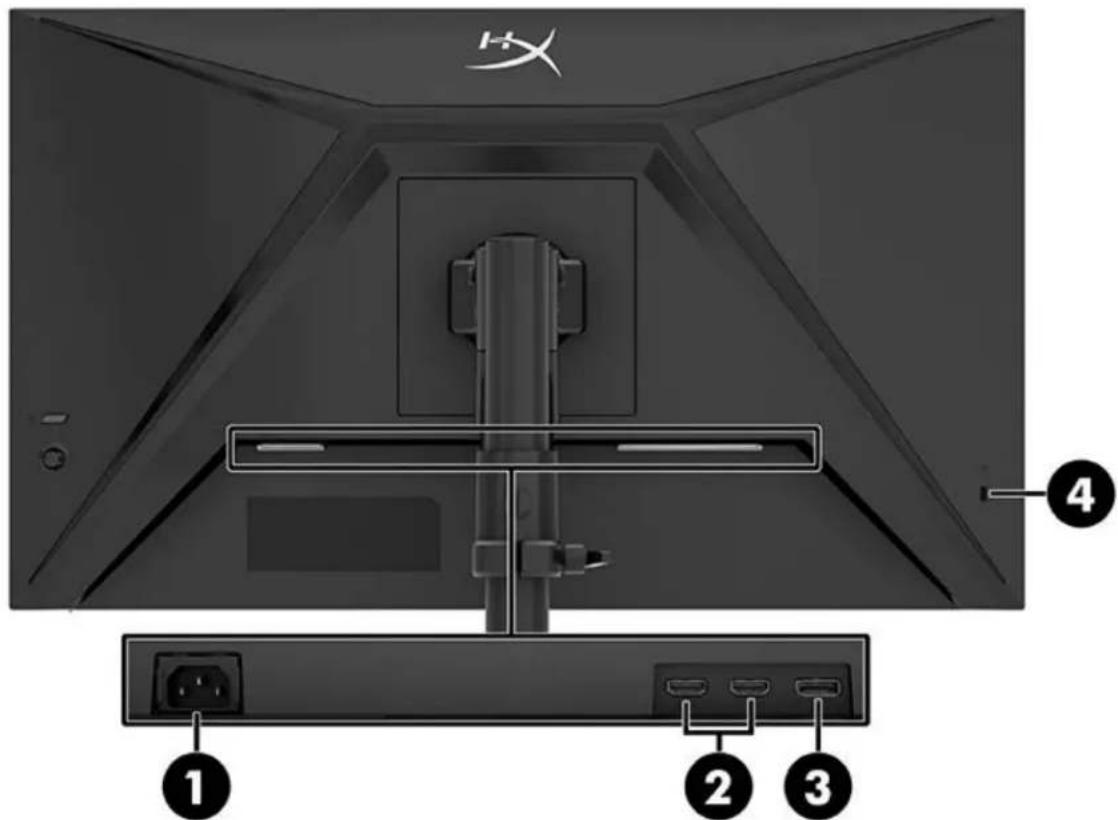
Getting to know your monitor
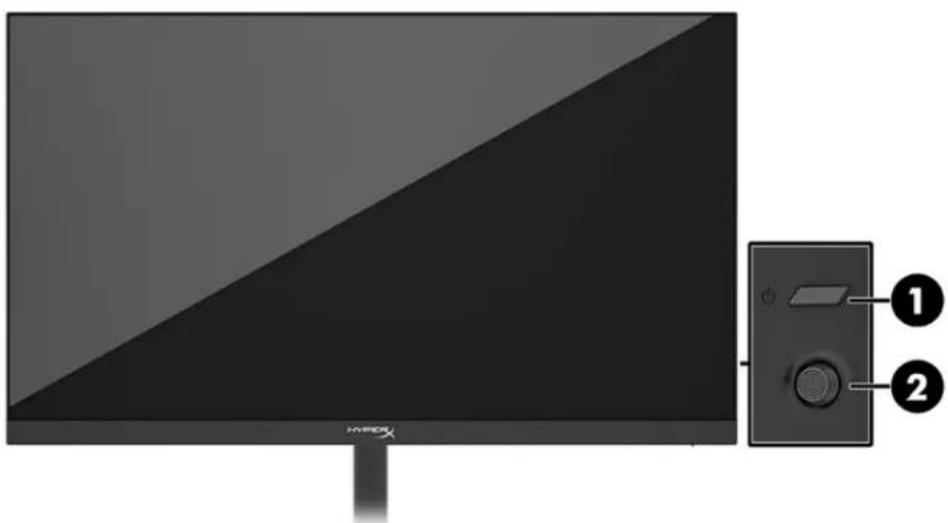
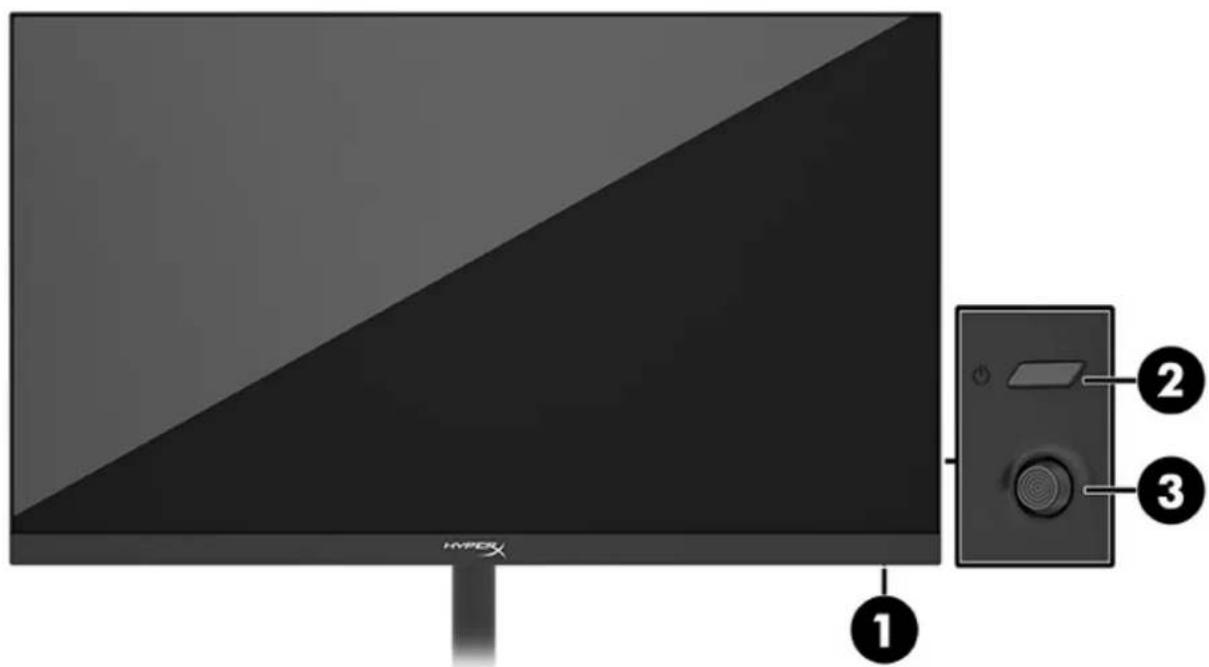
Components
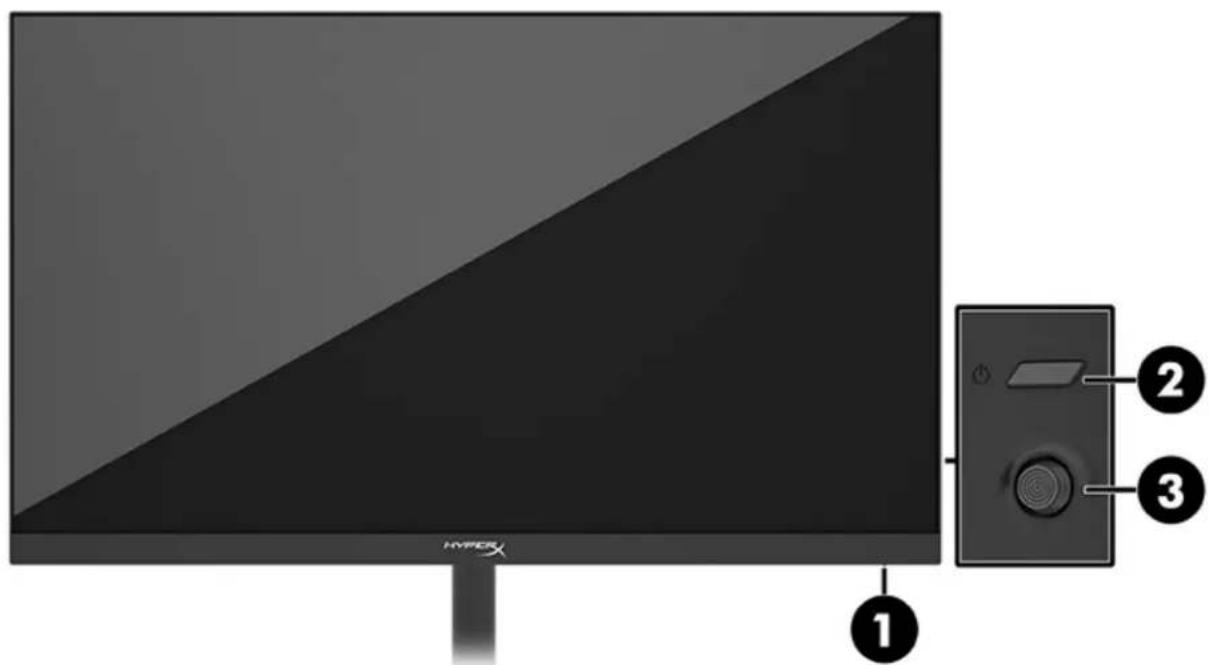
- Power light
- Power button
- Joystick control

- Power connector
- HDMI 2.0 ports (2)
- DisplayPort 1.4 connector
- Security cable slot
Locating the serial number and product number
Depending on the product, the serial number and product number are located on a label on the rear of the monitor or on a label under the front bezel of the monitor head. You might need these numbers when contacting HyperX for support.

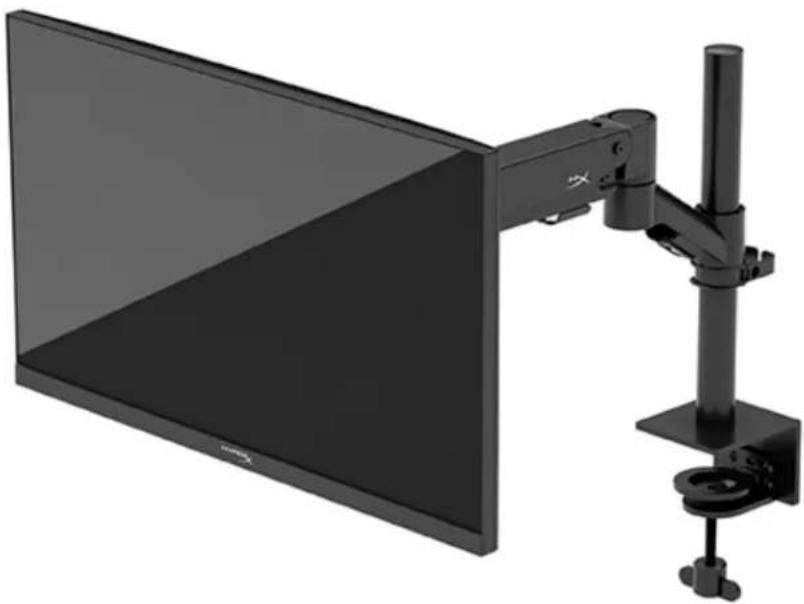
Setting up the monitor
Using the C clamp
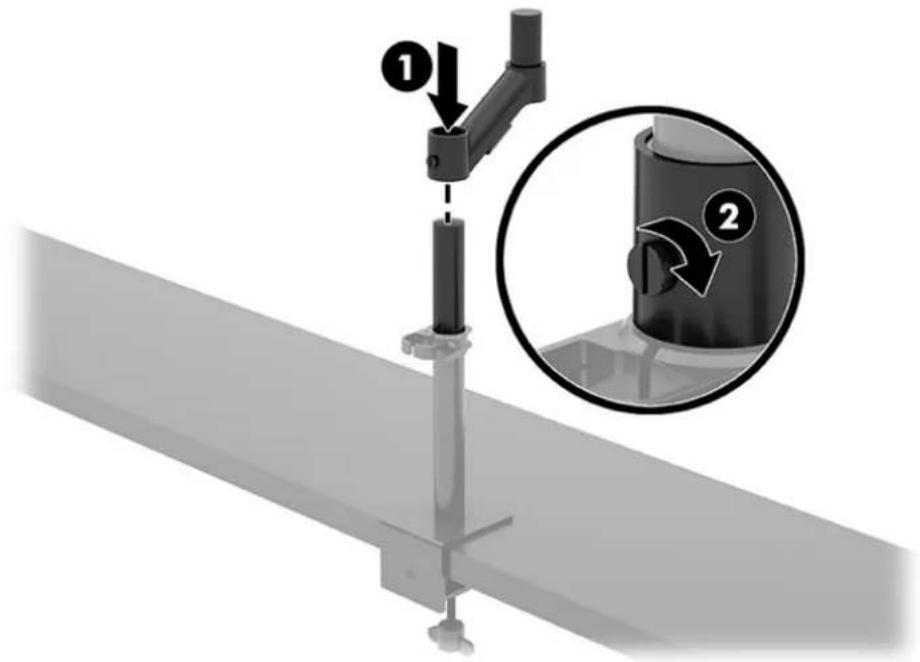
Using the grommet mount
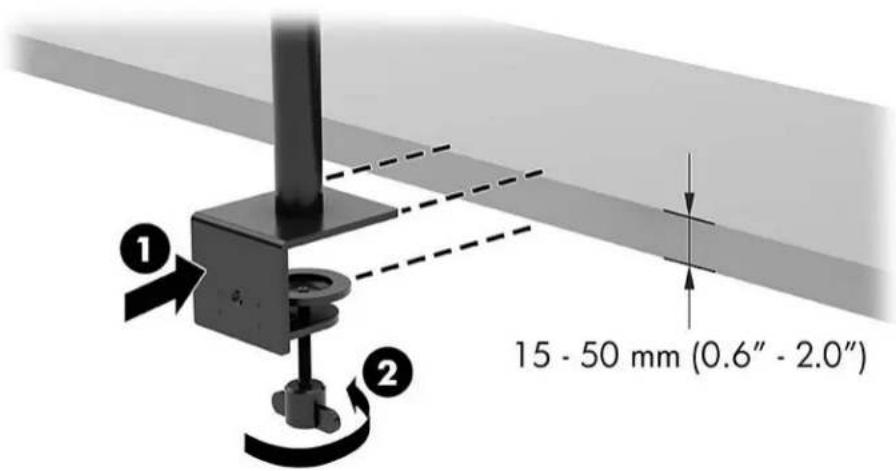
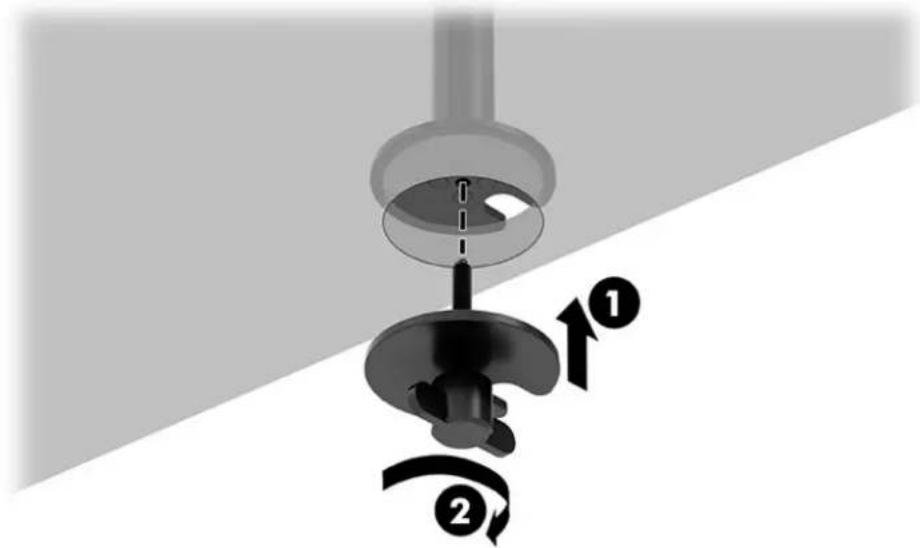
- If the stand has a C clamp installed, use a screwdriver to remove the C clamp.
- Drill a hole in the desktop for the grommet mount pole.
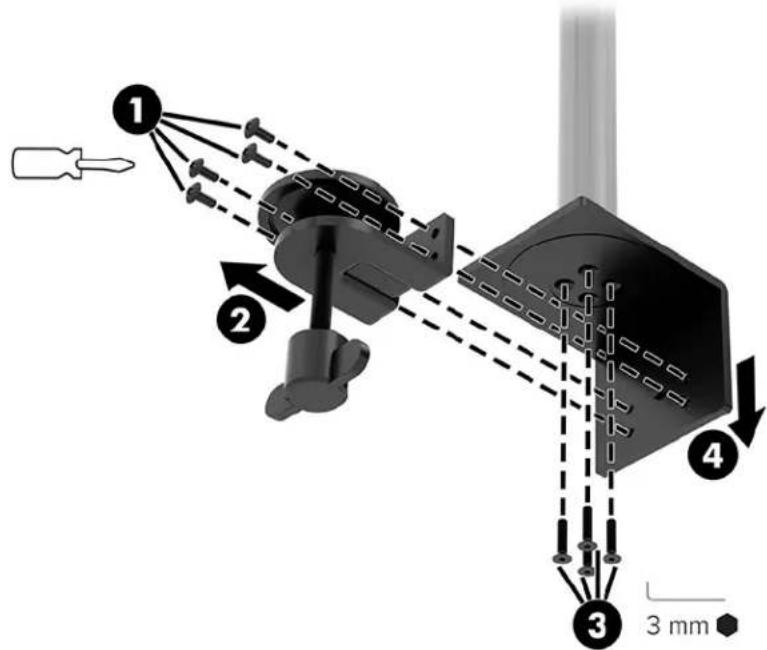
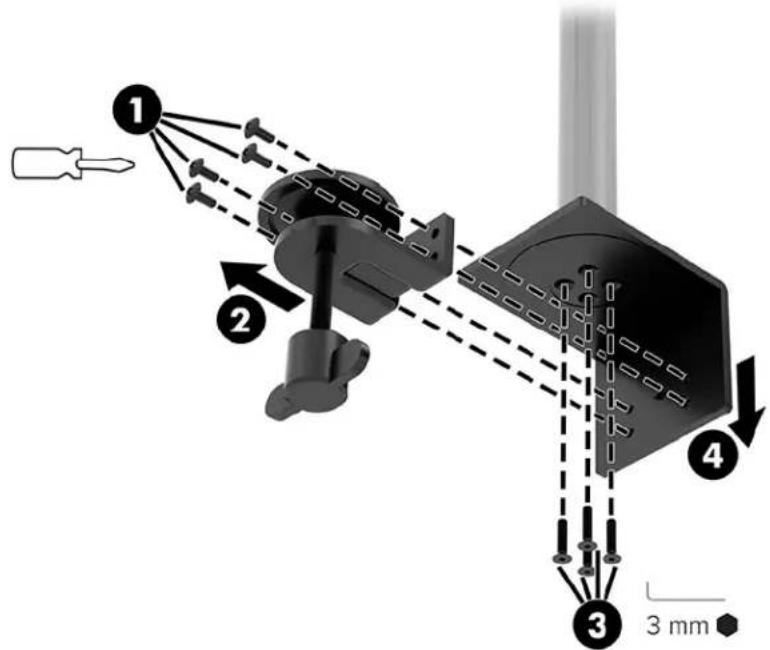
- Secure the grommet mount to the pole (1) using the four screws (2) and 3mm Allen key.

- Secure the stand to the desktop.
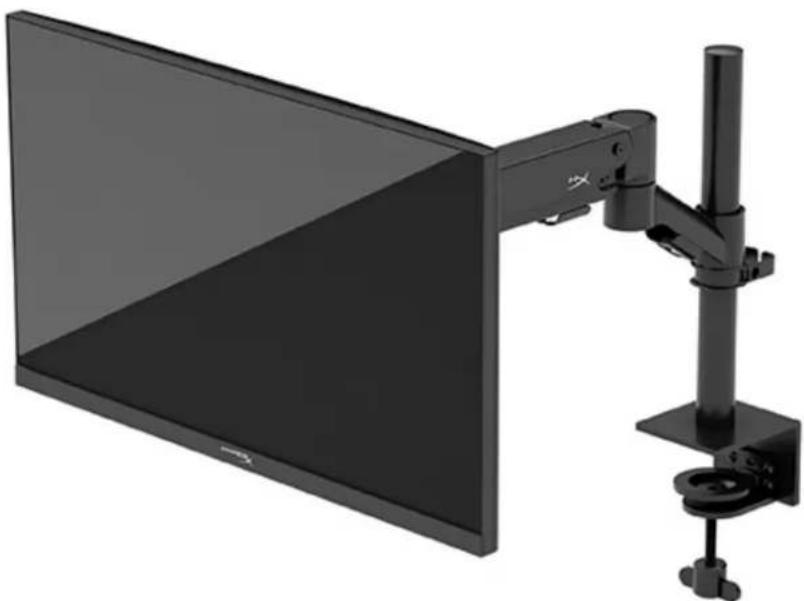
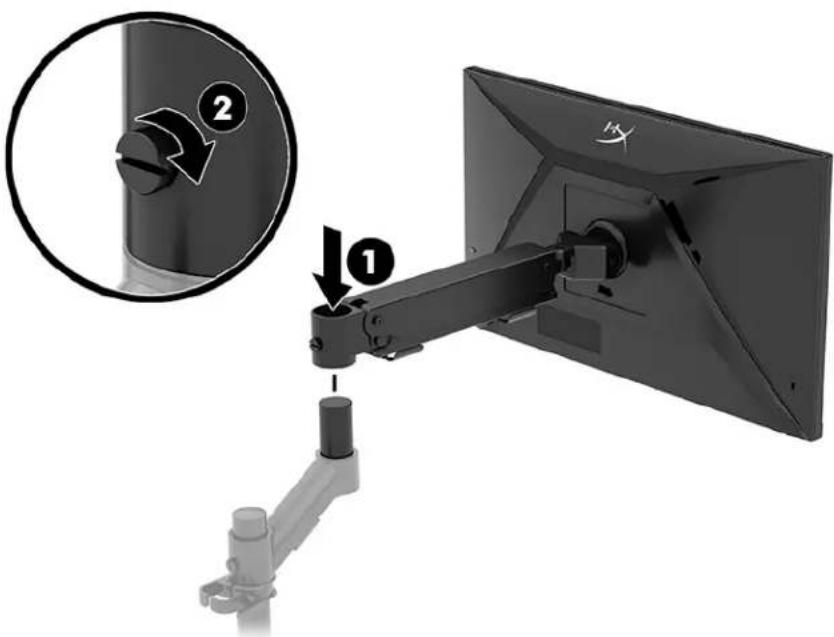
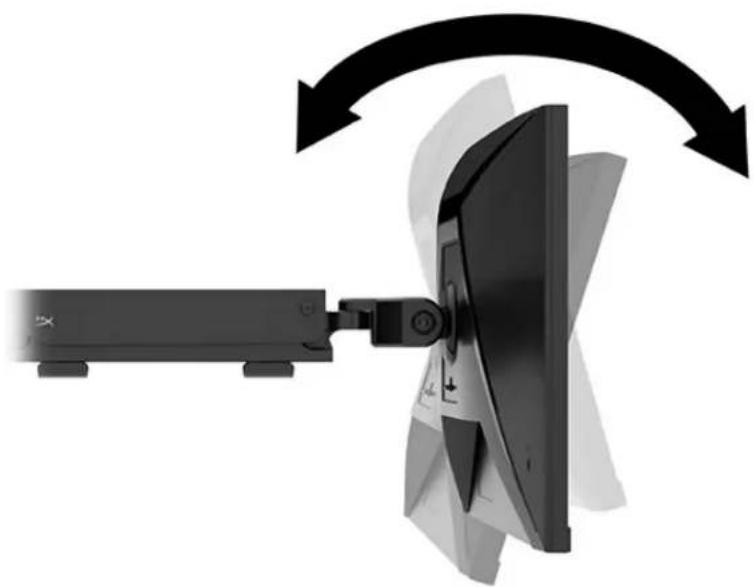
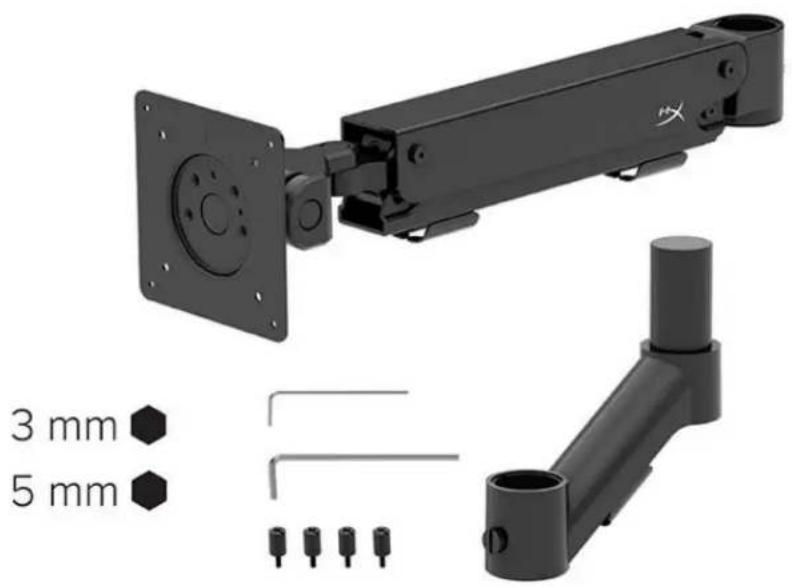
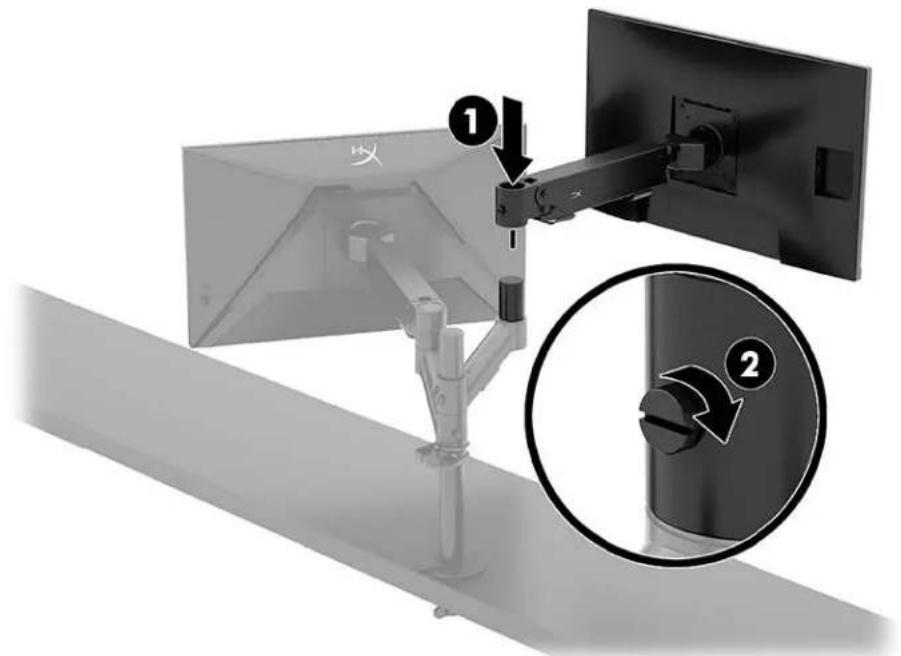
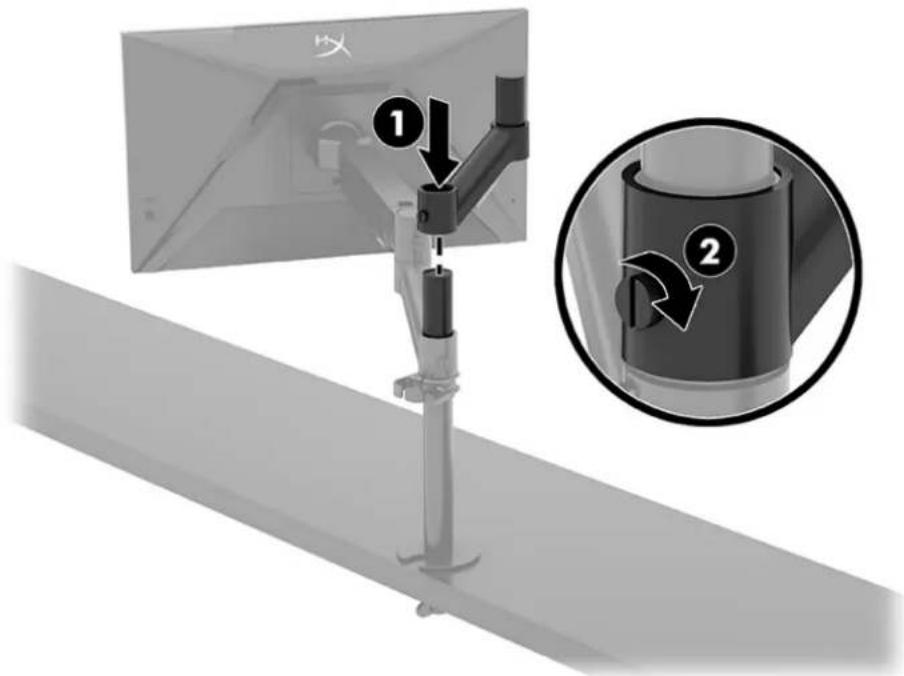
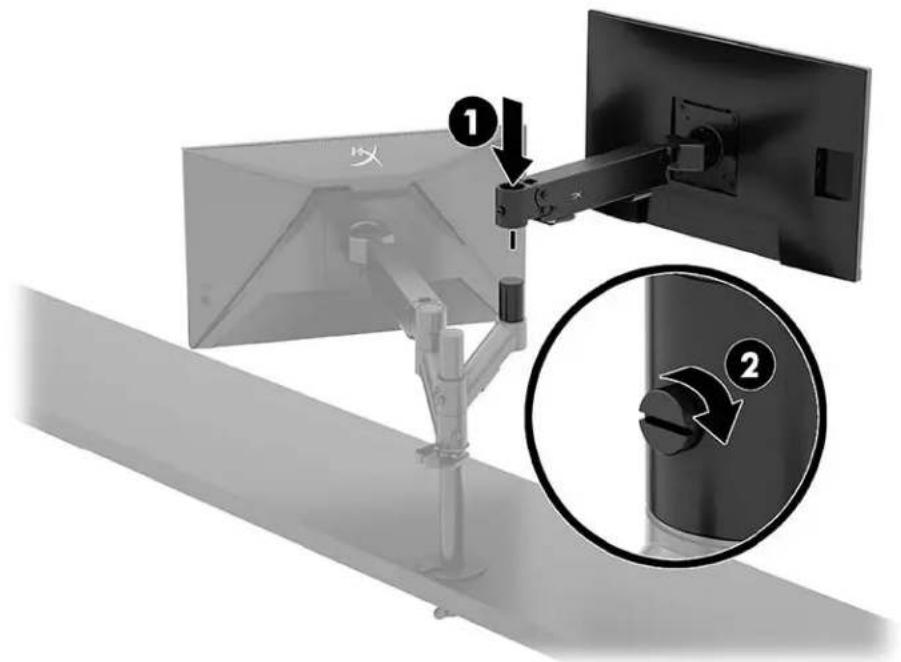
Attaching the neck and mounting arm
- Rotate the lock down to the unlocked position (1), adjust the stopper height up or down on the pole (2), and then return the lock to the locked position.

- Attach the neck to the pole (1) and tighten the thumbscrew (2).
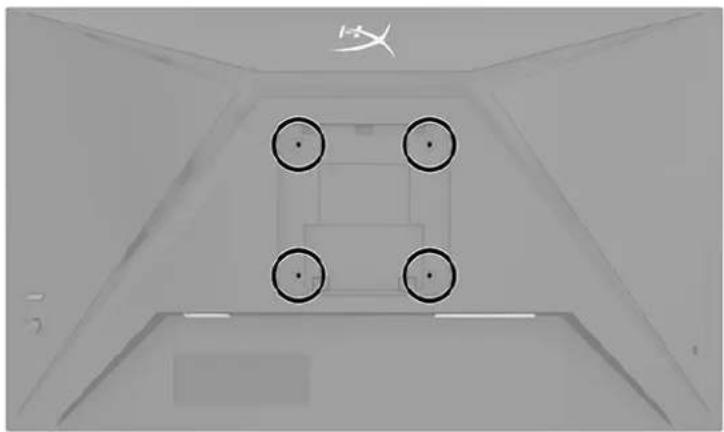
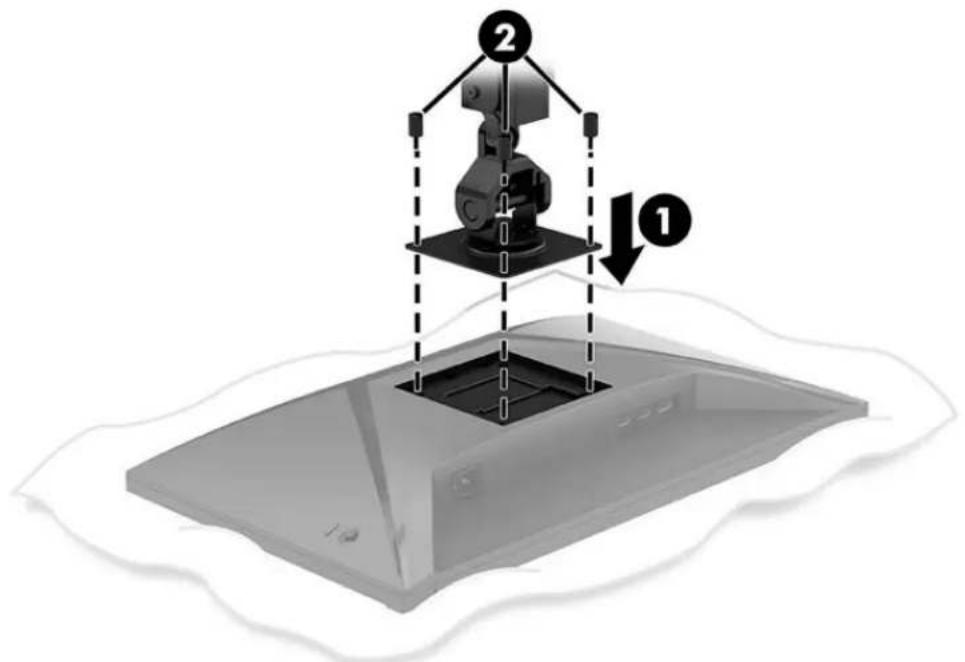
- Attach the mounting arm to the display using the quick release plate or the VESA mounting plate.
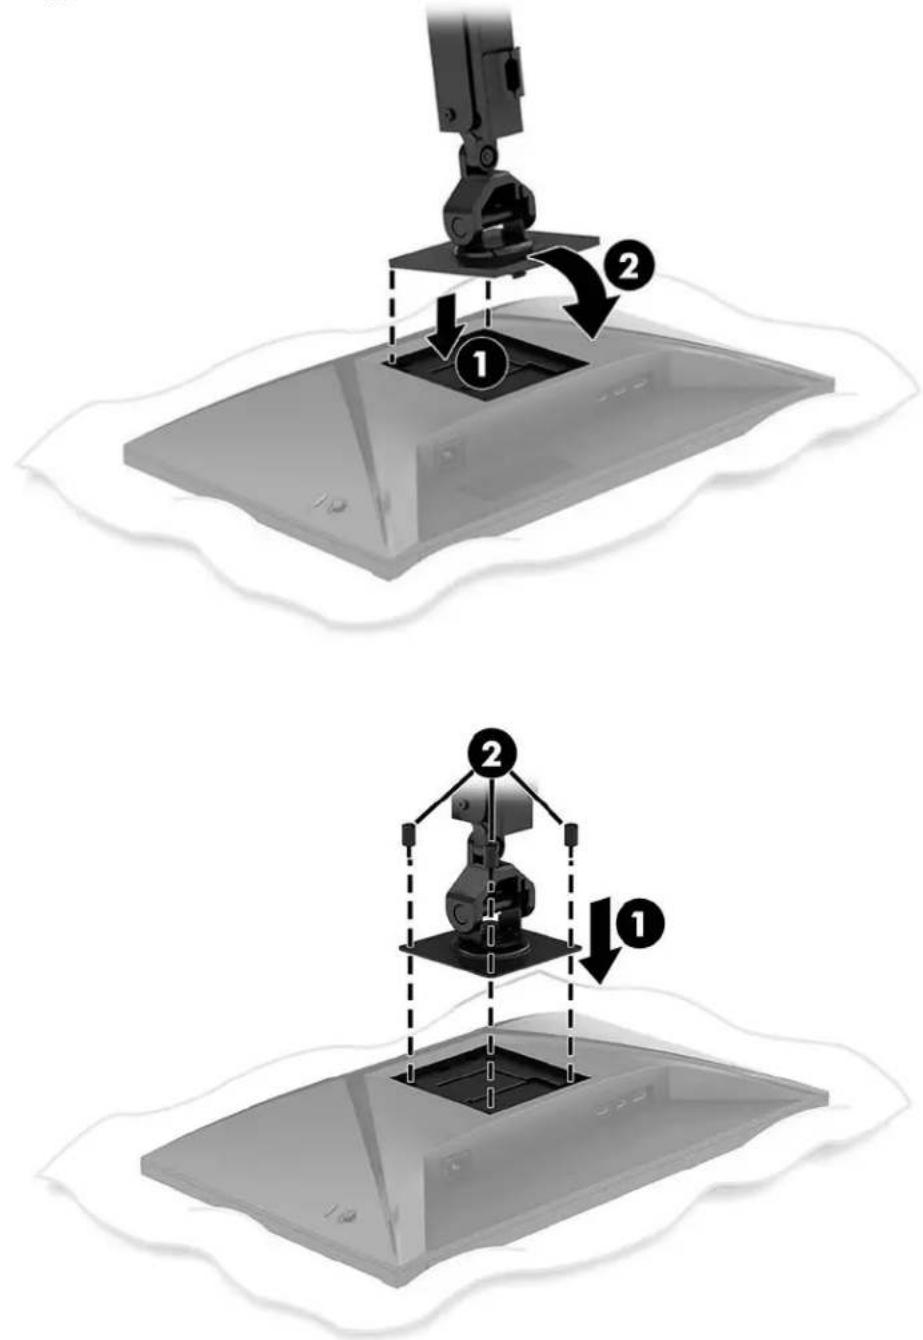
- Attach the display and arm assembly to the neck (1) and tighten the thumbscrew (2).
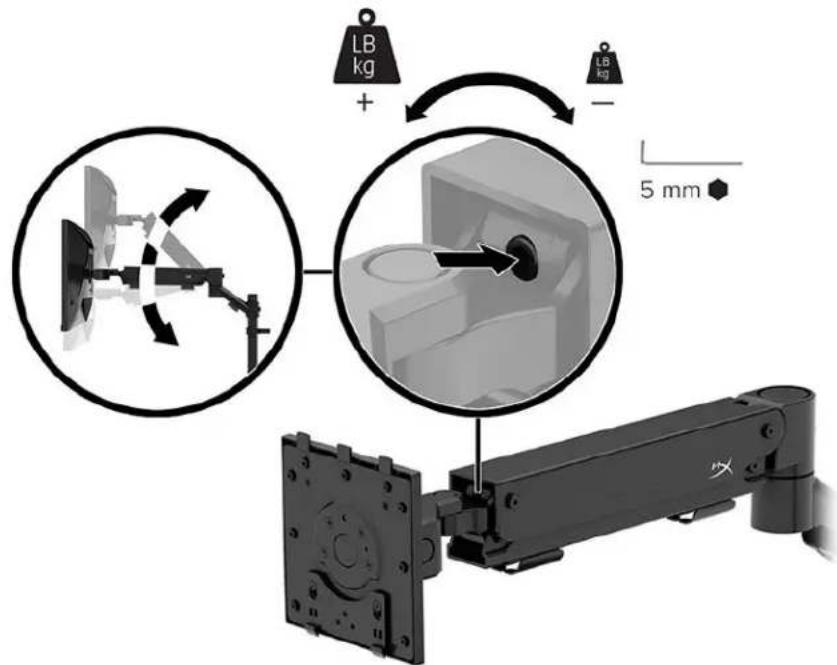
Adjusting the tension
- Adjust the tension at the end of the arm using the 3 mm Allen key.
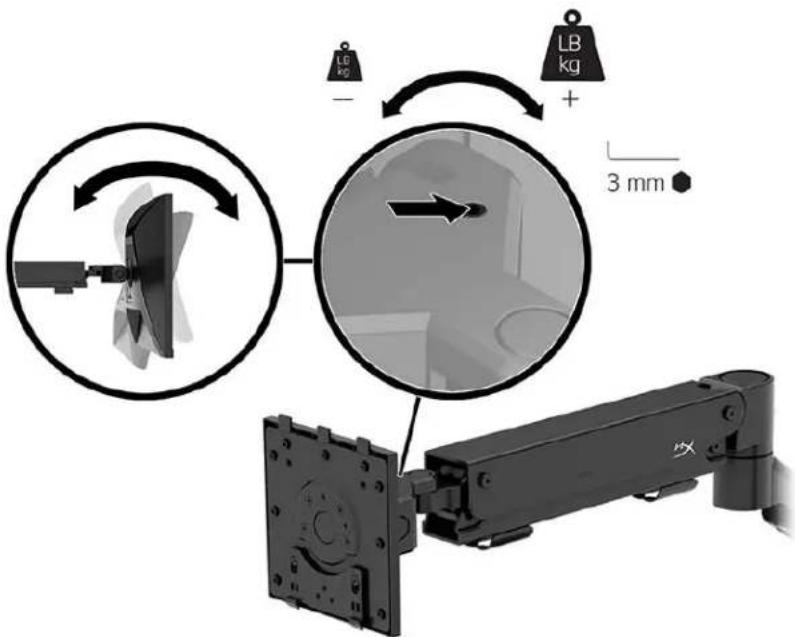
- Adjust the tension at the end of the arm using the 5 mm Allen key.
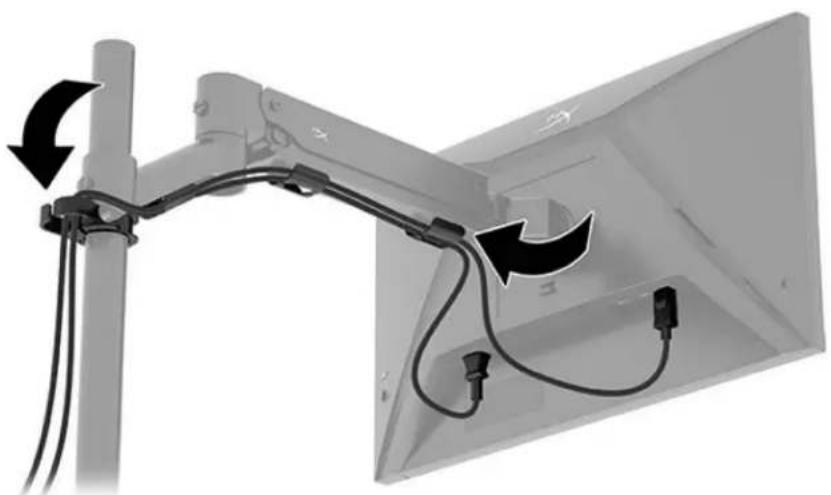
Connecting and routing the cables
Connect a signal cable (HDMI or DP) and power cable to the connectors on the back of the monitor and route the cables through the cable management system. Then connect the signal cable to the source device (computer or gaming system) and the power cable to a power outlet.
Adjusting the monitor
- Adjust the vertical height of the monitor.
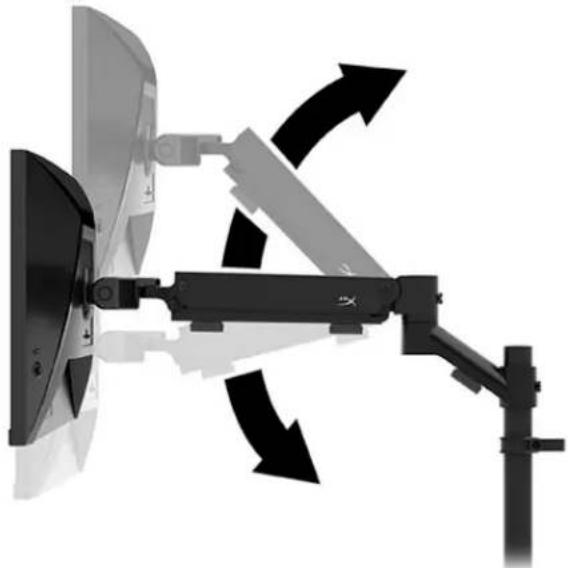
- Adjust the horizontal position of the monitor.
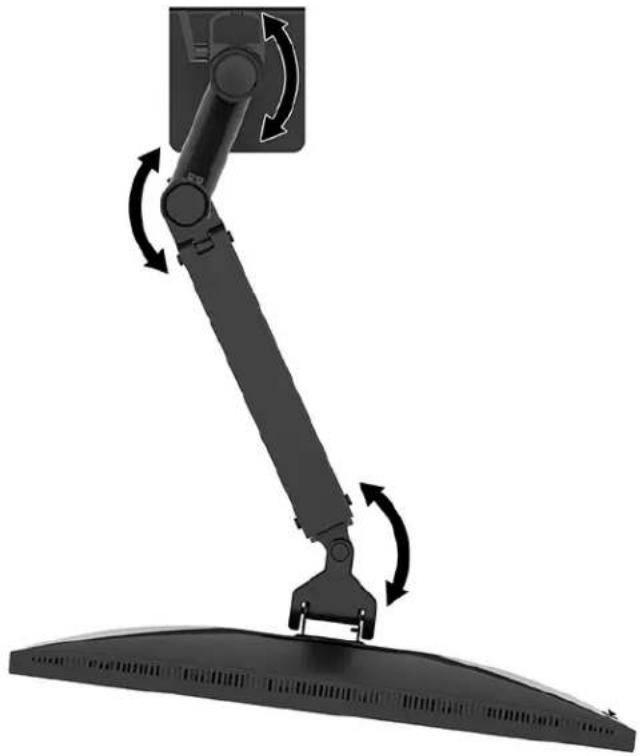
- Adjust the tilt of the monitor.
Turning on the monitor
Use the power button (1) to turn on the monitor and use the joystick control (2) to make any onscreen adjustments needed.
HyperX watermark and image retention policy
Some monitors are designed with In-Plane Switching (IPS) display technology, which provides ultrawide viewing angles and advanced image quality. Though suitable for many applications, this panel technology is not suitable for static, stationary, or fixed images for long periods of time, unless you use screen savers.
Applications with static images can include camera surveillance, video games, marketing logos, and templates. Static images can cause image retention damage that could look like stains or watermarks on the monitor's screen.
Image retention damage on monitors that are in use 24 hours per day is not covered under the HP warranty. To avoid image retention damage, always turn off the monitor when it is not in use, or use the power management setting, if supported on your computer, to turn off the monitor when the computer is idle.
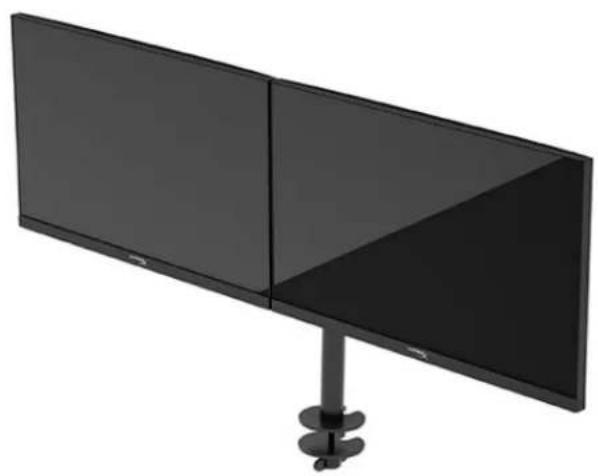
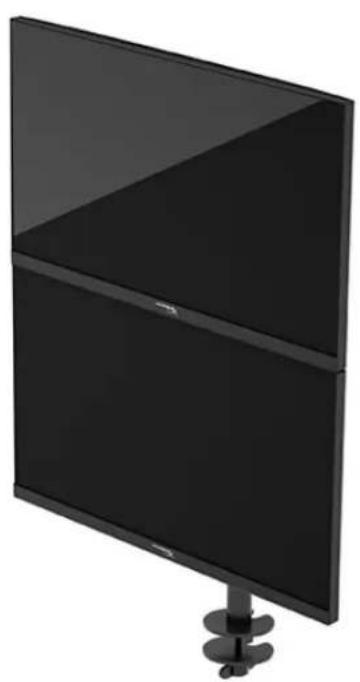
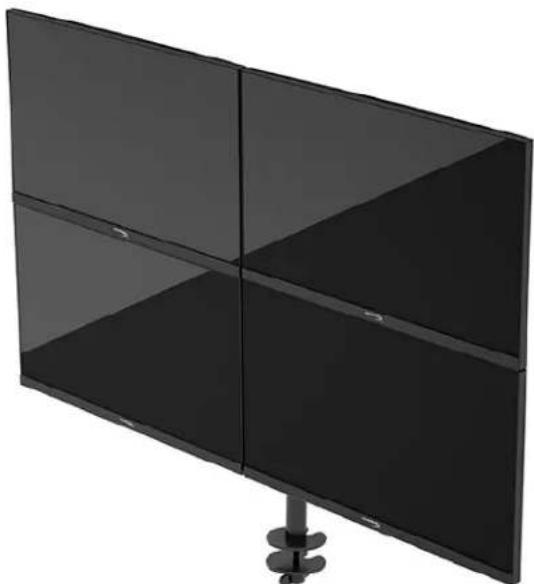
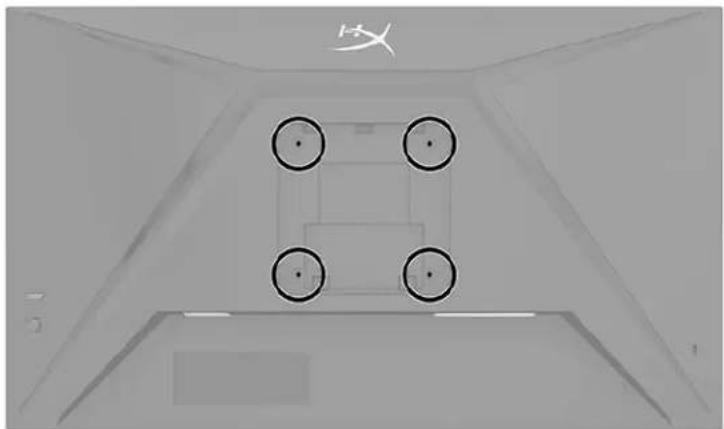
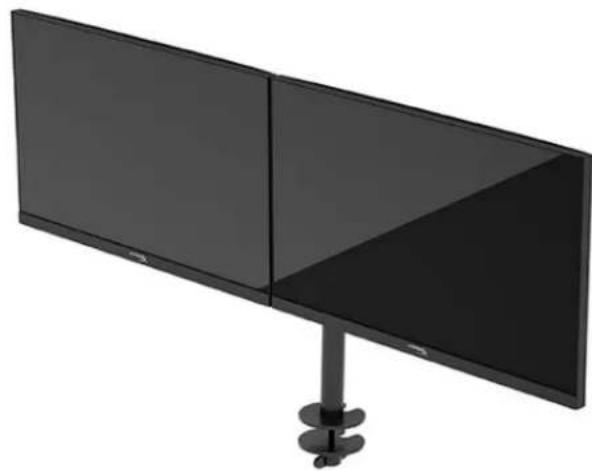
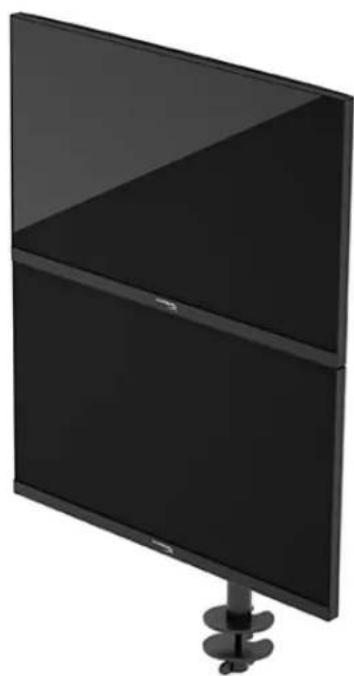
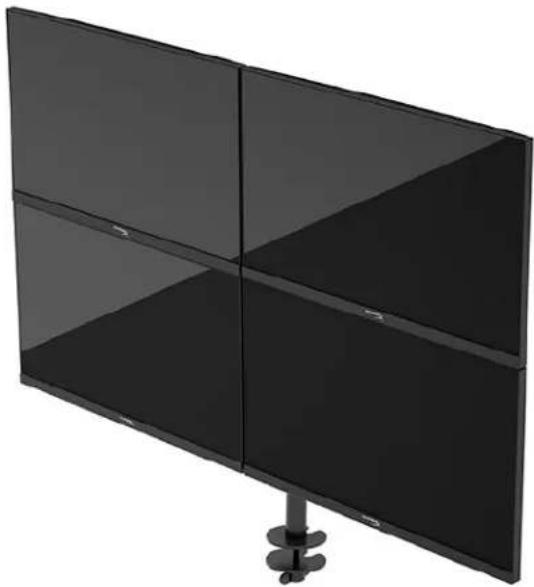
Mounting multiple monitors
To mount multiple monitors to a single mounting pole, you need to purchase the HyperX Armada Gaming Mount Addon.
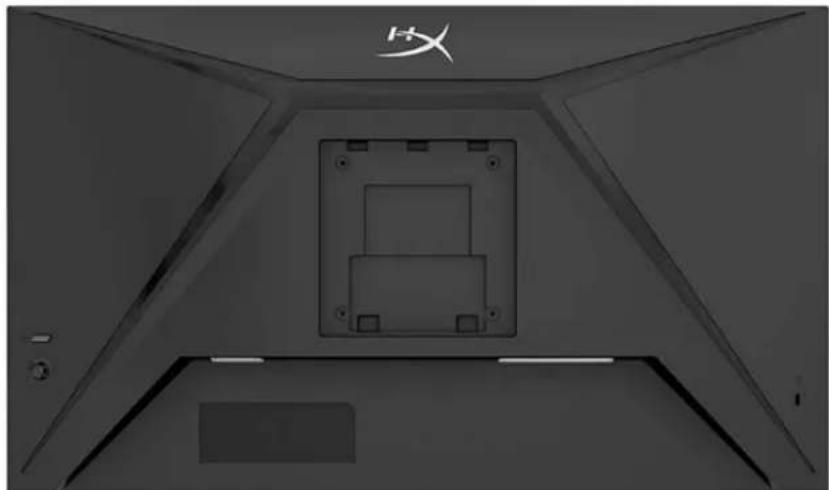
Use the four VESA mounting holes on the back of the monitor to secure the display arm to the back of the monitor with the four screws.
- At tach the addon arm to the neck (1) and tighten the thumbscrew (2).

- Attach the display arm to the back of the monitor (1) by installing the four screws (2).

- Attach the monitor arm assembly to the pole (1) and tighten the thumbscrew (2).
Monitor mounting configurations
You can mount two to four monitors to the pole in various configurations. When mounting more than one monitor to a pole, you can use the C clamp or the grommet mount.

Using the monitor
Downloading software
Download NGENUITY software at: hyperx.gg/ngenuity.

Using the OSD menu
You can adjust your monitor to suit your preferences. Use the OSD menu to customize the viewing features of your monitor.
To access and make adjustments in the OSD, use the joystick control on the rear of the monitor.
To access the OSD menu and make adjustments:
- If the monitor is not already on, press the power button to turn on the monitor.
- Press the center of the joystick button on the rear of the monitor.
- Use the joystick button to navigate, select, and adjust the menu choices. The on-screen button labels vary, depending on which menu or submenu is active.
The following table lists possible menu selections in the OSD main menu. It includes descriptions for each setting and its impacts on your monitor's appearance or performance.
| Main menu | Description |
| Gaming | Selects and adjusts gaming preferences, such as Adaptive-Sync, response time, frame rate, crosshair, and multi-monitor alignment. |
| Color | Selects and adjusts the screen color. |
| Picture | Adjusts the screen image. |
| Input | Selects the video input signal (DisplayPort or HDMI). |
| Power | Adjusts the power settings. |
| Menu | Adjusts the OSD menu and function button controls. |
| Settings | Adjusts Accessibility settings. |
| Information | Selects and displays important information about the monitor. |
| Exit | Exits the OSD menu screen. |
Display mode status
When you turn on the monitor, the status message shows the display mode. The display mode is also displayed when you change the video input.
The current display mode shows in the Information menu window and at the bottom of the OSD's main menu in the status bar area. Modes of operation vary by model.
To turn on the Adaptive-Sync mode:
Press the center of the joystick control to open the OSD.
- In the OSD, select Gaming.
- Select Adaptive-Sync, and then select On.
NOTE: The Adaptive-Sync menu default setting is on.
Using Auto-Sleep mode
Your monitor has an energy-saving feature called Auto-Sleep Mode, a reduced power state. This section describes how to activate or adjust Auto-Sleep Mode on your monitor.
When Auto-Sleep Mode is enabled (enabled by default), the monitor enters a reduced power state when the computer signals low power mode (absence of either horizontal or vertical sync signal).
Upon entering this reduced power state (Auto-Sleep mode), the monitor screen is blanked, the backlight turns off, and the power light turns amber. The monitor draws less than 0.5W of power when in this reduced power state. The monitor wakes from Auto-Sleep mode when the computer sends an active signal to the monitor (for example, when you activate the mouse or keyboard).
To disable Auto-Sleep Mode in the OSD:
- Press the Menu button to open the OSD.
- In the OSD, select Power.
- Select Auto-Sleep Mode, and then select Off.
Troubleshooting
If your monitor is not working as expected, you might be able to resolve the issue by following the instructions in this section.
Solving common issues
The following table lists possible issues, the possible cause of each issue, and the recommended solutions.
HyperX Armada 25 FHD Gaming Monitor
| Issue | Possible cause | Solution |
| Screen is blank or video is blinking. | Power cord is disconnected. | Connect the power cord. |
| Monitor is off. | Press the power button. | |
| Video cable is improperly connected. | Connect the video cable properly. | |
| Open the OSD menu and select the Input menu. Set Auto-Switch Input to Off and manually select the input. or Replace the video card or connect the video cable to one of the computer's on-board video sources. | ||
| Image appears blurred, indistinct, or too dark. | Brightness setting is too low. | Open the OSD menu and select Color to adjust the brightness scale as needed. |
| “Check Video Cable” is displayed on the screen. | Monitor video cable is disconnected. | Connect the appropriate video signal cable between the computer and monitor. Be sure that the computer power is off while connecting the video cable. |
| “Input Signal Out of Range” is displayed on screen. | Video resolution and/or refresh rate are set higher than the monitor supports. | Change the settings to a supported setting. |
| The monitor does not enter into a low-power sleep state. | The monitor's power saving control is disabled. | Open the OSD menu and select Power, select Auto-Sleep Mode, and then set auto-sleep to On. |
| “OSD Lockout” is displayed. | The monitor's OSD Lockout function is enabled. | Press and hold the center of the joystick control button for 10 seconds to disable the OSD Lockout function. |
| “Power Button Lockout” is displayed. | The monitor's Power Button Lockout feature is enabled. | Press and hold the Power button for 10 seconds to unlock the power button function. |
Button lockouts
The button lockout function is available only when the monitor is on, an active signal is displayed, and the OSD menu is closed. Holding down the power button or Menu button for 10 seconds disables that button. You can re-enable the button by holding it down again for 10 seconds.
Questions or Setup Issues?
Contact the HyperX support team at: hyperx. gg/support.
Maintaining the monitor
Properly maintained, your monitor can run for many years. These instructions provide steps you can perform to keep your monitor in the best condition.
Maintenance guidelines
Follow these instructions to enhance the performance and extend the life of the monitor.
- D o not open the monitor cabinet or attempt to service this product yourself. Adjust only those controls that are covered in the operating instructions. If the monitor is not operating properly or has been dropped or damaged, contact an authorized HP dealer, reseller, or service provider.
- U se only a power source and connection appropriate for this monitor, as indicated on the label or back plate of the monitor.
- B e sure that the total ampere rating of the products connected to the outlet does not exceed the current rating of the AC outlet and that the total ampere rating of the products connected to the cord does not exceed the rating of the cord. Look on the power label to determine the ampere rating (AMPS or A) for each device.
- I install the monitor near an outlet that you can easily reach. Disconnect the monitor by grasping the plug firmly and pulling it from the outlet. Never disconnect the monitor by pulling the cord.
- Turn the monitor off when it is not in use and use a screen saver program. Doing this can substantially increase the life expectancy of the monitor. NOTE: A burned-in image on the monitor is not covered under the HP warranty.
- N ever block the slots and openings of the cabinet or push objects into them. These openings provide ventilation.
- Do not drop the monitor or place it on an unstable surface.
D do not allow anything to rest on the power cord. Do not walk on the cord. - K eep the monitor in a well-ventilated area, away from excessive light, heat, or moisture.
Cleaning the monitor
Use these instructions to clean your monitor when necessary.
- Turn off the monitor and unplug the power cord from the AC outlet.
- Disconnect any external devices.
- Dust the monitor by wiping the screen and the cabinet with a soft, clean antistatic cloth.
- For more difficult cleaning situations, use a 50/50 mix of water and isopropyl alcohol.
IMPORTANT: Do not use cleaners that contain petroleum-based materials such as benzene, thinner, or any volatile substance to clean the monitor screen or cabinet. These chemicals might damage the monitor.
IMPORTANT: Spray the cleaner onto a cloth and use the damp cloth to gently wipe the screen surface. Never spray the cleaner directly on the screen surface. It can run behind the bezel and damage the electronics. The cloth should be moist, but not wet. Water dripping into the ventilation openings or other points of entry can cause damage to the monitor. Allow the monitor to air-dry before use.
- After you remove the dirt and debris, you can also clean the surfaces with a disinfectant. The World Health Organization (WHO) recommends cleaning surfaces, followed by disinfection, as a best practice for preventing the spread of viral respiratory illnesses and harmful bacteria. A disinfectant that is within HP's cleaning guidelines is an alcohol solution consisting of 70% isopropyl alcohol and 30% water. This solution is also known as rubbing alcohol and is sold in most stores.
Shipping the monitor
Keep the original packing box in a storage area. You might need it later if you ship the monitor or move.
Technical specifications
HyperX Armada 25 FHD Gaming Monitor
| Specification | Description | |
| Display size | 62.2 cm | 24.5 in |
| Display type | IPS | |
| Bezel type | 3-sided borderless | |
| Native resolution | FHD 1920 x 1080 | |
| Maximum resolution | FHD 1920 x 1080 @ 240 Hz | |
| Maximum refresh rate range | 240 Hz | |
| Variable refresh rate technology | G-SYNC Compatible | |
| Variable refresh rate | 48–240 Hz | |
| Viewing angle | 178° | |
| Aspect ratio | 16:9 | |
| Contrast ratio | 1000:1 | |
| Brightness | 400 nits | |
| Maximum response time | 1ms GtG (with OD) | |
| Color gamut | sRGB 99% | |
| Color depth | 8-bit | |
| Inputs | DisplayPort 1.4 (1) HDMI 2.0 (2) | |
| Power source | 100-240 VAC 50/60 Hz | |
| Power consumption – maximum | 45 W | |
| Power consumption – typical | 22 W | |
| Cables | HyperX red DisplayPort 1.4 cable (1) Black HDMI 2.0 cable (1) Power cable (1) | |
| Accessories | VESA mounting bracket (1) VESA mounting bracket screws (4) VESA monitor thumb screws (4) Grommet mounting plates (2) Grommet mounting screw (1) Hex keys (2) | |
| Compatible VESA patterns | 75 mm x 75 mm 100 mm x 100 mm | |
| Surface coating | Matte | |
| Dimensions | ||
| Height | 33.02 cm | 13.00 in |
| Depth | 6.12 cm | 2.41 in |
| Width | 55.74 cm | 21.94 in |
| Weight | 2.9 kg | 6.29 lb |
| Arm lift range | 31.2 ± 0.5 cm | 12.4 ± 0.2 in |
| Column height range | 25.5 cm | 10.0 in |
| Stand compatible display sizes | ≤ 81.28 cm | ≤ 32 in |
| Monitor weight capacity per arm | ≤ 9.1 kg | ≤ 20 lb |
| Desk thickness support | 15 mm-50 mm | 0.6 in-2.0 in |
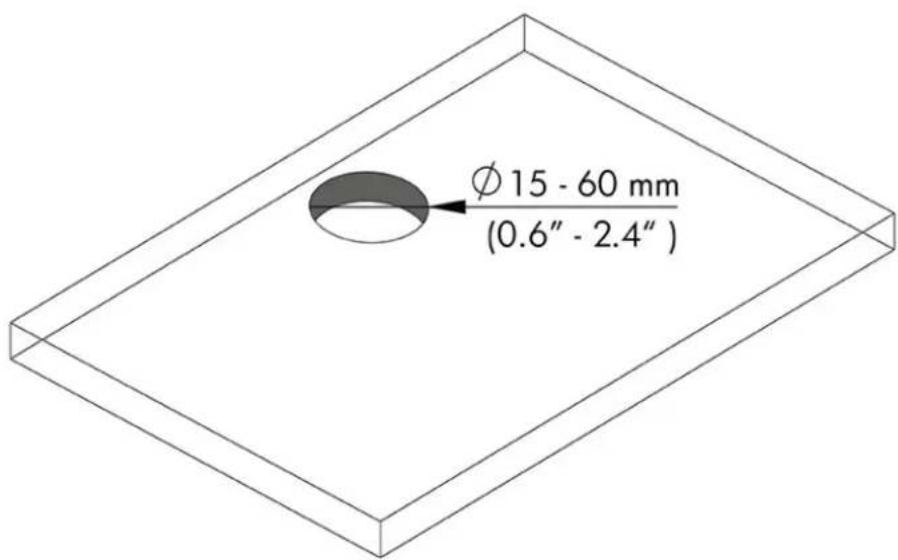
| Grommet hole size support* | 15mm-60mm | 0.6in-2.4in |
| Mount and arm (assembled) | 547 x 447 x 130 mm | 21.54 x 17.60 x 5.12 in |
| Mount and arm weight | 4.8 kg | 10.6 lb |
| Specification | Description |
| Hinge tilt range | -25 to 60° |
| Hinge rotate range | ± 90° |
| Hinge swivel range | ± 90° |
| Arm swivel range | ± 180° |
| *If grommet hole on desk is less than 40 mm (1.57 in), cables cannot be routed through the hole. | |
Preset display resolutions
| Preset | Pixel format | Vert freq (Hz) |
| 1 | 640 × 480 | 60 Hz |
| 2 | 640 × 480 | 75 Hz |
| 3 | 720 × 400 | 70 Hz |
| 4 | 800 × 600 | 60 Hz |
| 5 | 800 × 600 | 75 Hz |
| 6 | 1024 × 768 | 60 Hz |
| 7 | 1024 × 768 | 75 Hz |
| 8 | 1280 × 720 | 60 Hz |
| 9 | 1280 × 800 | 60 Hz |
| 10 | 1280 × 1024 | 60 Hz |
| 11 | 1280 × 1024 | 75 Hz |
| 12 | 1440 × 900 | 60 Hz |
| 13 | 1600 × 900 | 60 Hz |
| 14 | 1680 × 1050 | 60 Hz |
| 15 | 1920 × 1080 | 60 Hz |
| 16 | 1920 × 1080 | 144 Hz |
| 17 | 1920 × 1080 | 165 Hz |
| 18 | 1920 × 1080 | 200 Hz |
| 19 | 1920 × 1080 | 240 Hz |
HyperX Armada 25
Monitor de gaming FHD
N22234-161
CONTENIDOS
Copyright 2022 HP Development Company, L.P.
Copyright 2022 HP Development Company, L.P.
Copyright 2022 HP Development Company, L.P.
Monitor da gaming FHD

N22234-061
SOMMARIO
Copyright 2022 HP Development Company, L.P.
Copyright 2022 HP Development Company, L.P.
Copyright 2022 HP Development Company, L.P.
CO6CTBHeHHOCTbIO COOTBeTCTByIOUx BnaIaeJIbIeB.
CbeHn, coepkauneB HactoJsem Dokymente,
MOrTy 6bITb N3MeHeHbI 6e3 npeDbapntbHorO
yBEdomnHn. EInhCTBeHHbIe rapaHTn InI npOdyKToB
nyr HP yctaHaBnBaIOTcB npMbIX rapaHTnHbIX
063aTeIbCTBax, npnlaeraembIX K 3TUM npOdyKtAm I
ycnyram.HnkaKne npBBeHbIe B 3TOM dOKyMeHTe
CBeDeHnHe DOnKhbl TpaKToBaTbCk KaNpeDoCTaBHeHne
dONOHnTeIbHbIX rapaHTn. KomnaHnHa HP He Hecet
OTBETCTBeHHOCTn 3a CoepXaIuIeC8 B 3TOM DOKyMeHTe
Texnueckne nIpeaKTopcKe oun6Kn IIn6o ynyeHna.
Pnmueyane K npodykTam
B 3TOM pyKOBODCTBE OINCbIBaHOTcA yHKUIN, KOTOpbIe
YBIAOTCAO6UIMMnIy6oJIbUHcTBaMoJeNe.HaBaWem
yctpoiCTBeMoryT6bITbHeIOCTynHbI HeKOTOpblE yHKUIN.
PepBaPeDakn:IOHb 2022r.
Homep okymeHTa: N22234-251
Hauano pa60tbi
Baxhna nHΦopMaun o 6e3onacHOCTn
B ueJx oecneueHn 6e3oNaChocTn He KlaIte HnYeRo Ha npOBoA nI KabeN nITAHn. PnpKlAbBaHnn npOBoB n KaBeNe, NOkKnUeHHbIX K MOHTOpY, cOJIIOaTe OCTOPOXHOCTb, YTO6bl He HAcTVnTb Ha HIX, He BbITaHtB Nx, He pINXaTb Nx I He CNOTKHytBcra O HNX.
YTO6bI CHN3NTb PNCK NOJUyeHncepeB3HO TpaBMbl, npOHTaTe PyKOBODCTBO no 6e3OnacHoi n KOMΦOpTHo pa6ote PyKOBODCTBO no 6e3OnacHoi n KOMΦOpTHo pa6ote, doCTynHoe B INHTepHeT e no aDpecy https://hyperx.gg/ergo. B hem onncsbiaetcra, kak npabInbHo pa3MeCTNb KOMnbIoTeP n oprAn3OBaTB pa6ooyee MeCTO, npIBeHbI Mepbl no 3aunte 3doOpBBn npabInla pa6otbl C KOMNbIoTePOM. B PyKOBODCTBe no 6e3OnacHoi n KOMΦOpTHo pa6ote TAKKe npINBOJrTCBaxHbIe CBeDeHnNo TEXHNke 6e3OnacHOCTn pRn pa6ote C 3JIeKTPNueCKMn m MexAHuueCKMn YCTPOICTBaMn.
BAXHO!ДЯЗИТБМОHITOPAиKOMNBIOTepa NOДКЛQUAte BCE Ka6eIN NITAHN KOMNBIOTepa INпрИФериHBIX yCTPOIcTB (HaNPIMeP,MOHITOPA,IpHTEpa,CKaHEpa)KyCTpoIcTBy 3aUNTbI OT NepeHApJxEHN,HaNPIMeP cTeBOMyФINbTpU INN HcTOHKNY BeCnepe6oHOrO NITAHN (IVI).
He BCE ydnHnTeHN oBecneuBAOT 3aunTy OT nepeHaPRAKeHNI; OHn DOJXHbI 6bITb CHa6KeHbI CneuaNBHOm MapKnpoBcN, DeKnappyUoJe 3Ty BO3MOxHoCTb. NcnoJIb3yIte cTeBOi FInbTp, npOn3BOAnTeNb KOTOPOro npeJaRaET BO3MOxHOCTb 3AmHbIB Cnyae NOBpeJDeHNI, YTO6bl Bbl MOrIN 3aMeHNTb CBOE O6OpDobAHnE B CNYaee C6O8 CNCTeMbI 3aUnTb OT nepeHaPRAKeHNI.
Ipa3MeHnMoHTOpa IcNoB3yUte IOXoJMyU Me6JIb COOTBeTCTByUOero pa3Mepa.
OCTOPOXHO! MoHtOpbl, KOtOpbl He npabInbHo paCnoIoxeHbHa Ikaqax, nonkax, cToJax, dHaMKaX, aNkax Nn TeKKaX, MOrY Tynactb n npuHHTb TpaBMV.
OCTOPOXHO! Onacnoctb naeHn: yctpoiCTBO MOKeT ynaCTb, npuHHB cepbe3HbI TpaBMbl nIcmeptb. Bo n36exaHne TpaBM naExHo npKpeNITe MOHTOP K NOy IIN CTHe B COOTBETCTBn C INHCTpyKLJMaMn no yCTaHOBKe.
OCTOPOXHO! DaHoe o6OpydoBaHne He npedHa3NaueHo Ira NcNoB3oBaHn B MeCTax, rde MOryt npncyTCTBOBaT dtu.
Copyright 2022 HP Development Company, L.P.
70fTwEArDawon1o1d 23
才斯克一丁(OSD)M二一的使用 23
124
Copyright 2022 HP Development Company, L.P.
Copyright 2022 HP Development Company, L.P.
HyperX及HyperX去是的
HP Development Co.の説唱とは言は言言。
通默社,且,是的,有
I
Copyright 2022 HP Development Company, L.P.
HyperX uazIaHyperX uunnnnnae
HP Development Co.
nolusunnnn nnnnnnnnnnnnnnnn
nwnnnn nn nnnnnnnnnnnnnnnnnnnnnnnnnnnnnnnnnnnnnnnnnnnnnnnnnnnnnnnnnnnnnnnnnnnnnnnnnnnnnnnnnnnnnnnnnnnnnnnnnnnnnnnnnnn
y
nnaananaananaananaananaananaananaananaananaananaananaananaananaananaananaananaananaananaananaananaananaananaananaananaananaananaananaananaananaananaananaananaananaananaananaananaananaananaananaananaananaananaananaananaananaananaananaananaananaananaananaanaraannaa


nraan
nnaaannnnnnae
nnaaow ngENUITY hyperx. gg/ngenuity

nT (OSD)
nnaaannnnnnaanennnnnne nnnnne nnnnnnne (OSD) wouuuuunauuun
wnnnnnaeun nnnnne nn nnnnnnnnnnnnnnnnnnnnnnnnnnnnnnnnnnnnnnnnnnnnnnnnnnnnnnnnnnnnnnnnnnnnnnnnnnnnnnnnnnnnnnnnnnnnnnnnnnnnnnnnnnnnnnnnnnnnnnnnnnnnnnnnnnnnnnnnnnnnnnnnn
- nnnn nn nnnn nn nnnn nn nnnn nn nnnn nn nnnn nn nnnn nn
- nnnnnaaannnnnnnnnnnnnnnn
- 1uuaunauuauauau uan uauununuaauy Iauunouuuununununununununununununun
nnaaannnnnnaanennnnaanennnnaanennnnaanennnnaanennnnaanennnnaanennnnaanennnnaanennnnaanennnnaanennnnaanennnnaanennnnaanennnnaanennnnaanennnnaanennnnaanennnnaanennnnaanennnnaanennnnaanennnnaanennnnaanennnnaanennnnaanannnnnaanannnnnaanannnnnaanannnnnaanannnnnaanannnnnaanannnnnaanannnnnaanannnnnaanannnnnaanannnnnaanannnnnaanannnnnaanannnnnaanannnnnaanannnnnaanannnnnaanannnnnaanannnnnaanannnnnaanannnnnaanannnnnaanannnnnaanannnnnaanannnnnaanann
Innnaaannnnaa aannnnnnaa nnnnnaa Information (ya) naananaananaananaananaanana ananaananaananaananaananaananaananaananaananaananaananaananaananaananaananaananaananaananaananaananaananaananaananaananaananaananaananaananaananaananaananaananaananaananaananaananaananaananaananaananaananaananaananaananaananaananaananaananaananaananaanana
Adaptive-Sync:
nannanunuunununwauaduyuunrwnanununun (OSD)
- vuaoyuuyuunnuuauuun (OSD) nn Gaming (nuaaun)
- Adaptive-Sync On (
Wuwaanwau/uaaunu uauanu 0.5 W wauanu wauanu wauanu wauanu wauanu wauanu wauanu wauanu wauanu wauanu wauanu wauanu wauanu wauanu wauanu wauanu wauanu wauanu wauanu wauanu wauanu wauanu wauanu wauanu wauanu wauanuuw
nnaaannnnnnaeennnnnneennnnnneennnnnneennnnn (OSD):
- Menu (w) wwnuunnaaennnnae (OSD)
- 2023/10/28 15:49:47 UTC (OSD) 16:00 PM Power (Watt h)
- Iaon Auto-Sleep Mode (Iwauanwnnnaun) anuuaon Off (U)
nunuynnnn
nnaanwnnnnnaaunnnnnnnn n nnanaanlnuynnnnnaaauu uannnnnnnnnnn
Copyright 2022 HP Development Company, L.P.
HyperX va logo HyperX la cac thuong hiieu hoac thuong hiieu dα duoc dang ky cua HP Development Co. tai Hoa Ky va /hoac cac quocgia khac. Tát ca cac thuong hiieu vathuong hiieu da duoc dang ky deu la tai sán cua cac chu so huu tuong ung.
Thong tin trong tai lieuu nay co the thay doi ma khong can phai thong bao truc. Cac bao hanh chi dahn cho san pham va dich vu cua HP duoc quy dinh trong cac phiieu bao annihil ro rang kem theo cac san pham va dich vu do. Khong co dieu khoan nao trong tai lieuu nay duoc hiieu la thiiet lap bao annihil bo sung. HP se khong chiu trach nhiem phap ly doi voi nhung loi hoac thieu sot ve maf y tuat hoac bien tap co tong tai lieuu nay.
- Den nguon
- Nut nguön
- Tay can dieu khien

- Dau noi nguon
- Cong HDMI 2.0 (2)
- Dau noi DisplayPort 1.4
- Khe cam day cap bao vê
Xac dinh so sé-ri va so hieu san pham
Tuy thuoc vao san pham, so sé-ri va so hiieu san pham nam tren nhuan ma t sau cua man hinh hoac tren nhuan duoi khung vien phia truc cua dau man sinh. Ban co the can den cac so nay khi lien he voi HyperX de duoc h tro.
Thiet lap man sinh
Su dung kep chu C

Su dung giadogan lo
- Néu chan dé co lap kep chu C, hay su dung tuoc-no-vit de thao kep chu C.
- T rong menu OSD, chon Gaming (Choi game).
- Chon Adaptive-Sync, va sau do chon On (Bât).
LUU Y: Cai dāt mac dinh cua menu Adaptive-Sync la bhat.
Sù dung Ché do Tu dong ngu
Mān hìn choi game HyperX Armada 25 FHD
| Văn dê | Nguyên khác có thê | Giài tiên |
| Màn先进技术 có tân, hieu video, nháp. nhát. | Dàysoon网络传播 dày网络传播. Dày网络传播. Dày网络传播. Dày网络传播. Dày网络传播. Dày网络传播. Dày网络传播. Dày网络传播. Dày网络传播. Dày网络传播. Dày网络传播. Dày网络传播. Dày网络传播. Dày网络传播. Dày网络传播. Dày网络传播. Dày网络传播. Dày网络传播. Dày网络传播. Dày网络传播. Dày网络传播. Màu sòng. Màu sòng. Màu sòng. Màu sòng. Màu sòng. Màu sòng. Màu sòng. Màu sòng. Màu sòng. Màu sòng. Màu sòng. Màu sòng. Màu sòng. Màu sòng. Màu sòng. Màu sòng. Màu sòng. Màm suat. Màm suat. Màm suat. Màm suat. Màm suat. Màm suat. Màm suat. Màm suat. Màm suat. Màm suat. Màm suat. Màm suat. Màm suat. Màm suat. Màm suat. Màm suat. Màm suat. Mà m suat. Mà m suat. Mà m suat. Mà m suat Mà m suat Mà m suat Mà m suat Mà m suat Mà m suat Mà m suat Mà m suat Mà m suat Mà m suat Mà m suat Mà m suat Mà m suat Mà m suat Mà m suat Mà m suat Mà m suat Mà m tu Mà m suat Mà m suat Mà m suat Mà m suat Mà m suat Mà m suat Mà m suat Mà m suat Mà m suat Mà m suat Mà m suat Mà m suat Mà m suat Mà m suat Mà m suat Mà m suat Màm suat Màm suat Màm suat Màm suat Màm suat Màm suat Màm suat Màm suat Màm suat Màm suat Màm suat Màm suat Màm suat Màm suat Màm suat Màm suat Màm suat Nghế Nghế Nghế Nghế Nghế Nghế Nghế Nghế Nghế Nghế Nghế Nghế Nghế Nghế Nghế Nghế Nghế Nghế Nghế Nghế Nghế Nghế Nghế Nghế Nghế Ngh Québec Ngh Québec Ngh Québec Ngh Québec Ngh Québec Ngh Québec Ngh Québec Ngh Québec Ngh Québec Ngh Québec Ngh Québec Ngh Québec Ngh Québec Ngh Québec Ngh Québec Ngh Québec Ngh Québec Ngh Québec Ngh Québec Ngh Québec Ngh Québec Ngh Québec Ngh Québec Ngh Québec Ngh Québec Ngh QC Ngh QC Ngh QC Ngh QC Ngh QC Ngh QC Ngh QC Ngh QC Ngh QC Ngh QC Ngh QC Ngh QC Ngh QC Ngh QC Ngh QC Ngh QC Ngh QC Ngh QC Ngh QC Ngh QC Ngh QC Ngh QC Ngh QC Ngh QC Ngh QC Ngh OC Ngh OC Ngh OC Ngh OC Ngh OC Ngh OC Ngh OC Ngh OC Ngh OC Ngh OC Ngh OC Ngh OC Ngh OC Ngh OC Ngh OC Ngh OC Ngh OC Ngh OC Ngh OC Ngh OC Ngh OC Ngh OC Ngh OC Ngh OC Ngh OC Ngh QC Ngh QC Ngh QC Ngh QC Ngh QC Ngh QC Ngh QC Ngh QC Ngh QC Ngh QC Ngh QC Ngh QC Ngh QC Ngh QC Ngh QC Ngh QC Ngh QC Ngh QC Ngh QC Ngh QC Ngh QC Ngh QC Ngh QC Ngh QC NghQC NghQC NghQC NghQC NghQC NghQC NghQC NghQC NghQC NghQC NghQC NghQC NghQC NghQC NghQC NghQC NghQC NghQC NghQC NghQC NghQC NghQC NghQC NghQC NghQC Ngh QC Ngh QC Ngh QC Ngh QC Ngh QC Ngh QC Ngh QC Ngh QC Ngh QC Ngh QC Ngh QC Ngh QC Ngh QC Ngh QC Ngh QC Ngh QC Ngh QC Ngh QC Ngh QC Ngh QC Ngh QC Ngh QC Ngh QC Ngh QC Ngh QR Ngh QC Ngh QC Ngh QC Ngh QC Ngh QC Ngh QC Ngh QC Ngh QC Ngh QC Ngh QC Ngh QC Ngh QC Ngh QC Ngh QC Ngh QC Ngh QC Ngh QC Ngh QC Ngh QC Ngh QC Ngh QC Ngh QC Ngh QC Ngh QC Ngh Q Ngh QC Ngh QC Ngh QC Ngh QC Ngh QC Ngh QC Ngh QC Ngh QC Ngh QC Ngh QC Ngh QC Ngh QC Ngh QC Ngh QC Ngh QC Ngh QC Ngh QC Ngh QC Ngh QC Ngh QC Ngh QC Ngh QC Ngh QC Ngh QC Ngh MC Ngh QC Ngh QC Ngh QC Ngh QC Ngh QC Ngh QC Ngh QC Ngh QC Ngh QC Ngh QC Ngh QC Ngh QC Ngh QC Ngh QC Ngh QC Ngh QC Ngh QC Ngh QC Ngh QC Ngh QC Ngh QC Ngh QC Ngh QC Ngh QC Ngh JC Ngh QC Ngh QC Ngh QC Ngh QC Ngh QC Ngh QC Ngh QC Ngh QC Ngh QC Ngh QC Ngh QC Ngh QC Ngh QC Ngh QC Ngh QC Ngh QC Ngh QC Ngh QC Ngh QC Ngh QC Ngh QC Ngh QC Ngh QC Ngh QC NghJC Ngh QC Ngh QC Ngh QC Ngh QC Ngh QC Ngh QC Ngh QC Ngh QC Ngh QC Ngh QC Ngh QC Ngh QC Ngh QC Ngh QC Ngh QC Ngh QC Ngh QC Ngh QC Ngh QC Ngh QC Ngh QC Ngh QC Ngh QC Ngh QC Ngh KC Ngh QC Ngh QC Ngh QC Ngh QC Ngh QC Ngh QC Ngh QC Ngh QC Ngh QC Ngh QC Ngh QC Ngh QC Ngh QC Ngh QC Ngh QC Ngh QC Ngh QC Ngh QC Ngh QC Ngh QC Ngh QC Ngh QC Ngh QC Ngh QC Ngh NC Ngh QC Ngh QC Ngh QC Ngh QC Ngh QC Ngh QC Ngh QC Ngh QC Ngh QC Ngh QC Ngh QC Ngh QC Ngh QC Ngh QC Ngh QC Ngh QC Ngh QC Ngh QC Ngh QC Ngh QC Ngh QC Ngh QC Ngh QC Ngh QC Ngh LC Ngh QC Ngh QC Ngh QC Ngh QC Ngh QC Ngh QC Ngh QC Ngh QC Ngh QC Ngh QC Ngh QC Ngh QC Ngh QC Ngh QC Ngh QC Ngh QC Ngh QC Ngh QC Ngh QC Ngh QC Ngh QC Ngh QC Ngh QC Ngh QC Ngh WC Ngh QC Ngh QC Ngh QC Ngh QC Ngh QC Ngh QC Ngh QC Ngh QC Ngh QC Ngh QC Ngh QC Ngh QC Ngh QC Ngh QC Ngh QC Ngh QC Ngh QC Ngh QC Ngh QC Ngh QC Ngh QC Ngh QC Ngh QC Ngh QC Ngh QS Ngh QC Ngh QC Ngh QC Ngh QC Ngh QC Ngh QC Ngh QC Ngh QC Ngh QC Ngh QC Ngh QC Ngh QC Ngh QC Ngh QC Ngh QC Ngh QC Ngh QC Ngh QC Ngh QC Ngh QC Ngh QC Ngh QC Ngh QC Ngh QC Ngh GC Ngh QC Ngh QC Ngh QC Ngh QC Ngh QC Ngh QC Ngh QC Ngh QC Ngh QC Ngh QC Ngh QC Ngh QC Ngh QC Ngh QC Ngh QC Ngh QC Ngh QC Ngh QC Ngh QC Ngh QC Ngh QC Ngh QC Ngh QC Ngh QC Ngh HC Ngh QC Ngh QC Ngh QC Ngh QC Ngh QC Ngh QC Ngh QC Ngh QC Ngh QC Ngh QC Ngh QC Ngh QC Ngh QC Ngh QC Ngh QC Ngh QC Ngh QC Ngh QC Ngh QC Ngh QC Ngh QC Ngh QC Ngh QC Ngh QC Ngh RC Ngh QC Ngh QC Ngh QC Ngh QC Ngh QC Ngh QC Ngh QC Ngh QC Ngh QC Ngh QC Ngh QC Ngh QC Ngh QC Ngh QC Ngh QC Ngh QC Ngh QC Ngh QC Ngh QC Ngh QC Ngh QC Ngh QC Ngh QC Ngh QC Ngh IC Ngh QC Ngh QC Ngh QC Ngh QC Ngh QC Ngh QC Ngh QC Ngh QC Ngh QC Ngh QC Ngh QC Ngh QC Ngh QC Ngh QC Ngh QC Ngh QC Ngh QC Ngh QC Ngh QC Ngh QC Ngh QC Ngh QC Ngh QC Ngh QC Ngh VC Ngh QC Ngh QC Ngh QC Ngh QC Ngh QC Ngh QC Ngh QC Ngh QC Ngh QC Ngh QC Ngh QC Ngh QC Ngh QC Ngh QC Ngh QC Ngh QC Ngh QC Ngh QC Ngh QC Ngh QC Ngh QC Ngh QC Ngh QC Ngh QC Ngh XC Ngh QC Ngh QC Ngh QC Ngh QC Ngh QC Ngh QC Ngh QC Ngh QC Ngh QC Ngh QC Ngh QC Ngh QC Ngh QC Ngh QC Ngh QC Ngh QC Ngh QC Ngh QC Ngh QC Ngh QC Ngh QC Ngh QC Ngh QC Ngh QC NghXC NghQC NghQC NghQC NghQC NghQC NghQC NghQC NghQC NghQC NghQC NghQC NghQC NghQC NghQC NghQC NghQC NghQC NghQC NghQC NghQC NghQC NghQC NghQC NghQC Nghqc NghQC NghQC NghQC NghQC NghQC NghQC NghQC NghQC NghQC NghQC NghQC NghQC NghQC NghQC NghQC NghQC NghQC NghQC NghQC NghQC NghQC NghQC NghQC NghQC NghOC NghQC NghQC NghQC NghQC NghQC NghQC NghQC NghQC NghQC NghQC NghQC NghQC NghQC NghQC NghQC NghQC NghQC NghQC NghQC NghQC NghQC NghQC NghQC NghQC NghJC NghQC NghQC NghQC NghQC NghQC NghQC NghQC NghQC NghQC NghQC NghQC NghQC NghQC NghQC NghQC NghQC NghQC NghQC NghQC NghQC NghQC NghQC NghQC NghQC NghWC NghQC NghQC NghQC NghQC NghQC NghQC NghQC NghQC NghQC NghQC NghQC NghQC NghQC NghQC NghQC NghQC NghQC NghQC NghQC NghQC NghQC NghQC NghQC NghQC NghVC NghQC NghQC NghQC NghQC NghQC NghQC NghQC NghQC NghQC NghQC NghQC NghQC NghQC NghQC NghQC NghQC NghQC NghQC NghQC NghQC NghQC NghQC NghQC NghQC NghQCA NghQC NghQC NghQC NghQC NghQC NghQC NghQC NghQC NghQC NghQC NghQC NghQC NghQC NghQC NghQC NghQC NghQC NghQC NghQC NghQC NghQC NghQC NghQC NghQC NghHC NghQC NghQC NghQC NghQC NghQC NghQC NghQC NghQC NghQC NghQC NghQC NghQC NghQC NghQC NghQC NghQC NghQC NghQC NghQC NghQC NghQC NghQC NghQC NghQC NghGC NghQC NghQC NghQC NghQC NghQC NghQC NghQC NghQC NghQC NghQC NghQC NghQC NghQC NghQC NghQC NghQC NghQC NghQC NghQC NghQC NghQC NghQC NghQC NghQC NghKC NghQC NghQC NghQC NghQC NghQC NghQC NghQC NghQC NghQC NghQC NghQC NghQC NghQC NghQC NghQC NghQC NghQC NghQC NghQC NghQC NghQC NghQC NghQC NghQC NghYC NghQC NghQC NghQC NghQC NghQC NghQC NghQC NghQC NghQC NghQC NghQC NghQC NghQC NghQC NghQC NghQC NghQC NghQC NghQC NghQC NghQC NghQC NghQC NghQC NghXC NghQC NghQC NghQC NghQC NghQC NghQC NghQC NghQC NghQC NghQC NghQC NghQC NghQC NghQC NghQC NghQC NghQC NghQC NghQC NghQC NghQC NghQC NghQC NghJC NghJC NghJC NghJC NghJC NghJC NghJC NghJC NghJC NghJC NghJC NghJC NghJC NghJC NghJC NghJC NghJC NghJC NghJC NghJC NghJC NghJC NghJC NghJC NghJC Ngh JC NghJC NghJC NghJC NghJC NghJC NghJC NghJC NghJC NghJC NghJC NghJC NghJC NghJC NghJC NghJC NghJC NghJC NghJC NghJC NghJC NghJC NghJC NghJC NghJC NghJQC NghJC NghJC NghJC NghJC NghJC NghJC NghJC NghJC NghJC NghJC NghJC NghJC NghJC NghJC NghJC NghJC NghJC NghJC NghJC NghJC NghJC NghJC NghJC NghJC NgyJC NgyJC NgyJC NgyJC NgyJC NgyJC NgyJC NgyJC NgyJC NgyJC NgyJC NgyJC NgyJC NgyJC NgyJC NgyJC NgyJC NgyJC NgyJC NgyJC NgyJC NgyJC NgyJC NgyJC NgyJC NgcyJC NgcyJC NgcyJC NgcyJC NgcyJC NgcyJC NgcyJC NgcyJC NgcyJC NgcyJC NgcyJC NgcyJC NgcyJC NgcyJC NgcyJC NgcyJC NgcyJC NgcyJC NgcyJC NgcyJC NgCyJC NgCyJC NgCyJC NgCyJC NgCyJC NgCyJC NgCyJC NgCyJC NgCyJC NgCyJC NgCyJC NgCyJC NgCyJC NgCyJC NgCyJC NgCyJC NgCyJC NgCyJC NgCyJC NgCyJC NgCycJC NgCycJC NgCycJC NgCycJC NgCycJC NgCycJC NgCycJC NgCycJC NgCycJC NgCycJC NgCycJC NgCycJC NgCycJC NgCycJC NgCycJC NgCycJC NgCycJC NgyJC NgyJC NgyJC NgyJC NgyJC NgyJC NgyJC NgyJC NgyJC NgyJC NgyJC NgyJC NgyJC NgyJC NgyJC NgyJC NgyJC NgyJC NgyJC NgyJC NgyJC NgyJC NgyJC NgyJC NnyJC NnyJC NnyJC NnyJC NnyJC NnyJC NnyJC NnyJC NnyJC NnyJC NnyJC NnyJC NnyJC NnyJC NnyJC NnyJC NnyJC NnyJC NnyJC NnyJC NnyJC NnyJC NnyJC NnyJC NnyJC NgyJC NgyJC NgyJC NgyJC NgyJC NgyJC NgyJC NgyJC NgyJC NgyJC NgyJC NgyJC NgyJC NgyJC NgyJC NgyJC NgyJC NgyJC NgyJC NgyJC NgyJC NgyJC NgyJC NgyJC NtyJC | Mô menu OSD (sang) Mô menu OSD (sang) Mô menu OSD (sang) Mô menu OSD (sang) Mô menu OSD (sang) Mô menu OSD (sang) Mô menu OSD (sang) Mô menu OSD (sang) Mô menu OSD (sang) Mô menu OSD (sang) Mô menu OSD (sang) Mô menu OSD (sang) Mô menu OSD (sang) Mô menu OSD (sang) Mô menu OSD (sang) Mô menu OID (sang) Mô menu OID (sang) Mô menu OID (sang) Mô menu OID (sang) Mô menu OID (sang) Mô menu OID (sang) Mô menu OID (sang) Mô menu OID (sang) Mô menu OID (sang) Mô menu OID (sang) Mô menu OID (sang) Mô menu OID (sang) Mô menu OID (sang) |
| Mô menu OSD (sang) Mô menu OSD (sang) Mô menu OSD (sang) Mô menu OSD (sang) Mô menu OSD (sang) Mô menu OSD (sang) Mô menu OSD (sang) Mô menu OSD (sang) Mô menu OSD (sang) Mô menu OSD (sang) Mô menu OSD (sang) Mô menu OSD (sang) Mô menu OST (sang) Mô menu OST (sang) Mô menu OST (sang) Mô menu OST (sang) Mô menu OST (sang) Mô menu OST (sang) Mô menu OST (sang) Mô menu OST (sang) Mô menu OST (sang) Mô menu OST (sang) Mô menu OST (sang) Mô menu OST (sang) Mô menu OST (sang) | Mô menu OSD (sang) Mô menu OSD (sang) Mô menu OSD (sang) Mô menu OSD (sang) Mô menu OSD (sang) Mô menu OSD (sang) Mô menu OSD (sang) Mô menu OSD (sang) Mô menu OSD (sang) Mô menu OSD (sang) Mô menu OSD (sang) Mô menu OSD (sang) Mômenu OST( sang) Mô menu OST( sang) Mô menu OST( sang) Mô menu OST( sang) Mô menu OST( sang) Mô menu OST( sang) Mô menu OST( sang) Mô menu OST( sang) Mô menu OST( sang) Mô menu OST( sang) Mô menu OST( sang) Mô menu OST( sang) Mô menu OST( sang) Mô menu OST( sng) Mô menu OST( sng) Mô menu OST( sng) Mô menu OST( sng) Mô menu OST( sng) Mô menu OST( sng) Mô menu OST( sng) Mô menu OST( sng) Mô menu OST( sng) Mô menu OST( sng) Mô menu OST( sng) Mô menu OST( sng) Mô menu OST( sng) Mômenu OST( sng) Mô menu OST( sng) Mô menu OST( sng) Mô menu OST( sng) Mô menu OST( sng) Mô menu OST( sng) Mô menu OST( sng) Mô menu OST( sng) Mô menu OST( sng) Mô menu OST( sng) Mô menu OST( sng) Mô menu OST( sng) Mô menu OST( sNG) Mô menu OST( sNG) Mô menu OST( sNG) Mô menu OST( sNG) Mô menu OST( sNG) Mô menu OST( sNG) Mô menu OST( sNG) Mô menu OST( sNG) Mô menu OST( sNG) Mô menu OST( sNG) Mô menu OST( sNG) Mô menu OST( sNG) Mô menu OST( sNG) Mômenu OST( sNG) Mô menu OST( sNG) Mô menu OST( sNG) Mô menu OST( sNG) Mô menu OST( sNG) Mô menu OST( sNG) Mô menu OST( sNG) Mô menu OST( sNG) Mô menu OST( sNG) Mô menu OST( sNG) Mô menu OST( sNG) Mô menu OST( sNG) Mô menu OST( sng) Mô menu OST( sng) Mô menu OST( sng) Mô menu OST( sng) Mô menu OST( sng) Mô menu OST( sng) Mô menu OST( sng) Mô menu OST( sng) Mô menu OST( sng) Mô menu OST( sng) Mô menu OST( sng) Mô menu OST( sng) Mô菜单 OST( sng) Mô菜单 OST( sng) Mô菜单 OST( sng) Mô菜单 OST( sng) Mô菜单 OST( sng) Mô菜单 OST( sng) Mô菜单 OST( sng) Mô菜单 OST( sng) Mô菜单 OST( sng) Mô菜单 OST( sng) Mô菜单 OST( sng) Mô菜单 OST( sng) Mô菜单 OST( sNG) Mô菜单 OST( sNG) Mô菜单 OST( sNG) Mô菜单 OST( sNG) Mô菜单 OST( sNG) Mô菜单 OST( sNG) Mô菜单 OST( sNG) Mô菜单 OST( sNG) Mô菜单 OST( sNG) Mô菜单 OST( sNG) Mô菜单 OST( sNG) Mô菜单 OST( sNG) Mô菜单 OST( sNG) Mô菜菜单 OST( sNG) Mô菜菜单 OST( sNG) Mô菜菜单 OST( sNG) Mô菜菜单 OST( sNG) Mô菜菜单 OST( sNG) Mô菜菜单 OST( sNG) Mô菜菜单 OST( sNG) Mô菜菜单 OST( sNG) Mô菜菜单 OST( sNG) Mô菜菜单 OST( sNG) Mô菜菜单 OST( sNG) Mô菜菜菜单 OST( sNG) Mô菜菜菜单 OST( sNG) Mô菜菜菜单 OST( sNG) Mô菜菜菜单 OST( sNG) Mô菜菜菜单 OST( sNG) Mô菜菜菜单 OST( sNG) Mô菜菜菜单 OST( sNG) Mô菜菜菜单 OST( sNG) Mô菜菜菜单 OST( sNG) Mô菜菜菜单 OST( sNG) Mô菜单菜单 OST( sNG) Mô菜单菜单 OST( sNG) Mô菜单菜单 OST( sNG) Mô菜单菜单 OST( sNG) Mô菜单菜单 OST( sNG) Mô菜单菜单 OST( sNG) Mô菜单菜单 OST( sNG) Mô菜单菜单 OST( sNG) Mô菜单菜单 OST( sNG) Mô菜单菜单 OST( sNG) Mô菜单菜单 OST( sNG) Mô菜单菜菜单 OST( sNG) Mô菜单菜菜单 OST( sNG) Mô菜单菜菜单 OST( sNG) Mô菜单菜菜单 OST( sNG) Mô菜单菜菜单 OST( sNG) Mô菜单菜菜单 OST( sNG) Mô菜单菜菜单 OST( sNG) Mô菜单菜菜单 OST( sNG) Mô菜单菜菜单 OST( sNG) Mô菜单菜菜单 OST( sNG) Mô菜单菜单 OST( sNG) Mô菜单菜单 OST( sNG) Mô菜单菜单 OST( sNG) Mô菜单菜单 OST( sNG) Mô菜单菜单 OST( sNG) Mô菜单菜单 OST( sNG) Mô菜单菜单 OST( sNG) Mô菜单菜单 OST( sNG) Mô菜单菜单 OST( sNG) Mô菜单菜单 OST( sNG) Mô菜菜菜单 OST( sNG) Mô菜菜菜单 OST( sNG) Mô菜菜菜单 OST( sNG) Mô菜菜菜单 OST( sNG) Mô菜菜菜单 OST( sNG) Mô菜菜菜菜单 OST( sNG) Mô菜菜菜菜单 OST( sNG) Mô菜菜菜菜菜单 OST( sNG) Mô菜菜菜菜菜菜单 OST( sNG) Mô菜菜菜菜菜菜菜菜单 OST( sNG) Mô菜菜菜菜菜菜菜菜菜菜菜菜菜菜菜菜菜菜菜菜菜菜菜菜菜菜菜菜菜菜菜菜菜菜菜菜菜菜菜菜菜菜菜菜菜菜菜菜菜菜菜菜菜菜菜菜菜菜菜菜菜菜菜菜菜菜菜菜菜菜菜菜菜菜菜菜菜菜菜菜菜菜菜菜菜菜菜菜菜菜菜菜菜菜菜菜菜菜菜菜草菜菜菜菜菜菜菜菜菜菜菜菜菜菜菜菜菜菜菜菜菜菜菜菜菜菜菜菜菜菜菜菜菜菜菜菜菜菜菜菜菜菜菜菜菜菜菜菜菜菜菜菜菜菜菜菜菜菜菜菜菜菜菜菜菜菜菜菜菜菜菜菜菜菜菜菜菜菜菜菜菜菜菜菜菜菜菜菜菜菜菜菜菜菜菜菜菜菜菜类菜菜菜菜菜菜菜菜菜菜菜菜菜菜菜菜菜菜菜菜菜菜菜菜菜菜菜菜菜菜菜菜菜菜菜菜菜菜菜菜菜菜菜菜菜菜菜菜菜菜菜菜菜菜菜菜菜菜菜菜菜菜菜菜菜菜菜菜菜菜菜菜菜菜菜菜菜菜菜菜菜菜菜菜菜菜菜菜菜菜菜菜菜菜菜菜菜菜菜莱菜菜菜菜菜菜菜菜菜菜菜菜菜菜菜菜菜菜菜菜菜菜菜菜菜菜菜菜菜菜菜菜菜菜菜菜菜菜菜菜菜菜菜菜菜菜菜菜菜菜菜菜菜菜菜菜菜菜菜菜菜菜菜菜菜菜菜菜菜菜菜菜菜菜菜菜菜菜菜菜菜菜菜菜菜菜菜菜菜菜菜菜菜菜菜菜菜菜菜藻菜菜菜菜菜菜菜菜菜菜菜菜菜菜菜菜菜菜菜菜菜菜菜菜菜菜菜菜菜菜菜菜菜菜菜菜菜菜菜菜菜菜菜菜菜菜菜菜菜菜菜菜菜菜菜菜菜菜菜菜菜菜菜菜菜菜菜菜菜菜菜菜菜菜菜菜菜菜菜菜菜菜菜菜菜菜菜菜菜菜菜菜菜菜菜菜菜菜菜豆菜豆菜豆菜豆菜豆菜豆菜豆菜豆菜豆菜豆菜豆菜豆菜豆菜豆菜豆菜豆菜豆菜豆菜豆菜豆菜豆菜豆菜豆菜豆菜豆菜豆菜豆菜豆菜豆菜豆菜豆菜豆菜豆菜豆菜豆菜豆菜豆菜豆菜豆菜豆菜豆菜豆菜豆菜豆菜豆菜豆菜豆菜豆菜豆菜豆菜杂豆豆菜杂豆豆菜杂豆豆菜杂豆豆菜杂豆豆菜杂豆豆菜杂豆豆菜杂豆豆菜杂豆豆菜杂豆豆菜杂豆豆菜杂豆豆菜杂豆豆菜杂豆豆菜杂豆豆菜杂豆豆菜杂豆豆菜杂豆豆菜杂豆豆菜杂豆豆菜杂豆豆菜杂豆豆菜杂豆豆菜杂豆豆菜杂豆豆菜杂旦豆菜杂旦豆菜杂旦豆菜杂旦豆菜杂旦豆菜杂旦豆菜杂旦豆菜杂旦豆菜杂旦豆菜杂旦豆菜杂旦豆菜杂旦豆菜杂旦豆菜杂旦豆菜杂旦豆菜杂旦豆菜杂旦豆菜杂旦豆菜杂旦豆菜杂旦豆菜杂旦豆菜杂旦豆菜杂旦豆菜杂旦豆菜杂旦豆菜杂豆豆菜杂豆豆菜杂豆豆菜杂豆豆菜杂豆豆菜杂豆豆菜杂豆豆菜杂豆豆菜杂豆豆菜杂豆豆菜杂豆豆菜杂豆豆菜杂豆豆菜杂豆豆菜杂豆豆菜杂豆豆菜杂豆豆菜杂豆豆菜杂豆豆菜杂豆豆菜杂豆豆菜杂豆豆菜杂豆豆菜杂豆豆菜杂月杂杂杂杂杂杂杂杂杂杂杂杂杂杂杂杂杂杂杂杂杂杂杂杂杂杂杂杂杂杂杂杂杂杂杂杂杂杂杂杂杂杂杂杂杂杂杂杂杂杂杂杂杂杂杂杂杂杂杂杂杂杂杂杂杂杂杂杂杂杂杂杂杂杂杂杂杂杂杂杂杂杂杂杂杂杂杂杂杂杂杂杂杂杂杂杂杂杂杂杂朵朵朵朵朵朵朵朵朵朵朵朵朵朵朵朵朵朵朵朵朵朵朵朵朵朵朵朵朵朵朵朵朵朵朵朵朵朵朵朵朵朵朵朵朵朵朵朵朵朵朵朵朵朵朵朵朵朵朵朵朵朵朵朵朵朵朵朵朵朵朵朵朵朵朵朵朵朵朵朵朵朵朵朵朵朵朵朵朵朵朵朵朵朵朵朵朵朵朵朵杂杂杂杂杂杂杂杂杂杂杂杂杂杂杂杂杂杂杂杂杂杂杂杂杂杂杂杂杂杂杂杂杂杂杂杂杂杂杂杂杂杂杂杂杂杂杂杂杂杂杂杂杂杂杂杂杂杂杂杂杂杂杂杂杂杂杂杂杂杂杂杂杂杂杂杂杂杂杂杂杂杂杂杂杂杂杂杂杂杂杂杂杂杂杂杂杂杂杂尕杂杂杂杂杂杂杂杂杂杂杂杂杂杂杂杂杂杂杂杂杂杂杂杂杂杂杂杂杂杂杂杂杂杂杂杂杂杂杂杂杂杂杂杂杂杂杂杂杂杂杂杂杂杂杂杂杂杂杂杂杂杂杂杂杂杂杂杂杂杂杂杂杂杂杂杂杂杂杂杂杂杂杂杂杂杂杂杂杂杂杂杂杂杂杂杂杂杂杂备杂杂杂杂杂杂杂杂杂杂杂杂杂杂杂杂杂杂杂杂杂杂杂杂杂杂杂杂杂杂杂杂杂杂杂杂杂杂杂杂杂杂杂杂杂杂杂杂杂杂杂杂杂杂杂杂杂杂杂杂杂杂杂杂杂杂杂杂杂杂杂杂杂杂杂杂杂杂杂杂杂杂杂杂杂杂杂杂杂杂杂杂杂杂杂杂杂杂杂混杂杂杂杂杂杂杂杂杂杂杂杂杂杂杂杂杂杂杂杂杂杂杂杂杂杂杂杂杂杂杂杂杂杂杂杂杂杂杂杂杂杂杂杂杂杂杂杂杂杂杂杂杂杂杂杂杂杂杂杂杂杂杂杂杂杂杂杂杂杂杂杂杂杂杂杂杂杂杂杂杂杂杂杂杂杂杂杂杂杂杂杂杂杂杂杂杂杂杂分杂杂杂杂杂杂杂杂杂杂杂杂杂杂杂杂杂杂杂杂杂杂杂杂杂杂杂杂杂杂杂杂杂杂杂杂杂杂杂杂杂杂杂杂杂杂杂杂杂杂杂杂杂杂杂杂杂杂杂杂杂杂杂杂杂杂杂杂杂杂杂杂杂杂杂杂杂杂杂杂杂杂杂杂杂杂杂杂杂杂杂杂杂杂杂杂杂杂杂合杂杂合杂合杂合杂合杂合杂合合杂合合合合合合合合合合合合合合合合合合合合合合合合合合合合合合合合合合合合合合合合合合合合合合合合合合合合合合合合合合合合合合合合合合合合合合合合合合合合合合合合合合合合合合合合合合合合合合合合合合合合台合合合合合合合合合合合合合合合合合合合合合合合合合合合合合合合合合合合合合合合合合合合合合合合合合合合合合合合合合合合合合合合合合合合合合合合合合合合合合合合合合合合合合合合合合合合合合合合合合合合合并合合合合合合合合合合合合合合合合合合合合合合合合合合合合合合合合合合合合合合合合合合合合合合合合合合合合合合合合合合合合合合合合合合合合合合合合合合合合合合合合合合合合合合合合合合合合合合合合合合合合适合合合合合合合合合合合合合合合合合合合合合合合合合合合合合合合合合合合合合合合合合合合合合合合合合合合合合合合合合合合合合合合合合合合合合合合合合合合合合合合合合合合合合合合合合合合合合合合合合合合合格合格合格合格合格合格合格合格合格合格合格合格合格合格合格合格合格合格合格合格合格合格合格合格合格合格合格合格合格合格合格合格合格合格合格合格合格合格合格合格合格合格合格合格合格合格合格合格合格合格合格合格合格合格合格合格合格合格合格合格合格合格合格合格合格合格合格合格合格合格合格合格合格合格合格合格合格合格合格合格合格合格合格合格合格合格合格合格合格合格合格合格合格合格合格合格合格合格合格合格 | |
| Văn dê | Nguyên khác có thê | Giaci tiên |
| "OSD Lockout" (Khoa OSD) duoc hiên th!. | Chuc nang Khoa OSDCEE mân先进技术. | Nhân và giū chinh giūa nút tay can diieu khiêntron 10 giay dé tát chuc nang Khoa OSD. |
| "Power Button Lockout" (Khoa nút nguôn) duoc hiên th!. | Tích nang Khoa nút nguǒnCEE mân先进技术. | Nhân và giū nút Power (Nguôn)tron 10 giay dé mô khoa chuc nút nguôn. |
Khoa chan nút
Chuc nang khoa nut chi su dung duoc khi man inh dang bát, tin hiieu hoat dong duoc hiên thi va da dong menu OSD. Nhan giu nut nguon hoac nut Menu trong 10 giay se vô hiieu hóa nut do. Bàn co thehat lai nut do bang cach nhán giu no mot lan nuastrong 10 giay.
Bànc có cαu hoi haygap van de thiet lap?
Copyright 2022 HP Development Company, L.P.
http://www.hp.com/go/regulatory
Copyright 2022 HP Development Company, L.P.
.
.
1
C. it is proper for us to keep the public places clean
A.
4 2
9. 1
- 11
1.
10
17 25
Y.
11 1
11
Y
1
1
1
1
- ai a ai 分母最小值为 k .
FHD 0 HyperX Armada
1
y0
例:而余亦复以之无穷匮,而不得反之以也。
10
如: B2^1 · A1^2 · C1^3 · A2^3 · B_2^2
Copyright 2022 HP Development Company, L.P.
jIe jIeJxJyJzJxJxHyperXxHyperX
JyHHP Development Co
aale clogles aodll j
http://www.hp.com/go/regulatory
j 1
J 1
15
ailll alal aal lall jlll alo jao aal bll allu Jauie aal alal jaiy jayssll jai
.
J 2
jaiil jieji jie jie jie jie jie jie
https://hyperx.gg/ergo
i/1j0j1 j 1
aagall aiejll jall gaiy jil 1i iia
aaiiill jao aoe jao cullsail yss slll lal jill aball aabll
aie
aII
aBbjj.
S_ ADB = 12 · AB · DB = 12 × CD × 5
ab( a - b) = 12
()HDMI2.0
DisplayPort 1.4
a_2 = 1 a.b.c.d.e.f.g.h.i.
1 1
a a a a a a a a a a a a a a a a a a a a a a a a
()gjyj1jyj()
()
()g()
aaii
a 1
auii
山
hyperx. gg/ngenuity: ngENUITY

aalal alalal
aal aalalal alalal alalal alalal alalal alalal alalal alalal alalal alalal
ailll jaii i jai gai gai gai gai gai gai gai gai gai gai gai gai
ylll lclac e jlr g aalil
aallll llll 1j jie lae Jally aaiia aaii 5i i
aill jgill o jll g kll sddj aiaie gl baii
aaii iiaiiie 100000000000000000000000000000000000000
aalall aeg all aaiill
a a a a a a a a a a a a a a a a a a a a a a a a a a a
1
Aa gallllk,dlallllglg
a aal
8.2015 all 4 1
1
jz jz jz jz jz
y 1111111111111111111111111111
0.10. a 1
1 1 1 1 1 1 1 1 1 1 1 1 1 1 1 1 1 1 1 1 1 1 1 1 1 1 1 1 1 1 1 1 1 1
ailllll lllllllllllllllllllllllllllllll
aaiiie 10000000000000000000000000000000000000000000000000
a
la jyicly la yjbi jybjjaiall aaiaiia jyj. jybjj lki jyj, jyj
HP jao aaiiill clll jaoa 2gall gall .jalall yikil gaaagall gial jal jalil gial ao jol jolil
J 100%
Jaiyil jaiiill jaiila yjai lal jaiil jaiill jaiil aaiil
aai 1
FHD HyperX Armada