
Armada 27 QHD - Monitor HYPERX - Free user manual and instructions
Find the device manual for free Armada 27 QHD HYPERX in PDF.
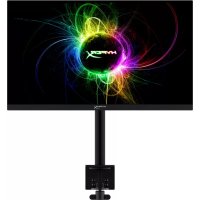


| Product Type | QHD Gaming Monitor |
| Brand | HyperX |
| Model | Armada 27 QHD |
| Screen Size | 68.5 cm (27 inches) |
| Panel Type | IPS, LED Backlight |
| Native Resolution | 2560 x 1440 (QHD) |
| Refresh Rate | 165 Hz (DisplayPort) |
| Variable Refresh Technology | G-SYNC Compatible, Adaptive-Sync (48-165 Hz) |
| Response Time | 1 ms GtG (with overdrive) |
| Brightness | 400 cd/m² |
| Contrast Ratio | 1000:1 |
| HDR | VESA DisplayHDR 400 |
| Color Gamut | DCI-P3 95% |
| Viewing Angle | 178° horizontal and vertical |
| Connectivity | DisplayPort 1.4, 2 x HDMI 2.0 |
| Power Supply | 100-240 VAC, 50/60 Hz |
| Power Consumption | 60 W max, 33 W typical |
| Monitor Weight (without stand) | 3.6 kg |
| Stand and Arm Weight | 4.8 kg |
| Monitor Dimensions (W x H x D) | 61.39 x 36.40 x 6.22 cm |
| VESA Mount Compatibility | 75 x 75 mm and 100 x 100 mm |
| Ergonomic Adjustments | Tilt (-25° to +60°), Swivel (±90°), Pivot (±90°), Height (column 25.5 cm) |
| Arm Reach | 31.2 ± 0.5 cm |
| Screen Coating | Matte, Anti-glare |
| Software Features | NGENUITY Compatible |
| Included Accessories | DisplayPort cable, HDMI cable, power cord, VESA bracket, screws, hex keys |
Frequently Asked Questions - Armada 27 QHD HYPERX
User questions about Armada 27 QHD HYPERX
0 question about this device. Answer the ones you know or ask your own.
Ask a new question about this device
Download the instructions for your Monitor in PDF format for free! Find your manual Armada 27 QHD - HYPERX and take your electronic device back in hand. On this page are published all the documents necessary for the use of your device. Armada 27 QHD by HYPERX.
USER MANUAL Armada 27 QHD HYPERX
HyperX Armada 27 QHD Gaming Monitor
Find the language and latest documentation for your HyperX Armada 27 QHD Gaming Monitor here.
HyperX Armada 27 QHD Gaming Monitor Installation Guide
For instructions in English Para instrucciones en Español Für Anleitungen in Deutsch Pour des instructions en Français Per le istruzioni in Italiano Por as instruções em Português Instrukcje w języku Polskim Инструкции на русском Türkçe talimatlar için 日本語マニュアル用 ... Hướng dẫn bằng tiếng Việt
Simplified Chinese....简体中文说明书
Traditional Chinese....繁體中文說明
Arabic.
HyperX Armada 27 QHD Gaming Monitor
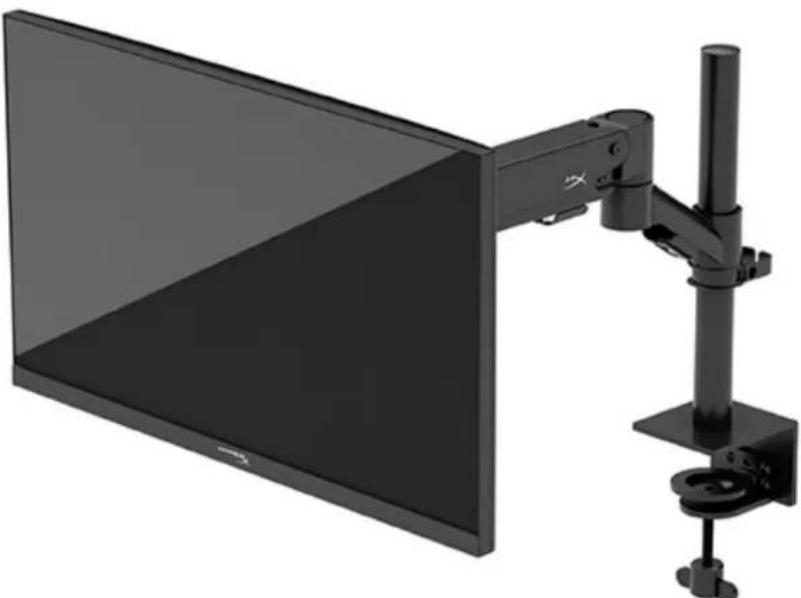
N21923-001
TABLE OF CONTENTS
Getting Started. 5
Important safety information. 5
Getting to know your monitor 6
Components 6
Locating the serial number and product number. 8
Setting up the monitor 9
Using the C clamp. 9
Attaching the neck and mounting arm. 11
Adjusting the tension 14
Connecting and routing the cables. 15
Adjusting the monitor. 16
Turning on the monitor 17
HyperX watermark and image retention policy. 18
Mounting multiple monitors 18
Monitor mounting configurations 21
Using the monitor 22
Downloading software 22
Using the OSD menu 22
Display mode status. 23
Using Auto-Sleep mode. 23
Troubleshooting 23
Solving common issues 24 HyperX Armada 27 QHD Gaming Monitor 24 Button lockouts 25 Questions or Setup Issues? 25 Maintaining the monitor 25 Maintenance guidelines 25 Cleaning the monitor 26 Shipping the monitor 26 Technical specifications 27 HyperX Armada 27 QHD Gaming Monitor 27 Preset display resolutions 29
Copyright 2022 HP Development Company, L.P.
HyperX and the HyperX logo are registered trademarks or trademarks of HP Development Co. in the U.S. and/or other countries. All registered trademarks and trademarks are property of their respective owners.
The information contained herein is subject to change without notice. The only warranties for HP products and services are set forth in the express warranty statements accompanying such products and services. Nothing herein should be construed as constituting an additional warranty. HP shall not be liable for technical or editorial errors or omissions contained herein.
Product notice
This guide describes features that are common to most models. Some features may not be available on your product.
First Edition: June 2022
Document part number: N21923-001
Getting Started
Important safety information
A power cord is included with the monitor. If you use another cord, use only a power source and connection appropriate for this monitor. For information about the correct power cord set to use with the monitor, see the Product Notices provided on the web at: http://www.hp.com/go/regulatory.
WARNING! To reduce the risk of electric shock or damage to the equipment:
- Plug the power cord into an AC outlet that is easily accessible at all times.
- If the power cord has a three-pin attachment plug, plug the cord into a grounded (earthed) three-pin outlet.
- Disconnect power from the computer by unplugging the power cord from the AC outlet. When unplugging the power cord from the AC outlet, grasp the cord by the plug.
For your safety, do not place anything on power cords or cables. Take care to route all cords and cables connected to the monitor so that they cannot be stepped on, pulled, grabbed, or tripped over.
To reduce the risk of serious injury, read the Safety & Comfort Guide available on the web at https://hyperx.qq/ergo. It describes proper workstation setup and proper posture, health, and work habits for computer users. The Safety & Comfort Guide also provides important electrical and mechanical safety information.
IMPORTANT: For the protection of the monitor and the computer, connect all power cords for the computer and its peripheral devices (such as a monitor, printer, scanner) to a surge protection device such as a power strip or uninterruptible power supply (UPS). Not all power strips provide surge protection; the power strip must be specifically labeled as having this capability. Use a power strip whose manufacturer offers a damage replacement policy so that you can replace the equipment if surge protection fails.
Use the appropriate and correctly sized furniture designed to properly support your monitor.
WARNING! Monitors that are inappropriately situated on dressers, bookcases, shelves, desks, speakers, chests, or carts could fall over and cause personal injury.
WARNING! Stability hazard: The device might fall, causing serious personal injury or death. To prevent injury, securely attach the monitor to the floor or wall in accordance with the installation instructions.
WARNING! This equipment is not suitable for use in locations where children are likely to be present.
NOTE: This product is suitable for entertainment purposes. Consider placing the monitor in a controlled luminous environment to avoid interference from surrounding light and bright surfaces that might cause disturbing reflections from the screen.
Getting to know your monitor Components
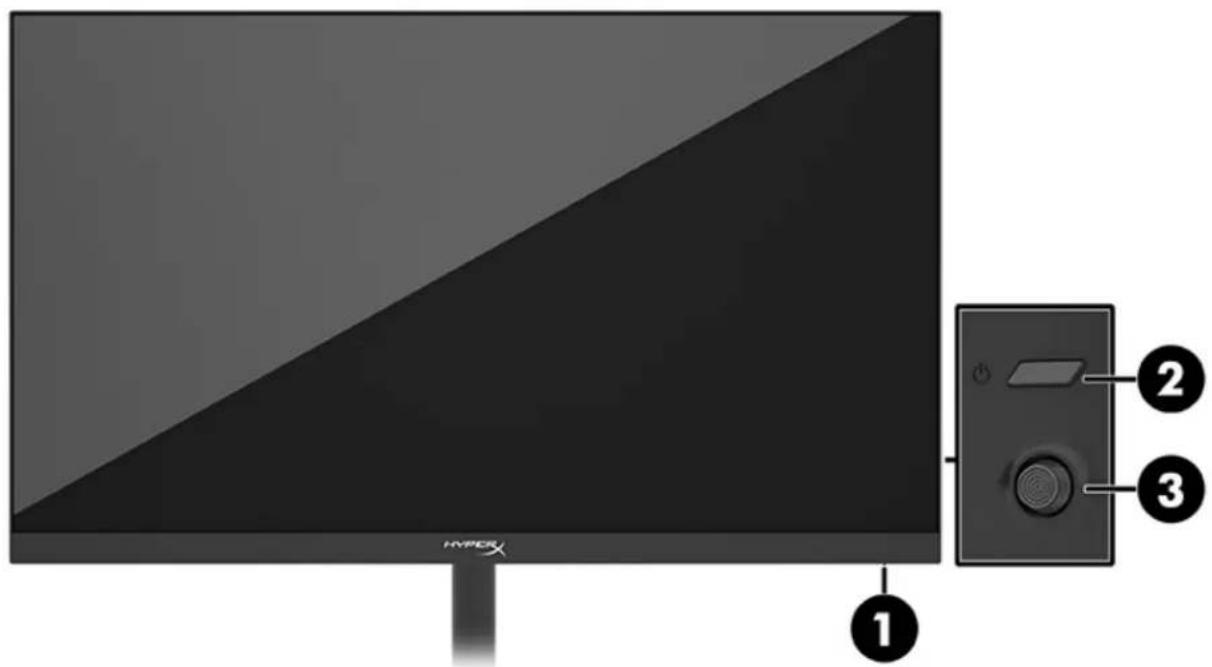
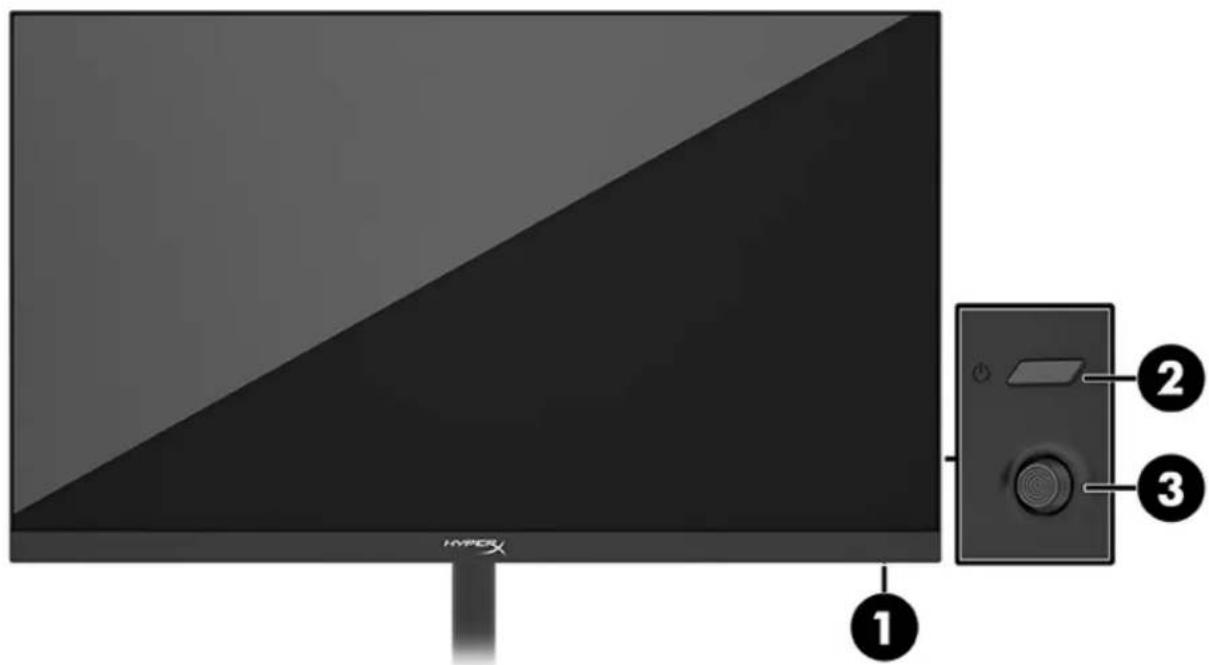
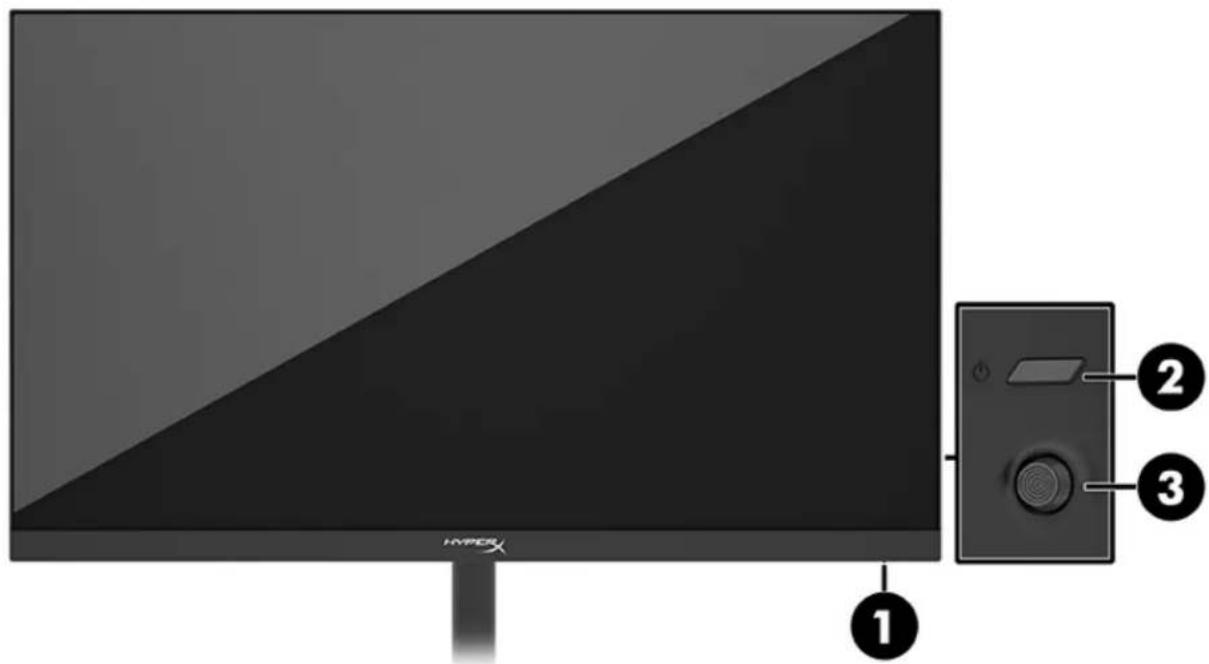
- Power light
- Power button
- Joystick control
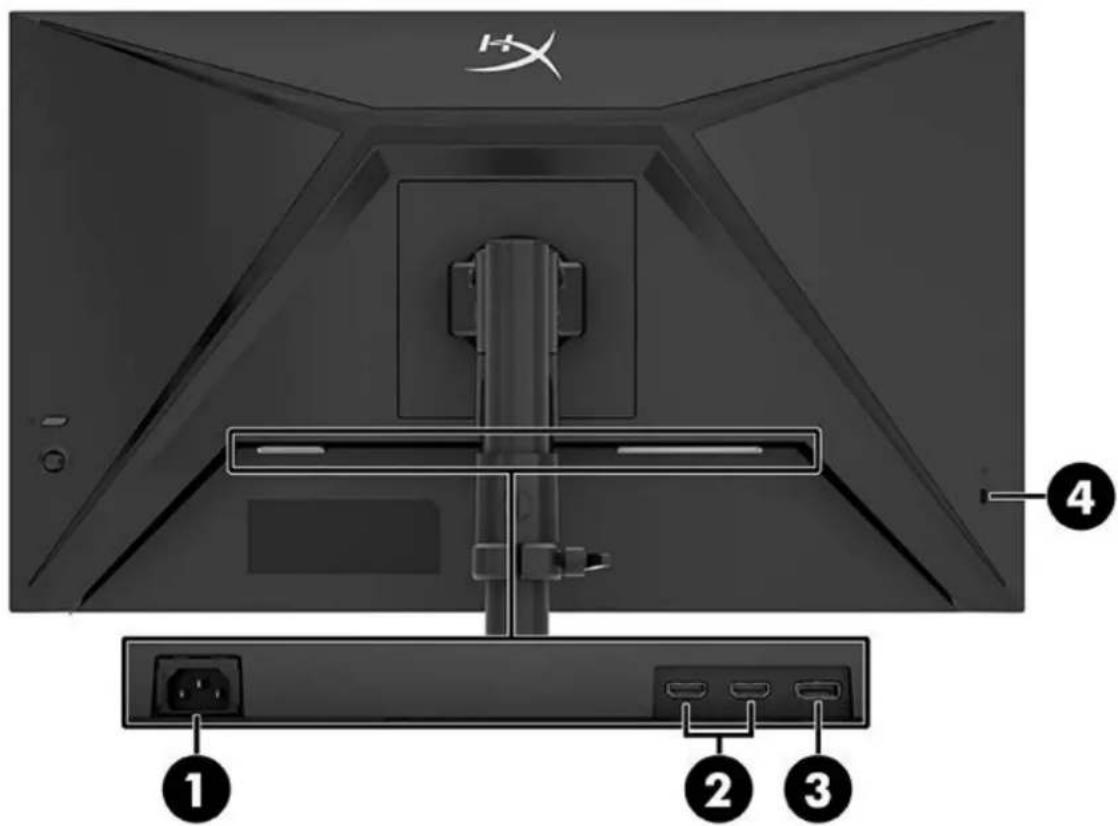
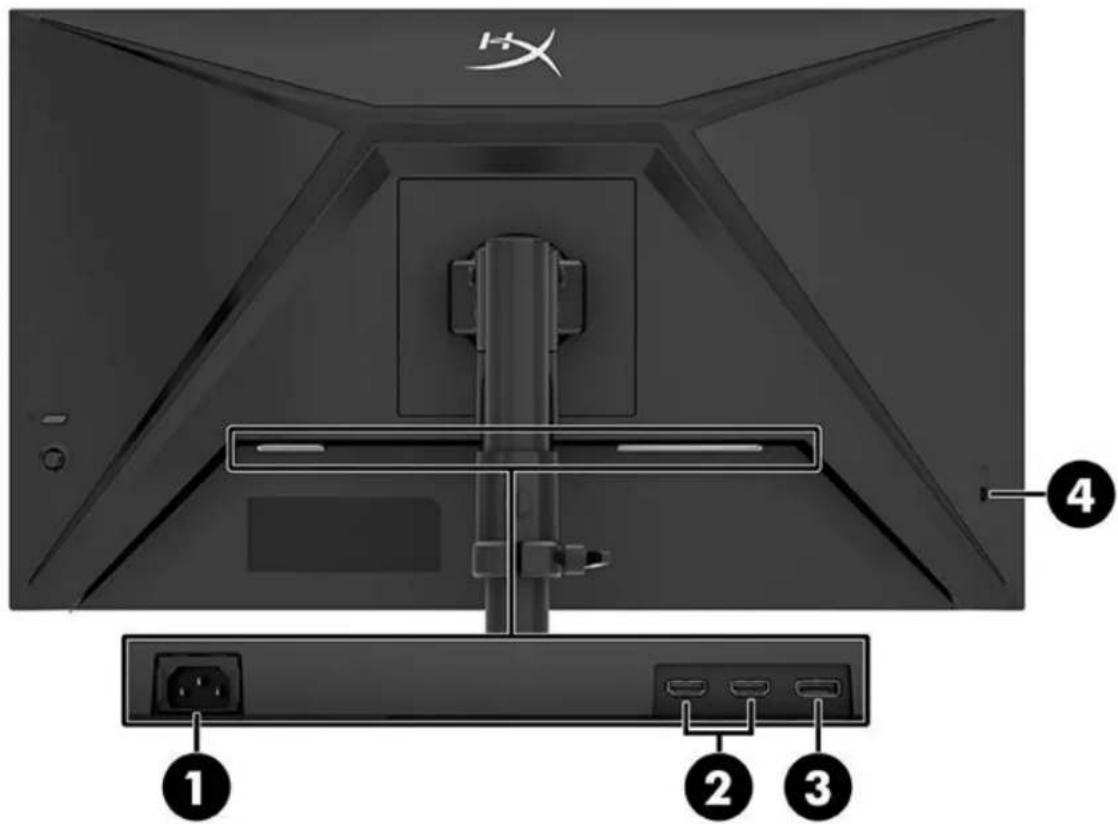
- Power connector
- HDMI 2.0 ports (2)
- DisplayPort 1.4 connector
- Security cable slot
Locating the serial number and product number
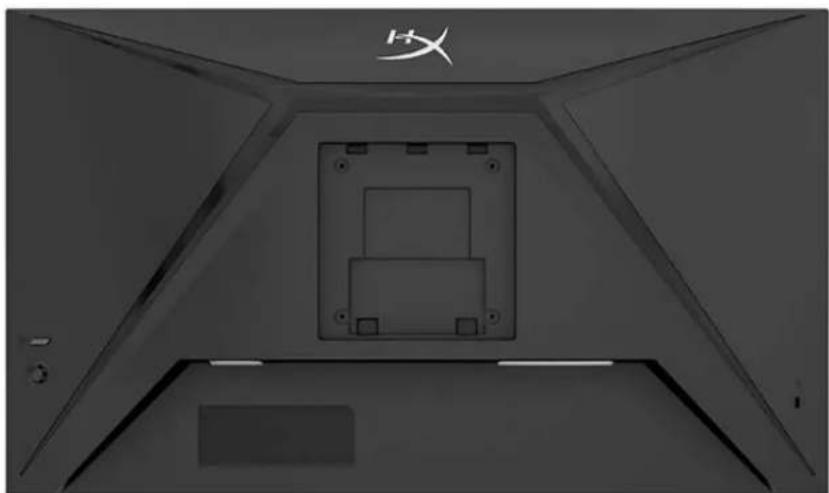
Depending on the product, the serial number and product number are located on a label on the rear of the monitor or on a label under the front bezel of the monitor head. You might need these numbers when contacting HyperX for support.
Setting up the monitor
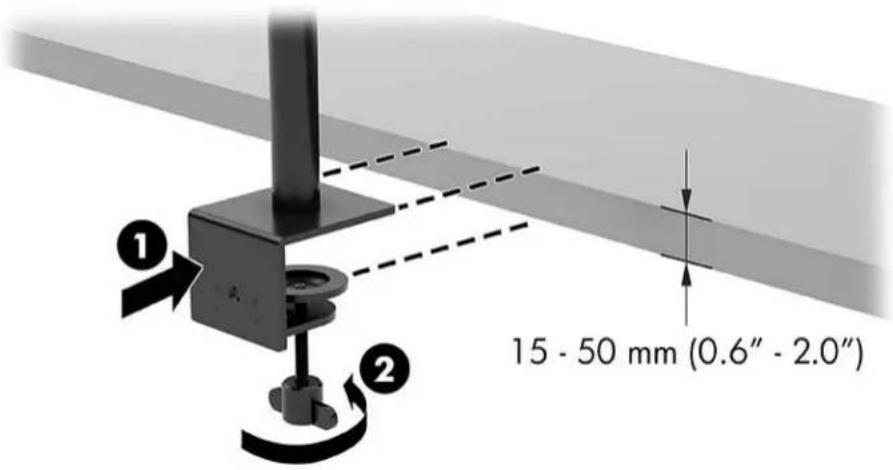
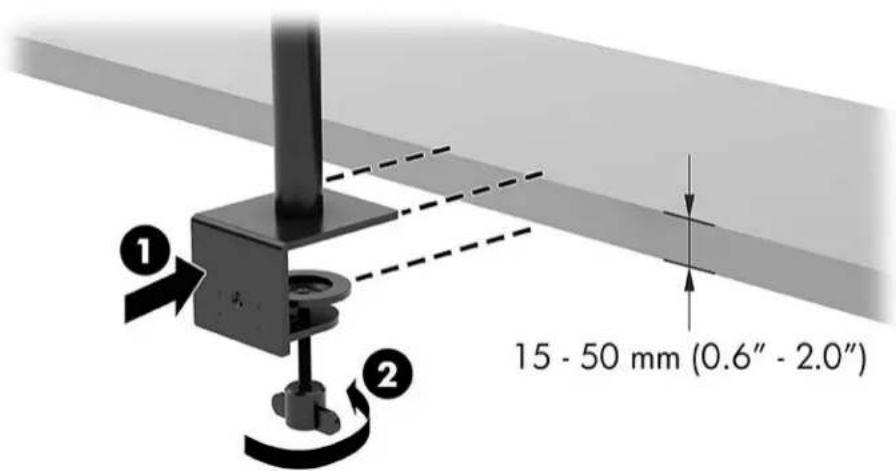
Using the C clamp
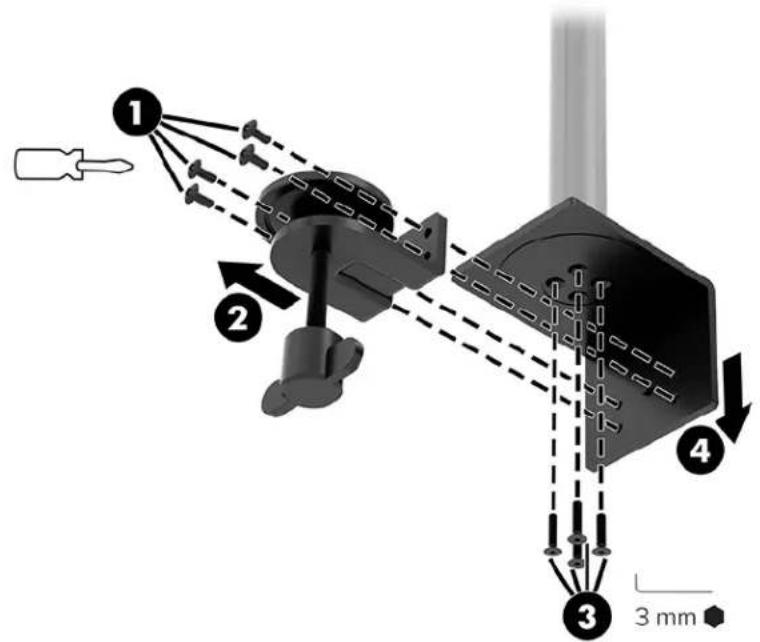
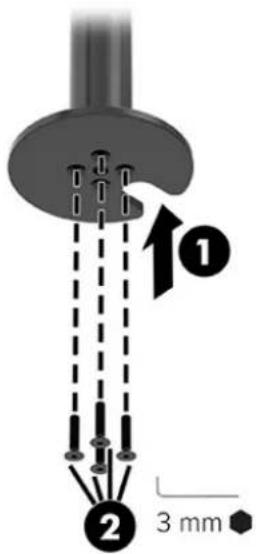
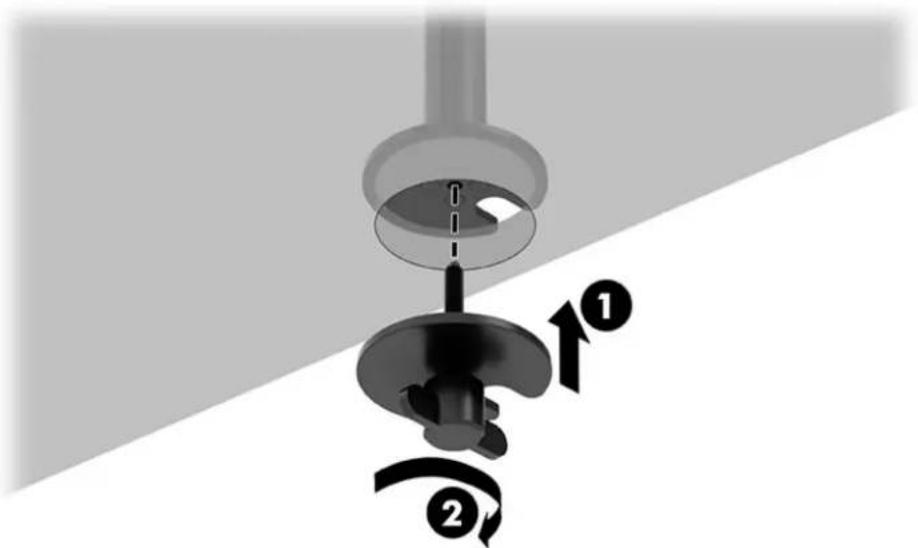
Using the grommet mount
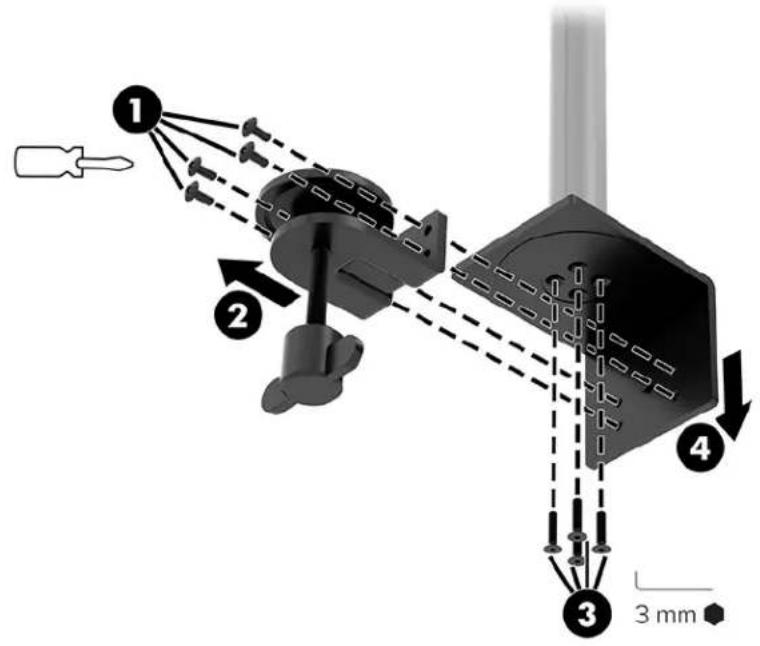
- If the stand has a C clamp installed, use a screwdriver to remove the C clamp.
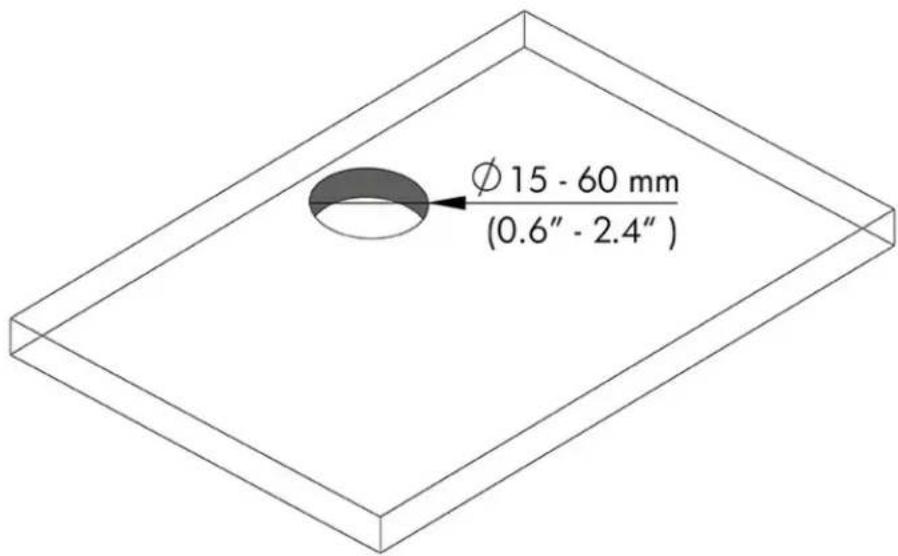
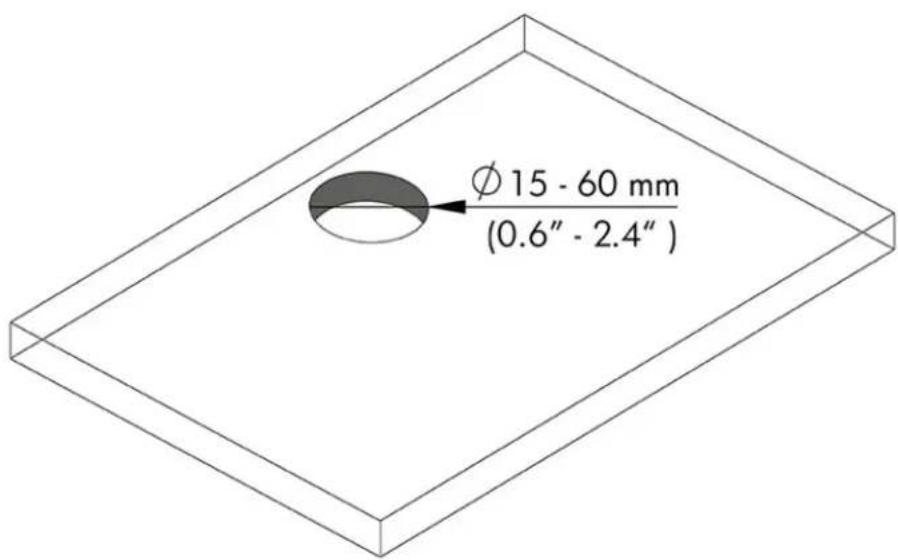
- Drill a hole in the desktop for the grommet mount pole.
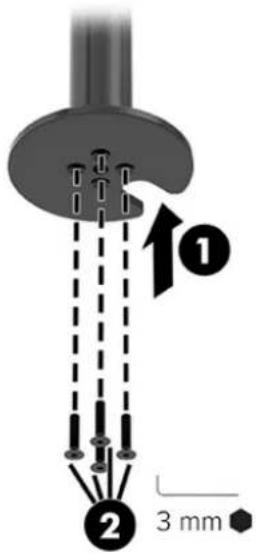
- Secure the grommet mount to the pole (1) using the four screws (2) and 3mm Allen key.
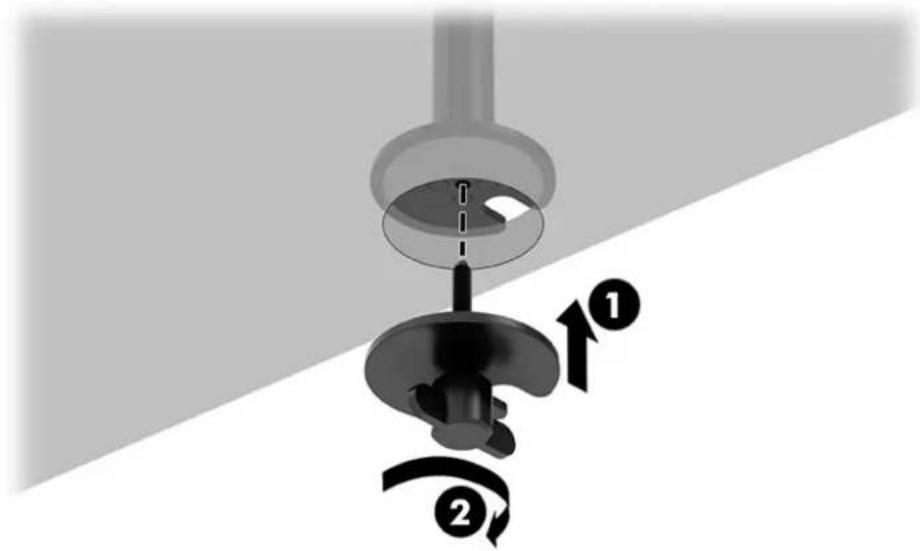
- Secure the stand to the desktop.
Attaching the neck and mounting arm
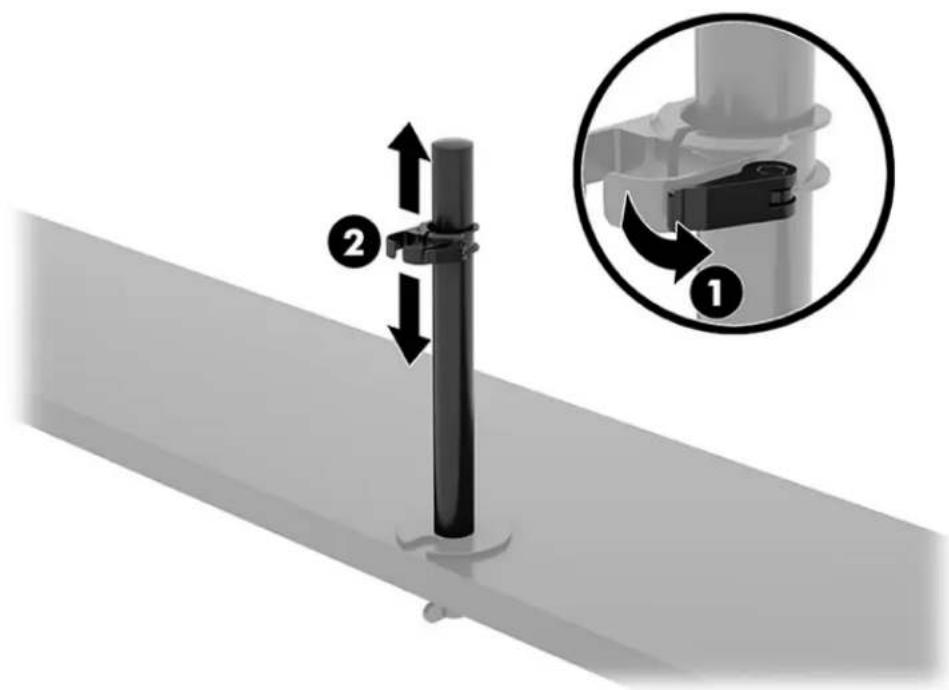
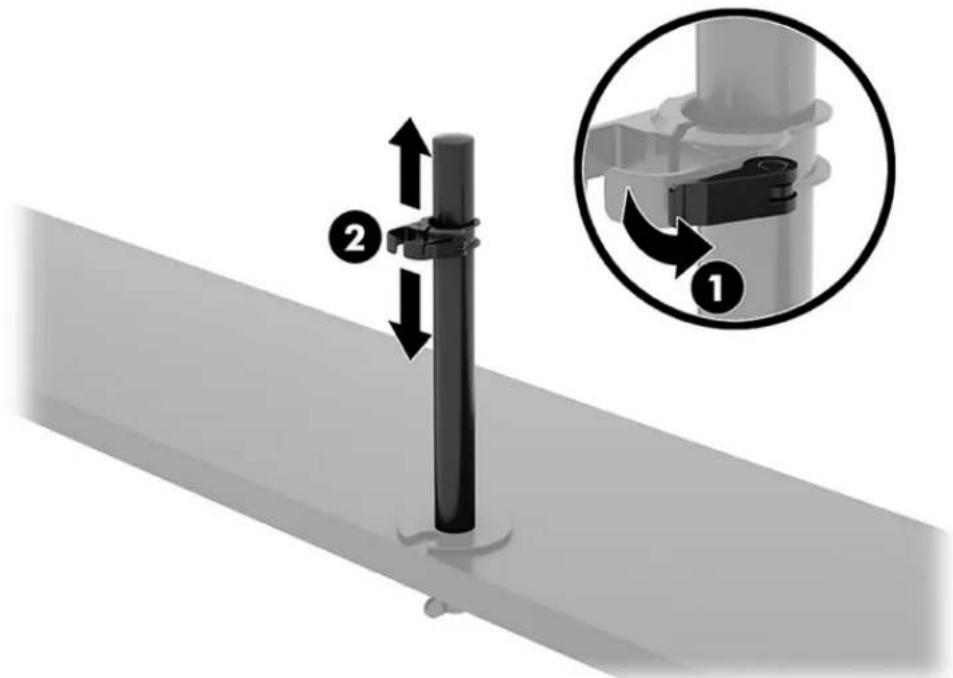
- Rotate the lock down to the unlocked position (1), adjust the stopper height up or down on the pole (2), and then return the lock to the locked position.
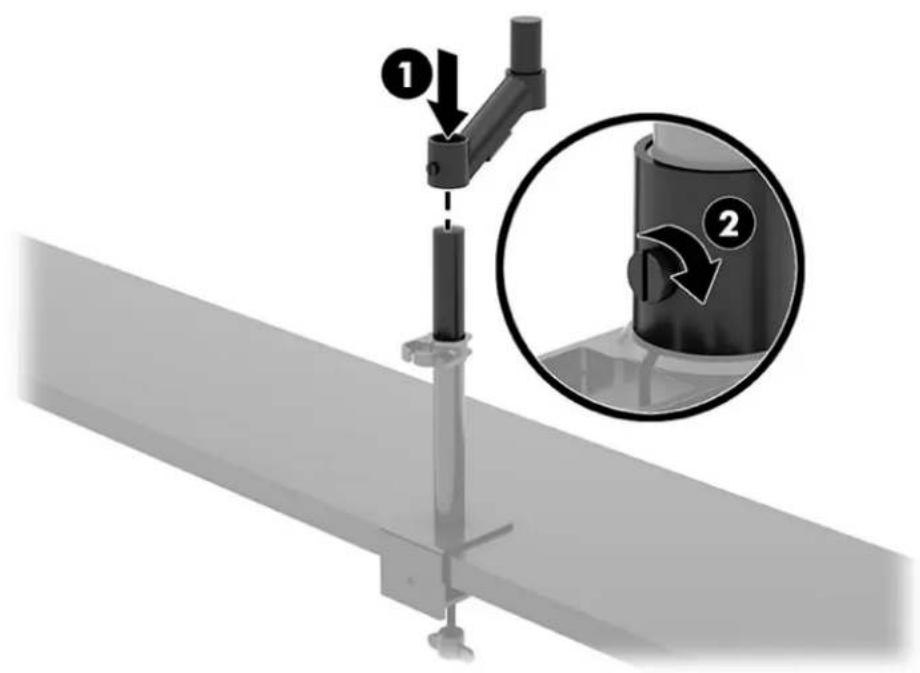
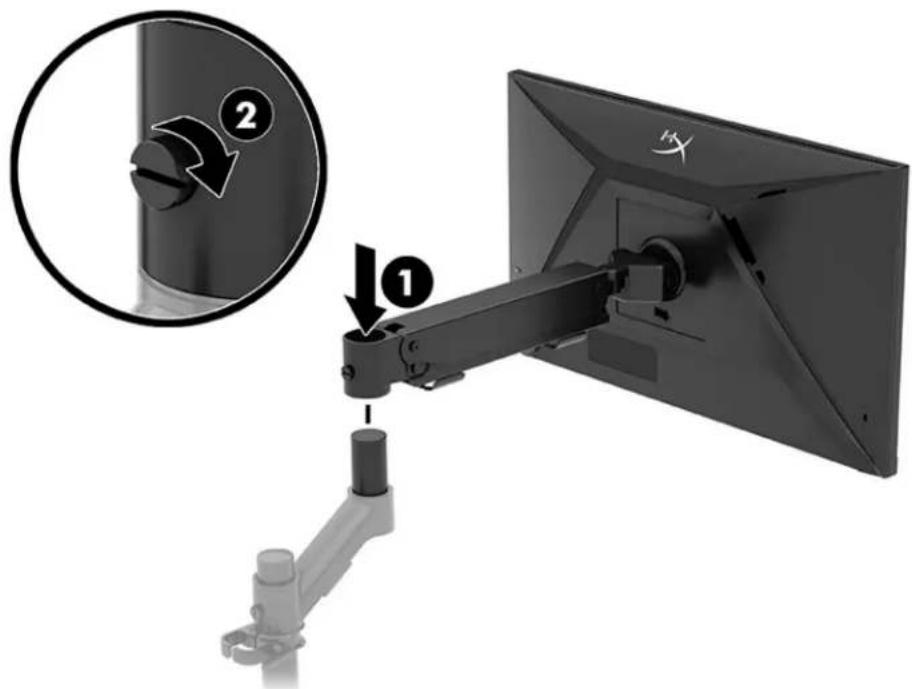
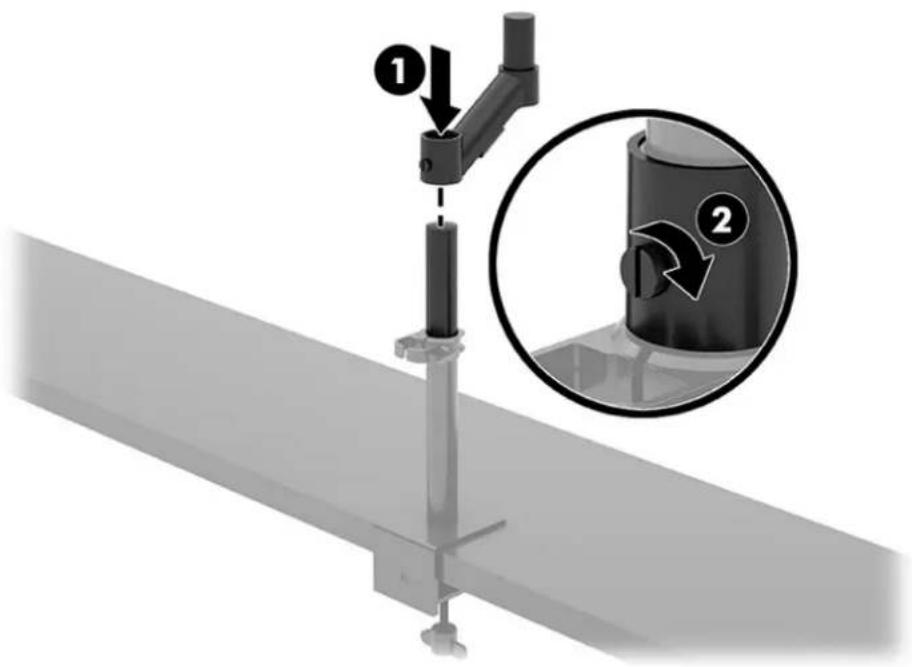
- Attach the neck to the pole (1) and tighten the thumbscrew (2).
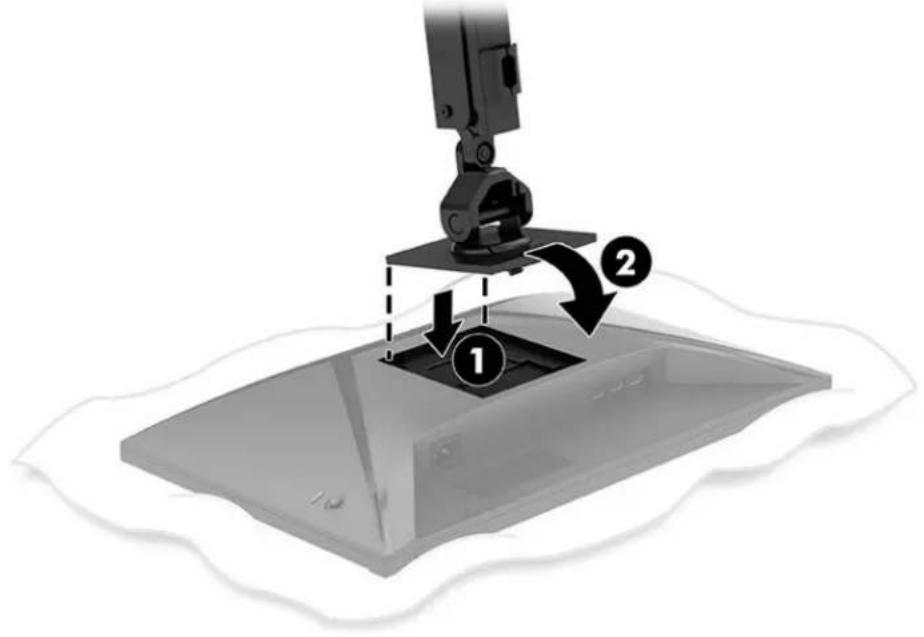
- Attach the mounting arm to the display using the quick release plate or the VESA mounting plate.
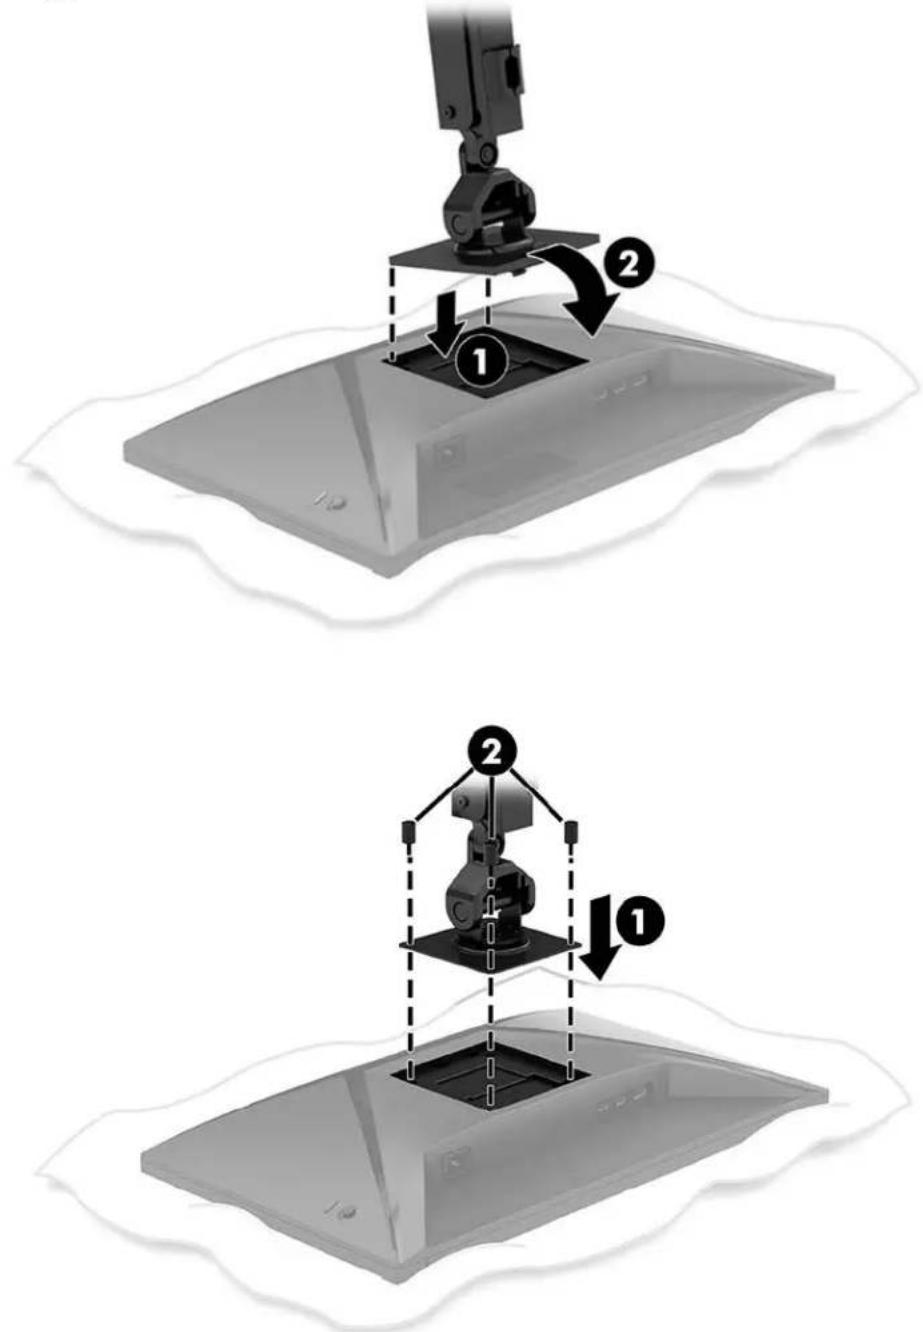
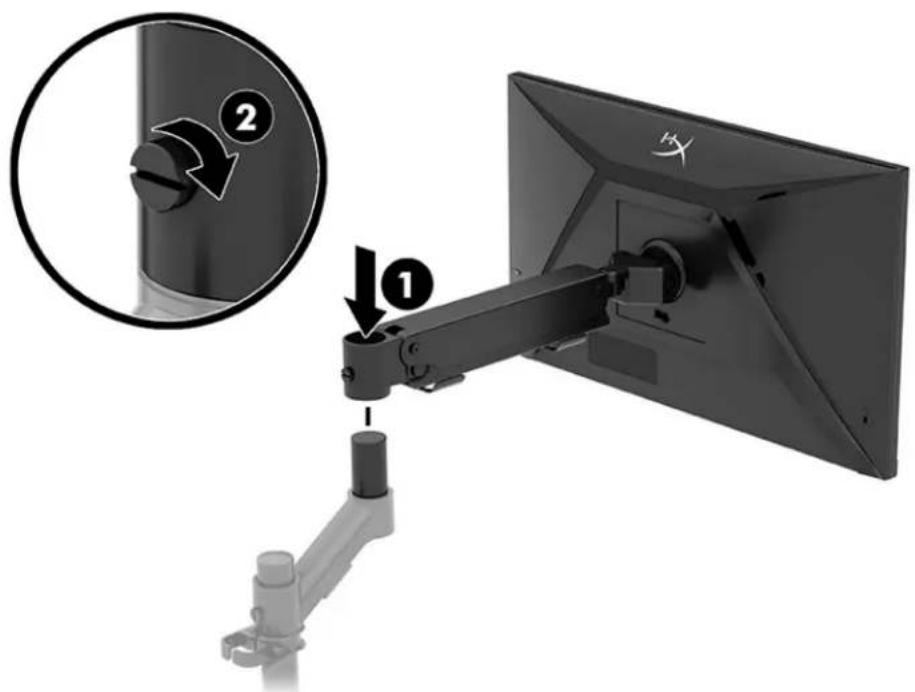
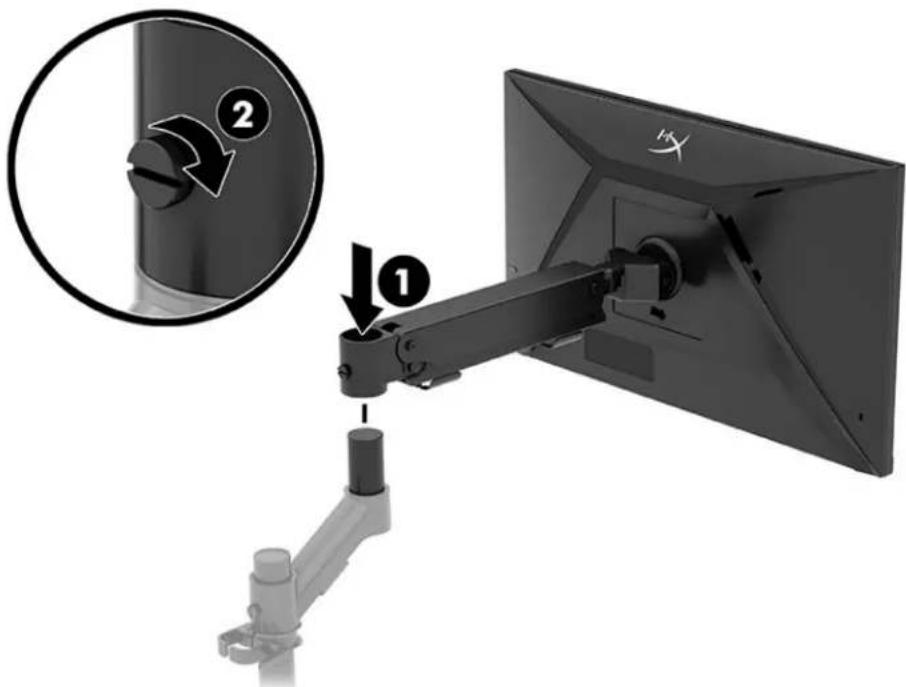
- Attach the display and arm assembly to the neck (1) and tighten the thumbscrew (2).
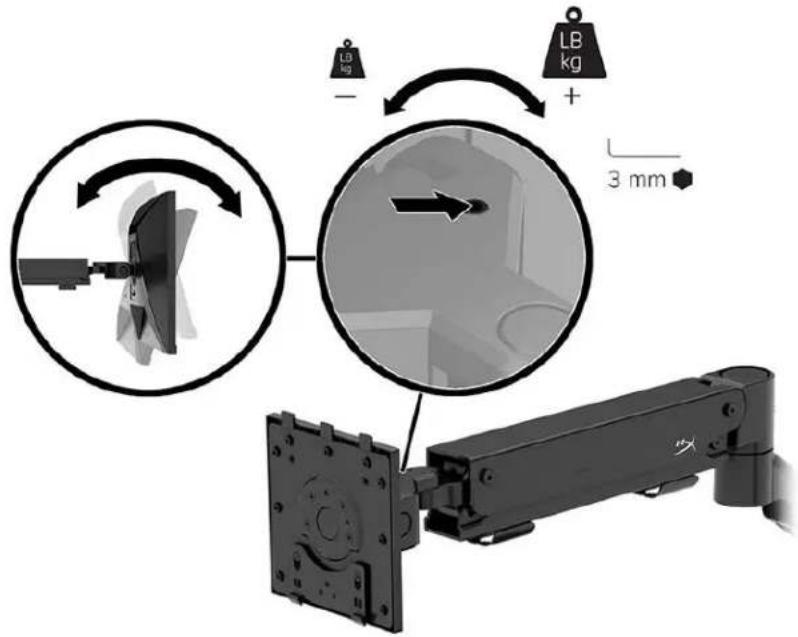
Adjusting the tension
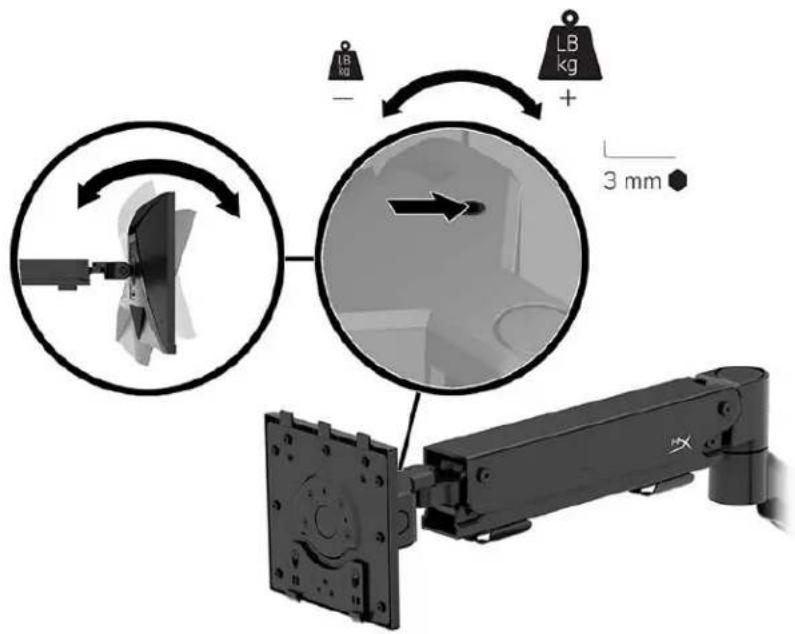
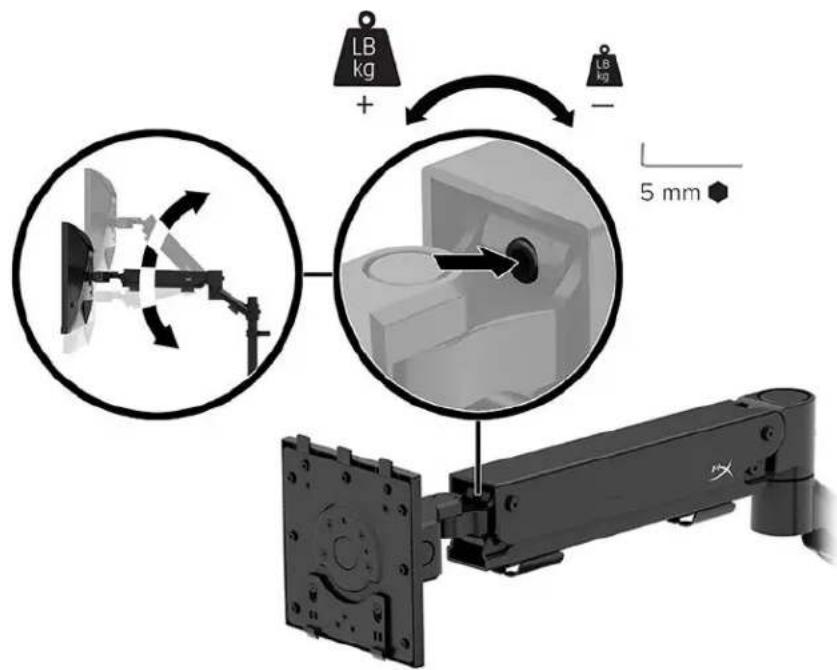
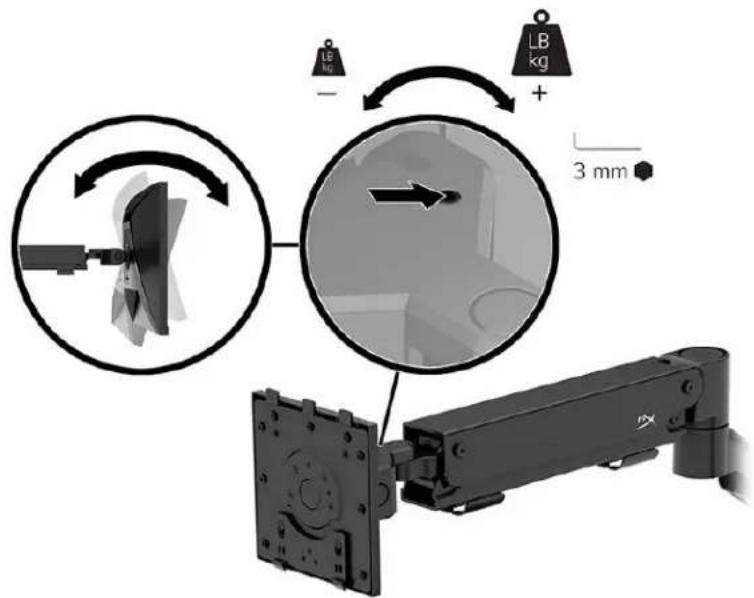
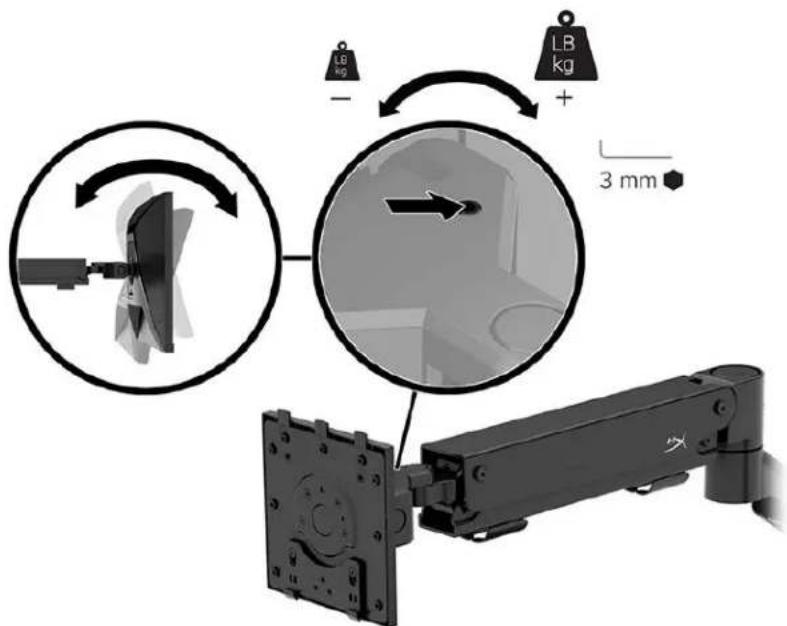
- Adjust the tension at the end of the arm using the 3 mm Allen key.
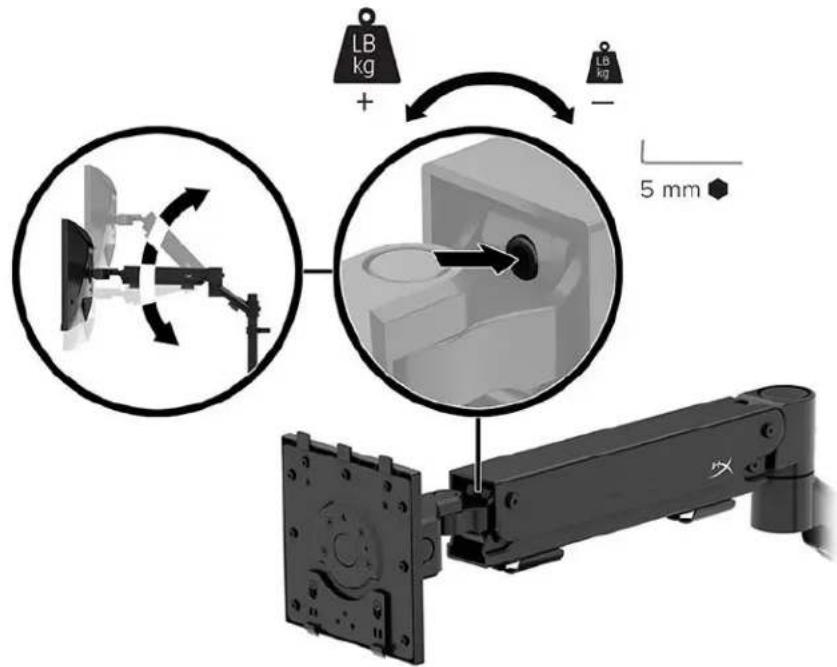
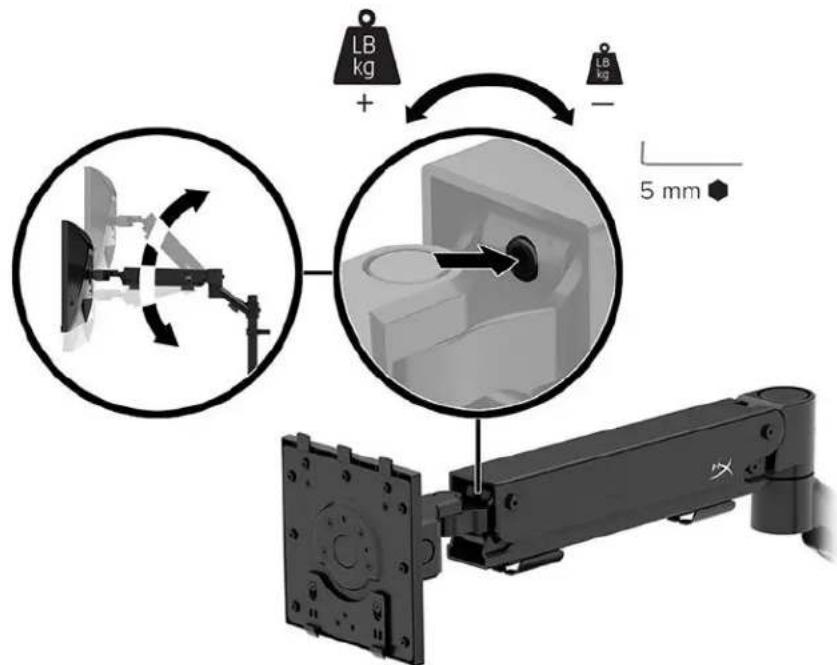
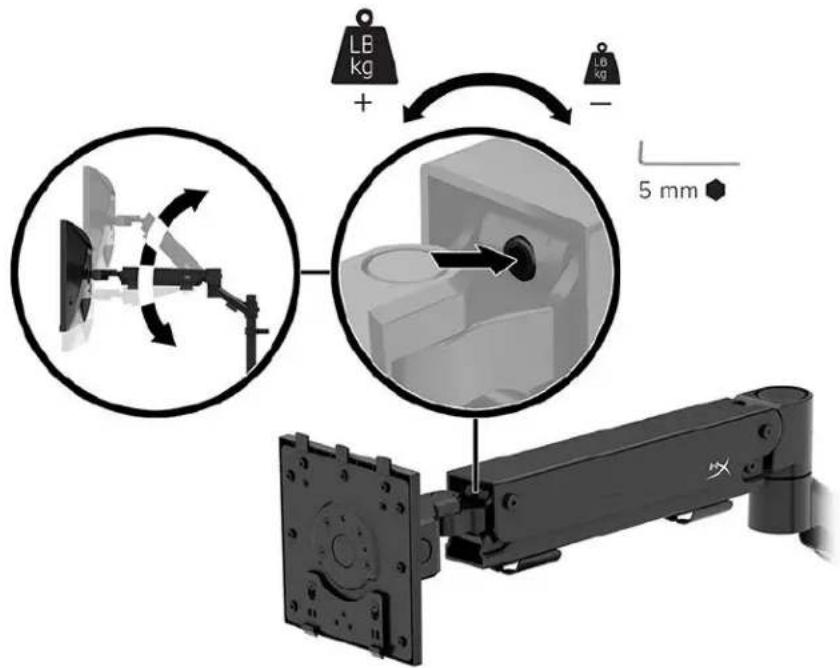
- Adjust the tension at the end of the arm using the 5 mm Allen key.
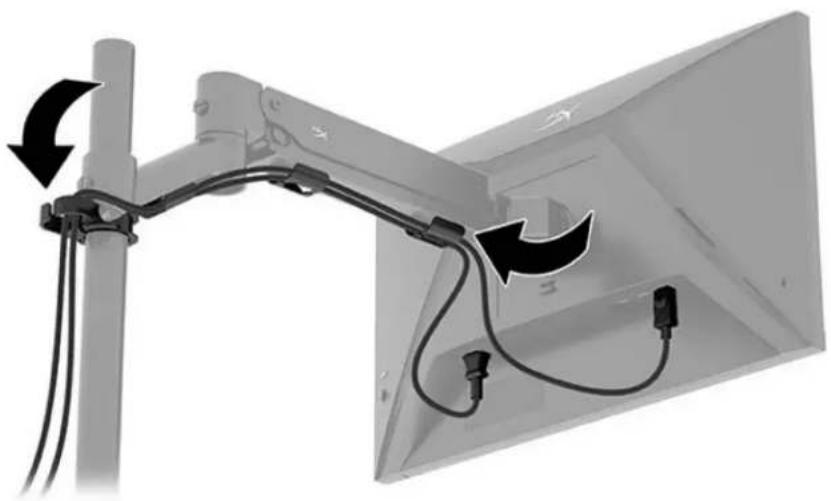
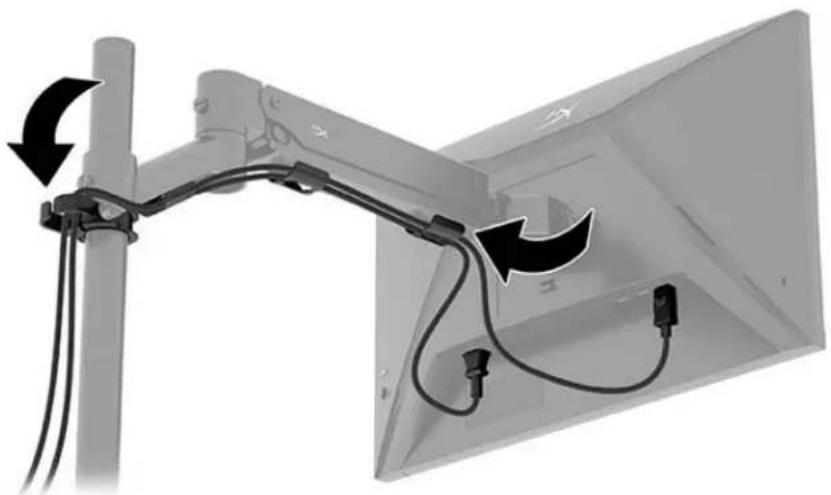
Connecting and routing the cables
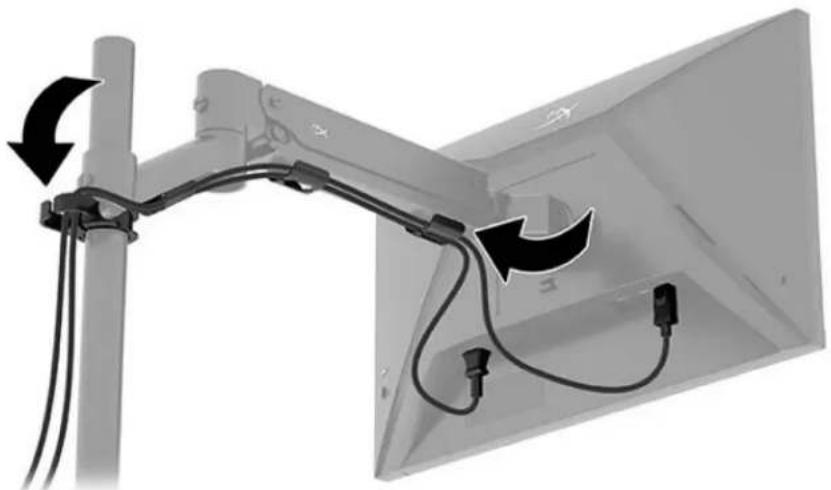
Connect a signal cable (HDMI or DP) and power cable to the connectors on the back of the monitor and route the cables through the cable management system. Then connect the signal cable to the source device (computer or gaming system) and the power cable to a power outlet.
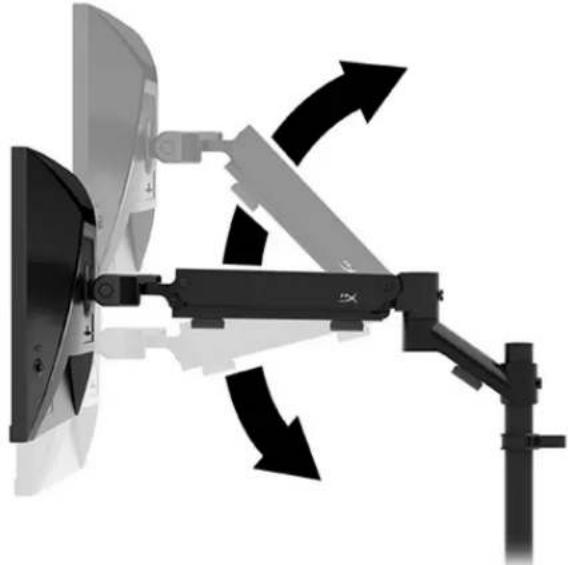
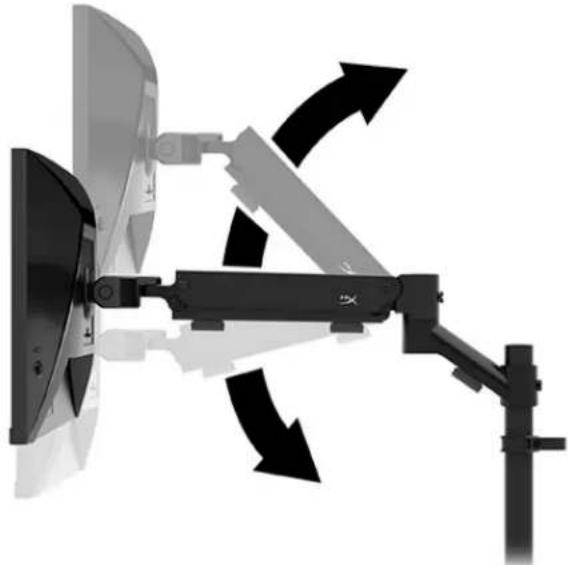
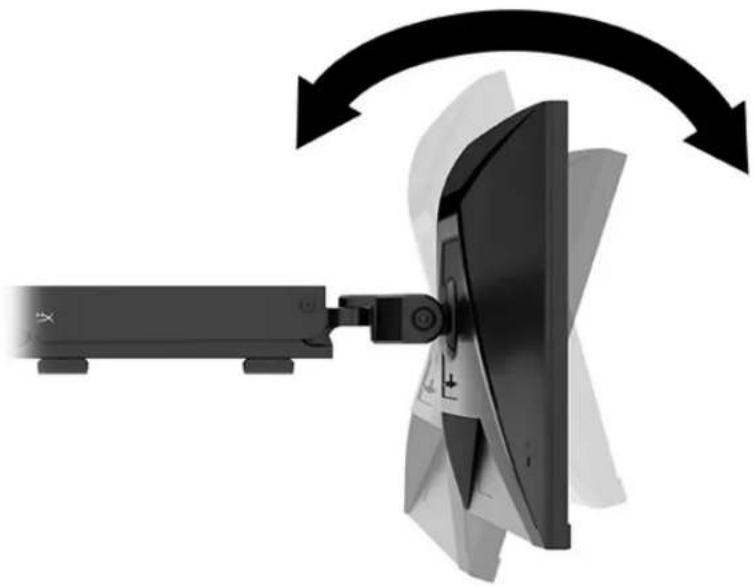
Adjusting the monitor
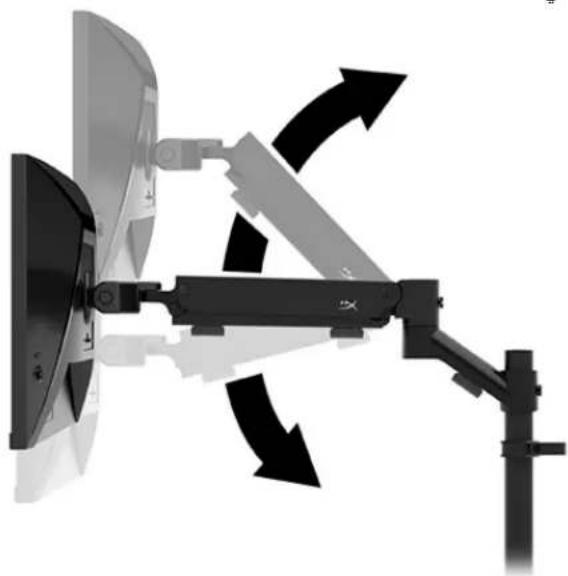
- Adjust the vertical height of the monitor.
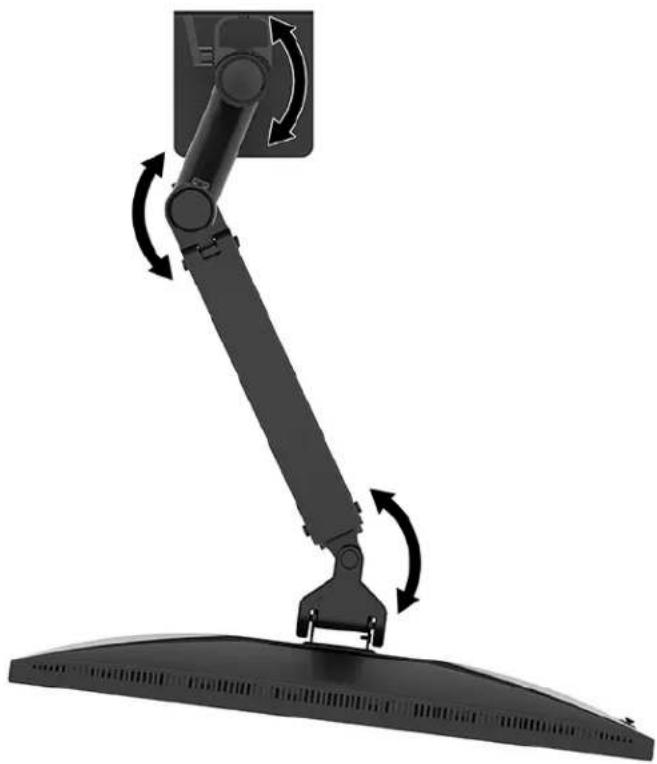
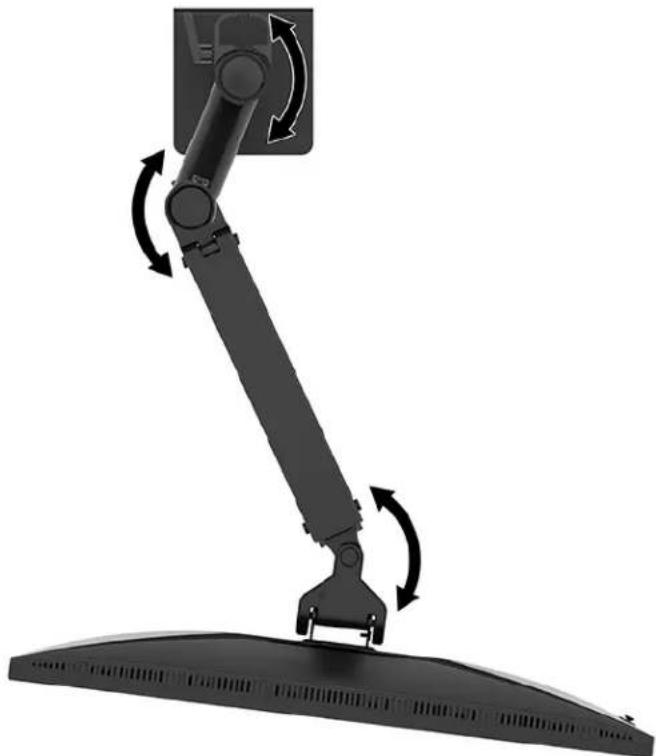
- Adjust the horizontal position of the monitor.
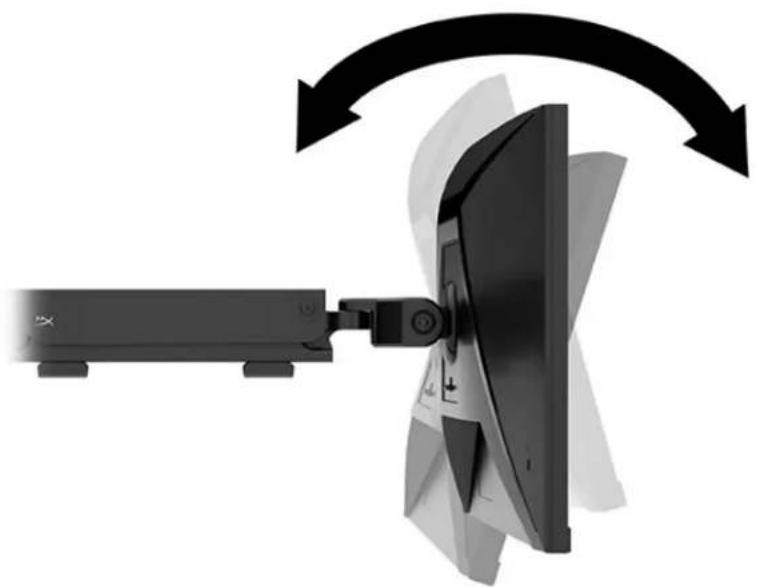
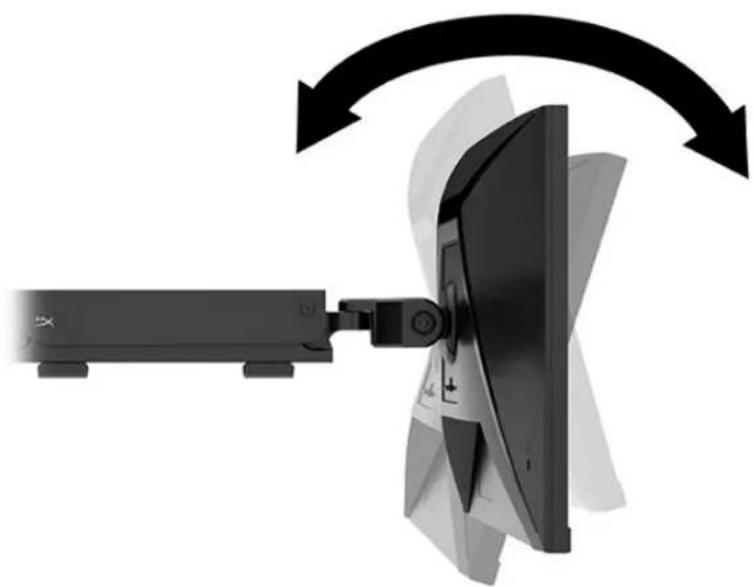
- Adjust the tilt of the monitor.
Turning on the monitor
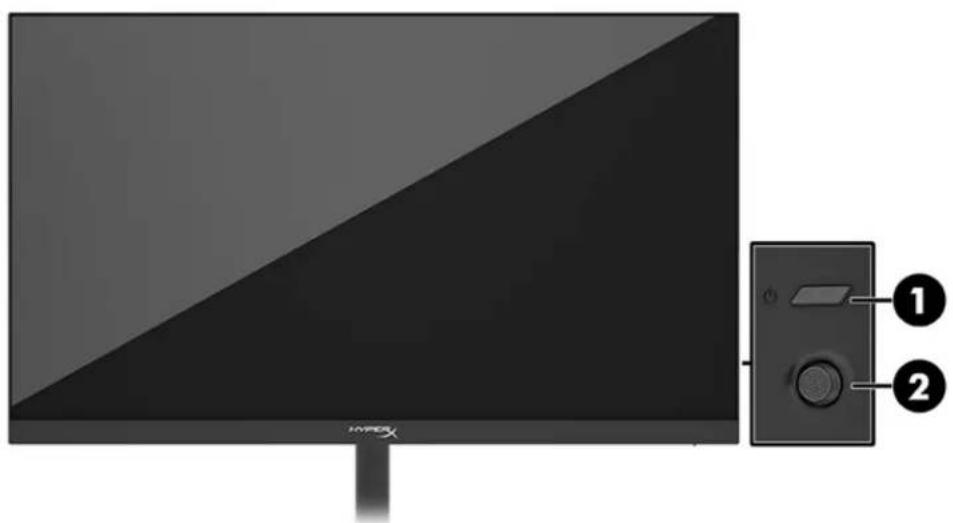
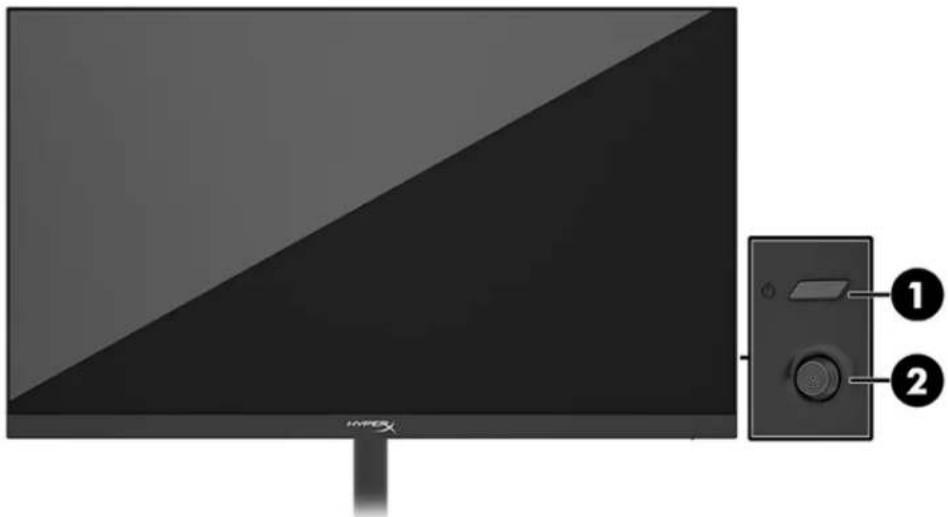
Use the power button (1) to turn on the monitor and use the joystick control (2) to make any onscreen adjustments needed.
HyperX watermark and image retention policy
Some monitors are designed with In-Plane Switching (IPS) display technology, which provides ultrawide viewing angles and advanced image quality. Though suitable for many applications, this panel technology is not suitable for static, stationary, or fixed images for long periods of time, unless you use screen savers.
Applications with static images can include camera surveillance, video games, marketing logos, and templates. Static images can cause image retention damage that could look like stains or watermarks on the monitor's screen.
Image retention damage on monitors that are in use 24 hours per day is not covered under the HP warranty. To avoid image retention damage, always turn off the monitor when it is not in use, or use the power management setting, if supported on your computer, to turn off the monitor when the computer is idle.
Mounting multiple monitors
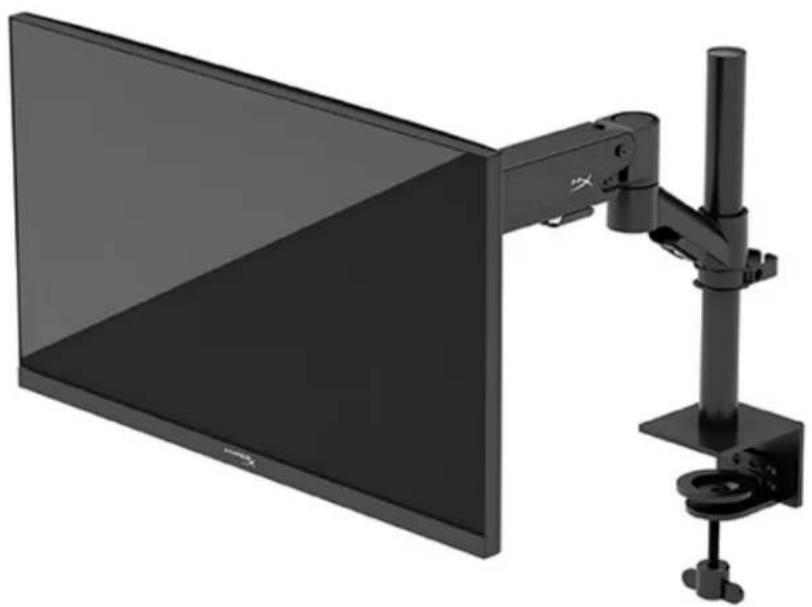
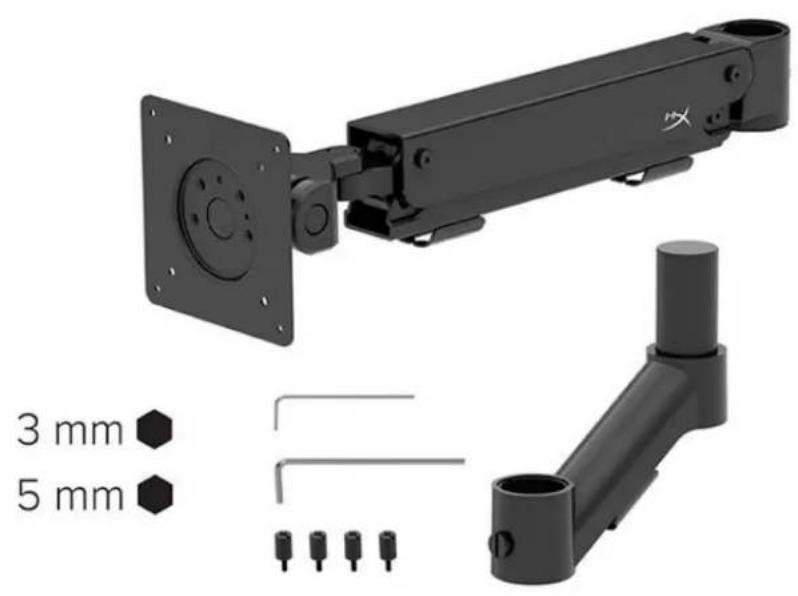
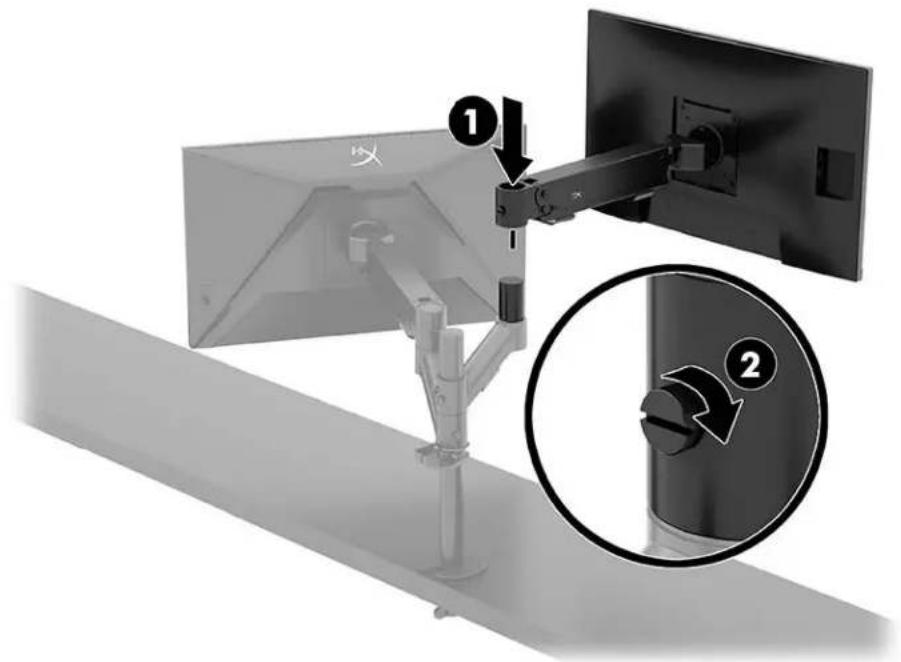
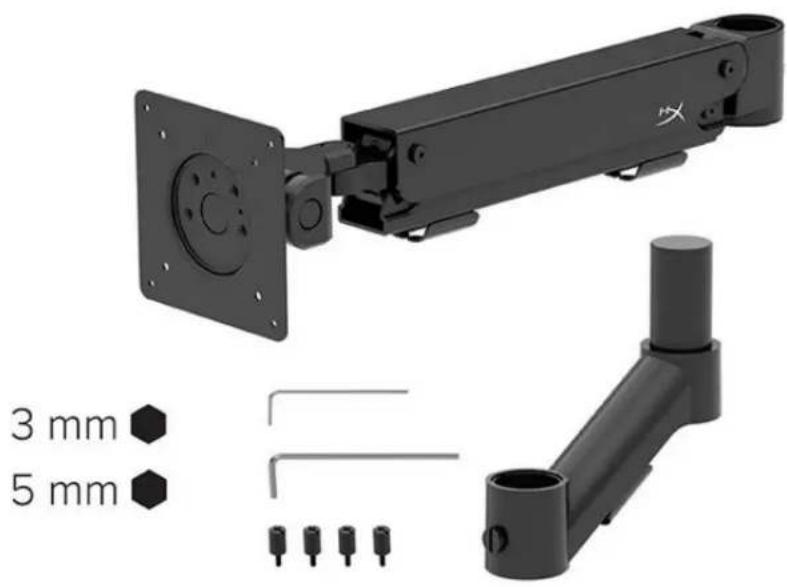
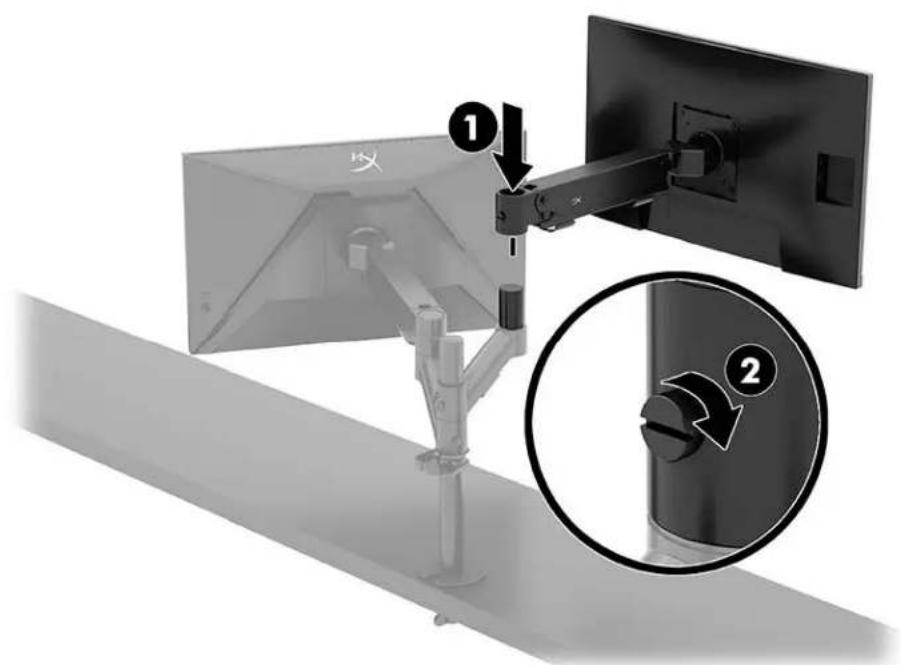
To mount multiple monitors to a single mounting pole, you need to purchase the HyperX Armada Gaming Mount Addon.
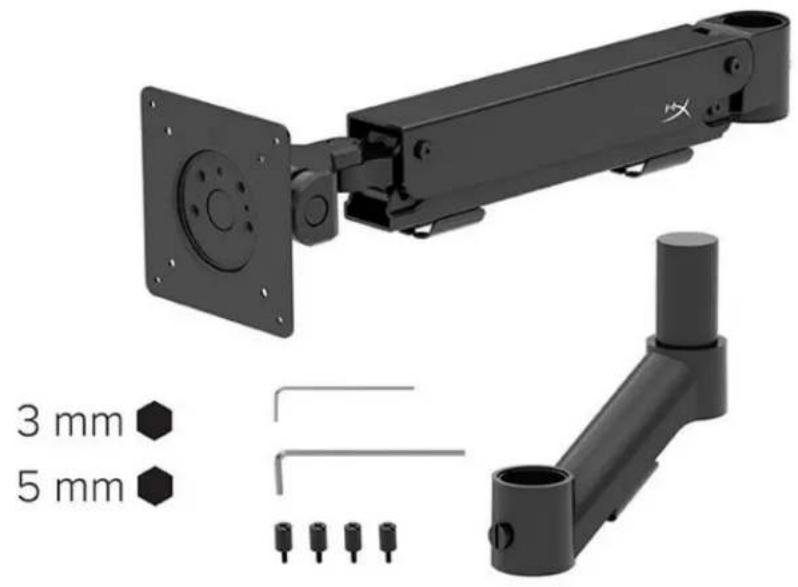
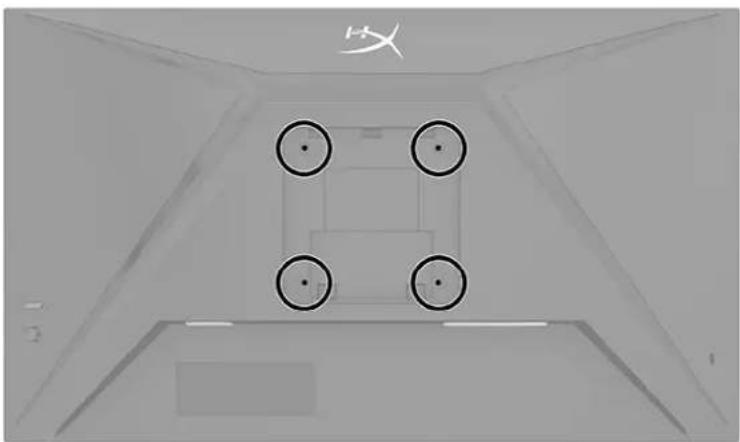
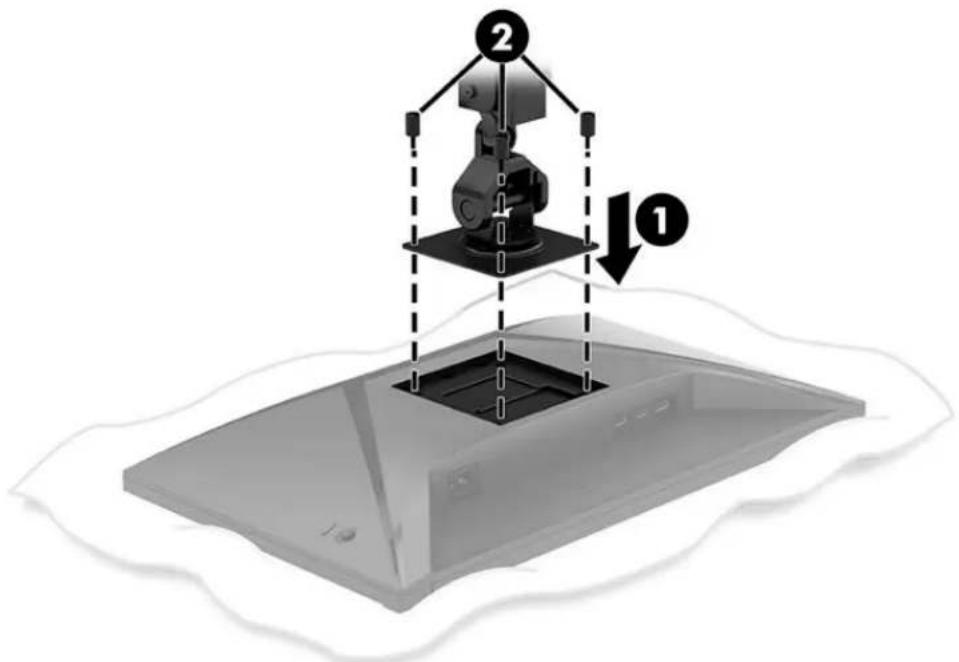
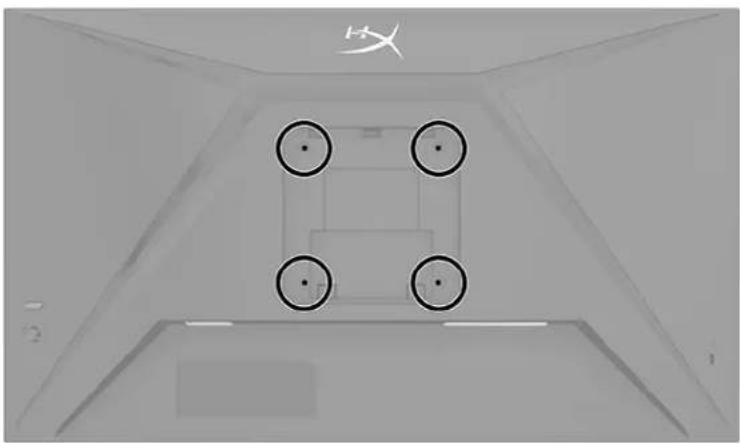
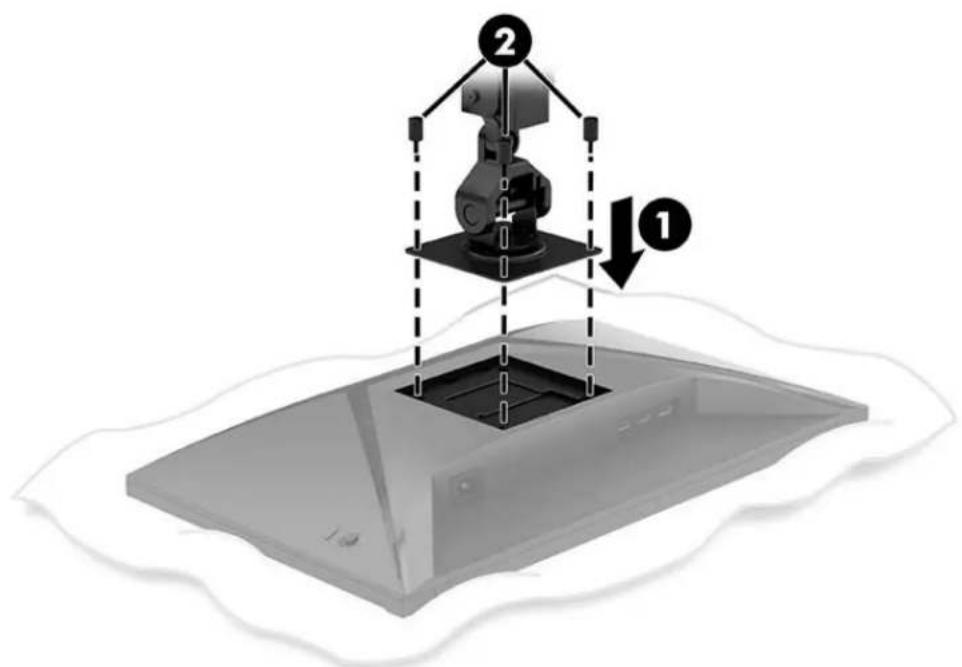
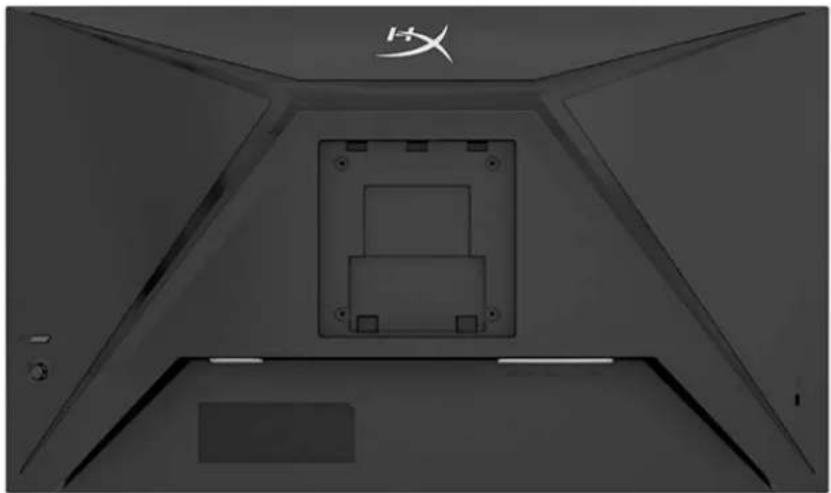
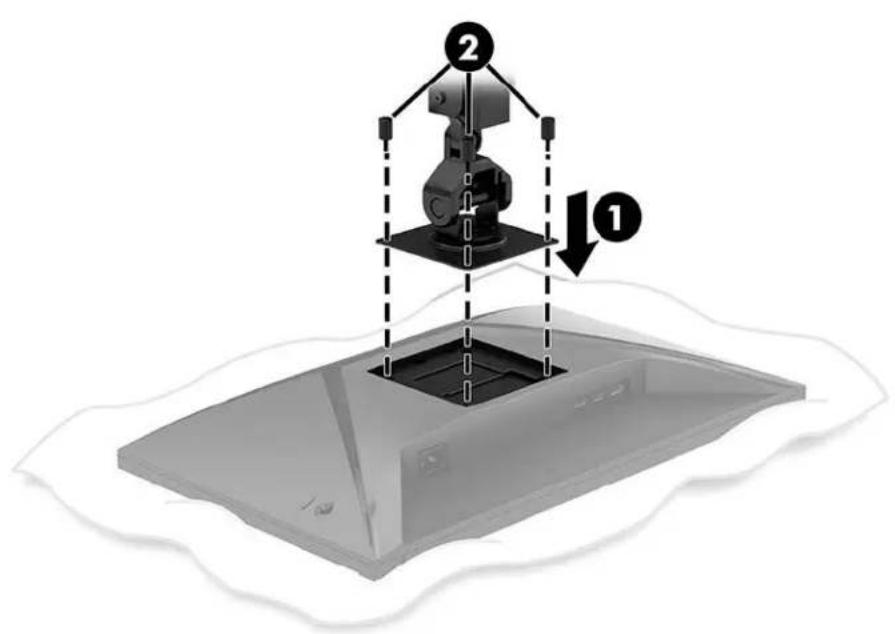
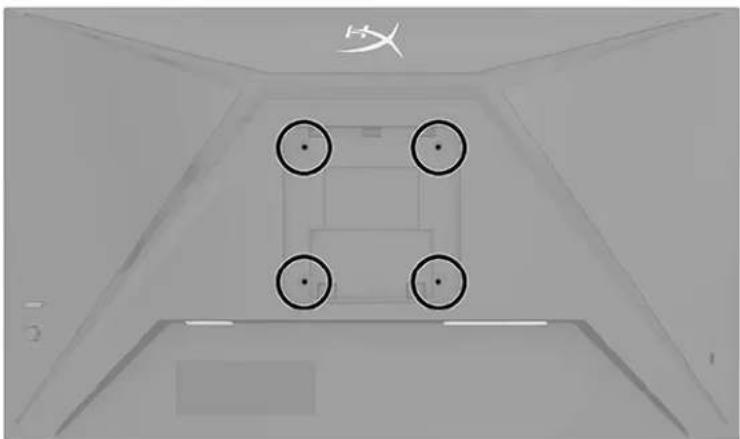
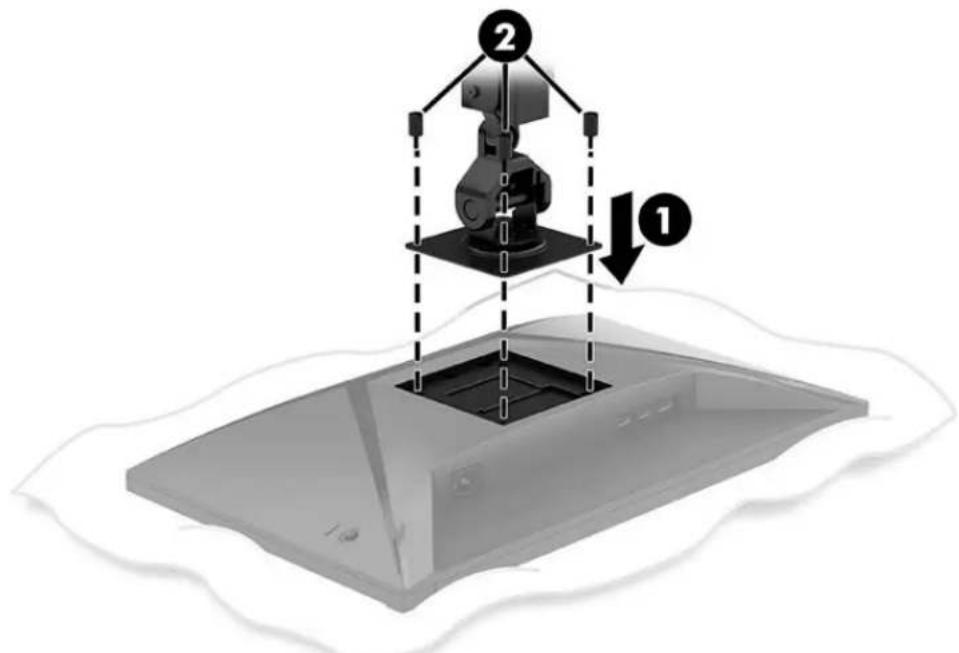
Use the four VESA mounting holes on the back of the monitor to secure the display arm to the back of the monitor with the four screws.
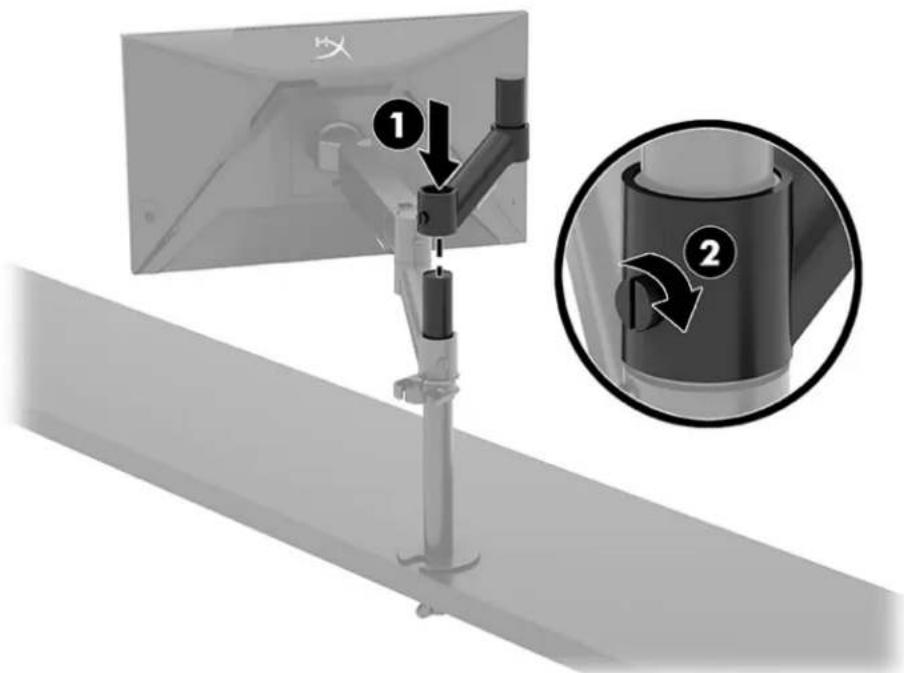
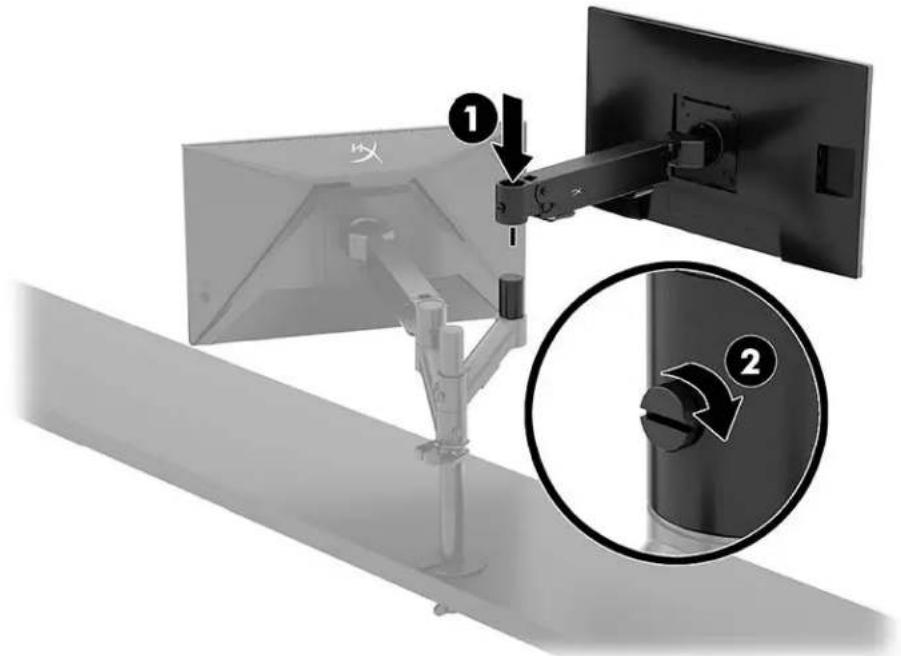
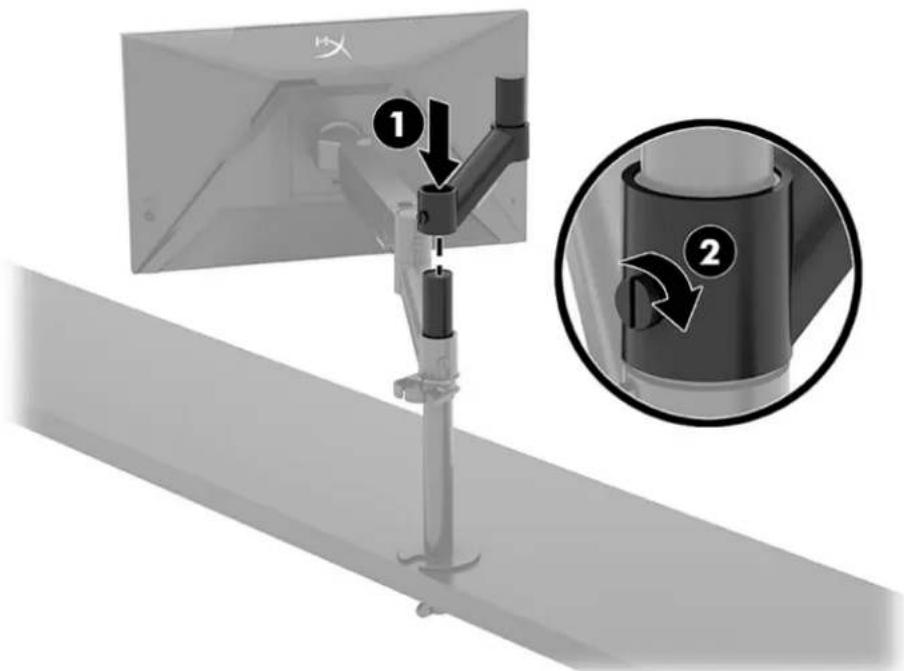
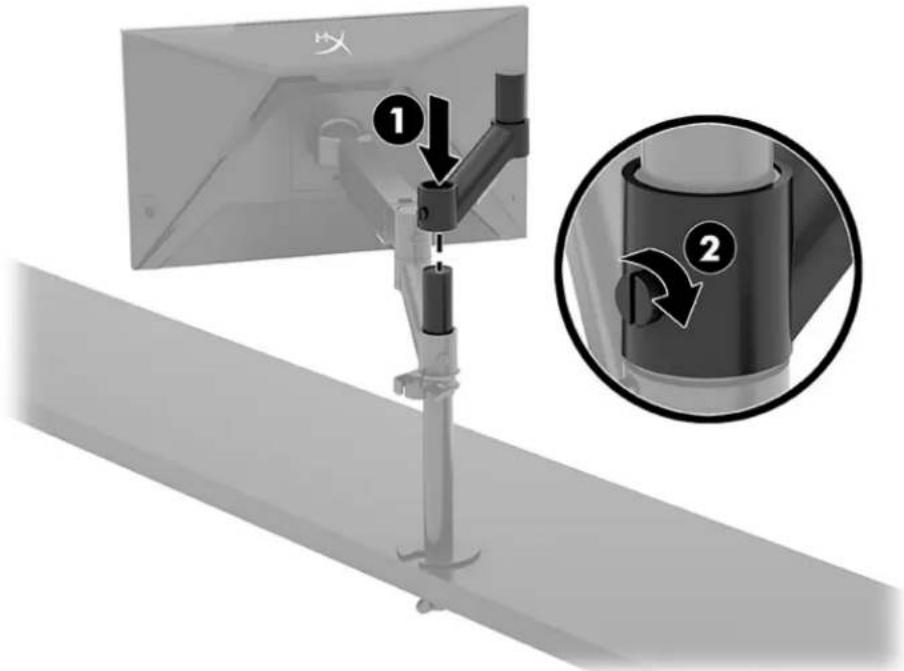
- Attach the addon arm to the neck (1) and tighten the thumbscrew (2).
- Attach the display arm to the back of the monitor (1) by installing the four screws (2).
- Attach the monitor arm assembly to the pole (1) and tighten the thumbscrew (2).
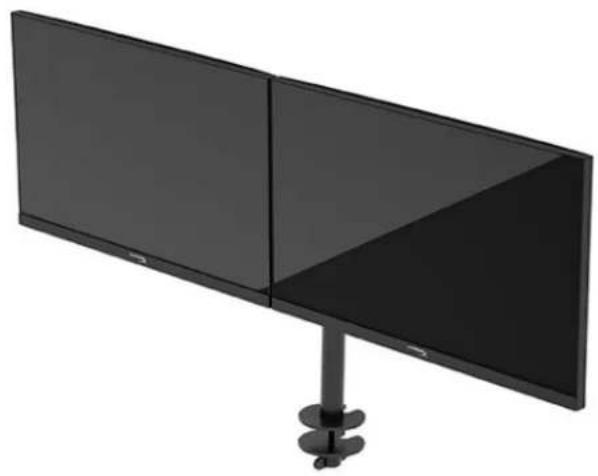
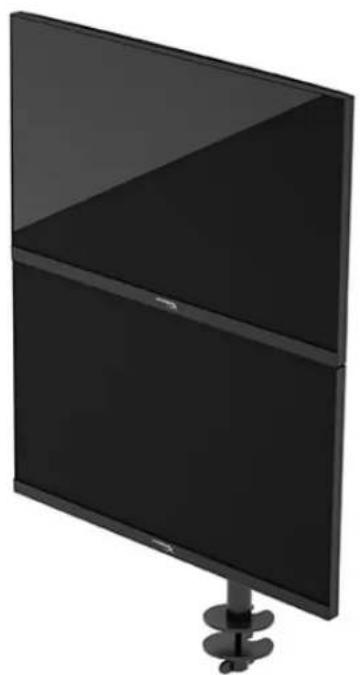
Monitor mounting configurations
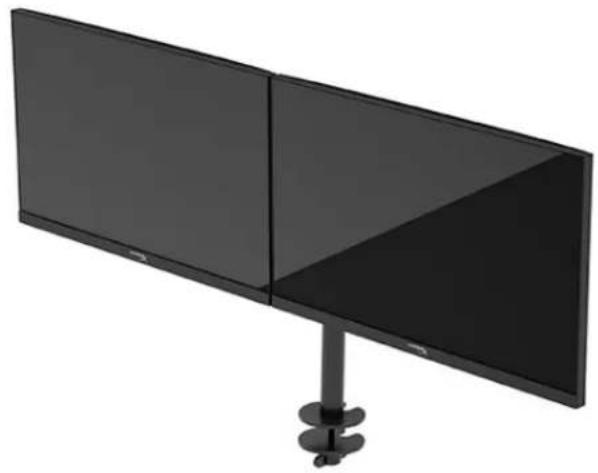
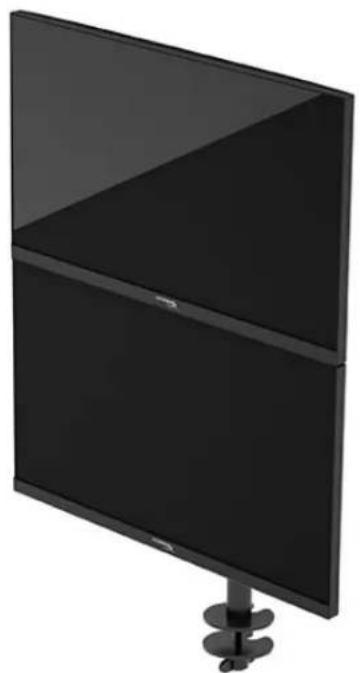
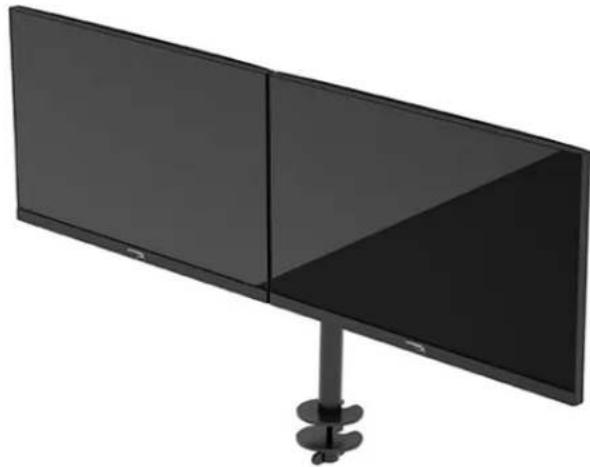
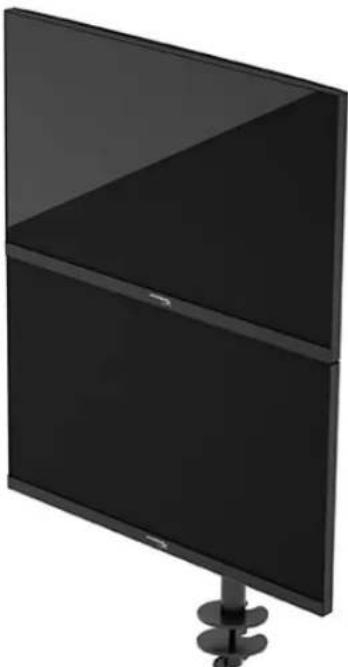
You can mount two monitors to the pole in either a horizontal or vertical configuration. When mounting more than one monitor to a pole, you can use the C clamp or the grommet mount.
Using the monitor
Downloading software
Download NGENUITY software at: hyperx.gg/ngenuity.

NGENUITY
Using the OSD menu
You can adjust your monitor to suit your preferences. Use the OSD menu to customize the viewing features of your monitor.
To access and make adjustments in the OSD, use the joystick control on the rear of the monitor.
To access the OSD menu and make adjustments:
- If the monitor is not already on, press the power button to turn on the monitor.
- Press the center of the joystick button on the rear of the monitor.
- Use the joystick button to navigate, select, and adjust the menu choices. The on-screen button labels vary, depending on which menu or submenu is active.
The following table lists possible menu selections in the OSD main menu. It includes descriptions for each setting and its impacts on your monitor's appearance or performance.
| Main menu | Description |
| Gaming | Selects and adjusts gaming preferences, such as Adaptive-Sync, response time, frame rate, crosshair, and multi-monitor alignment. |
| Color | Selects and adjusts the screen color. |
| Picture | Adjusts the screen image. |
| Input | Selects the video input signal (DisplayPort or HDMI). |
| Power | Adjusts the power settings. |
| Menu | Adjusts the OSD menu and function button controls. |
| Settings | Adjusts Accessibility settings. |
| Information | Selects and displays important information about the monitor. |
| Exit | Exits the OSD menu screen. |
Display mode status
When you turn on the monitor, the status message shows the display mode. The display mode is also displayed when you change the video input.
The current display mode shows in the Information menu window and at the bottom of the OSD's main menu in the status bar area. Modes of operation vary by model.
To turn on the Adaptive-Sync mode:
Press the center of the joystick control to open the OSD.
- In the OSD, select Gaming.
- Select Adaptive-Sync, and then select On.
NOTE: The Adaptive-Sync menu default setting is on.
Using Auto-Sleep mode
Your monitor has an energy-saving feature called Auto-Sleep Mode, a reduced power state. This section describes how to activate or adjust Auto-Sleep Mode on your monitor.
When Auto-Sleep Mode is enabled (enabled by default), the monitor enters a reduced power state when the computer signals low power mode (absence of either horizontal or vertical sync signal).
Upon entering this reduced power state (Auto-Sleep mode), the monitor screen is blanked, the backlight turns off, and the power light turns amber. The monitor draws less than 0.5W of power when in this reduced power state. The monitor wakes from Auto-Sleep mode when the computer sends an active signal to the monitor (for example, when you activate the mouse or keyboard).
To disable Auto-Sleep Mode in the OSD:
- Press the Menu button to open the OSD.
- In the OSD, select Power.
- Select Auto-Sleep Mode, and then select Off.
Troubleshooting
If your monitor is not working as expected, you might be able to resolve the issue by following the instructions in this section.
Solving common issues
The following table lists possible issues, the possible cause of each issue, and the recommended solutions.
HyperX Armada 27 QHD Gaming Monitor
| Issue | Possible cause | Solution |
| Screen is blank or video is blinking. | Power cord is disconnected. | Connect the power cord. |
| Monitor is off. | Press the power button. | |
| Video cable is improperly connected. | Connect the video cable properly. | |
| Open the OSD menu and select the Input menu. Set Auto-Switch Input to Off and manually select the input. or Replace the video card or connect the video cable to one of the computer's on-board video sources. | ||
| Image appears blurred, indistinct, or too dark. | Brightness setting is too low. | Open the OSD menu and select Color to adjust the brightness scale as needed. |
| “Check Video Cable” is displayed on the screen. | Monitor video cable is disconnected. | Connect the appropriate video signal cable between the computer and monitor. Be sure that the computer power is off while connecting the video cable. |
| “Input Signal Out of Range” is displayed on screen. | Video resolution and/or refresh rate are set higher than the monitor supports. | Change the settings to a supported setting. |
| The monitor does not enter into a low-power sleep state. | The monitor's power saving control is disabled. | Open the OSD menu and select Power, select Auto-Sleep Mode, and then set auto-sleep to On. |
| “OSD Lockout” is displayed. | The monitor's OSD Lockout function is enabled. | Press and hold the center of the joystick control button for 10 seconds to disable the OSD Lockout function. |
| “Power Button Lockout” is displayed. | The monitor's Power Button Lockout feature is enabled. | Press and hold the Power button for 10 seconds to unlock the power button function. |
Button lockouts
The button lockout function is available only when the monitor is on, an active signal is displayed, and the OSD menu is closed. Holding down the power button or Menu button for 10 seconds disables that button. You can re-enable the button by holding it down again for 10 seconds.
Questions or Setup Issues?
Contact the HyperX support team at: hyperx.gg/support.
Maintaining the monitor
Properly maintained, your monitor can run for many years. These instructions provide steps you can perform to keep your monitor in the best condition.
Maintenance guidelines
Follow these instructions to enhance the performance and extend the life of the monitor.
- Do not open the monitor cabinet or attempt to service this product yourself. Adjust only those controls that are covered in the operating instructions. If the monitor is not operating properly or has been dropped or damaged, contact an authorized HP dealer, reseller, or service provider.
- Use only a power source and connection appropriate for this monitor, as indicated on the label or back plate of the monitor.
- Be sure that the total ampere rating of the products connected to the outlet does not exceed the current rating of the AC outlet and that the total ampere rating of the products connected to the cord does not exceed the rating of the cord. Look on the power label to determine the ampere rating (AMPS or A) for each device.
- Install the monitor near an outlet that you can easily reach. Disconnect the monitor by grasping the plug firmly and pulling it from the outlet. Never disconnect the monitor by pulling the cord.
- Turn the monitor off when it is not in use and use a screen saver program. Doing this can substantially increase the life expectancy of the monitor.
NOTE: A burned-in image on the monitor is not covered under the HP warranty.
- Never block the slots and openings of the cabinet or push objects into them. These openings provide ventilation.
- Do not drop the monitor or place it on an unstable surface.
- Do not allow anything to rest on the power cord. Do not walk on the cord.
- Keep the monitor in a well-ventilated area, away from excessive light, heat, or moisture.
Cleaning the monitor
Use these instructions to clean your monitor when necessary.
- Turn off the monitor and unplug the power cord from the AC outlet.
- Disconnect any external devices.
- Dust the monitor by wiping the screen and the cabinet with a soft, clean antistatic cloth.
- For more difficult cleaning situations, use a 50/50 mix of water and isopropyl alcohol.
IMPORTANT: Do not use cleaners that contain petroleum-based materials such as benzene, thinner, or any volatile substance to clean the monitor screen or cabinet. These chemicals might damage the monitor.
IMPORTANT: Spray the cleaner onto a cloth and use the damp cloth to gently wipe the screen surface. Never spray the cleaner directly on the screen surface. It can run behind the bezel and damage the electronics. The cloth should be moist, but not wet. Water dripping into the ventilation openings or other points of entry can cause damage to the monitor. Allow the monitor to air-dry before use.
- After you remove the dirt and debris, you can also clean the surfaces with a disinfectant. The World Health Organization (WHO) recommends cleaning surfaces, followed by disinfection, as a best practice for preventing the spread of viral respiratory illnesses and harmful bacteria. A disinfectant that is within HP's cleaning guidelines is an alcohol solution consisting of 70% isopropyl alcohol and 30% water. This solution is also known as rubbing alcohol and is sold in most stores.
Shipping the monitor
Keep the original packing box in a storage area. You might need it later if you ship the monitor or move.
Technical specifications
HyperX Armada 27 QHD Gaming Monitor
| Specification | Description | |
| Display size | 68.5 cm | 27 in |
| Display type | IPS | |
| Bezel type | 3-sided borderless | |
| Native resolution | QHD 2560 × 1440 | |
| Maximum refresh rate* | 165 Hz | |
| Variable refresh rate technology | G-SYNC Compatible | |
| Variable refresh rate range | 48–165 Hz | |
| Viewing angle | 178° | |
| Aspect ratio | 16:9 | |
| Contrast ratio | 1000:1 | |
| Brightness | 400 nits | |
| HDR | HDR400 | |
| Local dimming | Yes | |
| Maximum response time | 1ms GtG (with OD) | |
| Color gamut | DCI P3 95% | |
| Color depth | 8-bit | |
| Inputs | DisplayPort 1.4 (1) HDMI 2.0 (2) | |
| Power source | 100-240 VAC 50/60 Hz | |
| Power consumption – maximum | 60 W | |
| Power consumption – typical | 33 W | |
| Cables | HyperX red DisplayPort 1.4 cable (1) Black HDMI 2.0 cable (1) Power cable (1) | |
| Accessories | VESA mounting bracket (1) VESA mounting bracket screws (4) VESA monitor thumb screws (4) Grommet mounting plates (2) Grommet mounting screw (1) Hex keys (2) | |
| Compatible VESA patterns | 75 mm x 75 mm100 mm x 100 mm | |
| Surface coating | Matte | |
| Dimensions | ||
| Height | 36.40 cm | 14.33 in |
| Depth | 6.22 cm | 2.45 in |
| Width | 61.39 cm | 24.17 in |
| Weight | 3.6 kg | 8.03 lb |
| Arm lift range | 31.2 ± 0.5 cm | 12.4 ± 0.2 in |
| Column height range | 25.5 cm | 10.0 in |
| Stand compatible display sizes | ≤ 81.28 cm | ≤ 32 in |
| Monitor weight capacity per arm | ≤ 9.1 kg | ≤ 20 lb |
| Desk thickness support | 15 mm-50 mm | 0.6 in-2.0 in |
| Grommet hole size support** | 15mm-60mm | 0.6in-2.4in |
| Mount and arm (assembled) | 547 x 447 x 130 mm | 21.54 x 17.60 x 5.12 in |
| Mount and arm weight | 4.8 kg | 10.6 lb |
| Hinge tilt range | -25 to 60° | |
| Hinge rotate range | ± 90° | |
| Hinge swivel range | ± 90° | |
| Arm swivel range | ± 180° | |
| Local dimming | Yes | |
| *HDMI port cannot support the 27-inch maximum refresh rate (HDMI 144Hz; panel 165Hz) because of the bandwidth limitation in QHD. | ||
| **If grommet hole on desk is less than 40 mm (1.57 in), cables cannot be routed through the hole. | ||
Preset display resolutions
| Preset | Pixel format | Vert freq (Hz) |
| 1 | 640 x 480 | 60 Hz |
| 2 | 640 x 480 | 75 Hz |
| 3 | 720 x 400 | 70 Hz |
| 4 | 800 x 600 | 60 Hz |
| 5 | 800 x 600 | 75 Hz |
| 6 | 1024 x 768 | 60 Hz |
| 7 | 1024 x 768 | 75 Hz |
| 8 | 1280 x 720 | 60 Hz |
| 9 | 1280 x 800 | 60 Hz |
| 10 | 1280 x 1024 | 75 Hz |
| 11 | 1440 x 900 | 60 Hz |
| 12 | 1600 x 900 | 60 Hz |
| 13 | 1600 x 1200 | 60 Hz |
| 14 | 1680 x 1050 | 60 Hz |
| 15 | 1920 x 1080 | 60 Hz |
| 16 | 1920 x 1200 | 60 Hz |
| 17 | 2560 x 1440 | 60 Hz |
| 18 | 2560 x 1440 | 100 Hz |
| 19 | 2560 x 1440 | 120 Hz |
| 20 | 2560 x 1440 | 144 Hz |
| 21 | 2560 x 1440 | 165 Hz (DP only) |
HyperX Armada 27
QHD gaming monitor
N21923-161
CONTENTS
Initial steps 5
Copyright 2022 HP Development Company, L.P.
Copyright 2022 HP Development Company, L.P.
Copyright 2022 HP Development Company, L.P.
QHD gaming monitor
N21923-061
SUMMARY
Introductory guide 5
Copyright 2022 HP Development Company, L.P.
Copyright 2022 HP Development Company, L.P.
Copyright 2022 HP Development Company, L.P.
Changes shall not be made without prior notice.
Additional warranties. HP shall not be
liable for the content of this document.
Technical or editorial errors or omissions.
Product notices
This guide describes functions that
are common to most models. On your
device, some functions may not be available.
First edition: June 2022
Document number: N21923-251
Start of work
Safety Information
The monitor package includes a power cable. If another cable is used, ensure that the power source and the connector plug are suitable for this monitor. For information on the correct power cable for the monitor, see the product notes available on the Internet at: http://www.hp.com/go/regulatory.
CAUTION! To reduce the risk of electric shock or damage to equipment, follow the instructions below.
- Connect the power cable to an easily accessible electrical outlet.
- If the power cable is equipped with a three-prong plug, connect it to a grounded three-prong outlet. To disconnect the computer power, unplug the power cable from the electrical outlet. When unplugging the cable from the outlet, pull the cable by the plug, not the cord.
To ensure safety, do not place anything on power cords or cables. Route power cords and cables connected to the monitor with care to avoid stepping on them, pulling them, or tripping over them.
To reduce the risk of serious injury, read the Safety and Comfort Guide. The Safety and Comfort Guide, available on the Internet at https://hyperx.99/ergo, describes how to properly set up your computer and organize your workspace, and provides measures to protect your health and proper computer usage. The Safety and Comfort Guide also provides important safety information regarding electrical and mechanical devices.
IMPORTANT! To protect the monitor and computer, connect all power cables of the computer and peripheral devices (such as the monitor, printer, scanner) to a surge protection device, such as a power strip or an uninterruptible power supply (UPS). Not all power strips provide surge protection; they must be equipped with a special label indicating this capability. Use a power strip whose manufacturer provides surge protection, so you can replace your equipment in case of a power surge.
Place the monitor on sturdy furniture of appropriate size.
CAUTION! Monitors that are not properly placed on desks, tables, stands, or carts may fall and cause injury.
CAUTION! Falling hazard: the device may fall, causing serious injury or damage. To avoid injury, securely attach the monitor to the floor or wall in accordance with the installation instructions.
CAUTION! This equipment is not intended for use in places where children may be present.
NOTE: This product is suitable for office use. Consider the placement of the monitor in relation to ambient lighting to prevent glare from nearby light sources and bright surfaces that may interfere with the display image.
Getting to Know Your Monitor
Components
Adjusting the monitor height
- Adjust the height at the end of the stand using the 3 mm hex wrench.
- Adjust the height at the end of the stand using the 5 mm hex wrench.
Connecting cables and routing
Connect the signal cable (HDMI or DP) and the power cable to the connectors on the back of the monitor and route them through the cable management system. Then connect the signal cable to the source device (computer or game console), and the power cable to the wall outlet.
Adjusting the monitor position
- Adjust the vertical position of the monitor.
- Adjust the horizontal position of the monitor.
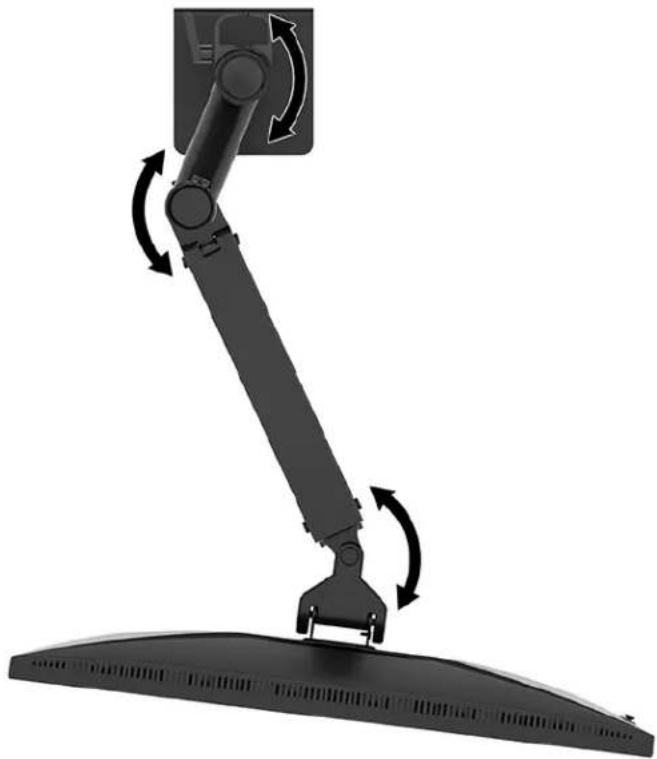
- Adjust the tilt of the monitor.
Turning on the monitor
The monitor is turned on using the power button (1), and the on-screen menu settings are selected using the joystick (2).
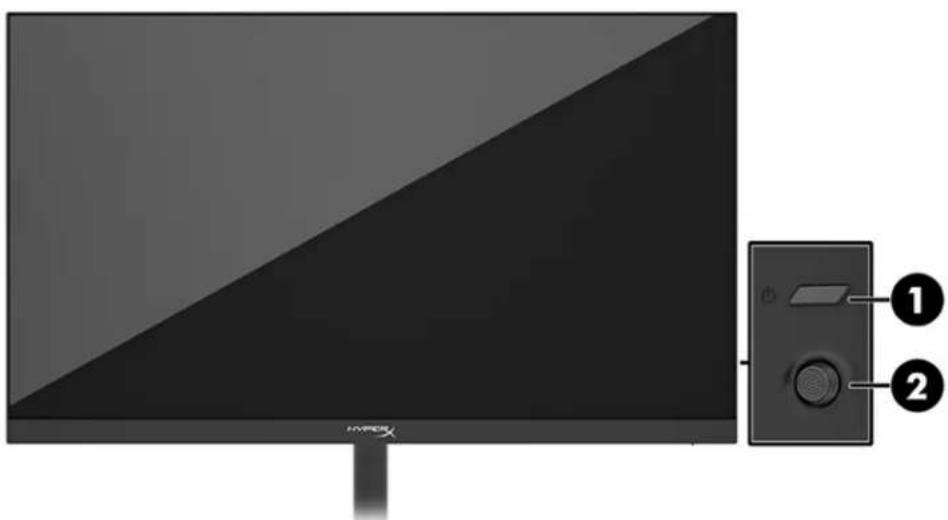
Image retention policy for HyperX monitors
Some models use In-Plane Switching (IPS) technology, which provides ultra-wide viewing angles and improved image quality. Although this technology is suitable for use in various fields, it is not suitable for static, fixed, or frozen images displayed for extended periods (unless a screen saver is used).
Static images may include video surveillance feeds, video games, advertising banners, and logos. Static images can lead to damage from image retention, which appears as ghosting or watermarks on the monitor screen.
The warranty does not cover damage from image retention on monitors used around the clock. To avoid this damage, always turn off the monitor when it is not in use, or use the power management mode if supported by the computer, or turn off the monitor during computer standby.
Attaching multiple monitors
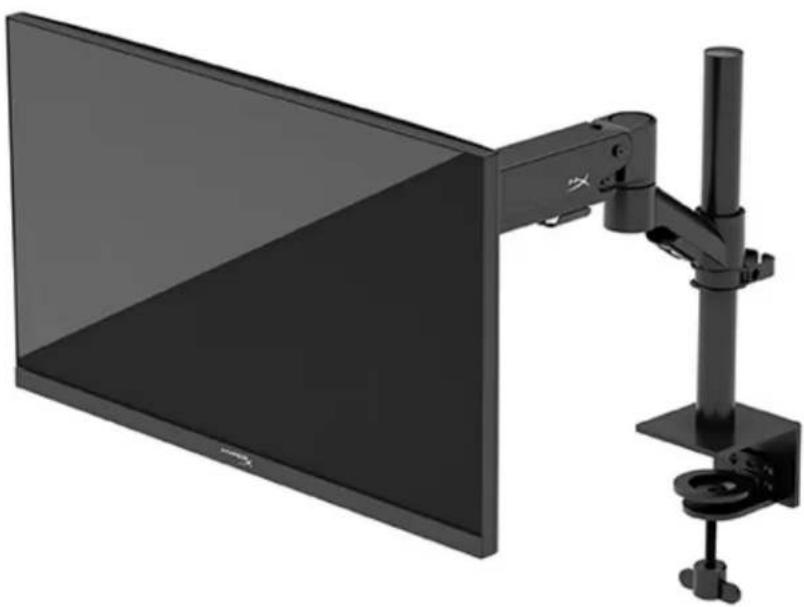
To attach multiple monitors to one stand, you will need to purchase the additional HyperX Armada Gaming Mount Addon.
Attach the bracket to the back of the monitor using four screws, inserting them into the corresponding VESA mounting holes on the back of the monitor.
- Attach the additional bracket to the stand (1) and tighten the screw with the knurled head (2).

HyperX Armada 27 Gaming Monitor QHD
Copyright 2022 HP Development Company, L.P.
Copyright 2022 HP Development Company, L.P.
Copyright 2022 HP Development Company, L.P.
The mighty general
- 3mm 1
- 5mm 1
Kai will be linked to
Mounter's serengue to hargsi kig Suymg enrjchraen dae jiee e a
Copyright 2022 HP Development Company, L.P.
HyperX uazIaHyperX uunnunununununun
HP Development Co.
Huluunn uanwnnnnnaaannnnn
- ansswWnnaaWnnaeauananaWoaanannnu AC uuaananaWoaanannnu AC
Woaanrnnnnaeannnnnneennnnn ne anen nnnnne aannnnnne annnnnne nn nnnnnnne
- 1
- 1
NGENUITY hyperx. gg/ngenuity

NGENUITY
OSD
OSD
- Gaming (OSD) menu
- Adaptive-Sync On
Adaptive-Sync menu
75Hz refresh rate
On / Off switch
- Main Menu (OSD)
- Power (OSD) menu
- Auto-Sleep Mode (default: Off)
Menu
Settings
HyperX Armada 27 QHD
| bihydrogen | bihydrogen | bihydrogen |
| bihydrogen, benzothiophen, benzothiophen | bihydrogen | bihydrogen |
| ยงรังadores | ยงURRENT | ยงURRENT |
| ywยงคุcottสุṭṭṭṭṭṭṭṭṭṭṭṭṭṭṭṭṭṭṭṭṭṭṭṭṭṭṭṭṭṭṭṭṭṭṭṭṭṭṭṭṭṭṭṭṭṭṭṭṭṭṭṭṭṭṭṭṭṭṭṭṭṭṭ | ywยงคุcottสุṭṭṭṭṭṭṭṭṭṭṭṭṭṭṭṭṭṭṭṭ | ywยงคุcottสุṭṭṭṭṭṭṭṭṭ |
| ywยงคุcottสุṭṭṭṭṭṭṭṭṭṭṭṭṭṭṭṭṭ | ywยงคุcottสุṭṭṭṭṭṭṭ | ywยงคุcott[bu] |
| ywยงคุcott[bu] | ywยงคุcott[bu] | |
| ywยงคุcott[bu] | ywยงคุcott[bu] | |
| ywยงคุcott[bu] | ywยงคุcott[bu] | |
| ywยงคุcott[bu] | ywยงคucca/bu | |
| ywยงคucca/bu | ywยงคucca/bu | |
| ywยงคucca/bu | ywยงคucca/bu | |
| ywยงคucca/bu | ywย弛mattbubu | |
| ywย弛mattbubu | yw弛mattbubu | |
| yw弛mattbubu | yw弛mattbubu | |
| yw弛mattbubu | yw弛mattbubu | |
| yw弛mattbubu | yw弛mattbubu | |
| yw弛mattbubu | yw弛mattbubu | |
| yw弛mattbubu | yw弛mattbubu | |
| yw弛mattbUB | yw弛mattbUB | |
| yw弛mattbUB | yw弛mattbUB | |
| yw弛mattbUB | yw弛mattbUB | |
| yw弛mattbUB | yw弛mattbUB | |
| yw弛mattbUB | yw弛mattbUB | |
| yw弛mattbUB | yw弛mattbUB | |
| yw弛mattbUB | yw弛mttbubu | |
| yw弛mattbUB | yw弛mttbubu | |
| yw弛mattbUB | yw弛mttbubu | |
| yw弛mattbUB | yw弛mttbubu | |
| yw弛mattbUB | yw弛mttbubu | |
| yw弛mattbUB | yw弛mttbubu | |
| yw弛mattbIB | yw弛mattbIB | |
| yw弛mattbIB | yw弛mattbIB | |
| yw弛mattbIB | yw弛mattbIB | |
| yw弛mattbIB | yw弛mattbIB | |
| yw弛mattbIB | yw弛mattbIB | |
| yw弛mattbIB | yw弛mattbIB | |
| yw弛mattbIB | yw弛mttbubu | |
| yw弛mattbIB | yw弛mttbubu | |
| yw弛mattbIB | yw弛mttbubu | |
| yw弛mattbIB | yw弛mttbubu | |
| yw弛mattbIB | yw弛mttbubu | |
| yw弛mattbIB | yw弛mttbubu | |
| yw弛mattbIE | yw弛mttbUB | |
| yw弛mattbIE | yw弛mttbUB | |
| yw弛mattbIE | yw弛mttbUB | |
| yw弛mattbIE | yw弛mttbUB | |
| yw弛mattbIE | yw弛mttbUB | |
| yw弛mattbIE | yw弛mttbUB | |
| yw弛mattbIE | yw弛mTTB | |
| yw弛mattbIE | yw弛mTTB | |
| yw弛mattbIE | yw弛mTTB | |
| yw弛mattbIE | yw弛mTTB | |
| yw弛mattbIE | yw弛mTTB | |
| yw弛mattbIE | yw弛mTTB | |
| yw弛mattbIE | yw弛mTTB |
HyperX: hyperx.gg/support
Copyright 2022 HP Development Company, L.P.
HyperX and the HyperX logo are trademarks or registered trademarks of HP Development Co. in the U.S. and/or other countries. All other trademarks and registered trademarks are the property of their respective owners.
The information in this document is subject to change without notice. The only warranties for HP products and services are set forth in the express warranty statements accompanying such products and services. Nothing herein should be construed as constituting an additional warranty. HP shall not be liable for technical or editorial errors or omissions contained herein.
Product notice
- In the OSD menu, select Gaming.
- Select Adaptive-Sync, and then select On.
Note: The default setting of the Adaptive-Sync menu is Off.
Using Auto-Sleep Mode
Your monitor has a power-saving feature called Auto-Sleep Mode, which is a reduced power state for the monitor. This section describes how to activate or adjust Auto-Sleep Mode on your monitor.
When Auto-Sleep Mode is enabled (enabled by default), the monitor will enter the reduced power state when the computer signals a low power mode (no horizontal or vertical sync signal).
When entering the reduced power state (Auto-Sleep Mode), the monitor will have no signal, the backlight will turn off, and the power LED will change to amber. The monitor consumes less than 0.5 W in this reduced power state. The monitor will wake from Auto-Sleep Mode when the computer sends an active signal to the monitor (for example, if you activate the mouse or keyboard).
J 1
. 5gill (g) jall lallylll jgsj gai
Jll J
y 2
jai jie jie jie jie jie jie jie jie
1.https://hyperx@qq/ergo
111 111 111 111 111 111 111 111 111
aagall aLgall gll gll lal
jaiall jaiilal jaiil 1000000000000000000000000000000000000000000
JUPS) 24
a 1
a a a a a a a a a a a a a a a a a a a
a
i 1
aaii
Therefore, a_4 = 1/2.
Therefore, the area of triangle BCD equals the area of triangle COD plus the area of triangle BDO minus the area of triangle BOC.
HDMI 2.0
DisplayPort 1.4
Therefore, the area of triangle ACD equals the area of triangle COD plus the area of triangle DCE.
VESA 5
A
J
Aiiill 1y jai 1 yj (4) aill 0 g adi 1 i (1) aiil j
a a a a a a a a a a a a a a a a a a a a a a a a a a
aiee aee eae ee eae eae eae eae eae eae eae eae eae eae
J 10000000000000000000000000000000000000000000000
i 1
Lulu o 1
HyperX Armada 1
a 1234567890123456789012345678901234567890123456789012345678901234567890123456789012345678901234567890123456789
(1)g(1)
(1)a(2)
(1)g(2)
aaii
y jie a jll plalit dkiag g adg a hj 15 k jie 1 1
C
__SUPPIMER__
hyperx.gg/ngenuity: NGENUITY

(Gaming (OSD)
(Adaptive-Sync
Adaptive-Sync
pslll 1s (gill s) Auto-Sleep Mode → gill j
Auto-Sleep Mode
QHD HHyperX Armada
| الله | الإستعمال | الإستعمال |
| ;}الله الحد ملاس بعس ملاس | ;}الله الحد ملاس بعس ملاس | ;}الله الحد ملاس بعس ملاس |
| ;}الله الحد ملاس بعس ملاس | ;}الله الحد ملاس بعس ملاس | |
| ;}الله الحد ملاس بعس ملاس | ;}الله الحد ملاس بعس ملاس | |
| Input "الله الحد ملاس بعس ملاس" (OSD) ("الله الحد ملاس بعس ملاس", (الترجمة)) Auto-Switch Input "الله الحد ملاس بعس ملاس" (OSD) (الترجمة), (الترجمة), Off (الترجمة), (الترجمة), (الترجمة), (الترجمة), (الترجمة), (الترجمة), (الترجمة), (الترجمة), (الترجمة), (الترجمة), (الترجمة), (الTRL), (الTRL), (الTRL), (الTRL), (الTRL), (الTRL), (الTRL), (الTRL), (الTRL), (الTRL), (الTRL), (الTRL), (الTRL), (الTRL), (الTRL), (الTRL), (الTRL), (الTRL), (الTRL), (الTRL), (الTRL), (الTRL), (الTRL), (الTRL), (الTRL), (الtram), (الtram), (الtram), (الtram), (الtram), (الtram), (الtram), (الtram), (الtram), (الtram), (الtram), (الtram), (الtram), (الtram), (الtram), (الtram), (الtram), (الtram), (الtram), (الtram), (الtram), (الtram), (الtram), (الtram), (الtram), (الtran), (الtran), (الtran), (الtran), (الtran), (الtran), (الtran), (الtran), (الtran), (الtran), (الtran), (الtran), (الtran), (الtran), (الtran), (الtran), (الtran), (الtran), (الtran), (الtran), (الtran), (الtran), (الtran), (الtran), (الtran), (الtram), (الtram), (الtram), (الtram), (الtram), (الtram), (الtram), (الtram), (الtram), (الtram), (الtram), (الtram), (الtram), (الtram), (الtram), (الtram), (الtram), (الtram), (الtram), (الtram), (الtram), (الtram), (الtram), (الtram), (الTRAN), (الtram), (الtram), (الtram), (الtram), (الtram), (الtram), (الtram), (الtram), (الtram), (الtram), (الtram), (الtram), (الtram), (الtram), (الtram), (الtram), (الtram), (الtram), (الtram), (الtram), (الtram), (الtram), (الtram), (الtram), (الbeam), (الbeam), (الbeam), (الbeam), (الbeam), (الbeam), (الbeam), (الbeam), (الbeam), (الbeam), (الbeam), (الbeam), (الbeam), (الbeam), (الbeam), (الbeam), (الbeam), (الbeam), (الbeam), (الbeam), (الbeam), (الbeam), (الbeam), (الbeam), (الbeam), (الtram), (الtram), (الtram), (الtram), (الtram), (الtram), (الtram), (الtram), (الtram), (الtram), (الtram), (الtram), (الtram), (الtram), (الtram), (الtram), (الtram), (الtram), (الtram), (الtram), (الtram), (الtram), (الtram), (الtram), (ال tram), (الtram), (الtram), (الtram), (الtram), (الtram), (الtram), (الtram), (الtram), (الtram), (الtram), (الtram), (الtram), (الtram), (الtram), (الtram), (الtram), (الtram), (الtram), (الtram), (الtram), (الtram), (الtram), (الtram), (الtram), (ال tran), (الtram), (الtram), (الtram), (الtram), (الtram), (الtram), (الtram), (الtram), (الtram), (الtram), (الtram), (الtram), (الtram), (الtram), (الtram), (الtram), (الtram), (الtram), (الtram), (الtram), (الtram), (الtram), (الtram), (الtram), (الBeam), (الbeam), (الbeam), (الbeam), (الbeam), (الbeam), (الbeam), (الbeam), (الbeam), (الbeam), (الbeam), (الbeam), (الbeam), (الbeam), (الbeam), (الbeam), (الbeam), (الbeam), (الbeam), (الbeam), (الbeam), (الbeam), (الbeam), (الbeam), (الbeam), (الBeam), (الbeam), (الbeam), (الbeam), (الbeam), (الbeam), (الbeam), (الbeam), (الbeam), (الbeam), (الbeam), (الbeam), (الbeam), (الbeam), (الbeam), (الbeam), (الbeam), (الbeam), (الbeam), (الbeam), (الbeam), (الbeam), (الbeam), (الbeam), (الtram), (الbeam), (الbeam), (الbeam), (الbeam), (الbeam), (الbeam), (الbeam), (الbeam), (الbeam), (الbeam), (الbeam), (الbeam), (الbeam), (الbeam), (الbeam), (الbeam), (الbeam), (الbeam), (الbeam), (الbeam), (الbeam), (الbeam), (الbeam), (الtram), (ال Beam), (الbeam), (الbeam), (الbeam), (الbeam), (الbeam), (الbeam), (الbeam), (الbeam), (الbeam), (الbeam), (الbeam), (الbeam), (الbeam), (الbeam), (الbeam), (الbeam), (الbeam), (الbeam), (الbeam), (الbeam), (الbeam), (الbeam), (الbeam), (الbeam), (ال Beam), (الbeam), (الbeam), (الbeam), (الbeam), (الbeam), (الbeam), (الbeam), (الbeam), (الbeam), (الbeam), (الbeam), (الbeam), (الbeam), (الbeam), (الbeam), (الbeam), (الbeam), (الbeam), (الbeam), (الbeam), (الbeam), (الbeam), (الbeam), (الtram), (الBeam), (الbeam), (الbeam), (الbeam), (الbeam), (الbeam), (الbeam), (الbeam), (الbeam), (الbeam), (الbeam), (الbeam), (الbeam), (الbeam), (الbeam), (الbeam), (الbeam), (الbeam), (الbeam), (الbeam), (الbeam), (الbeam), (الbeam), (الtram), (الbeam), (الBeam), (الbeam), (الbeam), (الbeam), (الbeam), (الbeam), (الbeam), (الbeam), (الbeam), (الbeam), (الbeam), (الbeam), (الbeam), (الbeam), (الbeam), (الbeam), (الbeam), (الbeam), (الbeam), (الbeam), (الbeam), (الbeam), (الbeam), (الtram), (الBeam), (الBeam), (الbeam), (الbeam), (الbeam), (الbeam), (الbeam), (الbeam), (الbeam), (الbeam), (الbeam), (الbeam), (الbeam), (الbeam), (الbeam), (الbeam), (الbeam), (الbeam), (الbeam), (الbeam), (الbeam), (الbeam), (الbeam), (الbeam), (الbeam), (الBeam), (الBeam), (الbeam), (الbeam), (الbeam), (الbeam), (الbeam), (الbeam), (الbeam), (الbeam), (الbeam), (الbeam), (الbeam), (الbeam), (الbeam), (الbeam), (الbeam), (الbeam), (الbeam), (الbeam), (الbeam), (الbeam), (الbeam), (الbeam), (الtram), (الtram), (الbeam), (الbeam), (الbeam), (الbeam), (الbeam), (الbeam), (الbeam), (الbeam), (الbeam), (الbeam), (الbeam), (الbeam), (الbeam), (الbeam), (الbeam), (الbeam), (الbeam), (الbeam), (الbeam), (الbeam), (الbeam), (الbeam), (الtram), (الtram), (الBeam), (الbeam), (الbeam), (الbeam), (الbeam), (الbeam), (الbeam), (الbeam), (الbeam), (الbeam), (الbeam), (الbeam), (الbeam), (الbeam), (الbeam), (الbeam), (الbeam), (الbeam), (الbeam), (الbeam), (الbeam), (الbeam), (الtram), (الtram), (الbeam), (الBeam), (الbeam), (الbeam), (الbeam), (الbeam), (الbeam), (الbeam), (الbeam), (الbeam), (الbeam), (الbeam), (الbeam), (الbeam), (الbeam), (الbeam), (الbeam), (الbeam), (الbeam), (الbeam), (الbeam), (الbeam), (الbeam), (الtram), (الtram), (الBeam), (الBeam), (الbeam), (الbeam), (الbeam), (الbeam), (الbeam), (الbeam), (الbeam), (الbeam), (الbeam), (الbeam), (الbeam), (الbeam), (الbeam), (الbeam), (الbeam), (الbeam), (الbeam), (الbeam), (الbeam), (الbeam), (الbeam), (الtram), (الtram), (الtram), (الbeam), (الbeam), (الbeam), (الbeam), (الbeam), (الbeam), (الbeam), (الbeam), (الbeam), (الbeam), (الbeam), (الbeam), (الbeam), (الbeam), (الbeam), (الbeam), (الbeam), (الbeam), (الbeam), (الbeam), (الbeam), (الtram), (الtram), (الbeam), (ال Beam), (الbeam), (الbeam), (الbeam), (الbeam), (الbeam), (الbeam), (الbeam), (الbeam), (الbeam), (الbeam), (الbeam), (الbeam), (الbeam), (الbeam), (الbeam), (الbeam), (الbeam), (الbeam), (الbeam), (الbeam), (الbeam), (الbeam), (الtram), (الtram), (ال Beam), (الbeam), (الbeam), (الbeam), (الbeam), (الbeam), (الbeam), (الbeam), (الbeam), (الbeam), (الbeam), (الbeam), (الbeam), (الbeam), (الbeam), (الbeam), (الbeam), (الbeam), (الbeam), (الbeam), (الbeam), (الbeam), (الbeam), (الtram), (الbeam), (الtram), (الbeam), (الbeam), (الbeam), (الbeam), (الbeam), (الbeam), (الbeam), (الbeam), (الbeam), (الbeam), (الbeam), (الbeam), (الbeam), (الbeam), (الbeam), (الbeam), (الbeam), (الbeam), (الbeam), (الbeam), (الbeam), (الbeam), (الtram), (الbeam), (ال Beam), (الbeam), (الbeam), (الbeam), (الbeam), (الbeam), (الbeam), (الbeam), (الbeam), (الbeam), (الbeam), (الbeam), (الbeam), (الbeam), (الbeam), (الbeam), (الbeam), (الbeam), (الbeam), (الbeam), (الbeam), (الbeam), (الtram), (الbeam), (الbeam), (الBeam), (الbeam), (الbeam), (الbeam), (الbeam), (الbeam), (الbeam), (الbeam), (الbeam), (الbeam), (الbeam), (الbeam), (الbeam), (الbeam), (الbeam), (الbeam), (الbeam), (الbeam), (الbeam), (الbeam), (الbeam), (الbeam), (الtram), (الbeam), (الbeam), (ال Beam), (الbeam), (الbeam), (الbeam), (الbeam), (الbeam), (الbeam), (الbeam), (الbeam), (الbeam), (الbeam), (الbeam), (الbeam), (الbeam), (الbeam), (الbeam), (الbeam), (الbeam), (الbeam), (الbeam), (الbeam), (الbeam), (الtram), (الtram), (الbeam), (الtram), (الbeam), (الbeam), (الbeam), (الbeam), (الbeam), (الbeam), (الbeam), (الbeam), (الbeam), (الbeam), (الbeam), (الbeam), (الbeam), (الbeam), (الbeam), (الbeam), (الbeam), (الbeam), (الbeam), (الbeam), (الbeam), (الtram), (الtram), (الBeam), (ال Beam), (الbeam), (الbeam), (الbeam), (الbeam), (الbeam), (الbeam), (الbeam), (الbeam), (الbeam), (الbeam) | ||
| Color "色" ("色") ("色") ("色") ("色") ("色") ("色") ("色") ("色") ("色") ("色") ("色") ("色") ("色") ("色") ("色") ("色") ("色") ("色") ("色") ("色") ("色") ("色") ("色") ("色") ("色") ("色") ("色") ("色") ("色") ("色") ("色") ("色") ("色") ("色")("色") ("色") ("色") ("色") ("色") ("色") ("色") ("色") ("色") ("色") ("色") ("色") ("色") ("色") ("色") ("色") ("色") ("色") ("色") ("色") ("色") ("色") ("色") ("色") ("色") ("色") ("色") ("色") ("色") ("色") ("色") ("色") ("色") ("地") ("地") ("地") ("地") ("地") ("地") ("地") ("地") ("地") ("地") ("地") ("地") ("地") ("地") ("地") ("地") ("地") ("地") ("地") ("地") ("地") ("地") ("地") ("地") ("地") ("地") ("地") ("地") ("地") ("地") ("地") ("地") ("地") ("地") (100) | ||
| Color "色" ("色") ("色") ("色") ("色") ("色") ("色") ("色") ("色") ("色") ("色") ("色") ("色") ("色") ("色") ("色") ("色") ("色") ("色") ("色") ("色") ("色") ("色") ("色") ("色") ("色") ("色") ("色") ("色") ("色") ("色") (“色”) ("色") ("色") ("色") ("色") ("色") ("色") ("色") ("色") ("色") ("色") ("色") ("色") ("色") ("色") ("色") ("色") ("色") ("色") ("色") ("色") ("色") ("色") ("色") ("色") ("色") ("色") ("色") ("色") ("色") ("色") ("色") ("色") ("色") (“色") ("色") ("色") ("色") ("色") ("色") ("色") ("色") ("色") ("色") ("色") ("色") ("色") ("色") ("色") ("色") ("色") ("色") ("色") ("色") ("色") ("色") ("色") ("色") ("色") ("色") ("色") ("色") ("色") ("色") ("色") ("色") ("色") ("化") ("化") ("化") ("化") ("化") ("化") ("化") ("化") ("化") ("化") ("化") ("化") ("化") ("化") ("化") ("化") ("化") ("化") ("化") ("化") ("化") ("化") ("化") ("化") ("化") ("化") ("化") ("化") ("化") ("化") ("化") ("化") ("化") ("化") (100) | ||
| Color "色" ("色") ("色") ("色") ("色") ("色") ("色") ("色") ("色") ("色") ("色") ("色") ("色") ("色") ("色") ("色") ("色") ("色") ("色") ("色") ("色") ("色") ("色") ("色") ("色") ("色") ("色") ("色") ("色") ("地") ("地") ("地") ("地") ("地")("地") ("地") ("地") ("地") ("地") ("地") ("地") ("地") ("地") ("地") ("地") ("地") ("地") ("地") ("地") ("地") ("地") ("地") ("地") ("地") ("地") ("地") ("地") ("地") ("地") ("地") ("地") ("地") ("地") ("地") ("地") ("地") ("地") ("色") ("色") ("色") ("色") ("色") ("色") ("色") ("色") ("色") ("色") ("色") ("色") ("色") ("色") ("色") ("色") ("色") ("色") ("色") ("色") ("色") ("色") ("色") ("色") ("色") ("色") ("色") ("色") ("色") ("色") ("色") ("色") ("色") (100) | ||
| Color "色" ("色") ("色") ("色") ("色") ("色") ("色") ("色") ("色") ("色") ("色") ("色") ("色") ("色") ("色") ("色") ("色") ("色") ("色") ("色") ("色") ("色") ("色") ("色") ("色") ("色") ("色") ("色") ("色") ("化") ("化") ("化") ("化") ("化")("化") ("化") ("化") ("化") ("化") ("化") ("化") ("化") ("化") ("化") ("化") ("化") ("化") ("化") ("化") ("化") ("化") ("化") ("化") ("化") ("化") ("化") ("化") ("化") ("化") ("化") ("化") ("化") ("化") ("化") ("化") ("化") ("化") ("地") ("地") ("地") ("地") ("地") ("地") ("地") ("地") ("地") ("地") ("地") ("地") ("地") ("地") ("地") ("地") ("地") ("地") ("地") ("地") ("地") ("地") ("地") ("地") ("地") ("地") ("地") ("地") ("地") ("地") ("地") ("地") ("地") (100) | ||
| Color "色" ("色") ("色") ("色") ("色") ("色") ("色") ("色") ("色") ("色") ("色") ("色") ("色") ("色") ("色") ("色") ("色") ("色") ("色") ("色") ("色") ("色") ("色") ("色") ("色") ("色") ("色") ("色") ("色") ("色") (100) | ||
| الحَل | الإستعمال | |
| الحَل الله燎ال محيى بعساني بعساني بعساني بعساني بعساني بعساني بعساني بعساني بعساني بعساني بعساني بعساني بعساني بعساني بعساني بعساني بعساني بعساني بعساني بعساني بعساني بعساني بعساني بعساني bsl.l. | الله燎ال محيى بعساني بعساني بعساني bsl.l. | "OSD Lockout" "الله燎火" (الله燎火) .(الله燎火) |
| Lockout | Power Button Lockout , Power Button "الله燎火" (Lockout) .(Lockout) "Lockout |
.hyperx. gg/support :HyperX
QHD HyperX Armada

- HYPERX ARMADA 27 QHD GAMING MONITOR
- HYPERX ARMADA 27 QHD GAMING MONITOR INSTALLATION GUIDE
- TABLE OF CONTENTS
- TROUBLESHOOTING
- PRODUCT NOTICE
- GETTING STARTED
- IMPORTANT SAFETY INFORMATION
- GETTING TO KNOW YOUR MONITOR COMPONENTS
- LOCATING THE SERIAL NUMBER AND PRODUCT NUMBER
- SETTING UP THE MONITOR
- USING THE GROMMET MOUNT
- ATTACHING THE NECK AND MOUNTING ARM
- ADJUSTING THE TENSION
- CONNECTING AND ROUTING THE CABLES
- ADJUSTING THE MONITOR
- TURNING ON THE MONITOR
- HYPERX WATERMARK AND IMAGE RETENTION POLICY
- MOUNTING MULTIPLE MONITORS
- MONITOR MOUNTING CONFIGURATIONS
- USING THE MONITOR
- DOWNLOADING SOFTWARE
- USING THE OSD MENU
- DISPLAY MODE STATUS
- USING AUTO-SLEEP MODE
- SOLVING COMMON ISSUES
- BUTTON LOCKOUTS
- QUESTIONS OR SETUP ISSUES
- MAINTAINING THE MONITOR
- MAINTENANCE GUIDELINES
- CLEANING THE MONITOR
- SHIPPING THE MONITOR
- TECHNICAL SPECIFICATIONS
- HYPERX ARMADA
- QHD GAMING MONITOR
- CONTENTS
- SUMMARY
- PRODUCT NOTICES
- START OF WORK
- SAFETY INFORMATION
- GETTING TO KNOW YOUR MONITOR
- COMPONENTS
- ADJUSTING THE MONITOR HEIGHT
- CONNECTING CABLES AND ROUTING
- ADJUSTING THE MONITOR POSITION
- IMAGE RETENTION POLICY FOR HYPERX MONITORS
- ATTACHING MULTIPLE MONITORS
- HYPERX ARMADA 27 GAMING MONITOR QHD
- THE MIGHTY GENERAL
- KAI WILL BE LINKED TO
- OSD
- HZ REFRESH RATE
- MENU
- SETTINGS
- LULU O
Brand : HYPERX
Model : Armada 27 QHD
Category : Monitor