
XG Station Pro - Docking station ASUS - Free user manual and instructions
Find the device manual for free XG Station Pro ASUS in PDF.
User questions about XG Station Pro ASUS
0 question about this device. Answer the ones you know or ask your own.
Ask a new question about this device
Download the instructions for your Docking station in PDF format for free! Find your manual XG Station Pro - ASUS and take your electronic device back in hand. On this page are published all the documents necessary for the use of your device. XG Station Pro by ASUS.
USER MANUAL XG Station Pro ASUS
The following safety precautions will increase the life of the XG Station PRO. Follow all precautions and instructions. Except as described in this manual, refer all servicing to qualified personnel. Do not use damaged power cords, accessories, or other peripherals. Do not use strong solvents such as thinners, benzene, or other chemicals on or near the surface.

Disconnect the AC power before cleaning. Wipe the XG Station PRO using a clean cellulose sponge or chamois cloth dampened with a solution of nonabrasive detergent and a few drops of warm water and remove any extra moisture with a dry cloth.
DO NOT place on uneven or unstable work surfaces. Seek servicing if the casing has been damaged.
DO NOT place or drop objects on top and do not shove any foreign objects into the XG Station PRO.
DO NOT expose to dirty or dusty environments. DO NOT operate during a gas leak.
DO NOT expose to strong magnetic or electrical fields.
DO NOT leave the XG Station PRO on your lap or any part of the body to prevent discomfort or injury from heat exposure.
DO NOT expose to or use near liquids, rain, or moisture. DO NOT use the modem during electrical storms.
DO NOT carry or cover a XG Station PRO that is powered ON with any materials that will reduce air circulation such as a carrying bag.
SAFE TEMP: This XG Station PRO should only be used in environments with ambient temperatures between 5^ (41°F) and 40°C (104°F)
- Never attempt to disassemble and reassemble XG Station PRO. Only ASUS-authorized technicians should repair the device.

This symbol of the crossed out wheeled bin indicates that the product (electrical and electronic equipment) should not be placed in municipal waste. Check local regulations for disposal of electronic products.
1. Installation requirements
To ensure a successful installation of the XG Station PRO, your computer must meet the following requirements:
A Notebook PC with Thunderbolt™ 3 (updated to the latest firmware)
Microsoft Windows 10 (64 bit)
Refer to www.asus.com for the complete Notebook PC QVL (Qualified Vendors List)
2. Specifications summary
| Model | XG Station PRO |
| Connection to PC | Thunderbolt™ 3 |
| Input / Output | 1 x USB 3.1 Gen 2 port |
| RGB Lighting Control | ASUS ROG AURA supported |
| Power Supply | 330W |
| Dimension | 109mm x 205mm x 375mm |
| Weight | 3.6KG |
| Graphics Card Support | NVIDIA* GeForce® GTX 900 series and laterAMD Radeon R9 series and later |
| Internal Graphics Slot Specification | Provides support for a single full length, 2.5 slot, PCI-Expressx16 graphics card1 x PCI-Express x16 (electrical spec: x16) |
| Graphics output | Defined by the graphics card installed |
| Accessories | 1 x Thunderbolt™ 3 Type-C cable1 x Power cord1 x 330W AdapterImportant product information guides |
3. Hardware introduction
Rear view
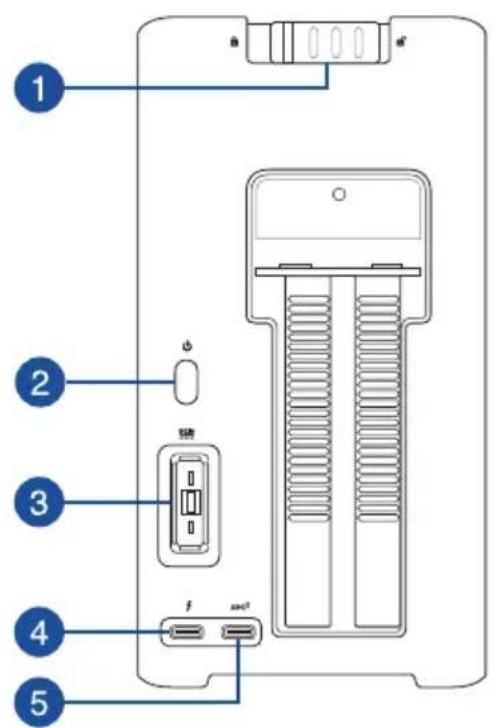
1 Cover lock
2 Power button
3 Power (DC) input port
4 ThunderboltTM 3 Type-C port
USB 3.1 Gen 2 Type-CTM port
4. Hardware installation
To install the XG Station PRO:
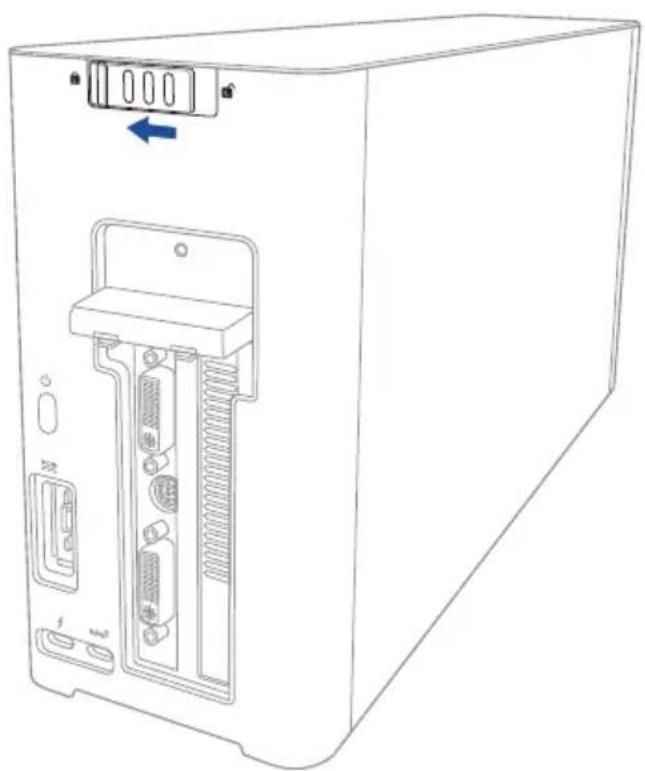
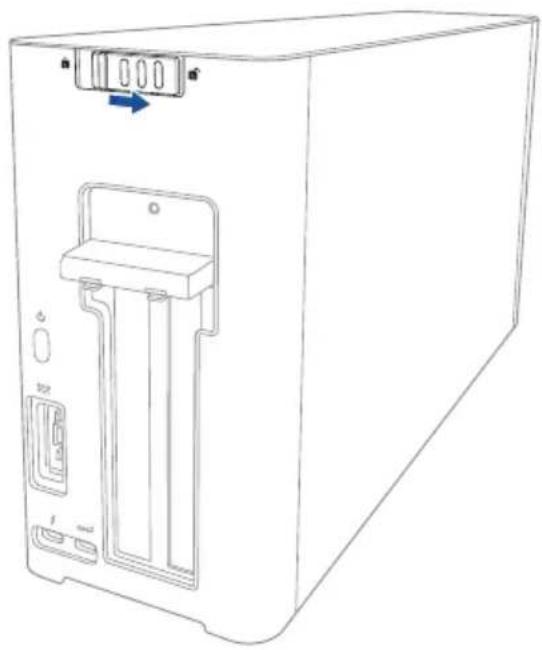
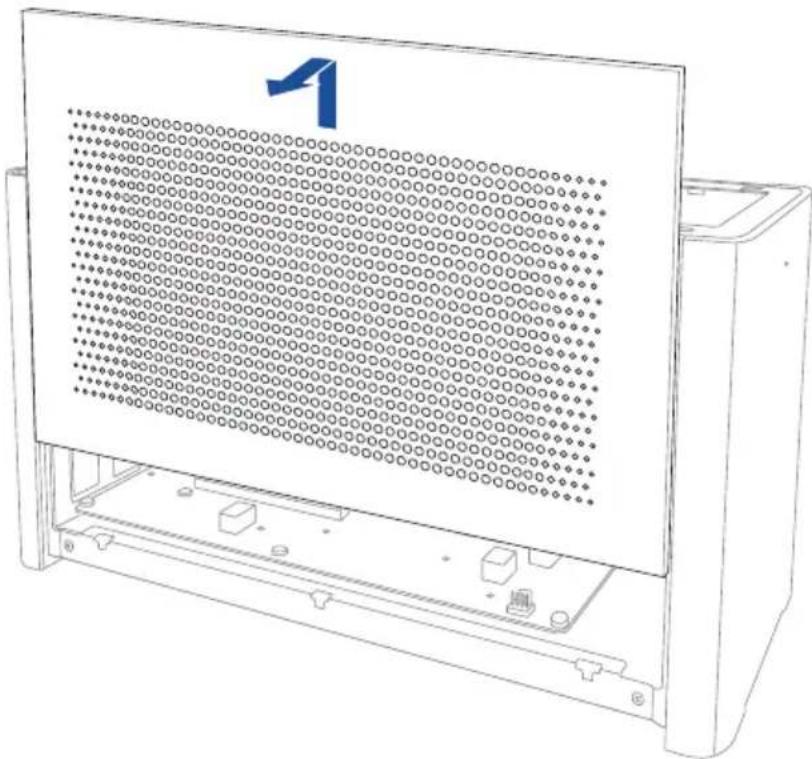
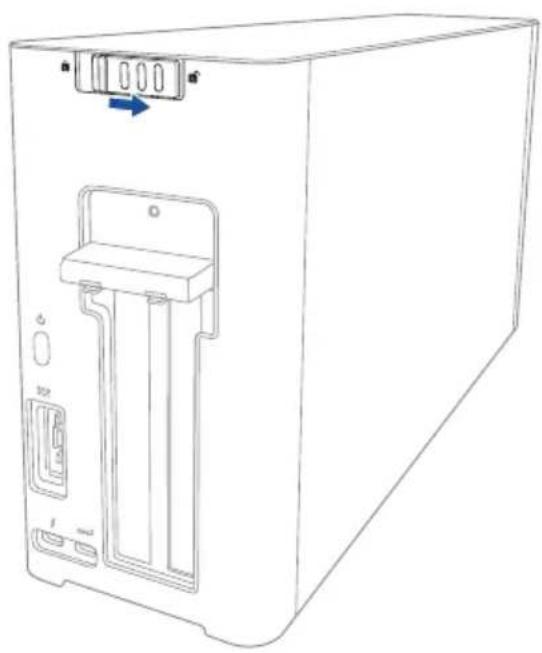
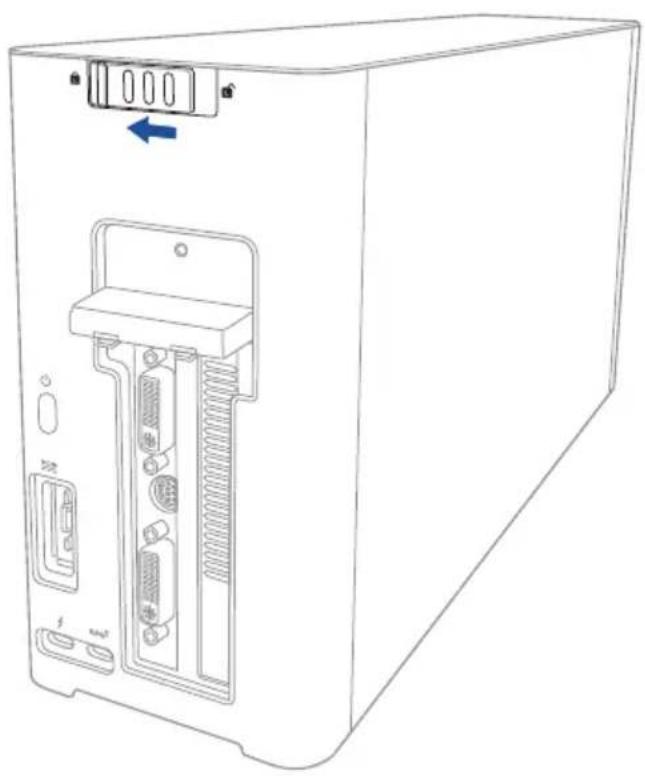
- Slide the cover lock to an unlocked position.
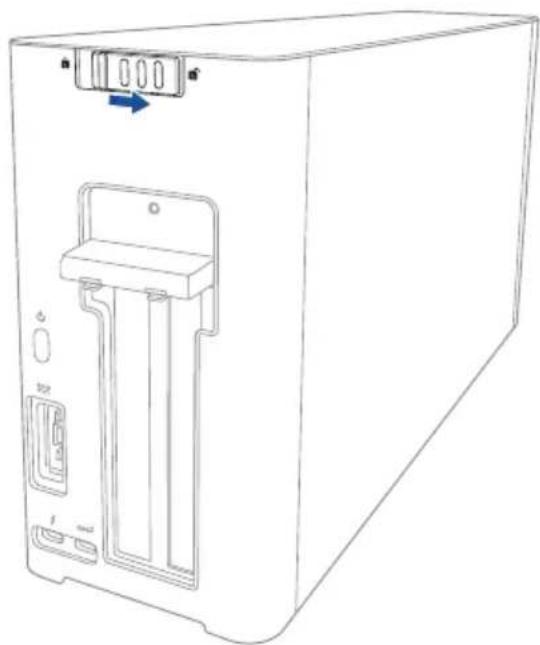
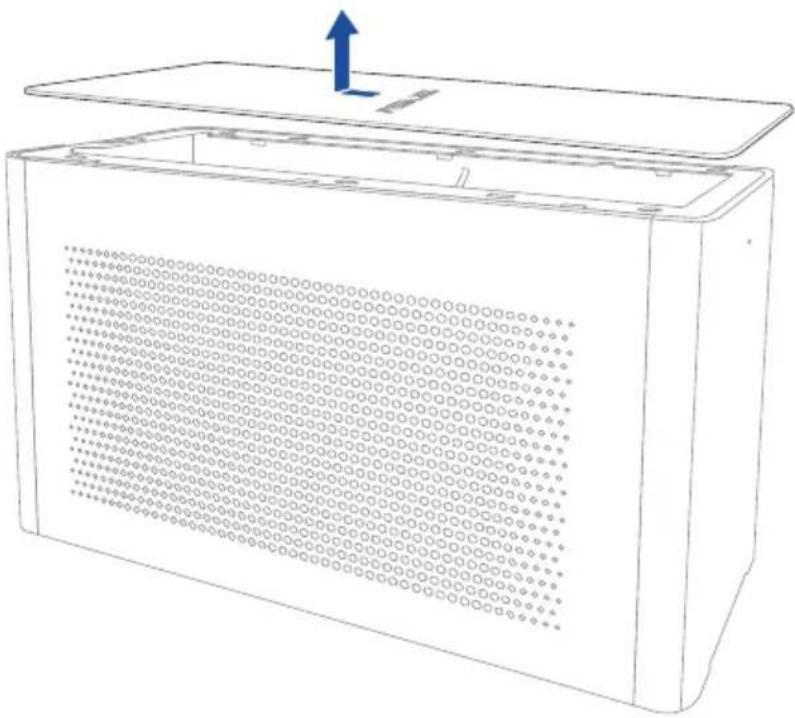
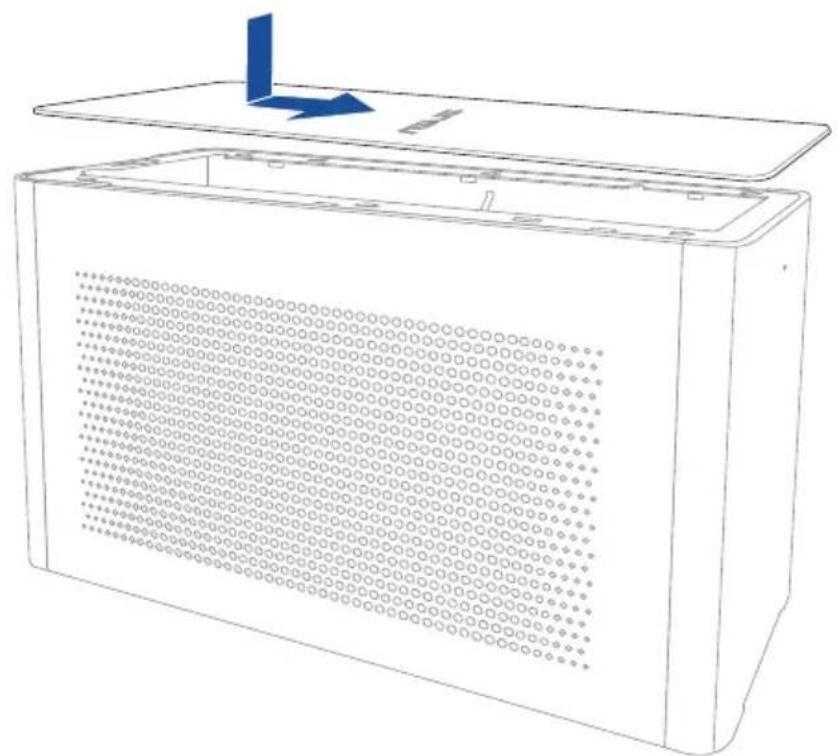
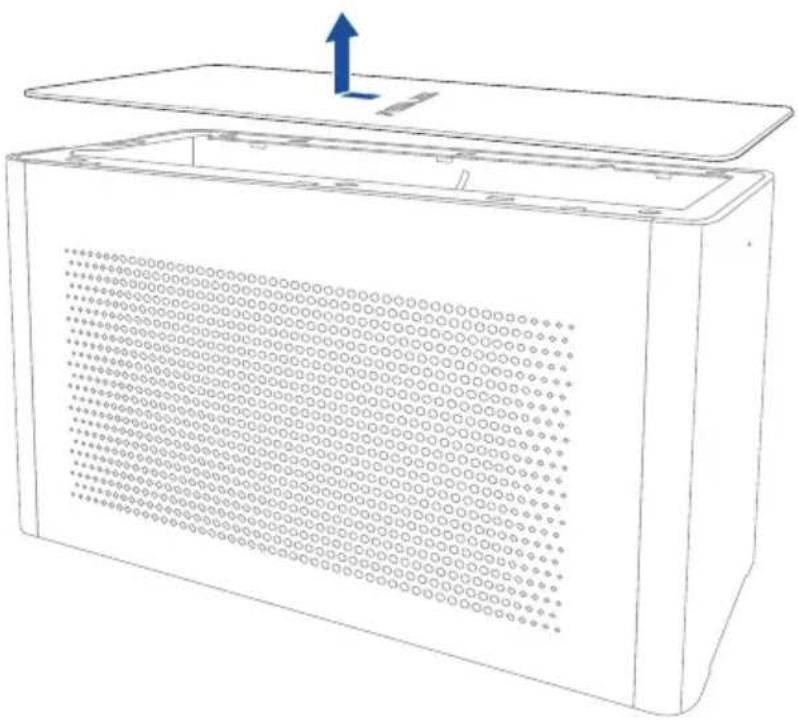
- Slide the top cover towards the rear of the XG Station PRO, then lift the top cover open.

- Slide the side cover upwards to remove it from the XG Station PRO.

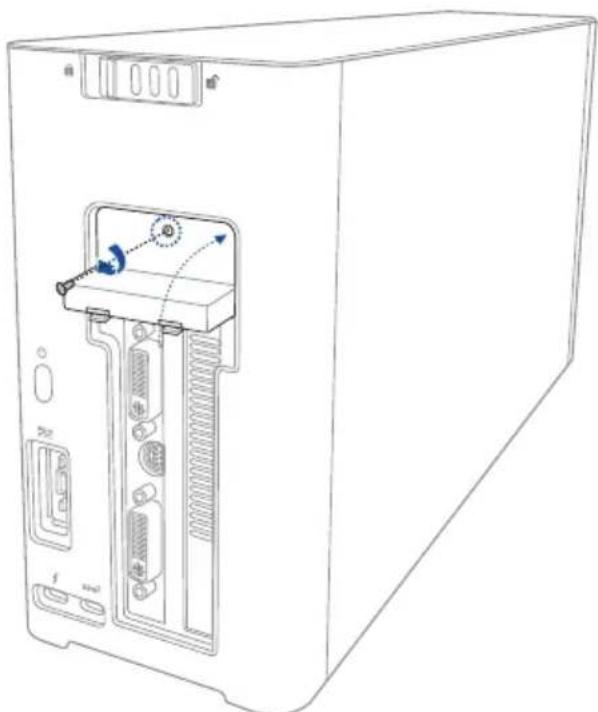
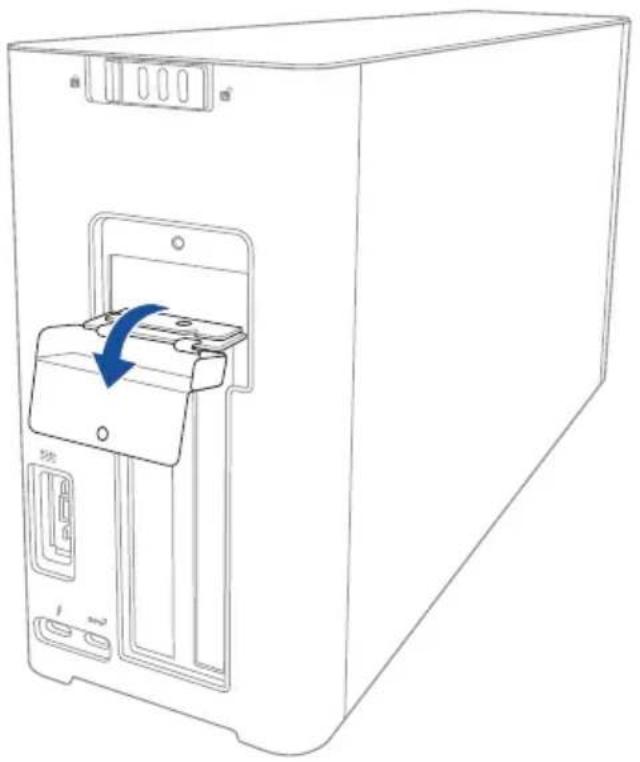
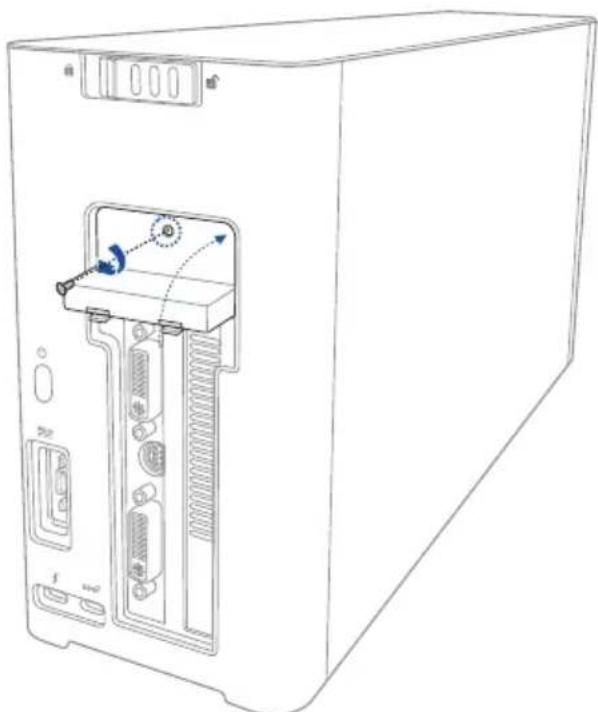
- Remove the screw that secures the metal cover to the XG Station PRO.
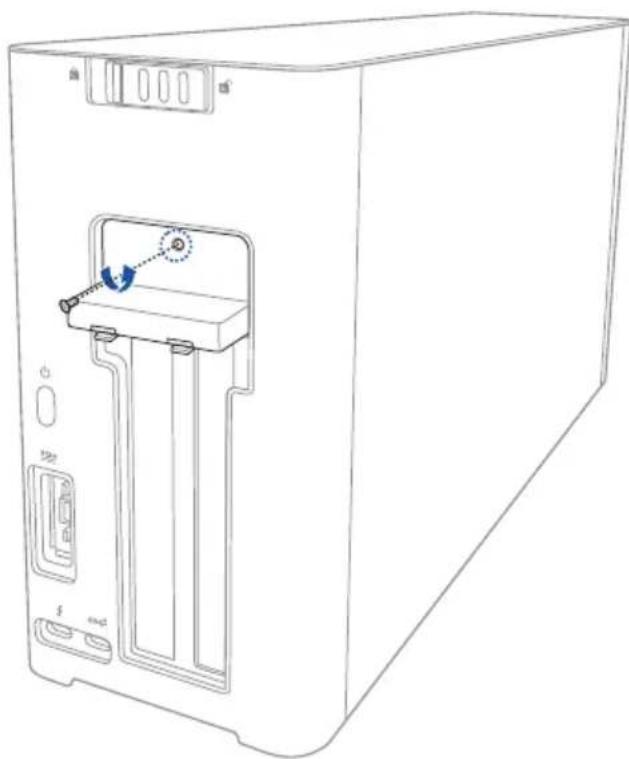
- Open the metal cover downwards to an opened position.

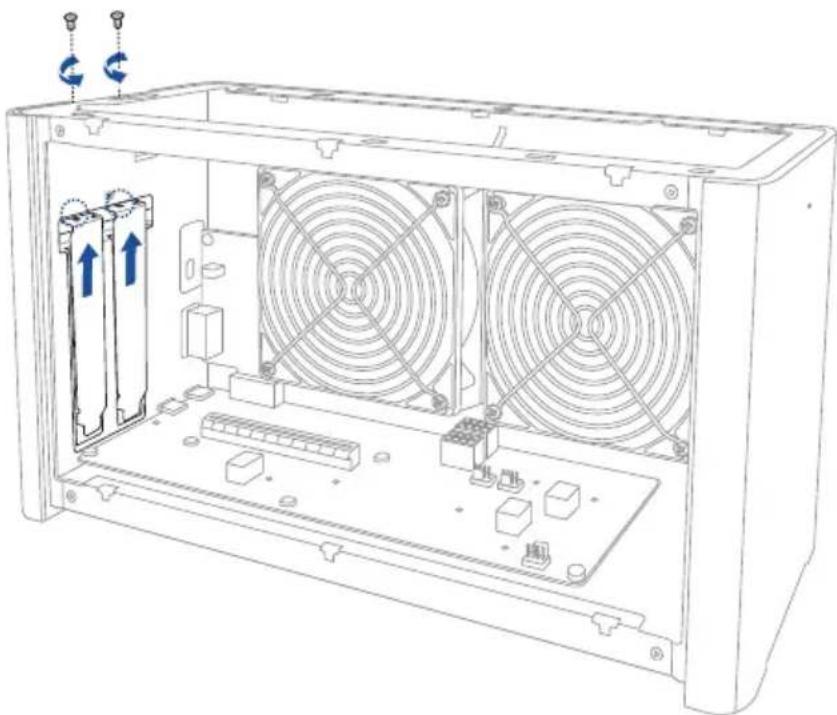
- Remove the screws that secure the metal bracket to the XG Station PRO, then remove the metal bracket.
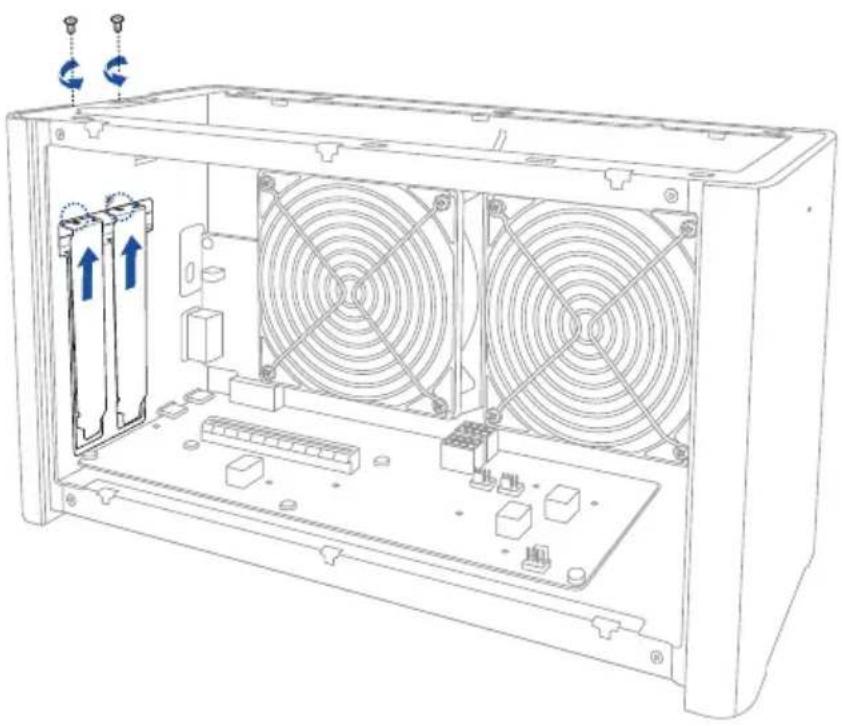

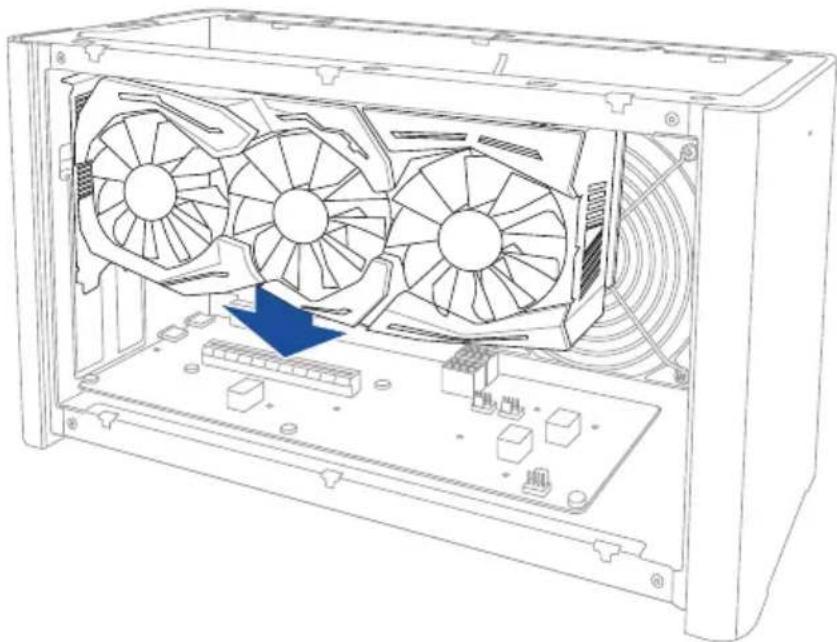
- Align and insert the graphics card into the PCI-E slot.

- Secure the metal bracket with the screws you removed earlier, then connect the power cables to the graphics card.

- Lift the metal cover upwards to a closed position, then secure the metal cover with the screw that you removed earlier.
- Align and slide the side cover into the XG Station PRO.

- Align and slide the top cover towards the front of the XG Station PRO to secure it in place.

- Slide the cover lock to the locked position.
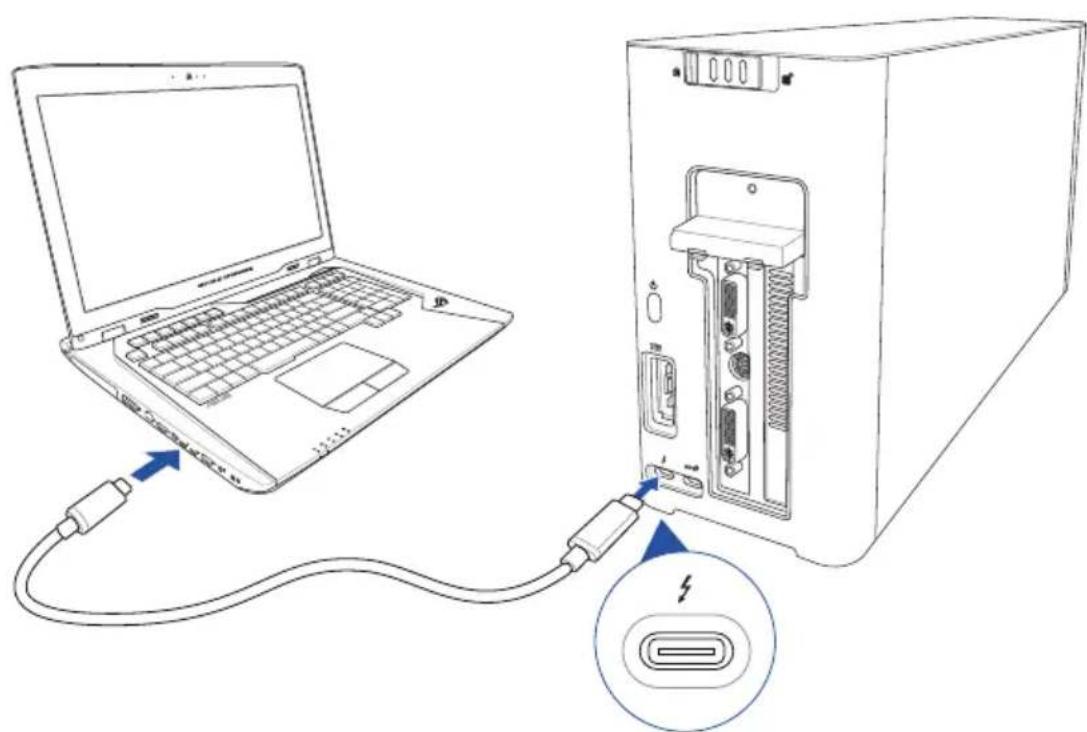
- Connect the bundled Thunderbolt™ 3 Type-C cable to your Notebook PC and the XG Station PRO.
- Connect the AC power cord to the AC/DC adapter (A). Connect the DC power connector into your XG Station PRO's power (DC) input port (B). Plug the AC power adapter into a 100V~240V power source (C).
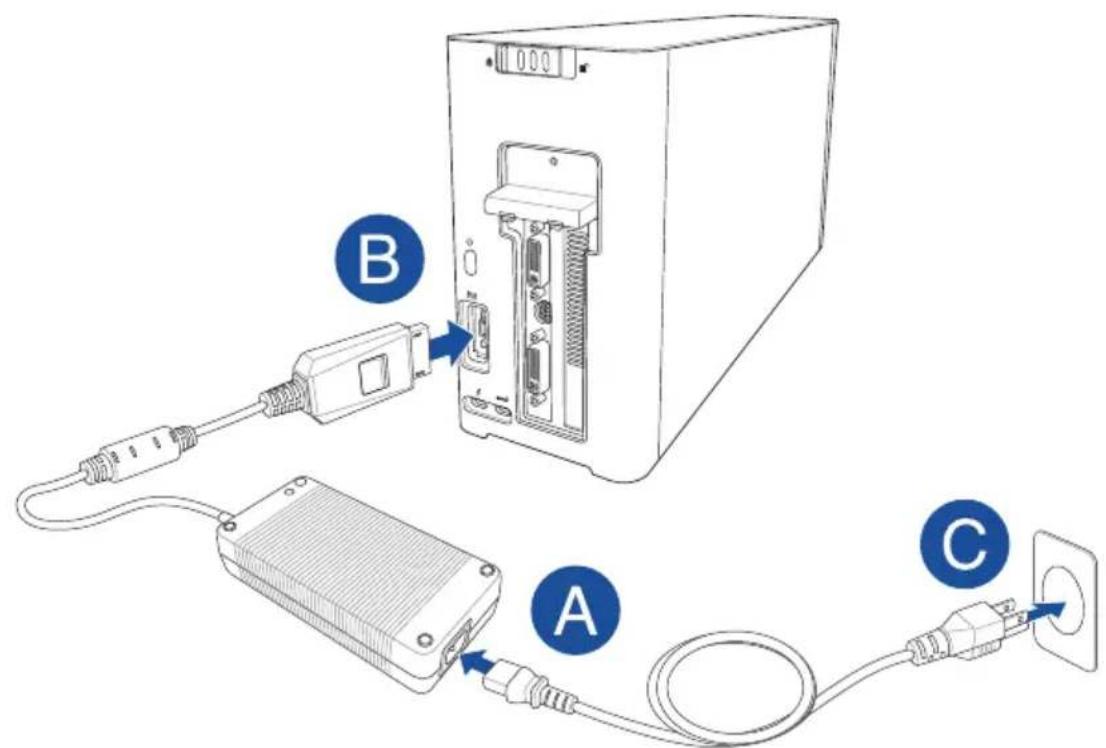

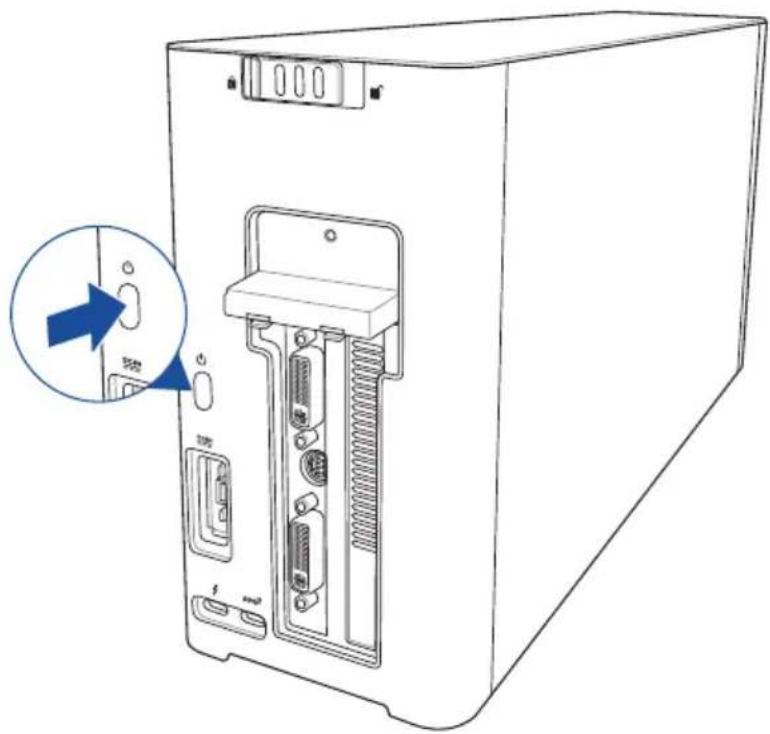
- Press the power button on your XG Station PRO to turn it on.
- Install the corresponding drivers for your graphics card.
5. Hardware customization
To customize the lighting effects of your XG Station PRO, visit www.asus.com and download the ASUS ROG AURA software.
6. Hardware maintenance
To remove the air filter:
- Slide the cover lock to an unlocked position.
- Slide the top cover towards the rear of the XG Station PRO, then lift the top cover open.
- Slide the side cover upwards to remove it from the XG Station PRO.
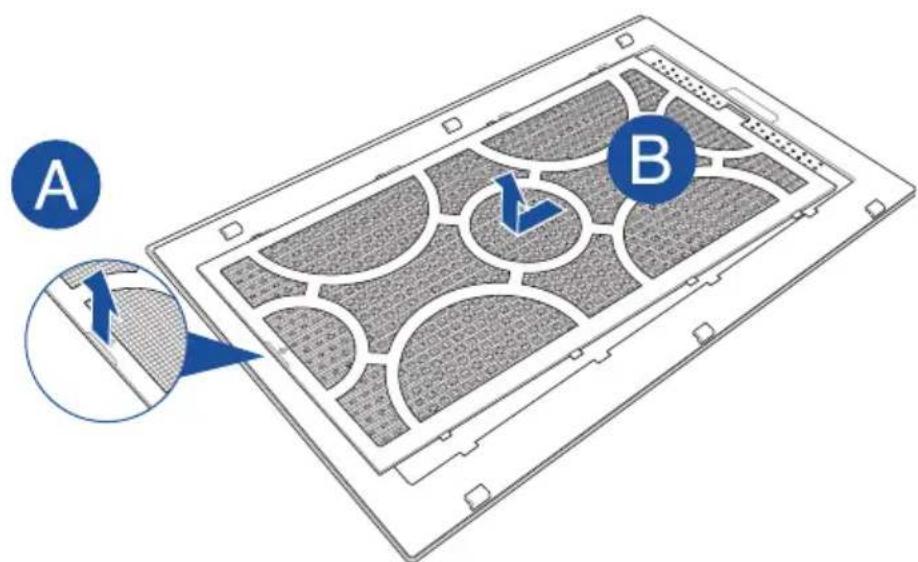
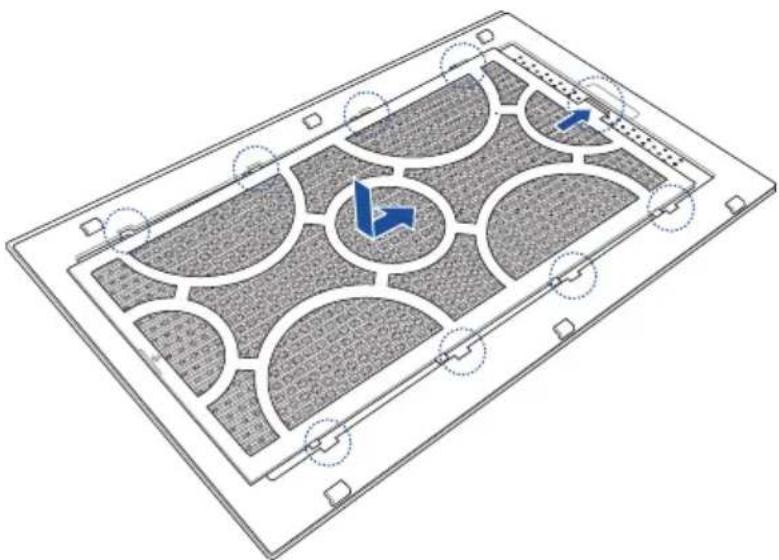
- Slightly lift the air filter handle (A), then slide the air filter and lift it out of the side cover (B).

To reinstall the air filter:
- Align the air filter and slide it into the side cover. Ensure that all the tabs are inserted into place.

- Align and slide the side cover into the XG Station PRO.

- Align and slide the top cover towards the front of the XG Station PRO to secure it in place.

- Slide the cover lock to the locked position.

安全说明
jll jll jll jll jll jll jll jll jll
XG Station PRO 2
aegsllgallglal gals
XG Station PRO jgjg
5 5 5 5 5 5 5 5 5 5 5 5 5 5 5 5 5 5 5 5 5 5 5 5 5 5 5 5 5 5 5
104) 40 (41)
JAS
aill aal l 1 1 1 1 1 1 1 1 1 1 1 1 1 1 1 1 1
1
XG Station PRO j
) TM Thunderbolt 1
Windows 10
()
()Micro
Jusssssssssssssssssssssssssssssssssssssssssssssssssssssssssssssssssssssssssssssssssssssssssssss

algal
Per installment XG Station PRO:
- Allineate e fate scorrere la cover laterale in XG Station PRO.

- Allineate e fate scorrere la cover laterale in XG Station PRO.

1. Tpe6oBaHnIyJyCTaHOBKn
IIO oecneHn yceHnOH ycTahOBKn KapbX G Station PRO, KOMIbotep eoKeH yIOBJeTBOpaTb cJeIyIOHM Tpe6oBAHHM:
Hoyt6yck Thunderbolt TM 3 (o6HOBJIeHHbI IO nOcJIeHei BepnH)
- Microsoft Windows 10 (64-6nrt)
CINCOK IPOH3BOJNTeJIHOHY6VKOBCMOTPHTHe HA WWW.asus.com
2. CnueHkaaia
- CoBmecHTHe Na3bI N DBHraTe BepXHIOIO KpbIaKBy B HAppaBJIeHHN IpeJHeN YacTH yCTpoHCTBa, Ioka OHa He BcTaHET Ha MeCTo.
JIa CHHTHbO3yHnHO fHJbTp:a
1.ПелемecтHTe 3aIeJIkyВIO3HIIIO "pa36JIOKINPOBaHO".
2.CBHHbTe BepxHIOKpblkky BaHnpaBleHHN3aHHeuacThyctpoHCTBaHCHMHTe ee.


3.CBHHbTe 60KOByIO KpbIIKy BBepx H cHMMTe ee.

- CJIeKa IIIOHHMHTe KpaB BO3IyIHHOTo _HI bTp a (A), 3aTeM cABHHbTe _HI bTp n CHHMHTe eO c 6OKOBn KpbIIKN (B).
ⅡIyycTaHOBKn BO3dyHnHO φHbTpa:
- CoBmecHTHe Ia3b BO3dYHOrO fHJIbTpHa H BcTaBbTe eRo B 6OKOByIO KpbHKy. Y6eHITecb, YTO BCE Ia3bI BCTABJIeHb HA MecTo.
- CoBmecHTHe Ia3bI yCtAHOBHTe 6OKOByIO KpbIIIKy Ha ycTpOncTBO.


- CoBmecHTHe Ia3bI N DBrHraHrTe BepXHIOIO KpbIHKy B HAppaBJIeHHN IpeJHEn YcTpoIcTBA, Ioka OHa He BCTaHET Ha MeCTO.

4.ПелемecTHTE3aIIeIkyBIO3HIIHO"3a6IOKHpOBAHO".
1. Installationskrav
1. Bumor no BCTaHOBJIeHHa
Uo6 3a6e3neuHTy cniHHe BCTaHOBnEHn XG Station PRO, Bau KOMn'IOTeP Mycntb BiINOBiDaTn HAcTyNHm BUMorAM:
- IopTaTbHnI K 3 iInTepeFemc ThunderboltTM 3 (3 haHOBiOIO BepciO MIkponporpaMn).
Microsoft 'Windows' 10 (64-po3pIHa).
Cnncok cymichnx nopTaunBnHex Nk nB. Ha caTti www.asus.com.

2. TexHiChi xapaKTepeNtIKN
Iio6 BcTaHOBuTn BiDeoKapTy B KOpnyc XG Station PRO:
- IpebeiB fikcatop naheni B noJokhenpo36nokybaHHa

2.Пелесуньтевхию naHelenxG Station PRO ha3aД,а notim niHimItb ii.
- 3Himits rBnHT, yOyTpmye MeTaNeBy KpnsKy Ha XG Station PRO.

- BiДКрИТe BИЗmetaJIeBy KpИшКy.
- BuaIbTBnHTn, 03aKpInIOuTb MeTaeBn KPOHTeH Ha XG-Station Pro, notim 3HimItb MeTaeBn KPOHTeH.
- BupiBHAIte i BCtABTe BiDeOKapTy B po3'EM PCI-E.
- 3akpiitb MeTaeBn KPOHtEHH RBHTAMN, Aki BN BnHn paHie, notim niknOHTb Ka6eJI XNBHeHH Do BideOKapTu.

9.ПдимитьmetалеByКршkyВЗakpinte NOLOXeHHa Ta 3akpinitb II rBHTOM,Яки Bn BnHra paHiwe.

Brand : ASUS
Model : XG Station Pro
Category : Docking station