
MyPal A696 - Browser ASUS - Free user manual and instructions
Find the device manual for free MyPal A696 ASUS in PDF.


| Product Type | PDA / GPS Navigator |
| Brand | Asus |
| Model | MyPal A696 |
| Dimensions (W x H x D) | 122 x 73 x 20 mm |
| Weight | 165 g |
| Display Type | TFT resistive touchscreen |
| Display Size | 3.5 inches |
| Display Resolution | 320 x 240 pixels |
| Operating System | Windows Mobile 6.1 |
| Processor | Marvell PXA270 520 MHz |
| Memory | 128 MB SDRAM |
| Internal Storage | 256 MB ROM |
| Battery Type | Rechargeable Li-ion |
| Battery Capacity | 1530 mAh |
| Charging Connector | Mini-USB |
| Connectivity | Bluetooth 2.0, Wi-Fi 802.11b/g, USB 1.1 |
| GPS | SiRF Star III chipset, integrated antenna |
| Camera | 2 MP rear |
| Audio | Speaker, microphone, 3.5 mm jack |
| Expansion Slot | SD/MMC slot (supports SDIO) |
| Sensors | Light sensor |
| Included Accessories | Car charger, car mount, USB cable, stylus |
| Operating Temperature | 0°C to 40°C |
Frequently Asked Questions - MyPal A696 ASUS
User questions about MyPal A696 ASUS
0 question about this device. Answer the ones you know or ask your own.
Ask a new question about this device
Download the instructions for your Browser in PDF format for free! Find your manual MyPal A696 - ASUS and take your electronic device back in hand. On this page are published all the documents necessary for the use of your device. MyPal A696 by ASUS.
USER MANUAL MyPal A696 ASUS
User Manual
E2775
First Edition
September 2006
Copyright © 2006 ASUSTeK COMPUTER INC. All Rights Reserved.
No part of this manual, including the products and software described in it, may be reproduced, transmitted, transcribed, stored in a retrieval system, or translated into any language in any form or by any means, except documentation kept by the purchaser for backup purposes, without the express written permission of ASUSTeK COMPUTER INC. ("ASUS").
Product warranty or service will not be extended if: (1) the product is repaired, modified or altered, unless such repair, modification of alteration is authorized in writing by ASUS; or (2) the serial number of the product is defaced or missing.
ASUS PROVIDES THIS MANUAL "AS IS" WITHOUT WARRANTY OF ANY KIND, EITHER EXPRESS OR IMPLIED, INCLUDING BUT NOT LIMITED TO THE IMPLIED WARRANTIES OR CONDITIONS OF MERCHANTABILITY OR FITNESS FOR A PARTICULAR PURPOSE. IN NO EVENT SHALL ASUS, ITS DIRECTORS, OFFICERS, EMPLOYEES OR AGENTS BE LIABLE FOR ANY INDIRECT, SPECIAL, INCIDENTAL, OR CONSEQUENTIAL DAMAGES (INCLUDING DAMAGES FOR LOSS OF PROFITS, LOSS OF BUSINESS, LOSS OF USE OR DATA, INTERRUPTION OF BUSINESS AND THE LIKE), EVEN IF ASUS HAS BEEN ADVISED OF THE POSSIBILITY OF SUCH DAMAGES ARISING FROM ANY DEFECT OR ERROR IN THIS MANUAL OR PRODUCT.
SPECIFICATIONS AND INFORMATION CONTAINED IN THIS MANUAL ARE FURNISHED FOR INFORMATIONAL USE ONLY, AND ARE SUBJECT TO CHANGE AT ANY TIME WITHOUT NOTICE, AND SHOULD NOT BE CONSTRUED AS A COMMITMENT BY ASUS. ASUS ASSUMES NO RESPONSIBILITY OR LIABILITY FOR ANY ERRORS OR INACCURACIES THAT MAY APPEAR IN THIS MANUAL, INCLUDING THE PRODUCTS AND SOFTWARE DESCRIBED IN IT.
Microsoft, Activesync, Outlook, Pocket Outlook, Windows, and the Windows logo are either registered trademarks or trademarks of Microsoft Corporation in the United States and/or in other countries. Microsoft products are licensed to OEMs by Microsoft Licensing, Inc., a wholly owned subsidiary of Microsoft Corporation.
Table of Contents
Chapter 1 Getting Started ....1
Introducing MyPal ....1
Installing and removing the battery ....5
Connecting to a power source ....5
Setting up GPS ....6
Additional storage ....7
Activating MyPal ....8
Basic screens on MyPal 9
Chapter 2 Basics ...... 11
Viewing system information ....11
Entering information ....11
Finding and organizing information ....18
Using the File Explorer ......18
Customizing your device....19
Using simple applications ......27
Chapter 3 Synchronize and Enhance ....31
Microsoft® ActiveSync® 31
Synchronizing your device ....33
Chapter 4 Microsoft® Pocket Outlook ....37
Calendar 37
Contacts 40
Tasks 43
Notes 44
Messaging 46
Chapter 5 Companion Programs ....51
Word Mobile 51
Excel Mobile 54
PowerPoint Mobile 56
Pocket MSN 58
Windows Media Player for Pocket PC 61
Remote Presenter....62
Chapter 6 Internet Explorer Mobile ......65
Using Internet Explorer Mobile 65
Mobile Favorites folder 66
Chapter 7 Get Connected ....71
Connecting to the Internet 71
Connecting to Work 72
Setting up connections ....72
Ending a connection 75
Setting up a WAP gateway 75
Using dialing rules ....76
Using Terminal Services Client 76
Infrared (IR) connection 77
Chapter 8 Bluetooth ® .....79
Using Bluetooth ....79
Bluetooth settings 80
Bluetooth Manager 81
Remote device services 83
Setting up High Quality Audio setup or Hands-free/Headset setup .....89
Setting up ActiveSync via Bluetooth 89
Chapter 9 Wi-Fi ......91
Using Wi-Fi 91
The Wi-Fi Manager 94
Appendix Notices 97
Federal Communications Commission Statement ....97
Canadian Department of Communications Statement 97
UL Safety Notices 98
Checklist of Regulatory Statement 99
MyPal A626/A686/A696 specifications
| A626 A686 A696 | |||
| Processor | Intel® XScaleTM Processor, 312MHz | Intel® XScaleTM Processor, 416MHz | |
| Operating system | Microsoft® Windows MobileTM 5.0 (Pocket PC) | ||
| Memory | 128MB Flash ROM, 64MB SDRAM | 256MB Flash ROM, 64MB SDRAM | |
| Display | 3.5-inch, brilliant TFT LCD65,000 Full-color, 16-bit displayQVGA, 240x320 resolution Touch PadSupport Anti-glare technology | ||
| Battery | 1200 mAh removable/rechargeable Li-ion battery | ||
| Expansion slot | One slot-SD card slot (SDIO/SD/MMC), at least 4GB | ||
| Bluetooth | Bluetooth® v2.0 (EDR)+ USB 1.1 Client | ||
| WLAN | WLAN802.11b/g | N/A | WLAN802.11b/g |
| Audio | 3.5 mm stereo | ||
| GPS | N/A | SiRF Star III / GPS chip with built-in GPS Antenna | |
| Size | 117 mm x 70.8 mm x 15.7 mm | ||
| Weight | 158 grams(with battery) | 165 grams (with battery) | |
(Specifications are subject to change without notice.)
IMPORTANT To avoid damaging your Pocket PC and accessories, it is best to operate this unit (including the protection case) within a temperature range of 20-30 °C (68-86 °F) and 50% humidity. Anything that goes beyond or below the ideal temperature range may damage the unit, and may shorten the battery life.
Package contents
Your package includes several accessories for the Pocket PC. After unpacking, check the items against the list below and make sure that they are in good condition. If any item is missing or damaged, contact your dealer or retailer immediately.
Standard items
• ASUS MyPal A626/A686/A696 Pocket PC - USB travel sync cable - AC adapter - Microsoft Companion CD: includes Microsoft® Outlook® 2002 and Microsoft® ActiveSync® 4.2 - Stylus - Protection case - Removable/rechargeable 1200mAh Li-ion battery - Manual - Quick Start Guide - Warranty card
Extra items for A686 and A696
• Car kit (car holder and gooseneck) - Car charger
Optional accessories
- Stylus x 3 / package
- AC adapter
- Battery
- Car charger
- External antenna
- USB travel sync cable • Car kit (car holder and gooseneck)
- Stereo headset with microphone
- Bluetooth headset • Leather protection case (wallet type)
Chapter 1 Getting Started
Introducing MyPal
The ASUS® MyPal A626/A686/A696 is truly a good companion wherever you go. Powered by a 416MHz (MyPal A696) or 312MHz (MyPal A686/A626) Intel® XScale processor, equipped with 64MB SDRAM and 256MB Flash ROM (MyPal A696) or 128MB Flash ROM (MyPal A626/A686), and bundled with the Microsoft® Windows Mobile® 5.0 plus a host of useful utilities, you have everything you need in your pocket!
The MyPal A626/A696 comes with additional Wi-Fi features that allow you to connect to wireless LAN and the Internet. The MyPal A686/A626/A696 has a single SD card slot.
Front features

- Power LED - shows a steady red light when the battery is charging; steady green when the battery is fully charged and the device is connected to an AC power source.
- LCD touch screen - allows you to enter, read, send, receive, or edit data by tapping on it. The screen brightness is increased or decreased by changing the backlight settings (anti-glare technology supported).
- Speaker - allows you to hear alarms and other sound output from the device.
- 4-way navigation button - functions like the four arrow keys on a keyboard. This button allows you to move through program icons, folders, or files in a menu by scrolling up or down, left or right.
If the ASUS MyPal is bundled with GPS map software, you may use the buttons to zoom in, zoom out, and adjust the volume.
- Launch button - functions like the enter/return key on a keyboard. Press once to launch a selected program, list folder contents, or open a file.
- Contacts button - opens your contacts list at any time.
- Calendar button - opens the Calendar program at any time.
- Mode Switcher button - allows you to switch between Today, Windows Media Player, and Rotate screen. The Mode Switcher button can also function as a Task Switcher, which allows you to switch between currently running programs on your device.
- Notes button - opens the Notes program at any time.
- Bluetooth/GPS/Wi-Fi LED - lights up blue when the Bluetooth feature is on; lights up green when GPS is on; lights up red when Wi-Fi is on.
Back features

- Battery cover - provides protection to the battery compartment of the device.
- SD card slot - accommodates an SD memory card, MMC memory card or an SDIO interface card (e.g. 802.11b/g, modem, etc.)
- External antenna jack - connects to an external GPS antenna (A686/A696 only).
NOTES: As a precaution, the Power button is automatically disabled when you remove the battery cover. You can only turn on the power when the battery cover is installed to the unit. The battery cover is removable, and allows you to remove or replace the main battery.
Right Side features
- Stylus - used for tapping or writing on the LCD touch screen.
- Hold key - provides a safety measure to avoid users from accidentally tapping the screen or turning on the device. Move the switch towards the word Hold to turn off the screen and prevent it from turning back on even when you tap the screen or press a button. Move the switch towards the opposite direction to disable this feature. • Headphone port - connects to a headphone.

NOTES: For longer battery life, lock the hold key when you listen to the music using the device.
Left Side features
- Sync and power cable connector - connect the Mini USB sync cable directly to this connector to synchronize your device with your computer.
This also charges the battery at the same time.

Top features
- Power button - turns the device power on or off if you press the button quickly.
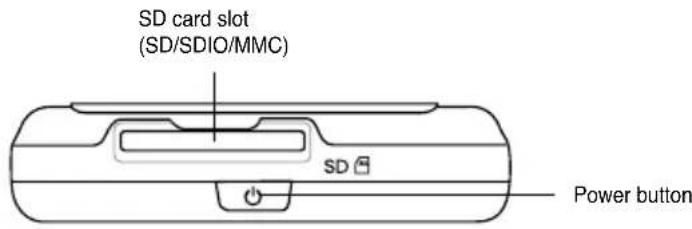
NOTE: To shutdown the device, press the Power button for about four seconds then tap Yes. All open files will be unsaved.
Bottom features

- Reset switch - allows you to perform a soft reset in case the device malfunctions, or when an application hangs. Press the tip of the stylus on this switch to reset the system.
- Infrared (IR) port - allows you to copy or send data to another device with an IR port. For a successful exchange of data, the IR port of both devices must be properly aligned and facing each other within the IR communication range.
NOTE To perform a clean reset, press the launch button and simultaneously press the stylus on the reset switch. Then a warning message appears. Press to do clean reset, or press to leave the operation screen. Performing a soft reset will not change the data in the device; while performing a clean reset will delete all data.

The GPS car kit (MyPal A686/A696 only)
The GPS car kit includes:
• Car holder - holds the Pocket PC. - Gooseneck - securely attaches the Pocket PC to the car's windshield.
Installing and removing the battery


NOTE Opening the battery cover automatically turns off the power. There is a mechanism at the upper left side of the battery compartment that switches the power off automatically when you slide out the battery cover. This is a safety measure for protecting the power circuitry, so please make sure not to lose the battery cover.
Install and remove the battery properly. Otherwise, the battery may explode.
IMPORTANT Do not expose the battery to high temperature (60 degree centigrade or higher).
Do not throw the battery in fire.
Do not disassemble the battery.
Do not short circuit the contacts.
Use the supplied AC adapter only.
Connecting to a power source
IMPORTANT You need to charge the battery before using the device for the first time.

NOTE The battery cannot be charged via old-type PCs or notebooks with 100mAh USB charging.
As soon as the power cable is connected to a power source, the battery will start charging and the power LED will show a steady red light. See “Changing the battery power settings” in Chapter 2 on how to display the battery power status.
Setting up GPS (MyPal A696/A686 only)
To use the GPS car kit:
NOTE For optimal GPS signal performance, we recommend that you use the PDA aside from the window of your car in landscape mode.
Press latch down

Horizontal orientation
Note All functions related to GPS are not intended to be used for location of persons, including "life-safety" and "non-life-safety" applications.
NOTE Remove the car holder and take the device with you when you leave the car.
Gently bend the gooseneck when adjusting the orientation. Do not forcibly bend the gooseneck. The device must be carefully placed into the holder to avoid damaging the mini USB connector and causing the device to breakdown.
Additional storage
MyPal A626/A686/A696 comes with the standard SD card slot. The SD card slot can be inserted with SD or MMC memory cards. It also supports SDIO cards of various functionalities including 802.11b/g, modem, etc.
Installing and removing SD/MMC/SDIO card
- With the label side (usually the side with the card manufacturer's name) face up, and the barcode/serial number side face down, insert the card into the SD card slot located on top of the device.
- Push the card all the way into the slot until it fits completely. If properly installed, the SD or MMC card edge aligns with the top edge of the device. SDIO cards usually have an extended part that protrudes over the slot edge.
- To remove, press the card slightly until it ejects out. You may then safely remove the card.

NOTE: An SD/MMC/SDIO card fits only in one orientation, and slides smoothly into the slot if inserted correctly. DO NOT force the card into the slot!
Activating MyPal
You need to properly calibrate and activate your device before using it. This process ensures accurate positioning when entering text and selecting menus.
Calibrating and activating your device
- Press the power button.

- The Welcome screen appears when you turn on the device for the first time, or after performing a clean reset. Tap anywhere on the screen to continue.
NOTE: To perform a clean reset, refer to the description on page 4.
NOTE: The default screen display orientation is landscape.
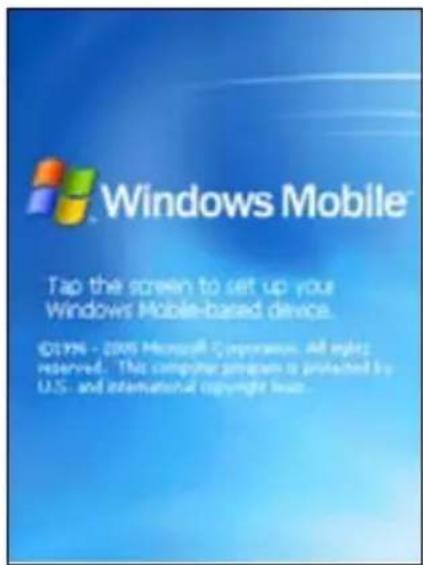
- Tap the center of the cross to perform the align screen process. You
may have to do this step a few times to properly calibrate.
NOTE: To launch the Align Screen function at any time, tap > Settings > System tab > Screen icon > Align Screen button.

- Follow the succeeding on-screen instructions.
- Tap anywhere on the Complete screen when you are done with the alignment and settings. You are now ready to use your device.
Basic screens on MyPal
Today screen
Normally, the Today screen appears when you turn on your device for the first time each day.
NOTE: When the device is already on and the screen displays another program, you may return to the Today screen any time by tapping ▶Today.
As shown in the sample below, the Today screen lets you see at a glance the summary of the important information for the day.

From the Today screen, tap any of the listed items with the stylus to display the details. See “Chapter 2: Basics” on how to modify the current tasks or activities, or to add new items or information.
Start menu
From the Start menu, you can select programs, settings, and help topics.
To display the Start menu, tap the icon from the top of the screen.

Menu bar
At the bottom of the screen of a program is the Menu bar. You can use the menus and buttons on the Menu bar to perform commands and actions.
The menus and buttons vary depending on the programs you are using.
Pop-up menus
With the pop-up menus, you can easily choose an action for an item.
For example, you can use the pop-up menu in File Explorer to delete, copy, or beam an item.

To access a pop-up menu, tap and hold the stylus on the item that you wish to perform an action on. When the menu appears, lift the stylus, and tap the action that you want to execute. To close the pop-up menu without performing an action, tap anywhere outside the menu.
NOTE: The pop-up menus are also available in most other programs on your device. However, the pop-up menu items vary depending on the program or application.
Chapter 2: Basics
Viewing system information

Your device allows you to easily display the built-in specifications.
NOTE: You cannot change the information you see in the system information screens.
To display the system information:
- Tap > Settings > System tab > System Information icon
- To display the device specifications, tap Device Info tab. This will display various information such as the device ID, system memory, and wireless capabilities.
- Tap the Version tab to view other information about the device.
Entering information
You can enter information in your device in any of the following ways:
- Use the input panel to enter text using either the soft keyboard, the Letter Recognizer, the Block Recognizer, or the Transcriber. Write directly on the screen with the stylus.
- Draw pictures on the screen
- Speak into the device microphone to record a message
- Use the Microsoft® ActiveSync® to synchronize or copy information from your desktop computer to your device
Entering text using the Input Panel
Use the Input Panel to enter information in any program on your device. You can either type using the soft keyboard or write using the Letter Recognizer, Block Recognizer, or Transcriber. In either case, the characters appear as typed text on the screen.
To show or hide the input panel, tap . To see input options, tap .
NOTE appears beside only when the input panel is not hidden.
To type with the soft keyboard:
- Tap > Keyboard.
- Tap the keys on the on-screen keyboard with the stylus to enter information.

Word completion feature
When you use the Input Panel and the soft keyboard, your device anticipates the word you are typing and displays it above the Input Panel. When you tap the displayed word, it is inserted into your text at the insertion point. The more you use your device, the more words it learns to anticipate.
To change options on the word completion feature:
- Tap > Settings > Personal tab > Input > Word Completion tab.
- Make your desired changes then tap ok.
![Inf influence. 123 1 2 3 4 5 6 7 8 9 0 - = Tab q w e r t y u i o p [ ] CAP a s d f g h j k l ; * Shift z x c v b n m , . / Cti áü ` \ New Menu. Tap here if this is the word you wish to use.](/content/2026/06/1389453/images/696a9bd4de6c798d03ed0057d1f391be1a42f32a498a128f38eda06835b0c37f.jpg)
To use Letter Recognizer:
With the Letter Recognizer, you can write letters on the screen with the stylus as you would on paper.
- Tap > Letter Recognizer.
- Write a letter within the writing area. When you write a letter, it is converted to a typed text that appears on the screen. For instructions and a demonstration on using the Letter Recognizer, tap next to the writing area.

To use Block Recognizer:
With the Block Recognizer, you can input character strokes that are similar to those used on other devices.
- Tap > Block Recognizer.
- Write a letter within the writing area.
When you write a letter, it is converted to a typed text that appears on the screen. For instructions and a demonstration on using the Block Recognizer, tap ? next to the writing area.

To use Transcriber:
With Transcriber, you can use the stylus to write anywhere on the screen as you would on paper. Unlike Letter Recognizer and Block Recognizer, you can write a sentence or additional information. Pause after writing and let Transcriber convert the written characters to typed characters.
- Tap >Transcriber.
- Write anywhere on the screen.
For instructions and demonstration on using Transcriber, with Transcriber open, tap at the lower right corner of the screen.

To edit typed text:
- Select the text that you wish to edit using either one of the following:
- drag the stylus over the text
- tap twice to select a word • tap three times to select a paragraph
- Tap Menu on the Menu bar and select an action, or use one of the tools in the Input Panel to enter a new text.
Writing on the screen
In any program that accepts writing, such as the Notes program, and in the Notes tab in Calendar, Contacts, and Tasks, you can use the stylus to write directly on the screen. Write the way you do on paper. You can edit and format what you have written and convert the writing to text at a later time.
To write on the screen:
- Tap > Programs > Notes > New
- The screen displays a blank space with lines to help you write.
- Write your text.
NOTE: Some programs that accept writing may not have the Pen button. See the documentation for that program to find out how to switch to writing mode.

To edit your writing:
- Tap and hold the stylus next to the text that you wish to select until the insertion point appears.
- To select text, tap Menu > Draw. Make sure Draw has no check mark beside it.
- Drag the stylus across the text you want to select. If you accidentally write on the screen, tap Menu > Undo Ink and try again.
- Tap Menu on the Menu bar, then select an action, or use one of the tools in the Input Panel to enter new text.
To convert writing to text:
- Tap Menu > Tools > Recognize.
To select a zoom level:
- Tap Menu > Zoom. From the list, tap a zoom percentage.
If the conversion is incorrect, you can select different words from a list of alternates or return to the original writing.
- Tap and hold the incorrect word.
- When the pop-up menu appears, tap Alternates to display a list of alternate words for the selection.
- Tap the word that you want to use, or tap the writing at the top of the menu to return to the original writing.


Tips for getting good writing recognition
- Write neatly.
- Write on the line and draw descenders below the line. Write the cross of the "t" and apostrophes below the top line so that they are not confused with the word above. Write periods and commas above the line.
- For better recognition, try increasing the zoom level to 300% using the Tools menu. • Write the letters of a word closely and leave big gaps between words so that the device can easily tell where the words begin and end.
- Hyphenated words, foreign words that use special characters such as accents, and some punctuation cannot be converted.
- If you add writing to a word or change it after the word has been recognized, the writing that you added will be included when you try to recognize the writing again.
Drawing on the screen
You can draw on the screen in the same way that you write on the screen. The difference between writing and drawing on the screen is how you select items and how they can be edited. For example, selected drawings can be resized, while writing cannot.
To create a drawing:
- Use the stylus to make a stroke that extends over three lines on the screen. A drawing box appears around the stroke.
NOTE If the drawing does not cross over three lines, the drawing box does not appear.
- Continue drawing. If your subsequent strokes extend outside the box, you will notice that the drawing box expands to enclose all the strokes.
The drawing box indicates the boundaries of the drawing
NOTE To easily work on or view your drawing, change the zoom level by tapping Menu > Zoom and selecting your desired zoom.

To edit your drawing:
- Tap and hold the stylus on the drawing until the selection handle appears. To select multiple drawings, drag to select the drawings you want.
- Tap and hold the selected drawing, then tap an editing command on the pop-up menu or tap a command on the Menu.
- Resize the drawing by dragging a selection handle to your desired size.
Recording a message
In any program where you can write or draw on the screen, you can also quickly capture thoughts, reminders, and phone numbers by recording a message. In Calendar, Tasks, and Contacts, you can include a recording in the Notes tab. In the Notes program, you can either create a standalone recording or include a recording in a written note. If you want to include the recording in a note, open the note first. In the Inbox program, you can add a recording to an e-mail message.
To create a recording:
- Tap > Programs > Notes > Menu > View Recording Toolbar.
- Hold your device with the microphone near your mouth or other source of sound.
- Tap ● (red button) to begin recording. To stop recording, tap ■ You will hear two beeps when you stop recording.
- The new recording appears in the Notes list, or as an embedded icon. To play the recording, tap it from the list, or if embedded in a note, tap the Speaker icon.

To change the recording format:
- In the note list, tap Menu > Options > Global Input Options link > Options tab.
- Select your desired recording format from the Voice recording format pull-down menu then tap ok when done.
NOTE Compared to other settings, the Pulse Code Modulation (PCM) provides slightly better sound quality but takes up 50 times more storage space than Mobile Voice recordings.
Finding and organizing information
The Search and Help features on your device help you quickly locate information.
Using the Search function
To search for information:
- Tap > Help > Search.
- Enter the text that you want to find, select a data type, then tap Search to start the search. To quickly find information that is taking up space on your device, select Larger than 64 KB in Type.
To use the Help feature:
- Tap > Help.
- Tap a link to the topic that you wish to display.

Using the File Explorer

To use the File Explorer to find and organize files:
- Tap > Programs > File Explorer icon to display the files in your device.
Customizing your device
You can customize your device by adjusting the settings, using the built-in programs, and installing additional software.
To see the available options:
- Tap > Settings > Personal or System tab.
NOTE: Tap and hold the slider on the right side of the screen to display other Settings icons.
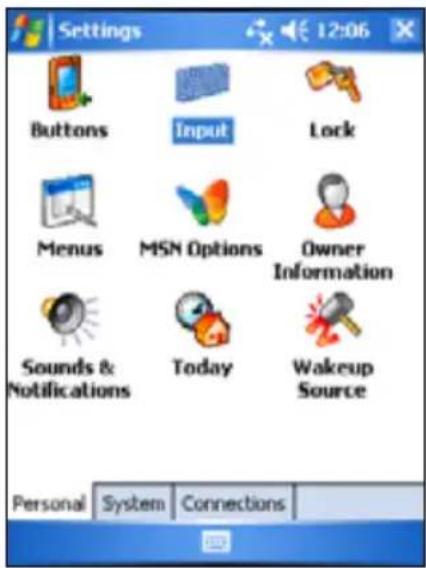

Changing the date and time

To change the date and time settings:
- Tap > Settings > System tab > Clock & Alarms icon.
- Under the Time tab, make your desired settings.
NOTE:
Tap the More tab and select Display the clock in the title bar in all programs to display the clock on the top right corner of the screen all the time.
To change the alarm settings:
- Tap > Settings > System tab > Clock & Alarms icon > Alarms tab.
- Make your desired settings.
Changing the start menu

To change the menu items:
- Tap > Settings > Menus icon.
- Check the box opposite the items that you wish to appear on the Start Menu.
- Tap OK.
NOTE: Items that are not added in the Start menu can be found in the Programs.

Changing the owner information

To change the owner information:
- Tap > Settings > Owner Information icon.
- Key in the data that you wish to appear on the Today screen.
- Add notes to the owner information by tapping the Notes tab.
- Key in your desired text.
- Tap the Options tab, then select the items that you wish to appear on-screen whenever you turn on the device. Tap OK when done.

Setting a password

To set a password for your device:
- Tap > Settings > Lock icon.
- Check the box 'Prompt if device unused', then select the period from the available options by tapping the down arrow.
- Select the password type: Simple 4 digit or Strong alphanumeric.
- Key-in a password. If you selected the Strong alphanumeric type of password, you need to key-in the password twice.
- Tap the Hint tab to create a kind of reminder in case you forget your password.
- Tap ok when done.
Changing the screen display orientation

To change the screen display orientation:
- Tap > Settings > System tab > Screen icon.
- Select your desired orientation, then tap ok.
Portrait orientation


Tap to change the screen display orientation
Landscape orientation (Default)

To enable the ClearType feature:
- Tap > Settings > System tab > Screen icon > Clear Type tab.
- Check the Enable Clear Type box, then tap ok.
To change the screen text size:
- Tap > Settings > System tab > Screen icon > Text Size tab.
- Move the slider toward the Smallest or Largest until you attain your desired text size. Tap OK.
NOTE: The slider is set on the middle by default.
Changing the screen theme

To change the screen theme:
- Tap > Settings > Today icon.
- Select your desired theme from the available options.
or
Check the box 'Use this picture as the background', then tap Browse to select an image from your picture files.
- Tap OK when done.
To specify the items to appear on the Today screen:
- Tap > Settings > Today icon > Items tab.
- Check the box opposite your desired items. Tap OK when done.
Changing the button assignments

To change the button assignments:
- Tap > Settings > Buttons icon.
- Highlight a button by tapping on it.
- Tap the down arrow to display the programs that you can assign to the button.
- Repeat steps 2 to 3 to change other button assignments.
- Tap OK when done.
To customize the button settings:
- Tap the Up/Down Control tab.
- Tap the slider to your desired settings of Up/Down button reaction time.
- Tap the Advance tab to set options for the key light and hold switch.
- Tap OK when done.
Using Mode Switcher and Task Switcher

On the rightmost group of buttons on the device (see Chapter 1), its right button functions, by default, as the Mode Switcher button which allows you to quickly toggle between the Today screen, Windows Media Player, and Rotate screen. The Mode Switcher box appears on-screen when you press this button.
To customize Mode Switcher:
- Tap > Settings > System tab > Mode Switcher > Display settings tab.
- The three programs mentioned earlier are selected by default to be included in the Mode Switcher box. You may remove a program by deselecting the corresponding checkbox.
- To change the ordering of the programs, tap the ▶ or button.
- Select the checkbox if you want to add an Exit icon to the Mode Switcher box.
- Tap OK when done.
If you want to change the button assignment to become the Task Switcher button, follow the steps below. Task Switcher allows you to toggle between currently running programs.
To enable Task Switcher:
- Tap > Settings > System tab > Mode Switcher > Basic tab, then select Task Switcher.
- Tap OK.
NOTE: In the Basic tab, you can increase the delay time for showing the Mode Switcher or Task Switcher box to give you more time to make selections.
Setting the backlight

To set the backlight:
- Tap > Settings > System tab > Backlight icon.
- Adjust the display brightness by dragging the slider towards Dark or Bright until you achieve your desired screen brightness.
- Tap the Advanced tab and customize the backlight settings when using battery power and AC power.
- Tap OK when done.
Changing the battery power settings

To change the battery power settings:
- Tap > Settings > System tab > Power icon to display the battery power status. This screen shows the detected percentages of the remaining battery power. You may not change the information on this screen.
- Tap the Advanced tab to customize the settings for the battery to conserve power.
- Tap the CPU Mode tab to set the processing power to use when using programs.
- Maximum - allows better CPU performance. Set to this mode when playing games or playing video. However, setting to this mode may reduce the battery life.
- Normal - allows for a normal CPU speed and more stable performance. Set to this mode when listening to MP3 audio files or for applications that do not require very fast CPU speed.
- Power Save - sets the CPU to a lower speed. This mode has a lower CPU performance but extends the battery life. Set to this mode when using text based applications such as Word, Excel, etc.
- For automatic power saving, tick the circle beside Auto. This mode adjusts the CPU speed depending on the program that you are running.
- Tap ok when done.
Selecting sounds and notifications

Your device can remind you of things you have to do in several ways. For example, if you have set up an appointment in Calendar, a task with a due date, or an alarm in Clock, you will be notified in any of the following ways.
• A message box appears on the screen • A sound is played (you can select the type of sound) • A light flashes on the device
To set sounds and notifications:
- Tap > Settings > Personal tab > Sounds & Notifications icon > Sounds tab then select the items that you wish to enable.
- Tap the Notifications tab and set the event notification details.
- Tap OK when done.
Changing the audio settings

To change the audio settings:
- Tap > Settings > System tab > Audio icon.
- Adjust the volume, balance, treble, bass, and 3D settings by dragging the slider left or right until you achieve your desired sound output.
- Tap OK when done.
NOTE: Tap the Default button to restore the default audio settings.
To change the microphone settings:
- Tap the Mic tab from the audio settings screen.
- In MIC Gain Control, choose either to manually adjust the gain control or let the device automatically adjust the recording volume. Adjust the volume to high or low by dragging the slider left or right.
NOTE: Tap Default to revert to the default settings.
Changing the wakeup settings

- Tap > Settings > Personal tab > Wakeup Source icon.
- Check the boxes of the items to control what functions/conditions will turn on the device's power. Pressing any one of the function buttons on the front panel wakes up the device.
- Tap OK when done.
Changing the USB settings

To change the USB settings:
- Tap > Settings > Connections tab > USB Settings icon.
- Select a USB connection mode.
- ActiveSync (high speed) - allows a high speed serial connection between your device and PC. Select this when using ActiveSync.
- ActiveSync (low speed) - allows a low speed serial connection between your device and PC. Select this when using ActiveSync.
- Mass storage device (card reader) - turns your device into a mass storage unit similar to a card reader.
- Tap ok when done.
To change the USB charging mode:
- Tap USB Charger tab from the USB Settings screen.
- Choose a USB charging mode.
- Slow Charging - to use this mode, your PC needs to support 100mA.
- Fast Charging - to use this mode, your PC needs to support 500mA.
- Tap OK when done.
NOTE: To avoid overcharge, charging automatically stops after 5 hours. In Fast Charging mode, the device can be fully charged within 5 hours, but in Slow Charging mode, it is necessary to connect the device again to the power source to get it fully charged.
Changing the memory settings

To display the memory allocation:
- Tap > Settings > System tab > Memory icon.
- Tap OK when done.
To check the storage card memory:
- Tap > Settings > System tab > Memory icon > Storage Card tab to display the memory information for the selected storage card.
- If you wish to free storage card memory, delete some files from the storage card. Use the File Explorer to delete files. See "Using the File Explorer" for information.
To view the running programs:
- Tap > Settings > System tab > Memory icon > Running Programs tab.
- If you wish to free some system memory currently used by the running programs, select a program then tap Stop.
To stop all running programs, tap Stop All.
Using simple applications
Your device includes several simple applications that are useful in your day-to-day use of your device.
NOTE The major applications that came with the Microsoft® Windows Mobile® 5.0 are discussed in other chapters.
To access the applications:
- Tap > Programs.
- Tap an icon to launch a specific application program.

Calculator

Tap the Calculator icon to use basic calculator functions.
Games

Tap the Games icon to display the available games.
Bubble Breaker

The main objective of this game is to burst all the bubbles. To do so, tap two or more bubbles of the same color that are connected to each other. The more bubbles you burst at a time, the higher your score.
Solitaire

The main objective of this game is to use all the cards in the deck to build up four suit stacks in ascending order, beginning with the aces.
NOTE: For details on the game rules, see the Help information on your device by tapping > Help > Contents > Play Games.
Pictures & Videos

Use Pictures & Videos to view pictures and play back videos of various formats stored in your device or in a storage card. You can then send them to your friends, view a slideshow of your pictures, play back the video, or set a picture as background on the Today screen.
Refer also to the online help on your device for more information on using this feature.
To use Pictures:
- Tap > Programs > Pictures & Videos icon.
- Tap the thumbnail of the picture or video that you wish to open.
- When the picture or video appears on the screen, tap Menu to zoom (zoom in, zoom out, or fit the image to window), play slide show, edit your picture, or play back the video.
- Tap Menu > Set as Today Background... to use the picture as your wallpaper in the Today screen.
or
Tap Menu > Beam picture... if you wish to send the picture to another device with IR port.
- Tap Send on the Menu bar to attach the picture to an e-mail.
To use Auto Correct:
- Tap Menu > Edit > Menu > Auto Correct to automatically adjust the picture.
NOTE
Tap Menu > Undo to reverse the last action made. Tap Revert to Saved to reverse all actions done on the picture.
To rotate the picture:
- Tap Menu > Edit > Rotate from the Menu bar. Each tap of Rotate turns the picture 90 degrees clockwise.
To crop the picture:
- Tap Menu > Edit > Menu > Crop.
- Drag the stylus pen over the screen to select the part of the picture you want to retain.
- Tap inside the crop box to crop the picture.
- Tap Undo to reverse the last action made.
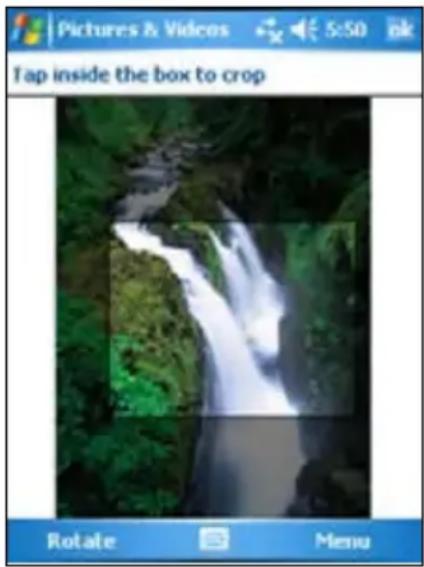
To save the picture:
- Tap Menu > Save As in order to save the changes after editing the picture.
Checking Device Status

Quickly view essential device information such as storage usage and battery life by using ASUS Status.
To open ASUS Status:
- Tap the ASUS Status icon at the lower right corner of the screen.
- A menu opens displaying general information about your device. Tap an item to access more options for that particular item.

To change Asus Status settings:
- Tap the ASUS Status icon at the lower right corner of the screen then tap Setting...
- Make the desired selections from the available items. You can remove items from the ASUS Status menu by clearing the box beside the items under Show Items.
- Tap ok to make the changes.

NOTE If you clear the box beside the Show system status icon, the ASUS Status icon will not show on the Today screen. To make the ASUS Status icon appear again, tap > Settings > System tab > ASUS Status icon.
Chapter 3 Synchronize and Enhance
Microsoft® ActiveSync®
The Microsoft® ActiveSync® is one of the important bundled programs in MyPal. With ActiveSync, you can synchronize the information on your desktop computer with the information on your device. Synchronization compares the data on your device with your desktop computer and updates both computers with the most recent information. To get the latest version of Microsoft® ActiveSync®, visit the website: http://www.microsoft.com/windowsmobile/downloads/activesync42.mspx.
For example:
- Keep Pocket Outlook data up-to-date by synchronizing your device with Microsoft Outlook data on your desktop computer.
- Synchronize Microsoft Word and Microsoft Excel files between your device and desktop computer. Your files are automatically converted to the correct format.
NOTE: By default, ActiveSync does not automatically synchronize all types of information. Use the ActiveSync options to turn synchronization on or off for specific information types.
With ActiveSync, you can also:
- Copy (rather than synchronize) files between your device and desktop computer.
- Control when synchronization occurs by selecting a synchronization mode. For example, you can synchronize continually while connected to your desktop computer or only when you choose to synchronize.
- Select which information types are synchronized and control how much data is synchronized. For example, you can choose to synchronize your appointments of the past two weeks only; appointments older than two weeks are not synchronized.
For more information about using ActiveSync:
- Start ActiveSync on your desktop computer.
- On the ActiveSync menu bar, click Help > Microsoft ActiveSync Help.
Installing ActiveSync® on your computer
The ActiveSync program is already installed on your device. To synchronize information on your device with your computer, you must also install ActiveSync on your computer. Install ActiveSync from the Companion CD that came with your product package.
NOTE Before starting the ActiveSync installation, make sure that you have Microsoft® Outlook® installed on your computer. If you do not have Outlook, install the Microsoft® Outlook® from the Companion CD. If you have Outlook 98 or Outlook 2000 installed, you are encouraged to update to the Outlook bundled in the Companion CD.
To install ActiveSync on your computer:
- Turn on your computer and monitor.
IMPORTANT Do not connect your device to your computer until you have finished installing ActiveSync.
- Place the Companion CD into the optical drive of your computer. The CD autoruns and displays the initial screen, then the Main Menu from which you can start the installation.
- Read the Overview before installing ActiveSync and Outlook to make sure that you perform the installation sequence correctly, and then click "Next".
- Follow the instructions on the succeeding screens. If you have previously installed ActiveSync in your computer, the installation wizard detects it and prompts you with a message. Click Next to continue installing and replace the current version. Click Cancel to quit and keep the current version.
- Wait until the wizard finishes copying all the necessary files, and updates your system.
NOTE You may connect your Pocket PC to your computer right after installing ActiveSync. Make sure that the ActiveSync (high speed) or ActiveSync (low speed) option is selected in Settings > Connections tab > USB Settings.
Synchronizing your device
Connecting your device to a computer
- Connect the mini USB device plug of the sync cable to the mini USB connector at the left side of your device.
- Connect the other end of the sync cable to a USB port on your computer.

Setting up a sync relationship
Immediately after you have completed the installation, the Sync Setup wizard will start automatically to help you establish a sync relationship and customize your synchronization settings. At this point, you can decide exactly which types of information you would like to synchronize with your computer.
A sync relationship is a file that allows you to synchronize your device with your desktop computer. This file is stored on your desktop computer. An additional file that enables your desktop computer to recognize your device is stored on your device.
To set up a sync relationship:
- On the Synchronization Setup Wizard screen, click Next.

- Check the box if you want to synchronize directly with a server. Ask your network administrator for the server address and logon credentials. Click Next and follow the on-screen instructions to connect to a server.
- Select the type of information that you wish to synchronize, then click Next. If you wish to customize a synchronized item, highlight the item then click Settings.
On the Calendar Synchronization Settings window, for example, select from the options on how you wish to synchronize the appointments on your device with your computer, then click OK.
- Click Finish to complete the sync relationship setup.
Immediately after you set up a sync relationship, ActiveSync starts automatically and initiates the first synchronization between your device and your computer.
Refer to the succeeding sections for more details on synchronization.


Checking synchronized information
After your first synchronization, take a look at Calendar, Contacts, and Tasks on your device. You will notice that the calendar information in Microsoft Outlook on your computer was copied to your device, and the information that you have on your device was copied to your computer.
NOTE: Open Microsoft
Outlook on your desktop computer to see the details of copied information from your device.

Manually initiating synchronization
Once you have set up ActiveSync and completed the first synchronization process, you can initiate synchronization from your device at any time.
To manually initiate synchronization:
- Tap > Programs > ActiveSync to display the ActiveSync screen.

- To start synchronization, connect your device to your computer, then tap Sync.
To end synchronization, tap Stop.
You may synchronize via IR (infrared port) or before changing synchronization settings. To do this, you need to stop synchronization with your computer first.
NOTE For more information on synchronization, tap while in the ActiveSync screen, then tap Help.
Synchronization options
The Microsoft ActiveSync program allows you to customize your synchronization settings at any time. You can select the items to synchronize, set the synchronization schedule, and specify the synchronization rules.
To display the synchronization options:
- From the ActiveSync window on your desktop computer, click on the Options icon, or • From the menu bar, click on Tools, then Options.
To select items to synchronize:
- Check the box beside the item that you wish to synchronize.
- Highlight a checked item then click on Settings to specify synchronization options for the item.
For example, highlight Calendar then click on Settings to display the Calendar Synchronization Settings window. Customize the available settings, then click OK when done.
- Do the same for the other checked items.
NOTE: You cannot set the options for unchecked items.
- Click OK when done.
Chapter 4
Microsoft® Pocket Outlook
Microsoft® Pocket Outlook includes Calendar, Contacts, Tasks, Notes, and Messaging. You can use these programs individually or together. For example, you can use an e-mail address stored in Contacts to address e-mail messages in Messaging.
Using ActiveSync®, you can synchronize information in Microsoft Outlook or Microsoft Exchange on your desktop computer with your device. You can also synchronize this information directly with a Microsoft Exchange server. Each time you synchronize, ActiveSync compares the changes you made on your device and desktop computer or server and updates both computers with the latest information. For information on using ActiveSync, see ActiveSync Help on your desktop computer.
You can switch to any of the Pocket Outlook programs by tapping

Calendar
Use Calendar to schedule appointments, including meetings and other events. You can check your appointments in one of several views (Agenda, Day, Week, Month, and Year) and easily switch views using the View menu.

NOTE: You can customize the Calendar display, such as changing the first day of the week, by tapping Menu > Options.
Creating appointments
To create an appointment:
- If you are in Day or Week view, tap your desired date for the appointment,
- Tap Menu > New Appointment.
![Calendar Subject: Location: Starts: 7/19/05 12:00 PM Ends: 7/19/05 1:00 PM All Day: No Occurs: Once Reminder: Remind me 15 minute(s) Categories: No categories... Appointment Notes 123 1 2 3 4 5 6 7 8 9 0 - = + Tab q w e r t y u i o p [ ] CAP a s d f g h j k l ; * Shift z x c v b n m , . / ← CtI áü `…](/content/2026/06/1389453/images/5bf6dd20b9523cbd0fa29c7b43b7fe042242dff94fcdb80b1d3342a1bdbefe69.jpg)
— Tap to select from a predefined text — Tap to select from previously entered locations — Tap to specify the time of appointment — Tap to specify the date of appointment
Tap to add notes to the appointment
- Using the input panel, enter a description and a location. Tap to select the field.
- If needed, tap the date and time to change them.
- Enter other desired information. You will need to hide the input panel to see all available fields.
- To add notes, tap the Notes tab. You can enter text, draw, or create a recording. For more information on creating notes, see the section "Notes" later in this chapter.
- When done, tap ok to return to Calendar.
NOTE
Tap Menu > Options... > Appointments tab to set the device to remind you of all your new appointments. Your device will remind you according to the options set in Settings, Personal tab, Sounds & Notifications.
Using the summary screen
When you tap an appointment in Calendar, a summary screen appears. To change the appointment, tap Edit.
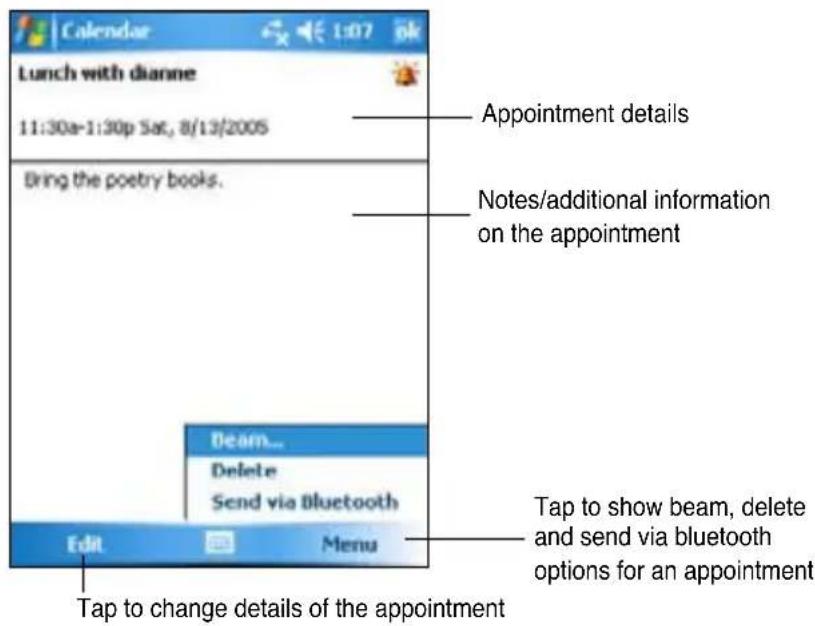
Creating meeting requests
You can set up meetings with users of Outlook and Pocket Outlook. The meeting request will be created automatically and sent either when you synchronize Inbox or when you connect to your e-mail server.
To create a meeting request:
- Tap Menu > Options > Appointments tab to indicate how you want meeting requests sent.
- If you send and receive e-mail messages through ActiveSync, select ActiveSync.
To schedule a meeting:
- Create an appointment.
- In the appointment details, hide the input panel, then tap Attendees.
- From the list of e-mail addresses you have entered in Contacts, select the meeting attendees. Tap Add to select more contacts. Tap OK when done.
The meeting notice is created automatically and placed in the Outbox folder. For more information on sending and receiving meeting requests, see Calendar and Messaging online help on the device.
Contacts

Contacts maintains a list of your friends and colleagues so that you can easily find the information you look for, whether you are at home or on the road. Using the Bluetooth or the infrared port (IR) on the device, you can quickly share Contacts information with other device users.
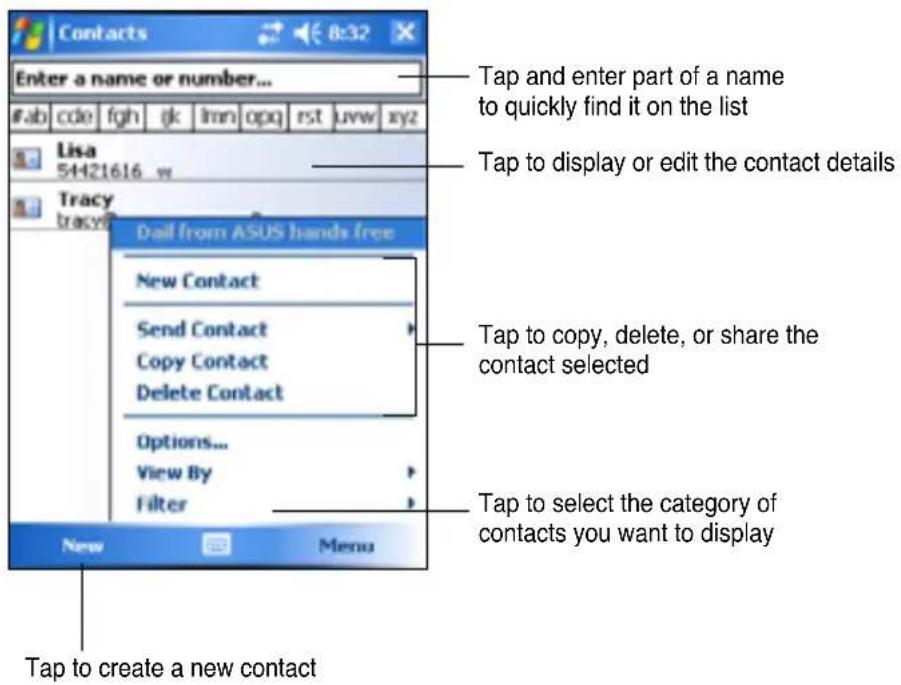
NOTE: To change the way information is displayed in the list, tap Menu > Options.
Creating contacts
To create a contact:
- Tap > Contacts > New.
- Using the input panel, enter a name and other contact information. You will need to scroll down to see all available fields.
- To assign the contact a category, scroll to and tap Categories, then select a category from the list. On the contact list, you can display the contacts by category.

- To add notes, tap the Notes tab.
You can enter text, draw, or create a recording.
For more information on creating notes, see the section "Notes" later in this chapter.
- Tap OK to return to the contact list when done.

Using the summary screen
Tapping a contact on the contact list displays a summary screen. To change the contact information, tap Edit.

Finding a contact
There are four ways to find a contact.
- In the contact list, enter a contact name in the box under the navigation bar. To show all contacts again, clear text from the box or tap the Undo button to the right of the box.
- Tap Menu > Filter and then select the type of contact that you wish to display. To show all contacts again, select All Contacts. To view a contact not assigned to a category, select No Categories.
- To view the names of companies your contacts work for, in the contact list, tap Menu > View By > By Company. The number of contacts that work for that company will be displayed to the right of the company name.
- Tap > Programs > Search. Enter the contact name, select Contacts for the type, and tap Search.

![Search screen: Search for: [field], Type: Contacts. Results: Ben (Contact 2659-5555), Elon (Contact (091) 712-3321), Joe (Contact (091) 754-3321). On-screen keyboard shown. Search Advanced option.](/content/2026/06/1389453/images/128e71f7ec533e6e6035fcb704c97614c06de1f44f9123e535711557d0171c13.jpg)
Tasks

Use Tasks to keep track of what you have to do. Tap Menu > Sort by or Filter to sort or filter displayed tasks respectively.

Creating tasks
To create a task:
- Tap > Programs > Tasks > Menu > New Task to display a blank task form.
- Using the input panel, enter a description.
- Enter a start date and due date, or enter other information by tapping the field first. If the input panel is open, you will need to hide it to see all available fields.
- To assign the task to a category, tap Categories and select a category from the list. On the task list, you can display tasks by category.

- To add notes, tap the Notes tab. You can enter text, draw, or create a recording. For more information on creating notes, see the section "Notes" later in this chapter.
- Tap OK to return to the task list when done.
Using the summary screen
Tapping a task on the task list displays a summary screen. To change the task details, tap Edit.

Notes

Quickly capture thoughts, reminders, ideas, and phone numbers with Notes. You can create a written note or a recording. You can also include a recording in a note. If a note is open when you create the recording, it will be included in the note as an icon. If the note is displayed, it will be created as a standalone recording.
You may change the default Notes options including the writing mode, template, file storage, and record button action.

To set the default input mode for entering note text:
- Tap > Programs > Notes > Menu > Options.
- In the Default mode box, select one of the following:
- Writing if you want to draw or enter handwritten text in a note.
- Typing if you want to create a typed note.
- Tap OK.
NOTE: On the Options screen, tap > Help to learn more about the other settings.
Creating notes
To create a note:
- Tap ▷ Notes > New.
- Create your note by writing, drawing, typing, or recording. For more information about using the input panel, writing and drawing on the screen, and creating recordings, see Chapter 2.
- Tap OK to save the note and return to the Notes list.

NOTE
Tap Menu > View Recording Toolbar to display recording tools and make a recording.
Messaging
Use Messaging to send and receive e-mail messages in one of these ways:
- Synchronize e-mail messages with Microsoft Exchange or Microsoft Outlook on your desktop computer
- Send and receive e-mail messages by connecting directly to an e-mail server through an Internet service provider (ISP) or a network
Synchronizing e-mail messages
You can e-mail messages as part of the general synchronization process. You will need to enable mail synchronization in ActiveSync. For more information on enabling mail synchronization, see the ActiveSync online help on your desktop computer.
During synchronization:
- Messages are copied from the mail folders of Exchange or Outlook on your desktop computer to the ActiveSync folder in Inbox on your device. By default, you will receive messages from the past five days only and the first 100 lines of each message.
- E-mail messages in the Outbox folder on your device are transferred to Exchange or Outlook, then sent from those programs.
- E-mail messages in subfolders must be selected in ActiveSync on your desktop computer in order to be transferred.
NOTE: You can also synchronize e-mail messages with your desktop computer from a remote location. For more information on connecting your device, see Chapter 7.
Connecting directly to an e-mail server
In addition to synchronizing e-mail messages with your desktop computer, you can send and receive e-mail messages by connecting to an e-mail server using a modem or network card connected to your device. You need to set up a remote connection to a network or an ISP, and a connection to your e-mail server. For more information, see Chapter 7.
When you connect to the e-mail server, new messages are downloaded to the device Inbox folder, messages in the device Outbox folders are sent,
and messages that have been deleted on the e-mail server are removed from the device Inbox folder.
Messages that you receive directly from an e-mail server are linked to your e-mail server rather than your desktop computer. When you delete a message on your device, it is also deleted from the e-mail server the next time you connect, based on the settings you selected in ActiveSync.
You can work online or offline. When working online, you read and respond to messages while connected to the e-mail server. Messages are sent as soon as you tap Send, which saves space in your device.
When working offline, once you have downloaded new message headers or partial messages, you can disconnect from the e-mail server and decide which messages to download completely. The next time you connect, Inbox downloads the complete messages you have marked for retrieval and sends the messages you have composed.
When you connect to your e-mail server or synchronize with your desktop computer, by default, you will receive messages from the last three days only, and the mail is less than 0.5KB in size. If the mail size is larger than 0.5KB, you need to download it through hyperlink. The original messages remain on the e-mail server or your desktop computer.
You can mark the messages that you want to retrieve in full during your next synchronization or e-mail server connection. In the message list, tap and hold the message that you want to retrieve. On the pop-up menu, tap Download Message. The icons in the Inbox message list give you visual indications of message status.
You can specify your downloading preferences when you set up the service or select your synchronization options. You can change them at any time.
- Change options for Inbox synchronization using ActiveSync options. For more information, see ActiveSync Help on your desktop computer.
- Change options for direct e-mail server connections in Inbox on your device. Tap Menu > Tools > Options. On the Accounts tab, tap the account that you wish to change. Tap and hold the account and select Delete to remove an account.
Reading messages in Inbox
The messages you receive appear in your Inbox folder. By default, the most recently received messages appear on top of the list. Unread messages appear in boldface.
Tap to select email account, and the folder that you wish to display

Tap an e-mail message from your Inbox to display it.

Composing messages
To compose a message:
- Tap New to display a blank e-mail screen.
![Enter the e-mail address here. Outlook E-mail. Box: Cc: From: (Outlook E-mail) To: "Ben" Subject: Tap and move the scroll bar up/down to show or hide the complete message header. Type your text here. 123 1 2 3 4 5 6 7 8 9 0 - = Tab q w e r t y u i o p [ ] CAP a s d f g h j k l j * Shift z x c v b n…](/content/2026/06/1389453/images/cb2e720b8194d9d3579e2d041ba96d65c573bb9b00f1d0e029558f5a2a95cc2f.jpg)
- In the To field, enter the e-mail address of your recipient. You may either type the e-mail address or select a name from the Contacts list by tapping "To".
If you wish to send a copy of your e-mail to other recipients, use the stylus pen to scroll up to display the Cc: and Bcc: lines in the message header.
The addresses in the To: and Cc: can be viewed by all recipients.
The addresses in the Bcc: are hidden from the recipients.
To address your e-mail to several recipients, type the e-mail addresses separated by a semicolon. A semicolon is automatically added between e-mail addresses if you select from your Contacts list.
All the names in the Contacts list with e-mail addresses appear in the e-mail address book.
- Enter a subject and compose your message.
- Tap Send.
NOTE To enter preset or frequently used messages, tap Menu > My Text and select your desired message.
To create or edit a preset message before adding it to the message body, tap Menu > My Text > Edit My Text Messages, select a message to change or select a blank line at the bottom of the list, then enter your text and tap ok.
To save composed messages:
If you are working offline, the message is moved to the Outbox folder and will be sent the next time you connect.
If you do not wish to send the message immediately, tap OK after composing the message to save it to the Drafts folder.
When you are ready to send the message, open the Drafts folder and tap the message. Tap Send to send the message.
Managing e-mail messages and folders
The behavior of the folders you create depends on whether you are using ActiveSync, SMS, POP3, or IMAP4.
- If you use ActiveSync, e-mail messages in the Inbox folder in Outlook will automatically be synchronized with your device. The folders you create and the messages you move will then be mirrored on the server.
- If you use SMS, messages are stored in the Inbox folder.
- If you use POP3 and you move e-mail messages to a folder you created, the link is broken between the messages on the device and their copies on the mail server. The next time you connect, the mail server will see that the messages are missing from the device Inbox and delete them from the server. This prevents you from having duplicate copies of a message, but it also means that you will no longer have access to messages that you move to folders created from anywhere except the device.
- If you use IMAP4, the folders you create and the e-mail messages you move are mirrored on the server. Therefore, messages are available to you anytime you connect to your mail server, whether it is from your device or desktop computer. This synchronization of folders occurs whenever you connect to your mail server, create new folders, or rename/delete folders when connected.
Chapter 5 Companion Programs
The companion programs consist of Microsoft® Word Mobile, Microsoft® Excel Mobile, Microsoft® PowerPoint Mobile, Pocket MSN, Windows Media™ Player, ASUS Hands-Free, and Remote Presenter for Pocket PC.
To switch to a companion program on your device, tap Programs on the menu, then tap the program that you wish to open.
Word Mobile
Word Mobile works with Microsoft Word on your desktop computer to give you easy access to copies of your documents. You can create new documents on your device, or you can copy documents from your desktop computer to your device. Synchronize documents between your desktop computer and your device so that you have the most up-to-date content in both locations.
Use Word Mobile to create documents, such as letters, meeting minutes, or trip reports.
Creating Word Mobile documents
To create a new Word document:
- Tap > Programs > Word Mobile to launch the application.
If you have existing Microsoft Word or Word Mobile documents in your device, a list of the documents appears.
- Tap New on the Menu bar to display a blank document.
- Use any of the tools in the input panel to type your text.
NOTE
If you tap Menu > Options and choose a template, that template appears with the appropriate text and formatting already provided.

Saving Word Mobile documents
To save a Word Mobile document:
When you have finished editing your document, tap ok.
By default, the document is saved using the first line as the file name. For example, if your first line in the document has the words Things to do, these words appear as the file name in your Word documents list.
To specify save options:
- With the document open, tap Menu > File > Save As to open the Save As screen.
- Type a file name in the Name field.
- Tap the down arrow in the Folder field, then select a folder where you want to save the file.
- Tap the down arrow in the Type field to select a file format.
- Tap the down arrow in the Location field to indicate the location of your saved file, either in the main memory of your device, or in a storage card, if available.
- Tap Save.
Opening an existing Word Mobile document
Word Mobile contains a list of the files stored on your device. Tap a file in the list to open. To delete, make copies of, and send files, tap and hold a file in the list, then select the appropriate action on the pop-up menu.

NOTE
If you opened an existing Word file, tap Menu > File > Rename/Move... to change the file name, folder and storage location to use for saving the file.
You can open only one Word Mobile document at a time. When you open a second document, you will be asked to save the current document first.
Viewing documents
If you are opening a Word document created on a desktop computer, tap View > Wrap to Window to see the entire document.
You can also adjust the viewing size of a document by zooming.
To zoom in or out of a document:
Tap View > Zoom, then select your desired percentage.
Excel Mobile

Excel Mobile provides fundamental spreadsheet tools, such as formulas, functions, sorting, and filtering. To display the toolbar, tap View > Toolbar.
![Excel Mobile. 88. A B C. total revenue. Joe 654000. Ben 500000. Alex 870000. Rick 650000. Tom 987000. Ken 500000. Cell contents appear here as you type, or when you select the cell. Ready Sheet1 Sum=0. 123 1 2 3 4 5 6 7 8 9 0 - = + Tab q w e r t y u i o p [ ] CAP a s d f g h j k l ; Shift z x c v b…](/content/2026/06/1389453/images/3d3927c6f6d1ee0bfc7da4cbc214dc3a0d889a0702c168897f5df8898755ebe1.jpg)
NOTE You can open only one Excel Mobile document at a time; when you open a second document, you will be asked to save the first.
Creating an Excel Mobile document
- Tap > Programs > Excel Mobile.
- Tap New to display a blank worksheet.
NOTE
If you tap Menu > Options in the file list and choose a template, that template appears with the appropriate text and formatting already provided when you create a new worksheet.
Opening an existing Excel Mobile document
- Tap > Programs > Excel Mobile to display a list of Excel Mobile files.
- Tap the file that you wish to open.
Saving an Excel Mobile document
To save an Excel Mobile document:
When you have finished editing your document, tap ok.
By default, your document is saved as Book1 as the file name. You can change the file name to one that is more descriptive of your document. See the procedure below for saving options.
To specify save options:
- With the document open, tap Menu > File > Save As... to display the Save As screen.
- Change the file name by simply typing a new one in the Name field.
- Tap the down arrow in the Folder field to select a folder where you wish to place the file.
- Tap the down arrow in the Type field to select a file format.
- Tap the down arrow in the Location field to indicate the location of your saved file, e.g. main memory, flash disk, or storage card, if available.
- Tap Save.
To rename/move a file:
- With the document open, tap Menu > File > Rename/Move... to display the Rename/Move screen.
- Change the file name in the Name field.
- Tap the down arrow in the Folder field to select a folder where you wish to move the file.
- Tap the down arrow in the Location box to select the folder location.
- Tap ok when done.
Tips for working in Excel Mobile
Take note of the following when working on large worksheets in Pocket Excel:
- View in full-screen mode to see as much of your worksheet as possible. Tap View > Full Screen. To exit full-screen mode, tap Restore.
• Show and hide window elements. Tap View > Show. - Freeze and unfreeze panes on a worksheet. First select the cell where you want to freeze panes. Tap View > Freeze Panes. You might want to freeze the top and leftmost panes in a worksheet to keep the row and column labels visible as you scroll through a sheet. To unfreeze panes, tap View > Unfreeze Panes. - Split panes to view different areas of a large worksheet. Tap View > Split. Drag the split bar to where you want it. To remove the split, tap View > Remove Split. - Show and hide rows and columns. To hide a row or column, select a cell in the row or column that you want to hide. Tap Menu > Format > Row or Column > Hide. To show a hidden row or column, tap Menu > Edit > Go To, and type a reference that is in the hidden row or column. Tap Menu > Format > Row or Column > Unhide.
For more information on using Excel Mobile, tap > Help.
PowerPoint Mobile

PowerPoint Mobile works with Microsoft PowerPoint on your computer to give you easy access to copies of your PowerPoint presentations. Copy PowerPoint presentation files from your computer to your device and view them on-the-go. Synchronize presentation files in your computer and your device so that you have the most up-to-date contents in both locations.
NOTE You can only view PowerPoint presentation files in PowerPoint Mobile.
Opening a PowerPoint presentation file
If you have previously copied PowerPoint Mobile presentation files into the device, a list of the documents appear after you tap the PowerPoint Mobile icon.
To open a PowerPoint Mobile file:
- Tap ➕ Programs > PowerPoint Mobile to display a list of PowerPoint files.
- Tap the file you wish to open.
Viewing a PowerPoint Mobile file
To go to the previous or next slide:
- While viewing a PowerPoint file, tap the arrow on the lower-left side of the screen to open the menu.
- In the menu, tap Next or Previous to go forward or go back in your PowerPoint Mobile file. Tap Go to Slide to immediately go to a specific slide in your presentation.
NOTE While viewing a PowerPoint file, you can also tap the screen to go to the next slide.
To zoom in on a slide:
- While viewing a PowerPoint file, tap the arrow on the lower-left side of the screen to open the menu.
- In the menu, tap Zoom In. In the lower-right side of the screen, drag the red box with the stylus pen to go to a specific area on the slide.
- Tap the magnifying glasses to zoom in or zoom out of the slide. Tap Fit to Screen to fit the slide to the whole screen.
NOTE When you are in a view other than Fit to Screen, the menu is not available.
Viewing a Custom Show (slideshow)
- While viewing a PowerPoint file, tap the arrow on the lower-left side of the screen to open the menu.
- Tap Custom Show then select the custom show you want to view.
Setting show options
- While viewing a PowerPoint file, tap the arrow on the lower-left side of the screen to open the menu.
- Tap Show Options. In the Orientation tab, select the slideshow orientation you want to use.
- Tap the Playback tab. Tap Override playback options for all files if you do not want to use the embedded settings of a PowerPoint file that you created in your desktop computer.
- Select your desired options. When done, tap ok.
Pocket MSN

Pocket MSN on your device is an instant messaging program that allows you to:
- See who among your contacts is online and chat with them by sending and receiving instant messages.
- Access your Hotmail account, if you have one, and send and receive e-mails.
To use Pocket MSN:
You must have a Microsoft Passport™ account or a Microsoft Exchange e-mail account.
You must have a Passport to use the MSN Messenger Service. If you have a Hotmail® or MSN account, you already have a Passport. Once you have obtained either a Microsoft Passport or Microsoft Exchange account, you are ready to set up your account.
Sign up for a Microsoft Passport account at http://www.passport.com.
Get a free Microsoft Hotmail e-mail address at http://www.hotmail.com.
To open MSN Messenger:
- Tap Pocket MSN on the Today screen, then tap MSN Messenger. OR
Tap > Programs > Pocket MSN > MSN Messenger.
Signing up in MSN Messenger
To sign in to MSN Messenger service:
- Tap the Tap here to sign in link. OR
Tap Sign In or Menu > Sign In.
- On the MSN - Sign In screen, enter your e-mail address and password. Then tap Sign In.

![MSN - Sign In. msn. E-mail address: bennyboy@hotmail.com. Password: ******. Save password. Cancel. Sign In. 123 1 2 3 4 5 6 7 8 9 0 - = + Tab q w e r t y u i o p [ ] CAP a s d f g h j k l ; * Shift z x c v b n m , . / ← Cti aü ` \ ↓ ↑ ← →](/content/2026/06/1389453/images/ce5fbcf384af8a21d2ac09b65a89a737355a79fb55156a9bc23931b203a35457.jpg)
NOTE If you already use MSN Messenger on your computer, your contacts will show up on your device.
MSN Messenger contacts
The MSN Messenger screen shows all of your messenger contacts at a glance, divided into Online and Not Online categories. From this view, while connected, you can chat, send an e-mail, block the contact from chatting with you, or delete contacts from your list using the pop-up menu.
To see others online without being seen, tap Menu > Block.
If you block a contact, you will appear offline but will remain on the blocked contact's list. To unblock a contact, tap and hold the contact, then tap Unblock on the pop-up menu.

Chatting with contacts
Tap a contact name to open a chat window. Enter your message in the text entry area at the bottom of the screen, or tap My Text to enter a preset message, then tap Send. To invite another contact to a multi-user chat, tap Menu > Invite, then tap the contact that you want to invite.

Using MSN Hotmail
With MSN Hotmail, you can access your hotmail mailbox on your Pocket PC and send and receive e-mails.
To open MSN Hotmail:
- Tap Pocket MSN on the Today screen then tap MSN Hotmail.
OR
Tap > Programs > Pocket MSN > MSN Hotmail.


Windows Media Player for Pocket PC
Use Microsoft® Windows Media Player for Pocket PC to play digital audio and video files that are stored on your device or on a network. To switch to Windows Media Player for Pocket PC, tap ➤ Windows Media.
Use Microsoft Windows Media Player on your desktop computer to copy digital audio and video to your Pocket PC. You can play Windows Media and MP3 files on your Pocket PC.

NOTE For more information on using Windows Media Player for Pocket PC, tap 📋 Help.
Remote Presenter

The Remote Presenter allows you to wirelessly control your presentation. With the remote presenter, you can select a certain page, slide the pages, record the duration of the presentation, and easily switch the screen from edit mode to full screen.
Before using the Remote Presenter, activate Bluetooth in your PC/ notebook, and launch the Remote Presenter tool in your PC/notebook.
NOTE Make sure you have installed the Remote Presenter tool in your PC/notebook.
Using Remote Presenter
To connect your Pocket PC to your PC/notebook:
- Tap > Programs > Remote Presenter to launch the application.
A reminding message appears, then tap Next.
The Pocket PC then automatically scans for all available bluetooth-enabled devices.
- Select the PC or notebook you want to connect to, then tap Next.
- A pop-up window appears, reminding you to check the pairing information on your PC or notebook.
- Follow the on-screen instructions to set up the connection.

To use the Remote Presenter
To use the Remote Presenter, select the file you wish to open. A main menu of Remote Presenter appears:

Chapter 6 Internet Explorer Mobile
Use Microsoft Internet Explorer Mobile to view Web or WAP pages in any of these ways.
- During synchronization with your desktop computer, download your favorite links and mobile favorites that are stored in the Mobile Favorites sub-folder in Internet Explorer on the desktop computer.
- Connect to an Internet service provider (ISP) or network and browse the Web. To do this, you need to create the connection first. See Chapter 7 for information on creating a connection.
When connected to an ISP or network, you can also download files and programs from the Internet or intranet.
Using Internet Explorer Mobile
You can use Internet Explorer Mobile to browse mobile favorites and channels that have been downloaded to your device without connecting to the Internet. You can also connect to the Internet through an ISP or a network connection to browse the Web.
To launch Internet Explorer Mobile:
- Tap > Internet Explorer to display the Mobile Services from MSN.
- Tap Menu > Home to display Internet Explorer Mobile with links to some useful Web sites.
- Tap any of the Web site buttons to go to a specific site.
Changing View settings
To change View settings:
- Tap Menu > View then select view options. Tap Full Screen, for example, to set explorer window to full-screen mode. To disable full-screen mode, tap and hold anywhere on the explorer, then select Full Screen again.
- Tap Zoom to see another pop-up for selecting your desired text size display.

Browsing the Internet
To browse the Internet:
- Set up a connection to your ISP or corporate network using Connections. See Chapter 7 for details.
- Do one of the following to connect and start browsing:
- Tap Favorites on the Menu Bar, then tap the favorite that you wish to view.
- Enter the Web address in the Address Bar that you want to visit then tap Go.
Mobile Favorites folder
Only the items stored in the Mobile Favorites sub-folder on your desktop computer will be synchronized with your device. This folder was created automatically when you installed ActiveSync.
Favorite links
During synchronization, the list of favorite links in the Mobile Favorites folder on your desktop computer is synchronized with Internet Explorer Mobile on your device. Both computers are updated with changes made to either list each time you synchronize. Unless you mark the favorite link as a mobile favorite, only the link will be downloaded to your device, and you will need to connect to your ISP or network to view the content. For more information on synchronization, see ActiveSync Help on your desktop computer.
Mobile Favorites
If you are using Microsoft Internet Explorer 4.01 or later on your desktop computer, you can download mobile favorites to your device. Synchronizing mobile favorites downloads Web content to your device so that you can view pages while you are disconnected from your ISP and desktop computer.
Use the Internet Explorer plug-in installed with ActiveSync to create mobile favorites quickly.
To create a mobile favorite:
- In Internet Explorer on your desktop computer, click Tools > Create Mobile Favorite.
- To change the link name, enter a new name in the Name box.
- Click OK. Internet Explorer downloads the latest version of the page to your desktop computer.
- If you want to download the pages that are linked to the mobile favorite you just created, in Internet Explorer on the desktop computer, click Favorites > Mobile Favorites, then right-click a specific mobile favorite item, then click Properties. In the Download tab, specify the number of links deep you want to download. To conserve device memory, go only one level deep.
- Synchronize your device and your desktop computer. Mobile favorites that are stored in the Mobile Favorites folder in Internet Explorer are downloaded to your device.
NOTE You will need to manually download content or set a schedule to keep the information updated on your desktop computer and device.
Before synchronizing with your device, in Internet Explorer on your desktop computer, click Tools > Synchronize. You will see the last time content was downloaded to the desktop computer, and you can manually download content if needed or set a schedule to automatically update contents. To set a schedule to update a specific mobile favorite, select a specific mobile favorite from the list then click Properties button. On the Schedule tab, you can set the mobile favorite to use a specific schedule to update its content.
You can add a button to the Internet Explorer toolbar for creating mobile favorites. In Internet Explorer on your desktop computer, click View > Toolbars > Customize.
Saving device memory
Mobile favorites take up storage memory on your device. To minimize the amount of memory used:
- In the settings for the Favorites information type in ActiveSync options, turn off pictures and sounds, or stop some mobile favorites from being downloaded to the device. For more information, see ActiveSync Help.
- Limit the number of downloaded linked pages. In Internet Explorer on your desktop computer, click Favorites > Mobile Favorites, then right-click a specific mobile favorite item you want to change, then click Properties. In the Download tab, specify 0 or 1 for the number of linked pages you want to download.
Viewing mobile favorites and channels
To view mobile favorites and channels:
- Tap Menu > Favorites to display your list of favorites.
- Tap a Favorites page that you wish to view.
You will see the page that was downloaded the last time you synchronized with your desktop computer. If the page is not on your device, the favorite is dimmed. You need to synchronize with your desktop computer again to download the page to your device, or connect to the Internet to view the page.

Adding/Deleting mobile favorites and folders
To add a favorite:
- Tap Menu > Favorites > Add/Delete tab.
- Tap the Add button to show the Add Favorite screen.
- Type a name for the favorite that you wish to add in the Name field.
- Type in the URL address in the Address (URL) field.
- Choose a folder where to place the favorite from the Create in selection box.
- Tap Add to return to the Favorites screen, which now shows the favorite that you added.
NOTE: To delete a favorite, tap the favorite you want to delete, then tap the Delete button.
To add a folder:
- Tap Menu > Favorites > Add/Delete tab.
- Tap the New Folder button.
- Type a name for the folder that you wish to create.
- Tap Add to return to the Favorites screen, which now shows the folder that you added.
NOTE: To delete a folder, tap the folder you want to delete, then tap the Delete button.
Chapter 7: Get Connected
You can set up connections to the Internet and corporate network at work to do such activities as browse the Internet or intranet, send and receive e-mail and instant messages, and synchronize information using ActiveSync.
Connections can be made using a modem, wireless network, or network (Ethernet) card. A modem connection can be used to set up connections with an external modem, or through your mobile phone network using a cellular line.
Your device has two groups of connection settings: My ISP and My Work Network. My ISP settings are used to connect to the Internet, and My Work Network settings can be used to connect to any private network, such as a corporate network you use at work. Simply fill in the settings and get ready to start connecting. For more information, see the sections “Connect to the Internet” or “Connect to Work.”
You may also establish connection to another device with infrared (IR) or Bluetooth features. For more information, see the section “Infrared (IR) connection” later in this chapter, or “Chapter 8 Bluetooth® connection.”
Connecting to the Internet
To connect to the Internet:
- Obtain the following information from your ISP: ISP server phone number, user name, and password.
- Tap > Settings > Connections tab > Connections.
- Under My Network, tap Add a new modem connection.
- Create a modem connection. For more information, see section "Set up modem connections."
- To start the connection, begin using the desired program. For example, switch to Internet Explorer Mobile and browse a Web page. Your device automatically connects.
To select the network
- Tap > Settings > Connections tab > Connections > Advanced tab.
- Tap Select Networks.
- In the appropriate lists, select My ISP or My Work Network.
To view intranet URLs
- Tap > Settings > Connections tab > Connections > Advanced tab > Exceptions.
- If you do not see your company's URL listed, tap Add new URL and create a new URL exception.
Connecting to Work
- Obtain the following information from your network administrator: server phone number, user name, and password.
- Tap > Settings > Connections tab > Connections.
- Under My Work Network, set up either a modem, network card, wireless network, or VPN server connection. Refer to the section "Set up connections" for the procedure.
- To start the connection, start using a desired program. For example, switch to Pocket Internet Explorer and browse to a Web page. Your device automatically starts connecting.
Setting up connections
Modem connections
To set up a modem connection:
Obtain the following information from your ISP or network administrator: telephone number, user name, password, domain name, and TCP/IP settings.
If your device does not have access to a mobile phone network, insert a modem card.
- Tap > Settings > Connections tab > Connections.
- To create a new connection, in either My ISP or My Work Network, tap Add a new modem connection, then follow the instructions in the New Connection wizard.
- To view additional information for any screen in the wizard or while changing settings, tap 📋
NOTE To change modem connection settings in either My ISP or My Work Network, tap Manage existing connections > Modem tab. Select the desired modem connection, tap Edit, and follow the instructions on the screen.
VPN server connections
A VPN connection helps you to securely connect to servers, such as a corporate network, via the Internet. Ask your network administrator for your user name, password, domain name, TCP/IP settings, and host name or IP address of the VPN server.
To set up a VPN server connection:
- Tap > Settings > Connections tab > Connections.
- To create a new VPN server connection, in My Work Network, tap Add a new VPN server connection, then follow the screen instructions.
- To view additional information for any screen in the wizard or while changing settings, tap 📋
NOTE To change existing settings, in My Work Network, tap Manage existing connections > VPN tab. Select your desired VPN connection under the VPN tab, tap Edit, then follow the instructions on the screen.
Proxy server settings
If you are connected to your ISP or private network during synchronization, your mobile device should download the proper proxy settings from your PC. If these settings are not on your PC or need to be changed, ask your ISP or network administrator for the proxy server name, server type, port, type of Socks protocol used, and your user name and password.
To change proxy server settings:
- Tap > Settings > Connections tab > Connections icon.
- Under My Work Network category, tap Setup my proxy server.
- Check the boxes beside This network connects to the Internet and This network uses a proxy server to connect to the Internet.
- In the Proxy server box, enter the proxy server name.
- To change the server and port settings for HTTP, WAP, Secure WAP, and Socks, tap Advanced.
- Tap OK when done.
Network card connections
Use a network (Ethernet) card to connect directly to a network. Once connected, you can view the Internet or intranet, or download e-mail. You do not need to create a new connection on your device. For more information, see your network administrator. Make sure to purchase and configure a network card that is compatible with your device.
To set up a network card:
- Obtain the following information from your network administrator: user name, password, and domain name.
- Insert the network card into your device.
- The first time you insert the card, Network Settings appears automatically so that you can configure the network card. If it does not appear, or to change settings later, tap > Settings > Connections tab > Network Cards.
- If you need to enter specific server information, tap the appropriate adapter, and then tap Properties. Most networks use DHCP, so you should not have to change these settings unless your network administrator instructs you to do so.
- If necessary, connect the network card to the network by using a network cable. For information, refer to the documentation that came with your network card.
- To start a connection, insert the network card, and begin using a desired program. For example, switch to Pocket Internet Explorer and browse a Web page. Your device automatically starts connecting. If you use your network card with two networks, such as a private network at work and one at home for the Internet, you need to change the network to which the network card connects.
NOTE: You may need proxy server and VPN connection settings. For more information, see your network administrator.
Ending a connection
- When connected via modem or VPN, tap Disconnect on the navigation bar.
- When connected via cable or cradle, detach your device from the cable or cradle.
- When connected via Infrared, move the device away from the other computer or device.
- When connected via a network (Ethernet) card, remove the card from your device.
- When connected via a wireless network, switch off the connection.

Setting up a WAP gateway
To access WAP sites through Pocket Internet Explorer, configure your device to use a WAP gateway. Use the following steps to create a new set of connections to the Internet with WAP gateway settings.
NOTE: Some device models do not support the WAP sites viewing feature.
- Get the following information from your ISP: ISP server phone number, user name, and password. Also, contact your mobile phone service provider and ask for your WAP gateway server name and port number.
- Tap > Settings > Connections tab > Connections.
- Tap Edit my proxy server. If a proxy server has not been set up, tap Set up my proxy server.
- In Programs that automatically connect to the Internet should connect using, tap New and enter a name for the ISP connection.
- On the Proxy Settings tab, select This network connects to the Internet and This network uses a proxy server to connect to the Internet.
- If necessary, in the Proxy server box, enter the proxy server name.
- Tap Advanced > WAP.
- In the Server box, enter the WAP gateway server name. Under Port, enter the port number. The most common WAP port number is 9201.
- Enter any logon credentials required by the WAP gateway server.
Using dialing rules
Additional numbers may need to be dialed depending on your given location when connecting. For example, if you want to dial from work, a 9 prefix must often be dialed, or an area code is needed.
To avoid creating a new modem connection for each situation, set dialing rules for the locations from which you often connect. Three dialing locations, Home, Mobile, and Work, have been created for you, and you can create more. If a connection cannot be made, your device gives you an opportunity to change the dialing location.
- Tap > Settings > Connections tab > Connections > Advanced tab > Dialing Rules... button.
- Tap the box beside Use dialing rules.
- Select a location.
• Home - Dials the number as a local call without the prefix 9.
• Work - Dials the number as local call with the prefix 9.
- Tap Edit... button and make your desired changes.
- Tap ok when done.
NOTE To create a new location, tap New and follow the directions on the screen. To view additional information, tap

Using Terminal Services Client
Use Terminal Services Client to log onto a computer and use all of the programs available on that computer from your Pocket PC. For example, instead of running Word Mobile, you can run the desktop computer version of Word and access all of the doc files on that computer from your device.
To have remote access to a computer, it must be running the Terminal Services or Remote Desktop program in Windows 2000 or XP.
To connect and have remote access to a computer:
- On your Pocket PC, tap > Programs > Terminal Services Client.
- Specify the server name that is used by the Terminal Services or Remote Desktop program in the computer.
You can also select the server name from the Recent servers list if you have previously connected to a computer.
- To run a program from the computer that are specifically sized for use with your Pocket PC, you can select the Limit size of server desktop to fit on this screen option to better fit the program on the device screen.
- Tap Connect.
Navigating within Terminal Services Client
The contents of the window on the computer may be too wide to fit the screen of your Pocket PC. You may see two sets of scroll bars on your device: one for scrolling the computer window contents, and one for scrolling your device's Terminal Services Client screen. To scroll the computer window contents, use the five directional buttons at the bottom of the Terminal Services Client screen.
Logging off or disconnecting from the remote computer
To log off without disconnecting from the computer:
- On the computer window, tap Start > Shut Down. The Shut Down Windows dialog box appears.
- Tap Log off , and tap ok.
To disconnect and end the remote session with the computer:
- On the computer window, tap Start > Shut Down. The Shut Down Windows dialog box appears.
- Tap Shut down, and tap OK.
Infrared (IR) connection
Setting beam options
To set the beam options:
- Tap > Settings > Connections tab > Beam icon to display the setting screen.
- By default, your device detects incoming infrared (IR) beams and prompts you to accept them. If you do not want your device to detect or receive beams, clear the Receive all incoming beams check box on the Settings screen.
Receiving infrared beams
To receive a file via infrared beam:
- When another infrared device within range beams a file or data to you, your device receives the file or data and prompts a receiving data status.
- After data transmission, tap Yes to accept or No to reject.

NOTE: Make sure to align the IR ports so that they are unobstructed and within the required range. Received files are automatically saved in the My Documents folder.
Sending infrared beams
To send a file via infrared beam:
- Tap and hold a file to beam, then tap Beam File... from the pop-up menu.
- Align the IR ports of the devices so that they are unobstructed and within a close range. If the ports are not aligned, a message appears asking you to do so.
When an IR port is found, a screen message appears indicating the sending process.
The message Done appears when the file transfer is complete.


Chapter 8 Bluetooth®
Bluetooth is a short-range wireless communications technology. Devices with Bluetooth capabilities can exchange information without requiring a physical connection. Unlike infrared, you do not need to line up devices to exchange information through Bluetooth. The devices only need to be within a range of about 10 meters (30 feet) in an open space environment. You can even beam information to a device in a different room, as long as it is within the specified range.
Bluetooth allows your Pocket PC to:
- Locate other Bluetooth devices within the vicinity • Discover the services that those devices offer
- Connect to, use, and disconnect from those services
- Enable or disable individual services
- Use security features including authentication, authorization, and encryption
NOTE If you experience problems using Bluetooth display orientation, revert to portrait.
® in a landscape
Using Bluetooth
The Bluetooth icon is located on the lower right corner of the Today screen.
When Bluetooth is enabled (turned ON), the icon is blue ⚙, and the Bluetooth LED blinks blue.
When Bluetooth is disabled (turned OFF), the icon is grayed with a red X on its lower right corner.
Tapping the icon displays a menu that allows you to:
- Turn Bluetooth on or off.
- Open the Bluetooth Manager.
- Customize Bluetooth Settings.

Bluetooth icon
Bluetooth settings
To configure Bluetooth settings:
- Tap 🖱 Bluetooth Settings.
- Tap one of the tabs at the bottom of the Settings screen to access and modify various settings.

Accessibility
Allows you to:
- Specify a name that identifies your Pocket PC as a Bluetooth device.
- Check the Bluetooth Device Address (BDA).
- Specify whether to allow all other Bluetooth devices or only paired devices to connect to your Pocket PC.
- Specify whether to allow remote devices to detect your device.
General
Allows you to:
- Select or create a user profile.
- Check the Bluetooth status (ON/OFF).
- Turn Bluetooth ON or OFF.
- Tap a link to the Bluetooth Manager.
Services
Under Bluetooth Services, you may enable/disable services such as File Transfer, Information Exchange, Serial Port, Personal Network server and Audio Gateway. Tap a service from the list, then choose whether to enable and share the selected service to other devices and whether to require authorization as well as passkey authentication between Bluetooth devices.
- File Transfer - allows other Bluetooth devices to have access to files on your Pocket PC and to perform file-related operations such as to get files, delete files, etc. Tap Advanced to set a target directory on your device that remote devices can access.
See the section "Remote device services" for more information.
• Information Exchange - allows you to specify a contact to be sent to Bluetooth devices when they request for your business card. Tap Advanced, then tap to choose a contact as your default business card.
- Serial Port - indicates the serial port address assignments. Tap Advanced to check the current serial port addresses. These cannot be changed. See the section "Remote device services" for details.
- Personal Network Server - allows hosting of a Bluetooth-based personal area network. See the section "Remote device services" for details.
• Audio Gateway - allows your Pocket PC to connect to a remote headset or other audio device.

Bluetooth Manager
The Bluetooth Manager allows you to pre-configure, manage, and use various types of Bluetooth connections to connect to remote devices.
To open the Bluetooth Manager:
- Tap Bluetooth Manager.
There are two tabs in the Bluetooth Manager:
- My Shortcuts - displays a list of pre-configured connections, if any. Tap New to make a new connection with other devices via Bluetooth. Tap and hold a connection icon to open a pop-up menu containing options for connecting to devices, disconnecting, checking connection status, and more.
• Active Connections - displays active incoming and outgoing connections. Tap New to make a new connection. Tap and hold a connection icon to open a pop-up menu containing options for disconnecting from devices and for checking connection status.
Bluetooth Connection Wizard
The Bluetooth Connection Wizard helps you set up connections with remote Bluetooth devices.
To launch the Bluetooth Connection Wizard:
- Tap New from the Bluetooth Manager Menu bar. The Bluetooth Connection Wizard screen appears.
- Select the type of connection you want to set up. Tap Next.
- Follow the on-screen instructions to set up the connection.

NOTE: Refer to the device online help for more information on Bluetooth.
Business Card Exchange
The Business Card Exchange feature allows you to send or receive a business card to or from a remote device, or exchange business cards with multiple remote devices.
To access Business Card Exchange:
- Tap Menu > Business Card Exchange from the Menu bar.
- Select the action you wish to perform.
NOTE: On this screen, tap the link Select the business card to go to the Information Exchange settings.
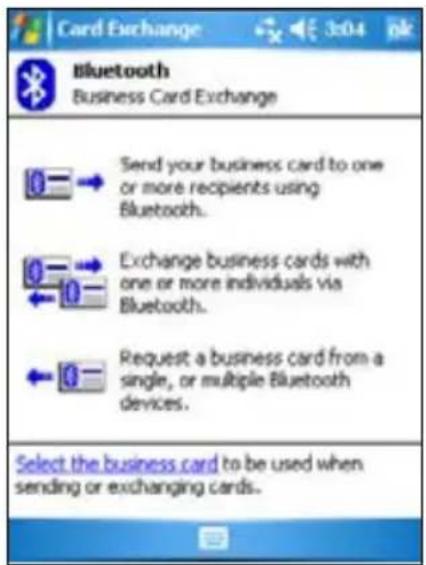
Remote device services
Wireless serial port
Using a Bluetooth serial port is equivalent to using a physical serial cable connection between two devices. As with a physical connection, you have to configure the application that will use the serial port.
To configure the Bluetooth Serial Port:
- Tap > Bluetooth Settings > Services tab.
- From the Services list, select Serial Port.
- Tap Advanced. Note the assigned Outbound COM Port (port 8).
NOTE: Refer to the application's documentation for more information about configuring your application's Outbound COM port.
Dial-up networking
The Dial-up Networking feature allows you to connect your Pocket PC to another Bluetooth-enabled device which can access the internet through a phone line. Once connected, you can browse the Internet, check/read emails, etc. on your Pocket PC.
The Bluetooth device that will provide the Dial-up Networking service to your Pocket PC should have access to a telephone system, either a hard-wired or a cellular connection, and be capable of answering a call. Such a device can be a Bluetooth-enabled mobile phone, a Bluetooth-enabled desktop computer attached to a telephone system, or a Bluetooth modem.
To set up Dial-up Networking:
- Tap Bluetooth Manager.
- Create a connection to the device that will provide telephone access. See the section "Bluetooth Connection Wizard".
- On the My Shortcuts screen, tap and hold the newly created shortcut, then select Connect from the pop-up menu.
- On the first Bluetooth connection screen, double-tap New Connection...
- On the second Bluetooth connection screen, enter a name for the connection, dial-up phone number, and the other prompted information. Then tap OK.
- Enter the required information on the succeeding screens.
Bluetooth File Explorer
The Bluetooth File Explorer appears automatically after a file transfer connection is established. This feature allows you to do the following:
- Navigate the directory structure of the remote device. • View the files and folders on the remote device.
- Create new folders on the remote device.
- Send files to, and copy or get files from the remote device.
- Delete files from the remote device.
NOTE The file operations on the remote device are limited to the configured FTP root directory and subdirectories of the remote device.
The Bluetooth File Explorer also allows you to set a folder in your device for receiving inbound files. You may configure this folder for each of your connection shortcuts. See the section "To set a local folder".
Bluetooth File Explorer menus
File Send a File...
Create a Folder
Get
Delete
Tools Set Local Folder
Refresh
To change the remote device folder:
- To move down in the directory structure of the remote device, tap the New Folder from the main window of Bluetooth File Explorer.
- To move up in the directory structure of the remote device, tap the down-arrow to the right of the currently selected folder and select the New Folder from the drop-down list.
To create a folder on the remote device:
- Select the folder in which you wish to place the new folder.
- From the File menu, tap Create a Folder.
- Enter a name for the new folder while the default name New Folder is highlighted.
To send a file to the remote device:
- From the File menu, tap Send a File... to display the Open screen.
The Open screen includes the following:
Folder - tap the down-arrow and select the folder that contains the file you wish to send.
Type - default and only option is "All Files (*.*)".
A list of files in the selected folder - tap a file that you wish to send.
Cancel button - abort the Send a File... operation.
- Tap your desired operation.
The file that you selected is automatically sent when tapped, after which the Bluetooth File Explorer re-appears.
To get a file from the remote device:
- Select the folder containing the file.
- Tap the file that you wish to get or copy.
- From the File menu, tap Get.
OR
Tap and hold the desired file and select Get from the pop-up menu.
The file is copied to the local folder listed in the Local Folder field at the bottom of the screen.
To delete a file from the remote device:
- Tap the file that you wish to delete.
- From the File menu, tap Delete.
- Tap ok in the confirmation dialog box.
OR
Tap and hold the desired file and select Delete from the pop-up menu.
To set a local folder for incoming files:
- From the Tools menu, tap Set Local Folder.
- Use the drop-down menu at the top of the screen to go to your desired folder.
- Tap OK to return to the main screen of the Bluetooth File Explorer. You will see the Local Folder field is updated to reflect the new folder selection.
NOTE: The Local Folder information is associated with the currently open shortcut and is saved with the active profile. You can separately configure your Local Folder for each connection shortcut.
To refresh the list of displayed files and folders on the remote device, simply tap Refresh from the Tools menu.
Send via Bluetooth
You can conveniently send your Outlook contacts, calendar items, and tasks individually or collectively to the remote device via Bluetooth.
To send data via Bluetooth:
- Tap, then open either Contacts, Calendar, or Tasks.
- Tap and hold the item you wish to send to the remote device, then tap Send via Bluetooth from the pop-up menu. OR
Tap Menu > Send via Bluetooth.
- On the Select a Bluetooth Device screen, tap the name of the destination, then tap OK.

Dial via Bluetooth
The Dial via Bluetooth option allows you to select a contact from the contacts list, and have your paired cell phone dial the contact's phone number. If a contact has more than one phone number, select the number that you wish to dial.
To dial via Bluetooth:
- On the Contacts screen, tap and hold a contact and select Dial via Bluetooth.
- If your device is paired with more than one cell phone, or if a phone is not yet selected, tap the phone icon next to Select a phone, and choose the phone that you wish to use.
- Select the number that you wish to dial, then tap Dial Number.
After the number is sent to the cell phone, the connection on the device is closed.
After the cell phone completes the dialing process, you can use the phone the normal way.
Bluetooth Personal Area Network
A Bluetooth personal area network is a private, temporary, ad-hoc network of up to eight (8) devices. A Bluetooth personal area network allows you to easily exchange information that normally requires a TCP/IP network. Most chat utilities, multi-player games, etc. are fully functional in a Bluetooth personal area network environment.
Bluetooth private area networks are subject to the same security settings (service availability, authorization, authentication, and encryption) that govern other Bluetooth communications.
One Bluetooth device must be the host of the personal area network. Other Bluetooth devices join the network as clients. The host can accept and reject clients on an individual basis.
To set up a Bluetooth personal area network:
- In the Bluetooth Manager, tap New > Join a personal network.
- On the wizard screen, select Host a personal network, then tap Next.
- Add remote devices to the Bluetooth personal network, if desired.
a. Select the device that you wish to add.
b. Add other devices, if desired. Tap Add to add other devices. There can be up to eight devices, including the host.
- After adding devices, tap OK to complete the setup and close the wizard.

NOTE: Adding devices is optional. You do not have to add devices to the personal network while configuring the host. You can let other devices join the personal network later.
To join a personal network:
- In the Bluetooth Manager, tap New > Join a personal network.
- On the wizard screen, select Join a personal network, then tap Next.
- Select the host of the personal network, then tap Next to establish a connection to the personal area network.
If you are asked to enter the IP network settings, select Use server-assigned IP address, then tap OK.

Setting up High Quality Audio setup or Hands-free/Headset setup
- Tap the icon > Bluetooth Manager.
- Tap New > High Quality Audio setup or Hands-free/Headset setup > Next.
- Follow the on-screen instructions to complete the setup.
NOTE: Please ensure the Hands-free device you are trying to connect to is ready to receive incoming connection requests. Please refer to the device's manual for more information.
Setting up ActiveSync via Bluetooth
- Tap the icon > Bluetooth Manager.
- Tap New > ActiveSync via Bluetooth > Next.
- Follow the on-screen instructions to complete the setup. Please make sure the COM Port number that is set on the ActiveSync program on the computer is the same as the COM Port setting on MyPal.
- On the Bluetooth Connection Wizard screen, select the name of the computer to synchronize MyPal with, then tap Next.
- Select the COM Port setting used by the computer and tap Next.
- Tap Finish.
Chapter 9 Wi-Fi (A626/A696 only)
MyPal A626/A696 comes with a built-in Wireless Fidelity (Wi-Fi®) feature that allows you to connect to wireless local area networks and the Internet. Using the IEEE 802.11b/g standard for wireless LAN, MyPal A626/A696 can connect at speeds of up to 10-17 Mbps (in an open area) to an access point (Infrastructure mode) or to another wireless device (Ad-hoc mode).
Using Wi-Fi
The Wi-Fi icon on the Today screen gives you easy access to the Wi-Fi (Wireless Fidelity) feature on your device. Tapping the icon displays a menu that allows you to:
- Turn Wi-Fi on or off.
- Configure Wi-Fi settings.
NOTE You can use the Bluetooth® and Wi-Fi features simultaneously.

Turning on Wi-Fi
To turn on Wi-Fi:
- Tap >Enable Wi-Fi.
The Pocket PC then automatically scans for all available wireless networks within the Wi-Fi range.
- From the list of detected wireless networks, select a wireless network that you want to connect the device to.
- Select whether the wireless network connects to The Internet or Work network.
- Tap Connect. The device then connects to the selected network.

Configuring wireless networks
To configure a wireless network:
- After selecting a wireless network to connect your device to, tap Settings.
The Settings screen then appears.
- Tap Network Cards > Wireless tab.
- On the Configure Wireless Networks screen, tap on an available wireless LAN, then make your desired changes as necessary.
If the wireless LAN you want to connect to is not on the list, tap Add New... Refer to the succeeding sections for details on how to add new wireless LANs.
- Tap OK when done.
To configure a network adapter:
- Tap the Network Adapters tab.
- Make your desired changes to the available adapters on the list.
- Tap OK when done.
- After changing the network adapter settings, a message appears instructing you to remove then re-install the network card to have your changes take effect. Tap OK to close the window.
Adding a wireless network
If the device fails to automatically detect the wireless network you want to connect to, you can add the network provided you know the wireless network settings. Ask for the wireless network settings from your network administrator.
To add a wireless network:
- Open the Configure Wireless Networks window by:
- Tapping on Settings in the Multiple Networks Detected callout. OR
- Tapping > Settings > Connections tab > Network Cards.
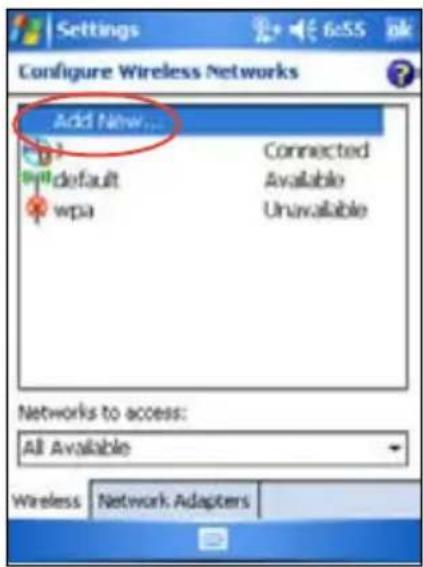
- In the Wireless tab of the Configure Wireless Networks screen, tap Add New.
- In the General tab of the Configure Wireless Network screen, enter the Network name using the input panel.
Then choose whether the wireless network connects to The Internet or Work network.
If you want to connect to another wireless device (Ad-hoc mode), select the option, This is a device-to-device (ad-hoc) connection. Otherwise, tap the Network Key tab to configure the wireless LAN's network security settings.
- In the Network Key tab, select the Authentication and Data Encryption settings of the wireless LAN you want to add.
NOTE: Inquire the network security settings from the network administrator.
- Tap the 802.1x tab to configure other network security settings.
- Tap OK to add the wireless network.
The new wireless network is then added to the list under the Wireless tab.
- Tap and hold the stylus on the new wireless network in the list, then tap Connect in the pop-up menu to connect your device to that network.
The Wi-Fi Manager
The Wi-Fi Manager shows connection status and information on a wireless network, and allows you to manually scan your area for available wireless networks.
To open Wi-Fi Manager:
- Tap > WLAN Setting. Or,
- Tap > Settings > Connections tab > Wi-Fi Manager.
There are four tabs in the Wi-Fi Manager:
Wi-Fi Status
This tab indicates whether Wi-Fi is currently connected, and shows information about the wireless connection. Specifically, the following information is displayed:
Status - shows the Wi-Fi connection status.
- Connected - the station is associated with one wireless LAN device. This status also indicates the MAC address of the device.
- Disconnected - a previous link existed but no beacon was received. The connection to the adapter is terminated.
ESSID - shows the Extended Service Set Identifier (ESSID) to which the wireless device is connected. The text in this field is usually an unreadable alphanumeric string.
BSSID - shows the Basic Service Set ID (BSSID) to which the wireless device is connected. In ESS mode, this is the MAC address of the access point to which your device is connected.
BSS Mode - tells you whether the device is connected to an access point (Infrastructure mode) or to another wireless device (Ad-hoc mode).
Channel - shows the channel used by the wireless device.
IP Address - shows the IP address of the wireless device.
Signal Strength - shows the signal strength level between the Wi-Fi device and the access point (or another wireless device) to which it is currently connected.
Setting

This tab allows you to define settings for establishing a device-to-device wireless connection as well as power saving settings.
NOTE: We recommend setting Power Save to Enable.
IP Info
This tab displays the device's Internet Protocol (IP) information including the host name, domain, DNS server, IP address, etc.
In this tab, you can renew the IP address when the wireless network uses the Dynamic Host Configuration Protocol (DHCP). Tapping the Renew button forces the device to refresh its server-assigned IP address. The process may take several seconds while the system updates the IP information.
You can also try to detect if the wireless device is currently connected to the wireless network by tapping the Ping button.
Site Survey
This tab allows you to search for available wireless networks within your location. Tap the Re-scan button to scan all available wireless networks and display the results on the screen.
Each wireless network is preceded by an icon for easy identification. The network channel, RSSI, and BSSID are also displayed in columns.

Refer to the table of icon indications and column descriptions below.
Table of icon indications:
| Icon Indicates that the wireless network is |
| an Access Point with disabled Wired Equivalent Privacy (WEP) encryption |
| an Access Point with enabled WEP encryption |
| an Access Point with disabled WEP encryption and MyPal is currently connected to this network |
| an Access Point with enabled WEP encryption and MyPal is currently connected to this network |
| a wireless device with disabled WEP encryption |
| a wireless device with enabled WEP encryption |
| a wireless device with disabled WEP encryption and MyPal is currently connected to this network |
| a wireless device with enabled WEP encryption and MyPal is currently connected to this network |
ESSID - shows the Extended Service Set Identifier (ESSID) of the wireless network found in the search.
CH - shows the channel used by a wireless device.
RSSI - shows the Received Signal Strength Indication (RSSI) transmitted by each wireless network. This information is helpful in determining which network you wish to associate your device. This signal is normally represented by a dBm value.
| Icon Link Quality |
| Excellent |
| Good |
| Fair |
| Poor |
NOTE The icon may be green or orange. The green icon indicates the signal received from IEEE 802.11b device, while the orange icon indicates the signal received from IEEE 802.11g device.
BSSID - shows the Media Access Control (MAC) address of the access point, or the Basic Service Set ID (BSSID) in an ad-hoc mode.
Appendix Notices
Federal Communications Commission Statement
This device complies with Part 15 of the FCC Rules. Operation is subject to the following two conditions:
1) This device may not cause harmful interference, and 2) This device must accept any interference received, including interference that may cause undesired operation.
This device and its antenna must not be co-located or operating in conjunction with any other antenna or transmitter.
This equipment has been tested and found to comply with the limits for a Class B digital device, pursuant to Part 15 of the FCC Rules. These limits are designed to provide reasonable protection against harmful interference in a residential installation. This equipment generates, uses and can radiate radio frequency energy and, if not installed and used in accordance with manufacturer's instructions, may cause harmful interference to radio communications. However, there is no guarantee that interference will not occur in a particular installation. If this equipment does cause harmful interference to radio or television reception, which can be determined by turning the equipment off and on, the user is encouraged to try to correct the interference by one or more of the following measures:
- Reorient or relocate the receiving antenna.
- Increase the separation between the equipment and receiver.
- Connect the equipment to an outlet on a circuit different from that to which the receiver is connected.
- Consult the dealer or an experienced radio/TV technician for help.
WARNING! The use of shielded cables for connection of the monitor to the graphics card is required to assure compliance with FCC regulations. Changes or modifications to this unit not expressly approved by the party responsible for compliance could void the user's authority to operate this equipment.
Canadian Department of Communications Statement
This digital apparatus does not exceed the Class B limits for radio noise emissions from digital apparatus set out in the Radio Interference Regulations of the Canadian Department of Communications.
This class B digital apparatus complies with Canadian ICES-003.
UL Safety Notices
Required for UL 1459 covering telecommunications (telephone) equipment intended to be electrically connected to a telecommunication network that has an operating voltage to ground that does not exceed 200V peak, 300V peak-to-peak, and 105V rms, and installed or used in accordance with the National Electrical Code (NFPA 70).
When using the Pocket PC, basic safety precautions should always be followed to reduce the risk of fire, electric shock, and injury to persons, including the following:
- Do not use the Pocket PC near water, for example, near a bathtub, washbasin, kitchen sink, or laundry tub, in a wet basement, or near a swimming pool.
- Do not use the Pocket PC during an electrical storm. There may be a remote risk of electric shock from lightning.
- Do not use the Pocket PC in the vicinity of a gas leak.
Required for UL 1642 covering primary (non-rechargeable) and secondary (rechargeable) lithium batteries for use as power sources in products. These batteries contain metallic lithium, or a lithium alloy, or a lithium ion, and may consist of a single electrochemical cell or two or more cells connected in series, parallel, or both, that convert chemical energy into electrical energy by an irreversible or reversible chemical reaction.
- Do not dispose of the Pocket PC battery pack in a fire, as it may explode. Check with local codes for possible special disposal instructions to reduce the risk of injury to persons due to fire or explosion.
- Do not use power adapters or batteries from other devices to reduce the risk of injury to persons due to fire or explosion. Use only UL certified power adapters or batteries supplied by the manufacturer or authorized retailers.
Replaceable batteries
If equipment is provided with a replaceable battery and if replacement by an incorrect type could result in an explosion (e.g., with some lithium batteries), the following applies:
- If the battery is placed in an OPERATOR ACCESS AREA, there shall be a marking close to the battery or a statement in both the operating and the servicing instructions.
- If the battery is placed elsewhere in the equipment, there shall be a marking close to the battery or a statement in the servicing instructions.
The marking or statement shall include the following or similar text:
CAUTION: RISK OF EXPLOSION IF BATTERY IS REPLACED BY AN INCORRECT TYPE. DISPOSE OF USED BATTERIES ACCORDING TO THE INSTRUCTIONS
Compliance is checked by inspection.
Operator access with a tool
If a TOOL is necessary to gain access to an OPERATOR ACCESS AREA, either all other compartments within that area containing a hazard shall be inaccessible to the OPERATOR by the use of the same TOOL, or such compartments shall be marked to discourage OPERATOR access.
An acceptable marking for an electric shock hazard is (ISO 3864, No. 5036)
Equipment for restricted access locations
For equipment intended only for installation in a RESTRICTED ACCESS LOCATION, the installation instructions shall contain a statement to this effect.
Checklist of Regulatory Statement
15.21
You are cautioned that any changes or modifications not expressly approved in this manual could void your authorization to use the device.
CAUTION: Any changes or modifications not expressly approved by the party responsible for compliance could void the user's authority to operate the equipment.
Prohibition of co-location
This device must not be co-located or operating in conjunction with any other antenna or transmitter
15.105 Federal Communications Commission (FCC) Requirements, Part 15
This equipment has been tested and found to comply with the limits for a class B digital device, pursuant to part 15 of the FCC Rules. These limits are designed to provide reasonable protection against harmful interference in a residential installation.
This equipment generates, uses and can radiate radio frequency energy and, if not installed and used in accordance with the instructions, may cause harmful interference to radio communications. However, there is no guarantee that interference will not occur in a particular installation. If this equipment does cause harmful interference to radio or television reception, which can be determined by turning the equipment off and on, the user is encouraged to try to correct the interference by one or more of the following measures:
—Reorient or relocate the receiving antenna. — Increase the separation between the equipment and receiver. —Connect the equipment into an outlet on a circuit different from that to which the receiver is connected. —Consult the dealer or an experienced radio/TV technician for help.
Regulatory information / Disclaimers
Installation and use of this Wireless LAN device must be in strict accordance with the instructions included in the user documentation provided with the product. Any changes or modifications (including the antennas) made to this device that are not expressly approved by the manufacturer may void the user's authority to operate the equipment. The manufacturer is not responsible for any radio or television interference caused by unauthorized modification of this device, or the substitution of the connecting cables and equipment other than manufacturer specified. It is the responsibility of the user to correct any interference caused by such unauthorized modification, substitution or attachment. Manufacturer and its authorized resellers or distributors will assume no liability for any damage or violation of government regulations arising from failing to comply with these guidelines.
CAUTION: To maintain compliance with FCC's RF exposure guidelines, this equipment should be installed and operated with minimum distance 20cm between the radiator and your body. Use on the supplied antenna. Unauthorized antenna, modification, or attachments could damage the transmitter and may violate FCC regulations.
MPE Statement (Safety Information)
Your device contains a low power transmitter. When device is transmitted it sends out Radio Frequency (RF) signal.
Safety Information
In order to maintain compliance with the FCC RF exposure guidelines, this equipment should be installed and operated with minimum distance 20cm between the radiator and your body. Use only with supplied antenna. Unauthorized antenna, modification, or attachments could damage the transmitter and may violate FCC regulations.
Caution Statement of the FCC Radio Frequency Exposure
This Wireless LAN radio device has been evaluated under FCC Bulletin OET 65C and found compliant to the requirements as set forth in CFR 47 Sections 2.1091, 2.1093, and 15.247(b)(4) addressing RF Exposure from radio frequency devices. The radiation output power of this Wireless LAN device is far below the FCC radio frequency exposure limits. Nevertheless, this device shall be used in such a manner that the potential for human contact during normal operation—as a mobile or portable device but use in a body-worn way is strictly prohibit. When using this device, a certain separation distance between antenna and nearby persons has to be kept to ensure RF exposure compliance. In order to comply with the RF exposure limits established in the ANSI C95.1 standards, the distance between the antennas and the user should not be less than 20cm.

Rock Solid · Heart Touching
ASUS contact information
ASUSTeK COMPUTER INC. (Taiwan)
Technical Support
Hotline 0800-093-456 (Toll-free call from Taiwan only)
Fax +886-2-2895-9254
E-mail http://vip.asus.com/eservice/techserv.aspx
Website http://tw.asus.com
ASUSTeK COMPUTER INC. (Asia-Pacific)
Technical Support
Hotline +886-2-2894-3447
Fax +886-2-2890-7698
E-mail http://vip.asus.com/eservice/techserv.aspx
Website http://www.asus.com
ASUS COMPUTER INTERNATIONAL (America)
Technical Support
PDA Support
E-mail http://vip.asus.com/eservice/techserv.aspx
PDA Hotline +1-866-732-7108
ASUS COMPUTER GmbH (Germany and Austria)
Technical Support
Hotline (Germany) +49-(0)2102-9599-10
(Austria) 0820-240513
Fax +49-2102-959911
Email http://www.asus.de/support/support.htm
Website http://www.asus.de
- COPYRIGHT © 2006 ASUSTEK COMPUTER INC. ALL RIGHTS RESERVED
- TABLE OF CONTENTS
- CHAPTER 1 GETTING STARTED
- CHAPTER 2 BASICS
- CHAPTER 3 SYNCHRONIZE AND ENHANCE
- CHAPTER 4 MICROSOFT® POCKET OUTLOOK
- CHAPTER 5 COMPANION PROGRAMS
- CHAPTER 6 INTERNET EXPLORER MOBILE
- CHAPTER 7 GET CONNECTED
- CHAPTER 8 BLUETOOTH ®
- CHAPTER 9 WI-FI
- APPENDIX NOTICES
- MYPAL A626/A686/A696 SPECIFICATIONS
- PACKAGE CONTENTS
- STANDARD ITEMS
- EXTRA ITEMS FOR A686 AND A
- OPTIONAL ACCESSORIES
- INTRODUCING MYPAL
- FRONT FEATURES
- BACK FEATURES
- RIGHT SIDE FEATURES
- LEFT SIDE FEATURES
- TOP FEATURES
- BOTTOM FEATURES
- THE GPS CAR KIT (MYPAL A686/A696 ONLY)
- INSTALLING AND REMOVING THE BATTERY
- CONNECTING TO A POWER SOURCE
- SETTING UP GPS (MYPAL A696/A686 ONLY)
- ADDITIONAL STORAGE
- INSTALLING AND REMOVING SD/MMC/SDIO CARD
- ACTIVATING MYPAL
- CALIBRATING AND ACTIVATING YOUR DEVICE
- BASIC SCREENS ON MYPAL
- TODAY SCREEN
- START MENU
- MENU BAR
- POP-UP MENUS
- CHAPTER 2: BASICS
- VIEWING SYSTEM INFORMATION
- TO DISPLAY THE SYSTEM INFORMATION
- ENTERING INFORMATION
- ENTERING TEXT USING THE INPUT PANEL
- TO TYPE WITH THE SOFT KEYBOARD
- WORD COMPLETION FEATURE
- TO CHANGE OPTIONS ON THE WORD COMPLETION FEATURE
- TO USE LETTER RECOGNIZER
- TO USE BLOCK RECOGNIZER
- TO USE TRANSCRIBER
- TO EDIT TYPED TEXT
- WRITING ON THE SCREEN
- TO WRITE ON THE SCREEN
- TO EDIT YOUR WRITING
- TO CONVERT WRITING TO TEXT
- TO SELECT A ZOOM LEVEL
- TIPS FOR GETTING GOOD WRITING RECOGNITION
- DRAWING ON THE SCREEN
- TO CREATE A DRAWING
- TO EDIT YOUR DRAWING
- RECORDING A MESSAGE
- TO CREATE A RECORDING
- TO CHANGE THE RECORDING FORMAT
- FINDING AND ORGANIZING INFORMATION
- USING THE SEARCH FUNCTION
- TO SEARCH FOR INFORMATION
- TO USE THE HELP FEATURE
- USING THE FILE EXPLORER
- TO USE THE FILE EXPLORER TO FIND AND ORGANIZE FILES
- CUSTOMIZING YOUR DEVICE
- TO SEE THE AVAILABLE OPTIONS
- CHANGING THE DATE AND TIME
- TO CHANGE THE DATE AND TIME SETTINGS
- TO CHANGE THE ALARM SETTINGS
- CHANGING THE START MENU
- TO CHANGE THE MENU ITEMS
- CHANGING THE OWNER INFORMATION
- TO CHANGE THE OWNER INFORMATION
- SETTING A PASSWORD
- TO SET A PASSWORD FOR YOUR DEVICE
- CHANGING THE SCREEN DISPLAY ORIENTATION
- TO CHANGE THE SCREEN DISPLAY ORIENTATION
- PORTRAIT ORIENTATION
- LANDSCAPE ORIENTATION (DEFAULT)
- TO ENABLE THE CLEARTYPE FEATURE
- TO CHANGE THE SCREEN TEXT SIZE
- CHANGING THE SCREEN THEME
- TO CHANGE THE SCREEN THEME
- TO SPECIFY THE ITEMS TO APPEAR ON THE TODAY SCREEN
- CHANGING THE BUTTON ASSIGNMENTS
- TO CHANGE THE BUTTON ASSIGNMENTS
- TO CUSTOMIZE THE BUTTON SETTINGS
- USING MODE SWITCHER AND TASK SWITCHER
- TO CUSTOMIZE MODE SWITCHER
- TO ENABLE TASK SWITCHER
- SETTING THE BACKLIGHT
- TO SET THE BACKLIGHT
- CHANGING THE BATTERY POWER SETTINGS
- TO CHANGE THE BATTERY POWER SETTINGS
- SELECTING SOUNDS AND NOTIFICATIONS
- TO SET SOUNDS AND NOTIFICATIONS
- CHANGING THE AUDIO SETTINGS
- TO CHANGE THE AUDIO SETTINGS
- TO CHANGE THE MICROPHONE SETTINGS
- CHANGING THE WAKEUP SETTINGS
- CHANGING THE USB SETTINGS
- TO CHANGE THE USB SETTINGS
- TO CHANGE THE USB CHARGING MODE
- CHANGING THE MEMORY SETTINGS
- TO DISPLAY THE MEMORY ALLOCATION
- TO CHECK THE STORAGE CARD MEMORY
- TO VIEW THE RUNNING PROGRAMS
- USING SIMPLE APPLICATIONS
- TO ACCESS THE APPLICATIONS
- CALCULATOR
- GAMES
- BUBBLE BREAKER
- SOLITAIRE
- PICTURES & VIDEOS
- TO USE PICTURES
- TO USE AUTO CORRECT
- TO ROTATE THE PICTURE
- TO CROP THE PICTURE
- TO SAVE THE PICTURE
- CHECKING DEVICE STATUS
- TO OPEN ASUS STATUS
- TO CHANGE ASUS STATUS SETTINGS
- MICROSOFT® ACTIVESYNC®
- FOR EXAMPLE
- INSTALLING ACTIVESYNC® ON YOUR COMPUTER
- TO INSTALL ACTIVESYNC ON YOUR COMPUTER
- SYNCHRONIZING YOUR DEVICE
- CONNECTING YOUR DEVICE TO A COMPUTER
- SETTING UP A SYNC RELATIONSHIP
- TO SET UP A SYNC RELATIONSHIP
- CHECKING SYNCHRONIZED INFORMATION
- NOTE: OPEN MICROSOFT
- MANUALLY INITIATING SYNCHRONIZATION
- TO MANUALLY INITIATE SYNCHRONIZATION
- SYNCHRONIZATION OPTIONS
- TO DISPLAY THE SYNCHRONIZATION OPTIONS
- TO SELECT ITEMS TO SYNCHRONIZE
- CHAPTER
- MICROSOFT® POCKET OUTLOOK
- CALENDAR
- CREATING APPOINTMENTS
- TO CREATE AN APPOINTMENT
- NOTE
- USING THE SUMMARY SCREEN
- CREATING MEETING REQUESTS
- TO CREATE A MEETING REQUEST
- TO SCHEDULE A MEETING
- CONTACTS
- CREATING CONTACTS
- TO CREATE A CONTACT
- FINDING A CONTACT
- TASKS
- CREATING TASKS
- TO CREATE A TASK
- NOTES
- TO SET THE DEFAULT INPUT MODE FOR ENTERING NOTE TEXT
- CREATING NOTES
- TO CREATE A NOTE
- MESSAGING
- SYNCHRONIZING E-MAIL MESSAGES
- DURING SYNCHRONIZATION
- CONNECTING DIRECTLY TO AN E-MAIL SERVER
- READING MESSAGES IN INBOX
- COMPOSING MESSAGES
- TO COMPOSE A MESSAGE
- TO SAVE COMPOSED MESSAGES
- MANAGING E-MAIL MESSAGES AND FOLDERS
- WORD MOBILE
- CREATING WORD MOBILE DOCUMENTS
- TO CREATE A NEW WORD DOCUMENT
- SAVING WORD MOBILE DOCUMENTS
- TO SAVE A WORD MOBILE DOCUMENT
- TO SPECIFY SAVE OPTIONS
- OPENING AN EXISTING WORD MOBILE DOCUMENT
- VIEWING DOCUMENTS
- TO ZOOM IN OR OUT OF A DOCUMENT
- EXCEL MOBILE
- CREATING AN EXCEL MOBILE DOCUMENT
- OPENING AN EXISTING EXCEL MOBILE DOCUMENT
- SAVING AN EXCEL MOBILE DOCUMENT
- TO SAVE AN EXCEL MOBILE DOCUMENT
- TO RENAME/MOVE A FILE
- TIPS FOR WORKING IN EXCEL MOBILE
- POWERPOINT MOBILE
- OPENING A POWERPOINT PRESENTATION FILE
- TO OPEN A POWERPOINT MOBILE FILE
- VIEWING A POWERPOINT MOBILE FILE
- TO GO TO THE PREVIOUS OR NEXT SLIDE
- TO ZOOM IN ON A SLIDE
- VIEWING A CUSTOM SHOW (SLIDESHOW)
- SETTING SHOW OPTIONS
- POCKET MSN
- TO USE POCKET MSN
- TO OPEN MSN MESSENGER
- SIGNING UP IN MSN MESSENGER
- TO SIGN IN TO MSN MESSENGER SERVICE
- MSN MESSENGER CONTACTS
- CHATTING WITH CONTACTS
- USING MSN HOTMAIL
- TO OPEN MSN HOTMAIL
- WINDOWS MEDIA PLAYER FOR POCKET PC
- REMOTE PRESENTER
- USING REMOTE PRESENTER
- TO CONNECT YOUR POCKET PC TO YOUR PC/NOTEBOOK
- TO USE THE REMOTE PRESENTER
- USING INTERNET EXPLORER MOBILE
- TO LAUNCH INTERNET EXPLORER MOBILE
- CHANGING VIEW SETTINGS
- TO CHANGE VIEW SETTINGS
- BROWSING THE INTERNET
- TO BROWSE THE INTERNET
- MOBILE FAVORITES FOLDER
- FAVORITE LINKS
- MOBILE FAVORITES
- TO CREATE A MOBILE FAVORITE
- SAVING DEVICE MEMORY
- VIEWING MOBILE FAVORITES AND CHANNELS
- TO VIEW MOBILE FAVORITES AND CHANNELS
- ADDING/DELETING MOBILE FAVORITES AND FOLDERS
- TO ADD A FAVORITE
- TO ADD A FOLDER
- CHAPTER 7: GET CONNECTED
- CONNECTING TO THE INTERNET
- TO CONNECT TO THE INTERNET
- TO SELECT THE NETWORK
- TO VIEW INTRANET URLS
- CONNECTING TO WORK
- SETTING UP CONNECTIONS
- MODEM CONNECTIONS
- TO SET UP A MODEM CONNECTION
- VPN SERVER CONNECTIONS
- TO SET UP A VPN SERVER CONNECTION
- PROXY SERVER SETTINGS
- TO CHANGE PROXY SERVER SETTINGS
- NETWORK CARD CONNECTIONS
- TO SET UP A NETWORK CARD
- ENDING A CONNECTION
- SETTING UP A WAP GATEWAY
- USING DIALING RULES
- USING TERMINAL SERVICES CLIENT
- TO CONNECT AND HAVE REMOTE ACCESS TO A COMPUTER
- NAVIGATING WITHIN TERMINAL SERVICES CLIENT
- LOGGING OFF OR DISCONNECTING FROM THE REMOTE COMPUTER
- INFRARED (IR) CONNECTION
- SETTING BEAM OPTIONS
- TO SET THE BEAM OPTIONS
- RECEIVING INFRARED BEAMS
- TO RECEIVE A FILE VIA INFRARED BEAM
- SENDING INFRARED BEAMS
- TO SEND A FILE VIA INFRARED BEAM
- CHAPTER 8 BLUETOOTH®
- USING BLUETOOTH
- BLUETOOTH SETTINGS
- TO CONFIGURE BLUETOOTH SETTINGS
- ACCESSIBILITY
- GENERAL
- SERVICES
- BLUETOOTH MANAGER
- TO OPEN THE BLUETOOTH MANAGER
- BLUETOOTH CONNECTION WIZARD
- TO LAUNCH THE BLUETOOTH CONNECTION WIZARD
- BUSINESS CARD EXCHANGE
- TO ACCESS BUSINESS CARD EXCHANGE
- REMOTE DEVICE SERVICES
- WIRELESS SERIAL PORT
- TO CONFIGURE THE BLUETOOTH SERIAL PORT
- DIAL-UP NETWORKING
- TO SET UP DIAL-UP NETWORKING
- BLUETOOTH FILE EXPLORER
- BLUETOOTH FILE EXPLORER MENUS
- TO CHANGE THE REMOTE DEVICE FOLDER
- TO CREATE A FOLDER ON THE REMOTE DEVICE
- TO SEND A FILE TO THE REMOTE DEVICE
- TO GET A FILE FROM THE REMOTE DEVICE
- TO DELETE A FILE FROM THE REMOTE DEVICE
- TO SET A LOCAL FOLDER FOR INCOMING FILES
- SEND VIA BLUETOOTH
- TO SEND DATA VIA BLUETOOTH
- DIAL VIA BLUETOOTH
- TO DIAL VIA BLUETOOTH
- BLUETOOTH PERSONAL AREA NETWORK
- TO SET UP A BLUETOOTH PERSONAL AREA NETWORK
- TO JOIN A PERSONAL NETWORK
- SETTING UP HIGH QUALITY AUDIO SETUP OR HANDS-FREE/HEADSET SETUP
- SETTING UP ACTIVESYNC VIA BLUETOOTH
- CHAPTER 9 WI-FI (A626/A696 ONLY)
- USING WI-FI
- TURNING ON WI-FI
- TO TURN ON WI-FI
- CONFIGURING WIRELESS NETWORKS
- TO CONFIGURE A WIRELESS NETWORK
- TO CONFIGURE A NETWORK ADAPTER
- ADDING A WIRELESS NETWORK
- TO ADD A WIRELESS NETWORK
- THE WI-FI MANAGER
- WI-FI STATUS
- SETTING
- IP INFO
- SITE SURVEY
- FEDERAL COMMUNICATIONS COMMISSION STATEMENT
- CANADIAN DEPARTMENT OF COMMUNICATIONS STATEMENT
- UL SAFETY NOTICES
- REPLACEABLE BATTERIES
- CAUTION: RISK OF EXPLOSION IF BATTERY IS REPLACED BY AN INCORRECT TYPE. DISPOSE OF USED BATTERIES ACCORDING TO THE INSTRUCTIONS
- OPERATOR ACCESS WITH A TOOL
- EQUIPMENT FOR RESTRICTED ACCESS LOCATIONS
- CHECKLIST OF REGULATORY STATEMENT
- PROHIBITION OF CO-LOCATION
- FEDERAL COMMUNICATIONS COMMISSION (FCC) REQUIREMENTS, PART
- REGULATORY INFORMATION / DISCLAIMERS
- MPE STATEMENT (SAFETY INFORMATION)
- SAFETY INFORMATION
- CAUTION STATEMENT OF THE FCC RADIO FREQUENCY EXPOSURE
- ASUS CONTACT INFORMATION
Brand : ASUS
Model : MyPal A696
Category : Browser