ROG XG Station 2 - Docking station ASUS - Free user manual and instructions
Find the device manual for free ROG XG Station 2 ASUS in PDF.
| Product Type | External docking station for laptop |
| Brand | ASUS |
| Model | ROG XG Station 2 |
| Connection to computer | Thunderbolt™ 3 (Type-C) |
| Ethernet connection | Gigabit network controller 10/100/1000 Mb/s |
| USB ports | 4 x USB 3.0, 1 x USB 3.0 Type-B |
| RGB lighting control | ASUS ROG AURA |
| Power supply | 600W, 80 Plus Gold |
| Dimensions (L x W x H) | 456 mm x 158 mm x 278 mm |
| Weight | 5.1 kg |
| Graphics card compatibility | PCI-Express x16, slot 2.5 ; NVIDIA GeForce GTX 900+, AMD Radeon R9+ |
| Graphics output | Defined by the installed graphics card |
| Included accessories | USB 3.0 Type-B cable, Thunderbolt™ 3 Type-C cable, Power cord |
| Operating temperature | 5 °C to 40 °C |
| Cleaning | Cellulose sponge or chamois soaked in a non-abrasive solution |
| Safety | Do not use solvents; unplug before cleaning; avoid humidity and magnetic fields |
| Repairability | Reserved for ASUS technicians; do not disassemble |
| Plasma tube | Not replaceable by user |
| Required operating system | Microsoft Windows 10 64-bit |
Frequently Asked Questions - ROG XG Station 2 ASUS
User questions about ROG XG Station 2 ASUS
0 question about this device. Answer the ones you know or ask your own.
Ask a new question about this device
Download the instructions for your Docking station in PDF format for free! Find your manual ROG XG Station 2 - ASUS and take your electronic device back in hand. On this page are published all the documents necessary for the use of your device. ROG XG Station 2 by ASUS.
USER MANUAL ROG XG Station 2 ASUS
The following safety precautions will increase the life of the ROG XG-Station 2. Follow all precautions and instructions. Except as described in this manual, refer all servicing to qualified personnel. Do not use damaged power cords, accessories, or other peripherals. Do not use strong solvents such as thinners, benzene, or other chemicals on or near the surface.

Disconnect the AC power before cleaning. Wipe the ROG XG-Station 2 using a clean cellulose sponge or chamois cloth dampened with a solution of nonabrasive detergent and a few drops of warm water and remove any extra moisture with a dry cloth.
DO NOT place on uneven or unstable work surfaces. Seek servicing if the casing has been damaged.
DO NOT place or drop objects on top and do not shove any foreign objects into the ROG XG-Station 2.
DO NOT expose to dirty or dusty environments. DO NOT operate during a gas leak.
DO NOT expose to strong magnetic or electrical fields.
DO NOT leave the ROG XG-Station 2 on your lap or any part of the body to prevent discomfort or injury from heat exposure.
DO NOT expose to or use near liquids, rain, or moisture. DO NOT use the modem during electrical storms.
DO NOT carry or cover a ROG XG-Station 2 that is powered ON with any materials that will reduce air circulation such as a carrying bag.
SAFE TEMP: This ROG XG-Station 2 should only be used in environments with ambient temperatures between 5^ (41°F) and 40^ (104°F)
- Never attempt to disassemble and reassemble ROG XG-Station 2. Only ASUS-authorized technicians should repair the device.
This symbol of the crossed out wheeled bin indicates that the product (electrical and electronic equipment) should not be placed in municipal waste. Check local regulations for disposal of electronic products.
1. Installation requirements
To ensure a successful installation of the ROG XG-Station 2, your computer must meet the following requirements:
A Notebook PC with Thunderbolt™ 3 (updated to the latest firmware)
Microsoft Windows 10 (64 bit)
Refer to www.asus.com for the complete Notebook PC QVL (Qualified Vendors List)
2. Specifications summary
| Model | ROG XG STATION 2 |
| Connection to PC | Thunderbolt™ 3 |
| Ethernet connection | Gigabit Lan 10/100/1000 Mbps |
| Input / Output | 4 x USB 3.0 ports |
| Additional USB | 1 x USB 3.0 Type B port |
| RGB Lighting Control | ASUS ROG AURA supported |
| Power Supply | 600W 80 Plus Gold Power Supply |
| Dimension | Length: 456mm; Width: 158mm; Height: 278mm |
| Weight | 5.1KG |
| Graphics Card Support | Provides support for a single full-length, 2.5 slot, PCI-Express x16 graphics card: - NVIDIA GeForce™ GTX 900 series and newer - AMD Radeon R9 series and newer |
| Graphics output | Defined by the graphics card installed |
| Accessories | 1x USB 3.0 Type-B cable 1x Thunderbolt™ 3 Type-C cable 1x Power cord Important product information guides |
3. Hardware introduction
Rear view
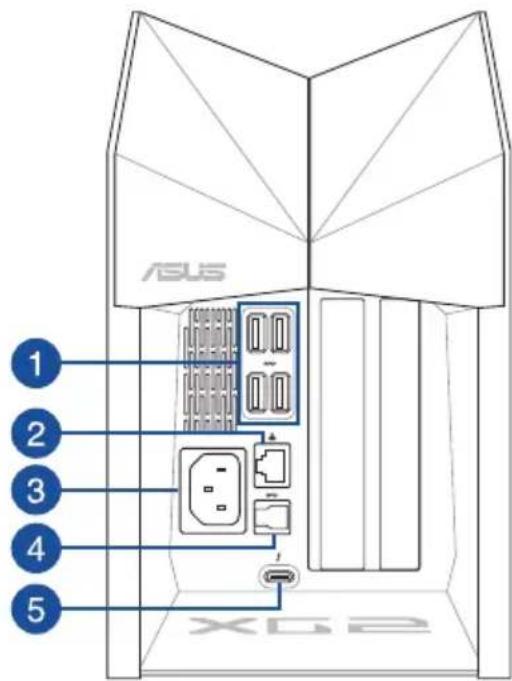
1 USB 3.0 port
LAN port
3 Power (DC) input port
4 USB3.0 Type-B port
5 ThunderboltTM 3 Type-C port
4. Hardware installation
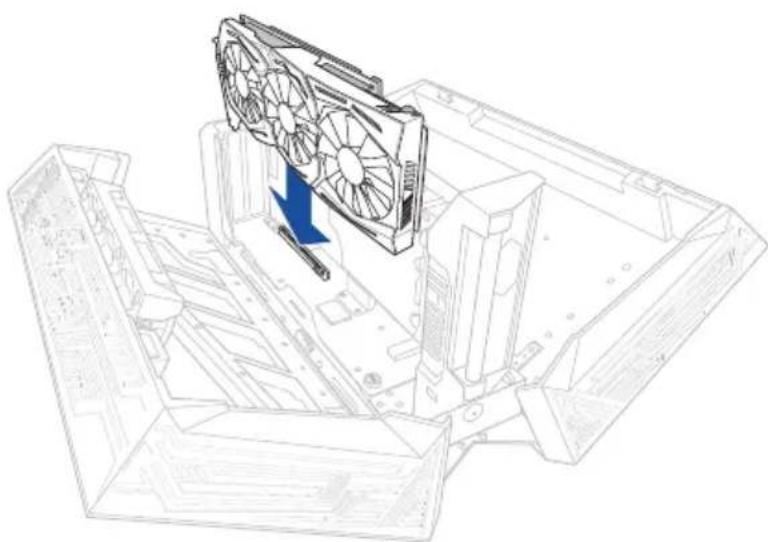
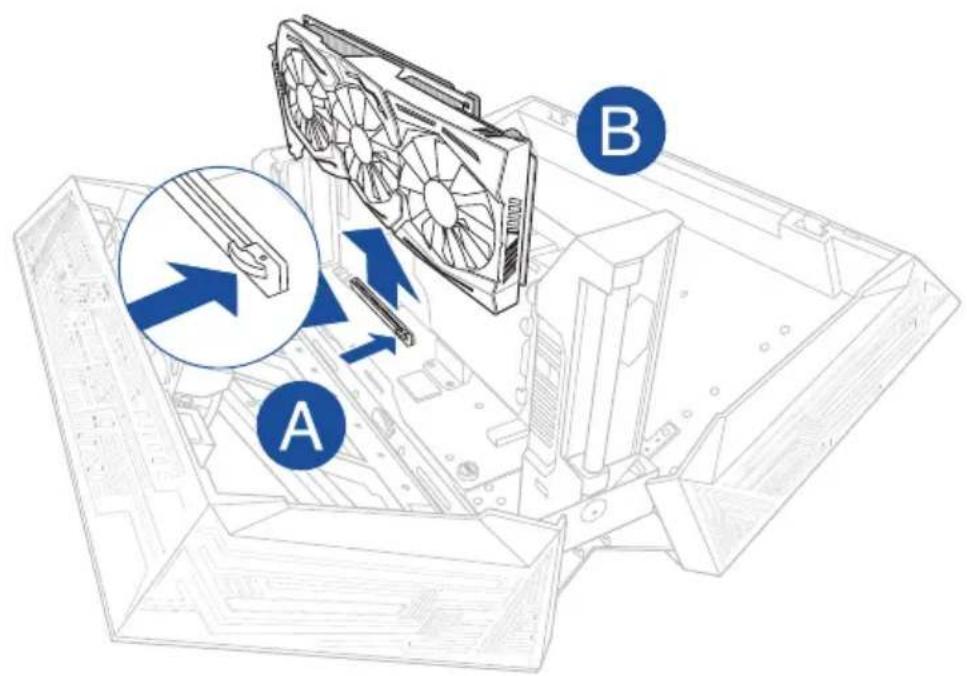
To install the ROG XG-Station 2:
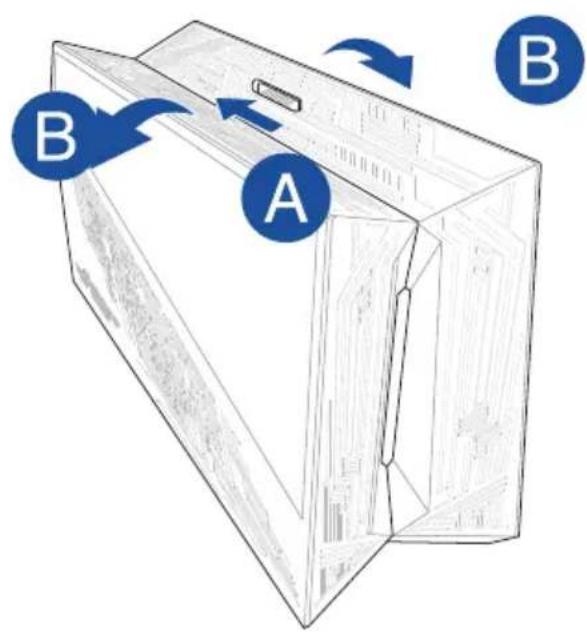
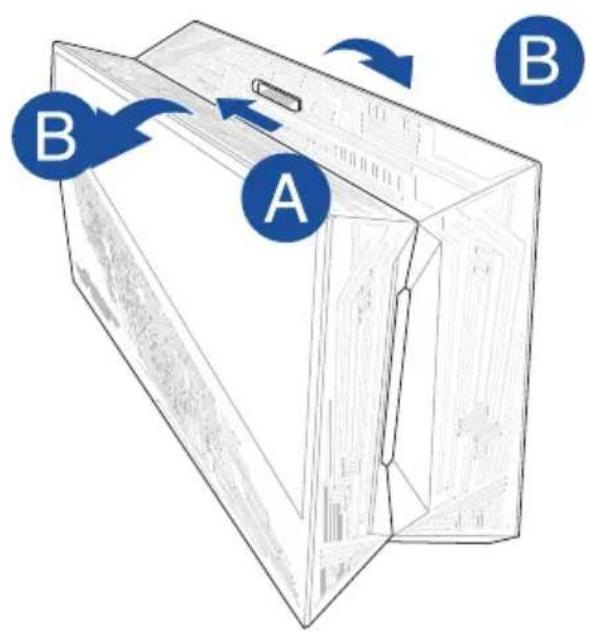
- Slide the spring lock to an unlocked position, then open the ROG XG-Station 2.
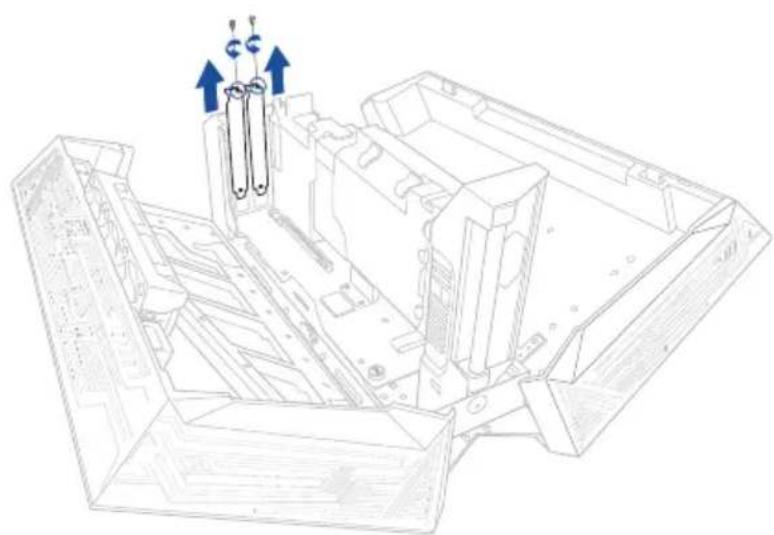
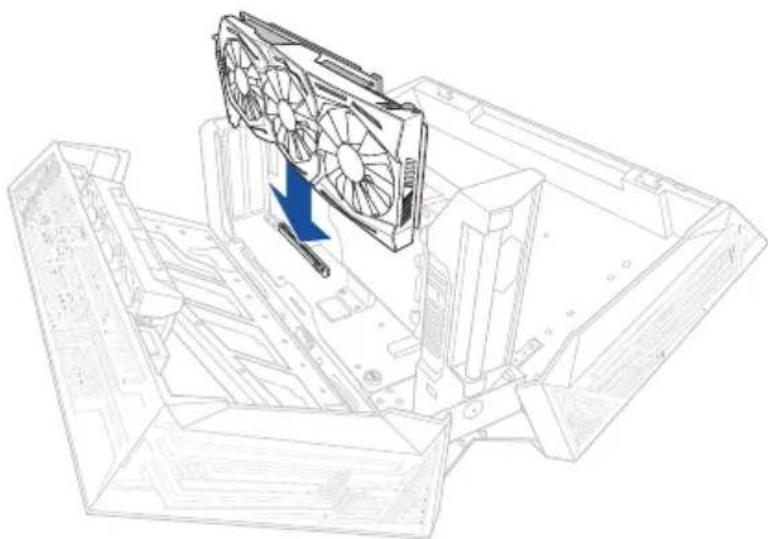
- Remove the screws that secure the metal bracket to the ROG XG-Station 2, then remove the metal bracket.

- Align and insert the graphics card into the PCI-E slot.

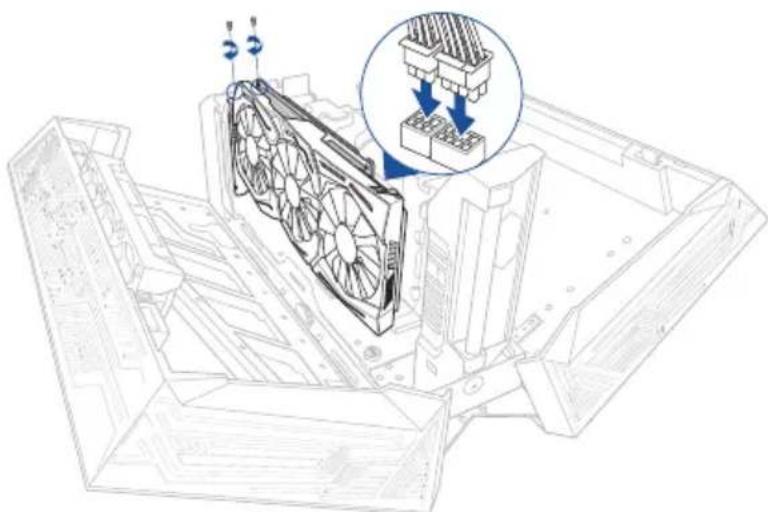
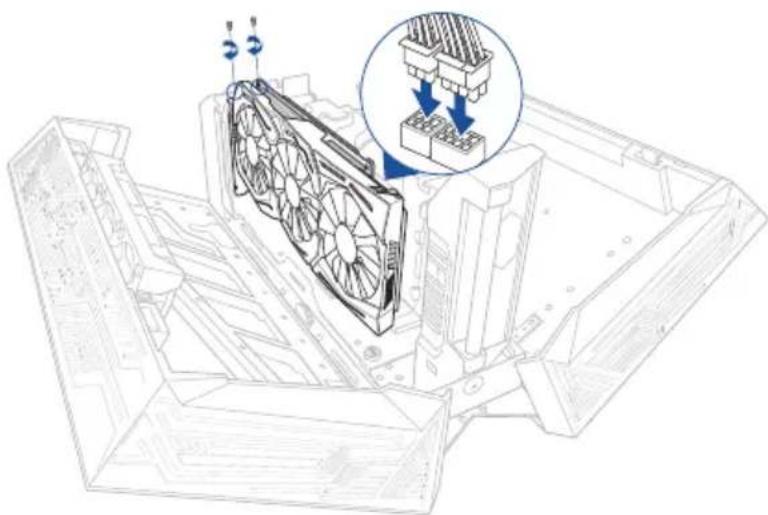
- Secure the metal bracket with the screws you removed earlier, then connect the power cables to the graphics card.

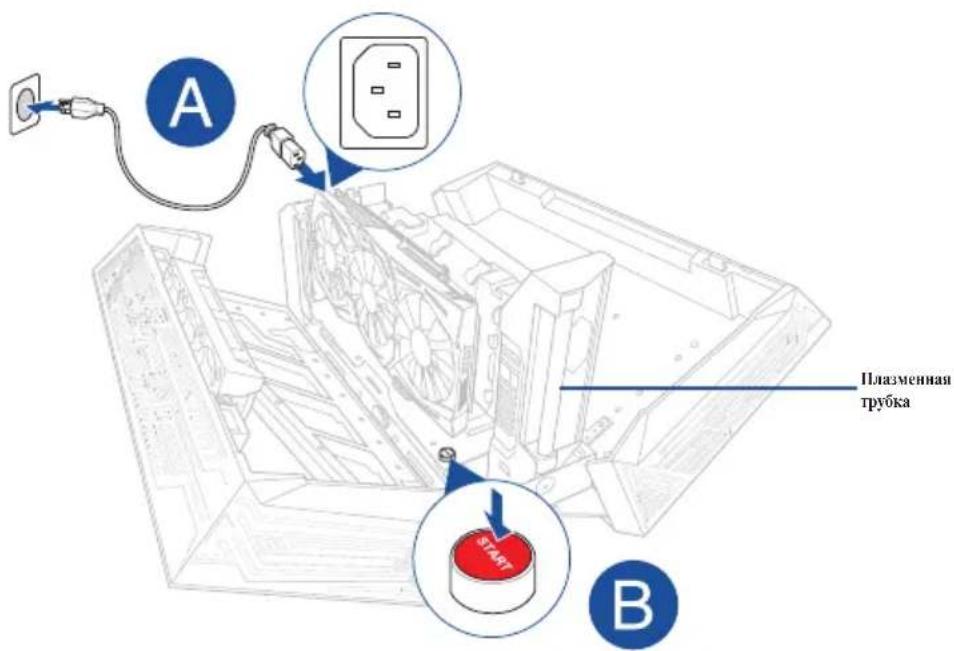
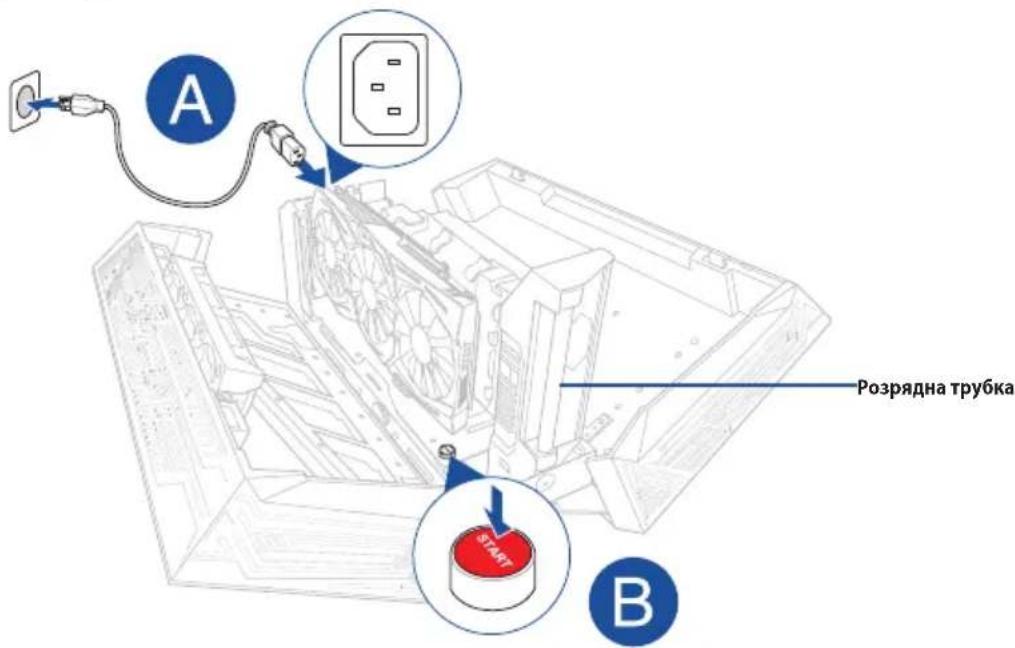
- Connect the AC power cord to the ROG XG-Station 2 and into a 100V 240V power source, then press the power button to turn on the ROG XG-Station 2. The plasma tube will light up.
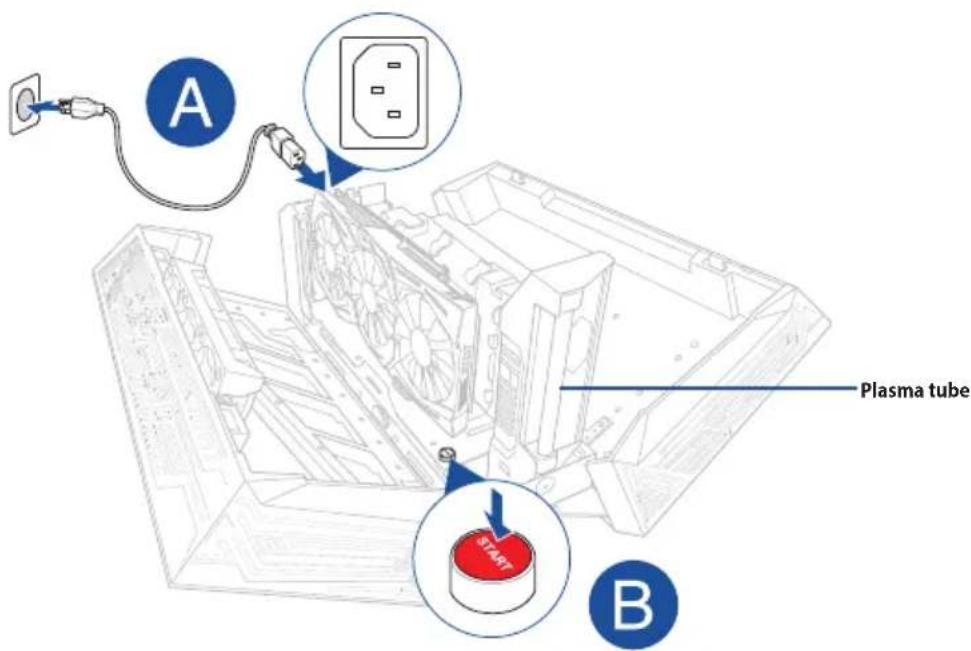

Never attempt to replace the plasma tube by yourself. Only ASUS-authorized technicians should repair the device.
- Close the ROG XG-Station 2, then connect the bundled Thunderbolt™ 3 Type-C cable to your Notebook PC and the ROG XG-Station 2.
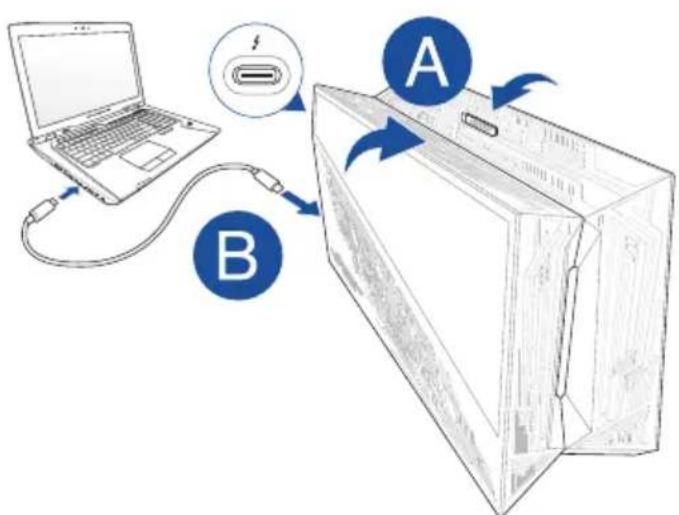

You can also connect a USB keyboard, USB mouse, external monitor, and other peripherals to your ROG XG-Station 2.
- Power on your Notebook PC and the LEDs in the ROG XG-Station 2 will light up.
- Install the corresponding drivers for your graphics card.
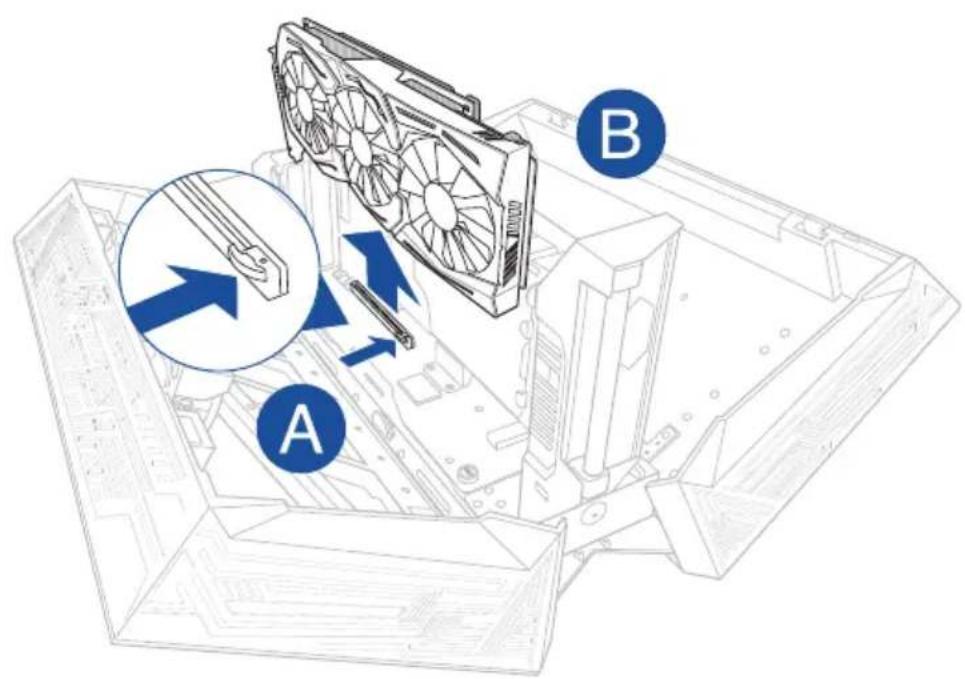
To remove the graphics card, press the release tab on the side of the PCI-E slot, then remove the graphics card.


- Disconnect the AC power before removing the graphics card.
- Your graphics card may become extremely hot after operating for a period of time, please be careful when removing the graphics card.
5. Hardware customization
To customize the lighting effects of your ROG XG-Station 2, visit www.asus.com and download the ASUS ROG AURA software.
安全說明
IyraTHOBKROG XG-Station 2:
- CbHbTe 3aIeKy B NOIOJKeHHe "OTKpbTo, 3aTeM OTKpoIte ROG XG-Station 2.

- OTKpyTHTE BHTbI, KpeHIIHe MeTaJIINHueCKH KPOHIITeH IN CHHMHTe erO.


- BcTaBbTe BnJeOkaTpY B cIOT PCI-E.
- 3aKpeHNTeMetaJIINHueckn KPOHITeH NOTKpyeHHbIMN paHee BHTAM, 3aTeM IOJIKIOHHTe K BHeOkaPte Ka6eHN HHTAHN.
5.ПОДКЛIOHHTe IIHyp ПИТAHнЯ K ROG XG-Station 2 I Kpo3eTke 100B\~240B,3aTeM HApKMHTe KHOIky PHTAHnI DII BKIOUeHnI ROG XG-Station 2.IIla3MeHHa Tpy6ka 3arOpHTcI.

He IIbTaIeTcB 3aMCHHT bIIa3McHHyIO Tpy6Ky caMoCToRcJIbHO. PcMOHT yCtPOHcTB aIOJIKeH IpoH3BOJITbcr TOJIbKO aBTOPH3OBAHbIMn cIeIHJaHcTaMH ASUS.
- 3aKpoIe ROG XG-Station 2, 3aTeM IIOJIIOUHTe HJyIIN B KOMIIIEKTE Ka6eJIb Thunderbolt 3 TIN-C K HoYt6ky H ROG XG-Station 2.


K ROG XG-Station 2 TaKc MoKHO IOKIOOHb KJIaBHaTyPy USB, Mbl USB, BHeHHH MoHHTop H pyTHc IepnepnHbIe ycToHCTBa.
- BkIIOHHTe HoYt6yK, HNDAKATOpb ROG XG-Station 2 zaropTcra.
8.YcTaHOBHTeIpaHBePJIbHeOkaPTbI.

H3BJIeEHn BHeOKePTb HaKMHTe 3aIeKy Ha cIote PCI-E, 3aTeM H3BJIeKHTe BHeOKeAPTy.

BaHbBnDeokapra MoKet cTb OeHb Kapko, Noche pa60tb B TeueHHe IepnoTa BpeMeHH, NoXaJIyIcTa, 6y1bTe octopOKhbl pHn H3BJeHenn BNDeokaptbl.
BHeOkaPra HaPeBaetc Ipi np pa6ote, IokaJyHcta, 6yIbte octopoKbI pN H3BJeHHn BHeOkaPbI.
5. HactpoIIka o6OpyIOBaHnIa
ДянасгюкCBeTOBbIXФфсКТOBROG XG-Station 2 nocetHTe www.asus.com n ckaaHte nporpaMMhoe o6ecneueHHe ASUS ROG AURA.
1. Installationskrav
1. Bumor no BCTaHOBHeHHa
Iio63a6e3neuHTyucniueHE BCTaHOBHeHHRAOG XG-Station 2,BAU KOMNIOTeP Mycntb BiINOBiDaTu HaCTynHIM BMORAM:
- IopTaTbHnI K 3 iInTepeFemCOM ThunderboltTM 3 (3 haHOBiOIO BepciO MIkponporpaMn).
Microsoft 'Windows' 10 (64-po3pIHa).
Cnncok cymichnx nopTaunBnHex Nk nB. Ha caTti www.asus.com.
2. Texhichi xapaKTepeNTnkn
Iio6 BcTaHOBnT BiJeOkaTp By KOpnyc ROG XG-Station 2:
- Nocyhble npyknHHn fikcaTop y noLoxKeHHN «po36IkoBaHo», notIM BiIkpniTe ROG XG-Station 2.
- BnndiB rBnHTn, 3aKpinnIOb MeTaeBn KPOHsteH Ha ROG XG-Station 2, notim 3himitb MeTaeBn KPOHsteH.

- BupiBnHnTe i BCTaBte BiDeokapTy B po3'Em PCI-E.
- 3akpiitb MeTaeBn KPOHtEHH RBHTAMN, Aki BN BnHn paHie, notim niknOHTb Ka6eJI XNBHeHH Do BideOKapTu.
- Пдкючыshурхиьнгязminho roCTpymydoROG XG-Station 2 ta doДжеретахиьнгя 100-240B,a notim hatachitb kHONky xinblenHH,io6 ybIMKHyTu ROG XG-Station 2.3acbitntbcra po3prdHa Tpy6ka.

Hikon He HamaraTecra camoctiHo 3amHHTn po3pAHy Tpy6Ky. IarOHTn npncptpi MoKytb NWe texHi ciueiaJIcTn, ABTOPI3OBaHI ASUS.
- 3akpiTe ROG XG-Station 2, niknouitb ka6eIb ThunderboltTM 3 (USB Type-C) 3 komnneKty do npTatNBHoro PI Ka ROG XG-Station 2.


IIO ROG XG-Station 2 MoXHa nIKKIOUHTn TaKoX USB-KNaBiaTpy, USB-MNHy, 3OBHIHm MOHITOp Ta iHsI nepuΦepiHi npCTpoi.
- NpaTe KnBHeHnHa npTaTnBnI PK, i CbTIIOJIOI Ha ROG XG-Station 23aropTbcra.
- IHCTaIIOHTe BiIDNOBIDHi DpaIBepn DIA BideOKapTn.
Iio6 BnHrtn BiDeokapTy HaTnCHiB BaXijb BuiBHeHHa 360ky Ha po3'EMi PCI-E, a notim BnMItb BiDeokapTy.


Bikniouitb kINBHeHHa 3MiHoro CTpyMy, npu Hix BnMaTH BiEoKaTy.
Bideokapta moKe cnIbHO po3irpiTcna nCnA neBHoro yacy po6OTn, TOMy 6yDbTe o6epexHi, BInMaOCHII.
5. HanaHTyBaHHa Bi3yaIbHnx eΦeKtIB
Ioo di3HaTnc npo HanaWtBuHn Bi3yAnbHnx eEeKribcTeMNI ndcbiuyBaHHra ROG XG-Station 2, BiDbiAaTe www.asus.com i 3aBaHTaXte I3 ASUS ROG AURA.
Gg 2 g 1 1 1 1 1 1 1 1 1 1 1 1 1 1 1 1 1 1 1 1 1 1 1 1 1 1
g 2 g 2

y j 1
.ROG XG-Station 2 jg g g g g g g g g g g g g g g g g g g g g g
jll jll jll jll jll jll jll jll jll
a 2
yagal gall galsgaii y jj j j j j j j j j j j j j j j j
ROG XG-Station 2
Jaa
5 5 5 5 5 5 5 5 5 5 5 5 5 5 5 5 5 5 5 5 5 5 5 5 5 5 5 5 5
104)40(41)
J 2000
ASUS
aal aal j 1 1 1 1 1 1 1 1 1 1 1 1
Aijiyikni Caii jn aaiill iailly l gaoaal yaiil 1
1
ROG XG-Station 2
TM Thunderbolt 4y
Windows 10
()
()Micro
Jusssllwsslll wssllnsssslls slls www.asus.com gssllg
.

algal
.ROG XG-Station 2 jjLLED
A

cIgssj 1y j,PCI-E aiai y gaiy jn glge biai tgaiaa
aagaaal aai jia jia jia jia jia jia jia