CR80DAB - Radio THOMSON - Free user manual and instructions
Find the device manual for free CR80DAB THOMSON in PDF.
| Product type | FM/DAB+ radio alarm clock with USB charger |
| Brand | Thomson |
| Model | CR80DAB |
| Dimensions | 246 x 138 x 126 mm |
| Power supply | Mains 230 V AC via adapter (included); backup battery CR2025 (not supplied) |
| Power consumption | 0.21 W (standby) / 7.5 W (operation with backlight) |
| Speaker | 2.5 inches (3 W) |
| Speaker impedance | 8 Ω |
| Radio receiver | FM (87.5-108 MHz) and DAB+ (Band III) |
| USB charging port | 5 V / 1.5 A for charging a smartphone |
| Functions | FM and DAB+ radio, dual alarm clock, sleep timer, brightness adjustment (3 levels), alarm snooze, DAB information display |
| Maintenance and cleaning | Disconnect before cleaning; use a soft, dry cloth; do not use abrasive products |
| Safety | Do not expose to water, excessive heat, or open flames; maintain at least 10 cm ventilation around the device |
| Spare parts and repairability | No user-serviceable parts; contact technical support for any repairs |
| General information | Made in China; customer service: 0969325962 (non-premium rate call) or support.thomson@bigben.fr |
Frequently Asked Questions - CR80DAB THOMSON
User questions about CR80DAB THOMSON
0 question about this device. Answer the ones you know or ask your own.
Ask a new question about this device
Download the instructions for your Radio in PDF format for free! Find your manual CR80DAB - THOMSON and take your electronic device back in hand. On this page are published all the documents necessary for the use of your device. CR80DAB by THOMSON.
USER MANUAL CR80DAB THOMSON
Waterloo Office Park/Batiment H
Dreve Richelle 161 bte 15 1410 Waterloo, Belgium
Bigben Interactive NEDERLAND b.v.
BELGIQUE,customerservice@bigben-interactive.be
NEDERLAND, customerservice@bigben-interactive.nl
ESPANA, sat@bigbenespana.es
ITALIA, support@bigbeninteractive.it
www/bigben.eu
THOMSON
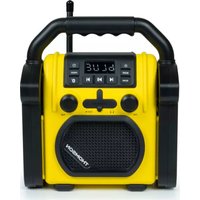
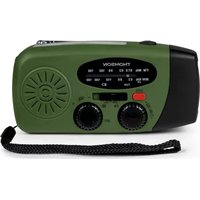
FM Clock Radio With USB Charge (CR80)
DAB FM Clock Radio With USB Charge (CR80DAB)

OPERATING INSTRUCTIONS
PLEASE READ THIS USER MANUAL CAREFULLY BEFORE
OPERATING THIS UNIT AND RETAIN FOR
FUTURE REFERENCE
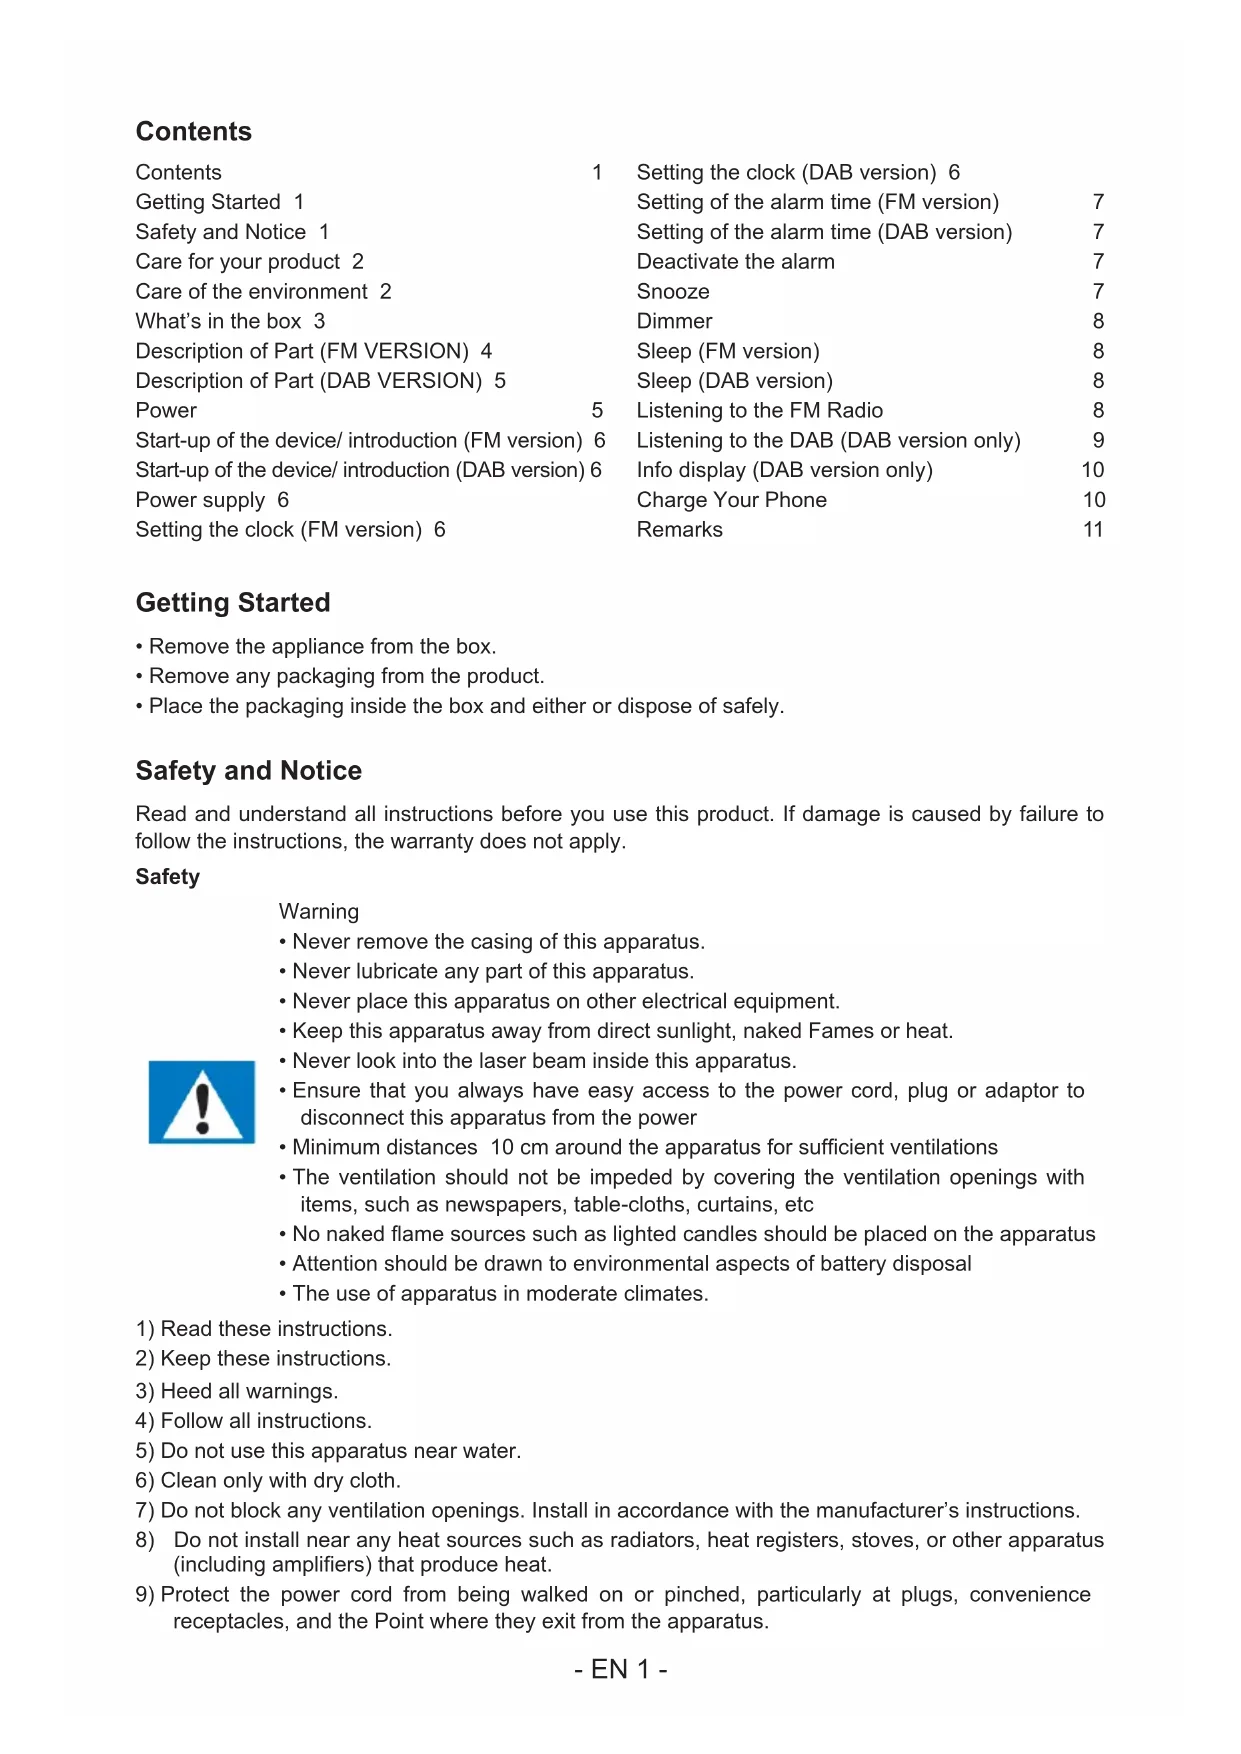
Contents
| Contents | 1 | Setting the clock (DAB version) | 6 |
| Getting Started | 1 | Setting of the alarm time (FM version) | 7 |
| Safety and Notice | 1 | Setting of the alarm time (DAB version) | 7 |
| Care for your product | 2 | Deactivate the alarm | 7 |
| Care of the environment | 2 | Snoopze | 7 |
| What's in the box | 3 | Dimmer | 8 |
| Description of Part (FM VERSION) | 4 | Sleep (FM version) | 8 |
| Description of Part (DAB VERSION) | 5 | Sleep (DAB version) | 8 |
| Power | 5 | Listening to the FM Radio | 8 |
| Start-up of the device/ introduction (FM version) | 6 | Listening to the DAB (DAB version only) | 9 |
| Start-up of the device/ introduction (DAB version) | 6 | Info display (DAB version only) | 10 |
| Power supply | 6 | Charge Your Phone | 10 |
| Setting the clock (FM version) | 6 | Remarks | 11 |
Getting Started
- Remove the appliance from the box.
- Remove any packaging from the product.
- Place the packaging inside the box and either or dispose of safely.
Safety and Notice
Read and understand all instructions before you use this product. If damage is caused by failure to follow the instructions, the warranty does not apply.
Safety
Warning
- Never remove the casing of this apparatus.
- Never lubricate any part of this apparatus.
- Never place this apparatus on other electrical equipment.
- Keep this apparatus away from direct sunlight, naked Fames or heat.
- Never look into the laser beam inside this apparatus.
- Ensure that you always have easy access to the power cord, plug or adaptor to disconnect this apparatus from the power
- Minimum distances 10cm around the apparatus for sufficient ventilations
- The ventilation should not be impeded by covering the ventilation openings with items, such as newspapers, table-cloths, curtains, etc
- No naked flame sources such as lighted candles should be placed on the apparatus
- Attention should be drawn to environmental aspects of battery disposal
- The use of apparatus in moderate climates.
1) Read these instructions.
2) Keep these instructions.
3) Heed all warnings.
4) Follow all instructions.
5) Do not use this apparatus near water.
6) Clean only with dry cloth.
7) Do not block any ventilation openings. Install in accordance with the manufacturer's instructions.
8) Do not install near any heat sources such as radiators, heat registers, stoves, or other apparatus (including amplifiers) that produce heat.
9) Protect the power cord from being walked on or pinched, particularly at plugs, convenience receptacles, and the Point where they exit from the apparatus.

10) Only use attachments/accessories specified by the manufacturer.
11) Unplug this apparatus during lightning storms or when unused for long periods of time.
12) Refer all servicing to qualified service personnel. Servicing is required when the apparatus has been damaged in anyway, such as power-supply cord or plug is damaged, liquid has been spilled or objects have fallen into the apparatus, apparatus has been exposed to rain or moisture, does not operate normally, or has been dropped.
13) Apparatus shall not be exposed to dripping or splashing.
14) Do not place any sources of danger on the apparatus (e.g. liquid filled objects, lighted candles).
15) Where the MAINS plug (or AC/DC adaptor) or an appliance coupler is used as the disconnect device, the disconnect device shall remain readily operable.
16) Make sure there is enough free space around the product for ventilation.
17) Batteries (battery pack or batteries installed) shall not be exposed to excessive heat such as sunshine, fire or the like.
18) The rating label is placed on the bottom side of apparatus
19) Don't sleep with the product. The product must be at a minimum distance of 20~cm from human body when working.
Care for your product
1) Always unplug the appliance when not in use and before cleaning.
2) Do not play music at excessive volume levels as damage to hearing and or the equipment may occur.
3) Do not use this unit in wet or damp conditions.
4) Always disconnect the unit from the mains power supply before cleaning. Clean the appliance with a soft, damp, lint free cloth. Do not use abrasives or harsh cleaners.
Care of the environment


Your product is designed and manufactured with high quality materials and components, which can be recycled and reused.
When this crossed-out wheeled bin symbol is attached to a product it means that the product is covered by the European Directive 2002/96/EC. Please inform yourself about the local separate collection system for electrical and electronic products. Please act according to your local rules and do not dispose of your old products with your normal household waste. Correct disposal of your old product helps to prevent potential negative consequences for the environment and human health.
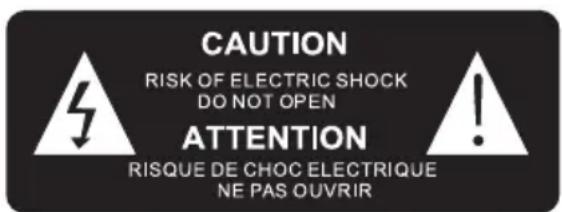

The lightning bolt with an arrowhead within a triangle indicates the presence of uninsulated dangerous voltage within the product enclosure that may be of sufficient magnitude to constitute a risk of electric shock to persons.

The exclamation point within a triangle indicates the presence of important operating and maintenance (servicing) instructions in the literature accompanying the unit.
FOR INDOOR USE ONLY

What's in the box
Check and identify the contents of your package:
- Main unit
- USB charging cable
- Instruction manual
| Type | Specifications | Type | Specifications |
| Speaker | 2.5" (3W) | Charging Time | N/A |
| Peak Speaker | N/A | Playing Time | N/A |
| RMS Power | 0.5W | Bluetooth Version | N/A |
| Power Consumptions | 0.21W (Standby)/7.5W (Operation) | Bluetooth Frequency | N/A |
| Power Input | N/A | Speaker Frequency | 80 Hz-20 kHz |
| Speaker Impedance | 8Ω | Input | DC 5V |
| S/N Ratio | 80dB | Driver | 2.5" 8Ohms speaker |
| Battery Capacity | N/A | Transmission Distance | N/A |
| Output (V,A) | 5.0V, 1.5A | Dimension | 246 x 138 x 126 mm |
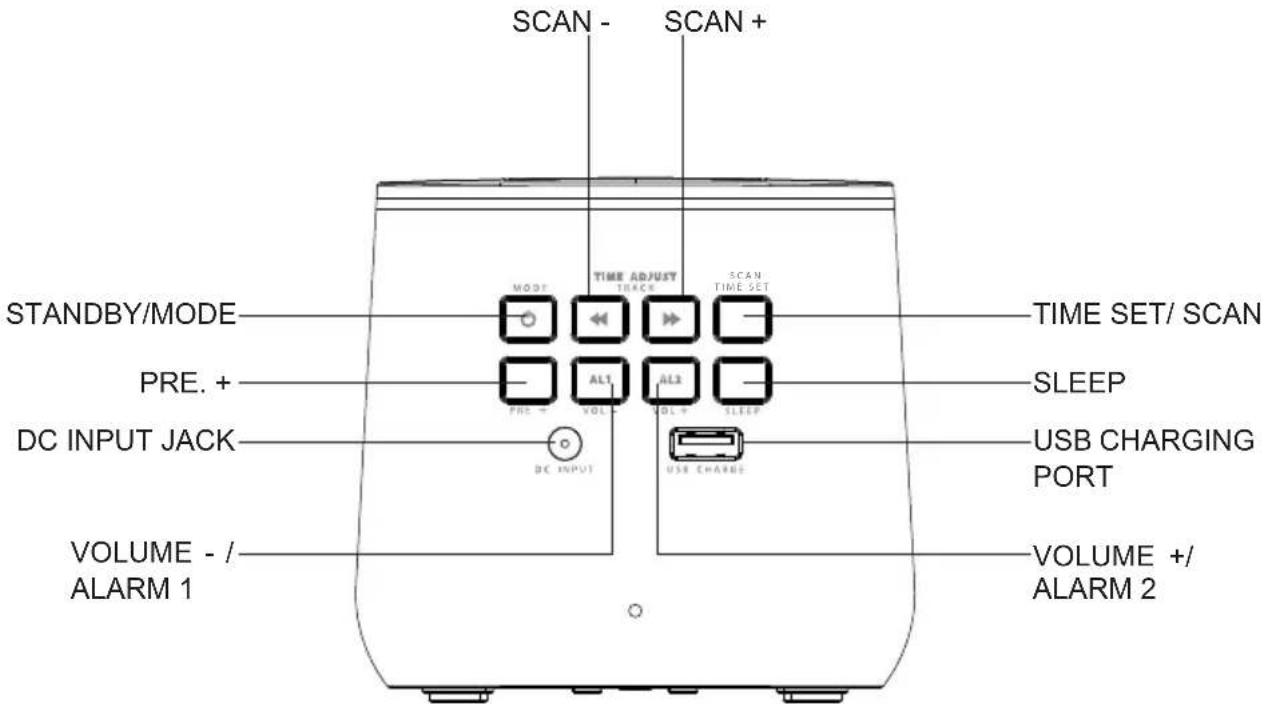
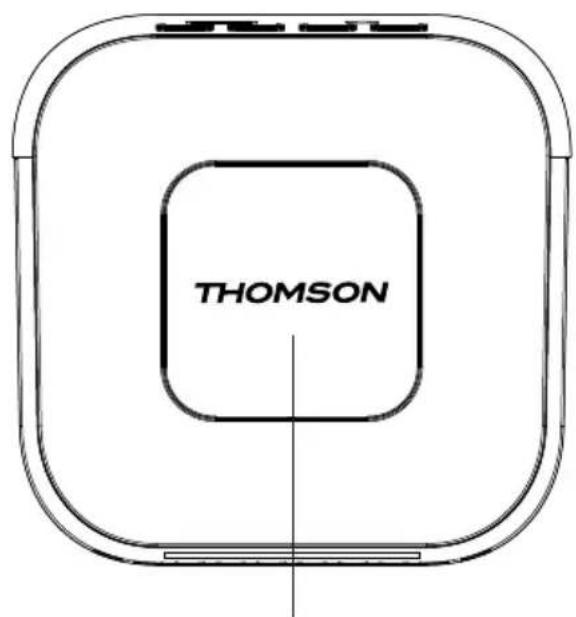
Description of Part (FM VERSION)
BACKUP BATTERY DOORSNOOZE/ DIMMER
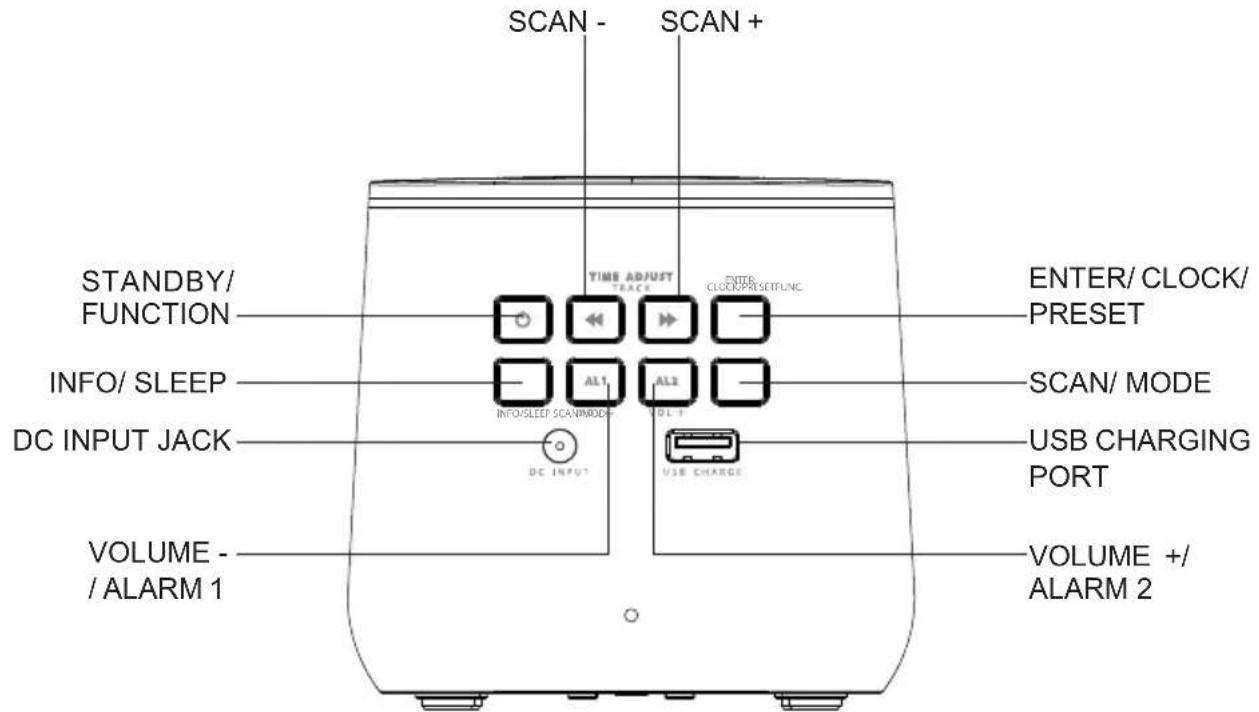
Description of Part (DAB VERSION)
BACKUP BATTERY DOORMENU/SNOOZE/DIM
Power
CAUTION
- Risk of product damager! Make sure that the power voltage corresponds to the voltage printed on the back label.
- Risk of electric shock! When you unplug the AC power cord always pull the plug from the socket. Never pull the cord
- Before connecting the AC power cord, ensure you have completed all other connections
When AC power supply...
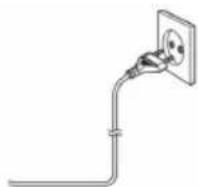
Place the unit in the desired position and unravel the mains cable. Insert the cable into the supply socket and switch on if applicable.
Battery power:
Be sure that the batteries are inserted correctly to avoid damage to the appliance. Always remove the batteries when appliance will not be used for a long period of time, as this will cause leakage to the batteries and subsequently damage to your set.
Use batteries of the same type. Never use different types of batteries together.
Do not throw the battery into the fire, or exposed to sunshine or the like.
If the liquid contained in the batteries comes in contact with eyes or skin, wash the area immediately and carefully with clear water and consult a doctor.

Note the following information: Only use the power supplies listed below.
Start-up of the device/ introduction (FM version)
- Remove the protective film from the display if it is still present.
- Press the "STANDBY/ MODE" button to turn on the device.
- Press the "STANDBY/ MODE" button again to switch into the standby mode.
Start-up of the device/ introduction (DAB version)
- Remove the protective film from the display if it is still present.
- Press the "STANDBY/ FUNCTION" button to turn on the device.
- Press the "STANDBY/ FUNCTION" button for approx. 3 seconds to switch into the standby mode.
Power supply
Insert the DC jack to the back case of your clock radio. Then insert the AC/DC power adapter into a standard AC wall outlet.
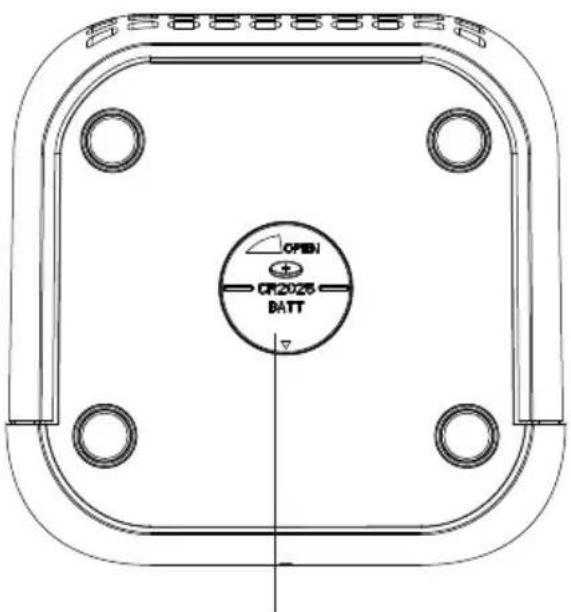
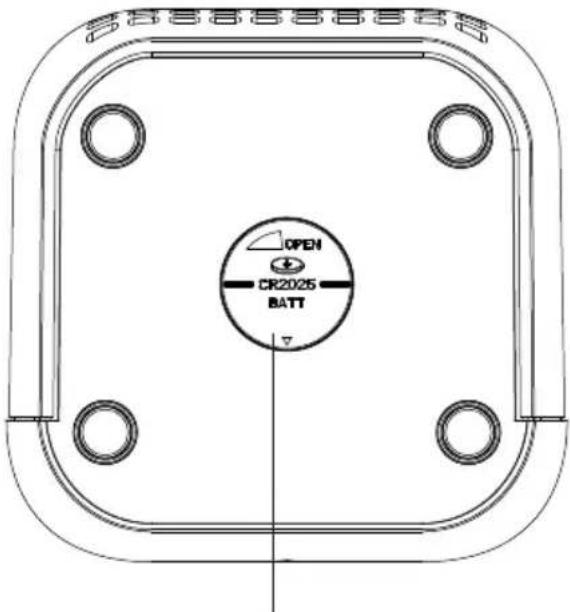
Back-up Battery (not supplied)
1) Open the battery compartment on the bottom. Turn the battery compartment lid in the direction "OPEN".
2) Insert a button cell battery of the type CR 2025. Ensure the correct polarity (see battery compartment lid).
3) Close the battery compartment again.
Note: The back-up battery preserves the clock time in case of a temporary power blackout.
Setting the clock (FM version)
The system must be in standby mode in order to set the clock.
1) Press and hold the "TIME SET / SCAN" button for approx.2 seconds.
2) The hour digits start flashing. Use the "SCAN +" & "SCAN -" buttons to set the hours accordingly.
3) Press the "TIME SET / SCAN" button to confirm the hour.
4) Repeat step 2 and 3 to set the minute.
Setting the clock (DAB version)
The system must be in standby mode in order to set the clock.
1) Press and hold the "ENTER / CLOCK / PRESET" button for approx.2 seconds.
2) Use the "SCAN+" & "SCAN-" buttons to set the time format "12 / 24hr".
3) Press the "ENTER / CLOCK / PRESET" button to confirm time format.
4) The hour digits start flashing. Use the "SCAN+ & "SCAN-" buttons to set the hours accordingly.
5) Press the "ENTER / CLOCK / PRESET" button to confirm the hour.
6) Repeat step 4 and 5 to set the minute / date.
Setting of the alarm time (FM version)
The system must be in standby mode in order to set the alarm.
1) Press and hold the "VOL - / ALARM 1" button for 2 seconds to entry alarm set mode.
2) The hour digits start flashing. Use the "SCAN +" & "SCAN -" buttons to set the hour accordingly.
3) Press the "VOL - / ALARM 1" button to confirm the hour.
4) Repeat step 2 and 3 to set the minute.
5) Press the "SCAN +" or "SCAN -" button to select below 1, or 2 for wake-up function.
1 - BUZZ, 2 - SCAN(RADIO)
6) Press the "VOL - / ALARM 1" button to confirm.
7) Use the "SCAN +" & "SCAN -" buttons to set the Alarm volume.
8) Press the "VOL - / ALARM 1" button to confirm. The display will show "AL1".
To set the second alarm time, repeat each of the above steps with the "VOL. + / ALARM 2" button.
Setting of the alarm time (DAB version)
The system must be in standby mode in order to set the clock.
1) Activate alarm setting mode: Press and hold "VOLUME-/ALARM 1" button for 3 seconds.
2) The display will show "Alarm 1 Setup". Press "VOLUME- / ALARM 1" button to confirm.
3) The hours of the currently set alarm time will start to flash.
4) Press "SCAN+" or "SCAN-" buttons to set the hour. Press "VOLUME- / ALARM 1" button to confirm. The minute indicator starts blinking.
5) Press "SCAN+" or "SCAN-" buttons to set the minutes. Press "VOLUME- / ALARM 1" button to confirm.
6) Press "SCAN+" or "SCAN-" buttons to set the Duration. Press "VOLUME- / ALARM 1" button to confirm.
7) You can use the "SCAN+" or "SCAN-" buttons to choose one of the Alarm mode: BUZZER / DAB / FM.
Press "VOLUME-/ALARM 1" button to confirm.
8) You can use "SCAN+" or "SCAN-" buttons to choose the channel and press "VOLUME- / ALARM 1" button to confirm. (Only available in DAB & FM Alarm mode.) Radio stations must be stored before to allow you to select channel.
9) You can use the "SCAN+ or "SCAN- buttons to choose one of the Alarm setting:
Daily / Weekdays / Weekends / Once
10) Press "VOLUME- / ALARM 1" button to confirm.
11) Press "SCAN+" or "SCAN-" buttons to set the Alarm volume. Press "VOLUME- / ALARM 1" button to confirm.
To set the second alarm time, repeat each of the above steps with the "VOLUME+ / ALARM 2" button.
Deactivate the alarm
Press "VOLUME- / ALARM 1" or "VOLUME+ / ALARM 2" button to turn off the alarm.
Snoopze
Press "SNOOZE / DIMMER" button to suspend alarm sound for a few minutes. (FM version)
Press "MENU / SNOOZE / DIMMER" button to suspend alarm sound for a few minutes. (DAB version)
The alarm will start again after approx. 9 minutes.
Dimmer
NOTE: This function can be used in both "Standby Mode" and "Turned On Mode"
1) Press the "SNOOZE / DIMMER" button to select dimmer. (FM version)
2) Press and hold the "MENU / SNOOZE / DIMMER" button to select dimmer. (DAB version)
Dimmer has 3 steps (100% brightness -> 30% brightness -> 0% brightness)
Sleep (FM version)
NOTE: The system must be in "Radio mode" in order to set the sleep timer
1) Press the "SLEEP" button to enter.
2) Press the "SLEEP" button to set SLEEP time (120, 110, 100 10, 5, OFF)
3) To cancel SLEEP, follow above step 1 to 2 and set the SLEEP time to "OFF".
Sleep (DAB version)
NOTE: The system must be in "Radio mode" or "DAB mode" in order to set the sleep timer.
Press and hold the "INFO / SLEEP" button to enter the sleep function. Press "INFO / SLEEP" button shortly to adjust the sleep timer in 10 minutes steps from 120 minutes to 10 and 5 to OFF.
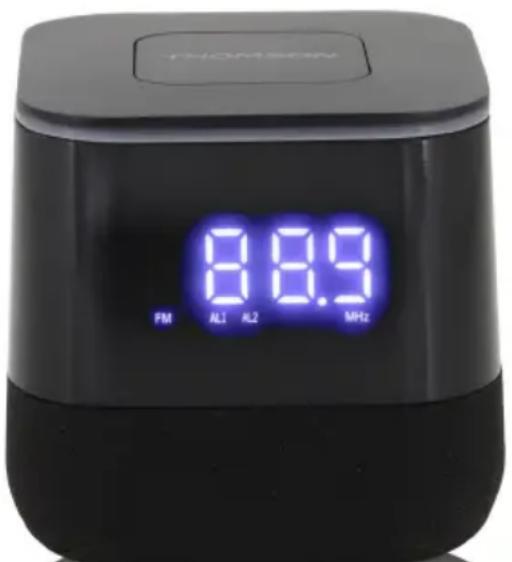
Listening to the FM Radio
1) Press the "STANDBY / MODE" button to turn on the device to listen the FM radio. (FM version)
2) Press the "STANDBY / FUNCTION" button, until "FM" is shown in the display. (DAB version)
- There are two options to search for and preset radio stations.
Automatic scan for FM stations:
Press the "SCAN +" or "SCAN -" buttons for approx.2 seconds, the device will search to the previous or next radio station respectively.
- Manual scan for FM stations:
Briefly press the "SCAN +" & "SCAN -" buttons, until you have found the radio station which you are looking for.
Automatic preset station (FM version):
1) Press and hold the "TIME SET/SCAN" button on unit for about 2-3 seconds to start the automatic preset process.
2) Display will show the memory sequence number and radio stations will be automatically preset into the sequence number (Note: Each sequence number means 1 preset station while during automatic preset process.)
3) Once all the stations were preset, press the "PRE +" button until you see memory sequence number.
4) Press the "SCAN +" or "SCAN -" buttons to search for the desired preset station.
5) Press "PRE +." button to confirm and listen to your desired radio stations.
Automatic preset station (DAB version) :
Press and hold the "SCAN / MODE" button for approx.3 seconds. The system scans the entire frequency band for radio stations. Any stations found will be preset from lowest to highest frequency.
Manual memory preset (FM version):
1) Search for a station as described in "Automatic scan for FM stations" or "Manual scan for FM stations".
2) Press "TIME SET/SCAN" button to enter manual preset station setting.
3) Display will show "P01" flashing.
4) Press "SCAN +" or "SCAN -" buttons to choose preset station number.
5) Press "TIME SET/SCAN" button to confirm chosen preset station number.
6) Once the stations were preset, press the "PRE +" button until you see memory sequence number.
7) Press the "SCAN +" & "SCAN -" buttons to search for the desired preset station.
8) Press "PRE +" button to confirm and listen to your desired radio stations.
Manual memory preset (DAB version)
1) Use the Automatic scan or Manual scan, until you have found the radio station which you are looking for.
2) Press "SCAN / MODE" button.
3) Press "SCAN+ or "SCAN- button to choose the preset station number.
4) Press "ENTER / CLOCK / PRESET" button to confirm chosen preset station number.
5) Once the stations were preset, Press and hold "ENTER / CLOCK / PRESET" button.
6) Press "SCAN+ or "SCAN- button to search for the desired preset station.
7) Press "ENTER / CLOCK / PRESET" button to confirm and listen to your desired radio stations.
FM Menu (DAB version only)
In FM mode, press the "MENU / SNOOZE / DIMMER" button to enter the FM menu. Press "SCAN+ or "SCAN-" buttons to choose the following FM menus and confirm with "ENTER / CLOCK / PRESET" button:
-
Scan setting: Select the desired option for automatic station search.
-
All stations: Search for all stations that can be received. In this case, station search also stops for weak stations.
-
Strong stations only: Only clear stations are searched.
-
System
Time
You can use the "SCAN+ or "SCAN- button to select the desired sub-menu and confirm with "ENTER / CLOCK / PRESET" button.
Language
You can use the "SCAN+ or "SCAN-" button to select the language and confirm with "ENTER / CLOCK / PRESET" button.
Factory Reset
Select an options with "SCAN+" or "SCAN-" button. Press "ENTER / CLOCK / PRESET" button to confirm.
- SW version
You can see the current SW version of the unit.
Listening to the DAB (DAB version only)
Select the DAB mode with the "STANDBY / FUNCTION" button, until "DAB" is shown in the display.
The radio will automatically do a full scan of DAB+ stations. The list of stations is then stored, eliminating the need for another full scan when the radio is turned on next time. When the scan is complete, the stations are stored in alphabetical order. The first available station will be played back.
NOTE: If there is no DAB+ reception at any time, change the position of the unit or adjust the antenna.
Press and hold the "SCAN / MODE" button for approx. 3 seconds to start a new search.
You can select the next or the previous station by using the "SCAN +" & "SCAN -" buttons.
Confirm your selection with the "ENTER / CLOCK / PRESET" button.
DAB Menu
Press the "MENU / SNOOZE / DIMMER" button to select the DAB radio menu. Press "SCAN+" or "SCAN-" buttons to chose the following DAB menus and confirm with "ENTER / CLOCK / PRESET" button:
- Full scan
The radio will automatically perform a full scan of DAB+ stations.
- Manual tune
Select a frequency with "SCAN+ or "SCAN-" button. Press "ENTER / CLOCK / PRESET" button to confirm.
- DRC
Dynamic Range Control removes or adds the degree of adaptation, required for the differences in dynamic range between stations.
Select an options with "SCAN+ or "SCAN-" button. Press "ENTER / CLOCK / PRESET" button to confirm.
Following options are available on the display:
- DRC high: DRC turned on; default setting recommended for noisy environments.
- DRC low: DRC is set to half the normal level.
-
DRC off: DRC is turned off.
-
TA (Traffic announcement)
Traffic information can be received manually or automatically with the TA function.
Select an options with "SCAN+ or "SCAN- button. Press ENTER / CLOCK / PRESET" button to confirm.
-Prune
It may be that you can no longer receive some stations after a station scan or change of location. With this function you can delete these stations from the reception list. Select "YES" and confirm with the "ENTER / CLOCK / PRESET" button.
- System
Time
You can use the "SCAN+ or "SCAN-" button to select the desired sub-menu and confirm with "ENTER / CLOCK / PRESET" button.
Language
You can use the "SCAN+ or "SCAN- button to select the language and confirm with "ENTER / CLOCK / PRESET" button.
Factory Reset
Select an options with "SCAN+ or "SCAN- button. Press ENTER / CLOCK / PRESET" button to confirm.
- SW version
You can see the current SW version of the unit.
Info display (DAB version only)
Press the "INFO / SLEEP" button to show the DAB information.
Charge Your Phone
You can charge your phone via USB charger slot.
1) Connect an external device via a USB cable(cable not included) to the USB charging port on the back of the device for charging.
2) The charge state is indicated in your external device as usual.
Remarks:
- THOMSON is a trademark of TECHNICOLOR SA or its affiliates used under license to Bigben Interactive.
- You can find the information on the plate located at the back of the unit.
DECLARATION OF CONFORMITY
The undersigned, Bigben Interactive declares that the radio equipment of the CR80 FM DAB complies with the 2014/53/EU directive.
The complete text is available at https://www/bigben-interactive.co.uk/support/
Manufactured by BIGBEN INTERACTIVE
396, Rue de la Voyette
CRT2-FRETIN
CS 90414
59814 LESQUIN Cedex - France
www/bigben.eu
Made in China
Email: support.thomson@bigben.fr


Fabricant:BigbenInteractive FRANCE
- Rue de la Voyette, C.R.T. 2, Fretin,
CS90414-59814 Lesquin Cedex, France
Waterloo Office Park/Batiment H
Dreve Richelle 161 bte 15 1410 Waterloo, Belgium
Bigben Interactive NEDERLAND b.v.
BELGIQUE, customerservice@bigben-interactive.be
NEDERLAND, customerservice@bigben-interactive.nl
ESPANA, sat@bigbenespana.es
ITALA, support@bigbeninteractive.it
www/bigben.eu
THOMSON
Menu FM (solo version DAB)
Waterloo Office Park/Batiment H
Dreve Richelle 161 bte 15 1410 Waterloo, Belgium
Bigben Interactive NEDERLAND b.v.
BELGIQUE, customerservice@bigben-interactive.be
NEDERLAND, customerservice@bigben-interactive.nl
ESPANA, sat@bigbenespana.es
ITALIA, support@bigbeninteractive.it
www/bigben.eu
THOMSON
BELGIQUE, customerservice@bigben-interactive.be
NEDERLAND, customerservice@bigben-interactive.nl
ESPANA, sat@bigbenespana.es
ITALIA, support@bigbeninteractive.it
www/bigben.eu
THOMSON
Waterloo Office Park / Batiment H
Dreve Richelle 161 bte 15 1410 Waterloo, Belgium
Bigben Interactive NEDERLAND b.v.
BELGIQUE, customerservice@bigben-interactive.be
NEDERLAND, customerservice@bigben-interactive.nl
ESPANA, sat@bigbenespana.es
ITALIA, support@bigbeninteractive.it
www/bigben.eu
THOMSON
Waterloo Office Park / Batiment H
Drève Richelle 161 bte 15 1410 Waterloo, Belgium
Bigben Interactive NEDERLAND b.v.
BELGIQUE, customerservice@bigben-interactive.be
NEDERLAND, customerservice@bigben-interactive.nl
ESPANA, sat@bigbenespana.es
ITALIA, support@bigbeninteractive.it
www/bigben.eu
THOMSON
Waterloo Office Park / Batiment H
Dreve Richelle 161 bte 15 1410 Waterloo, Belgium
Bigben Interactive NEDERLAND b.v.
BELGIQUE, customerservice@bigben-interactive.be
NEDERLAND, customerservice@bigben-interactive.nl
ESPANA, sat@bigbenespana.es
ITALIA, support@bigbeninteractive.it
www/bigben.eu
- Programvaruversion (SW version)
Du kan se nuvarande programvaruversion for encheten.
- Programvaruversion (SW version)
Du kan se nuvarande programvaruversion for encheten.
Informationsdisplay (endast DAB-version)
Tryck på "INFO/SLEEP"-knappen für att visa DAB-information.
Ladda din telefon
Du kan ladda din Telefon genom USB-laddningsuttaget.
Waterloo Office Park / Batiment H
Drève Richelle 161 bte 15 1410 Waterloo, Belgium
Bigben Interactive NEDERLAND b.v.
BELGIQUE, customerservice@bigben-interactive.be
NEDERLAND, customerservice@bigben-interactive.nl
ESPANA, sat@bigbenespana.es
ITALIA, support@bigbeninteractive.it
www/bigben.eu
THOMSON
FM clockradio med USB-oblader (CR80)
DAB FM clockradio med USB-oblader (CR80DAB)
BETJENINGSVEJLEDNING
LAES VENLIGST DENNE BRUGERVEJLEDNING OMHYGGELIGT, FØR DU BETJENER ENHEDEN, OG GEM DEN TIL EVT. SENERE BRUG.
Indholdsfortegnelse
- Automatism scanning after FM-stationer:
- Manuel scanning after FM-stationer:
BELGIQUE,customerservice@bigben-interactive.be
NEDERLAND, customerservice@bigben-interactive.nl
ESPANA, sat@bigbenespana.es
ITALIA, support@bigbeninteractive.it
www/bigben.eu
THOMSON
FM klokkeradio med USB-lading (CR80)
DAB FM klokkeradio med USB-lading (CR80DAB)

BRUKSANVISNING
LES DENNE BRUKSANVISNINGEN NØYE FØR DU BETJENER APPARATET, OG OPPBEVAR DEN FOR SENERE BRUK
Innhold
Stille inn alarmen (FM-version)
Stille inn tidspunkt for alarm (DAB-version)
Systemet ma vare i standby-modus for at du skal kinne stille inn klokken.
1) Aktiver alarminnstellingsmodus: Trykk og hold nede «VOLUM-/ALARM 1»-knappen i 3 sekunder.
2) Skjermen viser «Alarm 1 Setup». Trykk på «VOLUM/ALARM 1»-knappen for Å bekrefte.
3) Gjeldende alarmtidspunkt begynner Å blinke.
4) Trykk på «SKANN+»- eller «SKANN-»-knappene forå stille inn timen. Trykk på «VOLUM/ALARM 1»-knappen forå bekrefte.
Minuttindikatoren begynner Å blinke.
5) Trykk på «SKANN+»- eller «SKANN-»-knappene for Å stille inn minuttene. Trykk på «VOLUM/ALARM 1»-knappen for Å bekrefte.
6) Trykk på «SKANN+»- eller «SKANN-»-knappene forå stille inn varigheten. Trykk på «VOLUM/ALARM 1»-knappen forå bekrefte.
7) Du kan bruke «Skann+»- eller «SKANN-»-knappene for a velge en av alarmmodusene: FM/DAB/ SUMMER. Trykk på «VOLUM/ALARM 1»-knappen for a bekrefte.
8) Du kan bruke «SKANN +» aller «SKANN -»-knappene for à velge kanalen og trykk «VOLUME- / ALARM 1»-knappen for à bekrefte. (Kun tilgengelig i DAB- og FM-alarmmodus.) Radiostasjoner ma lagres før du kan velge kanal.
9) Du kan bruke «Skann+»- eller «SKANN-»-knappene for a velge en av alarminnstillingene: Daglig / ukedager / helger / en gang
10) Trykk på «VOLUM/ALARM 1»-knappen for Å bekrefte.
11) Trykk på «SKANN+»- eller «SKANN-»-knappene for Å stille inn alarmvolumet. Trykk på «VOLUM/ALARM 1»-knappen for Å bekrefte.
Manuelt forhandsinnstilt minne (FM-version):
Waterloo Office Park / Batiment H
Drève Richelle 161 bte 15 1410 Waterloo, Belgium
Bigben Interactive NEDERLAND b.v.
BELGIQUE, customerservice@bigben-interactive.be
NEDERLAND, customerservice@bigben-interactive.nl
ESPANA, sat@bigbenespana.es
ITALIA, support@bigbeninteractive.it
www/bigben.eu
THOMSON
FM orás rádio USB toltéssel (CR80)
DAB FM orás rádio USB toltésse (CR80DAB)

HASZNÁLATI UTMUTATÓ
KÉRJÜK, A KÉSZÜLEK MÜKÖDTETÉSE ELOTT OLVASSA EL FIGYELMESEN EZT AZ UTMUTATÖT, ES ÖRIZZE MEG KÉSÖBBI TAJÉKOZÓDÁS CÉLJÁBOL
Tartalomjegyzék
Waterloo Office Park / Batiment H
Dreve Richelle 161 bte 15 1410 Waterloo, Belgium
Bigben Interactive NEDERLAND b.v.
BELGIQUE, customerservice@bigben-interactive.be
NEDERLAND, customerservice@bigben-interactive.nl
ESPANA, sat@bigbenespana.es
ITALIA, support@bigbeninteractive.it
www/bigben.eu
THOMSON
Waterloo Office Park/Batiment H
Dreve Richelle 161 bte 15 1410 Waterloo, Belgium
Bigben Interactive NEDERLAND b.v.
BELGIQUE, customerservice@bigben-interactive.be
NEDERLAND, customerservice@bigben-interactive.nl
ESPANA, sat@bigbenespana.es
ITALIA, support@bigbeninteractive.it
www/bigben.eu
THOMSON
FM radio sa satom i USB punjačem (CR80)
DAB FM radio sa satom i USB punjačem (CR80DAB)

UPUTE ZARAD
PAŽLJIVO PROČITAJE OVAJ KORISNICI PRIRUČNIK PRIJE RUKOVANJA UREDAJE M I SACUVAJTE IH ZA BUDUCU UPOTREBU.
Sadržaj
Sadrzaj 1 Podešavanje sata (DAB verzija) 6
Waterloo Office Park / Batiment H
Drève Richelle 161 bte 15 1410 Waterloo, Belgium
Bigben Interactive NEDERLAND b.v.
BELGIQUE, customerservice@bigben-interactive.be
NEDERLAND, customerservice@bigben-interactive.nl
ESPANA, sat@bigbenespana.es
ITALIA, support@bigbeninteractive.it
www/bigben.eu