
RCD305UBT - Radio THOMSON - Free user manual and instructions
Find the device manual for free RCD305UBT THOMSON in PDF.


| Product type | Alarm clock radio with CD player and Bluetooth |
| Brand | Thomson |
| Model | RCD305UBT |
| Dimensions (W x H x D) | 300 x 150 x 200 mm |
| Weight | 1.2 kg |
| Power supply | Mains adapter 230 V AC or 6 LR20 batteries |
| Output power | 2 x 5 W RMS |
| Radio tuner | FM / DAB+ |
| CD player | Plays CD, CD-R, CD-RW, MP3 |
| Wireless connectivity | Bluetooth 5.0 |
| Auxiliary input | 3.5 mm jack socket |
| USB port | Yes, for MP3 playback |
| Alarm functions | Dual alarm with snooze, radio or buzzer |
| Timer | Adjustable sleep timer |
| Display | Backlit LCD screen |
| Care and cleaning | Wipe with a soft, dry cloth. Do not use abrasive products. |
| Safety | Do not expose to moisture or extreme temperatures. Unplug during storms. |
| Spare parts and repairability | Contact Thomson after-sales service for any repairs or parts. |
| Warranty | 2 years |
| General information | Compact alarm clock radio ideal for bedroom or living room. |
Frequently Asked Questions - RCD305UBT THOMSON
User questions about RCD305UBT THOMSON
0 question about this device. Answer the ones you know or ask your own.
Ask a new question about this device
Download the instructions for your Radio in PDF format for free! Find your manual RCD305UBT - THOMSON and take your electronic device back in hand. On this page are published all the documents necessary for the use of your device. RCD305UBT by THOMSON.
USER MANUAL RCD305UBT THOMSON
USER MANUAL -
MODEL RCD300U and RCD305UBT USER MANUAL
PLEASE READ THIS USER MANUAL CAREFULLY BEFORE USING THE DEVICE, AND KEEP IT FOR FUTURE REFERENCE.
Table of Contents
Power Source


Manufacturer: Bigben Interactive FRANCE
396, Rue de la Voyette, C.R.T. 2 Fretin, CS 90414 - 59814 LESQUIN Cedex, France
- INSTRUCTION MANUAL -
MODEL RCD300U and RCD305UBT OPERATING INSTRUCTIONS
PLEASE READ OPERATING INSTRUCTIONS CAREFULLY BEFORE USE AND KEEP FOR FUTURE REFERENCE.
Contents
Getting Started 1
Safety and Notice
Care for your product 2
Care of the environment
What's in the box
Power 3
Power Source
Battery power
PARTS/BUTTONS 4
- Remove the appliance from the box.
- Remove any packaging from the product.
- Place the packaging inside the box and either or dispose of safely.
Safety and Notice
Read and understand all instructions before you use this product. If damage is caused by failure to follow the instructions, the warranty does not apply.
Safety
Warning
- Never remove the casing of this apparatus.
- Never lubricate any part of this apparatus.
- Never place this apparatus on other electrical equipment.
- Keep this apparatus away from direct sunlight, naked flames or heat.
- Never look into the laser beam inside this apparatus.
- Ensure that you always have easy access to the power cord, plug or adaptor to disconnect this apparatus from the power.
- Read these instructions.
- Keep these instructions.
- Heed all warnings.
- Follow all instructions.
- Do not use this apparatus near water.
- Clean only with dry cloth.
- Do not block any ventilation openings. Install in accordance with the manufacturer's instructions.
- Do not install near any heat sources such as radiators, heat registers, stoves, or other apparatus (including amplifiers) that produce heat.
- Protect the power cord from being walked on or pinched, particularly at plugs, convenience receptacles, and the point where they exit from the apparatus.
- Only use attachments/accessories specified by the manufacturer.
- Use only with the cart, stand, tripod, bracket, or table specified by the manufacturer or sold with the apparatus. When a cart is used, use caution when moving the cart/apparatus combination to avoid injury from tip-over.

- Unplug this apparatus during lightning storms or when unused for long periods of time.
- Refer all servicing to qualified service personnel. Servicing is required when the apparatus has been damaged in any way, such as power-supply cord or plug is damaged, liquid has been spilled or objects have fallen into the apparatus, apparatus has been exposed to rain or moisture, does not operate normally, or has been dropped.
- Apparatus shall not be exposed to dripping or splashing.
- Do not place any sources of danger on the apparatus (e.g. liquid filled objects, lighted candles).
- Where the MAINS plug or an appliance coupler is used as the disconnect device, the disconnect device shall remain readily operable.
- Make sure there is enough free space around the product for ventilation.
- Batteries (battery pack or batteries installed) shall not be exposed to excessive heat such as sunshine, fire or the like.
Care for your product
- Always unplug the appliance when not in use and before cleaning.
- Do not play music at excessive volume levels as damage to hearing and or the equipment may occur.
- Do not use this unit in wet or damp conditions.
- Always disconnect the unit from the mains power supply before cleaning. Clean the appliance with a soft, damp, lint free cloth. Do not use abrasives or harsh cleaners.
Care of the environment

Your product is designed and manufactured with high quality materials and components, which can be recycled and reused.

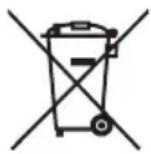
When this crossed-out wheeled bin symbol is attached to a product it means that the product is covered by the European Directive 2002/96/EC. Please inform yourself about the local separate collection system for electrical and electronic products. Please act according to your local rules and do not dispose of your old products with your normal household waste. Correct disposal of your old product helps to prevent potential negative consequences for the environment and human health.
What's in the box
Check and identify the contents of your package:
- Main unit
- AC cord
- User manual
Power
CAUTION

- Risk of product damage! Make sure that the power voltage corresponds to the voltage printed on the back label.
- Risk of electric shock! When you unplug the AC power cord always pull the plug from the socket. Never pull the cord.
- Before connecting the AC power cord, ensure you have completed all other connections.
Place the unit in the desired position and unravel the mains cable.
Insert the cable into the supply socket and switch on if applicable.

Power Source
This unit is designed to operate on a normal AC 100~240V, 50/60Hz household power supply. Do not attempt to operate the system using other power sources. This may result in damage to the unit and void your warranty.
Battery power:
- Be sure that the batteries are inserted correctly to avoid damage to the appliance. Always remove the batteries when the appliance will not be used for a long period of time, as this will cause leakage to the batteries and subsequently damage to your set.
- Use batteries of the same type. Never use different types of batteries together.
- Do not throw the battery into the fire, or expose it to sunshine or the like.
- If the liquid contained in the batteries comes in contact with eyes or skin, wash the area immediately and carefully with clear water and consult a doctor.
PARTS/BUTTONS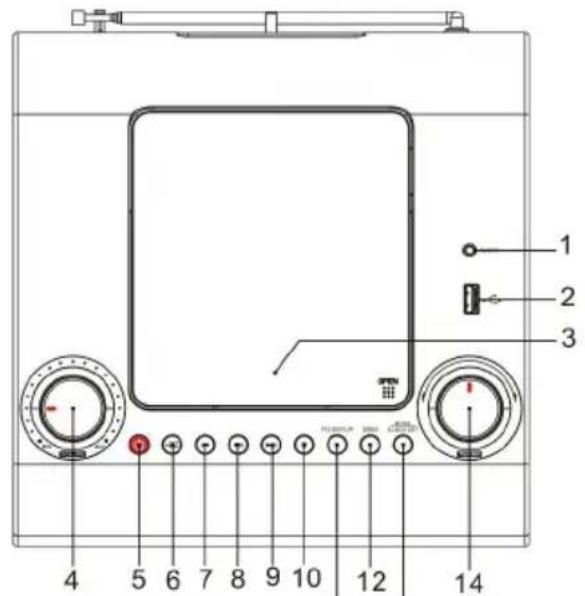
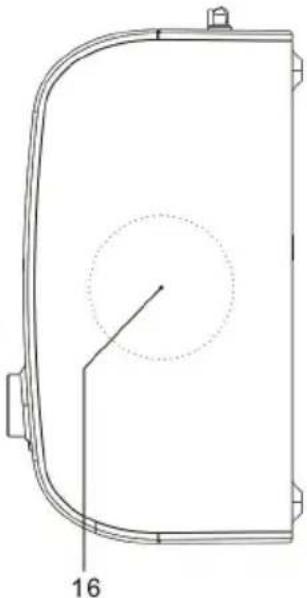


- Aux-in jack
- USB port
- CD door
- VOLUME control
- ⏻ Power ON/OFF button
- CD/USB/RADIO/AUX/BT Function (optional)
- SKIP DOWN/BACK button (CD/USB)
- SKIP UP/NEXT button (CD/USB)
- ▶|| PLAY/PAUSE button/ FM scan/BT Pair (optional)
- ■ STOP button
- FOLDER UP button
- Bass Boost button
- MODE/CLOCK SET button
- Tuning control knob
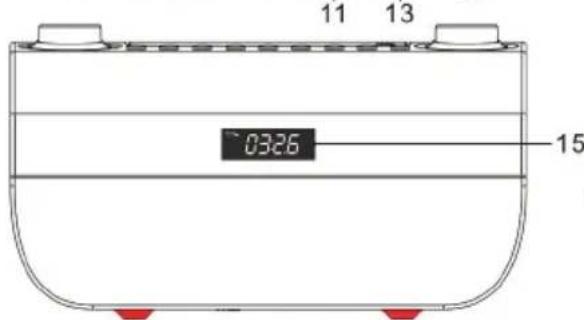
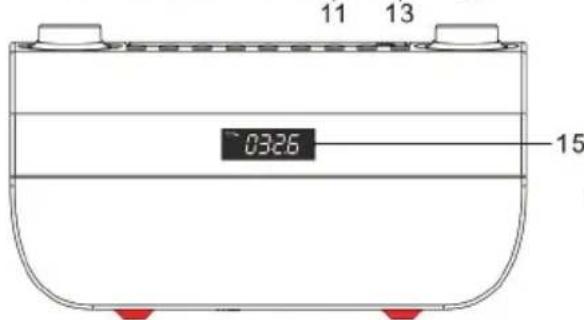
- Display
- Speaker
- Antenna
- AC socket
OPERATING THE RADIO
A. Auto scan
- Press the Power button (5) to turn the unit on.
- Set the Function button (6) to the TUNER position.
- Press the PLAY/PAUSE button (9) for 2 seconds to start the AUTO SCAN function and automatically search for radio stations for 3 minutes. The screen displays the digits and station numbers. Once complete, the unit will store a maximum of 20 preset stations.
- Press the FOLDER UP button (11) to select the desired station.
B. Tuning
- Set the Function button (6) to the TUNER position.
- Turn the Tuning control knob (14) to automatically tune in to the next station.
- Adjust the Volume (4) to the desired level.
- Press the Power Button (5) to turn the radio off.
C. Storing stations in memory positions P01 to P20
- Set the Function button (6) to the TUNER position.
- Tune in to the desired station.
- Press the FOLDER UP button (11) to select the station number.
- Press the MODE/CLOCK SET button (13). The current position number will flash in the display, e.g. 'P01, P02... P20'.
- Press the MODE/CLOCK SET button (13) again to save. 20 radio stations can be stored in memory.
- Press the FOLDER UP button (11) to select and listen to a saved station.
Antenna
Extend the wire to obtain the best reception. You may need to turn or change the position of the unit to improve reception.
SETTING THE CLOCK
- Press the Power button (5) to turn the unit on.
- Press the MODE/CLOCK SET button (13) and hold for 2 seconds: the display will flash. Press SKIP DOWN/BACK ◀◀ (7) or SKIP UP/NEXT ▶▶ (9) to select the time format (12 hrs or 24 hrs).
- Press the MODE/CLOCK SET button again: the hour will blink. Press SKIP DOWN/BACK |◀◀ (7) or SKIP UP/NEXT ▶▶ (9) to set the hour.
- Press the MODE/CLOCK SET button again: the minutes will blink. Press SKIP DOWN/BACK (7) or SKIP UP/NEXT ▶▶ (9) to set the minutes. Press the MODE/CLOCK SET button to finish setting the time.
- Press the Power button (5) to turn on the unit.
- Set the Function button (6) to the CD or USB position.
- Insert a compact disc or USB flash drive; "CD" or "USB" will be displayed.
▶|| PLAY/PAUSE button (9)
- When music is stopped, press the button to play the music.
- When music is playing, press the button to pause.
- When music is paused, press the button to resume play.
STOP button (10)
- When music is playing or paused, press the button to stop.
- When in programming tracks, press the button to exit the mode.
SKIP UP/NEXT button (8)
- When music is stopped, press the button to select the track you want to play (and go to the first track if currently on the last track).
- When music is playing, press the button to skip to the next track (and go to the first track if currently playing the last track).
- Press the button and hold for 2 seconds to fast-forward.
- When playing programmed tracks, press the button to skip to the next programmed track (and go to the first track if currently playing the last track).
SKIP DOWN/BACK button (7)
- When music is stopped, press the button to select the track you want to play (and go to the last track if currently on the first track).
- When music is playing, press the button to skip to the previous track (and go to the last track if currently playing the first track).
- Press the button and hold for 2 seconds to rewind.
- When playing programmed tracks, press the button to skip to the previous programmed track (and go to the last track if currently playing the first track).
CD PLAY REPEAT
- You can choose between two modes: Repeat 1 and Repeat All.
- During Repeat 1 mode, the player repeats the current CD track.
- During Repeat All mode, the player repeats all tracks on the CD; when it reaches end of the last track, it will return to the first track.
PROGRAMMING CD & USB PLAY
You can only enter programs in STOP mode. Press the STOP button (10) and then follow the instructions below.
- Press the MODE/CLOCK SET button (13); "Memory" is displayed and the track number flashes.
- Press the SKIP DOWN/BACK ◀◀/ SKIP UP/NEXT ▶▶buttons (7, 8) to choose the track number you wish to program.
- Press the MODE/CLOCK SET button again to confirm. The unit saves the track number and goes to the next track you wish to program.
- The unit can store 20 CD programs and 99 USB programs. After it has stored the maximum number of programs, no further entry is possible.
- If you press the ■ STOP button (10) while programming the unit, the unit clears the programmed content and returns to STOP mode.
- If you press the ▶JAY/PAUSE button (9) when the unit has been programmed, "Memory" is displayed and the unit starts playing the programmed tracks.
- If you press the SKIP DOWN/BACK ◀◀/SKIP UP/NEXT ▶▶buttons when playing programmed tracks, the unit skips to the previous or next programmed track.
- If you press the STOP button when playing programmed tracks, the unit stops playing but programmed track selection is kept. Press the STOP button again to clear the programmed content and return to STOP mode.
Remark: Please note that the unit can only read FAT32 format USB drives with less than 32GB.
BLUETOOTH (optional)
Bluetooth pairing
- Press the Function button several times until you reach "BT"
- Select RCD305UBT in your device list (phone, tablet, computer...)
- If you want to pair a new device: Press BT PAIR to restart the pairing process
AUX-IN
Plug one end of the 3.5 mm audio cable (included) into the Aux-in jack (1) on the top of the unit and the other end into the line-out jack or headphone jack of an external audio source to be able to listen through that system's speakers. While using the Aux-in function, the CD player will not work.
BASS BOOST
Press the Bass Boost button (12) once to set it to the ON position (DBBS will be displayed) to enjoy a sound with more powerful bass.
Note: When there is no sound output for about 30 minutes in CD/USB/RADIO/AUX/BT mode, the unit will automatically switch to standby mode to save energy. It can be turned on again by using the CD/USB/RADIO/AUX/BT Function button.
SPECIFICATIONS
Power supply: AC 230V ~ 50Hz
Power consumption: 13W
Radio frequency coverage: FM 87.5 – 108 MHz
Don't discard electrical and electronic appliances with regular waste.
• Take them to an official collection point. - Some components may be hazardous to health and the environment.

The Bluetooth® word, mark and logo are registered trademarks owned by Bluetooth SIG, Inc. and any use of such marks by Bigben Interactive is under license. Other trademarks and trade names are those of their respective owners.
- You can find the information on the plate located at the back of the unit.
The undersigned, Bigben Interactive declares that the radio equipment of the RCD305UBT type complies with the 2014/53/EU directive.
The complete text is available at www.bigben.fr/support
Manufactured by BIGBEN INTERACTIVE SA
396, Rue de la Voyette
CRT2 - FRETIN
CS 90414
59814 LESQUIN Cedex – France
www.bigben.eu
Made in China


Manufacturer: Bigben Interactive FRANCE
396, Rue de la Voyette, C.R.T. 2 Fretin, CS 90414 - 59814 LESQUIN Cedex, France
THOMSON is a trademark of TECHNICOLOR SA or its affiliates and is used under license by Bigben Interactive.
THOMSON
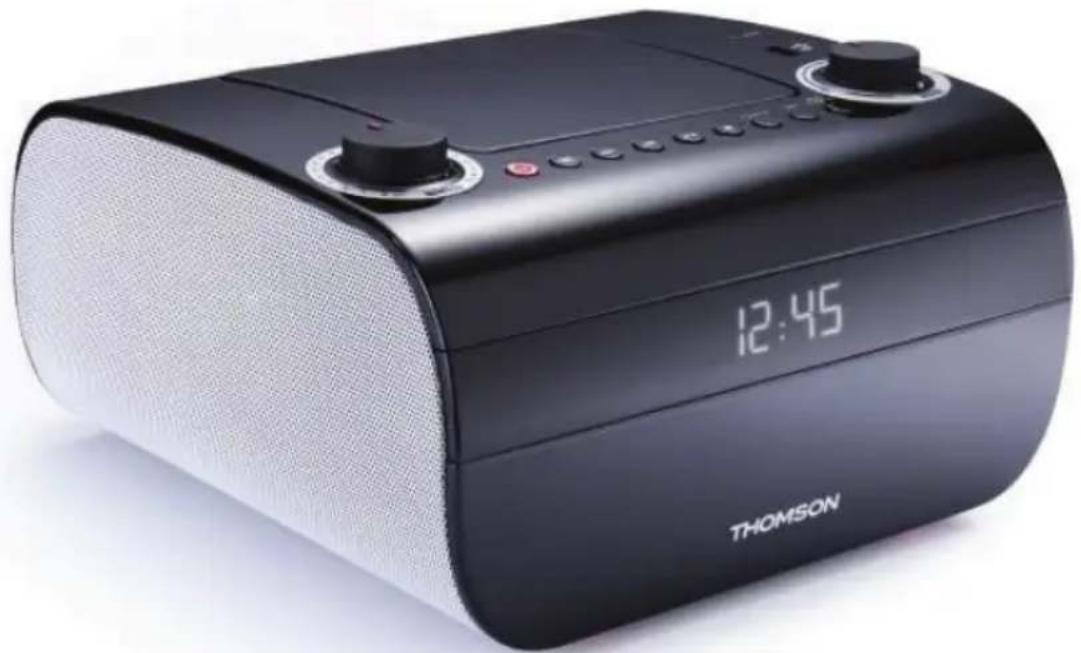
STEREO CD/MP3/USB PLAYER WITH FM RADIO AND BLUETOOTH (OPTIONAL)


Manufacturer: Bigben Interactive FRANCE
396, Rue de la Voyette, C.R.T. 2 Fretin,
CS 90414 - 59814 LESQUIN Cedex, France
Power supply


Manufacturer: Bigben Interactive FRANCE
396, Rue de la Voyette, C.R.T. 2 Fretin, CS 90414 - 59814 LESQUIN Cedex, France
- INSTRUCTION MANUAL –
MODEL RCD300U and RCD305UBT


Manufacturer: Bigben Interactive FRANCE
396, Rue de la Voyette, C.R.T. 2 Fretin,
CS 90414 - 59814 LESQUIN Cedex, France


Manufacturer: Bigben Interactive FRANCE
396, Rue de la Voyette, C.R.T. 2 Fretin,
CS 90414 - 59814 LESQUIN Cedex, France
- USER MANUAL -
MODEL RCD300U and RCD305UBT OPERATING INSTRUCTIONS
READ THE MANUAL CAREFULLY BEFORE USE AND KEEP FOR FUTURE REFERENCE.
Contents
Getting started 1

▶ PLAY/PAUSE (9)

Manufacturer: Bigben Interactive FRANCE
396, Rue de la Voyette, C.R.T. 2 Fretin,
CS 90414 - 59814 LESQUIN Cedex, France




- MODEL RCD300U AND RCD305UBT USER MANUAL
- POWER SOURCE
- MODEL RCD300U AND RCD305UBT OPERATING INSTRUCTIONS
- CONTENTS
- SAFETY AND NOTICE
- SAFETY
- WARNING
- CARE FOR YOUR PRODUCT
- CARE OF THE ENVIRONMENT
- WHAT'S IN THE BOX
- POWER
- CAUTION
- BATTERY POWER
- OPERATING THE RADIO
- ANTENNA
- SETTING THE CLOCK
- PLAY/PAUSE BUTTON (9)
- STOP BUTTON (10)
- SKIP UP/NEXT BUTTON (8)
- SKIP DOWN/BACK BUTTON (7)
- CD PLAY REPEAT
- PROGRAMMING CD & USB PLAY
- BLUETOOTH (OPTIONAL)
- BLUETOOTH PAIRING
- AUX-IN
- BASS BOOST
- SPECIFICATIONS
- THOMSON
- STEREO CD/MP3/USB PLAYER WITH FM RADIO AND BLUETOOTH (OPTIONAL)
- POWER SUPPLY
- MODEL RCD300U AND RCD305UBT
- PLAY/PAUSE (9)
Brand : THOMSON
Model : RCD305UBT
Category : Radio