G40HT - Hedge trimmers GREENWORKS - Free user manual and instructions
Find the device manual for free G40HT GREENWORKS in PDF.



User questions about G40HT GREENWORKS
0 question about this device. Answer the ones you know or ask your own.
Ask a new question about this device
Download the instructions for your Hedge trimmers in PDF format for free! Find your manual G40HT - GREENWORKS and take your electronic device back in hand. On this page are published all the documents necessary for the use of your device. G40HT by GREENWORKS.
USER MANUAL G40HT GREENWORKS
text_image
greenworks TOOLS2200907
EN 40V Cordless Hedge Trimmer USER'S MANUAL 1
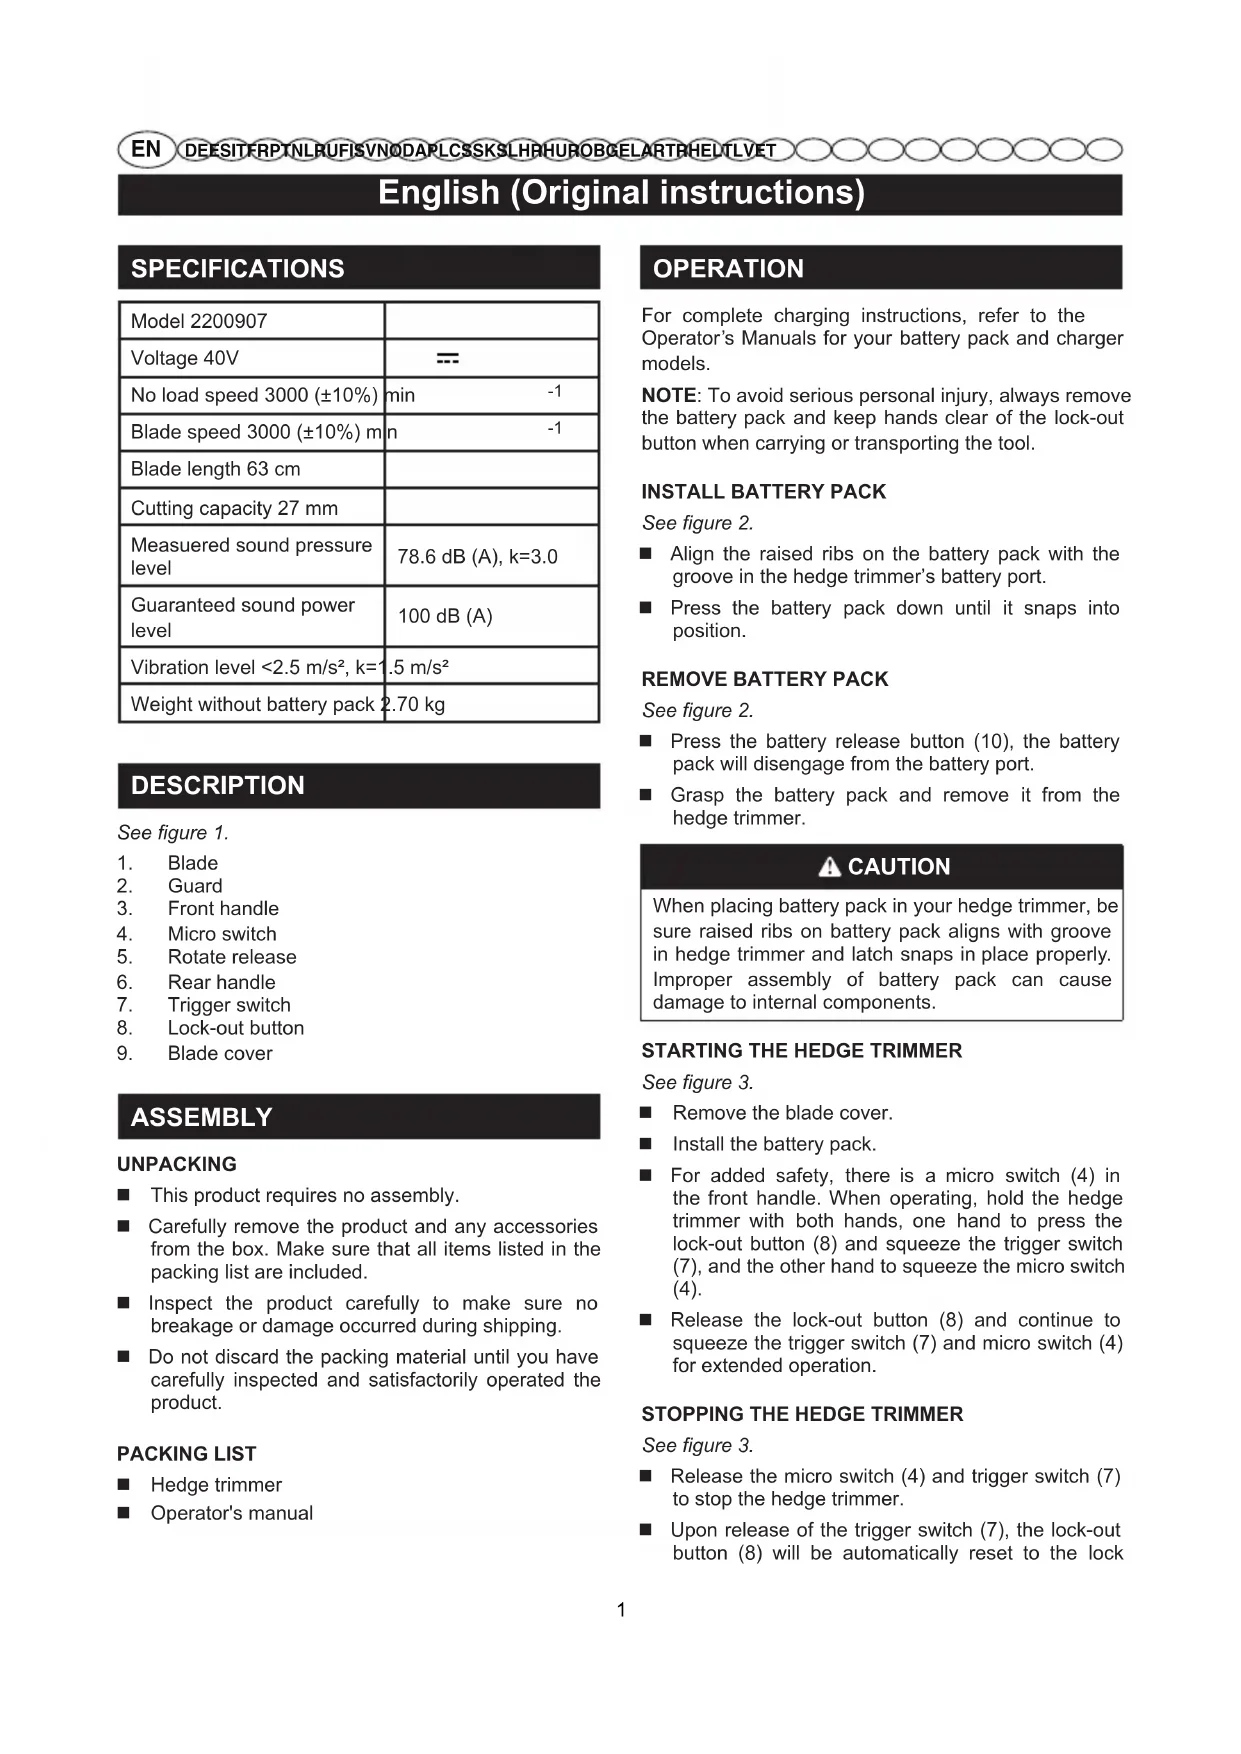
English (Original instructions)
SPECIFICATIONS
| Model 2200907 | |
| Voltage 40V | --- |
| No load speed 3000 (±10%) min | -1 |
| Blade speed 3000 (±10%) min | -1 |
| Blade length 63 cm | |
| Cutting capacity 27 mm | |
| Measured sound pressure level | 78.6 dB (A), k=3.0 |
| Guaranteed sound power level | 100 dB (A) |
| Vibration level <2.5 m/s2, k=1.5 m/s2 | |
| Weight without battery pack | 2.70 kg |
DESCRIPTION
See figure 1.
- Blade
- Guard
- Front handle
- Micro switch
- Rotate release
- Rear handle
- Trigger switch
- Lock-out button
- Blade cover
ASSEMBLY
UNPACKING
■ This product requires no assembly.
- Carefully remove the product and any accessories from the box. Make sure that all items listed in the packing list are included.
■ Inspect the product carefully to make sure no breakage or damage occurred during shipping.
■ Do not discard the packing material until you have carefully inspected and satisfactorily operated the product.
PACKING LIST
■ Hedge trimmer
■ Operator's manual
OPERATION
For complete charging instructions, refer to the Operator's Manuals for your battery pack and charger models.
NOTE: To avoid serious personal injury, always remove the battery pack and keep hands clear of the lock-out button when carrying or transporting the tool.
INSTALL BATTERY PACK
See figure 2.
■ Align the raised ribs on the battery pack with the groove in the hedge trimmer's battery port.
■ Press the battery pack down until it snaps into position.
REMOVE BATTERY PACK
See figure 2.
■ Press the battery release button (10), the battery pack will disengage from the battery port.
■ Grasp the battery pack and remove it from the hedge trimmer.
CAUTION
When placing battery pack in your hedge trimmer, be sure raised ribs on battery pack aligns with groove in hedge trimmer and latch snaps in place properly. Improper assembly of battery pack can cause damage to internal components.
STARTING THE HEDGE TRIMMER
See figure 3.
■ Remove the blade cover.
■ Install the battery pack.
For added safety, there is a micro switch (4) in the front handle. When operating, hold the hedge trimmer with both hands, one hand to press the lock-out button (8) and squeeze the trigger switch (7), and the other hand to squeeze the micro switch (4).
■ Release the lock-out button (8) and continue to squeeze the trigger switch (7) and micro switch (4) for extended operation.
STOPPING THE HEDGE TRIMMER
See figure 3.
■ Release the micro switch (4) and trigger switch (7) to stop the hedge trimmer.
■ Upon release of the trigger switch (7), the lock-out button (8) will be automatically reset to the lock
English (Original instructions)
position.
■ Remove battery pack from the hedge trimmer.
USING THE ROTATING REAR HANDLE
See figure 4.
■ Place the hedge trimmer on a flat and even surface.
■ Make sure that you turned off the hedge trimmer.
■ Press the rotation lever (5) and begin turning the rear handle. Release the rotation lever and turn the handle 45 or 90 degrees to either side until it clicks into place and the lever locks in.
■ To turn the handle back to center, press the rotation lever again, turn the handle slightly, release the rotation lever and continue turning the handle until it locks into place.
OPERATING TIPS
■ Do not force the hedge trimmer through heavy shrubbery. This can cause the blades to bind and slow down. If the blades slow down, reduce the pace.
■ Do not try to cut stems or twigs that are larger than 15 mm thick, or those obviously too large to feed into the cutting blade. Use a non-powered hand saw or pruning saw to trim large stems.
If desired, you can use a string to help cut your hedge level. Decide how high you want the hedge. Then, stretch a piece of string along the hedge at this height. Trim the hedge just above this guide line of string. See Figure 5. Trim the side of a hedge so that it will be slightly narrower at the top. See Figure 6. More of the hedge will be exposed when shaped this way, and it will be more uniform. If blades do become jammed, stop the motor, allow the blades to stop and remove the battery pack before attempting to remove the obstruction.
■ Wear gloves when trimming thorny or prickly growth. When trimming new growth, use a wide sweeping action, so that the stems are fed directly into the cutting blade. Older growth will have thicker stems and will be trimmed easiest by using a sawing movement.
| ⚠ DANGER |
| If blade jams on any electrical cord or line, DO NOT TOUCH THE BLADE! IT CAN BECOME ELECTRICALLY LIVE AND VERY DANGEROUS. Continue to hold the hedge trimmer by the insulated rear handle or lay it down and away from you in a safe manner. Disconnect the electrical service to the damaged line or cord before attempting to free the blade from the line or cord. Failure to heed this warning will result in serious personal injury or possible death. |
WARNING
Clear the area to be cut before each use. Remove all objects such as cords, lights, wire, or string which can become entangled in the cutting blade and create a risk of serious personal injury.
WARNING
Avoid using solvents when cleaning plastic parts. Most plastics are susceptible to damage from various types of commercial solvents and may be damaged by their use. Use a clean cloth to remove dirt, oil, grease, etc. When servicing use only identical Greenworks Tools replacement parts. Use of any other parts can create a hazard or cause product damage.
CAUTION
Do not at any time let brake fluids, gasoline, petroleum based products, penetrating oils, etc., come in contact with plastic parts. They contain chemicals that may damage, weaken, or destroy plastics.
MAINTENANCE AND REPAIR
Battery units do not have to be plugged into an electrical outlet; therefore, they are always in operating condition. To prevent serious personal injury, always remove the battery and take extra precautions and care when performing maintenance, service or for changing the cutting blade.
WARNING
To prevent serious personal injury, remove the battery pack before servicing, cleaning, or removing material from the unit.
BLADE CARE
■ Lubricate the cutting blades after each use.
■ Periodically inspect the blades for damage and wear.
■ Always use the manufacturer's specified replacement blades.
English (Original instructions)
TO LUBRICATE BLADE
See figure 7.
■ Remove battery pack from hedge trimmer.
For easier operation and longer blade life, lubricate the hedge trimmer blade before and after each use. Before lubricating, remove the battery pack and lay hedge trimmer on a flat surface. Apply light weight machine oil along the edge of the top blade.
■ Occasionally, you should oil your hedge trimmer during prolonged use. Before oiling, stop hedge trimmer, remove battery pack, then oil. You then can resume trimming. Do not oil while hedge trimmer is running.
All of the bearings in this tool are lubricated with a sufficient amount of high-grade lubricant for the life of the unit under normal operating procedures. Therefore, no further lubrication is required.
WARNING
Do not attempt to modify this unit or create or mount any accessory not specifically recommended in this manual for use with this hedge trimmer. Any such alteration or modification is misuse and could result in a hazardous condition leading to possible serious personal injury.
WARNING
Examine hedge trimmer frequently to assure all parts are unbroken and securely attached. Make sure all screws and fasteners are securely tightened to prevent the risk of serious personal injury.
CLEANING THE HEDGE TRIMMER
WARNING
To prevent serious personal injury, remove the battery pack before servicing, cleaning, or removing material from the unit.
■ Remove the battery pack.
■ Clean the unit using a damp cloth with a mild detergent.
■ Do not use any strong detergents on the plastic housing or the handle. They can be damaged by certain aromatic oils such as pine and lemon, and by solvents such as kerosene.
■ Moisture can cause a shock hazard. Wipe off any moisture with a soft dry cloth.
■ Use a small brush or the air discharge of a small
vacuum cleaner brush to clean the air vents on the battery pack housing and motor housing.
- Keep the air vents free of obstructions.
STORING THE HEDGE TRIMMER
See figure 8.
■ Clean the hedge trimmer thoroughly before storing. Store the hedge trimmer in a dry, well-ventilated place that is inaccessible to children. Keep away from corrosive agents such as garden chemicals and deicing salts.
■ Always place blade cover on cutting blades before storing. See Figure 8.
■ Store and charge your batteries in a cool area. Temperatures above or below normal room temperature will shorten battery pack life.
■ Store the battery pack where the temperature is below 27^ C, and away from moisture.
■ Never store batteries in a discharged condition. Wait for battery pack to cool and fully charge immediately.
All batteries gradually lose their charge. The higher the temperature, the quicker they lose their charge. If you store your unit for long periods of time without using it, recharge the batteries every month or two. This practice will prolong battery pack life.
English (Original instructions)
TROUBLESHOOTING
| PROBLEM | POSSIBLE CAUSE SO | LUTION |
| Motor fails to start when switch trigger and micro switch are depressed. | Battery is not secure. | To secure the battery pack, make sure the latches on the top of the battery pack snap into place. |
| Battery is not charged. | Charge the battery pack according to the instructions included with your model. | |
| Motor runs,but cutting blades do not move. | Hedger damaged.Do not use hedge trimmer. | Call for technical service. |
| Hedge trimmer smokes during operation. | Hedger damaged.Do not use hedge trimmer. | Call for technical service. |
| Motor hums, blades do not move. | Debris or other may be jamming the blades. | Remove battery, clear debris blockage from blades. |
HECKENSCHERE AUSSCHALTEN
Siehe Abb. 3.
TUOTTEEN TEKNISET TIEDOT
VEDLIKEHOLD OG REPARASJON
VEDLIKEHOLDE HEKKSAKSENS BLAD
ADVARSEL
VEDLIKEHOLDE HEKKSAKSEN
ADVARSEL
KONSERWACJA I NAPRAWY
KONSERWACJA LISTWY NOŻOWEJ NOŻYC DO ŻYWOPŁOTÓW
OSTRZEŻENIE
All new Greenworks Tools machinery is supplied with a 2 year parts and labour warranty from original date of purchase. A 30 day warranty is available for machines used professionally as Greenworks Tools are designed primarily to be used by DIY consumers.
This warranty is non-transferable.
LIMITATIONS
This warranty applies only to defective parts/components and does not cover repairs due to:
- Normal wear and tear.
- Routine tune up or adjustment.
- Damage caused by improper handling/abuse/misuse or neglect.
- Overheating due to lack of maintenance.
- Damage due to fittings/fasteners becoming loose/detached through lack of maintenance.
- Damage caused by cleaning with water.
- Machines serviced or repaired by non-authorised Greenworks Tools service centres.
- Machines incorrectly assembled or adjusted.
- Damage caused by improper use of the machine.
- Damage caused by improper winterisation (pressure washers)
-
Items considered as consumable parts are not normally covered by the warranty, including but not limited to:
-
Batteries
- Electric cables
- Blade and blade assemblies
- Belts
-
Filters
• Chucks and tool holders -
Certain products may contain components such as engines, transmissions from an alternative manufacturer, these items will be subject to the appropriate manufacturer's warranty policy except where Greenworks Tools Europe GmbH agrees to underwrite any claims outside the said manufacturer's warranty period.
- Second hand goods are not covered under this warranty policy.
- The fitting of spares, replacements or extra components which are not supplied or approved by Greenworks Tools Europe GmbH.
Warranty
To claim a warranty on any product under this policy a proof of original purchase is required. Credit card statement do not qualify as sufficient proof of purchase. In the first instance of a warranty event occurring the consumer should return the product to the original place of purchase with their proof of purchase. The machine will be sent to our central service facility and an inspection made. If the machine be found to be at fault it will be repaired and sent back to the address of the consumer free of charge. Machines that retail for less than €100 euros including sales taxes will generally be replaced.
If the central service facility finds that machine is not found to be at fault
then the consumer will be advised they will need to pay for the cost of the repair.
This warranty policy is subject to change from time to time to accommodate the needs of new products. A copy of the latest warranty policy will be available at www.greenworkstools.eu.

Greenworks Tools garantibetingelser for gjør-det-sely-maskiner
GARANTIPERIODE
| :הכלההוּרָהוּרָהוּרָהוּרָהוּרָהוּרָהוּרָהוּרָהוּרָהוּרָהוּרָהוּרָהוּרָהוּרָהוּרָה |
EN EC DECLARATION OF CONFORMITY
Manufacturer: Changzhou Globe Co., Ltd.
Address: No. 65 Xinggang Rd., Zhonglou Zone, Changzhou, Jiangsu, China
Name and address of the person authorised to compile the technical file:
Name: Peter Söderström
Adress: Hjortronvägen 3, 555 93 Jönköping, Sweden
Herewith we declare that the product
Category ...... CORDLESS HEDGE TRIMMER
Model 2200907
Serial Number ...... See product rating label
Year of Construction ...... See product rating label
■ is in conformity with the relevant provisions of the Machinery Directive (2006/42/EC)
■ is in conformity with the provisions of the following other EC-Directives EMC Directive (2014/30/EU),
Noise Emission Directive (2000/14/EC amended by 2005/88/EC)
And furthermore, we declare that
■ The following (parts/clauses of) European harmonised standards have been used EN 60745-1; EN 60745-2-15; EN ISO 3744; ISO 11094; EN 55014-1; EN 55014-2
Measured sound power level 98.6 dB(A)
Guaranteed sound power level 100 dB(A)
Conformity assessment method to Annex V / Directive 2000/14/EC
Place, date: Changzhou, 08/11/2017
Quality Director
Signature: Ted Qu Haichao
Ted Qu
DE
Adresse: No. 65 Xinggang Rd., Zhonglou Zone, Changzhou, Jiangsu, China
Indirizzo: No. 65 Xinggang Rd., Zhonglou Zone, Changzhou, Jiangsu, China
FR DÉCLARATION DE CONFORMITÉ EC
Fabricant : Changzhou Globe Co., Ltd.
Adresse : No. 65 Xinggang Rd., Zhonglou Zone, Changzhou, Jiangsu, China
Endereço: No. 65 Xinggang Rd., Zhonglou Zone, Changzhou, Jiangsu, China
Adres: No. 65 Xinggang Rd., Zhonglou Zone, Changzhou, Jiangsu, China
Osoite: No. 65 Xinggang Rd., Zhonglou Zone, Changzhou, Jiangsu, China
Adress: No. 65 Xinggang Rd., Zhonglou Zone, Changzhou, Jiangsu, China
Adresse: No. 65 Xinggang Rd., Zhonglou Zone, Changzhou, Jiangsu, China
Adresse: No. 65 Xinggang Rd., Zhonglou Zone, Changzhou, Jiangsu, China
Adres: No. 65 Xinggang Rd., Zhonglou Zone, Changzhou, Jiangsu, China
Adresa: No. 65 Xinggang Rd., Zhonglou Zone, Changzhou, Jiangsu, China
Adresa: No. 65 Xinggang Rd., Zhonglou Zone, Changzhou, Jiangsu, China
Naslov: No. 65 Xinggang Rd., Zhonglou Zone, Changzhou, Jiangsu, China
Adresa: No. 65 Xinggang Rd., Zhonglou Zone, Changzhou, Jiangsu, China
Ime i prezime, i adresa osobe ovlaštene da sastavi tehničku datoteku:
Ime i prezime: Peter Söderström
Cím: No. 65 Xinggang Rd., Zhonglou Zone, Changzhou, Jiangsu, China
Adresa: No. 65 Xinggang Rd., Zhonglou Zone, Changzhou, Jiangsu, China
Adres: No. 65 Xinggang Rd., Zhonglou Zone, Changzhou, Jiangsu, China
No. 65 Xinggang Rd., Zhonglou Zone, Changzhou, Jiangsu, China :
Adresas: No. 65 Xinggang Rd., Zhonglou Zone, Changzhou, Jiangsu, China
Adrese: No. 65 Xinggang Rd., Zhonglou Zone, Changzhou, Jiangsu, China
Aadress: No. 65 Xinggang Rd., Zhonglou Zone, Changzhou, Jiangsu, China