G40PH51 - Hedge trimmers GREENWORKS - Free user manual and instructions
Find the device manual for free G40PH51 GREENWORKS in PDF.
Frequently Asked Questions - G40PH51 GREENWORKS
User questions about G40PH51 GREENWORKS
0 question about this device. Answer the ones you know or ask your own.
Ask a new question about this device
Download the instructions for your Hedge trimmers in PDF format for free! Find your manual G40PH51 - GREENWORKS and take your electronic device back in hand. On this page are published all the documents necessary for the use of your device. G40PH51 by GREENWORKS.
USER MANUAL G40PH51 GREENWORKS
text_image
greenworks TOOLS22147T
natural_image
Technical line drawing of a mechanical tool or bracket assembly (no text or symbols present)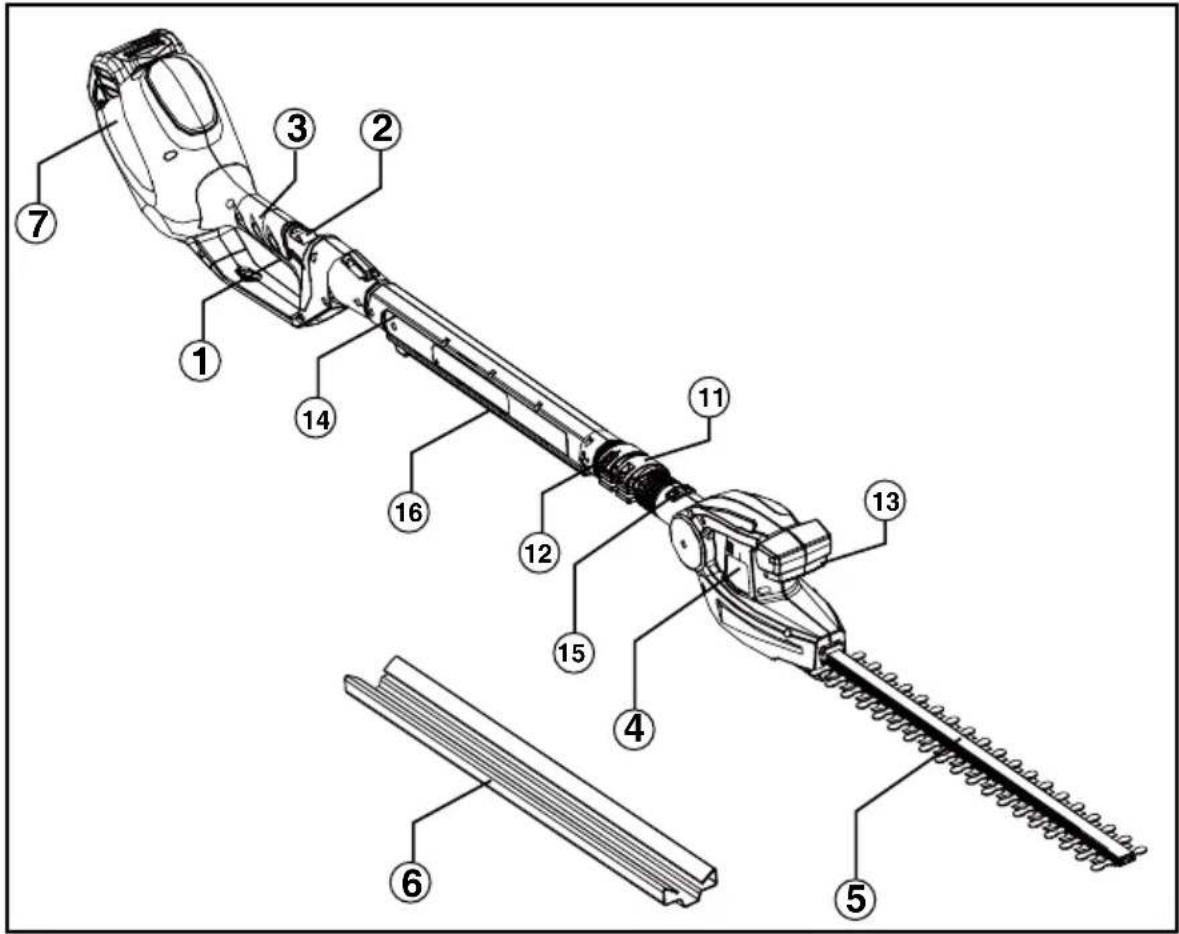
text_image
Technical diagram of a mechanical device with numbered components for identification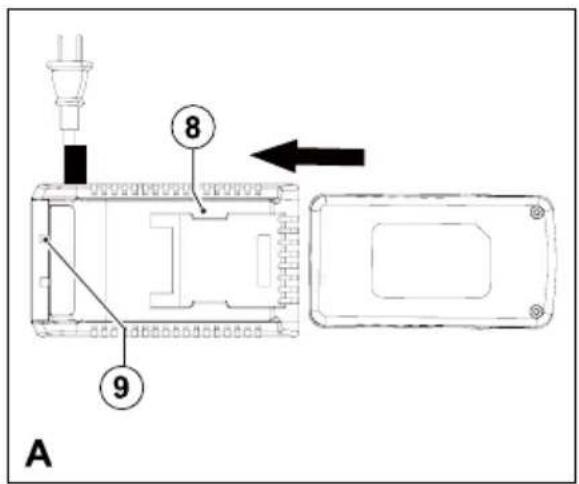
text_image
A 8 9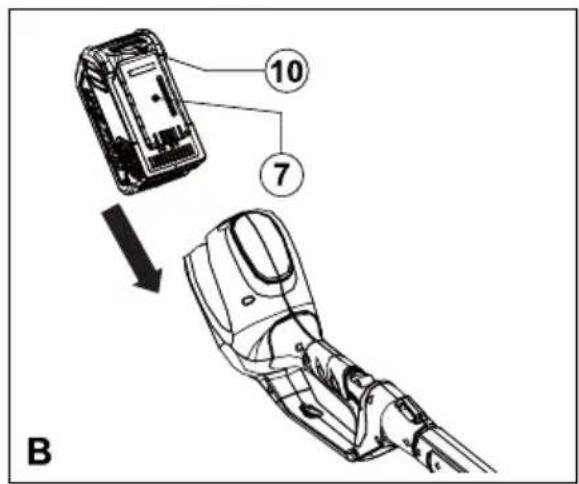
text_image
10 7 B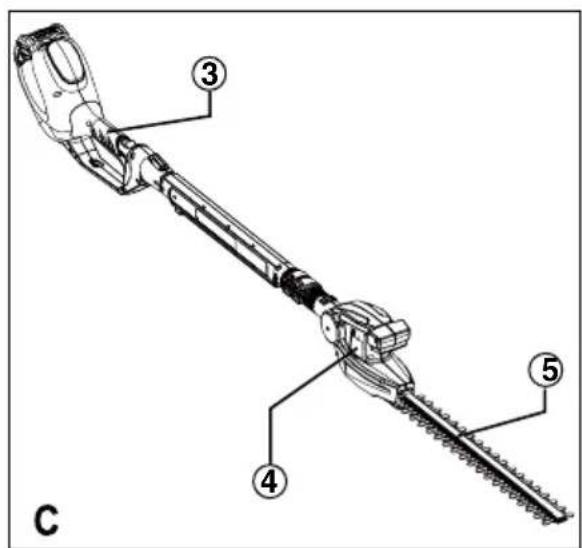
text_image
③ ④ ⑤ C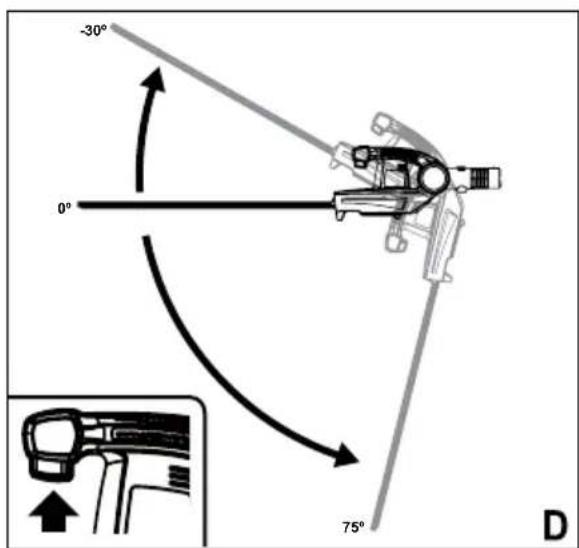
text_image
-30° 0° 75° D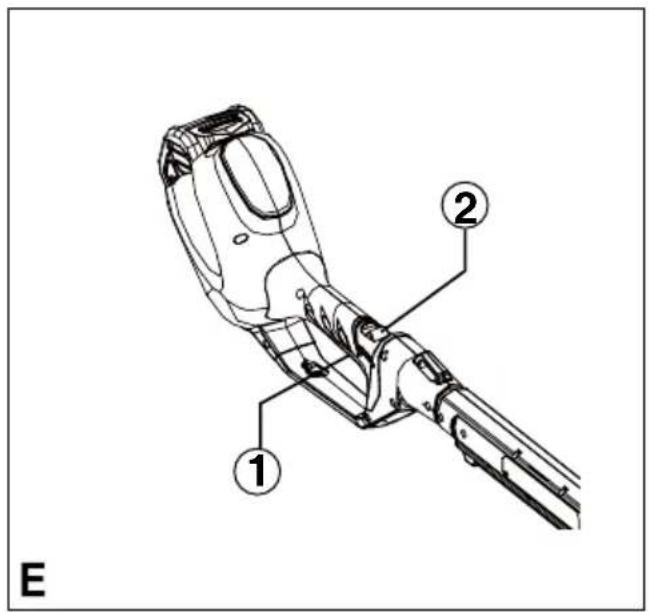
text_image
E ① ②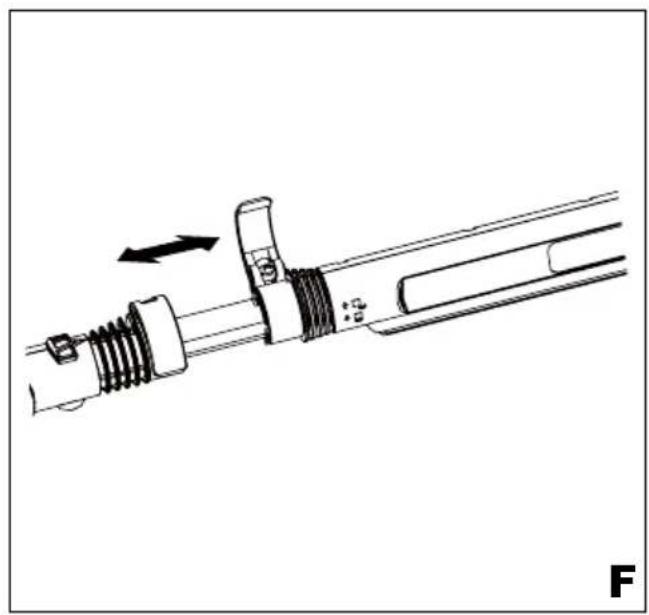
natural_image
Technical line drawing of a mechanical assembly with threaded components and directional arrows (no text or symbols)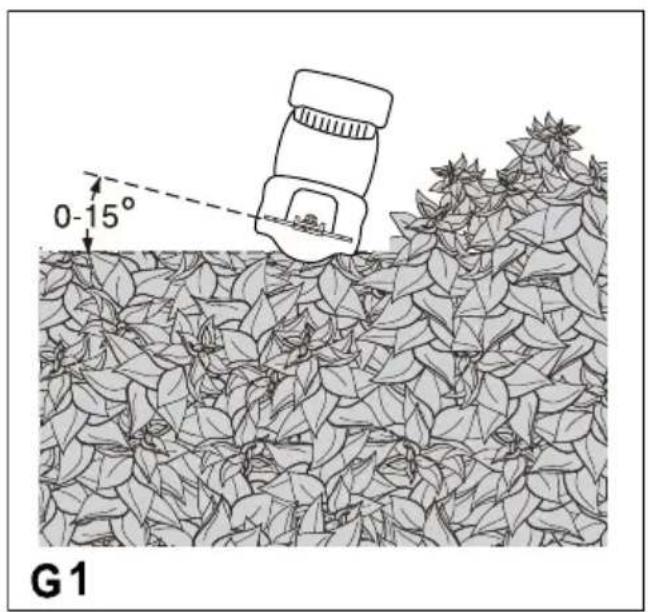
text_image
0-15° G1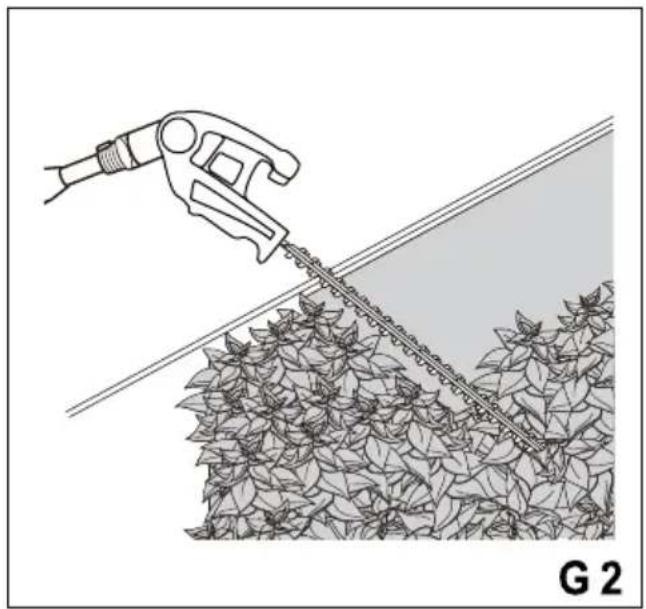
natural_image
Illustration of a hand using a tool to cut a plant stem, labeled G 2 (no text or symbols on the diagram itself)
natural_image
Illustration of a person using a tool to clean leafy plants (no text or symbols)
natural_image
Line drawing of a person using a tool to clean or brush a pile of material (no text or symbols)FRANÇAIS
- Rest the handle (3) on the ground.
- Loosen the handle cam lock (12) and adjust the handle shaft to a comfortable length.
- Fasten the handle cam lock.
Extension de la perche (fig. F)
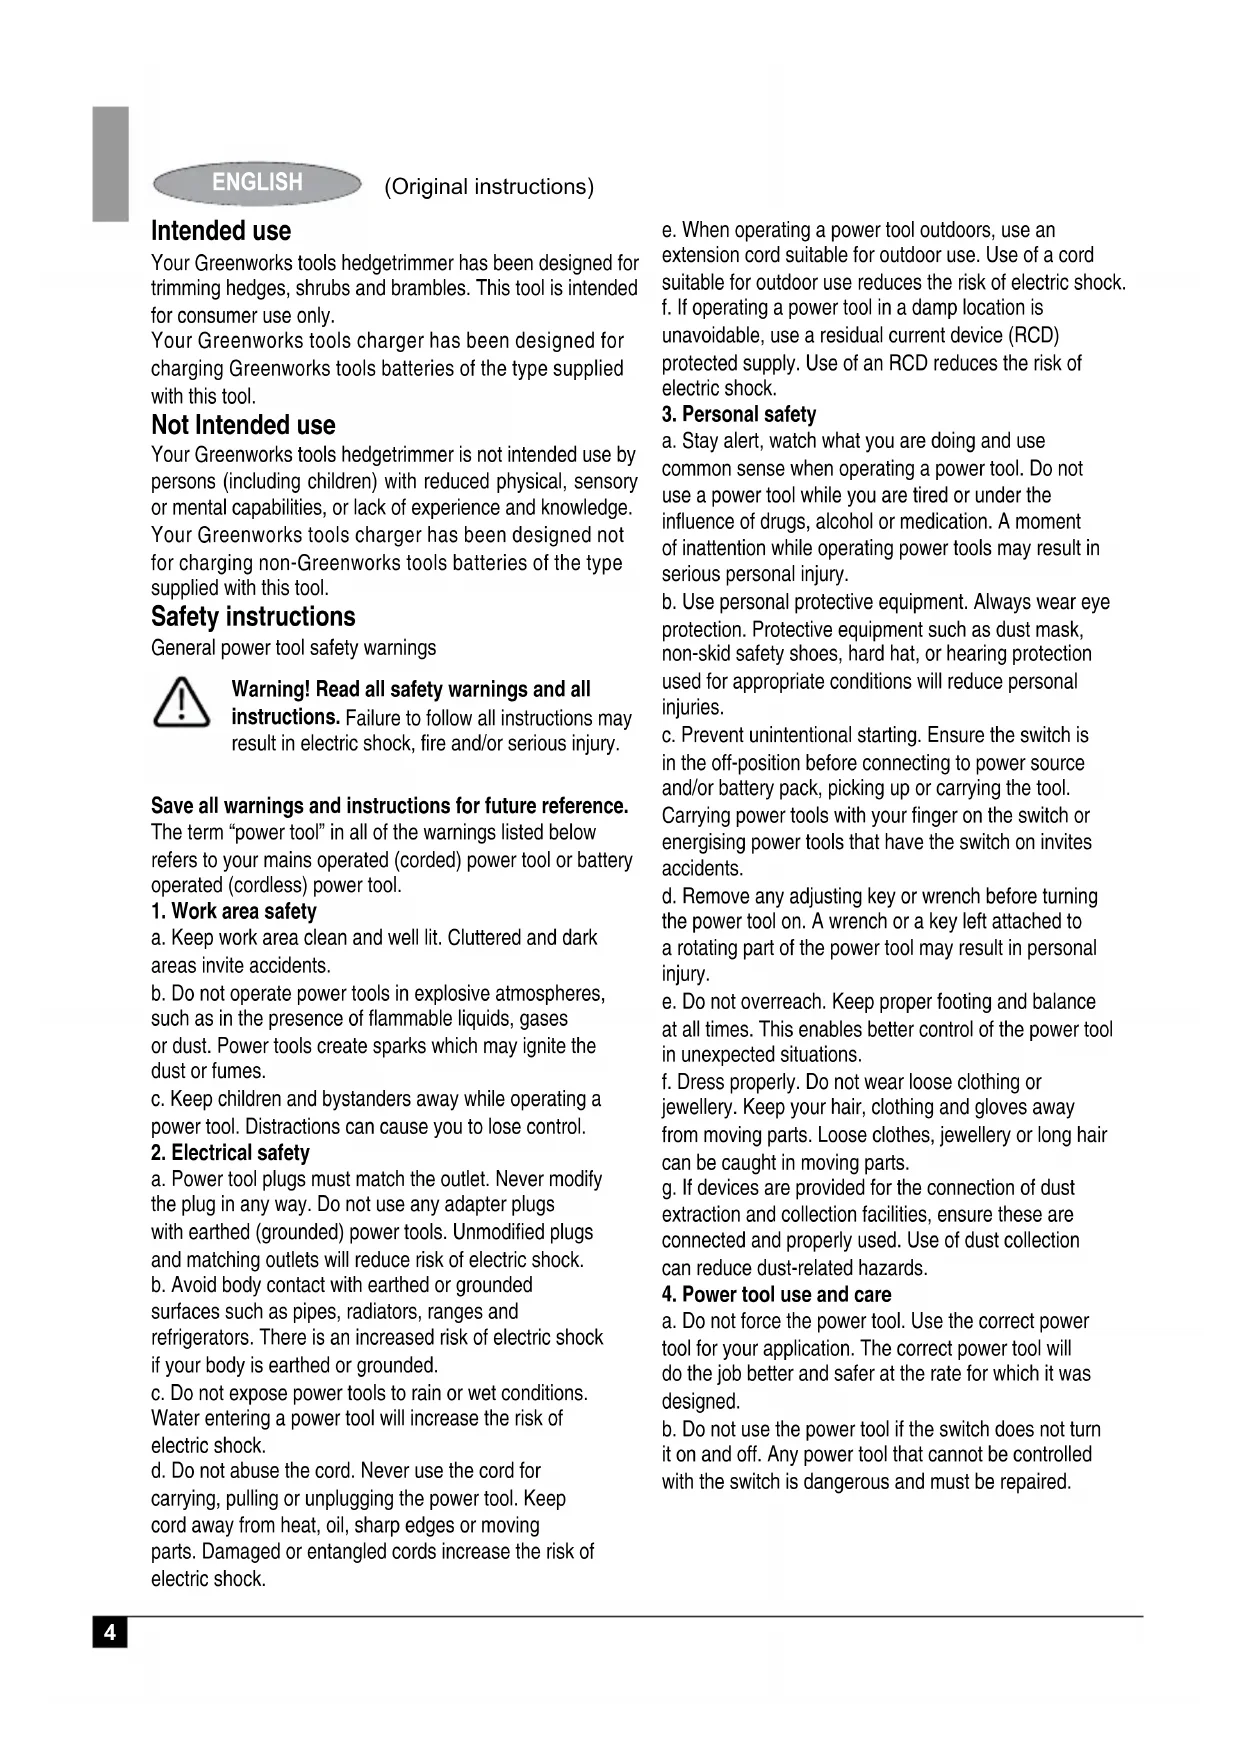
Your Greenworks tools hedgetrimmer has been designed for trimming hedges, shrubs and brambles. This tool is intended for consumer use only.
Your Greenworks tools charger has been designed for charging Greenworks tools batteries of the type supplied with this tool.
Not Intended use
Your Greenworks tools hedgetrimmer is not intended use by persons (including children) with reduced physical, sensory or mental capabilities, or lack of experience and knowledge. Your Greenworks tools charger has been designed not for charging non-Greenworks tools batteries of the type supplied with this tool.
Safety instructions
General power tool safety warnings

Warning! Read all safety warnings and all instructions. Failure to follow all instructions may result in electric shock, fire and/or serious injury.
Save all warnings and instructions for future reference.
The term "power tool" in all of the warnings listed below refers to your mains operated (corded) power tool or battery operated (cordless) power tool.
1. Work area safety
a. Keep work area clean and well lit. Cluttered and dark areas invite accidents.
b. Do not operate power tools in explosive atmospheres, such as in the presence of flammable liquids, gases or dust. Power tools create sparks which may ignite the dust or fumes.
c. Keep children and bystanders away while operating a power tool. Distractions can cause you to lose control.
2. Electrical safety
a. Power tool plugs must match the outlet. Never modify the plug in any way. Do not use any adapter plugs with earthed (grounded) power tools. Unmodified plugs and matching outlets will reduce risk of electric shock.
b. Avoid body contact with earthed or grounded surfaces such as pipes, radiators, ranges and refrigerators. There is an increased risk of electric shock if your body is earthed or grounded.
c. Do not expose power tools to rain or wet conditions. Water entering a power tool will increase the risk of electric shock.
d. Do not abuse the cord. Never use the cord for carrying, pulling or unplugging the power tool. Keep cord away from heat, oil, sharp edges or moving parts. Damaged or entangled cords increase the risk of electric shock.
e. When operating a power tool outdoors, use an extension cord suitable for outdoor use. Use of a cord suitable for outdoor use reduces the risk of electric shock. f. If operating a power tool in a damp location is unavoidable, use a residual current device (RCD) protected supply. Use of an RCD reduces the risk of electric shock.
3. Personal safety
a. Stay alert, watch what you are doing and use common sense when operating a power tool. Do not use a power tool while you are tired or under the influence of drugs, alcohol or medication. A moment of inattention while operating power tools may result in serious personal injury.
b. Use personal protective equipment. Always wear eye protection. Protective equipment such as dust mask, non-skid safety shoes, hard hat, or hearing protection used for appropriate conditions will reduce personal injuries.
c. Prevent unintentional starting. Ensure the switch is in the off-position before connecting to power source and/or battery pack, picking up or carrying the tool.
Carrying power tools with your finger on the switch or energising power tools that have the switch on invites accidents.
d. Remove any adjusting key or wrench before turning the power tool on. A wrench or a key left attached to a rotating part of the power tool may result in personal injury.
e. Do not overreach. Keep proper footing and balance at all times. This enables better control of the power tool in unexpected situations.
f. Dress properly. Do not wear loose clothing or jewellery. Keep your hair, clothing and gloves away from moving parts. Loose clothes, jewellery or long hair can be caught in moving parts.
g. If devices are provided for the connection of dust extraction and collection facilities, ensure these are connected and properly used. Use of dust collection can reduce dust-related hazards.
4. Power tool use and care
a. Do not force the power tool. Use the correct power tool for your application. The correct power tool will do the job better and safer at the rate for which it was designed.
b. Do not use the power tool if the switch does not turn it on and off. Any power tool that cannot be controlled with the switch is dangerous and must be repaired.
c. Disconnect the plug from the power source and/or the battery pack from the power tool before making any adjustments, changing accessories, or storing power tools. Such preventive safety measures reduce the risk of starting the power tool accidentally.
d. Store idle power tools out of the reach of children and do not allow persons unfamiliar with the power tool or these instructions to operate the power tool. Power tools are dangerous in the hands of untrained users.
e. Maintain power tools. Check for misalignment or binding of moving parts, breakage of parts and any other condition that may affect the power tools operation. If damaged, have the power tool repaired before use. Many accidents are caused by poorly maintained power tools.
f. Keep cutting tools sharp and clean. Properly maintained cutting tools with sharp cutting edges are less likely to bind and are easier to control.
g. Use the power tool, accessories and tool bits etc. in accordance with these instructions, taking into account the working conditions and the work to be performed. Use of the power tool for operations different from those intended could result in a hazardous situation.
5. Battery tool use and care
a. Recharge only with the charger specified by the manufacturer. A charger that is suitable for one type of battery pack may create a risk of fire when used with another battery pack.
b. Use power tools only with specifically designated battery packs. Use of any other battery packs may create a risk of injury and fire.
c. When battery pack is not in use, keep it away from other metal objects, like paper clips, coins, keys, nails, screws, or other small metal objects, that can make a connection from one terminal to another.
Shorting the battery terminals together may cause burns or a fire.
d. Under abusive conditions, liquid may be ejected from the battery; avoid contact. If contact accidentally occurs, flush with water. If liquid contacts eyes, additionally seek medical help. Liquid ejected from the battery may cause irritation or burns.
6. Service
a. Have your power tool serviced by a qualified repair person using only identical replacement parts.
This will make sure that the safety of the power tool is maintained.
Additional power tool safety warnings

Warning! Additional safety warnings for hedge trimmers
- Keep all parts of the body away from the cutter blade.
Do not remove cut material or hold material to be cut when blades are moving. Make sure the switch is off when clearing jammed material. A moment of inattention while operating the tool can result in serious personal injury.
- Carry the hedge trimmer by the handle with the cutter blade stopped. When transporting or storing the hedge trimmer always fit the cutting device cover.
Proper handling of the hedge trimmer will reduce possible personal injury from the cutter blades.
- Hold the power tool by insulated gripping surfaces only, because the cutter blade may contact hidden wiring. Cutter blades contacting a "live" wire may make exposed metal parts of the power tool "live" and could give the operator an electric shock.
- Keep cable away from cutting area. During operation the cable can be hidden in shrubs and can be accidentally cut by the blade.
Training
Provide the following instruction:
Become familiar with the owner's manual before attempting to operate the equipment.
Preparation
Provide the following instructions.
a) THIS HEDGE TRIMMER CAN CAUSE SERIOUS INJURIES. Read the instructions carefully for the correct handling, preparation, maintenance, starting and stopping of the hedge trimmer. Become familiar with all controls and the proper use of the hedge trimmer.
b) Never allow children to use the hedge trimmer.
c) Beware of overhead power lines.
d) Avoid operating while people, especially children, are nearby. e) Dress properly! Do not wear loose clothing or jewellery, which can be caught in moving parts. Use of sturdy gloves, non-skid footwear and safety glasses is recommended.
g) If the cutting mechanism strikes any foreign object or the hedge trimmer starts making any unusual noise or vibration, shut off the power source and allow the hedge trimmer to stop. Remove the battery pack and take the following steps:
- inspect for damage;
- check for, and tighten, any loose parts;
- have any damaged parts replaced or repaired with parts having equivalent specifications
ENGLISH
(Original instructions)
h) Warn of the need for ear protection.
i) Warn of the need for eye protection.
j) Instruct in how to stop the hedge trimmer in an emergency.
Operation
Provide instructions for correct use and an indication that the hedge trimmer should not be used for any other purpose, as well as the following instructions.
a) Stop the machine and move the battery pack before
- cleaning or when clearing a blockage,
- checking, carrying out maintenance or working on the hedge trimmer,
- adjusting the working position of the cutting device,
- leaving the hedge trimmer unattended.
b) Ensure that the hedge trimmer is correctly located in a designated working position before starting the engine.
c) While operating the hedge trimmer, always ensure that the operating position is safe and secure, especially when using steps or a ladder.
d) Do not operate the hedge trimmer with a damaged or excessively worn cutting device.
e) Always ensure that all handles and guards are fitted when using the hedge trimmer. Never attempt to use an incomplete hedge trimmer or one fitted with an unauthorized modification.
f) Always use two hands to operate a hedge trimmer fitted with two handles.
g) Always be aware of your surroundings and stay alert for possible hazards of which you may not be aware due to the noise of the hedge trimmer.
Maintenance and storage
Provide the following instructions.
a) When the hedge trimmer is stopped for servicing, inspection or storage, remove the battery pack and make sure all moving parts have come to a stop. Allow the hedge trimmer to cool before making any inspections, adjustments, etc.
b) Store the hedge trimmer where the children will not reach. Always allow the hedge trimmer to cool down before storing.
c) When transporting or storing the hedge trimmer, always fit the cutting device transport guard.
- The intended use is described in this instruction manual. The use of any accessory or attachment or performance of any operation with this tool other than those recommended in this instruction manual can present a risk of personal injury and/or damage to property.
- Do not carry the tool with your hands on the front handle, switch or the trigger switch unless the battery has been removed.
- If you have not used a hedge trimmer before, preferably seek practical instruction by an experienced user in addition to studying this manual.
- Never touch the blades while the tool is running.
- Never attempt to force the blades to come to a standstill.
- Do not put the tool down until the blades have come to a complete standstill.
- Regularly check the blades for damage and wear. Do not use the tool when the blades are damaged.
- Take care to avoid hard objects (e.g. metal wire, railings) when trimming. Should you accidentally hit any such object, immediately switch the tool off and check for any damage.
- Should the tool start to vibrate abnormally, immediately switch it off and check for any damage.
- If the tool stalls, immediately switch it off. Remove the battery before attempting to remove any obstructions.
- After use, place the blade sheath supplied over the blades. Store the tool, making sure that the blade is not exposed.
- Always ensure that all guards are fitted when using the tool. Never attempt to use an incomplete tool or a tool with unauthorised modifications.
- Never allow children to use the tool.
- Be aware of falling debris when cutting the higher slides of a hedge.
- Always hold the tool with both hands and by the handles provided.
Safety of others
- This appliance is not intended for use by persons (including children) with reduced physical, sensory or mental capabilities, or lack of experience and knowledge, unless they have been given supervision or instruction concerning the use of the appliance by a person responsible for the their safety.
- Children should be supervised to ensure that they do not play with the appliance.
Vibration
The declared vibration emission values stated in the technical data and the declaration of conformity have been measured in accordance with a standard test method provided by EN 60745 and may be used for comparing one tool with another. The declared vibration emission value may also be used in a preliminary assessment of exposure.
Warning! The vibration emission value during actual use of the power tool can differ from the declared value depending on the ways in which the tool is used. The vibration level may increase above the level stated.
When assessing vibration exposure to determine safety measures required by 2002/44/EC to protect persons regularly using power tools in employment, an estimation of vibration exposure should consider, the actual conditions of use and the way the tool is used, including taking account of all parts of the operating cycle such as the times when the tool is switched off and when it is running idle in addition to the trigger time.
Warning symbols
The following warning symbols are shown on the tool:

Warning! To reduce the risk of injury, the user must read the instruction manual.

Do not expose the tool to rain or high humidity.

Always wear non-slip safety footwear.

Warning! Do not touch the chain at the chip ejection point.

Always wear ear and eye protection.

To ensure continued safe operation, check the chain tension as described in this manual after every 10 minutes of use, and adjust back to a clearance of 3 mm as required.
Beware of falling objects. Keep bystanders away.
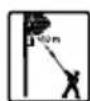
Electrocution hazard. Keep at least 10 m away from overhead lines.
Residual risks
Additional residual risks may arise when using the tool which may not be included in the enclosed safety warnings. These risks can arise from misuse, prolonged use etc.
Even with the application of the relevant safety regulations and the implementation of safety devices, certain residual risks cannot be avoided. These include:
- Injuries caused by touching any rotating/moving parts.
- Injuries caused when changing any parts, blades or accessories.
- Injuries caused by prolonged use of a tool. When using any tool for prolonged periods make sure you take regular breaks.
- Impairment of hearing.
- Health hazards caused by breathing dust developed when using your tool (example:- working with wood, especially oak, beech and MDF).
Additional safety instructions for batteries and chargers
Batteries
- Never attempt to open for any reason.
- Do not expose the battery to water.
- Do not expose the battery to heat.
- Do not store in locations where the temperature may exceed 40 C.
- Charge only at ambient temperatures between 10 C and 40 C.
- Charge only using the charger provided with the appliance/tool. Using the wrong charger could result in an electric shock or overheating of the battery.
- When disposing of batteries, follow the instructions given in the section "Protecting the environment".
- Do not damage/deform the battery pack either by puncture or impact, as this may create a risk of injury and fire.
- Do not charge damaged batteries.
- Under extreme conditions, battery leakage may occur.
When you notice liquid on the batteries, carefully wipe the liquid off using a cloth. Avoid skin contact.
• In case of skin or eye contact, follow the instructions below.
Warning! The battery fluid may cause personal injury or damage to property. In case of skin contact, immediately rinse with water. If redness, pain or irritation occurs seek medical attention. In case of eye contact, rinse immediately with clean water and seek medical attention.
Chargers
Warning! Your charger has been designed for a specific voltage. Always check that the mains voltage corresponds to the voltage on the rating plate. Warning! Never attempt to replace the charger unit with a regular mains plug.
- Use your Greenworks tools charger only to charge the battery in the appliance/tool with which it was supplied. Other batteries could burst, causing personal injury and damage.
- Never attempt to charge non-rechargeable batteries.
- If the supply cord is damaged, it must be replaced by the manufacturer or an authorised Greenworks tools Service Centre in order to avoid a hazard.
- Do not expose the charger to water.
- Do not open the charger.
- Do not probe the charger.
- The charger must be placed in a well ventilated area when charging.
Symbols on the charger
The following symbols are found on your charger:

Your charger is double insulated; therefore no earth wire is required. Always check that the mains voltage corresponds to the voltage on the rating plate. Never attempt to replace the charger unit with a regular mains plug. If the cord is damaged, it must be replaced by the manufacturer or an authorised Greenworks tools Service Centre in order to avoid a hazard.

The charger is intended for indoor use only.

Read the instruction manual before use.
Features
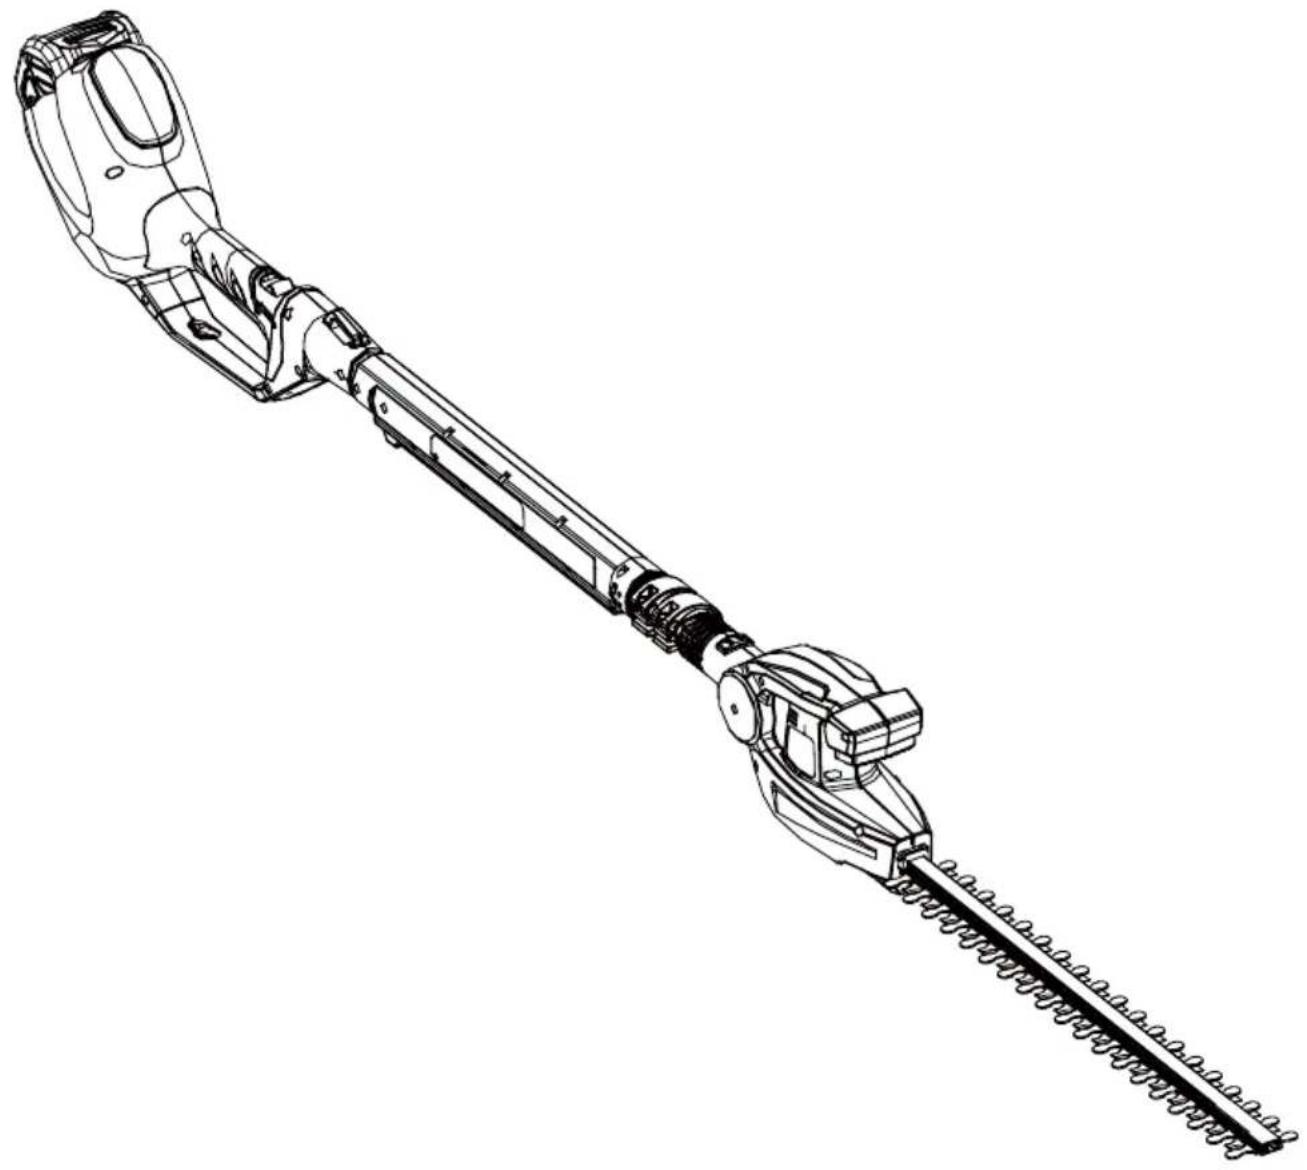
- On/off switch 10. Release button
- Lock-off button 11. Trimmer head cam lock
- Main handle 12. Handle cam lock
- Trimmer head 13. Pivoting button
- Blade 14. Second handle
- Blade sheath 15. Lock button
- Battery 16. Front trigger
- Charger
- Charging indicator
Assembly
Warning! To prevent accidental operation, ensure that the battery is removed and that the blade sheath is in place on the blades before performing the following operations. Failure to do this could result in serious personal injury.
Fitting and removing the trimmer head (fig. C)
Fitting the trimmer head
- Align the arrow on the end of main handle (3) with the arrow on the trimmer head (4).
- Push the trimmer head (4) onto the handle (3) till the red line.
- Fasten the trimmer head cam lock (11).
Warning! Periodically check the connections to ensure that they are tightened securely.
Removing the trimmer head
- Rest the handle (3) on the ground, loosen the trimmer head cam lock (11) and push lock button (15), then take off the trimmer head (4).
Adjusting the trimmer head angle (fig. D)
The trimmer head pivots 105 and can be locked into 7 positions within that range.
Warning! To avoid being pinched, wear gloves and hold the unit as shown.
- Rest the handle (3) on the ground, push the pivoting button (13) down and move the trimmer head (4) as required. Make sure the trimmer head clicks into place.
Telescoping the handle (fig.F)
- Rest the handle (3) on the ground.
- Loosen the handle cam lock (12) and adjust the handle shaft to a comfortable length.
- Fasten the handle cam lock.
Fitting and removing the battery (fig. B)
- To fit the battery (7), line it up with the receptacle on the tool. Slide the battery into the receptacle and push until the battery snaps into place.
- To remove the battery, push the release button (10) while at the same time pulling the battery out of the receptacle.
(Original instructions)
Use
Warning! Let the tool work at its own pace. Do not overload.
Charging the battery (fig. A)
The battery needs to be charged before first use and whenever it fails to produce sufficient power on jobs that were easily done before.
The battery may become warm while charging; this is normal and does not indicate a problem.
Warning! Do not charge the battery at ambient temperatures below 10 C or above 40 C. Recommended charging temperature: approx. 24 C.
Note The charger will not charge a battery if the cell temperature is below approximately 10 C or above 40 C. The battery should be left in the charger and the charger will begin to charge automatically when the cell temperature warms up or cools down.
- To charge the battery (7), remove it from the tool and insert it into the charger (8). The battery will only fit into the charger in one way. Do not force. Be sure that the battery is fully seated in the charger.
- Plug in the charger and switch on at the mains.
• The charging indicator (9) will illuminate.
The charge is complete when the charging indicator (9) lights green continuously. The charger and the battery can be left connected indefinitely with the LED illuminated. The LED will change to red (charging) state as the charger occasionally tops off the battery charge. The charging indicator (9) will be lit as long as the battery is connected to the plugged-in charger.
- Charge discharged batteries within 1 week. Battery life will be greatly diminished if stored in a discharged state.
Leaving the battery in the charger
The charger and battery pack can be left connected indefinitely with the LED lit. The charger will keep the battery pack fresh and fully charged.
Charger diagnostics
If the charger detects a weak or damaged battery, the charging indicator (9) will flash red at a fast rate. Proceed as follows:
- Re-insert the battery (7).
- If the charging indicator continues flashing red at a fast rate, use a different battery to determine if the charging process works properly.
- If the replaced battery charges correctly, the original battery is defective and should be returned to a service centre for recycling.
- If the new battery gives the same indication as the original battery, take the charger to be tested at an authorised service centre.
Note It may take as long as 60 minutes to determine that the battery is defective.
Switching on and off (fig. E)
For your safety, this tool is equipped with a double switching system. This system prevents starting the tool inadvertently.
Switching on
- Push the front trigger (16).
- Push the lock-off button (2) backward using your thumb and at the same time squeeze the on/off switch (1).
- Release the lock-off button (2).
Switching off
- Release the on/off switch (1).
Warning! Never attempt to lock a switch in the on position.
Hints for optimum use
- Start by trimming the top of the hedge. Slightly tilt the tool (up to 15 relative to the line of cut) so that the blade tips point slightly towards the hedge (fig. G1). This will cause the blades to cut more effectively. Hold the tool at the desired angle and move it steadily along the line of cut. The double-sided blade allows you to cut in either direction.
- In order to obtain a very straight cut, stretch a piece of string along the length of the hedge at the desired height. Use the string as a guideline, cutting just above it.
- In order to obtain flat sides, cut upwards with the growth. Younger stems move outwards when the blade cuts downwards, causing shallow patches in the hedge (fig. G2).
• Take care to avoid any foreign objects. Especially avoid hard objects such as metal wire and railings, as these could damage the blades.
• Regularly oil the blades.
Guidelines for trimming (UK & Ireland)
- Trim hedges and shrubs with seasonal leaves (new leaves every year) in June and October.
- Trim evergreens in April and August.
- Trim conifers and other fast growing shrubs every six weeks from May until October.
Guidelines for trimming (Australia & New Zealand)
- Trim hedges and shrubs with seasonal leaves (new leaves every year) in December and March.
- Trim evergreens in September and February.
- Trim conifers and other fast growing shrubs every six weeks from October until March.
Cleaning maintenance and storage
Your Greenworks tools tool has been designed to operate over a long period of time with a minimum of maintenance. Continuous satisfactory operation depends upon proper tool care and regular cleaning.
Your charger does not require any maintenance apart from regular cleaning.
Warning! Before performing any maintenance on the tool, remove the battery from the tool. Unplug the charger before cleaning it.
After use and before storage
• After use, carefully clean the blades. After cleaning, apply a film of light machine oil to prevent the blades from rusting.
- Regularly clean the ventilation slots in your tool using a soft brush or dry cloth.
- Regularly clean the motor housing using a damp cloth. Do not use any abrasive or solvent-based cleaner.
- Make sure all switches are free of debris before and after use.
Storage
When the tool will not be used for several months, ideally leave the battery connected to the charger.
Otherwise proceed as follows:
- Fully charge the battery.
- Remove the battery from the tool.
- Store the tool and battery in a secure and dry location.
The storage temperature must always remain in the range of +10 C to +40 C. Place the battery on a level surface. - Before using the tool after prolonged storage, fully charge the battery again.
Troubleshooting
If the tool does not operate correctly, check the following.:
| Fault | Possible cause | Action |
| Tool will not start. | Battery not installed properly. | Check the battery installation. |
| Battery discharged. | Fit a (fully) charged battery. | |
| Lock-off button not actuated. | Observe the starting procedure. | |
| Pole connections not properly tightened. | Check the connections. | |
| Battery will not charge. | Battery not installed properly. | Check the battery installation. |
Protecting the environment

Separate collection. This product must not be disposed of with normal household waste. Should you find one day that your Greenworks tools product needs replacement, or if it is of no further use to you, do not dispose of it with household waste. Make this product available for separate collection.

Separate collection of used products and packaging allows materials to be recycled and used again. Re-use of recycled materials helps prevent environmental pollution and reduces the demand for raw materials.
Batteries
At the end of their useful life, discard batteries with due care for our environment:
- Do not short-circuit the battery terminals.
- Do not dispose of the battery(s) in a fire as this may result in a risk of personal injury or an explosion.
- Run the battery down completely, then remove it from the tool.
- Batteries are recyclable. Place the battery(s) in a suitable packaging to ensure that the terminals cannot be shortcircuited. Take them to any authorised repair agent or a local recycling station.
Technical data
| 22147T | ||
| Input voltage | Vdc | 40 |
| No-load speed | min^-1 | 1,500 |
| Blade length | mm | 510 |
| Blade gap | mm | 18 |
| Blade brake time | s | < 1.0 |
| Weight (without battery) | kg | 3.0 |
| Battery | 29717/29727 |
| Capacity | 73wh&146wh |
| Type | Li-Ion |
| Charger | 29417/29447 | |
| Input voltage | Vac | 100-240V |
| Output voltage | Vdc | 40 |
| Output current | mA | 2000 |
04
cdV
egatloV
Level of sound pressure according to EN60745:
Sound pressure (LpA) 84 dB(A), uncertainty (K) 3 dB(A)
Sound power (LWA) 89 dB(A)
Vibration total values (triax vector sum)
according to EN 60745:
Vibration emission value (ah) 2m / s^2 , uncertainty (K) 1.5m / s^2
Guidelines for trimming (UK & Ireland)
- Trim hedges and shrubs with seasonal leaves (new leaves every year) in June and October.
• Trim evergreens in April and August.
- Trim conifers and other fast growing shrubs every six weeks from May until October.
Guidelines for trimming (Australia & New Zealand)
- Trim hedges and shrubs with seasonal leaves (new leaves every year) in December and March.
- Trim evergreens in September and February.
- Trim conifers and other fast growing shrubs every six weeks from October until March.
ROŻWI ZYWANIE PROBLEMÓW
Greenworks Tools Warranty Policy for DIY machines
PERIOD OF WARRANTY
All new Greenworks Tools machinery is supplied with a 2 year parts and labour warranty from original date of purchase. A 30 day warranty is available for machines used professionally as Greenworks Tools are designed primarily to be used by DIY consumers.
This warranty is non-transferable.
LIMITATIONS
This warranty applies only to defective parts/components and does not cover repairs due to:
- Normal wear and tear.
- Routine tune up or adjustment.
- Damage caused by improper handling/abuse/misuse or neglect.
-
Overheating due to lack of maintenance
-
Damage due to fittings/fasteners becoming loose/detached through lack of maintenance.
-
Damage caused by cleaning with water.
-
Machines serviced or repaired by non-authorised Greenworks Tools service centres.
-
Machines incorrectly assembled or adjusted.
-
Damage caused by improper use of the machine.
-
Damage caused by improper winterisation (pressure washers)
-
Items considered as consumable parts are not normally covered by the warranty, including but not limited to:
- Batteries
- Electric cables
- Blade and blade assemblies
- Belts
- Filters
- Chucks and tool holders
-
Certain products may contain components such as engines, transmissions from an alternative manufacturer, these items will be subject to the appropriate manufacturer's warranty policy except where Greenworks Tools Europe GmbH agrees to underwrite any claims outside the said manufacturer's warranty period.
-
Second hand goods are not covered under this warranty policy.
-
The fitting of spares, replacements or extra components which are not supplied or approved by Greenworks Tools Europe GmbH.
Warranty
To claim a warranty on any product under this policy a proof of original purchase is required. Credit card statement do not qualify as sufficient proof of purchase. In the first instance of a warranty event occurring the consumer should return the product to the original place of purchase with their proof of purchase. The machine will be sent to our central service facility and an inspection made. If the machine be found to be at fault it will be repaired and sent back to the address of the consumer free of charge. Machines that retail for less than €100 euros including sales taxes will generally be replaced.
If the central service facility finds that machine is not found to be at fault then the consumer will be advised they will need to pay for the cost of the repair.
This warranty policy is subject to change from time to time to accommodate the needs of new products. A copy of the latest warranty policy will be available at www.greenworkstools.eu.

EN EC DECLARATION OF CONFORMITY
Manufacturer: Changzhou Globe Co., Ltd.
Address: No. 65 Xinggang Rd., Zhonglou Zone, Changzhou, Jiangsu, China
Name and address of the person authorised to compile the technical file:
Name: Ted Qu Haichao (Quality Director)
Adress: Greenworks Tools Europe GmbH,
Wankelstrasse 40. 50996 Koln Germany
Herewith we declare that the product
Category ...... CORDLESS HEDGE TRIMMER
Model 22147T
Serial Number ...... See product rating label
Year of Construction ...... See product rating label
■ is in conformity with the relevant provisions of the Machinery Directive (2006/42/EC)
■ is in conformity with the provisions of the following other EC-Directives EMC Directive (2014/30/EU),
Noise Emission Directive (2000/14/EC amended by 2005/88/EC)
And furthermore, we declare that
■ The following (parts/clauses of) European harmonised standards have been used EN 60745-1; EN 60745-2-15; EN ISO 3744; ISO 11094; EN 55014-1; EN 55014-2
Measured sound power level 96.4 dB(A)
Guaranteed sound power level 99 dB(A)
Conformity assessment method to Annex V / Directive 2000/14/EC
Place, date: Changzhou, 04/20/2016
Quality Director
Signature: Ted Qu Haichao
Ted Qu
DE
Adresse: No. 65 Xinggang Rd., Zhonglou Zone, Changzhou, Jiangsu, China
Wankelstrasse 40. 50996 Koln Germany
Wankelstrasse 40. 50996 Koln Germany
Indirizzo: No. 65 Xinggang Rd., Zhonglou Zone, Changzhou, Jiangsu, China
Wankelstrasse 40. 50996 Koln Germany
FR DÉCLARATION DE CONFORMITÉ EC
Fabricant : Changzhou Globe Co., Ltd.
Adresse : No. 65 Xinggang Rd., Zhonglou Zone, Changzhou, Jiangsu, China
Wankelstrasse 40. 50996 Koln Germany
Endereço: No. 65 Xinggang Rd., Zhonglou Zone, Changzhou, Jiangsu, China
Wankelstrasse 40. 50996 Koln Germany
Local, data: Changzhou, 04/20/2016
Assinatura: Ted Qu Haichao
Adres: No. 65 Xinggang Rd., Zhonglou Zone, Changzhou, Jiangsu, China
Wankelstrasse 40. 50996 Koln Germany
Wankelstrasse 40. 50996 Koln Germany
Osoite: No. 65 Xinggang Rd., Zhonglou Zone, Changzhou, Jiangsu, China
Wankelstrasse 40. 50996 Koln Germany
Adress: No. 65 Xinggang Rd., Zhonglou Zone, Changzhou, Jiangsu, China
Adress: Greenworks Tools Europe GmbH,
Wankelstrasse 40. 50996 Koln Germany
Adresse: No. 65 Xinggang Rd., Zhonglou Zone, Changzhou, Jiangsu, China
Wankelstrasse 40. 50996 Koln Germany
Adresse: No. 65 Xinggang Rd., Zhonglou Zone, Changzhou, Jiangsu, China
Wankelstrasse 40. 50996 Koln Germany
Vi erklærer hermed, at produktet
Kategori ...... BATTERIDREVEN HÄEKKEKLIPPER
Model 22147T
Adres: No. 65 Xinggang Rd., Zhonglou Zone, Changzhou, Jiangsu, China
Wankelstrasse 40. 50996 Koln Germany
Adresa: No. 65 Xinggang Rd., Zhonglou Zone, Changzhou, Jiangsu, China
Wankelstrasse 40. 50996 Koln Germany
Adresa: No. 65 Xinggang Rd., Zhonglou Zone, Changzhou, Jiangsu, China
Wankelstrasse 40. 50996 Koln Germany
Naslov: No. 65 Xinggang Rd., Zhonglou Zone, Changzhou, Jiangsu, China
Wankelstrasse 40. 50996 Koln Germany
Adresa: No. 65 Xinggang Rd., Zhonglou Zone, Changzhou, Jiangsu, China
Ime i prezime, i adresa osobe ovlaštene da sastavi tehničku datoteku:
Ime i prezime: Ted Qu Haichao (Direktor odjela za kvalitetu)
Adresa: Greenworks Tools Europe GmbH,
Wankelstrasse 40. 50996 Koln Germany
Cím: No. 65 Xinggang Rd., Zhonglou Zone, Changzhou, Jiangsu, China
Wankelstrasse 40. 50996 Koln Germany
Adresa: No. 65 Xinggang Rd., Zhonglou Zone, Changzhou, Jiangsu, China
Wankelstrasse 40. 50996 Koln Germany
Wankelstrasse 40. 50996 Koln Germany
Wankelstrasse 40. 50996 Koln Germany
Wankelstrasse 40. 50996 Koln Germany
Adres: No. 65 Xinggang Rd., Zhonglou Zone, Changzhou, Jiangsu, China
Wankelstrasse 40. 50996 Koln Germany
Yer, tarih: Changzhou, 04/20/2016
Imza: Ted Qu Haichao
Kalite Müdürü
Ted Qu
'ַלְרָה: Changzhou Globe Co., Ltd.
תְרָה: No. 65 Xinggang Rd., Zhonglou Zone, Changzhou, Jiangsu, China
Wankelstrasse 40. 50996 Koln Germany
Adresas: No. 65 Xinggang Rd., Zhonglou Zone, Changzhou, Jiangsu, China
Wankelstrasse 40. 50996 Koln Germany
Adrese: No. 65 Xinggang Rd., Zhonglou Zone, Changzhou, Jiangsu, China
Wankelstrasse 40. 50996 Koln Germany
Aadress: No. 65 Xinggang Rd., Zhonglou Zone, Changzhou, Jiangsu, China
Aadress: Greenworks Tools Europe GmbH,
Wankelstrasse 40. 50996 Koln Germany
Kinnitame, et see toode
Nimetus ...... JUHTMEVABA ELEKTRILINE HEKITRIMMER
Mudel 22147T
Seerianumber ...... vaadake toote tehasesilti