
DFJ301Z - Wireless ventilated clothing MAKITA - Free user manual and instructions
Find the device manual for free DFJ301Z MAKITA in PDF.
| Product type | Cordless ventilated garment (cooling jacket) |
| Brand | Makita |
| Model | DFJ301Z |
| Power source | Lithium-ion battery 10.8 V / 14.4 V / 18 V (Makita compatible) |
| USB output port | 5 V DC, 2.1 A, type A (for charging devices) |
| Air speeds | 3 speeds (high, medium, low) + turbo mode (1 minute) |
| Battery life (examples) | Up to 6 h (speed 1) with BL1860B; up to 14 h (speed 3) with BL1860B (depending on battery) |
| Hood | Yes, integrated into DFJ301 model (foldable) |
| Battery pocket | Yes, inside the jacket (compatible with 10.8 V holder) |
| Belt hook | Yes, on the fan |
| Battery holder anti-drop function | Yes (for 14.4 V and 18 V holders) |
| Outer material | Polyester (100%) |
| Inner material | Polyester (100%) |
| Maintenance | Remove fan and battery before washing. Machine wash at 30 °C (delicate cycle) or 40 °C (normal cycle). Do not bleach. Dry in shade. Do not wring. Gentle ironing (max 110 °C). Dry cleaning prohibited. |
| Safety | Do not wear on bare skin; do not use if temperature >50 °C; do not sleep with it; do not expose to rain; use only original Makita batteries; do not insert objects into the fan. |
| Optional accessories | Dust filter, original Makita batteries and charger |
| Country of origin | Not specified (manufactured according to Makita standards) |
| Warranty | Standard Makita warranty (refer to provided document) |
Frequently Asked Questions - DFJ301Z MAKITA
User questions about DFJ301Z MAKITA
0 question about this device. Answer the ones you know or ask your own.
Ask a new question about this device
Download the instructions for your Wireless ventilated clothing in PDF format for free! Find your manual DFJ301Z - MAKITA and take your electronic device back in hand. On this page are published all the documents necessary for the use of your device. DFJ301Z by MAKITA.
USER MANUAL DFJ301Z MAKITA
ENGLISH (Original instructions)
SYMBOLS
The following show the symbols used for the equipment. Be sure that you understand their meaning before use.

Read instructions.

Machine wash below 30^ C at mild process.

Machine wash below 40^ C at mild process.

Machine wash with domestic or commercial machine at normal setting.

Do not bleach.

Line dry in the shade.

Do not wring.

Iron at a low temperature (not exceeding 110^ C).

Iron at a medium temperature (not exceeding 150^ C).

Do not iron.

Do not dryclean.

Cd Ni-MH Li-ion
Only for EU countries
Do not dispose of electric equipment or battery pack together with household waste material!
In observance of the European Directives, on Waste Electric and Electronic Equipment and Batteries and Accumulators and Waste Batteries and Accumulators and their implementation in accordance with national laws, electric equipment and batteries and battery pack(s) that have reached the end of their life must be collected separately and returned to an environmentally compatible recycling facility.
SAFETY INSTRUCTIONS
WARNING:
Read all safety warnings and all instructions. Failure to follow the warnings and instructions n
d with

result in electric shock, fire and/or serious injury.
Intended use
The fan jacket is intended for cooling down body temperature.
- Do not use the jacket other than its intended use.
- If you sense anything unusual, switch off the jacket and remove the battery holder immediately.
- Do not wear the jacket with bare skin.
- Never use the fan jacket where temperature reaches more than 50°C (122°F). Otherwise it may cause burns on your skin. Also avoid using in high humidity.
- Do not stamp, toss or abuse the fan jacket.
- Avoid water from electrical parts.
- Never sleep while wearing the fan jacket. Steep decline of body temperature may harm your health.
- Do not turn on the fan jacket unless you are wearing it.
- Do not put your finger into the fan unit. Especially, pay attention to children not to play with the fan jacket.
• Children, handicapped persons, or anyone who are insensitive to temperature, for example a person with poor blood circulation, shall refrain from
using the packet.
nitro® using the packet. professional
download the free trial online at nitropdf.com/professional
- If any abnormality is found, contact your local service center for repair.
- Keep maintenance labels and nameplate. If they become unreadable or missing, contact your local service center for repair.
- Choose appropriate fan speed in accordance with the usage environment for continuous use.
- This appliance can be used by children aged from 8 years and above and persons with reduced physical, sensory or mental capabilities or lack of experience and knowledge if they have been given supervision or instruction concerning use of the appliance in a safe way and understand the hazards involved. Children shall not play with the appliance. Cleaning and user maintenance shall not be made by children without supervision.
- Before washing, detach the fan unit, battery holder and remove the battery cartridge. Wash the jacket part only.
- Do not blow compressed air towards the fan. Do not put small stick into the fan unit. Otherwise the fan and motor may be damaged.
- Do not expose the jacket to rain or wet conditions. Water entering the jacket may
increase the risk of electric shock.
- Do not abuse the cord. Never use the cord for carrying, pulling or unplugging the jacket. Keep cord away from heat, oil, sharp edges.
- Do not use the jacket while you are under the influence of drugs, alcohol or medication.
- Do not leave the fan jacket into the high temperature place, such as sun-heated car. Otherwise plastic part may melt and be damaged.
- For long time storage, remove the battery holder and battery cartridge from the jacket, and remove the battery cartridge from the battery holder.
• This appliance is not intended for medical use in hospitals.
Electrical safety
- Do not insert a nail, wire, etc. into USB power supply port. Otherwise a circuit short may cause smoke and fire.
- Do not connect power source to USB port. Otherwise there is risk of fire. The USB port is only intended for charging lower voltage device. Always place the cover onto the USB port when not charging the lower voltage device.
Created with

nitro ^PDF professional
download the free trial online at nitropdf.com/professional
Important safety instructions for battery cartridge
CAUTION:
Only use genuine Makita batteries. Use of non-genuine Makita batteries, or batteries that have been altered, may result in the battery bursting causing fires, personal injury and damage. It will also void the Makita warranty for the Makita tool and charger.
- Recharge only with the charger specified by the manufacturer. A charger that is suitable for one type of battery pack may create a risk of fire when used with another battery pack.
- Use the jacket only with specifically designated battery packs. Use of any other battery packs may create a risk of injury and fire.
- Before using battery cartridge, read all instructions and cautionary markings on (1) battery charger, (2) battery, and (3) product using battery.
- Do not disassemble battery cartridge.
- If operating time has become excessively shorter, stop operating immediately. It may result in a risk of overheating, possible burns and even an explosion.
• Under abusive conditions, and may be ejected from the
battery; avoid contact. If electrolyte gets into your eyes, rinse them out with clear water and seek medical attention right away. It may result in loss of your eyesight.
- Do not short the battery cartridge:
-
Do not touch the terminals with any conductive material.
-
Avoid storing battery cartridge in a container with other metal objects such as nails, coins, etc.
-
Do not expose battery cartridge to water or rain. A battery short can cause a large current flow, overheating, possible burns and even a breakdown.
- Do not store the jacket, battery holder and battery cartridge in locations where the temperature may reach or exceed 50°C (122°F).
- Do not incinerate the battery cartridge even if it is severely damaged or is completely worn out. The battery cartridge can explode in a fire.
- Be careful not to drop or strike battery.
- Do not use a damaged battery.
- Follow your local regulations relating to disposal of battery.
• The contained lithium-ion batteries are subject to the
Dangerous Goods Legislation requirements.
download the free trial online at nitropdf.com/professional
For commercial transports e.g. by third parties, forwarding agents, special requirement on packaging and labeling must be observed.
For preparation of the item being shipped, consulting an expert for hazardous material is required. Please also observe possibly more detailed national regulations.
Tape or mask off open contacts and pack up the battery in such a manner that it cannot move around in the packaging.
Tips for maintaining maximum battery life
- Never recharge a fully charged battery cartridge. Overcharging shortens the battery service life.
- Charge the battery cartridge with room temperature at 10^ C - 40^ C (50°F - 104°F).
- Let a hot battery cartridge cool down before charging it.
- Charge the battery cartridge if you do not use it for a long period (more than six months).
- For an optimum life-time, the battery cartridge has to be fully charged, after use.
SAVE THESE INSTRUCTIONS.
(See the last part of this instruction manual for all the illustrations.)
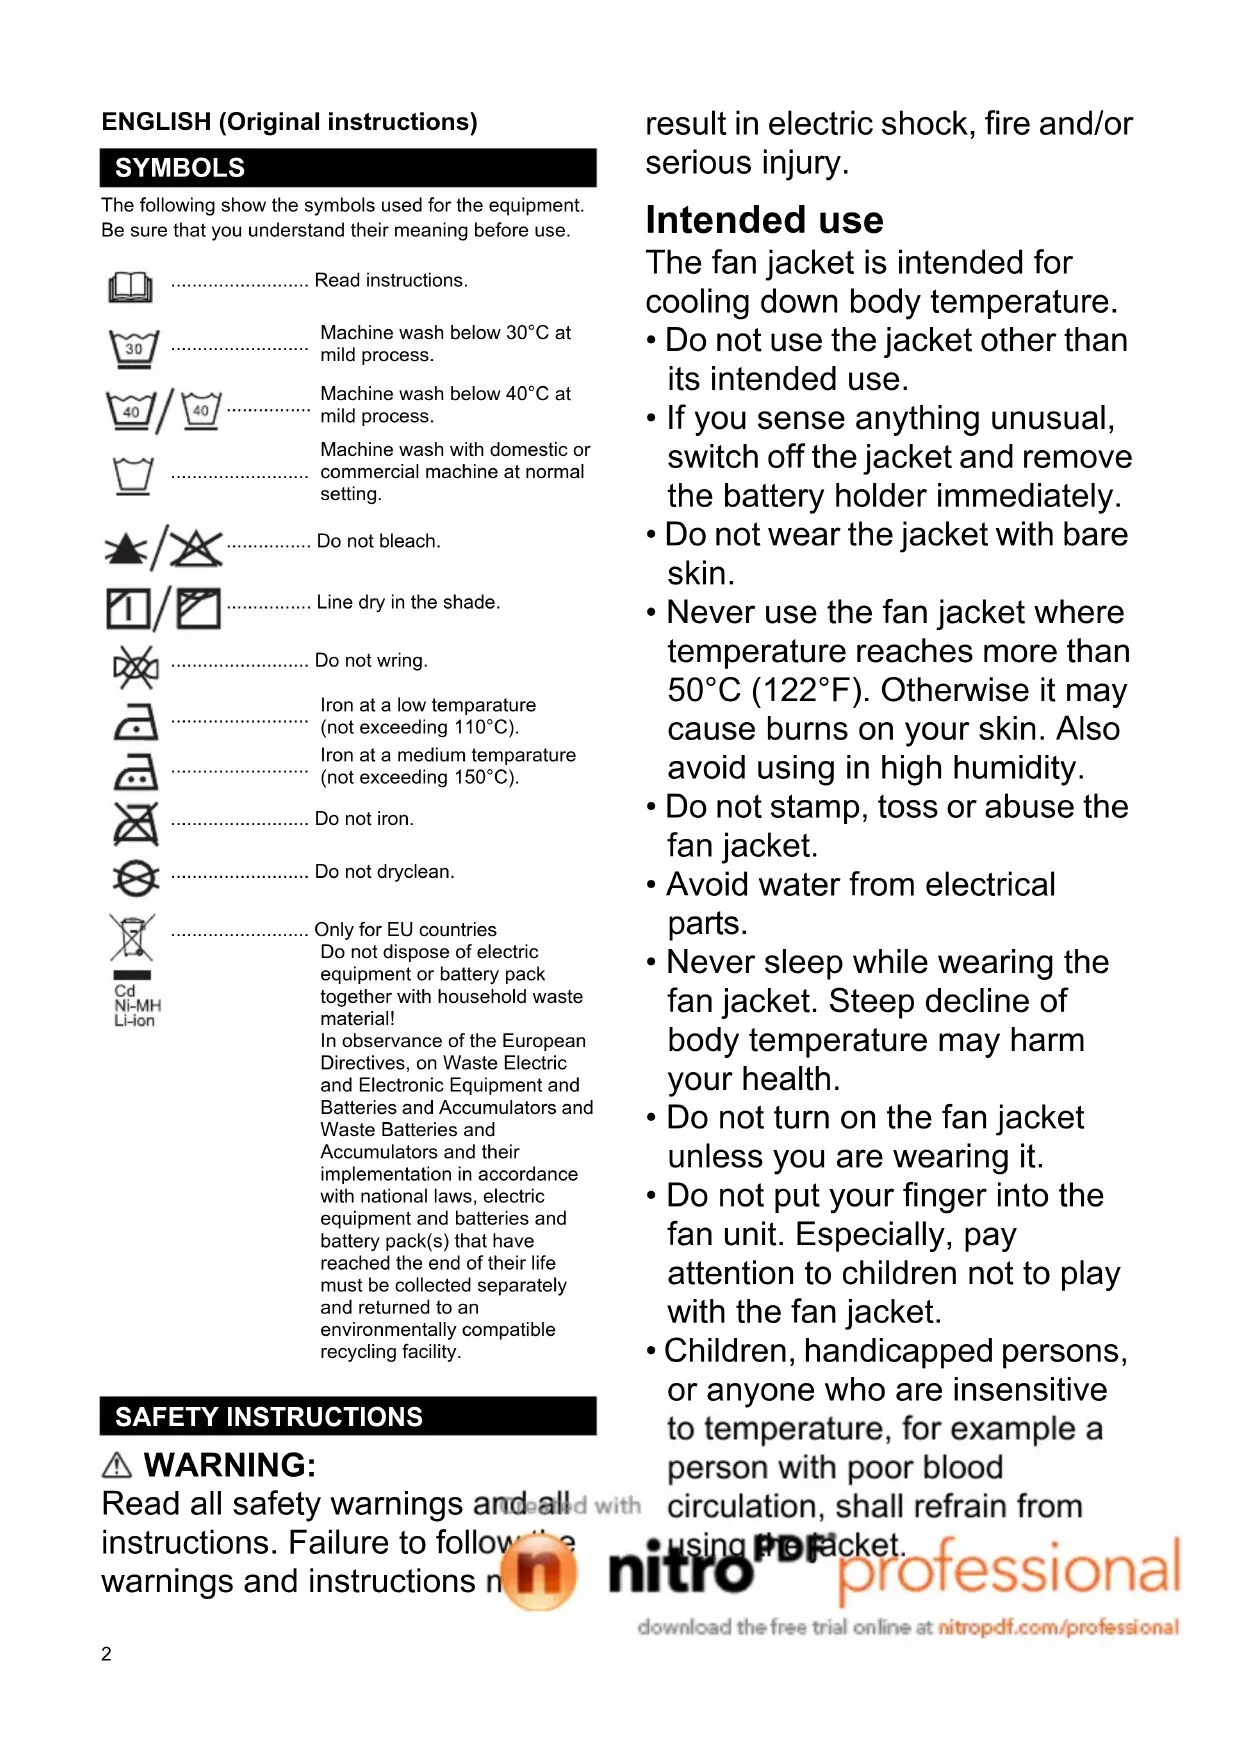
DESIGNATION OF PARTS (Fig. 1 & 2)
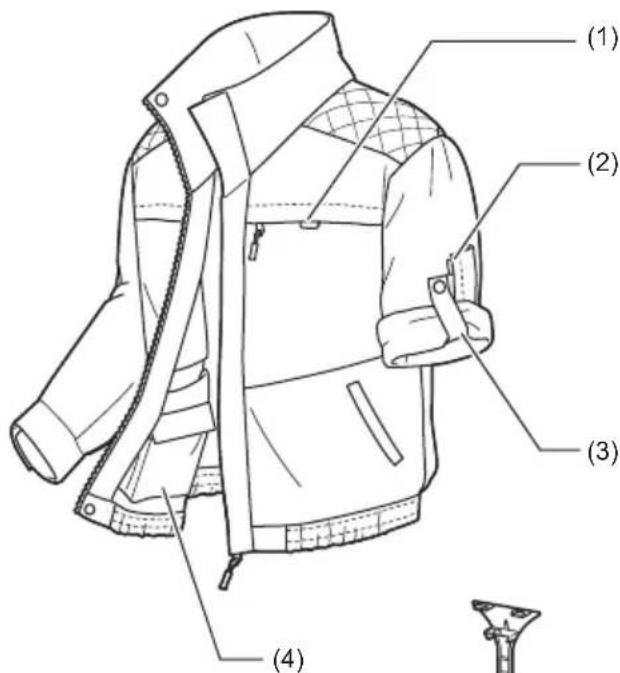
DFJ202, DFJ203, DFJ300, DFJ301 (Fig. 1)
(1) Loop for name badge
(2) Loop for arm badge
(3) Sleeve holder
(4) Battery pocket
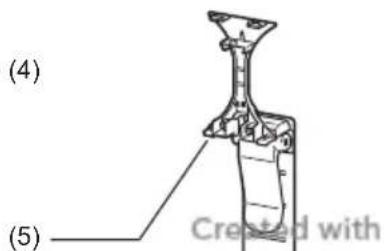
(5) Fan hook
(6) Snap button
(7) Fan unit
(8) Power cable
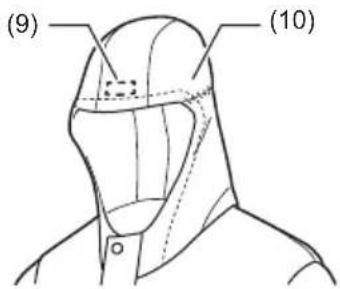
For DFJ203 and DFJ301 only
(9) Anti-slip rubber
(10) Hood
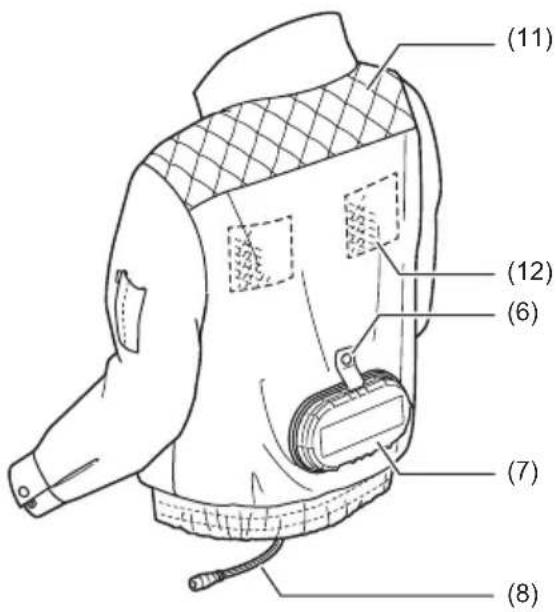
DFJ400, DFJ401 (Fig. 2)
(1) Loop for name badge
(2) Loop for arm badge
(3) Sleeve holder
(4) Battery pocket
(5) Fan hook
(6) Snap button
(7) Fan unit
(8) Power cable
(11) Shoulder pad
(12) Mesh pocket for ice pack
For DFJ401 only
(9) Anti-slip rubber
(10) Hood
SPECIFICATIONS
Power (All models)
| USB power supply port DC 5V, 2.1A, Type A | |
| Rated voltage (V) DC 10.8V | |
| DC 14.4V | |
| DC 18V | |
| Battery cartridge 10.8V | |
| BL1015, BL1020B, BL1040B | |
| 14.4V | |
| BL1415, BL1415N, BL1430, BL1430B, BL1440, BL1450, BL1460B | |
| 18V | |
| BL1815, BL1815N, BL1820, BL1820B, BL1830, BL1830B, BL1840, BL1840B, BL1850, BL1850B, BL1860B | |
Operating time (approximate hour)
| Air speed | with BL1040B | with BL1460B | with BL1860B |
| 1 | 16 | 21 | 34 |
| 2 | 11 | 16 | 25 |
| 3 | 6.0 | 8.5 | 14 |
Created with

nitroPDF®
professional
download the free trial online at nitropdf.com/professional
Material
| DFJ202 | Outer material: Polyester (100%) |
| DFJ203 | Inner material: Polyester (100%)Pocket: Cotton (100%) |
| DFJ300 | Outer material: Cotton (100%) |
| DFJ301 | Inner material: Polyester (100%)Pocket: Cotton (100%) |
| DFJ400 | Outer material: Polyester (100%) + titanium pearly coating |
| DFJ401 | |
| Inner material: Polyester (100%)Pocket: Cotton (100%)Shoulder pad: Polyester (65%) + Cotton (35%) |
- Due to our continuing program of research and development, the specifications herein are subject to change without notice.
- Specifications and battery cartridge may differ from country to country.
- Operating time may differ depending on battery type, charging status, and usage condition.
ASSEMBLY
Installing or removing the battery cartridge to the battery holder (Fig. 3)
CAUTION:
- Hold the battery holder and the battery cartridge firmly when installing or removing battery cartridge. Failure to hold the battery holder and the battery cartridge firmly may cause them to slip off your hands and result in damage to the battery holder and battery cartridge and a personal injury.
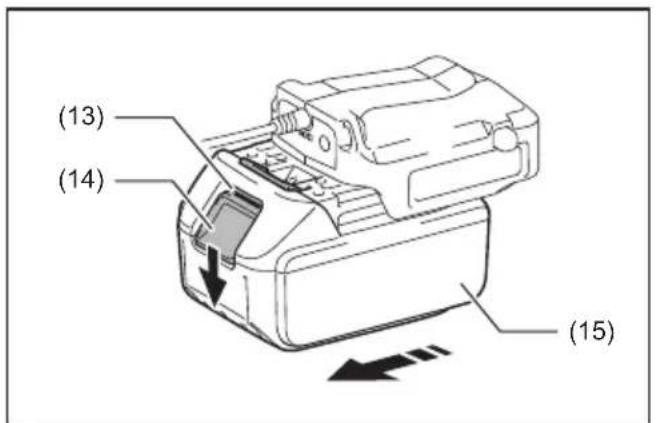
To install the battery cartridge (15), align the tongue on the battery cartridge with the groove in the battery holder and slip it into place. Insert it all the way until it locks in place with a little click. If you can see the red indicator (13) on the upper side of the button, it is not locked completely. Always install the battery cartridge fully until the red indicator cannot be seen. If not, it may accidentally fall out of the battery holder, causing injury to you or someone around you.
Do not install the battery cartridge forcibly. If the cartridge does not slide in easily, it is not being inserted correctly. To remove the battery cartridge, slide it from the battery holder while sliding the button (14) on the front of the cartridge.
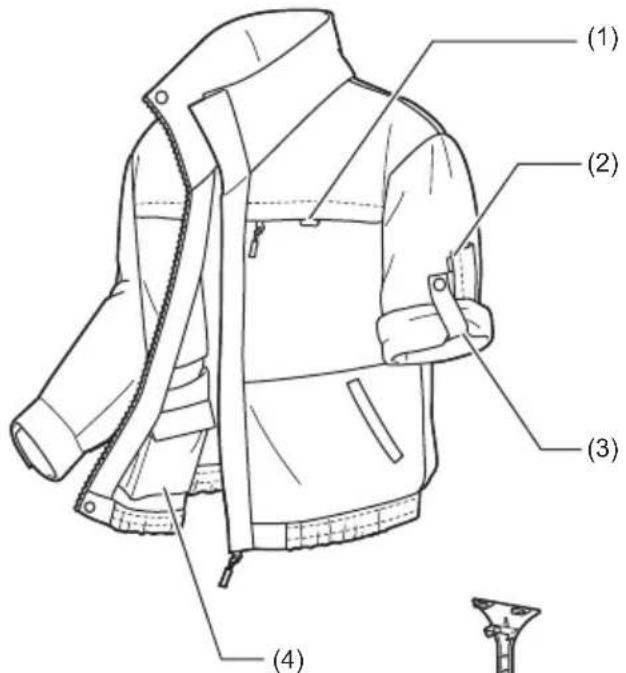
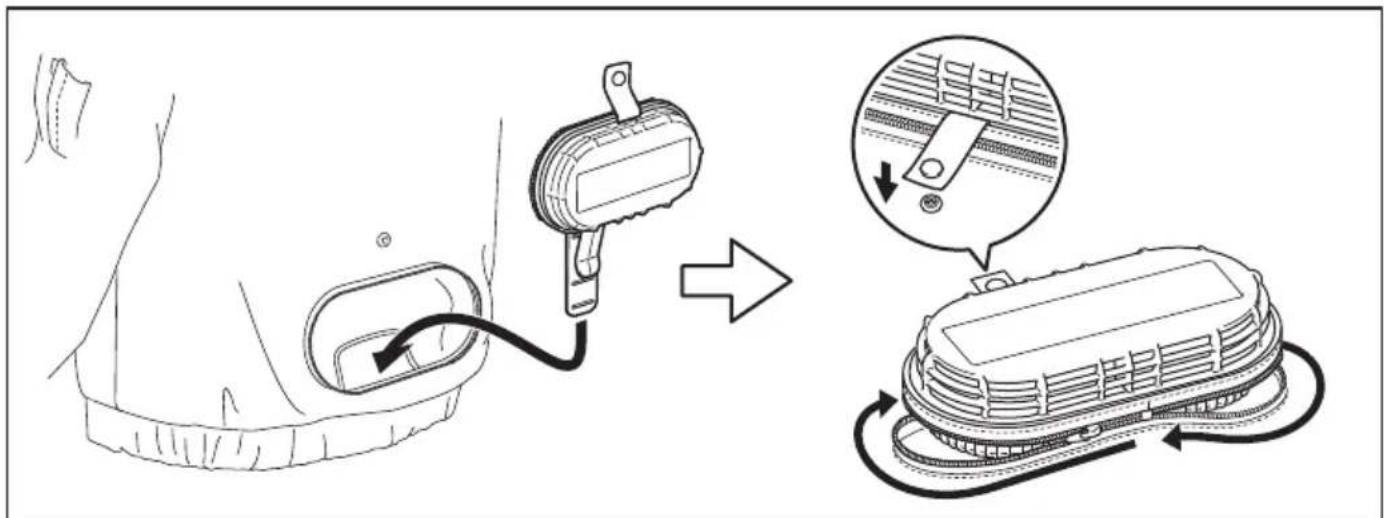
Installing or removing the fan unit to the jacket (Fig. 4, 5 & 6)
Attach the fan hook to the fan unit and pass it through the jacket so that the fan hook can hold your belt. The fan hook is useful for more comfortable mobility.
Attach the fan unit onto the jacket with closing the zipper. And then fasten the snap button to secure it.
Follow the installation procedure in reverse when removing.
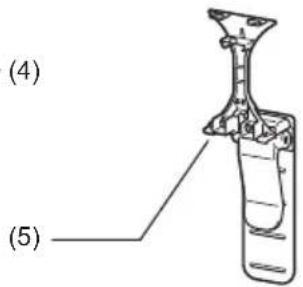
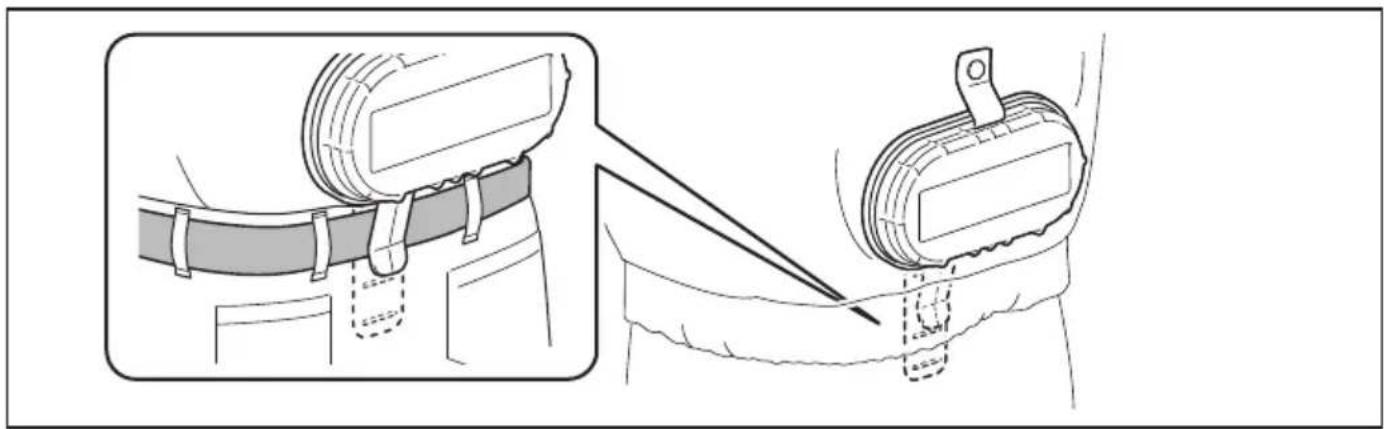
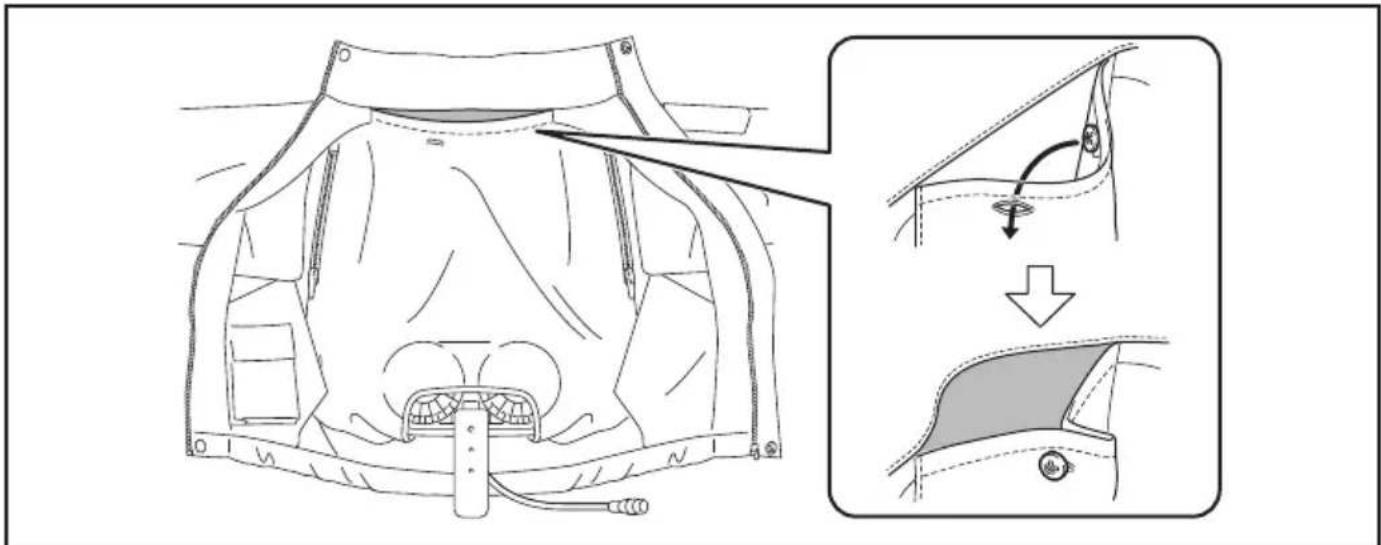
Attaching the battery holder (Fig.
Connect the battery holder and the power cabl jacket.
You can hang the battery holder on your waist belt.

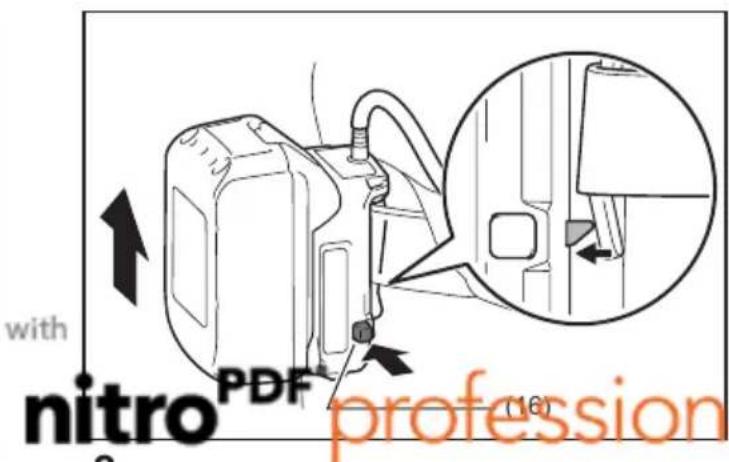
For 18V and 14.4V battery holders
The battery holder employs anti-drop function.
When removing the battery holder from the belt, pull up the battery holder with the unlock button (16) pressed.
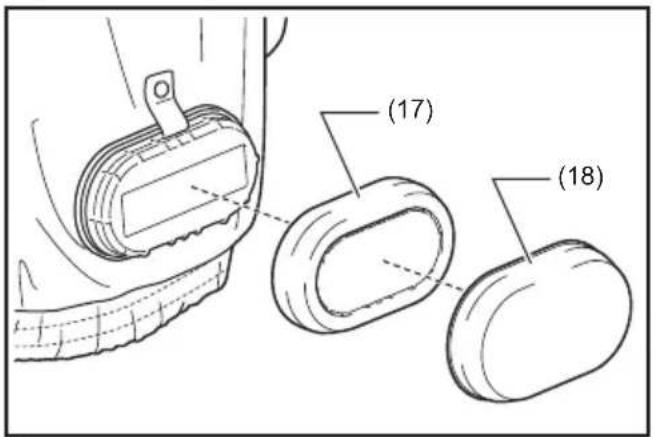
Attaching filter set (optional accessory) (Fig. 9)
The filter set protects the fan unit from the dust and powder. It is recommended to use the filter set in a dusty or powdery work place.
Attach the sponge filter (17) to the fan unit, and then put the filter (18) on it. Follow the installation procedure in reverse when removing.
FUNCTIONAL DESCRIPTION
CAUTION:
- The fan jacket takes effect as intaking air which temperature and humidity are lower than body surface. The fan jacket may not take effect if circumstance air temperature and/or humidity are higher than those of in the jacket.
Switch action (Fig. 10)
To turn on the jacket, press and hold the power button (21). The jacket starts with high air speed. Each time you tap the power button, the air speed changes from high to medium, medium to low, and low to high. The air speed indicator (20) shows current air speed.
To turn off, press and hold the power button again.
Turbo button (Fig. 10)
By pressing turbo button (19), the jacket works in turbo mode for quick cooling. The turbo mode lasts for a minute and the air speed returns to normal.
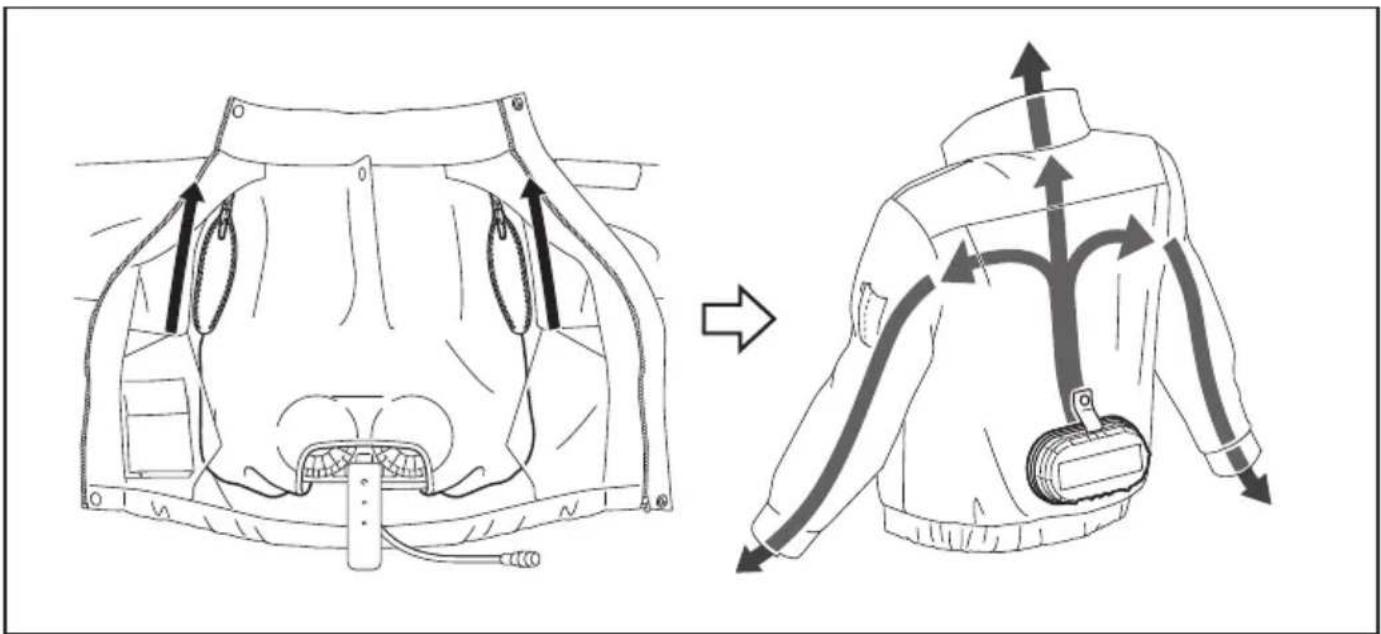
Air flow control (Fig. 11, 12, 13 & 14)
To maintain stable air flow, close the button at the neck of the jacket. (Fig. 11)
You can control the air flowing inside the jacket by fastening or opening the inner zippers.
When fastening the inner zippers (Fig. 12), the most of air flows through neck opening with high air volume. When opening the inner zippers (Fig. 13), the air flows through neck and sleeves openings.
For models with hood (Fig. 14)
Wear the hood with the helmet on. The air from the fan goes through the helmet and cools your head.
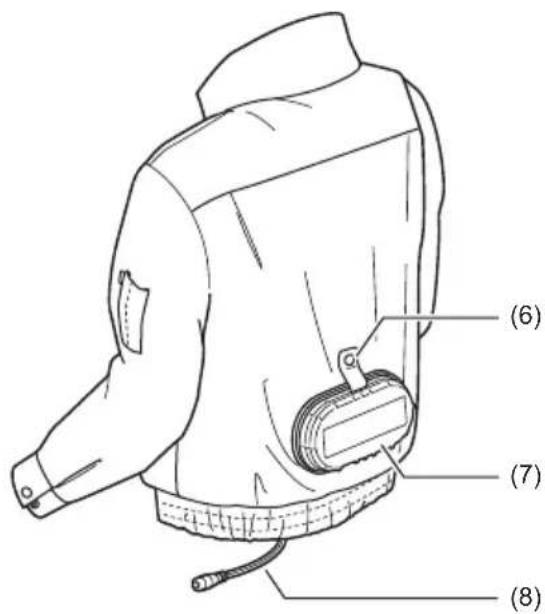
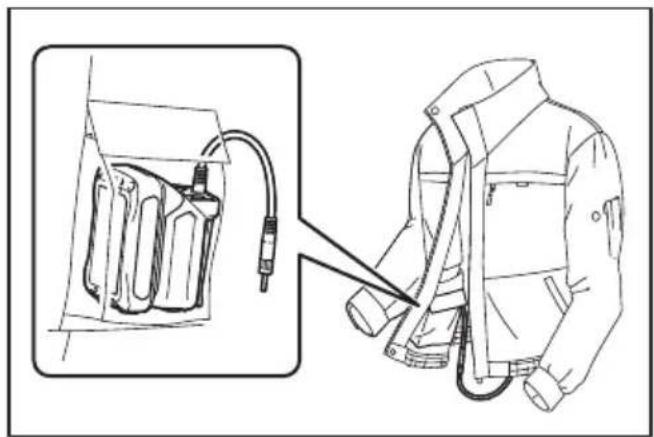
Battery pocket (Fig. 15)
A pocket is provided for storing the battery holder (with battery) inside the jacket. Connect the power cable with the battery holder, and then put it into the pocket. The 10.8V battery holder is suitable for this pocket.
Connecting USB devices (Fig.16)
CAUTION:
- Connect only devices which are compatible with the USB power supply port. Otherwise it may cause a function to the battery holder.
The battery holder (with the battery) can work as an external power supply for USB devices.
Open the cover and connect the USB cable (not included) with the power supply port (22) of the battery holder. And then connect the other end of the cable with the device and turn on the switch (23) next to the USB port. The battery holder (with the battery) supplies DC5V, 2.1A. The USB cable can be placed inside the jacket for convenience by using the hole of the pocket and cable holder.
NOTE:
- Before connecting USB device to the battery holder (with the battery), always backup your data of USB device. Otherwise your data may be lost by any possibility.
- The charger may not supply power to some USB devices.
- When not using or after charging, remove the USB cable and close the cover.
- The battery power is consumed while the switch next to the USB port is turned on. Always turn off the switch when not in use.
MAINTENANCE

CAUTION:
• Always be sure that the jacket is switched off and the battery cartridge is removed before attempting to perform inspection or maintenance.
If jacket does not switch on or any fault is found with a fully charged battery cartridge, clean the terminals of the battery holder and the battery cartridge. If jacket still does not work properly, stop using the jacket and contact our authorized service center.
- Never use gasoline, benzine, thinner, alcohol or the like. Discoloration, deformation or cracks may result.
Cleaning the jacket
Detach the fan unit and battery holder from the jacket before washing. Follow the instructions on the care label.
For DFJ400 and DFJ401
Use a laundry net when machine-washing.
OPTIONAL ACCESSORIES

CAUTION:
• These accessories or attachments are recommended for use with your Makita tool specified in this manual. The use of any other accessories or attachments might present a risk of injury to persons. Only use accessory or attachment for its stated purpose.
If you need any assistance for more details regarding these accessories, ask your local Makita Service Center.
- Filter set
- Makita genuine battery and charger
NOTE:
- Some items in the list may be included in the package as standard accessories. They may differ from country to country.
nitro ^PDF professional
download the free trial online at nitropdf.com/professional
download the free trial online at nitropdf.com/professional
nitro ^PDF professional
download the free trial online at nitropdf.com/professional
download the free trial online at nitropdf.com/professional
download the free trial online at nitropdf.com/professional
download the free trial online at nitropdf.com/professional
(9) Anti-Rutschgummi
(10) Kapuze
TECHNISCHE DATEN
nitroPDF® professional
download the free trial online at nitropdf.com/professional
download the free trial online at nitropdf.com/professional
download the free trial online at nitropdf.com/professional
download the free trial online at nitropdf.com/professional
DFJ400, DFJ401 (Fig. 2)
nitro ^PDF professional
download the free trial online at nitropdf.com/professional
nitro ^® professional
download the free trial online at nitropdf.com/professional
download the free trial online at nitropdf.com/professional
download the free trial online at nitropdf.com/professional
nitro ^PDF professional
download the free trial online at nitropdf.com/professional
MANTENIMIENTO

PRECAUCIÓN:
ventilada F® nitro® professional
download the free trial online at nitropdf.com/professional
download the free trial online at nitropdf.com/professional

download the free trial online at nitropdf.com/professional
nitro ^PDF professional
download the free trial online at nitropdf.com/professional
nitro ^PDF professional
download the free trial online at nitropdf.com/professional
download the free trial online at nitropdf.com/professional
nitroPDF professional
download the free trial online at nitropdf.com/professional
download the free trial online at nitropdf.com/professional
download the free trial online at nitropdf.com/professional
download the free trial online at nitropdf.com/professional
nitroPDF download the free trial online at nitropdf.com/professional
nitro ^PDF professional
download the free trial online at nitropdf.com/professional
TÜRKÇE (Orijinal talimatlar)
SIMGELER
nitroPDF professional
download the free trial online at nitropdf.com/professional
download the free trial online at nitropdf.com/professional
TEKNİK ÖZELLİKLER
Güç (Tüm modeller)
| USB güç beslemebağlantı noktası | DC 5V, 2,1A, Tip A |
| Anma gerilimi (V) DC 10,8V | DC 14,4VDC 18V |
| Akü 10,8V | BL1015, BL1020B, BL1040B14,4VBL1415, BL1415N, BL1430,BL1430B, BL1440, BL1450,BL1460B18VBL1815, BL1815N, BL1820,BL1820B, BL1830, BL1830B,BL1840, BL1840B, BL1850,BL1850B, BL1860B |
itroPDF professional
download the free trial online at nitropdf.com/professional
download the free trial online at nitropdf.com/professional
| USBstrømforsyningsport | DC 5 V, 2,1 A Type A |
| Merkespenning (V) DC 10,8V | |
| DC 14,4V | |
| DC 18V | |
| Batteri 10,8V | |
| BL1015, BL1020B, BL1040B | |
| 14,4V | |
| BL1415, BL1415N, BL1430, BL1430B, BL1440, BL1450, BL1460B | |
| 18V | |
| BL1815, BL1815N, BL1820, BL1820B, BL1830, BL1830B, BL1840, BL1840B, BL1850, BL1850B, BL1860B | |
Driftstid (omtrentlig time)
| Lufthastighet | med BL1040B | med BL1460B | med BL1860B |
| 1 | 1 | 6 | 2 |
| 2 | 1 | 1 | 1 |
| 3 | 6 | , | 0 |
Materiale
| DFJ202 | Utvendig materiale: Polyester (100 %) |
| DFJ203 | Innvendig materiale: Polyester (100 %)Lomme: Bomull (100 %) |
| DFJ300 | Utvendig materiale: Bomull (100 %) |
| DFJ301 | Innvendig materiale: Polyester (100 %)Lomme: Bomull (100 %) |
| DFJ400 | Utvendig materiale: Polyester (100 %) +titan, perleaktig belegg |
| DFJ401 | |
| Innvendig materiale: Polyester (100 %)Lomme: Bomull (100 %)Skulderpute: Polyester (65 %) +bomull (35 %) |
nitro ^PDF professional
download the free trial online at nitropdf.com/professional
download the free trial online at nitropdf.com/professional
download the free trial online at nitropdf.com/professional
download the free trial online at nitropdf.com/professional
BL1015, BL1020B, BL1040B
14,4 V
BL1415, BL1415N, BL1430,
BL1430B, BL1440, BL1450,
BL1460B
18 V
BL1815, BL1815N, BL1820,
BL1820B, BL1830, BL1830B,
BL1840, BL1840B, BL1850,
BL1850B. BL1860B
Created with

nitroPDF®
BL1850B, BL1860B professional
download the free trial online at nitropdf.com/professional
download the free trial online at nitropdf.com/professional
Akkutasku (kuva 15)
nitro ^PDF professional
download the free trial online at nitropdf.com/professional
download the free trial online at nitropdf.com/professional
download the free trial online at nitropdf.com/professional
TEHNISKIE DATI
Jauda (visiem modeliem)
| USB jaudas padeves ports | 5 V līdzstrāva, 2,1 A (A tips) |
| Nominālais spriegums (V) | Līdzstrāva 10,8 VLīdzstrāva 14,4 VLīdzstrāva 18 V |
| Akumulatora kasetne 10,8 V | |
| BL1015, BL1020B, BL1040B | |
| 14,4 V | |
| BL1415, BL1415N, BL1430, BL1430B, BL1440, BL1450, BL1460B | |
| 18 V | |
| BL1815, BL1815N, BL1820, BL1820B, BL1830, BL1830B, BL1840, BL1840B, BL1850, BL1850B, BL1860B | |
download the free trial online at nitropdf.com/professional
download the free trial online at nitropdf.com/professional
Elektros sauga
download the free trial online at nitropdf.com/professional
download the free trial online at nitropdf.com/professional
nitro ^PDF professional
download the free trial online at nitropdf.com/professional
PASIRENKAMI PRIEDAI

PERSPÉJIMAS:
nitro ^PDF professional
download the free trial online at nitropdf.com/professional
download the free trial online at nitropdf.com/professional

DFJ400, DFJ401 (Joon. 2)
nitro ^PDF professional
download the free trial online at nitropdf.com/professional
download the free trial online at nitropdf.com/professional
download the free trial online at nitropdf.com/professional
Akumulator 10,8 V
BL1015, BL1020B, BL1040B
14,4 V
| BL1415, BL1415N, BL1430, BL1430B, BL1440, BL1450, BL1460B |
18 V
| BL1815, BL1815N, BL1820, BL1820B, BL1830, BL1830B, BL1840, BL1840B, BL1850, BL1850B, BL1860B |
Created with

nitroPDF®
BL1850B, BL1860B professional
download the free trial online at nitropdf.com/professional
download the free trial online at nitropdf.com/professional
download the free trial online at nitropdf.com/professional
download the free trial online at nitropdf.com/professional
download the free trial online at nitropdf.com/professional
download the free trial online at nitropdf.com/professional
download the free trial online at nitropdf.com/professional
download the free trial online at nitropdf.com/professional
- Do jednotky ventilátora nestrkajte prst. Dávajte pozor najmä na to, aby sa s bundou nehrali deti.
nitroPDF professional
download the free trial online at nitropdf.com/professional
download the free trial online at nitropdf.com/professional
DFJ400, DFJ401 (Obr. 2)
(1) Pútko na menovku
(2) Pútko na menovku na ruku
n nitroPDF professional
download the free trial online at nitropdf.com/professional
OPIS FUNKCIÍ

UPOZORNENIE:
nitro ^PDF professional
download the free trial online at nitropdf.com/professional
download the free trial online at nitropdf.com/professional
TYTO POKYNY SI USCHOVEJTE.
download the free trial online at nitropdf.com/professional
TECHNICKÉ ÚDAJE
download the free trial online at nitropdf.com/professional
VOLITELNÉ PŘÍSLUŠENSTVÍ

UPOZORNĚNÍ:
download the free trial online at nitropdf.com/professional
temperature (npr. osebe s slabo prekravavitvijo), suknjiča ne smejo uporabljati.
- Če odkrijete kakršne koli neobičajnosti, stopite v stik s servisnim centrom glede popravila.
Nadzor pretoka zraka (sl. 11, 12, 13 in 14)
nitroPDF® professional
download the free trial online at nitropdf.com/professional
SHQIP (Udhëzimet originale)
SIMBOLET
veshuPDF professional
download the free trial online at nitropdf.com/professional
download the free trial online at nitropdf.com/professional
download the free trial online at nitropdf.com/professional
download the free trial online at nitropdf.com/professional
download the free trial online at nitropdf.com/professional
download the free trial online at nitropdf.com/professional
Почистване на якето
download the free trial online at nitropdf.com/professional
BL1015, BL1020B, BL1040B
14,4 V
BL1415, BL1415N, BL1430, BL1430B, BL1440, BL1450, BL1460B
18 V
BL1815, BL1815N, BL1820, BL1820B, BL1830, BL1830B, BL1840, BL1840B, BL1850, BL1850B, BL1860B

nitroPDF®
BL1820B, BL1830, BL1830B, BL1840, BL1840B, BL1850 BL1850B, BL1860B
download the free trial online at nitropdf.com/professional
download the free trial online at nitropdf.com/professional
Копче за турбо (Сл. 10)
nitro ^PDF professional
download the free trial online at nitropdf.com/professional
download the free trial online at nitropdf.com/professional
download the free trial online at nitropdf.com/professional
download the free trial online at nitropdf.com/professional
download the free trial online at nitropdf.com/professional
download the free trial online at nitropdf.com/professional
download the free trial online at nitropdf.com/professional
nitro ^PDF professional
download the free trial online at nitropdf.com/professional
Curățarea jachetei
download the free trial online at nitropdf.com/professional
download the free trial online at nitropdf.com/professional
download the free trial online at nitropdf.com/professional
download the free trial online at nitropdf.com/professional
download the free trial online at nitropdf.com/professional
ДОДАТКОВЕ ПРИЛАДДЯ

ЗАСТЕРЕЖЕННЯ:
nitro® PDE® professional
download the free trial online at nitropdf.com/professional
nitro PDF professional
download the free trial online at nitropdf.com/professional
download the free trial online at nitropdf.com/professional
download the free trial online at nitropdf.com/professional
download the free trial online at nitropdf.com/professional
شرح الوظائق
تنبيه:
nitroPDF professional
download the free trial online at nitropdf.com/professional
المواصفات
download the free trial online at nitropdf.com/professional
download the free trial online at nitropdf.com/professional
الغرض من الاستخدام
download the free trial online at nitropdf.com/professional
1

3

natural_image
Technical line drawing of a handheld air fan with internal blades and handle (no text or symbols)4
5
natural_image
Technical illustration of a mechanical assembly with two parts, one showing a belt and the other a clamped component (no text or symbols)6

natural_image
Line drawing of a person's arm holding a device with cable, no text or symbols present7
download the free trial online at nitropdf.com/professional
9

10
11

12
13

natural_image
Illustration of a person wearing a full-body mask with directional arrows indicating movement or force (no text or symbols)1415
natural_image
Technical line drawing of a safety harness and harness assembly (no text or symbols)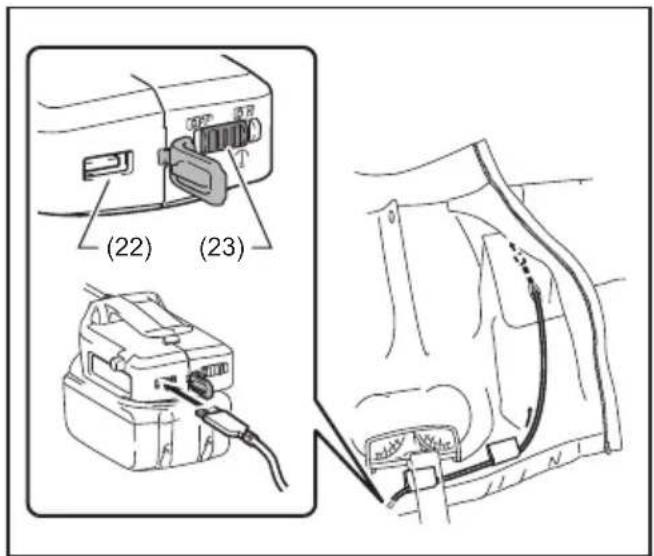
16
Created with

nitro ^PDF professional
download the free trial online at nitropdf.com/professional
Created with

nitro ^PDF professional
download the free trial online at nitropdf.com/professional
Makita Europe N.V.
Jan-Baptist Vinkstraat 2, 3070 Kortenberg, Belgium
Makita Corporation
3-11-8, Sumiyoshi-cho, Anjo, Aichi 446-8502 Japan
DFJ202-EU30L-0116
ALA

nitroPDF® nakita.com
professional
download the free trial online at nitropdf.com/professional


- ENGLISH (Original instructions)
- SYMBOLS
- SAFETY INSTRUCTIONS
- WARNING:
- Intended use
- Electrical safety
- Important safety instructions for battery cartridge
- CAUTION:
- Tips for maintaining maximum battery life
- SAVE THESE INSTRUCTIONS.
- DESIGNATION OF PARTS (Fig. 1 & 2)
- SPECIFICATIONS
- ASSEMBLY
- Installing or removing the battery cartridge to the battery holder (Fig. 3)
- Installing or removing the fan unit to the jacket (Fig. 4, 5 & 6)
- Attaching the battery holder (Fig.
- For 18V and 14.4V battery holders
- Attaching filter set (optional accessory) (Fig. 9)
- FUNCTIONAL DESCRIPTION
- Switch action (Fig. 10)
- Turbo button (Fig. 10)
- Air flow control (Fig. 11, 12, 13 & 14)
- For models with hood (Fig. 14)
- Battery pocket (Fig. 15)
- Connecting USB devices (Fig.16)
- NOTE:
- MAINTENANCE
- Cleaning the jacket
- OPTIONAL ACCESSORIES
- TECHNISCHE DATEN
- MANTENIMIENTO
- PRECAUCIÓN:
- TÜRKÇE (Orijinal talimatlar)
- SIMGELER
- TEKNİK ÖZELLİKLER
- Akkutasku (kuva 15)
- TEHNISKIE DATI
- Elektros sauga
- PASIRENKAMI PRIEDAI
- PERSPÉJIMAS:
- OPIS FUNKCIÍ
- UPOZORNENIE:
- TYTO POKYNY SI USCHOVEJTE.
- TECHNICKÉ ÚDAJE
- VOLITELNÉ PŘÍSLUŠENSTVÍ
- UPOZORNĚNÍ:
- Nadzor pretoka zraka (sl. 11, 12, 13 in 14)
- SHQIP (Udhëzimet originale)
- SIMBOLET
- Почистване на якето
- Копче за турбо (Сл. 10)
- Curățarea jachetei
- ДОДАТКОВЕ ПРИЛАДДЯ
- ЗАСТЕРЕЖЕННЯ:
- شرح الوظائق
- المواصفات
- الغرض من الاستخدام
Brand : MAKITA
Model : DFJ301Z
Category : Wireless ventilated clothing