RDD 9800 PN - Basket ROSIERES - Free user manual and instructions
Find the device manual for free RDD 9800 PN ROSIERES in PDF.
| Product type | Extractor/recirculation hood |
| Brand | Rosieres |
| Model | RDD 9800 PN |
| Version | Extractor or recirculation (charcoal filter kit not supplied) |
| Exhaust diameter | 150 mm |
| Number of motor speeds | 4 + intensive (automatic return to 3rd after 5 min) |
| Timer function | 5 minutes (motor stop and panel closure) |
| Lighting | LED, adjustable intensity High/Low |
| Extractor panel | Motorised, opening/closing with adjustable height |
| Grease filter alarm | After 30h of operation, indicator lit for 30s when off |
| Charcoal filter alarm | After 120h of operation, indicator flashing for 30s when off |
| Alarm reset | Long press of 2s on button P1 (or according to model) |
| Automatic safety shutdown | After 10h of inactivity (lighting and motor) |
| Panel blockage alarm | All LEDs flash: wait 30s then press UP/DOWN |
| External maintenance | Damp cloth with warm water + mild detergent (special product for steel/copper/brass) |
| Internal maintenance | Cloth soaked in denatured ethyl alcohol |
| Grease filter cleaning | Every 2 months, hand or dishwasher washable |
| Charcoal filter replacement | Every 6 months (recirculation version only) |
| Electrical supply | 220-240 V / 50 Hz |
| Installation | Recommended by a professional |
Frequently Asked Questions - RDD 9800 PN ROSIERES
User questions about RDD 9800 PN ROSIERES
0 question about this device. Answer the ones you know or ask your own.
Ask a new question about this device
Download the instructions for your Basket in PDF format for free! Find your manual RDD 9800 PN - ROSIERES and take your electronic device back in hand. On this page are published all the documents necessary for the use of your device. RDD 9800 PN by ROSIERES.
USER MANUAL RDD 9800 PN ROSIERES
English Instructions for use
! The appliance must be installed by a qualified person in compliance with the instructions provided.
Wear gloves when carrying out installation and maintenance operations.
If the supply cord is damaged, it must be replaced by the manufacturer, its service agent or similarly qualified persons in order to avoid a hazard.
Warning: Failure to install the screws or fixing device in accordance with these instructions may result in electrical hazards.
AIR VENT
(for ducting versions)
Prepare the hole and the air vent duct (150 mm diameter).
!Use a duct of the minimum indispensable length.
!Use a duct with as few elbows as possible (maximum elbow angle: 90^
!Avoid drastic changes in the duct cross-section.
!Use a duct with an as smooth as possible inside.
!The duct must be made of certified material.
!Do not connect the hood to smoke exhaust ducts for the products of combustion (boilers, fireplaces, stoves, etc).
!For the air vents comply with the provisions laid down by the competent authorities. In addition, the air must not be evacuated through a hole in the wall unless specifically intended for this purpose.
!Fit air intakes in the room to prevent the hood from creating a negative pressure in the room (which must not exceed 0.04 mbar); if the hood is used at the same time as non-electrical equipment (gas-, oil- and charcoal-fired stoves, etc.) the exhaust gas may be sucked in by the heat source.
FILTERING OR DUCTING VERSION?
The hood may be in filtering or in ducting version. Decide from the outset which type is to be installed. For better efficiency, we recommend installing the hood in the ducting version (if possible).

Ducting version

Version with external motor
The hood purifies the air and evacuates it to the outside through an exhaust duct (diameter 150~mm

Filtering version
The hood purifies the air and recycles the clean air back into the room.
Only for hoods equipped with electronic control: The 4th speed (intensive) is automatically lowered to 3rd speed after 5 minutes of operation to optimise energy consumption.
- If the hood is left on (lights and/or motor), after 10 hours in the absence of commands from the user, it will automatically switch to OFF condition with all services switched off.
- The Buzzer emits a "beep" each time that a command is set from the keyboard or remote control (optional).
- In the event of interruption of power during the hood, if you restore the hood in the OFF state, then the engine must be reactivate manually.
CONTROLS
IF1米% P1P2P3P4P5P6P7
|2|
3
1
P1: Filter alarm reset
P2: LED on/off - (only certain models: holding the button down you can change the LED intensity to High or Low).
Note: LED activation is displayed by P2 only when the lift panel is completely open.
P3: Motor on/off - 1st speed
P4: 2nd speed
P5: 3rd speed
P6: 4th speed
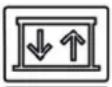
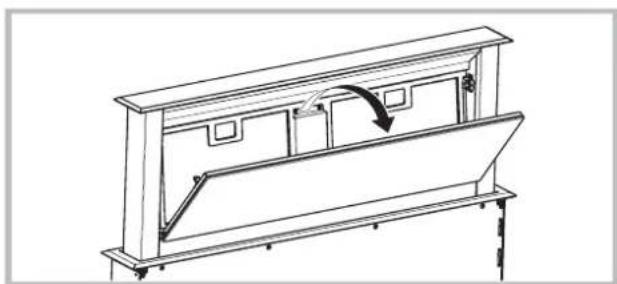
P7: Lift panel up/down (during opening the panel can be stopped at the desired height by pressing the button a second time).
5' Timer function:
Holding the buttons P3, P4, P5 or P6 pressed down (>2^ ) the 5' Timer function is activated. When the time has run out, the motor turns off and the lift closes. The LEDs change from High to Low intensity. When the function is active, the LED corresponding to the current motor speed blinks.
Filter alarm display:
Grease filters: After 30h of motor operation, the LED of the P1 button comes on for 30^ every time the motor turns off.
Charcoal filter: After 120h of motor operation, the LED of the P1 button blinks for 30^ every time the motor turns off.
CONTROLS
|F|
P1
%
P2
|2|
P3
3
P4
4
P5
P6
P1: Filter alarm reset
P2: Motor on/off - 1st speed
P3: 2nd speed
P4: 3rd speed
P5: 4th speed
P6: Lift panel up/down (during opening the panel can be stopped at the desired height by pressing the button a second time).
5' Timer function:
Holding the buttons P2, P3, P4 or P5 pressed down (>2^ ) the 5' Timer function is activated. When the time has run out, the motor turns off and the lift closes. The LEDs change from High to Low intensity. When the function is active, the LED corresponding to the current motor speed blinks.
Filter alarm display:
Grease filters: After 30h of motor operation, the LED of the P1 button comes on for 30^ every time the motor turns off.
Charcoal filter: After 120h of motor operation, the LED of the P1 button blinks for 30^ every time the motor turns off.
CONTROLS


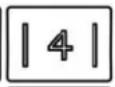
L1
L2
L
L4
L5
P1: Motor on/off - 1st speed
P2: 2nd speed
P3: 3rd speed
P4: 4th speed
P5: Lift panel up/down (during opening the panel can be stopped at the desired height by pressing the button a second time).
5' Timer function:
When the motor is on, holding the keys P1-P4 pressed down (depending on the speed set), the 5^ timer function is activated. When this function is active, the LED corresponding to the speed (L1-L4) blinks. When the 5^ have elapsed, the motor turns off and the carriage closes.
Filter alarm display:
After 30 hours of motor operation, the LEDs L1-L5 come on for 30^ each time the motor is turned off.
After 120 hours of motor operation, the LEDs L1-L5 blink for 30^ each time the motor is turned off.
To reset the alarm, press any one of the keys P1-P5 for 2" during alarm display.

ATTENTION
SAFETY SYSTEMS
In order to function correctly the product is equipped with a series of safety devices which are also intended to prevent any injury caused by inappropriate use.
In any case be very careful in using the product, above all the parts in motion.
ALARM ON CONTROL (all models)
- All LEDs flashing: this means that the telescopic trolley is locked. Wait 30" and then press the UP/DOWN button to release the trolley
- UP/DOWN button LED flashing: this means that the front panel of the filters is not closed properly. Reposition it correctly.
MAINTENANCE
!Before cleaning or maintenance cut the power.
If the light spot is damaged, it must be replaced only by the manufacturer, its service agent or similarly qualified persons in order to avoid a hazard
Cleaning the hood
WHEN TO CLEAN IT: clean it at least every 2 months to prevent the risk of fire.
EXTERNAL CLEANING: use a cloth moistened in lukewarm water and neutral detergent (for painted hoods); use specific products for steel, copper or brass hoods.
INTERNAL CLEANING: use a cloth (or brush) soaked in denatured ethyl alcohol.
WHAT NOT TO DO: do not use abrasive or corrosive products (e.g. metal sponges, brushes, too hard brushes, very aggressive detergents, etc.)
Cleaning the grease filters
WHEN TO CLEAN IT: clean it at least every 2 months to prevent the risk of fire.
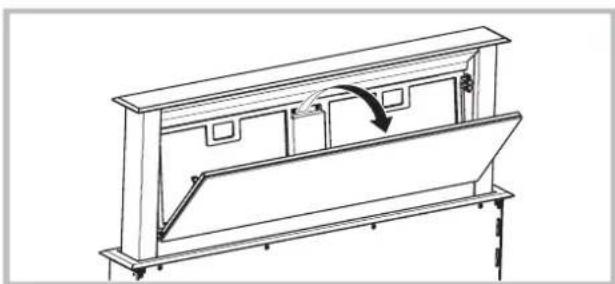
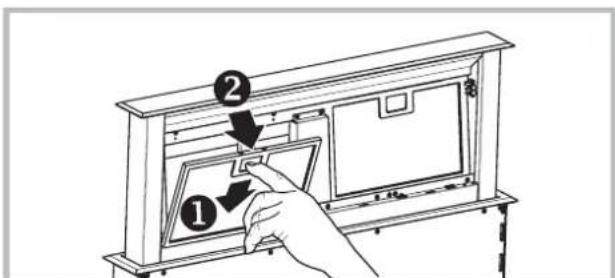
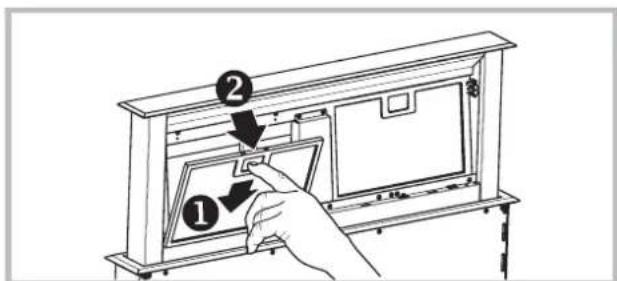
HOW TO REMOVE THE FILTERS: push the catch near the handle towards the rear of the hood and pull the filter downwards
HOW TO CLEAN THE FILTERS: hand wash or in the dishwasher using a neutral detergent. If washing in the dishwasher, possible discoloration of the filters does not in any way compromise their functioning.
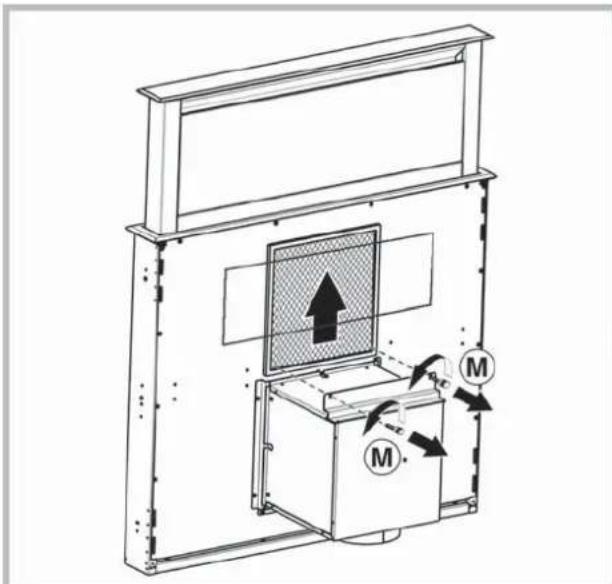
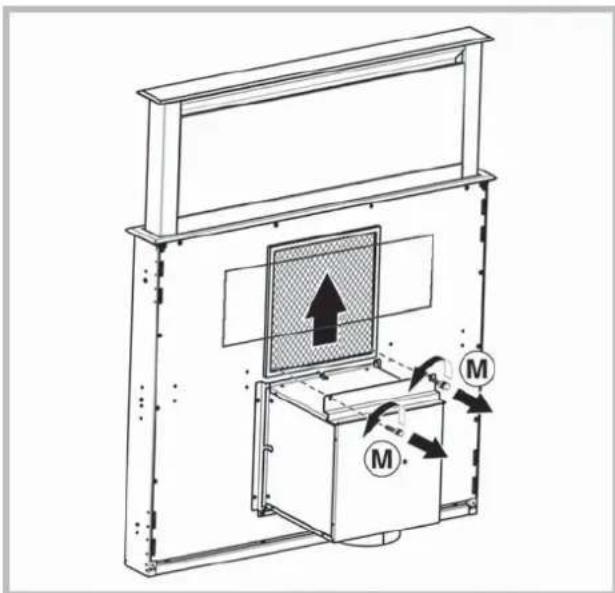
Replacing the charcoal filter (P)
(for filtering version only)
WHEN TO REPLACE IT: replace it at least every 6 months.
HOW TO REMOVE IT: position the charcoal filter inside the hood and fit the 2 filter clips (M).
MALFUNCTIONS
If something appears not to be working properly, do the following simple checks before calling Technical Service:
If the hood is not working:
Check that:
- The power has not been disconnected.
- A speed has been selected.
If the hood performs inefficiently:
Check that:
- The motor speed selected is sufficient for the amount of smoke and vapours released.
- The kitchen is sufficiently ventilated to allow air intake.
- The charcoal filter is not worn (hood in filtering version).
- If the hood has turned off during normal functioning: Check that:
- The power has not been disconnected.
- the omnipolar disconnection device has not tripped.

Components not provided with the product
AFVOER OF RECIRCULATIE?
!MOHTAX npOn3BODHTCB COOTBETCTBHN CMOHTAX npOn3BODHTCB COOTBETCTBHN C
HACTOUIHMHN HNCTpyKUHMN PPOOeCCMOHaJIbHO
KBaJIHΦIuIPOBaHHbIMn CneIuaJIHcTAmN.KBaJIHΦIuIpc

HHTBTHPPDQHDLHNTT
BaHHbIMN CNEuNaJInCTaMn.
BbTjKaOuHaET Bo3dyN BO3Bpaaet
OuHueHHbI BO3dyX B NOMEeHne.

IcnoB3oBaTb nepHaTKn BO Bpemy yctaHOBkn
Texo6cIyKINBaHnA.
Ecnn Ka6enb nHTaHn noBpeXdeH, B ceJnx npedynpeXeHn OAnCHoCTn, OHdoJXeH 6bTb 3aMeHeH n3roTOBNTeIeM nn erO cnyKbo TexHuYeCKo NODepkKn, INN JInC0m caHaNoTHo KBaNNpKaUne.
OTBODBO3DyXAOBTBODBO3DyXA
(BcabBaIOxMoJeN)
!PpeDyCMOTpeb OTBepCTne n Tpy6y dnyoBO3dyxa (DnAmEt p 150 MM).
!NcnoJIb3OBAbTpy6y MInHmAlbHO BO3MOKHOJINHbI.
!NcnoIb3OBAtBtpy6y C HAIMHeBIm BO3MOXHbIM YNCnOM n3r6OB (MaKcImaJIbHbI yrO I3r6a: 90°).
!N36eRaTbpe3KIXN3MeHEniDnAmEtpa CeHeHH Tpy6bl.
!No BO3MOXHOCTn CNOJb3OBAt b Tpy6y C rJaKoB HByTpEHHe NOBepxHOCTbIO.
! Tpy6a DoJnxHa 6bItb CdeJanaH n3 matepnaHa, COOTBeTCTByIOUeTO CTaHdApTaM.
!He NOIDCOEINHHTb BbITJkKy K Tpy6am OTB0daDbIMA,OBpa3OBAHHORo Bpe3yIbTaTe CxNraHnB (BOHOHarpeBaTeJI,KAmHbI,NeuKN I T.D.).
I Ipn OTBDOe BbITnBAeMOro BO3dyxa Heo6XoIMO co6JIIOdaTb Tpe6OBaHINKOMnTeHThIx OprAHOB. Kpome TORo, BO3dyx HE DoJKeH BbIBODNTcbr Chepe3 kaoe-Jn6o CTeHHoe OTBepCTne, eCIn ToJbKO OHO He npedyCMOTpeHO Dn DaHHo CEJI.
!O60pyoBaTb NOMEuHHe BEHTNIAUHOHBIMN OTBepCTnAMN BO 36ExKaHne CO3daHnB BByTRKoI OTPnCaTeJIbHorO DaBHeHnB NOMeUeHN (He DOJXHo npeBbIaTaB 0,04 6ap); ecJIN BBITRAKc IcNoJb3yeTcOgHOBpeMeHHo C He3NeKTpOHbIMN np6opamn (ra3OBbIe, macnHbIe, yroIbHbIe neu n T. d.) Bo3MOxHo O6paTHoe BCacbIBaHne ra3a, OTBeDeHOrO OT NCTOCHka TeIIa.
ΦNJIbTPYIOUJAR IIN BCACbIBAOUJAR?
BbTnKa MoKet 6bTb cHnTpyUoJero nnn
BCacBaHOJero Tnna. Heo6xOdmo C camoro Hauana
BbIpaTb TNB BbTnKn dNryCTaHOBKn. Dnra
MAKcIMaNbHOINPON3BOyNTeJIbHOCTn COBETyEM
YCTaHOBtB BCacBaHOJnTN IN BbTnKn (IO
BO3MOXHOCTn).

Bc00000000000000000000000000000

BepnC BHeUHHM ABHraTeIeM
BbTnKaOuHaeTe Bo3DyN BbI6paCbIBaetero HApKy Hepe3 BbITaKHyIO Tpy6y (DnaMeTp 150 MM).
TolbkoДЯ BBITRAKeK C 3NeKTPOHHbIM 6JOKOM ynpabHeHn: B ueJx ONTNM3aunn NOTpe6JeHn 3HepruYepe3 5 MNHyT pa6Otbl 4-RCOPoCTb (HHTeHCNBHa) aBtOMaTHueckn nepeXoDn Ha 3-IO CKOpocTb.
- EcJn B TeueHne 10 yacOB He MeHReTcY npaBJeHne BKIOUeHHo KxOHHO BbITXKoB (BKIOUeHO OCBeueHne n/nn NOCDBeTKa),TO BCE cyHKUN ABTomATNueCKn OTKnIOuAOTcN BbITXKKa NEpEXOHTB COCTOAHne OFF (BblIKI.).
- KaKbIpa3, KOrda BbIaTeCk KOMaHd cKnabNAtypblnnnybta DnCTaHcUNOHHOynpaBHeHH (OnCuHOHaJIbHbI BapNaHT), Cpa6aTbIBaET cyHKunnoDTBePKeHnBBINONHeHHKOMaHdbI 3ByKOBBIM CNrHanom "6n".
- EcnnB pexnme pa6oTbI BbITxKn HAcTyNT BHe3aHHe npekpaueHne noaBnB cetb 3JeKtpO3HeprHn, BblTAA Ka ABTomatNueckn BblKnHOaEcTc, a KHONKa NDeT B noLoXeHne OFF (BblKN.). CneNyET NOTOM NOBTOpHo BKIOHTb DBIRatelb BpyHyIO.
OPRAHbI YNPAJBENHIA
|F|
P1
¥
P2
%
P3
12
P4
3
P5
41
P6
P7
P1: c6poc cnHana TpeBorn qnbTpoB
P2:BkN./BbIKN. (TOnKo DnIg ONpepeHHbx MoDenei: CBETOHdNKaTOPbI -HaxKaTb N ydepKINBaTb KONky dIy I3MeHeHn IHTeHCNBHOCTN CBeYeHn CBETOHdNKaTOPOB: BbcOKa/Hn3Ka). PpIMeHaHne: P2 yka3bIBaet Ha To, YTo CBETODIObl BKNIOUeHbI, TOJIbKO pNI NOJHOCTbO OTKpbTOB bITAKHOH NaHEII
P3:Bk./BbIK.DBnraTeTn-1-ayckop.
P4:2-ayckop.
P5:3-ckop.
P6:4-ayckop.
P7: BbITXHnA naHeB BBepx/BHn3 (BO BpEmoTkpbBaHm MOXHO OCTaHOBTb NaHeNb HaHyxHO BbICOTE NOBTOHPbIM HaxaTMEM KONK)
CUNHAI3AUHA HANHEJIN YNPABJIEHNRA (Bce MoDen)
- Miraot BCE cBeToIONoHbIe HnDnKaTOpbl: O3Haayet, YTO BvIDBnXHnA KapeTkA 3a6NOKIpOBAHa. NdoJxTaTb 30 ceKyHd, 3aTeM HaxaTb KnabuWy UP/DOWN nIpa36nOKnPOBKn KapeTKN.
2.CBeToIOHOHaKnaBnuaUP/DOWN mraet: O3HauaET, YTOΦpOHTaJIbHa NaHeIbΦnIbTpOB yCTaHOBNeHa HENpABNJbHo. NepeyctaHOBtBu ee DOJXHBIM 6pa3OM.
TEXHNUECKOE OBCJYKBAHNE
IpeednCTKOnnnnpoBeHnemTexnueckoro 06CJyXnBaHHNOTKNIOHTb HAnpXeHne.
Ecni CBetoIIOI NOBpeXDeH, BO I36eXaHHe JIObOmy Tnny yrpo3bl, OH donKeH 6bItb 3aMeHen npOn3BOiNTeJIem,ero yN0NJHomOeHHbIM TexHNueCKM CneuNaJNCtOM NIN NlucOM c aHaJOrnHbIM KBaJIHΦKauJMaM.
CHCTKA BBITAXKNU
KOrIa IPOUN3BOUInb YNCTKY: YNCTNTb He peXe, cem pa3 B 2 Meca, TTo6bI N36ExKaTb PnCKa BO3ropaHna.
HAPYKHAR YNCTKA: nCnOJb3oBaTb TpIKNy, CMOeHHyB TENNoB OBe C HeITpaJIbHbIM MOIOUIM
cpeCTBOM (nra OKpaeeHHbIX BbTTJKeK);
MCNOJIb3OBaTb CneuaJIbHbIe CpeCTBa DJIb BbITJKeK
N3 CTaII, MeIN NIN NaTyHN.
BHYTPEHHRA YNCTKA: nCnoJIb3OBaTb TpRnKy (nIN KnCTOky), CMOeHHyIO B DeHaTpRuPoBAHHOM 3TNIOBOM CNIPTE.
YTO HJIb3r DEJIATb: He nCnoJIb3OBaTb
abpa3NBHbIE INI Koppo3NIHbIE CpeCTBa (HAnpIMep
MeTaNIIueckNe r6Kn, CInuKOM JeCTKne UeTKN, OueHb arpeccNBHbIe MOIoUne CpeCTBa, nT. d.).
KoTbHIOIN3BOIDNTb YNCTKY: NCTHTb He pexe,
yem pa3 B 2 Mecau, T06bl n36ekatb PnCKa
BO3ropaHn.
KAK BblHYtB FIIbTPbl: B mcepe pacnoIooKeHH
pyKn IpOTOLKNytB CTOpnp No HnpaBneHIO K
3aDHeN qactn BblJrKkN INOTAHyTB FNIbTp BBepX.
KAK YNCTHTb FIIbTPbl:MbITb HeItpaNBbIM
MOOUM CpeCTBOM BpyHyIO HnB
NOCydomooeHHO MaunHe. B cnyae IcNoJIb3OBAHn
NocydomoeyHO MaunHbI BO3MOxHO
OBeCuBeVHBaHHe FIIbTPOB, KOTOpoe He BnIeT Ha
HX FyHKUHOHaNbHOCTb.
3aMeHa yroIbHoro 0 (P) 40000000000000000000000000000000000000000000000000000
KOrDA IPOUN3BOJNTb 3AMEHY: 3aMeHrTb cIJIbTpTa KaK MInHMym KaXdIe 6 MeCAUEB.
KAK BbIHyTb ΦHbTP: To yctaHOBte yrotlbHbI ΦHbTP BHyTp b N BcTaBBte 2 KpennEnH φnltpa (M), 4t06bl 3akpenntb ero.
HENCNPABHOCTN B PABOTEHENCNPABHOCTN B PABOTI
Ecnn KaKaJ-Ni6o n3 cyHKnBbITaKHe pa6oTaet, npexde yem o6paTntbCn Cnyk6y TexHnuecko NODepKKN, BblONHHTb CJeDyUOuNe IpocTbe DeECTBn no npOBepKe np6opa:
- EcnBbItjKaHe pa6oTaet, y6eIITbcB TOM, YTO:
- Het nepe6o3JneKtponntaHn;
-BbIbpaHaCKOpocTb. - EcIN BbITaKpaBotaT He Ha noHyo MOuHocTb: y6eINTbcraB TOM, YTO:
-BbIbpaHHaCKOpocTbDnHraTeNlDOCTaTOHa dnn BBIbpaCbIBaEMORO KOJIHcEeTba DbIMa Hnapa.
-KyxHIOCTaTOUHO npOBETpNAeTcIg CO3daHn TAI.
-YrOJIbHbIΦnJIbTp He N3HOuEH (ДЯ BBITRAKKNФЛьТуЮцero TIna). - EcnBbITkKa BbIKNounacb BO Bpempa60Tb: y6eNTbcB TOM, YTO:
- Het nepe6o3JeKtponntaHnra;
-MHORONIOJIHOChbI BbIKNoHaTeNb He cpa6oTaN.

KOMNOHeHbI, He BXOJaUe B KOMNNeKT
UDLUFTNING AF LUFTEN
HVORNÁR SKAL DEN RENGÖRES: rengör mindst hver,anden maned for at undgå brandfare.
UDVENDIG RENGORING: anvend en fugtg klud opvredet i lunkent vand med et neutralt rengoringsmiddel (til lakerede emhaetter). Anvend specialprodukter til emhaetter i stal, kobber ell erer messing.
INDVENDIG RENGORGING: anvend en klud (eller en pensel) dyppet i husholdningssprit.
HVORNAR SKAL DET RENGORES: rengor mindst hver,anden maned for at undgå brandfare.
P1: reset alarm filter
m = 311
P3
P4
P5
0%
2
1
3
4
1
L2
L3
L4
15