
HCP61310IH - Basket BEKO - Free user manual and instructions
Find the device manual for free HCP61310IH BEKO in PDF.
| Brand | Beko |
| Model | HCP61310IH |
| Product Type | Kitchen hood |
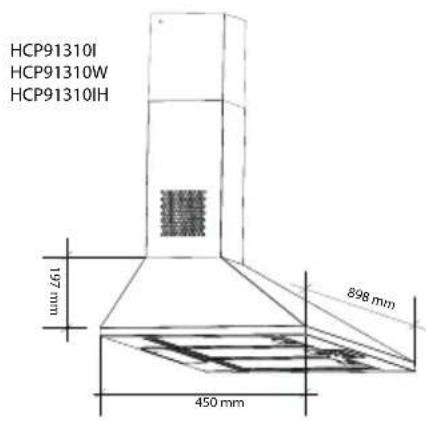
| Width | 60 cm |
| Dimensions (W x D x H) | 60 x 50 x 100 cm (estimated) |
| Net Weight | 10 kg (estimated) |
| Power Supply | 220-240 V ~ 50 Hz |
| Motor Power | 90 W |
| Lighting | 2 x 3 W LED (type E14) |
| Max Airflow | 395 m³/h (speed 3) |
| Number of Speeds | 3 |
| Insulation Class | Class II |
| Filtration Type | Metal grease filter + charcoal filter (optional) |
| Grease Filter Cleaning | Monthly washing (dishwasher safe) |
| Charcoal Filter Replacement | Every 3 months |
| Minimum Distance to Cooking Surface | 65 cm |
| Duct Diameter | 120 or 150 mm |
| Operation | With or without duct (recirculation) |
| Control Type | Mechanical switches (on/off and speed) |
| Spare Parts Available | Filters, LED lamps (E14 3W), motor |
| After-Sales Service | Contact an authorized Beko center |
| Warranty | According to manufacturer conditions |
Frequently Asked Questions - HCP61310IH BEKO
User questions about HCP61310IH BEKO
0 question about this device. Answer the ones you know or ask your own.
Ask a new question about this device
Download the instructions for your Basket in PDF format for free! Find your manual HCP61310IH - BEKO and take your electronic device back in hand. On this page are published all the documents necessary for the use of your device. HCP61310IH by BEKO.
USER MANUAL HCP61310IH BEKO
EN-BG-BS-CZ-DE-ET-FR-HU-LV-MK-NL-PL-PT-RO-SK-SL-SQ-SR
Please read this guide first!
Dear Customer,
Thank you for choosing a BEKO product. We would like you to achieve the optimal efficiency from this high quality product which has been manufactured with state of the art technology. Please make sure you read and understand this guide and supplementary documentation fully before use and keep it as a reference. Include this guide with the unit if you hand it over to someone else. Observe all warnings and information herein and follow the instructions.
Keep in mind that this user guide may apply to several product models. The guide clearly indicates any variations of different models.
Symbols and their meanings
These symbols are used throughout this guide:

Important information and recommendations regarding the use of the appliance.

CAUTION:Warnings on personal injury or property damage.
Electric shock warning.
Risk of fire warning.

Electric shock protection rating

This product has been manufactured at modern facilities respectful to the environment without harming nature.
CONTENTS
ENGLISH 04-12
БылгAPСКИ 13-25
BOSANSKI 26-36
CESKY 37-47
DEUTSCH 48-60
EESTI 61-71
FRANÇAIS 72-82
HRVATSKI 83-93
MAGYAR 94-104
LIETUVI K 105-115
LATVIAN 116-126
MAKEDOHCKN 127-139
NEDERLANDS 140-150
POLSKI 151-163
PORTUGUES 164-175
ROMÁNA 176-188
SLOVENSKY 189-199
SLOVENsCINA 200-210
SHQIPTARE 211-221
CPПСКИ 222-236
1 Important safety and environmental instructions
1.1 General Safety
Important Safety Instructions Read Carefully And Keep For Future Reference This section contains safety instructions that will help protect from risk of fire, electric shock, exposure to leak microwave energy, personal injury or property damage. Failure to follow these instructions shall void any warranty.
- Beko products comply with the applicable safety standards; therefore, in case of any damage on the appliance or power cable, it should be repaired or replaced by the dealer, service center or a specialist and authorized service alike to avoid any danger. Faulty or unqualified repair work may be dangerous and cause risk to the user.
-
This appliance is intended to be used in household and similar applications such as:
-
Staff kitchen areas in shops, offices and other working environments;
- Farm houses
- By clients in hotels, and other residential type environments;
-
Bed and Breakfast type environments.
-
Operate the appliance for its intended purpose only as described in this manual.
- The manufacturer cannot be held liable for damages resulting from improper installation or misuse of the product.
- This appliance can be used by children aged from 8 years and above and persons
with reduced physical, sensory or mental capabilities or lack of experience and knowledge if they have been given supervision or instruction concerning use of the appliance in a safe way and understand the hazards involved.
- Children shall not be allowed play with the appliance. Cleaning and user maintenance shall not be made by children without supervision.
- The minimum distance between the supporting surface for the cooking vessels on the hob and the lowest part of your product must be at least 50~cm for electric hobs and 65~cm for gas hobs.
- If the instructions for installation for the gas hob specify a greater distance, this has to be taken into account.
- Make sure that your mains power supply complies with the information supplied on the rating plate of the appliance.
- Never use the appliance if the power cable or the appliance itself is damaged.
- Prevent damage to the power cable by not squeezing, bending, or rubbing it on sharp edges. Keep the power cable away from hot surfaces and naked flame.
- Use the appliance with a grounded outlet only.
WARNING: Do not connect the appliance to the mains until the installation is fully complete.
1 Important safety and environmental instructions
- Place the appliance in a way so that the plug is always accessible.
- Do not touch the lamps if they have operated for a long time. They can burn your hands since they will be hot.
- Follow the regulations set out by competent authorities on discharge of the exhaust air (this warning is not applicable for use without chimney).
- Operate your appliance after putting a pot, pan etc. on the hob. Otherwise, high heat may cause deformation in some parts of your product.
- Turn off the hob before taking the pot, pan etc. from it.
- Do not leave hot oil on the hob. Pans with hot oil may cause self combustion.
- Pay attention to your curtains and covers since oil may catch fire while cooking food such as fries.
- Grease filter must be replaced at least monthly. Carbon filter must be replaced at least every 3 months.
- Product shall be cleaned accordance with user manual. If cleaning was not carried out in accordance with user manual, there may be fire risk.
- Do not use non-fire-resistant filtering materials instead of the current filter.
-
Only use the original parts or parts recommended by the manufacturer.
-
Do not operate the product without the filter and do not remove the filters while the product is running.
In the event of be started any flame, de-energize your product and cooking appliances. - In the event of be started any flame, cover the flame and never use water to extinguish.
- Unplug the appliance before each cleaning and when the appliance is not in use.
- The negative pressure in the environment should not exceed 4 Pa (4 x 10 bar) while the hood for electric hob and appliances running on another type of energy but electricity operate simultaneously.
- In the environment where the appliance is being used, the exhaust of devices running on fuel oil or gas, such as room heater must be absolutely isolated or device must be hermetical type.
- When connecting the chimney, use pipes with a diameter of 120 or 150~mm . Pipe connection must be as short as possible and have as few elbows as possible.
Danger of choking! Keep all the packaging materials away from children.
CAUTION: Accessible parts may become hot when used with cooking appliances.
- The product outlet must not be connected to air channels that include other smoke.
- The ventilation in the room may be insuf
1 Important safety and environmental instructions
ficient when the hood for electric hob is used simultaneously with the devices operating on gas or other fuels (this may not apply to appliances that only discharge the air back into the room).
- Objects placed on the product may fall. Do not place any objects on the product.
- Do not flambe under the your product.
WARNING: Before installing the Hood, remove the protective films.
- Never leave high naked flames under the hood when it is in operation
- Deep fat fryers must be continuously monitored during use: overheated oil can burst into flames.
1.2 Compliance with the WEEE Directive and Disposing of the Waste Product:
This product complies with EU WEEE Directive (2012/19/EU). This product bears a classification symbol for waste electrical and electronic equipment (WEEE).
This symbol indicates that this product shall not be disposed with other household wastes at the end of its service life. Used device must
be returned to official collection point for recycling of electrical and electronic devices. To find these collection systems please contact to your local authorities or retailer where the product was purchased. Each household performs important role
in recovering and recycling of old appliance. Appropriate disposal of used appliance helps prevent potential negative consequences for the environment and human health.
1.3 Compliance with RoHS Directive
The product you have purchased complies with EU RoHS Directive (2011/65/EU). It does not contain harmful and prohibited materials specified in the Directive.
1.4 Package Information
Packaging materials of the product are manufactured from recyclable materials in accordance with our
National Environment Regulations. Do not dispose of the packaging materials together with the domestic or other wastes. Take them to the packaging material collection points designated by the local authorities.
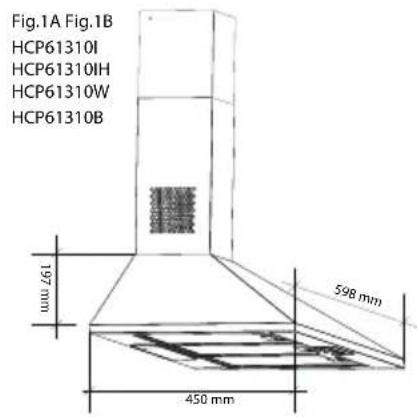
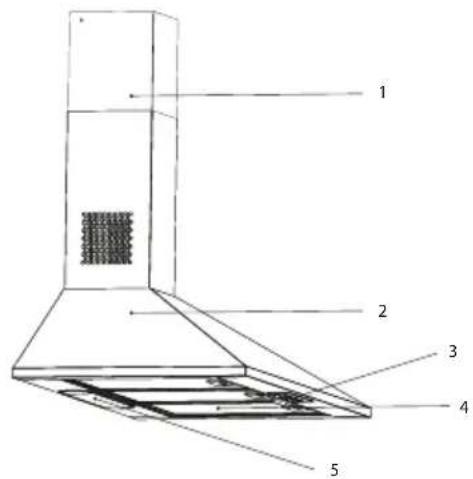
2 General Appearance
2.1 Overview
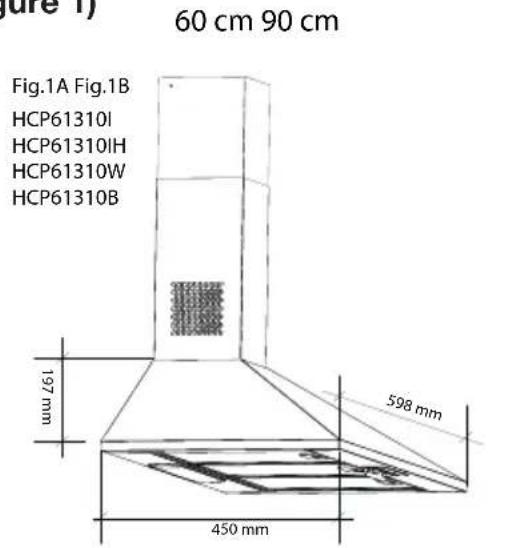
Figure 1)
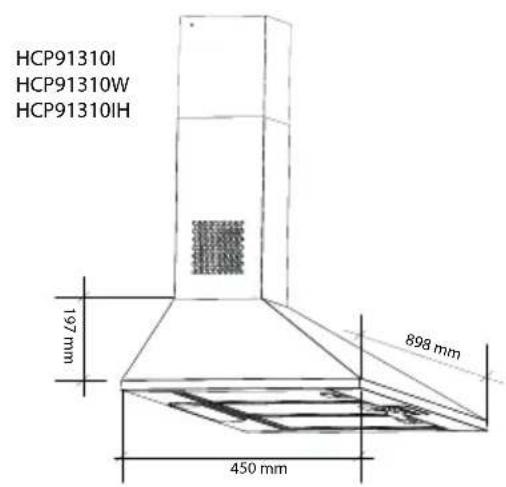
Figure 2
- Chimney
- Body
- Control Panel
- Aluminium Grease Filter
- Lighting
2.2 Technical Data
| Model HCP61310I - HCP61310IH - HCP61310W - HCP61310B HCP91310I - HCP91310W - HCP91310IH | |
| Supply voltage 220-240V ~ 50 Hz | |
| Lamp Power (W) 2 x 3 | |
| Motor Power (W) 90 | |
| Flow rate (m3/h) - 3. Level 395 | |
| Insulation Class of Motor Class F | |
| Insulation Class Class II | |
3 Operation of the Appliance
3.1 Controlling the Appliance
| 0 1 2 3 | 0 1 |
| To turn off the lamp, set the lamp switch ( ) to '0' position. | |
| To turn on the lamp, set the lamp switch ( ) to '1' position. | |
| To turn off the motor, set the motor switch ( ) to '0' position. | |
| You can run the motor minimum at speed level 1 and maximum at speed level 3 depending on the cooking vapour intensity. | |
3.2 Efficient Use with Regard to 3.3 Operating Instructions Energy Saving Your appliance contains a motor
- When using your appliance, adjust the speed settings according to vapour and odour intensity, in order to save energy.
- Use low speeds (1-2) under normal conditions, and high speeds (3) in intense odour and vapour.
- The hood is equipped with lamps in order to illuminate the cooking area.
Using them for environmental lighting shall cause unnecessary energy expenditure and insufficient lighting.
3.3 Operating Instructions
- Your appliance contains a motor that has various speeds.
- For better performance, we recommend using low speeds under normal conditions and high speeds in cases of strong odours and intense vapour.
3 Operation of the Appliance
3.4 Replacement of Lamp
Make the electrical connections of the appliance. Your appliance is equipped with a 3 W spot LED lamp. For replacing the lamps, push downwards on the holder from its behind, turn it counter-clockwise, and take it out downwards. Apply the above operation in reverse to install new lamps (Figure 3).
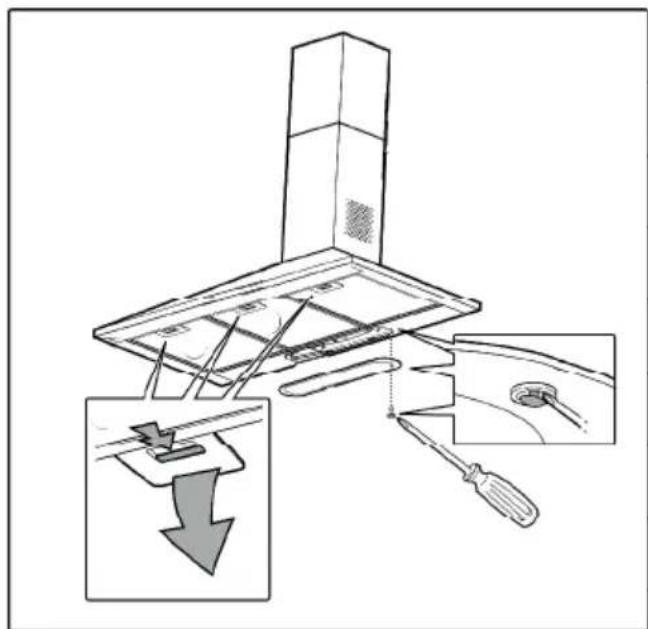
Figure 3
| Bulb | |
| Bulb Power (W) 3 | |
| Holder / Socket E14 | |
| Bulb Voltage (V) 220 | - 240 |
| Size (mm) 100 x 35 | |
| ILCOS Code DRBB/F | -3-220-240-E14-35/100 |
3.5 Operation with Flue Connection
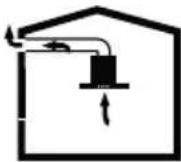
Vapour is extracted through the flue duct, which is fastened to the connection head on the
hood.
- The diameter of the flue duct must be the same as the connection ring. In horizontal settings, the pipe has to have a slight upward slope (around 10^ ) so that the air can exit the room easily.
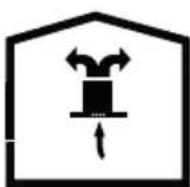
3.6 Operation without Flue Connection
Air is filtered through the carbon filter and recirculated in the room. Carbon filter is
used when it is impossible to use a flue in the house.
-
In flueless use, remove the flaps inside the flue adapter.
-
Remove the aluminium grease filter. To install the carbon filter, fit the filter to the tabs by centring it on the plastic piece on both sides of the fan body. tighten it by turning right or left.
-
Replace aluminium grease filter.
4 Cleaning and Maintenance

Before cleaning and maintenance, unplug the appliance or turn off the switch.
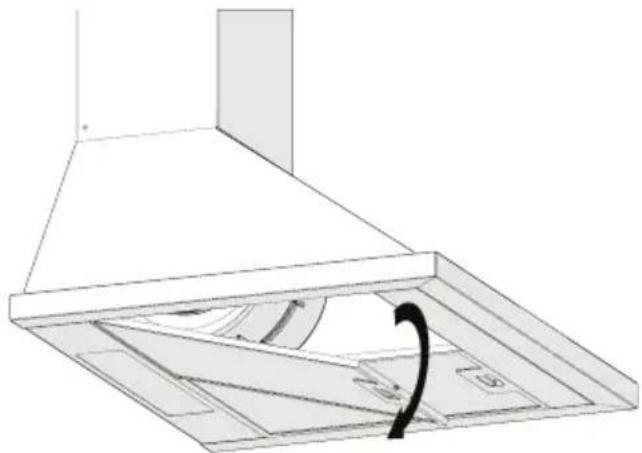
4.1 Cleaning of Aluminium Grease Filters
This filter retains the oil particles in the air. Aluminium grease filters may change colour as they are washed; this is normal and does not require replacing your filters.
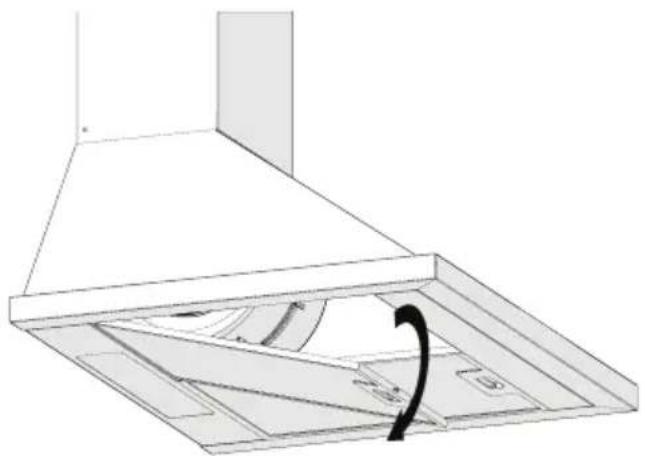
Figure 4)
- Push the aluminium grease filter lock forward.
- Then pull it slightly down and pull it out (Figure 4). Otherwise, you can bend the filter. Wash and rinse aluminium grease filters with liquid detergent and replace aluminium filters to their sockets by by carrying out the steps specified above in reverse order. This filter retains the oil particles in the air.

You may also wash your aluminium grease filters in the dishwasher.

CAUTION
In case of normal use, clean your filter once in a month.
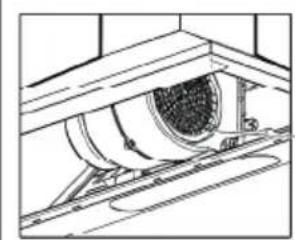
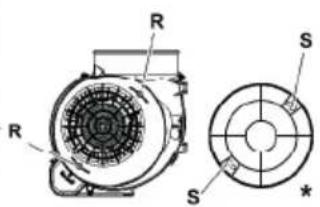
4.2 Replacement of Carbon Filters
Odour removing filters contain charcoal (Active carbon). Aluminium grease filters must be installed in the product, regardless of whether or not charcoal filters are used.
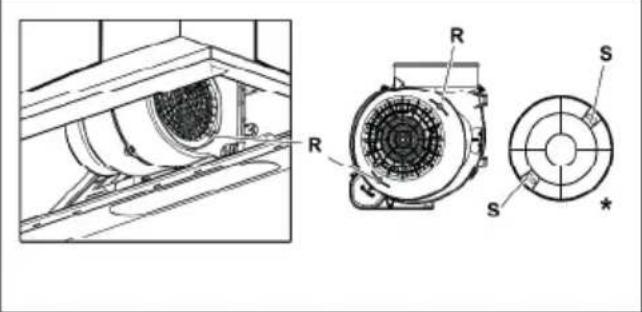
(Fig. 5)
- Remove the aluminium grease filters (Figure 4).
- Remove the filter by turning the pins from S level to R level clockwise. (Figure 5).
- Install the new filter by implementing the above procedure in reverse order.
Install the aluminium grease filters.

CAUTION
Carbon filter shall never be washed.

CAUTION
Replace carbon filters once every 3 months.

CAUTION
You can obtain the charcoal filter from authorized service dealers.
5 Installation Of Appliance

WARNING!
Before installation, read safety information in the User Manual

WARNING!
Failure to install with screws and stabilizers in accordance with these instructions may result in electric shock.

NOTE
Please refer to page 235 for the installation guide
For the installation of the hood, please contact the nearest Authorized Service.
It is the customer's responsibility to prepare the location and electrical installation of the hood.
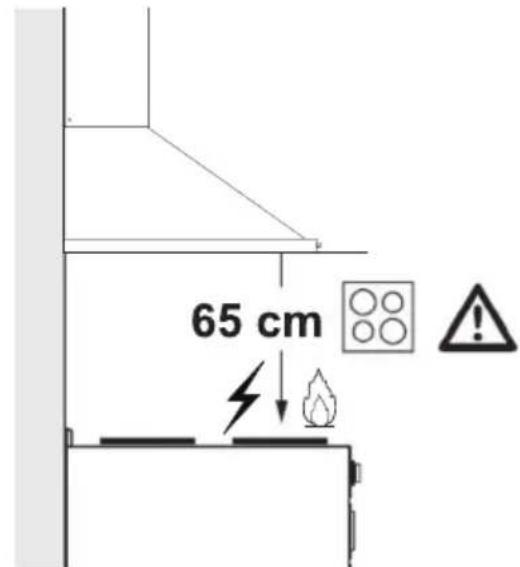
5.1 Position of the Appliance
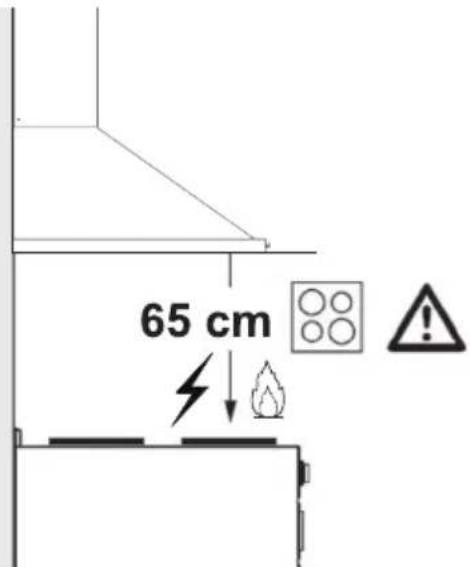
(Figure 6)
-
Distance between the cooker and the cooker hood must be considered prior to assembly. This distance should be 65 cm (Figure 6).
-
Distance must be measured from the surface of grate for gas cookers, from surface of glass for electric cookers.
6 Troubleshooting
| Troubleshooting Boot Cause Help | ||
| Appliance is not working. | Check your fuses. Fuse may be blown, inspect and restore it. | |
| Appliance is not working. | Check the electrical connection. Mains voltage shall be between 220 and 240 V. | |
| Appliance is not working. | Check the electrical connection. Check if other appliance in your kitchen operate. | |
| Illumination light does not operate. | Check the electrical connection. Mains voltage shall be between 220 and 240 V. | |
| Illumination light does not operate. | Inspect the lamp switch. Lamp switch shall be at "on" position. | |
| Illumination light does not operate. | Inspect the lamps. The lamps of the appliance shall illuminate. | |
| Air inlet of the appliance is inadequate. | Inspect the aluminium filter. Under normal operating conditions, aluminium grease filter shall be cleaned at least once in a month. | |
| Air inlet of the appliance is inadequate. | Check the air discharge flue. The air discharge flue shall be at "on" position. | |
| Air inlet of the appliance is inadequate. | Inspect the carbon filter. The filters of the appliances with carbon filters shall be replaced once in every 3 months under normal conditions. | |
Molna, npooyTeTe nbpBO TOBa pbkoBODCTBO!
YBaKaemn KIneHTN,
Благорам в, чу зakунхte рожукт на BEKO. Бихмінckалдяпостиггето ONТIMаJIнота eфektubHOCT OT TO3N BnCOKOKaYeCTBENпожкт, пОИЗВeDEн снай-cbВрЕмEHа ТexHOLIOгь.Моля, уверete ce, чс Te почели и pa3брази TOBa рьКOBODCTBO И дОпьЛНTeJIнATAdoKymentaци п徳и ynotpe6a n Г 3ana3eTe 3a cnpaВka B6bdeш. ВknOчete TOBa рьКOBODCTBO c yctpoiCTBOTO, akO ro пpeДавATEHa HЯков dpyr. СпаЗВaIte BCnUkпрdUnpExdEHNry INHΦopMaця поочен Tuk n CJIeДВaIte NHCTpyKcInTe.
ImaTe npedBnD, Ye TOBa pBkoBOcTBo MOKe Da ce npnilara 3a HraKoJIKO MoeJa Ha npOdykTa. PbKOBoCDTBOTO YCHO NOKa3Ba BCaKaBnN3MeHEnHa pa3JIuHHTe MoeJI.
Симboл n TexHnTe 3HaueHnA
Te3n CnMBOJN Ce n3PON3BaT B cIaNoto pBKOBOdCTBO:

Baxha INΦopMaçnI n IpeNoPbKn OTHOCHO 3nOJ3BaHeTo Ha ypeDa.

-BceIcKocToHaHcKn crpaN,
-
OT KJIneHTN B XOTEJI, MOTeJI NJI N dpyrN CbOpb-Jxehn 3a HaCTaHЯBaHe;
-
B OБшжNTЯ ИПИ NO-ДОБНСрedi.
Pa6oTe c ypeDa cnopei npedHa3NaueHneTo My, ONIcaHO cAmO B TOBa pboBOIDCTBO.
-ПрOn3ВОДиTeЯT He MoXe Da Hocn OTROBOPHOCT 3a NOBpeiN, PruHHeH N OT He npaBnJIeH MOHTaX nIpa6Ota Ha ypeDa.
To3n ypei moKe da ce n3- NOJ3Ba OT Deca Ha N HaJ 8-roJiSha Bb3pact C OIN- 3NueCKn IIN PCNXUeCKn HeIOCTaTBK, CTIgA Te Da 6bDat Na6JIoDaBAHN IIN INHCTpykTnpaHN 3a 6e3O-NaCHOTO I3NOJ3BaHe Ha ypeDa N da Ocb3HaBaT ONaCHOCTnte.
- Deuata He Tp6Ba Da cn nIgparT cypeDa. JeHocTe IIO NOUcTBaHe N IOd-
1 BaxHn HNcTpyKznn 3a 6e3oNaChOCT N ONa3BaHe Ha OKoJHaTa CpeDa
Дрьжka He Трава Да се ИЗВьршВaT OT Deцa, OСВенaco He ca Рд Нбл�дe-нe.
Korato MohtaXbT Ha BaShnY ypei npKlOuH, MnHmAlHOTo pa3CTOaHne MExdy DbHOTo Ha BaShnY ypei n IOBbpxHOCTTa, B KOrTo Ca NoCTaBeHn CbdoBete 3a RotBeHe, Tp6Ba Da e 65 cm.
- Ако Инструкцип Te 3a монтж Ha ra3OBaTa Neчka NocOyBaT NO-ROJMaO pa3-CTOJHne OT NocOyeHOTO NO-rope, TOBa TpЯ6Ba Да ce B3eMe npedBnD.
- YBepete ce, ye BaShaTa 3axpaHbAaMpexka OTROBapra Ha INΦopMaunrTa, NocoueHa B Ta6eJkata C etnKetn Ha ypeDa.
He n3noJ3BaIte ypeDa, ako Ka6eJbT nIiN ypeJbT ca noBpeHn.
3aДa npedotbpaTnte NOBpeDa Ha 3axpaHbAsnKa6eI, He N03BOJbAaTe Da Ce npuunBa, PtNTsCKa IIN Tpne B OcTpnpb6OBe. DpbXte 3axpaHbAsn Ka6eI daley OT HarpTn IOBbPxHOCTN I
OTKpNTOrbH.
- Изполизвайта урEDA само CBС 3a3eMeH KOHTaKT.
BHIMAHNE: He BkIIOyBaIte ypeDa npeDi MOHTaJa. - Пocтавete урEDA таKa, Ye IeIeNcIELbT Дa e BInHaRn Ha DoCTbПHOMЯСTO.
He dokocbaite Jamnte Ha npodykta, ako ca pa60tii npodbIXteJHOBpeMe. Tb' kato ige ca ropeu, Moxe da n3ropaTpbkata BN.
Cna3BaIte npabnIata n HNCTpyKcIInTe OTHOCHO TBExKaHTo Ha n3XoJa- ⅢYB3dUx, ONpeJeHn OT CbOTBETHnte OprAHn. (Toba npedynpejckdHne He Baxn 3a ynoTppe6a 6e3 Tpb6a.)
BkIoue Te ypeDa cJeI KaTO NOCTaBnTe TEnJxepa, TnraH n dp. Bbpxy KOTIO-Hnte. B npotnbEN clyuai, BnCOKata Temnepatypa MoKe Da npedn3BnKa DeΦopMnpaHe Ha cbuNte qactn ot BaunTe npodyKTN.
-Изклочete ropelkaTaHa
1 BaxHHn HNcTpyKznn 3a 6e3oNaChOCT n ONa3BaHe Ha OKoJHaTa cpeDa
rotbapcka neuka, npedn da cbaIte kacepoIaTa, TeHdJepaTa n T.H. OT neyKaTa.
He octabray Te Knnao OJNO Bbpxy neykata. CbdoBete, KOINTO cdbpbjat Knnao OJNO, MOraT camn da ce 3anaJrT.
TbN KaTO OJNOTO MoKe DaCe 3aapani npn PbpxKeHe, BHMaBaIte 3a BaInte 3aBeCN N POKPnBKn 3a Maca.
-Почистваite macIJeHteФИТРn BeHbЖ B Mececa.CmeHЯITE BbIpeOndHteФИТPn BeHbX Ha BCEK3 Mececa.
- HesperobHOTO NOUCTBaHe Na npOdykTa TOBa MoKe Da Cb3daTe pNcK OT NOxap.
BmecTo qnIbP He n3- noJ3BaIte qnItpnpaun MaTePnaJI, KOnTO He ca yCTOuINBn Ha OYbH.
-Използваite opигинhalнч actи плчactи,пpe-DoctaBeHn CamO OT npoN3BODNTeJЯ.
He pa6oTeTe c npOdyKta 6e3 pInTbp n He maxaIte pInTpnte, KOrato npOdyK
TbT pa60tn.
BcnyaHa noxap n3-KIOUte ypeDa n dpyrnte ypeDi 3a roTBeHe. (N3KIOUte ypeDa IIN rIaNn IpeKbcBaay.)
BcnyaHa noxap, noKpnIte PnAmbCnTe. HnKora He n3NoJ3BaIte BODa 3a raceHe Ha noxapa.
BnHa n3KlOuBaIte ⅢeCena OT KOHTaKTa npedn Da NOUcTBaTe UpeDa N He rO NoUcTBAIte N O BpeMe Ha yNo- Tpe6a.
Korato acnnpaTopbT uyctpoiCTBaTa, 3axpaH- BavH C eHeprna, pa3- liuHa OT eJeKtpnueCTBO, pa60Tt EINOBpeMeHHO, OTPuaTeJIHOTo HajraHe B NOMEeHNeTO He Tp6Ba Da NaBnShaBa 4 Pa (4 x 10 6apa).
- YpeiTe Ha ra3 nIi roPnBO, KaTo HApnPmep OToJIteHn TeHa, KOnTO CNoJeTcBzata CpeJa c Baunr npOdykT, Tp6Ba Da 6bDaT HanbIHo n3-OIInpaHn OT n3nyckaTeHNata Tpb6a Ha To3n
1 BaЖи nHcTpукци 3a 6e3oNaChOCT n ONa3BaHe Ha OKoJHaTa cpeDa
IpoDyKT nIa ca xep-METnUHN.
Korato Haprabnte Bpb3ka C dIMMOOTbOda Ha Baunia npoDyKT, n3noJ3BaIte Tpb6n C dNaMeTbp 150 MM nnn 120 MM. DblxHaTa Ha Tpb6aTa Ha Tpb6OpOBoDa, KaKTo N 6poT Ha Bpb3KnTe, Tp8Ba Da 6bDat Bb3-MoXHO Hau-MaJIbK.
Pnck ot 3aDywaBaHe! IpbkTe onakOBbHnMaTepeHaI daJeU OT o6Cera Ha deca.
BHIMAHNE: Korato pa-bOTn 3aedno C rotBapCKnte ypeNi, DoCTbHnTe yactn Morat da 6bdat ropeu.
-Изховьт Ha acnnpaTopa He Tp86Ba Da 6bde CBbp3aH KbM Bb3dUxOBOdi, KbdeTo Ca CBbp3aHn Друг ИЗTOUHин HaДIM.
Korato eIeKtpnuecknayT acnnpaTop ce n3noJ3Ba eNHOBpeMeHNO C yCTpOi-CTBaTa, KOINTo n3noJ3BaT ra3 nIIN dpyrI rOpNBa, NOmeuHeNeTO Tp8Ba Da ce npOBeTpra aDeKBaTHO. ToBa npedynpexkdeHne
He ce OTHacra 3a pa6ota 6e3 dmoOTbOd (pa6ota C BbyrIepoDeH cHJTbp).
-ПрееметиTe,постаВени Вьрху урEDA, могат да падот. He постаяnte НИКАКВИ реДmetи Вьрху урEDA.
Kateropnue 3a6pa-HeNo da pa3npbCKBaTe xpaHa pod ypeDa.
B H M A H N E: O t c t p a h e t e 3a u n t h n y c l o n i p e d i n da m o n t h i p a t e a c n i p a t o p a.
He octabraye OTKpnt OrbH IOd ypeDa, DOKaTo Toi pa6OTn.
-ПьженetoВдьлбokedaMa3HnHa Tpr6Ba Da ceN3BbPwBa NOd HaD3Op,Tb' KaTO Ma3HnHa,DocTnRaUa BnCOKn Tempea-Typu, MoKe Da Ce 3anapn.
6 OtrctpaHЯBaHe Ha HeN3npaBHOCTN
Die für Ihr Gerät verwendete Verpackung besteht aus wiewertbaren Materialien. Ensuree packaging is disposed of solely as per the regulations of localities to ensure that the bag of your appliance is included recycling process for environmental purposes.
1.3 Toote pakendmaterial
- Пон3ВeДУВaЧОТ He e OДROBOPEN 3a WTeTInTe WTo Ke ПOn3JIe3aT Od He npaBnHOTOn INCTaIIpaIbe IJI NOrpeShOTO KOpIcTeHBe Ha ypeJOT.
Oboj ypei moxe da ro KopncTaT Deca Hnd 8 rOdHH, KaKO n IuCa co HamaJIeHn Qn3NcK, CETINHn IIn MeHTaJHn CnOC6HoCTn IIn He Ce DOBOJHO NCKUChn N yNaTeHN, Ho cAmO aKO ce PND HeNJ HaN3Op IIn aKO ce 3aNo3HaEHn CO yNaTCTBaTa BO Bpcka Co 6e36eHOTo KopncTeHe Ha
1 BaxHn yNaTcTa 3a 6e36eHocTa n 3aHTntaTa Ha OKoJIHaTa
ypeIOT n CO onaCHOCTnTe 1TO Ce BknyeHn npntoA.
-Дeца He Cmeat da cn nrgpaat co OBOj ypei. YncteHbeto n OdpxUbaHbeto OD CTpHa Ha KOpncnKOT He Cmeat Da ro n3BpShyBaat Deza 6e3 HnuchnJ Hnd3Op.
-ПО ИНСТАЛРаьeto Ha ypeДOT, MInHIMaJIHOTOp pactоJaHne MeIy HajHnCKNt DeI Na ypeДOT I NOBpShHaT a Ha Koja ce CTaBaat caIOBNTe 3a roTBe№ Tpe6a Da 6nIe 65 cm.
Ako BO ynpaTcTBata 3a NHCTaIIpaIbe Ha PIIHHCKNOT IINOpET e HabeJeHO NOrOJIeMo pactoJaHne, Toa Mopa da Ce 3eme npedBnD.
- Пюверete Дали
Наноюуваьeto OД
Еnéктунота Мрека e
ВО сКлад CO падатоцпт
што ce HabeendeMu
Металнота etNKetа Ha
у畴дот.
He ro kopncTeTe ypeIoTaKO eNeKtpnHnot Ka6eNIIcAmNoT ypeI ceOwTeTeHN.
3a Da He Ce OStTeN eKeTpHuHnot Ka6eJ, He TpeBa Ce npITnCKa, npeBNTkyBa IIn Tpne Od octpn pa6obn. Ka6eJOT TpeBa Da 6nDe 7TO nOdaJeKy OJ XeShKn NOBpUnHn N OD OTBOpEn PnAmen.
KopncTeTe ro ypeIoT camo co 3a3emjeH uTekep. PPyPdYBAIbE: He ro noBp3yBaJte ypeIoT Ha eJeKtpnHaTa Mpeka nped Da ro nHcTaJInpaTe.
-При постаByBaHbeTo Ha ypeIOT BODeTe CMeTka WTeKePOT cekOraW da 6nDE leCHO doCTaPeH.
He r n dOnpajte cnjaInuKnTe Ha ypeIoT aKO pa6oTeIe DOnro BpeMe. BndejKn Ke bIaT MHOry JKeIKN, MoKe Da CN rN n3rOpnte paCte.
CledeTe rnpOnncnte n yNaTCTBaTa BO Bpcka co NcnyuStaHbeto Ha n3dYBHNOT BO3dYX, YTBpDeHn OJHaNdJIeKHNTE oPraHn. (Oba npdeynpeDyBaHbe He ce odHeCyBa Ha yNoTppe6a 6e3 dImen KaHaI.)
1 Baxhny ynatcTba 3a 6e36eHocTa n 3aHTnTaHa OKOJIHaTa
Bknyte ro ypeDToT dypn OTKaKO Ha 7npopeTOT Ke CTaBNTe TeHape, TaBye n cI. Bo cnpotuBO, BncoKaTa TOpInHa MoKe Da npedn3Bnka DeOpMaun Ha HeKo DeIOBn Ha npOn3BOdOT.
-Иcknyute ro shnopeToT nped Da rN TprHete od Hero TeHepeTo, TaByeTo n cI.
He octabajte BpeIo macNo Ha shnopetot. TaBnuHaTa co BpeIo macNo MoKe da ce 3aapanat camn od ce6e.
-Бидевимаclotomozhe da
�ншпдягпocobesh
dodeka npknte HeSTO
BO Hero, BHMabajTe Ha
3aBeCnTe n PpeKpNBknte.
Mnjte rHn ФИТРNTe 3a MacHTN eHaaw MeceuHO. KapboHcKInTe ФИТPn Tpe6a Da ce MeHyBaat cekon 3 MeceuN.
- Ako peIDOBHOTO YNCTeHbETo Ha ypeIOT He ce n3BpHn Ha BpeMe, MoKe Da DoJde Do NOKap.
He KopncTeTe HeoHooTnpHn MaTepnjaN BO yIora Ha QnItep HamectO
Noctoeuknot cnntep.
KopncTeCe camO opnHaJIHn DeIOBn IInI deIOBn Ha6aBeHn OJ npOn3BOdnteJOT.
He ro Kopnctete npOn3BOoT 6e3 nItpen He rBaTe pIITpIte Odoeka npOn3BOoT pa60tn.
Ako ce nojabn oran, ncknyute rno od ctpyjha t ampeka acnpaTopoT n cnte dpyrnaapanapatn 3a rotBeHe. (N3BaTeTe ro npNKnyOKOT Ha ypeDoT oD I Tekep nIn ncknyute ro CO npeknHyBaoy).
Ako ce nojabn oran, nokpnjte rnilamehaTa. Hnkoraaw he rachete orah co Boda.
-Изва对接у по Клунокот odштекерпразда ro chstITE урedingи He ro chstete doideka paBOTn.
1 BaxHH ynpaTcTba 3a 6e36eHocTa N 3aHTnTaHa OKoJIHaTa
-Додакистовремно\
paobotatи acnnpaTopot\
и дуги урedenшто\
функционupaat Ha Hekoj\
dpyr BnД eHeprija OCBeH\
Ha eJektpuHa CTpyja,\
HeratubHNOT pINTUCOK BO\
OKOJIINHaTa He cMee Da\
6nde nOrolem od 4 Pa (4\
x 10 6apn).
-Bo okolnata kaide
што ce kopinctи уpeiodot,
н3дунITE racobи на
уpeinte shto paBOTAT ha
ma3yT Илп на rac, КAKO
што e co6hata rpealka,
Mopa дa bIDAT цelocho
ИЗОЛРаHI ON ИЗДУВHATA
цевка на уpeiodOT Илп мора
да bIDAT od xepmetuken
ТП.
Kora ro noBp3yBaTe dmHnot KaHaJ, ynoTpe6eTe ueBkn co npuehNk od 150 mm nnn 120 mm. Bpckata tpe6a da 6nde kOJky wTO e MOxHO pOKpaTKa N da HMa KOLKy wTO e MOxHO nOMaJIky 3rIIO6OBn.
Опасноct Od 3адушуваьe! Cnte mATEPиJaIи Od ambaJaxata Tpe6a da
Бидат подаleку od Deça. BHIMAHNE: Kora ce KopructaT co anapatn 3a rotBeHbe, npicTaHnTe DeIOBm MoKe Da Ce BxkeHTaT.
- Tekepot Ha acnnpaTopot He cMee da 6nde noBp3aH CO BeHTnlaucnoH KaHaJI N BO KOn HABNeIgYBa I dpyr YaI.
Ako acnnpatopot Ha ShnopetOT ce Kopnstn NCTOBpeMeHO co ypeDN Sto pa60tAT Ha nnH nHa dpyrN rOpNBa, BentnaJata BO nPoctopjata MoxkeBn Hema da 6nde doBOJHa. Oba npedynpeDyBaJIe He Baxn Kora acnnpatopot pa60tN 6e3 dImen KaHaj (pabotn co KapboHcKn Фплтep). - ПпсдmetиTe wTo ce CTaBehn Bp3 ypeIOT MOxe Da NaHnat. He cTabajTe HnSTO Bp3 ypeIOT.
Ctporo 3a6paHeto e da npabnte pfambnpaHe Ha xpaHaTa NOd acnnpaTopoT. INPEyPepyBAHbE: OTcTpaHete rN 3aHTTHNTe CIOEBN
1 BaxHn yNaTcTa 3a 6e36eHocTa n 3aHTntaTa Ha OKoJIHaTa
OBoj npOn3BOD He rN coOpJn ONaCHNTe n 3a6paHETn MaTePnJaJIi
HabeHeN BO „PeryIaTnBaTa 3a KOHTpOJa Ha OTnAdHa eIeKTpUHa I eIeKTpOHcKa onpeMa" n3daJeHa Od
MHHNCTepcTBOTO 3a JXNBOTHa cpeiHa n yp6aHn3aCnJa Ha PEny6nka TypuJa. Bo cknaD co peYIaTINBITE 3a OTpaHa eIeKTPnHa n eIeKTPoHcKa onPema (WEEE). OBoj anapat e Ipn3BeDeH oD pezIKnPaqKn N IOBTOpHO yNOTpe6JIbN BHCOKOKBaJIITeTHn DeIOBV n MaTePiJaII. 3aToa, He ro
ФрлajTe OBOJ npOn3BOD 3aEdHOCO Dpyr OTnad ODOMaKINCTBOTO Ha KpaJOT ONDHEROBNt BEK Ha TpaEHe.ODHeceTe ro Ha CObnpHO MeCTO 3a eJIeKTPnUHa INeIeKTPoHcKa ONpema.MoXeTe Da ce pacnpaWate Bo BaWataONHTIna KaDe NMa TaKBNco6nHmecTa.MoXeTe DaPOMOrHeTe Da Ce 3aSTNTINXIBOTHaTcpeDnHa INPnPOrDNITE pecypcn Co ToaSTTo Ke IIOndHecTe DoTpaEHnTe pOn3BOdN Ha pezIKnIPAHe.
1.3 Am6aJaxa
Am6aJxKaTa Ha OBOj npOn3BoD e HappaBeHa
od peuzknpaqukn MaTepnjaJIi.
AmbaJaxata Ha ypeDoT
fprte ja nOce6Ho BO cKnaI
co npOnncnte Ha HaNJIeXHnTe
opraHn 3a da 6nDe
yNOTpe6eHa BO pOueCOT Ha
peuzknpaHBe co ceI da ce
3aCyBa XNBOTHaTa CpeDnHa.
2 Onst n3rJeI
2.1 Перлес
60cm90cm
(Cnka 1)
(Cnka 2)
1.ДиMeH kaHaJI
2. KykniuTe
3. KoHTpoJIHa Ta6Ja
4. MetaJIenФИNTep 3a MACHOTIN
5. OcBeTnyBaHbe Ha npocToPOT 3a RotBeHbe
2.2 Texnuchno PodaToCu
3.6 Kora He e NOBp3aH dImeH KaHaI
Bo3dyxOT ceФnItpnpa npeky KapboHcKnOTФnItep n NOBTOPOu npKyInpa BO npocToPjata. KapboHcKnOTФnItep ce KopncTn Kora He e MoXHo Da ce KopncTn dImeH KaHaJ.
Kora ro kopncntte acnpaTopoT 6e3 dImen KaHaJ,OTcTaHete rN KpIuata BO aanTepot Ha dIMHNOT kaHaJ.
- OtctpaheTe ro fntepot 3a Machotn. 3a Da ro CTabnte KapboHcKnOT fntep, HameCTeTe Ro fntepot 3a KnaHnTe ceHTpnpajknro Ha nlaCTnUHNOT DeI Ha DBeTe CTPaHn Ha KyknsTeTo, a NotoA npuBpcTeTe Ro CBpTyBajknro HaedeCHO nn HaJeBO.
3aMeHeTe ro aIyMnHnymCKNOT cnTep 3a MaCHOTn.
4 YncteHbe n OdpjKyBaHbe

Ipei YnCTeHbeto n OdpKyBaHbeto Ha ypeIoT N3BaTeTo IpnKnyOkOT OJ WTEKeP NII INCKnyTe To IpeKNHyBaOT.
4.1Чистelve на anymnHmCKNOTФИТep 3a MacHTHn
OBojФnITeP rN 3aDpyBa
MaCHnTe YecTnUKN OJ BO3dYXOT.
AlyMnHnymcknTe FnItpn 3a
MaCHOTn MOKe Da ja CMeHaT
6oJaTa Kora Ke Ce n3MnJaT, Ho Toa e
HopMaJIHo HHe TpeBa Da ce 3aMeHaT.
(Cnka 4)
- Ппнше jo haHaanpei 6paBaTa Ha anymnHymcknot qntep 3a MACHOTNI.
Itoa MaKy NOBJeTe ro HaOny n 3BJeTe ro (Cnka 4). Bo cnpotNBHO qntepOT moKe da ce CBNTka. N3MnjTe rN uNCnJaKHeTe rN aIyMNHyMCKnte qntprn 3a MacHTH N BpaTeTe rN Ha MeCTO CneJeKn rN ropeHaBeDeHnTe yeKOpn no o6pAteH peDocJIe. OBoj qntep rN 3aDpxyBa MacHTe YecTnckn OD BO3dYXOT.

AlymHuymcknTeΦnItpnMOxKe Da Tn MneTe N BOMaunHa 3a CaIOBn.

BHIMAHNE
Ipn HopmaJHa
ynoTppe6a, YnCTeTe
rO qnTepoTe dHaSh
MeceHNo.
4.2 3aMeHa Ha Kap6oHcKInTe ΦnItpn
Филtpnte wTo ja otctpaHyBaat Mmnp36ata codpxaT jarlen (akTNBeH jarlen).Bo acnnapotopMopa Da nMa nФилtpn 3a MacHTn He3aBnCHO oD Toa daJInc Ce KopncTaT KapboHcKnФиltpn.
(Cn. 5)
- 3BaTe Tn aIyMnHnymCKnte cnTpn (Cnka 4).
- ɪn3baɪdete ro φɪnɪtepɒt BpTejɪn
- nɪrɪŋknte OD HɪNBO S Ha HɪNBO
- R Bo npaBeu Ha Ctpeɪknte Ha
- yacobhɪkOT. (Cʌnka 5).
CTaBeTe ro HOBnot qnItep cJeJeKn rN rOpHnte yeKOpn no o6paTeH peOcnei.
CTaBeTe r anymnHmCKnTe nItpn.
4 YncteHe n OdpjyBaHbe

BHUMAHNE
KapboHcKnOT qnIepe He Tpe6a da ce Mne.

BHIMAHHE
KapboHcKeTeФnTpN Tpe6a Da ce MeHyBaat cekon 3 Meceu.

BHUMAHNE
Kapбонски Фплтер може за набавите BO OBlaactehnte cepвисн.
5 MoNTnpa№Ha ypeDoT

PPEyPENEYBAHe!
IpeM MoHTnpaHbeto Ha ypeDoT, IpoUHTajTe rN yNaTCTBaTa 3a 6e36eHnOCT daEHN Bc yNaTCTBOTO 3a yNoTpe6a

PPEyPENEYBAIbE!
Ako He rMoHTnpaTe ⅢpaΦOBNTe nIi He rO 0fHKpate ypeoT Bo CKnad co OBne yNaTCTBa, Moxe da Dojde do eJektpuyeHydap.

IorneHHeTe Ha cTpaHn- 235 3a yNaTCTBa 3a noCTaByBaHbe.
3a MOHTnpaHBe Ha acnnpaTopoT jaBete ce BO Haj6JIncKnOT OBJaCTeH cepBnC.
Kopischnikot Има OndroBOPHOCT Да ГОпдгOTи MeCTOTO Каде ШTO Ke ceMOHTnpa acnnpaTOPOT И HerOBaTa eJIeKTPuHa ИнсталациJA.
KapboHcN qnTep ce Hnkada He npe.

ONPE3
3aMeHnTe KapboHcKe ФИЛТepe jegHOM CBaKa 3 Mececa.

ONPE3
Kapбонски Фплтер можete набавити Ковlaшненх срвиca.
5 Yrpaɪnə ypehaj

yN03OPEHbE!
Ppe nHcTaIaunje npouHTajTe
6e36eHocHe HnΦopMaunje DaTe y KOpncnUcKOM npnpuHky
yN03OPEHbE!

Ako He noctabute wpafoBe nIypehaj 3a npuBpuHnBahe y cKnaDy C OBm UnyTCTBnMa, MoKe doHn Do onaCHOCTN OeJeKtpnHe eHeprNiJe.

IornejaTe cTpaHnUy 235 3a ynyTCTBa 3a KOHФИгуразию.
3a yrgadby acnnpatopa o6patnte ce haj6nxxem OBnaushenom cepBnu-cy.
Kopncnkeo rgobapdnappeMnIokaunjN eKeTpny HcTa-naunj 3a acnpaTop.
5.1 Положaj ypehaja
(Cnka 6.)
- Пр монтпаьа мopa ce y3etny ob3np ydaJIbeHocT n3MeHy wTeДьaka n acnnapota. Ta ydaJIbeHocT Tpe6a da 6yde 65 cm (Cnka 6).
- YdaJIbeHocT ce Mopa MepITN OJ IOBpUHHe peWetKe 3a PJIINHcKe WTeIDbake,
-OD NOBpHnHe cTaKna 3a eJIeKtpnUHe WTeIbAke.
6 Peшаваные поблеса
| Решавашиpe\ пробLEMа | Изворни разлог Помон | |
| Уреший не ради. | Провите осигурач. Можда ща осigурач. празорно, праверпite и в ratipte ra. | |
| Уреший не ради. | Провите прикъчak на\ hanajaые[elektprinhom eheprinjom. | Нанон мржеб мора бити измeну 220 n 240 V. |
| Уреший не ради. | Провите прикъчak на\ hanajaые[elektprinhom eheprinjom. | Праверпite раде л� другу урешиу в вашою кухиьи. |
| Расveтуна лампица не ради. | Провите прикъчak на\ hanajaыe[elektprinhom eheprinjom. | Нанон мржеб морабити измeну 220 n 240 V. |
| Расveтуна лампица не ради. | Провите пекидач за лamпицу. | Пекидач за лamпицу мора сbitиу положау „Укъчени”. |
| Расveтуна лампица не ради. | Провите пампице. Лампe ueшajama морajу светлитп. | |
| Довod ваздуха у урешиу по- довотан. | Провите等相关的新сki фелтет. | У hopmaлим радим условима,等相关的新 фелтет за маслоны чости се наманы JPEGOM месуно. |
| Довod ваздуха у урешиу по- довотан. | Провите об\'днок ваздуха. | Пекидач за об\'дн, ваздуха т'reба за суху послжайу „Укъчени”. |
| Довod ваздуха у урешиу по- довотан. | Провите karбонскii phelтет. | Фелтete урешиа с karбонскii phelтетима т'reба замен'tи JPEGOM уз\'мe栓а у нормалим ус\'ловима. |
