GD80LM51SP - Lawn mower GREENWORKS - Free user manual and instructions
Find the device manual for free GD80LM51SP GREENWORKS in PDF.
User questions about GD80LM51SP GREENWORKS
0 question about this device. Answer the ones you know or ask your own.
Ask a new question about this device
Download the instructions for your Lawn mower in PDF format for free! Find your manual GD80LM51SP - GREENWORKS and take your electronic device back in hand. On this page are published all the documents necessary for the use of your device. GD80LM51SP by GREENWORKS.
USER MANUAL GD80LM51SP GREENWORKS
English (Original Instructions)
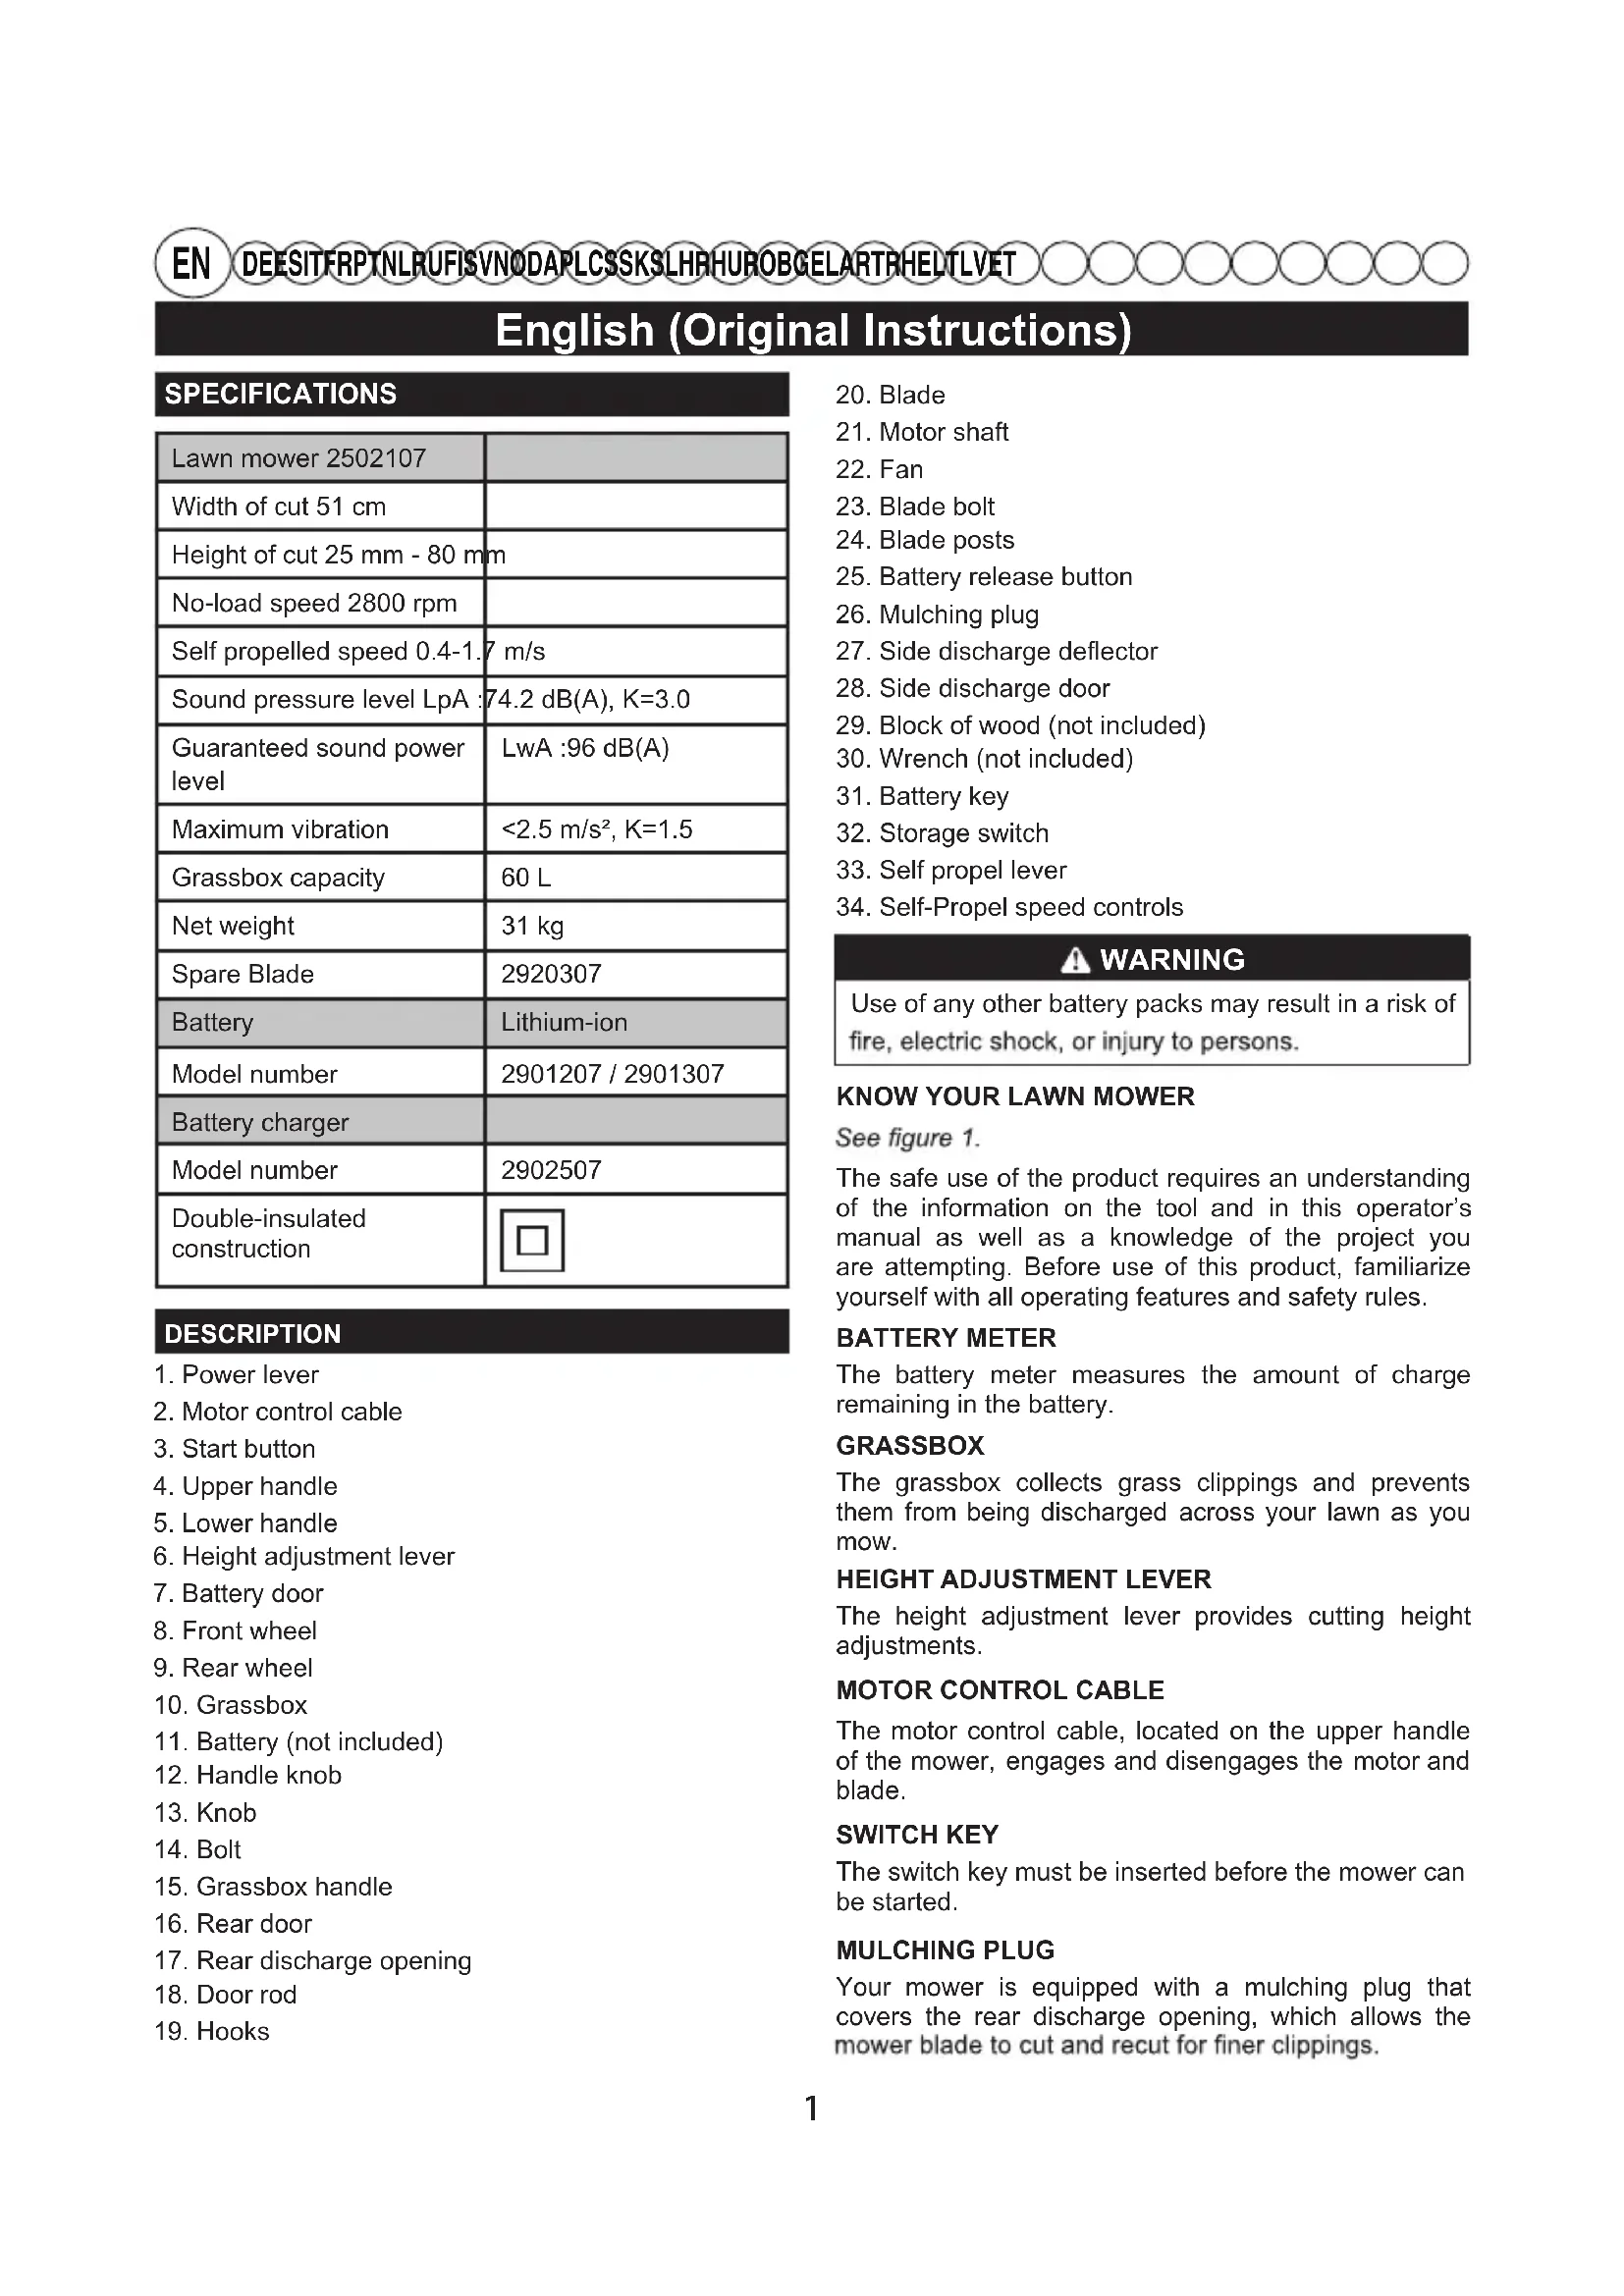
| SPECIFICATIONS | |
| Lawn mower 2502107 | |
| Width of cut 51 cm | |
| Height of cut 25 mm - 80 mm | |
| No-load speed 2800 rpm | |
| Self propelled speed 0.4-1.7 m/s | |
| Sound pressure level LpA :74.2 dB(A), K=3.0 | |
| Guaranteed sound power level | LwA :96 dB(A) |
| Maximum vibration | <2.5 m/s², K=1.5 |
| Grassbox capacity | 60 L |
| Net weight | 31 kg |
| Spare Blade | 2920307 |
| Battery | Lithium-ion |
| Model number | 2901207 / 2901307 |
| Battery charger | |
| Model number | 2902507 |
| Double-insulated construction | |
DESCRIPTION
- Power lever
- Motor control cable
3.Start button - Upper handle
- Lower handle
- Height adjustment lever
- Battery door
- Front wheel
- Rear wheel
- Grassbox
- Battery (not included)
- Handle knob
- Knob
- Bolt
- Grassbox handle
- Rear door
- Rear discharge opening
- Door rod
-
Hooks
-
Blade
- Motor shaft
- Fan
- Blade bolt
- Blade posts
- Battery release button
- Mulching plug
- Side discharge deflector
- Side discharge door
- Block of wood (not included)
- Wrench (not included)
- Battery key
- Storage switch
- Self propel lever
- Self-Propel speed controls

WARNING
Use of any other battery packs may result in a risk of fire, electric shock, or injury to persons.
KNOW YOUR LAWN MOWER
See figure 1.
The safe use of the product requires an understanding of the information on the tool and in this operator's manual as well as a knowledge of the project you are attempting. Before use of this product, familiarize yourself with all operating features and safety rules.
BATTERY METER
The battery meter measures the amount of charge remaining in the battery.
GRASSBOX
The grassbox collects grass clippings and prevents them from being discharged across your lawn as you mow.
HEIGHT ADJUSTMENT LEVER
The height adjustment lever provides cutting height adjustments.
MOTOR CONTROL CABLE
The motor control cable, located on the upper handle of the mower, engages and disengages the motor and blade.
SWITCH KEY
The switch key must be inserted before the mower can be started.
MULCHING PLUG
Your mower is equipped with a mulching plug that covers the rear discharge opening, which allows the mower blade to cut and recut for finer clippings.
SIDE DISCHARGE DEFLECTOR
Use the side discharge deflector on your mower when the grass is too high to mulch or when side discharging is preferred. The grass clippings produced when using the side discharge deflector are noticeably larger than those produced when using the mulching plug and side mulching plate.
SIDE DISCHARGE DOOR
Your mower is equipped with a door that covers the side discharge opening, which allows the mower blade to cut and recut the grass for finer clippings if the mulching plug is engaged, or otherwise sends the grass clippings to the collection bag.
ASSEMBLY
UNPACKING
This product requires assembly.
Carefully remove the product and any accessories from the box. Make sure that all items listed in the packing list are included.
WARNING
Do not use this product if any parts on the packing list are already assembled to your product when you unpack it. Parts on this list are not assembled to the product by the manufacturer and require customer installation. Use of a product that may have been improperly assembled could result in serious personal injury.
Inspect the product carefully to make sure no breakage or damage occurred during shipping.
- Do not discard the packing material until you have carefully inspected and satisfactorily operated the product.
If any parts are damaged or missing, please call your Greenworks tools service centre for assistance.
PACKING LIST
Lawn mower
Battery key
Grassbox
■ Mulching plug
Side discharge deflector
Operator's manual
Knobs
Bolts
WARNING
If any parts are damaged or missing do not operate this product until the parts are replaced. Using a product with damaged or missing parts could result in serious personal injury.
WARNING
Do not attempt to modify this product or create accessories not recommended for use with this product. Any such alteration or modification is misuse and could result in a hazardous condition leading to possible serious personal injury.
WARNING
Do not insert battery key until assembly is complete and you are ready to mow. Failure to comply could result in accidental starting and possible serious personal injury.
WARNING
To prevent accidental starting that could cause serious personal injury, always remove the battery pack from the product when assembling parts.
WARNING
Never operate the mower without the proper safety devices in place and working. Never operate the mower with damaged safety devices. Operation of this product with damaged or missing parts could result in serious personal injury.
UNFOLDING AND ADJUSTING LOWER HANDLE
See figure 2.
Pull and rotate the handle knobs 90^ on both sides to loosen the lower handles on both sides.
- Move the lower handles to the operating position. You may raise or lower the handle to a position comfortable for you. There are 3 positions for you to choose. Release the handle knobs to lock the lower handle into position.
NOTE: Ensure both sides are set at the same position for proper assembly.
INSTALLING THE UPPER HANDLE
See figure 3.
Align the mounting holes on the upper handle and the lower handle. Insert the carriage bolts and use
English (Original Instructions)
the knobs to tighten them. Repeat the operation on the other side.
INSTALLING THE GRASSBOX
See figure 4.
- Lift the rear discharge door.
- Lift the grass catcher by its handle and place under the rear discharge door so that the hooks on the grass catcher are seated on the door rod.
- Release the rear discharge door. When installed correctly, the hooks on the grass catcher will extend through the openings on the rear discharge door.
INSTALLING THE MULCHING PLUG
See figure 5.
- Lift and hold up the rear discharge door.
- Grasp the mulching plug by its handle and insert it at a slight angle, as shown.
Push the mulching plug securely into place.
Lower the rear discharge door.
INSTALLING SIDE DISCHARGE DEFLECTOR
See figure 6.
NOTE: When using the side discharge deflector, do not install the grassbox. The mulching plug should remain installed.
- Lift the side discharge door.
Align the hooks on the defl ector with the hinge rod on the underside of the door.
Lower the defl ector until the hooks are secured on the mulch door hinge rod. - Release the deflector and side discharge door.
SETTING BLADE HEIGHT
See figure 7.
When shipped, the wheels on the mower are set to a low-cutting position. Before using the mower for the first time, adjust the cutting position to the height best suited for your lawn. The average lawn should be between 38 mm and 51 mm during cool months and between 51 mm and 70 mm during hot months.
To adjust the blade height
To raise the blade height, grasp the height adjustment lever and move it toward the back of the mower.
To lower the blade height, grasp the height adjustment lever and move it toward the front of the mower.
OPERATION
A WARNING
Do not allow familiarity with products to make you careless. Remember that a careless fraction of a second is sufficient to inflict serious injury.
WARNING
Always wear eye protection. Failure to do so could result in objects being thrown into your eyes resulting in possible serious injury.
WARNING
Do not use any attachments or accessories not recommended by the manufacturer of this product. The use of attachments or accessories not recommended can result in serious personal injury.
WARNING
Always inspect mower for missing or damaged parts and blade for damage, uneven, or excessive wear prior to use. Using a product with damaged or missing parts could result in serious personal injury.
- Do not tilt the lawn mower when starting the engine or switching on the motor, unless the lawn mower has to be tilted for starting. In this case, do not tilt it more than absolutely necessary and lift only the part which is away from the operator.
- Do not start the engine when standing in front of the discharge chute.
- Do not put hands or feet near or under rotating parts. Always keep clear of the discharge opening.
For complete charging instructions, refer to the operator's manual for the battery packs and chargers listed in the specifications section.
TO INSTALL BATTERY PACK
See figure 8.
- Lift and hold up the battery door.
Align the battery with the mower's battery port.
Make sure the battery release button snaps in place and that battery is fully seated and secure in the mower before beginning operation.
Insert the battery key.
If the machine is not going to be used immediately, do not insert the battery key.
Close the door.
TO REMOVE BATTERY PACK
See figure 8.
- Release the power lever to stop the product.
- Open the battery door to access the battery compartment.
Remove the battery key.
Press the battery release button on the mower. This will cause the battery to raise out of the tool slightly. - Remove battery pack from the product.
STARTING/STOPPING THE MOWER
See figure 9.
Press and hold the safety ock-out button.
Pull the power lever upward to the handle to start the mower and release the safety lock-out button.
To stop the mower, release the power lever.
NOTE: A high-pitched noise and sparking may occur as the electric motor decelerates. This is normal.
SELF-PROPELLED MOWING
See Figure 9.
To engage the self-propelled feature:
Open the battery door.
Insert the battery.
Insert the battery key.
Pull the self propel lever upward to meet the handle.
To disengage the self-propelled feature:
- Release the self propel lever.
To adjust the speed of self-propelled feature:
Pull the variable speed control lever towards the Rabbit Symbol to increase speed.
- Push the variable speed control lever towards the Turtle Symbol to decrease speed.
MOWING TIPS
Make sure the lawn is clear of stones, sticks, wires, and other objects that could damage the lawn mower blades or motor. Do not mow over property stakes or other metal posts. Such objects could be accidentally thrown by the mower in any direction and cause serious personal injury to the operator and others.
For a healthy lawn, always cut off one-third or less of the total length of the grass.
- Do not cut wet grass, it will stick to the underside of
the deck and prevent proper bagging or mulching of grass clippings.
- New or thick grass may require a narrower cut or a higher cutting height.
Clean the underside of the mower deck after each use to remove grass clippings, leaves, dirt, and any other accumulated debris. - When cutting long grass, reduce walking speed to allow for more effective cutting and a proper discharge of the clippings.
NOTE: Always stop mower, allow blades to completely stop, and remove the battery key before cleaning underneath the mower.
SLOPE OPERATION
WARNING
Slopes are a major factor related to slip and fall accidents that can result in severe injury. Operation on slopes requires extra caution. If you feel uneasy on a slope, do not mow it. For your safety, do not attempt to mow slopes greater than 15 degrees.
Mow across the face of slopes, never up and down. Exercise extreme caution when changing direction on slopes.
- Watch for holes, ruts, rocks, hidden objects, or bumps which can cause you to slip or trip. Tall grass can hide obstacles. Remove all objects such as rocks, tree limbs, etc., which could be tripped over or thrown by the blade.
Always be sure of your footing. A slip and fall can cause serious personal injury. If you feel you are losing your balance, release the power lever immediately.
Do not mow near drop-offs, ditches, or embankments; you could lose your footing or balance.
- Stop mower, allow blade to completely stop, and remove battery key.
Lift the rear door. - Lift the grassbox by its handle to remove from mower.
Empty grass clippings. - Lift the rear door and reinstall the grassbox as described earlier in this manual.
English (Original Instructions)
MAINTENANCE
WARNING
Before performing any maintenance, make sure the mower battery and battery key are removed to avoid accidental starting and possible serious personal injury.
WARNING
To prevent accidental start-up or unauthorized use, the cordless lawn mower is equipped with a removable safety key. To completely disable the mower, the safety key should be removed and kept in a place away from the mower and out of the reach of children.
WARNING
When servicing, use only authorised replacement parts. Use of any other parts may create a hazard or cause product damage.
WARNING
Keep the motor and battery compartments free from grass, leaves or excessive grease. This will help reduce the risk of fire.
GENERAL MAINTENANCE
Before each use, inspect the entire product for damaged, missing, or loose parts such as screws, nuts, bolts, caps, etc.
Tighten securely all fasteners and caps and do not operate this product until all missing or damaged parts are replaced. Please call Greenworks tools customer service for assistance. Avoid using solvents when cleaning plastic parts. Most plastics are susceptible to damage from various types of commercial solvents and may be damaged by their use. Use clean cloths to remove dirt, dust, oil, grease, etc.
WARNING
To reduce the risk of damage and danger, never clean the tool with pressure washer or under running water.
WARNING
Store indoors only. Always remove the battery from mower and charger when cleaning or storing the tool.
WARNING
Do not at any time let brake fluids, gasoline, petroleum-based products, penetrating oils, etc., come in contact with plastic parts. Chemicals can damage, weaken, or destroy plastic which may result in serious personal injury.
Periodically check all nuts and bolts for proper tightness to ensure safe operation of the mower.
Wipe the mower clean with a dry cloth occasionally. Do not use water.
LUBRICATION
All of the bearings in this product are lubricated with a sufficient amount of high grade lubricant for the life of the unit under normal operating conditions. Therefore, no further bearing lubrication is required.
WARNING
Always protect hands by wearing heavy gloves and/or wrapping the cutting edges of the blade with rags and other material when performing blade maintenance. Contact with the blade could result in serious personal injury.
WARNING
Do not lubricate any of the wheel components. Lubrication may cause the wheel components to fail during use, which could result in serious personal injury to the operator and/or mower or property damage.
REPLACING THE CUTTING BLADE
See figure 11-12.
NOTE: Only use authorised replacement blades. Replace worn or damaged blades and bolts in sets to preserve balance.
- Stop the motor and remove the battery key. Allow blade to come to a complete stop.
Remove the battery pack.
Turn the mower on its side.
Wedge a block of wood between the blade and mower deck to prevent the blade from turning. - Loosen the blade bolt by turning it counterclockwise (as viewed from bottom of mower) using a 27mm wrench or socket (not provided).
Remove the blade bolt and blade. - Place the new blade on the shaft. Ensure blade is properly seated with shaft going through center
blade hole and the two blade posts on the fan inserted into their respective holes on the blade. Make sure it is installed with the curved ends pointing up toward the mower deck and not down toward the ground. When seated properly, the blade should be flat against the fan.
Thread the blade bolt on the shaft and finger tighten.
Torque the blade bolt down clockwise using a torque wrench (not provided) to ensure the bolt is properly tightened. The recommended torque for the blade bolt is 62.5~71.5 kgfcm (350-400 in.-lb.).
VERTICAL STORAGE FUNCTION
See figure 13.
- Remove the battery from the mower.
Remove the grass catcher bag. - Rotate the handle knobs to the unlocked position.
Lower the handle assembly and rotate the handle knobs to the locked position. Lift the mower by the front end to the vertical position.

WARNING
Always remove the battery from the mower before placing the unit in the vertical storage position.
STORAGE SWITCH
When the handle is rotated into the fully locked storage position, the mower is equipped with a storage switch that will disable the mower from running in the storage position. The storage switch does not replace the need to remove the safety key and battery to prevent accidental start-up or unauthorized use.
ENVIRONMENTAL PROTECTION
Environmental protection should be a priority of considerable importance when using the machine, for the benefit of both social coexistence and the environment in which we live. Try not to cause any disturbance to the surrounding area.
- Scrupulously comply with local regulations for the disposal of packaging, deteriorated parts or any elements with a strong environmental impact; this waste must not be disposed of as normal waste, it must be separated and taken to specified waste disposal centres where the material will be recycled.
- Scrupulously comply with local regulations for the disposal of waste materials after mowing.
At the time of decommissioning, do not pollute the environment with the machine, but hand it over to a disposal centre, in accordance with the local laws in force.
English (Original Instructions)
TROUBLESHOOTING
| Problem Possible cause | Solution | |
| Handle is not in position. | Carriage bolts are not seated properly. | Adjust the height of the handle and make sure the carriage bolts are seated properly. |
| Mower is not starting. | Battery is low in charge. Charge the battery. | |
| Battery is either inoperable or will not take a charge. | Replace the battery. | |
| The battery key is not inserted. Insert the battery key. | ||
| Mower is cutting grass unevenly. | Lawn is rough or uneven or cutting height not set properly. | Move the wheels to a higher position. All wheels must be placed in the same cutting height for the mower to cut evenly. |
| Mower is not mulching properly. | Wet grass clippings are sticking to the underside of the deck. | Wait until the grass dries before mowing. |
| Mower is hard to push. | High grass, rear of mower housing and blade are dragging in heavy grass, or cutting height too low. | Raise the cutting height. |
| Mower is not bagging properly. Cutting | height is set too low. Raise | the cutting height. |
| Mower is vibrating at higher speed. | Blade is unbalanced, excessively or unevenly worn. | Replace the blade. |
| Motor shaft is bent. | Stop the motor, remove isolator key and battery, disconnect the power source, and inspect for damage. Have it repaired by an authorised service center before restarting. | |
| Motor stops while cutting. | Cutting height is set too low. | Raise the cutting height. |
| Battery has no power. | Charge the battery. |
If these solutions do not solve the problem contact your authorised service dealer.
DIE INSTALLATION DES OBEREN GRIFFS
Siehe Abbildung 3.
No permitted in any time. No permit to eat, drink or have sex. No permit to be seen by a doctor. No permit to be seen by a nurse. No permit to be seen by a physician. No permit to be seen by a lawyer. No permit to be seen by a teacher. No permit to be seen by a student. No permit to be seen by a student. No permit to be seen by a student. No permit to be seen by a student. No permit to be seen by a student. No permit to be seen by a student. No permit to be seen by a student. No permit to be seen by a student. No permit to be seen by a student. No permit to be seen by a student. No permit to be seen by a student. No permit to be seen by a student
NOTA: Whenever you use this tool, you will be subject to the following requirements.
TEXHINUCKOE OBCJNUKUBAHNE
OCTOPOXHO
Ipepe npoBeHnem TexHnueeCKOrO 6cJyKuBaHn y6eintecb, YTO 6aTape ra30HOKocnKn I npedoxpaHnteHbHn KJIouh N3BneYeHb BO n36exaHne cnyauHoro 3anycka n cepbe3HbIX TpaBM.
OCTOPOXHO
IpyaHORnycka HnHcAHHOHOHORNcNoB3OBAHn 6ecnpoBDHa ra30HOKOCINKa OCHAeHa CbEMHBIM npedoxpAHTeNbHbIM KIOyOM. TTo6bl NnHOCTbBO BkHouNTb Ra3OHOKOCINKy, Heo6xOIMO nBNeYb npedoxpAHTeNbHbIKHOu XpaHtB ERO BdANOT ra3OHOKOCINK IN HeoCTyHOM DnI DeTeMceTe.
OCTOPOXHO
Pn npoBeHn texHueckoro 6cnyKuBaHn
ncnoJb3yIe TOnbKO peKOMeHIOBaHHbIe 3aNactN.
NcnoJb3OBaHne IIO6bIX dpynx qacte MoKet
co3daBaTb ONaCHocTb nII npuHrTb NOBpeXdHne
n3deJIra.
OCTOPOXHO
OuIaTe DnBraTeNb N OTCK akKymyTOpHoi 6aTapen OT TpaBbl, NCTbeB N IINHei CMa3Kn. 3To NOMoKET CHN3NTb ONaCHOCTb BO3rOpaHnI.
OBEEE OBCJYKBAHNE
Ipepe KaKdbIM HCNoJb3OBAHHe mpoBepbTe HnCTpyMeHT Ha OTCyTCTBne NOBpeXKeHn, HeIOCTaIOUx INN Ocna6uX DeTaNei (BnHTbl, raKn, 6oNTbl, KpbIuKN n T.I.
Haedxho 3aTAHnTe BCE KpeJIeHnI KpbIuKn I He NOJb3yIteCb IHCTpyMeHTOM Do 3AmHeBl BcEx yTepeHHbIX NIN NOBpeXdEHHbIX DeTanei.3a KOHCyIbTaunEoBpaUaIteCb BC LyK6by pa 60tbl KIne HTACmN KOMNaHm Greenworks tools. PnO uChTKe pIacTMaccOBbIX DeTaneI He DOnyckaetcR nCNoJb3ObaTb pactBOpNTen. BoJbUnHCTBO nIactMacc BOCpHmUHBO, YTObI IOBpeDITbcr OT pa3NHybIX TINOB KOMMepuecknx pactBopNTeNe I MoKET 6bITb NOBpeXdEHO IX NcNoIb3ObaHNEm. IIn OuchTKI OT rP3N, PbII, Macna, Cma3Kn I.T.I. nCNoJb3yIte npOTnpOuyHyToPAnky.
OCTOPOXHO
YTO6bI CHN3NTb PNCK NOBpeXDeHnI BO3HNKHOBeHnO nAChOH CNTyaCm, HNKoTa He OCHuaTe yCTPOJCTBO BODo NOD DaBHeHem NIN NOI pTOUHO BDOJ.
OCTOPOXHO
XpaHntb TOnIbKO B NOMEeHnN. Bcerda n3BNeKaIte aKkyMylTOp n3 r3oHOKOcNIKN 3apJdHOrO ycTpoiCTBa nepeD OYNCTKoN XpaHeHneM IHCTpyMeHTa.
OCTOPOXHO
He donyckaTe B3aHMOeJCTBnT TopMo3HbIX XnKoCTe, 6eH3nHa, HeFTeNpOdyKTOB, npOnTochbIX Macen n T.I. C pIaCTMaCCOBbIMn DeTajmXuMkAtb MoYr NOBpeJtB, Ocna6ntb Hn pa3pyuHTb PAcTMaccy, YTO MOKeT pINBeCTN K TAAKKIM TeJIeChbIM NOBpeXDeHnM.
PepnoDnueckn npOBepaTb BCE 6oNTbI n 3aDbNkKn Dnna HAnEkae nnOTHOCTn, YTObI rapaHTnpoBaTb 6e3onacHoe DeiCTBne KocNJkn.
BbItpaTb Kocnky, uCToN u cyXoN TkaHbIO uHorda. He nCNoJIb3OBaTb BODy.
CMA3bIBAHNE
Bce OTHOWeHnB 3TOM N3dEeHN - CMa3aHbI C IOCTaTOUHbIM KOJNUeCTBOM CMA3KN BBICWERO KaueCTBa DnA KIN3Hn EINHnCbI NOD HOPMaNbHBiM N3KcNJIyatauONHHbIMn peKmAmn. NoTOMy, HnKaKaJ IaNbHeNsa CMA3Ka OTHOWeHn, He Tpe6ByETcR.
OCTOPOXHO
Bcerda 3aunntb pykn, HaneBaTjKeIbe nepaTk n-nnn o6eptbBaJ ne3Bn Tprkamn n DpymM MaTePnaIOM npN BbINOnHeHm O6cnyKNaHn Jne3Bn. B pe3yNbTaTe KOHTa C pexKyum M Je3BnEM MoXHo NoJyUHTb cepBe3HyTO TaPbMy.
OCTOPOXHO
He Cma3bIbTaHnKaKoN H3 KOMNoHEHTOB KOJeca. Cma3ka MoKeT npNBecTu K c6oH B pa6ote KOMNoHEHTOB KOJeca BO BpeMcCTpNkN, YTO MoKeT npNBecTu K cepBe3HO TpaBMe OepaTopa N/nn NOBpeXdEHHO Ra3OHOKocNKn Nn DpyrOro NMyuEcTba.
3AMEHA COKPAUJAIOJEO JIe3BnJ
CM.puc.11-12.
INPMEYAHNE: NcnoJb3yIe TOnbko pa3peWeHHbIE 3aNaChBle pexyuJe ne3Bn. 3aMeHInTe n3HoWeHHbIE INN NOBpeXdEHHbIe peKyuJe ne3Bn I 6oNTbIB KOMnJIeKTe, qTo6bl ObecneuHb 6anaHCnpOBky.
OCTaHOBnTe DnIgATEIb n3BNEKeITe npedoxpaHnteIbHbN KIIOU. DoXdNTecb nonHoro octaHOBa peKyueo ne3BnI.
CHIMITE aKkymyIaTOpHyIO 6aTapeIO.
NoBepHyTb KocnKy Ha ee cToPOHy.
BtncHyTb 6nok dpeBecnHb MeJy ne3Bnem n naIy6oN KocnKn, YTO6bl npedotBpaNTb ne3Bne OT ppeBpaueHn.
IcnoJb3yKaIOHHa 27 MM (He BXOINT B KOMNJIeKT NOCTABKN), Ocna6bTe 6oNT NINbHOrO DnCKa NOBOPOTm IpOTNB YacOBOn CTpeJKn, ECNI CMOTpeTb C HIXKHeY qACTn Ra3OHOKOcNkN.
CHIMITE 60NT NINbHoro DNCKa n cam DNCK.
YcTaHOBInTe HOBbI NINbHbI DnCK Ha BaI. Y6eINTECb, YTO INNbHbI DnCK npaBnHbHO CnDHT Ha Bany, npoxOJaIeM Upe3 CEHTpaJIbHOE OTBepCTne INNbHOrO DNCKa, IN DaB WtBIpHa BeHTNlATope BCTaBJIeHbIB COOTBetCTByIOUne OTBepCTNa HnNbHOM DnCKe. Y6eINTECb, YTO OH YcTAHOBJIeH C 3aHyTbIMN KOHcAMN BBepx B CTOpOHy OCHOBAHRA30HOKOcNIKN, a He BHN3 K 3emNe. Ppi npaBnHbOM pa3MeueHm HAnpOTNB BeHTNlAToPa DOJIKHa HaxODNTbcrPiOckar qAcTb DnCKa.
HaxNBte 6oNT NnIbHO rCKa Ha BaJI n 3aTnHTe naIbUamN.
3aTAHnTe raKy pexkyIero ne3Bna raeuHbIM KInOyOM (He npinaraetc), Bpauaa no yacoboi cTpeJIke, YTO6bIObeCneUHTb HADNEXKaUyIO 3aTAAK Ky 6oNTa. PeKOMeHdyEmbIKpyTAnM MOMENT npn 3aTARBaHNr RaKn peKyuIero ne3Bna COCTABnRE 62,5~71,5 Krc-CM (350-400 DIOHMOB/ΦyHT).
XPAHEHNE B BEPTUKKAJbHOM NOJIOXEHIN
CM.puc.13.
CHIMITE 6aTaapeo c ra30HOKOcnKn.
OuHCTnTe TpaBoc6OpHNK.
■NoBepHnTe pyKn 6JIOKInpOBKn B noJIOKeHne «OTKpbITo».
Onyctnte pyky nIOBepHnTe pykN 6JIOKIpOBKn B noJoxKeHne «3aKpbITo>.
IOnHnMnte ra3OHOKocuKy 3a nepeHn KpaB BepTkaJbHoe nOIOKeHne.
OCTOPOXHO
Chmnte 6atapeo c ra30HOKOcNIKn nepei NOCTaHOBKO yctpoNCTBa Ha XpaHeHne B BePTKajbHOM NIOJXeHN.
NEPEKIOUATEB B NCXOJHOE NOJIOXEHNE
Korda pykoTka BpaaaetcB INCXoHoe NOJoxeHne
NoHOn KCaun, KOcnIKA OChauaetc
peeknouatelem B INCXoHoe NOJoxeHne, KOtOpBb
OTKnIOHT cyHKUIO nepemeueHn KocnIKN B
INCXoHoe noJoxeHne xpaehn. IpeeknOuatelb
B INCXoHoe noJoxeHne He OCBO6OJaET OT
HeoXoDMOCCTn CHrTHa KInOua 6e3ONaCHOCTn
6atape nIpyedTbpAseHn O T CnyHOrO 3anycka
nn Heo3BOeHHoro NcNoJIb3OBaHn.
OXPAHA OKPYXKAIOUEN CPEdbI
OxpaHa OkpyKaHoueI cpebl DOJIkHA RbJIaTbcra CyueCTBeHHbIM IN nepBOoHepeDHBIM acNeKTOM npIN OJb3OBaHN MaUNHO, BO 6naro YenOBeecKOro 6BcEcbN OKpyKaHoueI cpebl, B KOTOpON Mbl XNBem. CtapaiTeCb He 6ecnOKoNTb OkpyKaHoux.
Ctporo co6nOdaIte MeCTHbIe HOpMbI no yTnIn3aunyNakOBKn, MaceI, 6eHNHa, fNbTpOB, NOBpeXdEHHbIX YAcTei NN NIObix 3JeMeHTOB CO 3NaHTeINbHbIM BnnaHHe Na OKpyKaIOUcO CpeY; 3TN OTXdI He DOJKNbI Bbl6paCbIBaTbcra C 6bITobIM MyCopOM, a Co6npaTbcr OTdEnbHO n nepeDaBaTbcR B cneuaNBbIe CEHTpbI c6opa OTxODB, BblONHryIOuine IN nepepa60TKy.
Ctporo co6nOaIte DeIcTByIOuIe Ha MeCTHOM ypOBHe npabINla NO BbIBO3y OTXoIOB pa60Tbl.
Iocne 3aBepseHn Cpoka cnYk6bl MaunHbI He Bbl6paCbBaIte ee, a o6paTntecb UeHTp c6opa OTXoOB B COOTBETCTBUN C DeNCTBYUIM MecTHbIM 3aKHOdaTeJIbCTBOM.
Pycckn (IpeBOD n3 nepBOHaayalbHbIX IHCTpyKcN)
TOMMING AV GRESSBOKSEN
Se figure 10.
- Stopp gressklipperen, la kniven stoppe helt og fjern
GENERELT VEDLIKEHOLD
ISAE TING AF GRAESBOKSEN
Sefigur4.
TOMNING AF GRAESBOKSEN
Sefigur10.
INSTALACJA KOSZA NA TRAWE
Zobacz rysunek 4.
OPRÖZNIANIE KOSZA NA TRAWE
Zobacz rysunek 10.
N3BAKDAHE HA BATEPNYTA
BuxΦaypa8.
OtnycheTe NoCTa 3a 3axpaHbaHe, 3a Da cnpeTe npoDyKta.
OTbopeTe BpaTnUkata 3a akymyNaTopHaTa 6aTepe, 3a da CTnHete Do HeHOTO OTdJeHHe.
OctpaHete KnHouHa aKymyNaTOpHaTa 6aTePna.
HaTnchete 6yToHa 3a OcBo6oxkDaBaHe Ha 6aTepeYrTa OT KocayKaTa. AkymyIaTopHaTa 6aTepeNJIeKo Ue Ce NODaJe HABbH OTypeJa.
■ИЗва对接е 6а对接иета от порукта.
CTAPTIPAHE CINPAHE HA KOCAHKATA
Bux Duypa 9.
HaTnchete n 3aIpbkTe qKcaTopa Ha cnycbKa.
IpbHHeTe DpocenHnnoCT HArOpE KbM pkoXBaTKaTa, 3a Da CTapTnpaTe KocayKaTa N da OCbo6oJnteФKcAtopa Ha cnycbka.
3a da cnpeTe KocaykaTata, OTnycheTe KOHTpONHn npebKNIOuBaTeJEN IOCT.
3A6EJEXKA: Pn cnpaHTo Ha eNekTpOMToPAe Bb3MOxHO da ce yye cnIeH uym n da ce NOBRT NCKPN. Toba e HopMaHNo.
KOCEHE C ABTOMATNUHO IPNBUNBXBAHE
ex. fuaypa 9.
3a da akTnBnpaTe yHKnraTa 3a aBTOMaTHHO npDvBXBaHe:
J 1 J 1 J 1 J 1 J 1 J 1 J 1 J 1 J 1 J 1 J 1 J 1 J 1 J 1 J 1 J 1 J 1 J 1 J 1 J 1 J 1 J 1 J 1 J 1 J 1 J 1 J 1 J 1 J 1 J 1 J 1 J 1 J 1 J 1 J
C
e 1
()
JU 1JU JU UJU UJU UJU UJU UJU UJU UJU UJU UJU UJU UJU UJU UJU UJU UJU UJU UJU UJU UJU UJU UJU UJU UJU UJU UJU UJU UJU UJU UJU UJU UJU UJU UJU UJ
UCC
1JU
1 1
A C
JU 1 JU 1 JU 1 JU 1 JU 1 JU 1 JU 1 JU 1 JU 1 JU 1 JU 1 JU 1 JU 1 JU 1 JU 1 JU 1 JU 1 JU 1 JU 1 JU 1 JU 1 JU 1 JU 1 JU 1 JU 1 JU 1
L 1uuee eolso uieo o o o o
JU 1u JU 1u 1u 1u 1u 1u 1u 1u
Gg Gg Gg Gg Gg Gg Gg Gg Gg Gg Gg Gg Gg Gg Gg Gg Gg Gg Gg Gg Gg Gg Gg Gg Gg Gg Gg Gg Gg Gg Gg Gg Gg Gg Gg Gg Gg Gg Gg Gg Gg Gg Gg Gg Gg Gg Gg Gg Gg Gg Gg
354
L
a
1
1
A C
1 1 1 1 1 1 1 1 1 1 1 1 1 1 1 1 1 1 1 1 1 1 1 1 1 1 1 1 1 1 1 1
A C
JcJgJgJgJgJgJgJgJgJgJgJgJgJgJgJgJgJgJgJgJgJgJgJgJgJgJgJgJgJgJgJgJgJgJgJgJgJgJgJgJgJgJgJgJgJgJgJgJg
A
J 1 J 1 J 1 J 1 J 1 J 1 J 1 J 1 J 1 J 1 J 1 J 1 J 1 J 1 J 1 J 1 J 1 J 1 J 1 J 1 J 1 J 1 J 1 J 1 J 1 J 1 J 1 J 1 J 1 J 1 J 1 J 1 J 1 J 1 J
A
J 1 J 1 J 1 J 1 J 1 J 1 J 1 J 1 J 1 J 1 J 1 J 1 J 1 J 1 J 1 J 1 J 1 J 1 J 1 J 1 J 1 J 1 J 1 J 1 J 1 J 1 J 1 J 1 J 1 J 1 J 1 J 1 J 1 J 1 J
J 1s J s
2.
1 90° 28
1 11111111111111111111111111111111111
puee: 10000000000000000000000000000000000000000000000000
y
3.
1 1 1 1 1 1 1 1 1 1 1 1 1 1 1 1 1 1 1 1 1 1 1 1 1 1 1 1 1 1 1 1 1
()
C
4.
1
1 1
1 1 1 1 1 1 1 1 1 1 1 1 1 1 1 1 1 1 1
y
5.
1
1 1
1
1
y
6.
Jc: E u LcLgUu Uusu UeUu Uu
1
1 1
L
C. 1,2,3,4 1,2,3,4 1,2,3,4 .
7.
E 11111111111111111111111111111111111111111111111111
jcb1c
Jjgls 1nle Ljua Jpaal jie juaa b Jy
1 1
J
A C:
JU 1 JU 1 JU 1 JU 1 JU 1 JU 1 JU 1 JU 1 JU 1 JU 1
A C:
1s 1 s 1 s 1 s 1 s 1 s 1 s 1 s 1 s 1 s 1 s 1 s 1 s 1 s 1 s
A C
J 1s Jg jg Jg Jg Jg Jg Jg Jg Jg Jg Jg Jg Jg Jg Jg Jg Jg Jg Jg Jg Jg Jg Jg Jg Jg Jg Jg Jg Jg Jg Jg Jg Jg Jg Jg Jg Jg Jg Jg Jg Jg Jg
A C
1 1 1 1 1 1 1 1 1 1 1 1 1 1 1 1 1 1 1 1 1 1 1 1 1 1 1 1 1 1 1 1 1 1 1 1
JU 1JU JU UJU UJU UJU UJU UJU UJU UJU UJU UJU UJU UJU UJU UJU UJU UJU UJU UJU UJU UJU UJU UJU UJU UJU UJU UJU UJU UJU UJU UJU UJU UJU UJU UJU UJ
山
JU 1JU 1JU
JU 10000000000000000000000000000000000000000000
1 1 1 1 1 1 1 1 1 1 1 1 1 1 1 1 1 1 1 1 1 1 1 1 1 1 1 1 1 1 1 1 1 1 1 1 1 1 1 1 1 1 1
1 1
J 1 J 1 J 1 J 1 J 1 J 1 J 1 J 1
sul 2
10.
1g 1
L
1
j
1 1
1
A
J 1 J 1 J 1 J 1 J 1 J 1 J 1 J 1 J 1 J 1 J 1 J 1 J 1 J 1 J 1 J 1 J 1 J 1 J 1 J 1 J 1 J 1 J 1 J 1 J 1 J 1 J 1 J 1 J 1 J 1 J 1 J 1 J 1 J 1 J
()
A C
Jue Cie JUe JIe JIe JIe JIe JIe JIe JIe JIe JIe JIe JIe JIe JIe JIe JIe JIe JIe JIe JIe JIe JIe JIe JIe JIe JIe JIe JIe JIe JIe JIe JIe JIe JIe JI.e JI.e JI.e JI.e
A
e 11111111111111111111111111111
A C
1 1 1 1 1 1 1 1 1 1 1 1 1 1 1 1 1 1 1 1 1 1 1 1
Uuuauiu Ueip
JU J U LcLpLipuLpUeUeUeUeUeUeUeUeUeUeUeUeUeUeUeUeUeUeUeUeUeUeUeUeUeUeUeUeUeUeUeUeUeUeUeUeUeUeUeUeUeUeUeUeUeUeUeUeUeUeU
J 1 1 1 1 1 1 1 1 1 1 1 1 1 1 1 1 1 1 1 1 1 1 1 1 1 1 1 1 1 1 1 1 1 1 1 1 1 1 1 1 1 1 1 1 1 1 1 1 1 1 0
A
J 1
A
j 1000000000000000000000000000000000000000000
A
11 11 11 11 11 11 11 11 11 11 11 11 11 11 11 11 11 11 11 11 11 11 11 11 11 11 11 11 11 11 11 11 11 1
i 1
C 1
1000 1111 1111 1111 1111 1111 1111
#
J 1 J 1 J 1 J 1 J 1 J 1 J 1 J 1 J 1 J 1 J 1 J 1 J 1 J 1 J 1 J 1 J 1 J 1 J 1 J 1 J 1 J 1 J 1 J 1
1
11-12.
jzjzj 1
1g 1jgsy jge pae 1jbalrg. 1r 1j
10
L
1 1
()
1
1 1 1 1 1 1 1 1 1 1 1 1 1 1 1 1 1 1 1 1 1 1 1 1 1 1 1 1 1 1 1 1 1 1 1 1 1 1 1 1 1 1 1 1 1 1 1 1 1 1 1
JpWpaJUeJgEJLJepaJgJb0uJUa
1 60-71.5 350-400
()
U.
s
13.
1
山
.
E
E
A C
E 1
#
E 1111111111111111111111111111111111111111
Ucpso Uusisso
CIM HAZNESINB BOSALTILMASI
Bakiniz sekil 10.
wnn nn nnn nn nnn nn nnn nn nnn nn nnn nn nnn nn nnn nn nnn nn.
#
nno nnnnnnnnnnnnnnnn
nTUN
nntnx niosn tux wato innyn nn 1970 nntunuDUNN NOON.
n nn nnnn
n nn nnnnnnnnnnnnnnnnnnnnnnnnnnnnnnnnnnnnnnnnnnnnnnnnnnnnnnnnnnnnnnnnnnnnnnnnnnnnnnnnnnnnnnnnnnnnnnnnnnnnnnnnnnn
n nn n
n nn nnn, nan nnn nn nn nn nn nn nn.
nTTn 1017
nannnn ninn nn nnn nn nnn nnn nn nnn nnn nnn nnn nnn nnn nnn nnn nnn nnn nnn nnn nnn nnn nnn nnn nnn nnn nnn nnn nnn nnn nnn nnn nnn nnn nnn nnn nnn nnn nnn nnn nnn nnn nnn
noo 7n
777777777777777777777777777777777777777777777777777777
y (n xin n)
Tn ytn
nnnnn nn nn nn nn nn nn nn nn nn nn nn nn nn nn nn nn nn nn nn nn nn nn nn nn nn nn nn nn nn nn nn nn nn nn nn nn nn nn nn nn nn nn nn nn nn nn nn nn nn nn nn nn nn nn nn nn nn nn nn nn nn nn nn nn nn nn nn nn nn nn nn nn nn nn nn nn nn nn nn nn nn nn nn nn nn nn nn nn nn nn nn nn nn nn nn nn nn nn nn nn
#
#
y
n nn nn nn nn nn nn nn nn nn nn nn nn nn nn nn nn nn nn nn nn nn nn nn nn nn nn nn nn nn nn nn nn nn nn nn nn nn nn nn nn nn nn nn nn nn nn nn nn nn nn nn nn nn nn nn nn nn nn nn nn nn nn nn nn nn nn nn nn nn nn nn nn nn nn nn nn nn nn nn nn nn nn nn nn nn nn nn nn nn nn nn nn nn nn nn nn nn nn nn nn
#
77 7777777777777777777777777777777777777777777777
Tn nn nnnnnnnnnnnnnnnnnnnnnnnnnnnnnnnnnnnnnnnnnnnnnnnnnnnnnnnnnnnnnnnnnnnnnnnnnnnnnnnnnnnnnnnnnnnnnnnnnnnnnnnnnnnnnnnnn
n nn nnnnnnnnnnnnnnnnnnnnnnnnnnnnnnnnnnnnnnnnnnnnnnnnnnnnnnnnnnnnnnnnnnnnnnnnnnnnnnnnnnnnnnnnnnnnnnnnnnnnnnnnnnnnn
Greenworks Tools
wn noh
nONnn Tux
nann noh
TUN
nTnOi
10077777777
n777nnna
1
#
Xn n nn no n no n no n no n no n no n no n no n no n no n no n no n no n no n no n no n no n no n no n no n no n no n no n no n no n no n no n no n no n no n no n no n no n no n no n no n no n no n no n no n no n no n no n no n no n no n no n no n no n no n no
#
x7 nnon nn nn x 7nn nn nn nn nn nn nn nn nn nn nn nn nn nn nn nn nn nn nn nn nn nn nn nn nn nn nn nn nn nn nn nn nn nn nn nn nn nn nn nn nn nn nn nn nn nn nn nn nn nn nn nn nn nn nn nn nn nn nn nn nn nn nn nn nn nn nn nn nn nn nn nn nn nn nn nn nn nn nn nn nn nn nn nn nn nn nn nn nn nn nn nn nn nn nn nn nn nn nn nn nn
#
n nn nnn noyn y noon nn nn nn nn nn nn nn nn nn nn nn nn nn nn nn nn nn nn nn nn nn nn nn nn nn nn nn nn nn nn nn nn nn nn nn nn nn nn nn nn nn nn nn nn nn nn nn nn nn nn nn nn nn nn nn nn nn nn nn nn nn nn nn nn nn nn nn nn nn nn nn nn nn nn nn nn nn nn nn nn nn nn nn nn nn nn nn nn nn nn nn nn nn nn nn nn nn nn nn nn noon noon noon noon noon noon noon noon noon noon noon noon noon noon noon noon noon noon noon noon noon noon noon noon noon noon noon noon noon noon noon noon noon noon noon noon noon noon noon noon noon noon noon noon noon noon noon noon noon noon noom noom noom noom noom noom noom noom noom noom noom noom noom noom noom noom noom noom noom noom noom noom noom noom noom noom noom noom noom noom noom noom noom noom noom noom noom noom noom noom noom noom noom noom noom noom noom noom noom noom noemnoe
#
yyn noyn noyn noyn yyn noyn noyn noyn noyn noyn noyn noyn noyn noyn noyn noyn noyn noyn noyn noyn noyn noyn noyn noyn noyn noyn noyn noyn noyn noyn noyn noyn noyn noyn noyn noyn noyn noyn noyn noyn noyn noyn noyn noyn noyn noyn noyn noyn noyn noyn noyn noyn noyn noyn noyn
#
TNTNNTNNONNINNOYNOYNIIGNDIIT, NITNNTNIUNYNNNNNEYNNW.
N7 non nn onnn nyn nn nynn nn N7 N7 177ninn nn. nnn nn nnn nn nnn nn nnn
n7 n7 nn nn nn nn nn nn nn nn nn nn nn nn nn nn nn nn nn nn nn nn nn nn nn nn nn nn nn nn nn nn nn nn nn nn nn nn nn nn nn nn nn nn nn nn nn nn nn nn nn nn nn nn nn nn nn nn nn nn nn nn nn nn nn nn nn nn nn nn nn nn nn nn nn nn nn nn nn nn nn nn nn nn nn nn nn nn nn nn nn nn nn nn nn nn nn nn nn nn nn nn
77 77 n7n 77 n7n 77 n7n 77 n7n.
yinnn nn nnn, nnnn nnne nohnnn
noon noh
77 8.
n nn no nnnn nn
nno no17nn no17nn nnonn.
1X unno nnnn nohnn nn nnnn nn nnnn
nno nnn nohyn.
no nnnn nn no nnnn, n no nn no nnn no
OaNn
nno
77 8.
n nn nnnnnnnnnnnnnnnnnnnnn
nn nn noh n noh.
n nn no n
wnn nn nnnn nnnn nnnn nnnn nnnn nnnn nnnn.
nnnnn
ywnn, nnnn nn nnnn nnnn nn nnnn nn nnnn nn.
n n nn nnnn nn nnnn nn nnnn nn nnnn nn nnnn nn nnnn nn nnnn nn nnnn nn nnnn nn nnnn nn nnnn nn nnnn nn nnnn nn nnnn nn nnnn nn nnnn nn nnnn nn nnnn nn nnnn nn nnnn nn nnnn nn nnnn nn nnnn nn nnnn nn nnnn nn nnnnn nn nnnn nn nnnn nn nnnn nn nnnn nn nnnn nn nnnn nn nnnn nn nnnn nn nnnn nn nnnn nn nnnn nn nnnn nn nnnn nn nnnn nn nnnn nn nnnn nn nnnn nn nnnn nn nnnn nn nnnn nn
y (n xin n)
Use of any other battery packs may result in a risk of fire, electric shock, or injury to persons.
IEPAZISTIETSAVUZALESPLAVEJU
Skatiet 1. attelu.
All new Greenworks Tools machinery is supplied with a 2 year parts and labour warranty from original date of purchase. A 30 day warranty is available for machines used professionally as Greenworks Tools are designed primarily to be used by DIY consumers. This warranty is non-transferable.
LIMITATIONS
This warranty applies only to defective parts/components and does not cover repairs due to:
- Normal wear and tear.
- Routine tune up or adjustment
- Damage caused by improper handling/abuse/misuse or neglect.
- Overheating due to lack of maintenance
- Damage due to fittings/fasteners becoming loose/detached through lack of maintenance.
- Damage caused by cleaning with water.
- Machines serviced or repaired by non-authorised Greenworks Tools service centres.
- Machines incorrectly assembled or adjusted.
- Damage caused by improper use of the machine.
- Damage caused by improper winterisation (pressure washers)
-
Items considered as consumable parts are not normally covered by the warranty, including but not limited to:
-
Batteries
Electric cables - Blade and blade assemblies
- Belts
- Filters
-
Chucks and tool holders
-
Certain products may contain components such as engines, transmissions from an alternative manufacturer, these items will be subject to the appropriate manufacturer's warranty policy except where Greenworks Tools Europe GmbH agrees to underwrite any claims outside the said manufacturer's warranty period.
- Second hand goods are not covered under this warranty policy.
- The fitting of spares, replacements or extra components which are not supplied or approved by Greenworks Tools Europe GmbH.
Warranty
To claim a warranty on any product under this policy a proof of original purchase is required. Credit card statement do not qualify as sufficient proof of purchase. In the first instance of a warranty event occurring the consumer should return the product to the original place of purchase with their proof of purchase. The machine will be sent to our central service facility and an inspection made. If the machine be found to be at fault it will be repaired and sent back to the address of the consumer free of charge. Machines that retail for less than €100 euros including sales taxes will generally be replaced.
If the central service facility finds that machine is not found to be at fault then the consumer will be advised they will need to pay for the cost of the repair.
This warranty policy is subject to change from time to time to accommodate the needs of new products. A copy of the latest warranty policy will be available at www.greenworkstools.eu.
GEWÄHRLEISTUNGSRIST
Greenworks Tools garanti for hobbymaskiner
GARANTIPERIOD
- UuurjUuuuue / uuuuuuuuuuuuuuuuuuuuuuuuuuuuuuuuuuuuuuuuuuuuuuuuuuuuuuuuuuuuuuuuuuuuuuuuuuuuuuuuuuuuuuuuuuuuuuuuuuuuuuuuuuuuuuuuuuuuuuuuuuuuuuuuuuuuuuuuuuuuuuuuuuuuuuuuuuuuuuuuuuuuuuuuuuuuuuuUU
6.1
10:UuUuuuue uuuuuuuuuuuuuuuuuuuuuuuuuuuuuuuuuuuuuuuuuuuuuuuuuuuuuuuuuuuuuuuuuuuuuuuuuuuuuuuuuuuuuuuuuuuuuuuuuuuuuuuuuuuuuuuuuuuuuuuuuuuuuuuuuuuuuuuuuuuuuuuuuUU
- 1u, u, u, u, u, u, u, u, u, u, u, u, u, u, u, u, u, u, u, u, u, u, u, u, u, u, u, u, u, u, u, u, u, u, u, u, u, u, u, u, u, u, u, u, u, u, u, u, u, u, u,
| x - 2| = | x - 4| = 1
1
·
1
心
·
Uus uusuusususususususususususususususususususususususususususususususususususususususususususususususususususususususususususususususususus
1 1
U 1
www.greenworkstools.eu.

EC DECLARATION OF CONFORMITY FOR MACHINERY
Manufacturer:Changzhou Globe Co., Ltd.
Address: No.65 Xinggang Road Zhonglou Zone Changzhou, Jiangsu 213000
P.R.China
Name and address of the person authorised to compile the technical file:
Name: Gary Gao Naixin (Director of Outdoor Power Equipment)
Address: Greenworks Tools Europe GmbH
Wankelstrasse 40.
50996 Koln
Germany
Herewith we declare that the product
CORDLESS MOWER
Category
2503107
Model.... Serial nu
See product rating label
Year of Construction
See product rating label
-
is in conformity with the relevant provisions of the Machinery Directive (2006/42/EC)
-
is in conformity with the provisions of the following other EC-Directive
2014/30/EU (EMC-Directive), and
2000/14/EC (Noise-Directive) incl. modifications (2005/88/EC)
And furthermore, we declare that
- the following (parts/clauses of) European harmonised standards have been used
Measured sound power level
LWA:89.4dB(A)
Guaranteed sound power level
96 dB(A)
Conformity assessment method to Annex VI/ Directive 2000/14/EC
EC type approval to 2000/14/EC : Intertek Testing & Certification Co., Ltd. (NB0359)
Place, date: Changzhou, 22/07/2016
MIET) Vice president of Engineering
Signature: Gary Gao Naixin (BEng, CEng,


Yadelmas,declaremosque
2000/14/CE (Directive Emissions Sonores) y-comprismodifications (2005/88/CE)
Endereço: No.65 Xinggang Road Zhonglou Zone Changzhou, Jiangsu 213000
China
Naam: Gary Gao Naixin (Director of Outdoor Power Equipment)
Adres: Greenworks Tools Europe GmbH
Wankelstrasse 40.
50996 Kln
Germany
HaTOraIIMMb3aBnEm,HToDaHHbI npOdyKT
Katero pna 1
Moe nb. 2502107
3aBODCK O HOMep CM.nacnopTHyTO TaBNIHky npOdykTa
Tod BbInycka ..m.nacnptHyto TaBnky npdykta
COOTBETCTBYET BCMBAHXHNIIMIIOXKeHnMINPeKTHBbI NO MEXAHueCKOMy 060pOyDobAHNO (2006/42/EC)
COOTBeTCTByETBCEMNOLOXeHnM CneDyUOuNX DnpeKtNB EC
TapaHTpyEmbIypoBeHb 3ByKOBO MOUHOCTN 96 dB(A)
OueHka cooTBeCTBnna npObeHa corNacho npuIooKeHHIO VI / K dupeKtNBe 2000/14/EC
CepTnФнKauncooTBeTcTBnE EC 2000/14/EC:
Intertek Testing & Certification Co., Ltd. (NB0359)
Mecro, data: Changzhou, 22/07/2016 彭国彬: Gary Gao Naixin (BEng, CEng)
MIET) Bnue-npe3nneHT no pa3pa60tkam
FI LAITTEIDEN EY:N VAATIMUSTENMUKAISUUSVAKUUTUS
Namn: Gary Gao Naixin (Chef for Outdoor Power Equipment)
Adress: Greenworks Tools Europe GmbH
Wankelstrasse 40.
50996 Koln
Germany
EC type approval to 2000/14/EC: Intertek Testing & Certification
Co., Ltd. (NB0359)
Sted, datc: Changzhou, 22/07/2016 Signatur: Gary Gao Naixin (BEng, CEng,
DEKLARACJA ZGODNOSCI WE DLA MASZYN
Producent: Changzhou Globe Co., Ltd.
Adres: No.65 Xinggang Road Zhonglou Zone Changzhou, Jiangsu 213000 P.R.
Chiny
Homologaja typo WE do 2000/14/WE: Intertek Testing & Certification Co., Ltd. (NB0359)
Potpis: Gary Gao Naixin (BEng,
CEng,MIET)
TOnHa Ha npOn3B0DCTBO
BnKTe eTNKeTa C HOMHANHHTe CTOnHOCTN
OTROBAPnHa CbOTBeTHnTe pa3nope6n Ha NpuKtNbTa OTHOCHMaunHnTe 2006/42/EC
- OTROBAPa pa3nope6nte Ha cneHNTe dpyr n DpuekTbHn HA EO
2014/30/EU (ДиректINA 3a EMC) n
2000/14/EC (N3MbYBaH Wym OT Maunn H CbOpBXeHNA, KOnTo pa6oTt Ha OTKpuTO)
BKNIOHTeHNO npOMeHnTe (2005/88/EC)
OcbenToBaDeknapnpame,Ye
ca cna3eHn (yactw/kay3nOT) cneHNTe oobnte ebponeckn ctahdaptn
H3MepeHO HNOBa HA Wym
LWA: 89.4 dB(A)
TapaHTpaHO HnBO Ha Wym
96 dB(A)
MetoHa OueHbAHe Ha CbOTBeCTBnETo CbO6pa3HO npnIOKeHne Vt OIpuKTHBa
2000/14/EC
TINOBO OdopeHne Ha EO B cbOTBeTCTBne c 2000/14/EO: Intertek Testing &
Certification Co., Ltd. (NB0359)
Mácto, data: Changzhou, 22/07/2016
Tioinn: Gary Gao Naixin (BEng, CEng, MIE)
Bucenpe3nEHT,
MaunHocTpoeHe


△HAΩEH SYMMOPΦΩEH2 EK
Kataoekuaotn; Changzhou Globe Co., Ltd.
u Buvon: No.65 Xinggang Road Zhonglou Zone Changzhou,
Jiangsu 213000 P.R.China
Ovoja Ka iieuBuvon anoou eouoiobotnevou va uvtaei tov texvik okeao:
Ovoa: Gary Gao Naixin (Aeuuovntc uaiptoi npkpoivntou eonlioou)
Address: Greenworks Tools Europe GmbH
Wankelstrasse 40.
50996Koln
Germany
Aia Tou TApovtoc 8nawouye ot to Ppoiov
MHXANH KOYPEMATO PA I IOY
MovTeA
2502107
ApiOoC oipac
BA.ETIKETAbaOuvounngTpoioVIO
ETOS KATAOKEUNs
LA.ETIKETAaBIOPOVMOngsTPOIovTOG
Eivaouo me tcs oxetikc biataeic nOdyia Mxavmuw 2006/42/EK
To npoiov eivai ouwvo nig npoutoeoei twv napakataw loiw Odyiw ts EK
2014/30/EE (Oδηγα EMC) κα
2000/14/EK (O8nyia 8opou) oupiepiaaavovevw Tuv TpoTTOIOIeWv (2005/88/EK)
V/ Directive 2000/14/EC
2000/14/EC: Intertek Testing &
Certification Co., Ltd (NB0359)
U 22/07/2016
89.4 1
96 1
000/14/EC
000/14/EC: Intertek Testing &
:GaryGaoNaixin
10
U


AT UYGUNLUK BEYANI
Uretici: Changzhou Globe Co., Ltd.
Adres: No.65 Xinggang Road Zhonglou Zone Changzhou,
Imza: Gary Gao Naixin (BEng, CEng)
MIET)MuhendislikDepartmaniBaskanYardimci

nnnnnnn nn nnnn
Y: Changzhou Globe Co., Ltd.
Dian: No.65 Xinggang Road Zhonglou Zone Changzhou, Jiangsu 213000 P.R.China
:GaryGaoNaixin (nunwnnwnnnn)
Address: Greenworks Tools Europe GmbH
Wankelstrasse 40.
50996 Koln
2017
XAN
7017
TAD
no.07D:
WEP 2013
:
y
2014/30/EU (annnnn)
2000/14/EC (nun nn wyy) 2005/88/EC
109, 000
- 1000000000000000000000000000000000000000000
wnnnn nn nnnn 2000/14/EC
2000/14/EC: Intertek Testing & Certification
Co., Ltd. (NB0359)
pno, 2017: 22/07/2016
nnn: Gary Gao Naixin
(BEng, CEng, IET) onn"Mton


LT EKIRENGIMU ATITIKTIES DEKLARACIJA
Gamintojas:Changzhou Globe Co.,Ltd."
Adresas: No. 65 Xinggang Road Zhonglou Zone Changzhou, Jiangsu 213000 P.R. Kinija
Asmens, jgaloti tvarkyi technine byla, vardas, pavarde ir adreas:
Vardas, pavarde: Gary GaBekdins jrangos darbui lauke direktorius)
Adresas: Greenworks Tools Europe GmbH
Wankelstrasse 40.
50996 Koln
Germany
tertek Testing & Certification Co.,
Paras: Gary Gao Naixin (BEng,

LV MASINU EK ATBILSTIBAS DEKLARACIJA
Razotajs: Manufacturer:Changzhou Globe Co., Ltd.
Adrese: No.65 Xinggang Road Zhonglou Zone Changzhou, Jiangsu 213000
P.R.China
Personas, kas pilvarota sastadit tehniskodokumentaciju, vards, uzvards un
adrese:
Vards, uzvards: Gary Gao Naixin (Lauka iekartu direktors)
Adrese: Greenworks Tools Europe GmbH
Wankelstrasse 40.
50996 Koln
Germany