SmartPower MFW2510W - Meat Grinder BOSCH - Free user manual and instructions
Find the device manual for free SmartPower MFW2510W BOSCH in PDF.

| Product Type | Meat Grinder |
| Brand | Bosch |
| Model | SmartPower MFW2510W |
| Functions | Meat grinder, sausage maker, kibbeh attachment, grater, fruit press |
| Included Accessories | Base, worm screw, blade, perforated discs (3.8 mm and 8 mm), sausage maker, kibbeh attachment, grater with inserts, fruit press, pusher, funnel |
| Power Supply | Mains (230-240 V, 50 Hz) |
| Power | Approx. 500 W |
| Dimensions (L x W x H) | Approx. 25 x 20 x 18 cm (base only) |
| Weight | Approx. 2.5 kg (base unit with base) |
| Safety | Thermal cut-out, overload protection, drive shaft with programmed break zone, accessory lock |
| Maintenance and Cleaning | Disassemble all parts after use, clean by hand with a soft sponge, dry metal parts immediately and lightly oil |
| Spare Parts Available | Perforated discs, blade, worm screw, sausage maker, grater, fruit press, drive shaft (ref. 10011109) |
| Warranty | According to distributor conditions, requires proof of purchase |
| Usage | Household use only, not for professional use |
Frequently Asked Questions - SmartPower MFW2510W BOSCH
User questions about SmartPower MFW2510W BOSCH
0 question about this device. Answer the ones you know or ask your own.
Ask a new question about this device
Download the instructions for your Meat Grinder in PDF format for free! Find your manual SmartPower MFW2510W - BOSCH and take your electronic device back in hand. On this page are published all the documents necessary for the use of your device. SmartPower MFW2510W by BOSCH.
USER MANUAL SmartPower MFW2510W BOSCH
SmartPower Meat mincer
MFW25... MMWP2...
[en] Instruction manual Meat mincer 20
natural_image
Diagram of a mechanical component with labeled parts 'a' and 'b', showing a cylindrical shaft and a circular dial (no text or symbols beyond labels)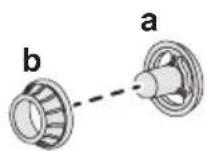
d

natural_image
Simple line drawing of a cylindrical object with a labeled point 'c' (no text or symbols on the object itself)h
flowchart
graph TD
    A["Raw Material Input"] --> B{Check Point}
    B -->|1. Red Arrow| C["Component"]
    B -->|2. Red Arrow| D["Intermediate"]
    B -->|3. Red Arrow| E["Final Output"]
    C --> F["Final Product Inspection"]
    D --> F
    E --> F
    F --> G["✓"]
flowchart
graph TD
    A["Step 1: Initial component"] --> B["Step 2: Rotation of part"]
    B --> C["Step 3: Inserting part"]
    C --> D["Final step: Final assembly with checkmark"]
flowchart
graph TD
    A["Step 1: Bearing Component"] --> B["Step 2: Ball bearing"]
    B --> C["Step 3: Axial joint assembly"]
    style A fill:#f9f,stroke:#333
    style B fill:#ccf,stroke:#333
    style C fill:#cfc,stroke:#333
flowchart
graph TD
    A["Step 1: Induction of kitchen using an orange tool"] --> B["Step 2: Click! presser"]
    B --> C["Step 3: Stopping funnel with red arrows"]
    C --> D["Step 4: Cutting in kitchen with red arrows"]
    D --> E["Step 5: Stopping on a bowl with red arrows"]
    E --> F["Step 6: Stopping on a bowl with red arrows"]
    F --> G["Step 7: Stopping on a bowl with red arrows"]
    G --> H["Step 8: Opening O/1 block with red arrow"]
    H --> I["Step 9: Stopping on a bowl with red arrows"]
    I --> J["Step 10: Stopping on a bowl with red arrows"]
    J --> K["Step 11: Stopping on a bowl with red arrows"]
G
natural_image
Simple line drawing of a pipe fitting with a green checkmark below (no text or symbols)H
1
natural_image
Illustration of a hand holding an orange electrical plug with a red arrow pointing to a circular component (no text or symbols)2
3
natural_image
Diagram of a cutting board with three pieces and an orange knife inserted, no text or symbols present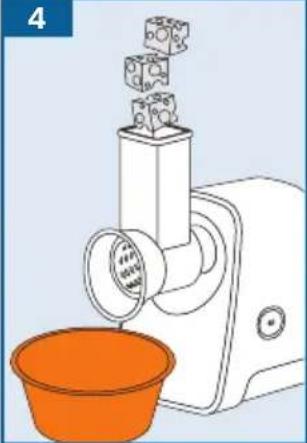
natural_image
Illustration of a handwashing machine with a bowl of orange material and a container pouring liquid into it (no text or symbols)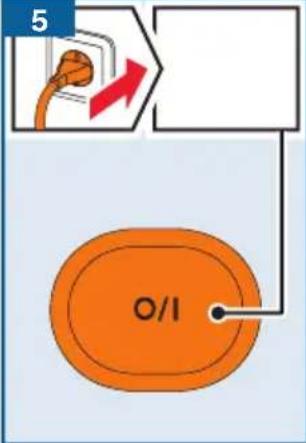
natural_image
Orange electrical plug with a bolt and arrow indicating rotation (no text or symbols)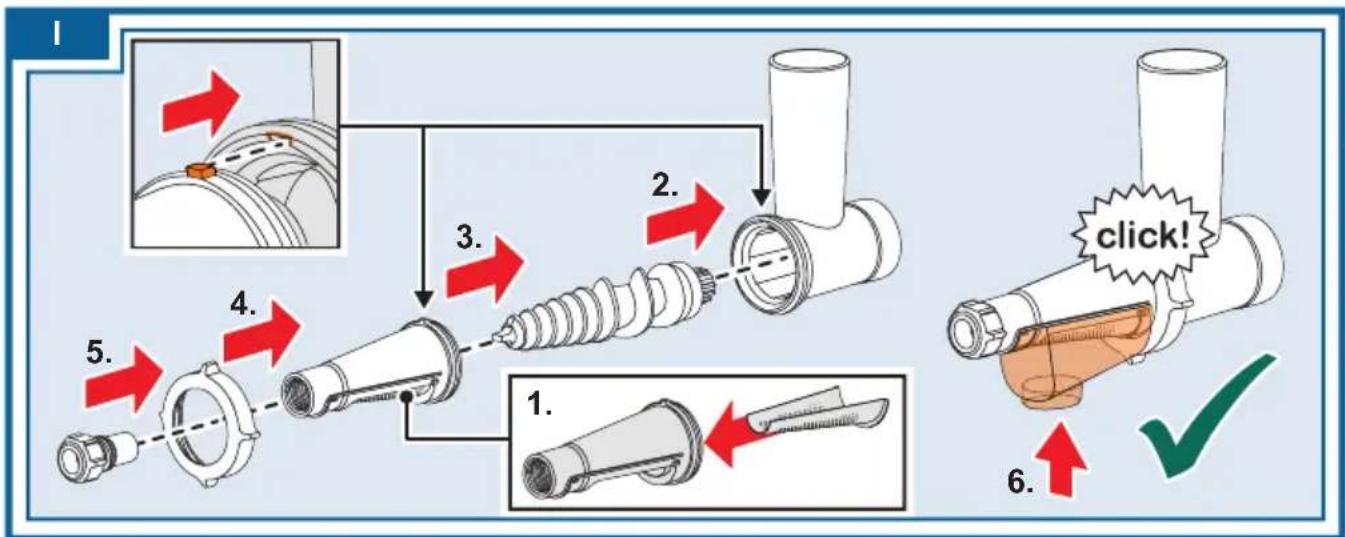
flowchart
graph TD
    A["Step 1: Tool with central connector"] --> B["Step 2: Screw assembly"]
    B --> C["Step 3: Screw assembly with coiled spring"]
    C --> D["Step 4: Screw assembly with flange"]
    D --> E["Step 5: Screw assembly with flange"]
    E --> F["Step 6: Click button with checkmark"]
    style A fill:#f9f,stroke:#333
    style F fill:#bbf,stroke:#333
flowchart
graph TD
    A["Step 1: Insert brush into airway"] --> B["Step 2: Click to brush inside airway"]
    B --> C["Step 3: Stimulation of brush with red arrows"]
    C --> D["Step 4: Cover in airway with black plastic parts"]
    D --> E["Step 5: ON press trigger"]
    E --> F["Step 6: Stimulation with O/1 brush and granular material"]
    F --> G["Step 7: Stimulation of brush with granular material in glass bowl"]
    G --> H["Step 8: Stimulation with granular material in glass bowl and brush"]
    H --> I["Step 9: OFF press trigger"]
    I --> J["Step 10: Stimulation with granular material in glass bowl"]
    J --> K["Step 11: Stimulation with granular material in glass bowl and brush"]
    K --> L["Step 12: Stimulation with granular material in glass bowl and brush"]
 | √ | ⚠ X | ⚠ X | |
 | √ | √ | √ | |
| √ | √ | ⚠ X | ||
 | √ | √ | √ | |
| ⚠ X | √ | ⚠ X | ||
 | √ | √ | √ | |
| √ | √ | ⚠ X | ||
| √ | √ | √ | ||
flowchart
graph LR
    A["Initial cylindrical component"] --> B["Add cylindrical part"]
    B --> C["Add cylindrical part with internal structure"]
    C --> D["Add cylindrical part with internal structure, then added vertically"]
    D --> E["Final cylindrical component with internal structure, marked by red arrows and a green checkmark"]
Read and follow the operating instructions carefully and keep for later reference! Enclose these instructions when you give this appliance to someone else.
If the instructions for correct use of the appliance are not observed, the manufacturer's liability for any resulting damage will be excluded.
This appliance is intended for domestic use only. Use the appliance for processing normal quantities of food for domestic use.
The appliance and accessories (depending on the model) are suitable for the following purposes:
Meat mincer: for mincing and mixing raw and cooked meat, bacon, poultry and fish.
Sausage filler: for making sausages and meat rolls.
Kebbe maker: for making dough and minced meat pockets.
Shredding attachment: for shredding, grating and cutting up food.
Fruit press: for squeezing juice out of soft fruits and vegetables such as raspberries, currants, strawberries and tomatoes.
Food which is to be processed must not contain any hard components (e.g. bones). The appliance should not be used for processing other substances or objects. Additional applications are possible if the accessories approved by the manufacturer are used. Use the appliance only with genuine parts and accessories.
Never use the attachments or slicing / shredding inserts on other appliances. Only use matching parts for the relevant attachments.
Only use the appliance indoors at room temperature and up to 2000 m above sea level. Do not place the appliance on or near hot surfaces, e.g. hobs.
Your work surface should be easily accessible, resistant to moisture, firm, flat, dry and large enough to prevent any harm from splashing and to let you work unhindered.
This appliance can be used by persons with reduced physical, sensory or mental capabilities or lack of experience and knowledge if they have been given supervision or instruction concerning safe use of the appliance and if they understand the hazards involved.
Keep children away from the appliance and connecting cable and do not allow them to use the appliance.
Children must not play with the appliance. Cleaning and user maintenance must not be performed by children.
Safety instructions
⚠️ Danger of electric shock and fire
Connect and operate the appliance only according to the type plate specifications. Do not use if the mains cable or appliance show any signs of damage. To avoid potential hazards, repairs such as replacing a damaged cable must only be carried out by our customer service personnel. Never connect the appliance to timer switches or remote-controllable sockets. Never leave the appliance unattended while it is switched on! We recommend that the appliance is never switched on for longer than is necessary to process the ingredients.
The mains cable must not come into contact with hot parts or be pulled across sharp edges. Never immerse the base unit in water or place it in the dishwasher. Do not steam-clean the appliance. Do not use the appliance with damp hands and do not operate at no load. The appliance must always be disconnected from the mains after each use, whenever the appliance is unattended, prior to assembly, disassembly or cleaning and in the event of a fault.
Risk of injury
Immediately after using the appliance wait for it to stop. Before fitting or replacing attachments, the appliance must be switched off and disconnected from the mains.
Do not grasp the sharp blades and edges of the shredding and slicing inserts. Keep hands clear of rotating parts. Never reach into the feed chute or outlet opening. Never put the food to be processed into the feed chute with your hands. Only use the pusher provided! Never clean the sharp blades and edges of the shredding and slicing inserts with your bare hands.
⚠ Caution! Risk of damaging the appliance
Check that there are no foreign objects in the feed chute or attachments. Do not poke objects (e.g. knives, spoons) in the feed chute or outlet opening.
⚠️ Important!
It is essential to clean the appliance as described after each use or after it has not been used for an extended period. → “Care and daily cleaning” see page 26
Congratulations on the purchase of your new Bosch appliance.
On the following pages of these operating instructions you will find useful information for safe use of this appliance.
We request that you read these operating instructions carefully and observe all instructions. This ensures you will be able to enjoy this appliance for a long time, and the results will confirm your choice of this appliance.
Retain these operating instructions for subsequent use or for the next owner. You can find further information about our products on our website.
Content
Intended use....20
Safety instructions....21
Overview....22
Before using for the first time....23
Control and display elements 23
Safety devices 23
Base unit....23
Base attachment....23
Shredding attachment ....25
Fruit press attachment....25
Care and daily cleaning....26
Recipes....27
Tips....28
Disposal....28
Guarantee....28
Spare parts and accessories....29
Troubleshooting....30
Overview
→ Fig. A
1 Base unit
a Drive for attachments
b Button O/I
c Release button
d Mains cable
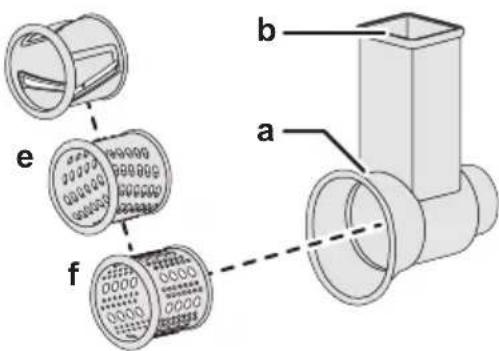
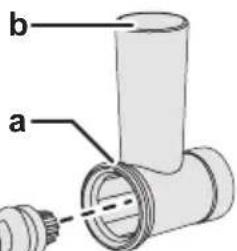
2 Base attachment
a Housing
b Feed chute
c Filling tray
d Pusher
e Lid for pusher
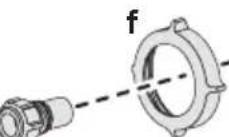
f Worm gear with agitator paddle
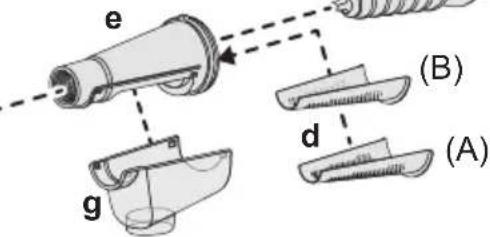
g Threaded ring
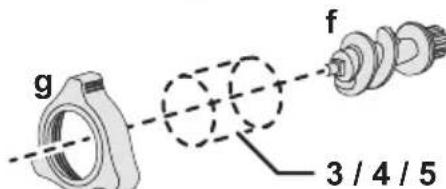
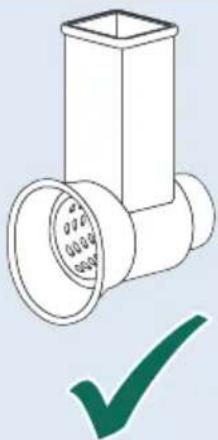
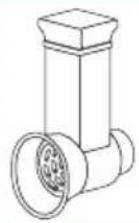
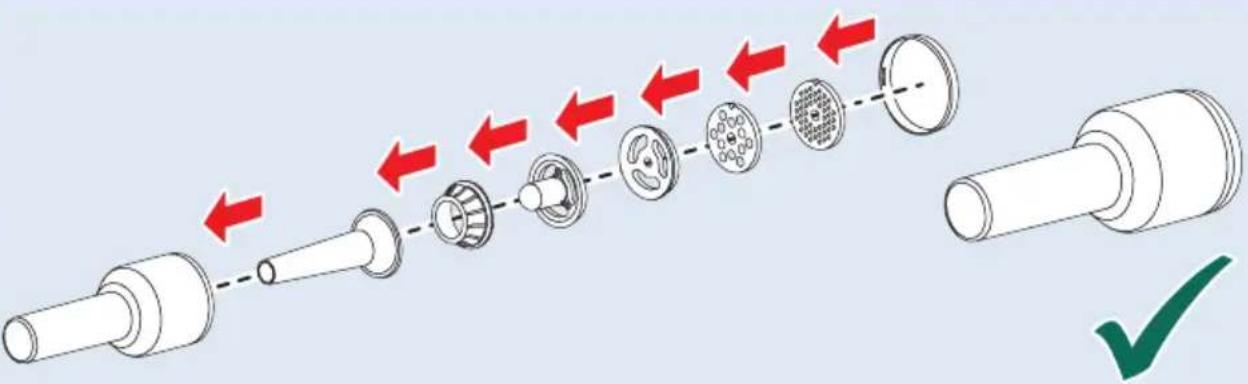
3 Meat mincer insert
a Blade
b Perforated disc, fine (3,8 mm) *
c Perforated disc, coarse (8 mm) *
4 Sausage filler insert \*
a Bearing ring
b Sausage filler nozzle
5 Kebbe insert \*
a Conical ring
b Kebbe nozzle
6 Shredding attachment \*
a Housing
b Feed chute
c Pusher
d Slicing insert
e Shredding insert, fine
f Grating insert
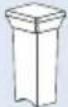
7 Fruit press attachment \*
Use filling tray and pusher from the base attachment.
a Housing
b Feed chute
c Worm gear with sealing ring
d Filter inserts: fine (B) & coarse (A)
e Filter holder with sealing ring
f Threaded ring
g Outlet funnel
h Pulp nozzle (adjustable)
* depending on the model
Spare parts and accessories are available from Customer Service or at
www.bosch-home.com. → "Spare parts
and accessories" see page 29
Before using for the first time
Before the new appliance can be used, it must be fully unpacked, cleaned and checked.
Caution!
Never operate a damaged appliance!
■ Remove the base unit and all accessories from the packaging.
■ Remove the packaging material that is present.
■ Dismantle any assembled parts into their individual parts. Do this in reverse order, as described under „Preparation“.
■ Check all parts for completeness.
→ Fig. A
■ Inspect all parts for visible damage.
■ Thoroughly clean and dry all parts before using for the first time.
→ “Care and daily cleaning” see page 26
Control and display elements
Button O/I
Press button O/I to switch on the appliance. The drive will start up at once. Press button O/I again to switch off the appliance. The drive stops.
Release button
Press the release button to unlock an attachment fitted on the appliance. Only when the release button is pressed is it possible to turn the attachment clockwise and remove it from the base unit.
Safety devices
Thermal circuit breaker
If the motor switches itself off while the appliance is being used, the overload protection feature has been activated. Possible causes may be the simultaneous processing of large quantities of food or a blockage caused by bones.
→ "Troubleshooting" see page 30
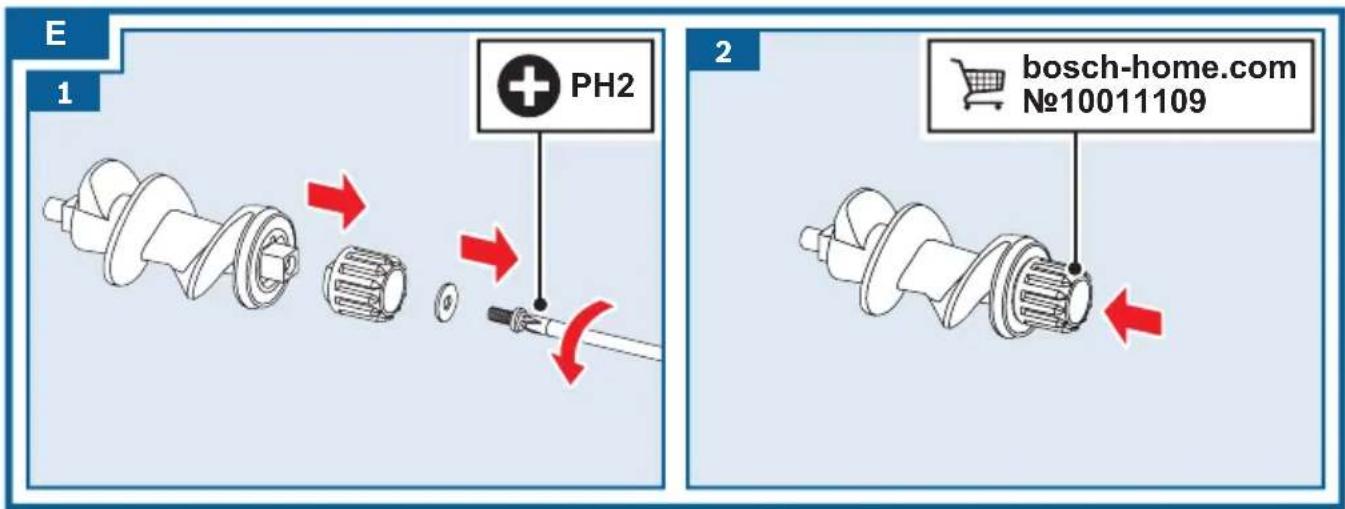
Overload protection
To prevent serious damage to your appliance if the base attachment is overloaded, the agitator paddle has a notch (predetermined breaking point). If overloading occurs, the agitator paddle will break at this point. A new agitator paddle is available from Customer Service (No. 10011109). Spare parts with a predetermined breaking point are not covered by our warranty obligations.
Replace agitator paddle
→ Fig. E
- Release the screw in the agitator paddle with a screwdriver (PH2) and remove the faulty paddle.
- Fit a new agitator paddle and screw tight again.
Base unit
Preparation
Risk of injury!
Do not insert the mains plug until all preparations for working with the appliance are complete and the required attachments are assembled correctly and connected to the base unit.
■ Place the base unit on a stable and level work surface.
The base unit is now prepared.
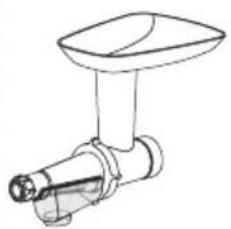
Base attachment
The base attachment can be used for the following applications:
Meat mincer
For mincing raw or cooked food. Select the appropriate perforated disc depending on the type and consistency of the food to be processed. → “Tips” see page 28
Sausage filler
For filling artificial and natural casings with sausage meat. For producing meat rolls.
Kebbe maker
For producing tubes of dough or minced meat.
Note: Other applications are possible using the base attachment and appropriate accessories available from Customer Service.
Caution!
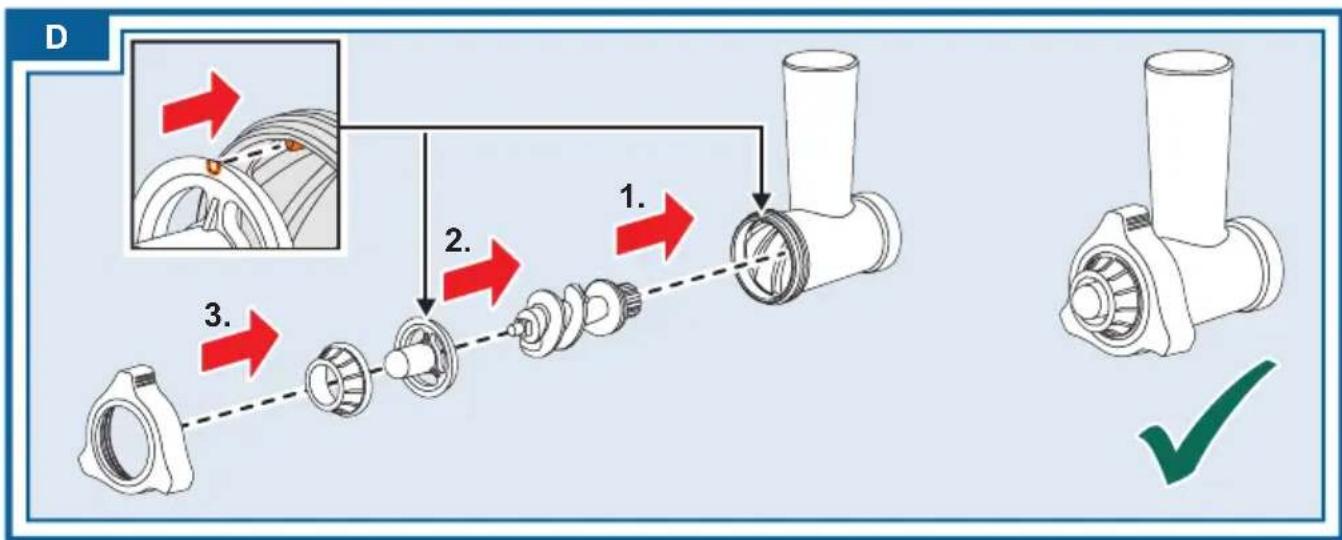
When assembling the different individual parts, make sure that the notched markings on the inserts match up with the relevant one on the housing.
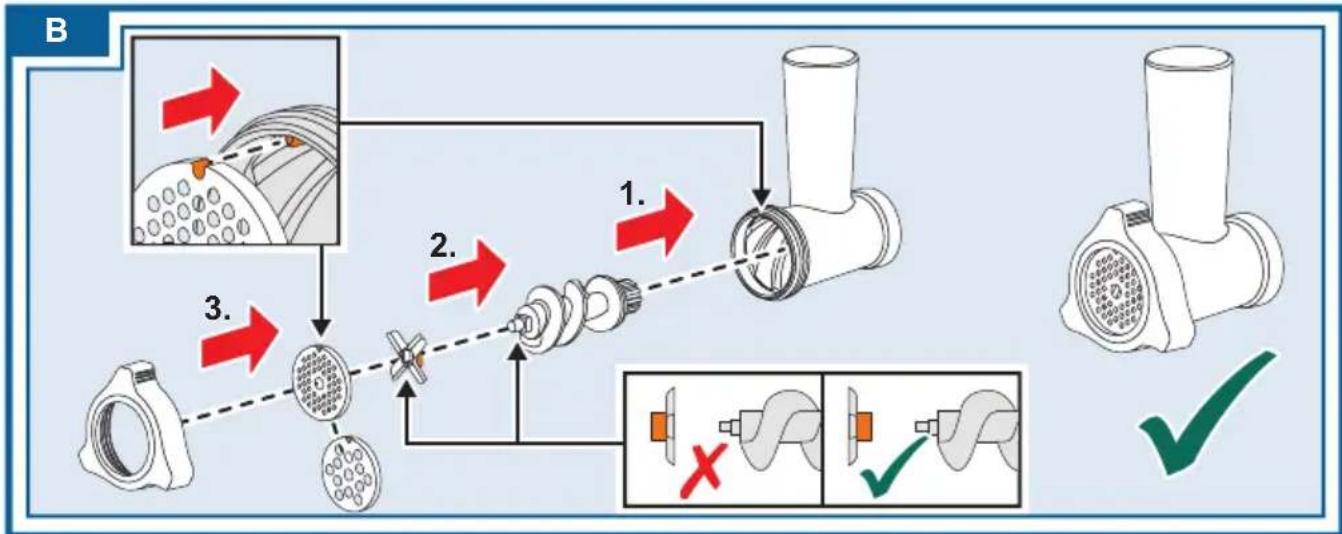
Preparation for meat mincer
Risk of injury!
Do not reach into the sharp knife.
Caution!
Always only use one perforated disc.
→ Fig. B
- Insert the worm gear with the agitator paddle at the front in the housing.
- First fit the knife and then the required perforated disc onto the worm gear. Blades must face the perforated disc.
- Fit the threaded ring onto the housing and screw tight in a clockwise direction without using force.
The meat mincer is now prepared.
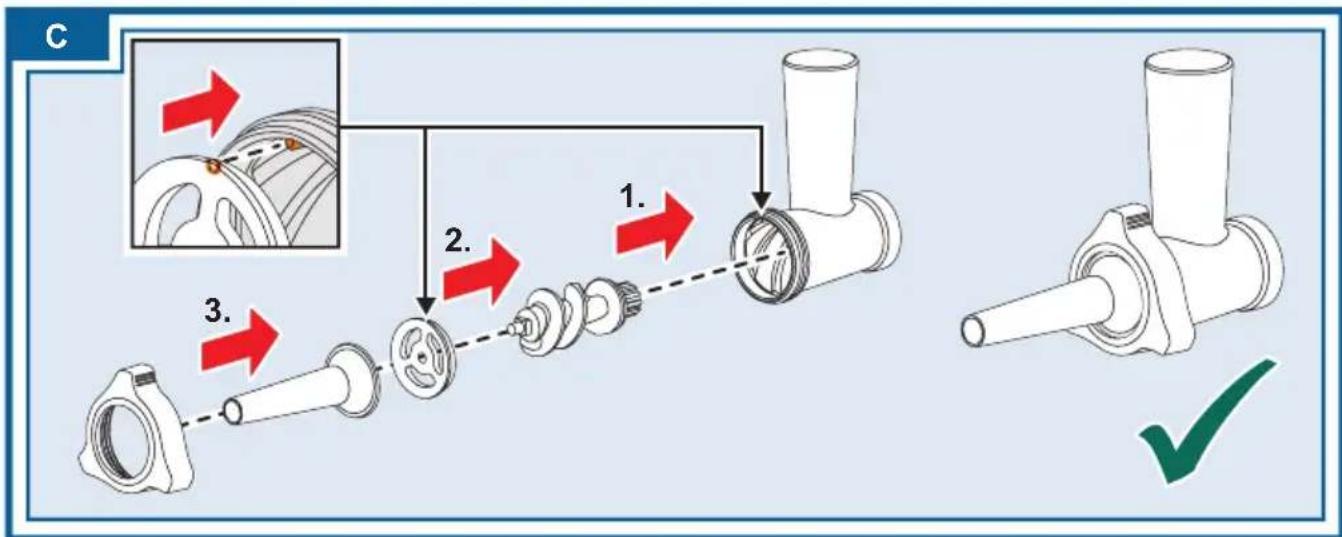
Preparation for sausage filler
→ Fig. ©
- Insert the worm gear with the agitator paddle at the front in the housing.
- First fit the bearing ring onto the worm gear and then the sausage nozzle into the housing.
- Fit the threaded ring onto the housing and screw tight in a clockwise direction without using force.
The sausage filler is now prepared.
Preparation for kebbe maker
→ Fig. D
- Insert the worm gear with the agitator paddle at the front in the housing.
- First fit the conical ring onto the worm gear and then the kebbe nozzle into the housing.
- Fit the threaded ring onto the housing and screw tight in a clockwise direction without using force.
The kebbe maker is now prepared.
Use
Note: The food is processed in different ways depending on the application.
→ "Recipes" see page 27
The following example describes use of the base attachment as a meat mincer:
Risk of injury!
- Do not reach into the feed chute with your hands.
- Only use the pusher when adding more food.
Caution!
- Do not process bones, gristle, sinews or other solid components.
- Do not process frozen meat.
- Do not apply great force with the pusher.
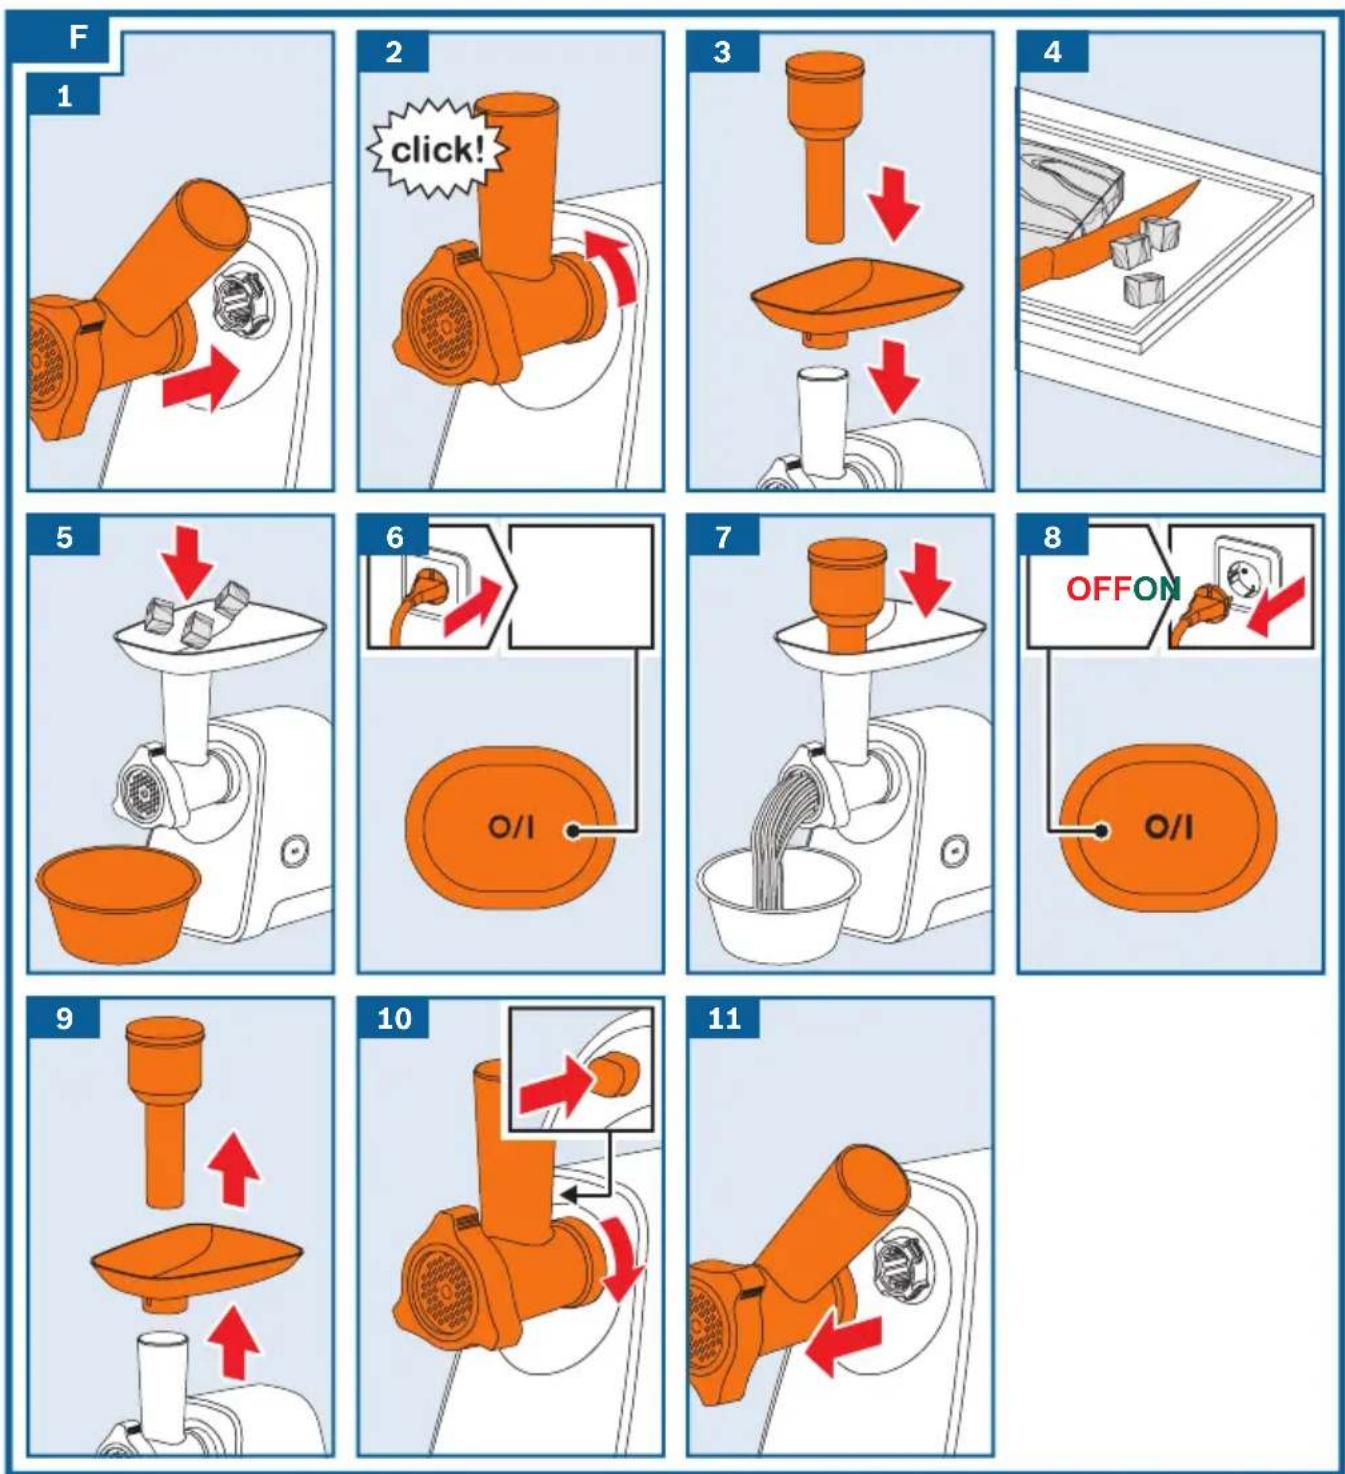
→ Sequence of figures F
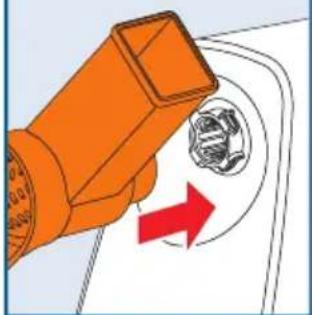
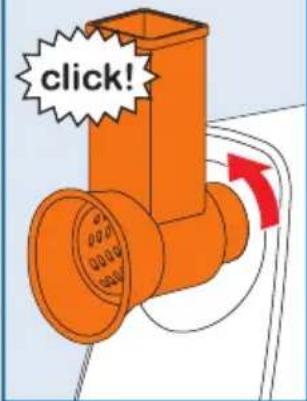
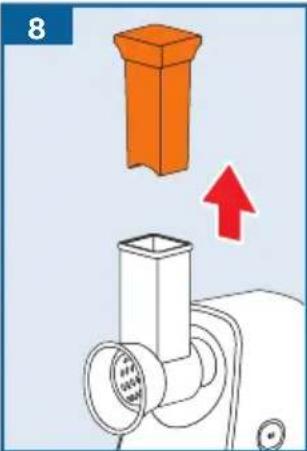
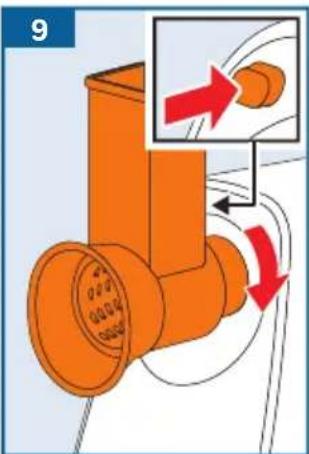
- Fit the prepared attachment onto the drive of the base unit, holding it at an angle.
- Turn the attachment anticlockwise until you hear it click into position.
- Fit the filling tray and insert the pusher in the feed chute.
- Prepare your food. Chop up large parts beforehand so they fit into the feed chute without having to press them in.
- Place a suitable container under the attachment. Add the prepared food to the filling tray.
- Connect the mains plug. Switch on the appliance.
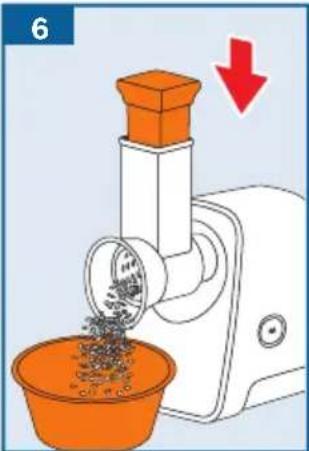
- Use the pusher to slide the food down the feed chute, applying light pressure.
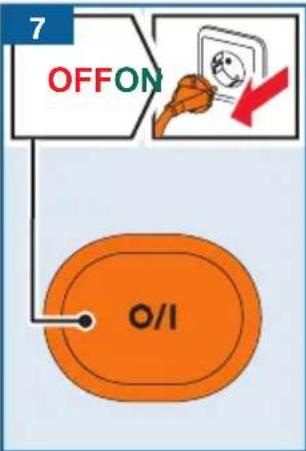
- Once you have finished, switch off the appliance and pull out the mains plug.
- Remove the filling tray and pusher.
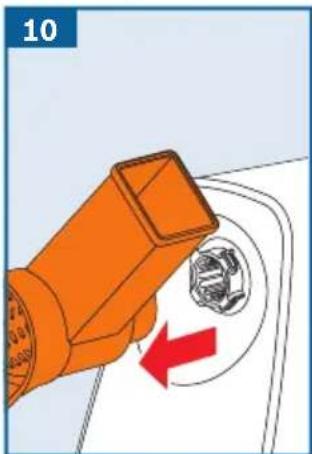
- Hold down the release button and turn the attachment clockwise until it disengages.
- Remove the attachment, take it apart and clean all parts. → “Care and daily cleaning” see page 26
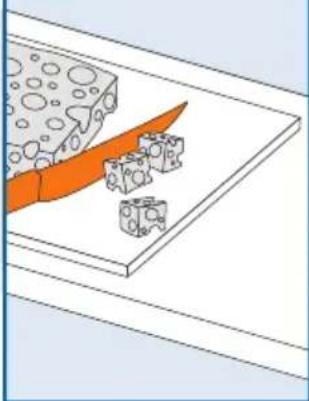
Shredding attachment
For shredding, grating and slicing items such as cheese, fruit, vegetables, nuts, almonds, dried bread rolls and other hard foodstuffs. Not suitable for cutting up fibrous foods such as celery or leek. Select the appropriate insert depending on the type and consistency of the food to be processed. → “Tips” see page 28
Preparation
Risk of injury!
Do not reach into the sharp blades and edges of the shredding, grating and slicing inserts.
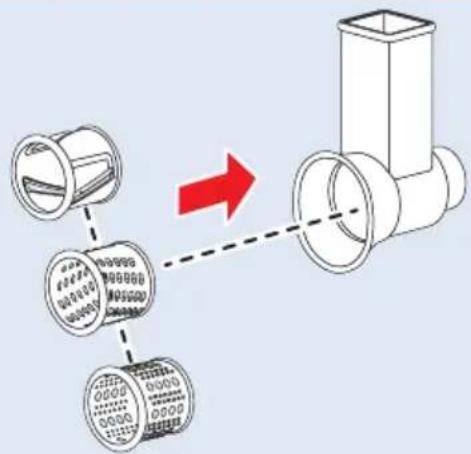
→ Fig. G
■ Fit the required insert into the housing.
Note: The insert is automatically locked when the appliance is switched on. The shredding attachment is now prepared.
Use
Risk of injury!
- Do not reach into the feed chute with your hands.
- Only use the pusher when adding more food.
Caution!
- The pusher can only be inserted in one direction.
- Remove hard shells (e.g. on nuts).
- Do not apply great force with the pusher.
→ Sequence of figures H
- Fit the prepared attachment onto the drive of the base unit, holding it at an angle.
- Turn the attachment anticlockwise until you hear it click into position.
- Prepare your food. Chop up large parts beforehand so they fit into the feed chute without having to press them in.
- Place a suitable container under the attachment. Add the prepared food to the filling tray.
-
Connect the mains plug. Switch on the appliance.
-
Use the pusher to slide the food down the feed chute, applying light pressure. The food is now cut up or shredded.
- Once you have finished, switch off the appliance and pull out the mains plug.
- Pull out the pusher.
- Hold down the release button and turn the attachment clockwise until it disengages.
- Remove the attachment, take it apart and clean all parts. → “Care and daily cleaning” see page 26
Fruit press attachment
For squeezing juice out of soft fruits such as raspberries, currants, strawberries and tomatoes. This attachment is not suitable for apples or grapes. The attachment is also not suitable for hard fruits or vegetables like carrots and beetroot.
Preparation
Note: selection of the filter insert determines the content of fruit pulp in the juice. Do not press fruit whose pips are similar in diameter to the hole diameter in the filter insert (e.g. raspberries).
→ Fig. Ⅱ
■ Make sure that the sealing rings are fitted onto the filter holder and the worm gear. If not, insert them into the sealing grooves of these parts.
-
Insert the filter insert into the filter holder and press it into place.
-
Insert the worm gear into the housing.
-
Insert the filter holder into the housing. Lug on the filter holder must be situated in the recess on the housing.
-
Fit the threaded ring onto the housing and screw tight in the clockwise direction without using force.
-
Screw pulp nozzle into the filter holder.
-
Place the outlet funnel onto the filter holder until it audibly clicks into place. The fruit press attachment is now prepared.
Use
Warning
Risk of injury!
- Do not reach into the feed chute with your hands.
- Only use the pusher when adding more food.
Caution!
- Remove hard fruit peel, pips and stalks.
- Berries such as e.g. currants can be pressed together with their stalks.
– Fruit with larger pips and stones such as e.g. plums and cherries must have their pips or stones removed before juicing. - Do not process frozen fruit.
- Do not apply great force with the pusher.
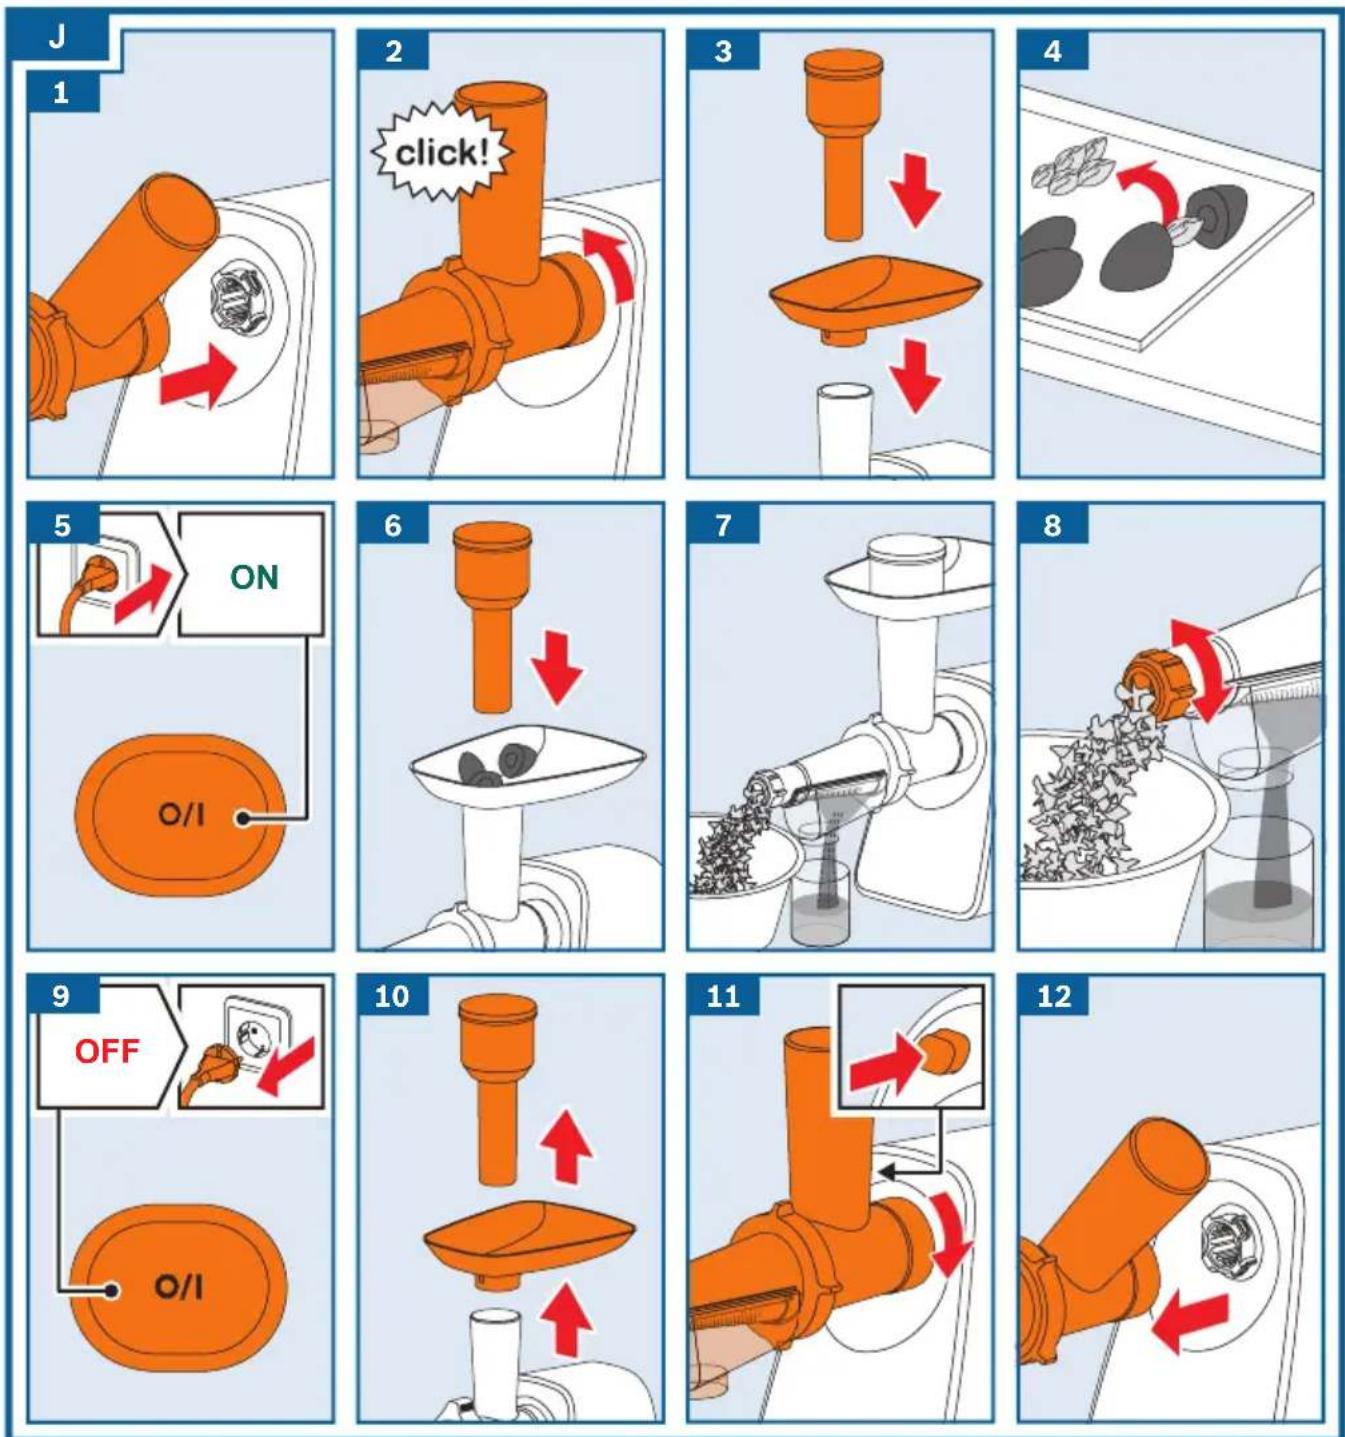
→ Fig. J
- Fit the prepared attachment onto the drive of the base unit, holding it at an angle.
- Turn the attachment anticlockwise until you hear it click into position. Tighten threaded ring.
- Fit the filling tray and insert the pusher in the feed chute.
-
Prepare the fruit. Chop up large fruit beforehand so it fits into the feed chute without having to be pressed in. Remove larger pips and stones (e.g. cherries, plums).
■ Place one container under each of the apertures for juice and for the pulp.
■ Add the prepared fruit to the filling tray. -
Connect the mains plug. Switch on the appliance.
-
Use the pusher to slide the fruit down the feed chute, applying light pressure.
-
The pressed juice flows out from the outlet funnel. The pulp (solid components) is pressed through the pulp nozzle.
-
Adjust the pulp nozzle. Unscrewing makes the pulp more moist; screwing in makes it dryer and more juice flows from the funnel. If the pulp is too dry, unscrew the nozzle, to avoid clogging the appliance with the pulp.
-
Once you have finished, switch off the appliance and pull out the mains plug.
- Remove the filling tray and pusher.
- Hold down the release button and turn the attachment clockwise until it disengages.
- Remove the attachment, take it apart and clean all parts. → “Care and daily cleaning” see page 26
Care and daily cleaning
The appliance, all attachments and the relevant accessories must be thoroughly cleaned after each use.
Risk of electric shock!
- Disconnect the mains cable from the socket prior to cleaning.
- Never immerse the base unit in liquids and do not clean in the dishwasher.
Risk of injury!
Do not reach into the sharp blades and edges of the shredding and slicing inserts.
Caution!
- Do not use any cleaning agents containing alcohol or spirits.
- Do not use any sharp, pointed or metal objects.
- Do not use abrasive cloths or cleaning agents.
Fig. K gives an overview of how to clean the individual parts.
■ Wipe the outside of the base unit with a soft, damp cloth and dry off.
■ Dismantle the attachments used in reverse order (see „Preparation“ for the relevant attachment).
■ Clean all accessories with a detergent solution and a soft cloth/sponge or with a soft brush.
■ Allow all parts to dry.
Notes:
- Immediately rub metal parts dry and apply a little cooking oil to protect them from rust.
- Discolouration of plastic parts may occur when processing foods such as carrots. This can be removed with a few drops of cooking oil.
Recipes
Minced meat rolls with Gouda
Basic recipe
- 500 g beef, cut into strips
- 500 g pork, cut into strips
- 200 g cheese (Gouda)
- 10 g salt
- 2 g freshly ground black pepper
- Garlic (optional)
– Oil for deep frying
■ To make the Gouda easier to process, cut into cubes (2 x 1 x 1 cm) and freeze overnight.
■ First process the frozen Gouda, followed by the beef and pork using the mincer (perforated disc, fine).
■ Add the salt, pepper and garlic (optional) and mix.
■ Make rolls approx. 10 cm in length either using your hands or with the sausage stuffing attachment.
■ Heat a little oil in a frying pan and fry the minced meat rolls for approx. 5 minutes. Turn several times until everything is cooked through.
Kebbe
Dough pockets:
- 500 g lamb, cut into strips
- 500 g bulgur wheat, washed and drained
- 1 small onion, chopped
■ Process the lamb and wheat with the meat mincer, alternating between the two (perforated disc, fine).
■ Mix the dough thoroughly and mix in the onion.
■ Process the mixture another two times with the meat mincer.
Filling:
- 400 g lamb, cut into strips
- 2 medium-sized onions, chopped
- 1 tablespoon of oil
- 1 tablespoon of flour
- 2 teaspoons of pimento
- Salt and pepper
■ Process the lamb with the meat mincer (perforated disc, fine).
■ Fry the onions until golden brown.
■ Add the lamb and fry until well done.
■ Add the remaining ingredients.
■ Fry everything gently for about 1-2 minutes.
■ Pour off the excess fat.
■ Leave the filling to cool down.
Prepare the kebbe:
■ Use the kebbe maker to process the mixture for dough pockets.
■ Cut off pieces 7.5 cm in length from the hollow strand of dough.
■ Press one end of the dough pocket to seal.
■ Insert a little filling in the opening and also seal the other end of the dough pocket.
■ Heat the oil (approx. 180 °C) and deep-fry the dough pockets for about 6 minutes until golden brown.
Bread dumplings
- 300 g fresh white bread
- 20 ml milk
- 40 g butter or margarine
- 3 eggs
- 1 tbsp finely chopped onions
- Parsley
- A little flour
- Salt and pepper
■ Cut the bread into slices 10 mm thick and halve lengthways. Add 20 ml of milk and soak.
■ Process the moistened bread for approx. 50 secs with the meat mincer (perforated disc, coarse).
■ Add the finely chopped onions, parsley and melted butter and mix.
■ Add the whisked eggs, salt and pepper and mix into the bread dough.
■ Leave the dough to prove for several minutes. Then knead again.
■ Shape the dumplings with wet hands. Roll the dumplings in flour.
■ Place dumplings in boiling water and leave to simmer for approx. 20 minutes. Do not bring to the boil!
Tips
Meat mincer
Using the perforated discs
- Perforated disc, fine (3.8 mm) for: cooked chicken / pork / beef, cooked liver, cooked fish for soups; raw pork and beef for meat loaf; raw liver, meat and bacon for liverwurst; pork for Mettwurst ; pork and beef for pâté and Cervelat sausage
- Perforated disc, coarse (8 mm) for: roast pork for goulash soup; leftovers (joint, sausage) for bakes
■ If you require a finer consistence to your processed food, process it several times or use different perforated discs one after the other (coarse, fine).
■ You can add other ingredients (e.g. onions, spices) directly during processing. This ensures all ingredients are mixed together thoroughly.
Sausage filler
■ Soak natural casing in lukewarm water for about 10 minutes before processing.
■ Do not stuff casings too full or the sausages may burst during boiling or frying.
Shredding attachment
Using the inserts
- Slicing insert: for carrots, courgettes, cucumber
- Shredding insert (fine): for nuts, hard cheese
- Grating insert: for potatoes, Parmesan cheese
Disposal

Dispose of packaging in an environmentally-friendly manner. This appliance is labelled in accordance with European Directive 2012/19/EU concerning used electrical and electronic appliances (waste electrical and electronic equipment – WEEE). The guideline determines the framework for the return and recycling of used appliances as applicable throughout the EU. Please ask your specialist retailer about current disposal facilities.
Guarantee
The guarantee conditions for this appliance are as defined by our representative in the country in which it is sold. Details regarding these conditions can be obtained from the dealer from whom the appliance was purchased. The bill of sale or receipt must be produced when making any claim under the terms of this guarantee.
Changes reserved.
Spare parts and accessories
| Spare parts and accessories | ||
 3.8 mm 3.8 mm | 10009254 | Perforated disc (fine) for meat mincer |
 8 mm 8 mm | 10009255 | Perforated disc (coarse) for meat mincer |
 | 00753386 | Sausage filler: for filling artificial and natural casings with sausage meat. For producing meat rolls. |
 | 00753387 | Kebbe maker: for producing tubes of dough or minced meat. |
 | 00753399 | Shredding attachment: for shredding, grating and slicing |
 | 00753398 | |
 | 00753400 | Shredding insert (coarse) for the shredding attachment |
 | 00753401 | Shredding insert (fine) for the shredding attachment |
 | 00753402 | Grating insert for the shredding attachment |
 | 00753403 | Slicing insert for the shredding attachment |
Spare parts and accessories are available from retailers and Customer Service.
Troubleshooting
In the following table you will find solutions for problems or faults which you can easily rectify yourself. If a fault cannot be eliminated, please contact customer service.
| Problem Cause Remedy | ||
| The appliance does not start when switched on. | Appliance has no power supply. | Insert the mains plug in the socket. |
| The food is not being processed or only very slowly. | The attachment or worm gear is blocked. | Switch appliance off, wait until it has stopped and unplug.Remove the attachment, take it apart and clean to eliminate the blockage. → “Care and daily cleaning” see page 26 |
| The pressure on the pusher is too great or the feed chute is too full. | Reduce the pressure on the pusher and fill the feed chute with less food. | |
| The food to be processed still contains hard components. | Remove hard components.Precook/steam vegetables before processing them. | |
| Appliance fails to start up or switches off while in use. | The overload protection device is activated. | Switch appliance off, wait until it has stopped and unplug.Let the appliance cool down for approx. 15-20 minutes and then switch it on again.If the appliance still does not start, leave the appliance to cool down further and try it again later. |
Sécurité anti-surcharge
→ Suite de la figure J
www.bosch-home.com/tr
www.bosch-yetkiliservisi.com
Bandrol ve Seri No. :
bosch-infoteam@bshg.com
Thank you for buying a Bosch Home Appliance!
Register your new device on MyBosch now and profit directly from:
- Expert tips & tricks for your appliance
• Warranty extension options
• Discounts for accessories & spare-parts
• Digital manual and all appliance data at hand - Easy access to Bosch Home Appliances Service
Free and easy registration – also on mobile phones:
www.bosch-home.com/welcome
BOSCH HOME APPLIANCES SERVICE
Looking for help? You'll find it here.
Expert advice for your Bosch home appliances, need help with problems or a repair from Bosch experts.
Find out everything about the many ways Bosch can support you:
www.bosch-home.com/service
Contact data of all countries are listed in the attached service directory.