MultiQuick 7 MQ7087X - Blender BRAUN - Free user manual and instructions
Find the device manual for free MultiQuick 7 MQ7087X BRAUN in PDF.
| Product type | Multifunction immersion blender |
| Brand | Braun |
| Model | MultiQuick 7 MQ7087X |
| Power | 750 W |
| Speed | Variable with Smartspeed switch |
| Included accessories | Whisk, potato masher, chopper 350 ml, food processor 1500 ml, slicing blade (fine and large), grating blade (fine and coarse), french fry disc |
| Blade material | Stainless steel |
| Chopper capacity | 350 ml |
| Processor capacity | 1500 ml |
| Power supply | 220-240 V |
| Frequency | 50/60 Hz |
| Maintenance | Clean with water and dish soap; do not immerse motor unit; most accessories are dishwasher safe |
| Safety | Very sharp blades; keep away from children; turn off and unplug before cleaning |
| Repairability | Braun authorized service center |
| Use | Household use only; do not dispose of with household waste |
Frequently Asked Questions - MultiQuick 7 MQ7087X BRAUN
User questions about MultiQuick 7 MQ7087X BRAUN
0 question about this device. Answer the ones you know or ask your own.
Ask a new question about this device
Download the instructions for your Blender in PDF format for free! Find your manual MultiQuick 7 MQ7087X - BRAUN and take your electronic device back in hand. On this page are published all the documents necessary for the use of your device. MultiQuick 7 MQ7087X by BRAUN.
USER MANUAL MultiQuick 7 MQ7087X BRAUN
natural_image
Exterior view of a Bruh device (no signage or text beyond branding)Type HB701AI
| Deutsch | 7 |
| English | 13 |
| Français | 18 |
| Español | 24 |
| Português | 30 |
| Italiano | 36 |
| Nederlands | 42 |
| Dansk | 48 |
| Norsk | 54 |
| Svenska | 58 |
| Suomi | 63 |
| Polski | 68 |
| Český | 74 |
| Slovenský | 79 |
| Magyar | 84 |
| Hrvatski | 90 |
| Slovenski | 95 |
| Türkçe | 100 |
| Română (RO/MD) 105 | |
| Ελληνικά | 111 |
| Қазақша | 117 |
| Русский | 123 |
| Українська | 130 |
| عربي | 140 |
© Copyright 2018. All rights reserved
De'Longhi Braun Household GmbH
* certain models only
B
natural_image
3D rendered image of a cylindrical mechanical component with flanged base and circular top (no text or symbols)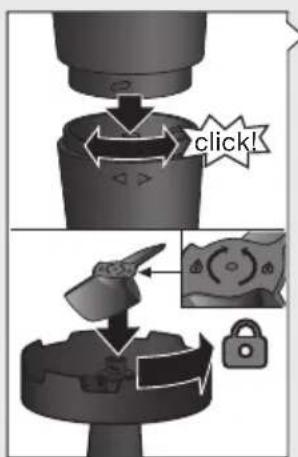


natural_image
Illustration of a hand using a power tool to lift a bowl with a curved arrow indicating flow (no text or symbols)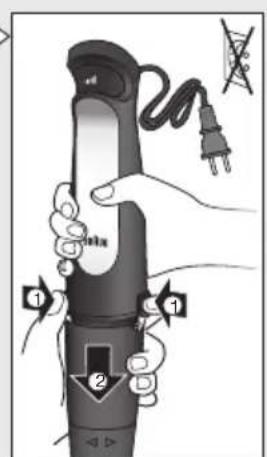
C

natural_image
Illustration of a hand using a manual mixer presser to press or adjust the product (no text or symbols visible)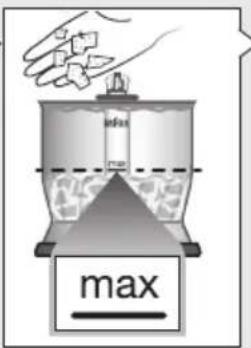
natural_image
Illustration of a blender with liquid and cracked contents (no text or symbols)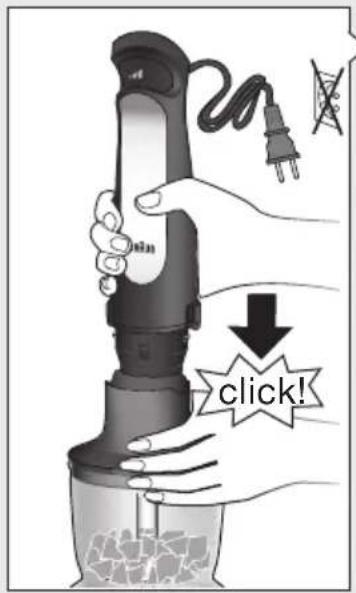
natural_image
Illustration of a hand using a hairdryer to press or install a product, with no visible text or symbols.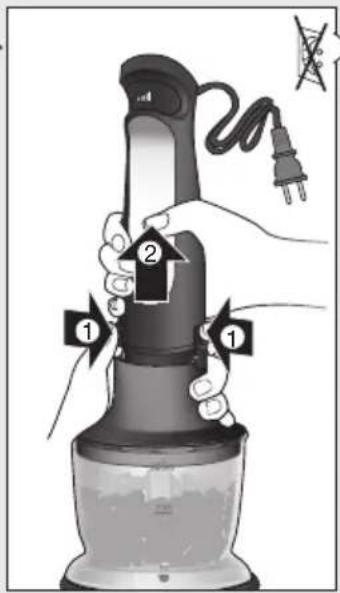
| Parmesan | ||||||||
 |  1cm 1cm |  |  |  | ||||
| max. | 100g | 50g10g | 90g + 25ml | 780g | 80g | 100g | ||
| speed |  |  |  | |||||
 sec. sec. | 15 45 | 555 | 10 5 | 10 | ||||
D

natural_image
Illustration of a kitchen blender with lid and side blades, showing internal components and directional arrows (no text or symbols)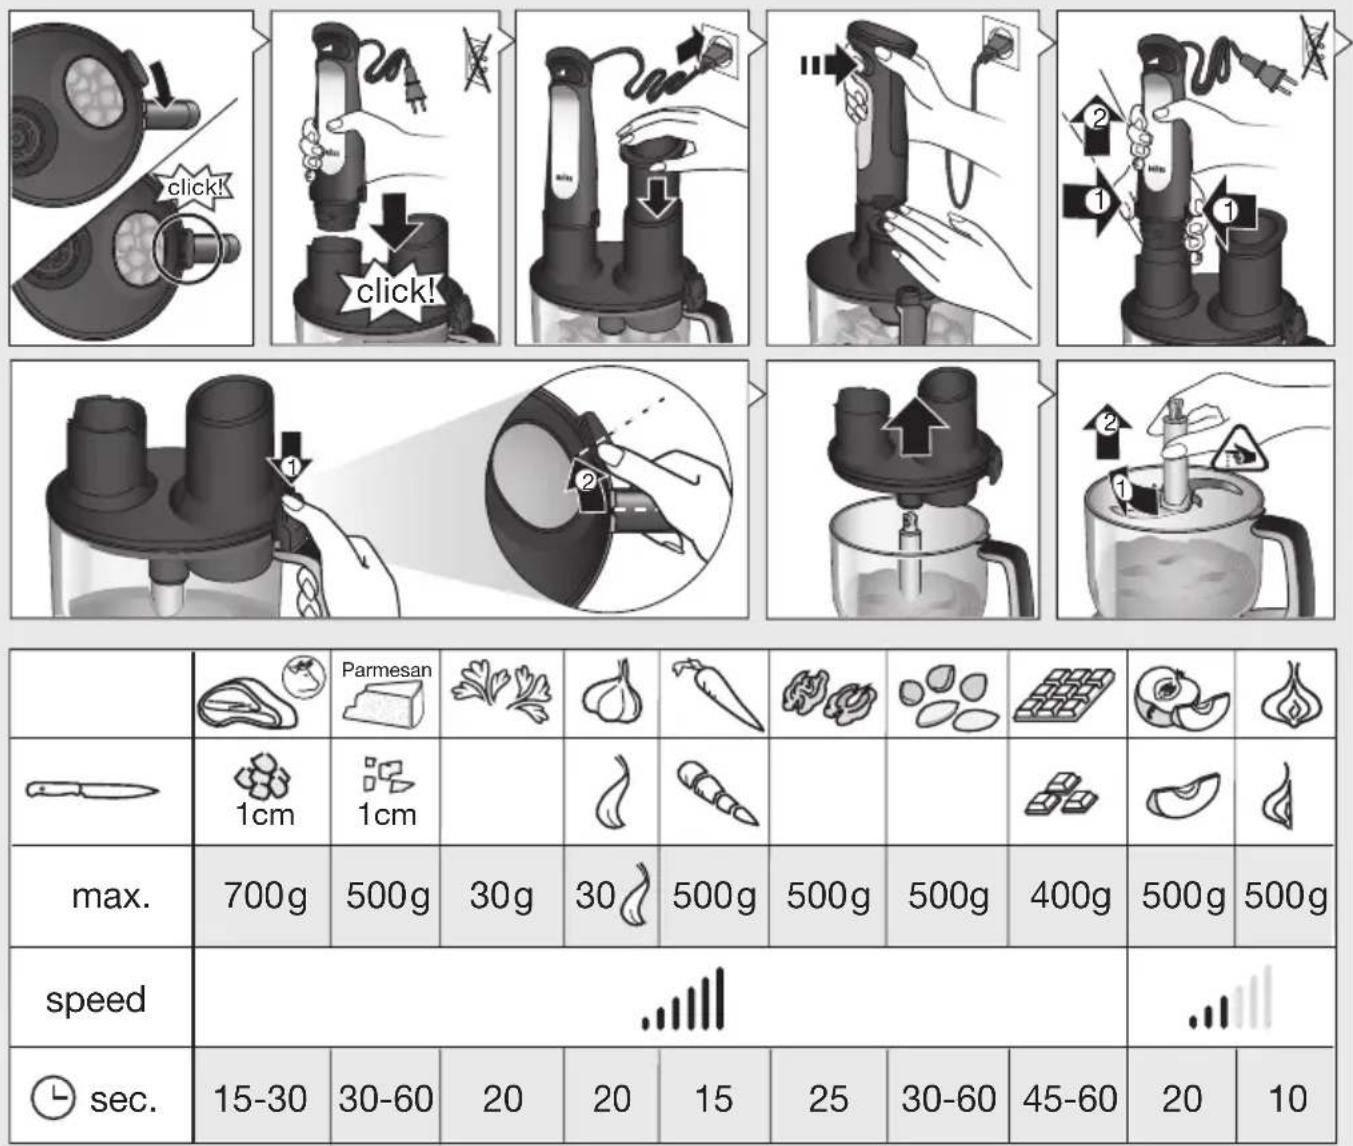
 |  |  |  |  |  |  |  |  | [3SG4] | |
 |  |  |  |  |  |  |  | |||
| max. | 700g | 500g | 30g | 30 | 500g | 500g | 500g | 400g | 500g | 500g |
| speed |  |  | ||||||||
 sec. sec. | 15-30 | 30-60 | 20 | 20 | 15 | 25 | 30-60 | 45-60 | 20 | 10 |
E

1500 ml
natural_image
Illustration of five different mechanical components or tools arranged vertically, with one showing a circular base and others holding circular ends (no text or symbols present)C
natural_image
Illustration of a hand placing a lid into a glass kettle with a downward arrow indicating cooling or residue (no text or symbols)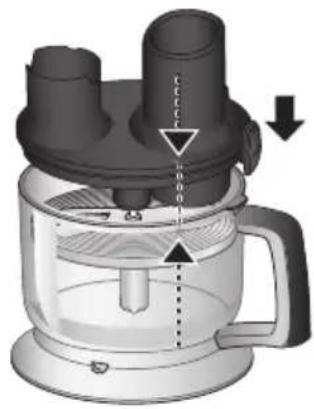
natural_image
Close-up of a mechanical component with a dialog box and arrow, no visible text or symbols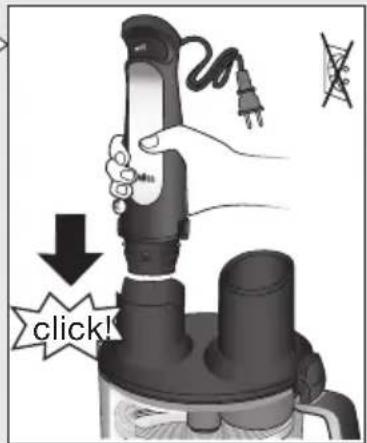
| Parmesan | ||||||||||
 |  |  |  |  |  |  | ||||
| speed | ||||||||||
F
Deutsch
Our products are engineered to meet the highest standards of quality, functionality and design. We hope you thoroughly enjoy your new Braun appliance.
Before Use
Please read instructions carefully and completely before using the appliance.
Caution
• The blades are very sharp! To avoid injuries, please handle blades with utmost care.
- Care shall be taken when handling the sharp cutting blades, emptying the bowl and during cleaning.
- This appliance can be used by persons with reduced physical, sensory or mental capabilities or lack of experience and knowledge if they have been given supervision or instruction concerning use of the appliance in a safe way and if they understand the hazards involved.
- Children shall not play with the appliance.
- This appliance shall not be used by children.
- Children shall be kept away from the appliance and its mains cord.
- If the supply cord is damaged, it must be replaced by the manufacturer, its service agent or similarly qualified persons in order to avoid a hazard.
- Always switch off and unplug the appliance when it is left unattended and before assembling, disassembling, cleaning and storing.
- Before plugging into a socket, check whether your voltage corresponds with the voltage printed on the bottom of the appliance.
- This appliance is designed for household use only and for processing normal household quantities.
- Do not use the appliance for any purpose other than the intended use described in the user manual. Any misuse may cause potential injury.
- Do not use any part in the microwave.
- Please clean all parts before first use or as required, following the instructions in the Care and Cleaning section.
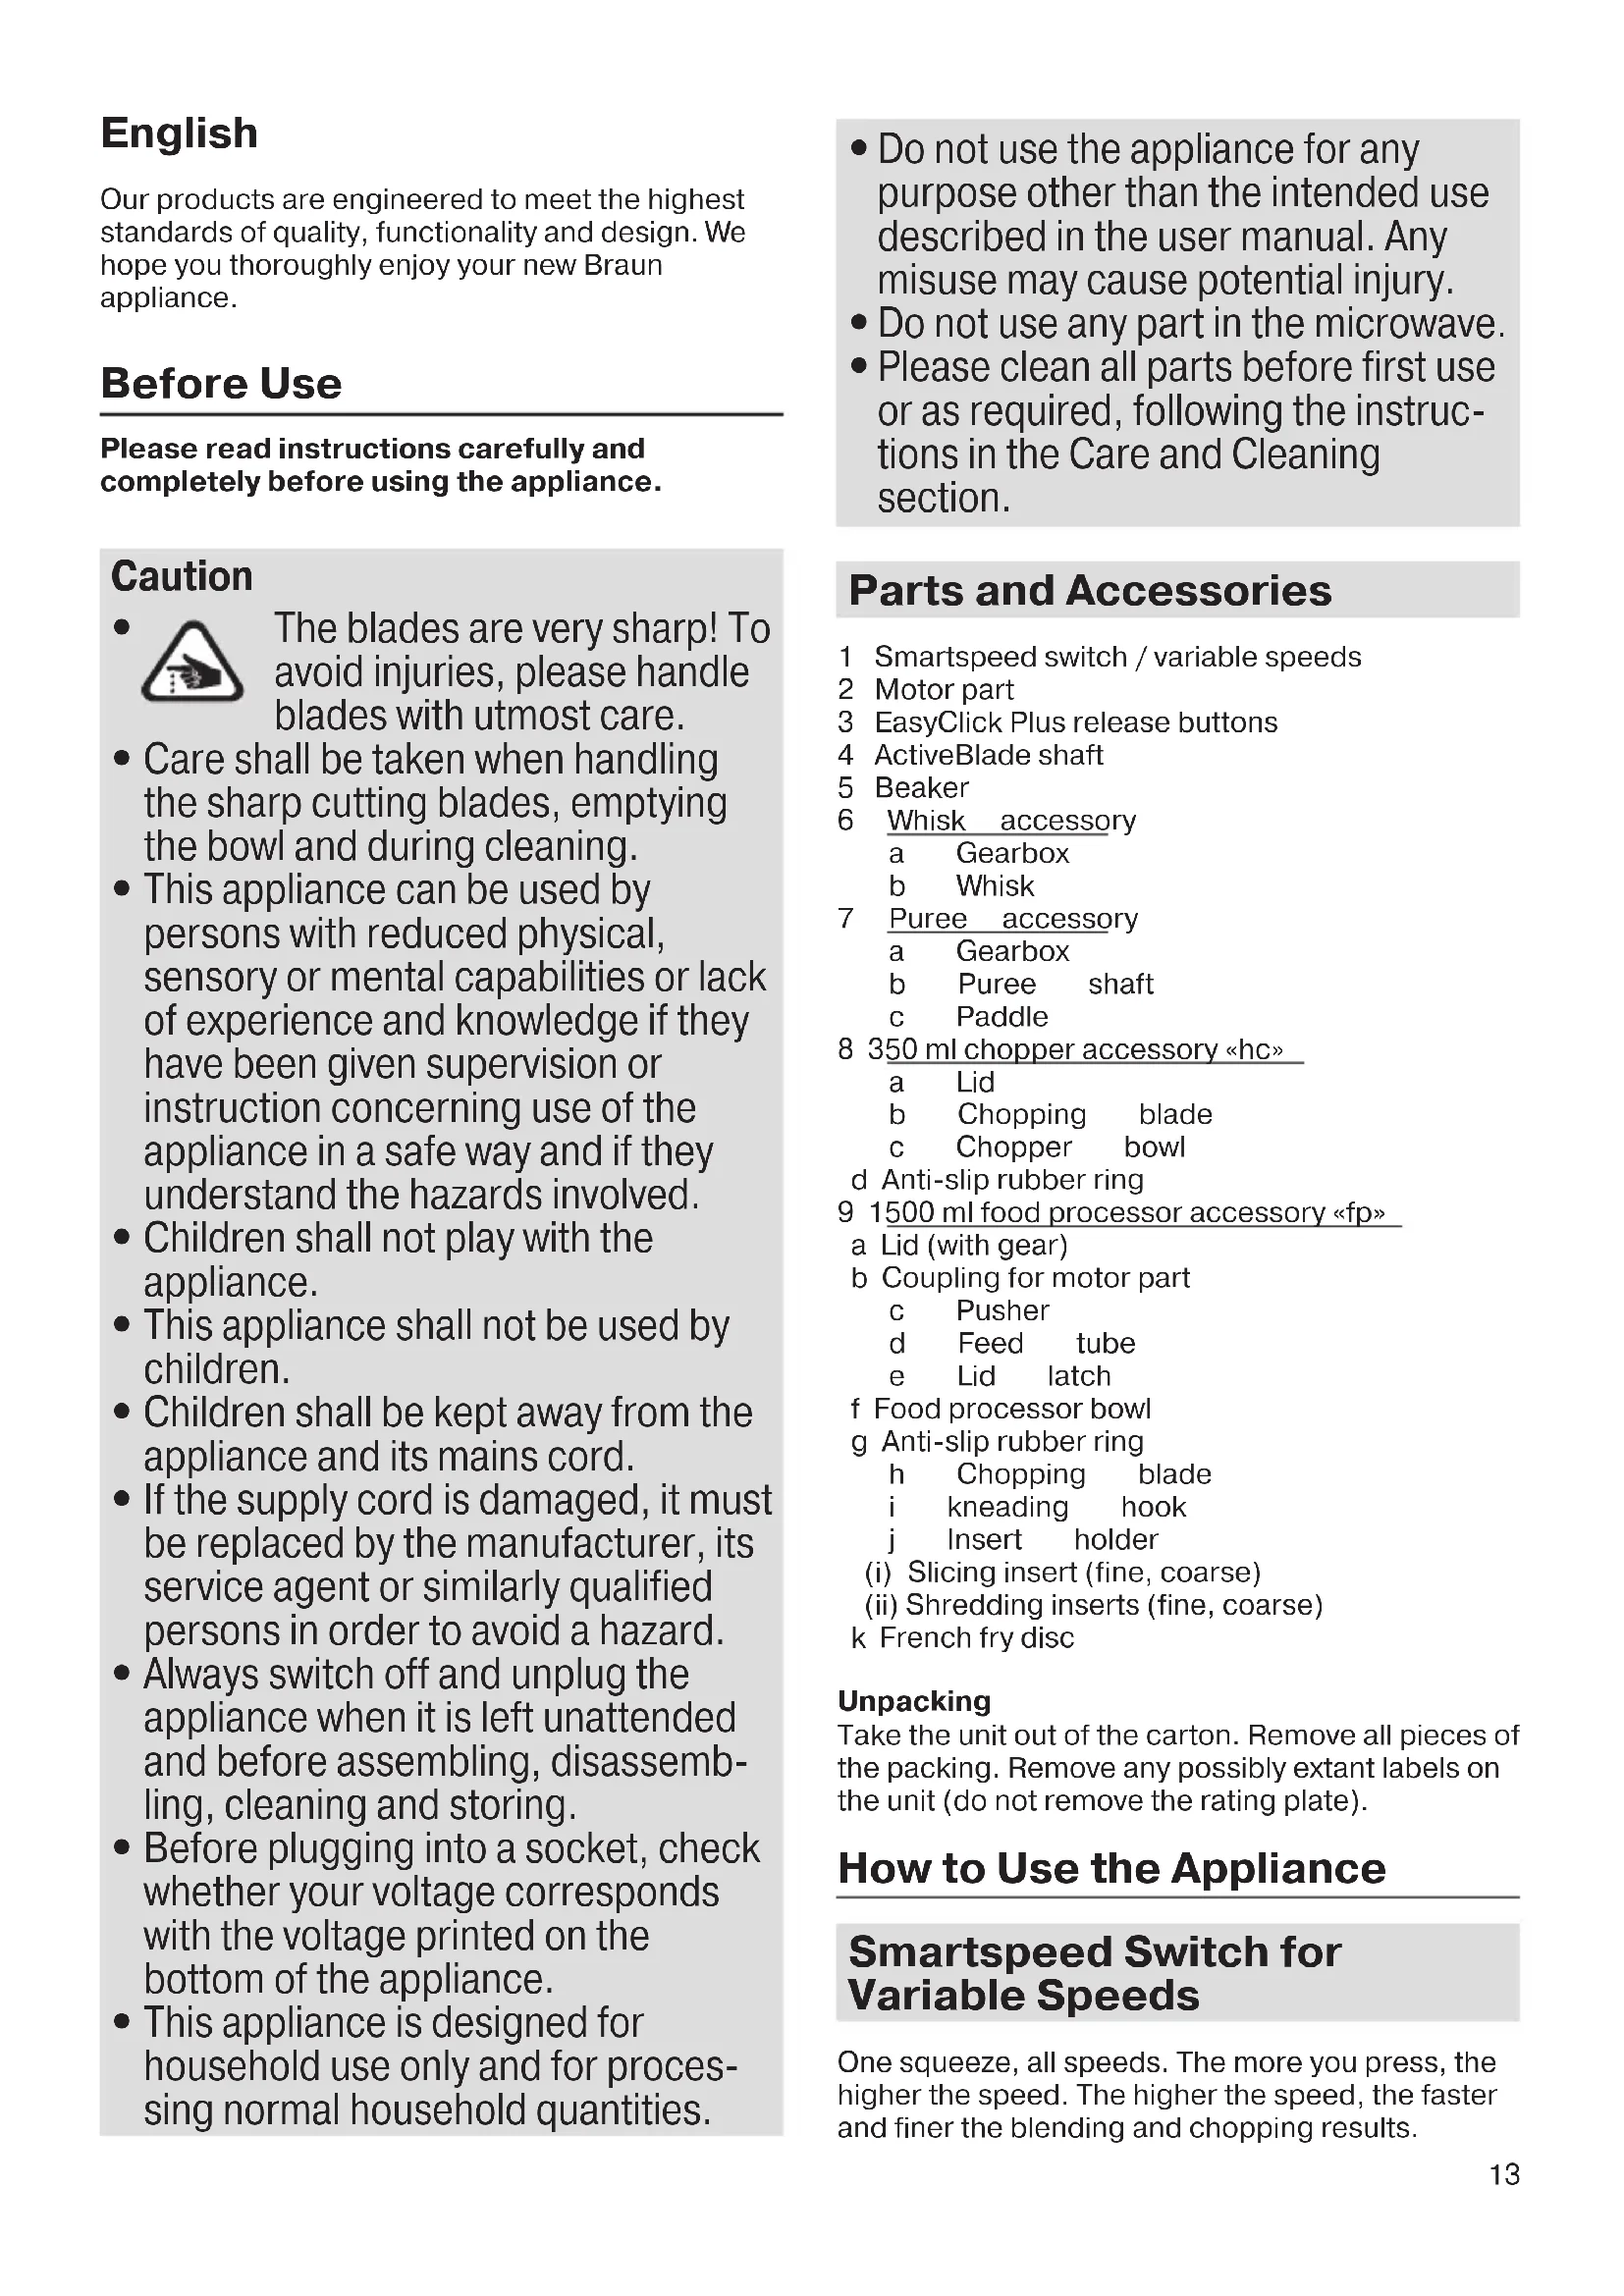
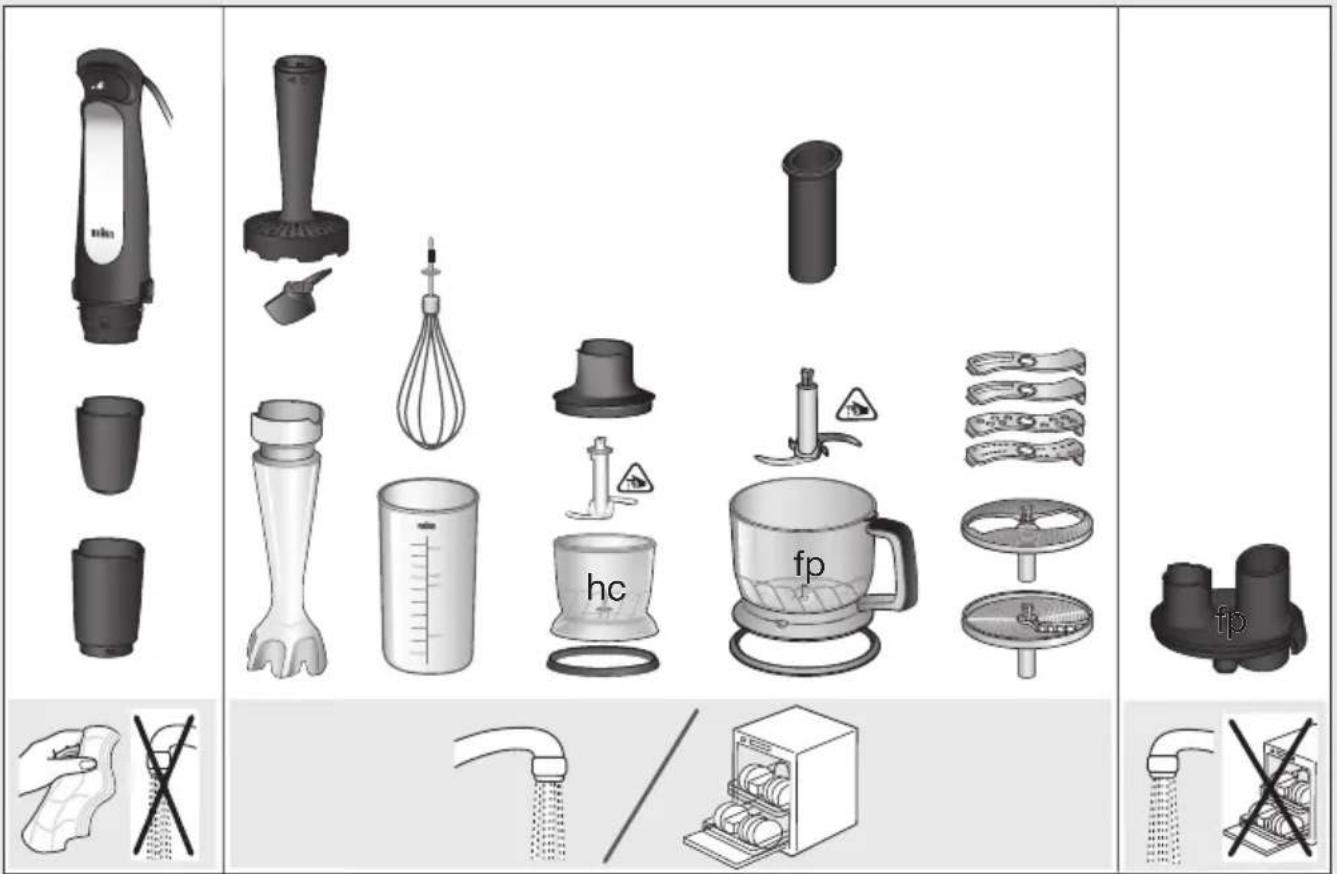
Parts and Accessories
1 Smartspeed switch / variable speeds
2 Motor part
3 EasyClick Plus release buttons
4 ActiveBlade shaft
5 Beaker
6 Whisk accessory
a Gearbox
b Whisk
7 Puree accessory
a Gearbox
b Puree shaft
c Paddle
8 350 ml chopper accessory «hc»
a Lid
b Chopping blade
c Chopper bowl
d Anti-slip rubber ring
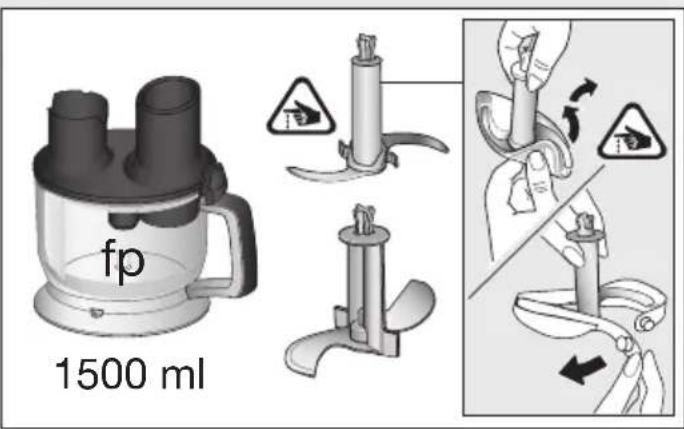
9 1500 ml food processor accessory «fp»
a Lid (with gear)
b Coupling for motor part
c Pusher
d Feed tube
e Lid latch
f Food processor bowl
g Anti-slip rubber ring
h Chopping blade
i kneading hook
j Insert holder
(i) Slicing insert (fine, coarse)
(ii) Shredding inserts (fine, coarse)
k French fry disc
Unpacking
Take the unit out of the carton. Remove all pieces of the packing. Remove any possibly extant labels on the unit (do not remove the rating plate).
How to Use the Appliance
Smartspeed Switch for Variable Speeds
One squeeze, all speeds. The more you press, the higher the speed. The higher the speed, the faster and finer the blending and chopping results.
One handed operation: the Smartspeed switch (1) allows you to turn on the appliance and control the speed with one hand.
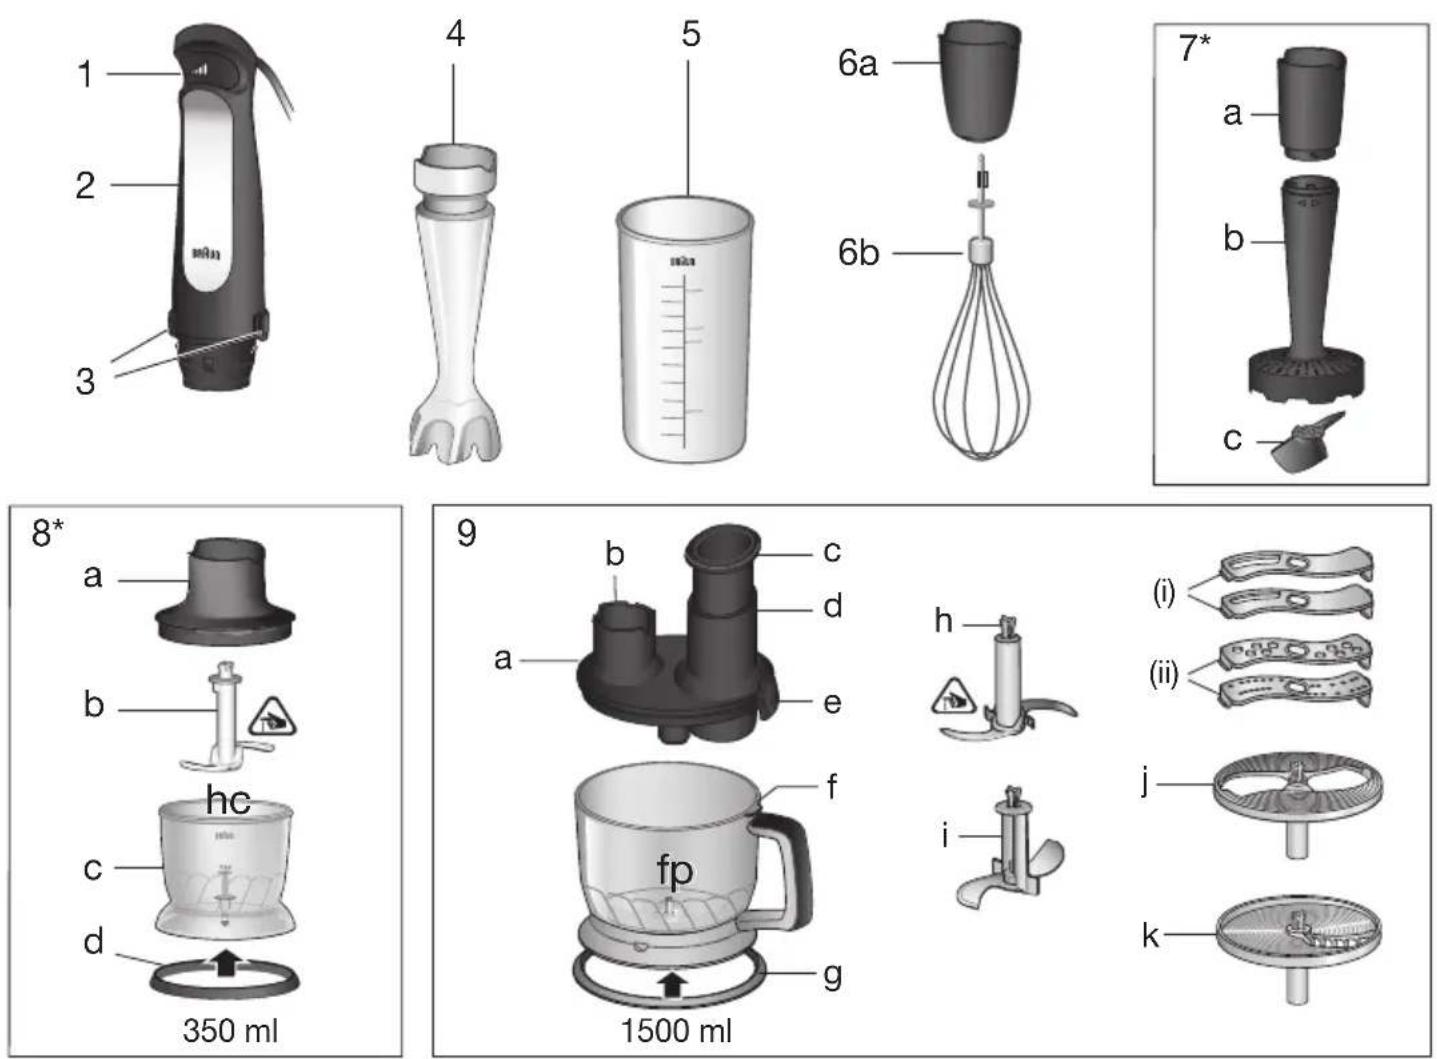
ActiveBlade Shaft (A)
The hand blender is equipped with an ActiveBlade shaft, which enables the knife extend to the bottom of the bell. The adjustment is made automatically by pressure required in blending tasks, especially suited to mix hard foods e.g raw fruits and vegetables.
It is also perfectly suited for preparing dips, sauces, salad dressings, soups, baby food, as well as drinks, smoothies and milkshakes.
For best results, use the highest speed.
Assembly and Operation
- Attach the ActiveBlade shaft (4) to the motor part until it clicks.
- Place the ActiveBlade shaft into the mixture to be blended. Then switch the appliance on as described above.
- Blend ingredients to the desired consistency using a gentle up-and-down motion. Depending on the pressure applied, the ActiveBlade shaft will depress and blade will extend.
- After use, unplug the hand blender and press the EasyClick Plus release buttons (3) to detach the ActiveBlade shaft.
Caution
- Do not let liquids or ingredients overlap the green line of the ActiveBlade shaft.
- If using the appliance to purée hot food in a saucepan or pot, remove the saucepan or pot from the heat source and ensure the liquid is not boiling. Allow hot food to cool slightly to avoid risk of scalding.
- Do not let the hand blender sit in a hot pan on the cooktop when not in use.
- Do not scratch the ActiveBlade shaft over the bottom of pans and pots.
Recipe Example: Mayonnaise
250 g oil (e.g. sunflower oil)
1 egg and 1 extra egg yolk
1–2 tbsp. Vinegar
Salt and pepper to taste
- Place all ingredients (at room temperature) into the beaker in the order as above.
- Place the hand blender at the bottom of the beaker. Blend at maximum speed until the oil starts emulsifying.
- With the hand blender still running, slowly raise the shaft to the top of the mixture and back down to incorporate the rest of the oil.
NOTE: Processing time: approx. 1 minute for salads and up to 2 minutes for a thicker mayonnaise (e.g. for dip).
Whisk Accessory (A)
Use the whisk only for whipping cream, beating egg whites, making sponge cakes and ready-mix desserts.
Assembly and Operation
- Attach the whisk (6b) to the gearbox (6a).
- Align the motor part with the assembled whisk accessory and push the pieces together until they click.
- After use, unplug and press the EasyClick Plus release buttons to detach the motor part. Then pull the whisk out of the gearbox.
Tips for Best Results
- Move the whisk clockwise while holding it at a slight incline.
- To prevent splattering, start slowly and use the whisk accessory in deep containers or pans.
- Place the whisk in a bowl and only then switch the appliance on.
- Always ensure the whisk and mixing bowl are completely clean and free of fat before whisking egg whites. Only whip up to 4 egg whites.
Recipe Example: Whipped Cream
400 ml chilled cream (min. 30% fat content, 4 - 8 °C)
- Start with low speed (light pressure on the switch) and increase the speed (more pressure on switch) while whipping.
- Always use fresh chilled cream to achieve greater and more stable volume when whisking.
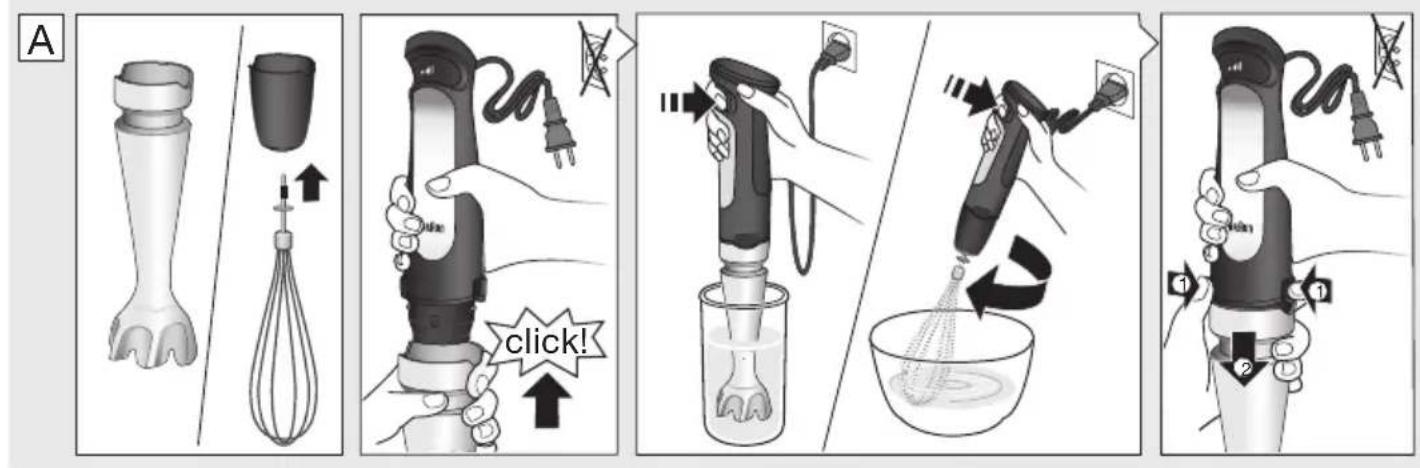
Puree Accessory (B)
The puree accessory can be used to mash cooked vegetables and fruits such as potatoes, sweet potatoes, tomatoes, plums and apples.
Before Use
- Do not mash hard or uncooked food, as this may damage the unit.
- Peel and remove any stones or hard parts; cook and drain then mash the fruit/vegetable.
Assembly and Operation
- Fit the gearbox (7a) to the shaft (7b) by turning in a clockwise direction until it locks into place.
- Turn the puree accessory upside down and fit the paddle (7c) over the central hub and turn counter-clockwise to locate. (If the gearbox is not fitted properly, then the paddle will not secure in place).
- Align the assembled puree accessory with the motor part and click the two parts together. Plug in.
-
Dip the puree accessory into the ingredients and switch on the appliance.
-
Using a gentle up and down motion, move the puree accessory through the ingredients until the desired texture is achieved.
- Release the Smartspeed switch and ensure the puree accessory has completely stopped turning before removing it from the food.
- After use, unplug the appliance. Remove the paddle (7c) by turning clockwise.
- Press the EasyClick Plus release buttons to detach the puree accessory from the motor part. Separate the gearbox from the shaft by turning counterclockwise.
Caution
- Never use the puree accessory in a saucepan over direct heat.
- Always remove the saucepan from the heat and allow to cool slightly.
- Sit the saucepan or bowl on a stable, flat surface, and support it with your free hand.
- Do not tap the puree accessory on the side of the cooking vessel during or after use. Use a spatula to scrape excess food away.
- For best results when mashing never fill a saucepan or bowl more than half full with food.
- Do not process more than one batch without interruption.
- Let the appliance cool down for 4 minutes before you continue processing.
Recipe Example: Mashed Potatoes
1 kg cooked potatoes 200 ml warm milk
- Place the potatoes in a bowl and mash for 30 seconds (3/4 way on the Smartspeed switch).
- Add the milk. Resume mashing for another 30 seconds.
Chopper Accessory (C)
The chopper (8) is perfectly suited for chopping hard cheese, onions, herbs, garlic, vegetables, bread, crackers, nuts and for preparing small portions of baby purée.
Use the «hc» chopper (8) for fine results. It is not suitable for meat.
For «hc» chopper do not exceed the quantity of ingredients higher than max line. Maximum operation time for the «hc» chopper: 1 minute for large amounts of wet ingredients, 30 seconds for dry or hard ingredients.
NOTE: leave an interval of at least 3 minutes before operating again (To prevent faults). Immediately stop processing when motor speed decreases and/or strong vibrations occur.
Refer to the Processing Guide C for maximum quantities, recommended times and speeds.
Before Use
- Pre-cut foods into small pieces for easier chopping.
- Remove any bones, tendons and gristle from meat to help prevent damage to the blades.
- Make sure the anti-slip rubber ring (8d) is attached to the bottom of the chopper bowl.
Assembly and Operation
- Carefully remove the plastic cover from the blade.
- The blade (8b) is very sharp! Always hold it by the upper plastic part and handle it carefully.
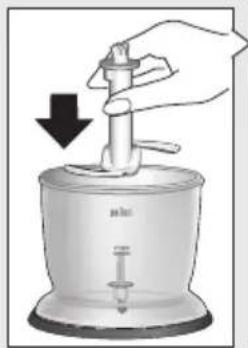
- Place the blade on the center pin of the chopper bowl (8c). Press it down and give it a turn so that it locks into place.
- Fill the chopper with food and put on the lid (8a).
- Align the chopper with the motor part (2) and click together.
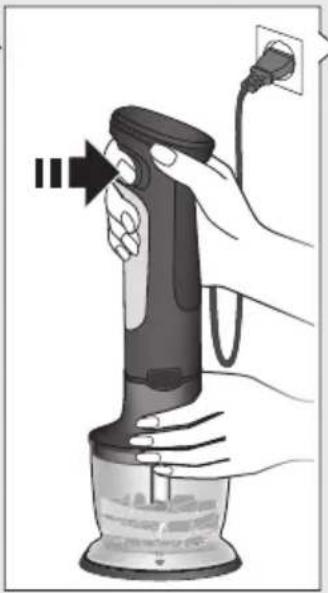
- To operate the chopper, switch on the appliance. During processing, hold the motor part with one hand and the chopper bowl with the other.
- Always chop harder foods (e.g. parmesan cheese) at full speed.
- When chopping is complete, unplug and press the EasyClick Plus release buttons (3) to detach the motor part.
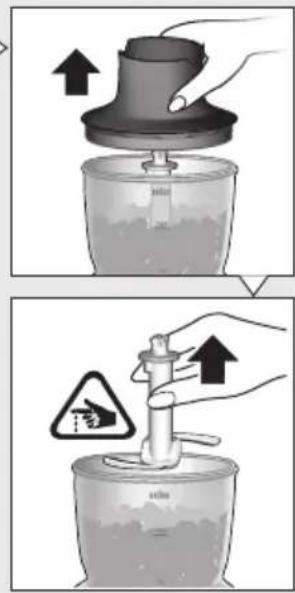
- Lift the lid up. Carefully take out the blade before pouring out the contents of the bowl. To remove the blade slightly turn it then pull it off.
Caution
- Do not use the chopper accessory (8) to process extremely hard foods, such as unshelled nuts, ice cubes, coffee beans, grains, or hard spices e.g. nutmeg. Processing these foods could damage the blades.
- If using the appliance to puree hot food ensure the liquid is not boiling. Allow hot food to cool slightly to avoid risk of scalding.
- Never place the chopper bowls in the microwave oven.
«hc» Recipe example: Honey-Prunes (as a pancake stuffing or spread)
50 g prunes
75 g creamy honey
70ml water (vanilla-flavoured)
- Fill the «hc» chopper bowl with prunes and creamy honey.
- Store at 3 °C in refrigerator for 24 hours.
- Add 70 ml water (vanilla-flavoured).
- Chop 1.5 seconds at maximum speed (fully press the Smartspeed switch).
Food Processor Accessory
The food processor accessory (9) can be used for:
- Chopping, blending and mixing light batter;
- kneading dough (based on max. 250 g flour);
- slicing, shredding and making French fries.
Chopping (D)
Using the blade (9h) you can chop meat, hard cheese, onions, herbs, garlic, vegetables, bread, crackers, and nuts.
Refer to the Processing Guide D for maximum quantities, recommended times and speeds.
Before Use
- Pre-cut foods into small pieces for easier chopping.
- Remove any bones, cartilage, tendons and gristle from meat to help prevent damage to the blades.
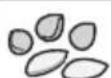
- Remove stems from herbs, shell nuts.
- Make sure the anti-slip rubber ring (9g) is attached to the bottom of the food processor bowl.
Assembly and Operation
- Carefully remove the plastic cover from the blade.
- The blade (9h) is very sharp! Always hold it by the upper plastic part and handle it carefully.
- Place the blade on the center pin of the bowl (9f). Press it down and give it a turn so that it locks into place.
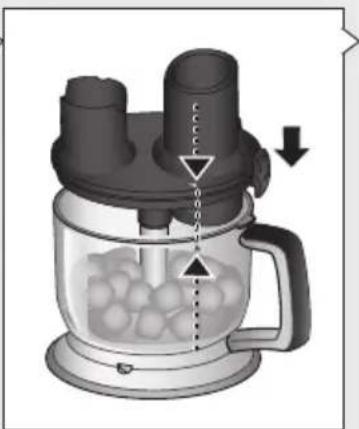
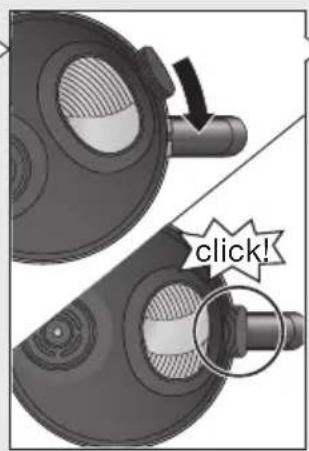
- Fill the bowl with food. Attach the lid (9a) to the bowl with the latch (9e) positioned to the right of the bowl handle and align with marks.
- To lock the lid, turn it clockwise so that the latch engages with a click.
- Insert the motor part (2) into the coupling (9b) until it locks.
- Plug in the appliance and insert the pusher (9c) in the feed tube (9d).
- To operate the food processor, switch on the appliance. During processing, hold the motor part with one hand and the food processor bowl on the handle.
- When chopping is complete, unplug and press the EasyClick Plus release buttons (3) to detach the motor part.
- Press the lid latch (9e) and hold it. Turn the lid (9a) counter-clockwise to unlatch it.
- Lift the lid up. Carefully take out the blade before pouring out the contents of the bowl. To remove and unlock the blade, slightly turn it then pull it off.
Caution
- Do not use the food processor accessory to chop extremely hard foods, such as unshelled nuts, ice cubes, coffee beans, grains or hard spices e.g. nutmeg. Processing these foods could damage the blades.
- Never place the food processor bowl in the microwave oven.
Using the blade (9h), you may also mix light batter like a pancake batter or a cake mixture based on up to 250 g of flour.
Recipe Example: Pancake Batter
375 ml milk
250 g plain flour
2 eggs
- Pour milk into the bowl, then add flour and finally the eggs.
• Using full speed, mix the batter until smooth.
Kneading Dough (D)
Figure F also applies for the use of the kneading hook (9i). The kneading hook is ideal for kneading different dough types such as yeast or pastry.
Assembly and Operation
- Place the kneading hook on the center pin of the bowl (9f). Press it down and give it a turn so that it locks into place.
- Fill the bowl with flour (max. 250 g), then add the other ingredients except the liquids.
- Turn the appliance on with 34 way pressure on the Smartspeed switch.
- Add liquids through the feed tube while the motor is running.
NOTE: Maximum kneading time: 1 minute – then allow the motor to cool down for 10 minutes.
Recipe Example: Pizza dough
250 g plain flour
12 tsp salt
12 tsp dried yeast
5 tbsp olive oil
- Put all ingredients except water into the bowl and start kneading.
- Add water through the feed tube while the motor is running.
Recipe Example: Sweet Pastry
250 g plain flour
170 g unsalted butter (cold/hard, small pieces)
80 g sugar
1 vanilla sugar
1 small egg
1 pinch salt
- Put butter and sugar into the bowl and start kneading. For good results use cold butter.
- Add flour and the rest of the ingredients.
- Dough will become too soft from over kneading. Stop kneading shortly after dough has formed a ball.
- Cool down the dough in the refrigerator for half an hour before proceeding.
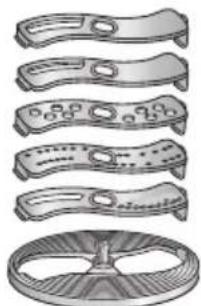
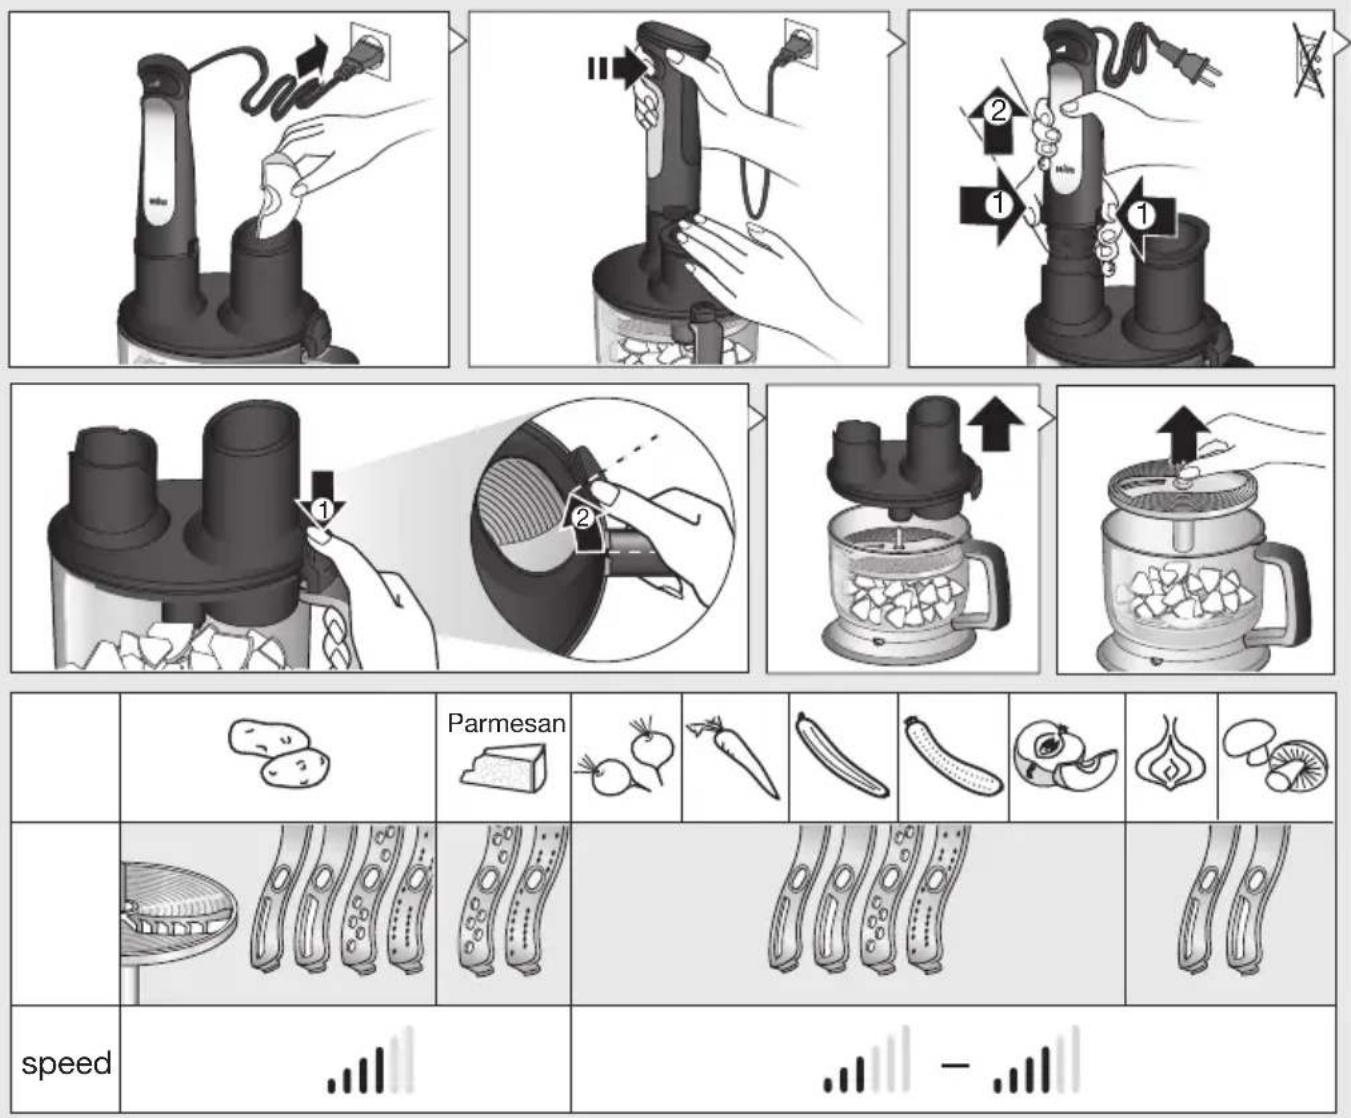
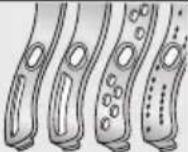
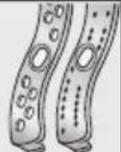
Slicing / Shredding / French Fry (E)
Use the fine and coarse shredding inserts (i) to shred foods such as apples, carrots, potatoes, beetroot, cabbage, hard cheese (like Parmesan). Use the French fry disc (9k) to prepare french fries.
Refer to the Processing Guide E for recommended speeds.
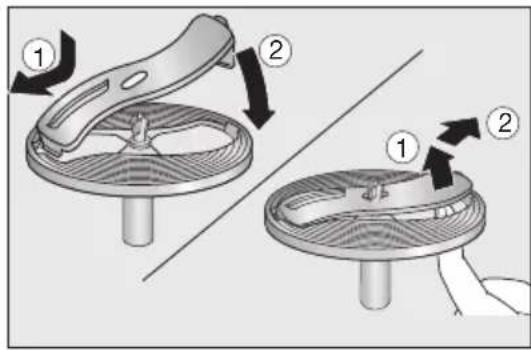
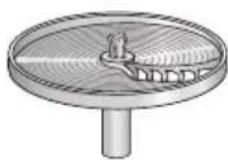
Assembly and Operation
- For slicing and shredding place an insert into the insert holder (9j) and snap into position. Place the assembled insert holder or French fry disc on the center pin of the bowl and give it a turn so that it locks into place.
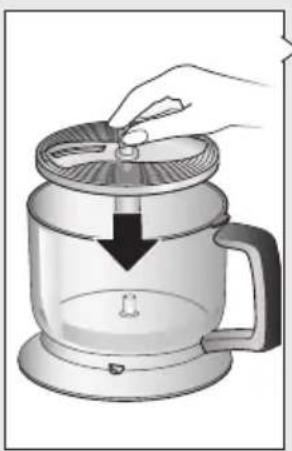
- Attach the lid to the bowl with the latch positioned to the right of the bowl handle.
- To lock the lid, turn it clockwise so that the latch engages with a click.
- Insert the motor part into the coupling until it locks.
- Plug in the appliance and insert the food to be processed into the feed tube.
- For best French fry results, place 3-4 potatoes (depending on the size) in the feed tube of the lid while the motor is switched off.
- Switch the appliance on to operate. Never reach into the feed tube when the appliance is switched on. Always use the pusher to feed in food.
- After use, unplug and press the EasyClick Plus release buttons to detach the motor part.
- Press the lid latch and hold it. Turn the lid counter-clockwise to unlatch it.
- Lift the lid up. Carefully take out insert holder or French fry disc before pouring out the contents of the bowl. To remove the insert holder or French fry disc, slightly turn it then pull it off.
- To remove an insert, push it up at the one end that protrudes at the bottom side of the insert holder.
Care and Cleaning (F)
- Always clean the hand blender and the suitable accessories thoroughly for first use and after every use with water and detergent.
- Unplug hand blender before cleaning.
- Do not immerse the motor part (2) or gearboxes (6a, 7a) in water or any other liquid. Clean with a damp cloth only.
- The lid (10a) can be rinsed under running water. Do not immerse in water, nor place in a dishwasher.
- All other parts can be cleaned in a dishwasher. Do not use abrasive cleaners that could scratch the surface.
- You may remove the anti-slip rubber rings from the bottom of the bowls for an extra thorough clean.
- When processing foods with high pigment content (e.g. carrots), the accessories may become discolored. Wipe these parts with vegetable oil before cleaning them.
Both the design specifications and these user instructions are subject to change without notice.
Please do not dispose of the product in the household waste at the end of its useful life. Disposal can take place at appropriate collection points provided in your country.

Materials and accessories coming into contact with food conform to EEC regulation 1935/2004.

For UK Only
Guarantee Information
All Braun Household products carry a minimum guarantee period of two years. The rights and benefits under this guarantee are additional to your statutory rights which are not affected.
Please keep your receipt as this will form the basis of your guarantee.
In the unlikely event of a breakdown you have access to professional help from our team simply by calling:
02392 392333
For service in the Republic of Ireland please call:
012475471
Braun Household undertakes within the specified period to repair or replace any part of the appliance, free of charge (with the exception of any glass or porcelain-ware incorporated in the product) found to be defective provided that;
• We are promptly informed of the defect.
- The product is used and maintained in accordance with the User Instructions.
- The appliance has not been altered in any way or subjected to misuse or repair by a person other than an authorised service agent for Braun Household.
- No rights are given under this guarantee to a person acquiring the appliance second hand or for commercial or communal use.
- Any repaired or replaced appliance will be guaranteed on these terms for the unexpired portion of the guarantee.
- The need for repair has not been caused by insufficient aftercare or cleaning: or damage caused by the chemical or electrochemical effects of water.
Under no circumstances shall the application of this guarantee give rise to the complete replacement of the appliance or entitle the consumer to damages.
Braun Household, New Lane, Havant, Hampshire PO9 2NH
www.braunhousehold.co.uk
Thank You for choosing Braun. We are confident that you will get excellent service from this product.
TO IMPROVE YOUR EXPERIENCE
Register now at www.braunhousehold.co.uk By registering we may send you from time to time details on exclusive offers, promotions, recipes and inside tips.
Français
Smartspeed bryter for variable hastigheter
Nasadka ActiveBlade (A)
Beybi Giz Plaza D:53-54 Maslak/İTANBUL
DLB Tuketici Hizmetleri
444 27 64
info@braunhousehold.com.tr