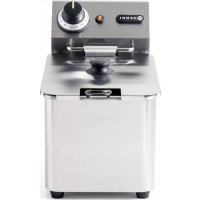
Electric Donut Fryer 205914 - Deep fryer Hendi - Free user manual and instructions
Find the device manual for free Electric Donut Fryer 205914 Hendi in PDF.

| Appliance type | Electric donut fryer |
| Brand | Hendi |
| Model | 205914 |
| Power supply | 230 V / 50 Hz, 3500 W |
| Tank capacity | 12 L |
| Temperature range | 50 °C to 190 °C |
| Dimensions (with drip tray) | 630 x 860 x 360 mm |
| Net weight | 16.3 kg |
| Protection class | Class I |
| Protection rating | IPX3 |
| Number of grids provided | 2 frying grids + 1 lower grid |
| Main material | Stainless steel |
| Oil drain valve | Yes |
| Main switch with indicator | Yes (on/off, green) |
| Temperature display | Orange indicator light |
| Safety thermal fuse | Yes, with reset button |
| Recommended use | Professional (commercial) |
| Cleaning | Manual, do not immerse or use high-pressure cleaner |
| Warranty | 12 months |
| Included accessories | Drip tray, frying grids |
Frequently Asked Questions - Electric Donut Fryer 205914 Hendi
User questions about Electric Donut Fryer 205914 Hendi
0 question about this device. Answer the ones you know or ask your own.
Ask a new question about this device
Download the instructions for your Deep fryer in PDF format for free! Find your manual Electric Donut Fryer 205914 - Hendi and take your electronic device back in hand. On this page are published all the documents necessary for the use of your device. Electric Donut Fryer 205914 by Hendi.
USER MANUAL Electric Donut Fryer 205914 Hendi
You should read this user manual carefully before using the appliance.
Thank you for purchasing this Fiesta Queen appliance. Before using the appliance for the first time, please read this manual carefully, paying particular attention to the safety regulations outlined below.
Safety regulations
- This appliance is intended for commercial use only and must not be used for household use.
- The appliance must only be used for the purpose for which it was intended and designed. The manufacturer is not liable for any damage caused by incorrect operation and improper use.
- Keep the appliance and electrical plug away from water and any other liquids. In the event that the appliance should fall into water, immediately remove plug from the socket and do not use until the appliance has been checked by a certified technician. Failure to follow these instructions could cause a risk to lives.
- Never attempt to open the casing of the appliance yourself.
- Do not insert any objects in the casing of the appliance.
- Do not touch the plug with wet or damp hands.
- Danger of electric shock! Do not attempt to repair the appliance yourself. In case of malfunctions, repairs are to be conducted by qualified personnel only.
- Never use a damaged appliance! Disconnect the appliance from the electrical outlet and contact the retailer if it is damaged.
- Warning! Do not immerse the electrical parts of the appliance in water or other liquids. Never hold the appliance under running water.
- Regularly check the power plug and cord for any damage. If the power plug or power cord is damaged, it must be replaced by a service agent or similarly qualified persons in order to avoid danger or injury.
- Make sure the cord does not come in contact with sharp or hot objects and keep it away from open fire. To pull the plug out of the socket, always pull on the plug and not on the cord.
- Ensure that the cord (or extension cord) is positioned so that it will not cause a trip hazard.
- Always keep an eye on the appliance when in use.
- Warning! As long as the plug is in the socket the appliance is connected to the power source.
- Turn off the appliance before pulling the plug out of the socket.
- Never carry the appliance by the cord.
- Do not use any extra devices that are not supplied along with the appliance.
- Only connect the appliance to an electrical outlet with the voltage and frequency mentioned on the appliance label.
- Connect the power plug to an easily accessible electrical outlet so that in case of emergency the appliance can be unplugged immediately. To completely switch off the appliance pull the power plug out of the electrical outlet.
-
Always turn the appliance off before disconnecting the plug.
-
Never use accessories other than those recommended by the manufacturer. Failure to do so could pose a safety risk to the user and could damage the appliance. Only use original parts and accessories.
- This appliance is not intended for use by persons (including children) with reduced physical, sensory or mental capabilities, or lack of experience and knowledge.
- This appliance must not be used by children under any circumstances.
- Keep the appliance and its cord out of reach of children.
- Always disconnect the appliance from the mains if it is left unattended or is not in use, and before assembly, disassembly or cleaning.
- Never leave the appliance unattended during use.
Special safety precautions
- This appliance is intended only for frying appropriate food such as donut, fries, etc in commercial use. Any other use may lead to damage of the appliance or personal injury.
- This appliance is intended to be used for commercial applications, for example in kitchens of restaurants, canteens, hospitals and in commercial enterprises such as bakeries, butcheries, etc., but not for continuous mass production of food. And it should be operated by trained personnel.
- Caution! Hot surface! The temperature of the accessible surface is very hot during use. Touch the switch and the temperature control knob only.
- When this appliance is to be positioned in close proximity to a wall, partitions, kitchen furniture, decorative finishes, etc., it is recommended that they are made of non-combustible material; if not, they shall be cladded with a suitable non-combustible heat insulating material, and that the closest attention be paid to fire prevention regulations.
- Do not place the appliance on a heating object (gasoline, electric, charcoal cooker, etc.). Keep the appliance away from any hot surfaces and open flames. Always operate the appliance on a level, stable, clean, heat-resistant and dry surface.
- Do not use the appliance near explosive or flammable materials, credit cards, magnetic discs or radios.
- This appliance is not intended to be operated by means of an external timer or separate remote-control system.
- WARNING: Always make sure the oil level between MAX & MIN marking in the oil container. Danger of fire if oil level below MIN marking.
- WARNING: Do not fry too wet foodstuffs and too much food at each time to avoid excessive foaming and spill out of oil. Maximum batch load is approximately 1kg.
- Allow at least 20~cm spacing around the appliance for ventilation purpose during use after install the frying grid holder.
- Only use suitable oil or fat for frying. Replace the oil or fat at regular intervals. Over cooked or dirty oil or fat can be ignited if it is overheated.
- Do not use plastic cutlery during operation.
-
Danger! Never use old oil, old oil has a reduced flash point and is more prone to surge boiling which increases the risk of fire and dangerous situations.
-
Always clean the appliance and other accessories after each use - - > Cleaning and maintenance).
- Do not use water jet, flush directly with water or steam cleaner as the parts will get wet and electric shock might be resulted.
- Caution! Securely route the power cord if necessary in order to prevent unintentional pulling or contact with the heating surface.
- Do not wash the appliance with water. Washing can cause leakages and increase the risk of electric shock.
- Do not clean or store the appliance unless it is completely cooled down.
- Always remove the plug from the socket when filling or cleaning the appliance.
- The electrical installation must satisfy the applicable national and local regulations.
- The oil container with heating element should be placed in a safe position in your kitchen before usage due to the hot contents when in use.
- No part is dishwasher safe.
Intended use
- The appliance is intended for professional use and can be operated only by qualified personnel.
-
This appliance is intended only for frying appropriate food such as donut, fries, etc in commercial use. Any other use may lead to damage of the appliance or personal injury.
-
Operating the appliance for any other purpose shall be deemed a misuse of the device. The user shall be solely liable for improper use of the device.
Grounding installation
This appliance is classified as protection class I appliance and must be connected to a protective ground. Grounding reduces the risk of electric shock by providing an escape wire for the electric
current. This appliance is equipped with a cord having a grounding wire with a grounding plug. The plug must be plugged into an outlet that is properly installed and grounded.
Preparations before using for the first time
- Check to make sure the appliance is undamaged. In case of incomplete delivery (2 frying grids & 1 bottom grid included) or any damages, contact your supplier immediately and DO NOT use the appliance.
- Remove all the packing material and protection film (if applicable).
-
Clean the appliance with luke-warm water and a soft cloth.
-
Place the appliance on a level and steady surface, unless mentioned otherwise.
- Make sure there is enough clearance around the appliance for ventilation purposes. Especially, allow enough spacing for placing the frying grid holder [8].
- Position the appliance in such a way that the plug is accessible at all times.
Installation
- Place the appliance on a level, stable, clean, heat-resistant and dry surface with its rubber feet.
- Carefully install the back support with heating element (4) on the rear edge of the oil container.
- Place the bottom grid (9) at the bottom of the oil container (5).
- Set up the frying grid holder (8) on either right or left side of the oil container (5).
Note:
-
Make sure that the rear support is in the correct position & properly inserted into 2 slots at 2 sides of the oil container [5].
-
The appliance should be placed in a safe position in your kitchen before use due to heat hazard when in use.
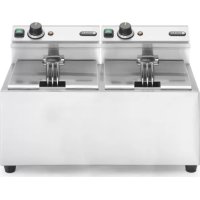
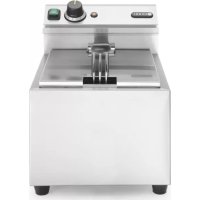
Main parts of the appliance

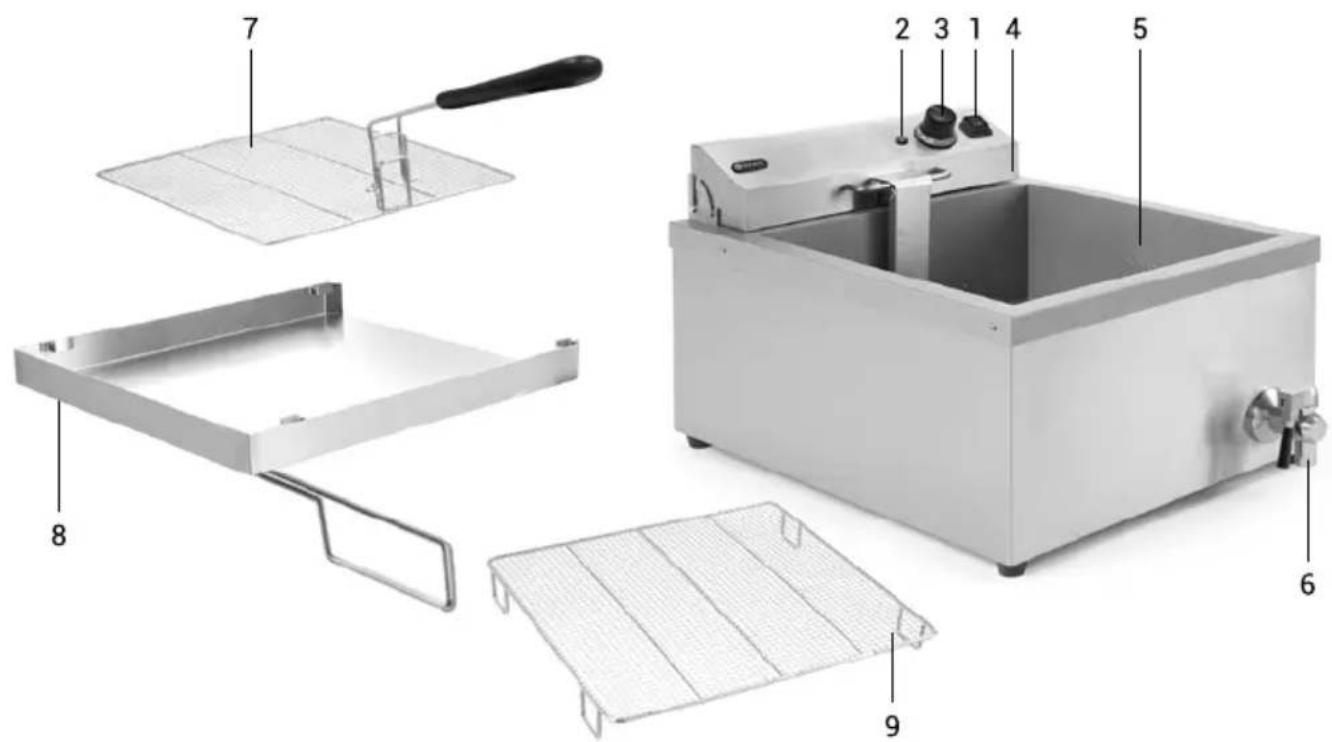
- Main switch (Green) [ON (I) / OFF (0)]
- Temperature indicator [Orange]
- Temperature control
- Detachable rear support with heating element
-
Oil container [400× 400× (H)160mm]
-
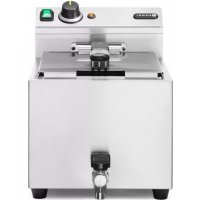
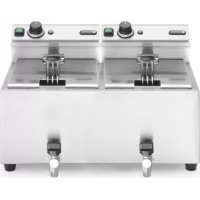
Oil drain tap
- Frying grid [2x354x383x(H)102mm]
- Frying grid holder (1x 423x446x(H)40 mm)
- Bottom grid (1x 390x365x[H]40 mm)
Use
- Make sure the oil drain tap is closed.
- Remove the plug from the socket.
-
Make sure the oil container is clean and dry and no water inside.
-
Carefully fill the oil container with oil between the "MIN" and the "MAX" marking.
- Plug the earthed plug into an earthed socket.
- You can now use the appliance.
Operation
- Fill the container (5) with oil and make sure the oil level is between the MIN and MAX marking.
Note: Remember that placing food in the oil will also raise the oil level. Do not put too wet food-stuffs or large amount of food at each time. - Connect the power plug to a suitable electrical power outlet.
-
Switch ON the appliance by pressing the main switch (1) to the "1" position. The switch will light up in green. Rotate the temperature control (3) clockwise to the desired Set Temperature. The orange indicator (2) will light up. [Temperature range: 50^ MAX(190^) ].
-
When the set temperature is reached, the orange indicator (2) will go out. Now, you can use the appliance.
Note: The frying grid holder (8) is just for temporarily holding of frying grid for excess oil discharge only. Do not hold too long time or place other objects on it to prevent from falling down accidentally.
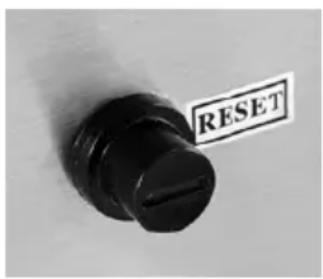
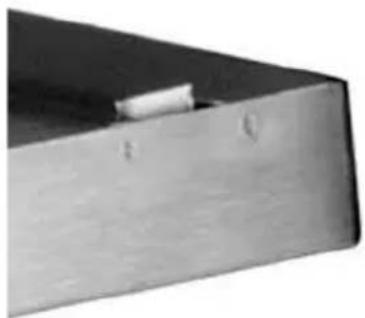
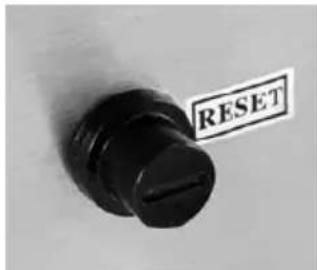
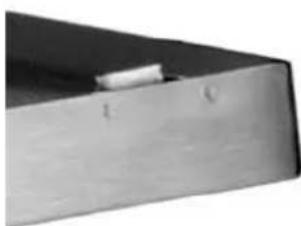
RESET the Hi-limiter (thermal cut-out)
Please note that the RESET button is located at the back of the detachable rear support [4] with a protective cap (see picture) to avoid overheat.
- Unplug the appliance from the electrical outlet first.
- Allow the appliance to completely cool down.
- Unscrew the black protective cap of the RESET button.
-
Press the RESET button of the Hi-limiter (thermal cut-out). You should hear a click sound.
-
Screw back the protective cap on the RESET button.
EN
Frying tips
- Only use liquid frying oil (preferably) or fat.
- The recommended temperature for frying chips and snacks is 175^ .
- Heat the oil slowly. Preferably in 3 steps for example first at 100^ , then from 100 - 140^ and later from 140^ to 175^ with 15 minutes breaks between steps.
- Remove ice and crumbs from frozen foods.
-
Do not fry too much at one time. This can cause the oil or fat to cool down too much. Cooled down oil/fat does not properly sear the surface of the food, so that more fat will be absorbed. The ideal proportion of frozen products to frying oil / fat is 1:10 maximum.
-
When used intensively, crumbs and other debris should be filtered out of the oil/fat.
- Replace oil or fat in time. Use test strips or test equipment regularly to track when oil/fat should be replaced.
- If oil or fat starts to foam, smoke or gets too viscous you should replace it. Also replace the oil/fat when it has a strong smell or taste.
After use
- Switch OFF the appliance by pressing the main switch (1) to the "0" position and unplug the appliance.
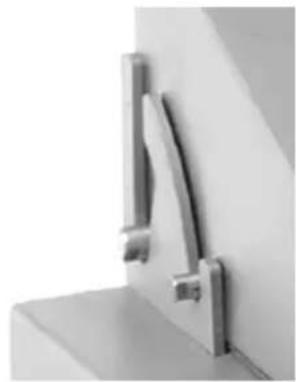
- Remove the frying grid (7) from the oil container (5). This avoids the frying grid (7) becoming stuck in the solidified fat.
- Overturn the frying grid holder (8) & place it on the top of oil container (5) with 4 raised stoppers (see picture) in the right position.
Cleaning and maintenance
Always remove the plug from the socket and let it cool down completely before cleaning the appliance.
- Beware: Never immerse the appliance in water or any other liquid!
- Clean the outside of the appliance with a damp cloth (water with mild detergent).
- Never use aggressive cleaning agents or abrasives. Do not use any sharp or pointed objects.
Do not use petrol or solvents! Clean with a damp cloth and detergent if necessary. Do not use abrasive materials.
- Do not clean the appliance with steam cleaner or water jet.
- Assemble the appliance after cleaning and make sure that the heating & control panel is mounted properly, otherwise the appliance will not function.
Technical specification
Protection class: Class I
EN Waterproof protection class: IPX3
| Item Dim | ension after placing the frying grid holder [mm] | Capacity [L] | Rated wattage [W] | Temperature range [°C] | Operating voltage [V] | Total net weight [kg] |
| 205914 63 | 0x860x[H]360 12 3500 50 - 1 | 190 230 16,3 |
Troubleshooting
If the appliance does not function properly, please check the below table for the solution. If you are still unable to solve the problem, please contact the supplier/service provider.
| Problems Possible causes Possible solutions | ||
| The appliance does not switch ON. The main switch (1) does not light up in green. | Power plug is not connected properly with the electrical power outlet. | Make sure the power plug is connect- ed properly with the electrical power outlet. |
| The main switch (1) is not pressed. | Press the main switch (1) to the "I" position. | |
| The rear support with heating ele- ment (4) is not properly mounted. | Properly placed the rear support with heating element (4) on the oil contain- er (5). | |
| Inside microswitch is defective. Contact your supplier. | ||
| The appliance does not heat up and temperature indicator (2) does not light up. But main switch (1) lights up in green. | Hi-limiter (thermal cut-out) activates. | Reset the Hi-limiter (thermal cut-out) (See => RESET the thermal cut-out). |
| Hi-limiter (thermal cut-out) defective. | Contact your supplier. | |
| Temperature control (3) defective. Contact your supplier. | ||
| Appliance does not reach the set tem- perature after long frying time. | Heating element defective Contact your supplier. | |
| Temperature control (3) defective. Contact your supplier. | ||
In case of any doubt, always contact your supplier!
Warranty
Any defect affecting the functionality of the appliance which becomes apparent within one year after purchase will be repaired by free repair or replacement provided the appliance has been used and maintained in accordance with the instructions and has not been abused or misused in any way. Your statutory rights are not affected. If the appliance is claimed under warranty, state where and
when it was purchased and include proof of purchase (e.g. receipt).
In line with our policy of continuous product development we reserve the right to change the product, packaging and documentation specifications without notice.
Discarding & Environment
When decommissioning the appliance, the product must not be disposed of with other household waste. Instead, it is your responsibility to dispose to your waste equipment by handing it over to a designated collection point. Failure to follow this rule may be penalized in accordance with applicable regulations on waste disposal. The separate collection and recycling of your waste equipment at the time of disposal will help conserve natural re
sources and ensure that it is recycled in a manner that protects human health and the environment. For more information about where you can drop off your waste for recycling, please contact your local waste collection company. The manufacturers and importers do not take responsibility for recycling, treatment and ecological disposal, either directly or through a public system.
3HOBy npNKpyTnT 3axnCHN KOBnaQOK KhoNkI RESET.
PeKoMeHndaui no cMaXeHHIO
-ДясmaжehнвикористовытBuNKJIIOHOp pIDKy onio(peKOMeHNOBaHy)aboJnp.
- PekomehnoBaHa TemnepaTpya cMaXeHHN dJa KApToJIΦn i3akvoc tAHOBNTb 175°C.
HarpibaTn onio noctynoBO. HauKpaue harpibaTn Knp B Tpu etanu: cnoaatky do 100°C, notim do 100-140°C i notim Bd 140°C do 175°C 3 15-XBUNHHMN nepepbAMM Mx KoxHM eTANOM.
BuaTn i kpxtn 3 amopoxhen npdyktiXapyBaHH.
He cmaxkntn 3aHaTo BeNki npu. Ie moKe npnbectn Do 3HnXeHHa Tempeatypn oIi a60 knpy.Octnra onia /xnp He o6cmaxkntb nobepxHIO npodyktB BiINOBiHNm YHOM i npNBede do
niBnueHOro B6npaHHxNpy. IdeaIbHa nponopzir 06cary 3amOpoxeHnx npOdyKtIB i 06cary oii /xNpy CTAHOBHT MaKcMym 1:10.
- Y pa3i iHTeHcNBHOI eKcnnyatau cIi d fiNbtpyBaTOnIO /xnpB iD KpuxT i BiXoDiB.
Heo6xio CBOeacHO mHrTO onIO aO xnp B p6- naHaHHI. 06 nepeBipuTn, KOJ noTpioHo noro 3aMHNTn, cII peyraepHO BkOpncToByBatn IHNKaTopHi CMyKKn aO bctyoui npucptoi.
JaKuo oni/ xnp noHne nIHnTnc, dHmTi a6o cTaHe 3aHaTTO JnPKM, cnIg Noro 3amHNTu. JaKuo oni Mae CnBn Hn 3anax a6o cMaK, cnIg II 3amHNTu.
Пиля Викорпстань
BumKHyTu 06laHaHHa 3a DOnOMoTO roOBHO
rO BUMnKaay (1) - BCTaHOBTu B NoIOJKeHHA 0 i
BnHrTu BNky 3 pOeTKU.
BnHrtn rpatn (7) 3 BaHHn dIa oII (5). 3aBdAnuOmy peiItka (7) He 3actnHe B rYctOMy Xnpy.
-ПовернлNBи nIDOn [8),noCTaBHTnHaBepxBaHHnIgOII(5)i3akpinTu 3aDOnOMoIO4 3aTnCKaivB(INBNCbMaIOHOK),BCTaHOJIIOUHyNOrOBiDNOBIDHomYNoJoxeHHI.
YnueHHa Ta DOrJa
- NepH HIX npntyHTn Do YUeHH, Heo6xIDHO BIDKIOHTN ObnaHaHH BID DKepeNa XNBHeHH i DaTn NobHicTIO oxOHOHTN.
- YBara: He 3aHypIOBaTn 06laHaHHy BODy Ta iHsi piDHH!
3OBHIHIO NOBepxHIO 06laHaHHaNCTHTn 3a DOnOMoTO raHcIPKN, 3MoueHO y Boi 3 DoJaBAHHM M'AKO MmHOro 3acOby.
He 3actocobvatn iDki Ta a6pa3NBHi Ynctaryn 3acobn. He 3actocobvatn roctpi npedmetn Ta IHctpymen 3 roctpum HakoheuHkOM. He 3acto
coByBaTu 6eH3nH i iHsi po3uHHNK! Yuctntu 0bnaHaHH BOnoToI raHupkoI o, npn Heo6xid HocTi, MnHm 3acobom. KaTeOpuHo 3abopohcEtbcraCTocyBaHH a6pa3NBHX MaTepiJIb.
He ynctitb 6bnHaHHa 3a donomoro npooyn- uya qn nHanopom BOn.
- Picra ouuueHHc iD 3aHOBo 3i6paTn 0bnaHannr Ta nepekoHaTncs, 0o 6loK ynpabInnH (HarpiBaJIbHn 6Iok) BCTaHOBJeHo BiIOBjIDHM YINOM - B iHouMy BnJaKy 0bLaHann He 6ynde npabNlboHo npaioBAtn.
TexhiuHa xapaKTepeNCTnKa
Klac 3axncty: I
CTyniHb BOHOHePOHOHKoCTi:IPX3
Hendi Food Service Equipment Romania Srl
PKS Hendi South East Europe SA
5 Metsovou Str.
18346 Moschato, Athens, Greece
Tel: +30 210 4839700
Email: office.greece@hendi.eu
Hendi Food Service Equipment GmbH
33 Wang Chiu Road, Kowloon Bay, Hong Kong
Tel: +852 2154 2618
Email: info-hk@hendi.eu
Hendi UK Ltd.
Central Barn, Hornby Road
Lancaster, LA2 9JX, United Kingdom
Tel: +44 [0]333 0143200
Email: sales@hendi.co.uk
FindHendi on internet:
www.hendi.eu
www.facebook.com/HendiFoodServiceEquipment
www.linkedin.com/company/hendi-food-service-equipment-b.v.
www.youtube.com/HendiEquipment
- Changes, printing and typesetting errors reserved.
- Änderungen und Druckfehler vorbehalten.
Wijzigingen en drukfouten voorbehonden. - Producent zastrzega sostie prawo do zmian oraz będów drukarskich w instrukcji.
-
Variations et fautes d'impression réservés.
-
Errori di cambiamenti, di stampa e di impaginazione riservati.
- Drepturi rezervate cu privire la modificari si gresei de imprimare.
-ImMeHHeHn,neaTnBepCTKn0wn6Kn3aunueHbI.
-Me enupuaEn aaiayaw,aaBovkntwnoangKaT OtoxioTeoiac