
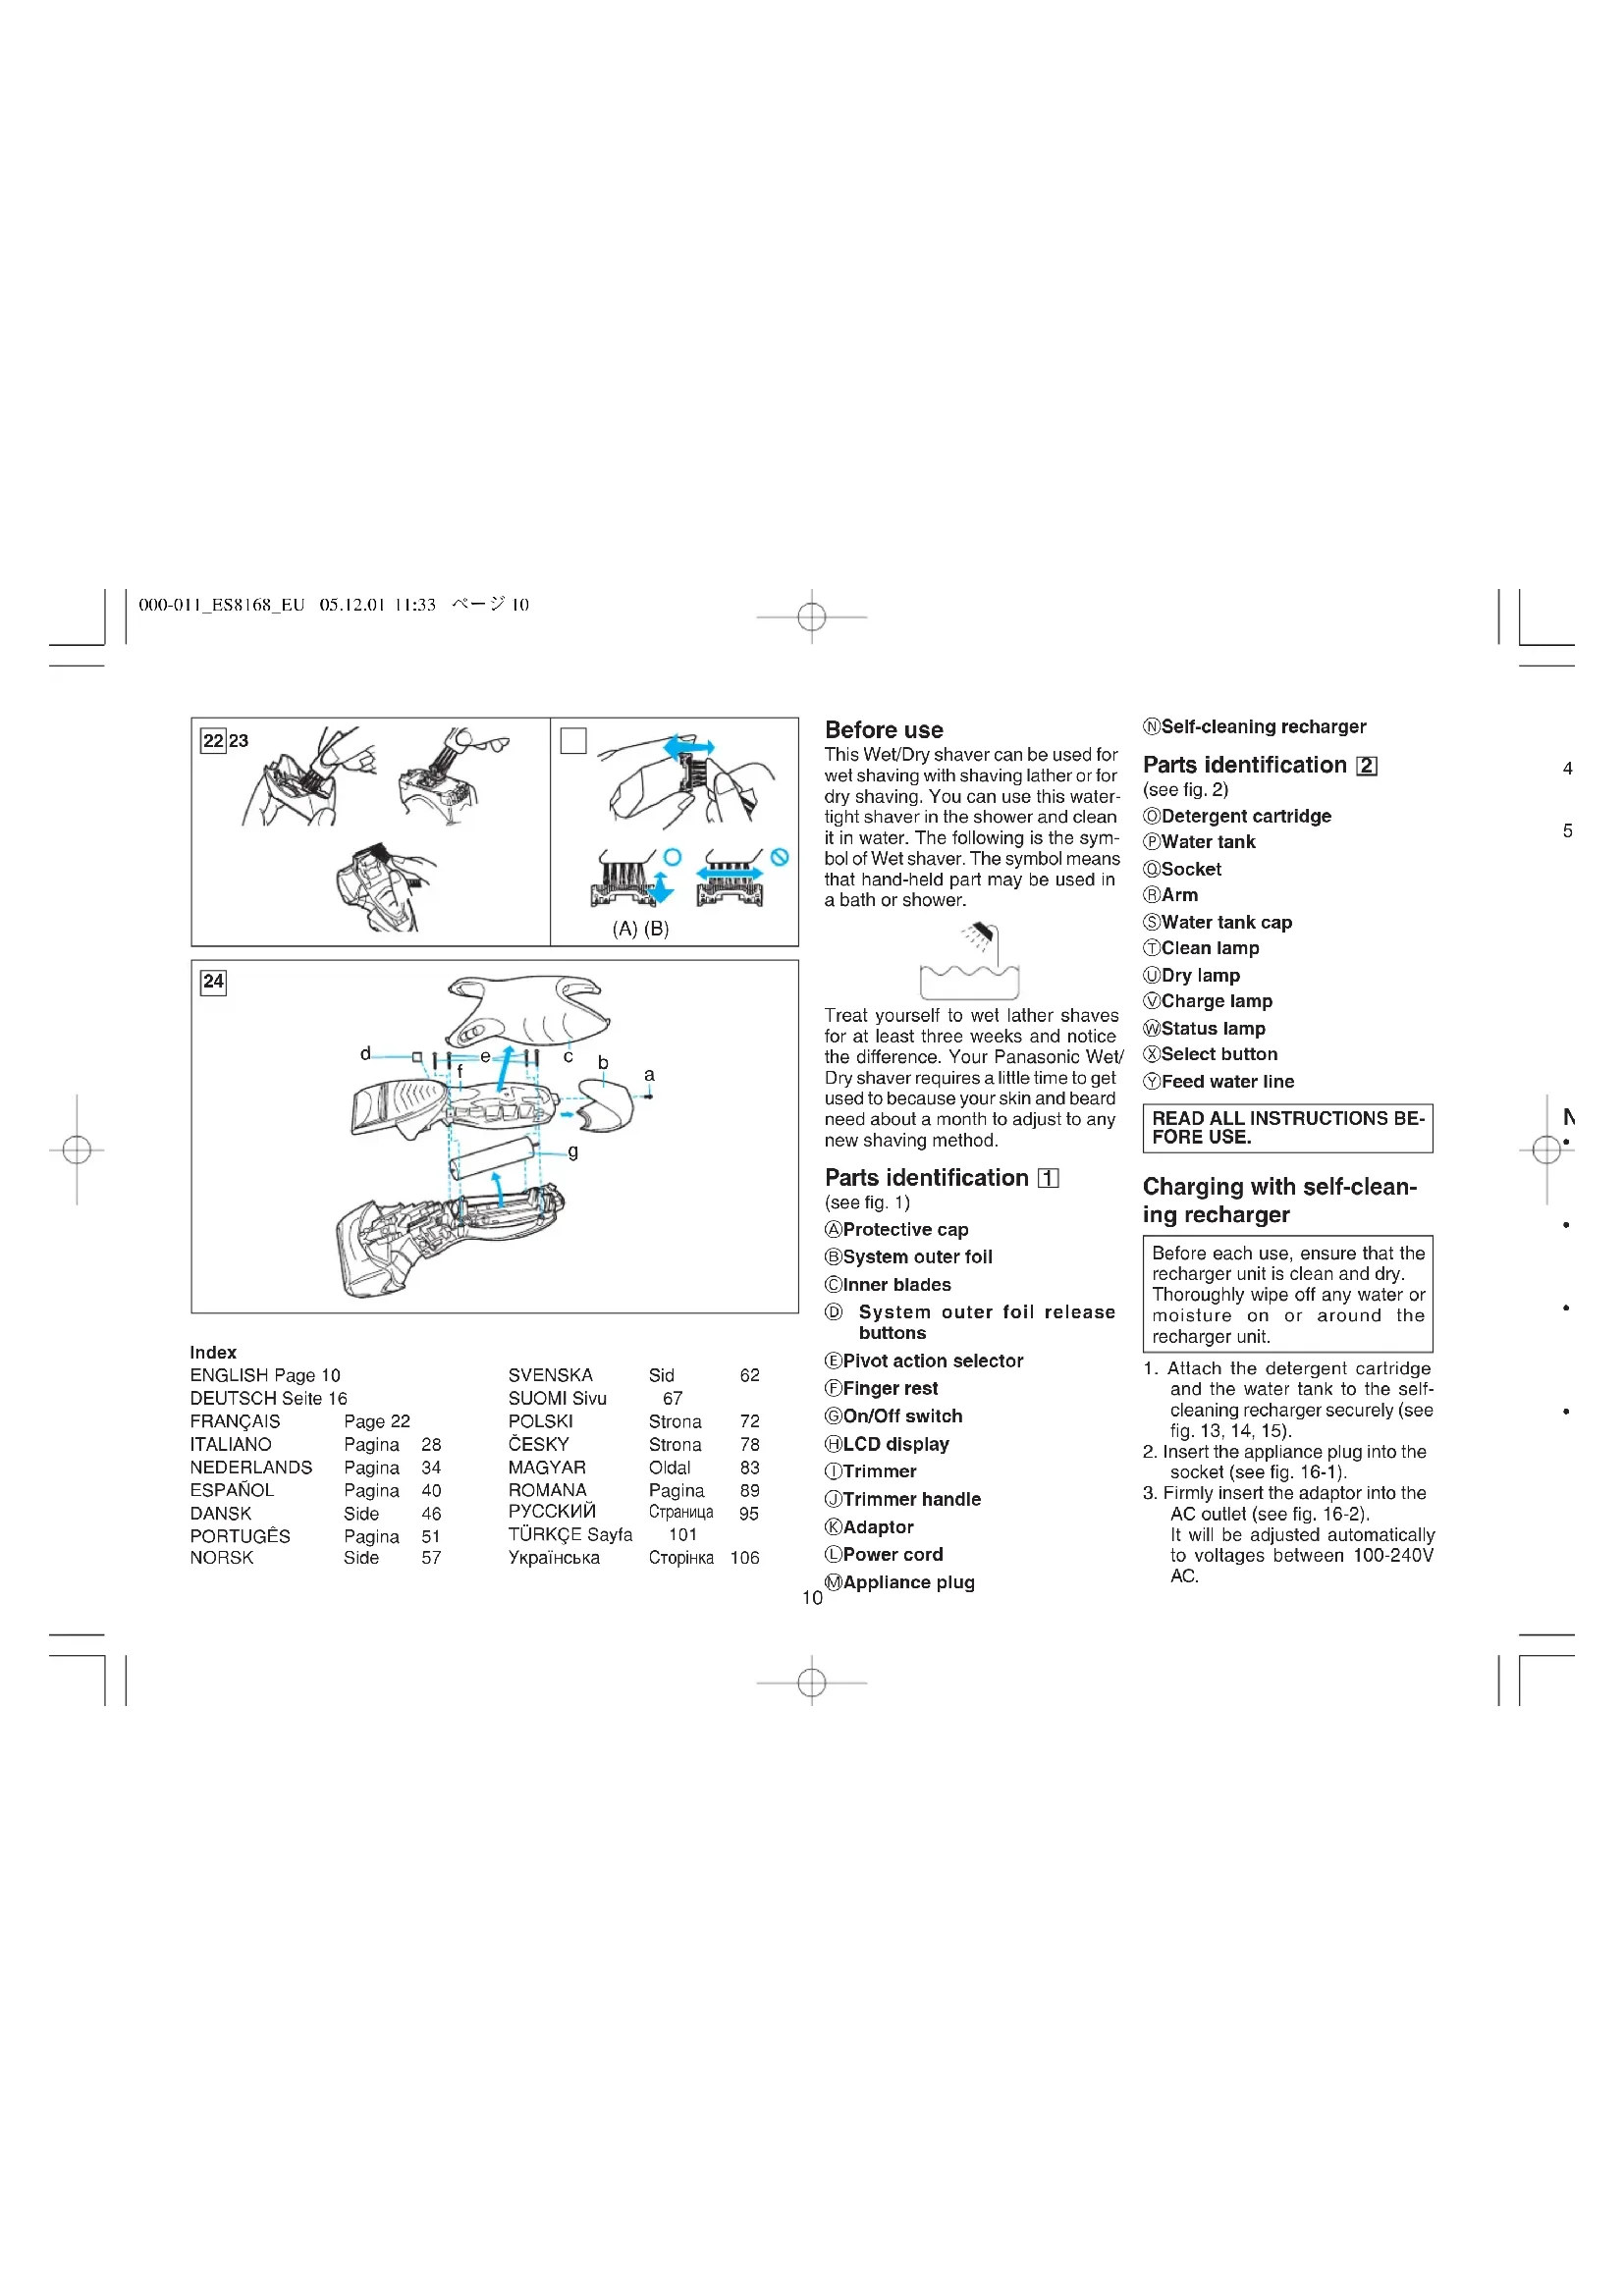
ES8168 - Shaver PANASONIC - Free user manual and instructions
Find the device manual for free ES8168 PANASONIC in PDF.
| Product type | Electric shaver |
| Brand | Panasonic |
| Model | ES8168 |
| Dimensions (W x H x D) | 6.2 x 15.3 x 4.6 cm |
| Weight | 180 g |
| Power supply | AC adapter 100-240 V AC (model RE7-25) and rechargeable lithium-ion battery |
| Charging time | Approximately 1 hour for a full charge |
| Runtime | Approximately 14 shaves (3 min per shave) |
| Charge indicator | LCD display with battery percentage (0-100%) |
| Shaving types | Dry shaving and wet/foam shaving |
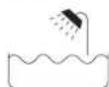
| Water resistance | Usable in the shower |
| Special functions | Pop-up trimmer, pivot selector (soft/lock mode), turbo mode for sonic vibration cleaning |
| Self-cleaning charger | Yes (cleaning, drying and charging cycles) |
| Manual cleaning | Under running water with sonic mode or with brush |
| Consumables | Detergent cartridge (replace every 30-40 days), outer foil (1 year), inner blades (2 years) |
| Noise level | 67 dB(A) |
| Safety | Do not use if foil damaged, do not immerse, do not clean with solvents |
| Usage | Household only |
| Country of origin | Not specified |
Frequently Asked Questions - ES8168 PANASONIC
User questions about ES8168 PANASONIC
0 question about this device. Answer the ones you know or ask your own.
Ask a new question about this device
Download the instructions for your Shaver in PDF format for free! Find your manual ES8168 - PANASONIC and take your electronic device back in hand. On this page are published all the documents necessary for the use of your device. ES8168 by PANASONIC.
USER MANUAL ES8168 PANASONIC
Wet/Dry Rechargeable Shaver Operating Instructions
Model No. ES8168
Before operating this unit, please read these instructions completely.
3 ENGLISH
| At self-cleaning recharger | Courses that can be changed halfway through | Time required (guide) | Course completion summary (※)Course sell | ||||||
| Course | clean | dry charge | At self-cleaning recharger | At main unit | |||||
| clean dry charge | Backlight (After 1 sec.) | ||||||||
| Charge | - | - | glow | All courses 2345 | Approx. 1 hour | - | - | - | blinks |
| Clean/Dry/Charge | ● glow | ● glow | ● glow | Course 6 | Approx. 3 hours | ● blinks | ● blinks | ● blinks | blinks |
| Clean/Dry | ● glow | ● glow | - | Course 2 | Approx. 3 hours | ● blinks | ● blinks | - | - |
| Dry/Charge | - | ● glow | ● glow | Courses 235 | Approx. 2 hours 50 mins. | - | ● blinks | ● blinks | blinks |
| Dry | - | ● glow | - | Courses 234 | Approx. 2 hours 50 mins. | - | ● blinks | - | - |
The displays at both the self-cleaning recharger and the main unit are the indications for the completion of each course as shown in the table above.
DEUTSCH
This Wet/Dry shaver can be used for wet shaving with shaving lather or for dry shaving. You can use this water-tight shaver in the shower and clean it in water. The following is the symbol of Wet shaver. The symbol means that hand-held part may be used in a bath or shower.
Treat yourself to wet lather shaves for at least three weeks and notice the difference. Your Panasonic Wet/ Dry shaver requires a little time to get used to because your skin and beard need about a month to adjust to any new shaving method.
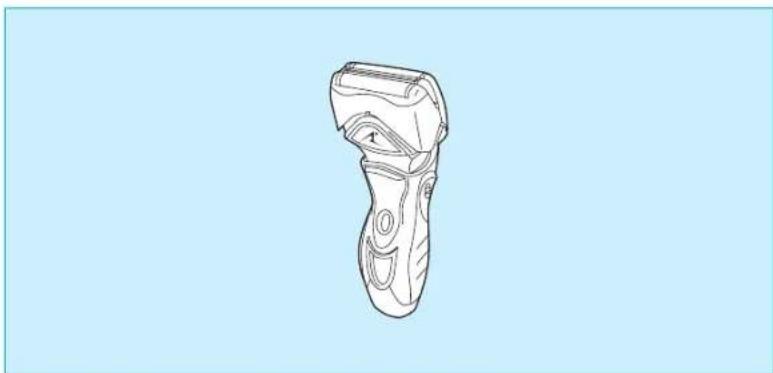
Parts identification 1
(see fig.1)
Protective cap
System outer foil
Inner blades
System outer foil release buttons
Pivot action selector
Finger rest
On/Off switch
LCD display
①Trimmer
①Trimmer handle
Adaptor
Power cord
Applianc plug
Self-cleaning recharger
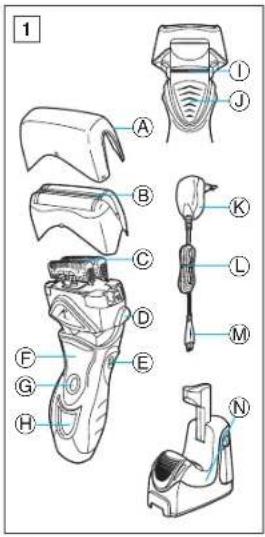
Parts identification 2
(see fig. 2)
Detergent cartridge
Water tank
Socket
Arm
Water tank cap
①Clean lamp
① Dry lamp
Charge lamp
Status lamp
Select button
Feed water line
READ ALL INSTRUCTIONS BEFORE USE.
Charging with self-cleaning recharger
Before each use, ensure that the recharger unit is clean and dry. Thoroughly wipe off any water or moisture on or around the recharger unit.
- Attach the detergent cartridge and the water tank to the self-cleaning recharger securely (see fig. 13, 14, 15).
- Insert the appliance plug into the socket (see fig. 16-1).
- Firmly insert the adaptor into the AC outlet (see fig. 16-2). It will be adjusted automatically to voltages between 100-240V AC.
In some areas, a special plug adaptor may be required.
- Pull up the arm of the self-cleaning recharger until it clicks (see fig. 17-3).
- Remove the protective cap and set the shaver firmly onto the self-cleaning recharger until it clicks (see fig. 17-4).
- The Self-cleaning recharger is set on the [Charge] (Charge) course when the shaver is set on.
- Do not push the arm downwards.
- Ensure that the outer foil does not get deformed or damaged when placing the shaver into the self-cleaning recharger.
Note
- Use the self-cleaning recharger in environments that do not exceed ambient temperatures of 15 to 35^ and humidity levels of 95% .
- If it is far below or over the appropriate temperature, the charging time may extend, or the Self-cleaning recharger may not function.
In particular, low temperature may shorten the life span of the rechargeable battery. In this case, the charge status lamp blinks twice per second. - When charging the shaver for the first time or when it has not been in use for more than 6 months, the plug symbol and backlight of LCD display may not illuminate for a few minutes after operation. These lights will eventually illuminate if kept connected.
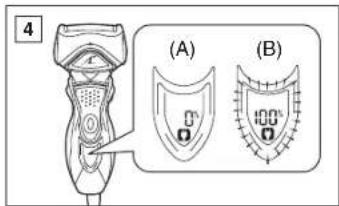
When the shaver is being charged, the backlight of LCD display turns on, and the plug symbol appears (see fig. 4 (A)).
It shows the remaining battery capacity from 0% to 100% , in 10% increments.
When the charging is completed, it will indicate "100%" and the backlight of LCD display will flash once in about 1 second. It will flash once in about 2 seconds for 10 minutes after charging is completed (see fig. 4(B)).
You can fully charge the shaver in 1 hour if the LCD display shows 10% and lower.
The plug symbol blinks in the LCD display when the remaining battery capacity is 10% and less.
The unit can be used once or twice more after the LCD display starts to show 10% . (Differs depending on usage.)
A full charge will supply enough power for approx. 14 shaves (3 minutes per shave for a normal beard). You can always connect your shaver to the self-cleaning recharger or the adaptor to maintain full battery capacity. This shaver cannot be overcharged.
Before travelling, charge it fully for 1 hour if you will not be taking the adaptor with you.
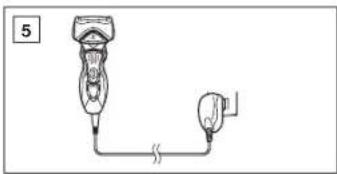
Charging without selfcleaning recharger
Connect the power cord to the shaver, and plug the adaptor to an AC outlet (see fig. 5). The shaver will
be adjusted automatically to voltages between 100-240V AC. In some areas, a special plug adaptor may be required.
Using your shaver
Caution - The system outer foil is very thin and can be damaged if handled improperly. Before each use, always check the foil for damage. To avoid personal injury, do not use if the foil or other parts of the shaving head are damaged.
Push the On/Off switch to turn the shaver on.
If you push and hold the On/Off switch for more than 2 seconds, it will activate the turbo mode for "sonic" vibration cleaning.
(see "Cleaning your shaver without the self-cleaning recharger") Shaving with "sonic" vibration may damage your skin. Please turn it off and on again to deactivate the turbo mode.
Do not place fingers on the On/Off switch during use.
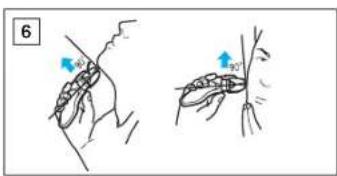
This may cause the shaver to stop during use or change it to the "sonic" vibration cleaning mode. Place your finger on the finger rest during use.
Hold the shaver at a right angle (90^) to your skin (see fig. 6). Start out shaving by applying gentle pressure to your face. Stretch your skin with your free hand and move the shaver back and forth in the direction of your
beard. You may gently increase the amount of pressure as your skin becomes accustomed to this shaver. Applying excessive pressure does not provide a closer shave.
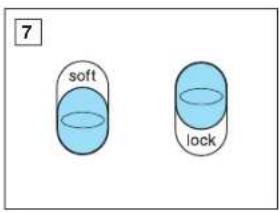
Pivot action selector (see fig.7)
Use the pivot action selector to choose the shaving mode, [soft] (soft) and [lock] (lock) based on your shaving preference.
The pivot action can be changed whether the switch is turned on or off.
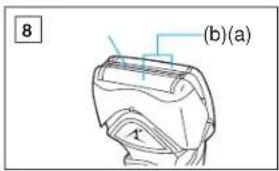
System outer foil (see fig. 8)
System outer foil has a slit blade (a) between 2 foils (b). They move up and down independently to follow the contours of your face.
The slit blade catches and cuts longer and lying hairs easily.
For wet shaving
Put a thin layer of shaving foam on your face which works as a lubricant. Shaving foam is the most suitable among many other shaving aids (gel, soap, cream, etc.). Do not put a thick layer of shaving foam as it may affect shaver's performance. If the shaving head is clogged with foam, simply rinse it under running water.
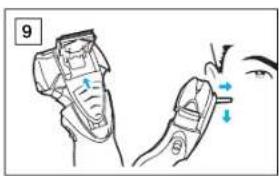
Using the trimmer (see fig.9)
Slide the trimmer handle up to open the trimmer.
Place the trimmer at a right angle to your skin and move it downward to trim sideburns.
Cleaning your shaver
Cleaning with the self-cleaning recharger
Preparing the self-cleaning recharger
Warning - Do not wash or apply water to the adaptor or self-cleaning recharger. Failure to observe this may cause electric shock or result in short circuits.
- Detach the shaver and the appliance plug from the self-cleaning recharger.
- Fill the water tank with water.
1) Remove the water tank from the self-cleaning recharger (see fig. 10-1).
2) Open the water tank cap (see fig. 10-2).
3) Wash away the old cleaning liquid inside the water tank and rinse (see fig. 11).
4) Pour tap water up until the feed water line (see fig. 12). Do not pour water over the water feed line in the tank. This may cause the cleaning liquid to spill. - Firmly shut the water tank cap and attach the tank to the selfcleaning recharger (see fig. 13).
- Peel off the seals from the new detergent cartridge (two seals) (see fig. 14).
-
Hold the detergent cartridge horizontally. (The detergent may spill if tilted excessively.)
-
Attach the detergent cartridge to the self-cleaning recharger (see fig. 15).
-
Do not use any solution other than the Panasonic Shaver self-cleaning recharger special detergent.
- Be sure to change the detergent cartridge and the cleaning liquid inside the water tank simultaneously.
Adding water, or changing just the detergent cartridge or the water, will result in deteriorated cleaning functions.
- When the self-cleaning recharger is operated, the concentrated detergent inside the cartridge will be diluted and the water inside the tank will become a cleaning liquid.
Cleaning your shaver
- Insert the appliance plug into the self-cleaning recharger socket (see fig. 16-1).
- Firmly insert the adaptor into the AC outlet (see fig. 16-2).
- Pull up the arm of the self-cleaning recharger until it clicks (see fig. 17-3).
- Remove the protective cap and set the shaver firmly onto the self-cleaning recharger until it clicks (see fig. 17-4).
- Ensure that the outer foil does not get deformed or damaged during setting.
Before using the self-cleaning recharger, make sure the shaver has been rinsed
thoroughly with water if it has been washed with hand soap or any other detergent, and swish water off properly before setting the shaver into the self-cleaning recharger unit.
The presence of soap or any other detergent residue will contaminate the cleaning solution in the self-cleaning recharger unit and could lead to poor cleaning performance.
5. To clean the shaver, select either the [Clean/Dry/Charge] (Clean/ Dry/Charge) course or the [Clean/Dry] (Clean/Dry) course. To dry the shaver after rinsing, select the [Dry/Charge] (Dry/ Charge) course or the [Dry] (Dry) course (see fig. 18).
The [Charge] (Charge) course will begin immediately when the shaver is set onto the self-cleaning recharger.
A total of five courses are available.
The display will alternate between [Clean/Dry/Charge] (Clean/Dry/Charge) [Clean/ Dry] (Clean/Dry) [Dry/ Charge] (Dry/Charge) [Dry] (Dry) [Charge] (Charge) whenever the select button is pressed.
The course will start approximately six seconds after being selected.
* Press the select button within six seconds to choose a different course (see fig. 3).
WARNING - Do not remove the shaver from the self-cleaning recharger when courses that include the [Dry] (Dry) function are in use. A heater is used during the drying process, and this may result in the area around the blade becoming extremely hot and causing burns.
The course will be aborted if the power is cut off during cleaning. In this event, it is necessary to perform the [Clean/Dry/Charge] (Clean/Dry/Charge) or [Clean/Dry] (Clean/Dry) course once again from the beginning.
It will take about 3 hours to finish the [Clean/Dry/Charge] (Clean/Dry/ Charge) or [Clean/Dry] (Clean/Dry) course.
The clean and dry lamp will blink after the [Clean/Dry/Charge] (Clean/ Dry/Charge) or [Clean/Dry] (Clean/ Dry) course is completed.
The self-cleaning recharger is mainly designed to clean the blades (outer foil and inner blades). Areas that are not soaked into the cleaning liquid or around the surface of the liquid are not subject to cleaning.
Carry out brush cleaning or wash with water to remove beard trimmings in these areas.
Replacing the Detergent Cartridge Replace the Detergent Cartridge when it has reached the end of its service life. Normally, it is recommended to replace it every 30-40 days if used once every day. Use the below chart as a guide.
Note: In order to maintain maximum cleaning performance, it is important to replace the water in the water tank at the same time you replace the cartridge.
| Shaving | Cleaning | Reusability |
| 1 time/day | 1 time/day | approx. 30~40 times |
| 1 time/3 days | approx. 10~15 times | |
| 1 time/1week | approx. 4~7 times |
It is recommended to clean the shaver with the self-cleaning recharger after every shave. Change the cartridges when the status lamp is illuminated. Before exchange, make sure to inspect the cartridges with following procedure.
Checking the status lamp
In cases when the status lamp blinks, carry out the following inspections.
- Is the detergent cartridge set properly? Properly set the detergent cartridge (see fig. 15).
- Was the detergent cartridge detached during cleaning? Reset the detergent cartridge
After completing inspection and treatment
- Properly set the detergent cartridge to extinguish the status lamp and start each course.
In cases when the status lamp is illuminated, detach the shaver from the self-cleaning recharger and carry out the following inspections.
Note that there are cases where the blade will be hot or wet if cleaning is not completed.
- Check to ensure that the clean lamp has been extinguished.
- Is the water tank and its cap set properly? Attach the water tank and its cap properly.
- Is the self-cleaning recharger tilted?
Place the self-cleaning recharger on a horizontal surface.
When an abnormality has been corrected in accordance with the above two inspections.
Hold down the select button for approximately two seconds to extinguish the status lamp and start each course.
When no abnormality was found after the above two inspections.
It is time to replace the detergent cartridge and cleaning liquid inside the water tank. (The same cartridge has been used to clean approximately 30 - 40 days worth of beard shavings.)
Drain the old cleaning liquid inside the water tank and refill the tank with water. Additionally, replace the old detergent cartridge with a new one.
If the status lamp blinks or illuminates again even after the inspections and treatments above have been carried out, contact an authorized service center.
2 Cleaning your shaver without the self-cleaning recharger (see fig. 19)
Warning - To prevent electric shock or personal injury, turn the shaver off and disconnect the power cord from the shaver before cleaning with water.
With the system outer foil in place, apply some hand soap onto the outer foil.
Push the On/Off switch more than 2 seconds to activate the turbo mode for "sonic" vibration cleaning.
At the same time, the "sonic" cleaning symbol appears in the LCD display.
Pour some water over the outer foil. After about 20 seconds, it will be automatically turned off, or you can turn it off by pushing the On/Off switch.
Remove the system outer foil and push the On/Off switch more than 2 seconds to activate the turbo mode for "sonic" vibration cleaning and clean it with running water.
Wipe off any moisture from the shaver with a dry cloth and dry it without the system outer foil.
It is recommended to clean your shaver with the self-cleaning recharger or the "sonic" vibration cleaning when the tap symbol (a) appears in LCD.
Brush cleaning
Squeeze the system outer foil release buttons and lift the system outer foil upward to remove it. (see fig. 20). Remove the inner blades one at a time by grasping it firmly at both ends and pulling it straight away from the shaver (see fig. 21). Clean the outer foils, the shaver body and the trimmer with the long brush (see fig. 22). Clean the inner blades with the short brush by moving it in the direction in fig. 23 (A). Do not move the brush in the direction in fig. 23 (B), as it will damage the inner blade, and
its cutting performance. Do not use the short brush to clean the outer foils.
Replacing shaving head components
It is recommended that you replace the system outer foil at least once a year and the inner blade at least once every 2 years to maintain your shaver's cutting performance.
Replacing the system outer foil (see fig. 20)
Squeeze the system outer foil release buttons and lift the system outer foil upward to remove it.
To insert the new system outer foil, press down until it snaps into place.
Check that the gaps on both sides of the system outer foil release buttons and the system outer foil are equal. If they are not equal, there is a chance that the system outer foil will become detached during use, or shaving capabilities will be deteriorated.
Replacing the inner blades (see fig.21)
Squeeze the system outer foil release buttons and lift the system outer foil upward to remove it. Remove the inner blade one at a time by grasping it firmly at both ends and pulling straight away from the shaver. Do not touch the metal parts of inner blades.
To insert the new inner blade, hold the blade one at a time at both ends and press downward until it snaps into the shaver.
For environmental protection and recycling of materials
This shaver contains a Lithium-ion battery.
Please make sure that the battery is disposed of at an officially assigned location, if there is one in your country.
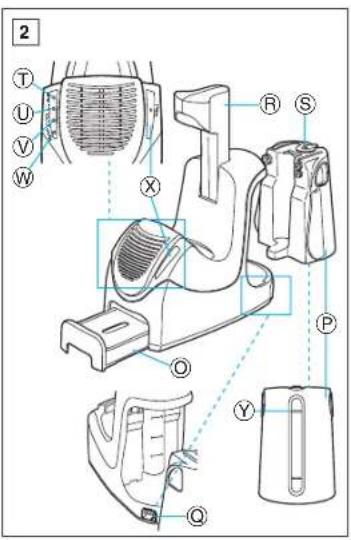
How to remove the built-in rechargeable battery before disposal of the shaver (see fig. 24)
WARNING - Do not attempt to replace the battery for the purpose of reusing the shaver. This could result in the risk of fire or electric shock.
The battery in this shaver is not intended to be replaced by consumers. However, the battery may be replaced at an authorized service center. The procedure described below is intended only for removal of the rechargeable battery for the purpose of proper disposal.
- Disconnect the power cord from the shaver when removing the battery.
- Remove the bottom cover screw (a).
- Remove the bottom cover (b).
- Slide the back panel (c) and remove it.
- Remove the housing clip (d).
- Remove the four housing screws (e).
- Remove the housing B (f).
- Lift the battery (g) and remove it.
Caution - To prevent personal injury or damage to the product,
- Do not charge the shaver, where it will be exposed to direct sunlight or a heat source, or where there is a lot of moisture.
- Use only the included adaptor RE7-25 to charge the ES8168 shaver.
- Dry the shaver completely before charging it.
- Keep the adaptor away from water and handle it only with dry hands.
- Grip the adaptor when disconnecting it from an AC outlet; tugging on the power cord may damage it.
- Do not pull, twist, or severely bend the power cord.
- Do not wrap the power cord tightly around the appliance.
- If the power cord gets damaged, it alone cannot be replaced. Contact an authorized service center.
- Store the adaptor in a dry area where it will be protected from damage.
- The shaver and adaptor will become slightly hot during use or charging, however this is not a malfunction.
- In cases where static noise is emitted from the television during use charging or cleaning, connect the adaptor to a different outlet.
- Do not touch the edge (metal part) of the inner blade.
Failure to observe this may lead to hand injuries. - When the shaver is washed without the self-cleaning recharger,
wash it in tap water. Do not use salt water or boiling water. Also, do not use cleaning products that are designed for toilets, bathrooms or kitchen appliances. Do not submerge the shaver for a long time.
- Do not wipe any part of the shaver with thinner, benzine or alcohol. Clean it by using a cloth dampened with soapy water.
- Do not take the housing apart as this can affect the watertight construction.
- Do not clean with water when the shaver is connected to the power cord.
- When cleaning the shaver with water, do so with both the inner blades attached. (Doing so with only one of the inner blades attached makes an abnormal noise and may damage the shaver.)
- Do not detach the detergent cartridge or water tank during cleaning.
The cleaning liquid may spill, leading to malfunctions. - Set the self-cleaning recharger on a level and stable surface.
The cleaning liquid may spill if the self-cleaning recharger is tilted. - In cases where the cleaning liquid is spilled, wipe it immediately. Caution is necessary as the cleaning liquid may discolor leather products or flooring boards.
-
The expiration date of the cleaning liquid is 6 months once it has been opened. Throw away the detergent cartridge and cleaning liquid inside the water tank if it will not be used for 6 or more months.
-
Wash away the old cleaning liquid inside the water tank down the drain. Dispose the used detergent cartridge as plastic waste.
- Keep the unit away from children.
- Keep instructions in a safe place.
- The adaptor is intended to be correctly oriented in a vertical or floor mount position.
This product is intended for household use only.
Airborne Acoustical Noise: 67 (dB(A) re
Information on Disposal for Users of Waste Electrical & Electronic Equipment (private households)

This symbol on the products and/or accompanying documents means that used electrical and electronic products should not be mixed with general household waste.
For proper treatment, recovery and recycling, please take these products to designated collection points, where they will be accepted on a free of charge basis. Alternatively, in some countries you may be able to return your products to your local retailer upon the purchase of an equivalent new product.
Disposing of this product correctly
012-027_ES8168_EU
05.11.29
23:58

will help to save valuable resources and prevent any potential negative effects on human health and the environment which could otherwise arise from inappropriate waste handling. Please contact your local authority for further details of your nearest designated collection point. Penalties may be applicable for incorrect disposal of this waste, in accordance with national legislation.
For business users in the European Union
If you wish to discard electrical and electronic equipment, please contact your dealer or supplier for further information.
Information on Disposal in other Countries outside the European Union
This symbol is only valid in the European Union. If you wish to discard this product, please use the following instructions:
please contact your local authorities or dealer and ask for the correct method of disposal.
Vor dem Gebrauch
Tryk pa On/Off-knappen for at taende shaveren.
Det tager ca. 3 timer at gennemfrole processen [Clean/Dry/Charge] (Rens/Tor/Oplad) eller [Clean/Dry] (Rens/Tor).
Rense- og tereindikatoren blinker, nar procesen [Clean/Dry/Charge] (Rens/Tor/Oplad) aller [Clean/Dry] (Rens/Tor) er udfort.
Dry/Charge] (Rense/Torke/Lade) ererprogrammet [Clean/Dry] (Rense/Torke).For a torke etter skylling velges programmet [Dry/ Charge] (Torke/Lade) eiler programmet [Dry] (Torke) (se fig. 18).
- Programmet [Charge] (Lade) starter umidelbart nár laderen plasseres i holderen.
- Total fem programmer er tilgengelige.
Displayet vil vekse mellom [Clean/Dry/Charge] (Rense/Torke/Lade) → [Clean/Dry] (Rense/Torke) → [Dry/Charge] (Torke/Lade) → [Dry] (Torke) → [Charge] (Lade) hve gang det trykkes pa velgeren. - Programmet starter cirka seks sekunder etter at det er valgt.
Trykk pa velgeren innen seksekunder for a velge et annet program (se fig. 3).
Programmene [Clean/Dry/Charge] (Rense/Tarke/Lade) aller [Clean/Dry]
(Rense/Torke) tar cirka 3 timer. Renselampen og torkelampen blinker etter at programmene [Clean/Dry/ Charge] (Rense/Torke/Lade) erler [Clean/Dry] (Rense/Torke) er fullfort.
Kyte parranajokone paalty viraktykimesta (On/Off).
Dry] (Cistit/Susit) [Dry/ Charge] (Suit/Nabijet) [Dry] (Suit) [Charge] (Nabijet).
Zvolenyrezimnabehne asi sest sekund po stisknuti volichto tlačtka.
Chete-li zvolit jiny rezim, stisknete do sesti sekund volici tlačitko (viz obr. 3).
A [Clean/Dry/Charge] (Tisztlitas/
Zgomot aerian: 67 dB(A) re 1pW
Informati pentruutilizatori, privind eliminarea echipamentelorelectrice si electronice uzate (proprietate particulara)

THTCTKa 6pNTBbI C NOMOuBHO 3aepHOrO yctpoNCTBa C CAMOOUCTKoI
Nodotoboka 3apHoro yctOyCTBaC CamaoOHCTKOn
096-111_ES8168_EU 05.11.29 23:59
IpeDynpexdHe - He npomBbIaTe aadTepn H3apJHoe ycTpoCTBO C caMOoHcTko, n CneTne 3a TEM, TTObIbHa HIX He noNANA BOda. HecobnOeHne daHHoro npEpynpexdHeM MoKet npBBeTr K nopaxehNO 3NeKtpnCeckm TKOM NJI 3aMbIKAHIM.
1.OTcOeDHHTe 6pNTbY bNkky npn6opa 0T 3apHNOVCTPOINCTBA C CAMOHOCTKNo
2.3aONHnTe BOJHOH 6aOK BOJOI.
1)OTcoeDnHnTe BOJHOHO 6aOK OT 3apdHoro YCTPOHCTBaC CAMOOHNTKoM (CM.PNC.10-1).
2) OKPojneKpbIkyBQyADHORO 6aHuKa (cm. pnc. 10-2).
3) CmoIte OuHuaOuyo XnKocTb BHyTpN BOaHoro 6aKa N cNoLoCHnTe erO BOdO (CM. pnc.11).
4) HanéIte BOponpoBOHNOBdI DIO NHIN NODaHN BOBdI (cm. pnc. 12).
He HanBaute BoBb CbBiwe HnHnNoaun BoBb B aChke. 3To MoKet npNBeCTn K npOJIbAHIO OOnuAIOeU XkDOKCTn.
3.ПлnothoЗakpoTKeКрblshky BODHOrO 6aHaNnPnKpENIe 6aQOK 3apAHOMyCtPOnCTBy c CamooHCTKOJ (cM.Pnc.13).
4.CHIMITE NIOMO6bl C HOBOI KACCETb MOIOOero CpEeTBa (DBE NIOMO6bl) (CM.PNC.14).
-Деркпге касу моюцero cpeCTBa ropn3OHTaNbHO. (ПрчрзмснHаКLOHe MOUue cpeCTBO MOKET npoJNTcB.)
5. Pnkpene nte kaccety mooero cpedTba K 3apdHomy ycptpOCTBy c camooOnctKo (cm.pnc.15).
HeNoB3yTeb HNKAKM DpyrnmPactBOPOM,KpOme CneuMaIbHOro MoUoero cpeCTBa Panasonic Shaver dHa 3apArdHOrO yctPoIcTBa c CAMooCHTcKoI.
O63aTeIbHo MeHnTe Kaccety MoUeero CpeCTBa n OuNtuaOpUxoo JXKoCtB BHyTpN BoHaHoro 6aKa OHOHOBpeMeHNO. D6abNeHne BOi nn 3aMeHa TOnbKO Kaccetbl
ctapyIOUoIeO CpeCTBa NIN BObl npBBeT K yXuDWeHIO cyHKnYnCTKn.
Pn3KcNpyaTaN 3apDHOrO yCtpoNCTBa C cAmooCHTko KOUHeHTpNOBAAHOE MOUeee CpEdCTBO BHTpyKACCetbI pa36abJnRETCN, INoDA BHTPN BaKaCA CTAHOBITCR OHuauoien KxIKKOCTbIO.
HnCTKa 6pntTbbl
1.BCTABBTe BUNKY yCTpOUICTBA C H3e3o 3apAHIOR yCTPOICTBa C CAMOOHTKON (cm.pnc.16-1).
2. HaeXHO BCTABTe aanTep B ToKy mTaHnpeMeHHOrTo KA (cm. pnc. 16-2).
3. Notarynite 3a pykortky 3apHORO yctpoCTBa C cAmooCHKTKo Do ueJIHa (cm. pnc.17-3).
- CHIMITE 3aunTHyO KpBlyKU n NnotHO BCTabBe 6ptBy B 3apHnoe yctpoNCTBO C CAMOOHCTKO DO UeNtKa (CM. pnc.17-4).
CneDnTe 3a TEM, YTObbl npn BCTABKE He DeOpDMNPOBATb INI He NOBpeINb BHeuHIO CETKY.
Ipeed nCnoB3ObaHnem 3aepdHOrO yctpoiCTBa C cAmooCHKTOK O63aTeJIbHO TtuaeTbHo CnOLOChTE 6pITBy BOIO, eCIN Do 3TOrO eeMbIMMbIOM NIN NIObIM dpyrMM MOUOM CpeCTBOM, IN CMaxHNTBE OyPeD BCTABKO B6PTBbB 3aepdHOoe yCTPOCTBO C CamooCHKTOK. PmycytCTBNE OCTaKOB MbIna INN IIOBOr DOpyrTO MOUoero cpeCTBA PnPBBeET K 3aRpa3HeHIO MOUoero paCTbopa B 3apdHOM yCTPOCTBc C CamooCHKTOK IN MoXeT PnPBecTN K YXduuHNO OMHueHH.
5.ДЯчNTKbPbTBbBb6epnte nI6o nocneObaTeNbHObTc [Clean/Dry/Charge] (NCTKa/Cyuka/3apnka),nI6o nocneObaTeNbHObTc [Clean/Dry] (NCTKa/Cyuka).ДЯчTKn bPbTBb nocne cnONaCKBaHNbIb6eTe N16o nocneObaTeNbHObTc Dry/Charge,nI6o nocneObaTeNbHObTc Dry (cm.pmc.18).
PnB BCTABKBe 6pNTbVB 3apAHOe YcPoTcTBo C caMOOChTKo NocMeDo
BaTeBbHocTb [Charge] (3apnka) nauHeTcB aBOMATNaueckn.
Bcerodctynno nrtb noctedobatehBOHCTei.
Pn HaxkATM KONK Bbl6opa Ha dnCnlee 6bnyT nonepMeHH OTo6paKaTbcN noCleDobateBHeOCTn [Clean/ Dry/Charge] (HcctKa/Cyukka/3apRikka) [Clean/Dry] (HcctKa/Cyukka) [Dry/ Charge] (Cyukka/3apRikka) [Dry] (Cyukka) [Charge] (3apRikka).
NocneObaTeIbHoCTb BKIOHaTcABTOMaTuYeCKn NO IcTeHEnMWeCTn CekyHn Nocne BbIbopa.
HaXMMTe KHOKNy BbIbOpaB TeueHne WeeCTN CeKYHd, YTO6bB bIb6paT dpyrYIO nocJeNoBaTeNbHOCTb (CM. pnc.3).
PNEyPENKDEHNE-He BbHMMAe6BnTBy n3 3aprHOrO yctpoCTBa c CamooNcTKo, ecnn nCNoNb3yOTcNocneDobateNbHOCTu, BkIyoaOuue CyHKuio [Dry] (CyuKa).B xOde npoeeca cyuKnncn3bETc HarpBeTaTeB, N p e3ynbTaTe 3TOr O6NaTb BOKpyr HoXa CTaHETOnepaReY, TTo MoKet npBcNTK OxKoRAM.
Ecnn B xode qctk 6ydet OKknoyeHO 3KekTPOHNTAHme, NOcNEBOATEBbHOCTbOCTAHOBITCA. B daHHOM Cnyae Heo6DNOIMO BblONHtB NocNEBOATBebHOCTb [Clean/Dry/Charge] (CHTka/Cyuka/
3apka)nni [Clean/Dry] (YncTkai/ Cyuka) eae pa3 c camoro hanyana.
Jnra 3aBepweHn nocne doBateIbHOCTn [Clean/Dry/Charge] (YncTkai/Cyuka/3apka) nn [Clean/Dry] (YncTkai/Cyuka) neo6xoIMMo npimepHo 3 yaca.
No 3aBepweHn nocne doBateIbHOCTn [Clean/Dry/Charge] (YncTkai/Cyuka/3apka) nn [Clean/Dry] (YncTkai/Cyuka) uNnDKaTOp NcCTKn i cyuKb 6ydet MIRatb.
3apnHoe yctpoNCTBO camOoNCTKm npeHa3NaHcHEno, BO OCHOBHOM, dna NcTKn HOKei (BHeuHJcETKa m BHyTpEHHne HOKe).
Te 0bactn KOTOpBle He onyckaTOcB OOuauoUO yO XIKKCTB, INN KOtOpBE HAXOITCTOKONO NOBepxHOCTn XIKKCTN, YIcTKe HE NODNeXat. IINY ydaENHnO CctAeKOB BONOC 60pObl B 3TNX 0bactrx OOnCTne INX TcTKoIN INN npOMouTE BOOJ.
3aMeHa Kaccetb MOUeero cpeCTBa
3amehnite kaccety moouero
cpectba npn DOCTNXeHNH
OKOHaHH ee cpoka cnXbbl.
O6byHO peKoMeHdyETc3aMeHtB
eepe3kaxdble 30-40 dne npn
eKeJHeBHOM nCnOFb3OBAHN. B
KaueCTBe pyKOBOdCTBa MOxHO
BOCONb3OBATcb CxEMOn Hxke.
PpmeHn: Dna oecneeynn MaKcMaJIbHOI pON3BOJNTeBHOIT PnNCHTE BAXHO MEHTb BOY B
BOJHOM 6aKeO OHOBpeMeHHO C3AmHOH KACCtBJ.
| Брttбу | Иства | Пов,在сЕ КИЗБЕGAЕМЕ |
| 1раз/дeнь | 1раз/дeнь | OK. 30-40раз |
| 1раз/3 дeH | OK. 10-15раз | |
| 1раз/1 He'deH | OK. 4-7раз |
PeKOMEHyETcHcHTb6pNTbYc NOMOULBO3APrHOrOyCTPOINCTBa CAMOOHcTKoNnCneKaJDO R6PTB.
3aemeHnTe KaccetbI,ecnn 3aoropntc HnDnKATOP cOCToHHN. Ppeed 3aemeHO 6B3atEnbHO npoBepeTe KaccetbI, BblNOHNHB npoueDpy HnKe.
Поверка ИнданаюсocToBnH
ECNINIIMKATOPcoT0AHHM MNTAET, IPOBEPTEcneDIOUe
- PpaBnIbHO JN yCTaHOBnEHa Kaccetata MOoJero cpeDCTBa? PpaBnIbHO yCTaHOBnTe Kaccety MOoJero cpeDCTBa (CM.pnc.15).
- He 6blna nn OTCoeDnHeHa KaccTeMaMOUeO cpeCTBa B XoJe YNCTKn? 3aHOBO yCTaHOBtE KACCey MOUeO cpeCTBa.
Ipo 3aBepweHn npOBepKn npOeDpy
- PpabunbH Oy yctahOBtte Kaccety MOUeero CpeCTBa, YTObl NOracntb INHnKATOp COCTOHAHNA, IN 3anyCTne KaJdyo NOcJeBOaTeBHOCTb.
EcnHnDnKATOP COCTOAHN HOPNT, OTOeONHTe 6pNTBY OTAPADHO
ycTPOJCTBAc CAMOOUCHTKO IN PNOBEBTE CNEDUOJE.
-
O6paTNTe BHIMAHHe Ha To, 4TO, eCJN HCTKa He 3aBepUeHa, HOX MOKET OKa3aTbCn RoprHm INN BnAkhBm.
Y6eDntTeB B TOM,HTO INHdkATOKYNKTOKJIHOYNCH -
PpaBnIbHo Jn yctaHOBne H BODHOH 6aOK n erO KpbHsKa? YCTAHOBHTe BOJHOH 6aOK n erO KpbHsKHaNm 0bp3OM.
2.HeHaKnloHEnIIm3apnHoe yctpoCTBO C cAmooNCTKo? YcTaHOBnTe 3apnHoe yctpoCTBO C cAmooNCTKo HA ROP30HTaIbHyIO NOBepxHOCTb.
Ecnn HncnpaBHOCTyctpaHeHa nocne dByx npOBepOK Bblwe.
Haxmte u ydepKbaine KhONky Bblbopa B TeEHNE pnpmePHO DByX CEYH, YTO6bl noraCnTb INdkaTop COCTOHN H NaHaTaB KaKdyo NocneDObaTeNbHcOtB.
Ecnnncne DByx npOBepok Bblue HeNCnpaBHOCTb He 6blya 6hApyXeHa.
PnIuN0 BPMe 3aMEHb KACCteB MoOJero CpeCTBa N OHuaOoEe JNKKOCTN BHTPN BOJHORO 6aKa.(Dna YnCtKn PnpMepHO 30\~40-dHeBbIX OCTaTKOB BOONc 6OpOdbi NCnOB3ObaNaoc OHa KaCCeTa.)
→CneIte cTapyo OHuaHOuyo XIKKOCTB N3 BOJHORO 6aKa n HANOHNTE bAOK BODI. KpOme TORO,3aMeHNTe cTapyo KACCey MOIOEFO CpeCTBA HOBOI.
- Ecnn HnDnKaTOp COCTOHN CHOBA Mnae Tnn Ropnt NOCTOHNO DaJae Nocne OcyueCTBHeHn npOBepOK npoUeDpy BbIwe, CBAxNtEc b c yNoHOMOueHHbIM cepBncHTPOM.
2 甲CTka 6pHTbbl 6e3 3apAHO rYcTPOCTBa C cAMOOHCTKo (cm.pnc.19)
Octopoxho -InnpneotbpaueHHN npaekhennaEKNKTPnueckm TOKOMnnTPaBMBIOKTLIOHTe6pntbyOTOCOENHtNEUHPNTAHNOrOT6pntbI nepeNCTKO BBOE.
He cHIMaCeTKy, HAMbIbTe ee MbIOM.
HaKMTe BbIKHOaTeB "BKn./ BbKn. JOJIbIe DByX CekYH, YTO6bI aKTbMBOBaTb Tpy6OpEKM UcNCTKn Bb6paueH "sonic".
OndOBpeMeHO Ha KxIKOKpCTaIIHueCKOM DcNpIe NOBnAETC3HAVOK"SONIC". 06NeIe THEHIOIO CETKY HEBONHIMKINHIECTBOBbl
Pn6n3ntbHo yepez 20 ckynd
6pntBa aTOMATNueckn
BblKnHouNTc, nIb Bbl moXeTe
BblKnIOuytB ee, Haxab
BblKnOHTaB"Bkn./BblKn.
CHMMTE BHEUHIO CETKY CNTCTEMbl yIepeKbuaBe TbIKNoaTeBb"BKn./BbKn." He MeHee 2 cekyH, YTO6bbl BKNHOHTb Typ6oepKeuN uCTKN Bn6pauei "sonic", n npomoe 6pntby B npotoHOn BOE.
Bbtpnte Bnary c 6pntbblc
NOMOJIIO CYXOI TKAHI NPOCUYIIME ee 63 BHEHNE CEKN CNTEMbl. PekomeHnyETOC OCUYCECTBnTbO ONUCTKyo OPNTBc NOMOJIIO BnBaPm "Sonic" npn NOBHeMn HA KK-Dncnnee 3NaKa Ka pana (a).
HcTka 电Ko
YTObbl CHBc CETKy,HaadABNTe Ha KHONKCHATNc CETKNI NOTHTHNE BBEPx (cm.Pnc.20).POdHOMy CHHMTe BHyTPEHnHeJe3BNy HADEXHO 3aXBaTbIBaN CX DBxv CTOPOH bBtTRAHINx N3 6PmTbbl (cm.Pnc.21).PpOuHCTNe CEkTN, KOpNyc 6PbTbbl B BYHTpeHNn TpMMep c NOMoBuD JInHHoJ ΜEeTKn (cm.Pnc.22).PpOuHCTNe BHYTPEHnHeJe3BNc NOMoUbBO KOpOTKOIeTKn, NepeDbHarEe B HappanBeHNy,Yka3AHHOM Ha pnc. 23(A).He DbrarTe eTky B HappanBeHNy,Yka3AHOM Ha pnc. 23(B)-3To npBneDet K NOBpeKDeHIO BHYTPEHneroJe3BNy n CHN3NT erO peKyuTyO cnoc6bocTb.He IcnNoJIb3yTe KOPTKyo eTKeJyI NcHTCnTcKtn
3aMeHa 3JemeHToB roJIO-BKn 6pNTBbl
Jn CoxpaHHe BbICOKo 3ΦΦeKTHBHOCTn 6pntb peKomehDyETC POn3BOdntb 3aMeHy cETKn, NO KpaHne Mepe, EeKOrHO, a BHyTPEHHX Ne3Bm - no KpaHne Mepe, Odn pa3 B 2 rOda.
3aMeHaBaWei CeTKn
(cm.pnc.20)
YtobbCHrBcETKy,HaBADIte HKHONK CHTRN CETKN I NOTRAHBEBpx. Ytobb BCTaBnBHObyO
cETKY, HAKMMNAPNEPEMEaJIe 6E BHIN3, NOKA OHO CO SEJYKOM He 3aФИКСРЕТСАНМЕCTE.
Y6eDInTeB TOM,TOO3a0pbl NO 06eHm CTOpOHAM KHOKOK OCB0bXDeHN BHeuHcETKN CNTeMb N BHeuHcETKO CNTeMb ODiHaKOBbl. Ecnn OH He ODiHaKOBbl, Ecbb BepoHTHOCTB TORO, YTO pNIM 3KcPiNyatauHN BHeuHra CETKa CNTeMb OTCoEOdHnTcR, HIN PpO3BODInTehHOCTb 6pntb CHM3NTCRA.
3aMeHa BHyTpeHHmX ne3Bn (CM.pnc.21)
Haxab Ha KcOpby roBbKb 6Pntbbl,notAHnTEe BBePx,TO6bI CHtBb, PO OHOmy ydAnITE BHYTpeHHne ne3BnA, TBEpO 3aXbaTbIbAR IH CObEx CTOPOH IN NOTAHBY IX BeBx OT bPTbbl.
He npkacaiaTecb K MeTAnnueckm 却CTM BHTPENHXJNEBNI.
YTObblCTABnB HOBbl BHUTpeHmH HOBOE BHYTpeHHee JI3Be, 3aXBaTtne Ero C O E6nx CTOpOH HnAdabNTe Ha Hero BnM3, YTObbl OH CO JeNkOM 3aΦNKcnpoBaNCA B 6PbnTe.
3aunTa OKpyKaIOUe CpeDbI NYTINN3aUNHNCNOB3OBAHHBIX MaTePnaIOB
3Ta 6pntBa coepknt Jntn- HNOHHy6bataeH.
IoxanyuCTa, yTnun3npyuTe 6batapeo B OΦnuaanbHO yTBepkDEHOM MecTe, eCn TaKaB cnY6a PnpEydCMOTpeHa B Baewc cTpaHe.
CHTME BCTPOEHHO6aTapen
DO yTNn3aun6pntbbl (cm.pnc.24)
OCTOPOXHO - He nbitaTecb 3aemeHb6batapeo dna NOBTOPHO nCNOB3OBAHn6pntbbl.30 MoKET npBeCTN K noxapaynnopaxKeHHN 3NEKTpuCeckm TOKOM.
BaTaper B daHHOB 6pHTBe He npedHa3NaueHa DaIraMeHb NnbsObaTeJeM. Ondako BaTaepo Moryt 3aMeHHb YBOJNOHOMOeHHOM cepBnc-ueHpe. Pnpdok DeNCTBn, ONcaHHb HnKpe, npdeHa3NaueH Tohko Dn CHATn3 3apHHOB 6bAtePc c eIb0 HauNeKauey Tynmaaum.
- OTKIIOUHTe 乌Hyp nITAHnO T 6pNTBbI np ChTm6bATpeN
- OTKpyTNTe BnHT HNXHNe Kpbuikn (a).
- CHIMITE HNXHIO Kpbikky (b).
4.CdBnBte 3aHNOI naHeIb (c) nCHIMITE ee.
5.CHIMNTe3axmblkopnyca(d). 6.OTkpynte yetbipe BnH
Koprnyca (e). 7. CHMNTe KoprnyC B (f).
8.ПОДнIMNTe 6atapeo(g)И CHIMNTe ee.
OcToPOxHo -Дn npedOTbpaueHn TpaBMbl Nn
NOBpeKdEHHN3dEHHN,
He npo3B0DnTe 3apRkdy6pntBbl B MecTAX BO3eNCTBnP nPBmXb COHNEHbX Lyue HnI NTOCHNHa TEIIa, INB NOMeUeHNx C
60JIbwoBnJaxHOCTbIO.
ПльзуITEcBoTOLkoBxOДИIMBM KOMJIeKТЗарнБHM YCTpOиCTBOMRE7-25дЯЗapdIKN6pITbIeS8168.
Ponnoctbno npocuunbaite 6pntv nepe3aepkdo.
XpaHnTe 3apHnDHe yCtpoCTBO NOaJbIe OT BObl, N DOtparNBaTecb Do Hero TOnBko CYXMMpyKAMi.
- Pn OTcoeDInHeHm 3apdHoro yctpoHCTBA O pOteKN CTn nepemehoro TOKa 6epntecb 3a cAmo 3aprdHOe YcTPOHCTBO; ECnn Bby6yTe TTHyTB HNOcpEDCTBEHHO 3a WHP npTaHnB, Bbl MoKETe NOpeDbI rEo.
He TnHtE 3a uHyp nHTAHHH, He CkpyuHBaTe N He crn6aTe erO CmIbHO.
- He namatbIaBte wHyp nITaHnHa nPi6Op.
- EcnB Whype nHTaHn6bdyT NOBPExEHn,ero HeIb38b6yDet 3aMeHnBT OTeJIbHO. CBXKNTecb C yOJNHomOeHHbIM cepBNC-CEHTPOM.
XpaHnTe 3aepnOe yctpoNCTBO cyxOM mect, rne OHO byet 3auuHcOo OT NOBpeKdHn.
- PnH IcNoJIb3OBAHm HmI 3apRdKe, 6pMTBa H3apRHOe YcTPOCTBO MORYr HEMHOrHarpTeBcR, HO 3TO HE ABNReTcH HEmCpRaBcHObTbO.
B Tex cnyaX, KORda npn nCNOIb3OBAHNN NINs 3apAKe 6PNTBb BO3NHaKoT CTaHHeCKHe NOMEXN-3a-4 pa60Tb TeneBn3Opa, NOkKnIOUHTe 3apAHOE yCTPOINCTBO K DpyroJ p03eTKe.
He npkaacaiTecb K kpaio (MeTAnIyueckan 卒ctb)
BHyTpeHHeroJe3BnA.
HecobnoDeHne daHHoro Tpe6oBaHnMOKet npBcTeN K TpaMaM pyK.
Pnpnpmbbke6pntbbl6e3 3apndoro yctpoictba c camooochtkno pombbaute ee BODonpobOHOBBOH.He moTte 6pntby B cohen HIN KINrHcHOB BOe. TaKxe 3anpeuaetcN CNOIb30BaTb NCTUne CpeCTBA,pneHa3NaueHHbe IIN qnCTKN TyaNETOB, BAHN INN KXoONHO O6OpDobAHNA. He nporpykaite 6pntby B BOy Ha DnITENbHOE BPM
3anpeaaetcn npotnpabIIO6bIeTaeTNIbPbIpa36aBntenEM,6henHomnnn Cnptom.1pOtnpaTe nx TKAhBO,CMoEHNO BMbIbHOBOE
He pa36bnpaTe Kopnyc 6pntBbl, NOCKOBKY 3TO MOKET HAPyHtBe ee BOHOHENPOHuaEMoCTb.
He npombIbaIte 6pntby BoDoy, ecn 6pntBa noKnloyeHa K shHyD nTAHNA.
PnOOnCTKe 6pnTbbl BOoO6a BNYTpEnHHX HOJA OJINKHbI 6BtB npKnpenHbI. (Ecnn ocyuectBnTb TaTKyO OHCTKY TOJbKO CODHM pNkpenHbIM HOXOM, NOBNTC He0bHbIM Wym, n3TO MOxET pNpBeTrN K NOBpeKDeHHO 6pnTbbl.)
He OTOcoeINHnIte Kaccety MOIOJero CpeDCTBA INI BOIHOH BaOHK B XOJE NCTKN.
OuuaaunxNdkocTb MoKET npoNTbc, 4TO npBeTeK HcnpaBHOCTRM.
YCTPOIcTBOCAMOOHCTKOH HPOBHYU HENODBHXHYO
noBepxHOctb.
Ecnn 3apnHoe yctpoNCTBO C cAmooCHcTKo HAKNOHtB, OOnuAIOUa XnKoCTb MoKet npOnTbC.
- Ecnn Ounuaoua JnkKoctb npolnaacb HemeJeHNO BbITpnte ee.
Heo6xoJnMo COJHOaTb OCTOpOxHcOtB, TAK KAOKUINaOuJAR XNIOKcTB MOXET OeBCuBTar KoxAhBe N3dEnn HNODCNPOJa.
Cpok xpaehnna Ounuhoe KIOKCTM COCTABNET 6 MeueB Nocne OTKpbTNI. BkInhTe Kaccety OUnuaHero cpeCTBa H BIneTE OUnuaHOUYo XNIOKCTB BYTPN BOJRAHO 6aKa,ecnO hA He 6ydet NCNOB3OBaTBCB R TeueHnE 6 MeueBnnb Bonnee
CMOIe CTAPYO ONUIaOuIyU XNIOKCTB BYTPN BOJHO R6aKa B CINB. YTNIMnpyte KACCETy ONUIauIoo CpeCDtBA Ka NIACTMaccBOBMy MUCP
- DePJIHe pIb6B HeNoCTyHOM dIaTeJe MeCte.
XpaHnTE NHTcpyKcIOHadeXHom MceTe.
AanTep npedHa3nauen dnn npabunbHoi paobtB B BEPTKaNbHOM nOJoxEHIN nn Ha pOBHO NOBEPXHOCTN.
DaHoe yctpoicTBO npedHa3HaHeo TOnbKO dIa IcNoB-3OBAHnB BOMaHmHX yCObMIX.
YcTaHOBHeHH npOn3BODntenEM B nopAKe n.2 cT.5 ZepeapbHoro DHa PH O 3aunTe npab Notpe6tEnep Cpok cyxkbI dAn daHoro u3dennpaBeH 7roamC
JaTbI npOn3B0DCTBa npN yCNOBN, YTO N3dJIe NcNoJIb3yETcBA C TcPOrOM COOTBETCTBn C HactoTaeHnCTpyKUnei NO 3KcNpIyaTaunu INpIMHeHmblMn TEXHueCKMM CTaHdaptAMn.

BZ02
CdeNaHO BAnOHn
3TOT np6op npedha3aueH ToIbKO. DnA DomauHero IcNoJb3ObaHnA.
MauywnTa 3neKtpnBopKc,JTd.
Bo3dyuHb aycTneckn yum: 67 (B) npn 1 nBT
HOpmaunno
06paueHHIO COTXODAMN ⅡIaCTpAH,He BXODAUINB EBPOeNCKM Coo3

DeIcTBnE 3Toro CMMBoNa paacnpocctpaHETC TOnbko Ha EBpOeckn COp3.
Ecnn Bbl c6bpaetecb B6pocntb DaHHb npOkyT, y3HaNTeB MecTHbX opraHax Bnactm INy m Dnepea, Kac CneYET NoCTynatb C OTOXAMT TAKOTOnA
Kullanmadan once
KoNb6pntBa 3apnJaactbcn, BMnKaTbcN niCobIeHn PKekpaHy, Ta 3'ABnBcTBcN CmBON BUNKn (INB.Man.4(A)).
Bih nokaye emhictb 6a tapei, 10a 3anwnnacr, bid 0 % do 100% 3 npnpoeHHM 10%
KoN3zapxJxHn3aBepueHe, 3'ABNTcbN oKApzHHn "100%" Ta NiIDCBTIeHNPK-EkpaHy MNHe OOnH pa3 3a 1 cekyHny. Pnicn 3aBepuHn3apRJaHn3 ce NOKaHaHH6yde MnrAtn pa3 3a 2 cekyHn BnpOdoX 10 XbHn H (DMB.MAN.4(B)).
HKUo PK-ekpan BiO6paKaε 10% a6o MEHwe, dIa NOBHorO 3apAkaHHb6pHTbn 3HaO6bTbcra 1 roDnHa.
CMBONBUNIKN NOUHae MIRATNaHa
PK-ekpahi, KOJI emHicb 6aTapei CTaHOBNT 10% a60 MeHue. KOJI HA PK-ekpahi 3'ABnEeTcB nOKa3aHHN 10%, npCtpi MOKHa BUKOPNCATn OINH a6o DBA p3M. (BiDi3HReTbc 3anExHo BiD BUKOPNCATnH.)
PobHCTO 3apRdxKeHOrO
akymyIaTopa Bnctaayc y
cepeiNbomy Ha 14 roJIHB
(3XbUNHHHa roJIHHB 3BnauHHO
bopoDi).
Bn TAKOX MOKETe npEHNATN 6pntbydo3apnHoro npCTpo1o 3 pnyHKUcO CaMOOnuENHbA oAoANTepa DnI NITPMKN NOBHO mHOCt6BaTapei. L4 6pnTBHe MoKe nepe3apnTNC.
Bnpyuaohny npoop663 3apnHoro aanTepa, noBHICHO 3apnIbAkyMynTAp0pNTBn BnpoDobk 1 roDMn.
3apJxahH6e3 3apJHoro npCTpOo 3 fHKciIO camOOnueHH
IiKIOHbWHyP XINBENHn DO 6pntBa Ta BKnOHT b aanTp y po3eKy MEpi KepenHHoro CTpyM (INB. Man. 5). EpnTa BAOTMATNHO HanaWtYcTbCn Ha Hanpyry Biy 100 Do 240 B nepeMHORo CTpyM.
B DeaKnx perioHax MoKe 3Haobunca CneuaIbHn WtencenbHn nepeixHnik.
KopncTyBaHHa 6pntboIO
Nonepedxehn - 30bHniHnniBk DaJx TohK npnHeHaENXHOMY NOBODKeHHI3
6pntbo MOKe 6ytn
nooKoJKeHa.Tomy nepeD
KOxHMM BkOpNCTaHHM
3aBxNnepeBipNte NlIBKy.
06 3anobirtyokOKeHb
wkipn, He KOPNCTyTEcA
6pntBOIO, AkoNo NlIBKa qn iHwi
actHN 6pntBeHO rOlBKN
nowokKeHi.
ДИЗ BMKANHAбРУNTБИНТИССТБЕМЕКИВ"БКИ...
HaTnCKaHHN yTpMaHHB HATnCHyTOm NOXoKHeH KHOKN BKn./BKn. 6Ibn 2 cKeynHd AKTNByE Typ6o peJmM WbUdkichoro Bi6pauiHoro YuueHHN
(nB.“HcTka6pntbn6e3
3aHnHO npCTPO 3
fynkuio camaoouueHH)
TINHH 3 AKTNBOBAHM
WBnDKICHIM B6pauiHNM
peXmOM MOKe CTAtn PNPHOO
yUKoJxHeb WkipN.
DeakTHByte Tpyo peXmH
wnXOM BUNKKAHH i
NOBTOPHO BMKaHNN6pNTBN
He TopkaIteca BmNkaua 已 Bkn./Bkn.)nIyacpoBtbn6pTbN。Le MoKe np3BeCTn DoBKNIOeHHbPTBNa a60nepeKIOUeHHypeKIMWBnIKICHO bIbpauiHoroYuNEHn.
Пи加快建设同列网网Tpmaite naneueh na cneuianb n onopi.
TpmaTe 6pntby nip npMm Kytom (90) do JIJIHKn uKipn, zo 6oBpOJIOeTbCn (INB. Man. 6). POnHiB rOIHH 3 IerKoro
HaTNCaHb 6pntBOIO Ha NoBepxHIO
wkpi 06nUyH. HArHHTb wkpy
binbHO pyko i nepemuaTe
6pNTBy 3BOPoTHNoCTynbHMn
pyxAMn B HanpMky poCTy
BOONCC. No mipi TORO, Rk Baawa
wkpa 3BNkaTMHe do IHTeHCNBHOCTi
pOBoTm 6pNTBn DO3BONETBCr
36bnJbWeHHn TCKy Ha wkpy.
3aBnTnck 6pNTBn Ha wkpy
06nUyH He cnpRe nIDBnueHHo
KOKOTI rONHH.
Pyka B6opy Wbukkocti oebptB
(DNVB.MaI.7)
Длб Вьбopy peKIMу rOINHЯ -«Sofb»
a60 «Iock» y 3aJIeXHocTi
BID ocObuctnx nepebar -
BVKOpuCTOByTe nepEMKaJdIi
wapHiPiB.
Lc moxha po6tu He3aIeXho BiToro, BkIIOyeHa 6pntBa, HHi.
3OBHIHNE NIIIBKOBE NOKPNTTCACTEMN DnI RONIHNA (DINB.MAN.8)
CnCTema 3 NIIIBKOBMM NOKPITTRM CKNADAeTBCa 3 JINHNOI NE3a (a), PO3aTOBHOARo MIX DbOMA nnBkAmn (b). NIIbKN pyXaIOTBcB DorOpri BHN3 HeaANEKHO OJHa BID OHO, NOBTOPOUO KOTypu Baworo OboNNy.
UJINHNE JIe3oJIerKO 3hAXOJNTb i 3pi3ye doBRE BONCC Ta BONCC, uO BIPOCNO.
Bolore roJIHH
3M'kWtB WKipy HaHeceHMM Ha 6OBMNTHOKHM WAPOM NINH DnI RONIH. 3 yCBOrO Po3MaTTTc CXOXM3M'KwYbANbHNx3aCobIB (reNi, MNIO, KpEM, TOIO) NiHa dN
roinHc Hnibb npdaTHOEOpeoBHO Dn 3aTocyBaHNB TaKnx jIax. He PeKoMeHyEcTbC HAnOHtN iHy TOCBTN M apOM, IO MOKe HeratNBHO BnHyHTHa RkictbpoBtM6pTbU. Y BunaKy 3aBbaHH Ro1iBKn dnn roJInHnriHO 3mne nHy nd cTpymemEBOn.
BnKOpNCtAHHHOXA dna nipipBHOBaHH
(ДИВ.МAN.9)
BMCYHUTN HIX DnI ndipinbHOBAHH, nepecyHBTeOB3yHOK Haropy.
BCTABTE HIX NID PnAMM KYTOM DO DINHKN WIKPII HA CKPOHI, IOO o6p0bIOeTBcR, Ta nepeMIuaJIte HIX DOHN3Y.
UHueHH6pntb
1 qnctka 3 3apdHm npncptpocm 3 yHKciO cAMOOHnueHH
PirotybaHH 3apdHoro npntpo 3 yHKuiecamaoouueHH
PonepeJxHn - He MnTe BDOIO aIantep a6o 3apAHH npCTPI 3 fYHKciEO cAMOOUHHeH. HeDopTpMaHnCboroNoLOXeHH MoKxBEKlnKaTu ypaXeHH eNektpuHN CTpyMOM a60 KOPOTKe 3AMKnAHn.
1.Bi'd'eHaHae6pntBy Ta Bnky npicrpoIO Bi3apraHoro npicrpoIO 3 yHKuiEO camooohueHH.
096-111_ES8168_EU 05.11.29
一 108
- Hanne BoDy y BoDHH 6aoyk.
1)BuaJIbBoaHm6aOKi3 3apJADHO npCTPOIO 3 dyHKciO camoouHcHnH (DINB.MAN.10-1).
2) BiDkPmTe KOBnaOc BOdHoro 6aKky (nB.MaI. 10-2).
3) 3nne CTapn po3HH dna mueeHn i3 BOJHoro 6aKy Ta npomnTe NOrO (INB. Man.11).
4) 3a n i nte BO do npoBI dHy BOydo nii pIBH BOi (DNB. man.12).
PibeHbOBNy6aKyHe NOBnHE6yTN BUNIM3a nHIO. 1e MoKe BKNNkATN BNINBAHHPiHNnDnYuNEHn.
3.卍bho 3aTnHtB KObnaOk BOAnHO 6aKy Ta npEChnAte 6aOK Do 3apAnHO npCtpo 3fynKciO caMoOuNueHHA (IMB.Man.13).
4.BuDanitb nnom6n 3 HOBORo kaptpnxky 3ac06y dnnuueHH (DBI nnom6n) (DNB. man.14).
TpmaTe Kapr ropn3oHTaBHO. (PnHaMipHomy Haxni 3ac6MOKe BnNTncb.)
5.Пд'еднaite KaptpnJx 3aco6y
Дгчишени Ддэзного
прстpoу 3 ФчкцiEO
camoochneeHn(DNB Manl.15)
He BnKOpNCToByTe iHux 3ac06iB, Kpim cneuaIbHorO
3ac6y dIra NIIeHNN Ia 6pBTR Panasonic.
KaptpnJx 3ac6oy dna YuueHHa TaPiHNY dny UuueHHY B OBOHOMy BaKy CNI,MIHTN ODOHcAHO. DpaBaHHra BOn, aObo 3amiHa TINbKn KAPTPnJx ABO BoDn, BKNJIne npOpueHHa FyHKU OHUeHHA.
KoN3apAHH npncTpi 3 cyHKcuio CaOooHenn H3xAoNDtcb R p060ti, KOHcHTpOBaHH 3ac6d nnn HnueHH BcepeHH KApTpuJky po3HNReTbCra TaBoda yBaKy cTa ePiINHO Dn NnueHH.
HnueHHb
1.BCTABTE BUNKy npnCTPOB rH3do 3apnHO npnCTPO3 fHyHKJIO CAMOOHUIEHHN (DNB. Man. 16-1).
2. BctaTe aanTeB hactiHpyo3eTKy 3miHoro ctpymy (mB.MAN.16-2).
3. NotarHtbypky 3apnHoropnpctpo3 yHKJIeCMAOOuHcEHn DO KnaaHn(Mn.M17-3).
4.3HIMtB 3axnCHN KObnaQOK Ta
JXBCCTABTE 6pNTBy y 3aprHnH
Pnncptpi 3 cyHKUeHO CAMOOHnueHHn DO KnaaHnH
(DNB.Mn17-4).
IpekoHaTeC, 3OBHlHc NJIIBKOBE NOKPITHe He DeOpMOBaHe Ta He NowKoJxHe.
- Pered BKNOpNCtHaHMM 3apAndoro npncTpo 3 cyHKuieCmOoynueHH
nepekoahTeC, 10o 6pntBa
ctapnHO BmNTa MnnOM a60
IHIMM NIOHM 3acObM, Ta
BnPTb BOy 3 6pntBN nepeD
TUM, RK BCTABNATI IIB
3apdHnnpCTPI3
fHKUcEco CMOOHNHEH.
HaBHcHt Ha 6pntBI MnaI
abo IHWO OMOHO TACO6Y
3abpyDNb MIOOHPO3YNH
y 3apdHOMy pncTPOI 3
fHyKUcEO CMOOHNHEH TA
MoKe np3BecTn DO
3HNXeHH eefkTNBHOCTI
OMHENH.
5.ДЯчSEHNA6PNTBUNB6epiB oNY3Onu[Clean/Dry/Charge](CHTKa/CyUka/3apnKa)a6o [Clean/Dry](CHTKa/CyUka).ДЯ BNCyUbyBaHHa 6PNTBNIcNpOMBaHHa B6epiB onuIIO [Dry/Charge] (CyUka/3apnKa) a6o [Dry] (CyUka)(DINb.Man.18).
Onui [Charge] (3apnka) noHHaetb3pa3y X nCnT TORO,IK 6pntBaBCTaJIeBA H 3apnHnn npncpti 3
fynkuiecamaoounenH. BcboRo HnABhOCTi n'rTb onui.
PiJ Yac HATNCKaHn KNKKn Bb6py, BiO6paKeHHa MIHReTcBa HAcTyYNHM NCHOM [Clean/Dry/Charge] (CytTkA/CyuKa/3apRJa) [Clean/Dry] (CytTkA/CyuKa) [Dry/Charge] (CyuKa/3apRJa) [Dry] (CyuKa) [Charge] (3apRJa).
Bukohannn noHaeCTbCABTOMaTHO 4eep3 wictb cekyHd nicra B6opy.
A JnBn6opyiHwoiOnuii HnatChiIb KNONKY Bn6opy BnpoDobXweCTNceKyHd (Jnu.Man.3).
I0NEPEJXEHH He BmMae 6pntby 3aepnHOro npCtpo 3 fynKuiEIO CAMOHNUEHH, KOIN fynHKUOhye Oniui, Ika BkNHOe fynHKU [Dry] (CyuKa).PiTac cyuKu BNKOpNCTOBytbcn HarpBaIbnHm enEmem, UO MOKe BUNIKATn CInbHe HarpBAnH Nla3, UO MOKe CTaTn pnuHNOOniky.
Bukohahn onui npnnHcTBc,
Akuo niaac HneHH
BmmkaTbCNEKTPOKINENHn. B
bcomy BNnady Ktp6a BHKOHATn
onuio [Clean/Dry/Charge] (NCTKa/Cyuka/3apraKa) a60 [Clean/Dry] (NCTKa/Cyuka) ue pa3cnouatKy,
Bukohahn onuii [Clean/Dry/ Charge] (NCTKa/Cyuka/3apraKa) a60 [Clean/Dry] (NCTKa/Cyuka) MOKe 3aHnTn bnMbo 3 roDnH.
PiCn 3abepuHn onuii [Clean/ Dry/Charge] (NCTKa/Cyuka/3apraKa) a60 [Clean/Dry] (NCTKa/Cyuka) noHaae MmRtn IHnKAtop
Bukohahn Ta BNCuyBaHHa.
3apnnpctpi 3 fyhkiio camoooheneHH CTBOPEH DnH uenHH ne3 (3OBHIuHbOro nIIIBKOBORO NOKPITTA Ta BHYTpuihix ne3).
30Hn, aki He 3MooyhotcBc piinHO DnA YnueHHa Ta HABKO NOBepxHi piHN, He OauoiaTObC.
Li 30Hn NOBHHI NCTNTCb
WtKOIO, a6o npOMBaTcN BDOIO.
3aeni Kaqrtnkxy 3acoby dny uienenna
KoN KaptpnJx Docrae KInu3 CTpOKy Cnyk6n, NOrO NotpIbHO 3AmHtN. 3BnuAHo, peKomeHMyETbcM HmHTn KaptpnJx YpeE3 30-40 dHIB, AKnIO BIN BnkOpCTOBYETcB pa3 Ha DeHb. BnkOpCTOByTe npBeDeHy HnKxpe CXemy B RKOCT KeipBHNUTBa.
Ipnmitka: nH niTpmaHHa M Kc m aBho i e fektnbHocti YnueHH noTpiHo MIHTN BOy y BOaHOMy 6aKyKoXHOro pa3y, KOJI MHaERtCBaKpTpuJx 3aco6y dna YnueHHa
3aMiHa BHyTpWiHix ne3 (mB. man. 21)
CTNCHITKHNKN,ISO pO3MnKaIOb 3aTBPCKINNEHNOBHIUNBO rNNIKBORO NOKPNTTA BPTBEHO CNTEM,NHIMTB CNCTEM.3HIMTB BHYTIUHNI E3a,MIUHO 3daBUBUN IX 3a 06nDa KINU i NOTARHYBUN Ha ce6e.
He TopkaTecMaTeBoI NOBepxHBIHTyPIuHixNe3. Noepei BCTaHObITb HOBI HByTpyHniH Ie3a, yTPmYIOUnx 3a 06nIBa KHIJI, i3akpInITb ix y6pNTBI, HATnCKaOuNHa Ne3a, DOKn He NOuyETe KnaaHHA.
3axoyn 3 oxopohn HABKOJIINHbOro cepeOBuua nytniiaui MATEPIANIB
Y KOMNNEKT 6PNTB XDQNTB JITINIOHNK AkyMNATOP.3a6e3neyTe yTNi3auiokyMNATOPa y OdiuiHOnpni3NaueHOMyMiCi, RkUoTake iChye B Bawii kpaII.
BudaneHH 6yobaoHAcymyntopho6atapei nepeIytniiaucie6pntbn (mB.Man.24)
3ACTEPEXEHHr He HamaarTecn 3amHHTn acMyTNpHy batapeo 3 MetoIO noanbwo BnKOpuctaHHbPHTBn.Bn p3sKyTe BnKlnkATn noxexy ab0 ypaXeHH eNektpuHMM CTpyMOM.
AkyMnTOpHa 6aTapera, BCTaHOBHeBa ui 6pntBi, He iNlraRac aMIHc nOxKBaAM.
Ondak 3aminy 6atapei moxha 3diiCHNTB ABOTPON3OBAHOMY cepbichomy ceHTp. KocTyntecn HabeDeHNMn HXyE IHCTpyKUIMn DnBnDaneHHA kMyMNTOPHTNX 6atapei 3 MeTO IXhBOI HANEXHOI ytNi1aui. Ipeep BnDaneHHAM akymyTTOPHNX 6atapei 6pNTBa MAe ByTN BiKDIOHea BID MEPEXi XHBNEHn!
- PpeB BnDaneHHM 6aTapei BiDcHnTe BID 6pTNb HYP XMBNEHnH.
2.BrBHTtB rHHT (a) Hxhboi KpuKu. - 3HIMITb HIXHHIO KPNWKY (b).
-
3MictIb 3aHIO nAHEnb (c) Ta 3HIMITb II.
-
Po3pfikcynte pfikcatopn, 6bataepHoro Bicicy (d).
-
BiDrBnHTiB cyTnpu rBnHTa (e).
7.3HIMITb 6aTapeeHHBicik B(f).
8.ПИДИМITb 6atapeIO (g) Ta BnDanITb II.
3anobixhni 3axoDn -Дл nonepdxkeHH TpaBM a60 nonamOK Bnp6y,
3abopohHeTbC3diHOBaTH 3apAkyakmyIaTopa6pntBn nipnMMBNNBOMCOHCHORO CBITna,6iINdxepena TennnoBoi ehepriiYBMoBXNBEHOI BONORocti.
3apdxkatakymyntop6pntb ES8168 donyckaetbcn lne 3a donomoroho 3apndoro aandantepaRE7-25,uo BXoDntb yKmnpkeBIDnoBIOHoi6pntBn.
- Pered 3apdko6pntby nobHicTIO BnCyWHTb.
He donyckaIe KOthakTy aanTepa 3 BOIOO i 6eipbsc 3a HbOro nme cyxmmpykamn.
BnMaOu3apAHHaanTep 3 poTeKn nepemHHoro CTpyM, 6epiTbCn Nne 3a HbO; He TArHtB 3a UHP XNBIENHRA, TOMy OTO KANTo HORMOXHA NOKOHTN.
He po3rnyte, He ckpyyute Ta He 3aunhae WHPX XMBNHEHn IIOI rOCTPM KYOTM.
He 60mToyTe uHyp KnBneHHn HABKONO 6pTBN3aHaJTO TYO.
Bpa3i nowkoDxHHeH HeMoxKnBOzAMInTuNne uHypXNBENHH.
YbomByBnnaKByeptaTeBc Do ABTOHBOrO cepBICHOrO ueHpy.
36peiraTe 3apAHH aanTep y cyxomy Micui, die BInb dybe 3axnueHIM BID noWkoJXeHHa.
-Пд ус ровоти abo 3apAnKb
6PmTBA ta aanTpep DeuO
HarpibaIotbcn, OndaK ue He e
HecepnaBHiCTU.
Bpa3i no8n niJ vac po60n a60 3ap4nK cTaNHN Npe6koD TEn eb3iHOMy npHOMy BCTpOMt bAanTeB iHw pO3ETKY.
He TopkaTecb KpaKn (Me- taneBoi YactHn) BHyTpIuHbOro ne3a. HeDtpMaHaHH UciBmOrn MoKe np3BcTeN Do nop3IB.
KoNb6PNTBa MNCTbCa 6e3 3apnHOrO pntpOo 3 cyHKUcIcO cAmooHnueHHB BIKOpNCTOByTe BOOnpOBiHy BOy. He BIKOpNCTOByTe MHepepanIOBAhy KNJ'RAeHy BOy.
096-111_ES8168_EU 05.11.29 23:59
一111
He BnKOpNCObyIe MIOUc3ac06u, np3HauHEn Ia8 o6p06KnTyanTeB,BaHHx Nk KyXOHHXnpnAad. He 3aHpyoute 6pTbYbOy HAp TaBnBn Yac.
He npotnpaute KOMnoheHTn 6pntbpo3HHNKoM,6eH3NHOM cnCnPTOM.
ДЯ YUHENH 6PHTB NBUKOpNCToByTe TKAHHY, 3MOEHy B MINbHi BOdi.
He po3bnpaTe KOpNc bPHTBn, 106 yHKnHyTN Ioro po3repMeTnaaui.
3abopohreBc B 甲HnHb6PbTN,AkoBOHa 3'EDHa3uHPOMXKHBNEHHa
PnBONORomyuHHe 3HIMaTe BHTpiWHIx ne3.(KkOo 3HATN OIDE H BYTpIWHXIe3, 3'BBNTbCRe HEHOPMaBbHmWyM,i 6pMTBa MoKe NoUKOdTNcR).
He 3hImaTe KAPrnpJx 3ac6y
dIyUHcHHA aBO BoaHnB 6aOk
PiJAC HsueHHa.
PiDHa IyUeHHa MoKe
BUNHTncb, Oo npN3BeDe oNopyuehnHa pOBtN.
BCTAHOBHnTe 3apAHHn npiCTPI 3 FyHKUeBO cAMoouHueHHHaPiBHI,TBepiIN NOBepxHi. RaH23apAHHn pniCTPI 6yDe HaxHHeHH,piDnA DnYHueHH MoKe BUNITNCb.
YBnAdkax, KOPIINHADIyUeHHBNBNAeTbcI, II Tpe6aHERaHNO BHTepn. Tpe6a ByTN 0bAChM, TAK KpINHADN UeHHMOKe3He6apBNTN WkipRHi BIpO6n a6oNOKpTTn iNOrn.
CTPOKBUNOPNCTAHNNPIINHINnI INNIIUENHHNICINIBIINKPNBAHHNCKNAe6MICuIB.IKUO KAPTPDKX3ac0bYdNnUHNHaTaPiINHANINuNUEHHNYYBOJHOHY 6auchy HE BUNOPCTOBYBaINCB6a0b6InbIeMCHUBIXTpe6aZAMIHNT.
3nnte piiny nny uenHna i3 BODnHO 6aKy Ta npomnTe noro.KaptnpJx 3acOby nny uuHnCnI yTNi3yBaTn, kNactKOBe CMTT.
36epiraute npnctpi
HIOEOJCKHOMy dIeIeMicu.
36epiraute IHCTpykcuio
6e3neHOMy Micu.
Aaantep nobnHe6 npabunbHO BCTAHOBnHn y BEPTNkAlbHOMy NOnOKeHHi a60 Ha nIeONs.
BCTAHOBJHNI BUP06HnKOM TepmIH cn yjckn (npndaTHoCTi) cIbOro BIP06y DOpIBHoe 7 pokam 3 daTn BINOTOBENHHa 3a yMOBN, 0u Bnip6 BIKOPNCTOByeTBcA y cyBOPi BiIDNOBIDHOCTOdo iDCHOI IHCTpykui 3 EKnnyataaII TaTexHiHnx CTaHdaptB, 0u 3actOCBOHYtCB DaIO BORB BIP06y.
Daty BnroTOBneHHa3HaueHO Ha Bnpo6i.
AkyctnHm ym:67 (d5(A) Biin. 1pW)
Matsushita Electric Works, Ltd. 1048, Kadoma, Osaka 571-8686 Japan
Maucyci Eneekptn BOpKc, Jt.1048,KaDoma,OcaKa 571-8686,JnoHia
InfopmaqiauOytni3auiB Kpaihax, AKeH BxOJrB CBponeicbKn Cioo3

y
DnHm CMBON dIiChN TINbKn Ha
TepnTopi EbponeKbKoro CoO3y.
Pnno notpe6i ytni3aui daHoro
Bnpo6y 3BepHtcbdo MiCueBoro
KeipBnHNTBa 60 aDnEpa 10do
npabNbHoro MeTOdy II 3dIeCHHH.
000-011_ES8168_EU
05.12.01
11:32
1
Matsushita Electric Works, Ltd.
1048, Kadoma, Osaka 571-8686, Japan