
Salon Collection Ultimate Perform HC9700 - Lawn mower REMINGTON - Free user manual and instructions
Find the device manual for free Salon Collection Ultimate Perform HC9700 REMINGTON in PDF.
| Product Type | Hair Clipper |
| Brand | Remington |
| Model | Salon Collection Ultimate Perform HC9700 |
| Battery Life | Up to 150 minutes (cordless) |
| Full Charge Time | 4 hours |
| Quick Charge | 5 min charge = 2.5 min use; 10 min = 5 min; 30 min = 15 min; 60 min = 30 min; 120 min = 60 min |
| Power Supply | AC adapter 100-240 V, 12 V DC, 600 mA (adapter SW-120060EU for Europe, SW-120060BS for UK) |
| Usage | Corded or cordless (with cable or on battery) |
| Cut Lengths | Without guide: 1 mm (0.5 mm perpendicular). With guides: 1.5 mm (#0), 3 mm (#1), 6 mm (#2), 9 mm (#3), 12 mm (#4), 16 mm (#5), 19 mm (#6), 22 mm (#7), 25 mm (#8) |
| Adjustment Lever | 5 positions to adjust cut length (1.0 to 1.6 mm per step) |
| Included Cutting Guides | 11 combs |
| Blades | Removable blade assembly, washable under running water |
| Replacement Blade | SP-HC9700 |
| Cleaning | Washable under running water (device off and unplugged). Curved cleaning brush included |
| Lubrication | Recommended: regular oil on blades |
| Maintenance | Disassembly possible with included hex key for deep cleaning every 6 months |
| Battery | Lithium-ion, non-user-replaceable, to be removed before disposal |
| Safety | Do not use near water; do not immerse; disconnect before cleaning; storage temperature 15-35°C |
| Weight | Approximately 500 g |
| Dimensions | Approximately 20 x 5 x 5 cm |
Frequently Asked Questions - Salon Collection Ultimate Perform HC9700 REMINGTON
User questions about Salon Collection Ultimate Perform HC9700 REMINGTON
0 question about this device. Answer the ones you know or ask your own.
Ask a new question about this device
Download the instructions for your Lawn mower in PDF format for free! Find your manual Salon Collection Ultimate Perform HC9700 - REMINGTON and take your electronic device back in hand. On this page are published all the documents necessary for the use of your device. Salon Collection Ultimate Perform HC9700 by REMINGTON.
USER MANUAL Salon Collection Ultimate Perform HC9700 REMINGTON
natural_image
Black and white photo of a hair styling tool with a clip, no visible text or symbolsThank you for buying your new Remington® product. Please read these instructions carefully and keep them safe. Remove all packaging before use.

IMPORTANT SAFETY INSTRUCTIONS
1 This appliance can be used by children aged from 8 years and above and persons with reduced physical, sensory or mental capabilities or lack of experience and knowledge if they have been supervised/instructed and understand the hazards involved. Children shall not play with the appliance. Cleaning and user maintenance shall not be done by children unless they are older than 8 and supervised. Keep the appliance and cable out of reach of children under 8 years.
2 Do not put the appliance in liquid; do not use it near water in a bath-tub, basin or other vessel; and don't use it outdoors.
3 Suitable for cleaning under an open water tap.

4 Keep the power cord and plug away from heated surfaces.
5 Make sure the power plug and cord to not get wet.
6 Do not leave the appliance unattended while plugged in, except when charging.
7 Do not use attachments other than those we supply.
8 Do not twist or kink the cable, or wrap it round the appliance.
9 Do not use the appliance if it is damaged or malfunctions.
10 If the supply cord is damaged, it must be replaced by the manufacturer, its service agent or similarly qualified persons in order to avoid a hazard.
11 Do not plug or unplug the appliance with wet hands.
12 Store the product at a temperature between 15°C and 35°C.
13 This appliance should be charged by approved safety isolating adaptors SW-120060EU (EU), SW-120060BS (UK) with the output capacity of 12Vdc; 600mA.
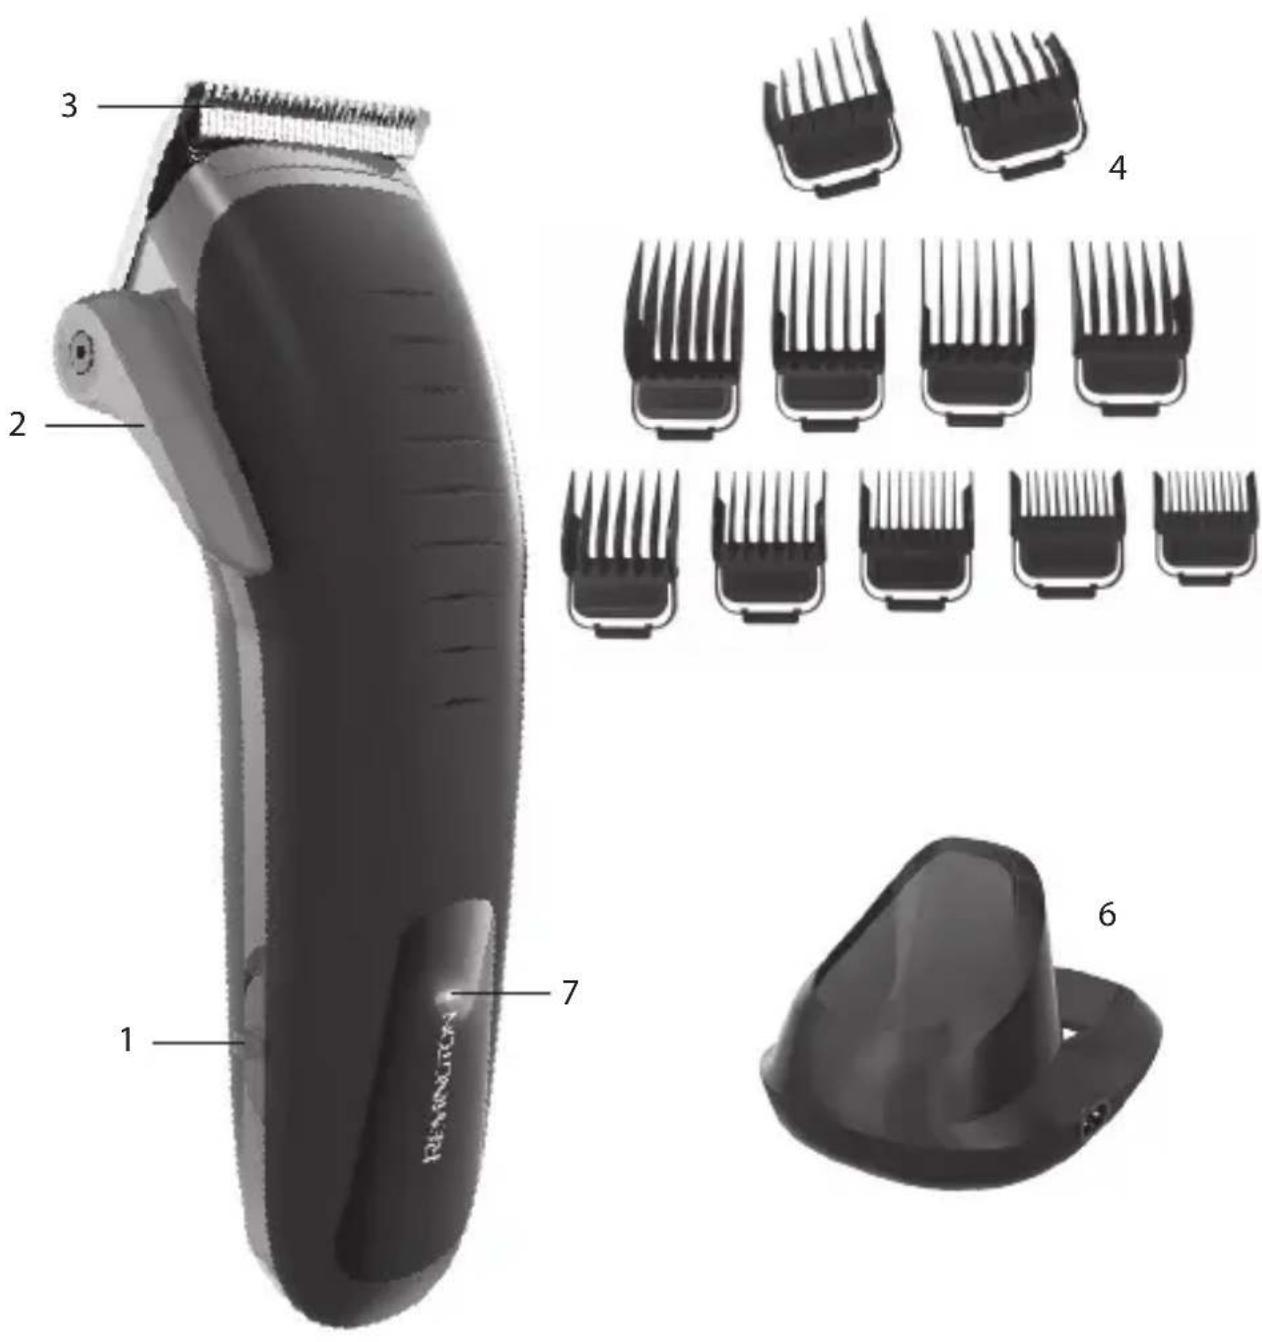

KEY FEATURES
1 On/off switch 6 Charging stand
2 Taper lever 7 Charge/low battery indicator
3 Blade set 8 Blade release button (not shown)
4 11 guide combs 9 Adaptor (not shown)
5 Angled cleaning brush (not shown) 10 Hex wrench (not shown)

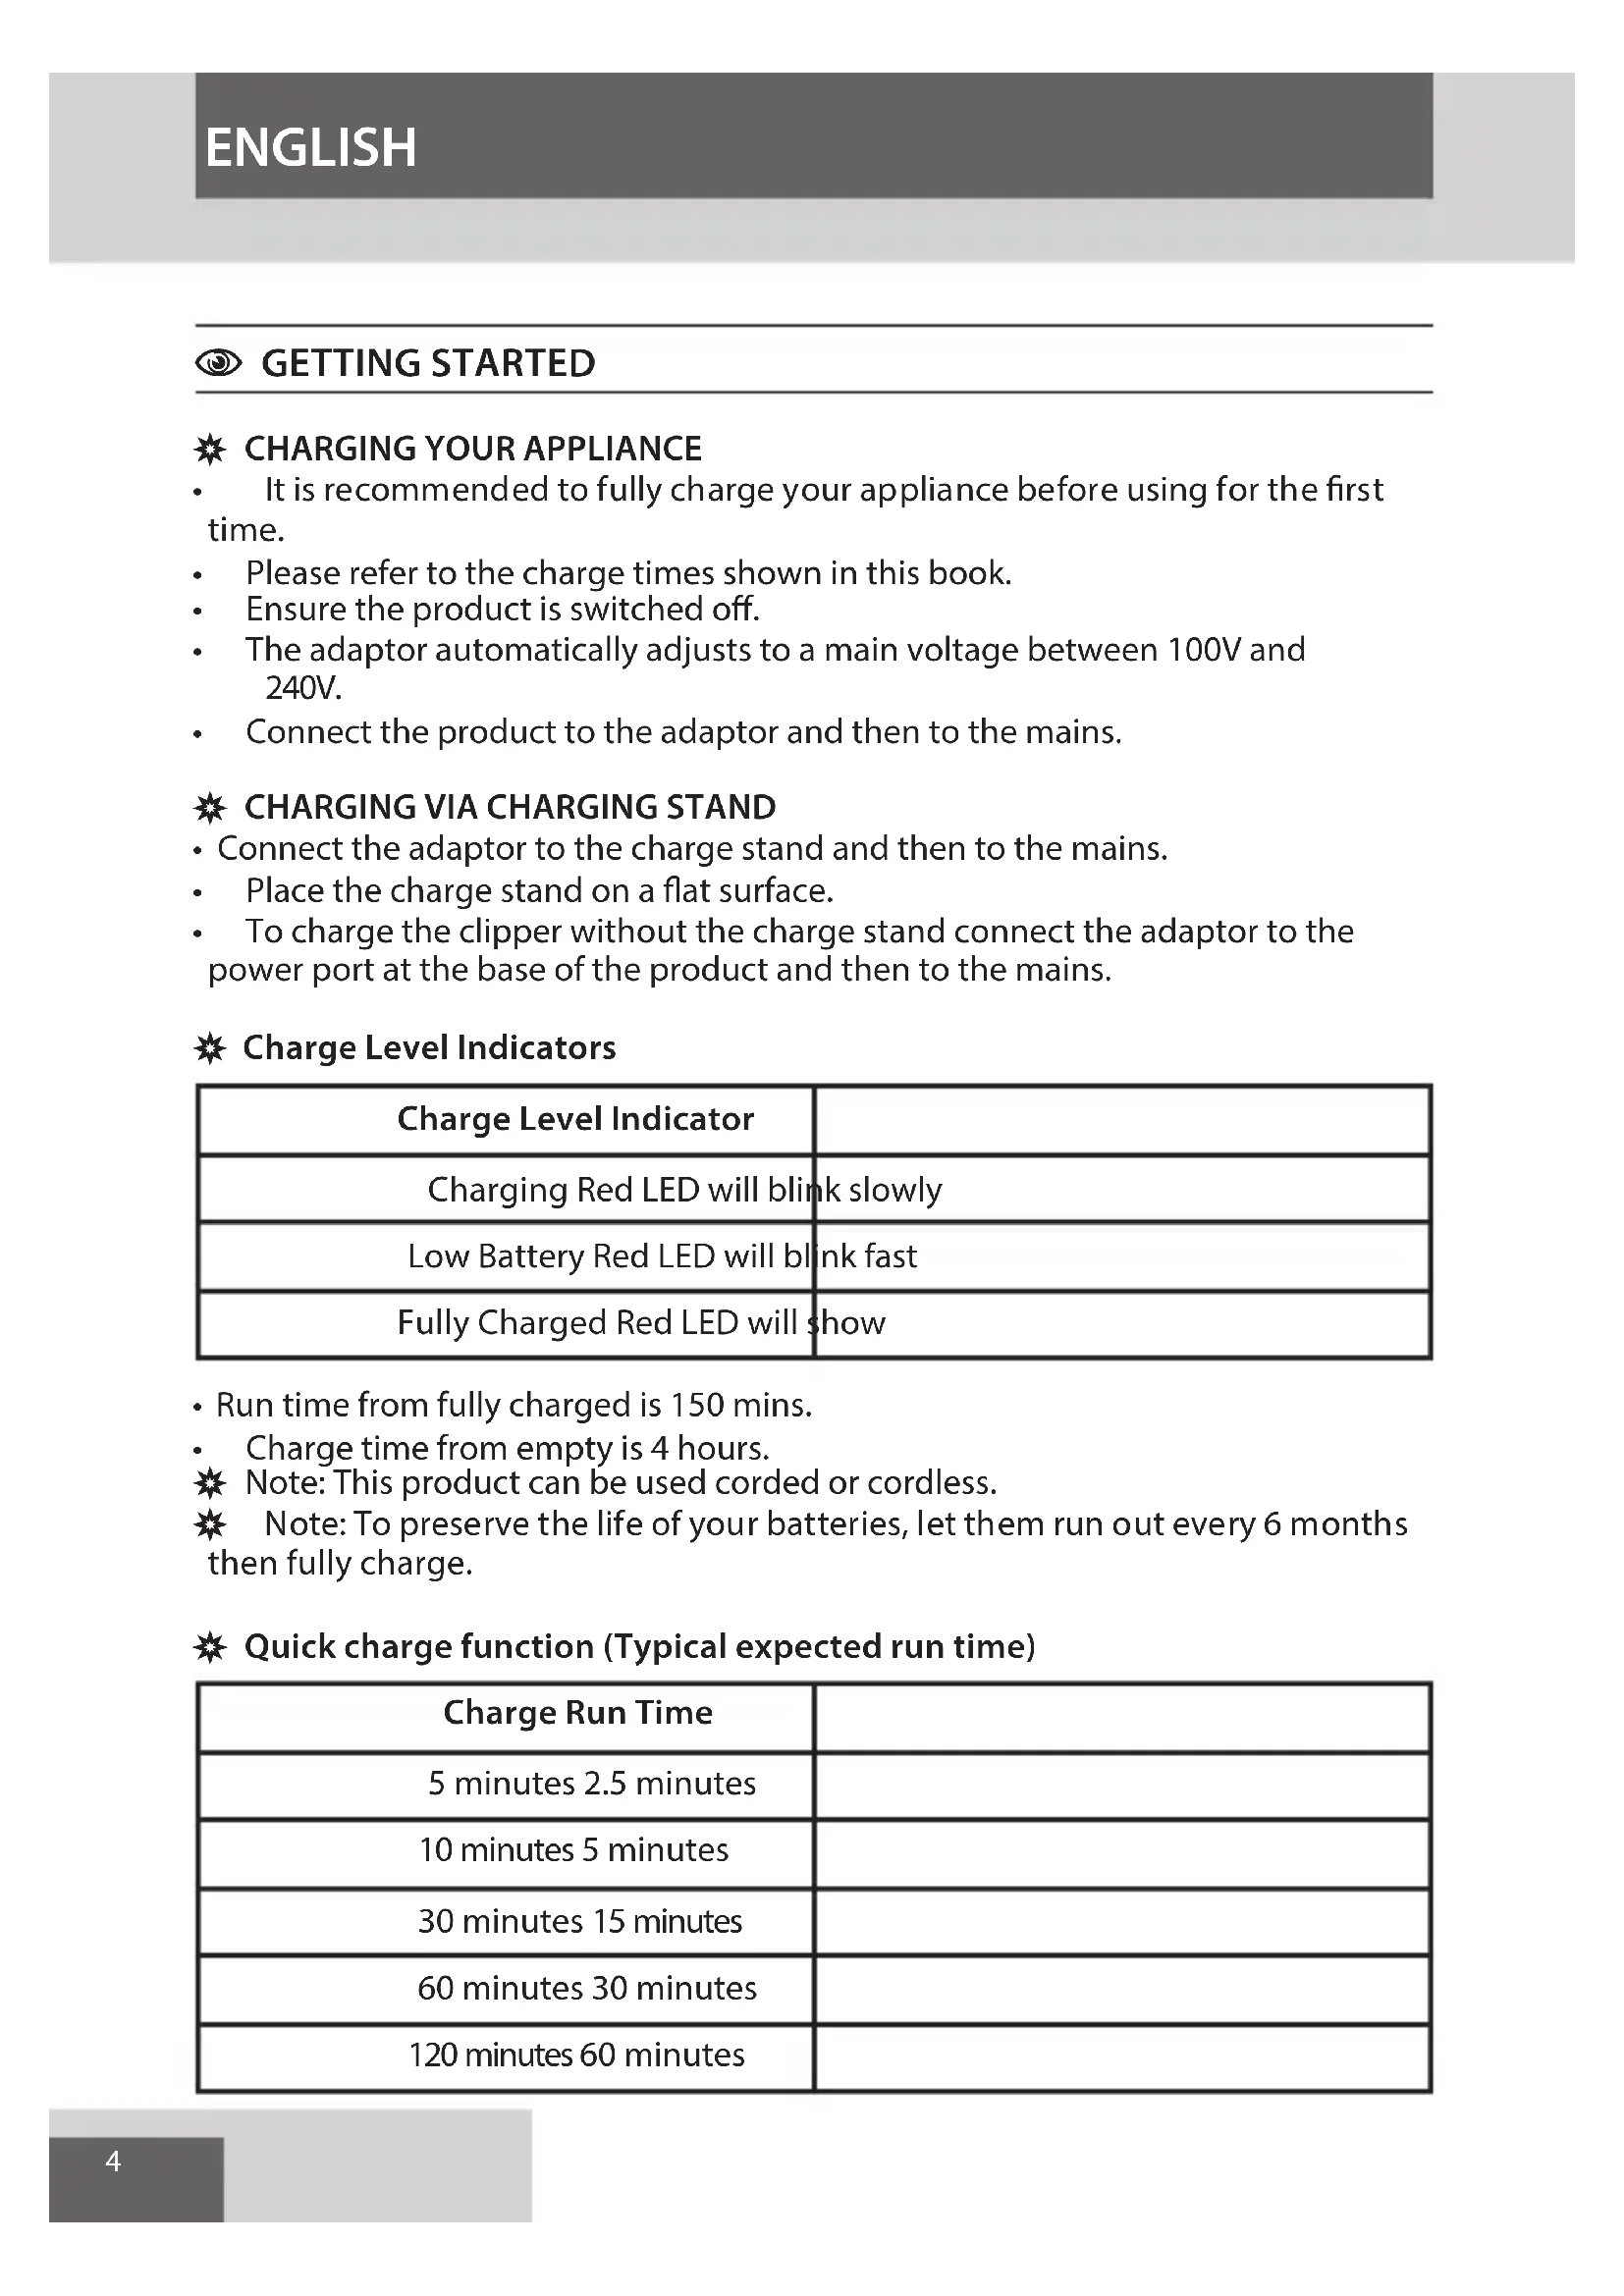
GETTING STARTED

CHARGING YOUR APPLIANCE
- It is recommended to fully charge your appliance before using for the first time.
• Please refer to the charge times shown in this book.
• Ensure the product is switched off. - The adaptor automatically adjusts to a main voltage between 100V and 240V.
- Connect the product to the adaptor and then to the mains.

CHARGING VIA CHARGING STAND
- Connect the adaptor to the charge stand and then to the mains.
- Place the charge stand on a flat surface.
• To charge the clipper without the charge stand connect the adaptor to the power port at the base of the product and then to the mains.

Charge Level Indicators
| Charge Level Indicator | |
| Charging Red LED will blink slowly | |
| Low Battery Red LED will blink fast | |
| Fully Charged Red LED will show | |
- Run time from fully charged is 150 mins.
• Charge time from empty is 4 hours.
Note: This product can be used corded or cordless.
Note: To preserve the life of your batteries, let them run out every 6 months then fully charge.

Quick charge function (Typical expected run time)
| Charge Run Time | |
| 5 minutes 2.5 minutes | |
| 10 minutes 5 minutes | |
| 30 minutes 15 minutes | |
| 60 minutes 30 minutes | |
| 120 minutes 60 minutes |
INSTRUCTIONS FOR USE
- For corded use connect the product to the adaptor, then to the mains.
- Extended mains only use will result in a reduction of battery life.
- Cordless use – when the product is switched on and fully charged it can be used in cordless mode for up to 150 minutes.
- Switch the product on by sliding up the on/off switch.
BEFORE STARTING THE CUT
• Inspect the clipper making sure that it is free from hair and dirt.
- Seat the person so that their head is approximately at your eye level.
- Before cutting, always comb the hair so it is tangle free and dry.
| Guide Comb Grade/Cut Length | |
| 0 #0, 1.5mm | |
| 1 #1, 3mm | |
| 2 #2, 6mm | |
| 3 #3, 9mm | |
| 4 #4, 12mm | |
| 5 #5, 16mm | |
| 6 #6, 19mm | |
| 7 #7, 22mm | |
| 8 #8, 25mm |
- 1mm length is achieved without any combs. Holding the blades perpendicular to the skin will trim to 0.5mm at the lowest taper lever setting.
TAPER LEVER
• The taper lever settings can be seen on the table below.
- Setting one gives you the length indicated on the fixed comb you are using.
• Using the taper lever will increase this length correspondingly.
| Setting Cut length | |
| 1 1.0 | |
| 2 1.15 | |
| 3 1.3 | |
| 4 1.45 | |
| 5 1.6 |
★ TO ATTACH AND REMOVE A COMB
• Make sure the blade is locked into place.
• Install the desired comb attachment on the blade, it will latch into place.
• To remove, pull the removal tab first to release the latch and pull away.
★ INSTRUCTIONS FOR CUTTING HAIR
- For even cutting, allow the comb attachment/blade to cut its way through the hair. Do not force it through quickly. If you are cutting for the first time, start with the maximum comb attachment.
STEP 1 – Nape of the neck
- Attach the 3mm or 6mm guide comb.
- Hold the clipper with the blade teeth pointing upwards. Begin starting at the centre of the head at the base of the neck.
- Slowly lift the clipper, working upwards and outwards through the hair, trimming just a little at a time.
STEP 2 – Back of the head
- With the 12mm or 19mm guide comb on the clipper, cut the hair at the back of the head.
STEP 3 – Side of the head
- With the 3mm or 6mm guide comb on the clipper, trim sideburns.
- Then change to the longer 9mm guide comb and continue to cut the top of the head.
STEP 4 – Top of the head
- Use the longer length guide comb 22mm or 25mm on the clipper to cut hair on top of the head against the direction in which the hair normally grows.
• Always work from the back of the head.
STEP 5 – The finishing touches
- Use the clipper without a guide comb for close trimming around the base and sides of the neck.
• To produce a clean straight line at the sideburns, reverse the hair clipper. Place the reversed clipper at right angles to the head, tips of the blades lightly touching the skin and then work downwards.
SHORT TAPERED STYLES – "FLAT TOPS" & SHORT CUTS
- Starting with the longest guide comb attached (25mm), cut from the back of the neck to the crown. Hold the guide comb flat against the head and slowly move the clipper through the hair.
- Use the same procedure from the lower side to the upper side of the head. Then cut the hair against the direction in which it grows and level with the sides.
- To give a "flat top" look, the hair on top of the head must be cut over the top of a flat comb.
- Use a closer guide comb to taper the hair down to the neckline as desired.
CLEANING AND MAINTENANCE
- To ensure long lasting performance of the clipper, clean the blades and unit regularly.
- Ensure the appliance is switched off and unplugged from the mains.
- Do not use harsh or corrosive cleaners on the unit or blades.
- Cleaning should be done with a soft brush.
• After each use - Brush the accumulated hair from the blades. - Ensure the appliance is switched off and unplugged from the mains.
• To clean the unit, wipe with a damp cloth and dry immediately.
Note: Suitable for cleaning under water.
WASHABLE CLEANING
• The clipper is fully washable and can be easily cleaned under a running tap.
- Press the blade release point to slide out the blade. Then the blade set can easily be cleaned under the tap.
- Once the blades are cleaned and dry, place the blade set on top of the clipper and push it towards the hair clipper until it snaps into place.
• We recommend that you oil the blades regularly. Add a few drops on all gliding surfaces, the cutting area and back pads of the blades.
Note: A hex wrench is provided to enable you to take the blade apart for deep cleansing and also remove the taper lever if it needs to be replaced.
EVERY SIX MONTHS
- The blade assembly can be taken apart for deep cleansing.
- Use the provided hex wrench to remove the two blade fasteners.
- The blade will come apart in 3 pieces, that can be wiped and cleaned.
★ Spare blade replacement model: Blade SP-HC9700

BATTERY REMOVAL
• The battery is not serviceable.
- The battery must be removed from the appliance before it is scrapped.
- The appliance must be disconnected from the supply mains when removing the battery.
- Push out the blade assembly from the unit.
- Using the hex wrench remove 4 screws from the unit.
- Using a small screwdriver, pry off the top housing.
- Remove the switch assembly.
- Using a small screwdriver remove 6 screws from the top inner housing.
- Open the top inner housing to expose the printed circuit board.
- Cut the wires which connect the motor to the circuit board and expose the battery.
- Cut the wire tabs which connect the battery to the circuit board and remove the battery.
- Dispose of the battery safely.

ENVIRONMENTAL PROTECTION
To avoid environmental and health problems due to hazardous substances in electrical and electronic goods, appliances marked with this symbol must not be disposed of with unsorted municipal waste, but recovered, reused or recycled.
KORTE GESTRUCTUREERDE KAPSELS - "FLAT TOPS" EN KORT HAAR
\* OPLAD DIT APPARAT
OHENNUKSEN SÄÄTÖVIPU
ENCAIXAR E REMOVER UM PENTE
Remington ^® is a Registered Trade Mark of Spectrum Brands, Inc., or one of its subsidiaries
VARTA Consumer Batteries GmbH & Co. KGaA, Alfred-Krupp-Str. 9, 73479 Ellwangen, Germany
www.remington-europe.com
© 2014 SBI