Filter 2322 - Aquarium EHEIM - Free user manual and instructions
Find the device manual for free Filter 2322 EHEIM in PDF.
Frequently Asked Questions - Filter 2322 EHEIM
User questions about Filter 2322 EHEIM
0 question about this device. Answer the ones you know or ask your own.
Ask a new question about this device
Download the instructions for your Aquarium in PDF format for free! Find your manual Filter 2322 - EHEIM and take your electronic device back in hand. On this page are published all the documents necessary for the use of your device. Filter 2322 by EHEIM.
USER MANUAL Filter 2322 EHEIM
For fresh and marine water
For fresh water only
IMPORTANT SAFETY INSTRUCTIONS
WARNING - To guard against injury, basic safety precautions should be observed, including the following.
a) READ AND FOLLOW ALL SAFETY INSTRUCTIONS.
b) DANGER - To avoid possible electric shock, special care should be taken since water is employed in the use of aquarium equipment. For each of the following situations, do not attempt repairs by yourself; return the appliance to an authorized service facility for service or discard the appliance.
1) If the appliance falls into the water, DON'T reach for it! First unplug it and then retrieve it. If electrical components of the appliance get wet, unplug the appliance immediately. (Non-immersible equipment only)
2) If the appliance shows any sign of abnormal water leakage, immediately unplug it from the power source. (Immersible equipment only)
3) Carefully examine the appliance after installation. It should not be plugged in if there is water on parts not intended to be wet.
4) Do not operate any appliance if it has a damaged cord or plug, or if it is malfunctioning or has been dropped or damaged in any manner.
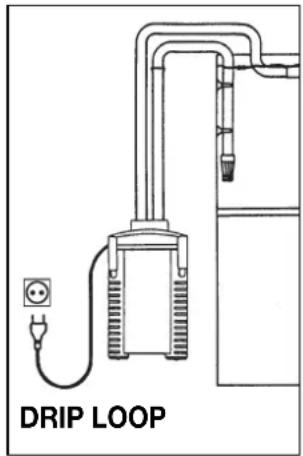
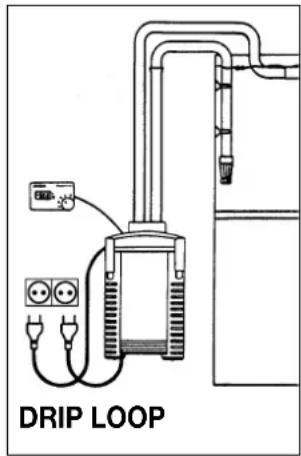
5) To avoid the possibility of the appliance plug or receptacle getting wet, position aquarium stand and tank to one side of a wall-mounted receptacle to prevent water from dripping onto the receptacle or plug. A "drip loop", shown in the figure, should be arranged by the user for each cord connecting an aquarium appliance to a receptacle. The "drip loop" is that part of the cord below the level of the receptacle, or the
connector if an extension cord is used, to prevent water traveling along the cord and coming in contact with the receptacle. If the plug or socket does get wet, DON'T unplug the cord. Disconnect the fuse or circuit breaker that supplies power to the appliance. Then unplug and examine for presence of water in the receptacle.
c) Close supervision is necessary when any appliance is used by or near children.
d) To avoid injury, do not contact moving parts or hot parts such as heaters, reflectors, lamp bulbs etc.
e) Always unplug an appliance from an outlet when not in use, before putting on or taking off parts, and before cleaning. Never yank cord to pull plug from outlet. Grasp the plug and pull to disconnect.
f) Do not use an appliance for other than intended use. The use of attachments not recommended or sold by the appliance manufacturer may cause an unsafe condition.
g) Do not install or store the appliance where it will be exposed to the weather or to temperatures below freezing.
h) Make sure an appliance mounted on a tank is securely installed before operating it.
i) Read and observe all the important notices on the appliance.
j) If an extension cord is necessary, a cord with a proper rating should be used. A cord rated for less amperes or watts than the appliance rating may overheat. Care should be taken to arrange the cord so that it will not be tripped over or pulled.
k) This appliance has a polarized plug (one blade is wider than the other). As a safety feature, this plug will fit in a polarized outlet only one way. If the plug does not fit fully in the outlet, reverse the plug. If it still does not fit, contact a qualified electrician. Never use with an extension cord unless plug can be fully inserted. Do not attempt to defeat this safety feature.
Exception: This instruction may be omitted for an appliance that is not provided with a polarized attachment plug.
"SAVE THESE INSTRUCTIONS".
External Aquarium Filter 2222 and 2224
Aquarium Thermofilter 2322 and 2324
Model: see type label at top of filter
Thank you
for buying a new external filter EHEIM professionel. It gives you optimum performance with excellent reliability and great effectiveness. The large container volume - combined with a balanced combination of filter media - guarantees highly effective disposal of pollutants.
Please take note of the relevant references to thermofilter models.
Safety instructions

For indoor use only. For aquaristic applications.

Before placing your hand in the aquarium water, ensure that all electrical appliances in the water have been switched off at the mains.

Thermofilters are suitable for fresh water only. Versions resistant to sea water are available on request and are labelled accordingly.

The mains cable of the device cannot be replaced. If the cable has been damaged the device must no longer be used. Contact your specialised dealer or your EHEIM Service Centre.

This equipment is not intended for use by persons (including children) with limited physical, sensory or mental abilities or for persons with no experience or knowledge unless they are supervised by a person responsible for safety or unless they have received from such a person instructions on how to use the equipment. Children should be supervised to ensure that they do not play with the equipment.

20cm

Notice: These devices produce magnetic fields which might cause electronic and mechanical disturbances or damages. This also refers to pacemakers. Please consult the manuals of medical equipment for the required safety margins.

Attention: Maintenance work presents the risk of crushing th fingers due to high magnetic forces.

Since a wide variety of varnishes and polishes are used when processing timer, the appliance feet can leave vis- ible traces on furniture or parquet floors as a result of che- mical reactions. Therefore the device should not be placed on unprotected wooden surfaces.

Do not dispose of this product as normal household waste. Take it to your local refuse collection site.
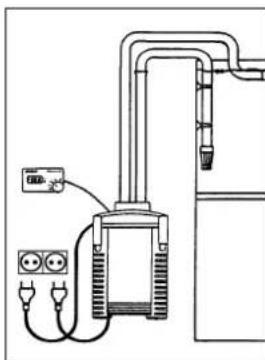
For your own safety we recommend that you allow the mains cable to form a drip loop which ensures that water running along the cable cannot drip into the mains socket. If a multiple socket is used this must be placed above the mains connection of the filter.

The products are approved according to the relevant national rules and regulations and are in accordance with EU standards.


External filter 2222 and 2224 for fresh and sea water Thermofilter 2322 and 2324 for fresh water only
① Pump head ② Sealing gasket ③ Fine filter pad (white) ④ Coarse foam filter pad (blue) ⑤ Filter media containers ⑥ Rubber hermetic seals ⑦ EZ clips ⑧ Filter canister ⑨ Integrated double tap connector ⑩ Hose clamp ⑪ Intake pipe ⑫ Intake strainer ⑬ Security outlet pipe ⑭ Spray bar and end cap ⑮ Suction cup with clips ⑯ Tubing ⑰ Vaseline.
Thermofilter: 18 Control knob 19 Control light.
When unpacking, please check to ensure that all parts have been included.
Installation
(1) Flip all four EZ clips open and push upwards. With the help of the two recessed lid handles, the pump head of the filter can be easily lifted off.
(2) Remove fine filter pad and take out each media container by grabbing the retractable handles and pulling upwards.
(3) Fill the filter media containers with EHEIM filter media to achieve best results. Fill the bottom container with EHEIM MECH, but leave just enough space so that the blue filter pad can be placed in the container under the retractable handle. Fill the second container with the biological media SUBSTRATpro to just below the edge.
Attention: Do not overfill. Do not clog flow-through pipe.
(4) Thoroughly rinse the filter media in the containers under running water until all cloudiness has disappeared. Place the container with the blue filter pad in the filter canister and firmly press downwards until it rests on the support frames. This guarantees an hermetic seal between media containers and canister.
(5) Insert the second media container in the same manner. Make sure the flow-through pipe openings line up on top of each other and that the 2 rubber seals are correctly fitted on the openings, so as to achieve a hermetic seal.
Lower each retractable handle and ensure that both media containers lie flush on top of each other. Then insert the fine filter pad (white) in such a manner that the round cut-out lines up with the respective flow-through pipe opening.
Attention: Fine filter pad (white) should not be placed under the retractable handle of the media container.

Thermofilter:
(6) By thermofilter version please check that the flow-through pipe openings are not placed directly above the heating element.
(7) Check to ensure that the sealing gasket on the pump head of the filter is not soiled and that it is properly placed into its groove.
(8) Place the pump head onto the filter canister so that the input connector of the pump head is lined up with the input guide of the media containers. Close all four EZ clips.
(9) Attention: Before the integrated double tap connector is inserted into the pump head of the filter, examine both o-rings for damage and correct fitting. Lightly grease the o-rings with Vaseline to help installation.
(10) Insert the integrated double tap connector with the locking clamp in an upright position into the opening on the pump head. To fasten the locking clamp into its sealed position push the handle downwards.
Tubing installation
(11) Shut off the integrated double tap connector by shifting the two levers to the OFF position.
(12) Push the enclosed tubing onto the intake and output supports of the integrated double tap connector as far as they will go. Since this can be a relatively difficult task, soak the hoses in warm water beforehand to make them softer.
Note: It is very important that you use original EHEIM hoses only.
(13) Place the two-part hose clamp around the installed hoses, hang into the proper position and
(14) clip it into place.
(15) Place the now ready to use filter into the lower cabinet of your aquarium stand and observe the prescribed installation height: the distance between water surface and base of the filter should not exceed 180~cm (5'11") in order to attain optimum functioning.
(16) Attach the intake strainer to the intake tube and fasten it onto the interior glass of the aquar
(17) ium with two clips and suction cups.
(18) Connect the security outlet pipe to the spray bar with a short piece of tubing and install in the aquarium with the clips and suction cups. Place on the rear or on one of the sides of the aquarium, depending on available space. Close the open side of the spray bar with the enclosed end cap.
Tip: The spray bar can either be installed below water level or just above the surface, depending upon the amount of oxygen-rich surface movement required.
(19) Guide the hoses from the filter outwards through the opening in the aquarium furniture and connect the installed intake pipe with the suction side of the filter, and the output pipe with the pressure side of the filter.
To achieve an even flow, be sure that the tubing is laid out smoothly and has no kinks; if necessary, shorten them.
Tip: If you lay the tubing into warm water for some time beforehand, they will become soft and possible kinks can be easily squeezed out.
Setting into operation
(20) Open the taps of the integrated double tap connector by shifting both levers to the ON position. Separate the output hose from the spray bar and suck strongly on the hose, to establish the syphon.
(21) Tip: Alternatively use the EHEIM Universal Installation Kit 1 (order no. 4004300, diam. 12 mm)
(22) or the EHEIM suction device (order no. 4003540). The canister will then automatically fill up with water.
Reconnect the hose to the spray bar.
(23) Tip: The water flow from the pump can be controlled by using the tap only on the pressure side (OUT).
Attention: Never reduce the pump output by closing the tap on the suction side (IN).
(24) Once again check all the connections for watertightness, then put the filter into operation by connecting the mains plug of the pump head.

Thermofilter:
(25) Attention: Only connect the heater's mains plug (separate cable) once the filter is working smoothly. Never operate the heater when dry.
Once the heater has been plugged into the mains socket, wait a few minutes for the temperature probe in the filter canister to adapt to the actual water temperature.
(26) Turn the temperature control knob to face a vertical position (arrow), which corresponds to a value of between 25^ and 27^ . The control lamp lights on with the heater in operation, and switches off automatically once the desired temperature has been reached.
(27) Should you wish a higher temperature value, turn the knob clockwise (with the control light switched off) until the control light turns back on again.
Once the heater and control light switch back off again, check the actual water temperature with a thermometer. Should the value still be too low, repeat the procedure as described above. As orientative measure use the + / - scale: each subdivision is equivalent to approx. 1^ .
(28) Should the desired water temperature already be reached while the heater is still operative, turn the control knob anti-clockwise, until the control light goes off.
The heater maintains the desired temperature virtually constant. As soon as the temperature diminishes, it switches on automatically, until it reaches the set value. Should the power supply be cut off the control light flickers. When the power is restored the heater works normally.
Maintenance and Servicing

Thermofilter:
First pull out the heater's mains plug, and then the pump's mains plug.
(29) Close both tap levers (OFF position). Gently pull the locking clamp upwards and the remove the integrated double tap connector from the pump head of the filter.
(30) Take the filter out of the cabinet by using the two recessed lid handles.
(31) Open all EZ clips and remove the pump head from the canister.
(32) In order to clean the pump chamber, turn the pump head upside down and open the pump cover by turning it anti-clockwise.
(33) Then remove the pump cover, impeller and shaft.
(34) Thoroughly clean pump parts, impeller chamber and cooling channel with EHEIM cleaning set (order no. 4009580). Carefully rinse off shaft (danger of breakage!), then put impeller back together again and insert into proper position.
Pay attention to the correct installation of shaft, bushings and pump cover. Lock pump cover by turning clockwise.
(35) Filter media: Remove filter pads and containers from the canister. Thoroughly wash out the filter media with used aquarium water – until no more clouding can be seen.
The fine filter pad (white) serves as mechanical fine filtration and should only be used once, since adhering dirt particles cannot be washed out completely. Use new pad, (order no. 2616225). The blue filter pad (1 x included in set, order no. 2616220) can be reused up to 2-3 times. Rinse thoroughly before using.
Tip: When renewing the SUBSTRATpro media, retain 1/3 of used filter medium and mix with new material to speed-up bacteria recolonization.
(36) Wash out the filter canister and then place the media containers back in position. Press the first one down to the support frame, then insert the second one as far as it will go. In the process, the pipe flow-through openings of the media containers must lie on top of each other, and the rubber seals must be correctly fitted on the openings so as to achieve an hermetic seal.
Attention: Fine filter pad (white) should not be placed under the retractable handle of the media container.
Place the new filter pad on the top container. Check to ensure that the sealing gasket of the pump head fits properly and is clean. Then lightly lubricate the sealing gasket of the pump head with Vaseline. Place the pump head on the filter canister, close the EZ clips and place the filter into the cabinet.
Examine both o-rings on the double tap connector for damage and correct fitting and lightly grease them with Vaseline; insert and lock in place. After both of the tap levers on the integrated double tap connector have been opened (ON position), the filter will automatically fill up again with water and be ready for operation. Put the filter into operation by connecting the mains plug.
Note: All hose connections must be checked at regular intervals for correct fitting.
Attention: Filter must always be operated in an upright position only.

Thermofilter:
(37) Wash out the filter canister. Periodically check the heating element for dirt deposits and clean if necessary. Do not bend the heating element. Do not submerge the filter canister underwater. Ensure heater electrics do not come into contact with splashing water. Place media containers back into the canister, as described above. Connect the pump's plug (from the pump head) into the mains socket. Only connect the heater's plug into the mains once the filter is running smoothly.
BHHMaHHe He npennoJIHrTb 3JemeHTb I He 3acopraTb BbIObI Ty6.
(4) 3aTeM ΦιNbtpyIoUy MAccy Heo6xOДmO TuaTeIbH O npOMbITb B KOp3nHKe IpoToHoi BoOn, Noka OHa He CTaHET npO3pauHoN.
(5) BCTaBnTb ΦIbTpYIOUm ΘeMeH T C CINHM ΦIbTpYIOUm MaTOM o6paTHO B KOpNc ΦIbTpPa I KpeNko HAdaBnTb Ha Hero, noka OH He cIaTeT Ha onOpy. TaKIM o6pa3OM rapaHTpPyETcH NaExHAR repMeTu3aun MexdY ΦIbTpYIOUm ΘeMeHToM ΚopNycOM. YCTaHOBtB BTOPOI ΦIbTpYIOUm ΘeMeH. CNeiNb 3a Tem, YTO6bI OTBepCTnI dIra Tpy6ok paCNoIarAInCb Ond Ho HAd DpyrIM N 3a Cuet pe3uHOBbIX HacaDOK ObecneuBaJIu COOTBeTCTByIOUee CoEduHeHne.
Onyctntb obpaTHo pyuN y6eHTbcraB TOM, yTO6bl fHnIbtpyIOUne 3JeMeHTbI paCnoJaraIncb dpyr noD npYROM 3aNoDnIO. HAdET bTOpYIO pe3HOByIO HacdKy Ha BepxHNI fHnIbtpyIOUIN 3JeMeHT. YIoXHTb 6JIbI hFInbTpOBAhbl XoCT TaK, yTO6bl OTBepCTne pacNoJaraIocb HAD OTBepCTNeM Tpy6Kn.
BHHMaHHe: He IOnyckatcpa3MeueHne 6eIoro fNtpoBaIbHOro xoJCTa nOd pyKoKop3nKn, cOpEkauef FtpuOuyIO maccy.
C° TepMoΦnJIbTp:
(6) Пи Исполноши С Термофильтуром Следиь за Tem, Утобы OTверсте Тубки Фильтуруюши Зем entов He 6blno pacnoLOXeHO NaD COeINHHTeHOB YacTbIO HarpeBaTeHBOrO ZIemeHTa.
(7) IpoBepntb, TTO6bl npOuHbHa yIIOHTHeBHa npOKlaKa Ha BepxHe Jactn fNJIbTp a He 6bla 3aqr3HeHa n 6bla TOUHO NocaxeHa B na3.
(8) YcTaHOBnTb BepxHIOU qAcTb Ha KOpNc fIbTpTa TaKIM Oba3OM, TTo6bl NaTpby6oK BepxHeu qactn fInbTpa 6bl BCTaBHeB HAnpabJIIOUne Tpy6 fIbTpuyOUX 3aKpbItb BCE YeTbpe 3aueJKN.
(9) BHMMaHHe: Ipeed Tem, kak BCTaBnTb B BepxHIOU yactb fNltpa aIaNTep IlaHROBbIX COeINHeHIn, npOBepNTb 06a yILOTHHTeJIbHbIX KOJIbca Ha NOBpeXdEHHa I npaBUNbHOCTb YCTaHOBKn. IJra OJleRcEHn MOHTaxKa yILOTHTeJIbHbIE KOJIbca CJIeKCa CMA3aTB Ba3eJIHOM.
(10) BCTaBntb aanTep c oTKpbItoB 3aueKoB B COOTBeTCTByOuEe OTBepCTne, paCnoJoxeHHoe B BepxHe yactn fHnbTpa n, OndHOBpeMeHHo Haxmam Ha KpEnex aanTepa, 3aФHKcnpOBaTb erO.
PoiocoeHHeHne WJahroB
(11)ДяТо,уTObI 3aKpblTb 3aOpHbIe KpaHbI, Heo6xOIMo o6e pyu KaanTepa npeBecTu B noJoxHne OFF.
(12) Пилагаимье Шанги Heobxodmo Do ynpa Naetb Ha naTpybkn aanTepa.перд STIMшанг pa3mryntbВ tenloi BOe.
Yka3aHne: NcnoB30BaTb TOnbKO opnHaJIbHbIe IJNaHrIΦnpMbEHEIM.
(13) Bokpyr cMOHTnipoBaHHbIX IJnaHROB paCNOJOXnTB DByxCEKUNOHbI JIaHROBbI 3axIM, NOcOeDINHTb I
(14) 3aüeKHyTb.
(15) YCTaHOBNTb NOJIHOCTbIO NOIITOTOBJIeHHbI ΦNJbTp B Tym6OHy.
CneHb 3a TEM, yTo6bI CO6IOJIoOc b yka3aHHoe pacCToHHe NO BbICote: IJIy OBeCNEuHn OITIMaJIbHOJ pa60tB MaKcImaJIbHOe pacCToHHe MEXdY IOBepXHOCTbIO BOdbI IN DHom FInbTpA He DoJXHO CoCTaBnTb 6OJIbWe 180 cm.
(16) HaneB ceTbI bIbTp Ha BCaBbAIOU m nATpy6oK n3akpeINt bero C nOMOuDByx Kpenexe n npncocok
(17) K BHyTppeHHHe nCTeHKe aKbapnMya.
(18) CoeHnItb BixOHOI OTBOID n "ΦIeIy" KOpOTKIM KcCKOM IHaHra N C NOMOJIIO KpeJExeN I npCOCOK MOHTnPOBaTb B aKBapNyMe.
B 3aBnCmOCTn OT yCNOBn yCTaHOBk npoBOuTcra Ha 3aDHe CTeHKe nIIN OJHO N3 6OKOBbIX cTeHOK. OTKpbityo CTOpOHy "ΦJIeITb" 3akpbITb npJlaraemO 3aJnyuKoN.
Yka3aHne: "ФлeNTa" MOXET 6bITb yCTaHOBNeHa HIXe NOBepxHOCTn BObl IIN Ha yPOBHe B 3aBNCUMOCTn OT XeJaEMoI INTEHCNBHOCTn DBNXEHNr BObl Ha NOBepxHOCTn.
(19)ПрOTЯнТьшlaHиOTФИьТрачep3ОТВерСпeВЗБангьЗдднEуМбOчК.СоeДиНИТьсmoHTированьИВCaCSbIBAIOUПи NaTpy6OK CO CTOPOHOB BCaCSbIBAHnAФИьТра,a BbIXODHOb OTBOD-CHaNoPHOCTOPOHOFФИьТра.
06paTntb BnmaHne Ha poBnyu yklaKy IaHroN OTCyTCTBne Cn6OB. Pn HeoXoImocn YuKOpOTNb IaHaRn.
Yka3aHHe:Pa3mRHTbIaHaBnBTeNIOBBoD,TO6bIycTpaHHTbOpa3oBaBwneecrN6bl.
Nyck B 3Kcnnyatauio
(20) OtkpbItb 3aOpHbIe KpaHbI Ha aadntpe fNbTpa, nepeBeda oBa pbHaRa B HappaBHeHne WlaHROB (noJIOxHne ON). 3aTeM OTcoEdHHtB HApOpHbI hAnOpHbI uHaHr OT "fleNt" n CHOba BOcCTaHOBHT b UnpKyJnUO BOdbl.
(21) Yka3aHne:ДяэтOro, npexde BCero, NOxOHT MOtaxHbI KOMnIeK T InstallationsSET 1 ФирMbI EHEIM dЯ
(22) CTOpOHy BCaCbBaHnA (apTnKyI N 4004300, DnaMeTp 12 MM) nII BCaCbBaHOoee npncno6JIeHne EHEIM (apTnKyI N 4003540). HapyxHbI ΦNtBtp aBtOMaTnueckn HanoNHReTcB Odoi.
Nocne toro, KaK fJIbTp HANOHNTCa, CHOBa NOIDCOeINHHTb UJNaHrN.
(23) Yka3aHne: MouHocTb fNbTpa beCCTyHnHaTo peryIpyeTcra Ha HAnOpHoN CTOpOHe npn NOMoU N BCTpoEHNO 3anOpHOro KpHa (OUT).
BHHMaHHe: 3aIpeuaeTcR CHNkaTb MOUHOCTb HaCOca Ha CTOpOHe BCaCbBaHnA (IN).
(24) Nocne noBtopHOn npOBepKn rePmeTuHOCtn 7JaanHOBbIX CoeHNHeH IN npaBnIbHOCTn IocaKn 7JaanHOBOrO 3axmAp BBeCTn B 3KcNpyTaunIO, NOkNIOuVB erO npn nOMoU WTeKepa K JJIeKTPOCTN.

TepmoΦnJIbTp:
(25) BHMaHHe: Toblko nocJe TOrO, KaK fNlBtp 6yDet paBHomepHo pa6oTaTb, noDcoeHNHTb HArpeBaTeIb K p03eTKe npi NOMOUs OTdeJIbHO rKa6eJI. Hn B KOM clyuae He 3KcPnyaTnpOBaTb HArpeBaTeIb 6e3 BObl. PocJe BBODa HArpeBaTeJI B 3KcPnyaTaUIO NOdoXdaTb HeCKoJIbKO MmHyT, IOKa TepMOdaTUnk B Kopnyce FInlbTp a aanTpPyETcRA K aKtuaJbHOr TemnepaType BObl.
(26) KhoNka yctaHOBKn TemnepaTybl Chauana ycTaHaBnBaETc B CpeDHee noLoXeHne (CTpeNka), B KOtOpom OcyuIecTBJIeTcpeYJInpObaHne TemnepaTybl MExdy 25^ n 27^ . KoHTpoNbHa JAmNoUka NOKa3bIbAet pa60ty HArpeBaTeIy I rachET npi DoCTnxKeHm YCTaHOBNeHHoTemnpaTybl.
(27) Ecln Heo6xOIMa 60Jee BbICOKa TEmNepaTpa, BpaAaTb yCTaHOBcHIO KHOKpy npi BbIKIOueHHo KOHTpOBHOn JAMNoUKe No YacOBo CTepeKe, Noka CHOBA 3arOpNTc JaMNoUka. IocIe TOrO, KaK HArpeBaTeJIb BbIKIOuHINcR i KOHTpOBbHa JAMNoUcKa CHOBA nORacJa, NO TePMOMtpy AkBapNyMa npOBepuTB DeIcTBnTEbHyIO TemnpaTyPb BOdbI. Ecln TemnpaTpa eIe CInuKOM Hn3Ka, IpOuecc IOBtOpuTB. B KaueCTBe opneHTnpOBKn cLyXnT +/- DeJeHne UkaJIb B Dnana3OHe yCTaHOBKn: OdHO DeJeHne COOTBETCTByET 1°C.
(28) EcIn BO BpeM npouecca NODORpeBa yXe DoCTnHyTo n3MepeHHe 3NaueHne TeMnpaTpybl, yCTaHOBOuHa KONka NOBOPaUBAeTcra Ha3aI, noka He NorachET KOHTpOlbHaa JAMNOUcKa. HarpeBaTeIb NODepxNBAeT yCTaHOBJIeHHe 3NaueHne NoUTn NOCToHHbIM. Pn CHIXKeHm TEMpePaTpbl NODORpe BkIIIOyaeTcABOMaTHueCKn, noka He bDeT CHOBA DOCTnHyTO 3aJaHHe 3NaueHne. Pn IOMexax 3JIeKTPocEtN KOHTpOlbHaa JAMNoUcKa HArpeBaTeJI Miraet. NocLe yCTpaHEHn HeUCnPabHOctn NODORpeBaTeJI bDeT CHOBA pa60TaTb HopMaJIbHO.
Texnueckoe 6cbnykBaHne nyxO

TepmoΦnJIbTp:
Chaujala OTCoeHNHb OT cETn WTeKeHarpeBaTeIa, a 3aTeM WTeKeP hacoca.
(29) 06a 3anopbix pbyara ha aadantpe 3akpbTb B noJoxeHm OFF. NOBepHyTB BBepx KcnpyUO pyKu N BblHyTb adantep n3 BePxHe yactn fNlbTpa.
(30) BbHyTb BHeuHnΦnIbTp n3 Tym6OuKn, B3aB eO 3a o6a yrIy6JIeHn.
(31) OTKpbITb BCE 3aUeJIKN IN CHrTb BepXHIOU YacTb fNJIbTpa.
(32) Дя оочстки камеры нася са OTКрьть Крьшky насяса, раснохену Ha дhe ворхнч actn Фпльтpa, NOВернв Влев.
(33) 3aTeM CHrTb KpbIuKy HacOca,poTOp C KpbIbUaTKoNIOcb.
(34)Детаин Насocaи oxлждioшй канал Tшateьно поспь пи поши КOMпгктдя чстк EHEIM (apTKyI N 4009580).Octopoxkno onolochytb ocB (onachoctb pa3pyeHnI)! n 3aTeM ChOBa co6paTb n BCTaBtB potop.
PnMOHTaKe cO6IIOaTb npaBnIbHOCTb yCTaHOBKn HacaIok OcN n KpbIshKn Haocca. 3aTeM ChOba 3aΦnKcnpoBaTb KpbIshKu Haocca, NOBepHyB BnpaBO.
(35) Φильърюше мaccь! Bынгь n3 корпуca Фильъррахолctи Фильърюше щлем entы. Oсоватьно помьтб фильърюшую масу тенлоь вдог, поka вда не станлрозан. (36)
Reproduction or copying - even parts thereof - only with the express permission of the producer.