WV 75 plus EU II - Windshield wiper Kärcher - Free user manual and instructions
Find the device manual for free WV 75 plus EU II Kärcher in PDF.
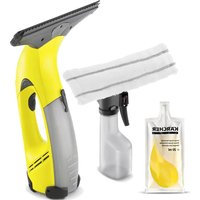
| Product type | Window squeegee (window cleaner) |
| Brand | Kärcher |
| Model | WV 75 plus EU II |
| Weight | 0.7 kg |
| Power supply | Li-Ion battery 3.6 V; Charger 5.5 V / 600 mA |
| Charging time | 2 hours |
| Runtime | 20 minutes |
| Dirty water tank capacity | 100 ml |
| Noise level | 54 dB(A) |
| Protection | IP X4 |
| Main functions | Detergent spraying, dirty water suction, wiping |
| Included accessories | Basic device, charger, wide and narrow suction nozzle, separator, spray bottle, wiping extension, microfibre pad, window cleaning concentrate (20 ml) |
| Maintenance | Clean lips under running water; wiping pad machine washable at 60°C; rinse dirty water tank with water |
| Safety | Do not spray into eyes; do not use on hot surfaces; do not insert objects into slots |
| Spare parts | Wide squeegee lip (ref. 2.633-005.0), narrow lip (2.633-104.0), microfibre pad (2.633-100.0), window concentrate (6.295-302.0) |
| Intended use | Cleaning smooth, wet surfaces (windows, mirrors, tiles); do not vacuum dust or large amounts of liquid (max 25 ml) |
Frequently Asked Questions - WV 75 plus EU II Kärcher
User questions about WV 75 plus EU II Kärcher
0 question about this device. Answer the ones you know or ask your own.
Ask a new question about this device
Download the instructions for your Windshield wiper in PDF format for free! Find your manual WV 75 plus EU II - Kärcher and take your electronic device back in hand. On this page are published all the documents necessary for the use of your device. WV 75 plus EU II by Kärcher.
USER MANUAL WV 75 plus EU II Kärcher
natural_image
Product photo of a white and gray water spray gun with a cloth cover, alongside a separate black-and-white component (no text or symbols visible)Deutsch 3
English 8
Français 13
Italiano 18
Nederlands 23
Español 28
Português 33
Dansk 38
Norsk 43
Svenska 48
Suomi 52
Ελληνικά 57
Türkçe 62
Русский 66
Magyar 72
Čeština 77
Slovenščina 82
Polski 87
Românește 92
Slovenčina 97
Hrvatski 102
Srpski 107
Български 112
Eesti 117
Latviešu 122
Lietuviškai 127
Українська 132
Қазақша 137

148
Register and win! www.kaercher.com/register-and-win


59652380 (01/16)
flowchart
graph TD
    A["Step 1: Hand presser on spray gun"] --> B["Step 2: Click the spray gun"]
    B --> C["Step 3: Capture or drag"]
    C --> D["Step 4: Capture or drag"]
    D --> E["Step 5: Hand presser on spray gun"]
    E --> F["Step 6: Capture or drag"]
    F --> G["Step 7: Hand presser on spray gun"]
    G --> H["Step 8: Capture or drag"]
Inhaltsverzeichnis
Safety instructions ..... EN ...3
Start up.....EN...4
Finish up your work / clean appliance .... EN ...5
Troubleshooting ..... EN ...6
Special accessories ..... EN .. .6
Technical specifications ..... EN .. .6
Disposing of old device and battery pack. . . . . . . . . . . . . . . . . EN . . . 7
Dear Customer,

Please read and comply with these original instructions prior to the initial operation of your appliance and store them for later use or subsequent owners.
Proper use
- Use this battery operated appliance only for personal use, for cleaning moist, smooth surfaces such as windows, mirrors or tiles. Not meant for the vacuum of dust.
- The appliance is not intended to vacuum up larger amounts of fluids from horizontal surfaces, such as from a tipped drinking glass (max. 25 ml).
- Only use this appliance with conventional window cleaners (no spirit, no foam cleaners).
- We recommend: Window cleaner concentrate made by KÄRCHER (see chapter "Accessories").
Any use extending beyond this is not considered as proper use. The manufacturer is not liable for any losses resulting from this; the user alone bears the risk for this.
Safety instructions
This appliance is not intended for use by persons with limited physical, sensory or mental capacities or lacking experience and/or skills, unless such persons are accompanied and supervised by a person in charge of their safety or
they have received precise instructions on the use of this appliance and have understood the resulting risks.
■ Children may only use this appliance if they are over the age of 8 and supervised by a person in charge of their safety, or if they have received instructions on the use of this appliance and have understood the resulting risks.
■ Children must not play with this appliance.
■ Supervise children to prevent them from playing with the appliance.
■ Cleaning and user maintenance must not be performed by children without supervision.
■ Do not insert objects into the air louvers.
■ Do not spray jet into eyes.
■ Do not direct the spray jet directly on equipment containing electrical components, such as the interior of ovens.
■ Prior to using this appliance on sensitive (high shine) surfaces, test the microfibre wiping pad at an inconspicuous location.
Information regarding the battery
■ Short circuit hazard! Do not insert conductive objects (such as screwdrivers or similar) into the charger plug.
■ You may recharge the battery using only the original charger provided with the appliance or a charger approved by KÄRCHER.
⚠ Tips for using the battery charger
In case of visual damage, replace the charger with charger cable immediately by original parts.
■ Only use and store the charger in dry rooms, ambient temperature 5 - 40°C.
■ Never touch the mains plug with wet hands.
⚠Information regarding the transport
■ The battery has been tested as per the relevant directives for international transport and can be transported/ shipped.
Environmental protection

The packaging material can be recycled. Please do not place the package to the ordinary refuse for disposal, but ge for the proper recycling.
Old appliance contain valuable recyclable materials and substances that must not be released into the environment. Thus, the appliance and the accumulator contained must not be disposed of via the domestic waste. The disposal can take place via locally available return and collection systems free of charge.
Notes about the ingredients (REACH)
You will find current information about the ingredients at:
www.kaercher.com/REACH
Symbols in the operating instructions
⚠️Danger
Immediate danger that can cause severe injury or even death.
⚠ Warning
Possible hazardous situation that could lead to severe injury or even death.
Caution
Possible hazardous situation that could lead to mild injury to persons or damage to property.
Start up
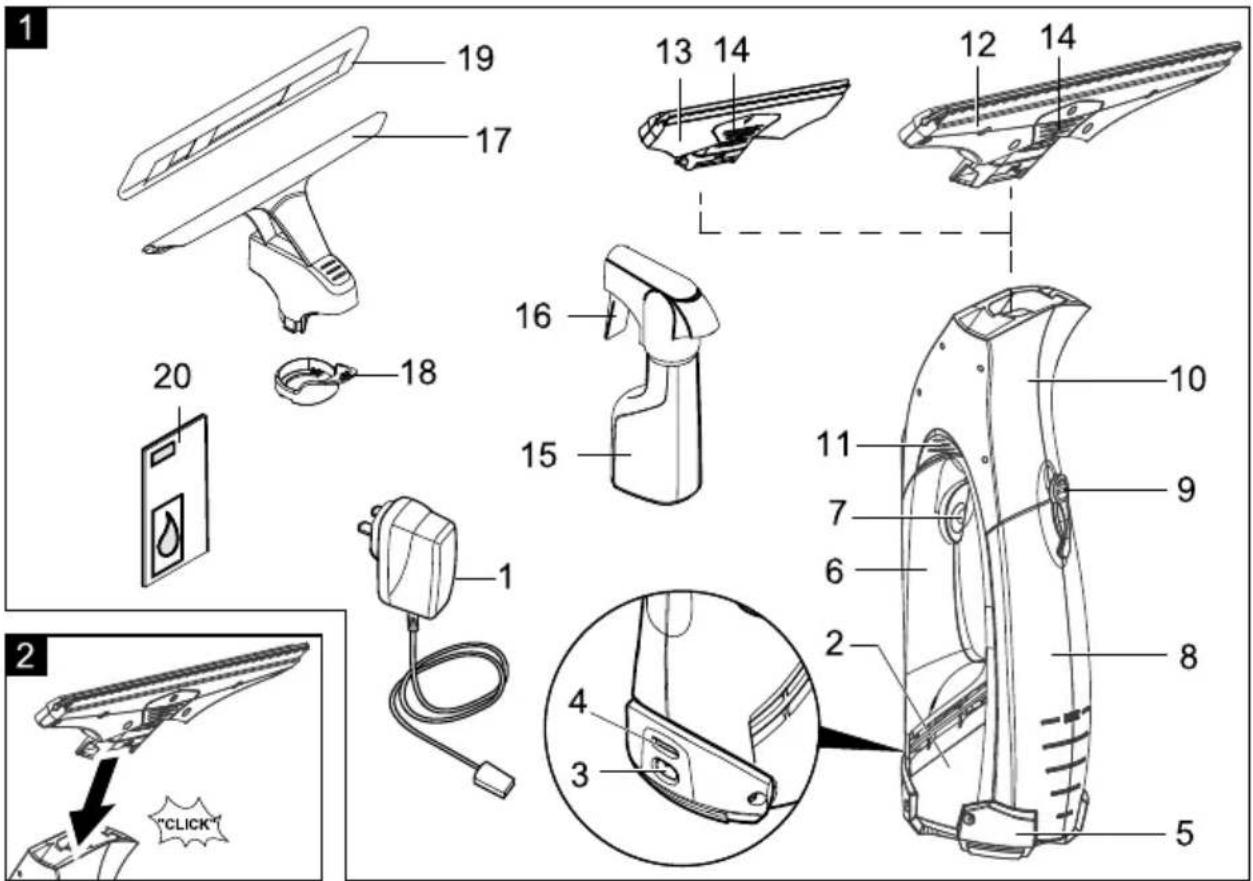
Description of the Appliance
When unpacking the product, make sure that no accessories are missing and that none of the package contents have been damaged. If you detect any transport damages please contact your dealer.
→ Illustrations on Page 2
Illustration 1
1 Charger with charging cable
2 Basic appliance
3 Charging box
4 Charge/operations display
5 Support leg
6 Handle
7 ON/OFF switch for appliance
8 Dirt water reservoir, removable
9 Lock, dirt water reservoir
10 Separator
11 Unlocking device, separator
12 Attachment with removable lips, wide
13 Attachment with removable lips, narrow
14 Unlocking device, suction nozzle
15 Spray bottle
16 Spray lever
17 Wiping attachment
18 Fastening ring for the wiper attachment
19 Micro-fibre wiping pad
20 Window cleaner concentrate
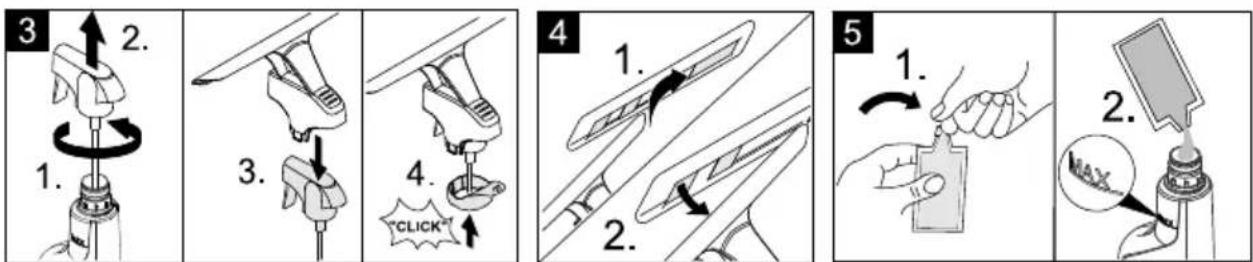
Assemble the appliance
Illustration 2
→ Attach the suction nozzle to the separator until it snaps in place audibly
Note: Depending on the size and accessibility of the surface to be cleaned, use the appropriate suction nozzle. For example, a narrow suction nozzle for multi-pane windows, a wide suction nozzle for large windows.
Attach the spray bottle and wiper attachment and fill it with detergent
Note: Please note that after first activation of the spray head transport lock will loosen.
Attach the wiping attachment
Illustration 3
→ Remove the spray head from the spray bottle.
→ Attach the wiper attachment to the spray head.
→ Secure the wiper attachment and the spray head with the fixating ring.
→ Attach the wiper pad to the wiper attachment and secure with Velcro.
Illustration 4
Fill the spray bottle
Illustration 5
→ Fill the included concentrate (1 x 20 ml) into the spray bottle and fill the bottle slowly with clear water (makes 250 ml of detergent solution).
→ Close the bottle.
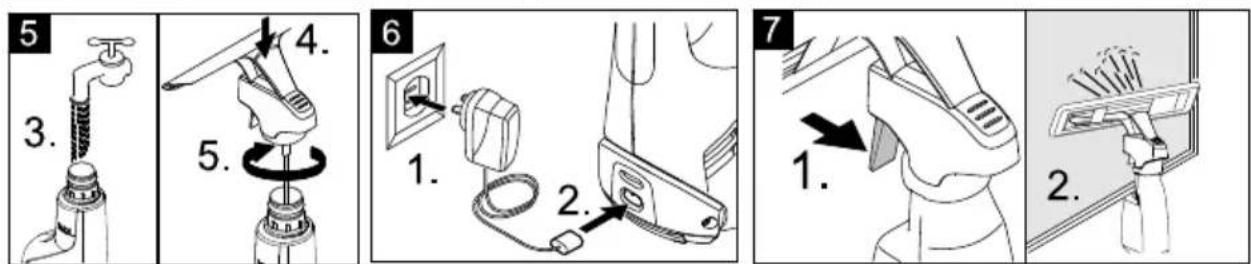
Charge the battery
Illustration 6
→ Insert the charger delivered with the appliance into a proper socket.
→ Insert the charging cable plug to the back of the appliance.
Note: During the charging process, the charge/operating display blinks. Once the battery is fully charged, it will be permanently illuminated.
Start working
Cleaning with spray bottle and wiper attachment
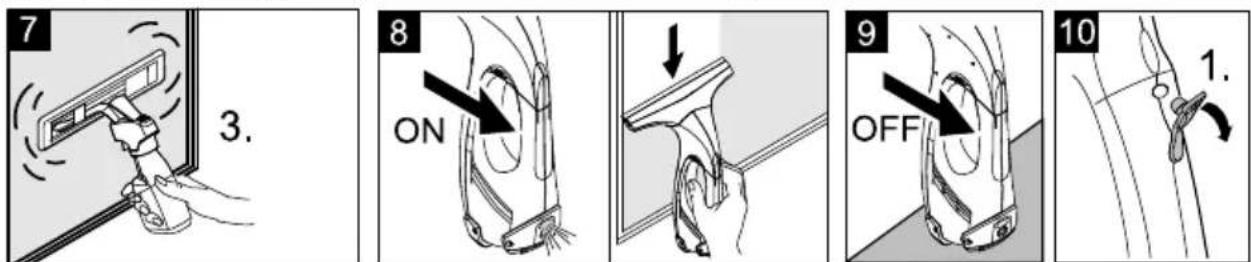
Illustration 7
→ Press the spray lever on the bottle to apply the detergent and spray the surface evenly; after that, loosen the dirt using the wiping pad.
Note: Rinse pad under running water if needed!
Illustration 8
→ Switch the appliance on, the charge/operations display will illuminate.
Important: Prior to use, ensure that the squeegees are free of soiling.
→ Pull the appliance from the top to the bottom to vacuum up the detergent.
Note: Hard to reach areas can be vacuumed vertically or horizontally (limited areas).
Notes:
If the battery is low, the charging / power indicator starts flashing slowly and the appliance switches off after a certain time. If this is the case, charge the battery.
The appliance can be switched off while the spray bottle is in use. This significantly increases the operating time per battery charge.
Cleaning without the spray bottle
→ Apply the detergent as usual according to manufacturer's instructions and loosen the dirt.
→ Further procedure same as the "Cleaning with spray bottle and wiper attachment", see illustration 8
Interrupting the work
Illustration 9
→ Switch off the appliance and set it down on the pedestal (parking position).
Emptying the reservoir during operation
Once the max. fill level (mark) of the dirt water reservoir is reached, please empty the tank.
Illustration 9
→ Turn off the appliance.
Illustration 10
→ Pull off the lock of the dirt water reservoir and empty the tank.
→ Close the closure of the wastewater tank.
Finish up your work / clean appliance
Illustration 9
→ Turn off the appliance.
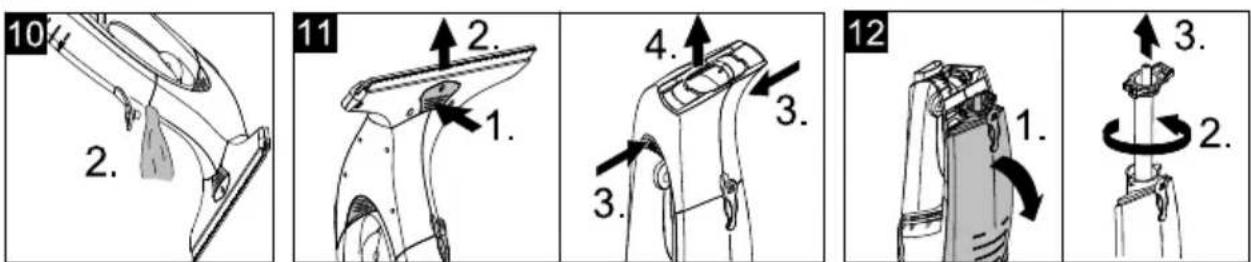
Illustration 11
→ Unlock the suction nozzle first and remove it from the separator, then unlock the separator and remove it, too.
→ Clean the separator and the suction nozzle under running water (not dish-washer safe).
Illustration 12
Caution: The basic appliance contains electrical components. Do not clean this under running water!
→ Remove the dirt water reservoir, rotate the lock and pull out.
→ Empty the reservoir and rinse with clear water. Close the reservoir again.
→ Remove the wiping cover from the spray bottle and rinse it under running water. The wiping cover can also be washed in the washing machine at a temperature of up to 60°C (without the use of fabric softeners).
→ Let the cleaned appliance dry prior to assembly.
→ Charge the battery.
Storing the Appliance
→ Store the appliance upright in a dry room.
Troubleshooting
Spray bottle does not spray
→ Refill detergent.
→ Pump mechanism in spray botte defective, contact dealer.
Machine does not start
Check the charge/operations display:
→ No signal or slowly blinking signal: Charge the battery.
→ With a rapidly blinking signal: Inform your dealer.
Streaks while cleaning
→ Clean the pull-off lip.
→ Reverse the used pull-off lip:
Pull the silicone squeegee to the side. Wet the squeegee in the area of the curve with water or detergent. Slide the silicone squeegee back in the holder in reverse order.
→ Replace the pull-off lip if necessary: If both edges are worn after turning the silicone squeegee around, a new silicone squeegee is required. Replace silicone squeegee as described above.
→ Adjust the dosing of cleaning solution.
Water is leaking from the air louvers
→ Empty the dirt water reservoir (max. 100 ml content).
Special accessories
Window cleaner concentrate (4 x 20 ml)
Order No. 6.295-302.0
Micro-fibre wiping pad (2 piece)
Order No. 2.633-100.0
Removable lips, wide (2 ea.)
Order No.: 2.633-005.0
Removable lips, small (2 ea.)
Order No.: 2.633-104.0
Technical specifications
| Type of protection IP X4 | ||
| Volume of dirt water reservoir | 100 | ml |
| Operating time with full charge | 20 | min |
| Nominal battery voltage 3,6 V | ||
| Rated power of appliance | 12 W | |
| Charging current for empty battery | 2 | h |
| Output voltage, charger 5,5 V | ||
| Output current, charger 60 mA | ||
| Sound pressure level (EN 60704-2-1) | 54 | dB(A) |
| Weight | 0,7 | |
| Battery type Li-Ion | ||
Subject to technical modifications!
Disposing of old device and battery pack
This appliance includes a built-in battery pack; please remove this battery pack before disposing of the old appliance.
Remove battery pack and dispose of
⚠Risk of a short circuit
→ Do not touch contacts or wires.
⚠️Risk of explosion
→ Do not expose the accumulator to direct sunlight, heat or fire.
⚠️Risk of injury due to short circuit, chemical burn or escaping irritant vapours
→ Do not open the accumulator.

→ The appliance may only be opened in order to dispose of the battery pack.
→ Remove the battery pack and dispose of properly (at a collection site or the dealer).
Table des matières
Utilisation conforme ..... FR ...3
⚠ Instructions relatives au transport
www.kaercher.com/REACH
www.kaercher.com/REACH
www.kaercher.com/REACH
www.kaercher.com/REACH
www.kaercher.com/REACH
www.kaercher.com/REACH
→ Kontroller rensemidlets dosering.
www.kaercher.com/REACH
Symboler i bruksanvisningen
⚠️Fare
For en umiddelbar truende fare som kan føre til store personskader eller til død.
⚠️Advarsel
www.kaercher.com/REACH
Symboler i bruksanvisningen
⚠️Fara
www.kaercher.com/REACH
www.kaercher.com/REACH
www.kaercher.com/REACH
www.kaercher.com/REACH
Гарантия
www.kaercher.com/REACH
www.kaercher.com/REACH
www.kaercher.com/REACH
www.kaercher.com/REACH
Mult stimate client,
www.kaercher.com/REACH
⚠️Pokyny pre prepravu
www.kaercher.com/REACH
www.kaercher.com/REACH
Simboli u uputama za rad
⚠️ Opasnost
Poseban pribor....SR...6
Tehnički podaci. . . . . . . . . . . . . SR . . 6
Odlaganje starih uređaja i akumulatora u otpad ....SR...7
Poštovani kupče,

Pre prve upotrebe Vašeg uređaja pročitajte ove originalno uputstvo za rad, postupajte prema njemu i sačuvajte ga za kasniju upotrebu ili za sledećeg vlasnika.
Namensko korišćenje
– Ovaj uređaj na baterije koristite isključivo u privatne svrhe, za čišćenje vlažnih i glatkih površina poput prozora, ogledala ili keramičkih pločica. Prašina ne sme da usisava.
– Uređaj nije namenjen za usisavanje većih količina tečnosti sa vodoravnih površina, npr. iz prevrnutih čaša (maks. 25 ml).
– Uređaj koristite samo sa uobičajenim sredstvima za pranje prozora (ne sa špiritusom ili penušavim deterdžentima).
- Preporučujemo: Koncentrat sredstva za pranje prozora marke KÄRCHER (vidi poglavlje "Poseban pribor").
Nenamenskom se smatra svaka upotreba izvan ovih okvira. Proizvođač ne preuzima odgovornost za tako nastale štete; rizik snosi jedino korisnik.
Sigurnosne napomene
■ Ovaj uređaj nije predviđen da njime rukuju osobe sa smanjenim fizičkim, senzornim ili mentalnim mogućnostima opažanja ili s ograničenim iskustvom i znanjem, osim ukoliko ih lice koje je za
www.kaercher.com/REACH
Simboli u uputstvu za rad
⚠️ Opasnost
Ukazuje na neposredno preteću opasnost koja dovodi do teških telesnih povreda ili smrti.
⚠ Upozorenje
Ukazuje na eventualno opasnu situaciju koja može dovesti do teških telesnih povreda ili smrti.
Oprez
Ukazuje na eventualno opasnu situaciju koja može dovesti do lakših telesnih povreda ili izazvati materijalnu štetu.
Stavljanje u pogon
Opis uređaja
Pre vađenja iz ambalaža proverite ima li u sadržini paketa delova koji nedostaju ili oštećenja. U slučaju transportnih oštećenja obavestite Vašeg prodavca.
www.kaercher.com/REACH
www.kaercher.com/REACH
www.kaercher.com/REACH
www.kaercher.com/REACH
www.kaercher.com/REACH
Кепілдеме
natural_image
Icon showing a gear and wrench inside a square frame (no text or symbols)http://www.kaercher.com/dealersearch
71364 Winnenden (Germany)
Tel.: +49 7195 14-0
Fax: +49 7195 14-2212