Sapling Elite - Baby products THULE - Free user manual and instructions
Find the device manual for free Sapling Elite THULE in PDF.
| Product type | Hiking baby carrier (backpack) |
| Brand | Thule |
| Model | Sapling Elite |
| Minimum child weight | 7.3 kg (16 lbs) |
| Maximum weight (child + gear) | 22 kg (48 lbs) |
| Recommended age | Child able to sit upright unassisted |
| Adult harness height adjustment | 4 positions, range 38-56 cm (15-22 in) |
| Adult waist belt adjustment | 3 sizes: S (68-79 cm), M (79-94 cm), L (94-125 cm) with 7.5 cm lateral adjustment |
| Child height adjustment | Adjustable seat via side buckle |
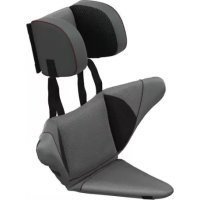
| Child straps | Adjustable shoulder straps, leg support buckles, side wings |
| Sunshade | Integrated, stowable behind headrest |
| Hydration pocket | Compatible with hydration reservoir (not included) |
| Support pedal | Folding kickstand for stability when removing child |
| Material | Machine-washable fabric (hand wash recommended) |
| Care | Hand wash with mild detergent, air dry |
| Storage | In a dry place away from direct sunlight |
| Safety | Use child restraint system, do not leave unattended, do not place on elevated surfaces |
| Spare parts | Available from Thule Inc./Sweden AB |
| Warranty | Visit www.thule.com |
Frequently Asked Questions - Sapling Elite THULE
User questions about Sapling Elite THULE
0 question about this device. Answer the ones you know or ask your own.
Ask a new question about this device
Download the instructions for your Baby products in PDF format for free! Find your manual Sapling Elite - THULE and take your electronic device back in hand. On this page are published all the documents necessary for the use of your device. Sapling Elite by THULE.
USER MANUAL Sapling Elite THULE
Thank you for choosing a Thule Sapling child carrier.
Please read all instructions before using the child carrier.
For additional languages, please visit www.thule.com.
IMPORTANT! PLEASE KEEP INSTRUCTIONS FOR FUTURE REFERENCE.
Getting Started
Instructions for safe assembly 04
Maintenance 04
How to Fit an Adult
Adjustable hipbelt 05
Torso adjustment 05
How to Adjust the Child Harness
Adjust child's height 06
Adjust child's shoulder harness 06
Adjust leg loops 07
Tighten side wings 07
Hydration sleeve 07
Sunshade operation 08
Stomp Pad
08

Thule Inc. | 42 Silvermine Road | Seymour, CT 06483 USA
Thule Sweden AB | Borggatan 2 | SE-330 33 Hillerstorp, Sweden

info@thule.com

www.thule.com
PART OF THULE GROUP

WARNING

Fall or strangulation hazard.
For safe carrier use, child must be able to sit upright without assistance and weigh at least 7.3kg /16 lbs.
Do not leave child unattended in carrier.
Do not place carrier on counter tops, tables or other elevated surfaces.
When in the carrier the child could be in a position that is higher than the adult. Please be aware of hazards such as branches, door frames, etc.
Check to assure all buckles, straps and adjustments are secure and adjusted in accordance with instructions before each use.
Avoid serious injury from falling or sliding out by always using the child retention system and ensuring that it is adjusted and fastened in accordance with instructions before each use.
When using the carrier the adult should be aware of the following:
Balance may be adversely affected due to movement of the child and also the adult.
- Take great care when bending, leaning forward, or making sudden movements.
- The carrier is suitable for use when undertaking leisure activities but not for sport activities.
- Care should be taken when putting on or removing the carrier.
For all buckles, be sure that you hear an audible click when connecting and pull on buckle to confirm that a secure connection has been made.
Maximum load: 22kg/48 lbs (combined weight of child and gear contents)
The child in the carrier can become tired; it is recommended to take frequent breaks.
Be aware that the child in the carrier may suffer from the effect of the weather and temperature before you do.
Care must be taken to avoid injury to the child's feet when the carrier is on or near the floor.
Additional or replacement parts should only be obtained from Thule Inc/ Sweden AB.
GETTING STARTED
INSTRUCTIONS FOR SAFE ASSEMBLY
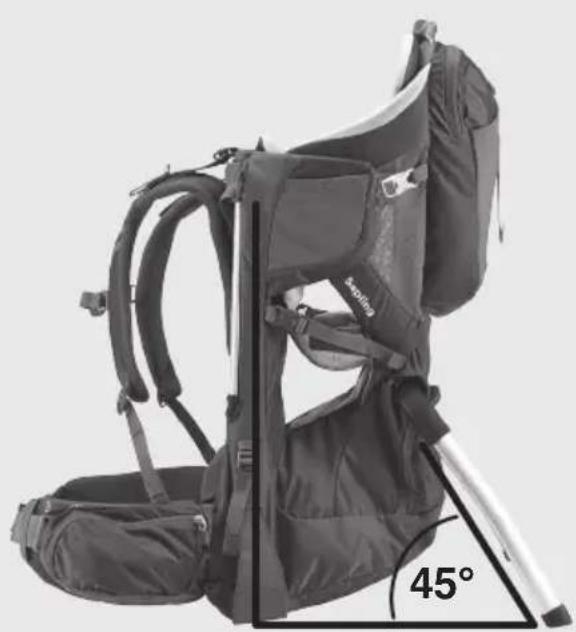
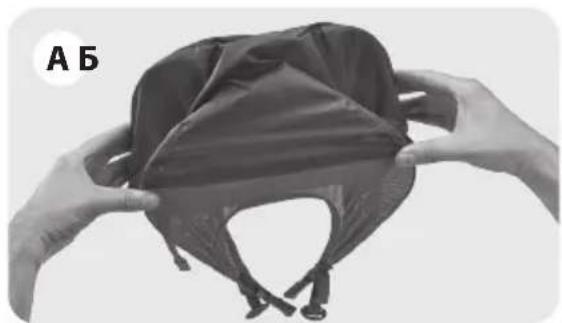
Thule child carriers come fully assembled. Before placing child in carrier, always deploy the kickstand until it is fully opened and audio feedback confirms it is locked in place. For shipping purposes, the side wings are folded inside the carrier. Tighten the side compression straps on rear wings before use.

WARNING
Always ensure the kickstand is fully deployed before carrier is placed on the ground.
MAINTENANCE
Regularly inspect your child carrier for damage and signs of wear. For repairs or questions, please contact your local dealer or visit our website for customer service information: www.thule.com
MAINTENANCE RECOMMENDATIONS
- Store in a dry area out of direct sunlight
- Wash the carrier if it comes in contact with mud, sand, salt, etc.
- Remove contents from carrier after each trip
- Before storing, your carrier should be dry to prevent the growth of mold or bacteria.
- The carrier, including the removable drool pad should be hand washed with a mild detergent in warm water, then hung to dry. Never use harsh cleansers or solvents.
HOW TO FIT TO AN ADULT
Thule child carriers have a wide range of adjustability to fit many different body types.
| ADJUSTABLE HIPBELT | |
| S | 68-79 cm | 27-31" |
| M | 79-94 cm | 31-37" |
| L | 94-125 cm | 7-49" |
| TORSO ADJUSTMENT | |
| S | < 41 cm | < 16" |
| M | 41-46 cm | 16-18" |
| L | 46-51 cm | 18-20" |
| XL | > 51 cm | > 20" |
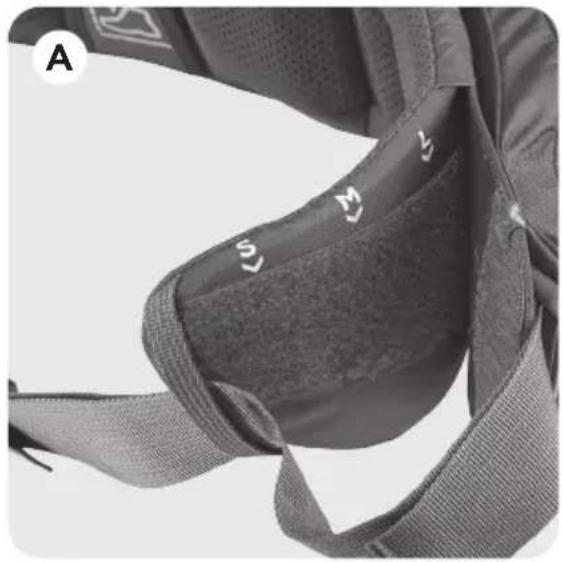
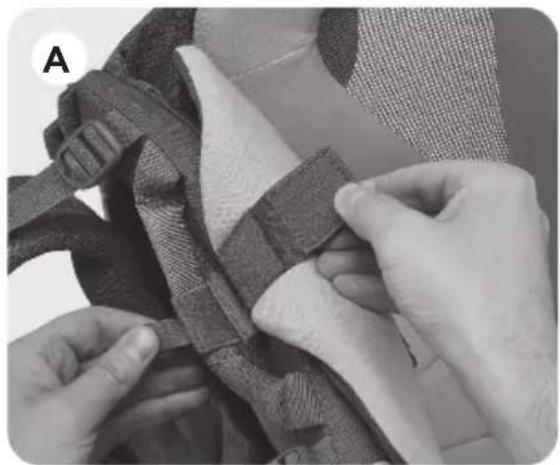
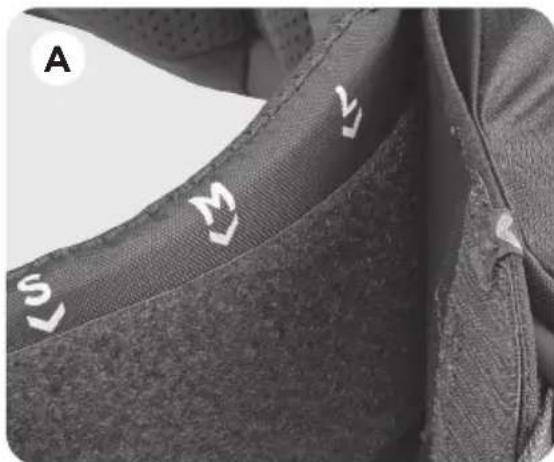
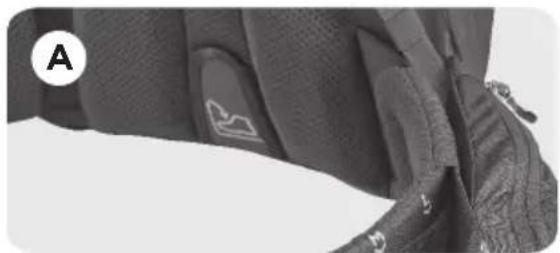
ADJUSTABLE HIPBELT
The hipbelt has 7.5cm / 3 in of adjustment on each side.
To adjust:
A. Separate the hook and loop between the hip belt pocket and the hipbelt padding and move the hipbelt pad forward or backwards as needed. Once adjusted, reconnect the hook and loop.
Proper fit - ensure that the padding fully wraps around your hipbones.
TORSO ADJUSTMENT
The carrier has 15cm / 6 in of adjustability, fitting torsos from 38-56 cm/15-22 in.
To adjust:
A. Depress the two gray buttons on the bottom of the horizontal shoulder bar located underneath the shoulder pad.
B. While depressed, slide the bar up or down to one of four marked positions. Ensure shoulder bar is locked in place before using.
Proper fit - With the hipbelt positioned directly over your hip bones, the top of the shoulder pad should sit just below the base of your neck.
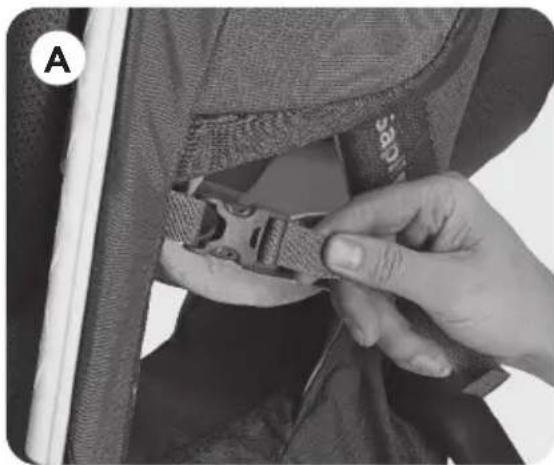
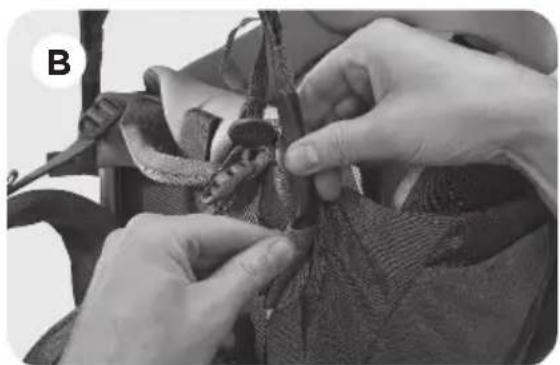
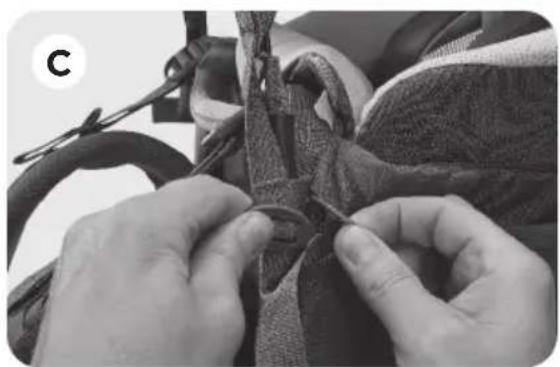
HOW TO ADJUST THE CHILD HARNESSE
A. Remove the drool pad by undoing the hook and loop near the top of the back panel.
B. Locate the large contrast colored side squeeze buckle behind the drool pad.
C. Pull up on the webbing connected to the side squeeze buckle to raise the seat. To lower, grab the top of the side squeeze buckle, pull toward the rear of the carrier and push the child seat downward.
D. Reconnect the drool pad.
Proper fit - The child's chin should be level with the top of the drool pad.

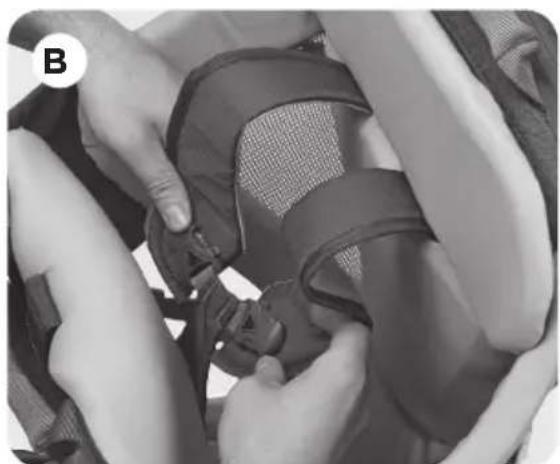
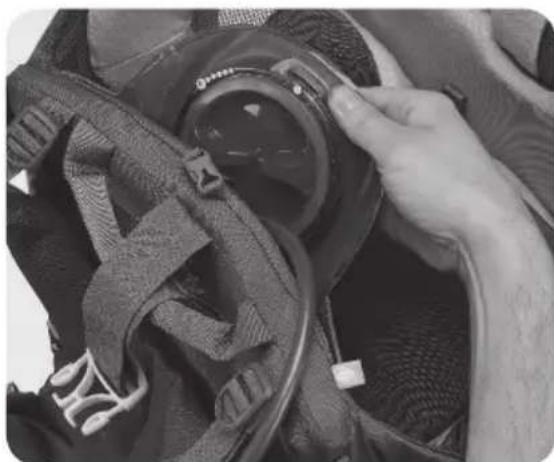
ADJUST CHILD'S SHOULDER HARNESS
A. To loosen, locate the cam lever buckle behind the child's headrest. Push down on the lever and simultaneously pull on forward on the child's shoulder straps. To tighten, simply pull up on the webbing connected to the cam lever buckle.
B. Connect the two side squeeze buckles in the front of the cockpit to the two shoulder straps. Adjust shoulder strap length as needed so that the child is secure.
Proper fit - The shoulder harness should be tight but still comfortable against the child's shoulders, chest and stomach.

ADJUST LEG LOOPS
A. Fasten the side squeeze buckles on both sides of the child carrier and tighten the webbing.
Proper fit - The leg loops should be tight but still comfortable against the child's legs.
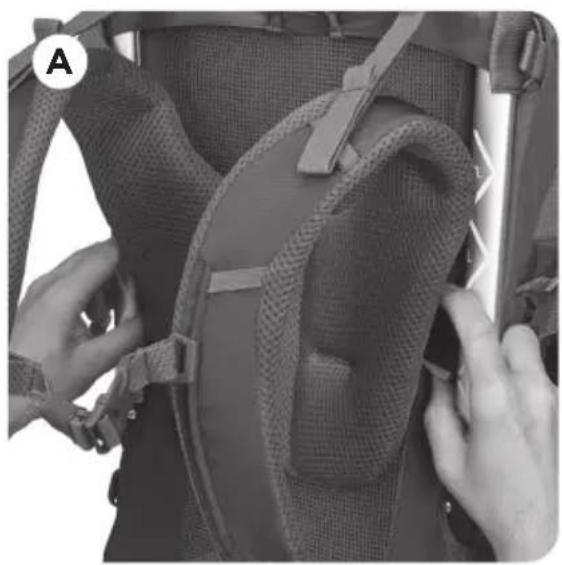
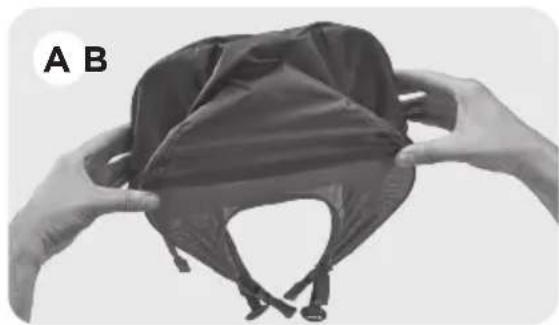
TIGHTEN SIDE WINGS
A. Clip the side access sidesqueeze buckle on the child carrier and tighten the webbing on both sides.
Proper adjustment - The side wings should be closed so that both wings overlap each other and the child is snug in the seat.
HYDRATION SLEEVE
A. Remove drool pad by undoing the hook and loop near the top of the back panel.
B. Locate the large contrast colored side squeeze buckle behind the drool pad and disconnect.
C. Slide hydration reservoir into sleeve then reconnect side squeeze buckle and drool pad.
D. Route hose out of the top of the carrier and down the adult's shoulder strap.

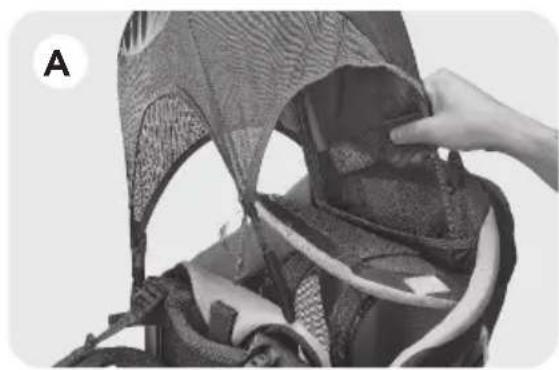
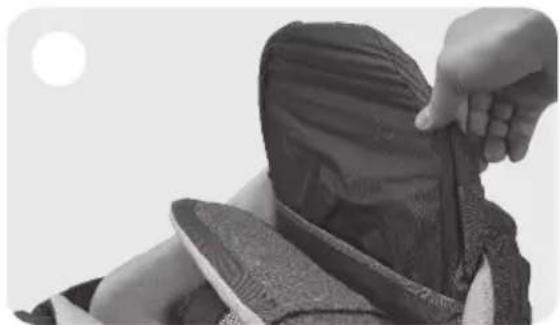
SUNSHADE OPERATION
A. Reach behind the headrest and pull the sunshade up so that the hook and loop on the sunshade matches up with the hook and loop on the back of the child carrier.
B. Insert the uprights on the front of the sunshade into the webbing slots along the carrier's back panel.
C. Connect the hooks on the uprights to the elastic cord on the back panel.
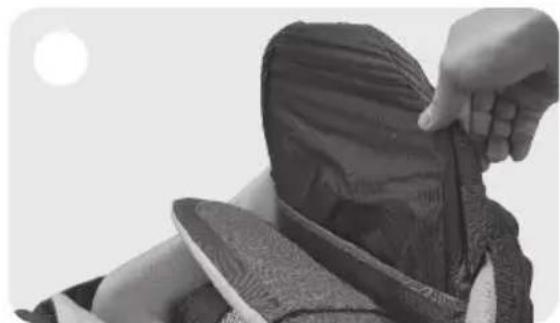
STOW THE SUNSHADE
A. Remove the uprights from the webbing slots.
B. Break hook and loop between headrest and sunshade to separate from carrier.
C. Collapse sunshade by folding legs together.
D. Store in compartment behind headrest.
STOMP PAD
A. Stomp pad flips down to help stabilize the carrier when removing your child
Thule Sapling
> Instructions
EN Instructions
FR Instructions
DE Anleitung
NL Instructies
NO Instruksjoner
DA Instruktioner
CZ Navod
PL Instrukcje
FI Ohjeet
IT Istruzioni
ES Instrucciones
PT Instruções
RU INHcTpukun
SV Instruktioner
JA取极説明書
ZH 说明
TW 說明
ET Juhised
HR Upute
INTRODUCTION
| EINSTELLBARER HUFTGURT | |
| S | 68-79 cm | 27-31" |
| M | 79-94 cm | 31-37" |
| L | 94-125 cm | 7-49" |
| ANPASSUNG AN DEN OBERKÖRPER | |
| S | < 41 cm | < 16" |
| M | 41-46 cm | 16-18" |
| L | 46-51 cm | 18-20" |
| XL | > 51 cm | > 20" |
EINSTELLBARER HUFTGURT
ANBEFALT VEDLIKEHOLD
JUSTER BARNETS SKULDERSTROpper
| JUSTERBART HOFTEBÆLTE | |
| S | 68-79 cm | 27-31" |
| M | 79-94 cm | 31-37" |
| L | 94-125 cm | 7-49" |
| JUSTERING TIL OVERKROPPEN | |
| S | < 41 cm | < 16" |
| M | 41-46 cm | 16-18" |
| L | 46-51 cm | 18-20" |
| XL | > 51 cm | > 20" |
JUSTERBART HOFTEBAELTE
Apertar as abas laterais 07
He KnaIte pIOK3aK Ha IprIJIaBKN, CTOJIbI IN DpyrIe IOBepXHOCTN, HAXOJaIiNeCA HA BO3BbIWeHNI.
B HeKoTOpbIX cIyuaX pe6eHOK B pIOK3aKe-NepeHoCKe MOKeT OKa3aTbC8 B IIOJoxKeHH N Bblue B3pocNoRo. B 3tOM cIyae Heo6xOIMo O6paTaB BHImaHHe Ha CneDyUuJe ONaCHOCTN: BeTbN DepeBBeB, DBePbIe PPOEmbl N dP.
IpeedncnoJIb3OBaHnemy6eIITecb,yTO BCE npJkK,peMHnIKpePJIeHnIpaBnIbHOOTpeRynipOBAHbI HaJeXHo 3aCTeHTbIB COOTBeTCTBUN C HHTpyKLJrMNI.
IcnoJIb3OBaHnE CNTeMbI CTa6HnH3aCnN IIOJoxeHnpe6eHka NOMoAeT
H6exKaTb cepbe3HbIX TpaBM PnI NaDeHnI INBbICKaJIb3bIBaHn.Ipeep KaXdbIM
NCIOJIb3OBaHnEM y6eHNTECb, YTO CNTeMa OTpeyInpOBAHa N 3aCTeHTyTa
BCOTBETCTBnC INHCTpyKUINM.
Pn nCnoB3OBAHn pIok3aka-NepeHocKn Heo6XoJIMO NOMHHTb O cJeNyIoUeM.
- YdepxnBaHne paBHOBeCn npx XoNb6e MoKet 6bItb OCIOXHeHO KaK DnIXeHnA MPe6eHka, TaK N B3pOcNoRo.
- CneNyET Oco6eHHO OCTOpOJHO HaKIOHATbCa N I36eRaTb pe3Knx DnBxKeHHI.
- PioK3aK-HepeHocky MoXHO IcNoJIb3OBAtB Ha OTbIXe, Ho He IJra CnOpTa.
- Heo6xOdIMMo OueHb OCTOpOXHO CHImaTb N HaedeBaTb pIOK3aK-NepeHoCKy.
Pn 3acteHbAHIN BCex npjxek DOJIKeH 6bITb CblweH xapaKTepeHbI uenQOK.
NoCne 3TOTO Heo6xoDIMO NOTAHyTb 3a npjxky, yTO6bl y6eINTbcra, YTO OHa HaeXHO
3acterHyta.
MaKcImaJIbHaJa HaIpy3ka:22Kr (cymMapHaJa MaCCa pe6eHKa n ChapJxKeHHa)
Pe6eHOK MoKet yCTaTb npi HaxoXJeHnB pIOK3aKe-NepeHoCKe, NO3Tomy peKOMeHdyETcA DeIaTb YaCTbIe NepepbIBbl.
POMHnTe O TOM, yTo pe6eHOK B pIok3ake-NepeHOCKe MOxET peaHnpOBaTb Ha TeMnepaTyPy nII NOrOHNbIe ycNobn 6bICTpee, YEM Bbl.
Ecnpiok3ak-inepeHocka HaxoITcra pAOM C NOLOM NnHa NOny, Heo6xOIMOCneIITb 3a TeM, UTo6bl He TpaBMIpOBaTb HOrn pe6eHka.
CKJIaIbAHHe COJHcE3AunTHOTo KO3bIPbKA
A. BbHbTe HappaIoune n3 npope3eJ.
5. OTCTeHnTe 3aCTeKky-lynyuky Ko3bipbKa OT 3aCTeKKn-linyuyni NOIroJOBnKa, YTO6bl CHrTb Ko3bipeK c pIOK3aKa-NepeHoCKN.
B. CbepHnTe Ko3bIpeK, cNoXKnB cKnAaHbIe HOxKn.
I. IIOJXITE erO B OTDeJIeHne 3a IOIROJOBHNKOM.
MЯГКА ПОДКЛАДKA
A. Korda Bby BbHmaeTe pe6eHa Ka n3 pK3aKa, MraKaI NOkJaKa nepeBopauNbaETcR Bn3, cTa6nIn3npyra POK3aK-NepeHoCKy.

Thule Sapling
> Instruktioner
EN Instructions
FR Instructions
DE Anleitung
NL Instructies
NO Instruksjoner
DA Instruktioner
CZ Navod
PL Instrukcje
FI Ohjeet
IT Istruzioni
ES Instrucciones
PT Instruções
RU INHcTpkyKcnn
SV Instruktioner
JA取叢説明書
ZH说明
TW 說明
ET Juhised
HR Upute
INLEDNING
ANPASSA BÄRSTOLEN FÖR DEN VUXNE
| JUSTERA AXELREMMARNA | |
| S | < 41 cm | < 16" |
| M | 41-46 cm | 16-18" |
| L | 46-51 cm | 18-20" |
| XL | > 51 cm | > 20" |
JUSTERA HÖFTREMEN
JUSTERA AXELREMMARNA
JUSTERA BARNETS AXELREMMAR
STÄLLA IN BENREMMARNA
NB! JÄTKE JUHEND ALLES. TEIL VOIB SEDA KA EDASPIDI VAJA MINNA.
Alustamine
Ohutukokkupaneku juhised 04
Hooldamine 04