
ESCM12MBK - Coffee machine GORENJE - Free user manual and instructions
Find the device manual for free ESCM12MBK GORENJE in PDF.

| Product Type | Espresso coffee machine with steam nozzle |
| Brand | Gorenje |
| Model | ESCM12MBK |
| Power supply | See label on appliance (220-240 V ~ 50/60 Hz according to standards) |
| Main functions | Espresso preparation, hot water, steam for milk frothing, automatic shut-off after 25 min, preheating |
| Descaling | Automatic after 500 cycles, requires household descaler or citric acid |
| Water tank capacity | Approx. 1.2 L (max level indicated) |
| Included accessories | Metal brewing unit, metal filter, measuring spoon, drip tray, cup rest |
| Housing material | Heat-resistant plastic |
| Safety | Grounded plug, overheat protection system, hot surfaces indicated |
| Maintenance | Regular cleaning of housing, tank, drip tray and accessories; periodic descaling |
| Repairability | Do not disassemble yourself; contact an authorized after-sales service |
| Warranty | International warranty (see warranty card) |
| Intended use | Household and similar applications (offices, hotels, etc.) |
| Weight | Approx. 3.5 kg (estimate) |
Frequently Asked Questions - ESCM12MBK GORENJE
User questions about ESCM12MBK GORENJE
0 question about this device. Answer the ones you know or ask your own.
Ask a new question about this device
Download the instructions for your Coffee machine in PDF format for free! Find your manual ESCM12MBK - GORENJE and take your electronic device back in hand. On this page are published all the documents necessary for the use of your device. ESCM12MBK by GORENJE.
USER MANUAL ESCM12MBK GORENJE
Before using the electrical appliance, the following basic precautions should always be observed:
Safety Cautions
Read all instructions.
- Before using, check that the voltage of wall outlet corresponds to rated voltage marked on the rating plate.
- This appliance is fitted with a grounded plug. Please ensure the wall outlet in your house is well earthed.
- To protect against fire, electric shock and injury to persons, do not immerse cord, plug, in water or other liquid.
- Remove plug from wall outlet before cleaning and when not in use. Allow appliance to cool down completely before taking off or attaching components, or before cleaning.
- Do not operate any appliance with a damaged cord or plug, after the appliance malfunctions, or after it is dropped or damaged in any way. Return the appliance to the nearest authorized service facility for examination, repair or electrical or mechanical adjustment.
- The use of accessory attachments not recommended by the appliance manufacturer may result in fire, electric shock or injury to persons.
- Place the appliance on a flat surface or table. Do not let the power cord hang over the edge of the table or counter.
- Ensure the power cord does not touch any hot surface of the appliance.
- To avoid damage, do not place the coffee maker on a hot surface or close to fire.
- To disconnect, remove the plug from the wall outlet. Always hold the plug; never pull the cord.
-
Do not use the appliance for any other purpose than intended, and place it in a dry environment.
-
Close supervision is necessary when your appliance is used near children.
- Be careful not to get burned by steam.
- Do not touch any hot surface of the appliance (such as the steam wand, and the steel mesh just after hot water passed through it). Use handle or knobs.
- Do operate the coffee maker without any water in it.
- Do not remove the metal funnel when appliance is brewing coffee or making steam.
- Connect the plug to the wall outlet before use, and turn off any switch before removing the plug from the wall outlet.
- This appliance is not intended for use by persons (including children) with reduced physical, sensory or mental capabilities, or lack of experience and knowledge, unless they have been given supervision or instruction concerning use of the appliances by a person responsible for their safety.
- Children should be supervised to ensure that they do not play with the appliance.
- This appliance is intended to be used in household and similar applications, such as:
- staff kitchen areas in shops, offices and other working environments;
- farm houses;
by clients in hotels, motels and other residential type environments; - bed and breakfast type environments.
- Do not use outdoors.
- Save these instructions.
- If you do not intend to use the appliance for a long time, turn it on and release steam for 3 minutes before leaving this appliance.
- If you cut off power during steam release, the appliance will continue to release steam for some time due to residual heat. If you turn off steam knob, the appliance will stop releasing steam immediately.
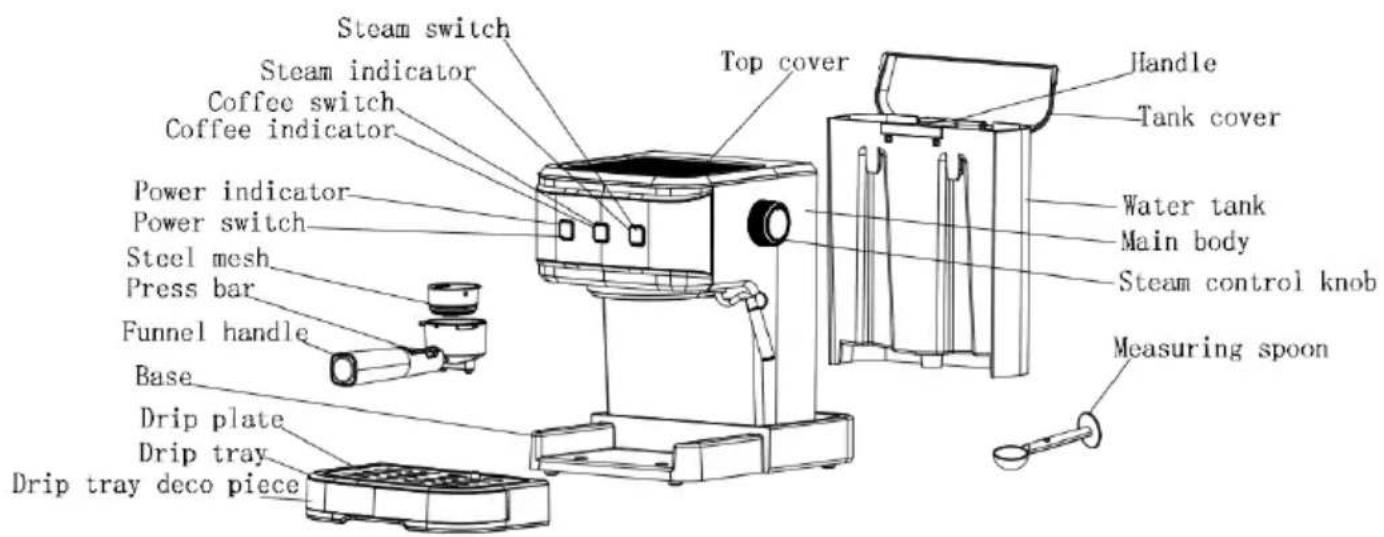
Know your coffee maker
Before the first use
To ensure the first cup of coffee tastes excellent, rinse the coffee maker with warm water as follows:
-
Pour water into the water tank. Water level should not exceed the "MAX" mark on the tank. Then, replace the water tank cover. Note: The appliance is supplied with a detachable tank for easy cleaning. You can fill the tank with water first, and then return the tank into the appliance.
-
Place the steel mesh into the metal funnel (without any coffee in steel mesh).
-
Place a jug on the removable shelf. Make sure the steam control knob is on the OFF position. Note: The appliance is not supplied with a jug. Please use your own jug or a coffee cup.
-
Connect the appliance to power supply. Press the power switch " " once. The red indicator is illuminated.
-
Press the coffee switch. The pump will start pumping water. When water starts to flow out of the appliance, stop the pump by pressing the coffee switch. Press the steam switch selector and wait for a moment. The appliance starts to preheat. When the inner lamp of coffee switch is illuminated, the preheating process is finished. Press the coffee switch and water will flow out of the appliance.
-
When water stops flowing or dripping from the appliance, you can discard the water in the container (jug or coffee cup). Clean the container thoroughly. Now, you can start brewing. Note: There may be noise when water is pumped for the first time. This is normal: the appliance is displacing the air inside. After about 20 seconds, the noise will disappear.
Preheating
To make a cup of good hot espresso, we recommend preheating the appliance before making coffee, including the funnel, filter and cup. This way, coffee flavour will not be affected by the cold parts.
-
Remove the detachable tank and open the tank cover to fill it with the desired amount of water. Water level should not exceed the "MAX" mark on the tank. Then, correctly place the tank into the appliance.
-
Place the steel mesh into the metal funnel, making sure the tube on the funnel aligns with groove in the appliance. Then, insert the funnel into the appliance from the "Insert" position, and fix it into the coffee maker firmly by turning it anticlockwise until it is in the "Lock" position.
-
Place an espresso cup on the removable shelf.
-
Then, connect the appliance to power supply. Make sure the steam control knob is in the OFF position.
- Press the power switch " " once. The power indicator turns on and the coffee indicator blinks. When preheating is complete, the coffee indicator is constantly lit. Press the coffee switch. When water starts to flow out of the appliance, close the pump immediately. The purpose of this step is to pump the water from the tank into the housing.
- When the lamp on coffee switch is illuminated, press the coffee switch again. Hot water will start flowing out of the appliance. When the lamp on the coffee switch is extinguished, close the pump. The preheating process is complete.
Make espresso
- Remove the funnel by turning it clockwise. Add ground coffee into the steel mesh, using a measuring spoon. A spoon of ground coffee can make about one cup of top-grade coffee. Press the ground coffee powder tightly with the tamper.
- Set the steel mesh into the metal funnel, making sure the tube on the funnel aligns with the groove in the appliance. Then, insert the funnel into the appliance from the "Insert" position, and fix it into the coffee maker firmly by turning it anticlockwise until it is in the "Lock" position.
- Pour hot water into the cup. When the cup is warmed up, discard the water from the cup and dry it. Then, place the hot cup on the removable shelf.
- At this point, the lamp in the coffee switch will be illuminated. If it is extinguished, wait for a moment. Once the lamp in it is illuminated, press the coffee switch. Wait for a moment; there will be coffee flowing out. When the required amount of coffee is in the cup, press the coffee switch again and the water pump will stop working.
WARNING:
- Do not leave the coffee maker unattended while making coffee, as is sometimes has to be operated manually!
- When you finish making the coffee, you can remove the metal funnel by turning it clockwise. Discard the coffee residue from the steel mesh.
- Let the funnel and the mesh cool down completely, then rinse them under running water.
- Operating time for brewing a single cup of coffee is up to 60 seconds. If operating time exceeds 60 seconds, the water pump will stop working. Operating/brewing time can be adjusted as follows. When the appliance is in standby mode, press and hold the coffee switch for 3 seconds. The coffee indicator blinks. Then, press the coffee switch again within 5 seconds. The water pump starts to operate. After the desired amount of time, press the coffee switch again and the water pump will stop working. The setting is finished. Operating time can be set in the range from 15 to 60 seconds.
Making hot water
When preheating is complete, the coffee indicator lights up and it is lit constantly. Then, press the coffee switch and the water pump starts to pump water. Turn the knob to "Hot water", and hot water will flow out of the steam pipe. To stop making hot water, press the coffee switch again. Hot water is used for warming cups, making tea or cooling down the appliance.
To adjust the operating time for heating up water, please refer to the section "Make ESPRESSO...
Make cappuccino/frothed milk
For a cup of cappuccino, top up a cup of espresso with frothed milk.
Method:
- First, prepare espresso as described in the section "MAKE ESPRESSO", using a sufficiently large container (cup). Make sure the steam control knob is in the "0" position.
- Press the steam switch selector. The lamp in the coffee switch will be illuminated. Wait until the indicator in the steam switch selector is illuminated.
Note: During operation, the indicator in the steam selector will cycle on and off as the desired temperature is maintained.
- Fill a jug with about 100ml of milk for each cappuccino to be prepared. We recommend using whole milk at refrigerator temperature (not hot!).
Note: When choosing the size of the jug for frothing milk, it is recommended that the diameter is not less than 70 ± 5 ~mm . Also, bear in mind that the milk volume is doubled during frothing; make sure the jug is tall enough.
- Slowly turn the steam control knob anticlockwise. Steam will come out from the frothing device.
Note: Never turn the steam control button rapidly, as the steam will accumulate in a short time, which may increase the risk of explosion.
-
Insert the frothing device about two centimetres into the milk. Froth the milk by moving the jug around, up and down.
-
When the milk is frothed to your liking, turn the steam control knob to position "0".
Note: Clean the steam outlet with a wet sponge immediately after steam stops, but be careful not to burn yourself!
-
Pour the frothed milk into the prepared espresso, and the cappuccino is ready. Sweeten to taste and sprinkle the froth with a little cocoa powder if desired.
-
Press the power switch to power down the appliance. All indicators will be extinguished.
WARNING:
After you finish using the "Steam" function, press the coffee switch. If the coffee indicator and steam indicator blink fast, this means that the appliance temperature is too high and the appliance needs to be turned off and rest for more than 5 minutes. Alternatively, you can activate the "Hot water" function to cool down the appliance. The water pump will stop pumping water automatically once the temperature is normal. If the appliance is used for brewing coffee immediately, without being cooled down, the coffee will be burnt and there will be overflow at the funnel.
Automatic power off function
If there is no any operation within 25 minutes, the unit will power off automatically.
FACTORY RESET
When preheating is complete, simultaneously press and hold the power switch, coffee switch and steam switch for 3 seconds. Their corresponding indicators will blink 3 times, and factory reset is complete.
Cleaning and maintenance:
- Before cleaning, unplug the appliance from power supply and let it cool down completely.
- Clean the coffee maker housing with a moisture-proof sponge often. Regularly clean the water tank, drip tray and removable shelf. Dry them after cleaning.
Note: Do not clean with alcohol or any solvent. Never immerse the appliance housing in water. - Detach the metal funnel by turning it clockwise and discard the coffee residue inside. Then, you can clean it with a detergent, but make sure you rinse it thoroughly with clean water.
- Clean all attachments in water and dry them thoroughly.
Cleaning mineral deposits
- A descending prompt will occur automatically after working for a total of 500 cycles. At that time, all indicators will quickly blink 5 times at the same time after preheating is finished. Once it is descaled, the appliance will operate normally again.
- Fill the tank with water and descending agent (descaler) to the MAX level. The ratio of water to descaler is 4:1; for details, please refer to the instructions provided with the descaler. Please use "household descaler". You can also use citric acid (obtainable from chemist's or drug stores) instead of the descaler, mixing it with water in the ratio of one hundred parts water to three parts citric acid.
-
Install the metal funnel (without any coffee powder in it), place a jug on to the tray, and brew water as described in the "PREHEATING" section.
-
Press the power switch once. Its red lamp will be illuminated. Press the pump control switch, making sure the coffee/steam selector is in the correct position. When water starts to flow out of the appliance, close the pump and wait for a moment. The coffee maker begins to heat up.
- When the lamp in the pump control switch is illuminated, this indicates that the heating process is finished. Press the pump control switch and make two cups coffee (about 2 oz.). Then, close the pump and wait for 5 seconds.
- Press the coffee/steam selector. The indicator in the pump control switch will be extinguished. Wait until the indicator in the coffee/steam selector is illuminated. Make steam for 2 minutes by turning the steam control knob. Then turn the steam control knob to "0" to stop making steam. Press the power switch to stop the unit immediately. Make sure the descaler remains in the unit for at least 15 minutes.
- Restart the unit and repeat steps 4 to 6 at least 3 times.
- Then, press the coffee/steam selector. The lamp in the pump control switch will be illuminated. Then, press the pump control switch to brew until no descaler is left in the appliance.
- Then, add tap water to the MAX level and brew coffee (without any coffee powder). Repeat steps 4-6 for 3 times (this time, it is not necessary to wait for 15 minutes in step 6). Then, brew until there is no water left in the tank.
- Repeat step 9 at least 3 times to make sure the piping is clean.
- To cancel the descending warning after the descending process, proceed as follows. While the appliance is in standby mode, simultaneously press and hold the coffee switch and steam switch for 3 seconds. Then, their corresponding indicators quickly blink 3 times, which means the descending warning is canceled and the working cycle counter is reset.
Trouble shooting
| Symptom | Cause | Corrections |
| There is rust on the metal parts of the tank. | You are not using the recommended type of descaler. Unsuitable descalers may corrode the metal parts in the tank. | Use a descaler recommended by the manufacturer. |
| Water leaks from the bottom of the coffee maker. | There is too much water in the drip tray. | Please clean the drip tray. |
| The coffee maker is malfunctioning. | Please contact the authorized service facility for repair. | |
| Water leaks from the outer side of the filter. | There is some coffee powder on the edge of the filter. | Remove coffee from the edge of the filter. |
| Espresso has acid (vinegar) taste. | Appliance has not been properly rinsed after the descaling process (after cleaning of mineral deposits). | Clean the coffee maker as described in the section “Before the first use” for several times. |
| Coffee powder was stored in a hot and wet place for a long time. The coffee powder turned bad. | Please use fresh coffee powder, or store unused coffee powder in a cool, dry place. After opening a package of ground coffee, reseal it tightly and store it in the refrigerator to maintain its freshness. | |
| The coffee maker does not work. | The appliance is not plugged correctly to a power outlet. | Correctly plug the power cord into a wall outlet. If the appliance still does not work, please contact an authorized service facility for repair. |
| Milk does not froth. | The steam ready indicator is not illuminated. | Steam can only be used for frothing when the steam ready indicator is illuminated. |
| The container is too big or the shape is not suitable. | Use a tall and narrow container/jug. | |
| You are using skimmed milk | Use whole milk or semi-skimmed milk |
If you cannot find the cause of a problem, do not take apart the appliance by yourself. Rather, contact a certified serving center.
This equipment is labelled in compliance with the European Directive 2012/19/EC on waste electric and electronic equipment - WEEE. The Directive specifies the requirements for collection and management of waste electric and electronic equipment effective in the entire European Union.
ENVIRONMENT
At the end of the appliance's useful life, do not discard it with common household waste. Take it to an authorized recycling centre. This will help preserve the environment.
WARRANTY AND REPAIR
For more information or in case of problems, please contact the Gorenje Call Centre in your country (phone number listed in the International Warranty Sheet). If there is no such centre in your country, please contact the local Gorenje dealer or Gorenje's small domestic appliance department.
For personal use only!
GORENJE
WISHES YOU A LOT OF PLEASURE IN USING YOUR APPLIANCE.
Pomembno
PnroTbHe Ha ropea Boda
Korato npedbapntno 3aqrbahe npnknou, nndkaTOpb3a kaede CBETBa. Hatnche 6ytoHa 3a kafe n BODnata nomna 3ano7a da pa6OTn. 3abpTeTe konyeTo Ha no3nucra "Hot water"(Topeua Boda) n BODATA Ue 3anoyHe 3a n3nn3a OT Tpb6nukata 3a npa. 3a da cnpete nprirotBHeTo Ha ropeua Boda, HATNCHEte 6ytoHa 3a kaFe OTHOB. Topeaa TBOda ce n3noJ3Ba 3a 3atOnnne Ha yau, npriotBHe Ha qai nn oxlankdahe Ha ypeia.
3a da perylnpate BpeMeTo Ha pa60Ta 3a 3aqrpaHe Ha BOda, MOJIA, BIXTe pa3dela "PprirotBHe Ha ECPIECO".
PnroTbHe Ha KaynuH0/MJeuHa NaHa
3a yaa kaanyuHo donbJIHeTe yaHa ecnpco C mJeHa nHa.
Haun Ha npiroTBAHe:
- Пьрв поюгов ecnpсо, кakTo e onиcaHo в раздela "ПИГOTВЯHE HA ECПPECO", kaTo n3нольВATE ДОСТаьчно rolям сбд (чашa). YБере тс, ч Кпчeto 3a PerулларHe Ha napaTe bno3иця "0".
- HatncheTe 6yToHa 3a napata. HndnKaTOpbT Ha 6yToHa 3a Kafe ue CBeTHe. N3yaKaIte, Dokato INndnKaTOpbT Ha 6yToHa 3a napata CBetN. Benejka: No BpeMe Ha pa6oTaHa INndnKaTOpbT Ha 6yToHa 3a napata ue Ce BKJIIOUByu N3KJIIOUBya C noDlbpJxHaTo Ha JKeJaHata TemnepaTypa.
- HanbHHeTe YaHa c OkJIo 100 ml MnaKo 3a BCaKO kanyuHNO, KoETo ue ce npiroTBA. IpeOpbYBaMe n3NoI3BaHcTo Ha NbHOMacNeHO MnAko C TemNepaTypa ot XnaDInNHNK (He ropeio!). BeneKka: Pn u36opa Ha pa3Mepa Ha yaHaTa 3a pa3neHbAHe Ha mJaKO ce npenopbUba DnAmEtbpT Da He e no-MaBk OT 70 ± 5 mm. CbIO taka ImaIte npedBnD, ye obembT ha MIAKOTO ce yDbOraBa No Bpeme Ha pa3neHbAHe; yBepete ce, ye yaHaTa e DocTaTbUHO BnCoka.
- Babho 3abpTeTe konyeTo 3a perynipaHe Ha napata B nocoka o6paTHa Ha yacobnkoBata cTpeJka. Napata ue n3ne3e ot hakpaHnka 3a nHa. Benexka: Hnkora He BbptTe KOJeTo 3a perynipaHe Ha napata 6bp30, Tb' KaTO npapaTa ige ce akymynpa 3a KpaTKo BpeMe, KoEtO MoKe Da yBeJIuH pNcKa OT EKcnIIO3nJ.
- ΠbXHeTe HApaHnka 3a nHa B MlKOTo Ha OKOTo 2 caHTmEtpa. Pa3neHeTe MlKOTO, KaTO BbPTnte YaWata Harope N HaOny.
- Korato Mnykoto e pa3neHeno NO BaW BKyc, 3aBbptTe KOChETo 3a ynpabJIeHne Ha npaTa Ha no3nua "0". BeIexka: IocnteTe HakpaHnka 3a napata c MOkpa r6a BEdHara cJeI KaTO npaTa cnpe, Ho BHIMaBaIte Da He ce n3ropuTe!
- CnneTe pa3nHeHTo MnaKo B nPirotBeHTo ecnpco N kanyuHTo e rTOBO. NoclaTe Ha BKyc N aKO JeJaTe, nopbcTe PnHaTc MaNKo KaKaO.
- HatncheTe 6yToHa Ha 3axpaHbAHeTo, 3a Da n3KJIIOHTe ypeJa. BcUckn INDkaTOpn Iue n3rachat.
PPEyPPEKDEHNE:
CneI KaTO npNKIOUHTe C n3NON3BaHHeTo Ha fYHKUHTa ,Napa", HATNCHETe 6yToHa 3a Kape. Ako INdIKaTOpbT 3a KaPe I INdIKaTOpbT 3a Napa MIRat 6bp30, TOBA O3NaUaBA, Ye TEMnepaTypaTa Ha ypeDa e TBbPde BnCOKA I ypeBbT Tp8Ba Da ce N3KIOUH I da NOUHcE 3a NOBuee OT 5 MNHyTN. KaTo anTEpHaTINBa MoKeTe Da aKTINBpuATE fYHKUHTA ,rOpeuBa BOda", 3a Da oxlaDInTe ypeDa. BoHata NOMna Ue cnpe Da n3NOMNBa BOda ABTomAtmUHO, CneI KaTO TemnepaTypaCTaHe HopMaHa. Ako ypeBbT Ce n3NON3Ba 3a npriOTBHe Ha KaPe BeDHa, 6e3 Da ce e OxnaDIn, KaFeTo Ue npereopn I Ue IMa npelINBaHe BbB fYHnraTa.
Функця 3a aBTOMaTNUHо n3KJIIOUYBaHe
Ako ypeDbT He ce n3noJ3Ba B npOdbJnxKeHHe Ha 25 MNHyTN, ToI ue Ce n3KNIOUHn ABTOMaTNUHO.
ФАБРИЧИН HACTPOДКИ
Korato npedBapntHOTo 3arpaBaHe npNKIOUHy, eHOBpemeHHo HATNCHETe N 3aDpBXTe 6yTOHnTe 3a 3axpaHbAHe, 3a Kape n 3a npapa 3a 3 cekyn. CboTBeTHnTe NM INHnKaTOPn Ue MmHnat 3 nbTn N Bb3CTaHOBRAHeto Ha a6pnHnTe NaCTPOkN e 3abbpseHo.
NouchTaBHe n noDpBjXka:
EcnB TeueHne 25 MInHyT He COBepaTb HnKaKnx DeiCTBn C np6Opom, TO OH AToMaTuYeCKN BblKnIOuHTcR.
BO3BPAT K 3ABOДСКИМ HACTPOИКAM
Iocne 3aBepseHnI npedBaIteIbHOro HarpBa OndHOBpeMeHNO HaxMnte n ydePknBaIte 3 cekyHdbI KhoNkPiTaHn, npiroToBJIeHn KoFe I noDaun npa. INDnKaTOpbl KHOPOK MmHyr 3 pa3a, n c6poc do 3aBOdcknx HAcTpoE K aBepuNTcra.
OuHCTka n o6cJyXnBaHne
- Ipeed ouhctkOJ OTKJIouHte npnbop OT 3JeKTPocetn JaTe NOJIHOCTbIO OCTbITb.
- Perynayrho npotnpaTe Kopnyc npnbopa BnaJHo, xopoOo OTkaToR y6koi. Perynayrho moTte EMKocTb dIra BoDbl, nOCTabkU dIra YauEeN I NOdoH dJIra KaneIb. Nocne ouNCTkn XopoOo npocyuHTE.
Ppimechane. He nCnoB3yIe Tn OYncTk np6opa cpeCTBa, coepkaune cnnpT n pactbopnten. 3anpeaetc nprykataK kOpNc np6opa B Body.
- OToeHNHTe MeTaJIINueckn poXOK, NOBepHyB no YacOBo CTepeJIke, n ydaIInTe n3 Hero OCTaTK KoPe. BbIMOnTE poXOK c NcNoJIb3OBAHHeM MOUSeR cpeDCTBa n IpOMOnTE uNCToN BOIOJ.
- BbIMoTe n XopoO Io npocuWnte BCE cbemHbIe DetaII.
OuNTka OT HaKNH
- Nocne BbInonHeHn 500 pa6oynx uKNoB np6op coo6uNT O Heo6XoDMOCn OuNCTKn OT HaKNH. Pn3om nocne 3aBepWeHn IpeBaPteJbHOrO HArpeBa BCE INDkaTOpbl ODHOBeMeHHo 6bICTpo MmHyT 5 pa3. Nocne ouNcTKn OT HaKNPi np6op cHOba 6yDet rTOB K HopMaJIbHoJ pa6Ote.
- HanonHnTe EMKocTb IJI BODbl pAcTBOPOM BOdbI CO CpeDCTBOM IJI ydaJIeHnHaKUNI DO OTMeTKN MAX (nponopun: Ha 4 qactn BOdbI 1 qactb CpeDCTBa IJI ydaJIeHn HaKUNI IJI KAKyka3aHO B INCTpykUKN K CpeDCTBy IJI ydaJIeHn HaKUNI). NcnoJb3yIte 6bITOBoe CpeDCTBO IJI ydaJIeHn HaKUNI. TaKke MoXHo CamOCToRteJIbHO pPnroTOBtB CpeDCTBO IJI ydaJIeHn HaKUNI, Do6aNB K 100 qactm BOdbI 3 qactn JIMMOHHON KNCJOTbl.
- YctaHOBtMe TaJIHueckn poKoK (6e3 KoOe), NocTaBBTe KpyKky Ha NOdoH dJa YauWeK n npiroTOBbTe TOpAyuBOy, KaK OINcHoB B pa3dJe «PpeBaPntbHbN HarpeB».
- Haxmte KhoNky nHTaHnOdH pa3. 3aOpTcKpachbI INDkaTOp. Haxmte KhoNky npiroTOBHeHn KoFe, npOBepbTe, yTo6blpeyIaTOp npa HaxoDInC8 B noLoKeHn OFF. Korda BOda NaHET BbITEKaTb N3 np6Opa, BbIKIOuHTe HAcoc IdoXdtecb NaHaJa nporpeBa np6Opa. Pnp6op NaHET HarpeBaTbcr.
-
Korda 3aropntcra HndnkaTOp KhoNKn npiroTOBHeHna KoFe,HarpeB 3aBepWeH. HaxMITE KhoNky npiroTOBHeHnaeTe 2 uAaKb BODbl (okol60 mnnnntpOB).OctahOBnTe Haoc n noDoxnTe 5 cekyHd.
-
Haxmnte KhoNky noaun napa. INdkkaTOp KhoNk npiroTOBHeHnK oKe norachET. Idoxndte, KOrda 3aropntc HndkaTOp KhoNk noaun napa. NodaBaIte nap B TeueHne 2 MInyT, OTKpbIB peryJrAeTOp napa. 3aTeM NOBepHnTe peryJrAeTOp napa B NoIOXeHne OFF dJa octaHObKn. Haxmnte KhoNky nHTaHnY, YTO6bl BBIKNUOHTb np6op. OctabBe cpeDCTBO dJa ydaJIeHnHaKUnn BHyTpIn np6oopa Ha 15 MInyT.
- ChOba BKJIIOHTe np6Op n IOBTOpe nyKtbi 4-6 He MeHee 3 pa3.
- HaxMMTe KNONky NODaun napa. 3arOpNTcN INDnKaTOp KNONK npiroTOBHeHnKoPe. HaxMMte u ydepxmbaTe KNONky npiroTOBHeHnKoPe do NOJHOrO ydaJeHnCpeCDTba dIydaJeHnHaKnPi n3 np6opa.
- 3aeneTe BOOnpoBOHyIO Bovy Do OTMeTKn MAX n, He do6abJra Kcpe, NOBtOpNte NyHKTb 4-6 eue 3 pa3a (HeT Heo6xOAnMoCTn XdaTb 15 MmHT B NyHKe 6). Pocne Yero BblonHraTe npiroTOBneHne DO nonHOrO ONOPOXHEHRA EMKOCTn DnA BODbl.
- NOBTOPHe 9 He MeHee 3 pa3, UTo6bI ObecneuHt b YnCTOTy Tpy60K.
- TTo6bI nocne BbINOJIHeHnO uNCTKc c6pocntb npedynpeXdHne o6 ouNCTke OT haKNPi, BblIOJIHnTe CNe dyUoIe DeIcTBn. Korda npi6op haxoIITcB pexkme OxuHaHn, OJHOBPemEHNO HaxMITE uYdePknBaIte KONKn nprirotOBJIeHn KoFe I noaun npap 3 cekyIbI. INDkaTOpbl KNONOK 6bICTpo MInHyT 3 pa3a, O3Naay, YTO npedynpeXdHne o6 ouNCTke OT haKNPi n CyeTnK pa6OuNX zIKNoB c6pOWeHbl.
YcTpaHHe HEnCnPaBHOCTeI
PnroTyBaHna rapaoyoBOn
KoII nporpiBaHHa 3aBepseHo, 3arOpntbca iHdkaTOp rToBHOCTi Do npiroTOyBaHHa KaBn. Bih cBITNTIMMeTbC aocIHHo. HATNCHTb BmMkaC naOaui KaBn, i BODHn Haococ NoUHe noDaBAtn BOy. NobepHtB pykU B noLoXeHHa Hot water (Tapya Boa). Tapya BOda nOdaBAtmEbC 3 Tpy6kn noaui napu. A6n npinnHnTn noauy rapayoi BOuN, 3HOBy HATNCHTb BmMkaC naOaui KaBn. TApya BOda BnKOpncTOByetbcra Jny po3irpiBy qAwoK, npiroTOyBaHHa Yau OY nxOxIoJXeHHa npnaDy. A6n hanaSTyBatn yac po6OTn dny niirpiBy BOu, DnB. p03dIn «PnpiroTOyBaHHa ECNPECO».
PnroTyBaHnKaNyUIno/MOnOuHoi nIKn
Дя пirotoуваняkanuyiHo HanOBHitb yaShky Дя ecnpecO cniHeHIM MOJOKOM.
Як пirotoybatn MONOChy nIKy:
- CnoaTy npiroToyTe ecnpco, k onncaHo B po3diJI «ПРИГOTYBAHЯ ECIIPECO», ВИКОпСТОВУЧи ДOCNTb BeIINKи KOHTeHep (uaShky). ПеpeKaHaiTeCs, lo peryIaTOp nOdaqi napi B noLoXeHHi «0».
- Hatachitb celekeTOp Bmikkaa noaui napn. lamna y Bmikayi noaui kabn 3aropntbc. 3auekaute, nokn He 3aropntbcraHdkatop y celekeTopi Bmikkaa npdaui napn.
IpnmiTka. IiJ yac po6oTu iHdkaTOp y ceJeKTopi napu 6yde BMnKaTncra Ta BmNkATncra, KOJI N BMnKaeTbcra NiirpiB.
3. Hanne Te y rneuk 6n3ko 100 mmo knoa dna koxho nopci kanyuho. MpeKomeHdycMo BnKOpncToBvBaTn He3bnpaHe 3 XoNoIbHnka (He rapaYe!).
Iprnmtka. Iprn Bn6opi po3mipy rIeunka dIra cIIHOBaHHaMOJOKa peKOMeHdYcBcA, 0o6 diametp 6yB He MeHwe 70± 5 MM. Kpim TOrO, o6'em MOJOKa IIac cIIHOBaHHa NOBOHOCTbC; rIeuk MaE 6yTN DocNTb BnCOKM.
OuHsEHHa Ta TexHiue He 6cIyroByBaHHa:
- Перацьшим вд'еднистпрлад вд джерета кИВпенгий дайтейюновсг IOXOJOHyTN.
- Kopnyc kabOMaHHn cIiD yacto OunuATN BONOROCTiIKoHO ry6koIO.PeryJrphO ouHuaTe 6aOK dJa BOIN, iIDOn dJa KpaneIb i 3HIMHy noJIuKy. IicJra OUnUeHNBA BNCywiTb ix.
IprnmiTka. He ouuzaaiTe cnpToM a6o kOdHm po3HHNKOM. Iprn ouuueHHi hikoJI He 3aHypouTe npnilad y BODy.
- Bi'd'edHaTe TpImaU fIbTpA, NOBepHyBUn Ioro 3a rOdINHHKOBoIO CTpiIKoIO, i BndaIitb i3 HbOrO 3aJIuShkN KabN. Notim Ounchte fIbTp 3a DOnOMoIO MInOyOro 3ac06y n peTeJbHo npomnTe YnCTOIO BOIOIO.
- OuncbTe BCE npnilaandy Bodi Ta peTeIbHO BnCywiTb ix.
OuHueHHBaBnHa
- Про вдаленя ванна (нakиу) писрий harада ec abTomatчho nicя 500 uzknib npirotoybaHHa HanoiB.При цbomy nicя поррівань Bci iHdkaTOpn wBudko 6lmaTmMyt b 5 pa3iB.пся вдаленя накиу пилad 3HOby npaцюВатime B HopMaIbHOMy peximi.
- Hanobhitb 6aok booio 3 aocobm nBn Buaen HnnaHnHaKnny do MAKcIMAJbHOO pIBn. CnBBiDnoWeHHBaOn Ta 3acoby Mae ctaHOBNTu 4:1. DOKnaHy iHopMaizIO dN.B. B iNCTpykixdo 3acobB nBn BuaJeHHn HaKnny. BnkOpncTOByte nobyTOBn 3acidn OunSeHHn BiD hKnny. 3amictb 3acoby TAKOX MOxHa BnkOpncTOByBatn JIMOHHy KNCLOTy (3 Mara3nHy). 3MiUyBatn II 3 BOIO CnId y nponopciI cTo qactIN BODn DO TPBOX YactNH JIMOHHOI KNCLOTn.
- YcTaHOBITb TpIMaU φiNbTp a (6e3 KaBn), nocTaBTe rIeUnK Ha IIOtOK i npriroTuHrte Bovy, kOncaHo B po3dini «IOnPEDHC HArPIBAHHra>.
- Hatachitb Bmikau XnBHeHna Odn pa3. 3arOpntbcq YepBOHa lamna. HatnciTB Bmikau Hacoca, nepekoHaBwncb, 10 CeJIeKTop Kabn/napn 3haxoDHTbcq y npabInbHomy noIoxeHHi. KOn 3 npnilady nOdaBatImetbcg Boda, 3akpniTe Haoc i 3auekaite Deekn Yac. KabOMaunHa noUnHaec HarpiBatncra.
-
Koln JAMna BIMNKaHa HACOCOM NOUHe CBITTNCsH — HarpiBaHHra3aBepSeHo. HatncHITb BIMNKaH HAcoca Ta npiroToyIe DBi YauKk KaBN (6n3bko 2 yHciA6o 60 m). Notim 3akpInTe Hacoc i 3aueKaIte 5 cekyHd.
-
Hatachitb calektop kabn/napn. IndkaTOp Bmikaui hacoca 3rache. 3aekaiTe, noKn He 3aropntbcra i ndkaTOp y calektopi kabn/napn. PoidabaTep npy 2 xBnInn, nobeptaounp perynlTOp nodaqui napn. Notim nobephitb perynlTOp npn B noIoxhenr «0», abn npinnHnTn noDaCy npn. Hatachitb Bmikau jNvBneHH, 0o6 HeraHNO 3ynnHnTn npncpti. NpekoHaTeC8, 0o 3ac6 dJa BnAJeHHaHKny 3aIIuAsCTbc8y npncTpoi oHaImMeHwe 15 xBnInn.
- Ybimkhitb npncptpi i nobtopitb kpoKn 3 4 no 6 oHaHMeHwe 3 pa3n.
- Notim Hatachitb ceJIeKTop KaBn/napn. JAmna BmMkaa HaCoca 3arOpntbcra. Hatachitb BmMkau Hacocat Ta noDaBaIte BoDy, NOKN B npInaDi He 3aIIINtbcra 3ac06y dnn BuaJeHHaKaIny.
- ПOTIM долипгь в бачок ВОДОПОНБИн hy Bodу до MAKСИМАЛьНО рIBня та виконыдл пи�отування кави (6e3 kabи). Повторы Крочи 3 4 по 6 3 рази (цberoюразу чекати 15 xВилин на Крочи 6 He noTpio6Ho). ПOTIM «poбiTь kaBy», пOKи в бачку не захиHTься ВODа.
- Повторы крok 9 сонаимеиwe 3 pa3n, соб забeзпунп nobHe ouHЯ npnilady.
- A6n ckacybTu n opejxehn y 0do hakiny nicJy BuaJeHHaKny, BkoHaIte HacTyHni di. KOn npuad y pekmi OchkyBaHH, odHouacHO hATNCiB i yTpmyTe BmHKaui noaui KaBV Ta napn npotraom 3 cekHyd. BiNobiDiHi iHdkaTopn uBnKO 6nMMhytB 3 pa3n. Lc eO3Naue, 0o nonepdxehn npo BuaJeHHaKny ckacOByeTbcra, a liuNbHnk po6oohx uKnib cKnDaetbcra.
YcyHeHHa HecnpaBHOcte