
TCM306ZG - Coffee machine GORENJE - Free user manual and instructions
Find the device manual for free TCM306ZG GORENJE in PDF.


| Product Type | Drip coffee maker |
| Brand | Gorenje |
| Model | TCM306ZG |
| Color | Stainless steel / black |
| Dimensions (W x D x H) | 24 x 18 x 30 cm |
| Weight | 2.8 kg |
| Power Supply | 220-240 V, 50-60 Hz |
| Power Consumption | 1100 W |
| Water Tank Capacity | 1.5 L |
| Cup Capacity | 12 cups (10 cl each) |
| Type of Coffee | Ground coffee |
| Control Type | Electronic push buttons |
| Display | LED indicator |
| Programmable Timer | Yes, 24-hour |
| Keep Warm Function | Yes, up to 2 hours |
| Anti-Drip System | Yes |
| Auto Shut-off | Yes, after 40 minutes |
| Descaling Function | Yes, with indicator |
| Removable Drip Tray | Yes |
| Water Filter | Integrated, replaceable |
| Warranty | 2 years |
| Included Accessories | Glass carafe, measuring spoon, permanent filter |
Frequently Asked Questions - TCM306ZG GORENJE
User questions about TCM306ZG GORENJE
0 question about this device. Answer the ones you know or ask your own.
Ask a new question about this device
Download the instructions for your Coffee machine in PDF format for free! Find your manual TCM306ZG - GORENJE and take your electronic device back in hand. On this page are published all the documents necessary for the use of your device. TCM306ZG by GORENJE.
USER MANUAL TCM306ZG GORENJE
Marking G – built-in heater; without marking – no built-in heater. Unit position (marking Z – top). Volume, heat exchanger (0 – no heat exchanger, 1 – one heat exchanger, 6 – one bottom heat exchanger). Water heater with heat pump with metal casing.
| Tip | TCM200ZG | TCM201ZG | TCM300ZG | TCM306ZG | |
| Profil rabe | L | L | XL | XL | |
| Razred energijske učinkovitosti 1) | A+ | A+ | A+ | A+ | |
| Energijska učinkovitost ogrevanja vode ηwh 1) | % | 177,6 | 176,1 | 179,2 | 178,9 |
| Letna poraba električne energije 1) | kWh | 576 | 581 | 935 | 936 |
| Dnevna poraba električne energije 1) | kWh | 2,709 | 2,739 | 4,352 | 4,362 |
| Nastavljena temperatura termostata | °C | 55 | 55 | 55 | 55 |
| Nivo zvokovne moči v notranjih prostorih 2) | dB (A) | 58,3 | 58,3 | 59 | 59 |
| Vrednost smart | 0 | 0 | 0 | 0 | |
| Prostornina | I | 200 | 190 | 285 | 275 |
| Mešana voda pri 40°C V40 4) | I | 265 | 255 | 395 | 380 |
| Morebitni varnostni ukrepi (sestava, nameščanje, vzdrževanje) | Pri tlačni priključitvi obvezna uporaba varnostnega ventila | ||||
| Tehnične lastnosti | |||||
| Čas segrevanja A15 / W10-55 3) | h:min | 08:07 | 7:36 | 08:15 | 07:55 |
| Čas segrevanja A20 / W10-55 4) | h:min | 07:19 | 06:59 | 07:14 | 06:57 |
| Poraba energije pri izbranem profilu rabe A15 / W10-55 3) | kWh | 3,01 | 3,03 | 4,74 | 4,77 |
| Poraba energije pri izbranem profilu rabe A20 / W10-55 4) | kWh | 2,72 | 2,75 | 4,36 | 4,37 |
| COP DHW A15/W10-55 3) | 3,9 | 3,9 | 4,0 | 4,0 | |
| COP DHW A20/W10-55 4) | 4,3 | 4,3 | 4,4 | 4,4 | |
| Moč v stanju pripravljenosti 4) | W | 15 | 17 | 17 | 18 |
| Hladilno sredstvo | R134a | R134a | R134a | R134a | |
| Količina hladiva | kg | 0,950 | 0,950 | 1,100 | 1,100 |
| Potencial globalnega segrevanja | 1430 | 1430 | 1430 | 1430 | |
| Ekvivalent ogljikovega dioksida | t | 1,359 | 1,359 | 1,573 | 1,573 |
| Območje delovanja | °C | 7 / 40 | 7 / 40 | 7 / 40 | 7 / 40 |
| Električne karakteristike | |||||
| Nazivna električna moč kompresorja | W | 350 | 350 | 490 | 490 |
| Moč grela 5) | W | 2000 | 2000 | 2000 | 2000 |
| Maksimalna priključna moč brez grela/z grelom | W | 350/2350 | 350/2350 | 490/2490 | 490/2490 |
| Napetost | V/Hz | 230/50 | 230/50 | 230/50 | 230/50 |
| Električno varovanje | A | 16 | 16 | 16 | 16 |
| Stopnja zaščite pred vlago | IP21 | IP21 | IP21 | IP21 | |
| Hranilnik vode | |||||
| Protikoroziska zaščita kotla | Emajlirano / Mg anoda | ||||
| Nazivni tlak | MPa | 0,6/0,9/1,0 | 0,6/0,9/1,0 | 0,6/0,9/1,0 | 0,6/0,9/1,0 |
| Najvišja temperatura vode - toplotna črpalka | °C | 65 | 65 | 65 | 65 |
| Najvišja temperatura vode - električno grelo 5) | °C | 75 | 75 | 75 | 75 |
| Priključne mere | |||||
| Višina skupna | mm | 1860 | 1860 | 1960 | 1960 |
| Širina | mm | 570 | 570 | 670 | 670 |
| Globina | mm | 585 | 585 | 685 | 685 |
| Priključki na vodovodno omrežje | G3/4 | G3/4 | G1 | G1 | |
| Ogrevana površina prenosnika toplote | m2 | / | 1,1 | / | 1,1 |
| Priključki prenosnika toplote | - | G1 | - | G1 | |
| Neto/bruto/masa z vodo | kg | 93/105/293 | 111/123/301 | 139/151/424 | 157/169/432 |
| Temperatura grelnega medija v prenosniku toplote | °C | / | 5 / 95 | / | 5 / 95 |
| Transportni podatki | |||||
| Mere embalaže | mm | 760x760x2060 | 760x760x2060 | 800x800x2160 | 800x800x2160 |
1) Directive 812/2013, 814/2013, EN16147:2017, indoor air 20 °C
2) according to EN12102:2013
3) inlet air temperature 15 °C, 74% humidity, water heated from 10 to 55 °C according to EN16147:2017
4) inlet air temperature 20 °C, 58% humidity, water heated from 10 to 55 °C according to EN16147:2017
5) version with heater

Fig. 3: Condensate drain
Fig. 8a: Example of temperature setting at 10 °C
| Oznaka | LED segment | Osvetlitev za posamezni temperaturni nivo | |
| 50% 100% | |||
| / | LED7(LED1-LED6 100%) | 70 °C 75 °C | |
| / | LED6(LED1-LED5 100%) | 60 °C 65 °C | |
| eco | LED5(LED1-LED4 100%) | 50 °C 55 °C | |
| / | LED4(LED1-LED3 100%) | 40 °C 45 °C | |
| / | LED3(LED1-LED2 100%) | 30 °C 35 °C | |
| / | LED2(LED1 100%) | 20 °C 25 °C | |
| / | LED1 | 10 °C | 15 °C |
Fig. 8b: Example of temperature setting at 50 °C
The appliance may be used by children aged 8 and older and persons with physical, sensory, or mental disabilities or lacking experience or knowledge, if they are under supervision or have been instructed on the safe use of the appliance and understand the potential dangers. Children should not play with the appliance. Children should not clean or maintain the appliance without supervision. During transport, the appliance must be kept upright. In exceptional cases, it may be tilted up to 35° in any direction. Ensure that the housing or vital parts of the product are not damaged during transport. The appliance must not be placed in a closed space containing corrosive or explosive materials. The connection of the appliance to the power supply must be carried out in accordance with electrical installation standards. A device for disconnection from the electrical network must be installed between the appliance and the electrical network in accordance with national installation regulations. To avoid damage to the heat pump power unit, never operate the appliance without water in the tank! Installation should be performed in accordance with applicable regulations and the manufacturer's instructions, and should be carried out by a professionally trained installation expert. In the case of a closed pressurized system, it is mandatory to install a safety valve with a rated pressure of 0.6 MPa (6 bar) on the inlet pipe of the hot water storage tank to prevent pressure in the tank from exceeding the rated pressure by more than 0.1 MPa (1 bar). ⚠️ Water may drip from the outlet opening of the safety valve. Therefore, the outlet opening should be open to atmospheric pressure. The outlet of the safety valve should be installed facing downwards and in a non-freezing area. To ensure proper functioning of the safety valve, the user should perform regular checks to remove limescale and ensure the valve is not blocked. Do not install a shut-off valve between the water tank and the safety valve, as this would disable the safety valve's operation! ⚠️ Components in the electronic control unit remain energized even after pressing the appliance off key. The storage tank is protected against failure of the operating thermostat by an additional thermal cut-out. In case of thermostat failure, water in the storage tank may reach temperatures up to 130 °C in accordance with safety standards. The possibility of such temperature overload should be taken into account in the plumbing design. If you choose to disconnect the power, the storage tank should be drained thoroughly before the onset of freezing conditions. ⚠️ Water from the storage tank is drained through the inlet pipe. For this purpose, a special fitting (T-fitting) with an outlet valve must be installed between the safety valve and the inlet pipe. ⚠️ Please do not attempt to fix any defects on your own. Contact the nearest authorized service provider. A decrease in temperature of an additional heating source and enabled water circulation via the heat exchanger can cause uncontrolled heat removal from the water tank. When connecting to other heating sources, it is necessary to ensure proper temperature regulation of the additional heating source. When connecting to solar energy sources as an external heating source, the heat pump unit must be disconnected. The combination of both heating systems can lead to water overheating and consequently excessive pressure. ⚠️ Circulation leads to additional heat loss in the water tank. In models without a heater, the hot water storage tank is not protected from freezing! This appliance contains fluorinated greenhouse gases. Hermetically sealed.
Dear buyer, thank you for purchasing our product.
PRIOR TO THE INSTALLATION AND FIRST USE OF HEAT PUMP WATER HEATER, PLEASE READ THESE INSTRUCTIONS CAREFULLY.
This heat pump water heater has been manufactured in compliance with the relevant Standards, which allow the manufacturer the use of the CE sign. The technical characteristics of the product are listed on the label attached to the protective cover.
The connection of the heat pump water heater to the plumbing and power networks must be carried out by qualified staff only. All repairs and maintenance work in the interior of the storage tank, as well as limestone removal or testing or replacement of the corrosion protection anode, may only be carried out by an approved maintenance service provider. Be especially careful when following instructions for potential errors and safe use of the appliance.
Store this booklet for times of doubt upon the functioning or maintenance.
The installation manual is available on our webpage http://www.gorenje.com or the webpages per country in the service and support section.
Authorised maintenance personnel are available for occasional maintenance. They will help you with their vast experience.
The design of the heat pump water heater and built-in shell and tube heat exchanger also allows using other heating sources, such as the central heating tank, solar panels etc.
USE
This heat pump water heater is designed for production of sanitary water in households and at premises where daily consumption of hot water (50 °C) does not exceed 400 l to 700 l. The set temperature should suffice actual needs. Recommended temperature settings are between 45 and 55 °C. Higher temperatures are not recommended as they reduce the efficiency (COP) and extend the time of heating or increase the number of operating hours. Because the heat pump water heater cools its surroundings during operation, the usefulness of the appliance is doubled (heating water – cooling air). The operation of the heat pump water heater is fully automatic.
The appliance must be connected to water supply mains and to the power supply grid. Leave enough room above the appliance for easier control and appliance servicing (figures 2 and 3). The appliance may not be used for purposes other than those defined in these Instructions. The appliance is not designed for use in rooms where corrosive or explosive substances are present. The manufacturer shall not assume any liability for damages caused by incorrect installation or misuse that are not in compliance with the Instructions for installation and use.
The instructions for use are a component and important part of this product and must be delivered to the customer. Read the warnings carefully, as they contain important directions related to safety during operation, use and maintenance. Keep these Instructions for later use.
The marking of the appliance is stated on the nameplate located on the bottom side of the unit, between both inlet pipes for sanitary water.
Once the packaging is removed, check the contents. When in doubt, contact your dealer. Never let children play with the packaging parts (clamping, plastic bags, expanded polystyrene, etc.) – potential risk. Make sure to remove and dispose of the packaging safely and in an environmentally friendly way.
The appliance is not intended for use in closed space, containing corrosive and explosive materials.
STORAGE AND TRANSPORT
Store the appliance in an upright position, in a clean and dry place.
During transport, the appliance must be placed in the upright position and may only be inclined by up to 35° in all directions in exceptional cases. Please make sure no damage of the casing and other vital parts of the appliance occurs during transport.
KEY TYPE
TCMXXYZV
Indication G – integrated heater; without indication – no heater installed Position of the heat pump power unit (indication Z - top) Volume, heat exchanger (0 – no heat exchanger, 1 – one heat exchanger, 6 – one bottom heat exchanger) Heat pump water heater with metal lining
| Type | TCM200ZG | TCM201ZG | TCM300ZG | TCM306ZG | |
| Use profile | L | L | XL | XL | |
| Energy efficiency class 1) | A+ | A+ | A+ | A+ | |
| Energy efficiency of water heating ηwh 1) | % | 177,6 | 176,1 | 179,2 | 178,9 |
| Annual electrical energy consumption 1) | kWh | 576 | 581 | 935 | 936 |
| Daily electrical energy consumption 1) | kWh | 2,709 | 2,739 | 4,352 | 4,362 |
| Set thermostat temperature | °C | 55 | 55 | 55 | 55 |
| Level of indoor sound power 2) | dB (A) | 58,3 | 58,3 | 59 | 59 |
| Smart value | 0 | 0 | 0 | 0 | |
| Storage volume | l | 200 | 190 | 285 | 275 |
| Mixed water at 40°C V40 4) | l | 265 | 255 | 395 | 380 |
| Potential safety measures (assembly, installation, maintenance) | Compulsory use of a safety valve with the pressure connection. | ||||
| Technical characteristics | |||||
| Heating time A15 / W10-55 3) | h:min | 08:07 | 7:36 | 08:15 | 07:55 |
| Heating time A20 / W10-55 4) | h:min | 07:19 | 06:59 | 07:14 | 06:57 |
| Energy consumption with selected use profile A15 / W10-55 3) | kWh | 3,01 | 3,03 | 4,74 | 4,77 |
| Energy consumption with selected use profile A20 / W10-55 4) | kWh | 2,72 | 2,75 | 4,36 | 4,37 |
| COP DHW A15/W10-55 3) | 3,9 | 3,9 | 4,0 | 4,0 | |
| COP DHW A20/W10-55 4) | 4,3 | 4,3 | 4,4 | 4,4 | |
| Power in standby mode 4) | W | 15 | 17 | 17 | 18 |
| Refrigerating agent | R134a | R134a | R134a | R134a | |
| Quantity of refrigerant | kg | 0,950 | 0,950 | 1,100 | 1,100 |
| Global Warming Potential | 1430 | 1430 | 1430 | 1430 | |
| Carbon dioxide equivalent | t | 1,359 | 1,359 | 1,573 | 1,573 |
| Operation area | °C | 7/40 | 7/40 | 7/40 | 7/40 |
| Electrical characteristics | |||||
| Specified power of the compressor | W | 350 | 350 | 490 | 490 |
| Healer power 5) | W | 2000 | 2000 | 2000 | 2000 |
| Maximum connection power without heater/with heater | W | 350/2350 | 350/2350 | 490/2490 | 490/2490 |
| Voltage | V/Hz | 230/50 | 230/50 | 230/50 | 230/50 |
| Electrical protection | A | 16 | 16 | 16 | 16 |
| Moisture protection | IP21 | IP21 | IP21 | IP21 | |
| Water tank | |||||
| Anti-corrosion protection of tank | Enamelled / Mg Anode | ||||
| Nominal pressure | MPa | 0,6/0,9/1,0 | 0,6/0,9/1,0 | 0,6/0,9/1,0 | 0,6/0,9/1,0 |
| The highest water temperature - heat pump | °C | 65 | 65 | 65 | 65 |
| The highest water temperature - electrical heater 5) | °C | 75 | 75 | 75 | 75 |
| Connection measurements | |||||
| Total height | mm | 1860 | 1860 | 1960 | 1960 |
| Width | mm | 570 | 570 | 670 | 670 |
| Depth | mm | 585 | 585 | 685 | 685 |
| Inlet/outlet water connections | G3/4 | G3/4 | G1 | G1 | |
| Heated surface of the heat exchanger | m2 | / | 1,1 | / | 1,1 |
| Exchanger connectors | - | G1 | - | G1 | |
| Net/gross weight/weight incl. water | kg | 93/105/293 | 111/123/301 | 139/151/424 | 157/169/432 |
| The temperature of the heating medium in the heat exchanger | °C | / | 5/95 | / | 5/95 |
| Transport data | |||||
| Packaging | mm | 760x760x2060 | 760x760x2060 | 800x800x2160 | 800x800x2160 |
1) Directive 812/2013, 814/2013, EN16147:2017, indoor air 20 °C
2) In accordance with EN12102:2013
3) Inlet air temperature 15 °C, 74% humidity, water temperature between 10 and 55 °C in accordance with EN16147:2017
4) Inlet air temperature 20 °C, 58% humidity, water temperature between 10 and 55 °C in accordance with EN16147:2017
5) Model with heater

Fig. 1: Connection and installation tank dimensions [mm]
| TCM200ZG | TCM201ZG | TCM300ZG | TCM306ZG | |
| A (mm) | 25 | 25 | 25 | 25 |
| B (mm) | 130 | 130 | 140 | 140 |
| C (mm) | / | 218 | / | 245 |
| D (mm) | / | 490 | / | 490 |
| E (mm) | 880 | 880 | 880 | 880 |
| F (mm) | 1240 | 1240 | 1250 | 1250 |
| G (mm) | 1835 | 1835 | 1930 | 1930 |
| H (mm) | 570 | 570 | 670 | 670 |
| I (mm) | 585 | 585 | 685 | 685 |
| J1 (mm) | / | 765 | / | 805 |
| J2 (mm) | / | 1185 | / | 1185 |
| HV | G3/4 | G3/4 | G1 | G1 |
| IM | / | G1 | / | G1 |
| CV | G3/4 | G3/4 | G3/4 | G3/4 |
| VM | / | G1 | / | G1 |
| TV | G3/4 | G3/4 | G1 | G1 |
HV Cold water inlet (H - blue rosette) IM Heat exchanger medium outlet (black rosette) CV Circulation pipeline (black rosette) VM Heat exchanger medium inlet (black rosette) TV Hot water outlet (T - red rosette) J1 Sensor pipe J2 Sensor pipe VZ Air inlet IZ Air outlet
LEGEND
OTHER HEATING SOURCES - SENSOR INSTALLATION
On the left side of the hot water storage tank are two openings (J1, J2), where the sensors for the control system of the connection of the hot water tank to other heating sources are installed. The maximum diameter of the probe is 8 mm. The length of the sensor tube is 180 mm. Insert the sensor into the tube and attach it:
- If the sensor is installed in the top (higher) position, then the thermostat will respond sooner, operating intervals of the circulation pump will be shorter, and the difference between water temperature in the hot water storage tank and the heating medium after the thermostat is switched off will be smaller; as a result, the amount of hot water in the hot water storage tank will be lower.
- If you install the sensor in the bottom (lower) position, the circulation pump operating intervals will be longer, the difference between the temperature of the heating medium and the actual water temperature in the hot water storage tank will be lower, and as a result, the amount of hot water in the hot water storage tank will be greater.
Heat pump water heater is intended for operation with surrounding air. During operation, only the energy from the air in the room where the appliance is installed is used for heating the domestic hot water. The appliance may be installed in a room where temperatures are above freezing point, preferably close to other sources of heat or heating devices, with a temperature between 7 °C and 40 °C, and minimum volume of 20 m³. In general, we recommend a sufficiently large and well-ventilated room with a temperature above 15 °C, which represents ideal conditions for heat pump operation. Desired level of air exchange for a residential building is 0.5. This means that the entire amount of air in the building is exchanged every 2 hours.
When choosing the room for installing the appliance, care should also be taken, in addition to the above instructions, that there should not be a considerable amount of dust in the room, as dust has a detrimental effect on the heat pump effect.

Fig. 2: Minimum requirements for installation of the appliance

Fig. 3: Condensate discharge
During operation of the heat pump, condensate forms in the aggregate. The condensate should be drained to the sewage system via a flexible tube Ø16mm on the rear side of the heat pump. The quantity of condensate depends on air temperature and humidity. For easier and faster condensate drain, we recommend installing the water heater with a heat pump with a 2° inclination toward the drain hose (Fig. 3).
To reduce noise and vibrations of the installed fan, take the following steps to prevent the noise and vibrations from being transmitted through walls into rooms where it would be disturbing (bedrooms, restrooms):
• install flexible connectors for hydraulic jacks • Install sound insulation on the floor below the heat pump to dampen the vibrations - use support elements.
Connect the water pipeline system according to the attachment signs from the previous chapter (Fig. 1).
Installing a safety valve is mandatory in order to assure safe operation. The valve prevents an increase of the pressure in the boiler by any more than 0.1 MPa (1 bar) above the nominal pressure. The outflow nozzle on the safety valve must have an outlet into the atmosphere. To assure correct operation of the safety valve, check the valve regularly and, if necessary, remove the limescale and check that the safety valve is not blocked. When checking the valve, push the lever or unscrew the nut of the valve (depending on the type of the valve) and open the drain from the safety valve. Water must flow from the valve nozzle, showing that the valve operation is faultless. During the heating of water, the water pressure in the hot water storage tank is increased up to the level present in the safety valve. Since the system prevents backflow of water into the water supply mains, water may be dripping from the outlet opening on the safety valve. The dripping water may be drained via trap into the drains; the trap is mounted under the safety valve. The outlet pipe, which is mounted under the safety valve, must be directed downwards, in a place with a temperature above freezing.
If the installation does not allow draining of the water from the safety valve into the drains, dripping can be avoided by installing an expansion vessel onto the inlet pipe of the hot water storage tank. The volume of the expansion vessel must be ca. 5% of the hot water tank volume.
The hot water storage tank is designed for connection to indoor water supply mains without using the relief valve if the pressure in the supply mains is lower than prescribed on the appliance. If the pressure is higher, a relief valve needs to be installed so as to provide that the pressure at the inlet to the hot water tank does not exceed the nominal pressure.
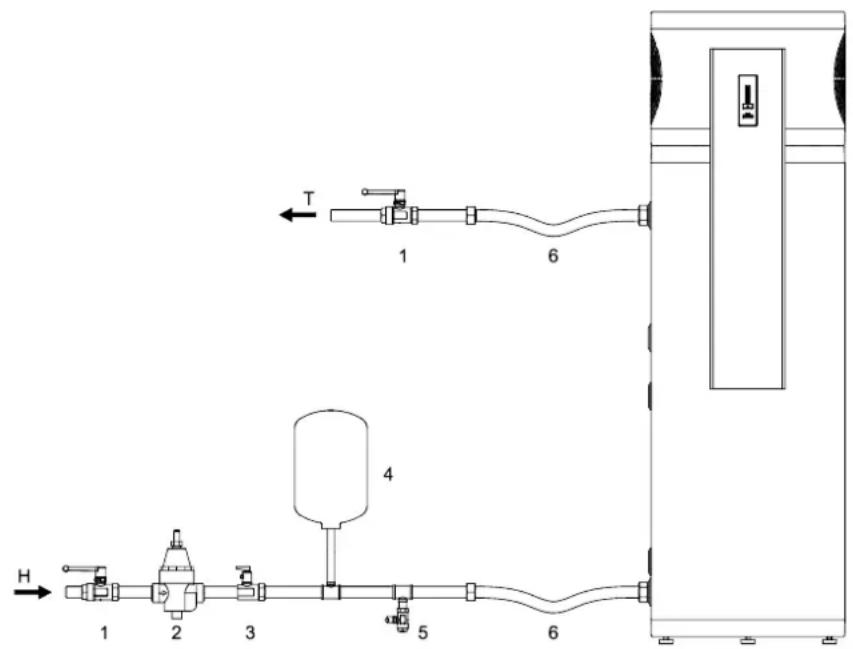
Fig. 4: Closed pressure system
LEGEND
1 Stop valve 2 Pressure reduction valve 3 Safety non-return valve 4 Expansion tank 5 Drain valve 6 Flexible hose
H Cold water
T Hot water
To avoid damage to the heat pump power unit, the heat pump water heater must not operate without any water in the tank!
CONNECTION TO OTHER HEATING SOURCES
Heat pump water heater with a shell and tube heat exchanger in the hot water storage tank allows preparation of domestic hot water in combination with different sources of energy (e.g. central heating, solar power etc.).
Connection options to different heating sources are shown below.

Fig. 5a: Connection to central heating

Fig. 5b: Connection to a solar collector
With a temperature decline of an additional heating source and with an enabled water circulation through the heat exchanger, proper temperature control of the additional source must be ensured. If the additional energy source is solar power, the operation of the heat pump unit must be shut off. The combination of two heating sources can lead to overheating of the hot water and thus to excessive pressures. The circulation pipeline causes additional temperature decline in the hot water storage tank.
CONNECTION TO THE POWER SUPPLY NETWORK
Appliance connection requires an electrical outlet suitable for the current load specified in the technical information table. Connecting the appliance to the power supply network must take place in accordance with the standards for electric appliances. To comply with national installation regulations, an all-pole disconnect switch must be installed between the appliance and the power supply network.

Fig. 6: Connection to the power supply network
LEGEND
1 Power cord 2 Electronic module 3 Thermal cut-out 4 Compressor 5 Fan 6 Electrical heater T1 Temperature sensor (electric heater) T2 Temperature sensor (heat pump) T3 Temperature sensor (air) T4 Temperature sensor (evaporator)
OPERATING THE APPLIANCE
After connecting the appliance to the water and power network and to the hot water storage tank filled with water, it is ready for operation. Upon connection to the supply voltage, the heat pump switches to standby mode. In standby mode, the heat pump maintains a water temperature of 10 °C.
The heat pump heats the water in the range from 10 °C to 65 °C. From 65 °C to 75 °C, the water is heated by an electric heater.

Fig. 7: Control panel
LEGEND
1 Heat pump on/off key, water temperature setting 2 Electric heater on/off key 3 Display for set/actual water temperature in the hot water storage tank, error indicator 4 Indicator for electric heater and "TURBO" function operation
Heat pump on/off
Switch on the heat pump by pressing the key and holding it (for 3 seconds).
Press and hold (for 3 s) the key again to switch the heat pump to standby mode.
Temperature adjustment
Use the [1] key to set the desired temperature (factory setting is 55 °C). Water temperature can be set in the range from 10 °C to 75 °C with 5 °C increments. When the maximum level of 75 °C is reached, the next time you press the [1] key, the setting returns to the minimum level of 10 °C. We recommend the "eco" setting. With this setting, water temperature will be at approximately 55 °C, and formation of limescale deposits and heat losses will be lower than at higher temperature settings. When you last press the [1] key, the setting is stored. After a while (approx. 5 seconds), the current temperature in the hot water storage tank is displayed on the display unit [3].
If the appliance is disconnected from the power mains and there is a danger of freezing, then water has to be drained from the hot water storage tank.
The table below shows the LED lighting for respective temperature levels.

Figure 8a: Example for temperature setting at 10 °C
| Indication | LED segment | Lighting for respective temperature levels | |
| 50% 100% | |||
| / | LED7(LED1-LED6 100%) | 70 °C 75 °C | |
| / | LED6(LED1-LED5 100%) | 60 °C 65 °C | |
| eco | LED5(LED1-LED4 100%) | 50 °C 55 °C | |
| / | LED4(LED1-LED3 100%) | 40 °C 45 °C | |
| / | LED3(LED1-LED2 100%) | 30 °C 35 °C | |
| / | LED2(LED1 100%) | 20 °C 25 °C | |
| / | LED1 | 10 °C | 15 °C |
Figure 8b: Example for temperature setting at 50 °C
Power supply failure protection
In case of power supply failure, the settings remain permanently stored.
After restart, the appliance operates in the same regime as before the power supply failure.
Activation of the "TURBO" mode
This operating mode is suitable especially when you need a large amount of hot water quickly. In the "TURBO" mode, the water in the hot water storage tank is heated with the heat pump and the electric heater simultaneously. This means faster heating of water to the set temperature.
You can choose between one-off and continuous activation of the "TURBO" function.
For one-off activation, briefly press the [2] key. Operation in the "TURBO" mode is indicated by the indicator [4] which is lit until water in the hot water storage tank is heated to the set temperature. When the temperature is reached, the function is switched off automatically and the indicator [1] is turned off.
For constant activation, press and hold (3 seconds) the key [2]. Operation in the constant "TURBO" mode is indicated by the indicator [4] that is lit. When the temperature is reached, the function is not switched off automatically. To deactivate the function, briefly press the [3] key, and the indicator will be turned off.
During operation of the "TURBO" function, the user can set the temperature, deactivate the function, and switch off the appliance.
Anti-Legionella program
If the water in the hot water storage tank is below 65 °C for 14 days, the anti-Legionella program is activated to heat the water in the hot water storage tank to a temperature of 70 °C. During the anti-Legionella program operation, respective segments will be consecutively lit on the display unit 3, as indicated on Figure 9. During operation of the anti-Legionella program, temperature setting is not possible; however, the "TURBO" function can be activated and deactivated.
If the appliance is switched off or there is a power supply failure while the anti-Legionella program is in progress, the anti-Legionella program will resume when the appliance is switched back on or power supply to the appliance is restored.

Fig. 9: Indication of the anti-Legionella program
Warning: after heating up in the anti-Legionella program, the temperature of the water in the tank is 65 °C or more, regardless of the temperature set for the appliance.
Switching the anti-Legionella program on and off
Press and hold (3 seconds) the 1 key to switch off the heat pump. The electronic controls switch to standby mode. Press the 1 key briefly for seven (7) times to display the current anti-Legionella function status. The function status is indicated by LED1 or LED7. If LED1 is lit, then the anti-Legionella program function is switched off (Figure 10b). If LED7 is lit, then the anti-Legionella program function is switched on (Figure 10a). Briefly press the 1 key again to change the setting. The setting is stored when the 1 key is not pressed for 5 seconds. The electronic controls return to standby mode. Press and hold (for 3 seconds) the 1 key to switch on the appliance again.
Fig. 10a: Anti-Legionella program activated
Fig. 10b: Anti-Legionella program deactivated
Backup operating mode
If the inlet air temperature is lower than 7 °C or higher than 40 °C, the appliance switches to backup operating mode. The compressor and fan do not operate, and the electric heater is switched on the heat the domestic hot water. The heat pump water heater operates in the backup operating mode. Possibility to switch to normal operating regime is checked cyclically. When the temperature conditions for normal heat pump operation are met, the appliance switches to normal operating regime. The heater is then switched off. Operation in the backup regime is indicated by the 4 indicator that flashes until the appliance switches to normal operating regime.
Special aspects of heat pump operation
After the heat pump is switched on, the compressor and the fan always operate for at least 5 minutes (minimum compressor operation time).
After the heat pump is switched off, the compressor and the fan are switched off for at least 20 minutes (minimum compressor down (off) time). If there is a request for compressor activation within this period of time, the compressor is not switched on. LED4 slowly flashes on the display unit 3 (Figure 11) (5-second interval). After the down (off) time, the compressor and the fan are switched on automatically. Current temperature level of the water in the tank is displayed on the display unit 3. Temperature adjustment, activation of the "TURBO" function, and switching off of the appliance are possible while the compressor is off.

Fig. 11: Compressor unit is switched off
Error indication
In case of an error, the control lamps start flashing on the display unit [3]. Temperature adjustment and activation of the "TURBO" function are not possible while errors are displayed or indicated; the appliance can only be switched off.
| Error | Error description | Indication | Solution |
| E2 | Temperature sensor error (heat pump) | Repeated 2x rapid flashing of the indicator 3 | Call service (Heat pump operates nevertheless). |
| E3 | Temperature sensor error (electric heater) | Repeated 3x rapid flashing of the indicator 3 | Call service (The heat pump operates, but the electric heater does not operate.) |
| E4 Temperature sensor error (evaporator) | Repeated 4x rapid flashing of the indicator 3 | Call service (Heat pump operates nevertheless). | |
| E5 | Temperature sensor error (air) | Repeated 5x rapid flashing of the indicator 3 | Call service (Heat pump operates nevertheless). |
| E6 | Overheating (Temperature >90 °C) | Repeated 6x rapid flashing of the indicator 3 | Disconnect the heat pump from the power mains; call service. |
If several errors occur simultaneously, they are displayed on the display unit 3 in succession (e.g. in case of simultaneous occurrence of errors E4 and E5, the following is displayed repeatedly: 4x rapid flashing of control lamps, pause, 5x rapid flashing of control lamps, pause).
If the errors E2 and E3 occur simultaneously, the heat pump and the electric heater do not operate. If the errors E4 and E5 occur simultaneously, the appliance switches to back-up operating mode.
After the connection to the water supply mains and other heating sources, the heat pump water heater is ready for use. If there is any possibility the water in the tank could freeze, you must drain the water from the tank. To do so, open the hot water lever at one of the mixing batteries connected to the hot water tank. The water is drained via a drain valve on the inlet water pipe.
To clean the exterior of the appliance, use a soft cloth and a mild detergent. Avoid cleaning agents containing alcohol and abrasive cleaners. If the appliance is exposed to dust, evaporator lamellas might become blocked, which can have a detrimental effect on the functioning of the appliance.
By providing regular service check-ups, you can ensure flawless operation and long life of the heat pump. The corrosion warranty for the tank only applies if you carry out regular inspections of the protective anode. The period between regular inspections should not be longer than stated in the warranty certificate. The inspection must be performed by an authorised expert. The inspection must be marked on the warranty document of the product. The inspection will check the anti-corrosion protection anode and if necessary clean the limescale, which builds up in the tank depending on the quality, quantity and temperature of water. The maintenance expert will recommend the date for the next inspection.
Despite careful production and control, errors may occur during heat pump water heater operation, which must be resolved by an authorised service technician.
Before calling your maintenance provider, check the following:
• Is everything OK with the power supply network? • Is the air outlet obstructed? • Is the environment temperature too low or too high? - Can you hear the operation of the compressor and fan?

Do not try to eliminate malfunctions by yourself, call your nearest authorized service provider!

Our products incorporate components that are both environmentally safe and harmless to health, so they can be disassembled as easily as possible and recycled once they reach their final life stage. Recycling of materials reduces the quantity of waste and the need for production of raw materials (e.g. metals) which requires a substantial amount of energy and causes release of harmful substances. Recycling procedures reduce the consumption of natural resources, as the waste parts made of plastic and metal can be returned to various production processes. For more information on waste disposal, please visit your waste collection centre or the store where the product was purchased.
WE RESERVE THE RIGHT TO ANY MODIFICATIONS NOT AFFECTING THE FUNCTIONALITY OF THE APPLIANCE.
The instructions for use are also available on our website http://www.gorenje.com.


- DEAR BUYER, THANK YOU FOR PURCHASING OUR PRODUCT
- PRIOR TO THE INSTALLATION AND FIRST USE OF HEAT PUMP WATER HEATER, PLEASE READ THESE INSTRUCTIONS CAREFULLY
- USE
- STORAGE AND TRANSPORT
- KEY TYPE
- LEGEND
- OTHER HEATING SOURCES - SENSOR INSTALLATION
- CONNECTION TO OTHER HEATING SOURCES
- CONNECTION TO THE POWER SUPPLY NETWORK
- OPERATING THE APPLIANCE
- HEAT PUMP ON/OFF
- TEMPERATURE ADJUSTMENT
- POWER SUPPLY FAILURE PROTECTION
- ACTIVATION OF THE "TURBO" MODE
- ANTI-LEGIONELLA PROGRAM
- BACKUP OPERATING MODE
- SPECIAL ASPECTS OF HEAT PUMP OPERATION
- ERROR INDICATION
Brand : GORENJE
Model : TCM306ZG
Category : Coffee machine